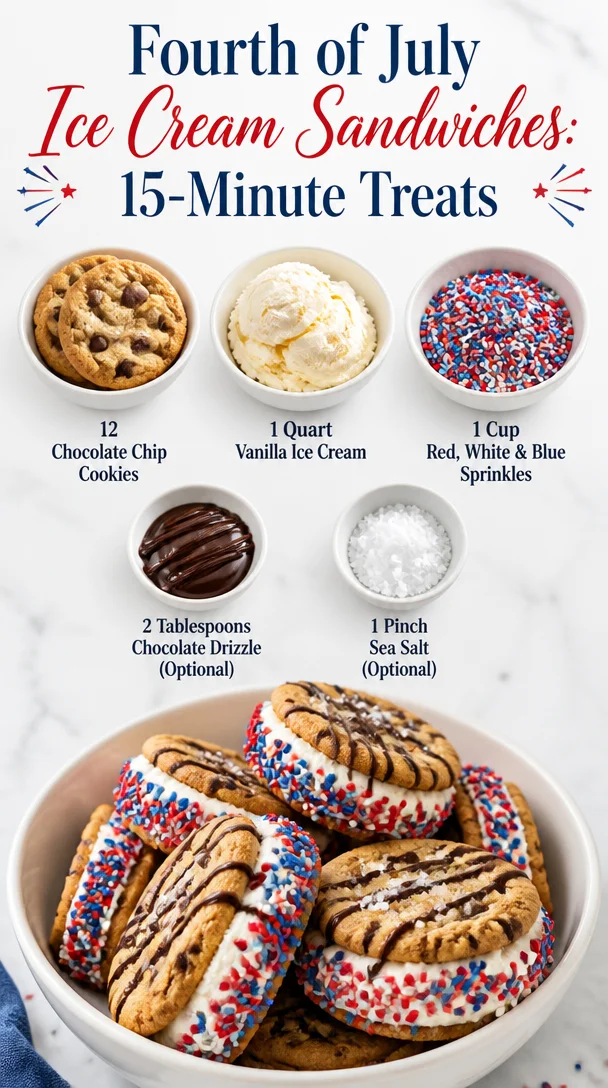
Fourth of July Ice Cream Sandwiches: 15-Minute Treats
Patriotic Ice Cream Sandwiches: A Celebration of Flavor and Festivity
Hey there, fellow food lovers! It’s Beau Collier here, and today we’re diving into a delightful treat that’s perfect for celebrating any summer occasion—Patriotic Ice Cream Sandwiches! Whether it’s the Fourth of July, Memorial Day, or simply a sunny day with friends and family, these festive desserts radiate fun, flavor, and a dash of nostalgia. Imagine biting into a soft chocolate chip cookie, a scoop of creamy vanilla ice cream oozing out, and a sprinkle of colorful joy all around. Sounds amazing, right? Let’s make it happen!
A Taste of Nostalgia
One of my fondest memories from childhood is enjoying ice cream sandwiches during family picnics. It wasn’t just about the delicious dessert; it was the laughter, the sunshine, and the carefree moments shared with those I loved. My grandma would whip up trays of homemade cookies right before our summer gatherings, and we’d race each other to get the first sandwich—always with the biggest scoop of ice cream we could manage. Those days were filled with innocence, love, and, of course, plenty of sprinkles.
Fast forward to now, I strive to recreate those feelings every time I take a bite of an ice cream sandwich. The combination of soft cookies with creamy ice cream sprinkled with vibrant colors is a celebration of those cherished moments. Trust me; these Patriotic Ice Cream Sandwiches will not only taste incredible—they’ll also spark sweet memories for you and your loved ones. Let’s dive into the details so you can make your own tasty trip down memory lane.
Ingredients
To create these delightful desserts, here’s what you’ll need:
-
12 Soft Chocolate Chip Cookies
- Chef Insight: Make sure they’re fresh and soft! Not only are homemade cookies best, but you can also use store-bought ones if you’re in a rush. Softness is key—no one wants a hard sandwich!
-
1 quart Vanilla Ice Cream, slightly softened
- Substitution Tip: If vanilla isn’t your jam, feel free to switch it up! Cookies and cream, strawberry, or mint chocolate chip could give your sandwich a new twist!
-
1 cup Red, White, and Blue Sprinkles
- Chef Insight: These colorful sprinkles add a fun pop of patriotism! If you can’t find them, any combination of red and blue will do, or use your favorite sprinkles for some extra pizazz!
-
2 tablespoons Chocolate Drizzle (optional)
- Substitution Tip: You can also use caramel or a fruit sauce if chocolate isn’t your vibe. It’s all about what tickles your taste buds!
-
1 pinch Sea Salt (optional)
- Chef Insight: A sprinkle of sea salt can really enhance the sweetness of the ice cream and cookies. Just a pinch makes a world of difference!
Step-by-Step Instructions
-
Prepare Your Cookies
- If you’re making cookies from scratch, preheat your oven to 350°F (175°C). Mix together your flour, sugar, chocolate chips, and other cookie ingredients to create a delicious dough. Shape tablespoons of the dough into balls on a baking tray—give each cookie some space to spread. Bake for 10 to 12 minutes until they are golden brown but still soft. Let them cool!
-
Soften Your Ice Cream
- While the cookies cool down, let your vanilla ice cream sit at room temperature for about 10-15 minutes until it’s slightly softened. This makes it easier to scoop and spread between the cookies. Pro tip: If you leave it out too long, you may end up with a puddle instead of scoops, so keep an eye on it!
-
Assembly Time!
- Grab your cooled cookies and place a generous scoop of softened ice cream on the flat side of one cookie. Top it with another cookie, flat side down, and gently press down to create your sandwich. Don’t worry about making it perfect; a little ice cream oozing out is part of the fun!
-
Roll in Sprinkles
- Take your assembled sandwiches and roll the sides in red, white, and blue sprinkles. This adds colorful flair and a nice crunch that complements the creaminess of the ice cream. You can never have too much sprinkle action!
-
Drizzle (If You’re Feeling Fancy)
- If you opted for chocolate drizzle, now’s the time! Drizzle a little over the top of your ice cream sandwiches for an extra splash of decadence.
-
Chill Out
- Place the assembled sandwiches on a baking sheet lined with parchment paper and pop them back into the freezer for about 30 minutes to let the ice cream firm up again. This will make your sandwiches easier to cut and eat!
Serving Suggestions
When it comes to serving, presentation is everything! You can place each ice cream sandwich on a festive plate adorned with colorful napkins (maybe stars and stripes, if you have them!). If you want to take it to the next level, serve them with a side of fresh berries or a scoop of additional ice cream. For an extra festive flourish, consider topping them off with whipped cream and a cherry! These little touches can take your dessert from ordinary to extraordinary, making it an unforgettable experience for friends and family.
Recipe Variations
When it comes to ice cream sandwiches, the only limit is your imagination! Here are a few creative ideas to switch things up:
-
Flavor Fusion: Swap out vanilla ice cream for your favorite variety. Think salted caramel for a sweet-salty delight or strawberry for a fruity twist!
-
Cookie Choices: Instead of chocolate chip, use oatmeal raisin, peanut butter, or even brownie cookies for added richness. The choice is yours!
-
Add-Ins Galore: Mix in crushed candies, nuts, or even bits of your favorite cereal into the softened ice cream before assembling for a new layer of flavor and texture.
-
Health-Conscious Version: Use whole wheat flour cookies with reduced-sugar ice cream for a healthier twist. You won’t compromise on flavor, I promise!
-
Vegan Option: Create a vegan version using plant-based cookies and almond or coconut milk ice cream. Who says you can’t have delicious ice cream sandwiches on a plant-based diet?
Chef’s Notes
Oh boy, these sandwiches have evolved so much over the years. I remember my first attempt, which resulted in ice cream gushing out in every direction. It was hilariously messy but a blast! Cooking is about experimentation and having fun, so don’t sweat the small stuff! The more I’ve made these ice cream sandwiches, the more I’ve learned to embrace imperfections. Each sandwich is unique—just like the memories we’re creating!
FAQs and Troubleshooting
-
Q: Why is my ice cream melting before I finish assembling?
A: That’s a classic problem! If you notice your ice cream is melting too quickly, try freezing it for a bit longer before the assembly, or work in a colder room if possible. -
Q: My cookies turned out hard. What did I do wrong?
A: Often, it’s a matter of baking time or the amount of flour used. Make sure to measure your flour correctly and take them out of the oven when they’re golden—soft cookies will firm as they cool. -
Q: Can I make these ice cream sandwiches ahead of time?
A: Absolutely! You can assemble them a day in advance and keep them in the freezer. Just make sure they’re well-wrapped to avoid freezer burn. -
Q: Can I use something other than sprinkles?
A: Definitely! You can roll them in crushed cookies, nuts, or chocolate chips. Get creative with what you love!
Nutritional Info
While I always emphasize flavor and fun, it’s also nice to be aware of the nutritional aspects of our treats. Each ice cream sandwich contains roughly:
- Calories: 350-450 (depending on the cookie type and ice cream used)
- Protein: 5g
- Fat: 15g
- Carbohydrates: 50g
This is a delightful indulgence, so enjoy every bite! Just remember balance is key; these sandwiches can be a special treat rather than a daily indulgence.
Final Thoughts
There you have it, folks—Patriotic Ice Cream Sandwiches that are as fun to make as they are to eat! I hope this recipe brings you as much joy as my childhood memories do for me. Cooking is about creativity, love, and connection. Share these treats with your friends and family, and watch as they become a cherished part of your gatherings, just like they have in mine.
So, what are you waiting for? Dive into your kitchen, gather your loved ones, and whip up a batch of these delicious ice cream sandwiches. Remember to savor the process as much as the final bite! Happy cooking, and may your summer celebrations be filled with joy and amazing treats! 🌟🍪🍦
Print
Patriotic Ice Cream Sandwiches
- Total Time: 45 minutes
- Yield: 4 servings 1x
- Diet: Vegetarian
Description
A fun and flavorful treat perfect for summer celebrations, combining soft chocolate chip cookies and creamy vanilla ice cream, rolled in festive sprinkles.
Ingredients
- 12 Soft Chocolate Chip Cookies
- 1 quart Vanilla Ice Cream, slightly softened
- 1 cup Red, White, and Blue Sprinkles
- 2 tablespoons Chocolate Drizzle (optional)
- 1 pinch Sea Salt (optional)
Instructions
- Prepare the cookies: Preheat your oven to 350°F (175°C). Mix together your flour, sugar, chocolate chips, and other cookie ingredients to create a delicious dough. Shape tablespoons of the dough into balls on a baking tray and bake for 10 to 12 minutes until golden but still soft. Let them cool.
- Soften your ice cream: While the cookies cool, let your vanilla ice cream sit at room temperature for about 10-15 minutes until slightly softened.
- Grab your cooled cookies and place a generous scoop of softened ice cream on the flat side of one cookie. Top with another cookie, and gently press down.
- Roll the assembled sandwiches in sprinkles for added flair and crunch.
- Drizzle chocolate (if using) over the top for extra decadence.
- Chill the sandwiches in the freezer for about 30 minutes to firm up the ice cream.
Notes
Feel free to experiment with different ice cream flavors and cookie types. Try to keep things festive and colorful with sprinkles!
- Prep Time: 15 minutes
- Cook Time: 12 minutes
- Category: Dessert
- Method: Baking
- Cuisine: American
Nutrition
- Serving Size: 1 sandwich
- Calories: 400
- Sugar: 30g
- Sodium: 200mg
- Fat: 15g
- Saturated Fat: 9g
- Unsaturated Fat: 6g
- Trans Fat: 0g
- Carbohydrates: 50g
- Fiber: 2g
- Protein: 5g
- Cholesterol: 25mg
Keywords: ice cream, sandwiches, patriotic, dessert, summer, celebration
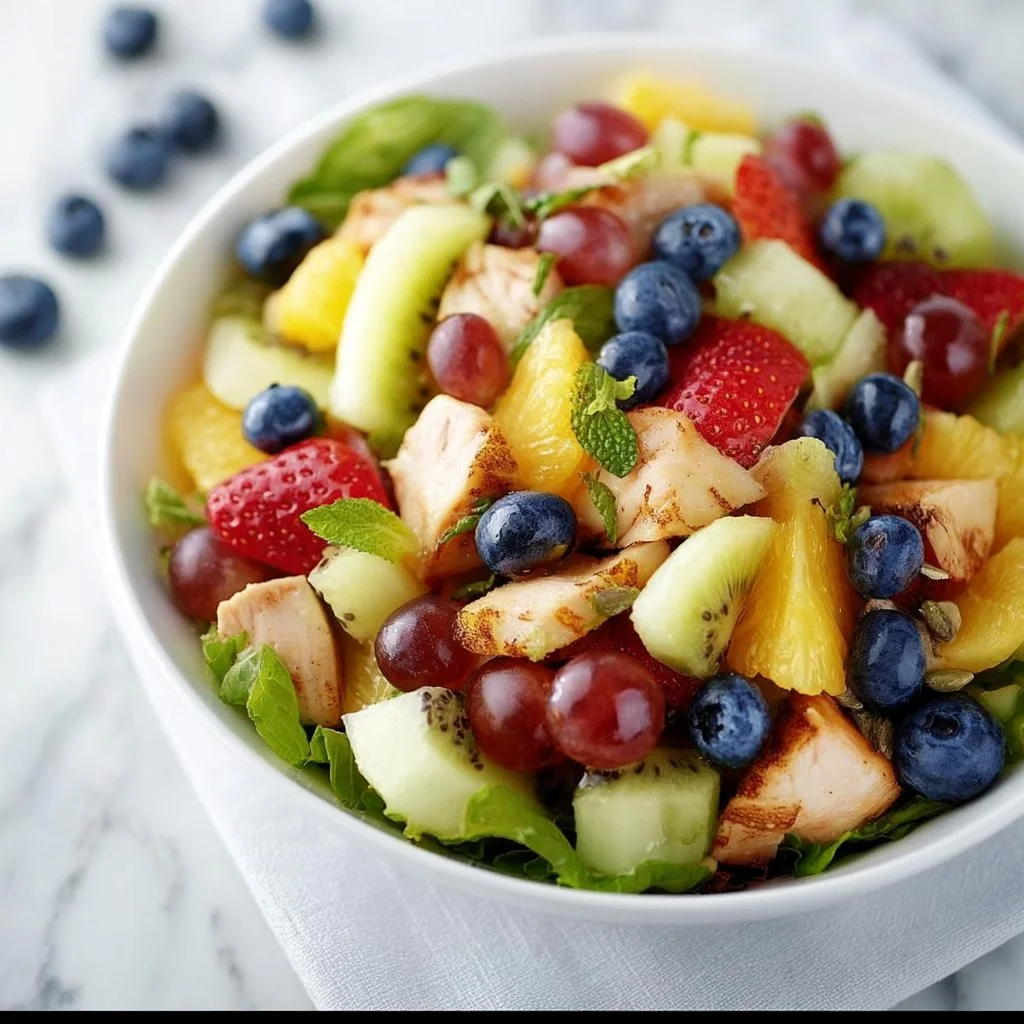
Fruit Salad
The Ultimate Fruit Salad: A Delight for the Senses
Hey there, fellow food lovers! I’m so thrilled you’re here at Feastical, your go-to spot for all things delicious and heartwarming. Today, we’re diving into a recipe that’s as easy as pie (okay, maybe even easier) and as vibrant as a summer day—Fruit Salad! Now, I know what you might think: “Fruit salad? Isn’t that just throwing some fruits together?” Ah, my friend, it’s so much more than that!
This dish is a canvas for your culinary creativity, bursting with color and flavor, and perfect for any occasion. Whether you’re serving it as a tantalizing appetizer at a backyard barbecue, a refreshing side for your brunch, or even a guilt-free dessert, this colorful medley of fruits will always leave your guests wanting more. And the best part? You can customize it to your heart’s content, making it a no-fail option for any fruit lover out there.
You see, growing up, fruit salad was a staple at family gatherings—especially during those balmy summer months. My Aunt Lily would whip up the most delicious concoctions. She taught me that the magic was in the details: using the ripest fruits, a drizzle of honey for sweetness, and a sprinkle of freshly torn mint leaves to elevate everything to a whole new level of deliciousness. Every spoonful was like biting into sunshine—and that’s something I carry in my heart and my kitchen to this day.
So grab your cutting board and let’s get chopping! I promise you this colorful creation will be a feast for both your eyes and your taste buds. Let’s jump right in!
Personal Story
I remember the first time I had a fruit salad that really changed my perspective on this classic dish. I was visiting my Aunt Lily during a hot August afternoon, and she had just come back from the farmer’s market with a bounty of fresh, ripe fruits. The smell of sweetness wafted through her kitchen as she began slicing through piles of juicy strawberries, pineapples, and bananas.
As she tossed everything into a big, vibrant bowl, she added a secret ingredient—her special honey-lime dressing. I watched in awe as she drizzled the honey and lime over the cut fruits, mesmerizing me with her kitchen dance. When I finally got to dig in, it was like a party for my taste buds! Each bite was a burst of flavors so bright and fresh that I could practically hear my taste buds singing. From that day forward, I realized that fruit salad could be so much more than just a bowl of cut-up fruits; it could be a delightful experience! Now, every time I make this dish, I think of Aunt Lily and that magical summer afternoon, transforming simple ingredients into something extraordinary.
Ingredients
Let’s gather our star players for today’s fruit salad! Here’s the list of ingredients you’ll need:
-
Mixed Fresh Fruits (Pineapple, Blueberries, Strawberries, Bananas):
- Pineapple: The tropical zing of pineapple adds a refreshing touch! Go for a fresh one; its juicy sweetness is unmatched! If you can’t find one, canned pineapple (in juice, not syrup) works as a great substitute.
- Blueberries: Tiny but mighty! These little beauties are packed with antioxidants. You can swap them for blackberries or raspberries if you want something different.
- Strawberries: Sweet and juicy, strawberries are a crowd favorite! If they’re out of season, feel free to use sliced peaches or nectarines.
- Bananas: Bananas are perfect for adding a creamy texture. If you need a substitute, try using mango or some diced kiwi for a tropical twist.
-
Honey or Agave Syrup (optional):
- Honey enhances the sweetness and adds a lovely glaze to our fruity mix. If you’re vegan or need a milder flavor, agave syrup is a fantastic substitute.
-
Mint Leaves (for garnish):
- Fresh mint lifts the flavor profile and adds a pop of color! If you don’t have mint, lemongrass or basil could introduce an interesting flavor twist.
So grab the freshest fruits you can find, and let’s get this sweet show on the road!
Step-by-Step Instructions
Alright, my fellow chefs, it’s time to get our hands a little fruity! Here’s how to whip up the ultimate fruit salad, step by step:
Step 1: Prepare Your Fruits
Start by washing all your fruits thoroughly under running water to freshen them up. For strawberries, remove the leafy green tops. For pineapples, cut the skin off, taking care to remove the ‘eyes’ (the little brown spots).
Chef Tip: If you’re unsure how to dice a pineapple, try cutting it in half lengthwise, slicing it into rings, and then cubing the rings.
Step 2: Chop and Dice!
Begin chopping your fruits into bite-sized pieces. Aim for uniform sizes so they mix together nicely and are easy to eat.
Chef Hack: To keep bananas from browning, you can sprinkle a little lemon juice on them once chopped. This not only preserves their color but adds a nice zing!
Step 3: Mix It Up
In a large mixing bowl, combine all your chopped fruits: pineapple, blueberries, strawberries, and bananas. Gently toss them together with a wooden spoon or spatula.
Tip: If you want to keep them from mushing together, take care when stirring—gentle is key!
Step 4: The Sweetener
If your fruit isn’t as sweet as you’d like, go ahead and drizzle in the honey or agave syrup. Start with one tablespoon, mix well, and taste. You can always add more if you need it sweeter!
Chef Insight: For an added zing, consider mixing in a splash of lime or orange juice with the honey/agave—it complements the fruits beautifully!
Step 5: Garnish to Impress
Tear fresh mint leaves and gently fold them into your fruit salad. It’ll add freshness and elevate the dish visually!
Chef’s Note: If you want to show off, save some mint leaves to sprinkle on top as an eye-catching garnish.
Step 6: Chill and Serve
Cover the mixing bowl with plastic wrap and refrigerate for about 30 minutes. This allows the flavors to meld together and results in an even tastier salad!
Chef Tip: Serve this beauty in a clear glass bowl to showcase all those vibrant colors—it’s all about the presentation!
Serving Suggestions
Now that you have this stunning fruit salad ready to go, let’s talk about how to serve it. The presentation can elevate this already delightful dish into something truly spectacular!
Consider using a large, clear glass bowl to really show off all those bright colors and textures. After chilling it, give it one last gentle toss before ladling it into individual servings. You could also use mason jars for an adorable picnic-style serving.
If you’re feeling a little extra fancy, sprinkle some chopped nuts—like toasted almonds or walnuts—on top for a bit of crunch. Another fantastic idea is to serve it alongside a scoop of vanilla yogurt or whipped cream for a divine dessert!
Trust me, your guests will be impressed, and you’ll be left with an empty bowl—nothing but sweet memories.
Recipe Variations
This fruit salad is wonderfully customizable! Here are a few creative variations you can try:
-
Tropical Twist: Add diced mango, papaya, or kiwi for an exotic flair. A splash of coconut milk can also lend a creamy tropical taste!
-
Berry Medley: Swap out the blueberries and strawberries for raspberries, blackberries, or go full berry bonanza by mixing all of them together!
-
Citrus Celebration: Include orange and grapefruit segments for a zesty burst of flavor. Pair it with a dressing made of citrus juice and zest to amp it up!
-
Nutty & Cheesy: Toss in some crumbled feta or cottage cheese for a savory touch, along with some toasted pecans or walnuts for crunch.
-
Spicy Kick: For the adventurous, sprinkle a touch of chili powder or jalapeño slices to introduce a surprising heat element that plays off the sweetness of the fruits!
Feel free to blend and match these ideas based on your preferences and what’s in season in your area!
Chef’s Notes
You know, there was a time when I thought fruit salad was just a boring mix of whatever fruits were left in the fridge. But as I’ve spent more time in the kitchen, I’ve realized that it doesn’t take much to elevate this dish! I love reimagining this classic with seasonal fruits or fun dressing combinations, keeping it fresh each time I make it.
One of my funniest kitchen moments was when I tried to impress a friend by making an elaborate fruit salad—namely, I slipped on a banana peel and sent fruit flying everywhere! The silver lining? We got to eat a floor fruit salad! Just remember to have fun in the kitchen, whether the results are picture-perfect or a little messy.
FAQs and Troubleshooting
Let’s tackle some common questions and troubleshooting tips that might pop up as you’re creating your fruit salad masterpiece:
-
Q: Why did my banana turn brown too quickly?
- A: Bananas are notorious for browning due to their exposure to air. Adding a bit of lemon juice can help! Always slice them last, just before serving, to maintain that bright yellow color.
-
Q: Can I make this salad ahead of time?
- A: Yes, but for best results, make it a few hours ahead of serving. This will allow the flavors to meld. However, it’s best to leave bananas and any delicate fruits until just before serving—nobody likes mushy fruit!
-
Q: How do I know if the fruit is ripe enough?
- A: Look for vibrant colors and a sweet aroma. For bananas, gently press—if they give slightly, they’re ripe. Pineapples should smell sweet and have a small amount of give when pressed.
-
Q: Can I use frozen fruits?
- A: Absolutely! However, thaw and drain them before mixing them in the salad to avoid excess moisture.
Nutritional Info
One serving of this fruit salad is not just a feast for the eyes but also for your health! Here’s a quick glance at the nutritional benefits:
- Calories: Approximately 120 calories per serving (depending on the fruits used).
- Vitamin C: The abundance of fruits provides a hefty dose of vitamin C, boosting your immune system.
- Fiber: The fresh fruits offer dietary fiber, which aids in digestion and keeps you feeling satisfied.
- Antioxidants: Berries, in particular, are packed with antioxidants that are great for overall health.
Feel good about indulging in this fresh, colorful salad!
Final Thoughts
And there you have it! An easy, vibrant fruit salad that is sure to add a splash of joy to any meal. As you embrace the world of fresh fruits and flavors, always remember that cooking is about creativity and enjoyment.
Don’t hesitate to experiment with different fruits, dressings, and serving styles! Food is meant to be shared and celebrated, and a fruit salad is the perfect, refreshing way to do that. Whether you’re enjoying it at a picnic, a family gathering, or just as a healthy snack, know that each bite is a step toward making beautiful memories.
So, what are you waiting for? Head to your kitchen, gather that fresh fruit, and let’s whip up a delicious fruit salad that’s bursting with flavor! Happy eating, foodies! 🍓🍍🍌🥝
Print
The Ultimate Fruit Salad
- Total Time: 15 minutes
- Yield: 4 servings
- Diet: Vegan
Description
A vibrant and customizable fruit salad that’s perfect for any occasion, bursting with flavor and freshness.
Ingredients
- Mixed Fresh Fruits (Pineapple, Blueberries, Strawberries, Bananas)
- Honey or Agave Syrup (optional)
- Mint Leaves (for garnish)
Instructions
- Prepare your fruits by washing them thoroughly. For strawberries, remove the leafy green tops. For pineapples, cut the skin off and remove the ‘eyes’.
- Chop your fruits into bite-sized pieces for easy mixing.
- Mix all the chopped fruits together in a large bowl.
- The sweetener: drizzle honey or agave syrup into the mix and stir well.
- Garnish with fresh mint leaves.
- Chill the salad in the refrigerator for about 30 minutes before serving.
Notes
Serve in a clear glass bowl for maximum visual appeal. You can also add chopped nuts or serve with yogurt for an extra treat.
- Prep Time: 15 minutes
- Cook Time: 0 minutes
- Category: Side Dish
- Method: No-Cook
- Cuisine: American
Nutrition
- Serving Size: 1 serving
- Calories: 120
- Sugar: 17g
- Sodium: 5mg
- Fat: 0g
- Saturated Fat: 0g
- Unsaturated Fat: 0g
- Trans Fat: 0g
- Carbohydrates: 31g
- Fiber: 3g
- Protein: 1g
- Cholesterol: 0mg
Keywords: fruit salad, summer salad, healthy dessert, colorful fruit, fresh fruit