
Ingredient Coconut Macaroon Cookies (No-Bake & Easy)
Coconut Macaroon Cookies: A Sweet Journey into Nostalgia
Hey there, lovely foodies! If there’s one treat that wraps you in warm memories and satisfies that sweet tooth, it’s got to be coconut macaroons. These delightful little cookies are more than just a simple dessert; they are pockets of nostalgia and joy. Today, I’m excited to share with you my go-to recipe for Coconut Macaroon Cookies, which not only taste like sunshine but also come with a heap of cherished stories.
A Sweet Personal Story
Let me take you back to a kitchen filled with laughter, flour-dusted countertops, and the sweet aroma of coconut. Many years ago, I experienced my first taste of coconut macaroons in my grandmother’s cozy kitchen. It was a magical Saturday afternoon, and grandma was busy whipping up her legendary cookies. She had a knack for turning ordinary ingredients into extraordinary moments.
I remember peeking over the counter, fascinated as she mixed sweetened shredded coconut, sugar, and egg whites, almost as if she were conducting a symphony. The best part? She always let me dip my fingers in the batter and sneak a bite! Those simple, crunchy-on-the-outside and chewy-on-the-inside cookies were always a hit, especially when we dipped them in melted dark chocolate. Every bite took me on a trip down memory lane, filled with warmth, love, and the best hugs from grandma. It’s this memory that inspires me to share my version of coconut macaroons. Let’s create some sweet kitchen magic together!
Ingredients
Here’s what you’ll need to whip up these irresistible Coconut Macaroon Cookies. Get ready—it’s a short but sweet list!
-
2 2/3 cups sweetened shredded coconut
This is the star of the show! Sweetened shredded coconut gives the macaroons their lovely chewiness and natural sweetness. If you’re looking for a healthier option, feel free to use unsweetened coconut, but you may need to increase the sugar a bit. -
1/2 cup granulated sugar
Just enough to add that perfect sweetness! You can substitute coconut sugar for a deeper flavor, or even use a sugar substitute for a lower-calorie version—just check the conversion ratio! -
2 egg whites
These little beauties act as the binding agent, giving the cookies their iconic structure. Don’t throw away those yolks; they’re great for making custard or adding to your breakfast omelet! -
1/4 teaspoon salt
A pinch of salt is essential! It enhances all the sweet flavors in the cookies and makes them so much more delicious. You could use sea salt for a more gourmet touch. -
1 teaspoon vanilla extract
This adds warmth and a hint of sophistication. Feel free to experiment with almond extract for a nutty twist on flavor!
Step-by-Step Instructions
Alright, kitchen warriors, let’s dive into the magic of creating our Coconut Macaroon Cookies! Follow these steps, and soon you’ll have a plate of these sweet treasures ready to enjoy.
-
Preheat Your Oven:
Preheat your oven to 325°F (160°C). This ensures that when you pop those cookies in, they’ll bake evenly and turn golden brown. Pro tip: Make sure your oven is fully preheated. It can make a world of difference in baking! -
Prepare Your Baking Sheet:
Line a baking sheet with parchment paper. This keeps your cookies from sticking and makes for an easy clean-up. If you don’t have parchment, a lightly greased baking sheet will do the trick too. -
Mix Dry Ingredients:
In a large bowl, combine the sweetened shredded coconut, granulated sugar, and salt. Stir them together until they’re well blended, and you see that lovely coconut fluff starting to form. I always love the texture of the coconut and sugar together; it’s the little things that make the process enjoyable! -
Add Wet Ingredients:
In a separate bowl, whisk the egg whites and vanilla extract until frothy but not peaked. You’re looking for a soft froth that will create the perfect binding mixture. Pour this frothy goodness into the dry mixture and mix well until everything is combined. Remember, it should be a little sticky! -
Shape the Cookies:
Using a tablespoon or a small ice cream scooper, scoop the mixture onto your prepared baking sheet. Keep them about 2 inches apart, as they will spread slightly. You can use your fingers to shape them into small mountain-like piles; this gives them that artisanal look! -
Bake:
Bake in your preheated oven for 20-25 minutes or until the tops are golden brown. Keep an eye on them; ovens can vary, and we want them perfectly baked, not burnt! Pro tip: Rotating the baking sheet halfway through can help ensure even baking. -
Cool Down:
Once baked, allow the cookies to cool on the baking sheet for about 10 minutes before transferring them to a wire rack. This helps them firm up a bit and makes them easier to move without crumbling.
Serving Suggestions
Now that your Coconut Macaroon Cookies are all baked and cooled, it’s time to celebrate! Here are some fun ways to serve them:
-
Platter Display: Arrange them on a beautiful platter, perhaps garnished with some fresh mint leaves or a sprinkle of shredded coconut for that extra flair.
-
Dipping Delight: Melt some dark or semi-sweet chocolate and dip half of each macaroon in it, then let them set on parchment. This adds a luxurious touch to the cookies!
-
Dessert Trio: Pair them with a scoop of vanilla ice cream and a drizzle of chocolate syrup for an indulgent dessert experience. Heaven in every bite!
Recipe Variations
Looking to shake things up a bit? Here are some fun twists and variations you can try with your coconut macaroons:
-
Chocolate Chip Surprise: Add 1/2 cup of mini chocolate chips to the mixture for a melty chocolate surprise within each cookie.
-
Nutty Coconut: Incorporate some chopped almonds or pecans into the mixture for added crunch and flavor.
-
Tropical Zest: Add the zest of one lime or orange to the mixture for a refreshing citrusy kick that pairs wonderfully with the coconut.
-
Coffee Lover’s Dream: Stir in 1 tablespoon of instant coffee granules for a delicious mocha flavor.
-
Gluten-Free Option: This recipe is already gluten-free, but you can also substitute some of the sugar with a low-carb sweetener for a keto-friendly version!
Chef’s Notes
Over the years, my coconut macaroon recipe has gone through some delightful tweaks and variations. I remember the first time I dared to dip them in chocolate—what a game changer! I’ve also experimented with different types of coconut, from finely shredded to even toasted, which adds a different dimension to the flavor.
One time, I cooked up a batch for a friend’s wedding, and it became the highlight of the dessert table. Watching everyone enjoy those cookies reminded me of my grandma’s kitchen and her joy in bringing people together through food. What a beautiful connection food creates!
FAQs and Troubleshooting
Here are some common questions you might have as you bake these delicious treats:
-
Why are my macaroons too dry?
If your batter seems dry before baking, it may need a bit more moisture. Consider adding an extra egg white or a splash of coconut milk for that perfect sticky texture. -
Can I freeze these cookies?
Absolutely! Once cooled, you can freeze them in an airtight container for up to three months. Just thaw them at room temperature when you’re ready to indulge. -
How can I make them crispier?
For crispier edges, bake them a few minutes longer until they are a deeper golden brown. Just be careful not to overdo it! -
What should I do if they spread too much?
If your coconut macaroons spread too much, it could be because you didn’t let the egg whites froth enough or the oven wasn’t hot enough. Make sure to follow the instructions closely for that perfect shape.
Nutritional Info
While these delightful cookies are a treat, it’s always good to know what you’re indulging in! Each macaroon is packed with the goodness of coconut and has approximately:
- Calories: 80-90
- Fat: 4g
- Carbohydrates: 10g
- Sugar: 7g
- Protein: 1g
As always, these figures can vary based on specific brands and portions used, but you can enjoy these little bites of joy guilt-free!
Final Thoughts
I hope you feel inspired to bake up a batch of Coconut Macaroon Cookies! There’s something truly special about creating something delicious from scratch, and sharing it with loved ones only makes it sweeter. So why wait? Grab those ingredients, and let’s create some memorable moments together in the kitchen!
Remember, cooking is all about joy, creativity, and togetherness. Let the warmth of those coconut macaroons embrace you, just like grandma’s hugs did. Until next time, happy baking and keep feeding your foodie soul! 🍪🥥
Print
Coconut Macaroon Cookies
- Total Time: 35 minutes
- Yield: 20 servings 1x
- Diet: Gluten-Free
Description
Delightful coconut macaroons that are crunchy on the outside and chewy on the inside, perfect for sweet nostalgia.
Ingredients
- 2 2/3 cups sweetened shredded coconut
- 1/2 cup granulated sugar
- 2 egg whites
- 1/4 teaspoon salt
- 1 teaspoon vanilla extract
Instructions
- Preheat your oven to 325°F (160°C).
- Line a baking sheet with parchment paper.
- Combine the sweetened shredded coconut, granulated sugar, and salt in a large bowl.
- Whisk the egg whites and vanilla extract in a separate bowl until frothy.
- Pour the egg white mixture into the dry ingredients and mix well until combined.
- Scoop the mixture onto the prepared baking sheet, keeping them about 2 inches apart.
- Bake for 20-25 minutes or until golden brown.
- Cool on the baking sheet for about 10 minutes before transferring to a wire rack.
Notes
Try dipping the macaroons in melted dark chocolate for a luxurious touch!
- Prep Time: 10 minutes
- Cook Time: 25 minutes
- Category: Dessert
- Method: Baking
- Cuisine: American
Nutrition
- Serving Size: 1 cookie
- Calories: 85
- Sugar: 7g
- Sodium: 100mg
- Fat: 4g
- Saturated Fat: 3g
- Unsaturated Fat: 1g
- Trans Fat: 0g
- Carbohydrates: 10g
- Fiber: 1g
- Protein: 1g
- Cholesterol: 0mg
Keywords: coconut macaroons, cookies, dessert, gluten-free, sweet treats
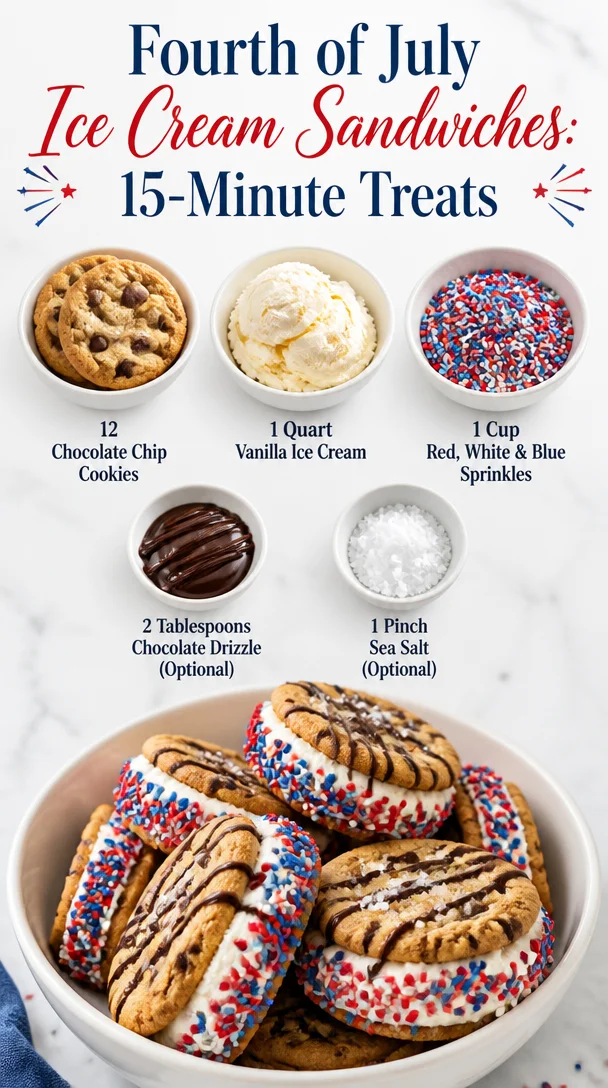
Fourth of July Ice Cream Sandwiches: 15-Minute Treats
Patriotic Ice Cream Sandwiches: A Celebration of Flavor and Festivity
Hey there, fellow food lovers! It’s Beau Collier here, and today we’re diving into a delightful treat that’s perfect for celebrating any summer occasion—Patriotic Ice Cream Sandwiches! Whether it’s the Fourth of July, Memorial Day, or simply a sunny day with friends and family, these festive desserts radiate fun, flavor, and a dash of nostalgia. Imagine biting into a soft chocolate chip cookie, a scoop of creamy vanilla ice cream oozing out, and a sprinkle of colorful joy all around. Sounds amazing, right? Let’s make it happen!
A Taste of Nostalgia
One of my fondest memories from childhood is enjoying ice cream sandwiches during family picnics. It wasn’t just about the delicious dessert; it was the laughter, the sunshine, and the carefree moments shared with those I loved. My grandma would whip up trays of homemade cookies right before our summer gatherings, and we’d race each other to get the first sandwich—always with the biggest scoop of ice cream we could manage. Those days were filled with innocence, love, and, of course, plenty of sprinkles.
Fast forward to now, I strive to recreate those feelings every time I take a bite of an ice cream sandwich. The combination of soft cookies with creamy ice cream sprinkled with vibrant colors is a celebration of those cherished moments. Trust me; these Patriotic Ice Cream Sandwiches will not only taste incredible—they’ll also spark sweet memories for you and your loved ones. Let’s dive into the details so you can make your own tasty trip down memory lane.
Ingredients
To create these delightful desserts, here’s what you’ll need:
-
12 Soft Chocolate Chip Cookies
- Chef Insight: Make sure they’re fresh and soft! Not only are homemade cookies best, but you can also use store-bought ones if you’re in a rush. Softness is key—no one wants a hard sandwich!
-
1 quart Vanilla Ice Cream, slightly softened
- Substitution Tip: If vanilla isn’t your jam, feel free to switch it up! Cookies and cream, strawberry, or mint chocolate chip could give your sandwich a new twist!
-
1 cup Red, White, and Blue Sprinkles
- Chef Insight: These colorful sprinkles add a fun pop of patriotism! If you can’t find them, any combination of red and blue will do, or use your favorite sprinkles for some extra pizazz!
-
2 tablespoons Chocolate Drizzle (optional)
- Substitution Tip: You can also use caramel or a fruit sauce if chocolate isn’t your vibe. It’s all about what tickles your taste buds!
-
1 pinch Sea Salt (optional)
- Chef Insight: A sprinkle of sea salt can really enhance the sweetness of the ice cream and cookies. Just a pinch makes a world of difference!
Step-by-Step Instructions
-
Prepare Your Cookies
- If you’re making cookies from scratch, preheat your oven to 350°F (175°C). Mix together your flour, sugar, chocolate chips, and other cookie ingredients to create a delicious dough. Shape tablespoons of the dough into balls on a baking tray—give each cookie some space to spread. Bake for 10 to 12 minutes until they are golden brown but still soft. Let them cool!
-
Soften Your Ice Cream
- While the cookies cool down, let your vanilla ice cream sit at room temperature for about 10-15 minutes until it’s slightly softened. This makes it easier to scoop and spread between the cookies. Pro tip: If you leave it out too long, you may end up with a puddle instead of scoops, so keep an eye on it!
-
Assembly Time!
- Grab your cooled cookies and place a generous scoop of softened ice cream on the flat side of one cookie. Top it with another cookie, flat side down, and gently press down to create your sandwich. Don’t worry about making it perfect; a little ice cream oozing out is part of the fun!
-
Roll in Sprinkles
- Take your assembled sandwiches and roll the sides in red, white, and blue sprinkles. This adds colorful flair and a nice crunch that complements the creaminess of the ice cream. You can never have too much sprinkle action!
-
Drizzle (If You’re Feeling Fancy)
- If you opted for chocolate drizzle, now’s the time! Drizzle a little over the top of your ice cream sandwiches for an extra splash of decadence.
-
Chill Out
- Place the assembled sandwiches on a baking sheet lined with parchment paper and pop them back into the freezer for about 30 minutes to let the ice cream firm up again. This will make your sandwiches easier to cut and eat!
Serving Suggestions
When it comes to serving, presentation is everything! You can place each ice cream sandwich on a festive plate adorned with colorful napkins (maybe stars and stripes, if you have them!). If you want to take it to the next level, serve them with a side of fresh berries or a scoop of additional ice cream. For an extra festive flourish, consider topping them off with whipped cream and a cherry! These little touches can take your dessert from ordinary to extraordinary, making it an unforgettable experience for friends and family.
Recipe Variations
When it comes to ice cream sandwiches, the only limit is your imagination! Here are a few creative ideas to switch things up:
-
Flavor Fusion: Swap out vanilla ice cream for your favorite variety. Think salted caramel for a sweet-salty delight or strawberry for a fruity twist!
-
Cookie Choices: Instead of chocolate chip, use oatmeal raisin, peanut butter, or even brownie cookies for added richness. The choice is yours!
-
Add-Ins Galore: Mix in crushed candies, nuts, or even bits of your favorite cereal into the softened ice cream before assembling for a new layer of flavor and texture.
-
Health-Conscious Version: Use whole wheat flour cookies with reduced-sugar ice cream for a healthier twist. You won’t compromise on flavor, I promise!
-
Vegan Option: Create a vegan version using plant-based cookies and almond or coconut milk ice cream. Who says you can’t have delicious ice cream sandwiches on a plant-based diet?
Chef’s Notes
Oh boy, these sandwiches have evolved so much over the years. I remember my first attempt, which resulted in ice cream gushing out in every direction. It was hilariously messy but a blast! Cooking is about experimentation and having fun, so don’t sweat the small stuff! The more I’ve made these ice cream sandwiches, the more I’ve learned to embrace imperfections. Each sandwich is unique—just like the memories we’re creating!
FAQs and Troubleshooting
-
Q: Why is my ice cream melting before I finish assembling?
A: That’s a classic problem! If you notice your ice cream is melting too quickly, try freezing it for a bit longer before the assembly, or work in a colder room if possible. -
Q: My cookies turned out hard. What did I do wrong?
A: Often, it’s a matter of baking time or the amount of flour used. Make sure to measure your flour correctly and take them out of the oven when they’re golden—soft cookies will firm as they cool. -
Q: Can I make these ice cream sandwiches ahead of time?
A: Absolutely! You can assemble them a day in advance and keep them in the freezer. Just make sure they’re well-wrapped to avoid freezer burn. -
Q: Can I use something other than sprinkles?
A: Definitely! You can roll them in crushed cookies, nuts, or chocolate chips. Get creative with what you love!
Nutritional Info
While I always emphasize flavor and fun, it’s also nice to be aware of the nutritional aspects of our treats. Each ice cream sandwich contains roughly:
- Calories: 350-450 (depending on the cookie type and ice cream used)
- Protein: 5g
- Fat: 15g
- Carbohydrates: 50g
This is a delightful indulgence, so enjoy every bite! Just remember balance is key; these sandwiches can be a special treat rather than a daily indulgence.
Final Thoughts
There you have it, folks—Patriotic Ice Cream Sandwiches that are as fun to make as they are to eat! I hope this recipe brings you as much joy as my childhood memories do for me. Cooking is about creativity, love, and connection. Share these treats with your friends and family, and watch as they become a cherished part of your gatherings, just like they have in mine.
So, what are you waiting for? Dive into your kitchen, gather your loved ones, and whip up a batch of these delicious ice cream sandwiches. Remember to savor the process as much as the final bite! Happy cooking, and may your summer celebrations be filled with joy and amazing treats! 🌟🍪🍦
Print
Patriotic Ice Cream Sandwiches
- Total Time: 45 minutes
- Yield: 4 servings 1x
- Diet: Vegetarian
Description
A fun and flavorful treat perfect for summer celebrations, combining soft chocolate chip cookies and creamy vanilla ice cream, rolled in festive sprinkles.
Ingredients
- 12 Soft Chocolate Chip Cookies
- 1 quart Vanilla Ice Cream, slightly softened
- 1 cup Red, White, and Blue Sprinkles
- 2 tablespoons Chocolate Drizzle (optional)
- 1 pinch Sea Salt (optional)
Instructions
- Prepare the cookies: Preheat your oven to 350°F (175°C). Mix together your flour, sugar, chocolate chips, and other cookie ingredients to create a delicious dough. Shape tablespoons of the dough into balls on a baking tray and bake for 10 to 12 minutes until golden but still soft. Let them cool.
- Soften your ice cream: While the cookies cool, let your vanilla ice cream sit at room temperature for about 10-15 minutes until slightly softened.
- Grab your cooled cookies and place a generous scoop of softened ice cream on the flat side of one cookie. Top with another cookie, and gently press down.
- Roll the assembled sandwiches in sprinkles for added flair and crunch.
- Drizzle chocolate (if using) over the top for extra decadence.
- Chill the sandwiches in the freezer for about 30 minutes to firm up the ice cream.
Notes
Feel free to experiment with different ice cream flavors and cookie types. Try to keep things festive and colorful with sprinkles!
- Prep Time: 15 minutes
- Cook Time: 12 minutes
- Category: Dessert
- Method: Baking
- Cuisine: American
Nutrition
- Serving Size: 1 sandwich
- Calories: 400
- Sugar: 30g
- Sodium: 200mg
- Fat: 15g
- Saturated Fat: 9g
- Unsaturated Fat: 6g
- Trans Fat: 0g
- Carbohydrates: 50g
- Fiber: 2g
- Protein: 5g
- Cholesterol: 25mg
Keywords: ice cream, sandwiches, patriotic, dessert, summer, celebration