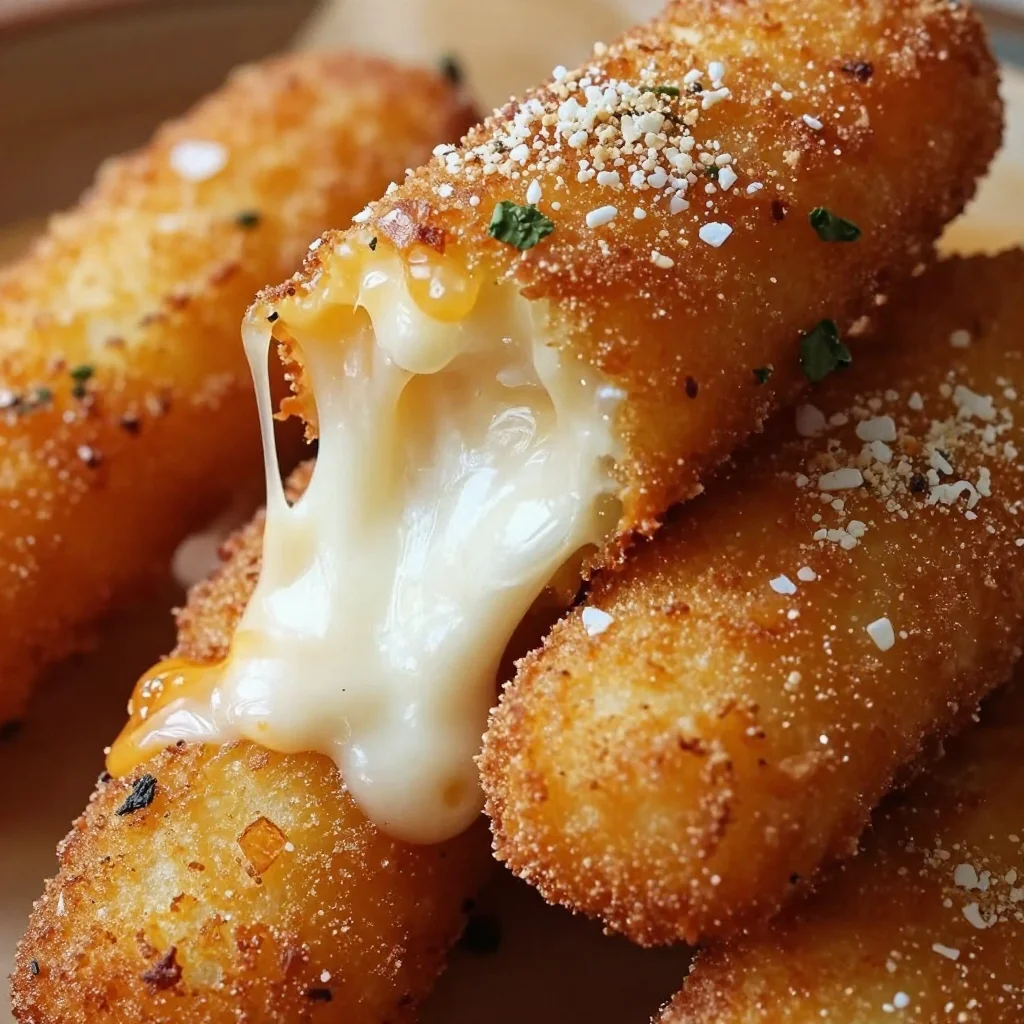
Crispy Mozzarella Sticks in 15 Minutes: Quick Snack Recipe
Irresistible Mozzarella Cheese Sticks: A Must-Try Recipe!
Hey, food lovers! It’s Beau Collier here, and today, we’re diving into one of the most delightful, gooey, and golden snacks you could ever make—Mozzarella Cheese Sticks! Trust me; these little bites of heaven will transport you back to your favorite pizza joint, or perhaps that beloved fair where you first discovered the magic of deep-fried cheese. With every stretchy, savory bite, you’ll feel like a kid again!
Making homemade mozzarella cheese sticks is not only super fun, but it’s also a great way to impress guests or spoil the family on movie night. Plus, there’s nothing quite like the satisfaction of pulling that cheese apart and watching it stretch like taffy. Ready your frying pan, folks, because we’re about to get cheesy!
A Trip Down Memory Lane
Let me share a little kitchen story with you. The first time I made mozzarella cheese sticks was at a family gathering, and boy, was that an adventure! I had gathered up some cousins and decided we should impress the adults with our snack-making prowess. Armed with a block of mozzarella and a smattering of ingredients I’d gathered, we set off on our cheesy quest.
Well, let’s just say it didn’t go entirely as planned. We were a bit too ambitious; flour ended up on the floor, breadcrumbs flew through the air like glitter at a party, and let’s not even talk about the oil splatters! But once we finally managed to fry our first batch of cheese sticks, the joy on everyone’s faces made all the chaos worth it. Those gooey, cheesy sticks disappeared faster than we could make them, and from that day on, I’ve cherished the delightful simplicity of this recipe and the laughter that comes with it.
Ingredients
Alright, let’s gather our ingredients, shall we? Here’s everything you need to whip up these mozzarella delights:
- 12 ounces mozzarella cheese: You can use string cheese or a block cut into sticks. If you want a fun twist, try flavored mozzarella for a kick!
- 1 cup all-purpose flour: This is your base for coating. Use gluten-free flour for a gluten-free option.
- 2 large eggs, beaten: This helps the breadcrumbs stick. For a vegan option, use a flax egg (1 tablespoon ground flaxseed combined with 3 tablespoons water).
- 1 cup seasoned breadcrumbs: Store-bought is great, but if you’re feeling adventurous, make your own by blending stale bread with your favorite spices!
- ½ teaspoon garlic powder (optional): Adds a lovely kick! Feel free to skip it if you’re not into garlic.
- ½ teaspoon Italian seasoning (optional): This will elevate the flavor profile. Experiment with your favorite herbs!
- Vegetable oil (for frying): Canola or peanut oil work great. You can air-fry for a healthier version!
Step-by-Step Instructions
Ready to get cheesy? Let’s go! Here’s how to make those irresistible mozzarella sticks step by step:
-
Prep Your Stations: First, set up an assembly line for easy coating. Place the flour in one bowl, the beaten eggs in another, and the breadcrumbs mixed with garlic powder and Italian seasoning in a third bowl. Trust me, this prep will save you time and sticky fingers later!
-
Cut the Cheese: If you’re using a block of mozzarella, cut it into sticks about 3 to 4 inches long. If you’re using string cheese, just unwrap those bad boys!
-
Coat the Sticks: Now for the fun part—dipping! Start by coating each mozzarella stick in flour, shaking off any excess. Then, dip it into the beaten eggs, ensuring it’s fully coated. Finally, roll it in the breadcrumb mixture. I like to press the breadcrumbs onto the cheese to ensure they stick well.
-
Double-Dip (Optional): For an extra crispy result, you can repeat the egg and breadcrumb steps. This double coating will give your cheese sticks that extra crunch you crave!
-
Chill for a Bit: Before frying, lay the coated cheese sticks on a plate and pop them into the freezer for about 15-20 minutes. This step helps to firm up the cheese and prevents it from melting too quickly during frying.
-
Heat the Oil: In a large skillet, pour enough vegetable oil to cover the bottom, about ½ inch deep. Heat the oil over medium-high until hot, but not smoking. You can test if it’s ready by dropping a breadcrumb in—if it sizzles, you’re good to go!
-
Fry ‘Em Up: Carefully place a few cheese sticks in the hot oil, making sure not to overcrowd the pan. Fry them for 1-2 minutes on each side or until golden brown. Use tongs or a slotted spoon to turn them and drain the excess oil on paper towels once they’re done.
-
Repeat: Continue frying the rest of the cheese sticks, adjusting the heat as necessary to keep the oil at the right temperature.
-
Serve: While they’re still hot, serve your gooey mozzarella sticks immediately with marinara sauce or your favorite dipping sauce. You’ll want to savor every cheesy bite!
Serving Suggestions
Presentation matters, folks! To make your mozzarella cheese sticks even more appetizing, consider serving them on a beautiful wooden platter or a colorful plate with a small bowl of warm marinara sauce on the side. You could sprinkle some fresh parsley or basil on top for a pop of color and freshness.
For a fun game day snack, pair these cheesy wonders with a side of spicy ranch or even sriracha for those who like a bit of heat. They’re also fabulous served alongside a crisp salad for balance. Just grab a toothpick and let your guests dip away!
Recipe Variations
Feeling adventurous? Here are a few creative twists you can try with your mozzarella cheese sticks:
-
Bacon-Wrapped: Wrap each cheese stick with a slice of bacon before frying for a smoky, meaty flavor. Just be aware that they’re even more indulgent—perfect for a party!
-
Spicy Jalapeño: Add finely chopped jalapeños to your breadcrumb mixture for an extra kick. You can also serve with chipotle or spicy marinara for an added heat boost!
-
Herb Crust: Instead of traditional breadcrumbs, try using crushed herbs or even a mixture of crushed tortilla chips for a unique flavor.
-
Cheese Mix: For a fun twist, use different types of cheese like pepper jack, cheddar, or Gouda along with mozzarella to create a gooey, flavorful combination.
-
Air Frying: For a healthier alternative, you can air fry your cheese sticks. Just spray the sticks lightly with olive oil and cook according to your air fryer’s instructions.
Chef’s Notes
Oh, where do I begin? This recipe has been a staple in my kitchen for years. Fun fact: the first time I attempted cheese sticks in my adult life, I was wearing a white shirt. Spoiler alert: it didn’t end well! Ever since that day, I’ve learned to wear an apron and embrace the culinary chaos.
The great thing is that this recipe has evolved over time. When I started, I strictly followed a standard breadcrumb coating; now, I experiment with flavors and ingredients. It’s all about what feels good to you. Remember, the best kitchen stories come from trying new things, whether they result in success or, let’s say, “character-building” experiences!
FAQs and Troubleshooting
-
Why did my cheese sticks burst open while frying?
- This can happen if the oil is too hot or if they weren’t chilled long enough. Try chilling them longer and adjusting the heat!
-
Can I bake these instead of frying?
- Absolutely! Preheat your oven to 400°F (200°C) and place the cheese sticks on a baking sheet lined with parchment. Spray with cooking oil and bake for about 15 minutes or until golden. They might not be as gooey but still delicious!
-
How can I make sure they stay crispy?
- Serve immediately after frying. If you have leftovers, pop them into the oven to crisp them up again instead of the microwave.
-
Can I freeze the cheese sticks?
- Yes! Before frying, freeze them. Once they’re firm, you can store them in a zip-top bag. When you’re ready to enjoy, fry them straight from the freezer—just add a minute or two to the fry time.
Nutritional Info
While comfort food isn’t always synonymous with health food, I believe in balance. Each cheese stick contains about 150 calories, with 10g of fat and 8g of protein. Rich in cheesy goodness and always a crowd-pleaser, these treats fit into an occasional indulgence. For a lighter version, opt to bake or air-fry, and serve with plenty of veggies for balance!
Final Thoughts
Mozzarella cheese sticks are more than just a snack—they’re a piece of nostalgia, a source of joy, and the ultimate party pleaser. With this recipe, you’ll never again have to settle for mediocre frozen varieties when you can whip up a homemade batch in no time. So, roll up those sleeves, channel your inner kid in the kitchen, and let your taste buds revel in the gooey magic of mozzarella.
I can’t wait to see how you put your spin on this recipe! Tag your photos and share your cheesy adventures with me. Happy cooking, and remember: there are no mistakes in the kitchen, just opportunities for deliciousness! 🍽️🧀
Print
Irresistible Mozzarella Cheese Sticks
- Total Time: 25 minutes
- Yield: 4 servings 1x
- Diet: Vegetarian
Description
Delightful, gooey, and golden mozzarella cheese sticks, perfect for parties or movie nights.
Ingredients
- 12 ounces mozzarella cheese, cut into sticks
- 1 cup all-purpose flour
- 2 large eggs, beaten
- 1 cup seasoned breadcrumbs
- ½ teaspoon garlic powder (optional)
- ½ teaspoon Italian seasoning (optional)
- Vegetable oil (for frying)
Instructions
- Prep your stations by setting up bowls of flour, beaten eggs, and breadcrumb mixture.
- Cut the mozzarella into sticks if using a block.
- Coat each stick in flour, dip in eggs, and roll in breadcrumbs.
- Double-Dip for a crispier result (optional).
- Chill the coated sticks in the freezer for 15-20 minutes.
- Heat vegetable oil in a skillet over medium-high heat.
- Fry the sticks for 1-2 minutes on each side until golden brown.
- Repeat with the remaining sticks.
- Serve immediately with marinara sauce.
Notes
For a healthier option, consider air-frying the cheese sticks.
- Prep Time: 15 minutes
- Cook Time: 10 minutes
- Category: Snack
- Method: Frying
- Cuisine: Italian
Nutrition
- Serving Size: 1 serving
- Calories: 150
- Sugar: 1g
- Sodium: 300mg
- Fat: 10g
- Saturated Fat: 4g
- Unsaturated Fat: 5g
- Trans Fat: 0g
- Carbohydrates: 10g
- Fiber: 1g
- Protein: 8g
- Cholesterol: 70mg
Keywords: mozzarella, cheese sticks, snack, party food, baking

Irresistible Easy Grilled Cheese Burrito You’ll Crave Again
Irresistible Easy Grilled Cheese Burrito You’ll Crave Again
Hey there, food lovers! It’s your pal Beau Collier, and I’m beyond excited to share one of my all-time favorite comfort food concoctions with you today – the Easy Grilled Cheese Burrito! Now, I know what you’re thinking: “What’s so special about a burrito?” Well, my foodie friends, this isn’t just any burrito; it’s a delicious melty masterpiece that wraps up all the goodness of grilled cheese with a taco twist!
Imagine biting into a warm, crispy tortilla that gives way to savory ground beef (or turkey… we’ll talk about options later) swaddled in ooey-gooey nacho cheese sauce, crowned with creamy sour cream, and topped with a decadent mix of cheddar and mozzarella. It’s the kind of dish that makes your taste buds do a happy little dance and your soul feel warm and fuzzy. Perfect for lazy weekends, quick dinners, or impromptu parties, it checks all the boxes for feel-good food.
The greatest part? You don’t need to be a culinary genius to whip this up! In fact, even if you just found your spatula after burying it under takeout menus and snack wrappers, don’t fret – this recipe is smooth sailing. So grab those ingredients and let’s dive deep into this scrumptious, cheesy adventure!
Personal Story
I still remember the first time I created this lovely burrito. It was a crisp fall weekend, and I found myself craving all the things that remind me of home—cozy blankets, the glowing warmth of a fireplace, and, of course, a mouthwatering meal. So, I rummaged through my pantry and fridge like a modern-day treasure hunter. I came across some leftover ground beef, a half-eaten block of cheddar, and those old tortillas in the back of my cupboard that needed a little love.
What started as a “let’s empty out the fridge” moment transformed into a delightful memory filled with laughter and flavor. My friends and I gathered around the stove, sipping our favorite drinks and playing DJ while I grilled these beauties up. Each bite led to oohs and aahs, and we ended up dubbing them the Grilled Cheese Burrito Extravaganza. It’s one of those cherished moments that reminds me of the joy food can bring, and I hope to replicate that joy in your kitchen!
Ingredients
Here’s what you’ll need to create your own Easy Grilled Cheese Burrito:
-
1 pound Ground Beef (or Turkey/Plant-based Meat)
- This is the heart of our burrito! Ground beef gives a rich flavor, but feel free to swap in ground turkey for a leaner option or plant-based meat for a vegetarian delight!
-
1 packet Taco Seasoning
- Spice it up! You can use store-bought or make your own with chili powder, cumin, garlic powder, and a pinch of salt for those who like it fresh and homemade.
-
2 cups Cooked White Rice
- Adds volume and texture. Brown rice or quinoa are great swaps if you’re looking for a nuttier flavor or extra health benefits!
-
1 cup Sour Cream (or Greek Yogurt/Dairy-Free Alternatives)
- The creaminess factor! Regular sour cream is lovely, but yogurt gives a tangy zip, and there are many great dairy-free yogurts if you prefer.
-
1 cup Nacho Cheese Sauce
- Go for the classic, or whip up homemade cheese sauce for a special touch. Vegan cheese sauce is an excellent choice for our plant-based friends!
-
1 cup Shredded Cheddar Cheese
- Adds that cheesy goodness! Feel free to mix in mozzarella or a Mexican blend to amp up the flavors.
-
1 cup Shredded Mozzarella Cheese (optional)
- More cheese equals more fun! If you’re watching your dairy intake, you can skip this or use a lower-fat cheese.
-
1 tablespoon Chipotle Sauce
- Adds a nice kick! Adjust according to your spice level—just a hint creates a fabulous smoky flavor.
-
4 large Flour Tortillas
- The ultimate wrap! Whole wheat tortillas are healthier, and gluten-free tortillas work perfectly too.
-
2 tablespoons Butter or Oil
- To grill those burritos to crispy perfection! Olive oil is a lovely substitute if you’re aiming for a healthier option.
Step-by-Step Instructions
Alrighty, let’s get cooking! Grab your apron (or that comfy shirt—no judgment here!), and let’s embark on this cheesy journey!
-
Cook the Ground Beef:
- Heat a large skillet over medium heat and add the ground beef. Cook until browned, breaking it apart with a spatula. It should take about 7–10 minutes. Chef tip: Drain the fat if you’re using beef to keep things from getting too greasy!
-
Season the Beef:
- Once the beef is cooked, sprinkle the taco seasoning over it. Pour in a splash of water if needed to help distribute those spices. Stir until everything is well coated. Let it simmer for a couple of minutes to let those flavors meld! Want a kick? Toss in some diced jalapeños or a pinch of cayenne pepper.
-
Mix with Rice:
- Remove your skillet from heat and fold in the cooked rice until well mixed. That rice gives a lovely fluffy texture and stretches those tasty ground flavors!
-
Prepare the Tortillas:
- On a clean countertop or cutting board, lay out your tortilla. Scoop about a generous half cup of the beef-rice mixture towards the center. Drizzle over the nacho cheese sauce, and add a dollop of sour cream. Don’t be stingy with the toppings!
-
Add the Cheeses:
- Sprinkle some shredded cheddar and mozzarella on top of the filling. Chef hack: Use pre-shredded cheeses for convenience or, if you’ve got time, shred your own for fresher flavors!
-
Roll ‘Em Up:
- Fold in the sides of the tortilla first, then roll it from the edge closest to you diagonally over the filling until you have a nice tight burrito. Protip: Make sure it’s snug, so nothing spills out while grilling!
-
Grill Time:
- In the same skillet or a griddle over medium heat, melt butter (or drizzle olive oil). Place the burrito seam side down and toast for about 3-4 minutes on each side until golden brown and crispy. Keep an eye on it! You want it to get that golden color without burning.
-
Slice and Serve:
- After that perfect crispiness is achieved, remove it from the skillet and slice it in half. The melty insides will ooze just a bit—yum! Let it cool for a moment before serving, but you’ll want to dive right in!
Serving Suggestions
Time to make it look as good as it tastes! Here’s how to plate your Easy Grilled Cheese Burrito:
-
Simple Plating: Place the halved burrito on a rustic wooden board or a colorful plate. You can add a drizzle of additional nacho cheese or a spoonful of sour cream on the side. A sprinkle of chopped cilantro or green onions for a fresh pop always looks gourmet!
-
Add Sides: Consider serving with a fresh side of guacamole or salsa for dipping. You want those vibrant colors and flavors to make everyone drool!
-
Garnish: If you’re feeling fancy, throw on some sliced jalapeños or a sprinkle of chili flakes for an extra sprinkle of flair. Your guests (or family!) will think you’re a culinary rock star!
Recipe Variations
Let’s keep things interesting! Here are a few creative twists and variations to try with your Easy Grilled Cheese Burrito:
-
Veggie Delight: Swap the ground beef for sautéed mushrooms, bell peppers, and black beans. Add some fresh spinach for a vibrant, healthy take!
-
Tex-Mex Spanish Fusion: Add some zesty chili con carne sauce instead of regular taco seasoning. Pair it with a Spanish rice mix instead of white rice for a fiesta in your mouth!
-
Buffalo Chicken Twist: Swap in shredded cooked chicken tossed in buffalo sauce and a sprinkle of blue cheese for a spicy kick! Pair it with a side of ranch dressing for dipping.
-
Breakfast Burrito: Add scrambled eggs and sautéed onions for a hearty breakfast option! Throw in some crispy bacon for extra flavor or chorizo for a Mexican twist.
-
Loaded Vegan: Use jackfruit or lentils as the protein base, and switch out all dairy ingredients for a vegan alternative. Top with avocado slices for healthy fats!
Chef’s Notes
Every kitchen has its adventures, and this recipe has evolved over time in my kitchen! I remember one particularly chaotic evening when I decided to get creative and accidentally added too much chipotle sauce. The result? A delicious smoky mess so good that my friends still ask for the ‘spicy version’ whenever they see me. Laughter was certainly the ingredient of the night!
Food should never be intimidating—it should be an adventure! So, feel free to take risks with this dish. Remember, the kitchen is your playground!
FAQs and Troubleshooting
Q: Why is my burrito falling apart?
- A: It could be a few factors! Make sure to roll it tightly and don’t overfill it. If the tortilla is too dry, it might crack, so warm them gently before adding the filling.
Q: Can I freeze these burritos?
- A: Absolutely! Wrap them tightly in foil or plastic wrap and freeze. When you’re ready to enjoy, just pop them in the oven at 375°F (190°C) for about 25 minutes, and they’ll be all warmed up!
Q: What is the best way to reheat leftovers?
- A: Try reheating in a skillet to maintain that crispness or the oven instead of the microwave. You want that cheesy goodness to stay melty without getting soggy!
Q: How can I make this dish vegetarian or vegan?
- A: Use plant-based ground meat, skip the cheese or choose vegan varieties, and switch out the sour cream for plant-based yogurt! Substitute the butter with olive oil, and you’re golden!
Nutritional Info
Let’s talk numbers! Each burrito (assuming you’re using ground beef and traditional ingredients) will range around:
- Calories: Approximately 525–575 calories
- Protein: 30–35 grams (depending on the meat)
- Fats: 25–30 grams
- Carbohydrates: 45–50 grams
Note: Adjustments based on swaps, such as using turkey or plant-based meat, will change nutritional values significantly for the better!
Final Thoughts
And there you have it—the Irresistible Easy Grilled Cheese Burrito that’s sure to become a staple in your home! Cooking is an expression, and combining ingredients doesn’t have to be about rigidity; it’s about joy, exploration, and bringing people together. Whether you’re sharing this with friends or enjoying it solo during a Netflix binge, it’s the kind of meal that fills not just your stomach but your heart as well.
So, don’t wait any longer—grab those ingredients, get into the kitchen, and whip up this delightful burrito. Remember, food is about community, laughter, and love—and with this dish, you’re sure to leave everyone craving for more! Happy cooking, my friends—let’s make some kitchen magic!
Print
Easy Grilled Cheese Burrito
- Total Time: 35 minutes
- Yield: 4 servings 1x
- Diet: Vegetarian
Description
A delicious melty masterpiece combining grilled cheese and burrito goodness, featuring ground beef or turkey and ooey-gooey cheese.
Ingredients
- 1 pound Ground Beef (or Turkey/Plant-based Meat)
- 1 packet Taco Seasoning
- 2 cups Cooked White Rice
- 1 cup Sour Cream (or Greek Yogurt/Dairy-Free Alternatives)
- 1 cup Nacho Cheese Sauce
- 1 cup Shredded Cheddar Cheese
- 1 cup Shredded Mozzarella Cheese (optional)
- 1 tablespoon Chipotle Sauce
- 4 large Flour Tortillas
- 2 tablespoons Butter or Oil
Instructions
- Heat a large skillet over medium heat and add the ground beef. Cook until browned, breaking it apart with a spatula for about 7–10 minutes.
- Sprinkle the taco seasoning over the cooked beef and stir until well coated. Let it simmer for a couple of minutes.
- Remove your skillet from heat and fold in the cooked rice until well mixed.
- Lay out your tortilla and scoop about half a cup of the beef-rice mixture towards the center.
- Drizzle over the nacho cheese sauce and add a dollop of sour cream.
- Sprinkle some shredded cheddar and mozzarella on top of the filling.
- Fold in the sides of the tortilla first, then roll it from the edge closest to you diagonally over the filling.
- Melt butter (or drizzle olive oil) in the same skillet and place the burrito seam side down. Toast for about 3-4 minutes on each side until golden brown.
- Remove from the skillet and slice it in half to reveal the melty insides.
Notes
Feel free to experiment with different fillings or swap the ground beef for plant-based options for a healthier or vegetarian delight.
- Prep Time: 15 minutes
- Cook Time: 20 minutes
- Category: Main Course
- Method: Grilling
- Cuisine: Mexican
Nutrition
- Serving Size: 1 burrito
- Calories: 550
- Sugar: 3g
- Sodium: 600mg
- Fat: 30g
- Saturated Fat: 15g
- Unsaturated Fat: 10g
- Trans Fat: 0g
- Carbohydrates: 45g
- Fiber: 3g
- Protein: 35g
- Cholesterol: 80mg
Keywords: grilled cheese, burrito, comfort food, easy recipe, quick dinner, beef burrito
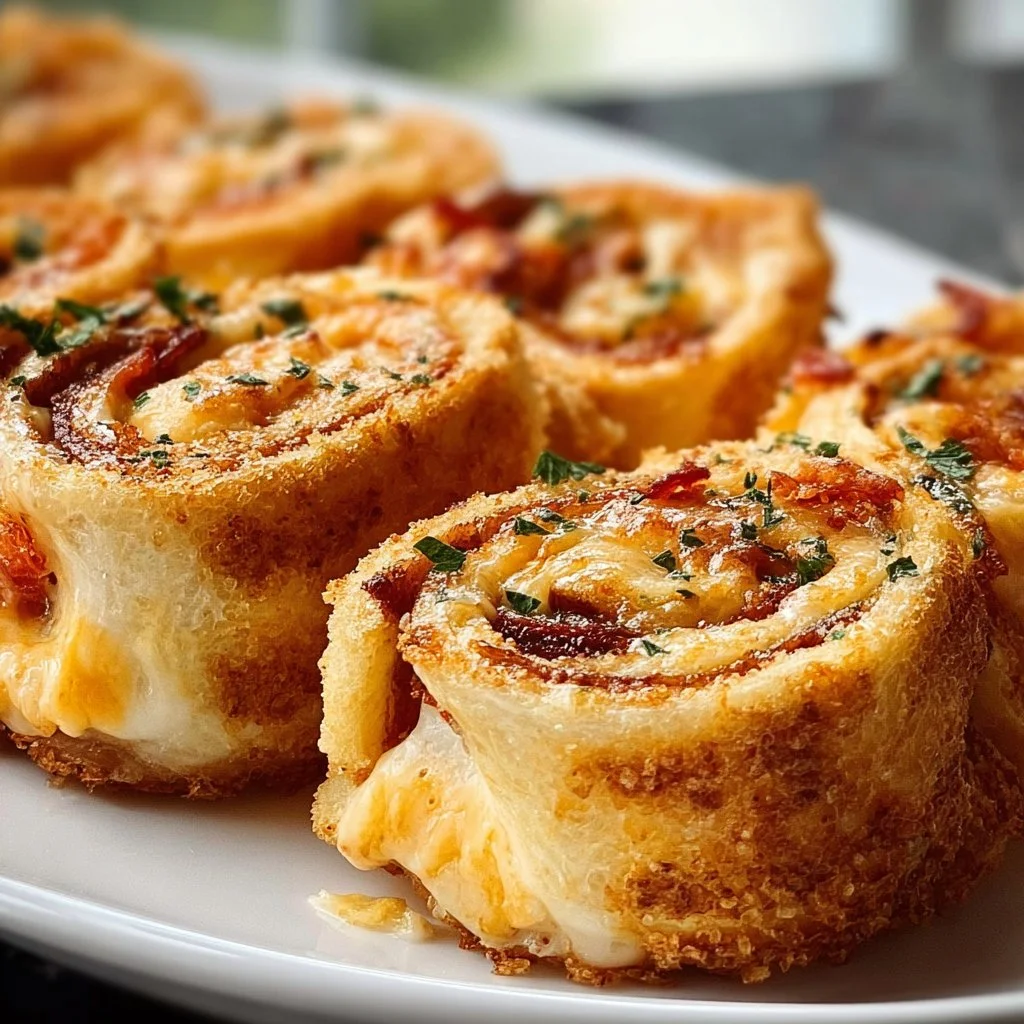
Crispy Cheesy Roll Ups
Crispy Cheesy Roll Ups: A Culinary Adventure You’ll Love
Hey there, fellow foodies! I’m Beau Collier, your guide to a deliciously fun journey in the kitchen, where I share my love for all things cozy and comforting. Today, we’re diving into a recipe that will instantly transport you back to simpler times: Crispy Cheesy Roll Ups! Imagine sinking your teeth into golden brown morsels packed with gooey, melty cheese, paired beautifully with a warm bowl of tomato soup or marinara sauce for dipping. It’s pure joy on a plate!
There’s something so nostalgic about crunchy, cheesy snacks. They evoke memories of childhood lunches and rainy days spent inside, huddling around the table with friends. And let me tell you, these crispy delights are not just for kids—they’re pure happiness for adults, too! Simple to make, yet endlessly satisfying, this recipe is bound to become a go-to in your kitchen repertoire.
In today’s post, I’ll guide you through the entire process of crafting these delicious roll-ups, sharing personal stories and tips along the way. Whether you’re hosting a casual get-together or just treating yourself to a cozy night in, this dish is sure to impress. So grab your apron and let’s get cooking together!
Personal Story
Growing up, my kitchen was bustling with laughter and the tempting aroma of my mom’s cooking. One of my favorite memories was when she would whip up these crispy cheesy roll-ups for us after school. With my siblings and I coming home famished and ready for a treat, the sight of those little golden rolls sizzling in the skillet was pure magic.
I remember sitting at the kitchen counter, devouring them while they were still steaming hot, dipping them into rich tomato soup. It felt like a hug in every bite, the kind of comfort you can only find in food made from the heart. As I grew older and started experimenting in my own kitchen, these roll-ups became my go-to treat for friends and family gatherings. With every crunch and cheesy pull, I was reminded of those warm, fuzzy moments shared around the table with my loved ones.
Now, as I share this recipe with all of you, I hope to inspire similar moments of joy and togetherness in your own kitchens.
Ingredients
Here’s what you’ll need to make these delicious Crispy Cheesy Roll Ups. Don’t worry, each ingredient is simple, and I’ve included some tips for making the most of them:
-
Bread (sliced, preferably white or whole wheat)
The base of our roll-ups! White bread gives a classic texture, while whole wheat adds a nutty flavor. You can also try sourdough for an extra tart twist. If gluten-free is your thing, any gluten-free bread will do. -
Cheese (your choice, such as cheddar or mozzarella)
The star of the show! Cheddar gives a sharp, tangy flavor, while mozzarella melts to perfection for that gooey goodness. Feel free to mix and match! Pepper Jack offers a nice kick if you’re feeling adventurous! -
Butter (for grilling)
Butter adds richness and ensures that your roll-ups get that golden-brown crust. If you’re looking for a healthier alternative, olive oil works wonderfully, too! -
Tomato soup or marinara sauce (for dipping)
A flavorful sidekick! You can use store-bought or homemade sauces. For something different, try a spicy salsa or even a creamy ranch for dipping, if you’re feeling cheeky!
Step-by-Step Instructions
Ready to bring these cheesy dreams to life? Let’s get cooking! Follow these steps:
-
Prepare Your Ingredients:
Start by gathering all your ingredients and laying them out on your kitchen counter. This makes the process feel seamless and fun. You’ll thank yourself later for having everything in one place! -
Flatten the Bread:
Using a rolling pin, gently flatten each slice of bread. This step helps ensure that you can roll them up easily and that they cook evenly. If you’re feeling fancy, you could even use a wine bottle if no rolling pin is around! -
Add the Cheese:
Place a slice or a handful of your chosen cheese onto each flattened piece of bread. Don’t be shy! The more cheese, the better! You want it to be generous enough that it melts and oozes out when you bite into it. -
Roll It Up:
Carefully roll the bread from one end to the other, making sure the cheese is encased snugly inside. You can secure the roll with a toothpick; it helps keep everything together while you cook. -
Butter Up:
In a small bowl, mix melted butter (or olive oil) with a pinch of salt. Brush this mixture over your roll-ups for that golden crunch. -
Pan-Fry:
Heat a skillet over medium heat. Once hot, place your roll-ups (with the seam side down) in the pan. Cook for about 3-4 minutes per side, or until they reach that beautiful golden brown and are crispy. Keep an eye on them; you want them to be crispy but not burnt. Flip them with care! -
Serve and Enjoy:
Once it’s done, place them on a paper towel to absorb any excess butter. Serve them hot with your dipping sauce on the side. Enjoy the oohs and aahs as you present these crispy delights to your friends and family!
Serving Suggestions
Presentation is key! To elevate your serving game, arrange the crispy cheesy roll-ups on a large platter, artfully drizzling the tomato soup or marinara sauce in a small bowl in the center. You can also sprinkle some fresh herbs—like basil or parsley—over the top for a pop of color and added flavor. For extra flair, consider garnishing your dish with a bowl of mixed olives or a side salad for freshness. Trust me, a little garnish goes a long way!
Recipe Variations
Here are some fun twists you can try to shake up the classic recipe:
-
Vegetable Lovers:
Add finely chopped veggies like spinach, bell peppers, or mushrooms inside the roll-ups for added texture and flavor. -
Meat it Up:
Toss in some ham or pepperoni slices for a heartier option. These savory goodies pair beautifully with melted cheese! -
Herb Infusion:
Experiment with different herbs! Try mixing some Italian seasoning or garlic powder into your butter for a fragrant surprise with every bite. -
Spicy Crunch:
For a little heat, add some sliced jalapeños or crushed red pepper flakes into the cheese mix before rolling it up. -
Sweet Surprise:
For a sweet twist, use cream cheese as your base with a sprinkle of cinnamon sugar and serve with a side of warm chocolate sauce for dipping!
Chef’s Notes
These roll-ups are endlessly adaptable, which is one of the things I love most about them! They’ve come a long way from my mom’s classic version—with every tweak, I’ve learned something new. From using different breads to experimenting with cheese types, the possibilities are as exciting as a new recipe book. Remember to have fun in the kitchen, and don’t stress if they don’t turn out picture-perfect. It’s all about good times and good eats!
FAQs and Troubleshooting
-
What if my roll-ups are falling apart?
If your roll-ups are unraveling, make sure to secure them with toothpicks before frying, or you can use a bit of cheese to seal the edges. -
Can I make these in advance?
Yes! You can assemble them ahead of time, store them in the fridge, and fry them just before serving. Just be mindful that they’ll need slightly longer in the skillet. -
How do I know when they are done cooking?
Keep an eye on that golden-brown color. Generally, about 3-4 minutes on each side should do the trick, but don’t hesitate to cut one open to check for gooeyness! -
What cheese is the best for this recipe?
That really depends on your preference, but mozzarella is fantastic for its meltability! Cheddar adds a lovely flavor, so I’d say mix and match according to what you have on hand!
Nutritional Info
Here’s a quick breakdown of what you can expect in one serving of the classic Crispy Cheesy Roll Up (with cheese and bread):
- Calories: Around 200-250, depending on the cheese you choose.
- Fat: 10-15g (mostly from butter & cheese)
- Protein: 8-10g
- Carbohydrates: 25-30g
- Fiber: 1-2g
Remember, these numbers can fluctuate based on your ingredient choices and portion sizes. Feel free to modify the recipe to fit your dietary needs!
Final Thoughts
I hope you’re feeling as excited as I am to whip up these Crispy Cheesy Roll Ups. They’re perfect for a cozy night in or as a crowd-pleasing appetizer at your next get-together. Remember, it’s about more than just food; it’s about sharing wonderful moments with friends and family.
So gather your loved ones, thank the good old days for inspiring us, and enjoy the joy of cooking and eating together. I can’t wait to hear how yours turn out! Share your stories and variations, and always remember—around here, food is love, laughter, and warm hugs. Happy cooking, and let’s dig in!
Print
Crispy Cheesy Roll Ups
- Total Time: 30 minutes
- Yield: 2 servings 1x
- Diet: Vegetarian
Description
Delicious, crispy roll-ups filled with gooey, melty cheese, perfect for dipping in tomato soup or marinara.
Ingredients
- 4 slices of bread (white or whole wheat)
- 1 cup cheese (cheddar or mozzarella)
- 2 tablespoons butter (for grilling)
- 1 cup tomato soup or marinara sauce (for dipping)
Instructions
- Prepare your ingredients by gathering everything on your kitchen counter.
- Flatten each slice of bread using a rolling pin.
- Add a slice or handful of cheese to each piece of flattened bread.
- Roll the bread tightly, enclosing the cheese securely inside.
- Butter the roll-ups with melted butter or olive oil mixed with salt.
- Pan-Fry in a skillet over medium heat for 3-4 minutes on each side until golden brown and crispy.
- Serve hot with your dipping sauce and enjoy!
Notes
These roll-ups are adaptable; try adding vegetables or different cheeses for variety.
- Prep Time: 15 minutes
- Cook Time: 15 minutes
- Category: Appetizer
- Method: Pan-Frying
- Cuisine: American
Nutrition
- Serving Size: 1 serving
- Calories: 250
- Sugar: 2g
- Sodium: 300mg
- Fat: 15g
- Saturated Fat: 7g
- Unsaturated Fat: 8g
- Trans Fat: 0g
- Carbohydrates: 30g
- Fiber: 2g
- Protein: 10g
- Cholesterol: 30mg
Keywords: cheese roll-ups, crispy snacks, comfort food, easy appetizer, childhood recipe
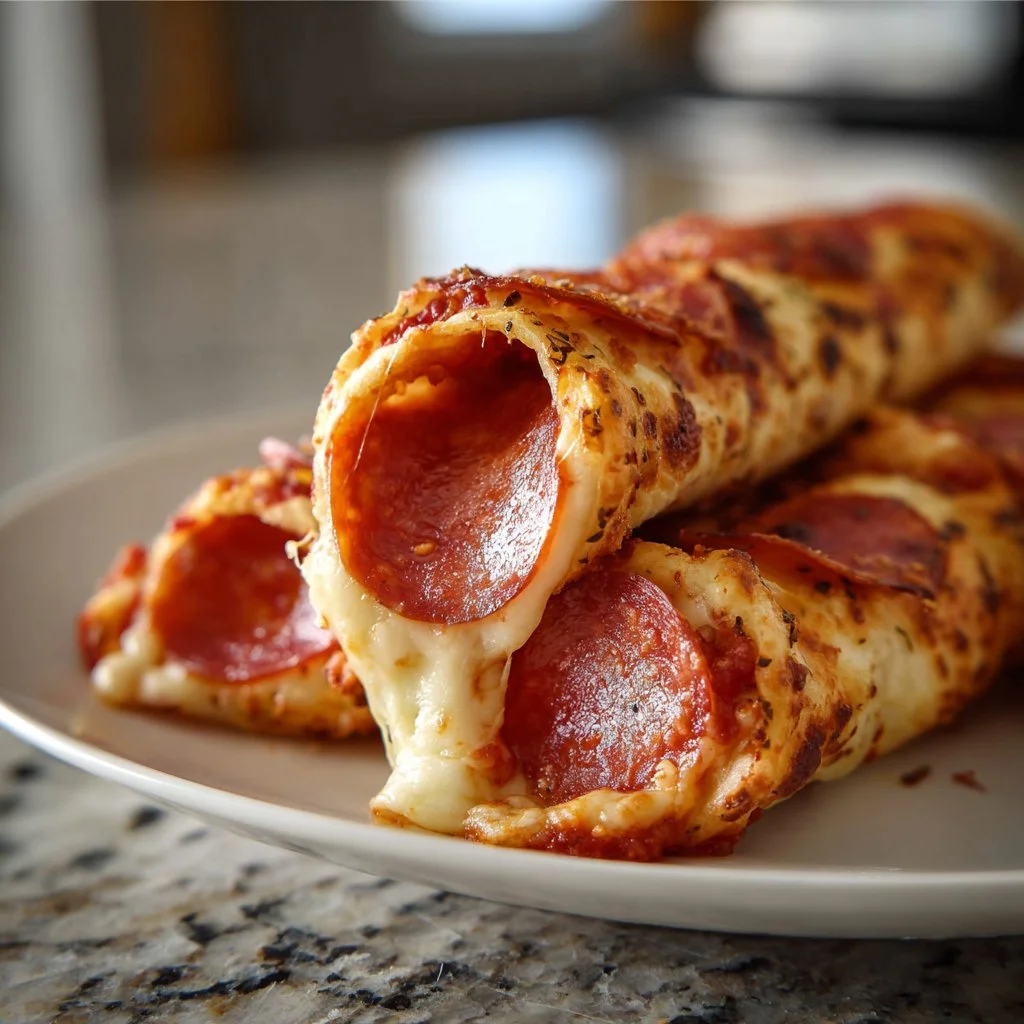
Cheesy Pepperoni Pizza Roll Ups
Cheesy Pepperoni Pizza Roll Ups: A Slice of Comfort
Hey there, food lovers! Welcome back to Feastical, where we whip up tasty creations that feel like home on a plate. If you’re anything like me, there’s nothing quite like a cheesy slice of pizza to lift your spirits. But what if I told you that you could take that beloved flavor and roll it up into something even more fun? That’s right! Today, we’re diving into the world of Cheesy Pepperoni Pizza Roll Ups — a dish that’s not only satisfying but also super easy to make!
Picture this: You’re back in your childhood kitchen, and the scent of warm dough and bubbling cheese fills the air. You can almost hear the excitement of your friends as they gather around, ready to devour whatever deliciousness is coming out of the oven. This recipe transforms the classic pizza experience into a handheld delight that’s perfect for snacking, parties, or just a cozy night in.
Whether you’re hosting game night, preparing a quick after-school treat for the kiddos, or just craving something ooey-gooey, these pizza roll ups fit the bill. They’re loaded with all your favorite pizza toppings, rolled up in a warm, soft tortilla, and baked until golden. It’s comfort food at its best — no fancy equipment needed! So, grab your apron and let’s roll with it.
Personal Story
Let me take you back to a Friday night in my childhood home. Every week, it was a tradition for my family to make homemade pizza. We’d gather in the kitchen, flour dusting the countertops, where my sisters and I would turn the preparation into a competition. I vividly remember one particular night when mom decided to try something fun and new: pizza roll ups! Instead of building pizza on a crust, we rolled all our favorite toppings into tortillas.
As we laughed and tossed cheese and pepperoni around, I could never figure out my spectacularly messy technique. But you know what? It didn’t matter. What mattered was the shared joy, the laughter, and of course, the delicious aroma wafting through the house. Those roll-ups were devoured in less than five minutes. I swear my dad’s plate was a science experiment on how fast we could eat!
That special memory stayed with me, and it’s why I love bringing these Cheesy Pepperoni Pizza Roll Ups to my kitchen today. They’re not just a recipe; they’re a nostalgic treat that connects to family and friendship. So, let’s make some new memories together as we dive into this cheesy goodness!
Ingredients
Here’s what you need for these Cheesy Pepperoni Pizza Roll Ups:
-
Low Carb Tortillas
These are the magic base for our roll ups! Perfect for those watching their carbs, they’re sturdy yet pliable. If you’re not low carb, any tortilla will work — grab a flour or corn one instead. -
Mozzarella Cheese
The superstar of our filling! Its melty, gooey texture is perfect for any pizza-inspired dish. If you prefer something stronger, you can mix in some provolone or even a bit of cheddar for a flavor twist. -
Pepperoni Slices
Traditional Italian goodness. For a healthier option, try turkey or chicken pepperoni. You can also replace the pepperoni with veggies for a delicious vegetarian version. -
Pizza Sauce
This will keep everything moist plus lead to a burst of flavor in every bite! Don’t have any store-bought? You can easily whip up a homemade version with crushed tomatoes, garlic, oregano, and a touch of sugar. -
Olive Oil
Just a drizzle to brush on top for a crispy finish. You can substitute with butter or even avocado oil for different flavor profiles. -
Italian Seasoning
This adds that classic pizza flavor we all love! If you don’t have it on hand, a mix of oregano and basil will do the trick just fine.
Step-by-Step Instructions
Now that we’ve gathered our ingredients, it’s time to get rolling! Let’s make these savory little bundles together.
Step 1: Preheat Your Oven
First up, we want to warm up that oven! Preheat it to 375°F (190°C). While it’s heating, you can get all your ingredients laid out. A hot oven ensures that our roll-ups get that gorgeous, crispy finish.
Step 2: Prep Your Tortillas
Grab a large tortilla and lay it flat on a clean surface. This is your canvas, so make sure it’s free of cracks or tears. If your tortillas feel stiff, warm them in a microwave for about 15-20 seconds to make them more pliable.
Step 3: Spread the Sauce
Spoon some pizza sauce onto the tortilla — be generous, but don’t go overboard, or your roll-ups will become a bit too squishy. Aim for about 2 tablespoons. Spread it evenly, leaving about an inch from the edges so you can easily roll them up.
Step 4: Add Cheese and Pepperoni
Sprinkle a generous amount of mozzarella over the sauce, then let your creativity run wild with the pepperoni. I recommend 6-8 slices, but hey — no judgment here if you sneak in a few more!
Step 5: Roll It Up
Now, it’s time to roll! Start at one end and gently but firmly roll the tortilla over the filling, tucking in the sides as you go. This keeps everything delicious contained within. Aim for a tight roll without squishing the goodies inside!
Step 6: Brush with Olive Oil
Place the seam side down on a parchment-lined baking sheet. Drizzle a little olive oil on top and sprinkle some Italian seasoning for that flavorful kick. This will help achieve that golden hue while baking!
Step 7: Bake
Pop those beauties in your preheated oven and bake for about 15-20 minutes or until golden brown. Make sure to check on them halfway through to see how they’re doing. What you’re looking for is that delicious crunchy outer layer.
Step 8: Cool, Slice, & Serve
Once they’ve hit that golden mark, remove them from the oven (careful, they’ll be hot!). Allow them to cool for about 5 minutes before slicing them into bite-sized pieces. Trust me, the anticipation makes them taste even better!
Serving Suggestions
To serve these Cheesy Pepperoni Pizza Roll Ups, I recommend plating them in a fun, family-style fashion. Cut them into smaller sections and arrange them on a nice platter for everyone to dive into. Pair them with a small bowl of warm pizza sauce on the side for dipping. Not only does that add an extra kick, but it’s also just fun to dip!
For added flair, you could sprinkle some fresh basil or parsley on top for a pop of color. If you want to get fancy and add a vibrant salad on the side, a simple arugula and cherry tomato salad would be a fresh companion.
Recipe Variations
Let’s mix things up a bit! Here are a few creative twists on the classic recipe:
-
Veggie Pizza Roll Ups
Swap out the pepperoni for your favorite veggies! Bell peppers, mushrooms, and spinach make a delightful combination. -
Buffalo Chicken Roll Ups
Replace the pepperoni with shredded buffalo chicken and drizzle with blue cheese dressing before rolling for a spicy kick! -
BBQ Chicken Roll Ups
Use BBQ sauce instead of pizza sauce, and fill with shredded cooked chicken and cheese for a fun BBQ twist. -
Caprese Roll Ups
Skip the sauce and instead layer fresh mozzarella, tomatoes, and basil for a fresh Italian twist. -
Breakfast Pizza Roll Ups
Add scrambled eggs, cheese, and cooked sausage or bacon for a comforting breakfast treat.
Chef’s Notes
What I love most about this recipe is its versatility. You can really throw in anything you have lying around — leftover chicken, extra veggies, or even different types of cheese. It’s fun to experiment!
I once hosted a pizza roll-up night where each person created their own version, and it ended up being a fantastic way to bond with friends. Laughter, competition, and a bit of culinary chaos filled the kitchen. This recipe truly leaves room for creativity and conversation, making it a wonderful dish for gatherings.
FAQs and Troubleshooting
Q1: My roll ups fell apart when I cut them. What did I do wrong?
This usually happens when they haven’t been rolled tightly enough. Make sure to tuck in the edges as you roll them!
Q2: Can I make these ahead of time?
Absolutely! You can prep them, refrigerate, and simply bake them when you’re ready for a quick snack.
Q3: Can I freeze the roll ups?
Yes! Wrap them tightly in freezer-safe bags and freeze for up to a month. When you’re ready, bake from frozen, extending the baking time slightly.
Q4: What can I use instead of low carb tortillas?
If you’re not on a low-carb kick, any tortilla will work — flour tortillas are particularly great for a soft, pillowy roll.
Nutritional Info
Here’s a quick overview of the nutritional contents based on four servings per recipe. Always remember that actual nutritional values may vary based on specific brands used.
- Calories: 250–300 kcal per serving
- Protein: 15–20 grams
- Carbohydrates: 15–20 grams (low carb option provided)
- Fat: 15–20 grams
These little beauties can indeed be both delicious and a great fit for your dietary needs!
Final Thoughts
And there you have it — delicious Cheesy Pepperoni Pizza Roll Ups that beat the traditional pizza in fun and flavor! They’re quick to prepare, adaptable to your cravings, and an excellent way to gather friends or family around the table (or couch).
So, next time you’re feeling that pizza urge, give this roll-up twist a try. They’re bound to lead to happy bellies and great memories. Remember: cooking is all about experimenting and enjoying the process. I can’t wait to hear how your pizza roll ups turn out!
Let me know in the comments what variations you tried or any stories you have around your roll up adventures. Until next time, keep it delicious and keep it real — you got this! Happy cooking!
Print
Cheesy Pepperoni Pizza Roll Ups
- Total Time: 30 minutes
- Yield: 4 servings
- Diet: Vegetarian
Description
Comforting and easy-to-make pizza roll ups filled with cheese and pepperoni, perfect for snacking or parties.
Ingredients
- Low Carb Tortillas
- Mozzarella Cheese
- Pepperoni Slices
- Pizza Sauce
- Olive Oil
- Italian Seasoning
Instructions
- Preheat your oven to 375°F (190°C).
- Grab a large tortilla and lay it flat on a clean surface.
- Spoon some pizza sauce onto the tortilla, about 2 tablespoons.
- Sprinkle a generous amount of mozzarella over the sauce and add 6-8 slices of pepperoni.
- Roll the tortilla tightly, tucking in the sides as you go.
- Place it seam side down on a parchment-lined baking sheet.
- Drizzle with olive oil and sprinkle with Italian seasoning.
- Bake for about 15-20 minutes or until golden brown.
- Cool for 5 minutes before slicing and serving.
Notes
You can substitute the pepperoni with vegetables for a vegetarian version. Serve with extra pizza sauce for dipping.
- Prep Time: 10 minutes
- Cook Time: 20 minutes
- Category: Snack
- Method: Baking
- Cuisine: Italian
Nutrition
- Serving Size: 1 serving
- Calories: 275
- Sugar: 3g
- Sodium: 350mg
- Fat: 18g
- Saturated Fat: 8g
- Unsaturated Fat: 7g
- Trans Fat: 0g
- Carbohydrates: 22g
- Fiber: 4g
- Protein: 17g
- Cholesterol: 20mg
Keywords: pizza, roll ups, snack, comfort food, easy recipes

11-Minute Cheesy Pepperoni Pizza Roll Ups
11-Minute Cheesy Pepperoni Pizza Roll Ups: A Quick and Delicious Delight
Hey there, pizza lovers! If you’re looking for a quick and tasty way to satisfy your pizza cravings, you’ve stumbled upon the right spot! I’m Beau Collier, and today I’m excited to share one of my all-time favorite recipes: 11-Minute Cheesy Pepperoni Pizza Roll Ups. These delightful bites are not only incredibly easy to whip up, but they also pack a punch of cheesy goodness and savory pepperoni flavor. Perfect for a movie night, a snack, or even a fun lunch with the kids—these roll ups are the epitome of comfort food.
I remember the first time I made these little beauties. It was a rainy afternoon, and the kids were bouncing off the walls, desperate for anything that could distract them. I had some pizza dough lurking in the fridge and decided to get creative. Before I knew it, we had pepperoni and cheese roll-ups that transformed our gloomy day into a cheesy, giggly pizza party right in our kitchen! It was a hit, and ever since then, they’ve become a staple in our household. I’m sure you’ll create wonderful memories with them in your own kitchens too!
So, gather your ingredients and roll up your sleeves—let’s dive into this delicious recipe. Trust me; once you make these 11-Minute Cheesy Pepperoni Pizza Roll Ups, you’re going to want to share them (or maybe just keep them all to yourself!).
Personal Story
A couple of years ago, during a family gathering, I decided to put my fun twist on traditional pizza. As I prepared the ingredients, my niece Ella was intrigued and suggested we make “pizza burritos.” Now, in my kitchen, it doesn’t matter how crazy the idea sounds; we’re all about creativity!
We rolled out the pizza dough, layered it with cheese and pepperoni, and folded it like a burrito. They didn’t just taste amazing; they sparked a mini baking competition among the kids, who were all eager to make their own unique creations. Some stuffed theirs with extra cheese; others threw in a handful of bell peppers and olives. Watching them giggle and munch away at their homemade pizza roll-ups warmed my heart.
That day reinforced my belief that cooking is not just about the food; it’s about the stories and connections made along the way. So, come on, let’s add some magic to your kitchen with these Cheesy Pepperoni Pizza Roll Ups!
Ingredients
Here’s what you’ll need to assemble these cheesy delights:
-
Pizza Dough
A pre-made pizza dough saves you time, but if you’re feeling adventurous, you can whip up your own! Alternatively, crescent roll dough or even a tortilla could work for an interesting spin. -
Cheese (Mozzarella or Cheddar)
Mozzarella is a classic choice for its melty goodness, but don’t shy away from sharp cheddar for a flavorful kick! Feel free to explore other cheeses like provolone or pepper jack if you’re in the mood for something different. -
Pepperoni Slices
The quintessential pizza topping! You can substitute pepperoni with turkey or chicken pepperoni for a leaner option, or even try vegetarian alternatives for a meat-free fiesta. -
Pizza Sauce
You can use store-bought pizza sauce for convenience or make your own with crushed tomatoes, a splash of olive oil, and Italian herbs. -
Olive Oil
A drizzle of olive oil before baking gives the roll-ups a crispy, golden finish. For a flavor upgrade, try flavored oils like garlic-infused oil. -
Herbs (Optional)
Adding dried oregano or Italian seasoning can elevate the flavor profile. If you’re feeling fresh, sprinkle in some basil right before serving! -
Veggies (Optional)
Want to make these roll-ups healthier? Toss in some finely chopped veggies! Bell peppers, spinach, or mushrooms work great. Just be sure to chop them small enough to fit inside.
Step-by-Step Instructions
Ready to get cooking? Let’s make these tasty roll-ups step-by-step!
Step 1: Preheat the Oven
Preheat your oven to 425°F (220°C). This will ensure that your roll-ups bake evenly and become perfectly golden brown.
Step 2: Roll Out the Dough
On a lightly floured surface, roll out your pizza dough into a large rectangle, about ¼ inch thick. If you’re using a store-bought dough, follow the package instructions for rolling it out. Make sure there are no cracks in the dough, as this will keep all that cheesy goodness inside!
Step 3: Spread the Sauce
Spread a thin layer of pizza sauce over the rolled-out dough, leaving about an inch at the edges free of sauce. This prevents a mess when rolling it up.
Step 4: Layer the Cheese
Now, sprinkle a generous amount of your chosen cheese over the sauce. Make sure to cover the surface completely for maximum melty goodness! While you’re at it, don’t forget the edges.
Step 5: Add the Pepperoni
Scatter the pepperoni slices evenly over the cheese. If you chose to add any veggies, now’s the time to sprinkle those on, too!
Step 6: Roll It Up
Starting from one edge, carefully roll the dough into a tight log. Pinch the seams to seal it and tuck in the ends. If you notice the dough resisting, gently stretch it as you roll—keep it tight but don’t rip it!
Step 7: Slice the Roll
Using a sharp knife or a pizza cutter, slice the rolled log into about 1-inch pieces. You should have a lovely swirl of cheese and pepperoni peeking out!
Step 8: Bake the Roll Ups
Place your roll-ups on a baking sheet lined with parchment paper. Drizzle a little olive oil on top for that crispy finish and sprinkle some Italian herbs if you’d like. Toss them in the oven for 10–12 minutes until they’re golden brown and bubbly.
Step 9: Cool and Serve
Allow your roll-ups to cool slightly before diving in. Drizzle a bit more pizza sauce for dipping if you like!
Chef’s Tip:
If you want your roll-ups extra crispy, switch to the broiler for the last 1–2 minutes of baking (watch closely to avoid burning).
Serving Suggestions
When it comes to serving these cheesy delights, simplicity is key! Arrange the roll-ups on a large platter and serve with a side of warm pizza sauce for dipping. If you want to add a gourmet touch, garnish the plate with fresh basil leaves or even a sprinkle of crushed red pepper flakes for those who crave a bit of heat. Pair this dish with a simple side salad or some crunchy veggie sticks for a fun, satisfying meal. Enjoy them with friends over a movie or make them the star of your next game night!
Recipe Variations
Feeling adventurous? Here are a few fun twists to take your roll-ups to the next level:
-
Buffalo Chicken Roll Ups: Swap the pepperoni for shredded cooked chicken tossed in buffalo sauce. Add a little blue cheese for a spicy twist!
-
Breakfast Roll Ups: Fill with scrambled eggs, cheese, and cooked bacon or sausage for a breakfast treat!
-
Caprese Roll Ups: Substitute mozzarella cheese with fresh mozzarella, add diced tomatoes, fresh basil, and a drizzle of balsamic glaze before rolling.
-
Vegetarian Roll Ups: Load them with your choice of chopped veggies like mushrooms, spinach, and artichokes for a delightful herbaceous flavor.
-
Dessert Roll Ups: Got a sweet tooth? Spread Nutella and sliced strawberries instead of pizza ingredients for a fabulous dessert twist!
Chef’s Notes
One of the things I love most about cooking is how easy it is to adapt recipes. My Cheesy Pepperoni Pizza Roll Ups started as a “leftover clean-out” idea, but now they’re a hit! Every time I make them, the ingredients might change based on what I have handy, and that’s the beauty of this recipe—it’s flexible!
Oh! And don’t even get me started on the epic post-baking aroma in your kitchen. It’s basically a little slice of heaven, and it will have everyone running to the oven to see what’s cooking!
FAQs and Troubleshooting
1. My dough is too sticky; what should I do?
If your dough is sticky, sprinkle a little flour on the surface where you’re working. If it’s still too tacky, you might need to knead in a bit more flour until it’s manageable.
2. Can I make this pizza ahead of time?
Absolutely! You can assemble the roll-ups, refrigerate or freeze them, and then bake them when you’re ready. Just remember to let them sit at room temperature for about 10 minutes if they’ve been frozen.
3. My roll-ups are not cooking evenly; what gives?
Make sure your oven is properly preheated and check that the roll-ups are evenly spaced on the baking sheet. Crowding can obstruct airflow, leading to uneven cooking.
4. How do I keep them warm until serving?
You can place them in a warm oven (around 200°F) covered with a clean kitchen towel. Just make sure they’re not left too long, or they’ll lose that crispy texture!
Nutritional Info
While it’s tough to put exact numbers on these pizza roll-ups since variations vary by ingredients, here’s a general idea:
- Calories (per roll-up): ~150 calories
- Protein: 6g
- Carbohydrates: 20g
- Fat: 7g
- Fiber: 1g
Feel free to adjust ingredients to match your dietary needs, and remember to enjoy these in moderation as part of a balanced diet.
Final Thoughts
There you have it: the ultimate guide to whipping up 11-Minute Cheesy Pepperoni Pizza Roll Ups! I hope this recipe inspires you to get creative in your kitchen and maybe even share some gorgeous food memories with your loved ones. The beauty of cooking is in the joy it brings, and I believe these roll-ups are sure to become a favorite in your home, just like they are in mine.
So, what are you waiting for? Grab those ingredients and give this recipe a whirl. And don’t forget to share your delicious creations with me on social media! Happy Cooking! 🍕✨
Print
11-Minute Cheesy Pepperoni Pizza Roll Ups
- Total Time: 15 minutes
- Yield: 4 servings
- Diet: Vegetarian
Description
Quick and delicious cheesy pepperoni pizza roll-ups perfect for a snack, movie night, or lunch.
Ingredients
- Pizza Dough
- Cheese (Mozzarella or Cheddar)
- Pepperoni Slices
- Pizza Sauce
- Olive Oil
- Herbs (Optional)
- Veggies (Optional)
Instructions
- Preheat the oven to 425°F (220°C).
- Roll out the pizza dough into a large rectangle, about ¼ inch thick.
- Spread a thin layer of pizza sauce over the rolled-out dough.
- Layer a generous amount of cheese over the sauce.
- Add the pepperoni slices evenly over the cheese.
- Roll the dough into a tight log.
- Slice the rolled log into about 1-inch pieces.
- Bake the roll-ups on a baking sheet for 10–12 minutes.
- Cool slightly before serving with a drizzle of pizza sauce for dipping.
Notes
For extra crispy roll-ups, switch to broiler for the last 1–2 minutes of baking, watching closely.
- Prep Time: 5 minutes
- Cook Time: 10 minutes
- Category: Snack
- Method: Baking
- Cuisine: Italian
Nutrition
- Serving Size: 1 roll-up
- Calories: 150
- Sugar: 1g
- Sodium: 400mg
- Fat: 7g
- Saturated Fat: 3g
- Unsaturated Fat: 4g
- Trans Fat: 0g
- Carbohydrates: 20g
- Fiber: 1g
- Protein: 6g
- Cholesterol: 20mg
Keywords: pizza, roll ups, quick snack, cheesy, pepperoni

Cheese Garlic Rolls
# Cheese Garlic Rolls: A Comforting Kitchen Hug

## Introduction

Hey there, fellow food lovers! Welcome to Feastical, your go-to spot for delicious recipes that bring a little sunshine into your kitchen. Today, I'm excited to share a recipe that’ll wrap your taste buds in a warm, cheesy embrace: Cheese Garlic Rolls! Picture this: fluffy, golden-brown rolls, oozing with melted cheese and subtle hints of garlic. There's something about the aroma wafting through your kitchen that instantly makes everyone feel at home—it's like a warm hug for your senses!

Now, before you think these rolls are just another side dish, let me assure you: they have personality! Whether you're preparing for game day, hosting a cozy dinner, or just craving something comforting, these rolls fit the bill perfectly. Plus, they’re incredibly fun to make! It's a great dish to whip up with family or friends, and everyone loves getting their hands doughy and sticky—trust me!

But what really gets me excited about these Cheese Garlic Rolls is the nostalgia they bring. They remind me of family dinners at my grandma’s house, where we’d gather around the table, the rolls freshly baked, and everyone diving in with the same eager enthusiasm. I can still hear the laughter and the clinking of forks over delicious plates. That’s the beauty of food: it connects us.

So, put on your apron, gather your ingredients, and let’s create some memories together with these irresistible Cheese Garlic Rolls!

## Personal Story

Ah, the memories of my childhood kitchen are both vivid and comforting. I recall one chilly Sunday afternoon when my family decided to gather for a potluck-style meal. My grandma had announced that she would be making her famous Cheese Garlic Rolls, a recipe she learned from her mother, and it instantly became the star of the show.

I watched as grandma expertly kneaded the dough, her hands dusted with flour and radiating warmth, similar to the rolls she was crafting. The mingling scents of garlic, melted cheese, and a hint of parsley filled the air. I was tasked with grating the cheese, and let me tell you, the thrill of watching that cheesy goodness transform into something magical was unreal! When those rolls finally emerged from the oven—golden, fluffy, with cheese bubbling out of the tops—it felt like the kitchen had transformed into a fragrant paradise.

As we sat around the table, rolling our eyes at overstuffed plates and stealing bites from one another, all while sharing stories and laughter, I knew these rolls were more than just a dish—they were an experience, a tradition, a reminder that food is best enjoyed together.

And now, I want to bring a piece of that joy into your kitchen with my Cheese Garlic Rolls!

## Ingredients

### For the Dough

- **2 cups all-purpose flour**
  The foundation of our rolls! All-purpose flour gives our dough the right balance of structure and tenderness. If needed, you can substitute it with bread flour for extra chewiness.

- **1 packet (2 1/4 teaspoons) active dry yeast**
  This little packet of magic is what makes our rolls rise. Make sure your water is warm (not hot!) to activate the yeast—too hot, and it’ll kill it!

- **1 tablespoon sugar**
  A little sweetness to help activate the yeast and balance out the flavors. You can swap it for honey or agave syrup if that's what you have on hand.

- **1 teaspoon salt**
  Essential for flavor! Salt enhances the taste of the dough. If you’re cutting back on sodium, feel free to reduce it slightly.

- **3/4 cup warm water**
  This helps ‘wake up’ the yeast. It should feel warm to the touch, like a cozy bath—perfect for our yeast friends!

- **2 tablespoons olive oil**
  Adds moisture and a lovely richness to the dough. Feel free to use melted butter instead for an extra buttery flavor.

### For the Filling

- **1 cup shredded cheese (e.g., mozzarella or cheddar)**
  Choose your cheese adventure! Mozzarella creates a gooey stretch, while cheddar adds a sharp kick. Mix and match or get creative—feta or pepper jack could also be delightful!

- **2 cloves garlic, minced**
  Fresh garlic adds a flavorful punch. If you fancy a milder flavor, roasted garlic is a sweet alternative that gives the rolls a lovely depth.

- **1 teaspoon dried oregano**
  A herby touch uplifts our rolls. Italian seasoning or even fresh herbs like parsley can add a beautiful twist.

- **1/4 cup melted butter**
  For brushing on top before baking—this gives our rolls a beautiful golden sheen! Try using garlic-infused butter for an added flavor boost.

## Step-by-Step Instructions

1. **Prep the Yeast**
   In a small bowl, mix the warm water with the sugar and yeast. Let it sit for about 5-10 minutes until it becomes foamy and bubbly—this means the yeast is alive!

2. **Combine Dry Ingredients**
   In a large mixing bowl, combine the flour and salt. Make a well in the center.

3. **Mix It Up!**
   Pour the foamy yeast mixture into the well, along with the olive oil. Stir gently until the dough starts to come together.

4. **Knead It Out**
   Sprinkle some flour on your work surface and turn out the dough. Knead for about 5-7 minutes until it’s smooth and elastic. Trust me, this is where the magic happens! If the dough is too sticky, sprinkle a bit more flour while kneading.

5. **Let It Rise**
   Place your dough in a greased bowl, cover it with a damp kitchen towel, and let it rise in a warm place until it doubles in size (about 1 hour). This is the perfect time to clean up and maybe sneak a snack!

6. **Prepare the Filling**
   While the dough is rising, mix your shredded cheese, minced garlic, and oregano in a bowl. Can you smell it already? Heaven!

7. **Shape the Rolls**
   Once your dough has risen beautifully, punch it down to release those air bubbles. Divide it into 12 equal pieces (or more if you want mini rolls).

8. **Fill ‘er Up**
   Flatten each dough piece into a disc, add a spoonful of the cheese-garlic mixture in the center, then fold the edges over to seal it like a tiny pocket. Roll it between your palms to create a smooth ball.

9. **Second Rise**
   Place the filled rolls seam-side down on a baking sheet lined with parchment paper. Cover them again and let them rise for another 30 minutes.

10. **Butter Them Up**
    Preheat your oven to 375°F (190°C). Brush the tops of the rolls with melted butter; this is where we bring the golden brown loveliness to life!

11. **Bake to Perfection**
    Bake in the preheated oven for about 15-20 minutes or until they are golden brown and your kitchen smells incredible!

12. **Cool and Serve**
    Once out of the oven, let them cool slightly, then dive in! Serve warm and watch your loved ones smile with each cheesy bite.

## Serving Suggestions

These Cheese Garlic Rolls are delicious on their own, but why not elevate the experience? Here are a few serving suggestions:

- **Dip-Dive Delight**: Serve them alongside marinara sauce or garlic butter for a heavenly dipping experience.
- **Cheesy Charcuterie**: Include them in a cheese board! Pair with cured meats, olives, and your favorite spreads to make a delightful appetizer.
- **Soup and Roll Combo**: Pair these rolls with a hearty soup or salad. They’re perfect for soaking up that delicious broth!
- **Garnish with Fresh Herbs**: A sprinkle of chopped parsley or chives on top adds not only color but a fresh flavor to the rolls.

## Recipe Variations

Now, let’s shake things up a bit with some fun variations to keep your kitchen adventures alive:

- **Spinach Feta Rolls**: Add a handful of wilted spinach and crumbled feta to the cheese filling for a Mediterranean twist!
- **Spicy Pepper Jack**: Substitute cheddar for spicy pepper jack cheese and toss in some minced jalapeños for a kick.
- **Herb Parmesan**: Mix in grated Parmesan cheese and fresh herbs like rosemary and thyme for an aromatic burst of flavor.
- **Sweet Garlic Rolls**: Mix the garlic filling with cinnamon, sugar, and butter for a unique dessert-style roll—perfect for the sweet tooth!
- **Gluten-Free Version**: Swap all-purpose flour with a gluten-free flour blend for a delicious gluten-free option.

## Chef’s Notes

Creating these Cheese Garlic Rolls feels like a warm embrace from the kitchen; it’s a recipe that has evolved for me over the years. Each time I make them, I’m reminded of that chilly Sunday with my family gathered around the table. I’ve played with the recipe many times—experimenting with cheeses, adjusting spices, and sometimes even going wild with fillings!

A funny kitchen story? Once I accidentally added cayenne pepper instead of oregano. Let’s just say the rolls had a bit more heat than anyone expected! But in the end, those spicy rolls became a hit at that gathering—food has a funny way of bringing people together, even when things don’t go as planned!

## FAQs and Troubleshooting

- **Why aren’t my rolls rising?**
  Make sure your yeast is fresh and your water isn’t too hot—check those temp settings! If they’re rising slowly, try placing them in a warmer spot.

- **What if I forgot to add salt?**
  No worries! If you’ve already baked them, you can brush some garlic butter mixed with salt on top right after they come out of the oven for a flavorful touch!

- **How can I store leftover rolls?**
  Place them in an airtight container at room temperature for 2-3 days, or freeze them for longer storage. Reheat in the oven for the best results!

- **Can I prepare these ahead of time?**
  Absolutely! You can prepare the dough, shape the rolls, and refrigerate them overnight. When you’re ready, let them rise at room temperature before baking.

## Nutritional Info

While Cheese Garlic Rolls are comfort food at its finest, let’s talk nutritional info to keep everything balanced!

Each roll (based on 12 servings) roughly contains:
- **Calories**: 180
- **Carbohydrates**: 24g
- **Protein**: 6g
- **Fat**: 7g
- **Fiber**: 1g

Enjoy them in moderation as part of a balanced meal, and don't forget, indulging in your favorite treats is all about those happy moments in the kitchen!

## Final Thoughts

And there you have it—my beloved Cheese Garlic Rolls straight from my heart to your kitchen! Each tender bite carries with it a story, a memory, and a whole lot of flavor. I hope this recipe brings joy to your dining table just as it has to mine.

So as you dive into these delicious rolls, don’t just savor the taste—celebrate the moments shared around the table, the laughter, and the memories created. That’s what food is truly about: connection, love, and feeling good.

Thank you for joining me today! I can't wait to hear how your Cheese Garlic Rolls turn out. Share your experiences, adaptations, and fun moments in the kitchen, and let’s keep this delicious journey going together. Happy cooking, my friends!

Cheese Garlic Rolls
- Total Time: 60 minutes
- Yield: 12 servings 1x
- Diet: Vegetarian
Description
Fluffy, golden-brown rolls oozing with melted cheese and hints of garlic, perfect for any gathering.
Ingredients
- 2 cups all-purpose flour
- 1 packet (2 1/4 teaspoons) active dry yeast
- 1 tablespoon sugar
- 1 teaspoon salt
- 3/4 cup warm water
- 2 tablespoons olive oil
- 1 cup shredded cheese (e.g., mozzarella or cheddar)
- 2 cloves garlic, minced
- 1 teaspoon dried oregano
- 1/4 cup melted butter
Instructions
- Prep the yeast: In a small bowl, mix warm water with sugar and yeast. Let it sit for about 5-10 minutes until foamy.
- Combine dry ingredients: In a large mixing bowl, combine flour and salt. Make a well in the center.
- Mix it up: Pour the foamy yeast mixture into the well along with olive oil. Stir until the dough starts to come together.
- Knead it out: Sprinkle flour on your work surface and turn out the dough. Knead for about 5-7 minutes until smooth and elastic.
- Let it rise: Place dough in a greased bowl, cover with a damp towel, and let it rise until doubled in size (about 1 hour).
- Prepare the filling: Mix shredded cheese, minced garlic, and oregano in a bowl.
- Shape the rolls: Punch down the risen dough, divide into 12 pieces, and flatten each into a disc.
- Fill ‘er up: Add a spoonful of the cheese-garlic mixture in each disc and fold the edges to seal.
- Second rise: Place filled rolls seam-side down on a baking sheet. Cover and let rise for another 30 minutes.
- Butter them up: Preheat oven to 375°F (190°C). Brush the rolls with melted butter.
- Bake to perfection: Bake for about 15-20 minutes until golden brown.
- Cool and serve: Let cool slightly, then serve warm.
Notes
Serve with marinara sauce or garlic butter for dipping. Great with soups or as part of a cheese board.
- Prep Time: 15 minutes
- Cook Time: 20 minutes
- Category: Appetizer
- Method: Baking
- Cuisine: Italian
Nutrition
- Serving Size: 1 roll
- Calories: 180
- Sugar: 1g
- Sodium: 250mg
- Fat: 7g
- Saturated Fat: 4g
- Unsaturated Fat: 2g
- Trans Fat: 0g
- Carbohydrates: 24g
- Fiber: 1g
- Protein: 6g
- Cholesterol: 20mg
Keywords: cheesy rolls, garlic rolls, comfort food, baking, appetizer