
Green Apple Sorbet: 5-Ingredient Quick Summer Treat
Refreshingly Simple: Homemade Green Apple Sorbet Recipe
Hey there, food friends! Today, we’re diving into a delightful and refreshing homemade treat that’s perfect for any occasion: Green Apple Sorbet! There’s nothing quite like a scoop of chilled sorbet to cool you down on a hot day or to cleanse your palate between courses at a dinner party. Trust me; this is a simple, fun, and nostalgic recipe that will bring joy to your kitchen.
A Whiff of Nostalgia
Whenever I think of sorbet, I’m taken back to those sultry summer afternoons of my childhood. My family and I would pack up a cooler and head to the beach, our favorite playground of sun and saltwater. My mom would whip up her famous fruit sorbet—sweet, tangy, and ice-cold. She’d always let me pick the fruit, so I’d reach for those shiny green apples, their tartness singing in harmony with the sugar and lemon juice. The way the sorbet brightened our spirits while we built sandcastles and chased waves is a memory I cherish.
Now, I want to share this lovely tradition with all of you. Making your own sorbet is easier than pie (and trust me, pie can be pretty easy too!). Grab some green apples, and let’s turn up the fun in your kitchen!
Ingredients
Here’s what you’ll need for this delightfully zesty Green Apple Sorbet:
-
2 cups green apples, peeled and chopped
These crisp beauties bring all the tart flavor you need. I love Granny Smith apples! If you want a sweeter taste, feel free to mix in some red apples. -
1 cup granulated sugar
This sweetener helps balance out the tartness of the apples. For a lighter option, you can substitute with coconut sugar or a sugar alternative like Stevia (just check the conversion). -
1 cup water
It’s the base of our sorbet, essential for blending all the goodness together. You can use sparkling water if you’re feeling fancy for an extra fizz! -
1 tablespoon lemon juice
Freshly squeezed is always best! It adds a nice zippy flavor that brightens the sorbet. If you have lime on hand, that works beautifully, too. -
1 teaspoon vanilla extract
This will enhance the overall flavor profile and add a warm note to the tartness. You can replace it with almond extract for a different vibe.
Step-by-Step Instructions
Alright, my fellow kitchen adventurers! Let’s get swirling.
-
Prepare Your Apples
Peel and chop the green apples into small chunks (roughly 1-inch pieces). The smaller the pieces, the easier they will blend. Pro Tip: Try to keep them as uniform as possible for even cooking. -
Cook the Apples
In a medium saucepan, combine the chopped apples, sugar, and water. Bring it to a gentle simmer over medium heat, stirring occasionally, until the apples are soft (about 10-12 minutes). This step releases all those juicy flavors. Keep stirring to avoid sticking; you want a tasty compote! -
Add the Zing
Once the apples are soft, remove the saucepan from heat. Stir in the lemon juice and vanilla extract. This is when the magic starts; the aroma becomes heavenly! Let it cool for about 10-15 minutes before moving to the next step. -
Blend It Up
Transfer the apple mixture to a blender (or use an immersion blender) and blend until smooth. You can blend it to your desired texture—if you prefer a little chunky sorbet, feel free to keeping some bits of apple. Taste it, and adjust sugar or lemon, if needed! -
Chill Out
Pour the mixture into a shallow container, cover it, and pop it into the freezer. Let it freeze for about 4-6 hours or until solid. Remember to give it a stir every hour or so; this incorporates air into the sorbet for a light and fluffy texture. -
Scoop and Serve!
To serve, let it sit out for 5-10 minutes to soften before scooping. Use an ice cream scoop or a sturdy spoon, and get ready to enjoy your homemade Green Apple Sorbet!
Serving Suggestions
Presentation is key, right? Here are some fun ways to serve this delightful sorbet:
-
Classic Scoops: Serve in beautiful ice cream dishes or bowls. Add a sprig of mint or a slice of apple on top for that extra wow factor.
-
Sorbet Floats: Scoop some sorbet into a tall glass and pour sparkling water or ginger ale over it for a refreshing float!
-
With a Twist: Drizzle a bit of balsamic reduction over the top. It pairs so well with the tartness and looks oh-so-classy.
Recipe Variations
Feeling adventurous? Here are some fun twists and swaps to jazz up your Green Apple Sorbet:
-
Spiced Sorbet: Add a pinch of cinnamon or nutmeg for a cozy flavor that’s perfect for fall.
-
Herbal Infusion: Try adding fresh basil or mint during the cooking step for a refreshing herbal note.
-
Berry Blend: Mix in some smashed raspberries or strawberries before freezing for a vibrant color and new flavor.
-
Coconut Cream: Swap out half of the water for coconut milk to make a creamier, tropical sorbet.
Chef’s Notes
Over time, I’ve learned to embrace creativity in the kitchen, and this sorbet is versatile enough to experiment. Every summer, I find myself making this, tweaking the ingredients based on what’s in my pantry or what fruits are at their peak. My kids even love getting involved, especially when it’s time to taste test! Remember, your kitchen is your playground. Don’t shy away from making it your own!
FAQs and Troubleshooting
Q: What if my sorbet is too hard?
A: If your sorbet’s too hard, let it sit out for a bit before scooping. Or, blend it again with a splash of water to soften it up.
Q: Can I make this ahead of time?
A: Absolutely! It keeps well in the freezer for about 2 weeks, but trust me, it will likely disappear before that!
Q: My sorbet turned icy. What went wrong?
A: That can happen if there’s not enough sugar or if it was left un-stirred while freezing. Just remember to stir it every hour!
Q: Can I use other fruits?
A: Yes! Almost any fruit can be used—just blend it up and follow the same instructions. Just keep in mind that not all fruits provide the same tartness.
Nutritional Info
Let’s get down to the nitty-gritty. Each serving of this delightful Green Apple Sorbet (approximately 1/2 cup) contains:
- Calories: ~120
- Total Fat: 0g
- Carbohydrates: 32g (Sugars: 28g)
- Fiber: 1g
- Protein: 0g
Note: Nutritional values can vary based on the specific ingredients used and portion sizes.
Final Thoughts
And there you have it, friends! A simple, feel-good recipe for Green Apple Sorbet. It’s refreshing, easy to make, and a wonderful way to celebrate the fruity gems of the season. Not only is this sorbet a treat for your taste buds, but it also stirs up warm memories of shared joy and laughter in the kitchen. So the next time you’re in need of a cool-down or a simple dessert, remember: the kitchen is a place for both delicious creations and cherished memories.
Now grab those apples, get blending, and enjoy this vibrant, tangy sorbet that’s sure to please! Happy cooking, everyone!
Print
Homemade Green Apple Sorbet
- Total Time: 240 minutes
- Yield: 4 servings 1x
- Diet: Vegan
Description
A refreshing and simple homemade green apple sorbet that’s perfect for any occasion.
Ingredients
- 2 cups green apples, peeled and chopped
- 1 cup granulated sugar
- 1 cup water
- 1 tablespoon lemon juice
- 1 teaspoon vanilla extract
Instructions
- Prepare your apples by peeling and chopping them into small chunks.
- Cook the apples with sugar and water in a saucepan until soft, about 10-12 minutes.
- Add the lemon juice and vanilla to the mixture and let it cool.
- Blend the mixture until smooth and adjust flavor if necessary.
- Chill the mixture in the freezer for 4-6 hours, stirring every hour.
- Scoop and serve the sorbet after letting it sit for 5-10 minutes.
Notes
Feel free to experiment with different fruits or flavor additions. Check for sweetness before freezing.
- Prep Time: 15 minutes
- Cook Time: 12 minutes
- Category: Dessert
- Method: Freezing
- Cuisine: American
Nutrition
- Serving Size: 1/2 cup
- Calories: 120
- Sugar: 28g
- Sodium: 1mg
- Fat: 0g
- Saturated Fat: 0g
- Unsaturated Fat: 0g
- Trans Fat: 0g
- Carbohydrates: 32g
- Fiber: 1g
- Protein: 0g
- Cholesterol: 0mg
Keywords: sorbet, dessert, green apple, refreshing, vegan, homemade

No-Bake Grasshopper Mint Chocolate Bark Recipe
Grasshopper Mint Chocolate Bark Recipe: A Sweet Journey into Flavor
Hey there, fellow food lovers! It’s your pal Beau Collier from Feastical, and today we’re diving into a delightfully nostalgic treat that’s bound to take your taste buds on a joyful ride: Grasshopper Mint Chocolate Bark. If you’re a fan of mint and chocolate—which let’s be real, who isn’t?—then you’re in for a real treat. This recipe is not only a feast for your senses but also a heartwarming slice of my culinary journey.
You see, whenever I think about this decadent treat, I’m reminded of my childhood days spent in my grandmother’s kitchen. She had this magical way of turning ordinary moments into extraordinary memories, and her mint chocolate bark was no exception. I remember standing on a little stool, trying to reach the countertop while she melted chocolate, and the entire kitchen filled with that enchanting scent. Each time she peeled open a box of Andes Crème de Menthe Thins, it was as if we were unwrapping little treasures! I would sneak pieces when I thought she wasn’t looking, only to be met with a quick chuckle and the playful challenge of “sneak all you want, but I know a baker’s dozen is coming for you!”
Fast forward to the present, and I still get that same giddy feeling when I whip up this delightful bark. The recipe has evolved over the years, but the spirit of fun and fond memories remains at the forefront. So, let’s stir up those nostalgic vibes together and make some Grasshopper Mint Chocolate Bark!
Ingredients
Gathering your ingredients is half the fun! Here’s what you’ll need:
-
16 oz. white chocolate chips
A creamy base for your bark, these white chocolate chips are sweet and melt beautifully. If you’re feeling adventurous, you can substitute them with white baking chocolate, but remember it may not melt as smoothly. -
16 oz. semi-sweet chocolate chips
Rich and slightly bitter, these balance the sweetness of the white chocolate. Alternatively, opt for dark chocolate chips if you prefer a more intense flavor. -
1 box Andes Crème de Menthe Thins
The true star of the show! These mint chocolate candies add a delightful crunch and a burst of minty flavor. If you can’t find them, think about using other mint chocolates, but the Andes’ texture and flavor are hard to beat. -
Green food coloring
A splash of fun! It’s optional, but a few drops can amp up the festive look. If you want a more natural tint, consider using spirulina powder or matcha. -
Optional: 1 teaspoon mint extract
For those who really love mint, a little mint extract adds an extra oomph! Just remember to go easy on it; a little goes a long way.
Step-by-Step Instructions
Now, let’s get down to business and make some mint chocolate magic!
Step 1: Melting the Chocolate
Start by breaking down the two types of chocolate. In separate microwave-safe bowls, add your white chocolate chips in one bowl and semi-sweet chocolate chips in the other. Microwave them individually. Heat each for about 30 seconds, then stir. Repeat this process until they’re both completely melted and smooth like a dream. Pro tip: Stirring in between helps prevent burning, and who wants burnt chocolate? Yikes!
Step 2: Pour the Semi-Sweet Layer
Line a baking sheet with parchment paper. Pour the melted semi-sweet chocolate onto the parchment and spread it evenly with a spatula. If you want precision, a rolling pin over the parchment paper helps to smooth it out.
Step 3: Add Andes Thins
Now comes the fun part! Take those precious Andes Crème de Menthe Thins, and place them evenly over the semi-sweet chocolate layer while it’s still warm. Give them a minute to soften, then gently press them in—this helps them stick.
Step 4: Tint the White Chocolate
While the Andes chocolates work their magic, add a few drops of green food coloring to your melted white chocolate and stir until you achieve your desired shade of minty green! Remember: if you’re adding mint extract, do it here for an extra minty kick.
Step 5: Pour the White Chocolate
Pour the tinted white chocolate over the Andes layer, covering them completely. Use your spatula to spread it out, ensuring every piece of mint is cozy beneath that creamy layer. This step is like tucking in a favorite blanket—just so satisfying!
Step 6: Chill to Perfection
Let it cool at room temperature for a few minutes, then pop the whole tray in the fridge for about 1-2 hours or until fully firm. While you wait, maybe treat yourself to a spoonful of peanut butter or have a mint tea!
Step 7: Cut and Serve
Once the bark is set, lift it out using the parchment paper. Break or cut it into pieces. You can trim the edges for a cleaner look or break it up for that rustic charm.
Serving Suggestions
When it comes to showing off your gorgeous Grasshopper Mint Chocolate Bark, keep it simple yet charming! Place the pieces in a beautiful bowl, maybe topped with a sprig of fresh mint for that extra flair. It also makes for a delightful gift during holidays or special occasions; just pack it up in a clear cellophane bag, tie it with a ribbon, and voilà! A sweet token of love.
Recipe Variations
Ready to get creative? Here are some fun twists you can add to the basic recipe:
-
Nutty Crunch: Add chopped nuts like pistachios or almonds atop the Andes layer for extra crunch and flavor.
-
S’mores Style: Alternate layers of graham cracker crumbles for a s’mores-inspired bark.
-
Fruit Fusion: Incorporate freeze-dried raspberries or strawberries for a fruity twist that pairs wonderfully with mint.
-
Peppermint Twist for the Holidays: Add crushed peppermint candies on top instead of Andes during the festive season for a holiday-themed treat.
-
Vegan Options: Substitute chocolate chips for vegan versions and ensure your mint chocolates are dairy-free. Chocolate lovers unite!
Chef’s Notes
Making this Grasshopper Mint Chocolate Bark has become a rite of passage in my kitchen. While it’s a fantastic recipe, it’s also a conversation starter, making everyone reminisce about their favorite mint chocolate moments. Each time I make this fabulous treat, I’m reminded of the legacy of love baked into food and how it brings people together.
One of my funniest kitchen stories involves a not-so-great melt of chocolate that turned into more of a chocolate football during my early attempts. You live, you learn, right? Now, I’m a pro at melting chocolate and feel like a wizard with a solid stirring magic spell.
FAQs and Troubleshooting
-
Why is my chocolate not melting properly?
Make sure you’re microwaving in short bursts and stirring often. If it clumps, it might be overheated. Try adding a teaspoon of oil to help with texture! -
How do I get perfect shards when breaking the bark?
Slightly score the surface with a sharp knife before chilling. This will give you guidance for cutting and help create clean pieces! -
What if my white chocolate hardens before pouring?
Just place it back in the microwave for a few seconds to gently reheat. Use sparingly; you want it liquid but not too hot. -
How long will my bark last?
In an airtight container, your bark can remain fresh for about two weeks. But trust me, it won’t last that long!
Nutritional Info
If you’re curious about the nutritional breakdown of this delightful bark, here’s a rough estimate for one piece (assuming 15 servings per batch):
- Calories: 200
- Fat: 10g
- Carbohydrates: 28g
- Sugar: 24g
- Protein: 2g
Keep in mind, these numbers can vary based on your ingredients, so this is just a ballpark!
Final Thoughts
And there you have it, my fellow food enthusiasts! A simple and scrumptious Grasshopper Mint Chocolate Bark recipe that’s brimming with flavors and nostalgia. Whether you savor a piece on a quiet night or share it with loved ones, I hope this treat warms your heart as much as it does your taste buds.
So, dust off that spatula, channel your inner chocolatier, and get ready to create some sweet memories! Remember, in the kitchen, it’s all about having fun and bringing joy with food. Until next time, happy cooking, and keep spreading that love through great dishes!
Print
Grasshopper Mint Chocolate Bark
- Total Time: 30 minutes
- Yield: 15 servings 1x
- Diet: Vegetarian
Description
A delightful and nostalgic mint chocolate bark that combines creamy white chocolate with rich semi-sweet chocolate and Andes Crème de Menthe Thins.
Ingredients
- 16 oz. white chocolate chips
- 16 oz. semi-sweet chocolate chips
- 1 box Andes Crème de Menthe Thins
- Green food coloring (optional)
- 1 teaspoon mint extract (optional)
Instructions
- Start by breaking down the two types of chocolate. In separate microwave-safe bowls, add your white chocolate chips in one bowl and semi-sweet chocolate chips in the other. Microwave them individually. Heat each for about 30 seconds, then stir. Repeat this process until they’re both completely melted and smooth.
- Line a baking sheet with parchment paper. Pour the melted semi-sweet chocolate onto the parchment and spread it evenly with a spatula.
- Take the Andes Crème de Menthe Thins and place them evenly over the semi-sweet chocolate layer while it’s still warm. Press them in gently.
- Add a few drops of green food coloring to your melted white chocolate and stir until you achieve your desired shade. If using mint extract, add it now.
- Pour the tinted white chocolate over the Andes layer, covering them completely.
- Let it cool at room temperature for a few minutes, then refrigerate for about 1-2 hours or until fully firm.
- Lift out the bark using the parchment paper and break or cut it into pieces.
Notes
This bark can be stored in an airtight container for about two weeks.
- Prep Time: 15 minutes
- Cook Time: 15 minutes
- Category: Dessert
- Method: No-Cook
- Cuisine: American
Nutrition
- Serving Size: 1 piece
- Calories: 200
- Sugar: 24g
- Sodium: 50mg
- Fat: 10g
- Saturated Fat: 6g
- Unsaturated Fat: 4g
- Trans Fat: 0g
- Carbohydrates: 28g
- Fiber: 1g
- Protein: 2g
- Cholesterol: 5mg
Keywords: mint chocolate, dessert, bark, holiday treat, sweet snack

Minute Banana Cream Cheese Cobbler: Quick Comfort Dessert
Banana Cream Cheese Cobbler: A Recipe That’s a Slice of Sunshine
Hey there, food lovers! Beau Collier here, and today we’re diving into a comforting dessert that’s sure to warm your heart and tickle your taste buds—Banana Cream Cheese Cobbler! Sounds intriguing, right? If the very thought of juicy bananas nestled in a creamy, dreamy custard with a buttery cobbler crust makes you smile, then you’ve just stumbled onto a delicious treasure.
You know, cooking is about more than just the food; it’s about the memories we create in the kitchen and the people we get to share our culinary creations with. When I first whipped up this delightful cobbler, I was reminded of my grandmother’s cozy kitchen, where she’d serve up her famous banana pudding after family dinners. That sheer joy of sharing something so delicious and nostalgic is why I want to bring this recipe to you today.
So grab your favorite apron, roll up those sleeves, and let’s get baking together! This cobbler is not just a dish—it’s a journey down memory lane wrapped in flavor. Ready? Let’s do this!
A Sweet Memory
Growing up, my home was always filled with the luscious scent of baked goods. My grandmother, a self-taught dessert connoisseur, had this magical ability to transform simple, everyday ingredients into extravagant desserts that had everyone begging for seconds. One of her signature dishes was a classic banana pudding, layered high with Nilla wafers, fresh whipped cream, and, of course, the beloved bananas.
I remember the first time I tried to make her banana pudding. I was probably ten, with flour in my hair and a spatula that seemed bigger than my little hands. But the pride I felt when I presented my creation to my family was palpable! They loved it—well, after they stopped laughing at my flour-covered face, that is.
Years later, as I experimented with combining traditional flavors into new creations, I wanted to capture that same nostalgia but with a twist. That’s when the idea of Banana Cream Cheese Cobbler was born. It’s a heartfelt tribute to my grandmother, celebrating the unbeatable combination of bananas and cream cheese in a whole new light.
Ingredients
Let’s get down to the nitty-gritty of what you’ll need for this delicious cobbler! Here’s a complete list of ingredients:
-
4 ripe bananas, sliced: The riper, the better! Overripe bananas bring out that lovely sweetness and rich flavor. Can’t find ripe ones? Try leaving them in a paper bag for a day or two, or bake unpeeled bananas at 300°F (150°C) for 15-20 minutes until they’re soft and caramelized.
-
8 oz cream cheese, softened: This creamy delight adds richness and texture. If you’re dairy-free, try a vegan cream cheese alternative like cashew or tofu-based spreads.
-
1 cup all-purpose flour: The backbone of our cobbler—gluten-free flour like almond or oat can work in a pinch, but be aware that the texture will change.
-
1 cup granulated sugar: Just regular white sugar gives the best sweetness hit. Brown sugar can add a deeper caramel flavor, so feel free to swap!
-
½ cup unsalted butter, melted: The butter brings in that lovely fat flavor. You could also use coconut oil for a light coconut twist.
-
1 cup milk: Whole milk is best for that creamy custard texture, but you can also use almond milk or oat milk for a lighter alternative.
-
2 large eggs: The eggs provide the structure—flax eggs or applesauce can do the trick if you’re looking for an eggless recipe.
-
1 tablespoon baking powder: Our leavening agent that makes the cobbler rise beautifully.
-
1 teaspoon vanilla extract: This little splash of flavor is a must! For a twist, use almond extract instead for a nutty profile.
-
½ teaspoon salt: A pinch of salt balances out the sweetness; don’t skip it!
-
½ teaspoon ground cinnamon: This will make everything smell and taste like a cozy hug.
-
Powdered sugar, for dusting (optional): A light dusting of powdered sugar gives a finishing touch that elevates your cobbler—perfect for those Instagram-worthy shots!
Step-by-Step Instructions
Alright, let’s get that oven preheated to 350°F (175°C) and set the stage for baking success. Follow my step-by-step guide for making this scrumptious Banana Cream Cheese Cobbler:
-
Prepare Your Dish: Lightly grease a 9×13-inch baking dish with non-stick spray or butter. This ensures that our glorious cobbler comes out without a hitch and lets every bite shine.
-
Mix the Cream Cheese Layer: In a mixing bowl, whisk together the softened cream cheese, half of the granulated sugar (½ cup), and the vanilla extract until smooth and creamy. If you have an electric mixer, now’s the time to use it! This creates a tender, luscious layer that will be the star of your cobbler.
-
Beat the Eggs: In a separate bowl, beat the eggs until fluffy. Then, slowly add the remaining sugar (½ cup) and continue mixing until combined. You want to incorporate a bit of air here for a light texture.
-
Combine Wet Ingredients: Gradually add the melted butter and milk to the egg mixture, stirring gently. I always say to take your time with this step. It’s all about building layers of flavor!
-
Mix the Dry Ingredients: In another bowl, whisk together the flour, baking powder, salt, and ground cinnamon. This is where you bring in the cozy, comforting vibes. Slowly integrate the dry mix into the wet mixture until just combined, but don’t overmix—you want it to be soft and fluffy!
-
Add the Bananas: Gently fold in those luscious banana slices. You want to distribute them evenly without bruising them too much. This caramelizes during baking, creating pockets of sweetness throughout the cobbler.
-
Assemble: Pour the batter into the greased baking dish, ensuring it’s spread evenly. Then dollop spoonfuls of the cream cheese mixture over the batter. Use a knife or toothpick to swirl them nice and gently; this adds a beautiful marbled effect.
-
Bake: Pop your masterpiece into the preheated oven and bake for about 35-40 minutes, or until a toothpick inserted in the center comes out clean. The top should be golden brown, and the aroma? Well, it’ll make your whole kitchen smell like heaven.
-
Cool and Dust: Once out of the oven, let it cool slightly before dusting with powdered sugar, if using. Trust me, this added touch will make your banana cobbler look like something straight out of a bakery!
Serving Suggestions
Now that you’ve got this beautiful Banana Cream Cheese Cobbler proudly sitting on your counter, it’s time to serve! Here are a few ideas to elevate the dessert for your friends and family:
-
Serve Warm: Cut into generous squares and dish it up warm. The cream cheese layer will still be gooey and sumptuous.
-
Top it Off: Consider serving a scoop of vanilla ice cream or a dollop of whipped cream on top for an indulgent treat. The cold cream balances the warm cobbler perfectly.
-
Garnish: Add fresh banana slices or a sprinkle of cinnamon on top for an eye-catching finish.
-
Personal Touch: Drizzle a bit of caramel sauce over the top for that extra flair. Who doesn’t love a bit of indulgence?
Recipe Variations
Feeling creative? Here are a few fun twists and variations to try:
-
Nutty Addition: Add a cup of chopped pecans or walnuts in with the bananas for a crunchy texture contrast.
-
Chocolate Lovers: Incorporate half a cup of chocolate chips into the batter for a decadent chocolate-banana combo.
-
Tropical Twist: Mix in some shredded coconut or chopped pineapple for a tropical flavor journey.
-
Spiced Up: Add a dash of nutmeg along with the cinnamon for a spicier backdrop that complements the bananas beautifully.
-
Vegan Version: Substitute eggs with flaxseed meal mixed with water (1 tablespoon flaxseed meal + 2.5 tablespoons water = 1 egg) and use a non-dairy cream cheese option. Use almond or coconut milk, and you’re in business!
Chef’s Notes
You know, this Banana Cream Cheese Cobbler has quite a journey. It started as an afternoon experiment, and I honestly had no idea it would become such a family favorite! My niece, who claims to "not like bananas," begs for seconds every time I make it. I’ve learned to keep my baking skills sharp, especially with little critics around. It truly brings a smile to my face when I see others enjoying something I created from scratch.
In fact, the beauty of this recipe is how adaptable it is! Each time I’ve made it, I tweak little things here and there. Sometimes I’ll add a pinch of nutmeg for warmth, other times I’ll play around with the types of bananas (the more spotted, the better). It’s all part of my cooking philosophy—get creative, have fun, and don’t be afraid to experiment!
FAQs and Troubleshooting
Have questions? Don’t worry; I’ve got your back! Here are some common reader questions and potential mistakes:
-
What if my cobbler is too dense?
This can happen if you overmix the batter. Gentle folding is key to keep that lovely airy texture. Remember, we want fluffy, not brick-like! -
Can I make this ahead of time?
Absolutely! You can prepare the batter and cream cheese mixture separately, refrigerate them, and then bake when you’re ready to serve. -
What if my bananas are under-ripe?
Aim for ripe bananas, as they bring out sweetness and flavor. If you’re in a pinch, you can still use them, but the cobbler will taste less sweet. Maybe add a tad more sugar to balance it out! -
How do I store leftovers?
If you have any leftovers (which I doubt!), keep them in an airtight container in the refrigerator for up to 3-4 days. Reheat in the microwave or oven before serving.
Nutritional Info
While I believe in enjoying good food, being mindful can be part of the joy too! Here’s a general nutritional breakdown per serving (makes about 12 servings):
- Calories: Approx. 220
- Fat: 10g
- Carbohydrates: 30g
- Fiber: 1g
- Sugar: 10g
- Protein: 3g
Of course, this will vary based on swaps and portion sizes! Remember to enjoy it in moderation, savoring each delightful bite.
Final Thoughts
As we wrap up this delicious journey into the world of Banana Cream Cheese Cobbler, I hope you’re feeling inspired to dive into the kitchen and create something beautiful. More than just a recipe, this cobbler brings the warmth of home and the joy of sharing togetherness. It’s about creating memories and indulging in the simple yet profound pleasures of life.
So, why not gather your loved ones for a cozy dessert night? Bake up this cobbler and let the sweet aroma fill your home. As you slice into that golden crust and reveal the luscious banana and cream cheese layer, you’ll be able to relive my grandmother’s kitchen with a fresh twist of your own.
Until next time, happy baking, and remember—food is better when shared! Let me know how your baking adventure goes in the comments below, and keep spreading the love with every delicious bite. Bon appétit! 🥧
Print
Banana Cream Cheese Cobbler
- Total Time: 55 minutes
- Yield: 12 servings 1x
- Diet: Vegetarian
Description
A comforting dessert that features juicy bananas in a creamy custard with a buttery cobbler crust, inspired by nostalgic flavors of banana pudding.
Ingredients
- 4 ripe bananas, sliced
- 8 oz cream cheese, softened
- 1 cup all-purpose flour
- 1 cup granulated sugar
- ½ cup unsalted butter, melted
- 1 cup milk
- 2 large eggs
- 1 tablespoon baking powder
- 1 teaspoon vanilla extract
- ½ teaspoon salt
- ½ teaspoon ground cinnamon
- Powdered sugar, for dusting (optional)
Instructions
- Preheat your oven to 350°F (175°C).
- Prepare a 9×13-inch baking dish by greasing it lightly.
- Mix the cream cheese layer by whisking together cream cheese, half of the sugar, and vanilla extract until smooth.
- Beat the eggs until fluffy, then mix in the remaining sugar.
- Combine the melted butter and milk with the egg mixture, stirring gently.
- Mix the dry ingredients in another bowl, then gradually incorporate into the wet mixture.
- Add the banana slices and fold gently.
- Assemble by pouring batter into the baking dish and swirling dollops of the cream cheese mixture on top.
- Bake for about 35-40 minutes until golden brown and a toothpick comes out clean.
- Cool slightly and dust with powdered sugar before serving.
Notes
Serve warm with vanilla ice cream or whipped cream for an indulgent treat.
- Prep Time: 15 minutes
- Cook Time: 40 minutes
- Category: Dessert
- Method: Baking
- Cuisine: American
Nutrition
- Serving Size: 1 serving
- Calories: 220
- Sugar: 10g
- Sodium: 200mg
- Fat: 10g
- Saturated Fat: 5g
- Unsaturated Fat: 4g
- Trans Fat: 0g
- Carbohydrates: 30g
- Fiber: 1g
- Protein: 3g
- Cholesterol: 50mg
Keywords: banana cobbler, dessert, comfort food, baking, family recipe

Strawberry Cheesecake Dump Cake Recipe
Strawberry Cheesecake Dump Cake Recipe
Introduction
Hey there, food lovers! It’s your pal Beau Collier, back in the kitchen with another feel-good recipe that’s bound to put a smile on your face and a delicious treat in your belly. Today, we’re diving into the wonderful world of desserts with my crowd-pleasing Strawberry Cheesecake Dump Cake. If you’ve ever found yourself wrestling with multiple bowls, spoons, and flaming hopes for dessert, this recipe is for you.
Imagine a dessert that combines the creamy richness of cheesecake with the sweet bursts of juicy strawberries—all in one easy, breezy baking dish. That’s what this dump cake is all about! I love a good cheesecake, but sometimes the whole process can feel like climbing a culinary mountain. With this recipe, we’re taking the frustration out of dessert preparation, focusing instead on the joy of sharing something sweet with the people we love.
One of the great things about this dump cake is that it captures all the nostalgic vibes of summer picnics and birthday celebrations, without any complicated steps. If you’re confused about what a dump cake is, let me break it down—it’s as simple as dumping all the ingredients into a pan, letting them mingle, and baking them into something truly magical. That’s my kind of kitchen wizardry!
And let’s not forget about the versatility of this dish. Whether you have fresh strawberries from the farmer’s market or frozen ones languishing in your freezer, you can whip up this delight any time of the year. Plus, the ingredients are super simple and easy to find, so get ready to roll up your sleeves and scoop out some yumminess.
Alright, let’s gather our ingredients and get started because this Strawberry Cheesecake Dump Cake is calling your name!
Personal Story
I’ll never forget the summer family barbecues at my grandma’s house growing up. She was quite the chef, and her desserts always stole the show. I can still hear the girls giggling as we waited for her to bring out the desserts, the sweet smell of strawberry pie wafting through the air. But it was her no-fuss dump cakes that got everyone buzzing with anticipation.
One particular summer, she shared her loved strawberry dump cake recipe with me. I remember standing beside her, captivated as she explained how easy it was to mix and match flavors. It was our little secret, and not just because she was a culinary influence; it pretty much symbolized the joy and togetherness that food brings.
Since then, I’ve created my twist on it, incorporating cheesecake flavors while still keeping it effortlessly delicious. Making this dish reminds me of those warm summer afternoons spent laughing and loving. It’s a recipe that evokes deep nostalgia while also being perfect for sharing new memories with friends and family. Now, my goal is to pass this love and laughter along to you, so let’s make some magic in the kitchen!
Ingredients
Here, I’m breaking down the ingredient list for you. Each ingredient plays a significant role, so let’s take a closer look.
-
2 cups fresh strawberries (sliced): Fresh strawberries bring vibrant flavor and natural sweetness to this dessert. If you don’t have fresh strawberries, frozen strawberries work too—just be sure to thaw and drain them before adding.
-
1 (8 oz) package cream cheese (softened): This is where we get that creamy cheesecake flavor. Low-fat cream cheese works well too. If you’re going dairy-free, try using a vegan cream cheese alternative!
-
1 cup granulated sugar: This sweetens the cream cheese mixture just right. If you’re looking for a healthier option, coconut sugar can be a great substitute.
-
1 teaspoon vanilla extract: This adds depth of flavor and enhances the sweetness of the strawberries. Feel free to use pure vanilla to make it even better!
-
1 box yellow cake mix: The backbone of our dump cake. You can easily swap this out for a gluten-free cake mix without losing that yummy flavor.
-
1/2 cup unsalted butter (melted): This adds richness to the cake mix. If you’re looking for a dairy-free alternative, coconut oil works beautifully!
-
1 cup milk: This gives moisture to the batter. Almond milk or oat milk are excellent substitutes for a dairy-free version.
-
1/2 teaspoon salt: Balances out the sweetness from the sugar and enhances the overall flavor.
-
Powdered sugar (for dusting, optional): This is the delightful finishing touch if you want to add some visual flair.
Step-by-Step Instructions
Now comes the fun part—baking! Follow these steps, and you’ll have a mouthwatering Strawberry Cheesecake Dump Cake ready to serve in no time.
-
Preheat your oven: First things first, preheat your oven to 350°F (175°C). This ensures the cake bakes evenly and gives you that perfect golden color.
-
Prepare your baking dish: Grab a 9×13 inch baking dish and grease it lightly with some butter or cooking spray. This will prevent any sticky situations later on.
-
Slice the strawberries: If you’re using fresh strawberries, wash and slice them. If you’re using frozen, remember to thaw them and discard any excess liquid. Evenly distribute the sliced strawberries across the bottom of your prepared baking dish.
-
Mix that cream cheese: In a mixing bowl, beat the softened cream cheese until it’s smooth and creamy. Add in the granulated sugar and vanilla extract, mixing until all the ingredients are well incorporated. This sweet, creamy layer is going to be the star of our dessert!
-
Spread the cream cheese mixture: Once it’s mixed well, spread the cream cheese mixture evenly over the fresh strawberry layer in your baking dish. Don’t fret if it’s not perfect; it’ll spread and blend as it bakes.
-
Combine cake mix and butter: In another bowl, pour in the yellow cake mix and melted butter. Mix until you get crumbly, coarse crumbs. This is where the magic starts; those crumbles will create a lovely topping.
-
Sprinkle the cake mix topping: Evenly sprinkle the buttery cake mix over the cream cheese layer. It doesn’t have to be meticulous—just ensure it covers it nicely. You want it to be rustic and cozy!
-
Pour the milk: Now pour the cup of milk evenly over the topping. This is what keeps everything moist and delicious. You might notice some liquid pooling; that’s okay—the oven will work its magic.
-
Bake your cake: Pop that glorious creation in the oven and bake for 45-50 minutes. You want the top to be golden and crisping nicely, and this will fill your kitchen with the most incredible aroma!
-
Cool and serve: Once it’s out of the oven, let it cool for about 10-15 minutes before serving. You can dust the top with powdered sugar, but that’s totally optional. Dive in warm with maybe a scoop of ice cream on the side, and I promise, you won’t regret it!
Serving Suggestions
Plating this beauty is all about making it look as delightful as it tastes. Here’s how I like to serve the Strawberry Cheesecake Dump Cake:
-
Individual servings: Use a scoop or spoon to serve portions onto dessert plates or bowls. For a fun touch, top with whipped cream or a generous scoop of vanilla ice cream!
-
Garnish with fresh strawberries: Add a few fresh slices (or whole strawberries) on top for that extra pop of color.
-
Dust with powdered sugar: A light sprinkle of powdered sugar adds the perfect finishing touch and gives a café-like vibe to your presentation.
-
Pair with drinks: Serve it alongside a refreshing glass of lemonade, sweet tea, or even a cup of coffee to balance the sweetness. Perfect for entertaining or enjoying a cozy evening at home!
Recipe Variations
The beauty of a dump cake is that it’s super versatile. Here are a few creative twists you can try:
-
Berry mix: Swap out the strawberries for a mix of berries like blueberries, raspberries, or blackberries for a colorful berry medley dumping flavor.
-
Nutty crunch: Add chopped nuts like pecans or almonds into the cake mix topping before baking for a delightful crunchy texture.
-
Chocolate lovers: For a chocolatier version, incorporate chocolate chips into the cream cheese layer, or substitute chocolate cake mix for the yellow cake mix.
-
Coconut twist: Stir in unsweetened shredded coconut into the cake mix for an island flair. Topped with toasted coconut, it’ll feel like a tropical getaway.
-
Banana cheesecake dump cake: Layer sliced bananas along with the strawberries for a unique banana-strawberry combo! Super smooth and creamy, it’ll take comfort food to another level.
Chef’s Notes
This recipe has certainly evolved over time. I used to make it using lots of heavy ingredients and complicated techniques, but I realized that the magic is in keeping it simple and creative. One of my favorite kitchen stories is about the first time I decided to make this for a gathering. I was a little nervous since baking isn’t normally my forte, but when I pulled it out of the oven and saw my friends devouring it, I knew I had struck gold.
Now, I whip this up whenever there’s an occasion, a gathering, or just a Tuesday that feels too ordinary. It’s become a staple in my recipe repertoire, always reminding me of family gatherings filled with laughter and love.
FAQs and Troubleshooting
-
What if my dump cake is soggy?: Ensure you didn’t add too much liquid accidentally. If it’s soggy after baking, let it cool completely; it may set up as it cools.
-
Can I make this ahead of time?: Absolutely! You can prep the ingredients and store them separately in the fridge one day ahead of time. Just assemble and bake when you’re ready.
-
What if I can’t find cream cheese?: You can substitute with mascarpone for a creamier texture or even a vegan cream alternative if you’re looking for a dairy-free option.
-
Can I double the recipe?: Sure thing! Just use a bigger baking dish, and you may need to add a few minutes to the baking time.
Nutritional Info
While I don’t focus too much on nutrition when baking (because, let’s be real, dessert is meant to be indulgent), here’s a breakdown. This Strawberry Cheesecake Dump Cake yields around 12 servings:
- Calories per serving: Approximately 275 calories
- Total Fat: 13g
- Saturated Fat: 7g
- Cholesterol: 40mg
- Sodium: 210mg
- Total Carbohydrates: 40g
- Dietary Fiber: 1g
- Sugars: 25g
- Protein: 2g
Final Thoughts
There you have it, folks—my go-to Strawberry Cheesecake Dump Cake recipe is a culinary hug that everyone is sure to love! It’s simple, satisfying, and a guaranteed way to bring sweetness into your day or night.
So gather your ingredients, invite your friends or family, and create some happy memories over this delicious dessert! Remember, cooking is all about joy, so don’t stress—just enjoy the experience! I’d love to hear how yours turns out and any fun twists you try—drop a comment or send me a message! Until next time, happy cooking, lovelies! 🍓❤️
Print
Strawberry Cheesecake Dump Cake
- Total Time: 60 minutes
- Yield: 12 servings 1x
- Diet: Vegetarian
Description
A simple and delicious dessert that combines the creamy richness of cheesecake with fresh strawberries, all in one easy dump cake.
Ingredients
- 2 cups fresh strawberries (sliced)
- 1 (8 oz) package cream cheese (softened)
- 1 cup granulated sugar
- 1 teaspoon vanilla extract
- 1 box yellow cake mix
- 1/2 cup unsalted butter (melted)
- 1 cup milk
- 1/2 teaspoon salt
- Powdered sugar (for dusting, optional)
Instructions
- Preheat your oven to 350°F (175°C).
- Prepare a 9×13 inch baking dish and grease it lightly.
- Slice the strawberries and evenly distribute them across the bottom of the dish.
- Mix cream cheese in a bowl until smooth; add sugar and vanilla extract, mixing until well incorporated.
- Spread the cream cheese mixture over the strawberry layer.
- Combine yellow cake mix and melted butter until crumbly.
- Sprinkle the cake mix topping over the cream cheese layer.
- Pour milk evenly over the topping.
- Bake for 45-50 minutes until golden and crisp.
- Cool for 10-15 minutes before serving. Dust with powdered sugar if desired.
Notes
Serve warm with whipped cream or vanilla ice cream. This dessert can be made ahead of time by prepping ingredients separately.
- Prep Time: 15 minutes
- Cook Time: 45 minutes
- Category: Dessert
- Method: Baking
- Cuisine: American
Nutrition
- Serving Size: 1 serving
- Calories: 275
- Sugar: 25g
- Sodium: 210mg
- Fat: 13g
- Saturated Fat: 7g
- Unsaturated Fat: 6g
- Trans Fat: 0g
- Carbohydrates: 40g
- Fiber: 1g
- Protein: 2g
- Cholesterol: 40mg
Keywords: Dump Cake, Strawberry, Cheesecake, Dessert, Easy Recipe

Minute Cucumber Sandwiches: Fresh, Light Summer Lunch
Cucumber Sandwiches: A Light and Lively Treat
Hey there, food lovers! If you’re here, it means you’re ready to add a delightful touch to your next gathering, picnic, or even just a cozy afternoon at home. Let’s talk about one of my all-time favorite snacks—cucumber sandwiches! These little delights are not only refreshing but also incredibly easy to whip up. Whether you’re a grandmaster in the kitchen or just starting your culinary journey, I’m here to guide you through every step. Trust me, once you try them, you’ll be making these for brunches, tea parties, and even casual get-togethers!
Cucumber sandwiches hail from the lovely traditions of British afternoon tea, but they’ve made their way into kitchens around the world. They’re light, creamy, and absolutely bursting with flavor. Plus, they can dress up any platter or occasion. There’s something wonderfully nostalgic about them—something refreshing that reminds me of sunny afternoons spent with family and friends.
I remember the first time I tried cucumber sandwiches. It was a beautiful sunny day, and my grandma set up a picnic outside. She brought out a wicker basket filled with all sorts of goodies, and right on top were these delicate little sandwiches. The first bite was like a burst of freshness—crisp cucumbers nestled in creamy goodness, all hugged by soft bread. From that moment, I was hooked! My grandma’s recipe has accompanied me through many gatherings, and I can’t wait to share it with you today.
So, if you’re ready to tantalize your taste buds and whip up a batch of these cucumber sandwiches, let’s jump right in!
Ingredients
Before we dive into how you can create these delightful bites, let’s gather our ingredients. Here’s what you need:
-
2 large cucumbers
Fresh cucumbers are key. Look for ones that are firm and have a vibrant green color. If you want a little more crunch, you can try using English cucumbers, as they tend to have fewer seeds and are a bit sweeter! -
8 oz cream cheese
Cream cheese gives that creamy element we all love. For a lighter version, you can use low-fat cream cheese. If you’re feeling adventurous, add flavored cream cheese like chive or herb varieties for a unique spin! -
2 tbsp fresh dill or parsley
Fresh herbs elevate the flavor of these sandwiches. Dill offers a classic pairing with cucumber, but you can also swap it for parsley, basil, or even chives if that’s what you have on hand. Just make sure they’re fresh for the best flavor. -
Salt and pepper to taste
Simple seasonings can make a world of difference. A pinch of sea salt and freshly cracked pepper will really enhance the flavors, but don’t go overboard—remember, we want to keep it light! -
Bread slices (white or whole wheat)
Choose your favorite bread; both white and whole wheat work beautifully. You can also experiment with rye or even gluten-free options. Just make sure it’s soft enough to easily bite into, but sturdy enough to hold the filling.
Now that we’ve got our ingredients in place, let’s get cooking!
Step-by-Step Instructions
Step 1: Prepare the Cucumbers
First things first, let’s take those cucumbers and give them a good wash. It’s like giving them a little spa treatment! Next, slice the cucumbers thinly—aim for about 1/8-inch thick slices. A mandoline slicer works great for this if you have one, but a sharp knife will do the trick too!
Chef’s Tip:
If you want your cucumbers to be extra crisp, soak the slices in cold water for about 10 minutes. Drain them, and pat dry with a paper towel. This also helps reduce any bitterness for a refreshing bite!
Step 2: Prepare the Cream Cheese Mixture
While those cucumbers soak, let’s move on to the cream cheese mixture. In a mixing bowl, combine the cream cheese with your chopped fresh dill or parsley. Add a pinch of salt and pepper to taste. Mix everything well until it’s smooth and creamy.
Chef’s Fun Hack:
Want some added zing? Squeeze in a bit of lemon juice or add a few drops of hot sauce to the cream cheese mixture for that little extra flair!
Step 3: Spread the Cream Cheese
Once your cream cheese is perfectly blended, grab your bread slices. Lay them out on a clean surface and spread an even layer of the cream cheese mixture on one side of each slice. Be generous—it’s a flavor-packed spread, and we want every bite to come together beautifully!
Step 4: Assemble the Sandwiches
Now it’s time for the star of the show—cucumbers! On half of the bread slices, layer the cucumber slices in an overlapping manner. Don’t be shy—pile them on; they not only look pretty but also taste sublime!
Step 5: Create the Sandwich
After layering on the cucumbers, take the other half of the cream cheesy bread and gently press it on top. Voila—your sandwiches are formed!
Step 6: Cut and Serve
Using a sharp knife, cut the sandwiches into squares or triangles, depending on how fancy you’re feeling. Make them bite-sized for easy handling and enjoyment!
Chef’s Note:
If you’re entertaining, you might want to serve these on a beautiful platter and savor how good they look. You could even garnish with extra herb sprigs for decoration!
Serving Suggestions
These cucumber sandwiches are best enjoyed fresh, but if you need to prepare them in advance, cover them with a damp paper towel and store them in the fridge until serving. When you’re ready to indulge, serve them alongside a refreshing cup of tea or lemonade for that picture-perfect afternoon snack!
You could also pair them with a light salad to make a delightful lunch spread or present them as hors d’oeuvres at your next gathering. Offer a choice of dipping sauces, like tzatziki or a yogurt herb dip, and watch your guests dive in!
Recipe Variations
While I’m a die-hard fan of the classic cucumber sandwich, feel free to get creative! Here are a few tasty twists:
-
Avocado Twist: Instead of cream cheese, mash up avocado. Sprinkle with lime juice, and season with salt for a creamy and delicious swap!
-
Spicy Kick: Add slices of jalapeño or a bit of sriracha to the cream cheese for some heat. It’s bold, just like you!
-
Smoked Salmon Delight: Add a layer of smoked salmon on top of the cucumbers for a posh twist that elevates the classic recipe into something uniquely delicious.
-
Herbed Cream Cheese: Mix in different herbs like chives and tarragon to the cream cheese for an aromatic touch that’ll have everyone coming back for more.
-
Mediterranean Flair: Substitute the cucumbers for roasted red peppers and add some feta cheese for a Mediterranean spin. Yum!
Chef’s Notes
Over the years, I’ve played around with this sandwich a lot! What started as my grandma’s simple recipe has turned into a canvas for imagination. Sometimes I even coat the edges of the sandwiches with crushed nuts or even a sprinkle of everything bagel seasoning for that extra crunch!
And let me tell you, there’s one thing I’ve learned in my culinary adventures—never take these sandwiches too seriously! There’s a certain charm to a little imperfection in the kitchen that makes cooking a joyous experience. So, if your sandwiches aren’t perfect squares, they’re still delicious!
FAQs and Troubleshooting
Here are some common questions I often hear about cucumber sandwiches along with handy tips to keep in mind:
1. Why are my cucumbers soggy?
Soggy cucumbers are often a result of not drying them well after soaking. Make sure to pat them dry before layering them on the bread.
2. Can I make the sandwiches in advance?
Absolutely! Just keep them covered in the fridge to prevent the bread from drying out. However, for the best texture and flavor, I recommend making them closer to serving time.
3. What bread is best for cucumber sandwiches?
You can use any bread you prefer! Soft white bread, whole wheat, or even a light rye are all excellent choices. The key is to avoid crusty bread, as it might overpower the delicate filling.
4. Can I freeze the sandwiches?
I wouldn’t recommend freezing them, as the cucumbers will lose their crispiness and the bread will become soggy upon thawing. Keep them fresh for the best experience!
Nutritional Info
Here’s a quick nutritional overview if you’re curious about what you’re enjoying:
- Calories: Approximately 180 per serving (2 sandwiches)
- Protein: 6g
- Carbohydrates: 15g
- Fat: 10g
- Fiber: 1g
Of course, these numbers can vary based on your choice of bread, cream cheese, and any additional ingredients you choose to add.
Final Thoughts
There you have it, food lovers—my beloved cucumber sandwiches! They’re a blend of simple ingredients, bright flavors, and feel-good memories wrapped up in a delightful bite. Whether you’re serving them at a fancy afternoon tea, a casual picnic, or just for a cozy day at home, these sandwiches are sure to bring smiles to all faces around the table.
Don’t be afraid to get creative and make them your own. Cooking is about bringing joy, and these cucumber sandwiches are all about sharing that happiness with those you love.
So, grab those ingredients and let the fun begin! Trust me, with each bite, you’ll understand why they hold a special place in my heart—and hopefully yours too. Happy cooking!
Print
Cucumber Sandwiches
- Total Time: 15 minutes
- Yield: 4 servings 1x
- Diet: Vegetarian
Description
Light and refreshing cucumber sandwiches perfect for any gathering.
Ingredients
- 2 large cucumbers
- 8 oz cream cheese
- 2 tbsp fresh dill or parsley
- Salt and pepper to taste
- Bread slices (white or whole wheat)
Instructions
- Prepare the cucumbers by washing and slicing them thinly.
- Prepare the cream cheese mixture by combining cream cheese, chopped dill or parsley, salt, and pepper.
- Spread an even layer of the cream cheese mixture on one side of each bread slice.
- Assemble the sandwiches by layering cucumber slices on half of the bread slices.
- Create the sandwich by placing the other half of the cream cheesy bread on top.
- Cut into squares or triangles and serve.
Notes
Serve fresh or store covered in the fridge. Serve with tea or lemonade.
- Prep Time: 15 minutes
- Cook Time: 0 minutes
- Category: Snack
- Method: No Cooking
- Cuisine: British
Nutrition
- Serving Size: 2 sandwiches
- Calories: 180
- Sugar: 2g
- Sodium: 300mg
- Fat: 10g
- Saturated Fat: 5g
- Unsaturated Fat: 3g
- Trans Fat: 0g
- Carbohydrates: 15g
- Fiber: 1g
- Protein: 6g
- Cholesterol: 30mg
Keywords: cucumber sandwiches, easy snacks, vegetarian recipes, refreshing appetizers

Coconut Cloud Cake: 5-Ingredient Fluffy Dessert Recipe
Coconut Cloud Cake Recipe: A Slice of Paradise
Hey there, food lovers! It’s Beau Collier here, and today we’re diving into the delightful world of coconut treats with a recipe that’s sure to make your taste buds do the happy dance: our Coconut Cloud Cake! This cake is not just a dessert; it’s an experience—a slice of fluffy, cloud-like bliss that brings warmth and joy wherever it’s shared.
Picture this: It’s a sunny Sunday afternoon, and I’m in the kitchen with a mix of excitement and nostalgia. The aroma of coconut, sugar, and vanilla fills the air, transporting me back to my childhood, where every family gathering was incomplete without a coconut cake on the table. My grandma, with her flowered apron and infectious laughter, would whip up her famous coconut cake, slathered in creamy frosting and topped with a generous sprinkle of toasted coconut. It was a ritual, a bonding moment we all cherished.
Those sunny afternoons shaped my love for baking, especially when it came to coconut. The texture, the flavor, and the sheer joy of creating and sharing something delicious—it’s all wrapped up in this cake. It’s a recipe that not only fills your belly but also your heart. So, are you ready to create some sweet memories in your kitchen? Let’s get started!
Personal Story
Growing up in a small town, we didn’t have fancy restaurants or trendy desserts, but what we lacked in variety, we made up for in family traditions—and coconut cake was at the top of that list! Every spring, as the flowers bloomed and cheer filled the air, my grandma would pull out her mixer and baking pans, announcing it was time for her legendary Coconut Cloud Cake.
I can still hear her humming old tunes as she worked her magic. The thrill of waiting for the cake to come out of the oven was almost unbearable. "Patience, Beau," she would chuckle. "Good things come to those who wait." And oh, how I waited! When that gorgeous, fluffy cake finally emerged, it was my job to help her layer on the frosting and sprinkle the coconut on top. Each bite was like a delicious hug, and today, I want to pass that embrace on to you through this recipe. Let’s create our own sweet memories!
Ingredients
Here’s what you’ll need to create your Coconut Cloud Cake:
For the Cake:
-
2 1/2 cups all-purpose flour
This is the backbone of our cake, providing structure. For a gluten-free version, substitute with a 1:1 gluten-free flour blend. -
2 1/2 teaspoons baking powder
This helps our cake rise! Make sure it’s fresh for the best results—old baking powder can leave you flat. -
1/2 teaspoon salt
A pinch of salt enhances the flavor. Don’t skip it! -
1 cup unsalted butter, softened
The star of the show! Butter adds richness. If you’re in a pinch, you can substitute with coconut oil for a dairy-free twist. -
2 cups granulated sugar
Sugar not only sweetens but also helps to create that fluffy texture. You could use coconut sugar for a less processed option. -
4 large eggs, room temperature
Eggs bind everything together and help lift the cake. Room temperature eggs blend more easily into the batter. -
1 teaspoon vanilla extract
Adds depth of flavor. Feel free to use a quality brand or homemade vanilla extract for a personal touch. -
1 teaspoon coconut extract
This is where the magic happens! It intensifies that heavenly coconut flavor. -
1 cup coconut milk
Adds moisture and richness. For a lighter version, you can use almond milk or even oat milk if you’re avoiding dairy.
For the Frosting:
-
1 1/2 cups heavy whipping cream
We’re going for a luscious frosting here, and heavy cream is essential. If you need a lighter option, you could use whipped topping. -
8 oz cream cheese, softened
Cream cheese gives that perfect tang to balance the sweetness. For dairy-free, try using a vegan cream cheese. -
1/2 cup powdered sugar
This helps sweeten the frosting and give it that soft finish. Sift for a smooth texture. -
1 teaspoon vanilla extract
You know the drill! It enhances the overall flavor. -
1 teaspoon coconut extract
More coconut goodness? Yes, please!
For the Topping:
- 1 cup sweetened shredded coconut (toasted or fresh)
This adds that beautiful texture and flavor to finish your creation. Toasted coconut gives a lovely crunch and a deeper flavor.
Step-by-Step Instructions
Let’s get down to business and cook up this magic!
-
Preheat Your Oven
Start by preheating your oven to 350°F (175°C). Trust me, you want your oven nice and hot when the cake batter is ready! -
Prepare Your Baking Pans
Grease and flour two 9-inch round cake pans. You can also line them with parchment paper for easier removal later. No one likes a cake that sticks! -
Mix the Dry Ingredients
In a bowl, whisk together the flour, baking powder, and salt. This helps distribute the leavening agents evenly throughout the flour. Set aside for now! -
Cream the Butter and Sugar
In a large mixing bowl, beat the softened butter and granulated sugar together until light and fluffy—about 3-5 minutes. This step is crucial for a nice texture, so don’t rush it. -
Add the Eggs
Gradually add the eggs, one at a time, mixing well after each addition. This helps to incorporate air into the batter, making it fluffier. Add the vanilla and coconut extracts, and mix until just combined. -
Combine Wet and Dry Ingredients
Alternately add the dry flour mixture and coconut milk to the butter mixture, starting and ending with the flour. Mix until just blended to avoid over-mixing, which can lead to a dense cake. -
Bake the Cakes
Divide the batter evenly between the prepared pans. Bake in the preheated oven for 25-30 minutes or until a toothpick inserted in the center comes out clean. Your kitchen should smell amazing right about now! -
Cool the Cakes
Once baked, let the cakes cool in the pans for about 10 minutes, then transfer them to a wire rack to cool completely. Cooling is key; you want fluffy frosting, not a melted mess! -
Frost the Cake
While your cakes are cooling, let’s whip up that frosting! Beat the heavy cream until it forms stiff peaks. In another bowl, combine the softened cream cheese and powdered sugar until smooth. Fold in the whipped cream gently until all is well combined. -
Assemble the Cake
Once the cakes are completely cool, it’s time to put them together. Place one cake layer on a serving plate, spread a generous amount of frosting on top, then add the second layer. Frost the top and sides of the whole cake. Don’t be shy—go for it! -
Top with Coconut
Finally, sprinkle the sweetened shredded coconut over the top. You can toast the coconut beforehand in a skillet over medium heat for a few minutes until golden, adding an extra layer of deliciousness.
Serving Suggestions
Now that your Coconut Cloud Cake looks absolutely stunning, it’s time to serve it up! Slice pieces generously and pair them with a scoop of vanilla ice cream for an extra indulgent treat. Drizzle with a bit of warm coconut milk or a light fruit compote to elevate the experience.
If you’re feeling fancy, top each slice with a maraschino cherry or a sprinkle of dark chocolate shavings—trust me, it makes a visually captivating difference! For gatherings, consider serving on a beautiful cake stand with fresh tropical fruits like mango or pineapple surrounding it. Your cake will be the life of the party!
Recipe Variations
Here are a few fun twists on the classic Coconut Cloud Cake:
-
Lemon-Coconut Cake
Add the zest of one lemon to the batter for a zesty zing. Lemon pairs beautifully with coconut! -
Chocolate-Coconut Cake
Swap out a cup of flour with cocoa powder for a rich chocolate variant. You could also swirl some melted chocolate into the batter for an extra treat. -
Pineapple Coconut Cake
Add crushed pineapple (drained) to the batter for an island-inspired delight. It adds moisture and a lovely flavor. -
Nutty Coconut Cake
Incorporate chopped macadamia nuts or almonds into the batter for extra crunch. Just be sure to account for the added mass in the wet ingredients. -
Vegan Coconut Cake
Substitute with almond milk, coconut oil, and a flaxseed mixture instead of eggs for a plant-based version without sacrificing flavor.
Chef’s Notes
Over the years, I have played around with this recipe, adding my little twists and personal touches. I remember the time I accidentally forgot to add the eggs; the cake turned out denser but still delicious! It’s amazing how a little mistake can lead to a new favorite recipe. Each version tells a story, and that’s the beauty of cooking—embracing the imperfections and celebrating each creation.
Cooking is like writing a story; each ingredient and step is a word or sentence that brings everything together. And remember, the best moments often come from experimentation and a sprinkle of love!
FAQs and Troubleshooting
1. My cake didn’t rise! What went wrong?
This can happen if your baking powder is old or if the batter was over-mixed. Always check the freshness of your leavening agents.
2. My frosting is too runny. What should I do?
Ensure the heavy cream is very cold when whipping, and that the cream cheese is fully softened. If it’s too soft, you can add more powdered sugar to thicken it.
3. How do I store leftovers?
Keep the cake in an airtight container in the refrigerator for up to a week. If you want to freeze it, wrap slices well in plastic wrap and foil.
4. Can I make this cake ahead of time?
Absolutely! You can bake the cakes a day in advance, cool them, and wrap them tightly. Frost just before serving for the freshest taste!
Nutritional Info
Each slice of Coconut Cloud Cake comes with a delightful burst of flavor! Here’s a rough estimate of nutritional information per serving (1 slice, assuming 12 servings):
- Calories: 420
- Total Fat: 28g
- Saturated Fat: 17g
- Cholesterol: 90mg
- Sodium: 180mg
- Total Carbohydrates: 43g
- Dietary Fiber: 1g
- Sugars: 24g
- Protein: 4g
Note: Nutritional content may vary based on ingredient substitutions and serving sizes.
Final Thoughts
And there you have it—your very own Coconut Cloud Cake that is not just a treat, but a heartfelt slice of joy. I hope this recipe brings as much warmth and happiness to your kitchen as it has to mine. So, next time you’re looking for a dessert that feels like a big, comforting hug, remember this Coconut Cloud Cake.
Embrace the process, share it with friends and family, and create some sweet memories together! If you try this recipe, I’d love to hear about your experiences, variations, or favorite moments in the kitchen. So grab that fork and dig in—let’s celebrate the magic of food together!
Stay delicious, and until next time, keep cooking with love!
Now, don’t forget to check out more on Feastical for tips, hacks, and other awesome recipes that will keep your culinary passions alive! Happy baking!
Print
Coconut Cloud Cake
- Total Time: 1 hour
- Yield: 12 servings 1x
- Diet: Vegetarian
Description
A fluffy, cloud-like coconut cake that brings warmth and joy, perfect for any gathering.
Ingredients
- 2 1/2 cups all-purpose flour
- 2 1/2 teaspoons baking powder
- 1/2 teaspoon salt
- 1 cup unsalted butter, softened
- 2 cups granulated sugar
- 4 large eggs, room temperature
- 1 teaspoon vanilla extract
- 1 teaspoon coconut extract
- 1 cup coconut milk
- 1 1/2 cups heavy whipping cream
- 8 oz cream cheese, softened
- 1/2 cup powdered sugar
- 1 teaspoon vanilla extract (for frosting)
- 1 teaspoon coconut extract (for frosting)
- 1 cup sweetened shredded coconut (toasted or fresh)
Instructions
- Preheat your oven to 350°F (175°C).
- Prepare two 9-inch round cake pans by greasing and flouring them.
- Mix the flour, baking powder, and salt in a bowl, then set aside.
- Cream the butter and granulated sugar together until light and fluffy.
- Add the eggs one at a time, mixing well after each addition. Mix in the vanilla and coconut extracts.
- Combine the dry ingredients and coconut milk alternately into the butter mixture.
- Bake in the preheated oven for 25-30 minutes or until a toothpick comes out clean.
- Cool the cakes in the pans for 10 minutes, then transfer to a wire rack.
- Frost the cake by beating the heavy cream until stiff peaks form and combining with softened cream cheese and powdered sugar.
- Assemble the cake by layering and frosting between the cooled cake layers.
- Top with sweetened shredded coconut.
Notes
For variations, try adding lemon zest or incorporating chocolate or pineapple into the batter.
- Prep Time: 30 minutes
- Cook Time: 30 minutes
- Category: Dessert
- Method: Baking
- Cuisine: American
Nutrition
- Serving Size: 1 slice
- Calories: 420
- Sugar: 24g
- Sodium: 180mg
- Fat: 28g
- Saturated Fat: 17g
- Unsaturated Fat: 9g
- Trans Fat: 0g
- Carbohydrates: 43g
- Fiber: 1g
- Protein: 4g
- Cholesterol: 90mg
Keywords: coconut, cake, dessert, baking, fluffy

Minute Summer Pineapple Cucumber Salad with Mint
A Fresh Twist: Pineapple Cucumber Salad
Hey there, food lovers! Beau Collier here, and I am beyond excited to share with you one of my favorite go-to recipes – the delightful Pineapple Cucumber Salad. This dish captures a perfect harmony of sweet, tangy, and refreshing flavors; the kind of salad that makes you feel like summer is dancing on your palate, no matter the season.
As we dive into the details, I’ll guide you through not just the recipe but also the memories and kitchen secrets that make this dish truly special. So, grab a comfy seat, maybe a cold drink, and let’s get started on this culinary journey!
A Personal Story: Summer Memories and the Magic of Food
Food tends to carry with it the vibrations of the moments in which it’s shared, and this Pineapple Cucumber Salad is no different for me. I remember vividly the summer family get-togethers at my grandparents’ house. The scent of grilled meats wafting through the air, laughter echoing around the backyard, and the vibrant colors of fresh produce artfully arranged on platters—it all created a magical experience!
One dish that made a frequent appearance on our picnic table was a fruity salad similar to what I’m sharing today. A twist of pineapple and cucumber, my grandma used to toss it together like it was second nature. I’d shamelessly pile it onto my plate between bites of smoky ribs and buttery corn on the cob. It was the refreshing interlude I didn’t know I needed!
Whenever I make this salad nowadays, I’m transported back to those lazy afternoons. This dish is not just about taste; it’s about memories, connections, and the joy that comes from sharing a meal with those you love. Plus, it’s so versatile and easy to whip up, you’ll want to make it a part of your celebrations, too!
Ingredients: Let’s Gather Our Goodies!
Before we jump into making this beauty, let’s take a moment to gather all the ingredients. Here’s what you’ll need:
-
2 cups Pineapple (diced, fresh or canned, drained): Pineapple brings a perfect touch of sweetness and a burst of tropical flavor. If using canned, be sure to drain out any excess juice!
-
1 Cucumber (sliced thinly): The cucumber adds a crunchy texture and refreshing flavor. English cucumbers are great for this because they have fewer seeds, but any cucumber will do!
-
1/4 cup Red Onion (thinly sliced): A little red onion provides a slight zing and color contrast. If you prefer something milder, soak the sliced onion in cold water for 10 minutes before adding it to the salad.
-
1/4 cup Cilantro (chopped): Fresh herbs uplift any dish, and cilantro adds a bright note to the mix. Not a fan of cilantro? Feel free to substitute with parsley or mint!
-
2 tablespoons Lime Juice (freshly squeezed): Fresh lime juice is crucial; it enlivens the salad and balances the sweetness.
-
1 tablespoon Olive Oil: A touch of good-quality olive oil ties everything together and adds richness.
-
1 teaspoon Honey (or agave for a vegan option): Just a hint of sweetness to enhance the natural flavors.
-
1/4 teaspoon Salt (to taste): Salt is your friend—it brings all the flavors to life!
-
1/4 teaspoon Black Pepper (to taste): A pinch of black pepper adds a bit of warmth to the salad.
These ingredients are simple yet elevate the dish in such a satisfying way, creating a salad that’s perfect for barbecues, potlucks, or a refreshing lunch at home.
Step-by-Step Instructions: Crafting Your Salad Masterpiece
Now that we have our ingredients, let’s start creating this delicious pineapple cucumber salad!
-
Prep Your Ingredients: Start by dicing the pineapple if you’re using fresh. Aim for bite-sized pieces, making it easy to enjoy with each forkful. For canned pineapple, make sure to drain it thoroughly so the salad doesn’t get watery.
-
Slice the Cucumber: Using a sharp knife, thinly slice your cucumber. If you’re feeling fancy, you can use a mandoline for even slices. Aim for about 1/8-inch thickness. The thin slices blend nicely with the other ingredients and allow the flavors to meld beautifully.
-
Chop the Red Onion and Cilantro: Thinly slice the red onion and chop the cilantro. I like to use kitchen shears for cutting herbs; it’s quicker and leaves less mess behind. Don’t be scissor-shy—fresh herbs make a world of difference!
-
Mix It Up: In a large mixing bowl, combine the pineapple, cucumber, red onion, and cilantro. Give them a gentle toss, embracing all those vibrant colors together. You want to see the layers of flavor blend without mashing anything up!
-
Create the Dressing: In a small bowl, whisk together the lime juice, olive oil, honey (or agave), salt, and pepper. This dressing will add a zingy kick to the salad that pulls everything together. Taste and adjust—seasons vary, and you want to achieve that perfect balance.
-
Toss the Salad: Pour the dressing over the salad and gently toss everything until all ingredients are coated evenly. Feel free to be generous with the tossing; we want every bite to be packed with flavor!
-
Chill & Serve: Let the salad sit in the fridge for about 30 minutes—this allows the flavors to marry and develop. When ready to serve, give it another light toss, and enjoy the delicious contrast of flavors!
Serving Suggestions: Plating Your Salad
When it comes to serving this pineapple cucumber salad, there are plenty of options! I love to serve it in a large, shallow bowl or a beautiful platter so all those vibrant colors really pop. You can garnish it with extra cilantro leaves or some additional lime wedges on the side for an eye-catching presentation.
For a bit of style, try serving it in individual glass bowls or jars! This not only looks impressive but makes it easy for guests to grab a serving. You can also pair it alongside grilled chicken, fish tacos, or even serve it on a bed of greens for a more substantial lunch option.
Recipe Variations: Get Creative!
While this Pineapple Cucumber Salad is already a winner on its own, feel free to jazz it up! Here are some variations to consider:
-
Add Avocado: Creamy avocado slices can elevate the texture and add healthy fats to your salad.
-
Spicy Kick: Toss in diced jalapeños or a sprinkle of red pepper flakes for some heat! That sweet and spicy combination is nothing short of magic.
-
Nuts and Seeds: Sprinkle some toasted sunflower seeds or chopped cashews on top for a delightful crunch that contrasts with the softer textures of the salad.
-
Protein Boost: Add grilled chicken, shrimp, or even chickpeas for a protein boost, turning this salad into a well-rounded meal.
-
Tropical Twist: Experiment with additional fruits like mango, kiwi, or even mint for a more tropical flair! The more colorful, the better—let your creativity shine!
Chef’s Notes: A Dish That Evolves
Over the years, this salad has seen its fair share of transformations. Initially, it was a recipe passed down from my grandmother, where it remained almost untouched for years. However, experimenting in the kitchen is what keeps things fun!
I now enjoy playing with seasonal ingredients and adding whatever is fresh at the market when I recreate this salad. One constant ingredient, though, is nostalgia. It reminds me of family gatherings and the sense of togetherness that only good food can foster.
FAQs and Troubleshooting: Your Common Questions
-
Can I prepare this salad ahead of time?
Absolutely! This salad can be made a few hours in advance. Just remember that it’s best enjoyed fresh, so prepare it close to serving time if possible. -
What if my pineapple is too tart?
If your pineapple ends up being a little tart, just adjust the sweetness of your dressing by adding more honey or agave, or even a pinch of sugar, if needed. -
How do I keep my cucumber from getting soggy?
If you want to prevent your cucumber from releasing too much water, try sprinkling them with a little salt and letting them sit for about 10 minutes before adding them to the salad. This draws out excess moisture! -
Can I use dried herbs instead of fresh?
Fresh herbs deliver the best flavor, but if you don’t have any, you can use dried herbs. Use about 1/3 the amount since dried herbs are more concentrated.
Nutritional Info
This Pineapple Cucumber Salad not only pleases your taste buds, but it’s also packed with nutrients. Here’s a quick breakdown:
-
Pineapple: Rich in vitamins C and B6, manganese, and bromelain—a digestive enzyme.
-
Cucumber: Low in calories and packed with water, cucumbers are excellent for hydration. They’re also a good source of vitamin K.
-
Red Onion: Contains antioxidants and compounds that may help reduce inflammation and improve heart health.
-
Cilantro: High in vitamins A, K, and C, cilantro is an excellent addition if you’re looking to boost your nutrient intake.
This salad can serve as a light and refreshing side dish or a healthy addition to any meal, without compromising on flavor!
Final Thoughts: Let’s Celebrate Flavor!
So there you have it—a vibrant, delicious, and simple Pineapple Cucumber Salad. It’s not just a dish but a celebration of flavors and memories. Each bite packs a punch, taking you on a tropical getaway, even if you’re just in your kitchen!
As you prepare this delightful salad, remember the joy that comes with creating and sharing food. Don’t hesitate to customize it to fit your taste; after all, cooking is a personal journey! I cannot wait to hear about the variations you try and the memories you create around this dish.
Until next time, keep cooking with love and creativity, and never forget—every meal is a chance to make unforgettable memories. Let’s dig into life together, one delicious recipe at a time!
Print
Pineapple Cucumber Salad
- Total Time: 30 minutes
- Yield: 4 servings 1x
- Diet: Vegetarian
Description
A refreshing salad combining sweet pineapple and crunchy cucumber, perfect for summer gatherings or as a light lunch.
Ingredients
- 2 cups Pineapple (diced, fresh or canned, drained)
- 1 Cucumber (sliced thinly)
- 1/4 cup Red Onion (thinly sliced)
- 1/4 cup Cilantro (chopped)
- 2 tablespoons Lime Juice (freshly squeezed)
- 1 tablespoon Olive Oil
- 1 teaspoon Honey (or agave for a vegan option)
- 1/4 teaspoon Salt (to taste)
- 1/4 teaspoon Black Pepper (to taste)
Instructions
- Prep your ingredients by dicing the pineapple and slicing the cucumber.
- Slice the cucumber thinly.
- Chop the red onion and cilantro.
- Mix the pineapple, cucumber, red onion, and cilantro in a large mixing bowl.
- Create the dressing by whisking together lime juice, olive oil, honey, salt, and pepper in a small bowl.
- Toss the salad with the dressing until evenly coated.
- Chill the salad in the fridge for about 30 minutes before serving.
Notes
Great for barbecues, potlucks, or as a refreshing lunch dish. Serve chilled for the best flavor.
- Prep Time: 15 minutes
- Cook Time: 0 minutes
- Category: Side Dish
- Method: Mixing
- Cuisine: Fusion
Nutrition
- Serving Size: 1 serving
- Calories: 180
- Sugar: 11g
- Sodium: 90mg
- Fat: 6g
- Saturated Fat: 1g
- Unsaturated Fat: 5g
- Trans Fat: 0g
- Carbohydrates: 28g
- Fiber: 3g
- Protein: 2g
- Cholesterol: 0mg
Keywords: salad, pineapple, cucumber, refreshing, summer

Minute Cucumber Guacamole Bites for Summer Entertaining
Cucumber Guacamole Appetizer Bites: A Refreshing Twist on a Classic Favorite
Hey there, foodie friends! 🌟 Today, I’m super excited to share one of my absolute favorite appetizers that’s not only easy to make but also packs a punch of flavor and freshness. I’m talking about Cucumber Guacamole Appetizer Bites! If you’re looking for a light, refreshing treat that’ll impress your guests (or just provide the perfect snack while binge-watching your favorite show), you’ve found it!
Picture this: a sunny afternoon gathering with friends on the patio, laughter filling the air, and the aroma of delicious food wafting through the breeze. You reached into the fridge and pulled out some creamy guacamole—because, let’s be honest, who doesn’t love guac? Now, instead of the usual tortilla chips, imagine crisp slices of European cucumber topped with that velvety goodness. Sounds heavenly, right? This dish combines simplicity with sophistication. Not only is it packed with wholesome ingredients, but it also looks like it’s straight out of your favorite bistro’s menu.
You don’t have to be a culinary expert to whip up these gorgeous bites. Seriously, if you can slice a cucumber and scoop some guacamole, you’re halfway there! Plus, the beauty of this dish is that it can be customized to fit any occasion or dietary preference. Whether you’re hosting a summer gathering, having a cozy date night, or just need a mid-afternoon snack, Cucumber Guacamole Appetizer Bites are here to save the day and delight your taste buds.
So, grab your apron and let’s dive into this deliciously fresh recipe that will surely become a staple in your kitchen!
A Nostalgic Twist on Creamy Goodness
Reflecting on my love for this recipe takes me back to the summer barbecues of my childhood. My grandparents had a stunning garden where they grew a variety of fruits and veggies, and, of course, cucumbers were always plentiful. They had this secret recipe for guacamole that was like no other—spicy, creamy, and oh-so-delicious. While my family would devour heaps of chips and guacamole, it was my imaginative cousin who decided to use cucumbers as a base instead. Watching her compose those little appetizer bites was pure magic.
From that moment, the combination of creamy guacamole and crisp cucumber became a summertime staple in our family. Not only did it add a light, refreshing crunch, but it also meant everyone could enjoy the snack without overindulging. Whether I was helping my cousin slice cucumber rounds or sneaking bites of guac before it ever made it to the table, those memories are forever etched in my heart. It’s amazing how simple ingredients can create such powerful memories and experiences. And that’s why I’m so excited to share this recipe with you! Let’s keep the tradition alive and bring some laughter and flavor into our kitchens.
Ingredients
Here’s what you’ll need to make these delightful Cucumber Guacamole Appetizer Bites. I’ll also throw in some quick insights for each ingredient!
-
1 large European cucumber: The star of the show! European cucumbers are ideal because they have fewer seeds and a thinner skin. If you can’t find one, you can substitute with regular cucumbers, just consider peeling them if you want a less bitter taste.
-
1 cup guacamole: Feel free to use store-bought or make your own homemade version! If you want to customize it, try adding diced tomatoes, jalapeños for some heat, or even a squeeze of lime for a zesty pop!
-
Chili powder (or Tajin seasoning): To sprinkle on top, adding a hint of spice and color. If you want something milder, a sprinkle of paprika or even just salt will do the trick.
Step-by-Step Instructions
Alright, let’s get down to the good stuff—making these beauties! Follow these detailed steps, and you’ll have a platter of Cucumber Guacamole Appetizer Bites ready in no time.
Step 1: Prepare the Cucumber
-
Slice your cucumber: Using a sharp knife, slice your European cucumber into rounds about ½ inch thick. This thickness gives them a satisfying crunch and provides a sturdy base for the guacamole.
-
Tip: If you want a bit of color, you can use a peeler to create stripes on the cucumber! Just run it down the length in a pattern, alternating between peeling and leaving the skin intact. Not only does it look fancy, but it also adds some visual flair to your dish.
Step 2: Make or Use Guacamole
-
If you’re going homemade: Start with ripe avocados. Cut them in half, remove the pits, and scoop the flesh into a bowl. Mash them with a fork or a potato masher until they reach your desired creaminess. Mix in lime juice, salt, diced onion, garlic powder, cilantro, and jalapeños as desired.
-
If using store-bought: Take that guacamole out of the fridge and give it a good stir! It’s always nice to add a few extras like fresh cilantro or a splash of lime juice for an elevating touch.
Step 3: Assemble the Bites
-
Scoop the guac: Use a spoon or a piping bag (fancy, huh?) to dollop or pipe a generous scoop of guacamole onto each cucumber round. Don’t be shy—this is the star flavor we want to shine!
-
Tip: If you’re planning to prepare these ahead of time, just assemble the cucumber and keep the guacamole separate until serving. It’ll maintain that fresh, vibrant color, and no browning will occur!
Step 4: Add Your Seasoning
-
Sprinkle it: To finish off these beauties, sprinkle a touch of chili powder or Tajin seasoning atop each bite. This adds a pop of color and a delightful kick!
-
Tip: Feel free to get creative! You could even add a small slice of jalapeño on top for an extra spicy bite.
Serving Suggestions
To serve these crisp, creamy trailers of joy, place them on a decorative platter, alternating between cucumber and guacamole to create a lovely visual arrangement. Garnishing with fresh cilantro leaves or a sprinkle of additional seasoning not only adds beauty but also a final touch of flavor.
These bites are perfect for any occasion—an appetizer for a garden party, snacks for a movie night, or even a light meal on a hot day. Pair them with fresh tortilla chips, margaritas, or your favorite beverage and you’ll have everything you need for a delightful gathering.
Recipe Variations
Here are some creative twists you can make to this recipe, just to keep things exciting:
-
Roasted Garlic Guacamole: Add roasted garlic into your guacamole for a rich and savory flavor.
-
Herbed Cream Cheese Spread: Swap guacamole for a creamy goat cheese or herbed cream cheese for a different but equally delicious topping!
-
Add Ins: For a bit of zing, incorporate diced tomatoes or mango into your guacamole for a sweet and tangy flavor burst.
-
Spicy Salsa: Instead of guacamole, top with your favorite salsa for a fresh, zippy option!
-
Veggie Wraps: Roll these cucumber bites with strips of bell pepper or carrots for added crunch and color—perfect for a summer picnic!
Chef’s Notes
Just a little secret here—I’ve been known to nibble on the leftovers of this dish way too many times! It’s a great post-workout snack or a guilty pleasure when you need a midday pick-me-up.
I’ve also experimented with varying levels of seasoning, so don’t be afraid to play it by ear! If you have a couple of friends who prefer something spicier or milder, aluminum foil can help keep some of the bites mild while the others pack a punch.
FAQs and Troubleshooting
-
Can I prepare these in advance?
- Absolutely! Just prepare the cucumber and guacamole separately. Assemble them right before serving for the best flavor and freshness.
-
What if my guacamole turns brown?
- Don’t panic! If you’ve made too much guacamole, just add a sprinkle of lime juice over the surface before covering it with plastic wrap to help prevent browning.
-
Can I use different types of cucumbers?
- Sure! Regular cucumbers work, but you might want to peel them to reduce bitterness and make them more appealing.
-
What’s the best way to store leftovers?
- If you have leftover cucumber rounds, store them in a sealed container in the fridge. Guacamole can be stored separately with plastic wrap pressed against its surface to prevent browning.
Nutritional Info
Let’s talk about how deliciously healthy these beauties are! Each Cucumber Guacamole Appetizer Bite is low in calories and packed with nutritious goodness.
On average, one cucumber slice topped with guacamole contains:
- Calories: ~50
- Carbohydrates: ~6g
- Healthy fats: ~4g (thanks to the avocado)
- Fiber: ~2g (cucumbers are surprisingly high in fiber!)
- Vitamins: Rich in Vitamin K, C, and E
These bites make for a guilt-free party snack, so feel free to enjoy them without holding back!
Final Thoughts
And there you have it, friends—Cucumber Guacamole Appetizer Bites that will transform any gathering into a flavor-packed fiesta! While these bites are undeniably simple, they remind us that the best meals usually come from the heart and highlight fresh, wholesome ingredients.
Whether you’re reminiscing about your own childhood memories in the kitchen, entertaining friends, or just feeding your cravings, I hope this recipe becomes a delightful addition to your culinary repertoire. Let’s keep the love of good food alive. Grab those cucumbers and guacamole, and let’s make some tasty memories! Happy cooking! 🍽️
Print
Cucumber Guacamole Appetizer Bites
- Total Time: 10 minutes
- Yield: 4 servings 1x
- Diet: Vegetarian
Description
A light and refreshing appetizer featuring crisp cucumber rounds topped with creamy guacamole.
Ingredients
- 1 large European cucumber
- 1 cup guacamole
- Chili powder (or Tajin seasoning) for garnish
Instructions
- Slice your cucumber into rounds about ½ inch thick.
- Make or use store-bought guacamole, mixing in lime juice and desired extras.
- Scoop a generous amount of guacamole onto each cucumber round.
- Sprinkle chili powder or Tajin seasoning on top of each bite.
Notes
These bites can be prepared ahead of time if you keep the guacamole separate until serving.
- Prep Time: 10 minutes
- Cook Time: 0 minutes
- Category: Appetizer
- Method: No-Cook
- Cuisine: Mexican
Nutrition
- Serving Size: 1 serving
- Calories: 50
- Sugar: 1g
- Sodium: 150mg
- Fat: 4g
- Saturated Fat: 0.5g
- Unsaturated Fat: 3g
- Trans Fat: 0g
- Carbohydrates: 6g
- Fiber: 2g
- Protein: 1g
- Cholesterol: 0mg
Keywords: cucumber bites, guacamole, appetizer, vegetarian snack, healthy snacks
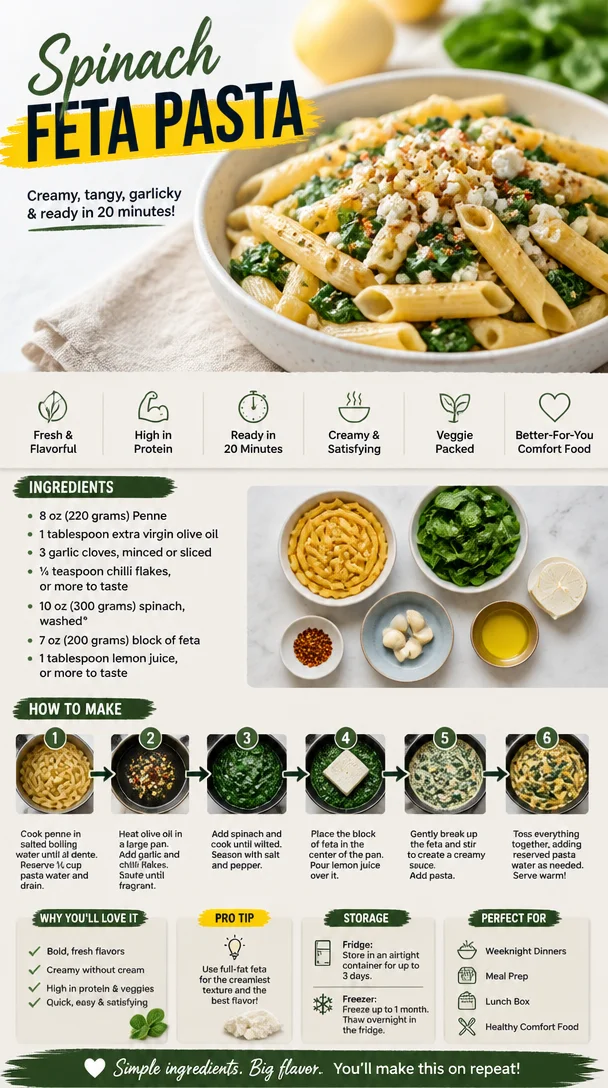
Spinach Feta Pasta
The Delish Spinach Feta Pasta You’re Going to Adore
Hey there, food lovers! Today, we’re diving into a delightful dish that has stolen my heart and probably yours too – Spinach Feta Pasta. If you’re like me, you appreciate meals that are simple, satisfying, and full of flavor. This dish wraps you up in a warm embrace, just like your favorite oversized sweater, and it comes together quicker than you can say “pasta perfection!”
Imagine walking into your kitchen to a fragrant medley of garlic, olive oil, and fresh spinach swirling together in harmony. The vibrant green of the spinach against the crumbly, salty feta is enough to make anyone drool. Whether you’re whipping it up for a quick weeknight dinner, impressing friends at a dinner party, or meal prepping for the week ahead, this dish is as versatile as it is delicious. Let’s get ready to make some kitchen magic!
My Spinach Feta Pasta Memories
Now, let me take you back in time to my first encounter with this dish. I remember it vividly—it was spring, and I was home from college visiting my parents. My mom was in the kitchen, her favorite apron tied around her waist, stirring something fragrant on the stove. The aroma wafting through the house was intoxicating, and it pulled me right in.
“Come help me with this recipe I found,” she said with a twinkle in her eye. I rushed to her side, eager to be her little sous-chef. As we mixed the fresh spinach with crumbled feta, sautéed garlic, and a sprinkle of chili flakes, I realized how much more than food this was—it was a celebration of flavors, family, and togetherness. We laughed, we chopped, and by the end of the evening, we had created a dish that would become a staple in our household.
Years later, I made this dish for my friends during a cozy dinner gathering. They couldn’t believe how easy it was to prepare! With each bite, I saw smiles spreading across their faces—the joy of good food shared with good company. That night, I realized that this Spinach Feta Pasta wasn’t just a recipe; it was a memory-maker!
Ingredients
Let’s get down to the nitty-gritty—here’s what you’ll need to create this amazing dish:
-
8 oz (220 grams) Penne (or similar pasta shape)
A classic choice for this dish. If you want a gluten-free option, quinoa pasta or chickpea pasta can work beautifully without sacrificing the flavor! -
1 tablespoon extra virgin olive oil
Use the good stuff here! Extra virgin olive oil adds a rich flavor that elevates the dish. If you’re in a pinch, you can use regular olive oil. -
3 garlic cloves, minced or sliced
Garlic is the star of the show! It adds depth and aroma. If you’re a garlic lover (like me!), don’t hesitate to add extra! -
¼ teaspoon chili flakes, or more to taste
A hint of heat adds a kick! Adjust based on your spice tolerance; if you prefer less heat, you could substitute with black pepper. -
10 oz (300 grams) spinach, washed
Fresh spinach is packed with nutrients. If you can’t find fresh, frozen spinach can work too—just make sure to thaw and drain well. -
7 oz (200 grams) block of feta
Crumbled feta brings creaminess and a tangy taste. For a vegan alternative, try using tofu feta or another nut-based cheese. -
1 tablespoon lemon juice, or more to taste
This brightens everything up! Feel free to add more for that extra zing. Lime juice can also be a fun swap!
Now that we’ve gathered our ingredients, let’s get cooking!
Step-by-Step Instructions
-
Boil the Water
Bring a large pot of salted water to a boil. The salt is vital to seasoning the pasta as it cooks. When the water is bubbling enthusiastically, toss in your penne. Cook according to package instructions until al dente—usually around 10-12 minutes. Don’t forget to stir it occasionally so it doesn’t stick! -
Sauté the Garlic
While the pasta is cooking, heat the extra virgin olive oil in a large skillet over medium heat. Add the minced or sliced garlic and sauté until it becomes fragrant and golden (about 1-2 minutes). Be careful not to burn it; burnt garlic is bitter rather than flavorful! -
Add the Chili Flakes
Stir in the chili flakes and let them sizzle for just a moment to release their flavor. That glorious aroma is going to hit your kitchen, trust me! -
Toss in the Spinach
Add the washed spinach to the skillet. Don’t be alarmed if it looks like a mountain—spinach wilts down dramatically. Stir frequently, and let it cook until it’s wilted and bright green. -
Incorporate the Feta
Crumble in the feta and toss everything together. Watch how it melts just enough to create a luscious sauce. The creamy texture of the feta mixed with the spinach is pure magic! -
Combine the Pasta and Sauce
Once your pasta is cooked, reserve a cup of the pasta water (trust me on this—it’s liquid gold for adjusting sauces best!). Drain the penne and add it directly to the skillet. -
Finish with Lemon Juice
Squeeze that fresh lemon juice over the top, and mix everything well. If the pasta seems a bit dry, slowly add some reserved pasta water until you reach the desired creaminess. -
Taste and Adjust
Give it a taste and adjust the seasoning—maybe you need a bit more salt, or perhaps a sprinkle of chili flakes? This is your dish!
Serving Suggestions
When it comes to plating, simplicity is key! Serve your Spinach Feta Pasta in a large bowl or individual plates, making sure to get a good mix of spinach, feta, and pasta in each serving. A light drizzle of extra virgin olive oil on top just before serving is a lovely touch. If you’re feeling fancy, add a wedge of lemon on the side for that extra zing when digging in.
For an extra touch of color, sprinkle some chopped fresh herbs like parsley or mint on top! It’s all about those little details that make a dish shine.
Recipe Variations
Here are a few ideas to keep this dish exciting and cater to your tastes or dietary preferences:
-
Creamy Spinach Feta Pasta: Add a splash of cream or a dollop of cream cheese to the skillet after adding the feta for a richer sauce.
-
Add Protein: Toss in some grilled chicken, shrimp, or chickpeas to make this a heartier option! Simply cook the protein before the garlic and set aside to add just before serving.
-
Vegetable Medley: Swap half the spinach for other greens like kale or arugula, or even throw in some sun-dried tomatoes for a colorful twist.
-
Herby Delight: Experiment with different herbs! Fresh basil, dill, or even oregano can change the flavor profile and take you on a culinary journey.
-
Pasta Swap: Feeling adventurous? Try using whole wheat pasta, or even zucchini noodles for a low-carb alternative!
Chef’s Notes
This recipe has evolved since my mom made it all those years ago. Over time, I’ve experimented with different ingredients and discovered how versatile this dish can be. I once had a friend’s Italian grandmother teach me to add a pinch of nutmeg to the spinach for a warm depth of flavor—who knew? Also, every time I make it, I remember my family gathering around the table, laughing and sharing stories. It’s more than just a meal; it’s a moment we create together.
FAQs and Troubleshooting
-
Why is my pasta sticking together?
Make sure to stir the pasta during the first couple of minutes of cooking. Additionally, adding a bit of olive oil to the water can help prevent sticking. -
Can I use frozen spinach instead?
Absolutely! Make sure to thoroughly thaw and squeeze out excess water before adding it to the skillet. Frozen spinach can be just as delicious and time-saving. -
What if I don’t have feta?
No problem! You can substitute with goat cheese for a tangy flavor, or use any soft cheese you have on hand. -
How do I store leftovers?
Store leftovers in an airtight container in the refrigerator for 3-4 days. Reheat on the stovetop with a splash of water or olive oil to revive its creaminess.
Nutritional Info
Spinach Feta Pasta is not just delicious; it’s also packed with nutrients! Spinach is rich in iron and vitamins A, C, and K. Feta adds calcium and protein to the mix. Each serving can range around 350-450 calories, depending on the portion sizes and whether you add protein or cream. This makes it a great balance between indulgence and nourishment!
Final Thoughts
There you have it, my dear foodies! Spinach Feta Pasta is a dish that ticks all the boxes—easy, fast, nutritious, and utterly comforting. It’s perfect for those evenings when you want a home-cooked meal without the fuss. Remember, the magic of cooking is not just in the eating but in the love you put into it. So, gather your loved ones, cook up this delightful dish, and create your own beautiful memories in the kitchen. Here’s to many delicious meals ahead—happy cooking!
PrintSpinach Feta Pasta
- Total Time: 25 minutes
- Yield: 4 servings 1x
- Diet: Vegetarian
Description
A quick and flavorful dish featuring pasta, fresh spinach, crumbled feta, and garlic, perfect for weeknight dinners or meal prep.
Ingredients
- 8 oz (220 grams) Penne
- 1 tablespoon extra virgin olive oil
- 3 garlic cloves, minced or sliced
- ¼ teaspoon chili flakes, or more to taste
- 10 oz (300 grams) spinach, washed
- 7 oz (200 grams) block of feta
- 1 tablespoon lemon juice, or more to taste
Instructions
- Boil a large pot of salted water. Add the penne and cook according to package instructions.
- Heat olive oil in a large skillet over medium heat. Add garlic and sauté until fragrant and golden.
- Add chili flakes and allow to sizzle briefly.
- Toss in the spinach, cooking until wilted.
- Crumble in the feta and mix well.
- Combine the cooked pasta with the spinach mixture, adding some reserved pasta water if needed.
- Squeeze lemon juice over the top, mix thoroughly, and adjust seasoning as desired.
Notes
For a creamy version, add a splash of cream or cream cheese after adding the feta. You can also include proteins like chicken or shrimp for a heartier meal.
- Prep Time: 10 minutes
- Cook Time: 15 minutes
- Category: Main Course
- Method: Sautéing
- Cuisine: Italian
Nutrition
- Serving Size: 1 serving
- Calories: 400
- Sugar: 2g
- Sodium: 500mg
- Fat: 16g
- Saturated Fat: 5g
- Unsaturated Fat: 8g
- Trans Fat: 0g
- Carbohydrates: 48g
- Fiber: 4g
- Protein: 15g
- Cholesterol: 30mg
Keywords: Spinach Feta Pasta, quick pasta recipe, vegetarian pasta, easy dinner recipe
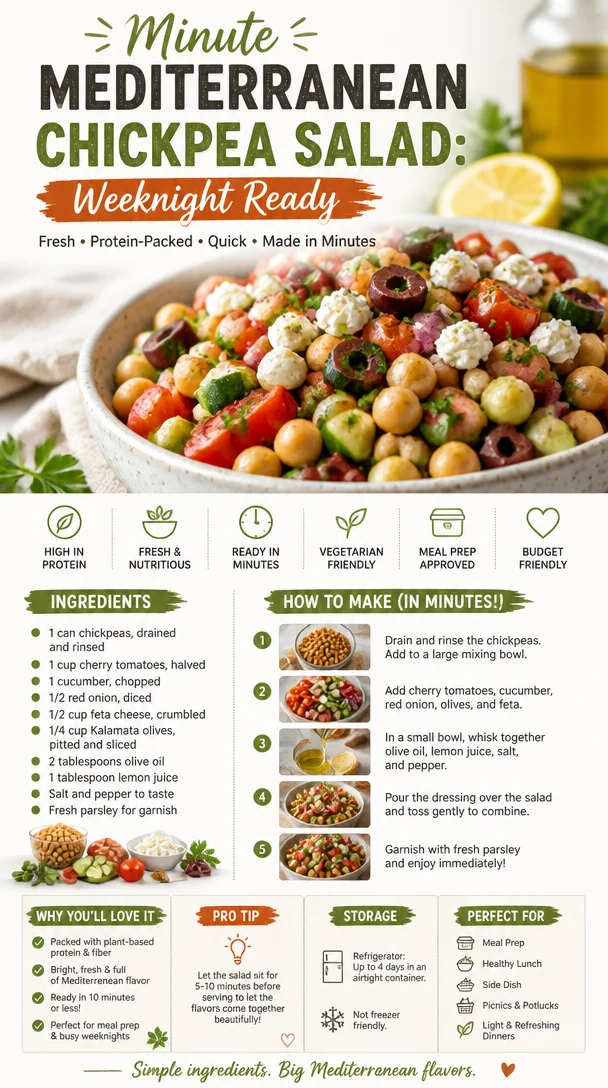
Minute Mediterranean Chickpea Salad: Weeknight Ready
Fresh Mediterranean Chickpea Salad: A Tasty Trip to the Mediterranean
Hey there, food lovers! Are you ready to dive into a dish that is not only vibrant and refreshing but also packed with nutrients? Let’s talk about the Fresh Mediterranean Chickpea Salad! This delightful salad is a celebration of flavors and textures, and trust me, it’s a dish that will have your taste buds dancing with joy.
Imagine this: It’s a sun-soaked afternoon, and you’re lounging in your garden, soaking up the rays. The scent of fresh veggies wafts through the air, and you know it’s time for a delicious, wholesome meal. Whether you’re hosting a summer picnic or simply want a quick and easy dinner after a long day, this chickpea salad checks all the boxes. It’s colorful, loaded with goodness, and takes mere minutes to whip up. The best part? You can customize it to suit your taste, so let’s get those kitchen vibes flowing!
This salad has a little Mediterranean magic to it—think sun-kissed tomatoes, crispy cucumbers, and tangy feta cheese—all wrapped up in a light olive oil and lemon dressing. It’s all about reminding us of those sun-drenched days spent near the Mediterranean coast, even if we’re just enjoying it at home.
Let’s take a trip down memory lane, shall we?
A Garlic-Infused Memory
One of my fondest culinary memories revolves around a family trip to Greece many years ago. We were exploring the colorful market in Athens, where the vibrant produce stole my heart: juicy tomatoes, glossy olives, crunchy cucumbers—the colors were simply breathtaking. My aunt, who I considered a culinary goddess, encouraged me to sample everything, from pungent olives to fragrant herbs.
As we wandered, we stumbled upon a hidden restaurant with tables adorned by rustic tablecloths and a stunning view of the Acropolis. While feasting on fresh salads and homemade pita, I tasted a chickpea salad that was bursting with flavor. It had a simplicity that felt almost profound. Each bite was a reminder of how little you actually need to create something beautiful. That experience sparked my lifelong love for Mediterranean cuisine, and this salad is my homage to my travels and those memorable petas filled with laughter and food.
Now, let’s channel that spirit as we whip up a bowl of Fresh Mediterranean Chickpea Salad!
Ingredients
Here’s what you’ll need to make this beautiful dish:
-
1 can chickpeas, drained and rinsed
Chickpeas (or garbanzo beans) are the star of this salad. They’re not only hearty but also a great plant-based protein source. If you want to use dried chickpeas, simply soak them overnight and boil until tender! -
1 cup cherry tomatoes, halved
Cherry tomatoes add a sweet pop of flavor and vibrant color. Feel free to use any tomato variety you prefer; just chop them up if they’re larger! -
1 cucumber, chopped
Cool, crunchy cucumbers bring hydration and a refreshing crunch. You can swap with Persian cucumbers for a sweeter profile or even use zucchinis if you want to experiment. -
1/2 red onion, diced
Red onion introduces a gentle bite that balances the salad’s freshness. Try using green onions for a milder flavor, or a sprinkle of shallots for something subtly sweet. -
1/2 cup feta cheese, crumbled
Feta cheese contributes a creamy, salty richness; it’s essential! Can’t eat dairy? Try using almond feta for a vegan alternative or omit it for a lighter version altogether. -
1/4 cup Kalamata olives, pitted and sliced
Kalamata olives give a briny depth that elevates the dish. If you’re not a fan, green olives can work too, just be mindful of their flavor strength! -
2 tablespoons olive oil
This is your dressing base. Use extra-virgin olive oil for the best flavor—it’s like liquid gold! If olive oil isn’t your jam, feel free to substitute with avocado oil. -
1 tablespoon lemon juice
Freshly squeezed lemon juice adds acidity and brightness to the salad. In a pinch? Bottled lemon juice works, but fresh is always best. -
Salt and pepper to taste
Essential for enhancing the flavors of your ingredients. Just taste as you go! -
Fresh parsley for garnish
Chopped parsley not only adds color but also a fresh herbal note. You could swap it for basil or mint if you like something aromatic!
Step-by-Step Instructions
Now that we have our ingredients ready, let’s get into the heart of the matter! Follow these simple steps:
-
Prep Your Ingredients:
Before you start throwing things into a bowl, take a moment to prep. Rinse the chickpeas under cold water to remove any canning liquid (this gets rid of that metallic taste). Chop the cherry tomatoes, cucumber, and red onion. The more uniform your chunks, the more beautiful your salad will be! -
Mix It Up:
Grab a large mixing bowl, and toss in the chickpeas, halved cherry tomatoes, chopped cucumber, diced red onion, crumbled feta, and sliced Kalamata olives. With this combo, you’re already off to a colorful start! -
Dress It Up:
Drizzle the olive oil and lemon juice over the salad. This is where the magic happens, as these ingredients help all the flavors come together. Sprinkle salt and pepper generously to taste; seasoning is key! -
Toss-o-Rama:
With your hands (or a spatula if you’re feeling fancy), gently toss the salad until everything is well combined. Try to be gentle with the feta so it doesn’t crumble too much; we want those beautiful chunks in our salad. -
Garnish & Serve:
Sprinkle freshly chopped parsley on top for that pop of freshness. You can even add a few extra olives or feta on top for presentation. -
Chill (Optional):
If time allows, let the salad sit for about 30 minutes to an hour! This lets the flavors meld together beautifully. But hey, if you’re too hungry to wait, dig in right away!
Serving Suggestions
Now, how to plate this beauty? You’ve got options! Serve this salad in deep bowls to emphasize its heartiness, or on a large platter for a communal vibe. Pair it with warm pita bread, a drizzle of yogurt dip, or even some grilled chicken or fish for a full Mediterranean feast. It can also stand alone as a light lunch or picnic lunch—just pack it up in a mason jar and shake it when you’re ready to eat.
For a little touch of elegance, you might want to drizzle some additional balsamic glaze over the top right before serving; it not only adds flavor but also a beautiful, glossy finish. Just a tip from yours truly!
Recipe Variations
The beauty of this salad lies in its versatility. Here are some creative twists you can try:
-
Add-Ins Galore:
Want some greens? Toss in a handful of baby spinach or arugula for added nutrition. -
Higher Protein:
Add diced grilled chicken, shrimp, or even some quinoa for an extra protein boost. -
Spice it Up:
Want a bit of heat? Dice up a jalapeño or sprinkle some red pepper flakes into the mix. -
Herbal Delight:
Consider adding fresh herbs like basil, mint, or even dill for a fragrant twist that will enhance the Mediterranean experience. -
Citrus Kick:
Besides lemon juice, try adding a splash of fresh orange juice or even lime for a zesty undertone!
Chef’s Notes
This Fresh Mediterranean Chickpea Salad has been a staple in my kitchen for years. It’s evolved through the seasons; sometimes I add what’s fresh from the garden, other times I just use what I have on hand. One time, I even made it with black beans instead of chickpeas—it was a fun twist and surprisingly tasty! My friends often tease me about how simple it is, but they all agree: sometimes the simplest things are the most comforting, just like food should be.
FAQs and Troubleshooting
-
Can I substitute the chickpeas?
Absolutely! You can use any bean or even lentils if you’re feeling adventurous. Just ensure they’re cooked and seasoned well. -
What if I can’t find Kalamata olives?
No problem! Any pitted olives will work. Just choose ones you enjoy eating! -
How long can I store leftovers?
This salad keeps well in the fridge for about 2-3 days. Just know that the cucumbers may lose some crunch, but the flavor will still be fabulous! -
Is this salad vegan?
It can easily be made vegan by omitting the feta cheese or substituting it with vegan-friendly cheese.
Nutritional Info
Now, who doesn’t want to know the goodness they’re putting into their bodies? This salad is not only delicious but also packed with nutrients. Here’s a quick breakdown per serving:
- Calories: Approx. 250
- Protein: 10g
- Carbohydrates: 30g
- Fat: 12g (predominantly from healthy fats in olive oil and feta)
- Fiber: 8g
Thanks to the chickpeas, you’ll get a solid hit of protein and fiber. Plus, tomatoes and cucumbers are hydrating and low in calories. It’s guilt-free eating at its finest!
Final Thoughts
There you go, my fellow foodies! A Fresh Mediterranean Chickpea Salad that is bursting with flavor, nutrition, and stories just waiting to unfold. Whether you decide to enjoy it on its own or pair it with something delightful, this salad is sure to elevate any meal. So why not gather some friends, whip up this recipe, and let the fresh flavors spark conversations? Remember, good food is all about creating moments, sharing laughter, and making lasting memories.
Don’t forget to tag me and show off your salad masterpieces on social media! I can’t wait to see how you make this dish your own. Happy cooking, and until next time, keep those flavors bright and beautiful! 🍽️❤️
PrintFresh Mediterranean Chickpea Salad
- Total Time: 10 minutes
- Yield: 4 servings 1x
- Diet: Vegetarian
Description
A vibrant and refreshing chickpea salad, loaded with Mediterranean flavors, perfect for a picnic or a light meal.
Ingredients
- 1 can chickpeas, drained and rinsed
- 1 cup cherry tomatoes, halved
- 1 cucumber, chopped
- 1/2 red onion, diced
- 1/2 cup feta cheese, crumbled
- 1/4 cup Kalamata olives, pitted and sliced
- 2 tablespoons olive oil
- 1 tablespoon lemon juice
- Salt and pepper to taste
- Fresh parsley for garnish
Instructions
- Prep your ingredients: Rinse the chickpeas under cold water, chop the tomatoes, cucumber, and onion.
- Mix it up: In a large mixing bowl, combine chickpeas, tomatoes, cucumber, onion, feta, and olives.
- Dress it up: Drizzle olive oil and lemon juice over the salad, then season with salt and pepper.
- Toss-o-Rama: Gently toss the salad until well combined, being careful with the feta.
- Garnish & serve: Top with freshly chopped parsley and enjoy!
- Chill (Optional): Let the salad sit for 30 minutes to meld flavors before serving.
Notes
Feel free to customize with your favorite veggies or proteins like grilled chicken or shrimp!
- Prep Time: 10 minutes
- Cook Time: 0 minutes
- Category: Salad
- Method: Mixing
- Cuisine: Mediterranean
Nutrition
- Serving Size: 1 serving
- Calories: 250
- Sugar: 5g
- Sodium: 400mg
- Fat: 12g
- Saturated Fat: 4g
- Unsaturated Fat: 6g
- Trans Fat: 0g
- Carbohydrates: 30g
- Fiber: 8g
- Protein: 10g
- Cholesterol: 30mg
Keywords: Mediterranean salad, chickpea salad, healthy salad, quick recipes, vegetarian recipes