
No-Bake Grasshopper Mint Chocolate Bark Recipe
Grasshopper Mint Chocolate Bark Recipe: A Sweet Journey into Flavor
Hey there, fellow food lovers! It’s your pal Beau Collier from Feastical, and today we’re diving into a delightfully nostalgic treat that’s bound to take your taste buds on a joyful ride: Grasshopper Mint Chocolate Bark. If you’re a fan of mint and chocolate—which let’s be real, who isn’t?—then you’re in for a real treat. This recipe is not only a feast for your senses but also a heartwarming slice of my culinary journey.
You see, whenever I think about this decadent treat, I’m reminded of my childhood days spent in my grandmother’s kitchen. She had this magical way of turning ordinary moments into extraordinary memories, and her mint chocolate bark was no exception. I remember standing on a little stool, trying to reach the countertop while she melted chocolate, and the entire kitchen filled with that enchanting scent. Each time she peeled open a box of Andes Crème de Menthe Thins, it was as if we were unwrapping little treasures! I would sneak pieces when I thought she wasn’t looking, only to be met with a quick chuckle and the playful challenge of “sneak all you want, but I know a baker’s dozen is coming for you!”
Fast forward to the present, and I still get that same giddy feeling when I whip up this delightful bark. The recipe has evolved over the years, but the spirit of fun and fond memories remains at the forefront. So, let’s stir up those nostalgic vibes together and make some Grasshopper Mint Chocolate Bark!
Ingredients
Gathering your ingredients is half the fun! Here’s what you’ll need:
-
16 oz. white chocolate chips
A creamy base for your bark, these white chocolate chips are sweet and melt beautifully. If you’re feeling adventurous, you can substitute them with white baking chocolate, but remember it may not melt as smoothly. -
16 oz. semi-sweet chocolate chips
Rich and slightly bitter, these balance the sweetness of the white chocolate. Alternatively, opt for dark chocolate chips if you prefer a more intense flavor. -
1 box Andes Crème de Menthe Thins
The true star of the show! These mint chocolate candies add a delightful crunch and a burst of minty flavor. If you can’t find them, think about using other mint chocolates, but the Andes’ texture and flavor are hard to beat. -
Green food coloring
A splash of fun! It’s optional, but a few drops can amp up the festive look. If you want a more natural tint, consider using spirulina powder or matcha. -
Optional: 1 teaspoon mint extract
For those who really love mint, a little mint extract adds an extra oomph! Just remember to go easy on it; a little goes a long way.
Step-by-Step Instructions
Now, let’s get down to business and make some mint chocolate magic!
Step 1: Melting the Chocolate
Start by breaking down the two types of chocolate. In separate microwave-safe bowls, add your white chocolate chips in one bowl and semi-sweet chocolate chips in the other. Microwave them individually. Heat each for about 30 seconds, then stir. Repeat this process until they’re both completely melted and smooth like a dream. Pro tip: Stirring in between helps prevent burning, and who wants burnt chocolate? Yikes!
Step 2: Pour the Semi-Sweet Layer
Line a baking sheet with parchment paper. Pour the melted semi-sweet chocolate onto the parchment and spread it evenly with a spatula. If you want precision, a rolling pin over the parchment paper helps to smooth it out.
Step 3: Add Andes Thins
Now comes the fun part! Take those precious Andes Crème de Menthe Thins, and place them evenly over the semi-sweet chocolate layer while it’s still warm. Give them a minute to soften, then gently press them in—this helps them stick.
Step 4: Tint the White Chocolate
While the Andes chocolates work their magic, add a few drops of green food coloring to your melted white chocolate and stir until you achieve your desired shade of minty green! Remember: if you’re adding mint extract, do it here for an extra minty kick.
Step 5: Pour the White Chocolate
Pour the tinted white chocolate over the Andes layer, covering them completely. Use your spatula to spread it out, ensuring every piece of mint is cozy beneath that creamy layer. This step is like tucking in a favorite blanket—just so satisfying!
Step 6: Chill to Perfection
Let it cool at room temperature for a few minutes, then pop the whole tray in the fridge for about 1-2 hours or until fully firm. While you wait, maybe treat yourself to a spoonful of peanut butter or have a mint tea!
Step 7: Cut and Serve
Once the bark is set, lift it out using the parchment paper. Break or cut it into pieces. You can trim the edges for a cleaner look or break it up for that rustic charm.
Serving Suggestions
When it comes to showing off your gorgeous Grasshopper Mint Chocolate Bark, keep it simple yet charming! Place the pieces in a beautiful bowl, maybe topped with a sprig of fresh mint for that extra flair. It also makes for a delightful gift during holidays or special occasions; just pack it up in a clear cellophane bag, tie it with a ribbon, and voilà! A sweet token of love.
Recipe Variations
Ready to get creative? Here are some fun twists you can add to the basic recipe:
-
Nutty Crunch: Add chopped nuts like pistachios or almonds atop the Andes layer for extra crunch and flavor.
-
S’mores Style: Alternate layers of graham cracker crumbles for a s’mores-inspired bark.
-
Fruit Fusion: Incorporate freeze-dried raspberries or strawberries for a fruity twist that pairs wonderfully with mint.
-
Peppermint Twist for the Holidays: Add crushed peppermint candies on top instead of Andes during the festive season for a holiday-themed treat.
-
Vegan Options: Substitute chocolate chips for vegan versions and ensure your mint chocolates are dairy-free. Chocolate lovers unite!
Chef’s Notes
Making this Grasshopper Mint Chocolate Bark has become a rite of passage in my kitchen. While it’s a fantastic recipe, it’s also a conversation starter, making everyone reminisce about their favorite mint chocolate moments. Each time I make this fabulous treat, I’m reminded of the legacy of love baked into food and how it brings people together.
One of my funniest kitchen stories involves a not-so-great melt of chocolate that turned into more of a chocolate football during my early attempts. You live, you learn, right? Now, I’m a pro at melting chocolate and feel like a wizard with a solid stirring magic spell.
FAQs and Troubleshooting
-
Why is my chocolate not melting properly?
Make sure you’re microwaving in short bursts and stirring often. If it clumps, it might be overheated. Try adding a teaspoon of oil to help with texture! -
How do I get perfect shards when breaking the bark?
Slightly score the surface with a sharp knife before chilling. This will give you guidance for cutting and help create clean pieces! -
What if my white chocolate hardens before pouring?
Just place it back in the microwave for a few seconds to gently reheat. Use sparingly; you want it liquid but not too hot. -
How long will my bark last?
In an airtight container, your bark can remain fresh for about two weeks. But trust me, it won’t last that long!
Nutritional Info
If you’re curious about the nutritional breakdown of this delightful bark, here’s a rough estimate for one piece (assuming 15 servings per batch):
- Calories: 200
- Fat: 10g
- Carbohydrates: 28g
- Sugar: 24g
- Protein: 2g
Keep in mind, these numbers can vary based on your ingredients, so this is just a ballpark!
Final Thoughts
And there you have it, my fellow food enthusiasts! A simple and scrumptious Grasshopper Mint Chocolate Bark recipe that’s brimming with flavors and nostalgia. Whether you savor a piece on a quiet night or share it with loved ones, I hope this treat warms your heart as much as it does your taste buds.
So, dust off that spatula, channel your inner chocolatier, and get ready to create some sweet memories! Remember, in the kitchen, it’s all about having fun and bringing joy with food. Until next time, happy cooking, and keep spreading that love through great dishes!
Print
Grasshopper Mint Chocolate Bark
- Total Time: 30 minutes
- Yield: 15 servings 1x
- Diet: Vegetarian
Description
A delightful and nostalgic mint chocolate bark that combines creamy white chocolate with rich semi-sweet chocolate and Andes Crème de Menthe Thins.
Ingredients
- 16 oz. white chocolate chips
- 16 oz. semi-sweet chocolate chips
- 1 box Andes Crème de Menthe Thins
- Green food coloring (optional)
- 1 teaspoon mint extract (optional)
Instructions
- Start by breaking down the two types of chocolate. In separate microwave-safe bowls, add your white chocolate chips in one bowl and semi-sweet chocolate chips in the other. Microwave them individually. Heat each for about 30 seconds, then stir. Repeat this process until they’re both completely melted and smooth.
- Line a baking sheet with parchment paper. Pour the melted semi-sweet chocolate onto the parchment and spread it evenly with a spatula.
- Take the Andes Crème de Menthe Thins and place them evenly over the semi-sweet chocolate layer while it’s still warm. Press them in gently.
- Add a few drops of green food coloring to your melted white chocolate and stir until you achieve your desired shade. If using mint extract, add it now.
- Pour the tinted white chocolate over the Andes layer, covering them completely.
- Let it cool at room temperature for a few minutes, then refrigerate for about 1-2 hours or until fully firm.
- Lift out the bark using the parchment paper and break or cut it into pieces.
Notes
This bark can be stored in an airtight container for about two weeks.
- Prep Time: 15 minutes
- Cook Time: 15 minutes
- Category: Dessert
- Method: No-Cook
- Cuisine: American
Nutrition
- Serving Size: 1 piece
- Calories: 200
- Sugar: 24g
- Sodium: 50mg
- Fat: 10g
- Saturated Fat: 6g
- Unsaturated Fat: 4g
- Trans Fat: 0g
- Carbohydrates: 28g
- Fiber: 1g
- Protein: 2g
- Cholesterol: 5mg
Keywords: mint chocolate, dessert, bark, holiday treat, sweet snack
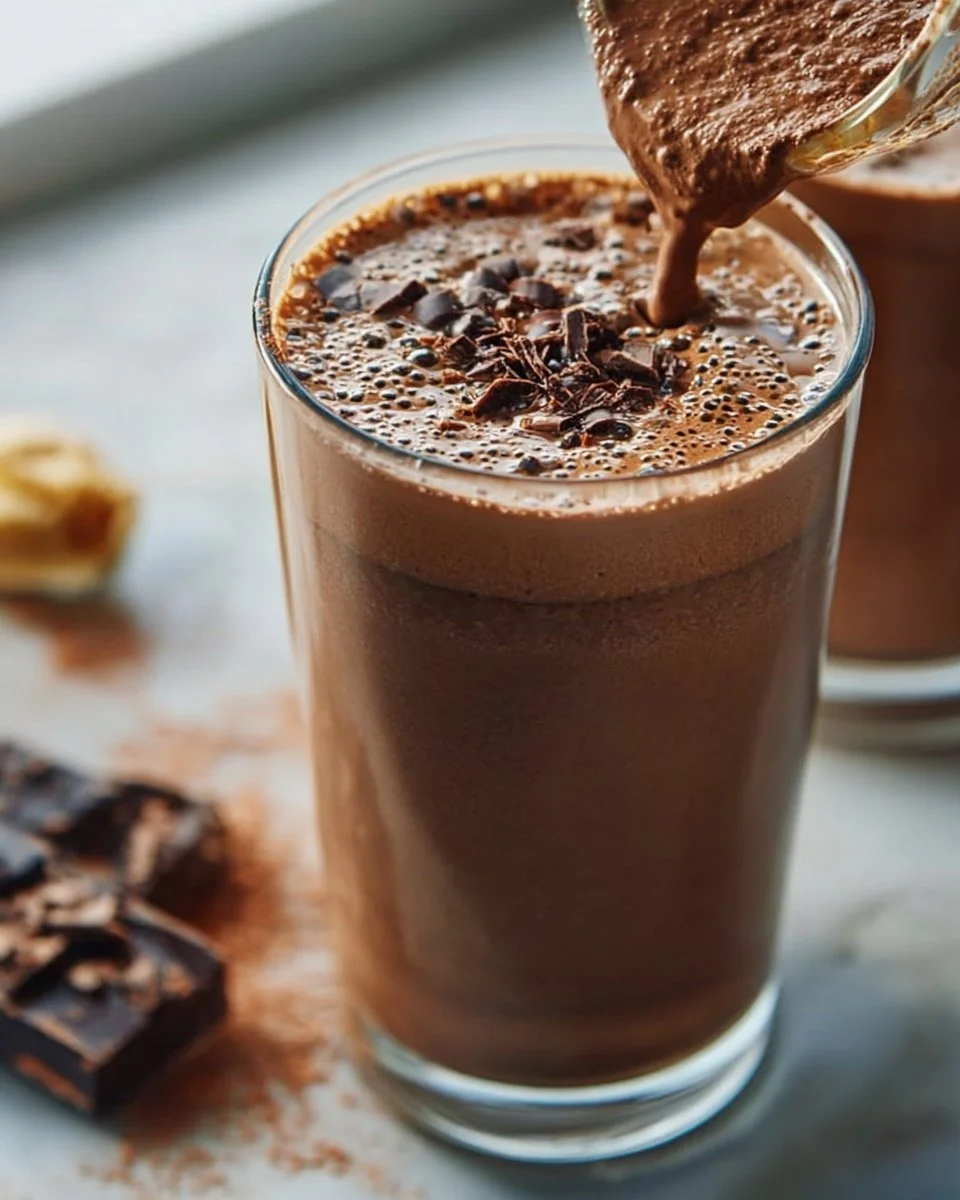
Ultimate Chocolate Smoothie
Ultimate Chocolate Smoothie: A Delicious Recipe for Any Time of Day
Hey there, fellow food lovers! Beau Collier here, and I’m thrilled to take you on a deliciously delightful ride through the amazing world of smoothies. Let’s talk about one of my favorite recipes: the Ultimate Chocolate Smoothie. Perfect for breakfast, a mid-day snack, or even a guilt-free dessert, this luscious blend is way too good to keep to myself. So, grab your blender, and get ready to whip up something that’s not only scrumptious but also incredibly nutritious!
Introduction
Now, I know what you’re thinking—chocolate for breakfast? Absolutely! When made right, a chocolate smoothie can be the perfect combination of indulgence and nourishment. Imagine starting your day with a creamy, sweet treat that also fuels your body with necessary vitamins and minerals. Sounds dreamy, right? This Ultimate Chocolate Smoothie recipe is designed to help you seize the day with a smile!
What’s wonderful about this smoothie is its versatility. You can tailor it to your preferences, making it suitable for just about everyone—from the busy student rushing to class to the parents who need an easy yet healthy breakfast option. And trust me, it’s like dessert in a glass! What’s not to love?
So, whether you’re having a rough morning or just want a delicious way to pack in nutrition, this chocolate smoothie has your back. It’s rich, satisfying, and oh-so-chocolaty, making it the ultimate pick-me-up. I can’t wait for you to dive into this recipe, but first, let me share a little story that makes this dish even more special for me.
Personal Story
Let me take you back to a sunny Saturday morning in my childhood kitchen. There I was, just a kid with dreams of becoming a chef, blending up a concoction of whatever was in the fridge. I remember my mom having a stockpile of ripe bananas, always ready for our favorite banana bread recipe. But that morning, I had a craving for something different—a chocolate smoothie!
After some trial and error, and a lot of gooey mess, I finally hit the perfect blend. My mom walked in, took one sip, and her face lit up like a Christmas tree—it was like we had found the fountain of youth! That simple smoothie with just a few ingredients left an indelible mark on our breakfast table.
Years later, as I dusted off my blender to recreate that magical moment, I couldn’t help but smile. This Ultimate Chocolate Smoothie has traveled with me through many stages of life. From childhood breakfasts to busy adult mornings, it has been a consistent source of comfort. Sharing this recipe with you is my way of passing on the magic. Now let’s get blending!
Ingredients
Now that the nostalgia train has pulled into the station, let’s take a look at what you’ll need to create this heavenly concoction! Here’s your handy ingredient list:
-
1 ripe banana
Bananas give this smoothie its creaminess and natural sweetness. The riper the banana, the sweeter it gets! If you’re out of bananas, you can swap it for half an avocado for a creamy texture without the same sweetness. -
1 tablespoon unsweetened cocoa powder
Cocoa powder adds that rich chocolatey flavor we crave! Look for unsweetened varieties to avoid extra sugar. If you’re in the mood for something different, try a flavored cocoa mix or even carob powder for a twist. -
1 cup milk
You can use any type of milk you prefer—dairy, almond, oat, or soy work great! If you’re going dairy-free, just make sure your choice is unsweetened. -
0.5 cup Greek yogurt
Greek yogurt gives the smoothie its thickness and a protein boost. Need a dairy-free option? Look for coconut or almond-based Greek yogurt alternatives. -
1 tablespoon honey
A little sweetener to round out the flavors! You can swap honey for maple syrup or agave nectar, or leave it out if you prefer a less sweet drink.
Step-by-Step Instructions
Now, let’s dive into the fun part—making this Ultimate Chocolate Smoothie! Grab your blender, and let’s get to work!
-
Prepare Your Ingredients
Start by peeling your ripe banana and breaking it into chunks. This will make blending easier and ensure everything mixes smoothly. Don’t skip the peeling part—trust me, it’s not a pretty sight when you forget! -
Add to Blender
Toss the banana pieces into your blender. Then, add 1 tablespoon of unsweetened cocoa powder. If you’re like me and love chocolate, feel free to throw in an extra half tablespoon for a richer flavor! -
Pour in the Milk
Now it’s time to pour in your milk of choice. Measure one cup and add it to the blender. If you want a thicker smoothie, start with half a cup and add more to adjust the consistency later. -
Spoon in the Greek Yogurt
Next up, scoop in half a cup of Greek yogurt. This adds creamy goodness and protein to keep you full. Don’t worry if it’s a bit chunky at first; the blender will work its magic! -
Drizzle the Honey
Finally, add 1 tablespoon of honey (or your chosen sweetener). If you’re feeling adventurous, toss in a pinch of vanilla extract or even a sprinkle of cinnamon for added flavor. -
Blend, Baby, Blend!
Secure the lid and blend everything on high speed for about 30–60 seconds (depending on your blender). You want it to be nice and smooth—no lumps allowed! If it’s too thick for your liking, add a splash more milk. -
Taste and Adjust
Here comes the fun part. Give your smoothie a taste! Does it need more sweetness? A tad more cocoa? Adjust as needed and blend again for a quick second to mix. -
Pour and Enjoy!
Once you’re satisfied with the flavor and consistency, pour it into your favorite glass. You can even make it fancy and top it with a dollop of extra Greek yogurt or a drizzle of honey!
Serving Suggestions
When it’s time to serve this smoothie, how you present it can truly elevate the experience. Here are a few fun ideas:
-
Top it Off: Add a sprinkle of chocolate shavings or granola on top for texture.
-
Smoothie Bowl: If you’re feeling “bowl” inspired, pour the smoothie into a bowl and top with sliced bananas, berries, and a handful of your favorite nuts or seeds.
-
Mason Jar Magic: Use a mason jar for a hipster twist. You can even take it to go if you’re in a rush!
-
Double Trouble: If you’re serving more than one, why not make a “smoothie flight”? Blend different flavors or customize each jar with unique toppings!
Recipe Variations
Now that you’ve mastered the classic Ultimate Chocolate Smoothie, let’s get creative with a few variations to keep things fresh:
-
Berry Bliss: Swap out half of the banana with fresh or frozen berries (strawberries or raspberries work wonderfully) for a fruity twist.
-
Nutty Chocolate: Add a tablespoon of nut butter (like almond or peanut butter) for extra creaminess and healthy fats.
-
Minty Fresh: Toss in a few fresh mint leaves for a cooling, refreshing take. This also gives it a fun green color!
-
Protein Power: Add a scoop of your favorite protein powder for a post-workout boost. This will keep you satiated all day long.
-
Cacao Nib Crunch: After blending, mix in a tablespoon of cacao nibs for a crunchy texture that intensifies the chocolate flavor.
Chef’s Notes
Cooking, much like life, is ever-evolving. This Chocolate Smoothie recipe started as a simple blend of whatever I had lying around, and it’s now become a staple in my kitchen. The echoes of that childhood memory always inspire me to experiment and share all this yumminess with you. It’s a reminder that the simplest recipes often hold the most love.
And hey, if you mess up a bit while blending (been there, done that!), just laugh it off! Some of the best meals come from kitchen mishaps.
FAQs and Troubleshooting
-
Can I use frozen bananas?
Absolutely! Frozen bananas will give your smoothie a creamy texture and icy delight. Just keep in mind that you may need less ice. -
What if my chocolate smoothie is too thick?
No problem! Just add a little more milk until you reach your desired consistency, and blend again. -
How can I reduce the sugar content?
You can skip the honey or use a sugar substitute if you’re looking to cut back on sugar. The banana adds natural sweetness! -
Can I prepare this smoothie in advance?
Sure! You can prep your ingredients the night before and store them in the fridge, or blend ahead and keep it in an airtight container for a day. Just give it a stir before enjoying!
Nutritional Info
For those keeping tabs on nutrition, here’s a rough breakdown of what you can expect from one serving of the Ultimate Chocolate Smoothie:
- Calories: About 300 (depending on your ingredients)
- Protein: 15g (thanks to the Greek yogurt)
- Fiber: 4g (from the banana and yogurt)
- Healthy Fats: 4g (if you add nut butter)
- Natural Sugars: 20g (mostly from the banana and honey)
This makes it a fairly balanced choice, packed with healthy fats, proteins, and carbs to fuel your day.
Final Thoughts
So there you have it! The Ultimate Chocolate Smoothie—a delicious blend that’s sure to become a staple in your kitchen. It’s quick, easy, and oh-so-tasty; in other words, it fits right in with the Feastical philosophy of feel-good food.
I encourage you to make this smoothie your own. Experiment with flavors, toppings, and variations. Food is intended to be enjoyed, shared, and celebrated, and I can’t wait for you to experience how wonderfully satisfying this smoothie can be.
So grab that blender, blend away, and share your creations with me! Happy cooking, and as always, let’s dig in!
Print
Ultimate Chocolate Smoothie
- Total Time: 5 minutes
- Yield: 1 serving 1x
- Diet: Vegetarian
Description
A rich and creamy chocolate smoothie perfect for breakfast, snacks, or dessert.
Ingredients
- 1 ripe banana
- 1 tablespoon unsweetened cocoa powder
- 1 cup milk (dairy or plant-based)
- 0.5 cup Greek yogurt
- 1 tablespoon honey (or maple syrup)
Instructions
- Prepare your ingredients by peeling the banana and breaking it into chunks.
- Add the banana pieces into your blender along with the cocoa powder.
- Pour in the milk of your choice.
- Spoon in the Greek yogurt.
- Drizzle the honey or your chosen sweetener into the blender.
- Blend everything on high speed for about 30–60 seconds until smooth.
- Taste the smoothie and adjust sweetness or cocoa as needed.
- Pour into your favorite glass and enjoy!
Notes
Try topping with chocolate shavings, granola, or serve as a smoothie bowl with fruit and nuts.
- Prep Time: 5 minutes
- Cook Time: 0 minutes
- Category: Snack
- Method: Blending
- Cuisine: American
Nutrition
- Serving Size: 1 serving
- Calories: 300
- Sugar: 20g
- Sodium: 90mg
- Fat: 7g
- Saturated Fat: 2g
- Unsaturated Fat: 5g
- Trans Fat: 0g
- Carbohydrates: 45g
- Fiber: 4g
- Protein: 15g
- Cholesterol: 10mg
Keywords: chocolate smoothie, healthy smoothie, vegan alternative
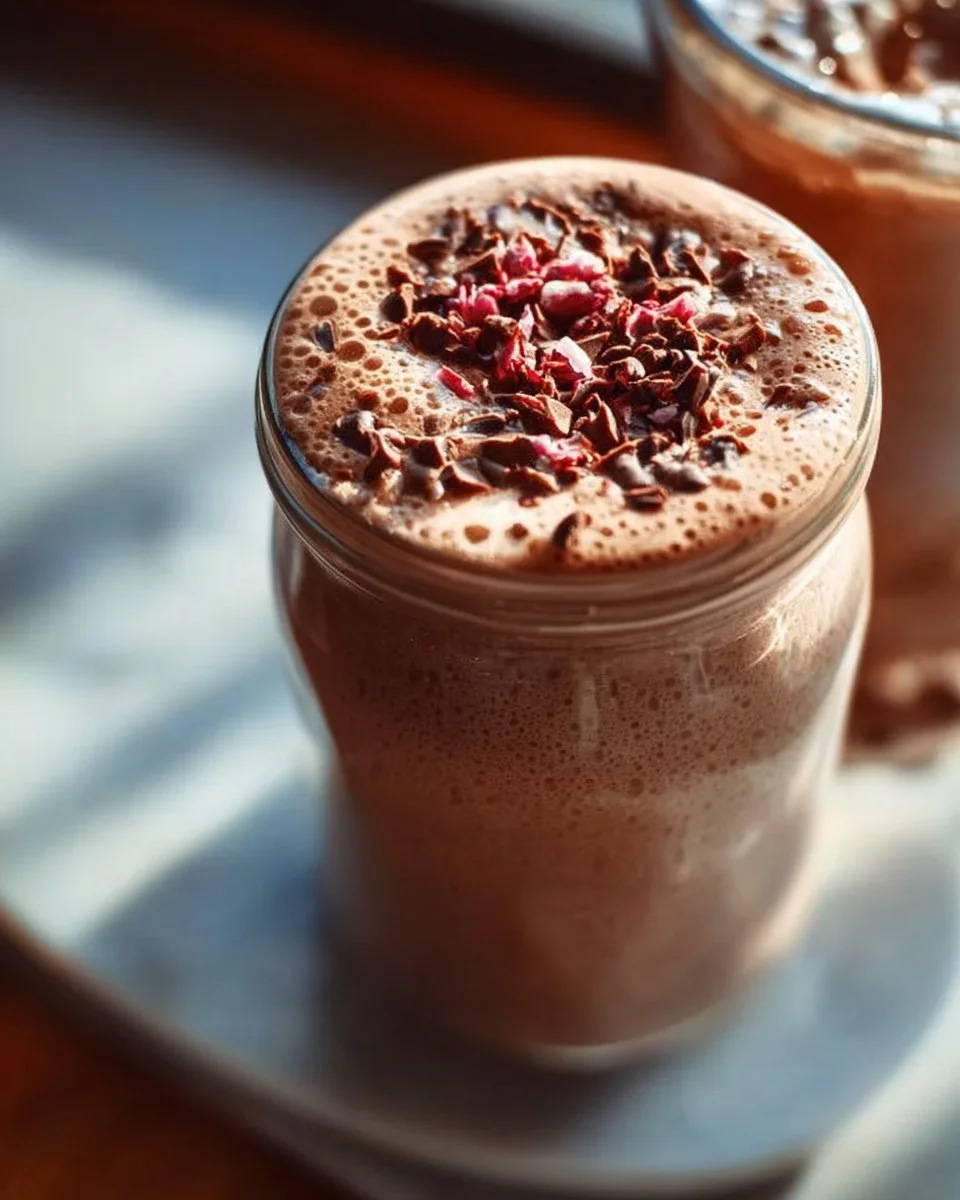
Creamy Chocolate Smoothie
The Ultimate Creamy Chocolate Smoothie: A Delicious Indulgence
Hey there, fellow foodies! Welcome back to Feastical, where we dive into mouthwatering recipes that bring comfort and joy. Today, I’m so excited to share one of my absolute favorite treats—the Creamy Chocolate Smoothie. This luscious drink is perfect for breakfast, a snack, or even a wholesome dessert. Imagine indulging in velvety chocolate goodness while knowing you’re fueling your body with nutritious ingredients. Sounds dreamy, right?
Now, smoothies are often considered a go-to for healthy eating, but let’s be honest: we all love the taste of chocolate, and it’s way more fun to whip up a smoothie that satisfies our cravings while being wholesome. The creamy texture of this smoothie will have you wondering if your favorite ice cream shop has a new rival!
As we go through this deliciously simple recipe together, I’ll share some personal stories, handy tips, and creative twists to elevate this drink from good to downright sensational. So grab your blender, and let’s blend our way to chocolate heaven!
A Sweet Memory
I still remember the first time I discovered the beauty of a chocolate smoothie. I was a young kid, sitting at my grandma’s kitchen table, watching her whip up all sorts of delightful concoctions. One day, she decided to surprise me with a special treat. She blended up a creamy mixture of chocolate, milk, and a touch of sweetness, and as the blender roared to life, I couldn’t help but bounce with anticipation.
When she poured that heavenly beverage into a tall glass, I remember the thick, luscious texture gliding down my throat like a chocolate waterfall. Grandma smiled at my delight, and I realized that food isn’t just about sustenance; it’s about creating connections and memories. It’s in that spirit that I developed this recipe—one that’s not only packed with flavor but also echoes the warmth of sharing such moments with loved ones.
Ingredients
-
6 oz vanilla yogurt
Greek yogurt or dairy-free alternatives add creaminess and a lovely tang. If you want a lighter option, you can substitute with non-fat yogurt, or for an egg-free choice, try coconut yogurt! -
½ cup milk of choice
Whether it’s whole, almond, oat, or soy milk, choose what speaks to your soul! If you’d like extra creaminess, go for whole/full-fat milk, or a rich non-dairy milk like oat. -
2 tbsp unsweetened cocoa powder or chocolate protein powder
Cocoa powder will give you that deep chocolatey flavor, while chocolate protein powder amps up the nutrition! Don’t have either? Use a bit of melted dark chocolate instead. -
Pinch of salt
This magic ingredient heightens flavor profiles—it’s like a sprinkle of fairy dust for your smoothie! Just a pinch makes all the difference. -
2 tbsp peanut butter (optional)
This is where things get ultra-creamy and decadent. If you’re feeling adventurous, swap it for almond butter or even sunbutter for a nut-free smoothie. -
Sugar or sweetener (to taste)
Depending on your sweet tooth, adjust the sweetness. Consider honey, maple syrup, or your favorite no-cal sweetener for guilt-free yumminess!
Step-by-Step Instructions
-
Gather Your Ingredients
Before turning on that blender, gather everything you need. Trust me, it’s easier to toss everything in when you have it all lined up! -
Add the Yogurt
Start by spooning the vanilla yogurt into the blender. This forms the smooth base of your drink, bringing all that lovely creaminess. -
Pour in the Milk
Next, add your choice of milk. It’ll create the liquid base to help your smoothie blend evenly. If you want it thick, use less milk; if you prefer it thinner, go for a bit more! -
Add Cocoa Powder
Toss in the cocoa powder or protein powder now. If using cocoa, make sure it’s unsweetened to avoid unnecessary sugar; let the yummy yogurt and other ingredients do the sweetening! -
Pinch of Salt
Don’t skip this step! A small pinch will balance the flavors, rounding out the sweetness and making that chocolate flavor pop! -
Incorporate Peanut Butter (Optional)
If you’re feeling adventurous (and trust me, you should be!), add in the peanut butter now. It’ll take your smoothie from ordinary to extraordinary! Blend this luscious mix together until smooth. -
Taste and Sweeten
Give it a taste! This is where you can adjust the sweetness to your liking. Remember, once you add ice (if desired), it’ll dilute a bit, so be bold with your sweetness. -
Add Ice (Optional)
For an ice-cold treat, add a handful of ice cubes and blend again. It transforms into a frosty delight that’s perfect for summer. -
Blend until Smooth
Blend everything well for about 30 seconds. You want that consistency silky, just like a classic milkshake. Your taste buds will thank you! -
Serve Up
Pour your creamy chocolate smoothie into a tall glass. Optional—but highly recommended—garnish with a sprinkle of cocoa or some toasted nuts on top for a crunchy finish.
Serving Suggestions
Presentation matters, even for smoothies! Pour your creamy concoction into a tall glass and consider drizzling a little melted chocolate or honey on the inside for a professional touch. You could also top it with a dollop of whipped cream (dairy or non-dairy) and a sprinkle of cocoa powder for that Instagram-worthy look. If you’re feeling adventurous, add a few banana slices on top for extra flair!
For breakfast or a snack, serve it with crunchy granola, fresh berries, or even a side of whole-grain toast for those who love a well-rounded meal.
Recipe Variations
- Mint Chocolate Smoothie: Add a few drops of peppermint extract or a handful of fresh mint leaves for a refreshing twist that’ll transport you to a chocolate mint paradise.
- Berry Chocolate Smoothie: Throw in a handful of mixed berries—whether frozen or fresh—before blending for a fruity kick that’ll brighten things up!
- Nutty Chocolate Delight: Swap out peanut butter for hazelnut spread, and you’ve got yourself a Nutella-inspired smoothie that’s rich and divine.
- Vegan Chocolate Smoothie: For a completely plant-based version, use almond yogurt and non-dairy milk, and you’ll be diving into this treat guilt-free.
- Spicy Chocolate Smoothie: Feeling bold? Add a pinch of cayenne pepper or a dash of cinnamon to bring a warm kick to your chocolate mix—it’s a game-changer!
Chef’s Notes
Each time I make this smoothie, I feel like I’m creating an edible love letter. It’s transformed over the years—from my grandma’s simple chocolate mix to this creamy creation that captures the essence of nostalgia while embracing modern flavors. Who knew chocolate could be so versatile? I’ve seen this recipe evolve into various forms, adding new ingredients here and there, but the core remains the same—a delightful treat that bridges generations.
And you know, there are those days when I sneak in a little more peanut butter than usual just because—hey, culinary spirit, right? These moments remind me that while recipes guide us, the kitchen is a canvas for culinary creativity.
FAQs and Troubleshooting
-
My smoothie is too thick—what can I do?
No worries! Just add a splash of milk, and blend until you reach your desired consistency. It’s all about personal preference! -
Can I make this smoothie ahead of time?
Absolutely! Just blend it up, pour it into an airtight container, and keep it in the fridge for up to 24 hours. Give it a good shake before serving! -
What’s the best way to sweeten this if I want it sugar-free?
Opt for natural sweeteners like stevia or monk fruit. They blend perfectly and won’t overpower the chocolate flavor without the calories! -
Can I freeze this smoothie?
For sure! Pour your smoothie into ice cube trays for a future treat. When you’re ready to enjoy, toss a couple of frozen cubes back into the blender for a super chilled drink!
Nutritional Info
This creamy chocolate smoothie is more than just delicious; it’s packed with nutrients! With each smoothie serving approximately:
- Calories: 350 (varies based on ingredients)
- Protein: 14g
- Fiber: 2g
- Healthy Fats: 14g (especially with the peanut butter)
- Calcium: Approximately 20% of your daily value, depending on the yogurt and milk used
It serves as a fantastic way to incorporate good fats from yogurt and peanut butter while getting a delightful dose of antioxidants from cocoa.
Final Thoughts
And there you have it—your sweet guide to creating a heavenly creamy chocolate smoothie! It’s the perfect balance of indulgence and nutrition that’ll satisfy the chocoholic in all of us. Remember, this smoothie is about more than just taste; it’s about the stories and love that come together in the kitchen. So, as you blend and enjoy this decadently creamy treat, think about the memories being created—because every sip is a celebration!
Thanks for joining me on this chocolatey journey today. I’d love to hear your thoughts and any little variations you make on your own! So, what are you waiting for? Grab that blender and let’s whip up some creamy chocolate magic! Happy blending!
Print
Creamy Chocolate Smoothie
- Total Time: 10 minutes
- Yield: 2 servings 1x
- Diet: Vegetarian
Description
Indulge in this luscious creamy chocolate smoothie, perfect for breakfast, a snack, or a wholesome dessert.
Ingredients
- 6 oz vanilla yogurt
- ½ cup milk of choice
- 2 tbsp unsweetened cocoa powder or chocolate protein powder
- Pinch of salt
- 2 tbsp peanut butter (optional)
- Sugar or sweetener (to taste)
Instructions
- Gather your ingredients.
- Add the vanilla yogurt to the blender.
- Pour in the milk of your choice.
- Add cocoa powder or protein powder.
- Pinch in the salt.
- Incorporate peanut butter if using.
- Taste and adjust sweetness as desired.
- Add ice if you want a colder smoothie.
- Blend until smooth for about 30 seconds.
- Serve in a tall glass with optional garnishes.
Notes
For a thicker smoothie, use less milk; for a thinner one, add more. Feel free to experiment with different add-ins like fresh fruits or nut spreads.
- Prep Time: 10 minutes
- Cook Time: 0 minutes
- Category: Snack
- Method: Blending
- Cuisine: American
Nutrition
- Serving Size: 1 serving
- Calories: 350
- Sugar: 15g
- Sodium: 150mg
- Fat: 14g
- Saturated Fat: 4g
- Unsaturated Fat: 8g
- Trans Fat: 0g
- Carbohydrates: 45g
- Fiber: 2g
- Protein: 14g
- Cholesterol: 10mg
Keywords: smoothie, chocolate, healthy, dessert, breakfast, snack
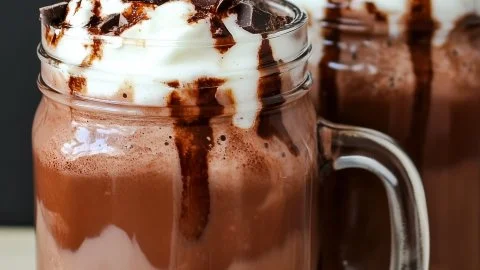
The Best Frozen Hot Chocolate
# The Best Frozen Hot Chocolate: A Chill Twist on a Classic Delight

## Introduction

Hey there, fellow foodies! If there’s one drink that perfectly bridges the gap between warmth and coolness, it has to be **frozen hot chocolate**. That magical concoction that screams indulgence is a delightful treat to sip on, regardless of the season. Today, we're diving deep into the world of this delicious drink that gives a nostalgic nod to cozy nights spent with friends, yet adds a refreshing twist perfect for sizzling summer days.

Picture this: a balmy summer evening, the sun setting in hues of pink and gold, and a group of friends gathered around, laughing animatedly. Suddenly, a tray of frozen hot chocolates appears, garnished with fluffy whipped cream and drizzled with rich chocolate syrup. There’s nothing quite like that chocolatey goodness in a chilled version to take your taste buds on a rollercoaster ride of flavors. Let’s just say, we’ve come a long way from those pesky powdered mixes we used to rely on! My mission today is to guide you through making the best frozen hot chocolate that will leave your taste buds saying, “Oh my cocoa goodness!”

No need to be a master chef here—what I love about this recipe is its simplicity. It’s all about celebrating the joy of creating something delicious, one spoonful at a time. Whether you’re looking to cool off on a hot day or whip up a fun treat for friends, this frozen hot chocolate is your ticket to dessert heaven. So, grab your blender, and let’s get to it!

---

## Personal Story

You know, I’ve always had a soft spot for hot chocolate. As a kid, nothing felt better than coming home from a chilly day outside, cheeks flushed, and sipping a warm cup of cocoa while nestled beneath a cozy blanket. Fast forward to my college years, where that same comforting drink evolved into something more adventurous. One chilly evening, my friend Jess and I had a little spontaneous gathering. Armed with a blender and a love for chocolate, we decided it was time we brought summer to winter with frozen hot chocolate.

With just a few simple ingredients, our late-night concoction transformed into a decadent dessert drink that had everyone swooning. To this day, that evening remains etched in my memory—not just because of the drink itself, but because of the laughter and joy we shared. It was a reminder of how food has the incredible power to unite us. And now, I’m thrilled to pass that joy on to you with my version of the **Best Frozen Hot Chocolate**!

---

## Ingredients

Here’s what you’ll need to whip up this frosty delight:

- **3½ cups ice**
  The backbone of your frozen drink; use crushed or cubed ice, depending on what you have on hand! Crush it up if you prefer a smoother texture.

- **2 cups milk (dairy or non-dairy)**
  Feel free to use your favorite milk—whole, almond, coconut, or oat milk work wonderfully. Each brings a different flavor, so go with what suits your taste!

- **4 packets hot cocoa mix**
  Grab your favorite brand or make homemade hot cocoa mix if you want to take it up a notch! (I’ll share a simple recipe for a DIY hot cocoa mix below!)

- **2 tablespoons chocolate syrup**
  This gives our frozen hot chocolate that irresistible chocolatey kick! Use store-bought or make your own for a richer taste.

- **2 teaspoons vanilla extract**
  A splash of vanilla brightens the flavors and takes this drink from good to phenomenal. Fresh vanilla pods work too for gourmet flair!

- **Whipped cream (for topping)**
  Because what’s a dessert drink without a cloud of whipped goodness on top? You can use store-bought or whip up your own at home.

- **Extra chocolate syrup (optional, for drizzle)**
  Go ahead and get a little extra with chocolate syrup drizzled on top of that whipped cream for an Instagram-worthy finish!

---

## Step-by-Step Instructions

Alright, let’s bring it all together! Here’s a straightforward guide to creating your **Best Frozen Hot Chocolate**.

1. **Blend the Base**
   Begin by grabbing your blender. Throw in the 3½ cups of ice, 2 cups of your chosen milk, and the 4 packets of hot cocoa mix. Don’t hold back on the blending; we’re going for a frosty, creamy consistency. Start on low and gradually increase the speed. A minute should do it, but feel free to blend longer for a smoother texture. *Chef’s hack:* If the mixture is too thick, add a splash more milk!

2. **Add in the Good Stuff**
   Next, drizzle in those 2 tablespoons of chocolate syrup and 2 teaspoons of vanilla extract. Keep blending until all the ingredients are well incorporated. You’ll notice the mixture turning smooth and velvety. *Tip:* Taste for sweetness! This is when you can adjust by adding more chocolate syrup or cocoa, depending on how rich you want it.

3. **Serve it Up**
   Grab your favorite glasses—yes, presentation matters! You can chill them in the freezer for a bit if you like. Pour the blended mixture into the glasses, filling each one to the brim. It’s fine—everyone deserves extra!

4. **The Crown Jewel: Whipped Cream**
   Top each drink with a generous swirl of whipped cream. Go wild here! The fluffier, the better! *Chef's insight:* For an extra treat, sprinkle some cocoa powder or chocolate shavings on top to jazz it up.

5. **Drizzle on Extra Chocolate**
   If you’re feeling adventurous (and I know you are!), finish off with a drizzle of chocolate syrup over the whipped cream. It’s the cherry on top for this dessert drink!

---

## Serving Suggestions

Now that your **frozen hot chocolate** is ready, it’s time to serve it up with style! You can consider these fun options:

- **Garnish with Chocolate Shavings or Sprinkles**
  Before you present these delicious drinks to your guests, adding chocolate shavings or fun sprinkles gives a delightful visual touch. Kids and adults alike go crazy for those!

- **Pair with a Side Treat**
  Serve these beauties alongside a crispy cookie or a slice of cake. Imagine dunking a buttery shortbread cookie into that chocolatey goodness—heavenly!

- **Create a Frozen Hot Chocolate Bar**
  Set up a DIY station where guests can customize their drinks with flavored syrups, crushed cookies, whipped cream, and toppings like marshmallows or caramel. This adds a fun and interactive element to your gathering!

---

## Recipe Variations

Looking to mix things up? Check out these creative twists that make this frozen hot chocolate your own:

1. **Mint Chocolate Chip**
   Add a few drops of mint extract for that peppermint flavor! This creates a festive holiday vibe that transports you to winter Wonderland—regardless of the weather!

2. **Peanut Butter Cup**
   Blend in a spoonful of creamy peanut butter to amplify that chocolaty flavor. Top off with crushed peanuts or mini Reese’s for a nutty crunch!

3. **Mexican Spiced Hot Chocolate**
   Kick it up a notch by adding a sprinkle of cinnamon and a hint of cayenne pepper. It’s a fun way to add warmth and flavor!

4. **Coffee Lover's Frappe**
   Screw in an espresso shot or a splash of brewed coffee to add an extra jolt. For coffee aficionados, this is the ultimate pick-me-up!

5. **Bananas Foster Fusion**
   Toss in a frozen banana before blending for a creamy, dreamy taste with hints of banana flavor. You can even top with caramel drizzle for that classic twist!

---

## Chef’s Notes

A little backstory on how this recipe evolved: When I first made frozen hot chocolate, it was a trial-and-error journey. I discovered through unfortunate mishaps that my original version was WAY too sweet. Over time, I adapted it by focusing on balance and using high-quality ingredients. The transformation into a silky, creamy drink packed with a flavor punch was a labor of love. Now, I can’t imagine summer without it!

Plus, this drink has been a crowd-pleaser at many of my family gatherings. Friends started requesting variations, and it quickly turned into a tradition. My only frustration? Getting the right balance of texture that’s not too icy but still a frozen treat! It’s all part of the fun of cooking, right?!

---

## FAQs and Troubleshooting

Let’s tackle some of the common questions and mistakes when making frozen hot chocolate:

1. **What if my frozen hot chocolate is too thick?**
   If your drink turns out too dense, don’t fret! Just add a splash of milk and give it another quick blend until you reach your desired consistency.

2. **Can I use homemade hot cocoa mix?**
   Absolutely! If you want to make your own hot cocoa mix, simply whisk together unsweetened cocoa powder, sugar, and a pinch of salt. Use this in place of store-bought packets for a personalized touch.

3. **How can I store leftovers?**
   If by some miracle you have leftovers, store them in an airtight container in the freezer. When you’re ready to sip again, thaw just a bit and re-blend for that fresh texture.

4. **Can I make this in advance?**
   While the frozen hot chocolate is best enjoyed fresh, you can prep your ingredients (like the cocoa mix and syrup) ahead of time. Just blend and serve when you're ready for a treat!

---

## Nutritional Info

Now, let’s chat about the nutrition aspect. A serving of this decadent frozen hot chocolate (approximately 1 cup) weighs in around:

- **Calories:** 250–350 (depending on milk choice and added toppings)
- **Fat:** 10g (can vary with milk and whipped cream)
- **Carbohydrates:** 42g
- **Protein:** 6g
- **Sugar:** 25g

Keep in mind, these numbers can shift based on your ingredient choices. Opting for a lower-calorie syrup or non-dairy milk can create a lighter version.

Whatever your preference, remember that moderation is key, and indulging occasionally keeps happiness in our lives!

---

## Final Thoughts

Well, there you have it—my take on the **Best Frozen Hot Chocolate**! You’ve got the recipe, the variations, and all the tips you need to rock this sweet temptation. I hope you’re inspired to create some wonderful memories around this drink just like I did with my friends back in the day.

So, whatever occasion you have in mind—be it a warm-weather gathering, an evening movie night, or simply a moment of self-indulgence—this frozen hot chocolate is sure to be a hit. Share it with loved ones, get creative with your toppings, and most importantly, enjoy every chocolatey sip!

Thanks for joining me in my kitchen today! Until next time, keep stirring up joy and flavor in everything you make. Cheers!

The Best Frozen Hot Chocolate
- Total Time: 10 minutes
- Yield: 4 servings 1x
- Diet: Vegetarian
Description
A refreshing twist on a classic treat, this frozen hot chocolate will indulge your taste buds and cool you down on hot days.
Ingredients
- 3½ cups ice
- 2 cups milk (dairy or non-dairy)
- 4 packets hot cocoa mix
- 2 tablespoons chocolate syrup
- 2 teaspoons vanilla extract
- Whipped cream (for topping)
- Extra chocolate syrup (optional, for drizzle)
Instructions
- Blend the base: Combine 3½ cups of ice, 2 cups of milk, and 4 packets of hot cocoa mix in a blender.
- Add in the good stuff: Drizzle in 2 tablespoons of chocolate syrup and 2 teaspoons of vanilla extract. Blend until smooth.
- Serve it up: Pour the blended mixture into chilled glasses, filling them to the brim.
- Top with whipped cream: Generously swirl whipped cream on top of each drink.
- Drizzle on extra chocolate: Finish with a drizzle of chocolate syrup over the whipped cream if desired.
Notes
For variations, consider adding mint extract, peanut butter, or even espresso for a coffee twist. Adjust sweetness to your preference.
- Prep Time: 10 minutes
- Cook Time: 0 minutes
- Category: Dessert
- Method: Blending
- Cuisine: American
Nutrition
- Serving Size: 1 serving
- Calories: 300
- Sugar: 25g
- Sodium: 150mg
- Fat: 10g
- Saturated Fat: 5g
- Unsaturated Fat: 4g
- Trans Fat: 0g
- Carbohydrates: 45g
- Fiber: 1g
- Protein: 6g
- Cholesterol: 20mg
Keywords: frozen hot chocolate, chocolate drink, summer drinks, dessert recipes

This healthy chocolate pudding is the best healthy snack recipe (vegan) | Healthy chocolate pudding recipe, Healthy dessert recipes, Healthy sweets recipes
The Best Healthy Vegan Chocolate Pudding You’ve Ever Tried!
Hey there, fellow foodies! Welcome back to Feastical! Today, I’m thrilled to share a recipe that’s not just a treat for your taste buds but also a big hug for your health—my beloved Healthy Vegan Chocolate Pudding. I can already hear the chocolate lovers cheering, and who wouldn’t? This rich, creamy delight is proof that healthy eating doesn’t have to be boring or, dare I say, tasteless!
When I first stumbled upon this recipe, I was on a mission to satisfy my chocolate cravings without the guilt. With just a few simple ingredients, I quickly transformed my indulgent snack into a dairy-free, vegan wonder that I could whip up in no time. Trust me; once you sample this healthy chocolate pudding, you’ll wonder why you ever reached for the store-bought stuff!
Upside? You can enjoy this pudding anytime—after dinner, as a mid-afternoon pick-me-up, or even as a post-workout treat that feels akin to a decadent dessert! So, gather your kitchen tools and your favorite spoon because we’re about to embark on a delicious journey to chocolate heaven that’s both easy and oh-so-wholesome. Let’s put on our aprons and get cooking!
Personal Story
Let me take you back to when I was just a budding chef in my parents’ kitchen, probably around the age of ten. I remember a rainy Saturday afternoon when I decided to surprise my family with a chocolate dessert. Armed with a cookbook I’d borrowed from the library, I set out to create something magical. What I didn’t realize was that I had forgotten a crucial ingredient—sugar. Oops!
Instead of downtrodden, I took a leap of faith and decided to wing it by using ripe bananas instead. To my utter delight, my first-ever chocolate pudding turned out to be an unexpected hit! The flavors melded beautifully, and I learned that improvisation in the kitchen can lead to delicious discoveries. That day ignited my love for creating healthy yet satisfying desserts, and now I’m passing that wisdom onto you with this healthy vegan chocolate pudding recipe. You see, food storytelling is what brings us together, and I can’t wait for you to create your own memories in the kitchen!
Ingredients
Now, let’s talk about the marvelous ingredients that come together to create this velvety pudding:
-
Ripe Avocados
Chef Insight: The secret to the creaminess of this pudding! They provide healthy fats and a smooth texture. Feel free to swap with bananas for a twist! -
Cocoa Powder
Substitution Tip: Ensure it’s unsweetened for that rich chocolate kick. You can use raw cacao powder if you want extra health benefits and a more intense flavor. -
Maple Syrup
Flavor Note: A natural sweetener that adds depth. You can swap it out for agave nectar or even date syrup if you’re feeling adventurous! -
Almond Milk (or any plant-based milk)
Quick Tip: This helps loosen up the pudding to the right consistency. Try coconut or cashew milk for a flavor boost! -
Vanilla Extract
Insight: A splash of this fragrant extract enhances the chocolate flavor. Always opt for pure vanilla extract over imitation for that extra kick of flavor. -
Pinch of Salt
Why It’s Important: Just a little pinch will elevate all the other flavors. Don’t skip it!
Step-by-Step Instructions
Now that we have our ingredients ready, let’s dive into the cooking process! This is where the magic happens, and I’ll share my favorite tips along the way.
Step 1: Prepare the Avocado
Begin by cutting your ripe avocados in half, removing the pit, and scooping the flesh into a blender or food processor. Avocados are not only nutrient-rich but also a creamy base for our pudding. If you need a quick tip: the riper the avocado, the better. Look for one that gives slightly when you press it gently!
Step 2: Add Cocoa Powder
Next, sprinkle in a generous amount of cocoa powder. It doesn’t just provide chocolatey goodness; it also comes packed with antioxidants! Just a note: Sift your cocoa powder beforehand if you want to avoid clumps in your pudding!
Step 3: Sweeten it Up
Pour in the maple syrup! This is where you can customize how sweet you want it to be, so feel free to taste and adjust. If you do leave it a bit less sweet, the rich cocoa flavor will shine through even more.
Step 4: Pour in the Milk
Now, it’s time to add your almond milk. Start with a small amount and gradually increase until you reach your desired consistency. Are you into a thicker pudding? Use less milk; for a more liquid texture, add more! This is your delicious creation; make it suit you.
Step 5: Blend It All Together
Blend until incredibly smooth. You want a creamy, silky texture that almost feels too good to be true (thanks to those avocados!). If you’re having trouble getting everything mixed, add a little more almond milk and keep blending until you achieve pudding perfection.
Step 6: Add Vanilla and Salt
Finally, add a splash of vanilla extract and a pinch of salt. Blend again briefly to incorporate these boosts of flavor. This step is crucial because it truly elevates the entire pudding!
Step 7: Taste-Test and Adjust
Taste your pudding! This is the fun part; feel free to adjust sweetness by adding more maple syrup or enhancing the chocolate flavor with extra cocoa. Some might even enjoy a dash of cinnamon for a unique twist!
Step 8: Chill
Once you’re satisfied with the flavor, transfer the pudding into serving bowls or an airtight container. Pop it in the refrigerator for at least an hour to firm up. It’s like giving it a little spa treatment!
Serving Suggestions
Alright, it’s the moment we’ve all been waiting for—the plating! This healthy chocolate pudding isn’t only rich in flavor; it’s a treat for the eyes as well. When you’re ready to serve, scoop generous dollops into small dessert bowls, ramekins, or even mason jars for a cute presentation.
Make it Instagram-worthy by topping it with your favorite garnishes! Here are some delicious ideas:
- Fresh Berries: Strawberries or raspberries add a pop of color and freshness.
- Chopped Nuts: Almonds, walnuts, or even pecans provide a delightful crunch.
- Coconut Whipped Cream: If you’re feeling extra fancy, a dollop of coconut whipped cream takes it over the top!
- Dark Chocolate Shavings: A sprinkle of chocolate love for those die-hard chocoholics!
Recipe Variations
Now that you’ve mastered the classic healthy chocolate pudding, here are some fun twists to keep things exciting:
- Spicy Chocolate: Add a pinch of cayenne pepper for a subtle kick!
- Nutty Chocolate: Blend in some almond or peanut butter for a nutty flavor explosion.
- Mocha Delight: Mix in a bit of instant coffee or espresso powder for that coffee-chocolate combo.
- Flavor Infusion: Experiment with different extracts like almond or hazelnut for an exotic touch.
- Fruit Fusion: Blend in a ripe banana for a fruit-forward pudding with a natural sweetness.
Chef’s Notes
This recipe holds a sweet spot in my heart, and over the years, it has seen its fair share of tweaks and modifications! I recently experimented with adding silken tofu for additional protein and creaminess, which worked wonders. The luscious, silky texture keeps the essence of the original pudding while giving it a healthy protein boost!
And a funny kitchen story: one time, I was rushing to make this pudding for friends, and in my haste, I accidentally dumped in chili powder instead of cocoa! Let’s just say that evening taught me to always double-check my labels!
FAQs and Troubleshooting
Q1: Why is my pudding too runny?
A: It might need more avocado or you added too much milk. To fix it, mix in a little more cocoa powder. You can also chill it longer to help it thicken!
Q2: Can I make this in advance?
A: Absolutely! This pudding can stay fresh in the refrigerator for up to 4-5 days. Just remember to cover it with plastic wrap or store it in an airtight container.
Q3: Can I freeze this pudding?
A: Yes, while you can freeze it, the texture may change when thawed. Just mix it up again after defrosting for a smoother consistency.
Nutritional Info
While indulging in our Healthy Vegan Chocolate Pudding, you can feel good about what’s going into your body! Here’s a rough nutritional breakdown per serving (based on the ingredients provided):
- Calories: Around 140
- Fat: 9g (mostly healthy fats from avocados)
- Carbohydrates: 15g
- Fiber: 5g
- Sugar: 4g (depending on the sweetness level from maple syrup)
- Protein: 2g
Emphasizing that chocolate doesn’t have to come with a hefty price tag in terms of health, this pudding is nutrient-dense and loaded with goodies like fiber, healthy fats, and antioxidants!
Final Thoughts
There you have it—my ultimate Healthy Vegan Chocolate Pudding recipe! I truly hope this becomes a staple in your kitchen as it has in mine. It’s not just a dessert; it’s a canvas for creativity, a way to satisfy that sweet tooth, and a dream come true for anyone looking for something wholesome yet indulgent.
So next time you’re craving something chocolatey, remember that healthy treats can still be delicious and satisfying. Don’t forget to share your pudding creations with me! Let’s keep the food-loving community alive and thriving. Until next time, my fellow food adventurers—happy cooking and even happier eating! 🍫✨
Print
Healthy Vegan Chocolate Pudding
- Total Time: 15 minutes
- Yield: 4 servings 1x
- Diet: Vegan
Description
A rich and creamy vegan chocolate pudding made with healthy ingredients, perfect for satisfying sweet cravings without the guilt.
Ingredients
- 2 ripe avocados
- 1/2 cup unsweetened cocoa powder
- 1/4 cup maple syrup
- 1/2 cup almond milk (or any plant-based milk)
- 1 teaspoon pure vanilla extract
- Pinch of salt
Instructions
- Prepare the avocados by cutting in half, removing the pit, and scooping the flesh into a blender.
- Add the cocoa powder to the blender.
- Pour in the maple syrup and adjust sweetness as desired.
- Add the almond milk gradually until the desired consistency is reached.
- Blend until smooth and creamy.
- Add the vanilla extract and a pinch of salt, then blend briefly.
- Taste the pudding and adjust sweetness or cocoa as needed.
- Chill the pudding in the refrigerator for at least an hour before serving.
Notes
For a thicker pudding, use less almond milk. Garnish with fresh berries, chopped nuts, or coconut whipped cream for an extra touch.
- Prep Time: 15 minutes
- Cook Time: 0 minutes
- Category: Dessert
- Method: Blending
- Cuisine: Vegan
Nutrition
- Serving Size: 1 serving
- Calories: 140
- Sugar: 4g
- Sodium: 10mg
- Fat: 9g
- Saturated Fat: 1g
- Unsaturated Fat: 8g
- Trans Fat: 0g
- Carbohydrates: 15g
- Fiber: 5g
- Protein: 2g
- Cholesterol: 0mg
Keywords: vegan dessert, chocolate pudding, healthy dessert, avocados, dairy-free