Fall Favorite: Pumpkin Oatmeal Cream Pies (Make-Ahead & Easy)
Pumpkin Oatmeal Cream Pies: A Cozy Autumn Treat
Hey there, fellow food lovers! If there’s one thing that whispers “fall” to me, it’s the delightful aroma of pumpkin wafting through the kitchen. That warm, spiced scent takes me back to my childhood—sitting at the kitchen table, a plate of freshly baked goodies in front of me while my family shared stories of days gone by. Today, I’m excited to share one of my all-time favorite recipes: Pumpkin Oatmeal Cream Pies!
These treats are the perfect blend of chewy, wholesome oats and the unmistakable flavor of pumpkin spiced just right. They feel like a warm hug on a crisp autumn day and have a luscious cream filling that takes them to another level of deliciousness. Trust me; once you take a bite of these pies, you’ll be transported to a cozy, pumpkin-spice paradise, no matter the season. Plus, they’re ridiculously easy to make! So grab your apron, and let’s dive into the warm, winning world of Pumpkin Oatmeal Cream Pies.
Personal Story
Growing up, my family had a tradition of baking cookies together every Sunday afternoon. It was more than just pulling ingredients together; it was a bonding experience filled with laughter, flour fights, and, of course, plenty of taste-testing. As the weather turned cooler, we started incorporating seasonal flavors into our bakes. One of my fondest memories involves my mom discovering her love for pumpkin in all things baked.
I still remember that day—she pulled out a recipe book with the most tantalizing cornucopia of fall-inspired goodies. As we whipped up those first batch of pumpkin cookies, the house filled with the warm spices that seemed to dance on the air. We didn’t just bake cookies; we made precious memories, and with each bite, we could taste the love and laughter we poured into those treats. Now, these Pumpkin Oatmeal Cream Pies are a spin on that nostalgic recipe, packed with autumn flavor and, of course, a generous helping of heart.
Ingredients
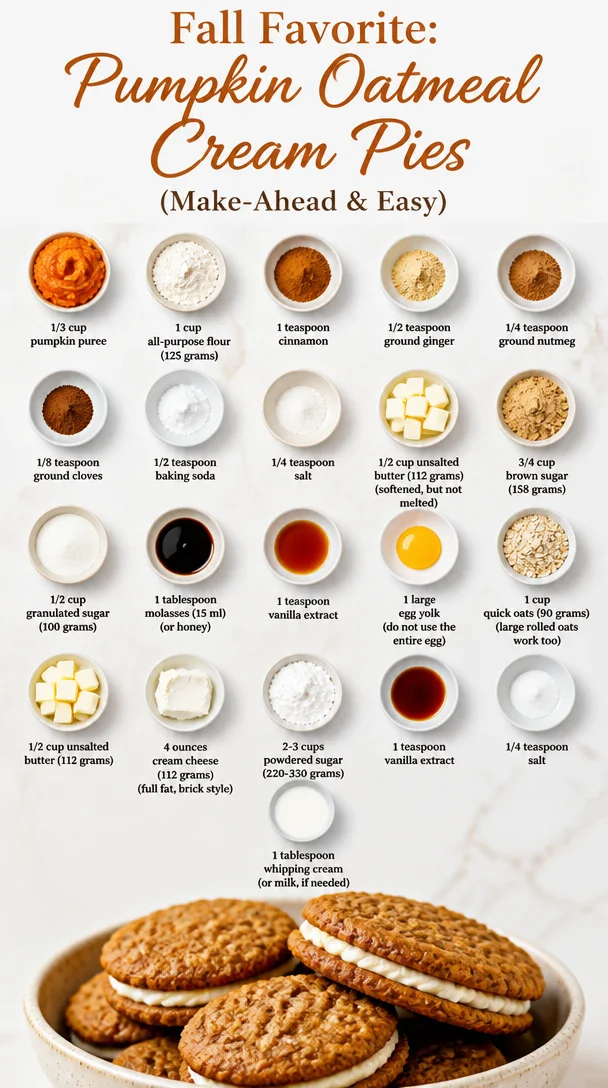
Here’s what you’ll need to whip up these scrumptious Pumpkin Oatmeal Cream Pies:
-
1/3 cup pumpkin puree
Tip: Be sure to use pure pumpkin puree, not canned pumpkin pie filling! This will give you the authentic pumpkin flavor without the added spices and sugars. -
1 cup all-purpose flour (125 grams)
Substitution: For a gluten-free option, feel free to use a 1:1 gluten-free flour blend. -
1 teaspoon cinnamon
Chef Insight: Cinnamon is the heart of pumpkin spice! Don’t be shy; a little more can bring out even more warmth in your cookies. -
1/2 teaspoon ground ginger
This adds a nice zing to the flavor profile, but you can omit it if you’re not a fan. -
1/4 teaspoon ground nutmeg
Nutmeg can be quite strong, so sprinkle with care! -
1/8 teaspoon ground cloves
These bring an aromatic depth to your pies. Trust me; just a pinch goes a long way! -
1/2 teaspoon baking soda
Baking soda gives our cookies that lovely lift! -
1/4 teaspoon salt
A pinch of salt enhances the sweetness; don’t skip this step! -
1/2 cup unsalted butter (112 grams) (softened, but not melted)
Make sure it’s softened for easy creaming with the sugars! -
3/4 cup brown sugar (158 grams)
Brown sugar adds moisture and richness; try using dark brown sugar for a deeper flavor. -
1/2 cup granulated sugar (100 grams)
Mix sugars will give that perfect balance of flavors. -
1 tablespoon molasses (15 ml) (or honey)
If you don’t have molasses, honey works beautifully! -
1 teaspoon vanilla extract
Use pure vanilla for the best flavor! -
1 large egg yolk (do not use the entire egg)
We only need the richness from the yolk for a soft cookie. Better leave the white out! -
1 cup quick oats (90 grams) (large rolled oats work too)
Oats give the cookies their chewy texture. Quick oats blend well, but you can use rolled oats for more chewiness too. -
4 ounces cream cheese (112 grams) (full fat, brick style)
The secret ingredient for the creamy filling! -
2-3 cups powdered sugar (220-330 grams)
Adjust sweetness to your liking, but remember—it’s a cream pie, so let’s be generous! -
1 teaspoon vanilla extract
Same as before, pure is best! -
1/4 teaspoon salt
A little salt in the filling makes everything taste more like itself! -
1 tablespoon whipping cream (or milk, if needed)
Add extra moisture to your filling to get the perfect consistency.
Step-by-Step Instructions
To get those Pumpkin Oatmeal Cream Pies into your lovely hands, follow along with these easy steps:
-
Preheat the Oven: Start by preheating your oven to 350°F (175°C). A warm oven is crucial for that perfect cookie texture!
-
Combine Dry Ingredients: In a mixing bowl, whisk together the flour, cinnamon, ginger, nutmeg, cloves, baking soda, and salt. This step is key—mixing those spices evenly throughout ensures each bite is flavorful!
-
Cream the Butter & Sugars: In another large bowl, beat together the softened unsalted butter, brown sugar, and granulated sugar until light and fluffy—about 2-3 minutes. This is where your arm workout pays off! The fluffiness of your butter mixture leads to lovely, airy cookies.
-
Mix in Wet Ingredients: Add the pumpkin puree, molasses (or honey), vanilla extract, and egg yolk to your butter-sugar mixture. Mix until well combined. Your kitchen should now smell delightfully autumnal.
-
Incorporate Dry Ingredients: Gradually add your flour mixture to the wet ingredients. Mix until just combined—overmixing can lead to tough cookies, and we’re all about softness!
-
Stir in Oats: Fold in the quick oats with a spatula. Just imagine how chewy and hearty these will be when they come out of the oven!
-
Scoop and Bake: Use a cookie scoop or tablespoon to drop spoonfuls of dough onto a lined baking sheet. Leave some space for spreading—about 2 inches apart. Bake for 10-12 minutes until they’re golden brown around the edges but still soft in the center. Let them cool for a couple of minutes before transferring them to a wire rack.
-
Make the Cream Filling: While your cookies are cooling, beat the cream cheese, powdered sugar, vanilla extract, and salt together until smooth. If it’s too thick, add a little whipping cream or milk to get that perfect spreadable consistency.
-
Assemble the Cookies: Once your cookies are completely cool, turn half of them upside down. Spread a generous dollop of cream filling on each of those cookies before topping them with the other halves. Press gently, and voilà!
Serving Suggestions
Now that you have these beauties assembled, it’s time to serve them up! You can present these Pumpkin Oatmeal Cream Pies on a rustic wooden board for a cozy autumnal feel. Toss in some mini pumpkins or squash for decoration—nothing says fall quite like a colorful display!
If you want to make them even more special, sprinkle a dash of cinnamon or powdered sugar dust on top before serving. You could even warm them up in the microwave for a few seconds for that straight-from-the-oven feel. Pair them with a cup of hot apple cider or a warm cup of coffee, and you’ve got an afternoon treat that will impress anyone.
Recipe Variations
Now you know the classic way to make these pies, but let’s get creative! Here are a few fantastic variations to try:
-
Pumpkin Spice Cream Cheese Filling: Add a pinch of pumpkin spice to the cream filling for an extra flavor boost.
-
Nutty Oats: Toss in some chopped nuts like pecans or walnuts into the oat mixture for added crunch.
-
Cranberry Zing: For a fruity twist, add dried cranberries or raisins to your cookie dough—a delightful texture that pairs nicely with the creamy filling!
-
Maple Cream Filling: Swap out the vanilla in the filling for maple syrup for a unique take.
-
Vegan Option: For a vegan version, use coconut oil instead of butter, substitute the egg yolk with a flax egg, and choose a dairy-free cream cheese for the filling.
Chef’s Notes
I must admit, these cookies have a special place in my heart! When I first shared them at a family gathering last year, they disappeared faster than I could say "yum"! They’ve since become a staple in my kitchen and are a go-to request for fall gatherings.
Don’t shy away from making these cookies your own; adding that personal touch will only make these pies more meaningful to you. Whether it’s a nostalgic recipe or a new favorite creation, every bite is an opportunity to share love.
FAQs and Troubleshooting
Here are some common questions you might find helpful as you navigate making these delicious treats:
-
Can I use canned pumpkin instead of puree?
No! Make sure to use actual pumpkin puree. Canned pumpkin pie filling includes spices and sugar that will alter the recipe. -
Why did my cookies spread too much?
This can happen if your butter was too soft or if the dough was not chilled before baking. Resting the dough in the fridge for 30 minutes can help! -
How can I tell if they’re done baking?
They should be just set on the edges and slightly soft in the center. They will continue to firm up as they cool. -
Can I make these cookies ahead of time?
Absolutely! You can make the dough and freeze it, or bake the cookies and store them in an airtight container for up to a week.
Nutritional Info
Each Pumpkin Oatmeal Cream Pie packs a delightful blend of flavors and nutrients! Here’s a rough estimate for one cream pie, depending on how thick you spread the filling:
- Calories: 200-250
- Protein: 3 grams
- Fat: 9 grams
- Carbohydrates: 32 grams
- Fiber: 2 grams
- Sugar: 15 grams
Remember, these nutrition values can vary based on substitutions and portion sizes. A little indulgence is always a good thing, especially when it comes to celebrating fall!
Final Thoughts
There you have it! Pumpkin Oatmeal Cream Pies are not just another dessert; they’re an experience filled with warmth, nostalgia, and joy. Whether you’re whipping them up for a cozy night in or bringing them to your next gathering, I guarantee they’ll be a hit!
Get ready to dive into this season’s flavors and create memories that taste as warm as a pumpkin-spiced hug. So, roll up those sleeves, and let’s bake some love into these pies! I can’t wait for you to try them. Be sure to share your baking adventures with me at Feastical.com—I’d love to hear your stories and see your delicious creations!
Happy baking, and here’s to a season rich with flavor and connection! 🍂
Print
Pumpkin Oatmeal Cream Pies
- Total Time: 32 minutes
- Yield: 24 cookies 1x
- Diet: Vegetarian
Description
Delight in the warm, spiced flavors of autumn with these chewy Pumpkin Oatmeal Cream Pies, filled with a luscious cream filling that’s perfect for cozy gatherings.
Ingredients
- 1/3 cup pumpkin puree
- 1 cup all-purpose flour (125 grams)
- 1 teaspoon cinnamon
- 1/2 teaspoon ground ginger
- 1/4 teaspoon ground nutmeg
- 1/8 teaspoon ground cloves
- 1/2 teaspoon baking soda
- 1/4 teaspoon salt
- 1/2 cup unsalted butter (112 grams), softened
- 3/4 cup brown sugar (158 grams)
- 1/2 cup granulated sugar (100 grams)
- 1 tablespoon molasses (15 ml) or honey
- 1 teaspoon vanilla extract
- 1 large egg yolk
- 1 cup quick oats (90 grams)
- 4 ounces cream cheese (112 grams), full fat, brick style
- 2–3 cups powdered sugar (220–330 grams)
- 1 teaspoon vanilla extract
- 1/4 teaspoon salt
- 1 tablespoon whipping cream or milk (if needed)
Instructions
- Preheat the oven to 350°F (175°C).
- Combine dry ingredients: whisk together flour, cinnamon, ginger, nutmeg, cloves, baking soda, and salt.
- Cream together the butter, brown sugar, and granulated sugar until light and fluffy.
- Mix in the pumpkin puree, molasses (or honey), vanilla extract, and egg yolk until well combined.
- Incorporate the dry ingredients gradually, mixing until just combined.
- Stir in the oats with a spatula.
- Scoop dough onto a lined baking sheet, leaving space between them, and bake for 10-12 minutes.
- Make the cream filling by beating cream cheese, powdered sugar, vanilla extract, and salt until smooth. Adjust consistency with whipping cream or milk if needed.
- Assemble the cookies by spreading cream filling on half of the cookies and topping with the remaining half.
Notes
Feel free to customize by adding nuts, dried fruits, or even different flavors of cream filling for a unique twist!
- Prep Time: 20 minutes
- Cook Time: 12 minutes
- Category: Dessert
- Method: Baking
- Cuisine: American
Nutrition
- Serving Size: 1 cookie
- Calories: 225
- Sugar: 15g
- Sodium: 200mg
- Fat: 9g
- Saturated Fat: 5g
- Unsaturated Fat: 4g
- Trans Fat: 0g
- Carbohydrates: 32g
- Fiber: 2g
- Protein: 3g
- Cholesterol: 30mg
Keywords: pumpkin, cream pies, oatmeal cookies, fall desserts, autumn recipes
Weeknight Beef Stuffed Shells: Creamy Comfort Dinner
Beef Stuffed Shells: The Ultimate Comfort Food Recipe
Hey fam! It’s Beau Collier here, your friendly neighborhood food enthusiast, and today, we’re diving into a dish that wraps you in a warm embrace: Beef Stuffed Shells! This comforting pasta dish isn’t just food; it’s a canvas for memories, laughter, and a sprinkle of love right from the oven to your plate. So, grab your apron, roll up those sleeves, and let’s get cooking!
Introduction
There’s something incredibly satisfying about stuffed pasta. It’s like a little treasure chest of flavors just waiting for you to take that first bite. The chewy jumbo shells bursting with savory ground beef and creamy ricotta, all smothered in rich marinara sauce, make Beef Stuffed Shells a true crowd-pleaser. Whether you’re hosting a cozy family dinner, prepping for the big game night, or simply craving a little nostalgia, this dish is your go-to.
Growing up, my family had a tradition—every Sunday, we’d gather around the dinner table for a hearty meal, and stuffed shells often graced our table. I remember my Mom pulling out a giant pot of simmering marinara sauce, the aroma filling the air as we could hardly wait to dig in. As kids, we’d bounce around the kitchen, stealing tastes of cheese and joking about who could stuff the most shells before dinner. It’s those little moments of joy and togetherness that inspired me to share this recipe with you.
Today, we’ll embark on a culinary journey where even novice cooks will feel like pros. I promise to keep it simple yet full of those feel-good vibes that make every bite a celebration. Let’s put on that chef’s hat and create the ultimate comfort food!
Personal Story
I can’t recall how many times I’ve made stuffed shells, but one memory stands out like a favorite film played on repeat. It was the holiday season, and the house was decked out in twinkling lights and the smell of pine was heavy in the air. With family coming over, my mom entrusted me with the mission of crafting the stuffed shells. I felt a mix of excitement and fear—could I pull it off?
I remember standing over the pot of bubbling marinara sauce, sprinkling in herbs as my younger sister snuck pasta shells from the counter. Together, we giggled and filled those shells with our makeshift mix, just figuring it out as we went along. The best part? When I pulled the finished dish from the oven, golden and bubbling, my dad said it was like a taste of “home.” That comment stuck with me, reminding me that food isn’t just about taste; it’s about the laughter, the love, and the memories we create in the kitchen.
To this day, whenever I make Beef Stuffed Shells, I’m transported back to that kitchen filled with love—an invitation I now extend to you.
Ingredients
Let’s gather everything you’ll need to whip up these delightful Beef Stuffed Shells. Here’s what’s in the lineup:
-
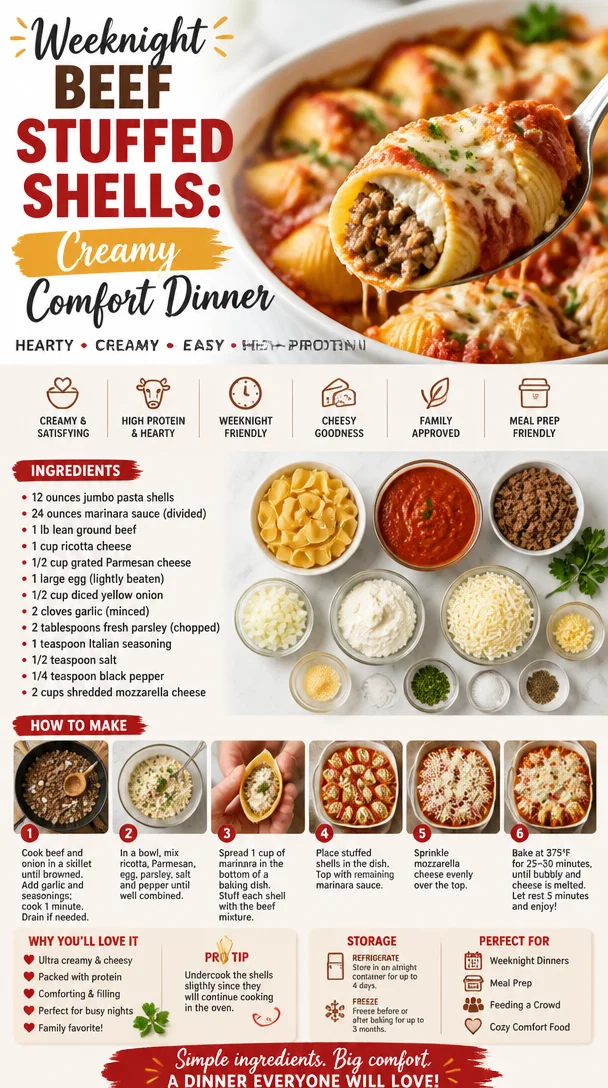
12 ounces jumbo pasta shells
These big boys are perfect for stuffing! If you can’t find jumbo shells, you can use manicotti noodles, but they won’t hold quite as much filling. -
24 ounces marinara sauce (divided)
Get your favorite jar or homemade recipe. The sauce is crucial: it adds moisture and flavor! You can swap with Alfredo sauce for a creamier vibe. -
1 lb lean ground beef
I love using lean ground beef for a healthier option. If you’re looking for alternatives, try turkey, chicken, or even plant-based ground meat for a veggie take. -
1 cup ricotta cheese
Kids and adults alike will love this creamy treasure! You can substitute with cottage cheese for a lighter option, but be sure to drain it well. -
1/2 cup grated Parmesan cheese
A sprinkle of this adds a punch of flavor! Freshly grated is best, but pre-packaged works if you’re in a pinch. -
1 large egg (lightly beaten)
This helps bind everything together! If you’re egg-free, skip it or use a flax egg (1 tablespoon of ground flaxseed mixed with 3 tablespoons of warm water). -
1/2 cup diced yellow onion
Onion gives a nice base of flavor—sautéed until translucent is best. If you’re not an onion fan, try shallots or green onions. -
2 cloves garlic (minced)
Because everything’s better with garlic! Feel free to up this to three or four cloves if you’re a garlic lover. -
2 tablespoons fresh parsley (chopped)
Fresh herbs brighten up the dish! Dried parsley can be used too, but reduce the amount since its flavor is more concentrated. -
1 teaspoon Italian seasoning
This blend brings warmth with herbs like oregano and basil. If you’re out, use a mix of dried basil, thyme, and marjoram. -
1/2 teaspoon salt
Seasoning is key, but remember, the cheese and sauce will contribute saltiness too! -
1/4 teaspoon black pepper
A little pepper adds a flavorful kick; adjust to taste! -
2 cups shredded mozzarella cheese
The melty, gooey goodness on top! You can’t go wrong with this classic. For a twist, use provolone or a spicy pepper jack.
Step-by-Step Instructions
Now, let’s get to the good stuff! Here’s how to create these Beef Stuffed Shells step by step:
-
Prep Your Ingredients
Start by preheating your oven to 375°F (190°C). Boil a large pot of salted water and cook the jumbo pasta shells according to package instructions until al dente. Since they’ll bake later, avoid overcooking them. Drain and set aside, but you might want to rinse them gently with cold water to prevent sticking. -
Cook the Beef and Aromatics
In a large skillet, heat a drizzle of olive oil over medium heat. Add the diced onion and sauté for about 3-4 minutes until softened. Toss in the minced garlic and cook for an additional minute until fragrant—your kitchen should smell heavenly right about now! -
Brown the Beef
Add the ground beef to the skillet, breaking it apart with a wooden spoon. Season with salt, pepper, and Italian seasoning. Cook until browned, about 6-8 minutes. Drain any excess grease (if using higher fat ground beef) because we want our filling to be creamy, not greasy. -
Create the Filling
In a large mixing bowl, combine the cooked beef mixture, ricotta, beaten egg, half of the Parmesan cheese, and chopped parsley. Mix until well combined; I always give it a taste here! It should be warm and flavorful with just a pinch extra salt and pepper if needed. -
Stuff the Shells
Prepare a 9×13-inch baking dish by spreading about 1 cup of marinara sauce on the bottom to prevent sticking. Using a spoon (or your hands if you’re feeling adventurous!), stuff each shell generously with the beef mixture and place them seam side up in the dish. Don’t be shy—really pack those shells! -
Top It All Off
Once all the shells are snug in the dish, pour the remaining marinara sauce over the top. Sprinkle with the remaining mozzarella and Parmesan cheese. This is where the magic happens—those bubbling cheese layers are the pièce de résistance! -
Bake
Cover the dish with aluminum foil (preventing direct contact with the cheese) and bake in the preheated oven for about 25 minutes. Then remove the foil and bake for an additional 15-20 minutes or until the cheese is bubbly and golden brown. Your kitchen will smell divine! -
Serve
Once out of the oven, let the dish sit for about 10 minutes—this will help set everything. Garnish with extra parsley if you’re feeling fancy. Serve these delightful stuffed shells alongside a crisp garden salad and a slice of garlic bread for a complete meal!
Serving Suggestions
When it comes to serving Beef Stuffed Shells, presentation can jazz up even the simplest dishes. Here’s how to plate it up beautifully:
- Place a generous portion of stuffed shells on one half of a large dinner plate.
- Drizzle a little extra marinara sauce over the shells for color and added yumminess.
- Sprinkle fresh basil or parsley on top for a pop of green—food likes to look pretty too!
- Serve with a side salad dressed in lemon vinaigrette, which pairs wonderfully with the richness of the shells.
- Don’t forget to have extra grated cheese on the table for those cheese enthusiasts!
Recipe Variations
Now that you know the classic way to make Beef Stuffed Shells, let’s have some fun with variations. Food loves variety as much as we do! Here are a few twist ideas:
-
Cheesy Spinach Stuffed Shells
Mix in some cooked and chopped spinach into the beef filling or swap half of the ground beef for sautéed spinach for a tasty veggie pack! -
Mexican-Inspired Shells
Add cumin and chili powder to the beef filling, then top with salsa and jalapeños instead of marinara for a fiesta on your plate! -
Mushroom Risotto Stuffed Shells
If you’re feeling adventurous, make a creamy mushroom risotto and stuff the shells with that instead. The mushroom flavor beautifully complements the rich cheese. -
Buffalo Chicken Stuffed Shells
Substitute the ground beef with shredded chicken mixed with buffalo sauce and ranch. Top with blue cheese crumbles for a tangy finish. -
Vegan Stuffed Shells
Swap the beef for lentils, add nutritional yeast instead of cheese, and use tofu ricotta for a delicious, plant-based alternative!
Chef’s Notes
As a chef, I can tell you that recipes often evolve from love and creativity. My Beef Stuffed Shells recipe isn’t cast in stone. Over the years, I’ve experimented with different types of cheeses and sauces—sometimes a fiery arrabbiata sauce made an appearance! Each twist brought its own memories and flavors, making dinner feel like a new adventure every time. I remember one time using leftover Thanksgiving turkey in place of beef—it was a huge hit! So don’t hesitate to play around and make it your own—as long as it comes from the heart, you can’t go wrong!
FAQs and Troubleshooting
-
Can I make these ahead of time?
Absolutely! You can assemble the stuffed shells a day in advance. Just cover tightly with plastic wrap and store in the fridge until you’re ready to bake. Just add a few extra minutes to the baking time if they’re coming straight from the fridge. -
What do I do if my shells break while cooking?
This happens sometimes, but no worries! Just fill the broken bits with the stuffing and layer them in the dish. They’ll still taste fabulous! -
Can I freeze the leftovers?
Yes! Cooked stuffed shells can be frozen for up to 3 months. Just be sure to wrap them tightly. To reheat, bake directly from frozen, adding extra time. -
How do I know when they’re done?
The cheese should be bubbly and golden brown on the top. A quick poke or cut will reveal if the filling is hot throughout.
Nutritional Info
Now, while I believe food is all about enjoyment, it’s also nice to know what you’re putting into your body. Here’s a rough idea of the nutritional info per serving (assuming 6 servings):
- Calories: 470
- Protein: 36g
- Fat: 22g
- Carbohydrates: 32g
- Fiber: 3g
- Sugar: 6g
Keep in mind, these numbers can vary based on the specific ingredients you choose. But with hearty meals like this, balance is key—pair with a salad for some added veggies!
Final Thoughts
Cooking isn’t just about the food; it’s about creating connections, reliving memories, and having fun. Beef Stuffed Shells may have rooted in my childhood, but this recipe now carries the spirit of so many experiences and flavors. I hope it becomes one of your favorites too! As you fill and bake your shells, remember that what you’re serving is more than just a dish; it’s a slice of love shared over the dinner table with your friends and family.
So, what are you waiting for? Let’s get cooking, dig in, and create your own flavorful memories! Be sure to drop a comment below with your own stories or variations on this recipe—I love hearing about your kitchen adventures! Happy cooking, friends!
Print
Beef Stuffed Shells
- Total Time: 60 minutes
- Yield: 6 servings 1x
- Diet: None
Description
A comforting pasta dish filled with savory ground beef and creamy ricotta, smothered in rich marinara sauce.
Ingredients
- 12 ounces jumbo pasta shells
- 24 ounces marinara sauce (divided)
- 1 lb lean ground beef
- 1 cup ricotta cheese
- 1/2 cup grated Parmesan cheese
- 1 large egg (lightly beaten)
- 1/2 cup diced yellow onion
- 2 cloves garlic (minced)
- 2 tablespoons fresh parsley (chopped)
- 1 teaspoon Italian seasoning
- 1/2 teaspoon salt
- 1/4 teaspoon black pepper
- 2 cups shredded mozzarella cheese
Instructions
- Prep your ingredients. Start by preheating your oven to 375°F (190°C). Boil a large pot of salted water and cook the jumbo pasta shells according to package instructions until al dente. Drain and set aside.
- Cook the beef and aromatics. In a large skillet, heat a drizzle of olive oil over medium heat. Add the diced onion and sauté for about 3-4 minutes until softened. Toss in the minced garlic and cook for an additional minute.
- Brown the beef. Add the ground beef to the skillet, breaking it apart. Season with salt, pepper, and Italian seasoning. Cook until browned, about 6-8 minutes. Drain any excess grease.
- Create the filling. In a large mixing bowl, combine the cooked beef mixture, ricotta, beaten egg, half of the Parmesan cheese, and chopped parsley. Mix until well combined.
- Stuff the shells. Spread about 1 cup of marinara sauce on the bottom of a 9×13-inch baking dish. Stuff each shell generously with the beef mixture and place them seam side up in the dish.
- Top it all off. Pour the remaining marinara sauce over the top and sprinkle with the remaining mozzarella and Parmesan cheese.
- Bake. Cover the dish with aluminum foil and bake for about 25 minutes. Then remove the foil and bake for an additional 15-20 minutes or until the cheese is bubbly and golden brown.
- Serve. Let the dish sit for about 10 minutes. Garnish with extra parsley if desired. Serve with a salad and garlic bread.
Notes
You can assemble these the day before and refrigerate them. They can also be frozen for up to 3 months.
- Prep Time: 15 minutes
- Cook Time: 45 minutes
- Category: Main Course
- Method: Baking
- Cuisine: Italian
Nutrition
- Serving Size: 1 serving
- Calories: 470
- Sugar: 6g
- Sodium: 800mg
- Fat: 22g
- Saturated Fat: 11g
- Unsaturated Fat: 6g
- Trans Fat: 0g
- Carbohydrates: 32g
- Fiber: 3g
- Protein: 36g
- Cholesterol: 90mg
Keywords: beef, stuffed shells, pasta, comfort food, Italian, family dinner
One-Pan Creamy Baked Macaroni and Cheese for Weeknights
Creamy Baked Macaroni and Cheese: A Warm Hug in a Dish
Hey there, fellow food lovers! Welcome to my cozy corner of the culinary universe, where we celebrate all things delicious and comforting. Today, we’re diving into a dish that’s as classic as it is creamy—Baked Macaroni and Cheese! There’s something magical about combining pasta with a rich, cheesy sauce and then baking it to golden, bubbling perfection. I promise, it’s going to be a treat for your taste buds and your soul.
Now, macaroni and cheese has probably crossed paths with you at a dinner table, a potluck, or even at the end of a long day when you just want to curl up with something that feels like home. For me, this dish stirs up nostalgia for childhood dinners at my grandmother’s house, where the aroma of her homemade mac and cheese would waft through the air, inviting us all to gather around the table. Oh, the joy of anticipation, waiting for that first creamy bite!
So grab your spatula, and let’s get cooking! We’re going to transform simple pantry staples into a dish that brings people together, invokes laughter, and sparks joyful memories.
A Walk Down Memory Lane
Growing up, I was lucky enough to have a grandmother who was a passionate cook. I still remember the sound of her stirring a bubbling pot of cheese sauce on the stove, the rhythmic clink of the whisk echoing through the kitchen. One of my favorite kitchen adventures with her was making macaroni and cheese from scratch. She taught me that the secret to a fabulous mac and cheese lies in the cheese sauce. She would always say, “Don’t skimp on the cheese, Beau!”
We’d laugh as cheese would inevitably find its way onto our hands and clothes, a badge of honor in our cheesy creation. We’d almost always sneak a spoonful of the gooey, cheesy goodness before adding the pasta, and I swear, those little tastes were as magical as the finished dish.
Every family gathering, without fail, her baked macaroni and cheese stole the show. A quick turnaround on a classic—but with a personal twist. Today, I’m sharing that same spirit of joy and creativity with you. So get ready to make some memories of your own!
Ingredients
For our creamy, baked macaroni and cheese, you’ll need the following ingredients:
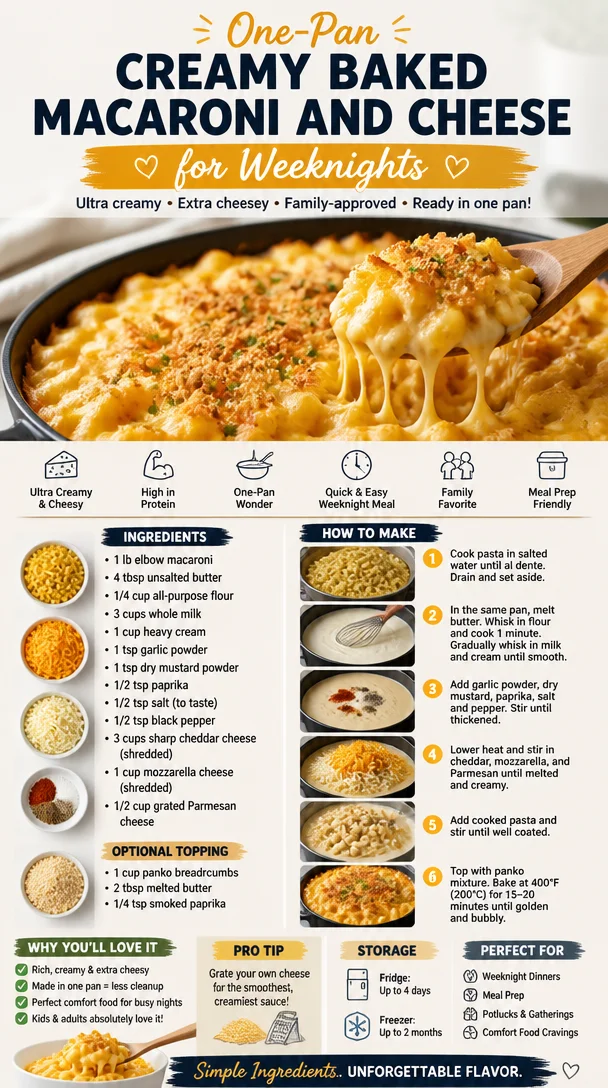
- 1 lb elbow macaroni: This is a classic choice for mac and cheese, but feel free to swap for cavatappi or shells for added fun!
- Water for boiling: Enough to cover your pasta—you want it nice and salty for flavor!
- Salt for pasta water: A good rule of thumb is to use about 1 tablespoon per gallon of water.
For the cheese sauce:
- 4 tablespoons unsalted butter: This adds richness. You can use salted butter, but then adjust your salt later.
- 1/4 cup all-purpose flour: This is our thickening agent. If you’re gluten-free, substitute with a gluten-free flour blend.
- 3 cups whole milk: Creamy and rich! You can use 2% milk, but whole milk gives a better texture.
- 1 cup heavy cream: For that velvety richness that dreams are made of. If you’re cutting calories, you can substitute half-and-half.
- 1 teaspoon garlic powder: A hidden hero that enhances flavors without overpowering them.
- 1 teaspoon dry mustard powder: This brings a tangy depth to the dish.
- 1/2 teaspoon paprika: Adds warmth and color. Feel free to use smoked paprika for a twist!
- 1/2 teaspoon salt (adjust to taste): Always taste as you go!
- 1/2 teaspoon black pepper: For a little kick. Add more if you love heat!
- 3 cups sharp cheddar cheese, shredded: A classic choice for mac and cheese—sharp cheddar offers more flavor.
- 1 cup mozzarella cheese, shredded: This lends a stretchy, gooey quality.
- 1/2 cup grated Parmesan cheese: This gives a salty finish that boosts the flavor profile!
Optional topping:
- 1 cup panko breadcrumbs: For that glorious crunch on top.
- 2 tablespoons melted butter: To make those breadcrumbs even more delicious.
- 1/4 teaspoon smoked paprika: To season your topping for a bit of depth.
Step-by-Step Instructions
Now that we have our ingredient lineup, let’s dive into the cooking process! Follow these detailed steps for a fail-proof mac and cheese journey:
-
Cook the Macaroni:
- Bring a large pot of salted water to a boil. Once boiling, add the elbow macaroni. Cook until al dente according to package instructions (usually about 7-8 minutes). Remember: the pasta will continue cooking in the oven, so you want it slightly underdone.
- Chef’s Tip: Reserve about a cup of pasta cooking water before draining. This starchy water can help adjust the cheese sauce’s consistency later.
-
Make the Cheese Sauce:
- In a large saucepan, melt the butter over medium heat. Once melted and bubbling, whisk in the flour. Keep whisking for about 2-3 minutes until it turns slightly golden—this is your roux.
- Gradually whisk in the whole milk and heavy cream, ensuring there are no lumps. Bring to a simmer and keep stirring until it thickens, about 5-7 minutes.
- Stir in the garlic powder, dry mustard powder, paprika, salt, and pepper. Taste and adjust seasoning as desired.
- Remove from heat, and slowly fold in the cheddar and mozzarella cheese until melted and smooth. For added creaminess, mix in a splash of reserved pasta water if needed.
-
Combine Pasta and Sauce:
- In a large mixing bowl (or in the pot if you’re feeling bold!), combine the drained macaroni with the cheese sauce. Stir well until every elbow is coated in that glorious cheese goodness.
- If you want to go extra, throw in the Parmesan cheese at this step for an extra cheesy bite!
-
Prepare for Baking:
- Preheat your oven to 350°F (175°C).
- Transfer the macaroni and cheese mixture to a greased 3-quart baking dish, spreading it out evenly.
-
Make the Topping (Optional):
- In a small bowl, mix panko breadcrumbs with melted butter and smoked paprika until the breadcrumbs are well-coated. Sprinkle the breadcrumb mixture evenly over the mac and cheese.
-
Bake:
- Bake in the preheated oven for about 25-30 minutes, or until the top is golden and crisp. Enjoy the heavenly aroma filling your kitchen as it bakes!
Serving Suggestions
Once your creamy baked macaroni and cheese emerges from the oven bubbling and golden brown, it’s time to plate up!
- Serve it family-style: Just scoop it into a large serving bowl or leave it in the baking dish and let everyone dive in.
- Add a garnish: A sprinkle of fresh parsley or chives on top adds a splash of color.
- Pair it right: Mac and cheese pairs wonderfully with a side salad dressed lightly to balance the richness, or serve it as a fulfilling side to fried chicken or BBQ ribs for a meal that will knock everyone’s socks off!
Recipe Variations
Let’s mix things up a bit, shall we? Here are some creative twists to put your mark on this classic dish:
-
Veggie Delight: Stir in some steamed broccoli, sautéed spinach, or roasted bell peppers before baking for added nutrition and flavor.
-
Bacon Lovers: Add cooked, crumbled bacon into the cheese sauce or as a topping for a savory smoky kick.
-
Spicy Mac: Kick it up a notch by mixing in diced jalapeños or switching up the cheese to pepper jack for a flavorful punch.
-
Truffle Mac and Cheese: Drizzle a bit of truffle oil over the top just before serving for an upscale touch.
-
Nutty Mac: Sprinkle chopped toasted walnuts or pecans over the top before serving for added crunch and flavor.
Chef’s Notes
Macaroni and cheese has evolved over the years, and each family seems to have their own beloved version. My grandmother’s recipe inspired my love for cooking and experimentation in the kitchen. Occasionally, I’ve tried using different cheeses—Gruyère, Gouda— and with them, I realized that the fun in cooking happens when you push boundaries! So don’t be afraid to get adventurous; let your creativity shine!
Oh, and if you find yourself with leftover mac and cheese, you can always repurpose it! Form it into patties and pan-fry for crispy mac and cheese cakes, or use it as filling for stuffed bell peppers.
FAQs and Troubleshooting
-
How do I make my mac and cheese less dry?: The key to creamy mac and cheese is adequate sauce. If it looks too thick after baking, you can add a splash of milk or reserved pasta water to the mixture before baking to maintain creaminess.
-
How can I store leftovers?: Store leftover mac and cheese in an airtight container in the fridge for up to 3-4 days. For freezing, freeze in a foil-lined dish or individual servings.
-
What can I do if my sauce is lumpy?: If your cheese sauce becomes lumpy, consider straining it through a fine mesh sieve. Alternatively, you can whisk it vigorously or use an immersion blender to smooth it out.
-
Why did my cheese sauce separate?: This can happen if the cheese is heated too quickly or at too high a temperature. Make sure you’re melting cheese on low heat, and that the milk is not boiling when you add the cheese.
Nutritional Info
Now, let’s talk nutrition. While creamy baked macaroni and cheese is undeniably a comfort food favorite, it’s worth noting that moderation is key. Here’s a quick breakdown per serving (approx. 1 cup):
- Calories: 500-600
- Carbohydrates: 50g
- Protein: 20g
- Fat: 30g
- Saturated Fat: 15g
- Cholesterol: 80mg
- Fiber: 2g
- Sodium: 700mg
You can make this dish a bit lighter by using low-fat dairy, whole-grain pasta, and loading up on veggies as mentioned above.
Final Thoughts
And there you have it! A creamy, rich baked macaroni and cheese sure to satisfy your cravings and bring warmth and joy to your table. Remember, cooking is all about experimenting and finding what brings you happiness, so don’t hesitate to add your special touches along the way.
Next time you serve up a bowl of this mac and cheese, I hope it brings you as many warm memories as it does delicious satisfaction! Enjoy every spoonful as you create your own kitchen tales. Until next recipe, keep that kitchen lively, and as always, let’s dig in!
Print
Creamy Baked Macaroni and Cheese
- Total Time: 45 minutes
- Yield: 4 servings 1x
- Diet: Vegetarian
Description
A classic and comforting baked macaroni and cheese dish that combines pasta with a rich, cheesy sauce baked to golden perfection.
Ingredients
- 1 lb elbow macaroni
- Water for boiling
- 1 tablespoon salt (for pasta water)
- 4 tablespoons unsalted butter
- 1/4 cup all-purpose flour
- 3 cups whole milk
- 1 cup heavy cream
- 1 teaspoon garlic powder
- 1 teaspoon dry mustard powder
- 1/2 teaspoon paprika
- 1/2 teaspoon salt (adjust to taste)
- 1/2 teaspoon black pepper
- 3 cups sharp cheddar cheese, shredded
- 1 cup mozzarella cheese, shredded
- 1/2 cup grated Parmesan cheese
- 1 cup panko breadcrumbs (optional)
- 2 tablespoons melted butter (optional)
- 1/4 teaspoon smoked paprika (optional)
Instructions
- Bring a large pot of salted water to a boil. Once boiling, add the elbow macaroni. Cook until al dente according to package instructions (about 7-8 minutes). Reserve about a cup of pasta cooking water before draining.
- In a large saucepan, melt the butter over medium heat. Whisk in the flour and cook until slightly golden (about 2-3 minutes).
- Gradually whisk in the whole milk and heavy cream. Bring to a simmer and stir until it thickens (about 5-7 minutes).
- Stir in the garlic powder, dry mustard, paprika, salt, and pepper. Adjust seasoning as needed.
- Remove from heat and fold in the cheddar and mozzarella cheese until melted and smooth.
- Combine the drained macaroni with the cheese sauce. Mix well to coat every elbow.
- Preheat your oven to 350°F (175°C).
- Transfer the macaroni and cheese mixture to a greased 3-quart baking dish.
- In a small bowl, mix panko breadcrumbs with melted butter and smoked paprika, and sprinkle over the mac and cheese.
- Bake for about 25-30 minutes, or until the top is golden and crisp.
Notes
For extra flavor, consider adding vegetables or bacon. Leftovers can be stored in an airtight container for 3-4 days.
- Prep Time: 15 minutes
- Cook Time: 30 minutes
- Category: Main Course
- Method: Baking
- Cuisine: American
Nutrition
- Serving Size: 1 serving
- Calories: 550
- Sugar: 6g
- Sodium: 700mg
- Fat: 30g
- Saturated Fat: 15g
- Unsaturated Fat: 10g
- Trans Fat: 0g
- Carbohydrates: 50g
- Fiber: 2g
- Protein: 20g
- Cholesterol: 80mg
Keywords: mac and cheese, comfort food, baked pasta, cheesy dish
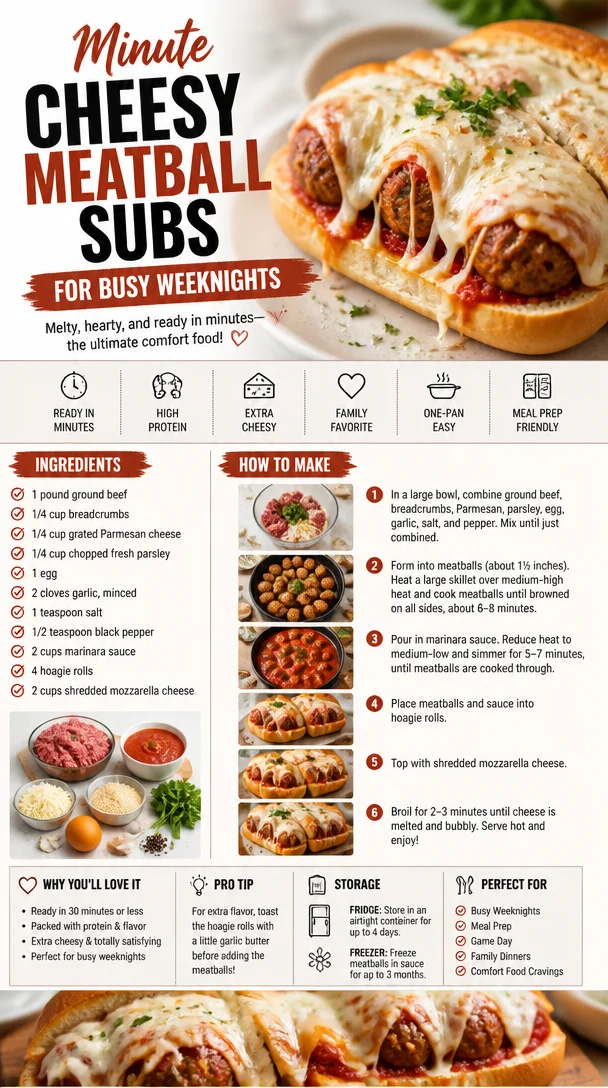
Minute Cheesy Meatball Subs for Busy Weeknights
Cheesy Meatball Subs: A Comfort Food Classic
Hey there! I’m Beau Collier, and welcome to Feastical! Today, I’m whipping up one of my all-time favorite comfort food creations: Cheesy Meatball Subs. There’s just something about a warm, gooey meatball sub that’s like a hug from the inside out. The way the meatballs bubble in marinara sauce, nestled in a hoagie roll and topped with melted mozzarella, is nothing short of magical. So, if you’re ready to roll up your sleeves, I promise you’ll want to savor every bite of these delectable sandwiches.
Like many cooking lovers, my journey began in my childhood kitchen, where my family gathered around the table for a Sunday feast. My mom always had a pot of marinara sauce simmering on the stove; its rich aroma made it impossible not to gather around. However, the star of our family meal was her meatball subs. She believed the secret ingredient was love, and her subs always tasted like it. The way she rolled those meatballs—so tender, so juicy—was an art form in itself. Fast forward a few decades later, and here I am, passing down that same joy and flavor to you. Let’s dive into this recipe and create some delicious memories together!
Ingredients
Here’s what you’ll need to bring your Cheesy Meatball Subs to life:
-
1 pound ground beef
The backbone of this recipe! You can also use a mixture of ground beef and ground pork for more flavor. For a leaner option, ground turkey or chicken works well. -
1/4 cup breadcrumbs
Ideal for that perfect meatball texture! Panko breadcrumbs are a great alternative if you want extra crunch. Gluten-free breadcrumbs are also available if you’re looking for a gluten-free option. -
1/4 cup grated Parmesan cheese
This adds a delightful umami savor to your meatballs. If you’re a fan of a stronger cheese flavor, try using Pecorino Romano instead. -
1/4 cup chopped fresh parsley
Fresh herbs elevate any dish! If parsley isn’t your thing, fresh basil or even cilantro will bring a unique flavor twist. -
1 egg
This is your binder to keep those meatballs together. You can use a flax egg (1 tablespoon ground flaxseed mixed with 2.5 tablespoons water) for a vegan option. -
2 cloves garlic, minced
Because garlic makes everything better! Use roasted garlic if you want a milder, sweeter taste. -
1 teaspoon salt
A must to enhance the flavors. Feel free to adjust for dietary needs or swap with garlic salt for an extra flavor kick. -
1/2 teaspoon black pepper
For that little punch! You can swap it with red pepper flakes for a spicy kick. -
2 cups marinara sauce
You can use homemade or store-bought. For extra depth, look for a brand with a blend of herbs. If you’re feeling adventurous, a spicy marinara adds a great twist. -
4 hoagie rolls
These are the vessel for our masterpiece! If hoagie rolls aren’t available, sub in any crusty bread or even baguettes. -
2 cups shredded mozzarella cheese
The gooey, melty star of our show! For a cheesy variation, try a blend of mozzarella and provolone cheese.
Step-by-Step Instructions
Now, let’s get cooking! Follow these easy steps for your Cheesy Meatball Subs:
-
Preheat the Oven
Preheat your oven to 375°F (190°C). This ensures that our meatballs will cook perfectly. If you have a convection oven, you can reduce the temperature by 25°F for a nice even cook. -
Prepare the Meatball Mixture
In a large mixing bowl, combine the ground beef, breadcrumbs, Parmesan cheese, chopped parsley, egg, minced garlic, salt, and black pepper. Get in there with your hands! Mixing with your hands helps you feel the texture and ensures everything is evenly combined. Pro Tip: Don’t overmix, or you’ll end up with tough meatballs. -
Shape the Meatballs
Roll the mixture into golf ball-sized meatballs – about 1 to 1.5 inches in diameter. Place them on a baking sheet lined with parchment paper. The parchment helps with easy cleanup. -
Bake the Meatballs
Pop those meatballs in the preheated oven for about 20–25 minutes, or until they’re golden brown and cooked through. You can multitask during this time—get your marinara sauce warming on low in a separate pot for an irresistible aroma. -
Simmer in Marinara Sauce
Once your meatballs are finished baking, add them to the warm marinara sauce. Let them simmer together for about 10 minutes. This step allows all those flavorful juices to mingle. -
Prepare the Rolls
While the meatballs are simmering, slice your hoagie rolls down the center, but not all the way through—think of it as creating a little pocket for the goodies! Place them on a baking tray. -
Assemble the Cheesy Subs
Spoon the meatballs and marinara sauce into each hoagie roll. Top generously with shredded mozzarella cheese. Chef Hack: If you want a delightful golden crust on the cheese, pop them under the broiler for 2-3 minutes. Just watch it—things can go from brown to burned quickly! -
Serve and Enjoy!
Once the cheese is melted and bubbly, remove the tray from the oven. Let them cool for a couple of minutes (if you can resist the smell!). Plate your subs and dive into cheesy deliciousness!
Serving Suggestions
For plating, serve your Cheesy Meatball Subs on a rustic wooden board or a simple white plate to let that gooey goodness shine. Dress it up with a sprinkle of extra parsley or basil on top for a pop of color. On the side, consider crispy, golden fries or a fresh garden salad to balance out the richness of the subs. And don’t forget a small bowl of extra marinara sauce for dipping!
Recipe Variations
Now, let’s shake things up a bit. Here are a few creative twists to make the recipe your own:
-
Spicy Meatball Subs: Add crushed red pepper flakes into the meat mixture for some heat. Serve with pickled jalapeños for an extra kick.
-
Veggie-Packed Meatballs: Swap half of the ground beef for finely grated zucchini or carrots. It adds moisture and a sneaky veggie boost!
-
Cheesy Garlic Bread Rolls: Brush the hoagie rolls with garlic butter before adding the filling for an extra layer of flavor.
-
Substitute Proteins: Use ground turkey, lamb, or even plant-based ground meat for a different flavor profile or for those following a specific diet.
-
Herbed Variations: Experiment by adding various herbs like oregano, thyme, or even a dash of Italian seasoning to the meatball mixture for a new twist on flavor.
Chef’s Notes
Every dish carries a piece of its creator’s heart, doesn’t it? This Cheesy Meatball Sub recipe is no exception. I’ve modified it over time—what started as mom’s secret sauce and infinite love has turned into a canvas for creativity. I’ve even experimented with homemade hoagie rolls; if you find yourself with some extra time, I highly recommend trying your hand at making them from scratch. The joy of biting into a chewy, fresh hoagie roll stuffed with these meatballs is simply unforgettable.
FAQs and Troubleshooting
1. Why are my meatballs falling apart?
This usually happens if there’s not enough binding agent. Make sure to use an egg and don’t skip the breadcrumbs!
2. How do I store leftovers?
Store any leftovers in an airtight container in the fridge for up to 3 days. Reheat in the oven for the best texture.
3. Can I freeze these?
Absolutely! You can freeze the uncooked meatballs on a baking tray and then transfer them to a freezer bag. They’ll keep for up to 3 months! Just thaw and bake when you’re ready.
4. What’s the best way to reheat the meatball subs?
For optimal gooeyness, reheat in the oven at 350°F (175°C) until warmed through and cheese is melted, about 10-15 minutes.
Nutritional Info
Serving size: 1 sub
- Calories: ~500
- Protein: 30g
- Fat: 25g
- Carbohydrates: 40g
- Fiber: 2g
- Sugar: 5g
(Nutritional values are estimates and may vary based on specific ingredients and serving sizes.)
Final Thoughts
There you have it, my friends! Your very own recipe for Cheesy Meatball Subs that’ll make your kitchen smell heavenly and your heart sing. It’s more than just food; it’s about gathering with friends, sharing stories, and creating memories over a dish that always brings everyone together. So, gather your ingredients, turn up your favorite playlist, and let’s get cooking. Remember, food is meant to be enjoyed, so don’t stress; have fun in the kitchen! Until next time, happy feasting!
Print
Cheesy Meatball Subs
- Total Time: 50 minutes
- Yield: 4 servings 1x
- Diet: None
Description
A comforting and delicious meatball sub recipe that features tender meatballs in marinara sauce, topped with gooey mozzarella cheese, all nestled in a warm hoagie roll.
Ingredients
- 1 pound ground beef
- 1/4 cup breadcrumbs
- 1/4 cup grated Parmesan cheese
- 1/4 cup chopped fresh parsley
- 1 egg
- 2 cloves garlic, minced
- 1 teaspoon salt
- 1/2 teaspoon black pepper
- 2 cups marinara sauce
- 4 hoagie rolls
- 2 cups shredded mozzarella cheese
Instructions
- Preheat your oven to 375°F (190°C).
- In a large mixing bowl, combine the ground beef, breadcrumbs, Parmesan cheese, chopped parsley, egg, minced garlic, salt, and black pepper.
- Roll the mixture into golf ball-sized meatballs and place them on a baking sheet lined with parchment paper.
- Pop those meatballs in the oven for about 20-25 minutes, until golden brown and cooked through.
- Once the meatballs are baked, add them to the warm marinara sauce and let them simmer for about 10 minutes.
- Slice your hoagie rolls down the center, but not all the way through.
- Spoon the meatballs and marinara into each hoagie roll and top with shredded mozzarella cheese.
- Pop them under the broiler for 2-3 minutes for a golden crust.
- Remove from the oven, let them cool for a couple of minutes, then serve and enjoy!
Notes
For variations, you can add spicy elements or swap out the ground meats, or brush the rolls with garlic butter for extra flavor.
- Prep Time: 15 minutes
- Cook Time: 35 minutes
- Category: Main Course
- Method: Baking
- Cuisine: Italian
Nutrition
- Serving Size: 1 sub
- Calories: 500
- Sugar: 5g
- Sodium: undefined
- Fat: 25g
- Saturated Fat: 10g
- Unsaturated Fat: 15g
- Trans Fat: 0g
- Carbohydrates: 40g
- Fiber: 2g
- Protein: 30g
- Cholesterol: 80mg
Keywords: meatball, sub, sandwich, comfort food, cheesy

Easy Chocolate Raspberry Bites
Easy Chocolate Raspberry Bites: A Sweet Indulgence
Hey there, food lovers! If you’re on the hunt for an easy, scrumptious dessert that looks fancy but is a breeze to whip up, you’ve landed in the right kitchen! Today, we’re diving into a treat that combines the rich decadence of chocolate with the bright and refreshing burst of raspberries.
Picture this—little bites of heaven that melt in your mouth, perfect for parties, movie nights, or just because it’s a Wednesday. Seriously, who needs a reason to indulge in chocolate? Whether you’re a novice in the kitchen or a seasoned pro, these Easy Chocolate Raspberry Bites are so simple, you’ll be sharing them with friends (or keeping them all to yourself—no judgment here!).
Let’s roll up our sleeves and dive into this delightful dessert. I promise, after this step-by-step guide, you’ll be making these little gems like a pro. So grab your apron, and let’s get started!
A Sweet Memory
Whenever I think about chocolate and raspberries, I can’t help but recall my childhood summer afternoons spent at my grandma’s house. She had these amazing bushes of fresh raspberries in her backyard, bursting with flavor. In between playing tag with my cousins, I’d sneak over to pick the ripest ones, feeling their coolness in my hands.
One afternoon, Grandma walked into the kitchen with a bowl of melted chocolate and a grin that suggested magic was about to happen. “Let’s dip some berries, darling!” she said, pulling me into the kitchen. Together, we made a chocolate-covered raspberry treat that felt like the best-kept secret. They were messy, sure, but oh-so-delicious!
This recipe for Easy Chocolate Raspberry Bites brings all those sweet memories flooding back. It’s a nod to those carefree days where simple things brought the most joy. Okay, enough reminiscing; let’s get to the recipe!
Ingredients
Here’s a quick rundown of what you’ll need to create these delightful bites:
-
9 ounces coarsely chopped chocolate or chocolate chips
Use semi-sweet chocolate for balance, dark chocolate for intensity, or milk chocolate for extra creaminess. If you’re looking for a dairy-free option, go for vegan chocolate chips! -
1 pint fresh raspberries
These little gems are the star of the show! Look for bright, plump berries without any mushy spots. If you’re in a pinch, frozen raspberries can work, but fresh is best for the crunch. -
Paper liners or non-stick cooking spray
These will make clean-up a breeze! If you prefer a more rustic look, omit the liners and let the bites set directly on a baking sheet lined with parchment paper.
Gather your ingredients, and let’s get cooking!
Step-by-Step Instructions
Step 1: Prepare Your Workspace
First things first, let’s make your kitchen ready for some chocolate magic! Grab a baking sheet and line it with your paper liners or coat it with non-stick spray. This is where your bites will cool, so let’s set the stage for success!
Step 2: Melt the Chocolate
Next, we need to melt that lovely chocolate! You can use a microwave or a double boiler for this task.
Microwave Method: Place the chopped chocolate or chocolate chips in a microwave-safe bowl. Microwave in 30-second intervals, stirring in between until the chocolate is smooth and fully melted.
Double Boiler Method: If you prefer a more controlled melt, heat some water in a pot and place a bowl on top (making sure it doesn’t touch the water!). Stir until melted.
Chef Tip: If your chocolate seizes up and looks clumpy, don’t panic! Just add a small splash of coconut oil or a teaspoon of vegetable oil to help bring it back to a smooth consistency.
Step 3: Dip the Raspberries
Once your chocolate is melted and silky, it’s time to get dipping! Hold a raspberry by the stem and dip it into the chocolate, twirling it around to coat it evenly. Let the excess chocolate drip off, then transfer it to the prepared baking sheet.
Chef Hack: For a crunchy topping, sprinkle some crushed nuts or sea salt on top while the chocolate is still wet. It adds a delightful texture and flavor contrast!
Step 4: Chill for Set
After all your raspberries are dipped and on the sheet, it’s time for the magic to happen! Place the baking sheet in the fridge and let the bites chill for at least 30 minutes or until firm. Patience is key, my friends!
Step 5: Serve and Enjoy
Once the bites are set, you can enjoy them straight from the fridge! Arrange them on a platter for impressing guests or just pull them out for a sweet treat for yourself.
Chef Note: These bites are best enjoyed within a couple of days, but trust me, they’ll be gone long before that!
Serving Suggestions
Presentation is everything, darling! While these bites are delightful on their own, here are a few ways to serve and elevate the experience:
-
On a Dessert Platter: Whether it’s a dinner party or a simple family gathering, arranging these bites on a nice platter with fresh mint leaves or edible flowers can add a charming touch.
-
With Dipping Sauces: Serve with a side of whipped cream or flavored yogurt for dipping—talk about a flavor explosion!
-
On Ice Cream: Crushed chocolate raspberry bites make a fabulous topping for vanilla or chocolate ice cream—pure bliss in every scoop!
Recipe Variations
While the classic chocolate raspberry combo is unbeatable, here are a few fun variations to get your creative juices flowing:
-
White Chocolate Raspberry Bites: Switch things up with creamy white chocolate for a milder, sweeter flavor.
-
Drizzle of Caramel: A light drizzle of caramel over the chocolate before it sets takes your bites to the next level.
-
Nutty Crunch: Roll the chocolate-covered raspberries in crushed almonds or pistachios for that extra crunch.
-
Coconut Clusters: Add shredded coconut to your melted chocolate before dipping. It adds a tropical twist that pairs beautifully with raspberries.
-
Spicy Heat: Love a little kick? Mix a pinch of cayenne pepper into the melted chocolate for a spicy surprise that pairs nicely with the tartness of the raspberries.
Chef’s Notes
Over the years, my recipe for chocolate-covered treats has transformed into this lovely version you see today. I’ve played around with different fruits—strawberries, bananas, and even cherries—but the raspberry always steals the show! They’re such a perfect balance of tartness and sweetness; I can’t imagine not using them.
One funny memory I have is from a friend’s birthday party. I thought I’d impress everyone with a giant chocolate raspberry bite. I melted so much chocolate and dipped a massive raspberry—only to find it rolled off the tray and straight onto the floor! That day, I learned that sometimes, the simplest bites are the best!
FAQs and Troubleshooting
-
What if my chocolate isn’t melting smoothly?
If the chocolate starts to seize, add a teaspoon of oil to help regain that smooth texture. Make sure you’re not overheating it; low and slow is the name of the game! -
Can I use frozen raspberries?
Yes, but be aware they may release more moisture, causing a bit of sogginess. Just ensure you pat them dry before dipping! -
How should I store the chocolate bites?
Keep them in an airtight container in the fridge to maintain freshness. They should last about 3-5 days if you don’t eat them all at once! -
Can I double the recipe?
Absolutely! Just make sure you have a larger space to chill them, or do it in batches. Trust me; you’ll want plenty to share!
Nutritional Info
While I believe every treat has its time and place, sometimes it’s good to know what you’re indulging in! Each bite holds its share of sweetness and flavor, but here’s a sneak peek at the nutritional breakdown per chocolate raspberry bite (approximation based on using semi-sweet chocolate and fresh raspberries):
- Calories: 70-80 per bite
- Fat: 4g (mostly from chocolate)
- Carbs: 10g
- Protein: 0.5g
- Sugars: 6g (from chocolate and raspberries)
Of course, this varies based on variations you make, but remember, balance is key!
Final Thoughts
There you have it—a simple, scrumptious, and soul-soothing recipe for Easy Chocolate Raspberry Bites! As you prepare and indulge in this delightful treat, I encourage you to make it your own. Add your flavors, experiment with toppings, and share it with your loved ones.
Whether you’re enjoying these bites as a sweet ending to your day or bringing them out for a special occasion, know that you’re creating delicious memories. Food has a magical ability to connect us, and I’m so glad to be on this journey with you.
So go on, get in that kitchen, and make some chocolate raspberry magic! Happy cooking, my foodie friend!
Print
Easy Chocolate Raspberry Bites
- Total Time: 45 minutes
- Yield: 4 servings 1x
- Diet: Vegetarian
Description
A simple and indulgent dessert combining rich chocolate and fresh raspberries, perfect for any occasion.
Ingredients
- 9 ounces coarsely chopped chocolate or chocolate chips (semi-sweet, dark, or milk)
- 1 pint fresh raspberries
- Paper liners or non-stick cooking spray
Instructions
- Prepare your workspace by lining a baking sheet with paper liners or spraying with non-stick spray.
- Melt the chocolate using a microwave or double boiler until smooth.
- Dip the raspberries into the chocolate, allowing excess to drip off.
- Chill the dipped raspberries on a baking sheet in the fridge for at least 30 minutes to set.
- Serve and enjoy directly from the fridge or arranged on a platter.
Notes
Best enjoyed within a couple of days. For variations, try different types of chocolate or toppings.
- Prep Time: 15 minutes
- Cook Time: 30 minutes
- Category: Dessert
- Method: Chilling
- Cuisine: American
Nutrition
- Serving Size: 1 serving
- Calories: 80
- Sugar: 6g
- Sodium: 5mg
- Fat: 4g
- Saturated Fat: 2g
- Unsaturated Fat: 2g
- Trans Fat: 0g
- Carbohydrates: 10g
- Fiber: 1g
- Protein: 0.5g
- Cholesterol: 0mg
Keywords: chocolate, raspberries, dessert, easy recipe, sweets

Ingredient Raspberry Peach Sorbet: Quick Summer Treat
Hey there, fellow food lovers! If you’re hunting for a delightful treat that captures the essence of summer, you’ve just hit the jackpot with this Raspberry-Peach Sorbet! Picture this: a warm sunny day, a gentle breeze, and a refreshing scoop of bright, fruity goodness that dances on your taste buds. That’s the kind of vibe this sorbet brings to the table. With vibrant raspberries and luscious peaches, it’s a dessert that’s not just a treat; it’s an experience.
I’ve had a long-standing love affair with frozen desserts. I remember the first time I made sorbet from scratch; I was all of seven years old, standing on a stool, trying to reach the counter while my adorable grandma cheered me on from the side. She was a master in the kitchen, wielding her wooden spoon like an artist with a paintbrush. That day, we put together a simple fruit puree, sweetened it a tad, and drizzled it into a tray before sliding it into the freezer. The anticipation was almost unbearable! When we finally scooped out the frosty delight, it was nothing short of magic. I still cherish the pink hue that matched my grandmother’s smile that day.
Here at Feastical, I believe that food should evoke memories and create new ones—just like that sorbet did for me. This raspberry-peach creation is one of those recipes that you’ll want to share with friends and family. It’s made with wholesome ingredients, super easy to whip up, and packs a punch of flavor. So grab your favorite bowl, and let’s get ready to mix up something special!
Personal Story
Every summer, when the fruit stands bust open their doors, I have a ritual: I head straight for the peaches and raspberries. It’s a sensory journey I look forward to all year! One summer in particular stands out—a roadside market with vibrant colors of red and yellow everywhere. The peaches were so juicy that just picking one up felt like holding a piece of sunshine.
I was on a mission to create the ultimate summertime dessert for a family barbecue, and the lush, ripe peaches and sweet yet tart raspberries were begging to be transformed into something magical. I teamed up with my niece, who was eager to experiment in the kitchen. We mixed, mashed, and tasted; laughter ensued as our hands got messy and our hearts grew fonder of these sweet, simple ingredients.
That day turned into a bonding experience over the shared love of cooking. As we scooped the vibrant raspberry-peach sorbet and licked the spoons clean, I realized that this recipe wasn’t just about satisfying our sweet tooth; it was about cherishing moments with family and making memories.
Ingredients
Let’s gather the star players for our Raspberry-Peach Sorbet! Here’s what you need:
-
2 cups fresh raspberries: These little gems are bursting with flavor! If you can’t find fresh ones, frozen raspberries work too—just make sure they aren’t sweetened.
-
2 cups fresh peaches (peeled and sliced): Peaches bring that luscious sweetness. Feel free to substitute with nectarines or even apricots if you’re feeling adventurous!
-
1/2 cup honey or agave syrup: This is your sweetener! I love honey for its rich flavor, but agave is a great vegan alternative. If you prefer a sugar option, simple syrup can do the trick.
-
1 tablespoon lemon juice: Just a squeeze! This adds brightness to your sorbet and balances the sweetness. Freshly squeezed is always best, but bottled works in a pinch.
-
1 cup water: This is the base of your sorbet. If you’re looking to amp up the flavor, consider using coconut water instead.
Step-by-Step Instructions
Now that we’ve got our ingredients ready, let’s dive into making this delightful Raspberry-Peach Sorbet. Follow me through these steps, and don’t hesitate to dance around the kitchen while you’re at it!
-
Prepare the fruits: Start by washing the raspberries gently under cool water. Don’t rush this step! Use a fine strainer to ensure they remain intact. For the peaches, peel them (a vegetable peeler works wonders) and slice them up. The riper, the better! Ripe peaches will lend a much sweeter flavor to your sorbet.
-
Blend the fruits: Toss the fresh raspberries and sliced peaches into a blender. Trust me, you want a high-powered blender here to achieve that silky-smooth texture. Blend until it’s super smooth; this is your fruit puree! Scrape down the sides if necessary, and give it one last blitz for good measure.
-
Add the sweetener and lemon juice: Pour in your honey (or agave) and the lemon juice. Here’s a fun tip: taste your mixture before it goes any further! You can adjust the sweetness by adding a bit more honey or a splash of lemon juice, depending on your preference. If you want to cut the sweetness, adding more raspberries is a genius move!
-
Combine the water: Add the one cup of water and blend again until everything is well combined—in other words, a beautiful, vibrant shade of delicious! If you’re using coconut water, you may find you won’t need as much sweetener—just something to keep in mind.
-
Chill and freeze: Pour the mixture into a shallow dish or a large plastic bag. If using a shallow dish, cover it tightly with plastic wrap. Pop it in the freezer and let it chill for about 3-4 hours or until it’s firm but scoopable. If you love the texture of freshly churned sorbet, consider giving it a good stir every hour or so!
-
Serve it up!: Once it’s frozen solid, you can serve your Raspberry-Peach Sorbet! Let it sit at room temperature for a few minutes before scooping—this helps create that perfect, creamy texture. A warm scoop for a cool dessert? Yes, please!
Serving Suggestions
When it comes to plating your sorbet, less is often more! Grab your favorite ice cream scooper or just a warm spoon to serve fluffy scoops into chilled bowls. A sprinkling of fresh mint leaves adds a pop of color and flavor; plus, it looks fancy! You can also drop in a few extra raspberries or peach slices for presentation. For a fun twist, try serving it with a drizzle of coconut cream or yogurt on top. If you want to keep it simple yet elegant, a tiny sprig of mint can elevate your serving game just in a snap!
And don’t forget: this sorbet is a fabulous treat on its own, but it can also star as a lovely palette cleanser between savory courses or an exquisite topping on a slice of cake. So whether you’re hosting a fancy dinner party or a casual picnic, make sure you have this fabulous sorbet at the ready—it’s a crowd-pleaser for sure!
Recipe Variations
Now, let’s level up your Raspberry-Peach Sorbet game with a few creative twists:
-
Berry Medley Sorbet: Incorporate other berries like blueberries or strawberries along with your raspberries. The more the merrier!
-
Mango-Peach Delight: Swap raspberries for mango for a tropical twist. Mango’s creamy texture pairs beautifully with peaches; it’s like an island getaway in a bowl!
-
Spicy Sorbet: Want to heat things up? Add a pinch of cayenne or a splash of Jalapeño syrup to your mix for a surprising kick.
-
Minty Fresh: Toss in a handful of fresh mint leaves before blending for a refreshing herbal note that’s oh-so-summery!
-
Yogurt Sorbet: For a creamier consistency, blend in a cup of Greek yogurt. This also adds a protein boost.
Feel free to mix and match—your taste buds will thank you!
Chef’s Notes
As a chef, I often find my creations evolve over time. This Raspberry-Peach Sorbet wasn’t always my go-to summer treat. I once made the rookie mistake of not letting the fruit blend long enough, which resulted in a grainy texture. But hey, every mishap is a learning opportunity, right? I embraced the graininess as a new style, calling it a “rustic sorbet.” Now I laugh about it, but oh boy, I was devastated back then!
It’s moments like these that remind me to cherish the process, and to always be open to improvisation in the kitchen. So don’t be afraid to make this recipe your own—experiment, laugh off those kitchen mishaps, and enjoy the journey!
FAQs and Troubleshooting
1. What if my sorbet is too hard?
If your sorbet has turned into an ice brick you can barely scoop, no worries! Let it sit out for 5-10 minutes to soften, then scoop with a warm spoon.
2. Can I use frozen fruit?
Absolutely! Frozen raspberries and peaches can still make a delicious sorbet—just make sure they’re unsweetened.
3. How can I avoid icy texture?
If your sorbet is icy, try blending in a little more sweetener or a bit of vodka before freezing. It keeps the texture smoother!
4. What’s the best way to store sorbet?
Store your sorbet in an airtight container in the freezer. It should last for about a month, but it’s so delicious it may not last that long!
Nutritional Info
While nutritional needs can vary, a generous scoop of Raspberry-Peach Sorbet roughly contains around 150 calories. The healthy fruit blend offers a wealth of vitamins, antioxidants, and fiber, making it a guilt-free indulgence! The honey provides natural sweetness, and by swapping it out for agave or a sugar alternative, you can tailor it to fit your dietary preferences.
Remember, moderation is key, so enjoy your sorbet as a refreshing treat without overindulging! It’s a wonderful way to beat the heat while indulging in natural flavor.
Final Thoughts
Creating this Raspberry-Peach Sorbet is all about simplicity and joy. It’s more than just a recipe; it’s about gathering, connecting, and savoring every moment. So whether you’re creating it for a crowd or just for a sweet moment alone on a hot day, it’s sure to brighten your spirits and satisfy your cravings.
So, my fellow foodies, take the plunge, gather your ingredients, and let’s whip up a sorbet that sings the songs of summer! Here’s to laughter, flavor, and all the sweet memories that come along with every scoop. Happy sorbet-making, my friends!
Print
Raspberry-Peach Sorbet
- Total Time: 240 minutes
- Yield: 4 servings 1x
- Diet: Vegetarian
Description
A refreshing Raspberry-Peach Sorbet that captures the essence of summer with vibrant flavors and easy preparation.
Ingredients
- 2 cups fresh raspberries
- 2 cups fresh peaches (peeled and sliced)
- 1/2 cup honey or agave syrup
- 1 tablespoon lemon juice
- 1 cup water
Instructions
- Prepare the fruits: Start by washing the raspberries gently under cool water and peeling and slicing the peaches.
- Blend the fruits: Toss the raspberries and sliced peaches into a blender and blend until super smooth.
- Add the sweetener and lemon juice: Pour in your honey (or agave) and lemon juice, and taste for sweetness.
- Combine the water: Add the one cup of water and blend again until well combined.
- Chill and freeze: Pour the mixture into a shallow dish, cover, and freeze for about 3-4 hours until firm.
- Serve it up: Let the sorbet sit at room temperature for a few minutes before scooping into bowls.
Notes
You can use coconut water instead of regular water for added flavor. Serve with a sprig of mint for garnish.
- Prep Time: 10 minutes
- Cook Time: 0 minutes
- Category: Dessert
- Method: Blending and Freezing
- Cuisine: American
Nutrition
- Serving Size: 1 serving
- Calories: 150
- Sugar: 30g
- Sodium: 5mg
- Fat: 0g
- Saturated Fat: 0g
- Unsaturated Fat: 0g
- Trans Fat: 0g
- Carbohydrates: 37g
- Fiber: 3g
- Protein: 1g
- Cholesterol: 0mg
Keywords: sorbet, raspberry, peach, summer dessert, refreshing treat

Minute Cheesy Bacon Ranch Wraps for Busy Weeknights
Cheesy Bacon Ranch Wraps: The Ultimate Comfort Food
Hey there, food lovers! Today we’re diving into the scrumptious world of Cheesy Bacon Ranch Wraps. If you’re in the mood for a dish that brings together creamy goodness, crispy bacon, and all the fresh flavors that make your taste buds sing, you’re in the right spot. These wraps are the quintessential feel-good food, perfect for everything from a casual lunch to a festive gathering with friends. Let’s get started on a culinary adventure that’ll leave everyone asking for seconds!
A Flavorful Journey
This recipe isn’t just a delightful meal; it’s a nostalgia trip down memory lane. I still vividly remember the first time I whipped up these cheesy bacon ranch wraps for a family gathering. I was just a young chef in training, excited to impress my parents with something quick and delicious. We had just built this fantastic outdoor grill in our backyard, and the scent of cooking food mingled with laughter and the sound of my siblings playing nearby. I can still see my dad grabbing a wrap, stuffing it full, and giving me a thumbs up. That moment sparked my love for cooking, and it also made me realize how food has this magical ability to bring people together.
Fast forward a few years, and I’ve made countless variations of the wraps, each time adding a little personal flair and love. From backyard BBQs to cozy movie nights, these wraps have never failed to evoke feelings of warmth and comfort. You can’t go wrong with this recipe—trust me on that!
Ingredients
Here’s what you’ll need to whip up these amazing wraps:
-
4 large flour tortillas
The base of your wrap; feel free to substitute with whole wheat or gluten-free tortillas for a healthier twist! -
8 ounces cream cheese, softened
This adds a rich, creamy layer. You can swap it with Neufchâtel cheese for a lighter version or even Greek yogurt for a tangy kick. -
1/2 cup ranch dressing
The star of the show! Use homemade ranch for a fresh taste or a low-fat alternative if you’re watching calories. -
1 cup shredded cheddar cheese
Cheddar is classic, but you can also use pepper jack for a spicier version. -
1 cup cooked bacon, chopped
Who doesn’t love bacon? Alternatively, you could use turkey bacon or even crispy chickpeas for a vegetarian option. -
1/2 cup green onions, chopped
These add a refreshing crunch; chives can also do the trick if green onions aren’t available. -
1 cup lettuce, shredded
Iceberg for that crunch or spinach for a nutrient boost—no wrong choices here. -
1 cup diced tomatoes (optional)
They add a nice burst of flavor and color. Leave them out if you’re not a fan. -
Salt and pepper to taste
Always essential to crank up those flavors!
Step-by-Step Instructions
Cooking these wraps is as easy as pie! Let’s break it down step by step:
-
Prep Your Ingredients:
Start by gathering and prepping all your ingredients. Chop your bacon, green onions, and tomatoes (if using), and shred your lettuce. Having everything ready makes the assembly process smoother. Trust me, the less frantic you are, the more fun you’ll have! -
Mix the Cream Cheese Mixture:
In a medium bowl, combine your softened cream cheese and ranch dressing using a spatula or hand mixer until it becomes smooth and creamy. This mixture serves as the glue that holds everything together, so don’t rush this step! -
Assemble the Wraps:
Place a tortilla on a clean, flat surface. Spread a generous layer of the cream cheese mixture on the tortilla, leaving about an inch around the edges. Feel free to spread it to the ends—you want that creamy goodness in every bite! -
Layer Your Ingredients:
Now it’s time to add some fun! Sprinkle a handful of shredded cheese over the cream cheese layer. Then, add chopped bacon, a sprinkle of green onions, and a nice handful of lettuce. If you’re using tomatoes, toss those on too. Remember, don’t go overboard—if you pack them too tight, the wraps will be hard to roll and may explode like confetti! -
Roll It Up:
Here comes the fun part! Starting from one edge, gently roll the tortilla tightly but not too tight (you want the fillings to stay inside). Once you’ve reached the end, press the seam to secure your wrap. If it doesn’t stick, a little smear of cream cheese will do the trick. -
Slice and Serve:
Take a sharp knife and slice the wrap in half diagonally. This not only makes it easier to eat but also showcases the colorful fillings inside. You can serve them as they are or pop them in the fridge for 30 minutes for a cooler snack.
Serving Suggestions
While these wraps are delicious on their own, there are plenty of ways to elevate the experience! Serve them alongside some crunchy veggie sticks or a fresh garden salad for added texture. A side of extra ranch or even a spicy dipping sauce can add a fun twist. Arrange your wraps on a platter, cut side up for a beautiful presentation, and voilà! Your guests will be in for a treat, and they’ll love munching on these tasty delights.
Recipe Variations
Get ready to get creative in the kitchen! Here are a few fun twists on the classic wrap that’ll keep things fresh:
-
Buffalo Cheesy Bacon Ranch Wrap: Substitute half of the ranch with buffalo sauce for a spicy kick. Add sliced grilled chicken to the mix for a hearty meal.
-
Mediterranean Twist: Swap the ranch dressing for tzatziki, add feta cheese, and substitute olives for bacon. It’s a deliciously zesty change of pace.
-
Veggie Lovers’ Wrap: Skip the bacon and pile on more veggies like bell peppers, cucumbers, and shredded carrots for a refreshing vegetarian option.
-
BBQ Bacon Ranch Wrap: Use BBQ sauce instead of ranch for a tangy, sweet flavor. Pair it with pulled pork or chicken for a satisfying meal that feels like summer all year round.
-
Breakfast Breakfast Wrap: Add scrambled eggs, avocado, and some salsa for a morning twist that’ll get your day started on a delicious note!
Chef’s Notes
Oh, how these wraps have evolved! I still remember the very first batch I made; they were a bit of a mess, honestly. The ingredients spilled out everywhere, but boy, did we have fun digging in! Over time, I’ve learned to be more strategic with the filling amounts and to have a few napkins handy (because let’s face it—wraps can be a bit gooey!). The versatility is what holds a special place in my heart; they’ve adapted to every party, mood, and dietary whim.
FAQs and Troubleshooting
Q: Can I make these in advance?
Absolutely! You can make them a few hours ahead of time. Just wrap them tightly in foil or plastic wrap and store them in the fridge to keep everything fresh.
Q: What if I don’t have ranch dressing?
No problem! You can whip up a quick homemade ranch using buttermilk, mayo, and your favorite herbs. Or, try a store-bought alternative like Caesar dressing or a creamy vinaigrette.
Q: Can I freeze these wraps?
While you can freeze them, I recommend enjoying them fresh to retain that delightful texture. If you must, wrap them tightly in foil or plastic and consume within a month.
Q: How can I add more protein?
Feel free to toss in some cooked chicken, turkey, or even black beans for an extra protein punch!
Nutritional Info
Each Cheesy Bacon Ranch Wrap (without additional ingredients) typically contains:
- Calories: Approximately 300-400 (varies based on specific ingredients)
- Protein: 15g
- Fats: 20g
- Carbohydrates: 30g
- Fiber: 2g
- Sodium: 700mg
(Note: For a healthier balance, adjust ingredients like bacon and cheese according to personal dietary preferences.)
Final Thoughts
These Cheesy Bacon Ranch Wraps are a simple, delicious way to bring a dose of happiness to your day. Whether as a quick lunch, a party platter, or a fun snack for movie night, they’re a hit everywhere. So roll up those tortillas and dig into a dish that’s not only satisfying but also packed with flavor and love. Remember, the kitchen is about creating memories—now get out there, put on your apron, and start wrapping!
Thanks for joining me today in the kitchen. Keep cooking, keep sharing, and above all, keep enjoying those feel-good moments that food brings into our lives. Happy feasting!
Print
Cheesy Bacon Ranch Wraps
- Total Time: 15 minutes
- Yield: 4 servings 1x
- Diet: Omnivore
Description
Delicious and creamy wraps filled with bacon, cheese, fresh vegetables, and ranch dressing, perfect for any occasion.
Ingredients
- 4 large flour tortillas
- 8 ounces cream cheese, softened
- 1/2 cup ranch dressing
- 1 cup shredded cheddar cheese
- 1 cup cooked bacon, chopped
- 1/2 cup green onions, chopped
- 1 cup lettuce, shredded
- 1 cup diced tomatoes (optional)
- Salt and pepper to taste
Instructions
- Prep your ingredients: Start by gathering and prepping all your ingredients. Chop your bacon, green onions, and tomatoes (if using), and shred your lettuce.
- Mix the cream cheese mixture: In a medium bowl, combine your softened cream cheese and ranch dressing using a spatula or hand mixer until smooth.
- Assemble the wraps: Place a tortilla on a clean, flat surface and spread a generous layer of the cream cheese mixture on the tortilla.
- Layer your ingredients: Sprinkle shredded cheese, chopped bacon, green onions, and lettuce over the cream cheese layer. Add tomatoes if using.
- Roll it up: Starting from one edge, gently roll the tortilla tightly. Press the seam to secure your wrap.
- Slice and serve: Slice the wrap in half diagonally. You can serve them immediately or refrigerate for 30 minutes.
Notes
Feel free to customize the ingredients based on your preferences and dietary needs.
- Prep Time: 15 minutes
- Cook Time: 0 minutes
- Category: Appetizer
- Method: No-Cook
- Cuisine: American
Nutrition
- Serving Size: 1 wrap
- Calories: 350
- Sugar: 3g
- Sodium: 700mg
- Fat: 26g
- Saturated Fat: 10g
- Unsaturated Fat: 12g
- Trans Fat: 0g
- Carbohydrates: 30g
- Fiber: 2g
- Protein: 15g
- Cholesterol: 40mg
Keywords: cheesy wraps, bacon ranch, comfort food, quick lunch, party food

Minute Tiramisu Martini: Creamy Coffee Cocktail Recipe
Tiramisu Martini: A Dessert Cocktail Delight
Hey there, fellow foodies! If you love dessert as much as I do, you’re in for a treat today. Imagine this: a cocktail that tantalizes your taste buds with the layered goodness of classic tiramisu while packing a sweet, boozy punch. Sounds dreamy, right? Well, let me introduce you to the Tiramisu Martini—a delightful fusion of flavors that makes for an indulgent after-dinner drink or a fun evening gathering.
Now, why am I so excited about this drink? Well, I have a soft spot for tiramisu. Not just because it’s delicious, but because it has a special place in my heart. A few years ago, I spent a summer in Italy, and one of the standout memories was enjoying traditional tiramisu at a small café in Rome. I remember sitting outside, the sun setting, and savoring each bite with a cold espresso in hand. That moment was pure bliss, and it inspired me to bring that experience into a cocktail! So let’s dive into how to create this delectable Tiramisu Martini that will make you feel like you’ve just transported to the charming streets of Italy.
A Personal Story Worth Sharing
Ah, the summer in Italy! Something magical about that country gets under your skin and makes you fall in love—not just with the beautiful scenery but with the food too! As I sat there in that quaint café, I was blown away by the rich flavors mingling on my palate. That soft mascarpone cheese, the bold espresso, and the delicate cocoa dusting—it was a symphony of tastes.
I remember chatting with the barista, who encouraged me to try a coffee liqueur with my espresso. The first sip of that combo was an explosion of flavors, and voilà, a light bulb went off in my head! Why not transform that tiramisu experience into a cocktail? This Tiramisu Martini is my tribute to that summer, bridging the warmth of Italy with the spirit of creativity.
Now, let’s get down to business and whip up this boozy masterpiece!
Ingredients
Here’s what you’ll need to get started on your Tiramisu Martini:
-
2 ounces vodka
- For a smooth base, use a quality vodka. If you’re feeling adventurous, flavored vodkas like vanilla or whipped cream can add another dimension!
-
1 ounce coffee liqueur (e.g., Kahlúa)
- This brings that coffee flavor without the need for brewing! If you’re not a fan, try a chocolate liqueur for a twist.
-
1 ounce espresso or strong coffee, cooled
- The star of the show! Freshly brewed espresso works best, but instant coffee or cold brew can also save the day. Just make sure it’s strong!
-
1 ounce vanilla cream liqueur
- Adds that creamy texture reminiscent of mascarpone. You can substitute it with a mix of heavy cream and vanilla extract for a homemade twist.
-
Cocoa powder or chocolate shavings for garnish
- For that decadent finish! You could also use cinnamon instead for a warm twist.
-
Coffee beans for garnish
- Just a few will do! They not only enhance the visual appeal but add a little aromatic punch.
Step-by-Step Instructions
Okay, let’s get our hands dirty—figuratively speaking, of course! Follow these steps, and you’ll have your Tiramisu Martini ready in no time.
-
Chill Your Glass:
- Before you start shaking things up, pop your martini glass in the freezer. A chilled glass keeps the drink refreshing for longer!
-
Brew That Espresso:
- Brew a shot of espresso (or a strong coffee). Let it cool down—I usually do my brewing first, so it’s ready while I prep. Pro tip: Make it extra strong; you want that rich coffee flavor to shine through.
-
Grab a Shaker:
- Fill a cocktail shaker with ice. About halfway full should do the trick. You want to shake to chill and mix, so don’t be shy with the ice!
-
Add All Ingredients:
- Pour in 2 ounces of vodka, followed by 1 ounce of coffee liqueur, your cooled espresso, and 1 ounce of vanilla cream liqueur.
-
Shake, Shake, Shake:
- Secure the lid on your shaker and give it a vigorous shake for about 15 seconds. This isn’t just to mix; it’s to aerate the ingredients and create that creamy texture!
-
Strain into Glass:
- Carefully strain the mixture into your chilled martini glass. The frothy finish is crucial, so take your time getting it all in!
-
Garnish Like a Pro:
- Now for the fun part—dust on some cocoa powder or sprinkle with chocolate shavings for that eye-catching look. Top it off with a couple of coffee beans. Voila!
Serving Suggestions
Once you’ve crafted your Tiramisu Martini, it’s all about presentation. Here are some serving suggestions:
-
Pair with Dessert: Serve alongside mini desserts like tiramisu squares, chocolate truffles, or biscotti for a delightful pairing experience.
-
Create a Cocktail Flight: If you’re hosting, consider offering a mini cocktail flight featuring different dessert martinis. Your Tiramisu Martini could be the star of the show!
-
Sip and Savor: Encourage guests to sip slowly and enjoy the flavors. This cocktail isn’t just a drink; it’s an experience around the table, bringing everyone together.
Recipe Variations
Feeling creative? Here are a few fun twists you can try to make this drink your own:
-
Mocha Tiramisu Martini:
- Swap the vodka for coffee-infused vodka for a deeper coffee flavor. You’ll get that rich mocha vibe!
-
Nutty Delight:
- Add a splash of hazelnut liqueur (like Frangelico) for a nutty flavor that complements the sweet creaminess.
-
Vegan Version:
- Use coconut cream or almond milk with a dairy-free liqueur to create a tasty vegan version without losing flavor.
-
Spicy Kick:
- A dash of cinnamon or a pinch of cayenne pepper in the mix adds a warm, spicy twist to the cocktail.
-
Frozen Tiramisu Martini:
- Blend the ingredients with ice for a frozen version that’s perfect for warm weather or a fun party vibe!
Chef’s Notes
When I first whipped up this Tiramisu Martini, it took a few tries to find the right balance of flavors. I remember one attempt where I accidentally added too much coffee liqueur—a mistake that turned my drink into an espresso bomb! But hey, every kitchen mishap is just another opportunity to learn, right? Since then, I’ve perfected my recipe and experimented with various liqueurs. It’s become a staple not only for me but also among friends who request it at gatherings.
FAQs and Troubleshooting
1. What if my martini isn’t frothy?
Make sure you shake it long enough! The aeration is key, so don’t be shy with those 15 seconds.
2. Can I use decaf coffee?
Absolutely! If you’re sensitive to caffeine but love the flavor, decaf espresso works just fine.
3. What if I don’t have a shaker?
No worries! You can use two jars or glasses—a larger one filled with ice and a smaller one to mix your ingredients.
4. How do I store leftover ingredients?
Keep the coffee liqueur and vanilla cream liqueur sealed in their original bottles. They should have a good shelf life when stored properly.
Nutritional Info
For those who like to keep an eye on their dietary intake, here’s a rough estimate per serving (excluding garnish):
- Calories: Approximately 200
- Fat: 0g
- Carbs: 15g
- Protein: 0g
Remember that indulgence is part of the experience, so enjoy responsibly!
Final Thoughts
So there you have it—a Tiramisu Martini that encapsulates the rich flavors of your favorite dessert in a delightful cocktail form. It’s perfect for gatherings, cozy nights in, or just to treat yourself after a long day. Remember, the best recipes come from sharing experiences, laughter, and love.
As you sip your creation, think back to when you first fell in love with tiramisu or recall your fondest memories in the kitchen. Embrace the joy of cooking and enjoy sharing this cocktail with friends and family. Until next time, happy mixing and bon appétit! Cheers!
Print
Tiramisu Martini
- Total Time: 10 minutes
- Yield: 1 serving 1x
- Diet: Vegetarian
Description
A delightful cocktail that combines the flavors of classic tiramisu with a sweet, boozy punch, perfect for after-dinner indulgence.
Ingredients
- 2 ounces vodka
- 1 ounce coffee liqueur (e.g., Kahlúa)
- 1 ounce espresso or strong coffee, cooled
- 1 ounce vanilla cream liqueur
- Cocoa powder or chocolate shavings for garnish
- Coffee beans for garnish
Instructions
- Chill your glass: Pop your martini glass in the freezer to keep the drink refreshing.
- Brew that espresso: Brew a shot of espresso and let it cool down.
- Grab a shaker: Fill a cocktail shaker with ice about halfway full.
- Add all ingredients: Pour in 2 ounces of vodka, 1 ounce of coffee liqueur, the cooled espresso, and 1 ounce of vanilla cream liqueur.
- Shake, shake, shake: Secure the lid and shake vigorously for about 15 seconds to aerate the ingredients.
- Strain into glass: Carefully strain the mixture into your chilled martini glass.
- Garnish like a pro: Dust with cocoa powder or sprinkle with chocolate shavings and top it off with coffee beans.
Notes
Experiment with different liqueurs and flavors for a unique twist on the classic recipe.
- Prep Time: 10 minutes
- Cook Time: 0 minutes
- Category: Cocktail
- Method: Shaking
- Cuisine: Italian
Nutrition
- Serving Size: 1 cocktail
- Calories: 200
- Sugar: 5g
- Sodium: 0mg
- Fat: 0g
- Saturated Fat: 0g
- Unsaturated Fat: 0g
- Trans Fat: 0g
- Carbohydrates: 15g
- Fiber: 0g
- Protein: 0g
- Cholesterol: 0mg
Keywords: Tiramisu, Martini, Dessert Cocktail, Italian Cocktail, After Dinner Drink

Minute Mediterranean Pasta Salad for Busy Weeknights
Irresistible Mediterranean Pasta Salad
Hey there, food lovers! Today, we’re taking a sunny detour to the Mediterranean with a dish that’s as vibrant as the Mediterranean coast itself—Mediterranean Pasta Salad! It’s colorful, it’s fresh, and honestly, it’s packed with flavors that’ll make your taste buds dance like it’s a Mediterranean festival. Whether you’re planning a picnic, a summer gathering, or just want to elevate your weeknight dinners, this pasta salad is the perfect companion.
Now, I don’t know about you, but when I think of Mediterranean cuisine, I envision sun-soaked gatherings, laughter echoing through the air, and plates overflowing with delicious bites. This pasta salad captures that essence perfectly. It’s super simple to whip up, and it’s so versatile that it can beautifully adapt to whatever you have in your pantry or fridge. So grab your favorite apron, and let’s dive into this delicious journey!
Personal Story
Ah, pasta salad. The memories it stirs up are nothing short of delightful! I remember a summer back in my college days when my friends and I decided to host a “Taste of the World” potluck. Plates from different cuisines were spread across my small kitchen table, but the moment I unveiled my Mediterranean Pasta Salad, the whole scene shifted to a delightful frenzy.
Everyone was pouring over my pasta salad, asking for the recipe and raving about the flavors. I beamed with pride as they enjoyed each bite. I can still hear the laughter, feel that summer sun pouring through the window, and taste the perfect combination of fresh vegetables and zesty dressing. It taught me something profound about food: it’s not just about the ingredients; it’s about the moments created and shared around the table. That’s why I can’t wait to share this recipe with you. Trust me, it’s bound to bring smiles and happy memories!
Ingredients
Alright, let’s get to the juicy part! Here are the ingredients you’ll need for this Mediterranean Pasta Salad, along with some chef insights and best substitution tips to ensure your dish is as fabulous as possible:
-
14 oz pasta (Barilla rotini or penne): I love using rotini or penne for their grooves and curves that catch all that yummy dressing. If gluten-free is your jam, try chickpea or quinoa pasta for a delicious twist!
-
1 large cucumber: Peeled and sliced into 1/2-inch half-moons. Crisp and refreshing, cucumbers add a hydrating crunch. If you prefer a different cucumber vibe, try grape seed cucumbers!
-
18 oz cherry tomatoes: They add sweetness and color! You can replace them with diced heirloom tomatoes if you want to add a splash of colors.
-
3/4 cup olives (Mezzetta sliced kalamata olives): These babies bring a briny punch to the mix. If kalamata isn’t your thing, try green olives for a milder flavor.
-
5 oz feta: Crumbled feta adds a creamy and tangy finish. You can swap it for goat cheese if you’re feeling adventurous!
-
1/2 red onion: Sliced thin for that sharp zip. Don’t have red onion? Sweet onion or even green onions work in a pinch!
-
1/4 cup fresh parsley, chopped: Bright and herbaceous, parsley adds a pop of freshness. If you’re looking for something different, fresh mint or basil can bring a unique twist.
-
1/3 cup olive oil (extra-virgin): Rich in flavor and healthy fats, extra-virgin olive oil is the way to go here! You can substitute with avocado oil for a different richness.
-
4 tbsp red wine vinegar: This tangy component enhances all the flavors. You can use apple cider vinegar if that’s what you have on hand.
-
1 tbsp lemon juice: Freshly squeezed gives a bright zing! Bottled lemon juice works, but the freshness can’t be beat.
-
2 tsp oregano: This herb is a staple in Mediterranean cooking for a reason! Feel free to swap it with Italian seasoning for a varied flavor profile.
-
1 tsp honey: Just a touch adds a lovely balance to the dish. Agave syrup or even maple syrup can be good substitutes.
-
3 garlic cloves (freshly pressed): Fresh garlic gives that intense aroma we all love! If you’re in a pinch, garlic powder can work, but it’s not quite the same.
-
1/4 tsp pepper: Black pepper brings a subtle warmth to the dish. You can use white pepper for a milder flavor.
-
1/2 tsp salt: Essential for enhancing flavors! Remember, the feta and olives are already salty, so adjust as needed.
-
1/4 tsp red pepper flakes: For those who like a little kick! You can leave it out for a milder version.
Step-by-Step Instructions
Okay, my fellow kitchen adventurers, it’s time to get cooking! Here’s how we’ll put this Mediterranean Pasta Salad together in just a few simple steps.
-
Cook the pasta: Start by bringing a large pot of salted water to a boil. Add in your pasta (rotini or penne) and cook according to package instructions until al dente, usually about 8-10 minutes. Don’t forget to stir occasionally! A little tip: adding salt to the water enhances the flavor of the pasta.
-
Prep the veggies: While the pasta is cooking, let’s get chopping! Peel and slice your cucumber, halve your cherry tomatoes, slice your red onion, and chop the parsley. Having everything prepped before you start mixing makes the process smoother and more enjoyable!
-
Make the dressing: In a small bowl, whisk together the olive oil, red wine vinegar, lemon juice, oregano, honey, minced garlic, salt, pepper, and red pepper flakes. This is where the magic happens! Taste and adjust the seasoning as needed—maybe a sprinkle of more salt or a squeeze of lemon juice if you’re feeling bold.
-
Combine it all: Once the pasta is cooked, drain it well and rinse it under cool water to stop the cooking process. In a large mixing bowl, add the warm pasta, followed by the cucumber, cherry tomatoes, olives, red onion, feta, and parsley. Now, pour in that delicious dressing. Mix it all together gently until everything is nicely coated, making sure not to mush the feta too much—this is a salad, not a smoothie!
-
Chill and serve: Cover the bowl with plastic wrap or a lid and let the salad chill in the fridge for at least 30 minutes. This melding time is essential as it allows all those fabulous flavors to get acquainted! When you’re ready to serve, give it a good toss, adjust the seasoning again if necessary, and voilà! Your Mediterranean Pasta Salad is ready to impress!
Serving Suggestions
Now, let’s talk presentation! This salad is gorgeous in its colors, but a little extra love goes a long way. Consider serving it in a large, vibrant bowl or individual mason jars if you want to make it look extra festive. You can garnish with a sprinkle of extra feta, a drizzle of olive oil, or a few whole olives on top for that “wow” factor. If you want to take it up a notch, serve it alongside grilled chicken, shrimp, or even some warm pita bread to scoop it up. There’s no wrong way to enjoy this dish—it’s all about what makes your food-loving heart sing!
Recipe Variations
Feeling a little adventurous? Here are some creative twists to spice up your Mediterranean Pasta Salad:
-
Add protein: Toss in some grilled chicken, tuna, or chickpeas for added protein. This can easily transform the salad into a more filling meal!
-
Use different cheeses: Swap feta for mozzarella balls or even a peppery cheese like pepper jack for a kick.
-
Change the herbs: Experiment with different herbs like dill or basil. Fresh herbs can really change the game!
-
Add roasted veggies: Roasted bell peppers, zucchini, or artichokes can add another layer of flavor and texture!
-
Go Mediterranean-styled: Include ingredients like roasted eggplant or sun-dried tomatoes for a more rustic feel.
Chef’s Notes
Oh, how this recipe has evolved over time! I started with just a basic pasta, olive oil, and vinegar concoction in my college days—but it’s grown into a family favorite. I often tweak it based on what’s in my fridge or what I’m craving. The best part? It never disappoints. I’ve also had many mishaps, like accidentally pouring in too much vinegar or forgetting to salt the pasta water. Let’s just say I learned the hard way! But those experiences only made it more rewarding when everything comes together perfectly.
FAQs and Troubleshooting
Here are some common questions I get about this Mediterranean Pasta Salad, along with solutions for potential kitchen hiccups:
-
Can I make this pasta salad ahead of time?
Absolutely! This dish is perfect for meal prep. Just let it chill in the refrigerator, and it’ll only get tastier as the flavors meld together. -
What’s the best way to store leftovers?
Store any leftovers in an airtight container in the fridge. It’ll last about 3-4 days. Just give it a good toss before enjoying it again! -
Can I freeze this salad?
I wouldn’t recommend freezing it, as the veggies will get a bit mushy once thawed. It’s best enjoyed fresh! -
Why is my pasta salad watery?
If you find your salad is too watery, it may be due to water left in the veggies after rinsing. Make sure to pat them dry with a paper towel or cloth before mixing.
Nutritional Info
This Mediterranean Pasta Salad isn’t just a joy for your taste buds, it’s also packed with nutrients! Here’s a rough breakdown per serving (assuming 8 servings):
- Calories: ~220
- Protein: ~6g
- Carbohydrates: ~28g
- Dietary Fiber: ~2g
- Total Fat: ~10g (includes healthy fats from olives and olive oil)
- Saturated Fat: ~2g
- Sodium: ~200mg (adjust based on feta and olives)
With fresh vegetables, whole grains from the pasta, and healthy fats, this dish is a delicious and balanced option for any meal.
Final Thoughts
There you have it, friends—an irresistibly delicious recipe for Mediterranean Pasta Salad that’s perfect for any occasion! With its endless variations and hearty flavors, it’s a dish that’s sure to bring people together, just like the warmest memories of summer. So, whether you’re enjoying it at a potluck, on a picnic, or just at home with your family, know that every bite is filled with love and joy.
I can’t wait for you to give this recipe a whirl. So gather your ingredients, roll up your sleeves, and let those flavors take you on a Mediterranean getaway! And remember—when you cook with heart and passion, it always tastes better. Happy cooking, and bon appétit!
Print
Irresistible Mediterranean Pasta Salad
- Total Time: 45 minutes
- Yield: 8 servings 1x
- Diet: Vegetarian
Description
A vibrant and flavorful Mediterranean Pasta Salad that’s perfect for picnics, gatherings, or weeknight dinners.
Ingredients
- 14 oz pasta (Barilla rotini or penne)
- 1 large cucumber, peeled and sliced into 1/2-inch half-moons
- 18 oz cherry tomatoes, halved
- 3/4 cup olives (Mezzetta sliced kalamata olives)
- 5 oz feta, crumbled
- 1/2 red onion, sliced thin
- 1/4 cup fresh parsley, chopped
- 1/3 cup olive oil (extra-virgin)
- 4 tbsp red wine vinegar
- 1 tbsp lemon juice
- 2 tsp oregano
- 1 tsp honey
- 3 garlic cloves, freshly pressed
- 1/4 tsp pepper
- 1/2 tsp salt
- 1/4 tsp red pepper flakes
Instructions
- Cook the pasta: Start by bringing a large pot of salted water to a boil. Add in your pasta and cook according to package instructions until al dente, usually about 8-10 minutes. Stir occasionally!
- Prep the veggies: While the pasta is cooking, peel and slice your cucumber, halve your cherry tomatoes, slice your red onion, and chop the parsley.
- Make the dressing: In a small bowl, whisk together the olive oil, red wine vinegar, lemon juice, oregano, honey, minced garlic, salt, pepper, and red pepper flakes.
- Combine it all: Once the pasta is cooked, drain it well and rinse it under cool water. In a large mixing bowl, add the warm pasta, veggies, feta, and dressing. Mix gently.
- Chill and serve: Cover the bowl and let the salad chill in the fridge for at least 30 minutes before serving.
Notes
This pasta salad can be made ahead of time and is ideal for meal prep. Store leftovers in an airtight container for up to 3-4 days.
- Prep Time: 15 minutes
- Cook Time: 10 minutes
- Category: Salad
- Method: Mixing
- Cuisine: Mediterranean
Nutrition
- Serving Size: 1 serving
- Calories: 220
- Sugar: 3g
- Sodium: 200mg
- Fat: 10g
- Saturated Fat: 2g
- Unsaturated Fat: 8g
- Trans Fat: 0g
- Carbohydrates: 28g
- Fiber: 2g
- Protein: 6g
- Cholesterol: 15mg
Keywords: Mediterranean pasta salad, summer salad, healthy salad

One-Pan Pineapple Chicken Tacos for Busy Weeknights
Pineapple Chicken Tacos: A Flavorful Twist on Taco Night
Hey food lovers! Welcome back to Feastical! If you’re ready to spice up your taco night with a juicy burst of flavor, you’re in for a treat with these Pineapple Chicken Tacos! Picture this: tender, marinated chicken paired with sweet, tangy pineapple, all enveloped in soft tortillas. It’s a dish designed not just to fill your belly but to warm your soul. So grab your favorite kitchen gear, and let’s dive into this deliciousness!
A Taste of Nostalgia
Growing up, taco night was a sacred family ritual in my home. My dad would handle the proteins while my mom prepared the toppings – fresh veggies, zesty sauces, you name it. One summer evening, when I was maybe ten or eleven, we decided to shake things up. My dad came home with a pineapple from the local farmer’s market, beaming with excitement about using it in our tacos. At that time, the concept of fruit in savory dishes was somewhat foreign to me, but curiosity got the best of me.
We diced the juicy pineapple and mixed it with grilled chicken, and the combination was magical! The sweetness of the pineapple danced with the spices while the chicken delivered that hearty substance we all missed. To this day, that summer taco night remains one of my fondest culinary memories. It taught me that cooking is about experimentation, joy, and gathering around the table with the people you love. Now, I can’t wait for you to experience the same exuberance with these Pineapple Chicken Tacos!
Ingredients You’ll Need
Let’s get started with what you need to make these delightful tacos. Here’s the list:
-
1 pound boneless skinless chicken breasts, diced
- These are your protein powerhouse! Boneless and skinless keeps things tender and easy. If you don’t have chicken, you can swap in shrimp or firm tofu for a great alternative.
-
1 tablespoon olive oil
- A little oil goes a long way in searing your chicken and bringing out those flavors! If you’re in a pinch, avocado oil or grapeseed oil works just as well.
-
1 teaspoon smoked paprika
- This spice adds a nice depth and smokiness! If you’re in a spice mood, you could just use regular paprika, but the smoke adds a unique flavor that’s worth the upgrade.
-
1 teaspoon chili powder
- Here comes the heat! Feel free to adjust to your taste. If you prefer it milder, you can go for a mild chili powder or even skip it entirely for a sweet flavor profile.
-
1/2 teaspoon garlic powder
- No taco is complete without garlic! You can use fresh minced garlic for a stronger flavor, just remember that one clove equals about 1/8 teaspoon of garlic powder.
-
1/2 teaspoon salt
- Salt enhances all the flavors, so don’t skip this step! Consider using sea salt or kosher salt for better texture.
-
1 cup fresh pineapple, finely diced
- The star of this show! The sweetness of the pineapple will be the perfect contrast to the savory chicken. Canned pineapple can work in a pinch, but go for fresh if you can!
-
1/4 cup red onion, finely chopped
- Adds a sweet crunch and vibrant color. If red onions are too sharp for you, use green onions or even scallions for a milder taste.
-
1/4 cup fresh cilantro, chopped
- A fresh herb that brightens the dish! If you’re not a fan of cilantro, swap it out for parsley or even mint for a different twist.
-
1 tablespoon lime juice
- To add that zesty kick! Fresh lime juice is best, but bottled lime juice is a decent substitute when you’re in a hurry.
-
8 small corn or flour tortillas
- Choose whichever you prefer! Corn tortillas have a lovely earthy flavor, while flour tortillas are soft and pliable. You can also find gluten-free options if necessary.
Let’s Cook! Step-by-Step Instructions
-
Prep Your Ingredients:
- Start by gathering all your ingredients. Chop the chicken into bite-sized pieces and set them aside. Dice your pineapple, chop the red onion, and mince the cilantro. Prepping all your components will make the cooking process a breeze!
-
Marinate the Chicken:
- In a bowl, combine the diced chicken with olive oil, smoked paprika, chili powder, garlic powder, and salt. Massage the spices into the chicken, ensuring it’s evenly coated. Let it marinate for at least 15 minutes; if you have time, letting it soak up those flavors for an hour or more is even better!
-
Cook the Chicken:
- Heat a large skillet over medium-high heat. Once hot, add the marinated chicken in a single layer. Sear for about 5-7 minutes, turning occasionally, until the chicken is golden brown and cooked through. Pro tip: use a meat thermometer—the internal temperature should reach 165°F (75°C). This ensures juicy chicken every time!
-
Add the Pineapple:
- Once your chicken is cooked, push it to one side of the skillet and add the diced pineapple to the other side. Sauté together for about 2-3 minutes until the pineapple starts to caramelize a bit. This enhances its natural sweetness and adds a lovely dimension to your tacos.
-
Mix and Combine:
- Stir everything in the skillet together! Toss the pineapple through the chicken so that every bite gets a touch of sweetness. Before removing the skillet from the heat, squeeze in lime juice and give it a final stir.
-
Warm the Tortillas:
- In another skillet or on direct flame, warm your tortillas for about 30 seconds on each side until they’re soft and pliable. This step is key for making sure your tacos don’t fall apart!
-
Assemble Your Tacos:
- Lay a few pieces of the chicken and pineapple mixture onto each tortilla. Top with red onion and fresh cilantro. Feel free to add some extra lime juice if you’re feeling zesty!
Serving Suggestions
Now that your Pineapple Chicken Tacos are ready, let’s talk presentation! Stack your tacos neatly on a vibrant plate and consider garnishing with additional lime wedges and cilantro for that pop of color. If you’re feeling fancy, a sprinkle of crumbled queso fresco or a drizzle of spicy crema (just mix sour cream with a bit of sriracha) elevates this dish even further!
Delicious Variations to Try
Here are a few fun twists to keep your taco game fresh:
-
Tropical Shrimp Tacos: Swap out the chicken for shrimp, marinated in a bit of lime juice and garlic, then quickly sauté them for a quicker seafood spin.
-
Vegetarian Delight: Replace chicken with roasted chickpeas or black beans for a hearty plant-based version! Add avocado for some creaminess.
-
Spicy Mango Salsa: Instead of pineapple, toss in some diced mango or a spicy mango salsa for another layer of sweetness with a kick!
-
Grilled Chicken Variant: Grill the chicken on an outdoor grill instead for that smokey flavor, then top with the caramelized pineapple right off the grill.
-
Crunchy Coleslaw: Add a crunch by topping your tacos with a simple slaw of cabbage, carrot, and lime juice for texture and freshness!
Chef’s Notes
As I was perfecting this recipe, I found myself reminiscing often about that magical family taco night. It reminded me of how food can tell stories. Each time I make these tacos, it feels like a celebration, a chance to gather and create new memories. Over the years, I’ve learned to tweak and adapt recipes based on what I have on hand or what mood I’m in. Feel free to experiment and find what works best for you!
FAQs and Troubleshooting
-
What if my chicken is dry?
- Overcooking is the main culprit. Always use a meat thermometer to check for doneness! If it’s too dry, consider serving it with a side of pineapple salsa.
-
Can I make these ahead of time?
- You can prep the chicken and pineapple mixture a day ahead and store it in the fridge, but warm it all up before serving to ensure freshness.
-
How do I store leftovers?
- Place any leftovers in an airtight container in the refrigerator for up to 3 days. Reheat on the stovetop before serving!
-
What can I use if I’m out of tortillas?
- Try lettuce wraps or rice bowls for a gluten-free and lower-carb option. These fillings are versatile and fit great in many bases!
Nutritional Information
Now, let’s break down what you’re getting in these delicious tacos. Each serving (2 tacos) provides roughly:
- Calories: 350
- Protein: 30g
- Carbohydrates: 30g
- Fat: 15g
Of course, nutritional values may vary based on the specific ingredients and amounts used. For a healthier touch, skip the tortillas and serve the chicken and pineapple mixture over brown rice or quinoa.
Final Thoughts
Pineapple Chicken Tacos are not just a meal but an experience – a delightful mix of flavors, colors, and textures that come together to create something truly special. I hope this recipe sparks joy in your kitchen, inspires you to gather your loved ones, and ends with smiles and full bellies. Remember, cooking should be fun, energizing, and reflective of your taste!
So, what are you waiting for? Round up your favorite people, gather around the kitchen, and whip up these incredible tacos. Don’t forget to share your culinary creations with me on social media! Happy cooking, my friends! 🍍🌮
Print
Pineapple Chicken Tacos
- Total Time: 35 minutes
- Yield: 4 servings 1x
- Diet: Gluten-Free
Description
A delicious twist on taco night featuring tender chicken and sweet pineapple, wrapped in soft tortillas.
Ingredients
- 1 pound boneless skinless chicken breasts, diced
- 1 tablespoon olive oil
- 1 teaspoon smoked paprika
- 1 teaspoon chili powder
- 1/2 teaspoon garlic powder
- 1/2 teaspoon salt
- 1 cup fresh pineapple, finely diced
- 1/4 cup red onion, finely chopped
- 1/4 cup fresh cilantro, chopped
- 1 tablespoon lime juice
- 8 small corn or flour tortillas
Instructions
- Prep your ingredients: Gather and chop the chicken, pineapple, red onion, and cilantro.
- Marinate the chicken: Combine chicken with olive oil, smoked paprika, chili powder, garlic powder, and salt. Let it marinate for at least 15 minutes.
- Cook the chicken: Heat a skillet over medium-high heat and sear the marinated chicken until cooked through.
- Add the pineapple: Push the chicken to one side and sauté the diced pineapple until caramelized.
- Mix and combine: Stir the chicken and pineapple together, then add lime juice.
- Warm the tortillas: Heat tortillas in another skillet until soft.
- Assemble your tacos: Fill each tortilla with chicken and pineapple mixture, topped with red onion and cilantro.
Notes
Serve with lime wedges and cilantro for added color. Consider adding queso fresco or spicy crema for extra flavor.
- Prep Time: 15 minutes
- Cook Time: 20 minutes
- Category: Main Course
- Method: Sautéing
- Cuisine: Mexican
Nutrition
- Serving Size: 2 tacos
- Calories: 350
- Sugar: 6g
- Sodium: 600mg
- Fat: 15g
- Saturated Fat: 2g
- Unsaturated Fat: 12g
- Trans Fat: 0g
- Carbohydrates: 30g
- Fiber: 3g
- Protein: 30g
- Cholesterol: 70mg
Keywords: Pineapple Chicken Tacos, Taco Night, Easy Tacos, Mexican Recipes, Family Recipes