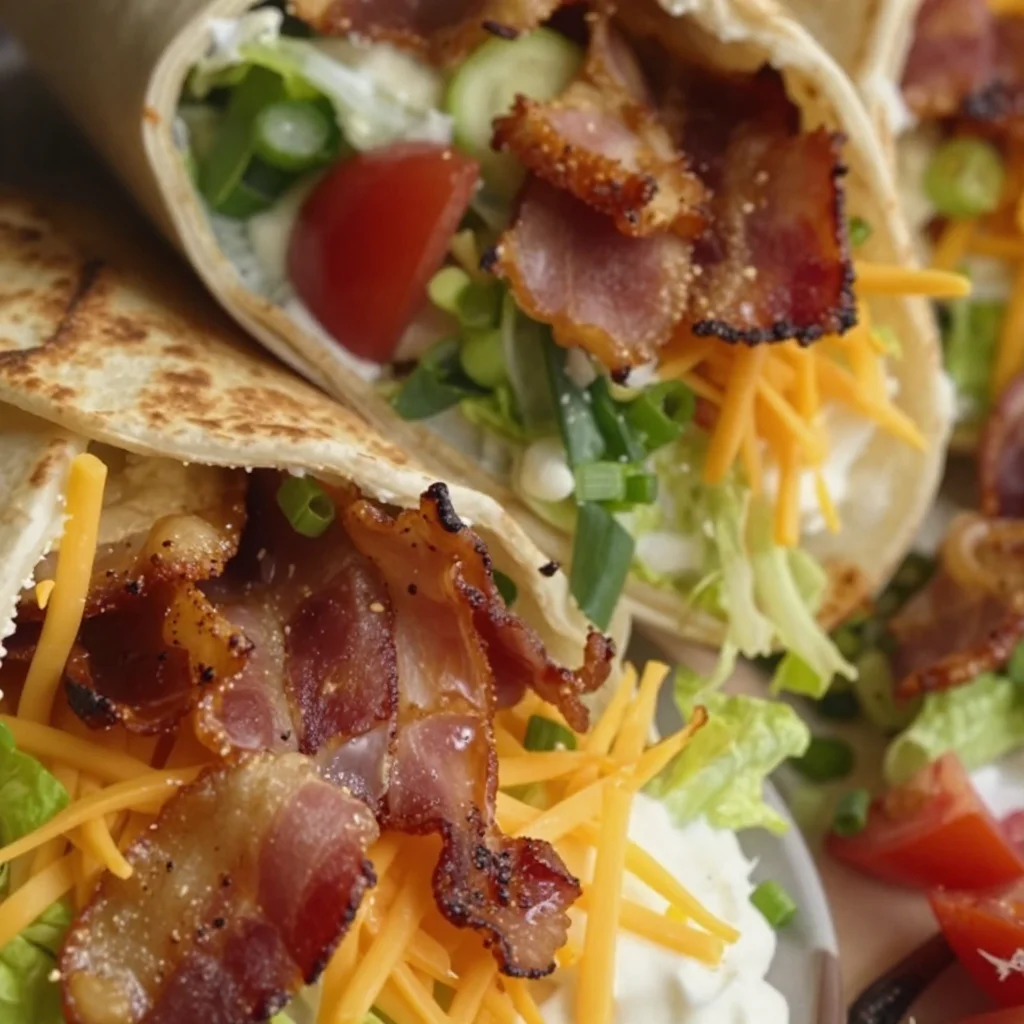
Minute Cheesy Bacon Ranch Wraps for Busy Weeknights
Cheesy Bacon Ranch Wraps: The Ultimate Comfort Food
Hey there, food lovers! Today we’re diving into the scrumptious world of Cheesy Bacon Ranch Wraps. If you’re in the mood for a dish that brings together creamy goodness, crispy bacon, and all the fresh flavors that make your taste buds sing, you’re in the right spot. These wraps are the quintessential feel-good food, perfect for everything from a casual lunch to a festive gathering with friends. Let’s get started on a culinary adventure that’ll leave everyone asking for seconds!
A Flavorful Journey
This recipe isn’t just a delightful meal; it’s a nostalgia trip down memory lane. I still vividly remember the first time I whipped up these cheesy bacon ranch wraps for a family gathering. I was just a young chef in training, excited to impress my parents with something quick and delicious. We had just built this fantastic outdoor grill in our backyard, and the scent of cooking food mingled with laughter and the sound of my siblings playing nearby. I can still see my dad grabbing a wrap, stuffing it full, and giving me a thumbs up. That moment sparked my love for cooking, and it also made me realize how food has this magical ability to bring people together.
Fast forward a few years, and I’ve made countless variations of the wraps, each time adding a little personal flair and love. From backyard BBQs to cozy movie nights, these wraps have never failed to evoke feelings of warmth and comfort. You can’t go wrong with this recipe—trust me on that!
Ingredients
Here’s what you’ll need to whip up these amazing wraps:
-
4 large flour tortillas
The base of your wrap; feel free to substitute with whole wheat or gluten-free tortillas for a healthier twist! -
8 ounces cream cheese, softened
This adds a rich, creamy layer. You can swap it with Neufchâtel cheese for a lighter version or even Greek yogurt for a tangy kick. -
1/2 cup ranch dressing
The star of the show! Use homemade ranch for a fresh taste or a low-fat alternative if you’re watching calories. -
1 cup shredded cheddar cheese
Cheddar is classic, but you can also use pepper jack for a spicier version. -
1 cup cooked bacon, chopped
Who doesn’t love bacon? Alternatively, you could use turkey bacon or even crispy chickpeas for a vegetarian option. -
1/2 cup green onions, chopped
These add a refreshing crunch; chives can also do the trick if green onions aren’t available. -
1 cup lettuce, shredded
Iceberg for that crunch or spinach for a nutrient boost—no wrong choices here. -
1 cup diced tomatoes (optional)
They add a nice burst of flavor and color. Leave them out if you’re not a fan. -
Salt and pepper to taste
Always essential to crank up those flavors!
Step-by-Step Instructions
Cooking these wraps is as easy as pie! Let’s break it down step by step:
-
Prep Your Ingredients:
Start by gathering and prepping all your ingredients. Chop your bacon, green onions, and tomatoes (if using), and shred your lettuce. Having everything ready makes the assembly process smoother. Trust me, the less frantic you are, the more fun you’ll have! -
Mix the Cream Cheese Mixture:
In a medium bowl, combine your softened cream cheese and ranch dressing using a spatula or hand mixer until it becomes smooth and creamy. This mixture serves as the glue that holds everything together, so don’t rush this step! -
Assemble the Wraps:
Place a tortilla on a clean, flat surface. Spread a generous layer of the cream cheese mixture on the tortilla, leaving about an inch around the edges. Feel free to spread it to the ends—you want that creamy goodness in every bite! -
Layer Your Ingredients:
Now it’s time to add some fun! Sprinkle a handful of shredded cheese over the cream cheese layer. Then, add chopped bacon, a sprinkle of green onions, and a nice handful of lettuce. If you’re using tomatoes, toss those on too. Remember, don’t go overboard—if you pack them too tight, the wraps will be hard to roll and may explode like confetti! -
Roll It Up:
Here comes the fun part! Starting from one edge, gently roll the tortilla tightly but not too tight (you want the fillings to stay inside). Once you’ve reached the end, press the seam to secure your wrap. If it doesn’t stick, a little smear of cream cheese will do the trick. -
Slice and Serve:
Take a sharp knife and slice the wrap in half diagonally. This not only makes it easier to eat but also showcases the colorful fillings inside. You can serve them as they are or pop them in the fridge for 30 minutes for a cooler snack.
Serving Suggestions
While these wraps are delicious on their own, there are plenty of ways to elevate the experience! Serve them alongside some crunchy veggie sticks or a fresh garden salad for added texture. A side of extra ranch or even a spicy dipping sauce can add a fun twist. Arrange your wraps on a platter, cut side up for a beautiful presentation, and voilà! Your guests will be in for a treat, and they’ll love munching on these tasty delights.
Recipe Variations
Get ready to get creative in the kitchen! Here are a few fun twists on the classic wrap that’ll keep things fresh:
-
Buffalo Cheesy Bacon Ranch Wrap: Substitute half of the ranch with buffalo sauce for a spicy kick. Add sliced grilled chicken to the mix for a hearty meal.
-
Mediterranean Twist: Swap the ranch dressing for tzatziki, add feta cheese, and substitute olives for bacon. It’s a deliciously zesty change of pace.
-
Veggie Lovers’ Wrap: Skip the bacon and pile on more veggies like bell peppers, cucumbers, and shredded carrots for a refreshing vegetarian option.
-
BBQ Bacon Ranch Wrap: Use BBQ sauce instead of ranch for a tangy, sweet flavor. Pair it with pulled pork or chicken for a satisfying meal that feels like summer all year round.
-
Breakfast Breakfast Wrap: Add scrambled eggs, avocado, and some salsa for a morning twist that’ll get your day started on a delicious note!
Chef’s Notes
Oh, how these wraps have evolved! I still remember the very first batch I made; they were a bit of a mess, honestly. The ingredients spilled out everywhere, but boy, did we have fun digging in! Over time, I’ve learned to be more strategic with the filling amounts and to have a few napkins handy (because let’s face it—wraps can be a bit gooey!). The versatility is what holds a special place in my heart; they’ve adapted to every party, mood, and dietary whim.
FAQs and Troubleshooting
Q: Can I make these in advance?
Absolutely! You can make them a few hours ahead of time. Just wrap them tightly in foil or plastic wrap and store them in the fridge to keep everything fresh.
Q: What if I don’t have ranch dressing?
No problem! You can whip up a quick homemade ranch using buttermilk, mayo, and your favorite herbs. Or, try a store-bought alternative like Caesar dressing or a creamy vinaigrette.
Q: Can I freeze these wraps?
While you can freeze them, I recommend enjoying them fresh to retain that delightful texture. If you must, wrap them tightly in foil or plastic and consume within a month.
Q: How can I add more protein?
Feel free to toss in some cooked chicken, turkey, or even black beans for an extra protein punch!
Nutritional Info
Each Cheesy Bacon Ranch Wrap (without additional ingredients) typically contains:
- Calories: Approximately 300-400 (varies based on specific ingredients)
- Protein: 15g
- Fats: 20g
- Carbohydrates: 30g
- Fiber: 2g
- Sodium: 700mg
(Note: For a healthier balance, adjust ingredients like bacon and cheese according to personal dietary preferences.)
Final Thoughts
These Cheesy Bacon Ranch Wraps are a simple, delicious way to bring a dose of happiness to your day. Whether as a quick lunch, a party platter, or a fun snack for movie night, they’re a hit everywhere. So roll up those tortillas and dig into a dish that’s not only satisfying but also packed with flavor and love. Remember, the kitchen is about creating memories—now get out there, put on your apron, and start wrapping!
Thanks for joining me today in the kitchen. Keep cooking, keep sharing, and above all, keep enjoying those feel-good moments that food brings into our lives. Happy feasting!
Print
Cheesy Bacon Ranch Wraps
- Total Time: 15 minutes
- Yield: 4 servings 1x
- Diet: Omnivore
Description
Delicious and creamy wraps filled with bacon, cheese, fresh vegetables, and ranch dressing, perfect for any occasion.
Ingredients
- 4 large flour tortillas
- 8 ounces cream cheese, softened
- 1/2 cup ranch dressing
- 1 cup shredded cheddar cheese
- 1 cup cooked bacon, chopped
- 1/2 cup green onions, chopped
- 1 cup lettuce, shredded
- 1 cup diced tomatoes (optional)
- Salt and pepper to taste
Instructions
- Prep your ingredients: Start by gathering and prepping all your ingredients. Chop your bacon, green onions, and tomatoes (if using), and shred your lettuce.
- Mix the cream cheese mixture: In a medium bowl, combine your softened cream cheese and ranch dressing using a spatula or hand mixer until smooth.
- Assemble the wraps: Place a tortilla on a clean, flat surface and spread a generous layer of the cream cheese mixture on the tortilla.
- Layer your ingredients: Sprinkle shredded cheese, chopped bacon, green onions, and lettuce over the cream cheese layer. Add tomatoes if using.
- Roll it up: Starting from one edge, gently roll the tortilla tightly. Press the seam to secure your wrap.
- Slice and serve: Slice the wrap in half diagonally. You can serve them immediately or refrigerate for 30 minutes.
Notes
Feel free to customize the ingredients based on your preferences and dietary needs.
- Prep Time: 15 minutes
- Cook Time: 0 minutes
- Category: Appetizer
- Method: No-Cook
- Cuisine: American
Nutrition
- Serving Size: 1 wrap
- Calories: 350
- Sugar: 3g
- Sodium: 700mg
- Fat: 26g
- Saturated Fat: 10g
- Unsaturated Fat: 12g
- Trans Fat: 0g
- Carbohydrates: 30g
- Fiber: 2g
- Protein: 15g
- Cholesterol: 40mg
Keywords: cheesy wraps, bacon ranch, comfort food, quick lunch, party food

Minute Pineapple Chicken Kabobs for Weeknight Grilling
Pineapple Chicken Kabobs: A Flavorful Taste of Paradise
Hey there, fellow food lovers! Are you ready to fire up that grill and embark on a tropical getaway right in your own backyard? I’m thrilled to share one of my favorite recipes: Pineapple Chicken Kabobs! These vibrant skewers are not only delicious but also a feast for the eyes. Packed with juicy chicken, sweet pineapple, and colorful bell peppers, they’re perfect for warm summer evenings or simply when you need a little taste of sunshine on your plate.
Picture this: the sizzle of chicken on the grill, the fragrance of garlic and ginger wafting through the air, and the juicy burst of pineapple melding with savory soy sauce. It’s a party for your taste buds and a recipe that brings happiness—both in the cooking and the eating! Whether you’re hosting a barbecue or just enjoying a casual dinner at home, these kabobs are sure to steal the show.
But wait, there’s more! Not only are these kabobs super tasty, but they also remind me of a cherished memory from my childhood. I vividly remember my parents hosting summer cookouts in our backyard. The grill was fired up, laughter filled the air, and kabobs were always on the menu. My dad had this special marinade he concocted, and we’d skewer anything we could find—not just chicken but also shrimp, veggies, and yes, pineapple. Each bite was a delightful explosion of flavor and a reminder of those carefree summer days. Now, I carry on that tradition, adding my little twists and turns with ingredients while keeping the spirit of those cherished family moments alive.
So, whether you’re a kitchen novice or a seasoned pro, let’s dive into this tasty recipe and make some memories of our own!
Ingredients
Let’s make sure we have everything we need to whip up these delicious Pineapple Chicken Kabobs. Here’s what you’ll need:
-
Chicken Breast: Boneless, skinless chicken breast works best here. It’s tender and cooks quickly. You can substitute with boneless thighs for a juicier option, or even tofu for a vegetarian twist!
-
Pineapple Chunks: Fresh pineapple is ideal for a juicy, sweet flavor. Canned pineapple can be used in a pinch, but make sure to drain it well. Pro tip: if you have a pineapple corer, it’s a great tool to use for skewering!
-
Bell Peppers: I recommend using red and yellow bell peppers for the sweetness, but feel free to mix in green or orange for a burst of color. If you’re looking for a low-carb option, zucchini or mushrooms can be great substitutes.
-
Onions: Red or sweet onions add a nice bite. However, if you’re not a fan of onions, feel free to leave them out or swap for shallots, which have a milder flavor.
-
Soy Sauce: This gives the kabobs a delightful umami flavor. For a gluten-free option, you can use tamari. You could also try coconut aminos for a sweeter flavor profile.
-
Honey: Honey adds a touch of sweetness and helps to caramelize the chicken on the grill. Agave syrup or maple syrup can also work well in its place for a vegan option.
-
Garlic: Minced fresh garlic is a must for that aromatic punch. If you’re in a hurry, garlic powder can save the day; just use about a half teaspoon for the equivalent.
-
Ginger: Fresh ginger gives the dish a warm, spicy kick. If fresh isn’t available, ground ginger can work too, but use it sparingly as the flavor is more concentrated.
-
Coconut Rice: This is a delightful side for the kabobs. Made with jasmine rice, coconut milk, and a pinch of salt, it’s creamy and pairs perfectly with the tropical flavors. You can substitute it with quinoa or regular rice if you prefer.
Step-by-Step Instructions
Now, let’s get down to cooking! Follow these simple steps to create your scrumptious Pineapple Chicken Kabobs.
-
Marinate the Chicken:
- Start by slicing your chicken breast into 1-inch cubes. This size ensures they cook evenly and stay juicy. Place them in a bowl and add soy sauce, honey, minced garlic, and grated ginger. Mix it well and let the chicken marinate for at least 30 minutes. If you’ve got more time, a few hours in the fridge will deepen that flavor!
-
Prepare the Vegetables:
- While the chicken is marinating, chop your bell peppers and onions into approximately 1-inch pieces. Try to keep them roughly the same size as the chicken so everything cooks evenly. You can also soak your skewers (if using wood) in water for about 30 minutes to prevent burning on the grill.
-
Assemble the Kabobs:
- Now for the fun part! Take your marinated chicken, pineapple chunks, bell peppers, and onions, and start threading them onto the skewers. You can alternate them however you like! I love to add a pineapple chunk between each piece of chicken for that sweet burst in every bite. Leave a little space at each end of the skewer for easy handling.
-
Preheat Your Grill:
- Get your grill ready! Preheat it to medium-high heat (about 375°F to 450°F). A little oil on the grates can help prevent sticking. If you’re using a grill pan on the stove, make sure it’s hot before adding the kabobs.
-
Grill the Kabobs:
- Place your assembled kabobs on the grill. Cook for about 10-15 minutes, turning them occasionally to get those lovely char marks on all sides. Chicken is cooked through when it reaches an internal temperature of 165°F. You’ll know they’re ready when the pineapple starts getting caramelized and golden!
-
Serve with Coconut Rice:
- As your kabobs are grilling, prepare your coconut rice. Rinse 1 cup of jasmine rice and combine it in a pot with 1 cup of coconut milk and a pinch of salt. Cook it as you normally would, and you’ll have a creamy, fragrant base for your kabobs once they’re done.
Serving Suggestions
Now that your kabobs are grilled to perfection, let’s talk about how to serve this delightful dish. For a beautiful platter, arrange the kabobs diagonally across a large serving dish. A sprinkle of fresh chopped cilantro or green onions adds a pop of color and freshness. You can also serve them with lime wedges for an extra zesty drizzle.
Pair the kabobs with the fluffy coconut rice on the side, garnished with a few toasted coconut flakes for that tropical vibe. For the adventurous, a spicy dipping sauce—like sweet chili sauce or a zesty yogurt sauce—can elevate the flavor profile and keep things interesting!
Recipe Variations
Feel free to get creative with these Pineapple Chicken Kabobs! Here are some variations you might love:
-
Teriyaki Twist: Swap the marinade for a homemade teriyaki sauce by simmering soy sauce, honey, rice vinegar, and sesame oil together. Drizzle this over the kabobs before serving for an extra flavor kick!
-
Mix-It-Up Veggies: Use whatever veggies you have on hand! Cherry tomatoes, zucchini, and even mushrooms can add depth and flavor.
-
Spicy Pineapple Kabobs: Spice things up by adding chopped jalapeños or a dash of sriracha sauce to the marinade. It’s a great way to bring some heat to your feast!
-
Fruit Fusion: Try using mango, strawberries, or peaches instead of or in addition to the pineapple. The sweetness of these fruits when grilled is absolutely divine.
-
Vegan Delight: Swap the chicken for marinated tofu or tempeh. Grilled portobello mushrooms can also be a robust and satisfying alternative!
Chef’s Notes
Oh, how this recipe has evolved over time! I remember when I first started experimenting with kabobs. They would often be a hodgepodge of whatever we had at home. There were plenty of mishaps—like that time I accidentally used too much ginger and thought I’d created a new flavor explosion (it was more like flavor confusion!). But that trial and error got me to where I am today, and that’s part of the fun in the kitchen! The beauty of meal prep is that every attempt leads to delicious new memories, and Pineapple Chicken Kabobs remind me of the joy of cooking and sharing.
FAQs and Troubleshooting
-
What if my chicken is dry?
- This often happens if you cook it for too long or at too high a temperature. Make sure to watch the chicken closely and remove it from the grill once it hits 165°F.
-
Can I make these kabobs ahead of time?
- Absolutely! You can marinate the chicken a day in advance and store it in the refrigerator. Just assemble and grill when ready to serve.
-
What if I don’t have skewers?
- No worries! You can grill the chicken and vegetables directly on the grill or use a grill basket for easy handling.
-
How do I store leftovers?
- Store any leftover kabobs in an airtight container in the fridge for up to 3 days. They can be reheated in the oven or on the stovetop, but be careful not to overcook them!
Nutritional Info
These Pineapple Chicken Kabobs are not only delicious but also packed with nutrients! Here’s a quick breakdown:
- Calories: Approximately 250 per kabob (including the rice)
- Protein: 25g (thanks to the chicken!)
- Carbohydrates: 30g (from the coconut rice and veggies)
- Fat: 5g (mostly healthy fats from coconut)
They’re a great source of lean protein, vitamins, and minerals, making it a balanced meal for any time of day.
Final Thoughts
There you have it—Pineapple Chicken Kabobs that are sure to bring sunshine to your dinner table! I hope you enjoy cooking and sharing this recipe as much as I do. Remember to have fun, experiment with flavors, and most importantly, gather your loved ones around the table to share in the deliciousness.
Just like those summer cookouts from my childhood, food is about connection. So grab those skewers, fire up the grill, and let’s make some memories that are just as warm and inviting as the food itself. Now, go and create your own kabob adventures—happy cooking!
Print
Pineapple Chicken Kabobs
- Total Time: 45 minutes
- Yield: 4 servings 1x
- Diet: Gluten-Free
Description
Delicious chicken kabobs with sweet pineapple and colorful bell peppers, perfect for grilling.
Ingredients
- 1 lb Boneless, skinless chicken breast, cut into 1-inch cubes
- 1 cup Pineapple chunks (fresh or canned)
- 1 cup Bell peppers (red and yellow preferred)
- 1/2 cup Onions (red or sweet)
- 1/4 cup Soy Sauce (or tamari for gluten-free)
- 2 tbsp Honey (or agave/maple syrup for vegan)
- 3 cloves Garlic, minced
- 1 tbsp Fresh ginger, grated
- 1 cup Coconut rice (made with jasmine rice and coconut milk)
Instructions
- Marinate the chicken by mixing soy sauce, honey, garlic, and ginger. Let sit for at least 30 minutes.
- Prepare the vegetables by chopping bell peppers and onions into 1-inch pieces.
- Assemble the kabobs by threading marinated chicken, pineapple, bell peppers, and onions onto skewers.
- Preheat the grill to medium-high heat.
- Grill the kabobs for 10-15 minutes, turning occasionally until chicken is cooked to 165°F and pineapple is caramelized.
- Serve with coconut rice and optional garnishes like cilantro and lime wedges.
Notes
Feel free to substitute chicken with tofu for a vegetarian version, and experiment with different veggies and fruits.
- Prep Time: 30 minutes
- Cook Time: 15 minutes
- Category: Main Course
- Method: Grilling
- Cuisine: Tropical
Nutrition
- Serving Size: 1 skewer
- Calories: 250
- Sugar: 10g
- Sodium: 400mg
- Fat: 5g
- Saturated Fat: 3g
- Unsaturated Fat: 2g
- Trans Fat: 0g
- Carbohydrates: 30g
- Fiber: 2g
- Protein: 25g
- Cholesterol: 70mg
Keywords: kabobs, chicken, pineapple, grilling, summer recipes, tropical