
No-Bake Sugar-Free Lemon Pie Recipe
No-Bake Sugar-Free Lemon Pie Recipe
Hey there, food lovers! 🥧 If you’re anything like me, you have a special spot in your heart (and stomach) for desserts that feel like a joyful celebration in every bite. Today, we’re whipping up something fantastic that doesn’t require turning on the oven—yep, you heard me right! This No-Bake Sugar-Free Lemon Pie is the perfect treat for those warm sunny days when you crave something refreshing yet indulgent.
This pie is not just easy to make, but it’s also a guilt-free delight that satisfies your sweet tooth without any of the usual sugar-induced guilt. If you want to impress your friends at the next picnic or simply conjure up some sweet memories while enjoying a slice on your couch, this pie is calling your name. I mean, who doesn’t love a good lemon dessert? With its bright zest and creamy filling, it’s like sunshine on a plate!
In my kitchen, this pie has become a staple after learning a few tricks along the way. As someone who loves sharing kitchen magic, I’m thrilled to spill all my secrets to you in this guide. Grab your apron, and let’s dive into creating this zesty beauty!
Personal Story
Ah, lemons. Just saying the word brings back fragrant memories from my childhood. I remember standing on a stool in my grandmother’s cozy kitchen, helping her whip up lemon meringue pies from scratch. The air was filled with the tangy scent of fresh lemons and the sweet softness of meringue. It was our bonding time, filled with laughter and flour fights—my grandfather’s playful shenanigans always made the kitchen feel extra warm.
The meringue was a bit finicky, though, which made me long for a dessert that was both easy and delicious. Fast forward to my culinary adventures today, and I’ve found that no-bake treats are my jam! This No-Bake Sugar-Free Lemon Pie sums up those cheerful memories, wrapped up in a creamy, dreamy filling that reminds me of those blissful days in my grandma’s kitchen. Let me share this recipe that keeps those joyous flavors alive, minus the fuss of the oven!
Ingredients
To bring this delightful creation to life, gather the following ingredients:
-
1 1/2 cups almond flour
This nutty flour serves as a great base for the crust. It’s gluten-free and offers a light, pleasant texture. If you’re not a fan of almond flour, feel free to swap in your favorite nut flour or even gluten-free oat flour! -
1/4 cup melted butter
Butter adds richness to the crust, creating a buttery flavor that complements the pie. If you prefer a dairy-free version, coconut oil works beautifully too! -
2 tbsp powdered sugar substitute (like erythritol)
This is a sweetener that gives just the right touch of sweetness without the sugar rush. You can also use stevia powdered for a similar effect, just bear in mind that the sweetness levels may vary! -
1 package (8 oz) cream cheese (softened)
Cream cheese provides the rich and creamy texture we crave in a lemon pie. For a lighter option, consider using Greek yogurt, but keep in mind it may alter the flavor slightly! -
1/2 cup powdered sugar substitute
Another layer of sweetness for the filling! If you’re looking for a fun twist, try flavored sugar substitutes like vanilla or coconut! -
1/4 cup fresh lemon juice
Nothing beats fresh lemon juice for that bright, zesty flavor! Feel free to use bottled lemon juice in a pinch, but fresh is always best! -
1 tbsp lemon zest
The zest adds a punch of citrusiness; it amplifies the flavor and gives that aromatic quality. If you’re in a pinch, don’t worry, you can skip the zest, but I highly recommend it! -
1 tsp vanilla extract
A splash of vanilla rounds out the flavors and brings everything together. If you’re looking to experiment, almond extract provides a lovely twist too! -
1 container (8 oz) sugar-free whipped topping (like Cool Whip or homemade)
This heavenly addition provides that airy lightness we love. You can also make your own by whipping heavy cream with a sweetener of your choice!
Step-by-Step Instructions
Ready to dive in? Let’s get to work on this pie!
Step 1: Prepare the Crust
-
In a mixing bowl, combine 1 1/2 cups almond flour and 1/4 cup melted butter along with 2 tbsp powdered sugar substitute. Mix them together until the texture resembles wet sand.
- Chef’s tip: Ensure your butter is not too hot; otherwise, it could make the crust oily.
-
Press the mixture firmly into the bottom and up the sides of an 8-inch pie dish.
- Hack: Use a glass or measuring cup to compact the crust evenly and create a smooth surface.
-
Chill the crust in the fridge for at least 15 minutes to help it set.
- Chef’s tip: A chilled crust will slice beautifully later—patience is key!
Step 2: Create the Creamy Filling
-
In a separate large mixing bowl, beat together 1 package of softened cream cheese and 1/2 cup powdered sugar substitute using a hand mixer or a stand mixer until smooth and creamy.
- Pro tip: Make sure the cream cheese is softened for the best texture. You can microwave it for about 10 seconds if you forgot to take it out early!
-
Add in the 1/4 cup fresh lemon juice, 1 tbsp lemon zest, and 1 tsp vanilla extract. Continue beating until it’s fully combined.
- Little hack: For extra lemony goodness, add a dash of lemon extract if you have it on hand!
-
Gently fold in 1 container of sugar-free whipped topping until fully mixed.
- Tip: Use a spatula to fold; this method keeps the mixture airy and luscious—no deflating allowed!
Step 3: Assemble the Pie
-
Take your chilled crust out of the fridge and spoon the creamy filling into it, spreading it evenly with a spatula.
- Chef’s insight: If you want a beautiful swirl, use the back of a spoon to create a design!
-
Cover the pie with plastic wrap and refrigerate for at least 4 hours, but overnight is even better. This allows the flavors to meld beautifully.
- Tip: If you’re in a hurry, just aim for a minimum of 2 hours—good things come to those who wait, but we’ve all been there, right?
Serving Suggestions
When the time finally comes to enjoy your delightful No-Bake Sugar-Free Lemon Pie, there are a few ways to elevate the presentation! Consider these serving suggestions:
-
Slice It Up: When you’re ready to serve, use a sharp knife dipped in hot water for clean cuts. This produces that perfect slice to show off the filling’s gorgeous color!
-
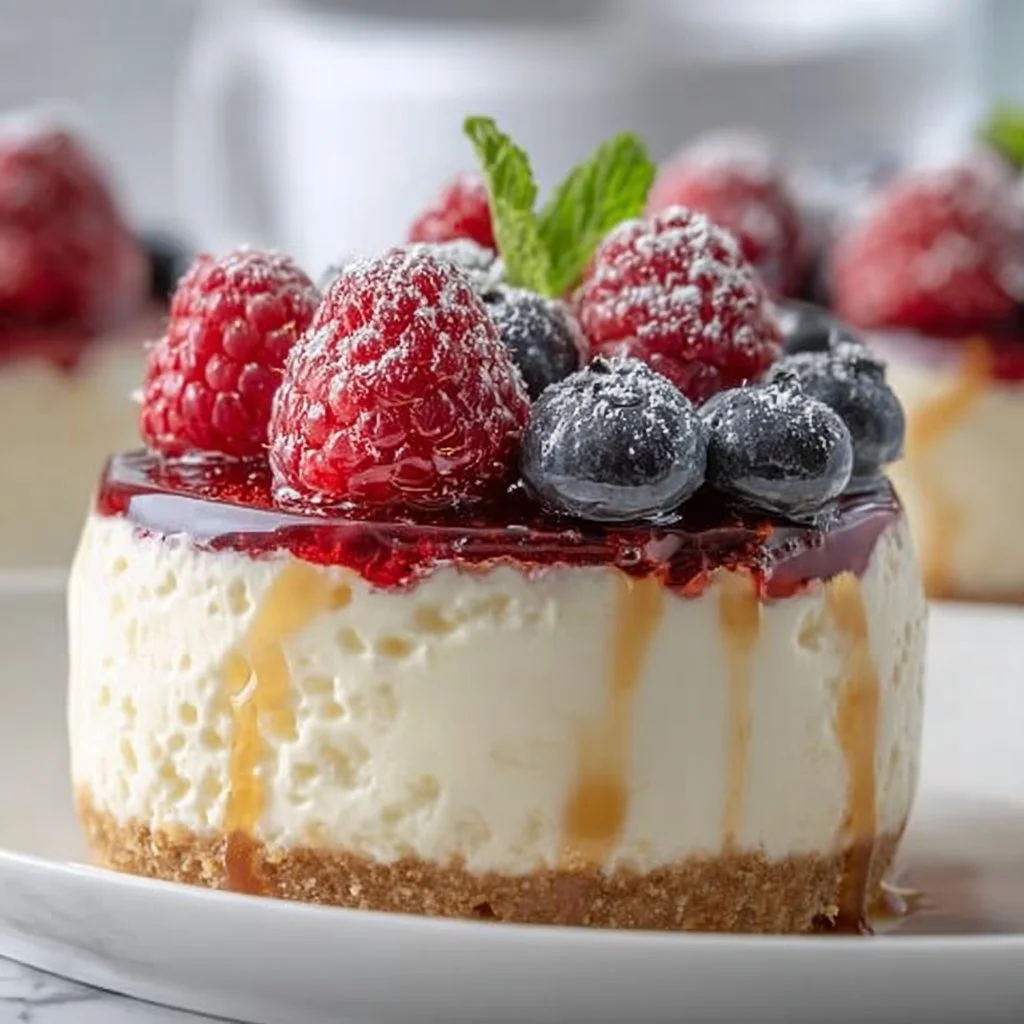
Garnish: Top each slice with a bit of fresh whipped cream and lemon zest for a pop of color and flavor. Fresh berries, such as blueberries or raspberries, add a nice touch of sweetness and a bit of tartness that really plays well with the lemon!
-
Serving Bowl: If you want to get creative, try using small mason jars for individual servings. Not only do they look adorable, but everyone loves grabbing their own pie in a jar!
Recipe Variations
Feeling adventurous? Here are some fun twists you can try out with your No-Bake Lemon Pie:
-
Berry Bliss: Fold in fresh strawberries or blueberries into the filling for a fruity explosion.
-
Coconut Cream: Add shredded unsweetened coconut to the filling for a tropical vibe. You can even substitute coconut cream for some of the cream cheese for added richness!
-
Chocolate Drizzle: For a decadent touch, melt some sugar-free chocolate chips and drizzle on top before serving.
-
Ginger Snap Crust: Swap out the almond flour for crumbled sugar-free ginger snaps for a spicy, crunchy crust.
-
Matcha Layer: For a unique twist, create a matcha layer by mixing one teaspoon of matcha powder into a portion of the filling before pouring it into the crust.
Chef’s Notes
Throughout my journey as a home chef, this No-Bake Sugar-Free Lemon Pie has evolved from a simple dessert to a cherished family recipe. The joy it brings at gatherings reminds me that cooking doesn’t have to be tedious. I recall one quirky mishap where I accidentally mistook salt for sugar—I don’t recommend that! The look on everyone’s face when they took a bite was priceless! Now, I keep my sweetener close at hand and always double-check.
Cooking is about experimenting and having fun, and it’s okay to laugh at your mistakes! So, my fellow foodies, if you stray off the beaten path while making this pie, don’t sweat it—just embrace the process!
FAQs and Troubleshooting
Q1: Can I use a different sweetener?
Absolutely! You can experiment with your favorite sweeteners, but keep in mind that some alternatives may have varying levels of sweetness, so adjust to your taste!
Q2: Why is my filling a bit runny?
If your filling is runny, it could be due to overmixing. When folding in the whipped topping, remember to do it gently to preserve the airy texture.
Q3: How long will this pie last?
In the refrigerator, your No-Bake Sugar-Free Lemon Pie will last about 3–5 days. But I doubt it’ll last that long—it’s just too good!
Q4: Can I freeze the pie?
Yes, you can! Just be sure to wrap it tightly in plastic wrap and foil. When you’re ready to enjoy it, thaw it in the fridge overnight!
Nutritional Info
This No-Bake Sugar-Free Lemon Pie recipe is not only delicious but also has some impressive nutritional benefits:
- Low in carbs: Perfect for those following a low-carb or keto lifestyle.
- Packed with healthy fats: The almond flour and cream cheese provide healthy fats that can help keep you satisfied.
- Sugar-free: Enjoy it without the traditional guilt of added sugars; it’s a delightful indulgence that won’t spike your blood sugar levels.
Per serving (approximate):
- Calories: 160
- Total carbs: 4g
- Fiber: 2g
- Sugar: 1g (from natural ingredients)
- Fat: 14g
- Protein: 3g
Final Thoughts
There you have it—your guide to making a luscious No-Bake Sugar-Free Lemon Pie! I hope you’re just as excited as I am to whip this up in the kitchen. This pie serves as an invitation to share laughter, love, and deliciousness with those around you, all while keeping it healthy and enjoyable.
So, next time you’re in the mood for something sweet that brings a burst of sunshine into your day, reach for this lemon pie recipe. Remember, it’s all about the experience of cooking, enjoying, and, most importantly, sharing with the people you love. Cheers to more delicious memories—and my friends, happy baking, or rather, “no-baking!” 🍋✨
Print
No-Bake Sugar-Free Lemon Pie
- Total Time: 255 minutes
- Yield: 8 servings 1x
- Diet: Sugar-Free
Description
A refreshing and indulgent no-bake lemon pie that is sugar-free and perfect for warm days.
Ingredients
- 1 1/2 cups almond flour
- 1/4 cup melted butter
- 2 tbsp powdered sugar substitute (like erythritol)
- 1 package (8 oz) cream cheese (softened)
- 1/2 cup powdered sugar substitute
- 1/4 cup fresh lemon juice
- 1 tbsp lemon zest
- 1 tsp vanilla extract
- 1 container (8 oz) sugar-free whipped topping (like Cool Whip or homemade)
Instructions
- Prepare the crust by mixing almond flour, melted butter, and powdered sugar substitute until resembling wet sand. Press into an 8-inch pie dish and chill for 15 minutes.
- Create the creamy filling by beating softened cream cheese and powdered sugar substitute until smooth. Add lemon juice, lemon zest, and vanilla; mix well. Fold in whipped topping gently.
- Assemble the pie by adding the filling to the crust. Cover with plastic wrap and refrigerate for at least 4 hours before serving.
Notes
For clean cuts, dip a knife in hot water while slicing. Garnish with fresh whipped cream, lemon zest, and berries for added flavor.
- Prep Time: 15 minutes
- Cook Time: 240 minutes
- Category: Dessert
- Method: No-Bake
- Cuisine: American
Nutrition
- Serving Size: 1 slice
- Calories: 160
- Sugar: 1g
- Sodium: 300mg
- Fat: 14g
- Saturated Fat: 7g
- Unsaturated Fat: 6g
- Trans Fat: 0g
- Carbohydrates: 4g
- Fiber: 2g
- Protein: 3g
- Cholesterol: 30mg
Keywords: no-bake dessert, sugar-free, lemon pie, refreshing dessert, healthy dessert

Yogurt Chocolate Chip Cookies
# The Ultimate Yogurt Chocolate Chip Cookies Recipe: Your New Favorite Treat!

## Introduction

Hey there, fellow food lovers! Welcome back to Feastical, where we transform everyday ingredients into unforgettable flavors! Today, I’m sharing a recipe that combines sweet nostalgia with a healthy twist: Yogurt Chocolate Chip Cookies. Yes, you read that right! These delightful cookies are lightened up with Greek yogurt, making them not only irresistibly tasty but also a tad healthier than your traditional cookies.

Picture this: a rainy afternoon, the scent of freshly baked cookies wafting through the kitchen, and laughter echoing as family and friends gather around the table. That’s the magic of food! Cookies have a special way of creating warm memories and bringing people together.

So grab your apron and get ready to bake some deliciousness. Whether you’re a kitchen novice or a seasoned chef, these cookies are super simple to whip up, and trust me, they’re going to melt your heart (and your taste buds!). Let’s dive into the world of Yogurt Chocolate Chip Cookies and discover how these little bites of joy can brighten your day!

## Personal Story

Ah, cookies! They remind me of my childhood, running around the kitchen while my mom baked up a storm. One of my favorite memories is making cookies with her every Sunday. We would measure out flour and sugar, sneak bites of chocolate chips, and giggle when the dough would inevitably stick to our hands.

But it wasn’t just about the cookies themselves; it was the connection we shared. Those cookies became a symbol of love, laughter, and togetherness. Fast-forward to today, and I still often find myself in the kitchen with loved ones, creating new memories while whipping up sweet treats.

One day, I decided to experiment with Greek yogurt to lighten up a classic chocolate chip cookie recipe. I was stunned by the result—chewy, rich, and just the right amount of sweetness! It reminded me of those childhood days while also allowing me to enjoy a snack that wouldn't derail my healthy eating goals. These Yogurt Chocolate Chip Cookies are now a staple in my recipe book, and I can’t wait for you to experience the same joy!

## Ingredients

Let’s gather our ingredients!

- **1 cup Greek yogurt**: This creamy ingredient gives our cookies their delightful texture and adds a protein boost. You can substitute it with regular plain yogurt, but Greek yogurt works best for that creaminess!

- **1 cup brown sugar**: This ingredient not only sweetens the deal but also keeps your cookies chewy. Feel free to swap with coconut sugar for a lower glycemic option.

- **1/2 cup butter, softened**: Butter adds richness and flavor. If you'd like to lighten it even more, you can use coconut oil or vegan butter as a substitute.

- **1 teaspoon vanilla extract**: A staple in any baking recipe, vanilla adds warmth and depth of flavor. If you have it, try using vanilla bean paste for an extra indulgent touch!

- **2 cups all-purpose flour**: This is our backbone ingredient. For a healthier spin, you could use whole wheat flour, but do keep in mind this may change the texture slightly.

- **1 teaspoon baking soda**: This helps the cookies rise perfectly. Make sure it’s fresh for the best results!

- **1/2 teaspoon salt**: Just a pinch helps to enhance all the flavors. If using salted butter, you may want to reduce this a tad.

- **1 cup chocolate chips**: The star of the show! Try dark chocolate for a richer flavor or mini chocolate chips for a fun twist.

Each ingredient here plays a crucial role in delivering that chewy, chocolatey goodness we crave in a cookie, so let's make sure we have everything prepped and ready to go!

## Step-by-Step Instructions

Okay, let’s get that oven preheated to 350°F (175°C). Your home is about to smell like a bakery!

1. **Mix the Wet Ingredients**: In a large mixing bowl, combine the Greek yogurt, softened butter, brown sugar, and vanilla extract. Using a whisk or electric mixer, blend them together until creamy and smooth. This stage is crucial! The yogurt gives our cookies a wonderful lightness, so make sure it’s fully combined.

2. **Combine Dry Ingredients**: In a separate bowl, whisk together the flour, baking soda, and salt. This helps evenly distribute the baking soda and salt, ensuring every bite has the perfect flavor balance.

3. **Combine it All**: Gradually add the dry mixture to the wet mixture—do this in batches to avoid a flour explosion! Gently fold until no streaks remain. Be careful not to overmix; we want to keep our cookies tender.

4. **Add the Chocolate Chips**: Now comes the fun part—fold in those chocolate chips! Use your spatula to mix them evenly throughout the dough. This is where you can double down and use a mix of chocolate chips if you’re feeling adventurous.

5. **Scoop and Bake**: Line a baking sheet with parchment paper and use a cookie scoop or spoon to drop rounded tablespoons of dough onto the sheet, leaving about 2 inches between each cookie. Bake in the preheated oven for about 10-12 minutes or until the edges are golden and the centers look set.

6. **Cool Down**: Once baked, let them sit on the baking sheet for about 5 minutes before transferring them to wire racks to cool completely. This step is vital; it allows them to firm up while still being ooey gooey in the center.

Baking is all about timing and patience, so enjoy your success as you watch (and smell!) the transformation.

## Serving Suggestions

The best way to serve these Yogurt Chocolate Chip Cookies is warm, of course! Pair them with a glass of cold milk or a scoop of your favorite ice cream for a treat that will take you right back to your childhood.

For a delightful twist, try sandwiching two of these cookies with a scoop of yogurt or a creamy filling for a cookie sandwich. They’re also fantastic crumbled over a bowl of vanilla ice cream or a fruit salad for an unexpected crunch.

If you’re looking to impress guests, pile them high on a pretty platter and dust with powdered sugar or serve them with fresh berries on the side. Trust me, your family and friends will be raving about these cookies long after the last crumb has been devoured!

## Recipe Variations

Feeling adventurous? Here are some fun twists to customize your Yogurt Chocolate Chip Cookies to match your cravings:

1. **Nutty Addition**: Add 1/2 cup of chopped nuts—walnuts or pecans work wonderfully—into the dough for some crunch and added health benefits.

2. **Dried Fruit Delight**: Swap out chocolate chips for dried cranberries or cherries for a tangy twist that pairs perfectly with the sweetness of the dough.

3. **Spice it Up**: Incorporate a teaspoon of cinnamon or nutmeg into the flour mix for a cozy, spiced flavor that elevates the cookies to a new level.

4. **Citrus Zest**: Add a teaspoon of orange or lemon zest for a fresh and zesty flavor that brightens up these cookies.

5. **Gluten-Free Alternative**: Use a gluten-free all-purpose flour blend in place of regular flour to make these cookies gluten-free without sacrificing flavor.

Get creative and have fun with each batch—there are no limits in the kitchen!

## Chef’s Notes

I must share that these Yogurt Chocolate Chip Cookies didn’t spring up overnight. The recipe has gone through its fair share of tests and tweaks over the years! My original version was heavy on the butter and sugar, but life happens, and we all want to enjoy treats without too much guilt, right?

One day while baking just for fun, I added Greek yogurt on a whim and boy, was I surprised! The result was so good that I’ve been making them this way ever since. I laugh at how many times I had to share them with friends just to keep my sanity (you know, ‘taste-testing’!).

These cookies are now a go-to treat for gatherings, road trips, and even a late-night snack when I need something sweet to brighten my day!

## FAQs and Troubleshooting

1. **Why are my cookies flat?**
   - If your cookies spread too much, check if your butter was too soft or melted. You want it softened but still solid. Chilling the dough for about 30 minutes can also help prevent spreading!

2. **Can I freeze these cookies?**
   - Absolutely! These cookies freeze beautifully. Just ensure they're fully cooled, and store them in an airtight container or zip-top bag. You can freeze the dough as well if you want freshly baked cookies on demand—just scoop them onto a baking sheet, freeze until solid, and then transfer them to a bag. When you're ready, bake straight from frozen, adding a couple of extra minutes to the baking time.

3. **What if my dough is too dry?**
   - If your dough feels crumbly, add a splash of milk or more yogurt to loosen it up. You want it to be soft but not sticky!

4. **Can I use flavored yogurt?**
   - While you can experiment with flavored yogurts, be mindful that this will change the overall taste of your cookies. Stick to plain yogurt for the best results!

## Nutritional Info

If you're wondering about the nutritional value of these Yogurt Chocolate Chip Cookies, here’s a quick breakdown for one cookie (based on the recipe making roughly 24 cookies):

- **Calories**: Approximately 140 kcal
- **Protein**: 2g
- **Carbohydrates**: 22g
- **Fat**: 5g
- **Fiber**: 0g
- **Sugar**: 7g

These cookies are a delightful treat that fits wonderfully into a balanced diet. Of course, moderation is key, but with added protein from the yogurt, you can feel just a tad better about indulging!

## Final Thoughts

Whether it's a rainy day, a family gathering, or just a moment for self-indulgence, these Yogurt Chocolate Chip Cookies are your new go-to comfort food. The joy of baking and sharing these treats with loved ones is what truly makes the kitchen come alive.

I hope you have as much fun making them as I did. Don’t forget to share your cookie adventures with us! Snap a picture, tag us on social media, and let the world see your delicious creations. Until next time, keep those ovens warm and your spatulas ready! Happy baking, and remember: life is too short not to enjoy a cookie (or three).

Yogurt Chocolate Chip Cookies
- Total Time: 27 minutes
- Yield: 24 servings 1x
- Diet: Vegetarian
Description
Deliciously chewy chocolate chip cookies made lighter with Greek yogurt.
Ingredients
- 1 cup Greek yogurt
- 1 cup brown sugar
- 1/2 cup butter, softened
- 1 teaspoon vanilla extract
- 2 cups all-purpose flour
- 1 teaspoon baking soda
- 1/2 teaspoon salt
- 1 cup chocolate chips
Instructions
- Mix the Wet Ingredients: In a large mixing bowl, combine the Greek yogurt, softened butter, brown sugar, and vanilla extract. Blend until creamy and smooth.
- Combine Dry Ingredients: In a separate bowl, whisk together the flour, baking soda, and salt.
- Combine it All: Gradually add the dry mixture to the wet mixture in batches and gently fold until no streaks remain.
- Add the Chocolate Chips: Fold in chocolate chips evenly throughout the dough.
- Scoop and Bake: Drop rounded tablespoons of dough onto a baking sheet, leaving about 2 inches between each cookie. Bake in a preheated oven at 350°F for about 10-12 minutes.
- Cool Down: Let them sit on the baking sheet for about 5 minutes before transferring them to wire racks to cool completely.
Notes
These cookies can be frozen for later enjoyment. Ensure they’re fully cooled before storing.
- Prep Time: 15 minutes
- Cook Time: 12 minutes
- Category: Dessert
- Method: Baking
- Cuisine: American
Nutrition
- Serving Size: 1 cookie
- Calories: 140
- Sugar: 7g
- Sodium: 100mg
- Fat: 5g
- Saturated Fat: 3g
- Unsaturated Fat: 2g
- Trans Fat: 0g
- Carbohydrates: 22g
- Fiber: 0g
- Protein: 2g
- Cholesterol: 15mg
Keywords: cookies, dessert, chocolate chip cookies, yogurt cookies, healthy baking
Quick Greek Yogurt Jello Cheesecake
Quick Greek Yogurt Jello Cheesecake: Whip It Up!
Hey there, fellow foodies! I’m Beau Collier, and today, we’re diving into a delightful dessert that’s sure to make your taste buds dance—Quick Greek Yogurt Jello Cheesecake! If you’re craving something creamy and fruity without all the fuss that usually comes with cheesecake, you’ve hit the jackpot! Think of this as the vibrant cousin of a classic cheesecake: light, fluffy, and a whole lot of fun. So, grab your mixing bowl, and let’s embark on this sweet journey together!
Whenever I think about desserts, it brings back a flood of warm memories from my childhood. Laughter around the kitchen, family gathered around the table, and the delightful scent of something delicious wafting through the air. There’s something magical about sharing food with loved ones; it transforms a meal into an experience.
Now, Greek yogurt jello cheesecake might sound like a new spin, but trust me—it’s as comforting as it is delicious. Picture this: a smooth, creamy filling infused with your favorite fruity jello, all snug in a crunchy graham cracker crust. And the best part? It’s so easy to whip up that you can get in and out of the kitchen before your favorite TV show starts!
This cheesecake isn’t just about flavors; it’s about nostalgia, creativity, and, most importantly, bringing people together. And while we might love indulging in a classic cheesecake from time to time, this version is perfectly balanced with that tangy Greek yogurt, keeping it light yet utterly satisfying—not to mention, it’s a fantastic way to sneak in some protein! Who says dessert can’t be healthy, right?
So, whether you’re hosting a summer party, celebrating a birthday, or simply want to treat yourself to something sweet, this Quick Greek Yogurt Jello Cheesecake is your secret weapon. Let’s tie on those aprons and get ready to bake some memories!
Personal Story
Before we dive into the ingredients, let me share a story. Growing up, my grandmother was the cheesecake queen. She had a recipe that was passed down through generations, and she would whip it up for every family gathering. The kitchen would fill with laughter, the clanging of mixing bowls, and my grandma’s gentle voice reminding me to “watch the mixer, Beau—you don’t want to end up in a flour cloud!”
One summer afternoon, I decided to experiment with her classic recipe. I was feeling adventurous and thought, “What if I added some jello for a fruity twist?” After a few tweaks, I ended up with a creamy, colorful dessert that everyone raved about. It became a family favorite, and my grandmother was proud that I’d taken her foundations and made them my own.
That’s how my love for creative twists on classic recipes blossomed! Now, every time I make this Greek Yogurt Jello Cheesecake, I think of my grandma and our time together in the kitchen, and I hope to inspire you to create your own delicious memories.
Ingredients
Here’s what you’ll need to whip up this delightful cheesecake. Easy peasy!
-
2 cups Greek yogurt
Greek yogurt is the star here! Its rich and creamy texture gives the cheesecake that velvety smoothness we crave. You can substitute it with regular yogurt, but the tanginess and thickness of Greek yogurt really take this recipe to the next level. -
1 cup Jello powder (flavor of your choice)
The flavor possibilities are endless—strawberry, raspberry, lime, or even a mix of flavors! Don’t forget that the color of the jello powder contributes to the final presentation—so get creative! If you want a sugar-free option, there are plenty of low-calorie varieties available. -
1 cup cream cheese, softened
This is essential for achieving that creamy, cheesecakey goodness we all love. Make sure it’s softened for easy mixing. You can use low-fat or even vegan cream cheese for a lighter, dairy-free version! -
1/2 cup sugar
A touch of sweetness! Feel free to use honey, maple syrup, or a sugar substitute if you’re looking for a low-sugar version. -
1 teaspoon vanilla extract
The flavor enhancer! It rounds out the cheesecake perfectly. Remember, always choose pure vanilla extract for the best taste. -
1 cup whipped cream or Cool Whip
A fluffy topping that adds lightness to the cheesecake! You can make your own whipped cream or use store-bought—it’s totally up to you. -
Graham cracker crust (pre-made or homemade)
The classic base! You can make one from scratch or buy a pre-made crust to save time. If you’re feeling adventurous, try using crushed Oreos or crushed nuts mixed with butter for a different flavor.
Step-by-Step Instructions
Now that we’ve gathered our ingredients, let’s get cooking! Follow these simple steps for a foolproof cheesecake experience.
-
Prepare the Crust: If you’re making your own graham cracker crust, preheat your oven to 350°F (175°C). In a mixing bowl, combine 1 ½ cups of crushed graham crackers, 1/4 cup of sugar, and 1/2 cup of melted butter. Mix well until combined. Press this mixture into the bottom of a 9-inch pie dish or springform pan. Bake for about 8 minutes until lightly golden. Let it cool completely before adding the filling. This step gives you a crunchy base!
-
Mix the Filling: In a large bowl, beat the softened cream cheese until smooth and creamy—this is where you get that luscious texture! You can use an electric mixer for ease or a good old-fashioned whisk if you’re feeling strong. Gradually add in your sugar and vanilla extract, mixing until fluffy. Make sure there are no lumps; no one likes a chunky cheesecake!
-
Add the Greek Yogurt: Once your cream cheese mixture is smooth, slowly fold in the Greek yogurt until well combined. This is the moment your cheesecake starts to take on that silky demeanor! Use a spatula to fold gently; we want to keep all that airiness.
-
Incorporate the Jello: Here’s where the fun begins! Sprinkle in your jello powder and mix until well incorporated. The color will start to pop, and you’ll be amazed at how vibrant your filling turns. If you have a favorite jello flavor combination, mix it up!
-
Fold in the Whipped Cream: Gently incorporate the whipped cream or Cool Whip into the mixture. This step is crucial for achieving that light and airy texture we all love. Use a folding motion, working from the bottom to top, until no streaks remain.
-
Pour and Chill: Once everything is blended, pour your cheesecake batter into the prepared graham cracker crust, smoothing out the top with a spatula. Cover with plastic wrap and pop it in the fridge for at least 3 hours, or until set. This waiting game is the hardest part, but it’s worth every second!
-
Serve Up: When you’re ready to indulge, cut into the cheesecake, and serve it with extra whipped cream or fresh fruit on top if you like! Get ready for compliments galore!
Serving Suggestions
Presentation can make all the difference, so let’s spruce this dessert up a bit! Here’s how I love to plate up this Quick Greek Yogurt Jello Cheesecake:
-
Garnish: Top slices with a dollop of whipped cream, a sprinkle of jello sprinkles, or a drizzle of fruit syrup. Fresh mixed berries or a slice of fruit that matches your jello flavor adds a pop of color and flavor!
-
Serving Dish: If you used a springform pan, you can showcase your cheesecake in its beautiful form. For a casual vibe, cut individual slices and place them on cute dessert plates.
-
Final Touch: A mint leaf or a sprinkle of crushed graham crackers can make your cheesecake all the more inviting. Remember, we eat with our eyes first!
Recipe Variations
Feeling a bit adventurous? Here are some creative twists you can try out with this cheesecake recipe:
-
Chocolate Lovers Delight: Swap out the fruity jello for chocolate pudding mix. Add a splash of coffee to enhance the chocolate flavor, and top with chocolate shavings for an indulgent dessert!
-
Zesty Lemon: Use lemon jello and fold in some lemon zest for a refreshing citrus twist. Top with a light lemon glaze for an extra zing!
-
Berry Bliss: Combine mixed berry jello with fresh blueberries and raspberries folded into the filling for a fruity explosion of flavor.
-
Nutty Crust: Change up the graham cracker crust by using crushed nuts like pecans or almonds mixed with a little melted butter. It adds a lovely crunch and nutty flavor.
-
Pumpkin Spice Dream: In the fall, take advantage of pumpkin spice jello! Add a sprinkle of cinnamon to the filling and serve with a dollop of whipped cream infused with cinnamon.
Chef’s Notes
As I’ve played with this recipe over the years, I’ve learned that baking is all about experimentation. The chemistry in the kitchen can lead to both flops and fabulous surprises! This specific Greek yogurt jello cheesecake recipe started as a way to use up leftover jello packets from a gathering, and it transformed into a go-to dessert for every occasion.
Sometimes, my kids will join in cooking, and the most fun chaos unfolds. They decorate it like a canvas, and the mess we make together becomes priceless memories!
FAQs and Troubleshooting
Let’s tackle some common questions and potential hiccups you might encounter along the way:
-
Can I make this cheesecake ahead of time?
Absolutely! This cheesecake actually tastes even better the next day after setting overnight. Just keep it covered in the fridge! -
My cheesecake didn’t set. What went wrong?
Not chilling it long enough can lead to a runny cheesecake. Make sure to allow ample chilling time! If you’re in a hurry, you can try sticking it in the freezer for an hour or so but keep an eye on it. -
Can I use low-fat or fat-free ingredients?
Yes! Feel free to swap some of the ingredients for low-fat or fat-free options. Just keep in mind that it may alter the taste and texture slightly. -
What can I do with leftovers?
You can enjoy it as a breakfast topping on pancakes or waffles, blend it into a smoothie, or simply take it to work for lunch!
Nutritional Info
Here’s a rough nutritional breakdown for a standard slice of Quick Greek Yogurt Jello Cheesecake, assuming a total of 12 servings:
- Calories: About 200
- Protein: 5g
- Fat: 9g
- Carbohydrates: 26g
- Sugar: 12g
- Fiber: 1g
Note: These values can vary based on ingredient choices, so be sure to calculate based on what you use!
Final Thoughts
So there you have it—Quick Greek Yogurt Jello Cheesecake, the dessert that’s as easy to make as it is to share! Every bite is a reminder of the joys of cooking, and I hope you feel inspired to whip this up for your next gathering (or just for yourself—you’ve earned it!).
As with all cooking, it’s about love, creativity, and connection. Share your version of this cheesecake with family and friends, swap out flavors, and make it your own. Remember, it’s all about making memories in the kitchen and, most importantly, having fun while doing it!
Until next time, happy cooking!
Print
Quick Greek Yogurt Jello Cheesecake
- Total Time: 180 minutes
- Yield: 12 servings 1x
- Diet: Vegetarian
Description
A light and creamy cheesecake made with Greek yogurt and fruity jello, perfect for any gathering.
Ingredients
- 2 cups Greek yogurt
- 1 cup Jello powder (flavor of your choice)
- 1 cup cream cheese, softened
- 1/2 cup sugar
- 1 teaspoon vanilla extract
- 1 cup whipped cream or Cool Whip
- Graham cracker crust (pre-made or homemade)
Instructions
- Prepare the crust: Preheat your oven to 350°F (175°C). In a mixing bowl, combine 1 ½ cups of crushed graham crackers, 1/4 cup of sugar, and 1/2 cup of melted butter. Mix well, then press into a 9-inch pie dish or springform pan. Bake for about 8 minutes until lightly golden. Let cool.
- Mix the filling: In a large bowl, beat the softened cream cheese until smooth. Gradually add sugar and vanilla extract, mixing until fluffy and smooth.
- Add the Greek yogurt: Slowly fold in the Greek yogurt until fully combined.
- Incorporate the Jello: Sprinkle in the jello powder and mix until well blended.
- Fold in the whipped cream: Gently mix in the whipped cream or Cool Whip until no streaks remain.
- Pour and chill: Pour the cheesecake batter into the crust and smooth the top. Cover and chill in the fridge for at least 3 hours, or until set.
- Serve up: Cut into slices and enjoy with extra whipped cream or fresh fruit on top!
Notes
This cheesecake tastes better the next day after setting overnight. Feel free to try different jello flavors for variety.
- Prep Time: 15 minutes
- Cook Time: 8 minutes
- Category: Dessert
- Method: Chilling
- Cuisine: American
Nutrition
- Serving Size: 1 slice
- Calories: 200
- Sugar: 12g
- Sodium: 180mg
- Fat: 9g
- Saturated Fat: 4g
- Unsaturated Fat: 2g
- Trans Fat: 0g
- Carbohydrates: 26g
- Fiber: 1g
- Protein: 5g
- Cholesterol: 30mg
Keywords: cheesecake, dessert, Greek yogurt, jello, no bake, light dessert

This healthy chocolate pudding is the best healthy snack recipe (vegan) | Healthy chocolate pudding recipe, Healthy dessert recipes, Healthy sweets recipes
The Best Healthy Vegan Chocolate Pudding You’ve Ever Tried!
Hey there, fellow foodies! Welcome back to Feastical! Today, I’m thrilled to share a recipe that’s not just a treat for your taste buds but also a big hug for your health—my beloved Healthy Vegan Chocolate Pudding. I can already hear the chocolate lovers cheering, and who wouldn’t? This rich, creamy delight is proof that healthy eating doesn’t have to be boring or, dare I say, tasteless!
When I first stumbled upon this recipe, I was on a mission to satisfy my chocolate cravings without the guilt. With just a few simple ingredients, I quickly transformed my indulgent snack into a dairy-free, vegan wonder that I could whip up in no time. Trust me; once you sample this healthy chocolate pudding, you’ll wonder why you ever reached for the store-bought stuff!
Upside? You can enjoy this pudding anytime—after dinner, as a mid-afternoon pick-me-up, or even as a post-workout treat that feels akin to a decadent dessert! So, gather your kitchen tools and your favorite spoon because we’re about to embark on a delicious journey to chocolate heaven that’s both easy and oh-so-wholesome. Let’s put on our aprons and get cooking!
Personal Story
Let me take you back to when I was just a budding chef in my parents’ kitchen, probably around the age of ten. I remember a rainy Saturday afternoon when I decided to surprise my family with a chocolate dessert. Armed with a cookbook I’d borrowed from the library, I set out to create something magical. What I didn’t realize was that I had forgotten a crucial ingredient—sugar. Oops!
Instead of downtrodden, I took a leap of faith and decided to wing it by using ripe bananas instead. To my utter delight, my first-ever chocolate pudding turned out to be an unexpected hit! The flavors melded beautifully, and I learned that improvisation in the kitchen can lead to delicious discoveries. That day ignited my love for creating healthy yet satisfying desserts, and now I’m passing that wisdom onto you with this healthy vegan chocolate pudding recipe. You see, food storytelling is what brings us together, and I can’t wait for you to create your own memories in the kitchen!
Ingredients
Now, let’s talk about the marvelous ingredients that come together to create this velvety pudding:
-
Ripe Avocados
Chef Insight: The secret to the creaminess of this pudding! They provide healthy fats and a smooth texture. Feel free to swap with bananas for a twist! -
Cocoa Powder
Substitution Tip: Ensure it’s unsweetened for that rich chocolate kick. You can use raw cacao powder if you want extra health benefits and a more intense flavor. -
Maple Syrup
Flavor Note: A natural sweetener that adds depth. You can swap it out for agave nectar or even date syrup if you’re feeling adventurous! -
Almond Milk (or any plant-based milk)
Quick Tip: This helps loosen up the pudding to the right consistency. Try coconut or cashew milk for a flavor boost! -
Vanilla Extract
Insight: A splash of this fragrant extract enhances the chocolate flavor. Always opt for pure vanilla extract over imitation for that extra kick of flavor. -
Pinch of Salt
Why It’s Important: Just a little pinch will elevate all the other flavors. Don’t skip it!
Step-by-Step Instructions
Now that we have our ingredients ready, let’s dive into the cooking process! This is where the magic happens, and I’ll share my favorite tips along the way.
Step 1: Prepare the Avocado
Begin by cutting your ripe avocados in half, removing the pit, and scooping the flesh into a blender or food processor. Avocados are not only nutrient-rich but also a creamy base for our pudding. If you need a quick tip: the riper the avocado, the better. Look for one that gives slightly when you press it gently!
Step 2: Add Cocoa Powder
Next, sprinkle in a generous amount of cocoa powder. It doesn’t just provide chocolatey goodness; it also comes packed with antioxidants! Just a note: Sift your cocoa powder beforehand if you want to avoid clumps in your pudding!
Step 3: Sweeten it Up
Pour in the maple syrup! This is where you can customize how sweet you want it to be, so feel free to taste and adjust. If you do leave it a bit less sweet, the rich cocoa flavor will shine through even more.
Step 4: Pour in the Milk
Now, it’s time to add your almond milk. Start with a small amount and gradually increase until you reach your desired consistency. Are you into a thicker pudding? Use less milk; for a more liquid texture, add more! This is your delicious creation; make it suit you.
Step 5: Blend It All Together
Blend until incredibly smooth. You want a creamy, silky texture that almost feels too good to be true (thanks to those avocados!). If you’re having trouble getting everything mixed, add a little more almond milk and keep blending until you achieve pudding perfection.
Step 6: Add Vanilla and Salt
Finally, add a splash of vanilla extract and a pinch of salt. Blend again briefly to incorporate these boosts of flavor. This step is crucial because it truly elevates the entire pudding!
Step 7: Taste-Test and Adjust
Taste your pudding! This is the fun part; feel free to adjust sweetness by adding more maple syrup or enhancing the chocolate flavor with extra cocoa. Some might even enjoy a dash of cinnamon for a unique twist!
Step 8: Chill
Once you’re satisfied with the flavor, transfer the pudding into serving bowls or an airtight container. Pop it in the refrigerator for at least an hour to firm up. It’s like giving it a little spa treatment!
Serving Suggestions
Alright, it’s the moment we’ve all been waiting for—the plating! This healthy chocolate pudding isn’t only rich in flavor; it’s a treat for the eyes as well. When you’re ready to serve, scoop generous dollops into small dessert bowls, ramekins, or even mason jars for a cute presentation.
Make it Instagram-worthy by topping it with your favorite garnishes! Here are some delicious ideas:
- Fresh Berries: Strawberries or raspberries add a pop of color and freshness.
- Chopped Nuts: Almonds, walnuts, or even pecans provide a delightful crunch.
- Coconut Whipped Cream: If you’re feeling extra fancy, a dollop of coconut whipped cream takes it over the top!
- Dark Chocolate Shavings: A sprinkle of chocolate love for those die-hard chocoholics!
Recipe Variations
Now that you’ve mastered the classic healthy chocolate pudding, here are some fun twists to keep things exciting:
- Spicy Chocolate: Add a pinch of cayenne pepper for a subtle kick!
- Nutty Chocolate: Blend in some almond or peanut butter for a nutty flavor explosion.
- Mocha Delight: Mix in a bit of instant coffee or espresso powder for that coffee-chocolate combo.
- Flavor Infusion: Experiment with different extracts like almond or hazelnut for an exotic touch.
- Fruit Fusion: Blend in a ripe banana for a fruit-forward pudding with a natural sweetness.
Chef’s Notes
This recipe holds a sweet spot in my heart, and over the years, it has seen its fair share of tweaks and modifications! I recently experimented with adding silken tofu for additional protein and creaminess, which worked wonders. The luscious, silky texture keeps the essence of the original pudding while giving it a healthy protein boost!
And a funny kitchen story: one time, I was rushing to make this pudding for friends, and in my haste, I accidentally dumped in chili powder instead of cocoa! Let’s just say that evening taught me to always double-check my labels!
FAQs and Troubleshooting
Q1: Why is my pudding too runny?
A: It might need more avocado or you added too much milk. To fix it, mix in a little more cocoa powder. You can also chill it longer to help it thicken!
Q2: Can I make this in advance?
A: Absolutely! This pudding can stay fresh in the refrigerator for up to 4-5 days. Just remember to cover it with plastic wrap or store it in an airtight container.
Q3: Can I freeze this pudding?
A: Yes, while you can freeze it, the texture may change when thawed. Just mix it up again after defrosting for a smoother consistency.
Nutritional Info
While indulging in our Healthy Vegan Chocolate Pudding, you can feel good about what’s going into your body! Here’s a rough nutritional breakdown per serving (based on the ingredients provided):
- Calories: Around 140
- Fat: 9g (mostly healthy fats from avocados)
- Carbohydrates: 15g
- Fiber: 5g
- Sugar: 4g (depending on the sweetness level from maple syrup)
- Protein: 2g
Emphasizing that chocolate doesn’t have to come with a hefty price tag in terms of health, this pudding is nutrient-dense and loaded with goodies like fiber, healthy fats, and antioxidants!
Final Thoughts
There you have it—my ultimate Healthy Vegan Chocolate Pudding recipe! I truly hope this becomes a staple in your kitchen as it has in mine. It’s not just a dessert; it’s a canvas for creativity, a way to satisfy that sweet tooth, and a dream come true for anyone looking for something wholesome yet indulgent.
So next time you’re craving something chocolatey, remember that healthy treats can still be delicious and satisfying. Don’t forget to share your pudding creations with me! Let’s keep the food-loving community alive and thriving. Until next time, my fellow food adventurers—happy cooking and even happier eating! 🍫✨
Print
Healthy Vegan Chocolate Pudding
- Total Time: 15 minutes
- Yield: 4 servings 1x
- Diet: Vegan
Description
A rich and creamy vegan chocolate pudding made with healthy ingredients, perfect for satisfying sweet cravings without the guilt.
Ingredients
- 2 ripe avocados
- 1/2 cup unsweetened cocoa powder
- 1/4 cup maple syrup
- 1/2 cup almond milk (or any plant-based milk)
- 1 teaspoon pure vanilla extract
- Pinch of salt
Instructions
- Prepare the avocados by cutting in half, removing the pit, and scooping the flesh into a blender.
- Add the cocoa powder to the blender.
- Pour in the maple syrup and adjust sweetness as desired.
- Add the almond milk gradually until the desired consistency is reached.
- Blend until smooth and creamy.
- Add the vanilla extract and a pinch of salt, then blend briefly.
- Taste the pudding and adjust sweetness or cocoa as needed.
- Chill the pudding in the refrigerator for at least an hour before serving.
Notes
For a thicker pudding, use less almond milk. Garnish with fresh berries, chopped nuts, or coconut whipped cream for an extra touch.
- Prep Time: 15 minutes
- Cook Time: 0 minutes
- Category: Dessert
- Method: Blending
- Cuisine: Vegan
Nutrition
- Serving Size: 1 serving
- Calories: 140
- Sugar: 4g
- Sodium: 10mg
- Fat: 9g
- Saturated Fat: 1g
- Unsaturated Fat: 8g
- Trans Fat: 0g
- Carbohydrates: 15g
- Fiber: 5g
- Protein: 2g
- Cholesterol: 0mg
Keywords: vegan dessert, chocolate pudding, healthy dessert, avocados, dairy-free
Healthy Savory Snacks
Savory Zucchini Chickpea Bites: A Healthy Snack to Savor!
Hey there, my fellow food lovers! Today, we’re diving into a delicious and healthy recipe that’s sure to tickle your taste buds and nourish your body. We’re talking about Savory Zucchini Chickpea Bites—the perfect party snack, midday pick-me-up, or a fun addition to any meal. You know how sometimes you just crave something crispy yet wholesome, something that packs a punch of flavor without overloading on guilt? Well, you’re in for a treat!
I can still remember the first time I made these savory bites. It was a sunny afternoon, and I wanted to whip up a snack that wouldn’t just fuel my body, but also remind me of the comforting flavors of my childhood. I was rummaging through the fridge and pantry, and there they were—zucchini and chickpeas calling my name! I decided to experiment, tossing in some spices and a sprinkling of parmesan for that cheesy goodness. The result? Pure magic! My kitchen smelled incredible, and one bite took me straight back to those cozy family dinners.
Food has that unique power, doesn’t it? Bringing us together, wrapping us in memories, and evoking feelings of happiness and nostalgia! That’s exactly why I started Feastical—to share my journey through the kitchen and inspire you to create your own delicious memories. So, whether you’re looking to impress friends, satisfy your snack cravings, or maintain a healthy diet, these bites are for you! Ready to let’s get cooking?
Personal Story
Let me take you back to a warm summer evening when I was a young culinary explorer, eager to learn from my mom while she whipped up her signature veggie dish in our cozy kitchen. With our small herb garden just steps away, those evenings felt like a treasure hunt! I loved how she made getting into the kitchen feel like an adventure. Together, we’d snip fresh basil, pluck ripe tomatoes, and rummage into our coolers for the freshest produce. It was during one of those adventures that I first stumbled upon zucchini and chickpea combinations. My mom was all about healthy snacking, using whatever was ripe and in-season.
One day, we decided to experiment with what we had. We turned those chunky zucchinis into little veggie balls that baked up beautifully, crisp on the outside and utterly comforting on the inside. The delight in my mom’s eyes when we pulled them out of the oven was priceless! We devoured them within minutes, and I’ve cherished that memory ever since. Today, I’m thrilled to share my revised version of those beloved bites, packed with wholesome ingredients and an extra kick of flavor!
Ingredients
Here’s everything you’ll need to create your savory zucchini chickpea bites:
-
2 medium zucchinis
These beauties give your bites moisture, making them tender and delicious! Feel free to swap with yellow squash if you want a different color. -
1 can (15 oz) chickpeas, drained and rinsed
A fantastic source of protein and fiber! If chickpeas aren’t your thing, cans of white beans work just as well! -
1 cup almond flour
This gluten-free alternative to traditional flours adds a lovely nuttiness and binds everything together perfectly. If you’re looking for a lower-calorie option, ground oats can work in a pinch! -
1 cup mixed vegetables, diced (bell peppers, onions, carrots, etc.)
Feel free to use whatever you’ve got on hand! The more colorful, the better. Plus, it adds extra nutrients and crunch. -
1 tsp smoked paprika
This spice adds a delightful smoky flavor! If you prefer less smokiness, regular paprika or even chili powder can be a fun twist! -
½ cup grated Parmesan cheese
Beautifully cheesy and addictive! To make this recipe vegan, use nutritional yeast for that cheesy flavor sans dairy! -
Salt and pepper to taste
To season those flavors perfectly! Keep it simple, or add a dash of cayenne pepper for a little heat!
With these ingredients, you’ll be on your way to crafting a pokeable pleasure of a snack!
Step-by-Step Instructions
Alright, let’s get our hands in the mix! Here’s how to make these Savory Zucchini Chickpea Bites:
Step 1: Prepare the Zucchini
Start by preheating your oven to 400°F (200°C). While that’s warming up, grab those zucchinis and give them a good wash. Grate them using a box grater or a food processor. Make sure to squeeze out excess moisture using a clean kitchen towel or cheesecloth. This step is crucial—too much water will make your bites mushy instead of delightfully crispy!
Step 2: Mash the Chickpeas
In a large mixing bowl, toss in your drained chickpeas. Use a fork or a potato masher to mash them up a bit. You’re looking for a chunky blend—some whole chickpeas add lovely texture! It’s okay to smash them a bit, but don’t go crazy; we want some bites to be a little crunchy.
Step 3: Combine the Ingredients
Add the sautéed vegetables (cooked until just soft to retain texture), grated zucchini, almond flour, grated parmesan, smoked paprika, salt, and pepper into the bowl with the chickpeas. Mix everything together with a spatula or your hands until well combined. You want a sticky blend, so it holds together when forming the patties.
Step 4: Shape the Bites
Now for the fun part! Take handfuls of the mixture and form them into small balls or patties, about the size of a golf ball or slightly bigger. You can shape them into whatever size you like—use mini sizes for party snacks, or larger shapes for a main dish!
Step 5: Bake to Crispy Perfection
Line a baking tray with parchment paper (easy cleanup is the name of the game!). Lay out the bites with a little space in between to allow for even baking. Pop them into your preheated oven and bake for 25-30 minutes, flipping halfway through. You want them golden brown, crispy on the outside, and tender on the inside. Feel free to rotate the tray halfway for an even cook!
Step 6: Enjoy the Aromatic Goodness
Once they’re out of the oven, resist the urge to dive in immediately! Allow them to rest for a few minutes; they’ll firm up as they cool. Just imagine those glorious smells wafting through your kitchen—it’s the best part! Present them with a side of your favorite dipping sauce, like tzatziki or spicy hummus, and you’re ready to serve!
Serving Suggestions
These savory bites are super versatile! Serve them warm with a sprinkle of fresh herbs like parsley or chives for a colorful touch. For a fun twist, create a platter with a variety of dips. Think garlic aioli, spicy ketchup, or classic marinara sauce!
If you want to jazz it up, try throwing a mini aperitivo party! Serve these bites alongside your favorite wine, fresh olives, and a handful of crackers. Trust me; you’ll have everyone raving about your impressive appetizer spread.
Recipe Variations
Looking to shake things up? Here are a few creative variations to try:
-
Mediterranean Twist: Fold in some chopped kalamata olives, sun-dried tomatoes, or feta cheese for a flavor boost that transports you straight to the Mediterranean.
-
Herby Delight: Add in finely chopped fresh herbs like cilantro, parsley, or basil for a burst of freshness. Choose herbs based on seasonal availability for the best flavor!
-
Spicy Kick: Toss in some diced jalapeños or a pinch of red pepper flakes for a spicy little surprise. Adjust the heat to suit your taste!
-
Cheesy Goodness: Swap the parmesan for crumbled goat cheese or cheddar for something extra cheesy and delicious.
-
Fancy Add-ins: Mix in a tablespoon of tahini or a tablespoon of nutritional yeast for that extra depth of flavor and a nutrient boost!
No matter how you switch things up, the main concept remains the same—joyful snacking at its finest!
Chef’s Notes
I’ve been tinkering with this recipe for quite some time now. What started as a simple family meal has evolved into a fun-filled party snack, and I often hear from friends and family about how much they enjoy these bites. They’ve become a staple at gatherings since everyone can enjoy them—trust me when I say the last time I made a double batch, they disappeared faster than I could serve!
More than just a recipe, I think of these Savory Zucchini Chickpea Bites as a reminder of how fun cooking can be. Experimentation is my favorite part of the journey; every new ingredient adds a twist of creativity!
FAQs and Troubleshooting
Q1: My bites fell apart while baking! What did I do wrong?
A: No worries! This can happen if there’s too much moisture in the mixture. Make sure to squeeze out excess water from your zucchini and allow your mixture to sit for a few minutes before shaping it into bites. If they still seem too loose, stir in some extra almond flour to help bind them!
Q2: Can I freeze these bites for later?
A: Absolutely! Once cooled, simply place them in a freezer-safe bag or container. They’re good for up to three months. Reheat them in the oven at 350°F (175°C) for a few minutes when you’re ready to enjoy again!
Q3: How can I make these bites spicier?
A: You can either add more smoked paprika, toss in some cayenne pepper before cooking, or serve them with a spicy dipping sauce!
Q4: Can I use other flours besides almond flour?
A: Yes! You can try oat flour, all-purpose flour, or even chickpea flour for more chickpea goodness. Just remember that the texture might slightly differ.
Nutritional Info
Each bite packs a flavorful punch while being loaded with nutrients! Here’s a rough breakdown:
- Calories: Approximately 80 cal per bite (varies with added ingredients)
- Protein: Around 3-4 grams from chickpeas and parmesan
- Fiber: 2 grams, thanks to the zucchini and chickpeas
- Fat: About 3-4 grams, depending on the type of cheese and oil used
- Vitamins & Minerals: Great sources of Vitamin C (from zucchini), iron, and potassium!
These bites are not just tasty; they’re a wholesome way to fuel your day without guilt!
Final Thoughts
And there you have it, my friends—Savory Zucchini Chickpea Bites that bring joy, flavor, and nostalgia all in one bite! Whether you’re snacking on them while binge-watching your favorite show or serving them at your next gathering, you’ll be sharing meals and memories that create smiles and warmth, much like a cozy hug.
I hope you enjoy making these as much as I do! Remember, cooking is all about creating, experimenting, and most importantly, HAVING FUN! So don your aprons, ignite those ovens, and let’s keep making food stories worth sharing. Until next time, happy cooking!
Print
Savory Zucchini Chickpea Bites
- Total Time: 45 minutes
- Yield: 4 servings 1x
- Diet: Vegetarian
Description
A delicious and healthy snack that combines zucchini and chickpeas for a crispy yet wholesome treat.
Ingredients
- 2 medium zucchinis
- 1 can (15 oz) chickpeas, drained and rinsed
- 1 cup almond flour
- 1 cup mixed vegetables, diced (bell peppers, onions, carrots, etc.)
- 1 tsp smoked paprika
- ½ cup grated Parmesan cheese
- Salt and pepper to taste
Instructions
- Preheat your oven to 400°F (200°C).
- Wash and grate the zucchinis, then squeeze out excess moisture.
- Mash the chickpeas in a large bowl until chunky.
- Combine the vegetables, grated zucchini, almond flour, Parmesan, smoked paprika, salt, and pepper with the chickpeas.
- Form small balls or patties with the mixture.
- Bake for 25-30 minutes, flipping halfway until golden brown.
- Allow to cool slightly before serving with a dipping sauce.
Notes
For a vegan version, replace Parmesan with nutritional yeast.
- Prep Time: 15 minutes
- Cook Time: 30 minutes
- Category: Snack
- Method: Baking
- Cuisine: Mediterranean
Nutrition
- Serving Size: 1 serving
- Calories: 80
- Sugar: 2g
- Sodium: 250mg
- Fat: 4g
- Saturated Fat: 1g
- Unsaturated Fat: 3g
- Trans Fat: 0g
- Carbohydrates: 9g
- Fiber: 2g
- Protein: 3g
- Cholesterol: 5mg
Keywords: snack, vegetarian, zucchini, chickpeas, healthy bites, party snack
100 Calorie Applesauce Snack Cake
100 Calorie Applesauce Snack Cake: A Cozy Recipe to Crave
Introduction
Hey there, fellow foodies! I’m Beau Collier, and today we’re diving into a delightful treat that will make your heart sing and your taste buds celebrate—the 100 Calorie Applesauce Snack Cake! 🎉 Trust me, this isn’t just any cake; it’s a warm hug in dessert form. Perfect for those lazy afternoons or even as a wholesome breakfast option, this cake brings comfort without the guilt.
As a passionate home cook who believes food should be fun and uncomplicated, I crafted this recipe while trying to find a satisfying snack that didn’t derail my healthy eating goals. And let me tell you, this cake ticks all the boxes! It’s moist, flavorful, and incredibly easy to whip up, which makes it an instant favorite in my kitchen. So roll up your sleeves, grab your spatula (or just a fork), and let’s dive into the delicious world of applesauce cake together!
But before we get our hands messy, let me share a little story that makes this recipe extra special. You see, this cake isn’t just about the ingredients; it’s about memories, aromas, and the love that fills the kitchen when you bake. So let’s get to it!
Personal Story
Oh, the memories I have tied to applesauce cake! Growing up, my grandmother had a knack for baking. Her kitchen always smelled like a warm embrace, filled with cinnamon, sugar, and love. One of my favorite childhood memories is when she’d invite me to help her bake her famous applesauce cake every autumn. We’d use the apples from our backyard tree—crisp, juicy, and bursting with flavor.
I remember standing on a stool to reach the counter, carefully measuring flour while she whisked together spices and the sweet-smelling applesauce. I couldn’t wait to lick the spoon (who doesn’t love a little kitchen mischief?). The excitement was palpable as we waited for the cake to bake. We’d sneak little bits of batter and giggle as the heavenly aroma floated around the house.
When the timer finally went off, we’d stick a toothpick in and if it came out clean, we’d dance around the kitchen, singing our silly songs! It became a cherished tradition, one that instilled in me a love for cooking and a profound appreciation for the simple joys of homemade food. Now, I want to share that joy with you through this 100 Calorie Applesauce Snack Cake. Let’s make new memories in your kitchen!
Ingredients
Here’s what you’ll need for the most scrumptious 100 Calorie Applesauce Snack Cake:
-
1 cup unsweetened applesauce: The star of the show! This adds moisture and natural sweetness to your cake. If you’re in a pinch, homemade applesauce works like a charm too!
-
1 cup whole wheat flour: A healthier alternative to all-purpose flour, adding a nutty flavor and extra fiber. Need a gluten-free option? Substitute with almond flour or a gluten-free flour blend.
-
1/2 cup maple syrup or agave nectar: This sweetener brings a lovely rich flavor. If you’re looking for a lower-calorie option, try using Stevia or a sugar-free syrup.
-
1 tsp baking powder: This helps your cake rise to fluffy perfection. Check your pantry—make sure it’s not expired for best results!
-
1/2 tsp baking soda: A little extra lift! It’s perfect when paired with the acidity in your applesauce.
-
1/2 tsp cinnamon: This adds warmth and depth to your cake. Adjust the spice level based on your preference—add more for a cozy kick!
-
1/4 tsp salt: Balances all the sweetness and enhances the flavors. Don’t skip it!
-
1/2 cup additional unsweetened applesauce: This keeps the cake moist. You can also replace it with mashed bananas for a different twist.
-
1/4 cup almond milk (or any plant-based milk): This keeps your cake light and fluffy. Use regular milk if that’s what you have on hand!
-
1 tsp vanilla extract: For that signature flavor! Homemade vanilla extract adds a special touch—just saying!
Step-by-Step Instructions
Ready to bake? Let’s make some magic happen in the kitchen!
-
Preheat Your Oven: Start by preheating your oven to 350°F (175°C). This way, you’ll have a perfectly heated environment for your cake to rise beautifully. Pro tip: Place your rack in the middle for even cooking!
-
Gather Your Ingredients: Before you begin mixing, take a moment to gather all your ingredients. Trust me; this will make the entire process smoother and more enjoyable. Plus, you’ll feel like a real chef!
-
Mix the Dry Ingredients: In a big bowl, whisk together the whole wheat flour, baking powder, baking soda, cinnamon, and salt. This step is crucial because it ensures even distribution of the leavening agents and spices—no clumps allowed!
-
Combine the Wet Ingredients: In another bowl, combine the unsweetened applesauce, maple syrup (or agave nectar), additional applesauce, almond milk, and vanilla extract. Stir until well combined. It should smell divine—trust your nose!
-
Mix It All Together: Pour the wet mixture into the dry ingredients and gently fold them together using a spatula or wooden spoon. Be careful—overmixing can lead to a dense cake! You want it to be just combined and a little lumpy.
-
Prepare Your Baking Dish: Grease an 8×8 square baking dish or line it with parchment paper for easy removal. This cake loves to stick if you skip this step, so don’t even think about it!
-
Pour & Spread: Gently pour your batter into the prepared baking dish. Smooth the top with a spatula for a nice presentation. No one wants a lumpy cake!
-
Bake Time!: Pop your baking dish into the oven and bake for about 25 to 30 minutes. Keep an eye on it! You’ll know it’s done when a toothpick comes out clean. (And bonus, your house will smell amazing!)
-
Cool Down: Once baked, remove the cake from the oven and let it cool in the pan for about 10 minutes before transferring it to a wire rack. This is key to avoid a mushy bottom. Then patience, my friend! Let it cool for a while longer before slicing into it.
-
Slice & Serve: Once cooled, slice it into squares and get ready for a taste sensation! Feel free to dust with a little extra cinnamon or powdered sugar for presentation.
Serving Suggestions
Now that your 100 Calorie Applesauce Snack Cake is fresh out of the oven, let’s talk about how to serve this beauty.
-
Plain and Simple: This cake is delicious on its own—perfect for a quick snack or a light dessert. Just slice it up and enjoy!
-
With a Dollop of Greek Yogurt: For a bit of creaminess, consider a dollop of plain Greek yogurt on top. This adds protein and pairs beautifully with the cake’s sweet flavor.
-
Top it with Fruit: Fresh slices of banana, berries, or even a drizzle of honey can elevate your dessert to new heights!
-
Pair with a Cup of Tea or Coffee: There’s nothing quite like indulging in a slice of this cake with your favorite warm beverage. Cozy vibes, anyone?
Recipe Variations
Feeling adventurous? Here are some fun variations to switch things up with your applesauce snack cake!
-
Add Nuts: Toss in a handful of walnuts or pecans for a delightful crunch. They add texture and healthy fats!
-
Stay Fruity: Mix in some raisins, dried cranberries, or chocolate chips for added sweetness and flavor explosions in every bite.
-
Spice it Up: Want a kick? Add some nutmeg or ginger alongside the cinnamon for a bolder flavor profile.
-
Cocoa Delight: Craving chocolate? Swap out a little flour for cocoa powder; you’ll have a chocolaty applesauce cake that’s to die for.
-
Orange Zest: For a citrusy twist, grate a bit of orange zest into the batter. It brightens up the flavors and makes your cake even more aromatic!
Chef’s Notes
Oh, how I love this recipe! It’s evolved over the years, and I’ve tried countless variations in pursuit of the perfect balance of flavor and health. I remember the first time I experimented with whole wheat flour—it felt like a leap of faith! The result was a hearty yet tender cake that my whole family couldn’t get enough of.
And don’t be surprised if your kitchen seems to get a little louder during the baking process. Between the sizzling oven and my silly singing, it can turn into a mini kitchen concert! Embrace the mess and the laughter; that’s what cooking is all about!
FAQs and Troubleshooting
-
Why did my cake not rise?
- Most likely, the baking powder or baking soda was expired, or it wasn’t mixed well enough with the dry ingredients. Make sure to check those dates!
-
Can I use regular all-purpose flour?
- Absolutely! However, the nutrition profile will change. It may also result in a slightly different texture. You might want to add a bit more liquid since all-purpose flour absorbs differently.
-
How can I make it vegan?
- You’re in luck! This recipe is mostly vegan as is; just use maple syrup and almond milk, plus ensure your vanilla extract is pure without additives.
-
The cake came out too dense. What went wrong?
- A common culprit here is overmixing the batter. Mix just until combined, and ensure your wet and dry ingredients are at room temperature before mixing.
Nutritional Info
Here’s a quick breakdown to help you count those calories! Each slice of this 100 Calorie Applesauce Snack Cake contains approximately:
- Calories: 100
- Protein: 3g
- Total Fat: 1.5g
- Carbohydrates: 20g
- Fiber: 3g
- Sugar: 5g
This makes it an excellent snack or dessert option that won’t leave you feeling guilty!
Final Thoughts
Well, there you have it—the warmly inviting, delightfully scrumptious, and oh-so-easy 100 Calorie Applesauce Snack Cake! I truly hope this recipe fills your kitchen with smiles and delicious aromas, just like it did in my grandmother’s kitchen. Remember, cooking should be about letting your personality shine through in every dish. Don’t hesitate to tweak the recipe, add your own twist, or even create lasting memories with loved ones as you bake.
So next time you’re craving something sweet, you know exactly what to whip up! Enjoy every bite—and who knows? Maybe this cake will become a new tradition in your home, just like it did in mine. Until next time, keep it simple, keep it soulful, and most importantly, keep it delicious! 🍰💖
Print
100 Calorie Applesauce Snack Cake
- Total Time: 40 minutes
- Yield: 8 servings 1x
- Diet: Vegetarian
Description
A delightful low-calorie snack cake made with applesauce, perfect for a guilt-free treat any time of day.
Ingredients
- 1 cup unsweetened applesauce
- 1 cup whole wheat flour
- 1/2 cup maple syrup or agave nectar
- 1 tsp baking powder
- 1/2 tsp baking soda
- 1/2 tsp cinnamon
- 1/4 tsp salt
- 1/2 cup additional unsweetened applesauce
- 1/4 cup almond milk (or any plant-based milk)
- 1 tsp vanilla extract
Instructions
- Preheat your oven to 350°F (175°C).
- Gather all your ingredients.
- Mix the dry ingredients in a bowl.
- Combine the wet ingredients in another bowl.
- Mix the wet and dry ingredients together until just combined.
- Prepare an 8×8 square baking dish.
- Pour the batter into the prepared baking dish.
- Bake for about 25 to 30 minutes.
- Cool for about 10 minutes before transferring to a wire rack.
- Slice and serve as desired.
Notes
Add nuts or dried fruits for extra flavor. Can be enjoyed plain or with a dollop of Greek yogurt.
- Prep Time: 10 minutes
- Cook Time: 30 minutes
- Category: Dessert
- Method: Baking
- Cuisine: American
Nutrition
- Serving Size: 1 serving
- Calories: 100
- Sugar: 5g
- Sodium: 200mg
- Fat: 1.5g
- Saturated Fat: 0.5g
- Unsaturated Fat: 1g
- Trans Fat: 0g
- Carbohydrates: 20g
- Fiber: 3g
- Protein: 3g
- Cholesterol: 0mg
Keywords: applesauce cake, healthy dessert, low calorie cake, snack cake, autumn baking
Chicken Shawarma Wrap
Discover the Magic of Chicken Shawarma Wraps: A Culinary Journey
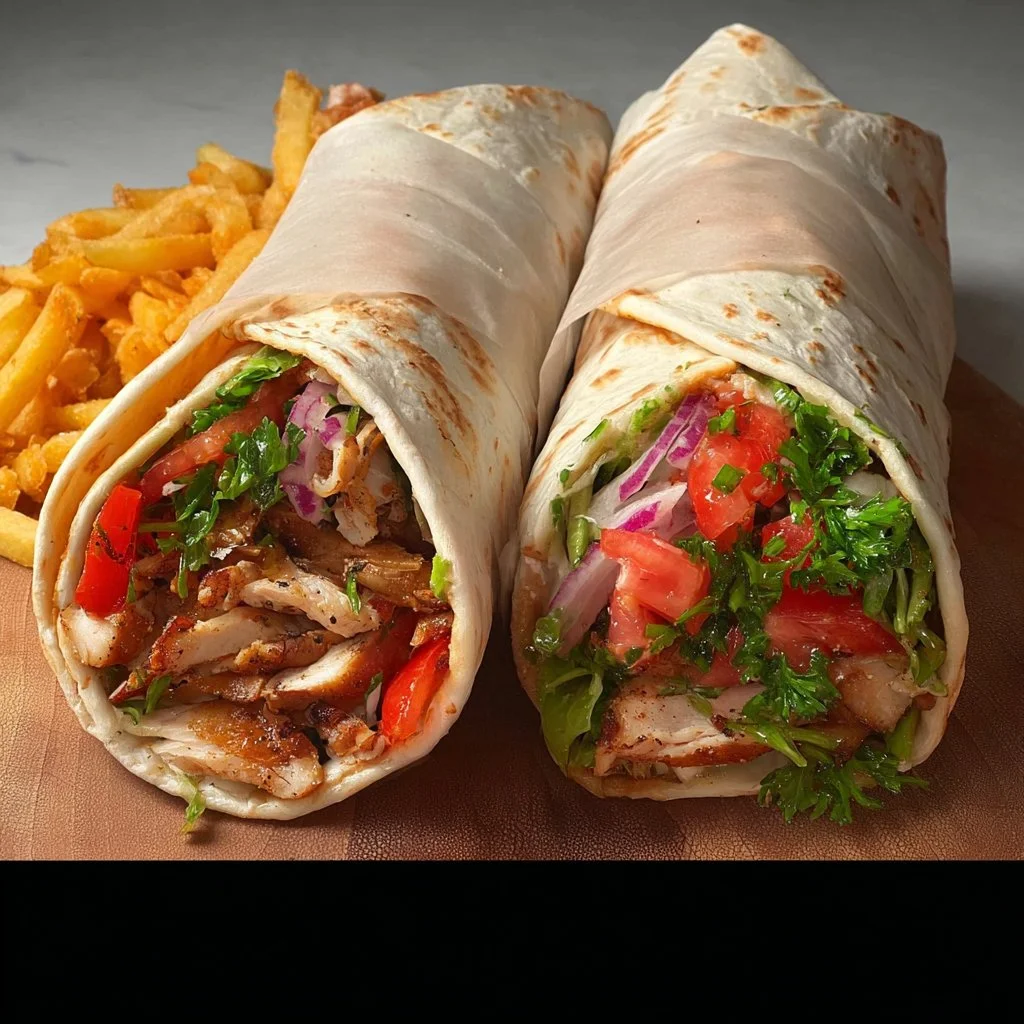
Hey there, fellow food lovers! It’s Beau Collier here, and today, we’re diving into the savory world of Chicken Shawarma Wraps. Now, if you know me, you know I’m all about feel-good food that brings everyone together, and this dish is no exception. Shawarma, that tantalizing Middle Eastern wonder, is a flavor explosion wrapped in love, and there’s nothing quite like it when you’re looking to satisfy your cravings or impress your friends.
Imagine this: tender, spiced chicken marinated to perfection, nestled in soft lavash bread, with creamy garlic sauce, zesty sumac onions, crunchy pickles, and crispy fries—all wrapped up for a delicious bite that transports you straight to a bustling street market in Lebanon. With each mouthful, you get a fusion of flavors and textures that make your taste buds dance like they just found the perfect groove.
Now, don’t let the thought of cooking at home intimidate you; making your own chicken shawarma wrap is simpler than you might think! Plus, it’s a fun adventure in the kitchen that I promise will be worth every minute. Whether you’re hosting a get-together, looking for an easy weeknight meal, or just hunting for a way to spice up your usual dinner routine, this recipe is bound to become a keeper.
So, roll up your sleeves, grab your apron, and let’s embark on this culinary journey together. Are you ready to give your taste buds the royal treatment? Let’s get cooking!
Personal Story
When I think of Chicken Shawarma, I can’t help but reminisce about my first trip to the vibrant streets of Istanbul. It was a chilly evening, and the air was thick with the rich aromas of sizzling meat, spices, and street vendors calling out to passersby. As I wandered, I found myself drawn to a small stall that served the most mouthwatering shawarma wraps. The moment I took my first bite, I knew I had stumbled upon something extraordinary—a burst of flavor that felt like a warm hug.
That night, I devoured wrap after wrap, my heart and stomach both full of joy. Ever since, I’ve been on a mission to replicate that unforgettable experience at home. Over the years, I’ve experimented with different spices, sauces, and toppings until I finally nailed it—my homemade Chicken Shawarma Wrap that even my friends and family rave about! It’s not just a meal anymore; it’s a cherished memory, an adventure waiting to unfold, and a delicious connection to people, places, and flavors all around the world.
Now, let’s get into the nitty-gritty of what makes this shawarma wrap so darn delicious!
Ingredients
Here’s what you’ll need to whip up your own Chicken Shawarma Wraps:
-
Chicken Thighs:
- The star player! Chicken thighs are juicier and more flavorful than breasts, perfect for marinating. If you’re not a fan, you can swap in chicken breasts or even tofu for a vegetarian version.
-
Lavash Bread:
- This is the wrap! It’s thin, flexible, and perfect for holding in all your delicious fillings. If lavash isn’t available, tortillas or pita bread work as great substitutes.
-
Garlic Sauce:
- The creamy, dreamy topping that ties everything together! You can go store-bought or make your own with garlic, mayo, and lemon.
-
Sumac Onions:
- Thinly sliced onions tossed with sumac for a tangy crunch. If you can’t find sumac, a little lemon zest will bring a similar brightness.
-
Pickles:
- Because every wrap needs that contrast of crunch and acidity! Dill pickles work best here, but feel free to experiment with pickled carrots or radishes.
-
Fries:
- Yep, you read that right! Adding fries to the wrap creates an addictive crunch. Use your favorite frozen fries or make fresh ones at home.
-
Spices (Cumin, Paprika, Garlic Powder, etc.):
- A mix of spices that transforms ordinary chicken into something extraordinary. Feel free to play around; a dash of coriander or turmeric can add an amazing twist!
-
Olive Oil:
- For marinating the chicken and keeping it juicy.
-
Salt and Pepper:
- Essential for enhancing all the flavors.
Overall, each ingredient plays a pivotal role in creating that authentic Chicken Shawarma experience in your home kitchen.
Step-by-Step Instructions
Let’s roll up our sleeves and cook up some magic! Follow these steps, and I promise you’ll have a delectable Chicken Shawarma Wrap that will transport you right to the Middle East.
1. Marinate the Chicken
What you’ll do: In a large mixing bowl, combine a generous drizzle of olive oil, 2-3 teaspoons of cumin, 2 teaspoons of paprika, 2 teaspoons of garlic powder, salt, and pepper. Add roughly 1 tablespoon of lemon juice for a zing!
Tip: If you have time, let the chicken marinate for a few hours (or overnight, if you’re planning ahead) to soak in all those fantastic flavors. The longer, the better!
2. Cook the Chicken
What you’ll do: Preheat your grill or skillet over medium-high heat. Once it’s hot, toss in the marinated chicken thighs, cooking for about 6-7 minutes per side or until they reach an internal temperature of 165°F and are beautifully charred.
Chef Hack: If you’re using a skillet, get a nice sear on both sides and cover it for a minute or two to let the chicken cook through. Added moisture = tender chicken!
3. Rest and Slice
What you’ll do: Remove the chicken from the heat and let it rest for about 5-10 minutes. This helps to seal in the juices. Once rested, slice the chicken into thin strips—this makes for an easier wrap!
Note: Make sure to take a moment to taste your heavenly creation.
4. Assemble the Wrap
What you’ll do: Take your lavash bread and lay it flat on a plate. Spread a generous layer of garlic sauce in the center, then pile on slices of chicken, top with sumac onions, pickles, and crispy fries.
Chef Insight: Don’t be shy! The more toppings, the better—it’s all about creating that fantastic bite.
5. Roll it Up
What you’ll do: Fold the sides of the lavash over the filling, then roll it up from the bottom, tucking as you go to ensure nothing falls out.
Pro Tip: If you want to make it extra secure, you can wrap the shawarma in parchment paper to hold everything in place.
6. Serve
What you’ll do: Slice your wrap in half and plate it up with extra garlic sauce on the side for dipping.
Garnish: Sprinkle a little extra sumac on top or serve with a side of tabbouleh or a simple salad for a fresh touch!
Serving Suggestions
Let’s talk presentation! A fantastic meal deserves to look just as delicious as it tastes. Here’s how I love to serve up my Chicken Shawarma Wrap:
-
On a Platter: Arrange the wraps neatly on a large platter, garnished with parsley or fresh mint for a pop of color. It’s perfect for sharing!
-
Dipping Sauces: Include small bowls of garlic sauce, tahini, or tzatziki on the side for folks to dip their wraps into.
-
Accompaniments: Serve with fresh veggies, homemade tabbouleh, or roasted chickpeas to add a healthy twist.
-
Personal Touch: If you’re entertaining, consider setting up a “Shawarma Station” where guests can customize their own wraps with toppings of their choice!
Recipe Variations
Feeling adventurous? Here are a few creative twists to elevate your Chicken Shawarma Wrap:
-
Spicy Shawarma: Toss in some chopped jalapeños or a drizzle of sriracha for a fiery kick!
-
Mediterranean Twist: Swap out the garlic sauce for a thick yogurt sauce mixed with fresh dill and cucumber for a cooling effect.
-
Veggie Love: Substitute tofu or roasted vegetables for the chicken to create a delightful vegetarian option that’s equally flavorful.
-
Herbaceous Delight: Add a mix of chopped fresh herbs like cilantro or parsley into the filling for an extra burst of color and flavor.
-
Breakfast Shawarma: Why not? Scramble some eggs with shawarma spices and layer them in the wrap for a hearty breakfast option!
Chef’s Notes
This recipe has come a long way since my first attempts in the kitchen. I remember experimenting with various spices until I discovered the perfect balance. One of my most favorite kitchen stories is when I made it for a potluck, and everyone kept coming back for seconds (and thirds). It warmed my heart to see everyone enjoying the food I’ve worked so hard on.
Incorporating seasonal veggies or even trying out different cooking methods, like air frying or baking, has been a fun journey, and I love that this dish is so versatile. No matter how you make it, I can guarantee it will be a hit!
FAQs and Troubleshooting
Q: What can I do if my chicken is dry?
A: Dry chicken can happen if it’s overcooked. Always use a meat thermometer for accuracy, and letting it rest afterward helps keep it juicy!
Q: Can I prepare this wrap in advance?
A: Absolutely! You can marinate the chicken the night before, and the components can be prepped ahead of time. Just assemble right before serving to keep the lavash from getting soggy.
Q: What’s the best way to store leftovers?
A: Place leftover wraps in an airtight container in the fridge. They’ll be good for a couple of days! Reheat gently in a skillet for better texture.
Q: Can I make this low-carb?
A: You bet! Use lettuce leaves as a wrap instead of lavash for a tasty low-carb version!
Nutritional Info
(approximate per wrap)
- Calories: 600
- Protein: 30g
- Fat: 25g
- Carbohydrates: 65g
- Fiber: 4g
- Sugar: 2g
(Note: Nutritional info can vary based on specific ingredient brands and portion sizes.)
Final Thoughts
And there you have it—your very own Chicken Shawarma Wrap! I hope this recipe brings as much joy to your kitchen as it has to mine. Cooking should be a delightful experience—a chance to create and share love through food. So gather your friends and family, dig in, and make memories together over a delicious, homemade shawarma wrap!
Remember, it’s not just about the bites; it’s about the stories you create along the way. Happy cooking, fellow foodies!
Let’s keep the conversation going! What variations will you try in your Chicken Shawarma Wrap? Let me know your thoughts in the comments below!
Print
Chicken Shawarma Wraps
- Total Time: 35 minutes
- Yield: 4 servings 1x
- Diet: Paleo, Gluten-Free Optional
Description
Delicious homemade chicken shawarma wraps filled with marinated chicken, creamy garlic sauce, crunchy pickles, and crispy fries—all wrapped in soft lavash bread.
Ingredients
- 2 lbs Chicken Thighs
- 4 Lavash Bread
- 1/2 cup Garlic Sauce
- 1 cup Sumac Onions
- 1 cup Pickles
- 2 cups Fries
- 2–3 tsp Cumin
- 2 tsp Paprika
- 2 tsp Garlic Powder
- 1/4 cup Olive Oil
- Salt and Pepper to taste
Instructions
- Marinate the Chicken: In a large mixing bowl, combine olive oil, cumin, paprika, garlic powder, salt, and pepper. Add lemon juice and marinate.
- Cook the Chicken: Preheat grill or skillet and cook marinated chicken for 6-7 minutes per side or until cooked through.
- Rest and Slice: Let the chicken rest for 5-10 minutes, then slice into thin strips.
- Assemble the Wrap: Lay lavash bread flat, spread garlic sauce, add sliced chicken, sumac onions, pickles, and fries.
- Roll it Up: Fold the sides over the filling and roll it up tightly.
- Serve: Slice in half and enjoy with extra garlic sauce on the side.
Notes
For a spicier kick, consider adding jalapeños. Excellent served with tabbouleh or a simple salad.
- Prep Time: 15 minutes
- Cook Time: 20 minutes
- Category: Main Course
- Method: Grilling
- Cuisine: Middle Eastern
Nutrition
- Serving Size: 1 wrap
- Calories: 600
- Sugar: 2g
- Sodium: 600mg
- Fat: 25g
- Saturated Fat: 6g
- Unsaturated Fat: 12g
- Trans Fat: 0g
- Carbohydrates: 65g
- Fiber: 4g
- Protein: 30g
- Cholesterol: 80mg
Keywords: chicken shawarma, wrap, Middle Eastern, easy recipe, homemade
Pesto Grilled Cheese
Pesto Grilled Cheese: A Flavor-packed Twist on a Classic Comfort Food
Hey food lovers, welcome back to Feastical! Today, I’m excited to whisk you away on a delicious adventure with one of my favorite comfort foods—Pesto Grilled Cheese. Picture this: two golden slices of perfectly toasted bread, melty cheese that oozes with every bite, and a vibrant pesto that adds a burst of freshness. That’s right; we’re taking the classic grilled cheese to a whole new level!
I’ve always had a soft spot for grilled cheese. Growing up, it was one of those “go-to” meals that my mom would whip up on rainy days alongside a bowl of tomato soup. There was something magical about the way the buttery bread transformed into crispy perfection, and how the cheese would stretch gloriously as I bit into it. Fast forward to now, and while I still savor the original grilled cheese, I’ve become obsessed with elevating it with all the flavors I adore—in this case, pesto.
I’ll never forget the first time I made this delightful twist. I had just returned home from a summer trip to Italy, where I fell in love with their fresh basil pesto sauce. With lingering memories of warm honeyed bread and rustic kitchens, I figured, why not combine these two culinary loves? I grabbed some ingredients and got to work. The result was a masterpiece that not only brought nostalgia to my taste buds but also transformed a simple meal into a gourmet experience. So, are you ready to dive into this cheesy, pesto-filled dream? Grab your spatula, and let’s get cooking!
Personal Story
The inception of my Pesto Grilled Cheese spills from a cherished memory of sunny afternoons spent in my Italian grandmother’s kitchen. I can still recall the delightful aroma of fresh basil wafting through the air, as she chopped herbs effortlessly while chatting about her secret family recipes. That kitchen was the heart of our family—a place for laughter, bonding, and, most importantly, amazing food.
One summer, I was tasked with helping her whip up a batch of basil pesto straight from her garden. As I lovingly crushed the basil and garlic with a mortar and pestle, she regaled me with stories of her childhood in Italy. That pesto made its way to sandwiches, tossed with pasta, and of course, drizzled generously over grilled cheeses. Fast forward to later years, when I found myself craving those flavors while in the comfort of my own kitchen. Inspired by my nonna’s wisdom, I decided to fuse her classic pesto with an all-time favorite. It was a joyful, delicious connection across time, and that’s how my Pesto Grilled Cheese was born!
Ingredients
Let’s gather the stars of the show for our Pesto Grilled Cheese! Here’s what you’ll need:
-
2 slices of bread
Choose your favorite! A hearty sourdough or a classic white works wonderfully, but feel free to experiment. Gluten-free options are also available if needed! -
2 slices of cheese
I love a good sharp cheddar for its rich flavor, but mozzarella adds a lovely stretch. Mix and match! Other great options include gouda or provolone. A dairy-free cheese can work too! -
2 tablespoons pesto
Homemade is amazing, but store-bought works in a pinch. You can also substitute with sun-dried tomato paste or spinach pesto if you’re feeling adventurous! -
Butter (for grilling)
Butter gives that iconic crispy golden crust, but if you’re looking for an alternative, try olive oil or vegan butter for a healthier option. Just remember, the key is to get that sizzle!
Step-by-Step Instructions
Alright, let’s get into the nitty-gritty of how to bring this cheesy delight to life!
-
Prep Work:
Gather all your ingredients and your trusted griddle or skillet. It’s worth cleaning your workspace beforehand to avoid any kitchen chaos. -
Bread it Up:
Take two slices of your chosen bread and place them on a clean surface. Don’t rush this part—be sure you’re selecting the right ones for your dream sandwich! -
Spread the Magic:
Slather a generous tablespoon of pesto on one side of each slice of bread. Ensure it’s evenly spread; this will add intense flavor to every bite. Want extra kick? Add a sprinkle of red pepper flakes for a little heat! -
Add the Cheese:
Place one slice of cheese on top of the pesto side of one of the bread slices. If you’re daring (and I think you should be), stack on another layer of cheese for maximum meltiness. Then, top with the other slice of bread, pesto side down. -
Butter Up:
Now, put that generous, warm pat of butter in the skillet over medium heat. Let it melt until golden and bubbly. You want that beautiful sizzle when you place the sandwich down! -
Get Grilling:
Carefully add your sandwich to the skillet. Cook for about 4 minutes on one side until it turns a toasty brown. Keep an eye out so it doesn’t burn! -
Flip Time:
When that side is golden, carefully flip your sandwich over using a spatula. If you want, add a little more butter around the edges for extra crunch and flavor. -
Perfect Melt:
Cook for another 3-4 minutes or until the cheese is beautifully ooey-gooey and the other side is radiantly golden. Use a lid to cover it during cooking to help the cheese melt faster. -
Serve It Up:
Once it’s just how you like it, remove it from the heat and let it cool momentarily. Slice it in half to reveal that glorious cheesy inside—totally Instagram-worthy!
Serving Suggestions
Presentation matters, right? For serving up your Pesto Grilled Cheese, keep it simple! Plate it on a rustic wooden board for that homey feel. I always love pairing it with a bowl of tomato soup or a light salad—something fresh to balance the richness.
You can add a sprinkle of fresh basil on top for color and flavor, or even a drizzle of balsamic glaze for a surprising tangy touch. And if you’re feeling playful? Try out an open-faced version by topping the grilled cheese with sliced fresh tomatoes or avocado right before serving.
Recipe Variations
The beauty of the Pesto Grilled Cheese is its flexibility! Here are some twists you can try to keep things exciting:
-
Caprese Style: Add slices of ripe tomatoes and fresh mozzarella along with the pesto for a refreshing Caprese touch.
-
Meat Lovers: Layer in some cooked bacon or prosciutto for a savory kick.
-
Veggie Delight: Sauté some spinach or mushrooms ahead of time, then add them in for a nutrient boost.
-
Nutty Flavor: Swap out the traditional cheese for goat cheese for a tangy twist, or even mix in a bit of sliced avocado for creaminess.
-
Spicy Pesto: Create a spicy version of your pesto by mixing in jalapeños or chipotle peppers for a heat-filled delight!
Chef’s Notes
As I revisit this recipe over the years, I’ve enjoyed exploring different flavor profiles and textures. One of the most memorable moments was when I served this dish at a family gathering, and my cousin, who hated vegetables, found himself heading back for seconds. That’s the magic of adding pesto; it transforms everything!
I also love the idea of transforming this dish into a breakfast delight. Think pesto grilled cheese with scrambled eggs and a sprinkle of chili flakes on top—perfect for brunch!
FAQs and Troubleshooting
1. My grilled cheese burnt before the cheese melted, what went wrong?
Ensure you’re using medium heat and keep a close eye on the sandwich. If it’s browning too quickly, lower the heat. Patience is key for that cheesy goodness!
2. What if I don’t have pesto?
No worries! Substitute with a mix of olive oil, garlic, and chopped fresh herbs, or even try any flavorful sauce you have on hand—sun-dried tomato paste works wonders!
3. Can I make this ahead of time?
While grilled cheese is best fresh, you can prepare the ingredients in advance and grill them right before serving.
4. My cheese didn’t melt! What did I do wrong?
Try using cheese that’s known for melting well, like mozzarella or Fontina. A little extra cover while cooking could speed up the melting process, too!
Nutritional Info (per serving)
- Calories: Approximately 400-500 (varies by bread and cheese choice)
- Protein: 18g
- Carbohydrates: 38g
- Fat: 25g
- Fiber: 2g
Remember, feel free to swap ingredients for lower-calorie alternatives, and always load on those veggies to up the nutritional value!
Final Thoughts
And there you have it, my wonderful friends—a gourmet take on the classic grilled cheese that’s sure to warm your soul! Whether you’re enjoying this solo with a good book or serving it up for friends, the Pesto Grilled Cheese will undoubtedly make you smile.
Cooking is about sharing, connecting, and creating memories, and I hope this recipe becomes a new favorite in your kitchen. Keep it simple, keep it delicious, and let that creativity flow! Stay tuned for more fun recipes and kitchen antics right here on Feastical. Until next time, happy cooking! 🧀✨
Print
Pesto Grilled Cheese
- Total Time: 18 minutes
- Yield: 1 serving 1x
- Diet: Vegetarian
Description
A flavor-packed twist on the classic comfort food, featuring melty cheese and vibrant pesto.
Ingredients
- 2 slices of bread
- 2 slices of cheese
- 2 tablespoons pesto
- Butter (for grilling)
Instructions
- Gather all your ingredients and your trusted griddle or skillet.
- Take two slices of your chosen bread and place them on a clean surface.
- Slather a generous tablespoon of pesto on one side of each slice of bread.
- Place one slice of cheese on top of the pesto side of one of the bread slices.
- Put that generous, warm pat of butter in the skillet over medium heat.
- Carefully add your sandwich to the skillet.
- When that side is golden, carefully flip your sandwich over using a spatula.
- Cook for another 3-4 minutes or until the cheese is beautifully ooey-gooey.
- Once it’s just how you like it, remove it from the heat and let it cool momentarily.
- Slice it in half to reveal the glorious cheesy inside.
Notes
Pair with tomato soup or a light salad for a complete meal. Add fresh basil or balsamic glaze for extra flavor.
- Prep Time: 10 minutes
- Cook Time: 8 minutes
- Category: Snack
- Method: Grilling
- Cuisine: Italian
Nutrition
- Serving Size: 1 sandwich
- Calories: 450
- Sugar: 2g
- Sodium: 600mg
- Fat: 25g
- Saturated Fat: 10g
- Unsaturated Fat: 10g
- Trans Fat: 0g
- Carbohydrates: 38g
- Fiber: 2g
- Protein: 18g
- Cholesterol: 30mg
Keywords: grilled cheese, pesto, vegetarian comfort food

Healthy Baked Churro Bites
Healthy Baked Churro Bites: An Irresistible Twist on a Classic Treat
Hey there, food lover! Imagine taking a bite of something warm, sweet, and spiced just right—right? I’m Beau Collier, and today we’re diving into a delightful recipe that will awaken your taste buds and add a sprinkle of joy to your day: Healthy Baked Churro Bites. Now, I know churros might sound like a guilty pleasure reserved for fairs and festivals, but I’m here to break that notion with a healthier, oven-baked version that doesn’t skimp on flavor or fun.
Churros, those crispy, sugary coils of happiness, have been a cherished treat in Spanish and Latin American cultures for generations. The scent of cinnamon wafting through the air as they fry up fresh is enough to make anyone do a little happy dance. However, thanks to our chic little recipe, you can embrace this joy in a healthier way—without guilt!
So, whether you’re gearing up for a cozy movie night, planning a festive gathering, or just whipping up a sweet snack because it’s Tuesday, this recipe is perfect for you! I promise, these bites will have you and your loved ones reaching for a second (or third) helping, minus any of that heavy feeling typical of fried treats. Let’s jump into this scrumptious journey of creating healthy baked churro bites!
A Dash of Nostalgia
Growing up, I was that kid who always wanted dessert before dinner—anyone else guilty of that? My family would frequently visit a charming little café where the churros were legendary. They came coated in cinnamon sugar, and one bite would send me straight to cloud nine. I can still hear the sizzle of the churros as they fried, the warm glow of the sun streaming through the café window, and my family laughing and sharing the treat.
One sunny afternoon, I decided to get a little adventurous. I wanted to replicate that joyous experience in my own kitchen, but with a healthier twist. The last thing I wanted was to feel weighed down from indulging in something I loved. That was the spark that ignited my creativity! I wanted to create churro bites that came together simply and without all the guilt. Fast forward to today, and I can confidently say these little bites capture that childhood joy, plus they’ll keep you feeling light and happy. That’s the kind of food magic I live for!
Ingredients
Here’s what you need to whip up these heavenly bites:
-
1 cup almond flour
A fantastic low-carb option that’s packed with fiber and protein. If you’re looking for a nut-free alternative, you can use sunflower seed flour—just be mindful of the taste difference! -
1/4 cup coconut flour
Offers a mild sweetness and is wonderfully absorbent. Swap with another gluten-free flour like oat flour if coconut isn’t your jam! -
1/4 cup sweetener
Use erythritol for a zero-calorie option, or coconut sugar for a more natural approach. Want more flavor? Brown sugar works beautifully too! -
1 tsp baking powder
A key ingredient for creating those fluffy bites—make sure it’s fresh for the best results! -
1/2 tsp cinnamon
The main spice hero of our churros! You can always amp up the cinnamon for that extra warmth and comfort. -
1/4 tsp salt
Enhances all the flavors; don’t skip it! If you’re watching sodium intake, you can reduce to a pinch. -
2 eggs
They bind everything together and make them oh-so-fluffy. If you’re vegan, replace them with flax eggs (2 tbsp ground flaxseed mixed with 6 tbsp water works like magic). -
1/4 cup melted coconut oil
This will add healthy fats and moisture. Unsalted butter or avocado oil can be substituted for a different flavor. -
1 tsp vanilla extract
A must for a well-rounded flavor. You could also try using almond extract for a unique twist. -
Cinnamon and sweetener mixture for coating
This is where the magic happens! Mix equal parts cinnamon and your sweetener choice. It adds that classic churro finish!
Step-by-Step Instructions
Preheat and Prep
-
Preheat your oven to 350°F (175°C). Getting the oven ready means that by the time your dough is ready, your baking surface is ready too!
-
Prepare a baking sheet. Line it with parchment paper for easy cleanup and to prevent sticking. Your future self will thank you for this!
Mix It Up
-
In a mixing bowl, combine the dry ingredients: almond flour, coconut flour, sweetener, baking powder, cinnamon, and salt. Whisk them together until fully mixed. This step helps all those flavors mingle well and ensures even baking.
-
In a separate bowl, whisk the wet ingredients: eggs, melted coconut oil, and vanilla extract until well combined. Incorporate all those liquid lovelies for a smooth texture.
Combine and Shape
-
Merge the wet and dry mixtures together. Stir until you have a thick dough-like consistency. It’ll be sticky, and that’s okay! You want to aim for a dough that holds together when squeezed.
-
Get your hands slightly wet (this will help with the stickiness), then scoop out a tablespoon of dough and roll it into a small ball. Place them about one inch apart on your prepared baking sheet.
Bake to Perfection
- Bake for 15-18 minutes until they’re golden brown on the edges and tender inside. Keep an eye on them after 15 minutes—oven times may vary. A toothpick inserted into the center should come out clean!
Sweet Coating Time
-
While the churro bites are baking, make your cinnamon-sugar coating by mixing equal parts cinnamon and your sweetener choice in a small bowl.
-
Once they’re out of the oven, let them cool for about 5 minutes, then gently roll them in the cinnamon-sugar mixture while they’re still warm. This will create that irresistible shell we all know and love!
Serving Suggestions
Plate those beautiful churro bites in a fun stack or a little basket. You can add a pinch of extra cinnamon sugar on top for good measure! Serve them with a side of creamy Greek yogurt or a luscious dark chocolate sauce for dipping. Imagine having these mini bites paired with a warm mug of chai or hot cocoa. Talk about a cozy combo!
Recipe Variations
Feeling adventurous? Here are a few ways to switch it up:
-
Chocolate Hazelnut Swirls: Add a spoonful of your favorite chocolate hazelnut spread right in the center before rolling into balls.
-
Coconut Churro Bites: Mix in shredded coconut into the dough for a tropical spin.
-
Nutty Crunch: Add chopped nuts (like pecans or walnuts) into the dough for a delightful crunch.
-
Spiced Churro Delight: Experiment with other spices! A bit of nutmeg or cardamom can lend a warm, unique flavor.
-
Sugar-Free Option: Use a sugar-free chocolate sauce or a drizzle of nut butter instead of the cinnamon-sugar for a different take!
Chef’s Notes
As I developed this recipe, I remembered the joy that churros brought to my family and me. It’s amazing how food can elicit such beautiful memories! Each iteration made me realize that there’s always room for improvement or a new technique to learn. I’ve swapped in different flours, played with spices, and each time, I found something delightful. Don’t be afraid to riff on this recipe—that’s where the real magic lies! Food is a celebration, so have fun with it!
FAQs and Troubleshooting
-
Why did my churro bites flatten?
Make sure you’re using freshly opened baking powder, and avoid overmixing. If the dough is too wet, add a bit more almond flour until the consistency is more dough-like. -
Can I freeze these?
Absolutely! Allow them to cool, then store them in a sealed bag in the freezer. Reheat them for a delicious snack anytime! -
What if they are too dry?
Ensure you’re measuring the flour correctly. Spoon the flour into your measuring cup, and level it off—too much flour can dry them out. -
Can I use a different sweetener?
You can use brown sugar, maple syrup, or honey. Just adjust the measurements, as liquid sweeteners may affect the dough’s consistency.
Nutritional Info
These Healthy Baked Churro Bites come in at roughly:
- Calories: 80-90 per bite
- Fat: 6g (mainly heart-healthy fats from coconut oil and almond flour)
- Carbohydrates: 5g net carbs
- Fiber: 2g
- Protein: 2g
They’re a delightful treat that fits into many dietary preferences while satisfying that sweet tooth!
Final Thoughts
And there you have it, friends! Healthy Baked Churro Bites that are easy to whip up, delicious, and full of stories waiting to be created at your dinner table. Food is all about connection—bringing people together, telling stories, and spreading joy through every bite. So, whether you’re indulging for breakfast, dessert, or a delightful snack, remember that good food doesn’t have to be complicated or heavy.
Try these out for your next gathering or, better yet, make them just for yourself! I promise they’ll warm your heart and home. Until next time, grab your spatula and let’s keep creating wholesome kitchen magic together! Happy cooking!
Print
Healthy Baked Churro Bites
- Total Time: 28 minutes
- Yield: 12 servings 1x
- Diet: Gluten-Free
Description
Delicious and guilt-free baked churro bites that capture the joy of a classic treat without the heaviness of frying.
Ingredients
- 1 cup almond flour
- 1/4 cup coconut flour
- 1/4 cup sweetener (erythritol or coconut sugar)
- 1 tsp baking powder
- 1/2 tsp cinnamon
- 1/4 tsp salt
- 2 eggs
- 1/4 cup melted coconut oil
- 1 tsp vanilla extract
- Cinnamon and sweetener mixture for coating
Instructions
- Preheat your oven to 350°F (175°C).
- Prepare a baking sheet lined with parchment paper.
- Combine the dry ingredients in a mixing bowl: almond flour, coconut flour, sweetener, baking powder, cinnamon, and salt.
- Whisk the wet ingredients: eggs, melted coconut oil, and vanilla extract until well combined.
- Merge the wet and dry mixtures together until you have a thick dough-like consistency.
- Wet your hands slightly, then scoop out a tablespoon of dough and roll it into a small ball.
- Place the dough balls about one inch apart on your prepared baking sheet.
- Bake for 15-18 minutes until golden brown on the edges.
- Mix equal parts cinnamon and your sweetener choice in a small bowl for coating.
- Once out of the oven, let cool for 5 minutes, then roll in the cinnamon-sugar mixture.
Notes
These bites are great served with Greek yogurt or dark chocolate sauce for dipping.
- Prep Time: 10 minutes
- Cook Time: 18 minutes
- Category: Dessert
- Method: Baking
- Cuisine: Spanish
Nutrition
- Serving Size: 1 bite
- Calories: 85
- Sugar: 2g
- Sodium: 100mg
- Fat: 6g
- Saturated Fat: 5g
- Unsaturated Fat: 1g
- Trans Fat: 0g
- Carbohydrates: 7g
- Fiber: 2g
- Protein: 2g
- Cholesterol: 30mg
Keywords: baked churros, healthy dessert, gluten-free, snack recipes

High-Protein Honey Garlic Shrimp
High-Protein Honey Garlic Shrimp: A Sweet and Savory Delight
Introduction: A Flavorful Journey
Hey there, food lovers! Welcome back to Feastical, where we whip up feel-good food and sprinkle in a little magic from the stories behind our favorite dishes. Today, we’re diving into a recipe that’s not just delicious but is also packed with protein to fuel your day—High-Protein Honey Garlic Shrimp!
If you’ve ever savored the tangy kiss of honey meeting the bold punch of garlic, then you already know that this dish is going to be a real crowd-pleaser. It’s perfect for those weeknight dinners when you want to impress without spending hours slaving away in the kitchen. Whether you’re cooking for family or just treating yourself to a well-deserved feast, this dish has you covered.
Now, I have to tell you that honey garlic shrimp has a special place in my heart. It reminds me of warm summer evenings spent on the patio with friends, laughter blending with the sizzle of shrimp hitting the hot grill. The smell of garlic filling the air, enticing everyone to flock to the table—it was pure magic. So grab your apron, because we’re about to recreate that magic together right in your kitchen!
Personal Story: A Sweet Memory
I still remember the first time I tried this dish. It was after a long day filled with ups and downs—I had just finished college and was finally finding my footing in the world. My buddies and I decided to throw a mini-celebration at my place, and I wanted to impress everyone with a delightful meal. One of my favorite meals growing up was my grandmother’s garlic shrimp, so I had a sudden burst of inspiration to give it a sweet twist.
With a whirl of creativity, honey was my secret ingredient. I remember feeling so nervous as I served it up, but as soon as the first bite hit their taste buds, the smiles were priceless! The notes of sweetness mixed with garlic danced joyfully on everyone’s palate. That night was filled with laughter, toasts, and the unforgettable taste of honey garlic shrimp. It made me realize that food has a unique way of bringing people together, creating memories that last far beyond the final bite. Now, I want to share that experience with you, one sweet and savory spoonful at a time!
Ingredients
To whip up this delightful dish, you’ll need the following ingredients:
-
1 pound shrimp, deveined and peeled
Chef Insight: Look for fresh shrimp with a firm texture and a pleasant ocean scent. If you’re feeling adventurous, try swapping shrimp for scallops or chicken for a different protein twist! -
1/4 cup honey
Substitution Tip: If you’re feeling like experimenting, you can use maple syrup or agave nectar for a vegan alternative that still brings that sweetness. -
1/4 cup soy sauce
Chef Insight: For a healthier version, use low-sodium soy sauce. If gluten is an issue, feel free to substitute with tamari sauce. -
3 cloves garlic, minced
Tip: Fresh garlic gives a vibrant flavor, but if you’re in a pinch, jarred minced garlic will work too—though keep in mind the taste won’t be as bold. -
2 tablespoons olive oil
Substitution Tip: For a hint of smokiness, use sesame oil instead. -
1 tablespoon cornstarch
Chef Insight: This is your thickening agent. For a gluten-free alternative, try arrowroot powder! -
Salt and pepper to taste
Tip: Adjust according to your preference. Freshly ground black pepper adds a wonderful kick! -
Steamed rice or vegetables, for serving
Suggestion: Cauliflower rice is a fantastic low-carb alternative if you’re watching those carbs!
Step-by-Step Instructions
-
Prep the Shrimp
Start with your shrimp! Make sure they are deveined and peeled because no one wants to wrestle with shells while trying to enjoy a delicious meal. Rinse them under cold water and pat them dry with a paper towel to ensure they get that lovely sear. -
Make the Marinade
In a bowl, combine honey, soy sauce, minced garlic, and olive oil. Give it a good whisk until fully blended. This marinade is your golden ticket to flavor town! You can even add a pinch of red pepper flakes if you like a little heat. -
Marinate the Shrimp
Toss the shrimp in the marinade and let them soak up all that beautiful flavor for about 15 to 30 minutes. If you’re short on time, even a 10-minute soak will do wonders. Just don’t forget to save a tablespoon or two of the marinade for later! -
Heat it Up
In a skillet, heat your olive oil over medium-high heat. Once the oil is shimmering (but not smoking!), it’s go time. Carefully add the shrimp to the pan in a single layer. Cook them for about 2-3 minutes on each side until they turn a lovely pink and opaque. Make sure not to overcrowd the pan—cook in batches if necessary. -
Thicken the Sauce
After the shrimp are cooked, pour the reserved marinade into the skillet. Stir in the cornstarch mixed with a teaspoon of water to form a slurry. This will make the sauce glossy and thick! Cook for an additional 1-2 minutes until the sauce beautifully coats the shrimp. -
Taste & Adjust
Give the shrimp a taste! If it needs a little more salt or pepper, now’s the time to adjust. Once everything is sizzling and fragrant, it’s time to plate up!
Serving Suggestions
Now that you’ve got your honey garlic shrimp ready to shine, let’s talk about how to serve it up! I love placing a generous scoop of fluffy steamed rice on one side of the plate. This rice will soak up all that delicious sauce, so don’t be shy!
Next, artfully arrange your honey garlic shrimp on top or beside the rice. Drizzle some of that luscious sauce over the shrimp to make it look irresistibly glossy. For an extra pop of color and crunch, garnish with chopped green onions or sesame seeds! It provides a beautiful contrast and doubles as a taste enhancer. Serve it alongside a vibrant array of steamed vegetables—broccoli, snap peas, or carrots work wonders here. Your plate will look like a work of culinary art!
Recipe Variations
Ready to give this dish a creative twist? Here are some variations to try that will keep your taste buds dancing:
-
Spicy Honey Garlic Shrimp: Add a cup of diced pineapple or a tablespoon of Sriracha for a tangy and spicy kick.
-
Coconut Honey Shrimp: Incorporate a tablespoon of coconut milk into the marinade for a tropical flair that will whisk you away to a sunny beach.
-
Lemon Garlic Shrimp: Substitute some of the honey with fresh lemon juice for a refreshing citrus burst.
-
Honey Ginger Shrimp: Add grated ginger into the marinade to give it a zesty and aromatic flair.
-
Herb Infused Shrimp: Fresh herbs like cilantro or parsley can be tossed over the dish at the finish for a fresh garden note.
Chef’s Notes
Over the years, this recipe has become a staple in my kitchen. I’ve seen how it adapts to any occasion—from busy weeknights to fancy dinner parties. One of my funniest kitchen mishaps while experimenting involved too much honey—let’s just say it’s not an excellent substitute for soy sauce when you’re trying to create balance!
With this recipe, I’ve learned to embrace the cooking process, and no dish is perfect every time. So make it your own! I encourage you to explore and trust your instincts. The kitchen is all about creativity and comfort—chase those good vibes!
FAQs and Troubleshooting
-
What if my shrimp are rubbery?
Rubberiness usually means the shrimp have been overcooked. Cooking shrimp until they’re just opaque and pink makes all the difference! -
Can I use frozen shrimp?
Absolutely! Just make sure to thaw them properly before cooking. Place frozen shrimp in the refrigerator overnight or soak them in cold water for quicker thawing. -
Why is my sauce too runny?
If your sauce isn’t thickening, ensure you’ve added the cornstarch slurry and cooked it long enough to thicken. Let it simmer for a few minutes after adding the slurry. -
Can I make this ahead of time?
While it’s always best fresh, you can marinate the shrimp a few hours in advance! Just cook right before serving for optimal flavor.
Nutritional Info
This high-protein honey garlic shrimp dish is not only delicious but also nutritious! Here’s a quick breakdown of what you’re getting per serving (about 4 servings):
- Calories: 250
- Protein: 22g
- Carbohydrates: 20g
- Fats: 10g
- Fiber: 1g
It’s packed with lean protein from the shrimp, and with the addition of steamed rice or vegetables, you’re getting a wholesome meal that’s balanced and satisfying.
Final Thoughts
Cooking doesn’t have to feel overwhelming or complicated. Remember, it’s about experimenting and enjoying the journey just as much as the destination. High-Protein Honey Garlic Shrimp is not just an easy weeknight meal; it’s a heartwarming dish that can transform any gathering into a magical experience filled with laughter and connection.
So whether you’re whipping it up for yourself or inviting friends over for a dinner party, you can create treasured moments around the table. Don’t forget to share your creations on social media and tag #Feastical!
I can’t wait to hear how your honey garlic shrimp turns out. Happy cooking, and remember: every dish has a story. Let’s keep telling those delicious tales, one recipe at a time. Cheers! 🥂🍤✨
Print
High-Protein Honey Garlic Shrimp
- Total Time: 25 minutes
- Yield: 4 servings 1x
- Diet: Pescatarian
Description
A sweet and savory honey garlic shrimp dish that’s high in protein and perfect for weeknight dinners.
Ingredients
- 1 pound shrimp, deveined and peeled
- 1/4 cup honey
- 1/4 cup soy sauce
- 3 cloves garlic, minced
- 2 tablespoons olive oil
- 1 tablespoon cornstarch
- Salt and pepper to taste
- Steamed rice or vegetables, for serving
Instructions
- Start with your shrimp! Make sure they are deveined and peeled.
- In a bowl, combine honey, soy sauce, minced garlic, and olive oil.
- Toss the shrimp in the marinade and let them soak for 15 to 30 minutes.
- In a skillet, heat your olive oil over medium-high heat.
- Carefully add the shrimp to the pan and cook for about 2-3 minutes on each side.
- After the shrimp are cooked, pour the reserved marinade into the skillet.
- Stir in the cornstarch mixed with a teaspoon of water to form a slurry.
- Give the shrimp a taste and adjust seasoning if needed.
- Now that you’ve got your honey garlic shrimp ready, plate it beautifully!
Notes
This recipe can be adapted with different proteins like scallops or chicken. You can experiment with various marinades as well.
- Prep Time: 15 minutes
- Cook Time: 10 minutes
- Category: Main Course
- Method: Sautéing
- Cuisine: Asian
Nutrition
- Serving Size: 1 serving
- Calories: 250
- Sugar: 22g
- Sodium: 500mg
- Fat: 10g
- Saturated Fat: 1g
- Unsaturated Fat: 4g
- Trans Fat: 0g
- Carbohydrates: 20g
- Fiber: 1g
- Protein: 22g
- Cholesterol: 150mg
Keywords: shrimp, high-protein, honey garlic, easy dinner, Asian cuisine