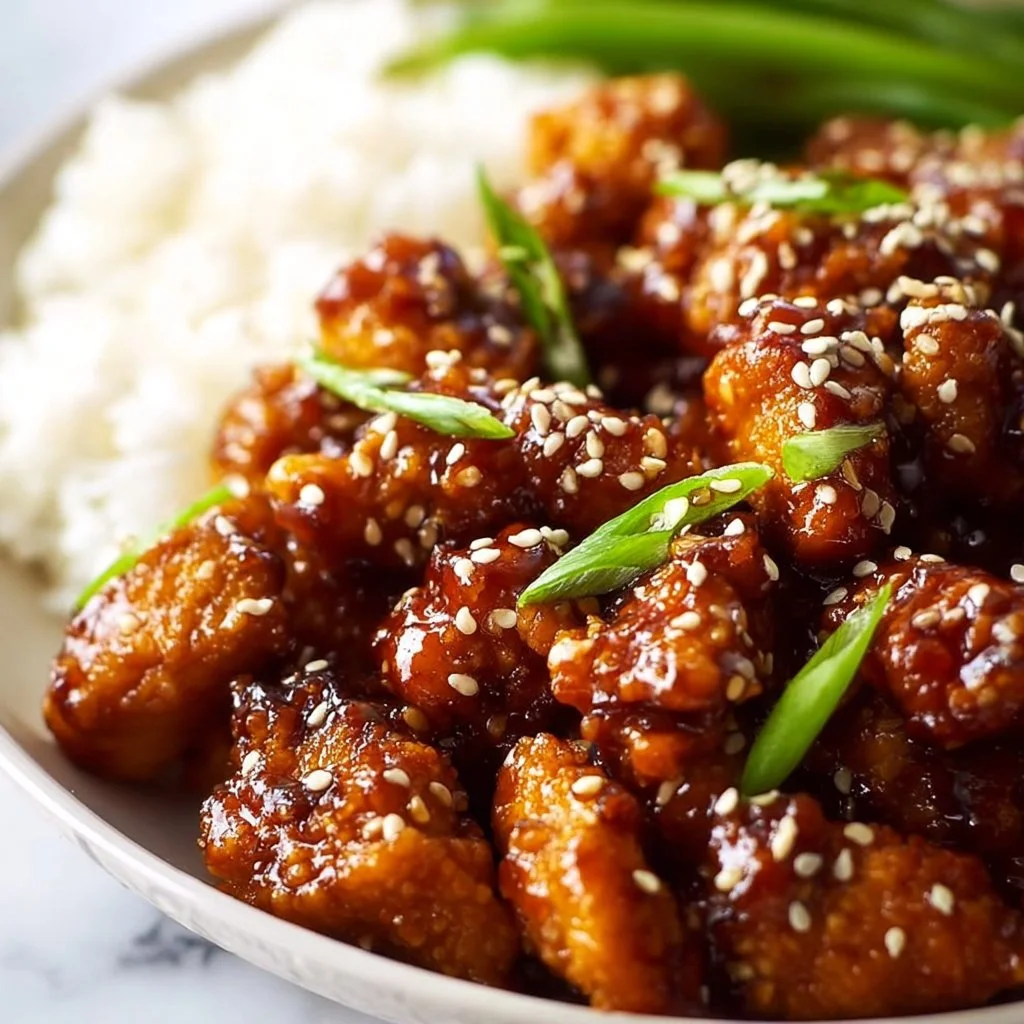
Easy High Protein Sesame Chicken
Easy High Protein Sesame Chicken: A Comfort Dish for Every Home Cook
Hey, food lovers! It’s Beau Collier here, and today, we’re diving into a dish that’s not just a meal but a whole experience: Easy High Protein Sesame Chicken! I’m telling you, this dish is about to become your new go-to for any weeknight dinner, or even those cozy weekends when you just want to whip up something that feels both fancy and comforting.
Picture this: golden, juicy chunks of chicken coated in a sweet and savory sesame sauce, sprinkled with nutty sesame seeds, and topped with vibrant green onions. It’s simple, it’s soul-satisfying, and it’s packed with protein too—perfect for fueling your day and keeping those taste buds happy.
One of my favorite kitchen memories revolves around a similar dish that my mother used to make. We’d gather around the dinner table after a busy day, and as the aromas wafted in from the kitchen, you could feel the warmth of home and togetherness just radiating through the air. There was always laughter, the clinking of forks against plates, and of course, second servings for those who managed to snag extra. That’s the magic of comfort food, isn’t it? It nurtures not only the body but also the soul.
So let’s roll up those sleeves and get ready to create a dish that’s as easy on the eyes as it is delicious on the palate. Whether you’re cooking for yourself, your family, or even sharing a meal with friends, this sesame chicken is bound to bring everyone together.
Personal Story
I remember the first time I tried a dish resembling this Sesame Chicken. I was in college, living off campus in a little apartment with some friends. We were broke but eager to experiment in the kitchen. One night, one of my buddies suggested we try making a stir-fry, and while we were scrambling to find a recipe, we stumbled upon a sesame chicken dish online. We didn’t have all the ingredients, but we made do with what we had, adding our own twists.
The kitchen was a whirlwind of laughter, failed attempts at tossing stir-fry without accidentally launching half of it onto the floor, and, surprisingly, a dish that tasted just like the takeout we used to have. From that night, I not only gained a love for cooking but also realized the joy of creating something delicious with friends. This High Protein Sesame Chicken is my tribute to those carefree days and the beautiful memories created over shared meals.
Ingredients
Here’s what you’re going to need to bring this beautiful dish to life.
-
1 lb chicken breast, diced
The star of our dish! Chicken breast is high in protein and cooks quickly. If you’re looking for a swap, boneless thighs can add a little more juiciness. -
2 tablespoons sesame oil
This oil adds a rich, nutty flavor that’s essential for authentic sesame chicken. If you’re out of sesame oil, a light olive oil can work in a pinch, but you’ll miss that distinct sesame taste! -
2 tablespoons soy sauce
It provides a savory punch and depth to our sauce. Tamari is a great gluten-free alternative if needed. -
2 tablespoons honey or maple syrup
This gives our dish a touch of sweetness. For a lower-calorie swap, consider using agave nectar or even a sugar-free syrup. -
2 cloves garlic, minced
The aromatic ingredient that brings everything together. Fresh is best, but you can use jarred minced garlic if you’re in a hurry. -
1 teaspoon ginger, grated
Adds a wonderful zing! If you’re not a fan, you can always skip it, but it does elevate the flavor profile. -
2 tablespoons sesame seeds
They’re not just for garnish; they add a fantastic crunch. If you can’t find sesame seeds, try using crushed peanuts or sunflower seeds. -
3 green onions, sliced
These add freshness and a pop of color. If you don’t have green onions, regular onions can do the trick, though they won’t provide the same milder flavor. -
Salt and pepper to taste
Essential for seasoning. I like to keep it simple, but feel free to add your favorite herbs or spices! -
Cooked rice or quinoa for serving
This is what you’ll dish up with your sesame chicken. Both options are great—they’ll soak up that luscious sauce.
Step-by-Step Instructions
Now, let’s get cooking! Grab your ingredients and let’s dive into these easy-peasy steps.
-
Prep Your Chicken:
Start by dicing your chicken breast into bite-sized pieces. Not too big or too small—think about the size of a decent bite. This ensures even cooking. Don’t forget to season with a sprinkle of salt and pepper.Chef Tip: Allow the chicken to come to room temperature before cooking. This helps it cook evenly and prevents dryness.
-
Heat the Sesame Oil:
In a large skillet or wok, heat up the sesame oil over medium-high heat. You want to see a little shimmer—this means it’s hot and ready for action.Chef Insight: The oil gives a nice toasty flavor. Just be careful not to let it smoke; that means it’s too hot!
-
Cook the Chicken:
Add the diced chicken to the skillet in a single layer. Let it cook undisturbed for about 3-4 minutes until it’s golden brown on one side. Flip it over and cook for an additional 3-4 minutes until it’s cooked through.Pro Tip: Don’t overcrowd the pan; cook in batches if needed to ensure it gets that nice sear.
-
Add Garlic and Ginger:
Once your chicken is just about done, toss in the minced garlic and grated ginger. Stir for about 30 seconds until fragrant—this is going to smell amazing! -
Create the Sauce:
Now, pour in the soy sauce and honey (or maple syrup). Stir everything together to coat the chicken. Allow it to simmer for about 2-3 minutes. This lets the flavors meld and the sauce thicken slightly.Sweet Note: If you prefer a thicker sauce, feel free to mix a teaspoon of cornstarch with a tablespoon of water and add it to the pan. Stir until thickened.
-
Toss in Sesame Seeds:
At the last moment, throw in the sesame seeds, giving it a good mix. This adds a delightful crunch! -
Finishing Touches:
Remove from heat and garnish with sliced green onions. If you want, you can also drizzle a little extra sesame oil on top for an added punch. -
Serve:
Plate your sesame chicken over a bed of warm rice or quinoa. Be generous with the sauce—the more, the merrier!
Serving Suggestions
Now that you’ve got your beautiful dish ready, let’s talk about how to serve it up. Presentation matters!
-
Plate It Right: For that restaurant feel, mound the rice or quinoa in the center of the plate and spoon the sesame chicken around it. This creates a gorgeous visual contrast.
-
Garnish: Sprinkle a few extra sesame seeds and green onions on top for that fresh look.
-
Add Color: Consider serving a side of steamed broccoli or snap peas for a vibrant dose of color and nutrition.
-
Family Style: If you’re serving a group, consider putting everything in the middle of the table with serving spoons. Let everyone dig in! It invites sharing and conversation.
Recipe Variations
Alright, my creative chefs, let’s switch it up! Here are a few fun variations to keep things exciting:
-
Spicy Sesame Chicken: Add some red pepper flakes or a dash of sriracha to your sauce for a fiery kick.
-
Teriyaki Twist: Swap the honey for teriyaki sauce for a different flavor profile—but be careful with saltiness!
-
Vegetarian Option: Use tofu cubes or chickpeas instead of chicken for a plant-based take that’s still high in protein.
-
Nutty Addition: Toss in some chopped peanuts when plating for an extra crunch and flavor.
-
Sesame Chicken Salad: Serve chilled sesame chicken on a bed of mixed greens, drizzling it with a light vinaigrette for a refreshing summer meal.
Chef’s Notes
Cooking is all about experimentation and evolution! When I first started prepping this recipe, it was all about the store-bought sauces. Over time, I’ve learned to adjust the ingredients, adding fresh garlic, ginger, and real honey for those homemade flavors that make your dishes stand out.
One funny kitchen memory—once, in my eagerness to impress friends, I accidentally used twice the amount of ginger. The result? Let’s just say it was a memorable night, and I’ve been known as the “Ginger King” ever since. Remember, cooking is a journey, so embrace any hiccups along the way!
FAQs and Troubleshooting
-
The Chicken Is Dry! What Did I Do?
Dry chicken usually comes from overcooking. Always check for doneness and consider using a meat thermometer (165°F is perfect). -
Why Is My Sauce Too Salty?
This can happen if the soy sauce is too concentrated. Next time, try using low-sodium soy sauce or mix in a bit of water to dilute it. -
What If I Don’t Have Sesame Oil?
You can substitute with light olive oil, but do try to get sesame oil soon! That flavor is key to this dish’s success. -
Can I Use Frozen Chicken?
While fresh is best for even cooking, you can use frozen chicken. Just remember to thaw it completely before starting!
Nutritional Info
With this Easy High Protein Sesame Chicken, you’re not just treating your taste buds but also benefiting your body. Here’s a quick nutritional breakdown (based on standard ingredients):
- Calories: Approximately 400 per serving (with rice or quinoa)
- Protein: Around 30 grams
- Carbohydrates: Roughly 50 grams
- Fats: 12 grams (mainly from sesame oil)
- Fiber: 2-3 grams
This dish provides a great balance of protein, healthy fats, and carbs, making it a perfect post-workout meal or an energizing dinner.
Final Thoughts
There you have it—your very own Easy High Protein Sesame Chicken! This recipe is a tribute to the meals that bring us together and warm our hearts. Whether you’re cooking for yourself, family, or friends, I encourage you to enjoy the process and savor each bite along the way.
Remember, the kitchen is a playground! Feel free to experiment with flavors, share your creations, and above all, make it your own. I can’t wait to hear how you put your spin on this dish, so be sure to share your stories and pictures! Until next time, happy cooking and keep spreading those positive vibes through your delicious meals. Let’s dig in!
Print
Easy High Protein Sesame Chicken
- Total Time: 30 minutes
- Yield: 4 servings 1x
- Diet: High Protein
Description
A comforting dish of golden, juicy chicken coated in a sweet and savory sesame sauce, topped with sesame seeds and green onions—perfect for fueling your day.
Ingredients
- 1 lb chicken breast, diced
- 2 tablespoons sesame oil
- 2 tablespoons soy sauce
- 2 tablespoons honey or maple syrup
- 2 cloves garlic, minced
- 1 teaspoon ginger, grated
- 2 tablespoons sesame seeds
- 3 green onions, sliced
- Salt and pepper to taste
- Cooked rice or quinoa for serving
Instructions
- Prep your chicken: Dice chicken breast into bite-sized pieces and season with salt and pepper.
- Heat the sesame oil in a skillet over medium-high heat until shimmering.
- Cook the chicken in a single layer for 3-4 minutes until golden, then flip and cook another 3-4 minutes until fully cooked.
- Add the minced garlic and grated ginger, stirring for about 30 seconds until fragrant.
- Create the sauce by pouring in the soy sauce and honey, stirring to coat and simmering for 2-3 minutes.
- Toss in sesame seeds for crunch.
- Finishing touches include removing from heat and garnishing with green onions and optional sesame oil.
- Serve over warm rice or quinoa, generously saucing as desired.
Notes
Allow chicken to come to room temperature before cooking for even results. Consider serving with steamed vegetables for extra color and nutrition.
- Prep Time: 15 minutes
- Cook Time: 15 minutes
- Category: Main Course
- Method: Stir-frying
- Cuisine: Asian
Nutrition
- Serving Size: 1 serving
- Calories: 400
- Sugar: 10g
- Sodium: 800mg
- Fat: 12g
- Saturated Fat: 2g
- Unsaturated Fat: 10g
- Trans Fat: 0g
- Carbohydrates: 50g
- Fiber: 3g
- Protein: 30g
- Cholesterol: 80mg
Keywords: chicken, sesame chicken, high protein, quick dinner, comfort food

High Protein Honey BBQ Chicken Mac & Cheese Meal Prep
High Protein Honey BBQ Chicken Mac & Cheese Meal Prep: A Deliciously Cozy Dish
Hey there, food lovers! It’s your favorite kitchen companion, Beau Collier, and today we’re diving into a comfort food classic with a healthy twist—High Protein Honey BBQ Chicken Mac & Cheese! Now, if you’re like me, the thought of gooey cheese enveloping perfectly cooked pasta sparks joy like nothing else. Add in some savory chicken and a hint of sweetness from honey BBQ sauce, and you’ve got yourself a dish that not only ticks all the boxes for comfort and flavor but is also packed with protein to fuel your day.
As life gets busier and we find ourselves juggling work, family, and everything in between, meal prep has become our culinary secret weapon. This dish is not just a mouthwatering meal; it’s a smart and deliberate way to ensure that you’re eating right while making your life just a tad easier. With this recipe, you can whip up a week’s worth of lunches or dinners in one appliance—your trusty oven, stovetop, or slow cooker. So, grab your spatula and let’s get cooking!
And I promise you, this isn’t just any mac and cheese. This is a love letter to the classic family favorite, elevated with the goodness of chicken and delightful honey BBQ flavors. Whether you’re meal prepping for the week or just treating yourself after a long day, this dish is all about that warm hug you get from good food. Let’s dig in!
Personal Story
I’ll never forget the first time I made mac and cheese for my family. I was just a wide-eyed kid standing on a stool to reach the stove, decked out in my superhero apron. My mission? To recreate the cheesy magic my mom always had up her sleeve. I grabbed elbow macaroni, a couple of blocks of cheese, and way too much milk. You can guess how well that went!
Fast forward to my teenage years, and I started getting creative in the kitchen. One experimental week, I decided to add BBQ chicken, thinking, “Why not?” and it was a hit! My family devoured it, and I couldn’t believe how something as simple as mac and cheese could be so versatile. That day sparked a love for combining flavors that drove me to create the delightful, health-conscious version I’m sharing with you today. Fast forward to now, and here I am, ready to share this powerhouse dish that packs the nostalgia of childhood with the nutrition we crave as adults.
Ingredients
Here’s what you’ll need for this High Protein Honey BBQ Chicken Mac & Cheese:
-
2 cups macaroni
- Chef Insight: Macaroni is the classic choice, but feel free to swap it for whole grain or gluten-free pasta for a health boost or dietary needs.
-
1 pound chicken breast, cooked and shredded
- Substitution Tips: If you’re short on time, rotisserie chicken or canned chicken will work perfectly. Just make sure to shred it for that perfect blend with the macaroni.
-
1 cup low-fat cheese
- Quick Note: Cheddar cheese is my go-to for that classic flavor, but you can also mix it up with mozzarella or gouda for a unique twist!
-
1/2 cup BBQ sauce
- Chef’s Insight: I love a tangy sauce! If you’re looking for a different flavor profile, experiment with honey mustard or hot sauce for a kick!
-
1 tablespoon honey
- Substitution Tips: If you’re feeling adventurous, try maple syrup or agave for a different sweetness!
-
1 cup milk
- Quick Note: Almond milk or any milk alternative can replace dairy milk while maintaining creaminess.
-
Salt and pepper to taste
- Chef Insight: Always season your pasta water; it makes a world of difference in flavor!
-
Optional toppings:
- Green onions: For a fresh crunch and color.
- Extra cheese: Because who doesn’t love more cheese?
Step-by-Step Instructions
Step 1: Cook the Macaroni
Bring a large pot of salted water to a boil. Add your macaroni and cook until al dente, about 8 minutes. Chef Tip: Reserve a cup of pasta water before draining! This liquid will help create a beautiful sauce later on.
Step 2: Prepare the Chicken
While your pasta is cooking, shred your cooked chicken breast. You can do this easily with two forks or in a stand mixer—just make sure it’s all nicely shredded to mix well with the mac and cheese later. If you’re using a store-bought option, simply measure out your portion.
Step 3: Create the Sauce
In a medium saucepan over medium heat, combine the BBQ sauce, honey, and milk. Stir gently until everything is well combined and heated through. Little Chef Hack: If you want to thicken your sauce a bit, add a small cornstarch slurry (mix a tablespoon of cornstarch with a tablespoon of water) and stir until it thickens.
Step 4: Combine Everything
In a large mixing bowl, combine the drained macaroni, shredded chicken, and the luscious BBQ sauce mixture. Add in your cheese and mix everything until well coated. If your mixture seems a bit dry, don’t hesitate to add a splash of the reserved pasta water to achieve your desired creaminess.
Step 5: Bake (Optional)
Transfer your mixture to a baking dish, top with extra cheese, and bake at 350°F (175°C) for about 20 minutes, or until bubbly and golden brown. If you like a little crust, broil it for the last minute or two. Just keep an eye on it so it doesn’t burn!
Step 6: Serve and Enjoy!
Once your mac and cheese is out of the oven, let it sit for about 5 minutes. This will help the flavors meld together and make serving a breeze. Top with optional green onions or extra cheese for a delightful finishing touch before diving in!
Serving Suggestions
There are a million ways to enjoy this High Protein Honey BBQ Chicken Mac & Cheese! Serve it in a cozy bowl, garnished with green onions for a pop of color. Pair it with a fresh green salad to balance the richness, or why not throw in some steamed veggies on the side? For casual dinners, serving it in a deep dish with some crusty bread on the side makes for the perfect family feast.
If you’re meal prepping, portion it out in airtight containers for easy grab-and-go meals throughout the week. Just reheat in the microwave for a delightful lunch that makes your coworkers envious!
Recipe Variations
-
Buffalo Chicken Mac: Swap in buffalo sauce for the BBQ sauce for a spicy kick. Add a dollop of blue cheese dressing on top!
-
Vegetarian Delight: Replace chicken with roasted vegetables or protein-rich chickpeas for a vegetarian option without losing flavor.
-
Cheesy Broccoli Mac: Stir in steamed broccoli florets for an extra serving of greens, plus they add a nice crunch.
-
Tex-Mex Twist: Incorporate black beans, corn, and a sprinkle of taco seasoning for a southwest flair.
-
Pesto Bliss: Instead of BBQ sauce, mix in your favorite pesto for an Italian-inspired comfort dish.
Chef’s Notes
As with all my recipes, this one has evolved over time. I originally created it without any thought of the high protein aspect, focusing solely on comfort food. But as I started meal prepping for an active lifestyle, the need to include solid proteins became evident. It’s been a joy finding ways to enjoy classic favorites while staying true to nutritional goals. I still remember that first bite, sharing it with my family, and knowing we all found joy in the flavors. Cooking has a funny way of taking you back, doesn’t it?
FAQs and Troubleshooting
1. My mac and cheese turned out too dry. What happened?
If your dish is dry, it may be due to not enough liquid in your sauce mixture. Try adding a bit more milk or reserved pasta water next time.
2. Can I freeze leftovers?
Absolutely! This dish freezes well. Just store it in an airtight container and reheat thoroughly when you’re ready to enjoy it again.
3. How can I make it spicier?
For an added kick, toss in some diced jalapeños or a spicy BBQ sauce.
4. What if I don’t have BBQ sauce?
You can use any sauce of your choice, like teriyaki for a sweet Asian twist or even just plain tomato sauce in a pinch!
Nutritional Info
While I’m not a nutritionist, I like to think about how the ingredients come together for a wholesome meal. This High Protein Honey BBQ Chicken Mac & Cheese is loaded with lean chicken breast and a decent amount of cheese, giving you about 25g of protein per serving. Coupled with the fiber from macaroni and any veggies you throw in, this meal offers a satisfying blend of macronutrients to keep you full and energized.
Each serving generally contains:
- Calories: 450-500
- Protein: ~25g
- Carbohydrates: ~50g
- Fat: ~15-20g
Of course, numbers can vary based on ingredients and measurements, but isn’t the focus on balance rather than perfection?
Final Thoughts
Cooking is an adventure, and I hope this High Protein Honey BBQ Chicken Mac & Cheese becomes one of your go-to recipes! With its rich flavors and comforting nature, this dish embodies everything I love about food—family, togetherness, and that magical ability to make us feel at home, no matter where we are. I can’t wait for you to try it out and hear how it turns out! Whether you’re savoring it on a busy weekday, indulging in it during a cozy movie night, or prepping it for your week ahead, remember: good food should always bring a smile. So let’s keep cooking, experimenting, and sharing the love of food with one another. Happy eating!
Print
High Protein Honey BBQ Chicken Mac & Cheese
- Total Time: 45 minutes
- Yield: 4 servings 1x
- Diet: High Protein
Description
A comfort food classic elevated with protein-packed chicken and delicious honey BBQ flavors, perfect for meal prep.
Ingredients
- 2 cups macaroni
- 1 pound chicken breast, cooked and shredded
- 1 cup low-fat cheese
- 1/2 cup BBQ sauce
- 1 tablespoon honey
- 1 cup milk
- Salt and pepper to taste
- Optional toppings: Green onions, Extra cheese
Instructions
- Cook the macaroni by bringing a large pot of salted water to a boil, adding macaroni, and cooking until al dente, about 8 minutes.
- Prepare the chicken by shredding the cooked chicken breast with two forks or in a stand mixer.
- Create the sauce by combining the BBQ sauce, honey, and milk in a medium saucepan over medium heat, stirring until heated through.
- Combine everything by mixing the drained macaroni, shredded chicken, BBQ sauce mixture, and cheese in a large bowl until well coated.
- Transfer the mixture to a baking dish, top with extra cheese, and bake at 350°F (175°C) for about 20 minutes until bubbly.
- Serve and enjoy! Let it sit for about 5 minutes, then top with green onions or extra cheese if desired.
Notes
Feel free to swap the macaroni for whole grain or gluten-free pasta. For a spicy kick, substitute BBQ sauce with buffalo sauce.
- Prep Time: 15 minutes
- Cook Time: 30 minutes
- Category: Main Course
- Method: Baking
- Cuisine: American
Nutrition
- Serving Size: 1 serving
- Calories: 450
- Sugar: 10g
- Sodium: 600mg
- Fat: 18g
- Saturated Fat: 8g
- Unsaturated Fat: 8g
- Trans Fat: 0g
- Carbohydrates: 52g
- Fiber: 2g
- Protein: 25g
- Cholesterol: 60mg
Keywords: mac and cheese, meal prep, chicken, BBQ, comfort food

High-Protein Honey Garlic Shrimp
High-Protein Honey Garlic Shrimp: A Sweet and Savory Delight
Introduction: A Flavorful Journey
Hey there, food lovers! Welcome back to Feastical, where we whip up feel-good food and sprinkle in a little magic from the stories behind our favorite dishes. Today, we’re diving into a recipe that’s not just delicious but is also packed with protein to fuel your day—High-Protein Honey Garlic Shrimp!
If you’ve ever savored the tangy kiss of honey meeting the bold punch of garlic, then you already know that this dish is going to be a real crowd-pleaser. It’s perfect for those weeknight dinners when you want to impress without spending hours slaving away in the kitchen. Whether you’re cooking for family or just treating yourself to a well-deserved feast, this dish has you covered.
Now, I have to tell you that honey garlic shrimp has a special place in my heart. It reminds me of warm summer evenings spent on the patio with friends, laughter blending with the sizzle of shrimp hitting the hot grill. The smell of garlic filling the air, enticing everyone to flock to the table—it was pure magic. So grab your apron, because we’re about to recreate that magic together right in your kitchen!
Personal Story: A Sweet Memory
I still remember the first time I tried this dish. It was after a long day filled with ups and downs—I had just finished college and was finally finding my footing in the world. My buddies and I decided to throw a mini-celebration at my place, and I wanted to impress everyone with a delightful meal. One of my favorite meals growing up was my grandmother’s garlic shrimp, so I had a sudden burst of inspiration to give it a sweet twist.
With a whirl of creativity, honey was my secret ingredient. I remember feeling so nervous as I served it up, but as soon as the first bite hit their taste buds, the smiles were priceless! The notes of sweetness mixed with garlic danced joyfully on everyone’s palate. That night was filled with laughter, toasts, and the unforgettable taste of honey garlic shrimp. It made me realize that food has a unique way of bringing people together, creating memories that last far beyond the final bite. Now, I want to share that experience with you, one sweet and savory spoonful at a time!
Ingredients
To whip up this delightful dish, you’ll need the following ingredients:
-
1 pound shrimp, deveined and peeled
Chef Insight: Look for fresh shrimp with a firm texture and a pleasant ocean scent. If you’re feeling adventurous, try swapping shrimp for scallops or chicken for a different protein twist! -
1/4 cup honey
Substitution Tip: If you’re feeling like experimenting, you can use maple syrup or agave nectar for a vegan alternative that still brings that sweetness. -
1/4 cup soy sauce
Chef Insight: For a healthier version, use low-sodium soy sauce. If gluten is an issue, feel free to substitute with tamari sauce. -
3 cloves garlic, minced
Tip: Fresh garlic gives a vibrant flavor, but if you’re in a pinch, jarred minced garlic will work too—though keep in mind the taste won’t be as bold. -
2 tablespoons olive oil
Substitution Tip: For a hint of smokiness, use sesame oil instead. -
1 tablespoon cornstarch
Chef Insight: This is your thickening agent. For a gluten-free alternative, try arrowroot powder! -
Salt and pepper to taste
Tip: Adjust according to your preference. Freshly ground black pepper adds a wonderful kick! -
Steamed rice or vegetables, for serving
Suggestion: Cauliflower rice is a fantastic low-carb alternative if you’re watching those carbs!
Step-by-Step Instructions
-
Prep the Shrimp
Start with your shrimp! Make sure they are deveined and peeled because no one wants to wrestle with shells while trying to enjoy a delicious meal. Rinse them under cold water and pat them dry with a paper towel to ensure they get that lovely sear. -
Make the Marinade
In a bowl, combine honey, soy sauce, minced garlic, and olive oil. Give it a good whisk until fully blended. This marinade is your golden ticket to flavor town! You can even add a pinch of red pepper flakes if you like a little heat. -
Marinate the Shrimp
Toss the shrimp in the marinade and let them soak up all that beautiful flavor for about 15 to 30 minutes. If you’re short on time, even a 10-minute soak will do wonders. Just don’t forget to save a tablespoon or two of the marinade for later! -
Heat it Up
In a skillet, heat your olive oil over medium-high heat. Once the oil is shimmering (but not smoking!), it’s go time. Carefully add the shrimp to the pan in a single layer. Cook them for about 2-3 minutes on each side until they turn a lovely pink and opaque. Make sure not to overcrowd the pan—cook in batches if necessary. -
Thicken the Sauce
After the shrimp are cooked, pour the reserved marinade into the skillet. Stir in the cornstarch mixed with a teaspoon of water to form a slurry. This will make the sauce glossy and thick! Cook for an additional 1-2 minutes until the sauce beautifully coats the shrimp. -
Taste & Adjust
Give the shrimp a taste! If it needs a little more salt or pepper, now’s the time to adjust. Once everything is sizzling and fragrant, it’s time to plate up!
Serving Suggestions
Now that you’ve got your honey garlic shrimp ready to shine, let’s talk about how to serve it up! I love placing a generous scoop of fluffy steamed rice on one side of the plate. This rice will soak up all that delicious sauce, so don’t be shy!
Next, artfully arrange your honey garlic shrimp on top or beside the rice. Drizzle some of that luscious sauce over the shrimp to make it look irresistibly glossy. For an extra pop of color and crunch, garnish with chopped green onions or sesame seeds! It provides a beautiful contrast and doubles as a taste enhancer. Serve it alongside a vibrant array of steamed vegetables—broccoli, snap peas, or carrots work wonders here. Your plate will look like a work of culinary art!
Recipe Variations
Ready to give this dish a creative twist? Here are some variations to try that will keep your taste buds dancing:
-
Spicy Honey Garlic Shrimp: Add a cup of diced pineapple or a tablespoon of Sriracha for a tangy and spicy kick.
-
Coconut Honey Shrimp: Incorporate a tablespoon of coconut milk into the marinade for a tropical flair that will whisk you away to a sunny beach.
-
Lemon Garlic Shrimp: Substitute some of the honey with fresh lemon juice for a refreshing citrus burst.
-
Honey Ginger Shrimp: Add grated ginger into the marinade to give it a zesty and aromatic flair.
-
Herb Infused Shrimp: Fresh herbs like cilantro or parsley can be tossed over the dish at the finish for a fresh garden note.
Chef’s Notes
Over the years, this recipe has become a staple in my kitchen. I’ve seen how it adapts to any occasion—from busy weeknights to fancy dinner parties. One of my funniest kitchen mishaps while experimenting involved too much honey—let’s just say it’s not an excellent substitute for soy sauce when you’re trying to create balance!
With this recipe, I’ve learned to embrace the cooking process, and no dish is perfect every time. So make it your own! I encourage you to explore and trust your instincts. The kitchen is all about creativity and comfort—chase those good vibes!
FAQs and Troubleshooting
-
What if my shrimp are rubbery?
Rubberiness usually means the shrimp have been overcooked. Cooking shrimp until they’re just opaque and pink makes all the difference! -
Can I use frozen shrimp?
Absolutely! Just make sure to thaw them properly before cooking. Place frozen shrimp in the refrigerator overnight or soak them in cold water for quicker thawing. -
Why is my sauce too runny?
If your sauce isn’t thickening, ensure you’ve added the cornstarch slurry and cooked it long enough to thicken. Let it simmer for a few minutes after adding the slurry. -
Can I make this ahead of time?
While it’s always best fresh, you can marinate the shrimp a few hours in advance! Just cook right before serving for optimal flavor.
Nutritional Info
This high-protein honey garlic shrimp dish is not only delicious but also nutritious! Here’s a quick breakdown of what you’re getting per serving (about 4 servings):
- Calories: 250
- Protein: 22g
- Carbohydrates: 20g
- Fats: 10g
- Fiber: 1g
It’s packed with lean protein from the shrimp, and with the addition of steamed rice or vegetables, you’re getting a wholesome meal that’s balanced and satisfying.
Final Thoughts
Cooking doesn’t have to feel overwhelming or complicated. Remember, it’s about experimenting and enjoying the journey just as much as the destination. High-Protein Honey Garlic Shrimp is not just an easy weeknight meal; it’s a heartwarming dish that can transform any gathering into a magical experience filled with laughter and connection.
So whether you’re whipping it up for yourself or inviting friends over for a dinner party, you can create treasured moments around the table. Don’t forget to share your creations on social media and tag #Feastical!
I can’t wait to hear how your honey garlic shrimp turns out. Happy cooking, and remember: every dish has a story. Let’s keep telling those delicious tales, one recipe at a time. Cheers! 🥂🍤✨
Print
High-Protein Honey Garlic Shrimp
- Total Time: 25 minutes
- Yield: 4 servings 1x
- Diet: Pescatarian
Description
A sweet and savory honey garlic shrimp dish that’s high in protein and perfect for weeknight dinners.
Ingredients
- 1 pound shrimp, deveined and peeled
- 1/4 cup honey
- 1/4 cup soy sauce
- 3 cloves garlic, minced
- 2 tablespoons olive oil
- 1 tablespoon cornstarch
- Salt and pepper to taste
- Steamed rice or vegetables, for serving
Instructions
- Start with your shrimp! Make sure they are deveined and peeled.
- In a bowl, combine honey, soy sauce, minced garlic, and olive oil.
- Toss the shrimp in the marinade and let them soak for 15 to 30 minutes.
- In a skillet, heat your olive oil over medium-high heat.
- Carefully add the shrimp to the pan and cook for about 2-3 minutes on each side.
- After the shrimp are cooked, pour the reserved marinade into the skillet.
- Stir in the cornstarch mixed with a teaspoon of water to form a slurry.
- Give the shrimp a taste and adjust seasoning if needed.
- Now that you’ve got your honey garlic shrimp ready, plate it beautifully!
Notes
This recipe can be adapted with different proteins like scallops or chicken. You can experiment with various marinades as well.
- Prep Time: 15 minutes
- Cook Time: 10 minutes
- Category: Main Course
- Method: Sautéing
- Cuisine: Asian
Nutrition
- Serving Size: 1 serving
- Calories: 250
- Sugar: 22g
- Sodium: 500mg
- Fat: 10g
- Saturated Fat: 1g
- Unsaturated Fat: 4g
- Trans Fat: 0g
- Carbohydrates: 20g
- Fiber: 1g
- Protein: 22g
- Cholesterol: 150mg
Keywords: shrimp, high-protein, honey garlic, easy dinner, Asian cuisine
High-Protein Breakfast Bake
High-Protein Breakfast Bake: A Cozy Morning Delight
Hey, food lovers! Welcome back to Feastical, your go-to spot for recipes that warm your heart and fill your belly. Today, we’re diving into a dish that’s not only packed with protein but is also super easy to whip up—a High-Protein Breakfast Bake! If you’re like me, you know breakfast is often the most important meal of the day. But let’s face it; we’re all busy, and some mornings it feels like there’s just not enough time to serve up something healthy and delicious.
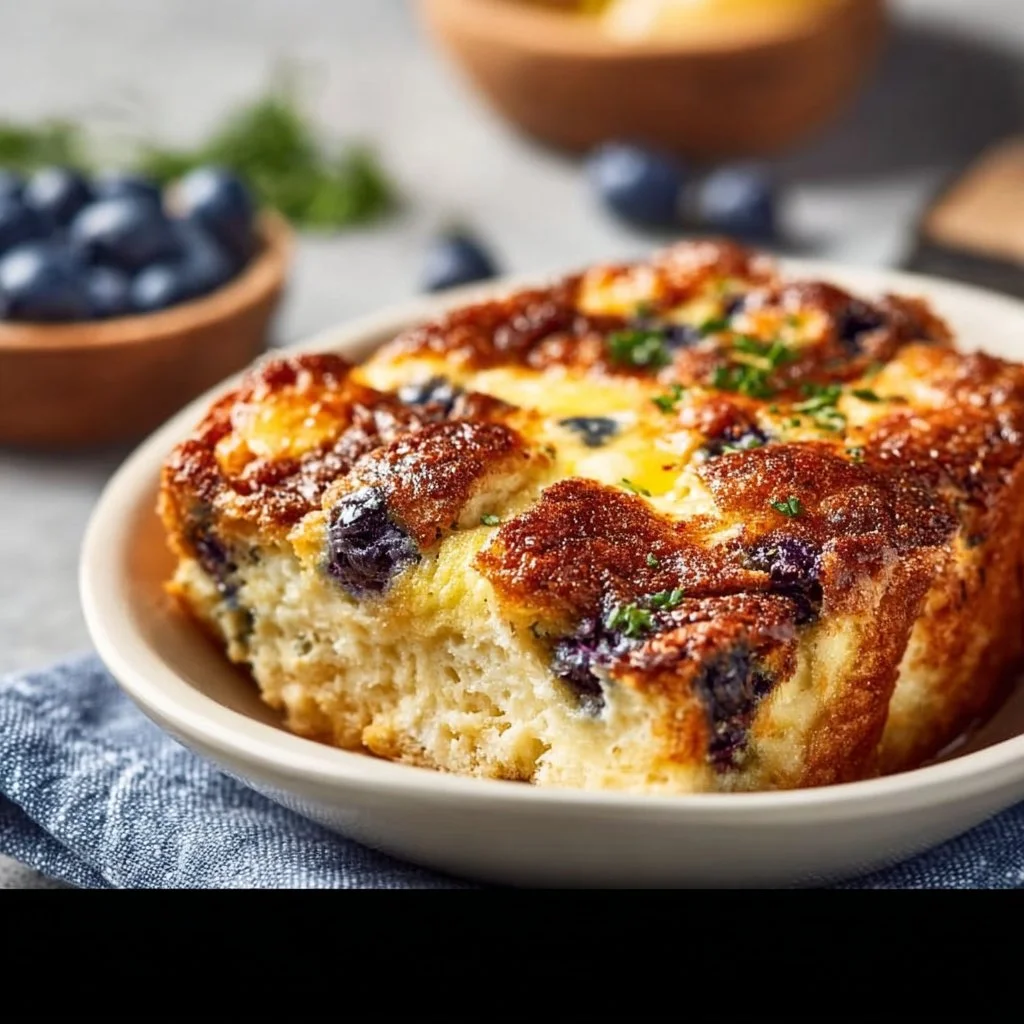
This Breakfast Bake is the solution you’ve been waiting for. Imagine waking up to the wafting aroma of baked oats mingling with the sweetness of honey and the fresh burst of blueberries. It’s like breakfast fairy dust sprinkled all over your kitchen. Not only is it nutritious, but it’s also versatile enough to be enjoyed any way you like—whether it’s a midweek boost to start your day right or a satisfying weekend brunch with family.
What I love most about this dish is its adaptability. You can meal prep it for the week, store it in the fridge, or even freeze portions for a quick breakfast on those extra-busy mornings. It’s a fantastic way to get all the goodness in one dish, and you can customize it to fit your tastes or dietary needs.
So, grab your apron, turn up that soft morning playlist, and let’s create something that’ll make you feel amazing from the first bite to the last!
Personal Story
A few years ago, I found myself in a breakfast rut—scrambling to make something nutritious before heading out the door. My mornings were a blur of coffee and toast, and while there’s nothing wrong with a classic toast, I knew I needed a refreshing change.
One sunny Sunday, I visited my grandmother who had just pulled a fresh batch of baked oatmeal out of the oven. With a twinkle in her eye, she told me all about her secret ingredients and how she’d always thrown in whatever was left in her pantry. That day, she used oats, eggs, and a handful of blueberries from her garden. We sat together, reminiscing about the summer mornings of my childhood, savoring each delightful bite. It was a revelation! Not only was it comforting, but it also fueled us up for a day of family adventures.
This High-Protein Breakfast Bake is inspired by those memories. It combines the wholesome ingredients my grandmother used with a modern twist. Every time I whip it up, it feels like I’m back in her warm kitchen, laughing and enjoying life’s simple pleasures.
Ingredients
Here’s what you’ll need to create your own High-Protein Breakfast Bake:
-
1 cup cottage cheese
A fantastic source of protein! It lends a creamy texture and richness to the bake. If you want to switch it up, Greek yogurt can be a great substitute. -
1 cup blueberries
These beauties add natural sweetness and a pop of flavor. Don’t have blueberries? Try using raspberries, strawberries, or even chopped apples. -
2 cups oats
Rolled oats are perfect for this recipe. They soak up moisture while baking, creating that hearty texture. If you’re gluten-free, make sure to use certified gluten-free oats. -
4 eggs
Eggs are the binding agent and power-packed with protein. If you’re looking for a vegan alternative, you could use flax eggs (1 tablespoon ground flaxseed + 2.5 tablespoons water per egg). -
1/4 cup honey or maple syrup
This adds the perfect hint of sweetness. If you’re watching sugar intake, you can reduce the amount or use a sugar substitute. -
1 tsp vanilla extract
A touch of vanilla elevates all the flavors. If you’re out, feel free to get creative with a splash of almond extract. -
1 tsp baking powder
This adds that extra fluffiness. It gives the bake a nice rise! Make sure it’s fresh for the best results. -
1/2 tsp salt
A pinch of salt not only enhances flavor but also balances the sweetness. You can use sea salt or kosher salt—both work wonders.
Step-by-Step Instructions
Preheat Your Oven
- Get Your Oven Ready: Preheat that oven to 350°F (175°C). This step is key; you want your bake to cook evenly and become perfectly golden brown on top.
Prepare the Baking Dish
- Grease Your Baking Dish: Grab a 9×9-inch baking dish—or any comparable size you have handy. Lightly grease it with oil, butter, or non-stick spray to ensure your breakfast bake doesn’t stick. Nothing is worse than losing that crispy top!
Mix the Wet Ingredients
-
Combine Cottage Cheese and Eggs: In a large mixing bowl, add 1 cup of cottage cheese and 4 eggs. Use a whisk to blend until it’s creamy. This step is crucial because it helps to create that soft, custardy texture in the final product.
-
Sweeten the Mix: Next, stir in 1/4 cup of your chosen sweetener (honey or maple syrup) along with 1 tsp of vanilla extract. Mix well until it’s all combined. Pro tip: If you’re using honey, slightly warming it will make it easier to mix.
Add the Dry Ingredients
-
Incorporate the Oats: Gently fold in 2 cups of oats to the wet mixture. This is where it starts becoming a breakfast bake! The oats soak up that creamy mixture and become tender while baking.
-
Incorporate Baking Powder and Salt: Don’t forget your baking powder and salt! Add 1 tsp of baking powder and 1/2 tsp of salt. Fold gently, keeping the mixture light and airy.
Add the Blueberries
- Toss in Blueberries: Finally, fold in 1 cup of blueberries. You can use fresh or frozen, depending on what you have available. If using frozen, there’s no need to thaw—just toss them in as is. You want to see those little beauties spread throughout the mixture!
Bake It Up!
-
Pour into Baking Dish: Transfer the mixture into your prepared baking dish and spread it out evenly. Use a spatula to smooth the top—after all, we eat with our eyes first!
-
Bake: Place it in the preheated oven and bake for about 30–35 minutes. You’ll know it’s done when a toothpick inserted into the center comes out clean and the top has turned a lovely golden brown color.
Cool and Serve
- Let It Cool: After baking, let the breakfast bake sit for about 10 minutes so it can set up a bit more. Trust me, this waiting time is worth it!
Enjoy!
- Slice and Serve: Cut into squares or scoop it right out of the dish. You could top it with a dollop of yogurt, some sliced bananas, or a drizzle of extra honey if you’re feeling fancy. Serve warm for the best experience!
Serving Suggestions
Presentation matters, even with breakfast! To serve, I love to place a slice of the bake on a small plate, topped with a spoonful of Greek yogurt for creaminess and a sprinkle of chopped nuts for texture. Pair it with a side of fresh fruit to add color and balance. If you want to feel extra fancy, dust a little cinnamon on top—it’s a beautiful and delicious finishing touch!
This makes for an excellent addition to any brunch spread. You can serve it warm or let it cool and slice it into bars for an on-the-go breakfast that you can grab before heading out the door.
Recipe Variations
-
Chocolate Chip Delight: Add a handful of dark chocolate chips to the batter for a sweet twist that will make everyone smile.
-
Nutty Banana Oat Bake: Mix in some sliced bananas and a few tablespoons of nut butter (like almond or peanut butter) for a nourishing nutty flavor.
-
Spiced Pumpkin Bake: Swapping in 1/2 cup of pumpkin puree and a dash of pumpkin spice can create an autumn-inspired version that’s delightful any time of the year.
-
Coconut Bliss: Toss in some shredded coconut for tropical vibes. It adds a nice chewiness and complements the sweetness of the blueberries.
-
Savory Spinach and Cheese Bake: For a savory breakfast option, you can omit the sweetener, replace blueberries with fresh spinach, and mix in some feta or cheddar cheese. It’s a whole new take that’s packed with flavor!
Chef’s Notes
This recipe has come a long way since my grandmother’s version. I added cottage cheese for that extra protein punch because we all know how important breakfast is! I often make this recipe while prepping for a busy week ahead, and it never gets old. A great thing I discovered is that it turns out beautifully in muffin tins too, making perfect breakfast muffins!
Another funny story comes to mind: I once forgot to add the eggs (yikes!) and ended up with a blueberry oatmeal blob! Surprisingly, it still tasted alright, and I called it a ‘breakfast crumble’ (which quickly became a family favorite). So, don’t worry if it doesn’t always go as planned; there’s always a silver lining in the kitchen!
FAQs and Troubleshooting
-
Why is my Breakfast Bake too dry?
If it turns out dry, it might’ve been cooked too long. Keep an eye on the time and do the toothpick test around the 30-minute mark. -
Can I make this ahead of time?
Absolutely! You can assemble the bake the night before, cover it, and place it in the fridge. Just pop it in the oven in the morning when you’re ready for a delicious breakfast. -
How do I store leftovers?
You can store them in an airtight container in the fridge for up to 4-5 days. Just reheat a slice in the microwave for a quick breakfast! -
Can I freeze this dish?
Yep! After cooling completely, slice it into portions and wrap tightly in plastic wrap, then place them in a freezer-safe container. They’ll stay good for up to 3 months.
Nutritional Info
Let’s break down the nutritional power of this delightful breakfast bake! Each serving (assuming 9 servings) contains:
- Calories: Approximately 180
- Protein: 10g
- Carbohydrates: 28g (mostly from the oats and blueberries)
- Dietary Fiber: 4g
- Sugars: 5g (if using honey or maple syrup)
- Fat: 4g
The combination of oats, cottage cheese, and eggs provides a balanced breakfast that keeps you energized throughout the day. With plenty of protein, fiber, and vitamins from the blueberries, it’s a wholesome start to your morning!
Final Thoughts
This High-Protein Breakfast Bake is more than just a recipe; it’s a nostalgic dish that brings people together around the table. The warmth of the flavors and the cozy feeling it brings can brighten even the busiest of mornings. The best part? It adapts to your preferences and dietary needs, making it the go-to breakfast for any occasion.
So, whether you whip it up for a family brunch, meal prep for the week, or simply indulge on a lazy Sunday morning, joy is just a bake away. I can’t wait for you to try it out—your mornings will never be the same again!
Don’t forget to share your creations with me. Happy cooking, and let’s dig in!
Print
High-Protein Breakfast Bake
- Total Time: 45 minutes
- Yield: 9 servings 1x
- Diet: High Protein
Description
A delicious and nutritious breakfast bake that’s easy to prepare, packed with protein, and perfect for meal prep.
Ingredients
- 1 cup cottage cheese
- 1 cup blueberries
- 2 cups oats
- 4 eggs
- 1/4 cup honey or maple syrup
- 1 tsp vanilla extract
- 1 tsp baking powder
- 1/2 tsp salt
Instructions
- Preheat the oven to 350°F (175°C).
- Grease a 9×9-inch baking dish with oil or non-stick spray.
- Combine cottage cheese and eggs in a large mixing bowl and whisk until creamy.
- Stir in honey or maple syrup and vanilla extract.
- Fold in the oats until well combined.
- Add baking powder and salt, folding gently.
- Toss in blueberries, folding them into the mixture.
- Pour the mixture into the greased baking dish and spread evenly.
- Bake for about 30–35 minutes, until golden brown and a toothpick comes out clean.
- Let cool for 10 minutes before slicing and serving.
Notes
Can be customized with various fruits, sweeteners, or add-ins like nuts or chocolate chips.
- Prep Time: 15 minutes
- Cook Time: 30 minutes
- Category: Breakfast
- Method: Baking
- Cuisine: American
Nutrition
- Serving Size: 1 slice
- Calories: 180
- Sugar: 5g
- Sodium: 200mg
- Fat: 4g
- Saturated Fat: 1g
- Unsaturated Fat: 3g
- Trans Fat: 0g
- Carbohydrates: 28g
- Fiber: 4g
- Protein: 10g
- Cholesterol: 70mg
Keywords: breakfast, protein bake, oatmeal, healthy recipe, meal prep
High-Protein Breakfast Bake
The Ultimate High-Protein Breakfast Bake: Fuel Your Day the Delicious Way!
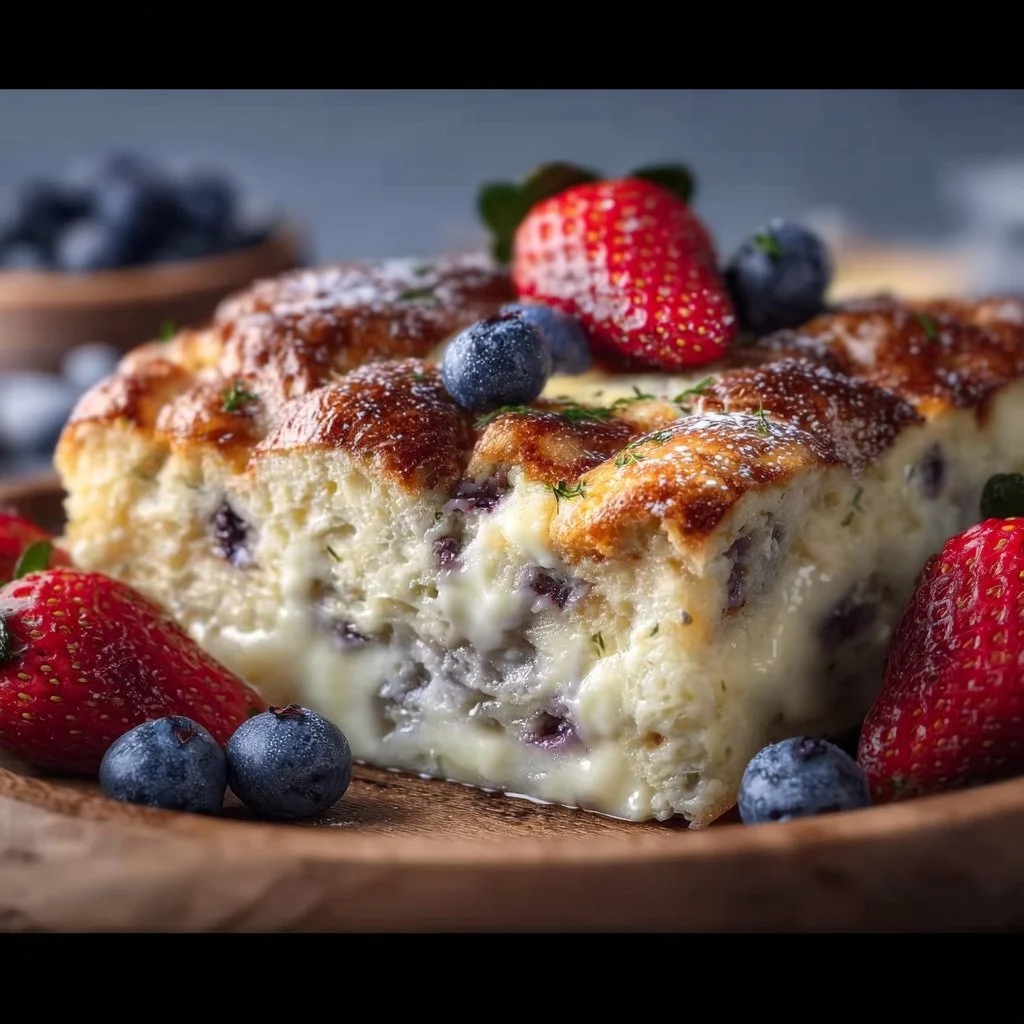
Hey there, food lovers! I’m Beau Collier, and if you’re anything like me, breakfast is not just the first meal of the day; it’s a ritual that sets the tone for everything that follows. Today, we’re diving into a vibrant and nourishing dish that packs a punch of protein to fuel your morning: the High-Protein Breakfast Bake!
Imagine waking up to the enticing aroma of something warm and comforting lingering in your kitchen. The kind of breakfast that feels like a big hug but is also loaded with nutrients to kickstart your day. Trust me, whether you’re rushing to work, curling up with your favorite book, or lounging around on a lazy weekend, this Breakfast Bake is your answer to wholesome and delicious.
This bake is not just easy-peasy but super customizable—perfect for all my fellow foodies out there who love to play around in the kitchen. From toddlers to grandparents, everyone at the table will be reaching for seconds (or thirds!). Plus, you can prep it the night before for an extra smooth morning—bless those weekday hustle vibes!
So grab your apron, put on your favorite playlist, and let’s create something delightful you can be proud of. Get ready to whip up this High-Protein Breakfast Bake that’s ready to impress your taste buds and feed your soul!
Personal Story
As I reminisced about my childhood mornings, I’m taken back to my mom bustling around the kitchen, apron tied and a smile painted across her face. Those were the days when pancakes flipped with ease, and the air was thick with the scent of maple syrup and vanilla syrup wafting from the stove. While pancakes are delightful, I always imagined how fantastic a breakfast sweet that was packed with nutritional prowess could be.
One Sunday morning, my mom surprised us with a baked oatmeal dish filled with seasonal fruits and nuts. It was more than just breakfast; it was an experience—a warm family gathering around the table, laughter and stories mixing with the aroma of baked goodness. Ever since that day, I believed that breakfast should be more than a meal; it should be a celebration.
That was the inspiration behind my High-Protein Breakfast Bake. Bit by bit, I developed this recipe to combine the nostalgic warmth of those cozy breakfasts with health-giving ingredients that help us wake up with a spring in our step. And just like my mom made many versions of that baked dish, I encourage you to play with this recipe and make it your own!
Ingredients
Let’s get down to what you’ll need to whip up this delicious dish! Here’s your ingredient lineup:
-
1 cup cottage cheese
Creamy and rich in protein, cottage cheese is the star of the show here! If you’re not a fan or looking for a vegan alternative, try silken tofu for a similar texture. -
1 cup blueberries
Fresh or frozen, these bite-sized bursts of sweetness are packed with antioxidants. Not into blueberries? Try strawberries, raspberries, or even dried fruits like cranberries. -
1 cup oats
These whole grains are fiber-rich and keep you feeling full. For a gluten-free option, use certified gluten-free oats or swap for quinoa flakes if you’re feeling adventurous! -
3 large eggs
They add structure and protein to the bake. If you’re egg-free, try flax eggs (1 tablespoon ground flaxseed mixed with 2.5 tablespoons of water) for a vegan swap. -
1/4 cup honey or maple syrup
This natural sweetener adds flavor and moisture. Keep it gluten-free with pure maple syrup, or use agave nectar for a different flavor profile. -
1 teaspoon vanilla extract
This adds a warm, comforting flavor. Use pure vanilla extract for the best taste; imitation vanilla will work in a pinch but won’t be quite as good. -
1 teaspoon baking powder
This helps the batter rise, giving it a light, fluffy texture. A pinch of baking soda can be used too, but make sure you balance it with something acidic like a splash of lemon juice. -
Pinch of salt
A tiny bit of salt enhances all the flavors. It’s easy to overlook, but don’t skip it—it makes a difference!
Step-by-Step Instructions
Okay, it’s time to get our hands dirty in the kitchen and create some magic! Here’s how to bring this High-Protein Breakfast Bake to life:
-
Preheat and Prepare
First things first, let’s preheat that oven to 350°F (175°C). While it’s heating up, grab an 8×8-inch baking dish (or any suitable oven-safe dish you’ve got) and grease it lightly with cooking spray or a dab of butter. -
Mix It Up
In a large mixing bowl, combine the cottage cheese, eggs, honey or maple syrup, and vanilla extract. Use a whisk to combine everything until it’s nice and smooth. You want the cottage cheese to blend in well but don’t stress if there are a few small curds left here and there; they’ll add great texture! -
Fold in Dry Ingredients
Next, sprinkle the oats, baking powder, and salt into the wet mixture. Gently fold everything together until well incorporated. You want to avoid overmixing; just combine until you can’t see any dry oats peeking through. -
Add in the Blueberries
Fold in the blueberries with care. You don’t want them to completely burst; we’re aiming for juicy pockets of flavor throughout our bake! -
Spread and Smooth
Pour the mixture into your prepared baking dish and spread it out evenly. Give it a quick gentle shake to help the batter settle into all the corners. -
Pop It in the Oven
Time to bake! Slide that beauty into the oven and let it bake for around 30-35 minutes. The top should turn a golden brown, and a toothpick inserted into the center should come out clean. Don’t be tempted to open the oven door too soon! Let it bake steadily without interruption. -
Cool and Serve
Once it’s done, remove it from the oven and allow it to cool for about 10 minutes. This makes slicing easier! You can serve it warm or at room temperature. Cut into squares, and get ready to enjoy!
Serving Suggestions
Serving this High-Protein Breakfast Bake is as delightful as the bake itself! Here are a few tasty ideas:
- Fresh Fruit Topping: Serve slices with a dollop of Greek yogurt and a handful of fresh berries for a pop of freshness and tang.
- Nut Butter Drizzle: Drizzle with almond or peanut butter for a nutty flavor boost that complements the sweetness of the bake perfectly.
- Maple Glaze: A light drizzle of warm maple syrup across the top adds an indulgent touch.
- Coconut Flakes: For a tropical twist, sprinkle some toasted coconut flakes on top just before serving!
Recipe Variations
Let’s get creative! Here are some fun twists on our delicious breakfast bake:
- Savory Spin: Omit the sweet ingredients entirely and add chopped spinach, diced tomatoes, and crumbled feta cheese for a savory Italian-inspired breakfast bake.
- Nutty Delight: Fold in a handful of your favorite nuts—walnuts, pecans, or even sunflower seeds—for added crunch and nutrition.
- Banana Bliss: Replace the blueberries with diced bananas for a delightful twist. Drizzle with a bit of extra honey to bring out that sweet flavor.
- Spiced Up: Add a teaspoon of cinnamon or pumpkin pie spice to bring a warm fall flavor to your dish. It’s especially cozy during chilly mornings!
- Choco-Fruit: Mix in dark chocolate chips along with the blueberries for a decadent treat that feels like dessert.
Chef’s Notes
As a chef who’s been in the kitchen for quite some time, I find that recipes evolve as we do! This High-Protein Breakfast Bake began as a basic oatmeal bake but grew into something much heartier and versatile. Over time, I’ve added a few twists here and there—try adding vanilla protein powder for an extra protein kick. Who says you can’t indulge while keeping it healthy?
And remember, don’t hesitate to experiment. The kitchen is a creative playground, and you’re the artist!
FAQs and Troubleshooting
Here are a few common questions that come up when making this breakfast bake:
1. Can I make this ahead of time?
Absolutely! You can prepare the mixture the night before and store it in the fridge. Just pop it in the oven in the morning, and you’re good to go!
2. How do I store leftovers?
Store leftover bake slices in an airtight container in the fridge for up to five days. You can reheat them in the microwave for a quick, convenient breakfast.
3. My bake is too dry! What happened?
If your bake turns out a bit dry, it could be due to overbaking. Keep an eye on it in the oven, and do your toothpick test!
4. Can I freeze it?
Yes! Slice the bake into portions and freeze them in an airtight container. Just thaw and reheat when you’re ready to eat!
Nutritional Info
This High-Protein Breakfast Bake doesn’t just taste delicious; it’s a nutritional powerhouse that’ll fuel your morning! Here’s a breakdown of what you get per serving (based on generous 8 servings):
- Calories: ~190-220
- Protein: ~12-15g
- Carbohydrates: ~25-30g
- Fat: ~4-5g
- Fiber: ~3-4g
- Sugar: ~5-7g (depending on the sweetener used)
This dish is packed with protein from the cottage cheese and eggs while providing hearty oats for energy and fiber! It’s the ultimate well-rounded breakfast to kick off your day right.
Final Thoughts
There you have it—the ultimate High-Protein Breakfast Bake, a celebratory dish you’ll love to make and share! Whether you’re treating yourself to a comforting breakfast or serving it to family and friends, this recipe is sure to bring joy to your mornings.
Remember, cooking should be a joyful and creative experience. This breakfast bake recipe is just a jumping-off point, inviting you to make it your own and express your culinary creativity. So, grab your favorite ingredients, throw on a big smile, and let’s get cooking!
Happy baking, and until next time, keep your spatula at the ready and your heart full of flavor!
Print
High-Protein Breakfast Bake
- Total Time: 40 minutes
- Yield: 8 servings 1x
- Diet: Vegetarian
Description
A delightful and nourishing breakfast bake packed with protein, perfect for fueling your mornings and customizable for every taste.
Ingredients
- 1 cup cottage cheese
- 1 cup blueberries
- 1 cup oats
- 3 large eggs
- 1/4 cup honey or maple syrup
- 1 teaspoon vanilla extract
- 1 teaspoon baking powder
- Pinch of salt
Instructions
- Preheat the oven to 350°F (175°C) and grease an 8×8-inch baking dish.
- Mix the cottage cheese, eggs, honey or maple syrup, and vanilla extract until smooth.
- Fold in oats, baking powder, and salt until just combined.
- Carefully fold in the blueberries.
- Pour the mixture into the prepared baking dish and spread evenly.
- Bake for 30-35 minutes until golden brown and a toothpick inserted comes out clean.
- Cool for 10 minutes before slicing and serving.
Notes
Feel free to customize the recipe with different fruits, nuts, or flavors to suit your taste preferences.
- Prep Time: 10 minutes
- Cook Time: 30 minutes
- Category: Breakfast
- Method: Baking
- Cuisine: American
Nutrition
- Serving Size: 1 slice
- Calories: 200
- Sugar: 6g
- Sodium: 250mg
- Fat: 5g
- Saturated Fat: 2g
- Unsaturated Fat: 3g
- Trans Fat: 0g
- Carbohydrates: 30g
- Fiber: 4g
- Protein: 15g
- Cholesterol: 70mg
Keywords: healthy breakfast, high-protein, breakfast bake, easy breakfast, nutritious meal