Minute Summer Corn and Zucchini Chowder (Creamy One-Pot)
Embrace Summer with a Warm Bowl of Corn and Zucchini Chowder
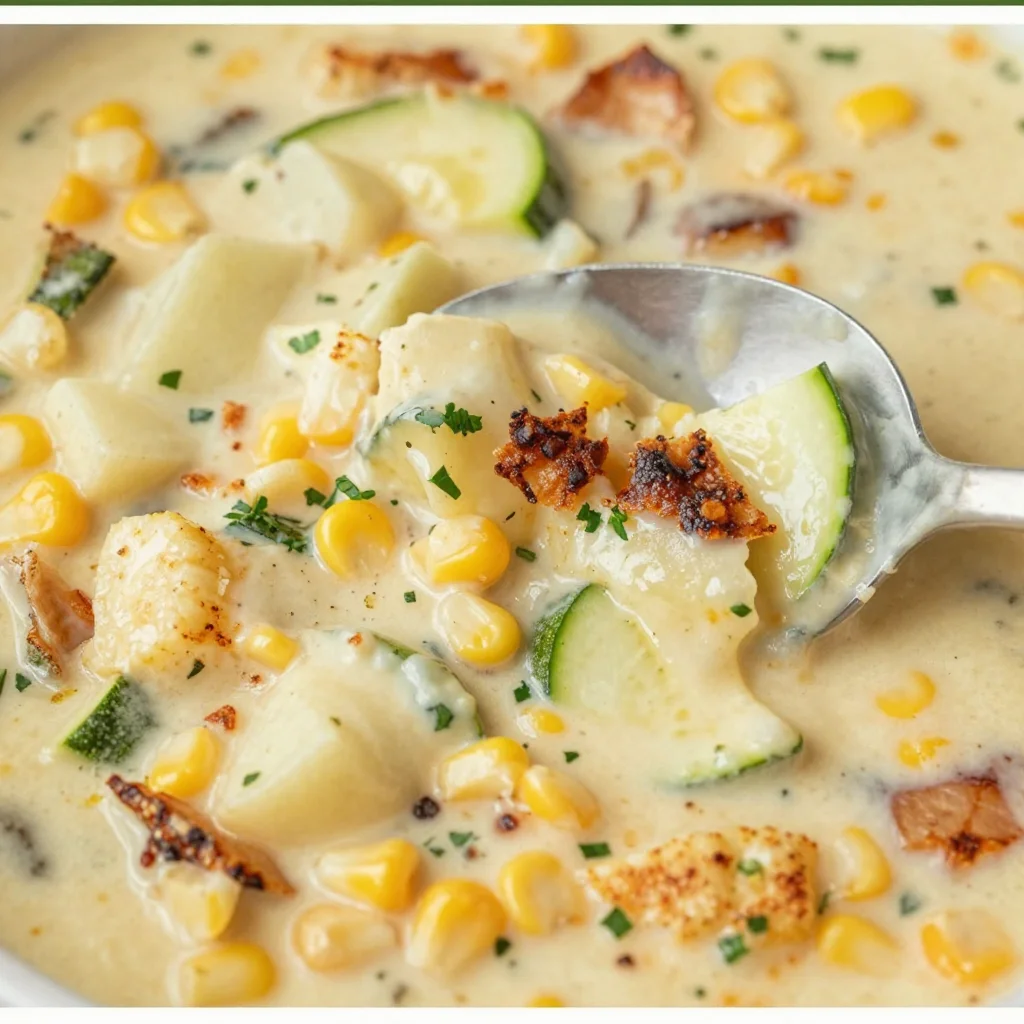
Hey there, fellow food lovers! It’s Beau Collier here, and I’m excited to welcome you to another delicious adventure in the kitchen. As the summer sun shines bright and nature puts on its vibrant display, there’s no better way to celebrate the season than with a bowl of fresh, heartwarming Corn and Zucchini Chowder. This dish is like a cozy hug in a bowl, brimming with the sweet taste of summer corn and fresh garden veggies!
Chowder is one of those comforting dishes that can transport you back to sun-soaked afternoons, family barbecues, and lazy weekends spent laughing around the dinner table. I remember the first time I tasted chowder; my Grandma Alice would whip it up on scorching summer days after we’d made a trip to the farmer’s market. The aroma of sautéing garlic and onions would fill the kitchen, instantly making me feel at home. This recipe is a tribute to those nostalgic memories, crafted with love and a touch of creativity!
What I adore about chowder is its flexibility. Each ingredient works in perfect harmony, layering flavors that tell the story of the season. Whether you’re cozying up on the couch, hosting a summer get-together, or just looking to brighten up your weekday meals, this Corn and Zucchini Chowder will bring a sunny smile to your face.
So, grab your apron, chill your favorite drink, and let’s get cooking!
Personal Story: Grandma’s Kitchen and Summer Memories
Ah, the kitchen! It’s not just a space; it’s a hub of warmth, laughter, and memories. I can still picture myself as a kid, standing on a stool to reach the countertop in Grandma Alice’s kitchen, eagerly awaiting her famous chowder. She’d have me by her side, teaching me the secrets of simmering vegetables and stirring in love. Those afternoons were filled with stories—of her childhood, her garden, and of the community that thrived around her.
The family would gather each Sunday, and I vividly remember my aunts arguing over who made the best cornbread to accompany Grandma’s chowder. The tangy scent of sweet corn and sautéed garlic wafted through the air, each bowl served with a sprinkle of freshly chopped basil from her garden. I still treasure those moments, knowing that the love we stirred into our meals was as vital as the ingredients we used. This recipe is inspired by those sunny days, echoing the laughter and sweet memories of summer.
Ingredients
Let’s dive into the ingredient list for this mouthwatering Corn and Zucchini Chowder! Here’s what you’ll need:
-
2 tablespoons olive oil
A perfect base for sautéing your veggies and bringing out their robust flavors. You can substitute this with avocado oil for a slightly different taste or use butter for a creamy richness. -
1 onion, diced
Onions add that savory depth we all crave. If you’re sensitive to onions, shallots work wonderfully, or you can skip them altogether and use a sprinkle of onion powder. -
2 cloves garlic, minced
Garlic brings a punch of flavor to the dish. If you prefer a milder taste, reduce the amount or use roasted garlic for sweetness. -
2 zucchinis, diced
Zucchinis are light, fresh, and add a lovely texture. Feel free to substitute them with yellow squash or even chopped bell peppers for a twist. -
3 cups corn kernels (fresh or frozen)
Fresh corn is a winner in this dish! If fresh isn’t available, frozen works great too. Canned corn can also be used in a pinch, but drain and rinse it to remove excess sodium. -
4 cups vegetable broth
This is the heart of the chowder, giving it body and flavor. For a richer taste, you could use homemade broth or swap in chicken broth if you don’t mind the meat. -
1 cup heavy cream or coconut milk
This adds the creamy element that pulls everything together. If you’re looking for a lighter option, canned evaporated milk could work, too. -
Salt and pepper to taste
Essential seasonings! Don’t skimp on these—trust your taste buds. If you want a flavor boost, add a pinch of smoked paprika or cayenne pepper! -
Fresh basil or parsley for garnish
A sprinkle of fresh herbs adds the finishing touch. Basil pairs beautifully, but feel free to use parsley or even cilantro for a fresh note.
Step-by-Step Instructions
Now that we’re ready with our ingredients, let’s walk through the flavorful process of creating our delicious Corn and Zucchini Chowder!
-
Sauté the Aromatics
In a large pot or Dutch oven, heat the olive oil over medium heat. Once hot, add the diced onion, stirring frequently. You’ll want to cook them until they turn translucent—about 5 minutes. This step is crucial because it sets the flavor base. Pro tip: Add a pinch of salt at this stage to help the onions release moisture and develop flavor. -
Add the Garlic
Toss in the minced garlic and continue to sauté for about 1 minute. Be careful not to let the garlic brown too much, as it can impart a bitter taste. You want it fragrant and fragrant only! -
Introduce the Zucchini
Add the diced zucchini to the pot and cook for 3-4 minutes, just until they start to soften but are still vibrant in color. This is your chance to be creative! Want an herb kick? Throw in a pinch of thyme or Italian seasoning at this stage. -
Stir in the Corn
Now for the star of the show! Add the corn kernels to the mix and stir everything together, letting all those flavors mingle for another 2-3 minutes. If you’re using fresh corn, the sweet smell will start to fill your kitchen! -
Pour in the Broth
Carefully add the vegetable broth to the pot and increase the heat, allowing it to come to a gentle simmer. This will help everything cook together and absorb that yummy broth flavor. -
Simmer and Season
Reduce the heat to low and let the chowder simmer for about 15 minutes. This is where the magic really happens! Turn on your favorite playlist or podcast and enjoy the fragrant aromas filling your space. Taste it halfway through and adjust the seasoning with salt and pepper as needed. -
Cream It Up
Once the vegetables are tender, add in the heavy cream (or coconut milk). Stir well and let it warm through for another 5 minutes. You want the chowder to be rich but not overly heavy. For a lighter alternative, add more broth or a splash of water! -
Garnish and Serve
Serve hot, garnished with fresh basil or parsley. This adds a pop of color and a fresh flavor that balances the richness of the chowder.
Serving Suggestions
Now that you’ve got this steaming bowl of Corn and Zucchini Chowder, how do you serve it up? Here are a few fun ideas to elevate your dining experience:
- Crusty Bread: The classic pairing—serve with a slice of toasted crusty bread or a hearty baguette to soak up every drop of that delicious broth.
- Cheese Croutons: Fancy it up by sprinkling cheese over your bread, toasting it under the broiler for cheesy croutons to top your chowder.
- Side Salad: Pair it with a vibrant summer salad filled with mixed greens, cherry tomatoes, and a zesty vinaigrette for a refreshing balance.
Recipe Variations
Feeling adventurous? Here are some creative twists and variations for your Chowder:
-
Spicy Corn and Zucchini Chowder: Add a diced jalapeño or a smattering of chili flakes for a kick!
-
Bacon Lovers’ Chowder: Sauté some chopped bacon before the onion—remove when crispy, and use the rendered fat for adding flavor—then sprinkle the crispy bits on top before serving.
-
Herbed Delight: Cosset in fresh herbs like dill or rosemary for herbal tweaks that both enhance the chowder and make your kitchen smell amazing!
-
Cheesy Twist: Stir in shredded cheddar or a cheese blend towards the end for a creamy, cheesy extra layer of flavor.
-
Dairy-Free Options: Swap the cream for more coconut milk or even a cashew cream for a creamy and satisfying plant-based option.
Chef’s Notes
Every recipe has its own journey, and this chowder is no exception. What started as simple summer cooking with my Grandma Alice has evolved over time into a creative outlet in my kitchen. I’ve experimented with different vegetables, spicing it up based on what I’ve got on hand or what’s fresh at the market.
Whenever I make this chowder, I’m reminded of those cherished moments—how love and food connect us. Whether it’s a quiet dinner or a lively family occasion, this recipe serves as a canvas for memories, laughter, and sharing.
FAQs and Troubleshooting
1. My chowder is too thick! What can I do?
If your chowder is thicker than you’d like, simply add more vegetable broth or water to reach your desired consistency. Stir well and let it simmer for a few more minutes.
2. Can I use frozen corn instead of fresh?
Absolutely! Frozen corn is a great alternative. Just toss it in directly from the bag; there’s no need to thaw it out—convenience at its best!
3. What if my chowder is too salty?
If you find your chowder is too salty, try adding a splash more cream or water. You can also add a diced potato, which will absorb some of the saltiness. Let it simmer a bit longer with the potato, and then remove before serving.
4. How do I store leftovers?
Store leftovers in an airtight container in the refrigerator for up to 3 days. The flavors will meld beautifully! To reheat, gently warm it on the stovetop, adding a splash of broth or water if it thickens too much.
Nutritional Info
This Corn and Zucchini Chowder is not only delicious but also packed with nutrition. Here’s a quick breakdown (per serving, based on yield of 6 servings):
- Calories: Approximately 350
- Protein: 8g
- Fat: 24g (primarily from cream and olive oil)
- Carbohydrates: 30g (with a healthy dose of fiber from the corn and zucchini)
- Fiber: 4g
- Vitamins: High in Vitamins A and C, thanks to the zucchini and corn!
Always remember to keep an eye on portion sizes if you’re watching calories, but this chowder can definitely fit into a balanced diet!
Final Thoughts
Cooking is all about connection—whether it’s with our ingredients, our families, or even the memories we forge along the way. As you dive into this delectable Corn and Zucchini Chowder, I hope it brings a little piece of summer into your home. Remember, it’s not just about the final dish but the joy of cooking, the laughter shared in the kitchen, and the love that you stir in with each ingredient.
So, tell me, what memories do you have that inspire your cooking? Do you have a go-to chowder recipe? I’d love to hear your stories, tips, and any summer twist you bring to your own chowder creations. Until next time, keep cooking, keep smiling, and remember—every bite can be a celebration!
Bon appétit! 🍽️✨
Print
Corn and Zucchini Chowder
- Total Time: 45 minutes
- Yield: 6 servings 1x
- Diet: Vegetarian
Description
A heartwarming chowder brimming with the sweet taste of summer corn and fresh garden veggies, perfect for cozying up on a sunny day.
Ingredients
- 2 tablespoons olive oil
- 1 onion, diced
- 2 cloves garlic, minced
- 2 zucchinis, diced
- 3 cups corn kernels (fresh or frozen)
- 4 cups vegetable broth
- 1 cup heavy cream or coconut milk
- Salt and pepper to taste
- Fresh basil or parsley for garnish
Instructions
- Sauté the onions in olive oil over medium heat until translucent—about 5 minutes.
- Add the minced garlic and sauté for about 1 minute.
- Introduce the diced zucchini and cook for 3-4 minutes.
- Stir in the corn kernels and combine for another 2-3 minutes.
- Pour the vegetable broth into the pot and bring to a gentle simmer.
- Simmer for about 15 minutes on low heat, adjusting seasoning with salt and pepper.
- Add heavy cream (or coconut milk) and warm through for another 5 minutes.
- Garnish with fresh basil or parsley before serving.
Notes
Great with toasted crusty bread or as a base for cheesy croutons!
- Prep Time: 15 minutes
- Cook Time: 30 minutes
- Category: Soup
- Method: Simmering
- Cuisine: American
Nutrition
- Serving Size: 1 serving
- Calories: 350
- Sugar: 5g
- Sodium: 400mg
- Fat: 24g
- Saturated Fat: 12g
- Unsaturated Fat: 8g
- Trans Fat: 0g
- Carbohydrates: 30g
- Fiber: 4g
- Protein: 8g
- Cholesterol: 60mg
Keywords: chowder, summer soup, vegetarian soup, corn, zucchini

Nectarine Salsa
Spice Up Your Summer with Nectarine Salsa
Hey there, food lovers! Beau Collier here, and today, we’re diving into something that perfectly captures the essence of summer sunshine: Nectarine Salsa. If you’re like me, the arrival of stone fruits signals it’s time to shake up your kitchen routine and get a little adventurous with your meal prep. This salsa is not just a condiment; it’s a dazzling condiment that elevates countless dishes while adding a burst of fresh flavor and vibrant color.
A Taste of Nostalgia
Let me take you back to a summer cookout several years ago, where the grilling was in full swing and the laughter floated through the air like the delightful aroma of barbecue. My good buddy Kyle and I decided to whip up something light and refreshing to complement the smoky flavors of the grill. We rummaged through the pantry and fruit bowl, and voilà! We stumbled upon some juicy nectarines that were just begging to be transformed into a salsa.
As we diced and mingled the ingredients, all that chopping and mixing quickly turned into a spontaneous salsa dance-off in the kitchen. Who knew chopping vegetables could be so much fun? With a big bowl of our freshly made Nectarine Salsa in hand, we served it up alongside smoky grilled chicken, and it was an instant hit. The vibrant citrus notes balanced perfectly with the savory depth of the grill—everyone was asking for the recipe. That’s why I’m so excited to share this incredible recipe with all of you!
Ingredients
Here’s what you’ll need to make this delightful Nectarine Salsa. Take a peek at the ingredients, and I’ll add some of my personal chef insights that might just inspire you!
-
2-3 nectarines, diced (about 2 cups)
Choose ripe but firm nectarines for that perfect sweet-tart balance. If nectarines are out of season, peaches work wonderfully as a substitute! -
1 tomato, diced (about 1 cup)
Opt for juicy, ripe tomatoes. For added sweetness, cherry or grape tomatoes are fabulous alternatives. -
1 cup cilantro, minced
Fresh cilantro makes all the difference! If you’re not a fan, try swapping it for parsley, or for a unique twist, mint. -
1/4 cup shallot, diced (or substitute red onion)
Shallots offer a milder flavor. However, if you prefer that slightly sharper bite, red onion is your friend. -
1 bird’s eye chili, seeds removed, finely diced (also called Thai red chilis, or substitute jalapeño)
This little chili brings the heat! Adjust the amount based on your heat tolerance. Don’t have a chili on hand? A dash of red pepper flakes will do the trick. -
1 tablespoon lime juice (plus more to taste)
Freshly squeezed lime is best. Lemon juice can be used as an alternative if limes aren’t available. -
1 teaspoon honey or sugar
Honey enhances the salsa’s natural sweetness. If you’re vegan, stick with honey; if you prefer a plant-based option, sugar is perfectly fine!
Step-by-Step Instructions
Now that you’ve got your ingredients, let’s get cooking! This is where the magic happens, so buckle up for some fun in the kitchen.
-
Prepare the Produce
Start by washing your nectarines and tomato thoroughly. If you’re using peaches instead of nectarines, follow the same washing technique. Next, grab your trusty knife and dice the nectarines into bite-sized pieces—roughly ½-inch chunks work beautifully. Set them aside. -
Dicing the Tomato
Slice and chop the tomato into similar-sized pieces. Keep those juices! They’re packed with flavor. Don’t worry about making it perfect; we’re going for a rustic vibe here. -
Chop the Shallot
Slice the shallot or red onion thinly, then finely chop it. Remember, your salsa doesn’t have to look perfect; a little chunkiness adds character! -
Cilantro Magic
Rinse and roughly chop the cilantro. If you’re using parsley or mint as a substitute, the same goes; just give it a good chop to release those aromatic oils. -
Mix it All Together
In a large bowl, combine the diced nectarines, tomato, shallots, and cilantro. Toss gently; you want everything to get cozy without turning mushy. -
Add the Heat
Now, grab your bird’s eye chili (it’s time for some spice!). Slice it, remove the seeds, and finely chop it. Adjust based on your heat level preference; a little goes a long way! Toss it into your salsa mixture. -
Lime Juice and Sweetness
Squeeze that fresh lime juice over the salsa, followed by a drizzle of honey or a sprinkle of sugar. Give it a gentle stir and taste. This is your moment! Add more lime juice if you like it zesty and adjust sweetness to your liking. -
Chill Before Serving
Allow your salsa to chill in the fridge for at least 30 minutes. This gives the flavors time to meld together—that’s when the magic truly happens. Trust me on this one! -
Taste and Adjust Again
Once chilled, give it another taste. Sometimes, a bit more lime or a pinch of salt is just what it needs. -
Ready to Serve!
Now that your Nectarine Salsa is bright, fresh, and bursting with flavor, it’s ready to shine on your table!
Serving Suggestions
One of the great things about this Nectarine Salsa is its versatility. You can serve it in all sorts of creative ways. Here are a few of my favorite serving suggestions:
-
Tacos: Serve it on top of fish or chicken tacos for a refreshing crunch. The sweet-spicy notes work like a charm!
-
Grilled Meats: Pair it with grilled chicken or pork. The smoky meatiness resonates beautifully with the fresh salsa.
-
Chips and Dip: Got some tortilla chips nearby? Dive right in! This salsa is an absolute crowd-pleaser at parties.
-
Salads: Pour it over a bed of mixed greens for a quick, refreshing salad. Top it with grilled shrimp for an elegant touch.
-
Sourdough Toast: Spread a bit of cream cheese on some toasted sourdough, pile on the salsa, and you’ve got yourself a delicious appetizer!
Recipe Variations
Now, let’s get your creative juices flowing! Here are some fun variations you might want to try out:
-
Avocado Addition: Mix in some diced avocado to add a creamy texture that complements the salsa beautifully.
-
Mango or Pineapple Twist: Substitute half the nectarines with mango or pineapple for a tropical vibe.
-
Cucumber Crunch: Add diced cucumber for an extra layer of crunch and refreshment.
-
Smoky Flavor: Sprinkle in some smoked paprika to give your salsa a delightful touch of smokiness.
-
Black Bean Boost: Add a cup of canned black beans (rinsed and drained) to make it heartier. This is also a great way to turn the salsa into a main dish!
Chef’s Notes
This Nectarine Salsa has become a staple in my kitchen, and it’s evolved over time based on what I have on hand. Every summer, I experiment with different fruits and spices, allowing each batch to be a unique creation. Once, during a particularly enthusiastic testing phase, I threw in a few chopped strawberries. Let’s just say that batch disappeared in record time!
FAQs and Troubleshooting
1. My salsa turned out too sweet! How do I fix it?
If you find your salsa is too sweet, balance it out with a splash more lime juice or a little salt. The acidity will help cut through the sweetness.
2. Can I make this ahead of time?
Absolutely! Nectarine Salsa is perfect for making ahead. Just keep it in an airtight container in the fridge for up to 3 days. The flavors will deepen over time.
3. What if I can’t handle spicy food?
No problem! If you’re sensitive to heat, simply leave out the chili or use a milder pepper, like a red bell pepper.
4. Is there a fruity alternative to this salsa?
Definitely! Practically any stone fruit can work. Consider trying plums or apricots for different flavors.
Nutritional Info
While enjoying Nectarine Salsa, you’ll be delighted to know that it’s not only delicious but also nutritious! Here’s a quick breakdown per serving (about 2 tablespoons):
- Calories: Approximately 30
- Fat: 0.5g
- Carbohydrates: 8g
- Fiber: 1g
- Sugars: 2.5g
- Protein: 0.5g
The fresh fruits and veggies are packed with vitamins A and C, while the cilantro offers a burst of flavor and additional nutrients.
Final Thoughts
Friends, I hope you’re as excited about this Nectarine Salsa as I am. Whether you’re grilling, gathering with friends, or simply craving that fresh summer flavor, this salsa is guaranteed to bring a smile to your face and a flavor explosion to your taste buds. So get in that kitchen, roll up those sleeves, and embrace the joy of creating something utterly delightful!
As always, I’d love to hear how your Nectarine Salsa turns out! Share your adventures in the comments below, and don’t forget to spread the love—food tastes even better when shared. Happy cooking, and I’ll catch you next time at Feastical! 🍽️✨
Print
Nectarine Salsa
- Total Time: 30 minutes
- Yield: 4 servings 1x
- Diet: Vegan
Description
A vibrant and refreshing Nectarine Salsa that perfectly captures the essence of summer, great for pairing with grilled meats, tacos, or as a dip.
Ingredients
- 2–3 nectarines, diced (about 2 cups)
- 1 tomato, diced (about 1 cup)
- 1 cup cilantro, minced
- 1/4 cup shallot, diced (or substitute red onion)
- 1 bird’s eye chili, seeds removed, finely diced (or substitute jalapeño)
- 1 tablespoon lime juice (plus more to taste)
- 1 teaspoon honey or sugar
Instructions
- Prepare the Produce: Wash the nectarines and tomato, then dice the nectarines into bite-sized pieces.
- Dicing the Tomato: Chop the tomato into similar-sized pieces, keeping the juices.
- Chop the Shallot: Slice and finely chop the shallot or red onion.
- Cilantro Magic: Rinse and chop the cilantro to release aromatic oils.
- Mix it All Together: In a large bowl, combine the diced nectarines, tomato, shallots, and cilantro.
- Add the Heat: Finely chop the bird’s eye chili and toss it into the salsa mixture.
- Lime Juice and Sweetness: Squeeze fresh lime juice over the salsa and add honey or sugar, then stir and taste.
- Chill Before Serving: Allow the salsa to chill in the fridge for at least 30 minutes.
- Taste and Adjust Again: After chilling, taste and adjust lime or salt if needed.
- Ready to Serve: Enjoy your Nectarine Salsa fresh and vibrant!
Notes
Perfect for serving with tacos, grilled meats, or as a refreshing dip with chips. Try adding diced avocado or mango for variation.
- Prep Time: 15 minutes
- Cook Time: 0 minutes
- Category: Appetizer
- Method: Mixing
- Cuisine: Mexican
Nutrition
- Serving Size: 2 tablespoons
- Calories: 30
- Sugar: 2.5g
- Sodium: 5mg
- Fat: 0.5g
- Saturated Fat: 0g
- Unsaturated Fat: 0.5g
- Trans Fat: 0g
- Carbohydrates: 8g
- Fiber: 1g
- Protein: 0.5g
- Cholesterol: 0mg
Keywords: nectarine salsa, summer recipes, fresh salsa, healthy dip, vegan condiments