
Fresh Cherry Cake: Easy 30-Minute Summer Dessert Recipe
Discovering the Sweetness of Fresh Cherry Cake
Hey there, fellow foodies! It’s Beau Collier, and I’m so excited to share one of my all-time favorite recipes with you today – Fresh Cherry Cake! If you’re looking for a deliciously vibrant dessert that’ll leave your taste buds dancing and your friends begging for the recipe, you’ve hit the jackpot! Imagine biting into a moist, fluffy cake bursting with luscious cherries. It’s like summer on a plate, and your kitchen is the happy hub of this tasty adventure.
Fresh cherry cake isn’t just another dessert; it’s a slice of nostalgia for me. You see, I grew up in a family where baking was akin to art, and our kitchen was always filled with delightful scents and sounds – the whir of the mixer, the laughter of loved ones, and of course, the delightful “oohs” and “aahs” as desserts made their grand entrance.
Every summer, we’d visit a little cherry orchard not too far from our home, and I remember running around with my siblings, eyes wide in wonder as we picked the ripest cherries. The process was so magical: selecting the juiciest ones, filling our buckets (and our mouths), and then bringing our bounty back home to create everything from pies to preserves. One particular year, we decided to bake a cake with our freshly picked cherries, and the sweet aroma that filled our kitchen was unforgettable. That cake became an instant family classic and the star of many summer gatherings.
Now, I want to help recreate that magic in your kitchen with my twist on the original recipe. Everybody should get a taste of this cherry goodness because life is just sweeter with a slice of Fresh Cherry Cake!
Ingredients
Let’s get down to business and gather our ingredients for this delightful treat. Here’s what you need:
-
1 cup All-purpose flour
This is your go-to flour for building a solid cake structure. If you’re gluten-free, try using a gluten-free flour blend instead! -
¼ cup Almond flour
This nutty flour adds moisture and a lovely flavor. If you don’t have it, substituting with the same amount of finely ground oats can work in a pinch. -
½ cup Sugar
Regular granulated sugar works great, but feel free to experiment with raw or cane sugar for a deeper flavor. -
1 tsp Baking powder
This little magic powder helps your cake rise beautifully! -
¼ tsp Baking soda
A sprinkle of baking soda adds an extra boost; together with the baking powder, they ensure a fluffy cake. -
¼ tsp Salt
A pinch of salt enhances all the flavors and balances the sweetness. -
1 Egg
Eggs provide moisture and structure. You can swap it out for 1/4 cup of unsweetened applesauce if you’re looking for an egg-free option. -
½ cup Greek yogurt, plain
This secret ingredient not only keeps the cake moist but adds a lovely tang. Just ensure you use plain yogurt so it doesn’t alter the flavor! -
¼ cup Coconut oil
Coconut oil brings richness and a hint of tropical flair. Substitute with any neutral oil you love, such as canola or sunflower oil. -
1 tsp Vanilla extract
This classic flavor enhancer is a must! There’s nothing quite like the warmth of vanilla in baked goods. -
½ tsp Almond extract
Almond extract works its magic in this recipe, but if you’re not a fan, feel free to leave it out or increase the vanilla. -
1 cup Cherries, pitted and halved
Fresh, juicy cherries take the center stage in this cake. Tossing them in a little flour before adding helps prevent them from sinking to the bottom! -
Cherry halves and almond flakes for topping (Optional)
A decorative touch that looks as good as it tastes!
Step-by-Step Instructions
Now that we’ve gathered all our ingredients, let me guide you through the steps to create this lovely dessert. Get ready because it’s super easy, and I’ll sprinkle in a few chef hacks along the way!
-
Preheat Your Oven
Preheat your oven to 350°F (175°C). This step is crucial to ensure your cake cooks evenly from the get-go. You can pop in a baking sheet lined with parchment paper to catch any drips or excess batter. -
Prepare Your Cake Pan
Grease a 9-inch round cake pan with coconut oil or your favorite non-stick spray, and sprinkle a little flour in to coat. This will help your cake slide out easily once it’s baked. -
Mix Dry Ingredients
In a large bowl, whisk together the all-purpose flour, almond flour, sugar, baking powder, baking soda, and salt until fully combined. This ensures that all the leavening agents are evenly distributed. -
Combine Wet Ingredients
In another bowl, beat the egg until fluffy, then mix in the Greek yogurt, coconut oil, vanilla extract, and almond extract. Ensure everything is blended smoothly before combining it with the dry ingredients. -
Combine Wet and Dry
Gradually fold the wet mixture into the dry ingredients, just until combined. Overmixing can lead to a dense cake, and we want fluffy and cake-y goodness here! -
Prepare the Cherries
Toss your halved cherries in about 2 teaspoons of flour. This step is key to keeping them suspended in the batter. Fold in the floured cherries gently into your cake batter. -
Pour into Pan
Gently pour the batter into the prepared cake pan, smoothing the top with a spatula. If you like, add a few more cherry halves and almond flakes on top for a decorative touch. -
Bake
Place the cake in the oven for about 30-35 minutes. Keep an eye on it; the cake is done when a toothpick inserted in the center comes out clean. -
Cool It Down
Once baked, remove the cake from the oven and let it cool in the pan for about 10 minutes. Then, gently transfer it to a wire rack to cool completely. The smell in your kitchen is going to be irresistible!
Serving Suggestions
Alright, your Fresh Cherry Cake is cool and ready to serve! Here are a few ideas for making it even more fabulous:
-
Dust with Powdered Sugar
A light dusting of powdered sugar adds a lovely elegance and sweetness without being too overwhelming. -
Top with Whipped Cream
Serve generous dollops of fresh whipped cream or even a scoop of vanilla ice cream for an indulgent treat! -
Garnish with Fresh Cherries
You can never have too many cherries! Decorate your plated piece with a few fresh cherries on top for that pop of color and flavor. -
Pair with Coffee or Tea
Nothing complements a slice of cherry cake better than a hot cup of your favorite coffee or a nice chamomile tea.
Recipe Variations
Now that you’ve mastered the classic recipe, let’s spice things up with a few creative twists!
-
Cherry Almond Swirl
Create a marbled effect by swirling in some almond paste or by mixing a tablespoon of almond extract into half of the batter before combining! -
Chocolate Cherry Delight
Add about ½ cup of dark chocolate chips into the batter for an ooey-gooey chocolate surprise in every bite. Chocolate and cherries are a match made in heaven! -
Coconut Cherry Cake
Add shredded coconut into the batter for a tropical twist that complements those sweet cherries beautifully. -
Lemon Zest Punch
Zest a lemon into your batter for a zesty pop that adds brightness to the sweet cherries. It’s floral and fruity in the best way! -
Vegan Cherry Cake
Swap the egg for flaxseed meal mixed with water, use non-dairy yogurt, and coconut oil for a vegan-friendly version!
Chef’s Notes
Over the years, this Fresh Cherry Cake has seen many iterations in my kitchen, often inspired by the seasons. I first started making it during those sweet summer months when cherries are bursting with flavor. You know, the delicious kind that practically begs to be baked into a cake! One year, I was in a rush to celebrate a friend’s birthday and mixed up a batch in under 30 minutes. It became an instant hit, and I decided I had to share it with everyone!
And let me tell you, the joy of seeing my friends take that first bite and their expressions light up—it’s everything. Don’t be surprised if this cake becomes your go-to for gatherings and celebrations, too!
FAQs and Troubleshooting
1. My cake sank in the middle; what went wrong?
This can happen if the batter is overmixed, or there wasn’t enough leavening. Ensure to fold gently and measure your ingredients accurately!
2. Can I use frozen cherries instead of fresh ones?
Absolutely! Just make sure to thaw and drain them well before incorporating them into your batter, as excess moisture can affect the texture.
3. How can I tell when the cake is done?
A toothpick inserted into the center should come out clean or with only a few crumbs stuck to it. If it comes out sticky, it needs a bit longer in the oven.
4. The cake is too dry; how can I avoid this in the future?
Be careful not to overbake! Every oven is different, so check for doneness a few minutes before the recommended baking time.
Nutritional Info
Now that we’ve shared the love with this delicious Fresh Cherry Cake, let’s glance at the nutritional information (per serving, assuming you cut your cake into 8 slices):
- Calories: Approx. 220
- Total Fat: 10g (Saturated Fat: 4g)
- Cholesterol: 30mg
- Sodium: 135mg
- Total Carbohydrates: 30g (Dietary Fiber: 1g, Sugars: 12g)
- Protein: 4g
It’s always nice to indulge a little and enjoy the sweet things in life, isn’t it?
Final Thoughts
There you have it, friends! Your guide to creating a culinary masterpiece with Fresh Cherry Cake that’s equal parts delicious and nostalgic. This recipe is perfect for summer barbecues, birthday parties, or even quiet weekends when you want to treat yourself to something special.
Remember, the kitchen is not just a place to cook—it’s where memories are made, laughter is shared, and flavor takes the spotlight. So, gather those ingredients, roll up your sleeves, and let’s bake something truly memorable today. I can’t wait to hear how your Fresh Cherry Cake turns out and the stories you’ll share around it! Happy baking!
Print
Fresh Cherry Cake
- Total Time: 50 minutes
- Yield: 8 servings 1x
- Diet: Vegetarian
Description
A moist and fluffy cake bursting with fresh cherries, perfect for summer gatherings.
Ingredients
- 1 cup All-purpose flour
- ¼ cup Almond flour
- ½ cup Sugar
- 1 tsp Baking powder
- ¼ tsp Baking soda
- ¼ tsp Salt
- 1 Egg
- ½ cup Greek yogurt, plain
- ¼ cup Coconut oil
- 1 tsp Vanilla extract
- ½ tsp Almond extract
- 1 cup Cherries, pitted and halved
- Cherry halves and almond flakes for topping (optional)
Instructions
- Preheat your oven to 350°F (175°C).
- Grease a 9-inch round cake pan with coconut oil and sprinkle flour to coat.
- Whisk together flour, almond flour, sugar, baking powder, baking soda, and salt in a large bowl.
- Beat the egg in another bowl and mix in Greek yogurt, coconut oil, vanilla extract, and almond extract.
- Fold the wet mixture into the dry ingredients until just combined.
- Toss the halved cherries in about 2 teaspoons of flour and gently fold them into the batter.
- Pour the batter into the prepared cake pan, smoothing the top with a spatula.
- Bake for about 30-35 minutes, or until a toothpick comes out clean.
- Cool the cake in the pan for 10 minutes, then transfer to a wire rack to cool completely.
Notes
Serve with powdered sugar, whipped cream, fresh cherries, or pair with coffee or tea for the perfect accompaniment.
- Prep Time: 15 minutes
- Cook Time: 35 minutes
- Category: Dessert
- Method: Baking
- Cuisine: American
Nutrition
- Serving Size: 1 slice
- Calories: 220
- Sugar: 12g
- Sodium: 135mg
- Fat: 10g
- Saturated Fat: 4g
- Unsaturated Fat: 6g
- Trans Fat: 0g
- Carbohydrates: 30g
- Fiber: 1g
- Protein: 4g
- Cholesterol: 30mg
Keywords: cherry cake, summer dessert, baking recipes

No-Bake Cookie Dough Bites: Fast, Creamy Dessert in Minutes
Indulgent No-Bake Cookie Dough Bites Recipe: Easy Dessert Bliss
Hey there, fellow food lovers! If you’re anything like me, the mere thought of cookie dough can make your heart race with excitement. There’s just something so delightful about that creamy, slightly sweet dough that brings us back to our childhood days of sneaking spoonfuls straight from the mixing bowl. Today, I’m so thrilled to share a recipe that combines that nostalgic joy with the grown-up bliss of indulgent treats: No-Bake Cookie Dough Bites. Trust me, these are as easy to whip up as they are to devour!
A Little Taste of Nostalgia
You know, I can’t help but smile when I think back to my childhood kitchen adventures with my mom. Every Saturday, we’d bake chocolate chip cookies, and like clockwork, I’d sneakily scoop up a spoonful of cookie dough when she wasn’t looking. I remember her chuckling and shaking her head, reminding me that raw flour and eggs weren’t exactly the healthiest choice, but that never stopped me from indulging in a little cookie dough heaven!
Fast forward a few years, and I found myself in a bit of a dilemma. I still craved that incredible taste of cookie dough but wanted something safe to snack on. Enter my No-Bake Cookie Dough Bites! They are perfect for satisfying your sweet tooth without any of the risks of traditional cookie dough—no eggs and heat-treated flour make this treat a total win! Plus, they’re easy to customize, allowing you to experiment with flavors and fillings. Let’s get rolling!
Ingredients
Here’s a quick rundown of the ingredients for these heavenly No-Bake Cookie Dough Bites:
-
1 stick Unsalted Butter (Softened)
The star ingredient! Butter adds a rich flavor and smooth texture. If you want to keep it vegan, feel free to swap in dairy-free butter. -
1/2 cup Light Brown Sugar
This brings the perfect sweetness and caramel-like depth to your bites. If you prefer not to use brown sugar, coconut sugar is a great alternative! -
2 tablespoons Milk
Just a splash for moisture! Use any milk you like—almond, soy, or oat milk work brilliantly for a dairy-free version. -
1 teaspoon Vanilla Extract
A must for that warm, comforting flavor! Homemade vanilla extract is easy to make and super tasty if you’re feeling adventurous. -
1 cup All-Purpose Flour (Must be heat-treated)
Heat-treating eliminates any potential pathogens in flour, making it safe to eat raw. You can also use gluten-free flour if needed! -
1/4 teaspoon Salt
A pinch of salt intensifies the sweetness and balances out all the flavors. Trust me, it’s a crucial step! -
1/2 cup Mini Chocolate Chips
Because who can resist more chocolate? Mini chips meld perfectly into the dough and give those delightful bites a perfect pop! -
1 cup Semisweet or Milk Chocolate
This is for coating the cookie dough bites. Use whichever chocolate suits your taste buds—dark chocolate would be divine too! -
1 tablespoon Coconut Oil or Vegetable Oil (Optional)
If you want a smoother chocolate coating, adding a bit of oil can help thin it out. Coconut oil lends a subtle flavor and sheen, making everything look extra gourmet!
Step-by-Step Instructions
Alright, my foodie friends, let’s get down to the fun part—making these delightful bites! Follow me as we craft these little pieces of cookie dough bliss.
-
Prep Your Kitchen: First thing’s first, we’ll want to make sure our kitchen is ready for action. Grab a mixing bowl, a spatula, and a baking sheet lined with parchment paper. The parchment makes clean-up so much easier!
-
Cream the Butter and Sugar: In your mixing bowl, combine the softened unsalted butter and brown sugar. Use your spatula or an electric mixer to beat them together until it’s creamy and smooth—about 2-3 minutes. Tip: The softer your butter, the easier this will be, so let it sit out for a bit before starting.
-
Add Milk and Vanilla: Pour in the milk and vanilla extract, and mix it all together until combined. If you like your dough on the sweeter side, you can always taste and adjust with a little more vanilla!
-
Mix in the Flour and Salt: Now for the magic! Gradually add in your heat-treated flour and the salt. I like to do this a little at a time, mixing as I go to avoid a flour explosion! Your mixture should come together into a lovely, thick dough.
-
Fold in the Chocolate Chips: Grab your mini chocolate chips and fold them into the dough using a spatula. You want to have an even distribution so every bite has those chocolatey bits we all love!
-
Form the Bites: Once your dough is ready, it’s time to form them into bites. Use your hands to roll out about 1-inch balls and place them on your prepared baking sheet. I find it helps to slightly dampen my hands, making the rolling process easier and less sticky!
-
Chill Out: Pop those cookie dough balls in the fridge for about 30 minutes. This will help them firm up and be less likely to fall apart when coating them in chocolate.
-
Melt the Chocolate: While they’re chilling, melt your semisweet or milk chocolate. You can do this in the microwave in 30-second intervals, stirring after each session until it’s completely smooth. If using, mix in the coconut oil for that ultra-smooth coating.
-
Coat the Dough Bites: Once your cookie dough bites are chilled, it’s time for the fun part! Dip each ball into the melted chocolate, making sure it’s fully coated. Return to the parchment-lined sheet afterward.
-
Set Them Up: Once all your bites are coated, pop them back into the fridge for another 15-20 minutes until the chocolate hardens. Then, it’s finally time to enjoy your incredible creation!
Serving Suggestions
Now that you’ve made these sensational No-Bake Cookie Dough Bites, here are a few fun ways to serve them up:
-
On a Dessert Platter: Arrange them on a pretty serving tray and dust with a sprinkle of sea salt for an extra touch of flair. They’ll shine bright among your favorite desserts!
-
Coffee Companion: Pair your bites with a cup of coffee or hot cocoa for the ultimate cozy treat. The chocolatey goodness complements that warm beverage perfectly!
-
Gift Them: Pack these bites into a mason jar tied with a ribbon for a sweet gift. They make great presents for friends, family, or anyone with a sweet tooth!
Recipe Variations
Love to mix things up? Here are some fun variations and twists you can try with your No-Bake Cookie Dough Bites:
-
Peanut Butter Lovers: Add ¼ cup of creamy peanut butter to your dough mixture for a delicious nutty flavor. You can also roll them in crushed peanuts for an added crunch!
-
Add Some Crunch: Mix in ¼ cup of chopped nuts, like walnuts, pecans, or almonds, to add a delightful texture to your cookie dough bites.
-
Spiced Up Dough: Looking for something a little different? Add a pinch of cinnamon or a sprinkle of nutmeg to the butter-sugar mix. It gives your bites a warm, cozy flavor that’s perfect for fall!
-
Nut-Free Version: If you want these bites to be nut-free, swap any nut products for sunflower seed butter, and be sure your chocolate chips are nut-free as well!
-
S’mores Style: Mix in mini marshmallows and crushed graham crackers, and use a blend of milk chocolate. A fun twist that’ll take you back to campfire nights!
Chef’s Notes
Ah, the journey of recipe creation is always full of delightful surprises! I’ve played around with this cookie dough bites recipe a ton over the years. From adding different mix-ins to experimenting with various chocolate coats, each trial has brought me closer to the perfect bite. One of my favorite iterations was adding a layer of crushed Oreos into the dough—it was a total game-changer!
Every aspiring chef has their mishaps in the kitchen, and trust me, I’ve had my fair share! The time I tried melting chocolate with butter on the stovetop led to a delightful disaster of burnt chocolate. Lesson learned: always use low heat, or better yet, melt in the microwave for a safer option!
FAQs and Troubleshooting
-
Can I use regular flour instead of heat-treated?
Nope! Use heat-treated flour to ensure it’s safe to eat raw. You can find it pre-heat-treated or easily make your own by baking it in a preheated oven at 350°F for about 5-7 minutes. -
Why did my dough come out crumbly?
If your dough is too crumbly, it might be due to too much flour. Next time, reduce the flour slightly or add a splash more milk to bring it all together. -
How do I store these bites?
Store in an airtight container in the fridge for up to a week. If you find you have extras, you can freeze them for longer storage. Just thaw them in the fridge when you’re ready to indulge! -
Can I sub the chocolate?
Absolutely! You can use white chocolate, dark chocolate, or even carob chips if you’re looking for a healthier option. Just keep the ratios consistent!
Nutritional Info
While I always recommend indulging in moderation, here’s a rough estimate of the nutritional value per No-Bake Cookie Dough Bite (assuming you make around 20 bites total):
- Calories: Approximately 120
- Fat: 7g
- Carbohydrates: 12g
- Sugar: 8g
- Protein: 1g
Feel free to make swaps or adjustments depending on dietary preferences, like using dairy-free options or different sweeteners, to make your bites fit your nutritional needs!
Final Thoughts
Creating these No-Bake Cookie Dough Bites is not just about satisfying that sweet tooth; it’s about reliving those cherished moments from my kitchen while creating new ones with you. This fun recipe invites you to take your first step into the world of no-bake desserts and embrace the joys of improvisation in the kitchen.
Gather your loved ones, roll up those sleeves, and whip up these delicious bites that practically scream comfort! Whether it’s an afternoon snack, a party treat, or a late-night indulgence, you won’t be able to resist their charm. Now, let’s give yourself a hearty hug in the form of indulgent bites and keep spreading the love through feel-good food, one bite at a time! Happy cooking!
Print
No-Bake Cookie Dough Bites
- Total Time: 45 minutes
- Yield: 20 bites 1x
- Diet: Vegetarian
Description
Indulge in these delightful No-Bake Cookie Dough Bites, combining the nostalgic taste of cookie dough with a safe twist—no eggs and heat-treated flour!
Ingredients
- 1 stick Unsalted Butter (Softened)
- 1/2 cup Light Brown Sugar
- 2 tablespoons Milk
- 1 teaspoon Vanilla Extract
- 1 cup All-Purpose Flour (Must be heat-treated)
- 1/4 teaspoon Salt
- 1/2 cup Mini Chocolate Chips
- 1 cup Semisweet or Milk Chocolate (for coating)
- 1 tablespoon Coconut Oil or Vegetable Oil (Optional)
Instructions
- Prep Your Kitchen: Prepare your mixing bowl, spatula, and a baking sheet lined with parchment paper.
- Cream the Butter and Sugar: In a mixing bowl, combine softened unsalted butter and brown sugar and beat until creamy—about 2-3 minutes.
- Add Milk and Vanilla: Mix in the milk and vanilla until combined.
- Mix in the Flour and Salt: Gradually add heat-treated flour and salt, mixing until a thick dough forms.
- Fold in the Chocolate Chips: Incorporate mini chocolate chips into the dough for even distribution.
- Form the Bites: Roll out 1-inch balls and place them on the prepared baking sheet.
- Chill Out: Refrigerate the cookie dough balls for about 30 minutes.
- Melt the Chocolate: Melt semisweet or milk chocolate in the microwave until smooth, adding coconut oil if desired.
- Coat the Dough Bites: Dip each ball into melted chocolate, ensuring it’s fully coated, and return to the lined sheet.
- Set Them Up: Chill again for 15-20 minutes until the chocolate hardens.
Notes
Store in an airtight container in the fridge for up to a week. Optional variations include adding peanut butter or nuts.
- Prep Time: 15 minutes
- Cook Time: 0 minutes
- Category: Dessert
- Method: No-Bake
- Cuisine: American
Nutrition
- Serving Size: 1 bite
- Calories: 120
- Sugar: 8g
- Sodium: 50mg
- Fat: 7g
- Saturated Fat: 4g
- Unsaturated Fat: 3g
- Trans Fat: 0g
- Carbohydrates: 12g
- Fiber: 0g
- Protein: 1g
- Cholesterol: 30mg
Keywords: cookie dough, no-bake dessert, easy treat, snack, indulgent, sweet bites
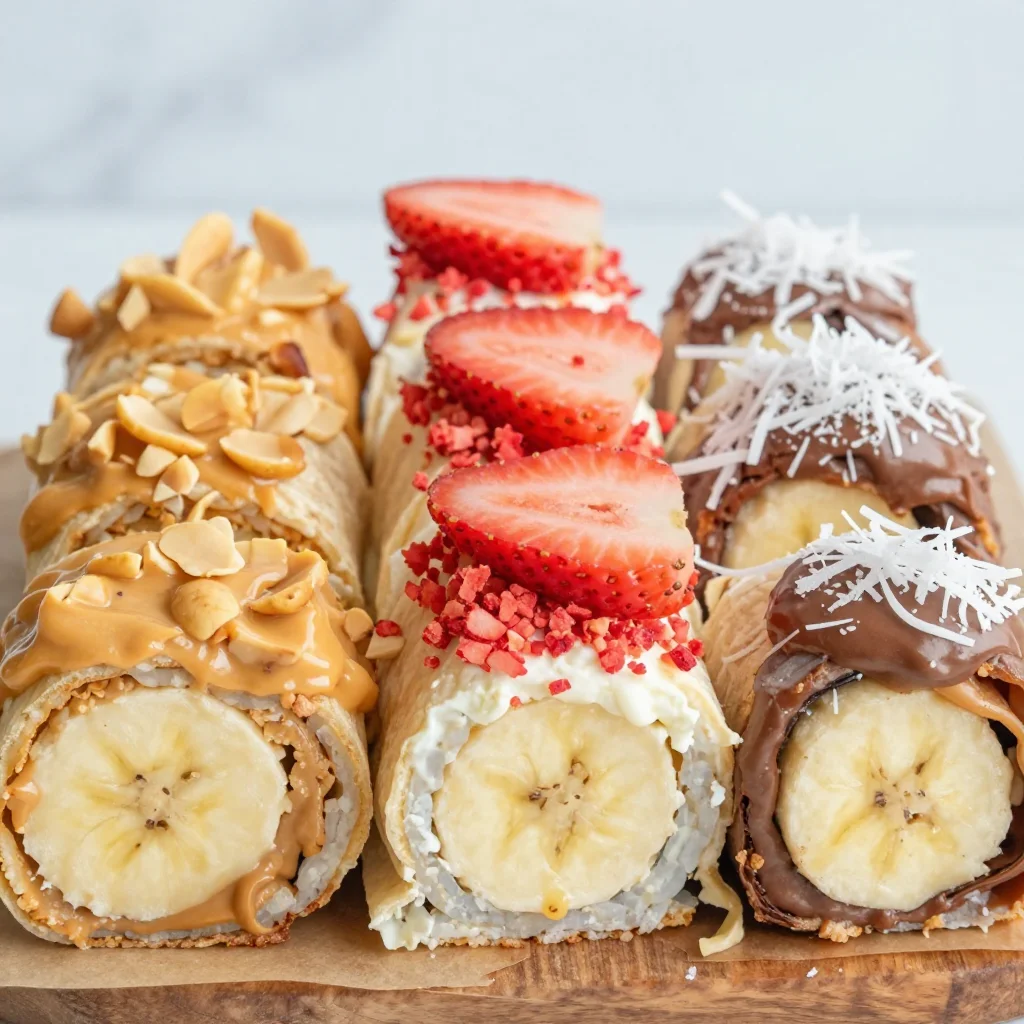
Banana Sushi
Banana Sushi: A Fun Twist on a Classic Snack!
Hey there, fellow food lovers! Welcome back to Feastical! Today, I’m thrilled to share a quirky recipe that combines two of my favorite things: bananas and sushi! Wait, wait—before you raise an eyebrow and click away, let me explain why you should keep reading. This delightful dish is a playful take on traditional sushi, and it’s perfect for a snack, a fun breakfast, or even a dessert. Trust me; it’s as tasty as it is entertaining!
Why banana sushi? Well, we all know bananas are a fantastic source of potassium and they make for an easy, healthy snack. But why stop there when we can jazz them up with a little creativity? Imagine wrapping those bananas in a tortilla and slathering them with scrumptious spreads, then rolling them up like sushi. This recipe is as simple as it sounds, and it’s a hit with both kids and adults alike. Not only is it a blast to make, but it’s also a perfect way to get picky eaters excited about fruit!
So, whether you’re a busy parent looking for creative snacks for your little ones or simply someone who loves to experiment in the kitchen, banana sushi is for you. Grab your favorite toppings, and let’s roll!
A Nostalgic Kitchen Memory
Let me take you back to my childhood for a moment. Picture this: I’m about nine years old, standing on a stool in the kitchen, playing mad scientist with my mom. We loved to create weird and wonderful food combinations. One sunny Saturday morning, when we were supposed to be making pancakes, I spied a bunch of bananas on the counter. My mind immediately went wild with ideas. “What if we rolled them up in something?” I shouted in excitement.
Mom, always the adventurous spirit, decided to go along with my crazy idea. We pulled out the tortillas and the peanut butter—it’s always peanut butter in our house! Fast forward to our first taste of the banana sushi, and it was love at first bite! The creamy peanut butter, the sweetness of the banana, and that satisfying crunch from the peanuts created a flavor explosion in my mouth! That moment sparked a tradition in our home. Whenever we were feeling creative or needed a fun snack, we went straight for the banana sushi.
As I grew older, I would show my friends this quirky dish, and every single time, it elicited gasps and giggles. The creativity and joy of wrapping up a banana in a tortilla and jazzing it up with spreads and toppings always reminded me of those carefree weekends spent in the kitchen with Mom. Join me in rediscovering this childhood favorite, and let that same joy roll into your kitchen as we make banana sushi together today!
Ingredients
Let’s gather our ingredients! This recipe is incredibly versatile, but here’s the basic lineup for your banana sushi creation:
-
1 taco-size flour tortilla: Soft and pliable; it’s the perfect base. You can also use gluten-free tortillas for a healthier option or if you’re gluten-sensitive.
-
1 ripe but firm banana: You want it ripe enough for sweetness but firm enough to hold the roll together! If it’s too ripe, it could get mushy.
-
3 tablespoons peanut butter (divided): This nutty spread is a classic choice! Don’t have peanut butter? Almond butter or any nut butter will work wonderfully.
-
½ cup chopped peanuts: The crunchy texture adds an awesome contrast. If you’re nut-free, try using crispy rice cereal for the same crunch.
-
3 tablespoons softened cream cheese (divided): Creamy and smooth; it complements the flavors beautifully. For a vegan option, go for dairy-free cream cheese.
-
2 strawberries (thinly sliced): Fresh fruit is an excellent way to add brightness to your sushi! Any berry would work; think blueberries or raspberries, too!
-
2 tablespoons crushed freeze-dried strawberries: They pack a punch of flavor and a bit of whimsy. You can swap these out for crushed nuts or granola.
-
3 tablespoons Nutella (divided): Chocolate lovers will adore this! For a twist, try using cookie butter or a caramel spread if that tickles your fancy.
-
2 tablespoons shredded coconut: A tropical touch that brings it all together! Use sweetened or unsweetened depending on your preference.
With these ingredients, the flavor combinations are endless—so don’t be afraid to mix and match!
Step-by-Step Instructions
Ready to roll? Here’s how to whip up your very own banana sushi!
-
Prepare Your Workspace: Clear a space on your kitchen counter and gather all your tools—your tortillas, spreads, toppings, and a good knife. Making sushi is more fun when everything is within reach!
-
Spread the Goodness: Take one flour tortilla and place it on a clean surface. Using a spatula, spread one tablespoon of peanut butter evenly across the tortilla. Don’t be shy—leave a little bit of room around the edges so it doesn’t ooze out when you roll it. The peanut butter acts like glue, keeping everything together.
-
Bring On the Banana: Next, grab your ripe banana. Peel it and place it roughly in the center of the tortilla. Feel free to lay it diagonally for a more appealing roll! This is your anchor, so make sure it’s stable.
-
Top It Off: If you’re making the peanut butter version, sprinkle half of your chopped peanuts over the banana. Need extra crunch? Go crazy and add sugary granola or crispy rice cereal instead!
-
Roll It Up: Now we’re getting to the fun part! To roll, fold in both edges of the tortilla, then take one end and start rolling tightly but gently over the banana. Just like rolling a burrito, but with more flair! When you reach the end, it should hold together well.
-
Slice and Serve: With a sharp knife, slice the banana sushi into rounds—about 1-inch pieces work perfectly! Arrange them beautifully on a plate. It’s like sushi, but way sweeter and way less intimidating.
-
Repeat for More Flavors: Come on, you know you want to try all the variations. Repeat steps 2 through 6 with your cream cheese and strawberry combo, and your Nutella and coconut option! Mix up the spreads and toppings for each roll—your plate will look like a work of art!
-
Taste Test Time: Now, dig in! Enjoy the gooey goodness of the peanut butter, the creaminess of the cream cheese, or the chocolate-flavor explosion from Nutella. Each different combination will tickle your taste buds!
Serving Suggestions
Serving banana sushi is an art—so let’s make it look as delicious as it tastes! Here’s how to plate up your creation:
-
Colorful Platter: Use a bright, colorful plate to make your banana sushi pop. A vibrant platter not only enhances the aesthetic but also invites you to dive in.
-
Garnish with Fresh Fruit: Surround your sushi with fresh fruit like sliced strawberries or kiwi. This adds color and freshness while complimenting the flavors beautifully.
-
Drizzle of Honey or Chocolate: For extra sweetness, drizzle honey or some melted chocolate on top of your sushi platter. This simple touch elevates the dish and provides a delightful finishing touch.
-
Fun Dipping Sauces: Serve with small bowls of yogurt, chocolate sauce, or maple syrup for an interactive experience! Who doesn’t love to dip?
-
Creative Stacking: Stack the sushi rolls high and secure them with a toothpick or small skewer. It makes for an eye-catching display at any gathering or snack time!
Recipe Variations
Now that you’ve mastered the classic banana sushi, it’s time to get creative! Here are some fun variations to try:
-
Tropical Coconut Delight: Use almond butter instead of peanut butter and top with shredded coconut and crushed pineapple for a tropical twist.
-
Chocolate Lover’s Dream: Layer Nutella on the tortilla and sprinkle mini marshmallows and graham cracker crumbles on the banana for a s’mores-style sushi!
-
Berry Blast: Swap in cream cheese for whipped cream cheese sweetened with a touch of honey, and top with a medley of mixed berries like blueberries, raspberries, and strawberries.
-
Savory Spin: If you’re feeling adventurous, try a savory version by spreading hummus on the tortilla and adding some sliced veggies like cucumber or bell peppers to the roll.
-
Nut-Free Version: If you’re looking for something nut-free, try a sun butter (sunflower seed butter) as your spread, and toss in some raisins or dried cranberries for added texture.
Chef’s Notes
This banana sushi recipe has become a staple in my house over the years. It’s fascinating to see how something so simple can bring so much joy. I often tell my friends that this dish is a reminder that food doesn’t have to be fancy to create happy moments. The laughter in the kitchen while making these sushi rolls is worth more than a Michelin star in my book!
Through the years, banana sushi has evolved for me—I’ve introduced different spreads and toppings to keep it fresh and exciting. Don’t be afraid to branch out! Get the kids involved; they’ll love the DIY aspect of it. And who knows? You might create a few new family traditions of your own!
FAQs and Troubleshooting
1. What if my banana is too ripe?
If your banana has become too soft, switch it up! Instead of rolling the banana directly, you can slice it into thick rounds and layer them on the tortilla with your spreads. It won’t hold the traditional roll shape, but it’ll still be delicious!
2. Can I use other spreads besides peanut butter or Nutella?
Absolutely! The beauty of banana sushi is its adaptability. Feel free to experiment with other spreads such as almond butter, tahini, or even yogurt. The possibilities are endless!
3. What if my tortillas are breaking while I roll?
If your tortillas are cracking, try warming them slightly in the microwave for about 10 seconds to make them more pliable. Or, look for freshly made tortillas that are softer.
4. How do I store leftovers?
If you happen to have any leftovers (a rare occurrence with this recipe!), wrap them in plastic wrap and store them in the fridge for a few hours. They’re best enjoyed fresh, so I recommend making them right before serving whenever possible.
Nutritional Info
Banana sushi can be a fun and nutritious snack or dessert. Here’s a rough estimate of the nutritional values for one roll of banana sushi (based on a recipe with a peanut butter filling):
- Calories: 280
- Protein: 8g
- Fat: 12g
- Carbohydrates: 40g
- Fiber: 5g
- Sugars: 10g
(Bear in mind that nutritional values will vary depending on the specific ingredients used.)
Final Thoughts
Banana sushi isn’t just a recipe; it’s an experience—a fun way to get creative in the kitchen and share delightful flavors with family and friends. It’s all about embracing the joy of cooking and making memories. So next time you’re craving something yummy, don’t reach for the same old snack. Instead, whip up some banana sushi!
Whether you keep it classic with peanut butter or venture into more exotic flavors, the underlying joy is what counts. Get your loved ones involved, turn on some music, and make it a little celebration in your kitchen. Remember, the best meals are made not just with ingredients but with laughter, love, and a sprinkle of creativity!
Happy sushi rolling! 🍌🍣
Print
Banana Sushi
- Total Time: 10 minutes
- Yield: 2 servings 1x
- Diet: Vegetarian
Description
A fun twist on a classic snack combining bananas and sushi, perfect for a snack, breakfast, or dessert.
Ingredients
- 1 taco-size flour tortilla
- 1 ripe but firm banana
- 3 tablespoons peanut butter (divided)
- ½ cup chopped peanuts
- 3 tablespoons softened cream cheese (divided)
- 2 strawberries (thinly sliced)
- 2 tablespoons crushed freeze-dried strawberries
- 3 tablespoons Nutella (divided)
- 2 tablespoons shredded coconut
Instructions
- Prepare Your Workspace: Clear a space on your kitchen counter and gather all your tools—your tortillas, spreads, toppings, and a good knife.
- Spread the Goodness: Take one flour tortilla and place it on a clean surface. Using a spatula, spread one tablespoon of peanut butter evenly across the tortilla.
- Bring On the Banana: Peel your ripe banana and place it roughly in the center of the tortilla.
- Top It Off: If you’re making the peanut butter version, sprinkle half of your chopped peanuts over the banana.
- Roll It Up: Fold in both edges of the tortilla, then take one end and start rolling tightly but gently over the banana.
- Slice and Serve: With a sharp knife, slice the banana sushi into rounds—about 1-inch pieces work perfectly!
- Repeat for More Flavors: Repeat steps 2 through 6 with your cream cheese and strawberry combo, and your Nutella and coconut option.
- Taste Test Time: Enjoy the gooey goodness of the peanut butter, the creaminess of the cream cheese, or the chocolate flavor explosion from Nutella.
Notes
Mix and match various spreads and toppings for endless flavor combinations.
- Prep Time: 10 minutes
- Cook Time: 0 minutes
- Category: Snack
- Method: No-Cook
- Cuisine: Fusion
Nutrition
- Serving Size: 1 roll
- Calories: 280
- Sugar: 10g
- Sodium: 200mg
- Fat: 12g
- Saturated Fat: 3g
- Unsaturated Fat: 6g
- Trans Fat: 0g
- Carbohydrates: 40g
- Fiber: 5g
- Protein: 8g
- Cholesterol: 5mg
Keywords: banana sushi, fun snacks, healthy snacks, dessert, kid-friendly recipe

Minute Ham and Cheese Sticks: Crispy, Kid-Friendly Bite
Ham and Cheese Sticks: An Easy, Feel-Good Snack
Hey there, food lovers! Today, I’m thrilled to share one of my absolute favorite comfort food recipes with you—Ham and Cheese Sticks. These delightful bites are not only delicious but also incredibly simple to whip up. Picture this: crispy, flaky dough wrapping around savory ham and gooey cheddar cheese, bringing joy to every single bite. They’re perfect for a quick snack, a party appetizer, or even a cozy movie night treat.
You know, it’s funny how certain foods can take you back in time, isn’t it? These Ham and Cheese Sticks remind me of weekends spent in my grandma’s kitchen, where fresh-from-the-oven snacks would fill the air with mouthwatering aromas. Grandma would often make a similar version, but hers were a bit more elaborate. I remember sitting around the kitchen table, eagerly cutting into these gooey delights, almost burning my tongue because I couldn’t wait a second longer!
As I grew older, my love for food transformed into a passion for cooking, and I realized I didn’t need fancy techniques to create something extraordinary. My recipe for Ham and Cheese Sticks reflects that ethos—it’s about embracing simplicity while savoring every flavor.
So let’s put on our aprons and dive into this wonderful world of flaky, cheesy goodness!
Personal Story
Growing up, food was a central theme in my family—an abundant source of joy, comfort, and creativity. Every Friday night was pizza night at my house, but occasionally, my grandma would surprise us with her legendary Ham and Cheese Sticks. We’d practically race to the kitchen when we heard the oven timer ding, the allure of melted cheese and golden pastry filling the air was simply irresistible.
I can still hear her laughter ringing through the house as we devoured her creations. These snacks became a family tradition, a simple pleasure that strengthened our bonds. She always believed that the best recipes are rooted in love and the stories behind them. Her kitchen was infused with warmth and laughter, and now, I try to replicate that spirit with my own twist.
With each batch of Ham and Cheese Sticks, I feel connected to those beautiful memories. It’s not just about the food; it’s about the people we share it with. So grab your apron, a friend, or your family, and let’s create some more magic in the kitchen!
Ingredients
Now, let’s gather all the ingredients you’ll need for these Ham and Cheese Sticks:
-
1 can of flaky crescent dough
- This is the base of our sticks. You can find it in almost any grocery store. If you want to mix things up, you can use puff pastry instead, which will give you an even flakier texture.
-
8 slices of deli ham
- I love using black forest ham for its rich flavor, but feel free to switch it up! Honey ham or even turkey slices work wonderfully if you’re looking for a lighter option.
-
8 slices of cheddar cheese
- You can’t go wrong with classic cheddar here! For an extra flavor kick, try using pepper jack or gouda. Just remember, not all cheeses melt the same, so choose wisely!
-
2 tablespoons of butter
- Melted butter brushed on top gives your sticks that beautiful golden crust. You could also mix in a bit of olive oil if you want to lighten things up.
-
1 teaspoon of garlic powder
- Adds a delightful kick of flavor. If you’re feeling adventurous, you can use minced fresh garlic instead for a more robust taste.
-
Salt and pepper to taste
- Always adjust seasoning to your preference; a little sprinkle can elevate your dish to another level!
Step-by-Step Instructions
Let’s get cooking! Here’s how to turn these humble ingredients into your new favorite snack:
Step 1: Preheat Your Oven
Preheat your oven to 375°F (190°C). This ensures your Ham and Cheese Sticks will bake perfectly.
Step 2: Prepare Your Baking Sheet
Line a baking sheet with parchment paper. This will prevent sticking and make for easier cleanup—plus, who doesn’t love a clean kitchen?
Step 3: Roll Out the Crescent Dough
Open your can of flaky crescent dough and unroll it on a clean surface. Don’t be shy—this is the part where you can let your creativity shine! Pinch the seams together if they separate; we want each stick to hold its filling.
Step 4: Cut & Assemble
Using a pizza cutter or sharp knife, slice each dough triangle into two smaller triangles. Now, place a slice of ham and a slice of cheddar cheese on the wider part of the triangle. Don’t hold back—stack as much as your heart desires!
Step 5: Roll Them Up
Starting from the wider end, roll the dough triangle toward the point. As you roll, the ham and cheese will snuggle inside the dough. Place the rolled sticks seam-side down on your baking sheet, and repeat until you’ve used up all your dough.
Step 6: Butter Up!
Now it’s time to brush melted butter over each stick. This is where the magic happens; the butter will help turn your sticks a beautiful golden brown. Sprinkle garlic powder, salt, and pepper on top for extra flavor.
Step 7: Bake & Enjoy!
Slide your baking sheet into the preheated oven and bake for about 12-15 minutes, or until they’re golden brown and your kitchen smells amazing. The result is a warm kitchen filled with mouthwatering scents that will have everyone gathering around as you pull them out.
Step 8: Cool & Serve
Let your Ham and Cheese Sticks cool for a few minutes on a wire rack before digging in. This helps the cheese set a bit so you don’t burn your mouth! Trust me, patience is a virtue when cheesy goodness is involved.
Serving Suggestions
These Ham and Cheese Sticks are incredibly versatile when it comes to serving. Here are a few fun ideas:
-
Serve with Dipping Sauces: A side of spicy mustard, ranch dressing, or a tangy barbecue sauce can elevate your snacking experience. If you’re in the mood for something special, try making a simple garlic aioli.
-
Garnish with Fresh Herbs: A sprinkle of chopped parsley or chives on top adds a lovely burst of color and freshness.
-
Create a Snack Platter: Pair your sticks with an assortment of veggies and dips, or alongside a charcuterie board featuring various meats and cheeses.
-
Pack for Lunch: These tasty treats are perfect for lunchboxes! They’re easy to grab on the go and taste fantastic even when they’re not hot from the oven.
Recipe Variations
Feeling adventurous? Here are some creative twists to try out:
-
Spicy Ham and Cheese Sticks: Add jalapeño slices or red pepper flakes to give your sticks a fiery kick.
-
Herbed Cream Cheese Filling: Swap out the deli ham for a spread of herbed cream cheese and a slice of smoked salmon for a delightful brunch option.
-
Vegetarian Delight: Use roasted vegetables and mozzarella cheese for a veggie-packed version that even meat-lovers will enjoy!
-
Sweet and Savory: Spread some fig jam or peach preserves inside before adding the ham and cheese for a deliciously unique take.
-
Breakfast Version: Use scrambled eggs, breakfast sausage, and cheese to create a breakfast treat that’s perfect for lazy Sunday mornings.
Chef’s Notes
Ah, my dear friends, every recipe has a story, and this one is no exception. These Ham and Cheese Sticks have evolved over time. I remember experimenting with all sorts of fillings and doughs when I first made them and ultimately found that the classic version is still my favorite. The combination of rich cheese, savory ham, and flaky dough creates that comforting embrace we all crave.
There was a time when I was trying to impress my then-girlfriend (now wife) with my culinary skills, and I totally flubbed the first batch of these sticks. The dough split, the cheese oozed out everywhere—it was a disaster! But we had such a laugh about it, and we spent the evening in the kitchen together, creating something entirely new. And let’s be honest, sometimes the best memories come from those culinary flops.
FAQs and Troubleshooting
Let’s tackle some common questions and troubleshoot any potential hiccups you might encounter:
1. Why are my sticks not crispy?
If your Ham and Cheese Sticks come out soggy, it might be due to too much filling or not enough baking time. Make sure to roll the dough tightly and give them a good 12-15 minutes in the oven.
2. Can I prepare these in advance?
Absolutely! You can assemble them ahead of time and store them in the fridge. Just pop them in the oven when you’re ready for a delicious snack.
3. What should I do if my cheese isn’t melting?
Be sure to use a good melting cheese like cheddar or mozzarella. If you’re using alternatives, check that they’re suitable for melting to avoid disappointment!
4. Can I freeze these?
Yes, you can freeze the assembled sticks before baking! Just wrap them tightly in plastic wrap and store them in an airtight container. When you’re ready to enjoy them, bake from frozen—just add a few extra minutes to the baking time.
Nutritional Info
For those keeping an eye on nutritional content, here’s a general breakdown for one Ham and Cheese Stick (based on the recipe as is):
- Calories: Approx 130
- Protein: 6g
- Fat: 9g
- Carbohydrates: 8g
- Fiber: 0g
- Sodium: 300mg
Keep in mind that these values can vary based on the specific brands and ingredients you choose.
Final Thoughts
So, there you have it, my fellow foodies— a delightful dive into the world of Ham and Cheese Sticks! These easy, flavor-packed snacks embody the spirit of comfort food and are sure to bring smiles to the faces of everyone who tries them. Whether you whip them up for a casual get-together, a party, or just as a special treat for yourself, they are bound to be a hit.
Remember, cooking is about exploration, joy, and love. So don’t be afraid to add your own twist to this recipe, just like I did with that unforgettable batch in my grandma’s kitchen. Every morsel tells a story, and I can’t wait for you to share yours!
Happy cooking, my friends—now go forth and create some magic in your own kitchen!
Print
Ham and Cheese Sticks
- Total Time: 30 minutes
- Yield: 8 servings 1x
- Diet: None
Description
Crispy, flaky dough wrapped around savory ham and gooey cheddar cheese—perfect for a snack or appetizer.
Ingredients
- 1 can of flaky crescent dough
- 8 slices of deli ham
- 8 slices of cheddar cheese
- 2 tablespoons of butter
- 1 teaspoon of garlic powder
- Salt and pepper to taste
Instructions
- Preheat your oven to 375°F (190°C).
- Line a baking sheet with parchment paper.
- Open your can of flaky crescent dough and unroll it on a clean surface.
- Using a pizza cutter, slice each dough triangle into two smaller triangles.
- Place a slice of ham and a slice of cheddar cheese on the wider part of the triangle.
- Starting from the wider end, roll the dough triangle toward the point.
- Brush melted butter over each stick and sprinkle with garlic powder, salt, and pepper.
- Slide your baking sheet into the preheated oven and bake for 12-15 minutes.
- Let your Ham and Cheese Sticks cool for a few minutes on a wire rack.
Notes
For a twist, try using different types of cheese or adding spices to the filling.
- Prep Time: 15 minutes
- Cook Time: 15 minutes
- Category: Snack
- Method: Baking
- Cuisine: American
Nutrition
- Serving Size: 1 stick
- Calories: 130
- Sugar: 1g
- Sodium: 300mg
- Fat: 9g
- Saturated Fat: 4g
- Unsaturated Fat: 5g
- Trans Fat: 0g
- Carbohydrates: 8g
- Fiber: 0g
- Protein: 6g
- Cholesterol: 15mg
Keywords: ham, cheese, snack, appetizer, comfort food
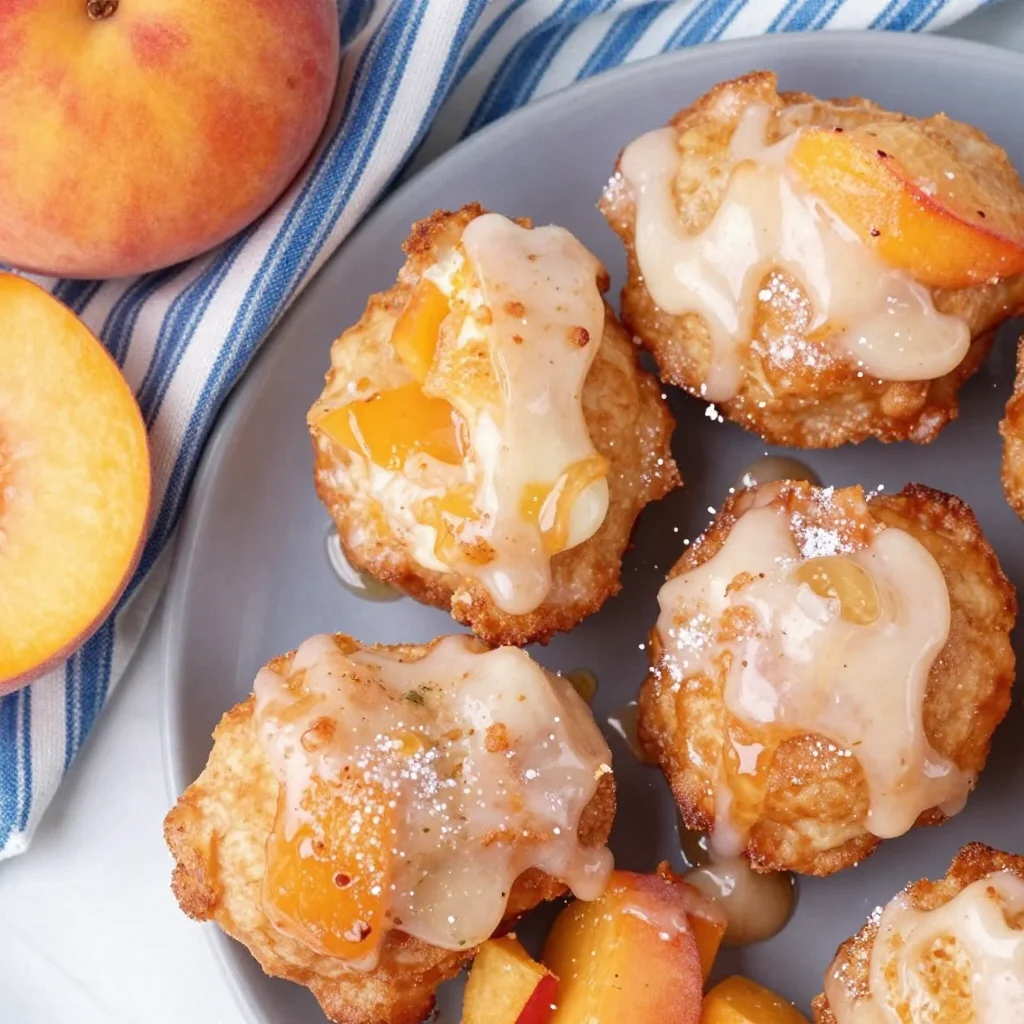
Ingredient Peach Fritters with Honey Glaze in 25 Minutes
Glazed Peach Fritters: A Sweet Summer Treat
Hey there, food lovers! Are you ready to dive into a world of sweetness and sunshine with me? Today, we’re whipping up something that’s sure to make your taste buds dance—Glazed Peach Fritters! These little gems are like little bites of happiness, capturing the essence of summer in every crispy, golden layer. Whether you’re hosting a brunch or just need a sweet pick-me-up, these fritters have got your back!
The beauty of these fritters lies not only in their taste but in their casual, approachable nature. They’re perfect for both seasoned chefs and those just finding their culinary groove. Plus, think about how wonderful it would be to bring a batch of these to your next gathering! I mean, who can resist the aroma of freshly fried dough mingling with that delightful peachy goodness?
Personal Story: A Peach of a Memory
Let me whisk you back to one sultry summer afternoon during my childhood. My grandma had an old, weathered fry pan that she cherished, and with it, she whipped up the most delightful fritters. We’d spend the summer days at her cozy farmhouse, surrounded by peach trees that seemed to stretch endlessly into the horizon. I can still remember the sweet, fragrant air wafting through the windows as we waited, hands clasped in anticipation.
One magical day, we decided to harvest the ripest peaches from her garden. With my young hands covered in sticky peach juice, we laughed and concocted a plan for Grandma’s famous fritters. Every bite we shared felt like a warm hug, reminding us that food isn’t just about nourishment; it’s about connection and nostalgia. Now, that memory fuels my desire to recreate those feelings through cooking. Each fritter I make is a tribute to those sunny afternoons spent mixing, frying, and laughing in Grandma’s kitchen.
Ingredients: Gather Your Goodies
Let’s dive into the ingredients that will bring these delightful fritters to life! Make sure you have these on hand:
-
2 cups all-purpose flour: This is your fritter base. If you’re looking for gluten-free options, a gluten-free flour blend will work wonders, but you might need to play with the liquid a bit.
-
1 tablespoon baking powder: This is your secret weapon for that fluffy, airy texture. No substitutes needed here; just make sure it’s fresh!
-
1/2 teaspoon salt: A little pinch elevates the sweetness, balancing the flavors wonderfully. You can use sea salt or kosher salt based on your preference.
-
1/4 cup granulated sugar: Sweetness is key! If you want to experiment, brown sugar adds a lovely depth of flavor.
-
1 cup buttermilk: This tangy ingredient makes the batter oh-so-rich and moist. If you don’t have buttermilk, no worries! Just mix a cup of regular milk with a tablespoon of vinegar or lemon juice and let it sit for 5 minutes.
-
2 large eggs: These help bind the mixture and add some fluffiness. You can swap with flaxseed meal mixed with water for a vegan option.
-
2 cups fresh peaches (diced): These beauties are the star of the show! Choose perfectly ripe ones that are fragrant. If peaches aren’t in season, feel free to use frozen ones—just drain the excess moisture.
-
Oil for frying: A neutral oil, like vegetable or canola, is ideal for frying. Avoid olive oil, as its lower smoke point isn’t optimal for frying.
-
1 cup powdered sugar: This will form your lovely glaze. If you want it less sweet, reduce the sugar, or use coconut sugar for a fun twist.
-
2 tablespoons milk (for the glaze): Use whatever milk you fancy—dairy, almond, soy—you name it!
Step-by-Step Instructions: Let’s Get Cooking!
Alright, friends! It’s time to put on that apron and get down to business. Here’s how to create these peach fritters step by step.
-
Prep Your Peaches: Start by washing and dicing your fresh peaches. Aim for about 1/2-inch chunks. Remember, the juicier the peach, the better the flavor! If you’re feeling adventurous, reserve some larger pieces for the garnish!
-
Mix the Dry Ingredients: In a large mixing bowl, whisk together the flour, baking powder, salt, and granulated sugar. Give it a good mix to combine everything evenly; you don’t want any unexpected pockets of salt or sugar in your fritters!
-
Combine the Wet Ingredients: In another bowl, beat the eggs and then add in the buttermilk. Mix until well combined. This creamy mixture is where the magic happens!
-
Bring It All Together: Carefully fold the wet ingredients into the dry mixture. Be gentle; you want to maintain that airiness! It’s totally okay if the batter is a little lumpy—flour pockets are just waiting to puff up beautifully in the fryer.
-
Add the Peaches: Gently fold in those marvelous diced peaches. Don’t be too rough; you want to keep the pieces intact as much as possible. Think of them as little jewels nestled into your batter.
-
Heat the Oil: In a deep pan or heavy-bottomed pot, pour in enough oil for frying. You’ll want it to be about 2 inches deep. Heat it on medium until it reaches around 350°F (175°C). A good way to test if the oil is ready is by dropping a little batter into it; if it sizzles and rises, you’re good to go!
-
Fry Away! Using a tablespoon or ice cream scoop, drop spoonfuls of the batter into the hot oil, being careful not to overcrowd the pan. Fry for about 2-3 minutes on each side or until they’re golden brown and lovely. Flip them gently with a slotted spoon when they’re perfect!
-
Drain and Cool: Once your fritters are golden, carefully transfer them to a plate lined with paper towels to drain excess oil. Let them cool for a moment as you prepare the glaze.
-
Make the Glaze: In a small bowl, whisk together powdered sugar and milk until you achieve a smooth, glossy consistency. If it’s too thick, add a tiny bit more milk!
-
Glaze Those Fritters: Drizzle or dip your cooled fritters in the glaze, letting it drip down the sides in a sweet cascade. Trust me; this step is worth every sticky finger!
Serving Suggestions: The Perfect Plate
When it comes to serving your Glazed Peach Fritters, presentation is key! Arrange them on a beautiful platter, maybe sprinkle a bit of extra powdered sugar on top for that Instagrammable touch. You could even garnish with a few fresh peach slices or mint leaves to make them pop.
For a fun twist, serve them alongside a cup of rich vanilla ice cream or a dollop of whipped cream for that indulgent dessert vibe. Got a brunch party? Place them at the center of the table for a delightful sharing experience. Everyone will want to grab a warm fritter, and trust me, they won’t last long!
Recipe Variations: Get Creative!
Want to mix things up? Here are a few creative variations to make these fritters uniquely yours:
-
Spiced Peach Fritters: Add a dash of cinnamon and nutmeg to the dry ingredients for a warm, cozy flavor twist.
-
Savory Option: How about some savory peach fritters by adding crumbled bacon or fresh herbs like basil or thyme?
-
Berry Fusion: Swap out some peaches for blueberries or raspberries for a delightful berry fritter medley.
-
Peach-Chipotle: For the adventurous, a bit of finely chopped chipotle pepper can add a smoky kick!
-
Gluten-Free Goodness: Use a gluten-free flour blend, and watch as everyone enjoys these fritters without a worry!
Chef’s Notes: A Dash of Nostalgia and Joy
Here’s a little nugget of wisdom from my kitchen: recipes evolve over time, just like our palates do. The first time I tried making these fritters, I was all over the place—I burned a few, had batter flying everywhere, and icing splatters were the least of my worries! But through all the kitchen chaos, I found that each failed attempt taught me something new.
Don’t stress if your fritters aren’t perfect the first time. Use it as an opportunity to learn and embrace that fabulous kitchen mess! Those imperfect moments can lead to the most delightful flavors. After all, the best recipes come with a side of laughter and a pinch of love!
FAQs and Troubleshooting: Your Burning Questions
-
Why did my fritters absorb too much oil?
- If your fritters absorbed oil, the oil may not have been hot enough. Make sure it’s at the right temperature (around 350°F) before frying. If they are frying too slowly, they’ll soak up excess oil.
-
Can I use frozen peaches instead of fresh ones?
- Absolutely! Just be sure to thaw them first and drain excess moisture. They’ll be just as delicious!
-
How can I store leftover fritters?
- Store any leftover fritters in an airtight container in the refrigerator. To reheat, pop them in the oven at 350°F for about 10 minutes, or until warm!
-
My batter is too thick; what do I do?
- If your batter seems overly thick, add a little more buttermilk, one tablespoon at a time, until you reach the desired consistency.
Nutritional Info
While indulging in sweet treats, it’s always nice to be aware of what you’re consuming. One glazed peach fritter will typically contain about:
- Calories: 210-250
- Carbohydrates: 30g
- Protein: 3g
- Fat: 10g
- Sugar: 8g
Adjusting the recipe may alter these nutritional values, but remember, food should be enjoyed in moderation!
Final Thoughts: Come Together Over Fritters
As we wrap up this journey of crafting Glazed Peach Fritters together, I hope you’re inspired to create your own batch in your kitchen. There’s a certain magic that happens when you cook with love—and trust me, every bite will feel like summer’s sweetest memory.
So gather your friends and family, let the aroma of these delectable fritters fill your space, and share stories and laughter around the table. After all, life is better when enjoyed with good company and great food! Don’t forget to share your fritter successes, failings, and variations with me—let’s continue to spread that warmth and creativity in the kitchen. Happy cooking, my friends!
Print
Glazed Peach Fritters
- Total Time: 35 minutes
- Yield: 12 servings 1x
- Diet: Vegetarian
Description
Delicious peach fritters that capture the essence of summer in every crispy, golden layer.
Ingredients
- 2 cups all-purpose flour
- 1 tablespoon baking powder
- 1/2 teaspoon salt
- 1/4 cup granulated sugar
- 1 cup buttermilk
- 2 large eggs
- 2 cups fresh peaches (diced)
- Oil for frying
- 1 cup powdered sugar
- 2 tablespoons milk (for the glaze)
Instructions
- Prep Your Peaches: Start by washing and dicing your fresh peaches into about 1/2-inch chunks.
- Mix the Dry Ingredients: In a large mixing bowl, whisk together the flour, baking powder, salt, and granulated sugar.
- Combine the Wet Ingredients: In another bowl, beat the eggs and then add the buttermilk.
- Bring It All Together: Carefully fold the wet ingredients into the dry mixture.
- Add the Peaches: Gently fold in the diced peaches until just combined.
- Heat the Oil: In a deep pan, heat oil to about 350°F (175°C).
- Fry Away! Drop spoonfuls of the batter into the hot oil and fry until golden brown.
- Drain and Cool: Transfer fritters to paper towels to drain excess oil.
- Make the Glaze: In a small bowl, whisk together powdered sugar and milk until smooth.
- Glaze Those Fritters: Drizzle or dip cooled fritters in the glaze.
Notes
Serve warm and enjoy with ice cream or whipped cream for an extra indulgent treat.
- Prep Time: 15 minutes
- Cook Time: 20 minutes
- Category: Dessert
- Method: Frying
- Cuisine: American
Nutrition
- Serving Size: 1 fritter
- Calories: 230
- Sugar: 8g
- Sodium: 200mg
- Fat: 10g
- Saturated Fat: 1g
- Unsaturated Fat: 7g
- Trans Fat: 0g
- Carbohydrates: 30g
- Fiber: 1g
- Protein: 3g
- Cholesterol: 25mg
Keywords: fritters, peach fritters, dessert, summer treat
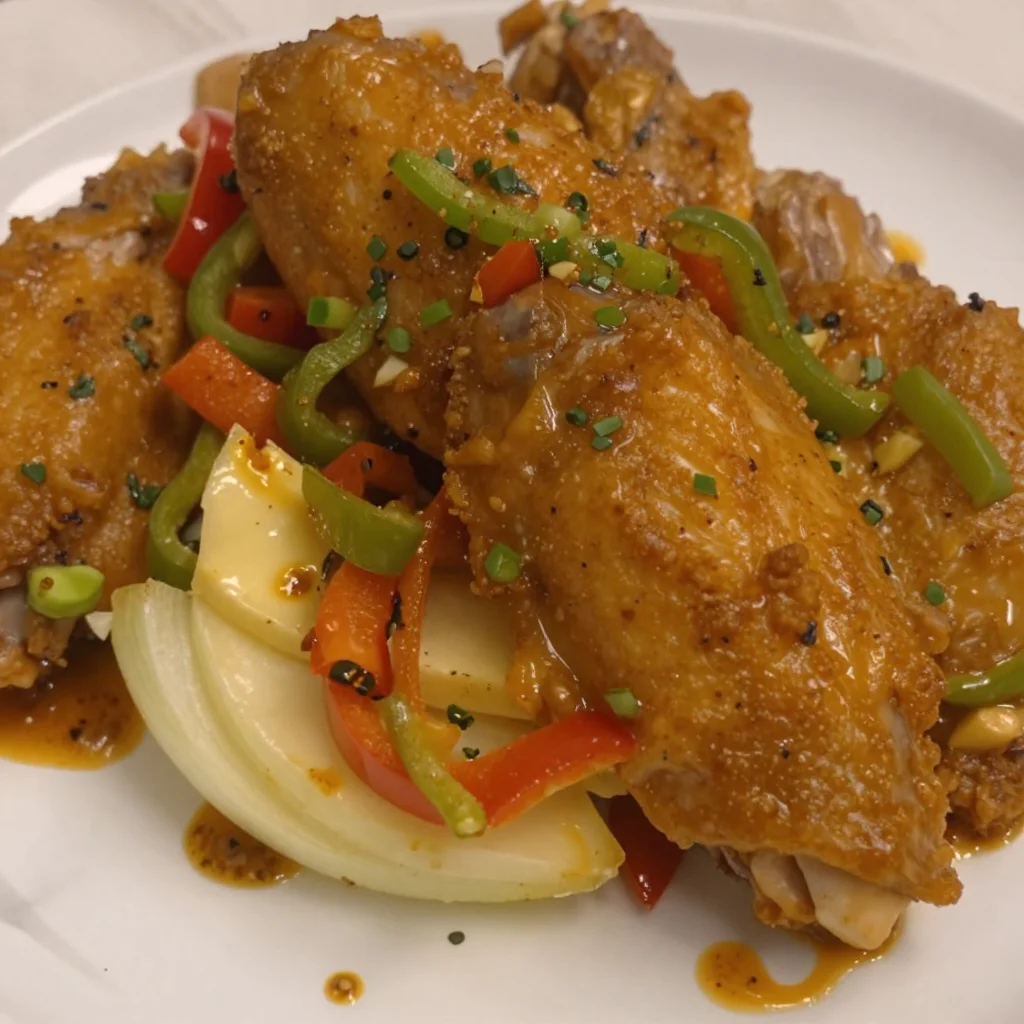
Weeknight 5-Ingredient Crispy Smothered Turkey Wings
The Best Smothered Turkey Wings: A Comfort Food Classic
Hey there, food lover! If you’re anything like me, you believe that food has the power to connect us, heal our spirits, and create unforgettable memories. Today, we’re going to cozy up with a dish that brings joy to our hearts and fullness to our bellies: the best smothered turkey wings! There’s something incredibly heartwarming about turkey wings, especially when they’re slow-cooked to perfection beneath a velvety blanket of luscious gravy. It’s the kind of dish that hugs you back, you know?
As I invite you to dive into the world of cooking these succulent wings, let me take a moment to share with you why this dish holds a special place in my heart. Picture this: My grandma, clad in her well-loved apron, whipping up a storm in her charming kitchen filled with delicious aromas. She’d gather us around the table, her laughter mingling with the sizzle of turkey wings cooking away. Those meals were more than just food; they were moments of family, love, and comfort. Now, I strive to recreate that same magic for my friends and family, and today, I want to share that experience with you!
So, roll up your sleeves, put on your favorite music, and let’s get cooking! Whether you’re preparing for Sunday dinner or a cozy weeknight meal, these smothered turkey wings are bound to become a household favorite.
A Bite of Nostalgia
One of my favorite memories around smothered turkey wings dates back to my childhood. My family would gather for holiday dinners, and my grandma would always insist on making her special recipe. This dish was non-negotiable; it had to be on the table. I remember the way she’d carefully season the wings, her hands moving with practiced ease. After they were cooked, she’d hover over the pot, spooning rich gravy over the wings before delicately plating them on a huge family-style platter.
Those meals were filled with chatter, laughter, and, of course, a little healthy family competition as we argued over who got the last wing. Smothered turkey wings were never just dinner—they were a feast of love and connection. I can still hear my grandma’s voice saying, “You’ve got to smother them in love!” It’s this heartwarming sentiment that drives me to recreate her recipe and pass it down to all of you.
Ingredients
Let’s gather our ingredients! Here’s what you’ll need to whip up the best smothered turkey wings:
-
4-5 Turkey Wing Portions (cut in half, 8-10 total): You can find these at your local grocery store or butcher. They’re perfect for smothering because they hold onto the moisture beautifully during the cooking process. If turkey wings aren’t available, you can substitute with chicken wings or even drumsticks.
-
1 tbsp All-Purpose Seasoning: A great base for flavor! You can use a store-bought blend, but I recommend making your own for a more personalized touch.
-
1 tbsp Poultry Seasoning: This classic mix adds depth and a savory touch perfect for turkey. If you’re out, you can use thyme, rosemary, and sage instead.
-
1 tbsp Cajun Seasoning: For a little kick! If you’re not keen on heat, feel free to reduce the amount or skip it altogether for a milder flavor.
-
1 tbsp Smoked Paprika: This adds a warmth and smokiness to the dish. If you don’t have it, regular paprika will work as a substitute, but you might miss that smoky essence.
-
1 tsp Italian Seasoning: A blend of dried herbs that complements the turkey beautifully. You can also opt for fresh herbs, just remember to double the amount!
-
1 tsp Celery Salt: This adds an earthy flavor; if you don’t have it, simply use regular salt, possibly with extra celery sticks for garnish later.
-
1 tsp Ground Mustard: This gives an extra zing. Yellow mustard could work in a pinch, but avoid using too much as it can easily overpower.
-
1 Large Onion (sliced): Sweet onions work well here, adding moisture and flavor. Substitute with shallots for a milder taste or green onions for a fresh finish.
-
1 Green Bell Pepper (sliced): Great for color and crunch! If you’re not a fan of green peppers, yellow or red peppers can be swapped in for a milder, sweeter flavor.
-
1 Red Bell Pepper (sliced): Beautifully sweet and adds a freshness to the dish. You can use all green peppers if you prefer a more robust taste.
-
1 Stick Unsalted Butter (sliced thinly): Butter helps create a rich sauce; if you’re looking for a lighter option, olive oil is a great substitute.
-
2 tsp Avocado Oil: This oil has a high smoke point and great health benefits. You can easily swap this with olive oil or any other vegetable oil you like.
Gather these ingredients, and you’re one step closer to a delicious homemade meal that will leave your kitchen smelling divine!
Step-by-Step Instructions
-
Prep Your Wings: Rinse your turkey wings under cold water and pat them dry with a paper towel. This helps them get a nice sear during cooking! Don’t skip this part, as moisture can hinder the browning process.
-
Season the Wings: In a large bowl, add your turkey wings. Sprinkle them with the all-purpose seasoning, poultry seasoning, Cajun seasoning, smoked paprika, Italian seasoning, celery salt, and ground mustard. Toss the wings until they’re evenly coated. Bonus tip: Let them marinate for 30 minutes if you have the time—flavor intensifies like a pro.
-
Sear the Wings: In a large skillet or Dutch oven, heat the avocado oil over medium-high heat. Add your seasoned turkey wings in batches to avoid overcrowding the pan. Sear each side for about 4-5 minutes until they’re golden brown. This step enhances the flavor and gives the wings that beautiful color.
-
Sauté the Vegetables: Once all wings are seared and removed from the pan, add a couple of tablespoons of unsalted butter. Toss in the sliced onions and bell peppers along with a pinch of salt. Cook until they’re soft and lovely—this will only take about 5-7 minutes.
-
Combine and Simmer: Return the turkey wings to the pot, layering them over the sautéed vegetables. Pour enough water or chicken broth to nearly cover the wings (about 2 cups should do). Bring everything to a gentle simmer, and then cover the pot with a lid. Reduce the heat to low and let them cook for at least 1.5 – 2 hours. This slow-cooking process is where the magic happens!
-
Add More Richness: After about an hour of simmering, add the remaining slices of butter to the pot. This helps create an oh-so-creamy gravy. It’s also time to taste—feel free to adjust seasoning as needed!
-
Thicken the Gravy: If you like a thicker gravy, use a tablespoon of cornstarch mixed with cold water to create a slurry. Stir this into the pot about 10 minutes before serving.
-
Serve Hot: Once the wings are tender and the gravy is perfect, it’s time to plate!
Serving Suggestions
When it comes to serving smothered turkey wings, I like to keep it simple and inviting. For a classic plate, serve the wings alongside fluffy mashed potatoes or steamed rice—a little sponge for soaking up all that luscious gravy! You can also pair it with cornbread for that ultimate Southern comfort feel.
To plate, grab a large, shallow bowl and ladle a generous helping of the wings, making sure to drizzle plenty of gravy over the top. Scatter some of those sautéed onions and peppers for an extra pop of color. Finally, finish with a sprinkle of fresh herbs like chopped parsley or green onions to add brightness!
Trust me, your guests will be drooling as they sit down to this feast.
Recipe Variations
Feeling adventurous? Let’s switch things up! Here are several creative twists you can try with this classic recipe:
-
BBQ Smothered Turkey Wings: Add a layer of your favorite BBQ sauce to the gravy for a sweet, tangy flavor explosion! Just mix it into the pot during the last 30 minutes of cooking.
-
Honey Garlic Turkey Wings: Incorporate minced fresh garlic and honey into the glaze before serving. It’ll sweeten up the dish beautifully!
-
Spicy Kick: Increase the Cajun seasoning or add a touch of cayenne pepper if you like a prominent kick in every bite.
-
Stout Smothered Wings: For a rich, deep flavor, replace half the liquid with a stout beer. This will bring a wonderful depth to the dish.
-
Herb Infusion: Toss in fresh herbs—a sprig of rosemary or thyme—while it simmers for an herby twist that’s simply divine.
Chef’s Notes
Ah, the beauty of cooking is that it’s ever-evolving! The recipe I’m sharing with you today has gone through many iterations. When I was first experimenting with it, I cooked the wings for too short a time, and they came out tough. It was a learning curve! Now that I’ve perfected the simmering, I can’t help but smile every time I see the deliciousness unfold in front of me.
And let me share a funny moment—once, while making this dish for a friend, I accidentally dropped a huge spoon of paprika into the pot. I panicked at first but then decided to embrace it. The dish turned out to be surprisingly delightful, landing the nickname "Smoky Surprise Wings" in our kitchen!
FAQs and Troubleshooting
1. My wings are too tough. What did I do wrong?
Ah, tough wings can be a result of not cooking them long enough! Slow cooking is key. Ensure to simmer on low until the meat is tender and falls off the bone.
2. The gravy isn’t thickening, what can I do?
You can make a slurry with cornstarch and water, stirring it into your gravy toward the end of cooking to enhance thickness.
3. Can I make this in a slow cooker?
Absolutely! Sear the wings first, then place them in your slow cooker with all the ingredients. Cook on low for 6-8 hours for an effortless meal.
4. How can I store leftovers?
Store leftover smothered turkey wings in an airtight container in the fridge for up to 3-4 days. They also freeze well—just make sure to separate them into portions for easy reheating!
Nutritional Info
Now, let’s talk nutrition! Turkey wings are a fantastic source of lean protein, making them a satisfying choice for many diets. Here’s a quick nutritional breakdown per serving (assuming 2 wings with generous gravy):
- Calories: 350-400
- Protein: 35g
- Carbohydrates: 8g
- Fat: 20g
- Fiber: 1g
Keep in mind that caloric content might vary based on the amount of gravy and sides you choose to serve. Enjoy it in moderation and savor every bite!
Final Thoughts
As we wrap up this delicious culinary adventure, I want to take a moment to thank you for joining me in the kitchen today. Cooking is about more than just filling our stomachs; it’s about sharing love, laughter, and memories with those around us. These smothered turkey wings are just the ticket to create those moments!
So, whether you’re gathering with family for a big dinner or simply treating yourself to a cozy evening at home, these wings will not disappoint. I can’t wait for you to tuck into them and declare them your new favorite dish. Remember, there’s no wrong way to enjoy food—especially when it’s made with passion.
Until next time, keep your spatula handy and your heart open for new recipes and adventures. Happy cooking!
Print
The Best Smothered Turkey Wings
- Total Time: 150 minutes
- Yield: 4 servings 1x
- Diet: Paleo
Description
A heartwarming dish of succulent turkey wings slow-cooked in a rich gravy, perfect for family gatherings and cozy dinners.
Ingredients
- 4–5 Turkey Wing Portions (cut in half, 8–10 total)
- 1 tbsp All-Purpose Seasoning
- 1 tbsp Poultry Seasoning
- 1 tbsp Cajun Seasoning
- 1 tbsp Smoked Paprika
- 1 tsp Italian Seasoning
- 1 tsp Celery Salt
- 1 tsp Ground Mustard
- 1 Large Onion (sliced)
- 1 Green Bell Pepper (sliced)
- 1 Red Bell Pepper (sliced)
- 1 Stick Unsalted Butter (sliced thinly)
- 2 tsp Avocado Oil
Instructions
- Prep your wings: Rinse your turkey wings under cold water and pat them dry with a paper towel.
- Season the wings: In a large bowl, add your turkey wings and sprinkle with all-purpose seasoning, poultry seasoning, Cajun seasoning, smoked paprika, Italian seasoning, celery salt, and ground mustard. Toss until coated and marinate for 30 minutes if possible.
- Sear the wings: Heat avocado oil in a large skillet over medium-high heat. Add seasoned turkey wings in batches and sear each side for about 4-5 minutes until golden brown.
- Sauté the vegetables: Add unsalted butter to the pan, then toss in sliced onions and bell peppers along with a pinch of salt and cook for 5-7 minutes.
- Combine and simmer: Return the turkey wings to the pot, layer over sautéed vegetables, pour enough water or chicken broth to nearly cover the wings, and simmer for 1.5 – 2 hours.
- Add more richness: After 1 hour of simmering, add remaining butter and adjust seasoning.
- Thicken the gravy: If desired, use a tablespoon of cornstarch mixed with cold water to thicken the gravy about 10 minutes before serving.
- Serve hot on a large shallow bowl, drizzling plenty of gravy over the top.
Notes
Serve with mashed potatoes or steamed rice to soak up the gravy. You can also add fresh herbs for garnish.
- Prep Time: 30 minutes
- Cook Time: 120 minutes
- Category: Main Course
- Method: Slow Cooking
- Cuisine: Southern
Nutrition
- Serving Size: 2 wings with gravy
- Calories: 375
- Sugar: 2g
- Sodium: 500mg
- Fat: 25g
- Saturated Fat: 10g
- Unsaturated Fat: 12g
- Trans Fat: 0g
- Carbohydrates: 9g
- Fiber: 1g
- Protein: 35g
- Cholesterol: 80mg
Keywords: smothered turkey wings, comfort food, turkey recipes, family dinner, Southern cooking
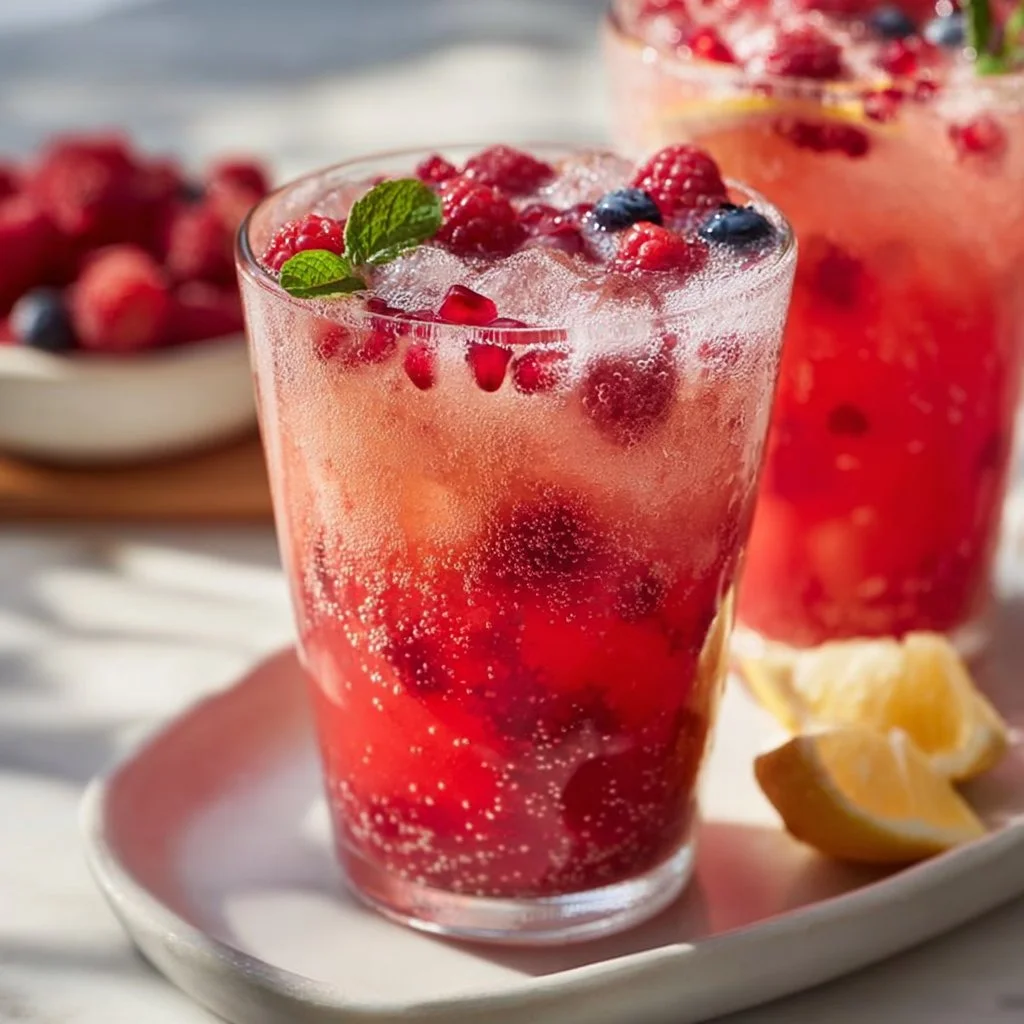
Sparkling Berry Lemonade Recipe (3-Ingredient, Refreshing)
Sparkling Berry Lemonade Recipe: A Refreshing 3-Ingredient Delight
Hey there, friends! Welcome back to Feastical, where we’re all about feel-good food that makes you feel right at home. Today, I’m super excited to take you through a refreshing beverage that’s perfect for any occasion—whether soaking up the sun in your backyard, hosting a weekend brunch, or just enjoying a cozy night in. That’s right; we’re talking about a Sparkling Berry Lemonade that’s as easy to make as it is delightful to sip!
Imagine this: It’s a bright, sunny day, and you’re just getting those lazy weekend vibes going. You open your fridge to search for something refreshing, and your eyes land on some lemons and berries you bought during your last grocery run. Well, you’re in for a treat because with just three simple ingredients—yes, three—you can whip up a batch of sparkling berry lemonade that tastes like summer in a glass!
What makes this drink special is not just its delicious flavor but also its versatility. You can customize it with whatever berries you love or even make it a little fancier for parties with some mint garnish. Plus, it’s super kid-friendly, so the whole family can enjoy the refreshing fizz. Let’s grab our ingredients and get our sparkle on!
Personal Story
You know, some of my favorite memories from childhood revolve around summer days spent with family and friends. One sunny afternoon, I remember my grandma pulling out her old lemonade pitcher, a true vintage gem that had probably seen better days. She always had a knack for concocting the most delightful beverages, infusing her fresh lemon juice with whatever berries were in season.
As we gathered around her backyard, sunbeams filtering through the trees, she’d mix together that lemonade, turning it into a masterpiece. Each sip felt like a burst of sunshine—tart, sweet, and oh-so-refreshing! Those gatherings inspired my love for easy yet impressive drinks, and I knew I had to share a modern twist with you all. That’s how my Sparkling Berry Lemonade was born—echoing those treasured moments while letting us all enjoy that bright summer essence any day of the year!
Ingredients
Now, let’s dive into what you need to create this bubbly refreshment. Below is a handy ingredient list, along with some tips and insights to help you in the kitchen.
-
1 cup fresh lemon juice (6-8 lemons): Fresh lemon juice is key for that zesty brightness! If you’ve got bottled lemon juice lying around, you can use it, but trust me—the taste won’t compare. Always roll your lemons on the countertop before slicing to loosen the juices.
-
1 cup berry syrup (strawberry, raspberry, or mixed): You can use homemade berry syrup (simply simmer berries with sugar and water) or store-bought. Feel free to get creative! Try a mix of strawberries and raspberries for a deeper flavor profile or blackberries if you’re feeling adventurous—as long as it’s sweet, it’ll work!
-
4 cups sparkling water (club soda or seltzer): This is what adds the sparkle! Choose any sparkling water you like. If you want it sweetened, go for flavored club soda. For a chic twist, consider using tonic water; it’ll give your lemonade an intriguing, slightly bitter edge.
-
Ice cubes: You can never go wrong with ensuring your drink stays icy cold!
-
Fresh berries & lemon slices for garnish: Not only do they look beautiful, but they also amp up the fruitiness of your drink. Use whatever berries you have on hand—blueberries, raspberries, strawberries—it’s like having a little garden in your glass!
-
Mint leaves (optional): These little gems can elevate your drink, making it feel extra refreshing. If you don’t have mint, don’t worry! Your lemonade will still shine without it.
Step-by-Step Instructions
Alright, let’s dive into the nitty-gritty of making this fabulous drink! Follow along with these simple steps, and I promise you’ll be sipping away in no time.
Step 1: Juice those lemons!
Start by cutting your lemons in half and juicing them into a measuring cup until you hit that one-cup mark. I love using a handheld juicer to get every last drop. Tip: If you find lemon seeds in your juice, don’t fret! Just strain them out with a fine mesh strainer. This gives you a smooth, refreshing lemonade that won’t interrupt your sip.
Step 2: Create your berry syrup
If you’re making homemade berry syrup—great choice! Just toss a cup of your favorite berries (think strawberries or raspberries) in a saucepan and add a cup of sugar and a half cup of water. Simmer over medium heat, stirring until the mixture thickens slightly—this usually takes about 10–15 minutes. Let it cool before straining through a sieve to get rid of the berry bits. If you’re using store-bought berry syrup, skip this step—easy peasy!
Step 3: Mix the magic
Here comes the fun part! In a large pitcher, combine the fresh lemon juice and berry syrup. Stir it gently until everything is mixed perfectly. The vibrant color will wow you already!
Step 4: Add the fizz
Now for the sparkling water! Slowly pour in the four cups of sparkling water to avoid overly bubbly splashes. Give it a gentle stir to combine. Voilà! You’re already looking at a refreshing drink! (But let’s not stop here.)
Step 5: Serve it up
Fill your glasses with ice cubes (it’s hot out there!). Pour the sparkling berry lemonade over the ice, filling each glass just shy of full to leave room for garnishes.
Step 6: Garnish & enjoy!
Finish things off with those beautiful lemon slices and fresh berries. If you’re feeling fancy, add a sprig of mint. Look at that! You’ve not only created a delicious drink but a stunning centerpiece for your gathering. Now, go ahead and take that first sip!
Serving Suggestions
Presentation is everything, my friends! Serve your Sparkling Berry Lemonade in chilled glasses or mason jars for a rustic feel. Toss a few fresh berries and a sprig of mint on top for that extra visual pop. If you’re serving a crowd, consider a larger pitcher on the table, adorned with lemon slices and whole berries.
For a fun twist, serve these refreshers with striped paper straws or fancy drink stirrers. If it’s a warm summer afternoon, why not even make it part of a cocktail? Add a splash of vodka or gin for the adults—trust me, it’ll elevate your lemonade game to a whole new level!
Recipe Variations
The beauty of this Sparkling Berry Lemonade is its versatility. Here are some fun variations you can try:
-
Tropical Twist: Substitute half of the lemon juice with fresh lime juice and add pineapple juice for a fruity paradise vibe.
-
Herbal Infusion: Infuse your lemonade with fresh basil instead of mint for a unique herbal twist. This adds a deeper flavor that’s refreshing and sophisticated.
-
Citrus Medley: Mix in other citrus fruits like grapefruit or lime to give your berry lemonade an exciting zing.
-
Flavor Fusion: Combine your berry syrup with different flavors like coconut or peach for a unique twist on the classic.
-
Frozen Berry Lemonade: Blend the ingredients with ice for a slushy texture. This is super refreshing on a hot day!
Chef’s Notes
This Sparkling Berry Lemonade recipe has evolved over time, stemming from my grandma’s classic lemonade with a splash of creativity. The idea of adding a bubbly element came after I realized how much we all adore that fizzy mouthfeel. Plus, let’s be real—nobody wants a boring drink!
Fun fact: one hot summer day, my buddy tried to add soda to our homemade lemonade thinking it would add sweetness—and boy, did it turn out to be a bubbly disaster! We ended up having a mini lemonade fountain for a few minutes before we could contain the fizz. So, lesson learned: always pour sparkling water slowly!
FAQs and Troubleshooting
-
What if my lemonade is too sweet?
If your lemonade leans toward the sweet side, add a splash more lemon juice to balance it out. Tasting as you go is key! -
Can I use frozen berries instead?
You bet! Just let them thaw slightly before blending them into syrup, or toss them directly in for a pitcher that’s both fruity and chilled. -
What can I do if it loses its fizz?
To keep your drink bubbly, serve the sparkling water separately and let guests pour it into their glasses at the table. -
How long does the lemonade last?
While it’s best enjoyed fresh, you can store it in the fridge for up to a day—but the fizz might flatten out over time.
Nutritional Info
A refreshing 8 oz glass of Sparkling Berry Lemonade boasts around 100-120 calories* and delivers:
- Carbs: 25g
- Sugars: 20g
- Vitamin C: High, thanks to those fresh lemons!
Keep in mind that this info can vary based on the specific berries and syrup used, so double-check your ingredients for a more accurate picture.
(*calories may vary based on specific ingredients used)
Final Thoughts
And there you have it—your very own Sparkling Berry Lemonade! It’s easy, quick, and oh-so-refreshing, capturing the essence of summer in every sip. Whether you’re hosting a brunch or just want to quench that thirst after a long day, this beverage is sure to impress.
Try it out, share it with loved ones, and create your own memories around this delightful drink. Remember, recipes are only as good as the stories we create with them, so pour, sip, and enjoy each moment. Cheers to good times and great flavors, my fellow foodies! Until next time, stay sparkly!
Print
Sparkling Berry Lemonade
- Total Time: 25 minutes
- Yield: 4 servings 1x
- Diet: Vegan
Description
A refreshing beverage that combines fresh lemon juice, berry syrup, and sparkling water for a delightful summer drink.
Ingredients
- 1 cup fresh lemon juice (6–8 lemons)
- 1 cup berry syrup (strawberry, raspberry, or mixed)
- 4 cups sparkling water (club soda or seltzer)
- Ice cubes
- Fresh berries & lemon slices for garnish
- Mint leaves (optional)
Instructions
- Juice those lemons! Cut lemons in half and juice into a measuring cup until you reach 1 cup.
- Create your berry syrup by simmering berries with sugar and water until it thickens, about 10-15 minutes.
- Mix together the fresh lemon juice and berry syrup in a large pitcher.
- Add the sparkling water slowly to combine.
- Serve over ice cubes in glasses.
- Garnish with lemon slices, fresh berries, and mint if desired.
Notes
Serve in chilled glasses or mason jars for a rustic feel. Great for summer brunches or gatherings.
- Prep Time: 10 minutes
- Cook Time: 15 minutes
- Category: Beverage
- Method: Mixing
- Cuisine: American
Nutrition
- Serving Size: 8 oz
- Calories: 120
- Sugar: 20g
- Sodium: 5mg
- Fat: 0g
- Saturated Fat: 0g
- Unsaturated Fat: 0g
- Trans Fat: 0g
- Carbohydrates: 25g
- Fiber: 1g
- Protein: 1g
- Cholesterol: 0mg
Keywords: berry lemonade, refreshing drink, summer beverage, easy drink recipe, non-alcoholic drink
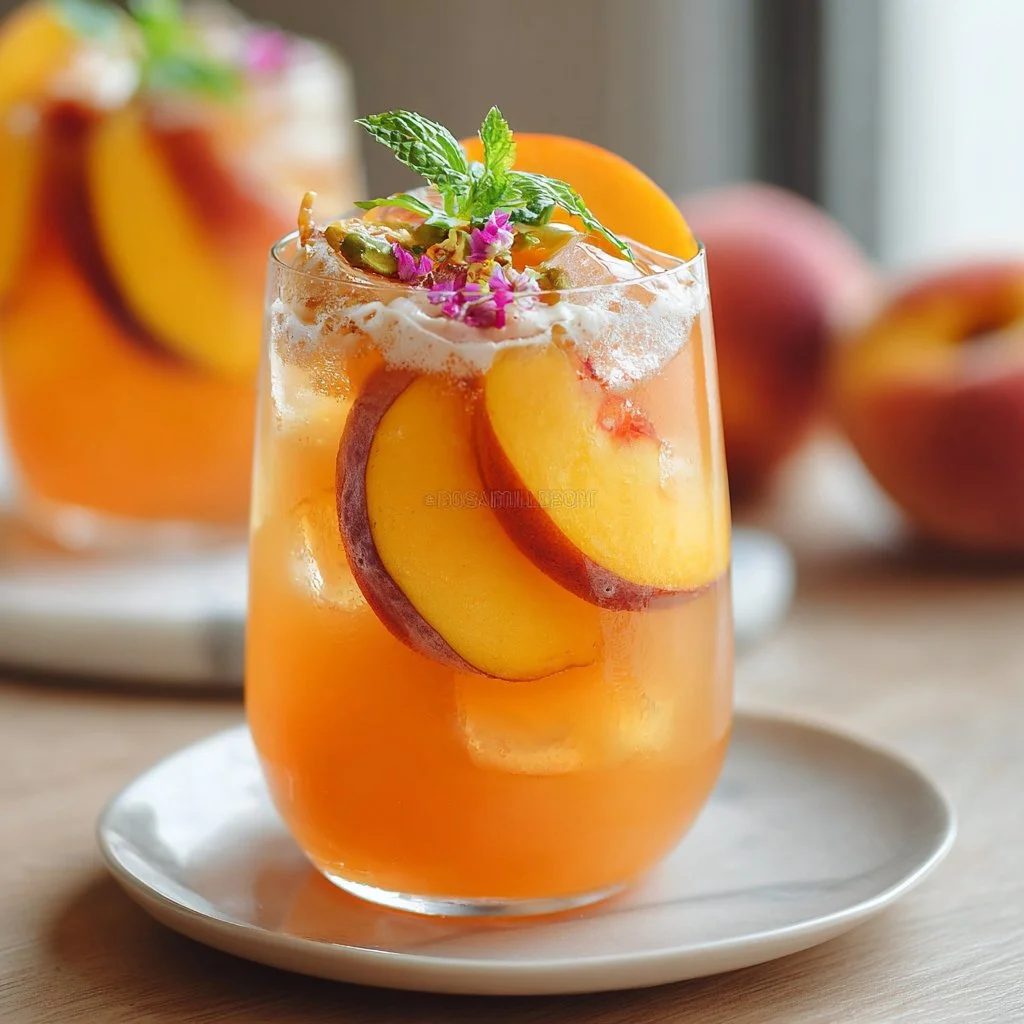
Peach Lemonade Recipe
Refreshing Peach Lemonade Recipe: Sip into Summer Bliss
Welcome to Feastical, my fellow food enthusiasts! Today, we’re diving into one of my all-time favorite summertime thirst-quenchers—Peach Lemonade! Just saying the name sounds delightful, doesn’t it? This drink captures all the sweetness of luscious ripe peaches and the zesty brightness of freshly squeezed lemons. Talk about a match made in paradise!
Introduction
Picture this: the sun is shining, the birds are chirping, and you’ve got one foot in your flip-flops and the other in a sweet summer daydream. It’s the perfect moment for a cold, refreshing drink that embodies everything wonderful about the season. Enter Peach Lemonade! This isn’t just a beverage; it’s that magical elixir that can turn any hot day into a backyard celebration.
Whether you’re hosting a brunch with friends, having a family picnic, or simply lounging on your porch, this recipe is sure to impress! With just a handful of ingredients and some simple steps, you’ll be sipping on a delicious, homemade lemonade that tastes like a warm hug from the inside out. This recipe not only quenches your thirst but also brings back fond memories of summer days spent heading to farmers’ markets, picking sweet peaches and tart lemons, and gathering with loved ones over a shared glass of joy.
So, let’s grab our aprons, roll up our sleeves, and embark on this aromatic adventure. Don’t worry if you’re a kitchen novice; I’ll be right here guiding you every step of the way. Ready? Let’s make some Peach Lemonade magic!
Personal Story
When I was a kid, summer meant spending lazy afternoons at my grandmother’s house. She had the biggest, juiciest peach tree in her backyard, and every season, it was the highlight of my summer. My cousins and I would race each other in the early morning sun to see who could climb the highest and grab the ripest peaches. Those peaches were so plump and sweet that we often devoured them on the spot, juice running down our arms while we giggled and spilled secrets.
One summer, it was particularly hot, and Grams decided it was time to make the ultimate summer refresher. She combined those sweet peaches with tart lemons, and I can still remember the way her face lit up when we took our first sip. We practically danced with joy! It was an alchemical moment that transformed simple ingredients into something extraordinary—an endless summer captured in a glass. Whenever I make Peach Lemonade today, I’m reminded of those carefree summer days, that beautiful bond with family, and the joy of savoring life’s simple pleasures.
Ingredients
Here’s what you’ll need to whip up this refreshing Peach Lemonade:
-
4 – 6 ripe peaches
Choose peaches that are fragrant and slightly soft to the touch. If you can’t find ripe peaches, feel free to swap in frozen peach slices or canned peaches in juice (drained) for shortcuts! -
1 cup (240 milliliters) freshly squeezed lemon juice
Freshly squeezed is a must for that bright lemony flavor. If you’re in a pinch, bottled lemon juice works, but you’ll miss out on the vibrant taste. -
1 cup (200 grams) granulated sugar
This is your sweetener. For a healthier option, consider using honey or agave syrup. Adjust the sweetness according to your taste! -
6 cups (1.4 liters) cold water
Cold water helps to chill the lemonade quickly. Try adding sparkling water for an effervescent twist! -
Ice cubes
Keep those cubes handy for serving! You could also freeze peach slices into ice cubes for an extra fruity punch! -
Fresh mint leaves
These will not only add a pop of color but also a refreshing finish to your drink. Feel free to adjust based on how minty you like it! -
Peach slices and lemon slices for garnish
A little garnish goes a long way in making your drink look as fabulous as it tastes!
Step-by-Step Instructions
Step 1: Preparing the Peaches
Start by washing your peaches thoroughly. If you love that fuzzy peach skin (I do!), go ahead and leave it on; if you prefer a smoother texture, feel free to peel them. Next, slice the peaches in half, remove the pits, and chop them into smaller pieces. It’s okay if they aren’t perfectly uniform; it’s all going to get blended later!
Chef’s Tip: Overripe peaches can be used, too! They’re super sweet and perfect for blending. Just be sure they don’t have any major bruises.
Step 2: Create the Peach Puree
In a blender, combine the chopped peaches with 1 cup of cold water. Blend until smooth, creating a beautiful peach puree. You might feel like a smoothie wizard at this point—trust me, it’s totally magical!
Chef Hack: If you want to be super fancy, strain the puree through a fine mesh sieve to remove the skin and pulp. But I say embrace the texture; it gives the lemonade character!
Step 3: Mixing in the Lemon Juice and Sugar
In a large pitcher, pour in the peach puree. Next, add the freshly squeezed lemon juice and granulated sugar. Stir until the sugar dissolves completely. You want that sugar to blend in smoothly, just like your favorite song that you can’t help but hum along to!
Pro Tip: Adjust the sweetness to your liking before adding all the water. Some people love a tarter lemonade, while others prefer it sweeter!
Step 4: Finishing Touches
Now, pour in the remaining cold water, mixing everything thoroughly. Add more water or sugar if needed until you reach your desired taste. Lastly, toss a handful of fresh mint leaves into the pitcher and give it a gentle stir. The mint will infuse a subtle flavor that elevates the whole drink.
Step 5: Chill and Serve
Refrigerate the Peach Lemonade for at least 30 minutes before serving. The flavors meld beautifully as they chill together! Once you’re ready to serve, pour the lemonade into glasses filled with ice cubes. Top with peach and lemon slices, and garnish with mint leaves for that photo-worthy finish.
Chef’s Secret: A splash of club soda just before serving adds a refreshing twist! The bubbles bring an exciting dimension to your drink.
Serving Suggestions
When it comes to serving your Peach Lemonade, presentation is key! My go-to is to serve it in tall glasses so that everyone can savor the vibrant color. Add peach slices along the rim of the glass for a charming touch, and don’t skimp on the mint leaves; they not only look pretty but also emit a delicious aroma.
Feel free to serve alongside summer favorites like grilled burgers, barbecue chicken, or a fresh garden salad. You can also elevate your serving game by creating a lemonade bar where guests can customize their drinks with additional fruit slices, herbs, or flavored syrups!
Recipe Variations
Let’s not stop at just the classic Peach Lemonade! Here are a few creative twists you can try:
-
Peach Basil Lemonade: Swap mint for fresh basil for a unique herbal note. The pairing of peach with basil is surprisingly delightful!
-
Spicy Peach Lemonade: Add a splash of freshly grated ginger or a pinch of cayenne pepper for a kick that wakes up your taste buds. Just a little goes a long way!
-
Berry Peach Lemonade: Mix in a cup of blended strawberries or blueberries for a colorful, fruity fiesta. You can muddle the berries into the lemonade for added texture.
-
Frozen Peach Lemonade: Blend all ingredients with ice to create a slushy version that’s absolutely perfect for hot days. Top with whipped cream for a dessert-like treat!
-
Vegan Peach Lemonade: Instead of using granulated sugar, substitute with pure maple syrup or agave nectar to keep it vegan-friendly.
Chef’s Notes
This Peach Lemonade has become a summertime staple that I love to share with friends and family. Over the years, I’ve made countless batches, each with its special twist, and it never fails to evoke summertime nostalgia.
One time, while making this lemonade for a backyard cookout, I accidentally spilled almost half of it on the grass. Instead of panicking, my friends and I just laughed and created lemonade popsicles by pouring what’s left into molds. Oh, those turned out to be a hit!
FAQs and Troubleshooting
Q1: Why is my Peach Lemonade too sour?
If your lemonade turned out sour, try adding a little more sugar or honey. Start with a tablespoon at a time until the taste balances out to your liking.
Q2: Can I make this lemonade in advance?
Absolutely! You can prepare the base and store it in the refrigerator. However, I recommend adding the ice and garnishes just before serving to keep it fresh.
Q3: What’s the best way to store leftovers?
Store any leftovers in an airtight container in the fridge for up to 3 days. Just give it a good stir before serving since separation may occur.
Q4: Can I use bottled peach juice instead?
While bottled peach juice is a convenient option, fresh peaches provide the best flavor and texture. If you must use bottled juice, adjust the sugar since many juices are pre-sweetened!
Nutritional Info
A generous serving of this Peach Lemonade typically contains about:
- Calories: 120 per 1 cup serving
- Total Fat: 0g
- Sodium: 5mg
- Carbohydrates: 31g (Sugars: 29g)
- Dietary Fiber: 1g
- Protein: 0g
Keep in mind nutritional values will vary depending on the specific ingredients you use (like sweeteners and extra fruit), especially if you make any variations.
Final Thoughts
There you have it! A refreshing, fruity, and thirst-quenching Peach Lemonade recipe that’s sure to become a family favorite. This beverage is more than just a drink; it’s an experience, a memory, a gathering of loved ones around the table. So, the next time you find yourself tasked with hydrating guests or just treating yourself on a hot day, remember this recipe and the joy it brings.
Thank you for joining me on this culinary exploration today! I can’t wait to see how your Peach Lemonade turns out, so share your pictures and stories with me! Cheers to summer bliss, happy sipping, and many delightful kitchen moments. Until next time on Feastical, stay cool and keep creating delicious memories!
Print
Refreshing Peach Lemonade
- Total Time: 30 minutes
- Yield: 4 servings 1x
- Diet: Vegetarian
Description
A delightful and refreshing summertime beverage that combines the sweetness of ripe peaches with the brightness of freshly squeezed lemons.
Ingredients
- 4 – 6 ripe peaches
- 1 cup (240 milliliters) freshly squeezed lemon juice
- 1 cup (200 grams) granulated sugar
- 6 cups (1.4 liters) cold water
- Ice cubes
- Fresh mint leaves
- Peach slices and lemon slices for garnish
Instructions
- Wash your peaches thoroughly. Slice them in half, remove the pits, and chop into smaller pieces.
- Combine the chopped peaches with 1 cup of cold water in a blender and blend until smooth to create a peach puree.
- Pour the peach puree into a large pitcher, then add the freshly squeezed lemon juice and granulated sugar. Stir until the sugar dissolves.
- Add the remaining cold water, mixing thoroughly, and adjust sugar to taste. Toss in fresh mint leaves.
- Refrigerate for at least 30 minutes, then serve over ice and garnish with peach and lemon slices.
Notes
For a fun twist, consider adding a splash of club soda just before serving for extra fizz.
- Prep Time: 15 minutes
- Cook Time: 0 minutes
- Category: Beverage
- Method: Blending
- Cuisine: American
Nutrition
- Serving Size: 1 serving
- Calories: 120
- Sugar: 29g
- Sodium: 5mg
- Fat: 0g
- Saturated Fat: 0g
- Unsaturated Fat: 0g
- Trans Fat: 0g
- Carbohydrates: 31g
- Fiber: 1g
- Protein: 0g
- Cholesterol: 0mg
Keywords: peach lemonade, summer drink, refreshing beverage
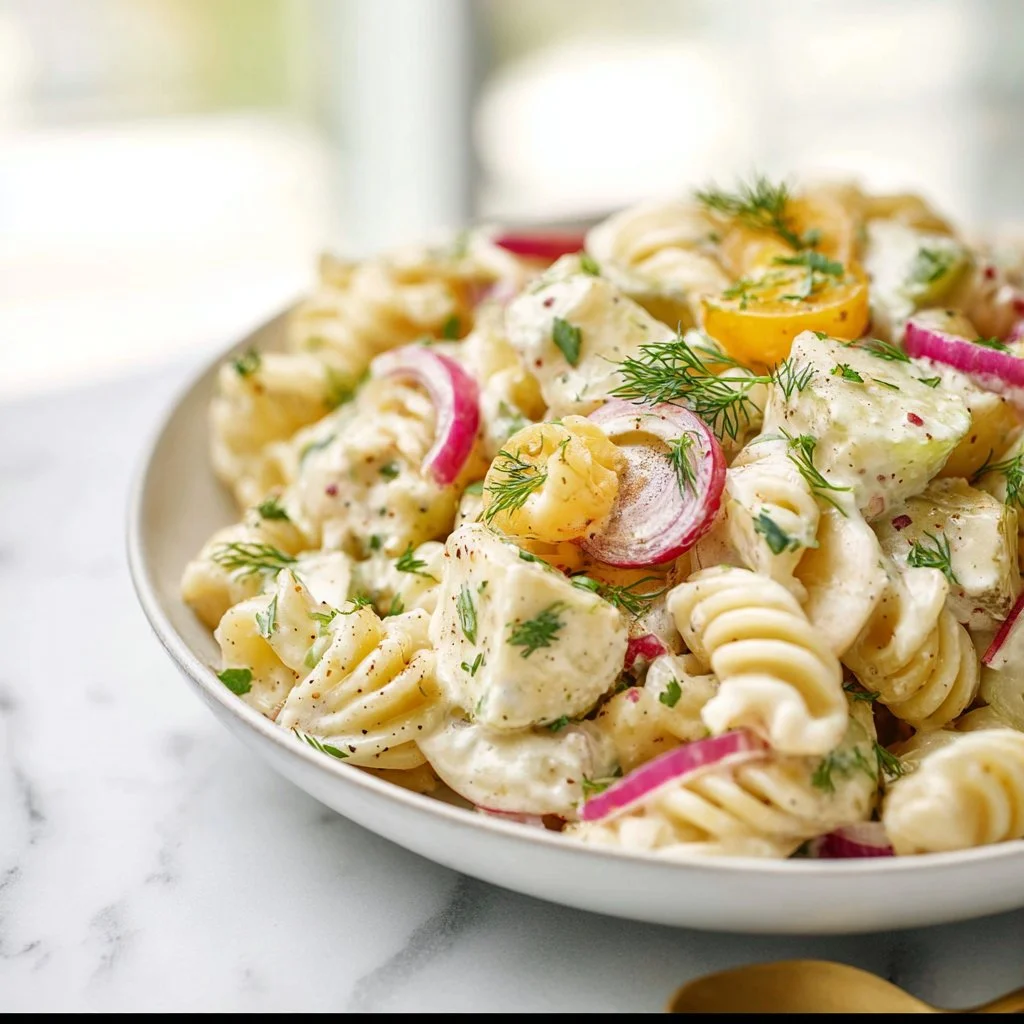
Dill Pickle Pasta Salad
Dive into Summer with Dill Pickle Pasta Salad: A Refreshing Twist!
Hey there, food lovers! I’m Beau Collier, and today, we’re diving into a dish that’s pure joy on a plate: Dill Pickle Pasta Salad. As the weather warms up and picnic vibes start to light the air, there’s nothing quite like a cool, creamy, and zesty pasta salad to elevate your gatherings and mealtime delights! This recipe is packed with flavors that dance in your mouth and conjure up memories of carefree summer picnics. So, let’s get started!
A Taste of Nostalgia
Let me take you back to those long, sun-soaked days of childhood spent in my grandparent’s backyard. My family would gather every Saturday for our weekly BBQ; the smell of grilled burgers and hot dogs wafted through the air like a delicious aroma symphony. One of my favorite dishes was my grandma’s Dill Pickle Pasta Salad. The combination of crunchy pickles, creamy dressing, and delightful bites of tender pasta was absolute heaven.
She would always say, “A little bit of pickle juice makes everything better!” And boy, was she right! As we sat around the table, stories flowed just like the magic of flavors colliding on our plates. Fast forward to today—whenever I whip up this dish, it feels like I’m transported back to her backyard, surrounded by laughter and love. So, whether you’re basking in the sun or hosting a cozy dinner, let’s recreate that spirit and dig into this sensational Dill Pickle Pasta Salad!
Ingredients
To create this delightful salad, you’ll need the following ingredients:
-
12 ounces pasta (rotini, shells, or elbow macaroni): The shape holds the dressing perfectly! Use whole wheat or gluten-free alternatives for dietary preferences.
-
1 cup dill pickles, finely chopped: These add a delightful crunch! You can substitute with bread and butter pickles for a sweeter twist.
-
½ cup pickle juice from the jar: This liquid gold enhances flavor dramatically. It can be replaced with vinegar for acidity.
-
¾ cup mayonnaise: The creamy base. Greek yogurt is a healthier alternative that still packs a creamy punch!
-
¼ cup sour cream or Greek yogurt: Adds tang! If you prefer dairy-free, use a plant-based yogurt.
-
1 cup shredded cheddar cheese (optional but delicious): Adds richness! DJ (dairy junkies) could try pepper jack for a spicy kick!
-
¼ cup fresh dill, chopped (or 1 tablespoon dried dill): Fresh is best for that vibrant pop over dried, but use what you’ve got on hand!
-
½ teaspoon garlic powder: A sprinkle of flavor! Fresh minced garlic is a fabulous swap for a stronger punch.
-
½ teaspoon onion powder: Enhance the taste without the crunch. You can use finely chopped green onions for fresh flavor!
-
Salt and pepper, to taste: Essential for seasoning! Don’t be shy; season until it sings.
Step-by-Step Instructions
Let’s cook up some magic! Here’s how to whip up this delectable pasta salad step by step:
-
Cook the Pasta: Begin by boiling a large pot of salted water. Add your choice of pasta and cook according to the package instructions until al dente (about 8-10 minutes). Remember, we want it tender but not mushy! Strain and rinse under cold water to stop the cooking process—this keeps the pasta from sticking together.
-
Prepare the Dressing: In a large mixing bowl, combine ¾ cup mayonnaise and ¼ cup sour cream (or Greek yogurt). Mix until smooth! Here you can fold in that magical pickle juice. Trust me, it adds a tangy zing!
-
Add Flavors: Stir in the chopped dill pickles, shredded cheese, fresh or dried dill, garlic powder, and onion powder. Simply divine! Don’t forget to taste; add salt and pepper to your liking.
-
Combine with Pasta: Gently mix the cooled pasta into the bowl with the dressing and pickles. Use a spatula to fold it in. You want to coat every piece without breaking the pasta—be gentle but thorough!
-
Chill and Serve: Cover and chill the deliciousness in the refrigerator for at least 30 minutes. This helps the flavors meld together for that delicious taste explosion! Enjoy while chilling—you’ve earned a moment to kickback!
Serving Suggestions
Time to plate this beauty! Serve the Dill Pickle Pasta Salad in a colorful bowl and garnish with a sprinkle of fresh dill and extra dill pickle slices for that eye-catching finish. It’s a stunning addition to any summer table, accompanied by grilled meats or served on its own as a light meal. Plus, don’t forget to have a ladle handy for your guests—everyone will want seconds!
Recipe Variations
Want to mix things up? Here are some creative twists to take your Dill Pickle Pasta Salad to another level:
-
Spicy Twist: Add some sliced jalapeños or diced hot pepper to give your salad a kick! Perfect for the heat lovers out there.
-
Protein Power: Toss in some diced rotisserie chicken or chickpeas for a hearty, protein-packed meal!
-
Veggie Lovers: Add cherry tomatoes cut in half or shredded carrots for vibrant pops of color and crunch.
-
Bacon Bliss: Crumbled bacon will add a smoky richness to the dish that is hard to resist. Just cook it up crispy and sprinkle over the top before serving!
-
Herbed Goodness: Swap the dill for fresh parsley or chives for a different herbaceous flavor.
Chef’s Notes
This recipe is one of those timeless gems that never goes out of style. Over the years, I’ve tried adding a myriad of ingredients, but the classic version always brings back nostalgia. I’ve tested recipes with different pasta and various dressings, but it’s this straightforward concoction that brings a smile to my face and a craving in my heart.
Oh, and a little kitchen story for you: I once accidentally used the brine from a spicy pickle jar instead of the regular dill pickle juice. Let’s just say it turned out a tad more adventurous than planned! But sometimes, those happy accidents lead to brilliant new ideas!
FAQs and Troubleshooting
1. Can I make this salad a day in advance?
Absolutely! In fact, it’s even better the next day as the flavors have more time to meld together.
2. What’s the best way to store leftovers?
Keep any leftovers in an airtight container in the fridge for up to 3 days. Just give it a quick stir before serving!
3. How can I make it vegan?
Use vegan mayonnaise and plant-based yogurt, and skip the cheese or swap it with a vegan alternative.
4. Why is my pasta salad sticky?
This usually happens when pasta is overcooked or not rinsed in cold water. Make sure to cook it al dente, then rinse thoroughly to cool.
Nutritional Info
Let’s keep it real, folks—celebrating food means enjoying it, but we can also be mindful! This Dill Pickle Pasta Salad serves up about 250 calories per serving (1 cup), depending on your ingredients. It’s rich in carbs but offers a bit of protein if you add cheese or chicken. With the fresh pickles and herbs, it sneaks in some vitamins too!
Nutritional Highlights:
- Protein: If you add chicken or cheese, you’ll up the protein content significantly!
- Healthy Fats: From mayo and yogurt, providing richness and flavor to keep you satiated.
Of course, depending on your add-ins and swaps, these numbers can vary, but all the love and care put into this salad make it totally worth it.
Final Thoughts
There you have it! A creamy, refreshing, and utterly delightful Dill Pickle Pasta Salad that exudes love and nostalgia from every bite. As we embrace summer, let’s celebrate warmth, laughter, and gathering around delicious food. No matter where you are—host a picnic, bring it to a potluck, or simply enjoy it on a sunny afternoon on your porch—this dish is sure to evoke those feel-good vibes just like Grandma’s backyard BBQ.
So, grab your ingredients and get ready to make some new memories of your own! And don’t forget to share your pasta salad adventures with me! Until next time, keep cooking, keep smiling, and always, always eat with joy!
Happy feasting! 🍽️🥒
Print
Dill Pickle Pasta Salad
- Total Time: 45 minutes
- Yield: 4 servings 1x
- Diet: Vegetarian
Description
A cool and creamy pasta salad featuring crunchy dill pickles and a zesty dressing perfect for summer gatherings.
Ingredients
- 12 ounces pasta (rotini, shells, or elbow macaroni)
- 1 cup dill pickles, finely chopped
- ½ cup pickle juice from the jar
- ¾ cup mayonnaise
- ¼ cup sour cream or Greek yogurt
- 1 cup shredded cheddar cheese (optional)
- ¼ cup fresh dill, chopped (or 1 tablespoon dried dill)
- ½ teaspoon garlic powder
- ½ teaspoon onion powder
- Salt and pepper, to taste
Instructions
- Cook the Pasta: Begin by boiling a large pot of salted water. Add pasta and cook according to package instructions until al dente (about 8-10 minutes). Strain and rinse under cold water.
- Prepare the Dressing: In a large mixing bowl, combine mayonnaise and sour cream (or Greek yogurt). Mix until smooth and fold in the pickle juice.
- Add Flavors: Stir in chopped dill pickles, shredded cheese, fresh or dried dill, garlic powder, and onion powder. Add salt and pepper to taste.
- Combine with Pasta: Gently mix the cooled pasta into the bowl with the dressing and pickles. Use a spatula to fold it in.
- Chill and Serve: Cover and chill in the refrigerator for at least 30 minutes before serving.
Notes
This salad can be made a day in advance for better flavor. Store leftovers in an airtight container for up to 3 days.
- Prep Time: 15 minutes
- Cook Time: 10 minutes
- Category: Salad
- Method: Mixing
- Cuisine: American
Nutrition
- Serving Size: 1 cup
- Calories: 250
- Sugar: 3g
- Sodium: 600mg
- Fat: 18g
- Saturated Fat: 3g
- Unsaturated Fat: 12g
- Trans Fat: 0g
- Carbohydrates: 25g
- Fiber: 2g
- Protein: 6g
- Cholesterol: 15mg
Keywords: pasta salad, summer recipe, dill pickle salad

Pin by Cooking Classy on Cooking Classy Main Dish Dinner Recipes | Easy pasta salad recipe, Chicken Caesar pasta salad, Dinner salads
The Ultimate Chicken Caesar Pasta Salad: A Feel-Good Dish to Refresh Your Dinner Table!
Hey there, fellow foodies! It’s Beau Collier here, and I couldn’t be more excited to dive into one of my absolute favorite dishes with you today: Chicken Caesar Pasta Salad. Trust me, this dish isn’t just a salad; it’s a symphony of flavors that dances on your taste buds, bringing that classic Caesar salad vibe into a delightful, filling pasta creation. Picture tender chicken, crisp romaine, and perfectly cooked pasta all smothered in a creamy dressing that reminds you of summer barbecues and cozy family dinners. Yes, it’s THAT good!
I remember the first time I made a version of this salad in my tiny apartment kitchen. It was a whim, a spontaneous creation using whatever I had on hand. I was just getting my foodie feet under me, and the bold flavors of Caesar dressing stole my heart. Fast forward a few years, and I’ve perfected this dish into a go-to recipe that’s always a hit, from backyard picnics to potluck dinners. Whether you’re a meal prep guru or just need something easy yet impressive for unexpected guests, this Chicken Caesar Pasta Salad is the answer.
Now, let me tell you why this recipe is the perfect blend of ease and joy. It’s as simple to make as it is delicious, making it a fantastic weeknight option or a crowd-pleaser for gatherings. Not to mention, it’s endlessly adaptable! Just toss in your favorite ingredients, and voilà—you’ve transformed a classic into your unique masterpiece. So grab your apron, and let’s create a dish that brings smiles, hearty satisfaction, and brings everyone to the table!
Personal Story
Ah, the memory of that first attempt at making Chicken Caesar Pasta Salad still makes me chuckle! It was a sunny afternoon, and I had invited a few friends over for a laid-back lunch. I dashed through the grocery store, plucking up items that simply caught my eye. You know, the usual shopping spree that begins with “Oh! I need this!” — and ends with what looks like an impromptu cooking show.
I had a goal in mind but found myself coming home with an array of ingredients. After some trial and error and a lot of taste-testing, I finally whipped up my very own pasta salad recipe. My pals arrived, and I was a nervous wreck hoping my kitchen experiment would impress them.
Let me tell you, as I plated that pasta salad and tossed it with the creamy dressing, I could feel my heart racing with excitement and a tad bit of dread. But the moment they took their first bites, it was a symphony of yum! Laughter filled the air, and I knew I had nailed it. This recipe has since evolved, becoming a staple in my repertoire, always reminding me of those sunlit days filled with laughter, great food, and cherished friendships.
Ingredients
Let’s gather our ingredients, shall we? Here’s what you’ll need to get started—with a few chef insights and substitution tips along the way!
-
Pasta (Rotini or Fusilli): These shapes are perfect for holding onto sauce and ingredients. If you’re gluten-free, feel free to swap in gluten-free pasta or quinoa for a lighter option.
-
Grilled Chicken Breast: Tender, juicy chicken is the star here. If you’re pressed for time, store-bought rotisserie chicken works like a charm!
-
Romaine Lettuce: Crisp romaine provides that fresh crunch! If you’re feeling adventurous, try using kale for a more robust texture.
-
Parmesan Cheese: Freshly grated is the way to go for the best flavor. Don’t have any? Pecorino Romano or nutritional yeast (for a vegan alternative) will do the trick!
-
Caesar Dressing: You can use store-bought for convenience or whip up your own. Homemade adds a special touch, and you can customize the flavors.
-
Cherry Tomatoes: Sweet and juicy, they pop in your mouth! Feel free to swap in diced bell peppers or radishes if tomatoes aren’t your jam.
-
Croutons: For that satisfying crunch! Make your own with leftover bread or use your favorite store-bought variety.
-
Black Pepper and Salt: Classic seasoning to enhance all those yummy flavors.
-
Lemon Juice: A little squeeze brightens up the dish! If you’re short on fresh lemons, bottled lemon juice works as well.
Step-by-Step Instructions
Now that we have our ingredients ready, it’s time to dive into the cooking process! We’ll break it down so it feels effortless and fun.
-
Cook the Pasta:
- Bring a pot of salted water to a rolling boil. Add in your pasta and cook according to package instructions, usually about 8-10 minutes for rotini or fusilli.
- Tip: To prevent sticking, stir occasionally and taste test for doneness. You want it al dente—there’s nothing worse than mushy pasta!
-
Prepare the Chicken:
- If you’re grilling chicken, season it with salt, pepper, and a sprinkle of garlic powder for an extra kick. Grill for about 6-7 minutes on each side, or until fully cooked and juices run clear.
- Chef Hack: Let the chicken rest for a few minutes before slicing—this helps keep it juicy!
-
Chop the Veggies:
- While the pasta is cooking, wash and chop your romaine lettuce, slice the cherry tomatoes in half, and grate the Parmesan cheese.
- Pro Tip: Make sure your lettuce is very dry before mixing. A salad spinner is a game-changer here!
-
Make the Dressing (if homemade):
- In a bowl, whisk together equal parts mayonnaise and Greek yogurt, a splash of lemon juice, minced garlic, Worcestershire sauce, salt, and pepper. Adjust to your taste preferences.
- Quick Note: Homemade dressing can be stored in the fridge and works great on other salads!
-
Combine it All:
- In a large bowl, combine the cooked pasta, sliced chicken, chopped lettuce, cherry tomatoes, and Parmesan cheese. Drizzle with the dressing.
- Toss it all together gently until everything is coated evenly. If you’re feeling fancy, reserve some cheese and croutons for garnish!
-
Serve:
- Divide the salad into bowls or plates. Top with extra croutons, a sprinkle of cheese, and a dash of black pepper. Don’t forget that extra lemon wedge for drizzling!
Serving Suggestions
Presentation is everything, right? To serve this dish, consider offering it in a large bowl where everyone can dig in, family-style! Garnish the top with a sprinkle of fresh parsley or basil to add a pop of color. You could also serve it individually on chilled plates for that extra special touch—just imagine your guests’ faces lighting up when they see their own personalized portion.
For a complete meal, pair it with a crispy baguette or homemade garlic bread to soak up any leftover dressing. It’s also delightful alongside a fruit salad or a chilled soup for a light lunch. Don’t forget to serve a refreshing drink, perhaps a sparkling lemonade or iced tea, to complement those vibrant flavors.
Recipe Variations
-
Mediterranean Twist: Add kalamata olives, sun-dried tomatoes, and feta cheese for a Mediterranean flair. This combo elevates the flavor profile and adds a zing!
-
Vegan Version: Swap the chicken for chickpeas or grilled tofu and use vegan mayo in the dressing. Toss in some hemp seeds for an extra protein boost.
-
Spicy Kick: Add sliced jalapeños or a sprinkle of red pepper flakes to the salad for that heat lovers will adore!
-
Seasonal Produce: Incorporate fresh veggies based on the season—roasted zucchini in summer or crispy apples in fall can change things up beautifully.
-
Pasta Salad Bar: Turn this recipe into a fun pasta salad bar! Set out bowls of various toppings—like bacon bits, grilled vegetables, and different kinds of cheese—so guests can create their own versions.
Chef’s Notes
You know, this recipe has come a long way since that sunny afternoon in my tiny kitchen! Over the years, I’ve played with flavors and textures, always armed with my trusty taste-tester friends. One time, I added a splash of hot sauce to the dressing as a last-minute thought, and it turned out to be a huge hit. Now, that’s a tip I always share.
The beauty of this Chicken Caesar Pasta Salad is that it’s the ultimate blank canvas. Each time I make it, I can create something new while still holding onto that classic taste we all know and love.
FAQs and Troubleshooting
What can I do if my dressing is too thick?
- If your dressing is a tad too thick, just whisk in a bit of water or extra lemon juice until it reaches your desired consistency.
Can I make this salad ahead of time?
- Absolutely! Just keep the dressing separate until you’re ready to serve to avoid soggy ingredients. You can store it in the fridge for 24–48 hours.
What if I don’t have chicken?
- No problem! You can easily substitute with shrimp, canned tuna, or go meatless with packed chickpeas or lentils for protein.
My pasta stuck together, what happened?
- This usually happens if you skip the stirring step during cooking. Always give it a good stir while boiling, and remember to rinse it under cold water after draining to stop the cooking process!
Nutritional Info
To keep things in check, here’s a general breakdown of the nutrition content in one serving (based on a standard recipe):
- Calories: 450
- Protein: 36g
- Carbohydrates: 40g
- Fats: 20g
- Fiber: 4g
This dish is hearty and fulfilling, making it a great meal option that balances flavor and nutrition!
Final Thoughts
Well, folks, there you have it: the ultimate Chicken Caesar Pasta Salad that’s sure to wow your family and friends. It’s an adventure in flavors and textures—reminding us that food is all about bringing people together.
Whether you’re celebrating a sunny day, soothing a tough week, or just looking for something delicious to whip up, this pasta salad has your back every time. So, dive into the kitchen, get your hands a little messy, and most importantly, have fun crafting this delightful dish!
Thanks for joining me! Can’t wait to hear about your own kitchen creations and the stories that come with them. Until next time, happy cooking, and remember—life’s too short for boring food. Grab that fork (or your favorite mug), and let’s dig in together! 🍽️
Print
Ultimate Chicken Caesar Pasta Salad
- Total Time: 35 minutes
- Yield: 4 servings 1x
- Diet: Meat
Description
A delightful and filling pasta salad that brings the classic Caesar salad flavors together with tender chicken and fresh ingredients.
Ingredients
- 8 ounces rotini or fusilli pasta
- 2 grilled chicken breasts
- 4 cups chopped romaine lettuce
- 1/2 cup freshly grated Parmesan cheese
- 1 cup Caesar dressing
- 1 cup cherry tomatoes, halved
- 1 cup croutons
- Black pepper and salt to taste
- 2 tablespoons lemon juice
Instructions
- Cook the Pasta: Bring a pot of salted water to a rolling boil. Add in your pasta and cook according to package instructions, usually about 8-10 minutes.
- Prepare the Chicken: Season chicken with salt, pepper, and garlic powder. Grill for 6-7 minutes on each side until fully cooked.
- Chop the Veggies: Wash and chop romaine, slice cherry tomatoes, and grate Parmesan cheese.
- Make the Dressing: Whisk mayonnaise, Greek yogurt, lemon juice, minced garlic, Worcestershire sauce, salt, and pepper together.
- Combine it All: In a large bowl, mix pasta, chicken, lettuce, tomatoes, and Parmesan. Drizzle with dressing and toss gently.
- Serve: Divide into bowls, top with croutons and extra cheese, and serve with a lemon wedge.
Notes
This salad can be customized with various toppings and is great for meal prep.
- Prep Time: 15 minutes
- Cook Time: 20 minutes
- Category: Main Course
- Method: Grilling
- Cuisine: American
Nutrition
- Serving Size: 1 serving
- Calories: 450
- Sugar: 4g
- Sodium: 800mg
- Fat: 20g
- Saturated Fat: 5g
- Unsaturated Fat: 10g
- Trans Fat: 0g
- Carbohydrates: 40g
- Fiber: 4g
- Protein: 36g
- Cholesterol: 75mg
Keywords: pasta salad, chicken salad, Caesar salad