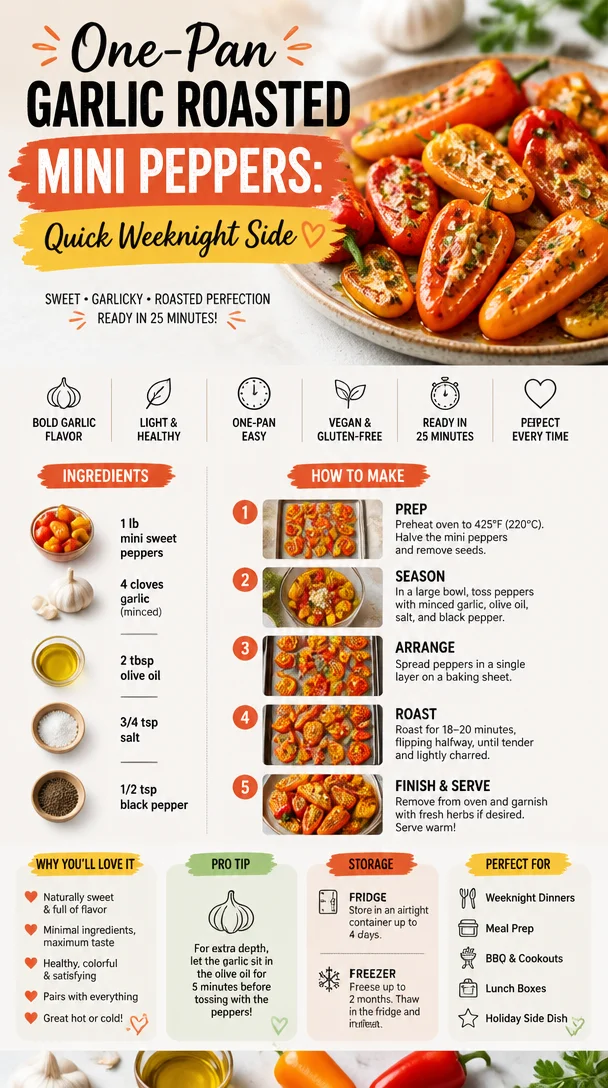
One-Pan Garlic Roasted Mini Peppers: Quick Weeknight Side
Garlic Roasted Mini Peppers: A Flavorful Delight
Hey there, fellow food lovers! I’m Beau Collier, and today we’re diving into a colorful, vibrant dish that’s guaranteed to brighten your day and your table: Garlic Roasted Mini Peppers. These little gems pack a punch of flavor and are super easy to whip up. Whether you’re looking for a zesty side dish, a party starter, or a simple snack to munch on, you’ve hit the jackpot with these beauties!
Introduction
Let’s be honest: everyone loves a good roasted pepper. They’re sweet, tender, and can elevate any dish from mundane to magnificent in just a matter of minutes. But what’s the secret? It’s all about roasting them to that perfect level of caramelization, infusing them with garlic goodness that’s simply irresistible.
Now, I can vividly remember my first encounter with mini peppers. I was at a local farmer’s market, and they caught my eye with their vibrant reds, yellows, and oranges. I couldn’t resist loading my basket full of these bite-sized beauties. Fast forward a few weekends later, and I found myself experimenting with different flavors and cooking methods. My kitchen transformed into a mini pepper paradise, and every time I roasted a batch, I was transported back to that sunny market day.
The great thing about garlic roasted mini peppers is they’re not just beautiful—they’re delicious! The creamy texture paired with the slight crunch makes every bite a burst of flavor. Plus, you’ll love the aroma that fills your kitchen as they roast. It’s like a warm hug welcomed by your senses, making this simple dish part of your comfort food repertoire.
As we cook together today, I want you to enjoy every step of the process. Embrace the smell of garlic wafting through your kitchen and the vibrant colors of these mini peppers. So, grab your favorite apron, crank up that oven, and let’s get cooking!
Personal Story
I still remember the summer of my culinary awakening. One beautiful Saturday, I invited a few close friends over for a backyard BBQ. Of course, I went a little overboard planning the menu—it’s just how I roll! Amidst the marinated meats and scrumptious salads, I wanted something unique to wow my guests.
That’s when I remembered those mini peppers. I quickly roasted a tray, drizzling them with olive oil, sea salt, and plenty of garlic. As they baked away, the anticipation built in the air. Once they were done, the vibrant colors and those savory smells brought everyone rushing over to the table.
The moment they took their first bite, I was flooded with compliments. People went back for more, and those mini peppers quickly became the star of the meal. Everyone loved how easy they were to make and how they complemented the barbecue spread perfectly. It was a small moment, but I realized how food brings people together and creates lasting memories. Whenever I make garlic roasted mini peppers now, I’m transported back to that summer BBQ, surrounded by laughter and good company.
Ingredients
To make these delectable Garlic Roasted Mini Peppers, you’ll need the following ingredients:
-
Mini Sweet Peppers: These bite-sized beauties come in a variety of colors and have a sweet, mild flavor. You can use red, yellow, or orange ones, or a mix for a colorful presentation. If you can’t find mini sweet peppers, feel free to use regular bell peppers, though you may need to adjust the roasting time.
-
Garlic: Fresh garlic is a game-changer in this recipe. It adds depth and aromatic flavor. You can substitute it with garlic powder in a pinch, though fresh will always yield the best results. Mince it finely or thinly slice it to achieve different flavor levels.
-
Olive Oil: A good quality extra virgin olive oil enhances the dish’s richness. It’s perfect for roasting and adds a wonderful flavor. If you’re looking for a lighter option, you can use avocado oil or a bit of melted butter instead.
-
Salt: A sprinkling of sea salt enhances all the natural flavors. If you want to experiment, consider using smoked salt for an added depth of flavor, or keep it simple with table salt.
-
Pepper: Freshly cracked black pepper is key to balancing the sweetness of the peppers. You can use white pepper for a different taste or even a pinch of cayenne for a little kick.
Step-by-Step Instructions
Now that we’ve gathered our ingredients, let’s dive into the cooking process. It’s time to transform those vibrant mini peppers into a mouthwatering dish.
-
Preheat Your Oven
Start by preheating your oven to 425°F (220°C). This high temperature will help caramelize the peppers, bringing out their natural sweetness. -
Prepare the Peppers
Rinse your mini sweet peppers under cold water and pat them dry with a clean kitchen towel. Slice each pepper in half lengthwise and remove the seeds. Feel free to leave the stems on for presentation—just a little more rustic and charming! -
Mince Garlic
While your oven heats up, let’s prep the garlic! Peel the garlic cloves and mince them finely. If you love a stronger garlic flavor, don’t be shy—add more! Just be aware that this recipe is all about balance, so taste as you go. -
Toss with Oil and Seasoning
In a large bowl, combine the halved peppers, minced garlic, olive oil, salt, and pepper. Use your hands to toss everything together until the peppers are well-coated. This is where the magic begins; the oil carries the flavors and helps them roast to perfection. -
Spread on a Baking Sheet
Arrange the seasoned peppers in a single layer on a baking sheet. Make sure they have some space between them—crowding the pan will lead to steaming rather than roasting, and we want those lovely browned edges! -
Roast in the Oven
Now’s the fun part! Place the baking sheet in the preheated oven and roast for about 20–25 minutes. The sweet smell of garlic will fill your kitchen—absolutely delightful! Give them a little toss halfway through to ensure even cooking. -
Check for Doneness
You’ll know they’re done when the peppers are tender and slightly charred around the edges. Keep an eye on them during the last few minutes—they can go from perfectly roasted to burnt pretty quickly! -
Taste and Adjust Seasoning
Once they’re ready, take them out of the oven and allow them to cool for a few minutes. Taste one pepper and see if it needs more salt or pepper. That’s the beauty of cooking—you get to personalize your dish! -
Serve and Enjoy!
Transfer the roasted mini peppers to a serving platter. They can be served warm or at room temperature, depending on your preference.
Serving Suggestions
When plating your garlic roasted mini peppers, think about how to enhance their presentation and flavor. A simple serving suggestion is to position them on a beautiful platter, and drizzle a little extra olive oil on top for sheen.
For an extra visual punch, consider adding fresh herbs like parsley or basil on top—their bright green colors will contrast beautifully with the vibrant peppers. You can also offer a bowl of feta cheese or goat cheese on the side for a creamy finish that complements the sweetness of the peppers.
These mini peppers can stand alone as a side dish, but they’re also wonderful as part of a charcuterie board or a tasty addition to salads. Serve them alongside some crusty bread for dipping, or toss them into pasta for an added twist.
Recipe Variations
Now that you’ve mastered the basic garlic roasted mini peppers, let’s have some fun with variations! Here are a few creative twists to try:
-
Honey Balsamic Glaze: Drizzle some honey balsamic reduction over the roasted peppers for a sweet-tangy finish.
-
Spicy Sriracha Kick: Add a splash of sriracha sauce into the oil mixture before roasting for a spicy punch.
-
Cheesy Delight: Top the peppers with shredded cheese (like mozzarella or parmesan) during the last 5 minutes of cooking for a melty finish.
-
Mediterranean Flair: Toss some olives and sun-dried tomatoes in with the peppers pre-roast for a Mediterranean twist.
-
Herb-Infused Oil: Instead of plain olive oil, blend in some fresh herbs like oregano or thyme with the oil for extra flavor.
Chef’s Notes
This recipe has become one of my go-to favorites over the years. It’s versatile, forgiving, and can be adapted to whatever you have on hand. The first time I made these, I overdid it on the garlic—who knew that much could be overwhelming? After some trial and error, I found the right balance that pleases most palates.
The best part is that garlic roasted mini peppers always bring smiles and satisfaction. Whenever friends come over for dinner, I know I can count on these lovely little bites to steal the show. Plus, they make a killer leftovers snack—if you have any left, that is!
FAQs and Troubleshooting
-
Why are my peppers not browning?
Make sure your oven is preheated and that you’re using high heat. Give the peppers space on the baking sheet to roast properly. -
Can I use frozen mini peppers?
While fresh is best, you can use frozen mini peppers. Just be sure to thaw and drain any excess water before tossing them with oil and seasoning. -
What can I do with leftovers?
Leftover roasted peppers are great in salads, on sandwiches, or blended into a pesto. They also freeze well for future meals! -
How do I know when the peppers are done?
They should be tender to the fork and have slightly charred edges. Keep an eye on them to avoid overcooking!
Nutritional Info
While garlic roasted mini peppers are a treat, they’re also packed with nutritional goodness! Mini sweet peppers are low in calories, making them a guilt-free addition to any meal. They’re rich in vitamins A and C, helping to boost your immune system and keep your skin glowing.
Olive oil, the base of our recipe, is known for its heart-healthy monounsaturated fats, which can help lower bad cholesterol. Plus, garlic has antioxidant properties and has been linked to various health benefits, including improved heart health. So, you can enjoy this dish knowing you’re also treating your body well!
Final Thoughts
So, there you have it—garlic roasted mini peppers that are bound to become a staple in your kitchen. They’re simple, satisfying, and downright delicious!
As you gather around the table with friends and family, remember that the best part of cooking is not just the end result but the experience—and the memories made together through good food. So the next time you find yourself at the grocery store, don’t forget to snag those little sweet peppers.
I can’t wait to hear how your garlic roasted mini peppers turn out. Let’s keep this culinary journey going—next up, I might just share my secret to a creamy garlic dip that pairs perfectly with these beauties. Happy cooking, and eat with joy!
PrintGarlic Roasted Mini Peppers
- Total Time: 35 minutes
- Yield: 4 servings 1x
- Diet: Vegetarian
Description
A colorful and flavorful dish of garlic roasted mini peppers, perfect as a side or snack.
Ingredients
- 1 pound Mini Sweet Peppers
- 4 cloves Garlic, minced
- 2 tablespoons Olive Oil
- 1 teaspoon Sea Salt
- 1/2 teaspoon Freshly Cracked Black Pepper
Instructions
- Preheat your oven to 425°F (220°C).
- Rinse the mini sweet peppers under cold water and pat them dry. Slice each pepper in half lengthwise and remove the seeds.
- Mince the garlic cloves finely.
- Combine the halved peppers, minced garlic, olive oil, salt, and pepper in a large bowl and toss until well coated.
- Arrange the seasoned peppers in a single layer on a baking sheet.
- Roast in the oven for about 20–25 minutes, tossing halfway through for even cooking.
- Check for doneness; they should be tender and slightly charred.
- Taste and adjust seasoning as needed.
- Serve the roasted mini peppers warm or at room temperature.
Notes
For a colorful presentation, use a mix of red, yellow, and orange mini peppers. Optionally, drizzle with extra olive oil and garnish with fresh herbs before serving.
- Prep Time: 10 minutes
- Cook Time: 25 minutes
- Category: Side Dish
- Method: Roasting
- Cuisine: Mediterranean
Nutrition
- Serving Size: 1 serving
- Calories: 150
- Sugar: 3g
- Sodium: 200mg
- Fat: 10g
- Saturated Fat: 1.5g
- Unsaturated Fat: 8g
- Trans Fat: 0g
- Carbohydrates: 15g
- Fiber: 4g
- Protein: 2g
- Cholesterol: 0mg
Keywords: mini peppers, roasted peppers, garlic, healthy side dish, easy recipes, Mediterranean
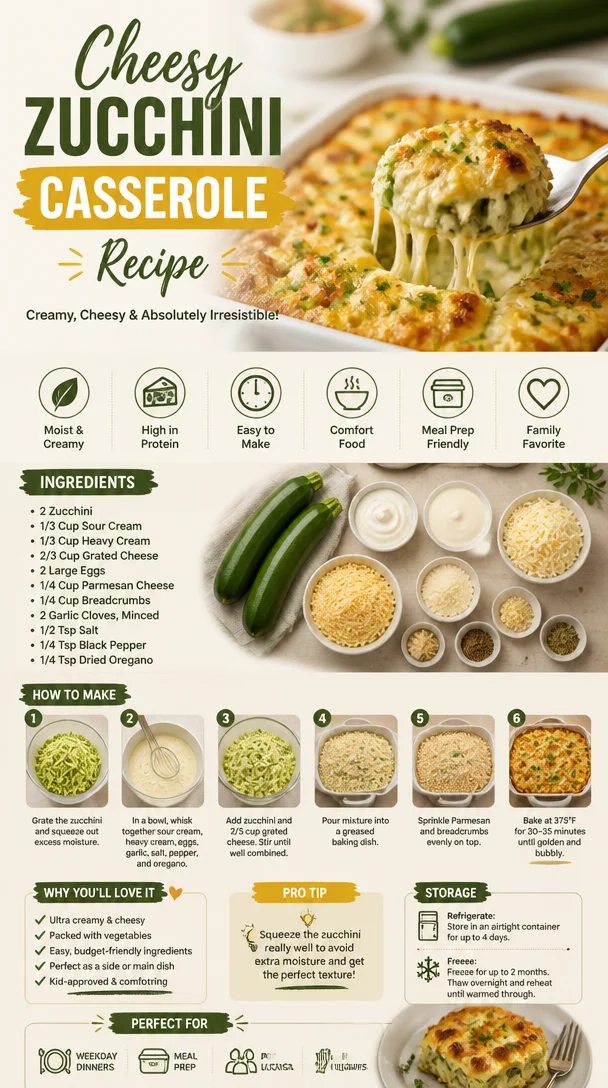
Cheesy Zucchini Casserole Recipe
Cheesy Zucchini Casserole: A Hug in a Dish
Hey there, food lovers! Beau here, and today we’re diving into something that will make your kitchen smell like a cozy haven and your heart feel warm—Cheesy Zucchini Casserole! This dish is like a warm hug that makes everything better, and trust me, it’s as easy to whip up as it is comforting to share. Whether you’re dealing with a bounty of zucchini from your garden or just looking for a scrumptious way to sneak some veggies into your meal, this casserole has got you covered.
In the world of comfort food, casseroles often hold a special place. They symbolize togetherness and warmth—a dish to share with family or friends when you gather around the table after a long day. And you know what? They are also the perfect canvas for creativity. With the combination of creamy goodness, cheesy decadence, and the wholesome taste of zucchini, this dish is the epitome of ‘feel-good food’. So, let’s roll up our sleeves, grab that spatula, and get cooking!
A Personal Connection: My Zucchini Adventure
Let me take you back to my childhood for a moment. I remember hot summer days spent at my grandmother’s house, where she would turn out delicious meals from her garden’s bounty. Zucchini was always in abundance, and I could never quite wrap my head around what to do with it. That all changed one day when grandma brought out her beloved casserole dish. She layered slices of zucchini with gooey cheese and a creamy mixture that became my instant favorite. Every bite was a magical combination of flavors that warmed my heart. Now, whenever I make this Cheesy Zucchini Casserole, I can almost hear her laughter and imagine her bustling around the kitchen, sharing stories while stirring pots and pans. It’s not just food—it’s nostalgia, love, and a whole lot of cheesy goodness all rolled into one.
Ingredients to Gather
Before we dive into cooking, let’s gather our ingredients. Here’s what you’ll need:
-
2 Zucchini: Fresh, medium-sized zucchini is key for the best texture. If you’re in a pinch, yellow squash can work too!
-
1/3 Cup Sour Cream: Adds a rich, tangy flavor. If you prefer, plain Greek yogurt is a fantastic substitute for a healthier option.
-
1/3 Cup Heavy Cream: This is where the creaminess comes into play! If you’re looking for a lighter option, you can use half-and-half or even almond milk for a dairy-free version.
-
2/3 Cup Grated Cheese: I love using cheddar for its melty goodness, but feel free to mix it up! Mozzarella gives a nice gooey stretch, and Parmesan adds a delightful sharpness.
Step-by-Step Instructions
Now that we have our ingredients, let’s get cooking! Follow these easy steps and let’s unleash the power of zucchini!
-
Preheat Your Oven: Set your oven to 350°F (175°C) so it’s nice and hot when your casserole is ready to go in. This ensures even cooking and that golden bubbly top we all love!
-
Prepare the Zucchini:
- Wash them thoroughly, then slice your zucchini into thin rounds—about 1/4 inch thick. You want them to cook evenly without getting mushy. Chef Tip: A mandoline can give you uniform slices, but a trusty knife works just fine!
-
Season It Up:
- Sprinkling a little salt over the zucchini slices before cooking helps to draw out excess moisture. Let them sit for about 10-15 minutes. This will keep your casserole from getting watery and help the zucchini maintain its structure.
-
Mix the Creamy Base:
- In a large bowl, combine the sour cream, heavy cream, and half of your grated cheese. Whisk until combined and creamy. A little pepper or garlic powder adds an extra kick if you fancy it.
-
Layer Like a Pro:
- In a greased 9×9 inch baking dish, start by layering half of the sliced zucchini at the bottom. Then pour half of your creamy mixture over the zucchini. Repeat with the remaining zucchini and creamy mixture.
-
Top It Off:
- Sprinkle the rest of the grated cheese on top. This will create a beautiful, cheesy crust when it bakes. Chef Hack: Mix a bit of breadcrumbs with your cheese for an extra crunch!
-
Bake:
- Slide your casserole into that preheated oven and let it bake for about 30-35 minutes, or until the zucchini is tender and the cheese is bubbly and golden brown.
-
Cool and Serve:
- Once out of the oven, let it cool for about 5-10 minutes. This allows the layers to set a bit and makes serving easier. Plus, the aroma will fill your kitchen, and believe me, everyone will come running!
Serving Suggestions
There are countless ways to enjoy your Cheesy Zucchini Casserole! I love serving it hot right from the oven. For a beautiful presentation, try cutting it into squares and placing them on a colorful plate. Sprinkle with fresh herbs like parsley or basil for a pop of color and freshness.
This casserole makes a fabulous side dish to accompany grilled meats or a zesty salad. Or serve it as a main dish alongside crusty bread to soak up all that deliciousness. A light drizzle of olive oil or a sprinkling of crushed red pepper flakes can amp up the flavor profile, making each bite something to rave about!
Recipe Variations
Here are a few creative twists on this Cheesy Zucchini Casserole that you might want to try:
-
Add Protein: Toss in some shredded cooked chicken or cooked ground turkey for a heartier dish that turns it into a full meal.
-
Herb Delight: Fresh herbs like thyme, rosemary, or dill can bring an aromatic flair to the casserole. Mix them into the creamy base for a special touch.
-
Zany Zucchini: Want to mix it up? Add in some diced tomatoes for a Mediterranean vibe or swap out half the zucchini for eggplant or bell peppers.
-
Cheesy Surprise: Layer in a different cheese profile, like goat cheese for tanginess, or feta for a more Mediterranean twist.
-
Make It Spicy: Incorporate some jalapeños or even a touch of crushed red pepper for those who like a kick in their comfort food.
Chef’s Notes
This Cheesy Zucchini Casserole has been a staple recipe in my household for years, and it has certainly evolved! Early on, I experimented with numerous veggies, and I found it’s an absolute canvas for seasonal ingredients. Just last month, I threw in some leftover roasted veggies, and wow—what a game-changer! It’s a reminder that cooking is all about experimenting and adjusting to our taste preferences. And if you ever burn the top, just call it ‘extra crispy’—a fancy term in the culinary world!
FAQs and Troubleshooting
Q: Can I make this ahead of time?
A: Absolutely! You can prepare the casserole, cover it, and refrigerate it for a day before baking. Just add a few extra minutes to the baking time if it’s coming straight from the fridge.
Q: What if my casserole is watery?
A: If you notice excess moisture, make sure to drain the zucchini after salting. You can also try baking it a little longer; this may help evaporate some of that liquid.
Q: Can I freeze leftovers?
A: Yes! Just scoop the leftovers into an airtight container after it cools. When you’re ready to eat, thaw it overnight in the fridge and reheat—not quite as fresh as the first time, but still delicious!
Q: What can I serve with the casserole?
A: It pairs well with grilled meats, fresh salads, or even a light soup. The cheesy richness makes it a beautiful accompaniment to a variety of dishes!
Nutritional Info
This casserole not only warms the heart but also packs a nutritional punch. Here’s a rough estimate of the nutritional information per serving, based on 8 servings:
- Calories: Approximately 180
- Protein: 6g
- Carbohydrates: 7g
- Dietary Fiber: 2g
- Total Fat: 14g (Saturated Fat: 8g)
- Sugar: 2g
These values can vary depending on the specific ingredients you use, but the addition of zucchini ensures you’re getting some vital nutrients like Vitamin C, potassium, and fiber.
Final Thoughts
Cooking should feel like a delightful adventure, and this Cheesy Zucchini Casserole is the perfect dish to make memories around. The way ingredients come together to create goodness is nothing short of magic. Remember, food is not just a necessity; it’s an experience to be shared, enjoyed, celebrated, and even at times, adapted to reflect who we are.
So the next time you find yourself with some zucchini or simply craving comfort food, give this casserole a try. And hey, don’t forget to share your creations with me! Grab your fork, dig in, and let’s keep the kitchen love going strong. Happy cooking, friends!
Print
Cheesy Zucchini Casserole
- Total Time: 50 minutes
- Yield: 8 servings 1x
- Diet: Vegetarian
Description
A comforting cheesy zucchini casserole perfect for family gatherings, made with layers of zucchini, creamy goodness, and gooey cheese.
Ingredients
- 2 Zucchini, fresh, medium-sized
- 1/3 Cup Sour Cream
- 1/3 Cup Heavy Cream
- 2/3 Cup Grated Cheese (cheddar, mozzarella, or parmesan)
Instructions
- Preheat your oven to 350°F (175°C).
- Prepare the zucchini by washing and slicing into thin rounds.
- Season the zucchini slices with salt and let them sit for 10-15 minutes.
- Mix the sour cream, heavy cream, and half of the grated cheese in a bowl until creamy.
- Layer half of the zucchini in a greased 9×9 inch baking dish, followed by half of the creamy mixture. Repeat.
- Top with the remaining grated cheese.
- Bake for 30-35 minutes or until the cheese is bubbly and golden brown.
- Cool for 5-10 minutes before serving.
Notes
Feel free to mix in different cheeses or add leftover vegetables. For a crunchier top, mix breadcrumbs with cheese before baking.
- Prep Time: 15 minutes
- Cook Time: 35 minutes
- Category: Main Course
- Method: Baking
- Cuisine: American
Nutrition
- Serving Size: 1 serving
- Calories: 180
- Sugar: 2g
- Sodium: 400mg
- Fat: 14g
- Saturated Fat: 8g
- Unsaturated Fat: 4g
- Trans Fat: 0g
- Carbohydrates: 7g
- Fiber: 2g
- Protein: 6g
- Cholesterol: 30mg
Keywords: casserole, zucchini, comfort food, cheesy, vegetarian

Irresistibly Crunchy Garlic Parmesan Roasted Zucchini
Irresistibly Crunchy Garlic Parmesan Roasted Zucchini
Hey there, folks! Beau Collier here, and today we’re diving into a dish that’s sure to change the way you think about veggies. That’s right, we’re talking about my Irresistibly Crunchy Garlic Parmesan Roasted Zucchini! This dish is more than just a side—it’s a celebratory bowl of yumminess that’ll have even the pickiest of eaters asking for seconds.
Zucchini is one of those veggies that tends to get overlooked, but when roasted to perfection with crispy garlic and nutty Parmesan, it transforms into a delicious treat that’s hard to resist. Whether you’re a busy parent looking for a quick side to throw together or a foodie wanting to impress your guests, this simple recipe is about to become your new best friend. So let’s get those ovens fired up and those apron strings tied!
A Little Personal Story
Growing up, my parents had a beautiful garden in our backyard, bursting with fresh vegetables just begging to be picked. Zucchini was always abundant—thankfully, it was a favorite of my mom’s. I remember her making various scrumptious dishes with it, but one summer evening stood out in particular.
With the golden rays of the setting sun streaming through the kitchen window, she decided to roast some zucchini alongside our family BBQ. The aroma of garlic wafting through the air was simply intoxicating! As the zucchini roasted, we dashed outside to play, only to return to the kitchen with that irresistible smell calling us back. The zucchini was perfectly crisped, the cheese melted just right, and when we finally gathered around the dinner table, those slices vanished like magic. Our laughter and conversations flowed just like mom’s recipes—smooth, enjoyable, and a little cheesy!
From that evening on, I believed roasted zucchini was simply a gift from the culinary heavens, and I’ve carried that love into my own kitchen, ready to share it with all of you.
Ingredients
Here’s what you’ll need to create your very own Irresistibly Crunchy Garlic Parmesan Roasted Zucchini:
-
4 medium zucchinis: Slice these into 1/4-inch thick rounds. Zucchini is fantastic in this dish because it roasts beautifully and absorbs flavors like a sponge. Prefer a little twist? Try swapping in yellow squash for a pop of color!
-
2 tablespoons olive oil: This is key for getting that nice crunch while roasting. If you’re out of olive oil, feel free to use avocado oil or melted coconut oil for a different flavor.
-
3 cloves garlic: Minced. Garlic is the star here, adding depth and a savory punch. If you love a stronger flavor, toss in an extra clove or two!
-
1/2 cup Parmesan cheese: Grated. Freshly grated is best since it melts beautifully. If you’re looking for a dairy-free option, nutritional yeast is a great substitute.
-
1 teaspoon Italian seasoning: This will enhance the flavor of the zucchini. If you want a little heat, try adding some crushed red pepper flakes!
-
1/2 teaspoon salt: Seasoning is important! Salt brings out the flavor of the zucchini and garlic. Adjust to taste based on your preference.
-
1/4 teaspoon black pepper: A little kick goes a long way! You can use freshly cracked pepper for a stronger taste.
-
Fresh parsley: Chopped, for garnish. Besides being pretty on the plate, fresh herbs can elevate the dish with their bright flavor. Feel free to swap parsley for other herbs like basil or chives!
Step-by-Step Instructions
Ready to get cooking? Let’s walk through the steps to achieve that crunchy, savory goodness!
-
Preheat the Oven: First things first—preheat your oven to 425°F (220°C). This high temperature ensures that our zucchini gets that coveted crispy exterior.
-
Prep the Zucchini: Give your zucchinis a good rinse under cold water and slice them into 1/4-inch rounds. Don’t stress about making them perfectly even; a little variance adds character! Place them in a large bowl.
-
Add the Olive Oil and Spices: Drizzle those zucchini rounds with the olive oil, ensuring each piece gets a nice coating. This is where the magic begins! Add in the minced garlic, Italian seasoning, salt, and black pepper. Toss everything together gently using your hands or a spatula. You want each zucchini piece beautifully coated in oil and spices!
-
Grate the Parmesan: Now, grab your cheese grater and finely grate the Parmesan cheese. Toss half of it into the zucchini mixture and mix it well. This will help create a tasty base, and we’ll top it off later for an extra crunch!
-
Arrange on a Baking Sheet: Line a baking sheet with parchment paper or lightly grease it. Spread the zucchini slices in a single layer—no overlapping! This is crucial for achieving that crispy texture we all crave.
-
Top with Remaining Parmesan: Sprinkle the remaining Parmesan cheese over the zucchini slices. This is where you can go wild—if you love cheese, add a little more!
-
Roast Away: Pop the baking sheet into the preheated oven and roast for about 20-25 minutes, flipping the zucchini halfway through. This helps them cook evenly and crisp up beautifully! Keep an eye on them during the last few minutes—once they’re golden brown, they’re done!
-
Garnish and Serve: Remove the zucchini from the oven and let them cool for a couple of minutes. Sprinkle the freshly chopped parsley on top for that fresh herb finish that’s bound to impress!
Serving Suggestions
Now comes the fun part—how to serve up this delicious dish! I love presenting these crunchy zucchini rounds as a vibrant side next to grilled chicken, steak, or even on a vegetarian platter with hummus and pita. For something extra fancy, try serving them on a rustic wooden board, drizzled with a little balsamic glaze for added flavor and visual appeal. Pair them with a refreshing salad or alongside a plate of spaghetti, and you’ve got yourself a meal that is anything but ordinary!
Recipe Variations
Looking to switch things up? Here are a few creative variations you can try:
-
Spicy Garlic Parmesan: Want to turn up the heat? Add some crushed red pepper flakes or a dash of hot sauce to the olive oil before tossing it with the zucchini for that fiery kick!
-
Lemon Zest Twist: Incorporate the zest of a lemon into the mix. This adds a zesty freshness that brightens the dish, especially during warmer months.
-
Herb Infusion: Move beyond Italian seasoning! Try adding fresh thyme or rosemary instead for a woodsy flavor that’s absolutely divine.
-
Cheesy Additions: Switch things up by using a mix of cheeses—like mozzarella for a gooey texture or feta for a tangy twist!
-
Gluten-Free Variation: If you’re searching for a gluten-free dish, replace the Parmesan with almond flour or gluten-free breadcrumbs for an equally delicious crunch.
Chef’s Notes
As with many recipes, this one has evolved over time. I remember when I first tried roasting zucchini, I was a bit hesitant. It seemed almost too simple. But wow, my friends, when I took that first bite, I was hooked! It inspired me to broaden my horizons—mixing flavors and experimenting in the kitchen in ways I never imagined. This dish epitomizes my belief that cooking doesn’t have to be complicated to be incredible. So, whether you’re whipping this up for a family dinner, potluck, or a cozy night in, I hope you find as much joy in making it as I do!
FAQs and Troubleshooting
-
Why is my zucchini soggy?: The key to crunchy zucchini is ensuring they’re spread out on the baking sheet. Overcrowding can lead to steaming rather than roasting. Also, make sure to pat them dry with a paper towel if you’ve washed them.
-
Can I use frozen zucchini?: While fresh zucchini is ideal for roasting, you can use frozen. Just remember to thaw and drain them thoroughly to avoid excess moisture, which can make them soggy.
-
How do I store leftovers?: If you have any left (which is rare!), allow them to cool completely, then store them in an airtight container in the fridge for up to 3 days. Note that they will lose some of their crunch, but can be reheated in the oven or air fryer to re-crisp!
-
Can I use other vegetables?: Absolutely! This roasting method works wonderfully for vegetables like eggplant, bell peppers, or broccoli. Just adjust the roasting times as needed.
Nutritional Info
For those keeping an eye on their calories, here’s a quick overview of the nutritional benefits of this dish (per serving):
- Calories: Approximately 150
- Protein: 6g
- Fat: 9g (mostly healthy fats from olive oil)
- Carbs: 12g
- Fiber: 3g
- Calcium: 15% of the daily value (thanks to Parmesan!)
Not only is this dish delicious, but it’s packed with vitamins and minerals from the zucchini, making it a great addition to any meal!
Final Thoughts
There you have it, my foodie friends—Irresistibly Crunchy Garlic Parmesan Roasted Zucchini! This dish isn’t just a recipe; it’s an experience, one that brings back memories for me and will surely create new ones for you. Whether you’re enjoying a cozy family dinner or hosting friends, I can guarantee this delightful dish will steal the show, with laughter and stories shared over every bite.
So go ahead—give this recipe a whirl, and let me know how it turns out! Remember, cooking is all about trying new things and having fun in the kitchen. And at the end of the day, if you can share it with someone you love, that’s what makes it truly special. Happy cooking, and see you next time at Feastical!
Print
Irresistibly Crunchy Garlic Parmesan Roasted Zucchini
- Total Time: 35 minutes
- Yield: 4 servings 1x
- Diet: Vegetarian
Description
A delicious side dish featuring roasted zucchini with crispy garlic and nutty Parmesan that transforms overlooked veggies into a delightful treat.
Ingredients
- 4 medium zucchinis, sliced into 1/4-inch thick rounds
- 2 tablespoons olive oil
- 3 cloves garlic, minced
- 1/2 cup Parmesan cheese, grated
- 1 teaspoon Italian seasoning
- 1/2 teaspoon salt
- 1/4 teaspoon black pepper
- Fresh parsley, chopped, for garnish
Instructions
- Preheat the oven to 425°F (220°C).
- Prep the zucchinis by rinsing and slicing them into 1/4-inch rounds.
- Add olive oil, minced garlic, Italian seasoning, salt, and black pepper to the bowl with zucchini and toss to coat.
- Grate the Parmesan cheese, adding half to the zucchini mixture and mixing well.
- Arrange the zucchini slices on a lined baking sheet in a single layer.
- Top with the remaining Parmesan cheese.
- Roast for 20-25 minutes, flipping halfway through until golden brown.
- Garnish with chopped parsley before serving.
Notes
For added flavor, try incorporating lemon zest or mixing in other fresh herbs.
- Prep Time: 10 minutes
- Cook Time: 25 minutes
- Category: Side Dish
- Method: Roasting
- Cuisine: Italian
Nutrition
- Serving Size: 1 serving
- Calories: 150
- Sugar: 3g
- Sodium: 400mg
- Fat: 9g
- Saturated Fat: 3g
- Unsaturated Fat: 4g
- Trans Fat: 0g
- Carbohydrates: 12g
- Fiber: 3g
- Protein: 6g
- Cholesterol: 15mg
Keywords: zucchini, roasted vegetables, side dish, vegetarian