
Soft Apple Cinnamon Bread Loaf: Quick One-Bowl Recipe
Soft Apple Cinnamon Bread Loaf: A Cozy Culinary Hug
Hey there, friends! Today, we’re diving into the wonderful world of baking with a recipe that’s perfect for those crisp fall mornings or any time you’re craving something warm and sweet. I’m talking about my Soft Apple Cinnamon Bread Loaf — a delightful treat that combines the comforting flavors of fresh apples and warm cinnamon, all wrapped up in a super soft, buttery loaf that’ll make your kitchen smell like heaven.
There’s just something special about the combination of apples and cinnamon. It brings back childhood memories of cozy weekends, family gatherings, and that irresistible aroma wafting through the house. Trust me, once you slice into this loaf, you’ll be greeted by a tender crumb and pockets of sweet apples that just melt in your mouth. Ready to join me in this apple-scented adventure? Let’s do it!
A Sweet Memory of Apple Bread
One of my favorite childhood memories revolves around baking with my grandma in her small but vibrant kitchen. I can still picture the way the sunlight poured in through the window, illuminating the flour-dusted countertops. Every autumn, we would spend a Saturday afternoon preparing her famous apple cinnamon bread. It was our tradition!
With flour on our noses and laughter spilling into the air, I’d watch as she chopped apples, measured out the sugar, and sprinkled in the cinnamon with a twinkle in her eye. The smell of that bread baking was pure magic! Each loaf seemed to be an edible hug, a slice of comfort that brought our family together around the table. We’d slather it with butter, of course, and share it with hot mugs of apple cider. Sometimes, I think back to those days and wish I could be that little kid, wearing an apron too big for me, standing on a stool just to see what my grandma was creating.
All of those sweet memories inspired me to craft my very own apple cinnamon bread recipe. Now, I’m excited to share it with you! Let’s bring that warmth and comfort into your kitchen.
Ingredients
Here’s what you’ll need to create this delightful Soft Apple Cinnamon Bread Loaf:
-
2 cups (240 grams) all-purpose flour
The foundation of our loaf! All-purpose flour gives a tender crumb. You can also use gluten-free flour blends for a gluten-free option, but the texture may vary. -
2 teaspoons baking powder
This helps the bread to rise and become fluffy. Ensure your baking powder is fresh for the best results. -
½ teaspoon baking soda
A little boost that works alongside the baking powder to help the loaf rise nicely. -
2 teaspoons ground cinnamon
The star of the show! Feel free to add more if you love that cinnamon flavor, or even swap for other spices like nutmeg for a twist. -
½ teaspoon salt
Just a pinch to enhance the sweetness of our bread. -
¾ cup (150 grams) granulated sugar
This sweetens the loaf beautifully. You can reduce the sugar slightly if you prefer. -
½ cup (115 grams) unsalted butter, melted
Adds rich flavor and moisture! If you’re looking for a dairy-free option, melted coconut oil works fantastic. -
2 large eggs, room temperature
Eggs add structure. Make sure they’re at room temperature for even mixing! -
1 teaspoon vanilla extract
A splash of vanilla adds depth and warmth to our loaf. -
½ cup (120 ml) plain full-fat yogurt
This keeps our bread moist and tender. You can substitute with sour cream or plant-based yogurt if you’d like! -
2 medium apples, peeled and diced (firm varieties like Granny Smith or Honeycrisp)
Apples provide natural sweetness and moisture. Use your favorites, but I highly recommend using a firmer variety for the best texture. -
¼ cup (50 grams) brown sugar
Adding a touch of caramel flavor! Light or dark brown sugar works here; both will do just fine.
Step-by-Step Instructions
Now that we’ve gathered our ingredients, let’s bake some magic! Follow along with these easy steps, and don’t forget to sprinkle in your own flair. Here’s how to make your very own Soft Apple Cinnamon Bread Loaf:
Step 1: Preheat Your Oven
Start by preheating your oven to 350°F (175°C). This ensures that your bread bakes evenly. While the oven warms up, you can prep the rest of the ingredients.
Step 2: Prepare Your Pan
Grab a standard 9×5 inch loaf pan and grease it lightly with butter or non-stick cooking spray. You can also line the bottom and sides with parchment paper for easy removal later. A happy loaf is a loaf that comes out easily!
Step 3: Combine Dry Ingredients
In a large mixing bowl, whisk together the all-purpose flour, baking powder, baking soda, ground cinnamon, and salt. This step is important because it ensures that the leavening agents and spices are evenly distributed.
Step 4: Mix Sugars and Wet Ingredients
In another bowl, combine the granulated sugar, brown sugar, melted butter, eggs, vanilla extract, and yogurt. Use a whisk or an electric mixer to beat this mixture until smooth and creamy. You want everything well integrated to create a deliciously moist loaf.
Step 5: Stir in the Apples
Fold in the diced apples gently until they’re coated with the batter. This is where the fun really begins; those apples will bring moisture and sweetness!
Step 6: Combine Wet and Dry Mixtures
Now, pour the wet mixture into the dry flour mixture. Using a spatula or wooden spoon, mix just until combined. Avoid over-mixing—some lumps are perfectly fine! Over-mixing can lead to a dense loaf, and we want fluffy and tender, remember?
Step 7: Pour into the Pan
Spoon the batter into your prepared loaf pan. Smooth out the top with your spatula to ensure an even bake. If you’re feeling adventurous, sprinkle a little extra cinnamon or brown sugar on top for an extra sweet crust.
Step 8: Bake
Place your loaf in the preheated oven and bake for 55–60 minutes. You’ll know it’s done when a toothpick inserted into the center comes out clean or with just a few moist crumbs—nothing more!
Step 9: Cool and Enjoy
Once baked, remove your loaf from the oven and let it cool in the pan for about 10 minutes. Then, transfer it to a wire rack to cool completely. This is the hardest part—waiting to taste it!
Serving Suggestions
When your Soft Apple Cinnamon Bread Loaf is cool enough to cut, the experience can be delightful. Serve it warm with a generous pat of butter, and let it melt into the soft bread for pure bliss.
You can also drizzle a simple glaze made from powdered sugar and a little milk over the top for added sweetness. Pair slices with herbal tea for a cozy afternoon snack, or serve it alongside breakfast as a delightful alternative to toast. Trust me, your guests (or your family) will be begging for more.
Recipe Variations
Feel like shaking things up? Here are a few creative twists and variations you could try with this recipe:
- Nutty Crunch: Add ½ cup of chopped walnuts or pecans to the batter for an extra crunch and nutty flavor.
- Dried Fruit Delight: Swap out some of the apples for ½ cup of dried cranberries or raisins for a chewiness that complements the apples.
- Spiced Up: Add a teaspoon of pumpkin pie spice or apple pie spice for a more complex flavor profile, perfect for fall.
- Gluten-Free Version: Substitute all-purpose flour with a gluten-free flour blend that measures 1:1 to keep it fluffy.
- Caramel Drizzle: Drizzle some caramel sauce over the cooled loaf before serving for an indulgent treat that’s simply divine.
Chef’s Notes
Every time I make this Soft Apple Cinnamon Bread Loaf, I can’t help but reminisce about those days spent in my grandma’s kitchen, discovering more about baking with each loaf we made together. This recipe has evolved, too! As I started experimenting, I found that small tweaks, like using yogurt or swapping butter for coconut oil, really enhanced the texture and flavor.
Also, remember that the joy of cooking is in the experience, so don’t be afraid to make this recipe your own. Every loaf you bake is a chance to create new memories!
FAQs and Troubleshooting
Q1: My bread didn’t rise! What did I do wrong?
A: Check your baking powder and baking soda; they should be fresh for the best rise. Make sure you’re measuring accurately as well!
Q2: Can I freeze this bread?
A: Absolutely! Slice it and wrap it tightly with plastic wrap and then foil. It can last in the freezer for up to 3 months. Just thaw overnight in the fridge when you’re ready to enjoy.
Q3: How do I store leftovers?
A: Keep any leftover bread in an airtight container at room temperature for up to 3 days. If you want to store it longer, consider refrigerating it, but be aware it may dry out.
Q4: Can I use other fruits?
A: Yes, feel free to get creative! Pears or berries work wonderfully as substitutes for apples. Just remember to adjust the sugar based on the fruit’s sweetness.
Nutritional Info
(Estimated per slice if the loaf is divided into 12 slices)
- Calories: Approximately 180 kcal
- Carbohydrates: 29 g
- Fat: 8 g
- Protein: 3 g
- Sugar: 10 g
- Fiber: 1 g
Keep in mind that nutritional values can vary depending on ingredient brands and variations. Always adjust based on your dietary needs!
Final Thoughts
There you have it, folks: my ultimate Soft Apple Cinnamon Bread Loaf recipe that embodies warmth, comfort, and those cherished kitchen memories. Baking isn’t just about mixing ingredients; it’s a way to express love and create lasting connections, whether with family, friends, or even yourself.
So the next time you’re looking for a sweet treat to share or simply want to enjoy something warm from your oven, I hope you’ll give this recipe a try. Trust me, your taste buds (and maybe even a few friends) will thank you for it! Happy baking, and remember: keep it simple, soulful, and satisfying. Cheers!
Print
Soft Apple Cinnamon Bread Loaf
- Total Time: 75 minutes
- Yield: 12 servings 1x
- Diet: Vegetarian
Description
A delightful loaf combining fresh apples and warm cinnamon, perfect for cozy mornings or as a sweet treat.
Ingredients
- 2 cups (240 grams) all-purpose flour
- 2 teaspoons baking powder
- ½ teaspoon baking soda
- 2 teaspoons ground cinnamon
- ½ teaspoon salt
- ¾ cup (150 grams) granulated sugar
- ½ cup (115 grams) unsalted butter, melted
- 2 large eggs, room temperature
- 1 teaspoon vanilla extract
- ½ cup (120 ml) plain full-fat yogurt
- 2 medium apples, peeled and diced
- ¼ cup (50 grams) brown sugar
Instructions
- Preheat your oven to 350°F (175°C).
- Prepare a standard 9×5 inch loaf pan and grease it lightly.
- Combine the all-purpose flour, baking powder, baking soda, ground cinnamon, and salt.
- Mix the granulated sugar, brown sugar, melted butter, eggs, vanilla extract, and yogurt until smooth.
- Stir in the diced apples gently.
- Combine the wet mixture into the dry ingredients.
- Pour the batter into the prepared loaf pan and smooth out the top.
- Bake for 55–60 minutes, or until a toothpick comes out clean.
- Cool in the pan for 10 minutes, then transfer to a wire rack to cool completely.
Notes
Serve warm with butter or a simple glaze for extra sweetness. Can be varied with nuts or dried fruit.
- Prep Time: 15 minutes
- Cook Time: 60 minutes
- Category: Bread
- Method: Baking
- Cuisine: American
Nutrition
- Serving Size: 1 slice
- Calories: 180
- Sugar: 10g
- Sodium: 200mg
- Fat: 8g
- Saturated Fat: 5g
- Unsaturated Fat: 2g
- Trans Fat: 0g
- Carbohydrates: 29g
- Fiber: 1g
- Protein: 3g
- Cholesterol: 40mg
Keywords: apple bread, cinnamon bread, baking, comfort food, fall recipes

Ingredient Slow-Cooker Chicken Parmesan Soup (Weeknight)
Hearty Crockpot Chicken Parmesan Soup: A Warm Hug in a Bowl
Hey there, fellow food lovers! Welcome back to Feastical! If you’re looking for that ultimate feel-good meal that warms both your belly and your heart, you’ve stopped by the right spot. Today, we’re diving into something special: Hearty Crockpot Chicken Parmesan Soup. This dish is like a comforting blanket on a chilly evening, and trust me, it’s a bowl of goodness you’ll be grateful for!
Growing up, Sunday dinners at my grandmother’s house were always an experience. You could count on her being elbow-deep in the kitchen, whipping up something magical. I vividly remember the aroma of simmering tomatoes and garlic wafting through the air while she prepared her famous chicken Parmesan. It was a family affair, with everyone gathered around the table, laughter bubbling over like the bubbling sauce in the pot. Those memories not only define who I am as a cook but also shaped my love for sharing food with loved ones. That’s exactly how I came up with this hearty soup recipe. It’s straightforward, rich, and embodies everything we adored about her chicken Parmesan, but in a cozy soup form that’s perfect for any day of the week.
Ingredients
Let’s gather our ingredients because cooking is all about having fun and using what you love! Here’s what you’ll need for our delicious soup:
-
1.5 lbs boneless, skinless chicken breasts or thighs
(The choice is yours! Breasts are leaner, while thighs bring juicy flavor. Use shredded rotisserie chicken for a quick shortcut, too.) -
28 oz canned crushed tomatoes
(Opt for fire-roasted tomatoes for an extra depth of flavor or use fresh tomatoes when they’re in season!) -
4 cups chicken broth (preferably low-sodium)
(Homemade broth adds a personal touch, but store-bought works great. Just watch the salt levels if you’re aiming for a low-sodium option.) -
3/4 cup small pasta shapes (ditalini or small shells)
(I love small pasta for its bite! Try rice or quinoa for a gluten-free twist.) -
1/2 cup freshly grated Parmesan cheese
(There’s nothing quite like fresh cheese! It’s creamier and tastier than pre-grated. Rainy shoes can be swapped with nutritional yeast for a vegan option.) -
3-4 garlic cloves, minced
(The more, the merrier! If you’re not a garlic lover, feel free to reduce the amount.) -
1 medium onion, finely chopped
(Sweet onions add a lovely flavor. A yellow onion is a perfect substitute.) -
1 tbsp Italian seasoning (basil, oregano, thyme, and rosemary blend)
(Feel free to mix your dried herbs or even toss in some fresh herbs for a burst of flavor!) -
1/4 tsp red pepper flakes (optional)
(Skip if you’re not into the heat, but they add a wonderful kick if you are!) -
Salt and freshly ground black pepper to taste
(Always season to your liking—every palate is different!) -
2 tbsp olive oil
(A dash of flavor that helps sauté the veggies. You can use avocado oil or butter for a different twist.) -
A handful of fresh basil leaves, chopped
(This is pure heaven for the garnish! You can substitute with parsley if you prefer.) -
Fresh mozzarella, torn into small pieces (optional)
(Oh yes! It adds that quintessential cheesy goodness. Use vegan cheese for a dairy-free option.)
Step-by-Step Instructions
Ready to dive in? Here’s how we’re going to create this beautiful bowl of goodness:
-
Prep the Ingredients: Begin by chopping your onion and mincing your garlic. This step is crucial; it sets the aromatic base for your soup. Don’t be shy with the garlic—it’s the soul of the dish!
-
Sauté the Aromatics: In a skillet, heat the olive oil over medium heat. Add in the chopped onions and let them go for about 5 minutes until they’re soft and fragrant. Next, toss in the minced garlic and stir for another 30 seconds. Cooking the garlic just enough will release its oils and flavor into the soup, setting the stage for some seriously delicious bites.
-
Combine in the Crockpot: Transfer those beautiful sautéed onions and garlic into your crockpot. Layer in the chicken breasts or thighs, the crushed tomatoes, and the chicken broth. Make sure everything is well mixed.
-
Season Generously: Add in the Italian seasoning, red pepper flakes (if you want that nice warmth), and season with salt and black pepper. Honestly, tasting as you go is key! It’s all about making it just right for your taste buds.
-
Let it Simmer: Cover the crockpot and set it to cook on low for about 6 hours or high for 3-4 hours. Here’s the magic: the chicken gets ultra-tender, and every flavor melds perfectly. You can go about your day while it does its thing—works for me!
-
Cook the Pasta: About 30 minutes before your soup is done, bring a small pot of salted water to a boil and add your pasta. Cook until al dente, then drain and set it aside. This little step ensures your pasta stays perfectly cooked without being mushy when added to the soup.
-
Shred the Chicken: When your crockpot tells you it’s done (trust me, you’ll know), remove the chicken, shred it with two forks, and return it to the pot. This gives the soup that hearty texture we adore and helps every spoonful be filled with chicken goodness.
-
Finish it Off: Stir in the grated Parmesan cheese until it’s melty and lovely. Add in the freshly chopped basil and taste once more for seasoning adjustments. You’re almost there!
-
Serve it Up: Ladle the soup into bowls, top it off with some torn mozzarella cheese (if using), and maybe add another sprinkle of Parmesan. Fresh basil leaves on top give a fragrant finish. It’s all about presentation, my friends!
Serving Suggestions
Now that you’ve created a masterpiece, let’s talk about serving! This soup is super versatile, so here are a few ideas:
-
Add Crusty Bread: Serve with a warm slice of artisan bread for dunking and soaking up every delicious drop. It’s a cozy combo straight out of an Italian kitchen.
-
Garnish with Fresh Herbs: A sprinkle of fresh basil or oregano on top brings a vibrant color contrast and elevates the dish visually!
-
Use Bowls that Speak Comfort: Grab your favorite soup bowls—something rustic or vintage can make this meal feel extra special.
Recipe Variations
Want to switch things up? Here are a few fun twists to try:
-
Zesty Lemon Chicken Parmesan Soup: Add the zest of one lemon and a splash of lemon juice for a fresh zing!
-
Creamy Version: Stir in a splash of heavy cream or coconut milk at the end for a rich and creamy finish.
-
Vegetable-Packed: Toss in some chopped spinach, carrots, or zucchini for added nutrition and a pop of color.
-
Mexican Twist: Add black beans and corn with a pinch of taco seasoning for a southwest take on this comforting classic.
-
Gluten-Free Options: Swap out the pasta with quinoa or keep it carb-free by adding riced cauliflower.
Chef’s Notes
This recipe holds a special place in my heart. Over the years, I’ve tweaked it as my family has grown and preferences have changed. One winter, I found myself with an abundance of zucchini from the garden, so I tossed that in, and it was an instant hit! Those moments in the kitchen, experimenting and adjusting, always remind me of why I love cooking—there’s infinite exploration and room for creativity.
You know, one time I accidentally added way too much red pepper flakes, and let’s just say, it was a lesson learned! Now, I always start with a smaller amount. Sometimes, the little blunders lead to the most unforgettable recipes!
FAQs and Troubleshooting
Q: Can I make this soup vegetarian?
Absolutely! Substitute the chicken with lentils or chickpeas, and replace the chicken broth with vegetable broth for a delicious vegetarian version.
Q: What if my soup is too thick?
Just add a little more broth or water until you reach your desired consistency. Remember, you can always adjust!
Q: My pasta turned mushy. What’s wrong?
This usually happens when the pasta cooks too long. Always cook it separately and add it at the end to keep it al dente.
Q: Can I freeze leftovers?
Yes! Freezing soup is a fantastic way to preserve those comforting flavors. Just cool completely before placing it in an airtight container. It can keep for up to three months in the freezer!
Nutritional Info
A typical serving of Hearty Crockpot Chicken Parmesan Soup offers a balance of protein from the chicken, healthy fats from the olive oil, and essential nutrients from the tomatoes and herbs. Each bowl is enriched with vitamins and minerals while remaining comfortingly satisfying. Here’s a rough estimate:
- Calories: 320
- Protein: 28g
- Carbohydrates: 28g
- Fiber: 5g
- Fat: 10g
Final Thoughts
And that’s it, lovely folks! Your Hearty Crockpot Chicken Parmesan Soup is ready to shine! Cooking doesn’t have to be complicated; it can be an enjoyable adventure filled with delightful discoveries. I hope this recipe becomes a new classic in your home, one that you can share with your own loved ones, just like my grandmother instilled in me.
Now, tell me, how will you make this soup your own? I’d love to hear your variations or memories associated with your favorite warm dishes in the comments below! Until next time, keep spreading love through food.
Happy cooking, and grab that spoon—it’s time to dig in! 🍽️
Print
Hearty Crockpot Chicken Parmesan Soup
- Total Time: 375 minutes
- Yield: 6 servings 1x
- Diet: Gluten-Free
Description
A comforting and hearty soup that combines the classic flavors of chicken parmesan with the ease of a crockpot.
Ingredients
- 1.5 lbs boneless, skinless chicken breasts or thighs
- 28 oz canned crushed tomatoes
- 4 cups chicken broth (preferably low-sodium)
- 3/4 cup small pasta shapes (ditalini or small shells)
- 1/2 cup freshly grated Parmesan cheese
- 3–4 garlic cloves, minced
- 1 medium onion, finely chopped
- 1 tbsp Italian seasoning
- 1/4 tsp red pepper flakes (optional)
- Salt and freshly ground black pepper to taste
- 2 tbsp olive oil
- A handful of fresh basil leaves, chopped
- Fresh mozzarella, torn into small pieces (optional)
Instructions
- Prep the ingredients: Begin by chopping your onion and mincing your garlic.
- Sauté the aromatics: In a skillet, heat the olive oil over medium heat. Add the chopped onions and let them cook for about 5 minutes. Add the minced garlic and stir for another 30 seconds.
- Combine in the crockpot: Transfer the sautéed onions and garlic into your crockpot. Layer in the chicken, crushed tomatoes, and chicken broth.
- Season generously: Add the Italian seasoning, red pepper flakes, salt, and black pepper. Taste and adjust seasoning as needed.
- Let it simmer: Cover the crockpot and set it to cook on low for about 6 hours or high for 3-4 hours.
- Cook the pasta: About 30 minutes before the soup is done, cook the small pasta in a pot of salted water until al dente.
- Shred the chicken: When the cooking time is complete, remove the chicken, shred it, and return it to the pot.
- Finish it off: Stir in the grated Parmesan cheese until melted and add in the fresh basil.
- Serve it up: Ladle the soup into bowls, adding mozzarella (if using) and garnish with fresh basil.
Notes
For a vegetarian version, substitute chicken with lentils and use vegetable broth.
- Prep Time: 15 minutes
- Cook Time: 360 minutes
- Category: Soup
- Method: Slow Cooking
- Cuisine: Italian
Nutrition
- Serving Size: 1 serving
- Calories: 320
- Sugar: 6g
- Sodium: 588mg
- Fat: 10g
- Saturated Fat: 2g
- Unsaturated Fat: 8g
- Trans Fat: 0g
- Carbohydrates: 28g
- Fiber: 5g
- Protein: 28g
- Cholesterol: 90mg
Keywords: chicken soup, crockpot soup, Italian soup, comfort food, chicken parmesan
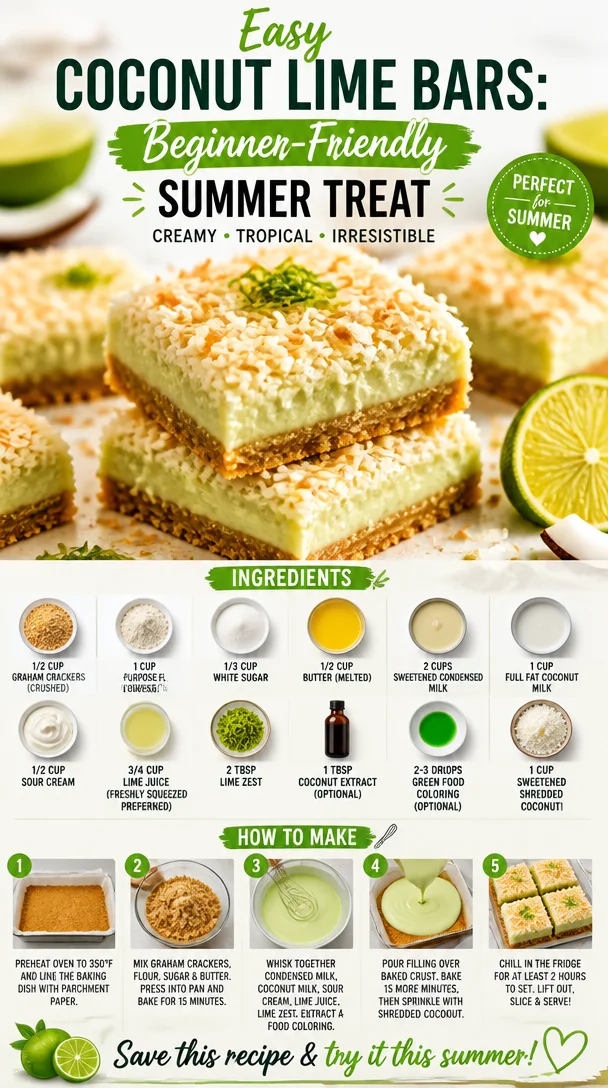
Easy Coconut Lime Bars: Beginner-Friendly Summer Treat
Coconut Lime Bars: A Slice of Sunshine!
Hey there, fellow food lovers! If you’re looking for a treat that brings a splash of summer into your kitchen all year round, then grab your mixing bowl and get ready to whip up some Coconut Lime Bars. These little squares of bliss are perfect for any occasion, be it a sunny picnic, a cozy gathering, or just because you deserve something sweet in your life. With their buttery graham cracker crust and a zesty lime coconut filling, these bars are sure to make your taste buds dance.
As I sit here typing with a warm mug of coffee in hand, I can’t help but reminisce about the first time I made these heavenly bars. It was a lazy Saturday afternoon, and I was craving something tropical. I recalled my childhood on those sun-soaked beaches, playing in the sand, and sipping on coconut drinks. I decided that what I needed was a little bit of that nostalgia in edible form. After a round of trial and error (who knew bars could be so tricky?), I finally got it just right—and let me tell you, it was worth every minute! The moment these bars came out of the oven, the kitchen filled with the irresistible aroma of lime and coconut, and I knew I had stumbled upon something special.
These Coconut Lime Bars are super easy to make—even if you’re more of a novice in the kitchen. With just a handful of ingredients and a few simple steps, you can create a refreshing dessert that will have your friends and family raving. So, put on your apron, grab a spatula, and let’s dive into this festive recipe!
Personal Story: A Slice of Nostalgia
The inspiration for Coconut Lime Bars came from fond memories of summer vacations spent with my family. My grandmother had a little beach house where we would spend long, sun-drenched days playing in the surf and hunting for seashells. Every evening, she would whip up something sweet for us to enjoy after dinner. I remember one trip when she surprised us with a coconut key lime pie she made from scratch. The combo of tangy lime and rich coconut was pure magic. Those flavors have stuck with me, and they often lead my culinary journey.
Years later, as I started experimenting in the kitchen, I aimed to recreate that same feeling of joy and nostalgia—a dessert that captures the essence of summer but in a bar form. That’s how Coconut Lime Bars came to life in my kitchen. The first bite transported me back to those sandy shores, bringing with it a wave of sweet memories. And now, I’m thrilled to share this recipe with you, so you can create your own beachy memories with each delicious bite!
Ingredients:
Here’s what you need to whip up these delightful Coconut Lime Bars:
-
1/2 cup graham crackers (crushed): Essential for the crust, they add that sweet, crumbly base. Want a gluten-free option? Use gluten-free graham crackers!
-
1 cup all-purpose flour: This provides structure to the filling. If you’re looking for a healthier option, swap it with almond flour for a nutty flavor.
-
1/3 cup white sugar: To balance the tartness of the lime. Coconut sugar or brown sugar can also be used for a deeper flavor.
-
1/2 cup butter (melted): This binds everything together. Use vegan butter if you’re looking for a dairy-free alternative.
-
2 cups sweetened condensed milk: The star of the filling! It makes everything wonderfully creamy. For a lighter version, you can use coconut cream.
-
1 cup full-fat coconut milk: Adds richness and a tropical flavor. Light coconut milk works too, but you’ll lose some creaminess.
-
1/2 cup sour cream: Incorporates a bit of tang. Greek yogurt can be a great substitute!
-
3/4 cup lime juice (freshly squeezed preferred): Fresh lime juice is essential for that zesty punch. Bottled lime juice works in a pinch but taste test for any differences.
-
2 tbsp lime zest: It’s all about the zing! Buy a zester or grater to incorporate every bit of that bright flavor.
-
1 tbsp coconut extract (optional): For super coconut flavor! It’s not necessary, but if you love coconut, go for it.
-
2-3 drops green food coloring (optional): Just a fun little addition to make it look extra pretty.
-
1 cup sweetened shredded coconut: Topping off the filling with a bit of shredded coconut adds texture and sweetness.
Step-by-Step Instructions:
Now that we have our ingredients ready, let’s jump into the cooking process! Follow these steps, and you’ll be on your way to Coconut Lime Bar glory.
-
Preheat the Oven: First things first, preheat your oven to 350°F (175°C). An adequately preheated oven helps the crust become perfectly golden.
-
Prepare the Crust: In a mixing bowl, combine the crushed graham crackers, flour, sugar, and melted butter. Keep mixing until the mixture resembles wet sand. A little tip: If the mixture is too dry, add a splash of coconut milk until you reach the right consistency!
-
Press It Down: Take that sweet graham cracker mixture and press it firmly into the bottom of an 8×8-inch baking dish. I like to use the back of a measuring cup to ensure it’s nice and even. Pop it in the oven for 8-10 minutes, just until it’s golden brown.
-
Meanwhile, Whisk the Filling: In another bowl, whisk together the sweetened condensed milk, full-fat coconut milk, sour cream, lime juice, lime zest, and coconut extract (if using). If you want a touch more lime zest, feel free to add it here! And don’t be shy with the whisking—make it airy!
-
Add the Food Coloring: If you want to add those fun green food coloring drops, this is the moment! Just a few drops will do—you want a subtle hint of color. Just be cautious, or you might end up with green bars that look more suited for Halloween!
-
Pour the Filling: Once your crust is out of the oven and slightly cooled, pour the coconut-lime filling over the crust. Spread it evenly using a spatula.
-
Sprinkle the Coconut: Top with sweetened shredded coconut, covering the surface. The coconut will toast beautifully as it bakes.
-
Bake Again: Return everything to the oven for 20-25 minutes. Keep an eye on it; you’ll know it’s ready when the edges are set, and the center has a little jiggle, similar to a cheesecake.
-
Cool Down: Allow them to cool at room temperature first, and then transfer them to the refrigerator for at least 2 hours. This helps the filling to firm up nicely.
-
Cut and Serve: Once chilled, cut into squares and serve! A little dusting of powdered sugar on top adds a nice touch!
Serving Suggestions
These Coconut Lime Bars are versatile when it comes to serving! Here’s how I like to present them:
-
On a Platter: Arrange the bars on a colorful platter, garnished with lime wedges and maybe a sprinkle of coconut for an eye-catching display.
-
With Whipped Cream: For an extra indulgence, serve with a dollop of whipped cream on top. A scoop of coconut whipped cream? Yes, please!
-
Tea Time Treat: Pair these bars with a refreshing cup of iced tea or lemonade for a delightful snack. Trust me; the flavors really complement each other!
Recipe Variations
Want to take your Coconut Lime Bars to the next level? Here are a few fun twists:
-
Mango Madness: Replace some of the lime juice with mango puree for a tropical mango twist—think beach vibes!
-
Berry Burst: Add a layer of fresh raspberries or blueberries in the filling for a fruity explosion.
-
Choco-Coconut Delight: Drizzle some melted dark chocolate on top for a decadent finish.
-
Nutty Delights: Toss in some chopped macadamia nuts into the filling or on top for that crunchy texture contrast.
-
Vegan Version: Swap out dairy for all coconut alternatives—use coconut yogurt and vegan sweetened condensed milk. Perfect for plant-based friends!
Chef’s Notes
As a chef and home cook, I can tell you that recipes are often just the beginning of your culinary adventure. This Coconut Lime Bars recipe has evolved over time; I’ve tried it with different fruit combinations, crust types, and even different sweetness levels. What really matters is that you have fun with it! Don’t be afraid to get creative—this is your kitchen, after all.
And speaking of fun, I remember one time I added a bit too much lime juice and ended up with a very tangy batch. It became a running joke in my family, and we laughed about the “super sour squares.” I learned to balance it out with a hint more sugar in the next round!
FAQs and Troubleshooting
1. Why did my bars turn out too watery?
If your filling is runny, it could be due to too much lime juice. Make sure you’re measuring accurately, especially with the liquid ingredients. Remember, lime juice can vary in tartness, so start with a little less and add to taste!
2. Can I freeze these bars?
Absolutely! Once fully cooled and cut, wrap them in plastic wrap and store them in an airtight container. They freeze well for up to a month—just thaw them overnight in the fridge when you’re ready to indulge again.
3. What can I use instead of sour cream?
Greek yogurt is a fantastic substitute! It will yield a similar texture and a slight tang, keeping your bars delicious.
4. How can I tell when the bars are done?
You’re looking for a firm edge and a slightly jiggly center. If you insert a toothpick, it should come out with a few moist crumbs but not wet batter.
Nutritional Info
If you’re curious about the nutritional values, here’s a rough breakdown per serving (assuming 16 servings):
- Calories: 220
- Protein: 3g
- Fat: 10g
- Carbohydrates: 30g
- Fiber: 1g
- Sugar: 16g
Keep in mind these values can vary based on specific brands and measurements. Adjust your ingredients according to your dietary needs, and remember that balance is key!
Final Thoughts
Coconut Lime Bars are much more than just a dessert; they’re a celebration of flavors and family memories, a little sunshine on a plate! Whether you’re crafting them for a gathering or treating yourself to a little sweet indulgence, these bars embody the heartwarming nature of cooking.
So, as we tie this all together, don’t forget to add your personal touch, share them with loved ones, and create even more beautiful memories around the kitchen table. I can’t wait to hear how your Coconut Lime Bars turn out—tag me in your delicious pictures and let’s keep the foodie love spreading! Until next time, keep cooking with passion and love!
Print
Coconut Lime Bars
- Total Time: 45 minutes
- Yield: 16 servings 1x
- Diet: Vegetarian
Description
Delight in these zesty Coconut Lime Bars, featuring a buttery graham cracker crust and a creamy lime coconut filling – the perfect treat to brighten any day.
Ingredients
- 1/2 cup graham crackers (crushed)
- 1 cup all-purpose flour
- 1/3 cup white sugar
- 1/2 cup butter (melted)
- 2 cups sweetened condensed milk
- 1 cup full-fat coconut milk
- 1/2 cup sour cream
- 3/4 cup lime juice (freshly squeezed preferred)
- 2 tbsp lime zest
- 1 tbsp coconut extract (optional)
- 2–3 drops green food coloring (optional)
- 1 cup sweetened shredded coconut
Instructions
- Preheat the oven to 350°F (175°C).
- Combine the graham crackers, flour, sugar, and melted butter until it resembles wet sand.
- Press the mixture into the bottom of an 8×8-inch baking dish.
- Bake for 8-10 minutes until golden brown.
- Whisk together sweetened condensed milk, coconut milk, sour cream, lime juice, lime zest, and coconut extract in a bowl.
- Add food coloring if using and mix until combined.
- Pour the filling over the crust once cooled.
- Sprinkle shredded coconut on top.
- Bake again for 20-25 minutes until set.
- Cool at room temperature, then chill in the refrigerator for at least 2 hours.
- Cut into squares and serve.
Notes
Feel free to experiment with different fruits and toppings. Enjoy with whipped cream or iced tea!
- Prep Time: 15 minutes
- Cook Time: 30 minutes
- Category: Dessert
- Method: Baking
- Cuisine: American
Nutrition
- Serving Size: 1 serving
- Calories: 220
- Sugar: 16g
- Sodium: 100mg
- Fat: 10g
- Saturated Fat: 6g
- Unsaturated Fat: 3g
- Trans Fat: 0g
- Carbohydrates: 30g
- Fiber: 1g
- Protein: 3g
- Cholesterol: 30mg
Keywords: Coconut, Lime, Bars, Dessert, Summer, Sweet

Pineapple Coconut Fritters
Pineapple Coconut Fritters: A Tropical Delight
Hey food lovers! Welcome back to Feastical, where I’m thrilled to share another scrumptious recipe that’s bound to become a favorite at your table. Today, we’re diving into the tropics with some delectable Pineapple Coconut Fritters. Imagine biting into a warm, crispy fritter that bursts with the sweet and tangy flavor of pineapple, all wrapped up in a lovely coconut coating. Whether it’s a sunny brunch or a festive gathering, these fritters are sure to steal the show!
A Taste of Nostalgia
Let me take you back to my childhood, where summer days were filled with adventure and a whole lot of good food. My grandma used to whip up these fritters every time she had a craving for something sweet, although I suspect she just wanted an excuse for us to gather around the kitchen. The aroma of frying pineapple and coconut wafting through the house was enough to lure us from our backyard escapades.
I’ll always remember the giggles and stories shared as we waited for the golden morsels to emerge from the pan, crispy on the outside and soft on the inside. Grandma would serve them up warm, dusted with a bit of powdered sugar, and we’d devour them while they were still steaming. It was comfort food at its finest, and every bite brought a smile to our faces. Now, every time I make these fritters, I’m transported back to those sun-soaked afternoons, reminding me that food isn’t just about sustenance; it’s about love, connection, and making memories.
Ingredients
To make these luscious Pineapple Coconut Fritters, you’re going to need the following ingredients:
-
1 cup all-purpose flour
The base of our fritter. You can substitute whole wheat flour for a healthier version, but keep in mind it will change the texture a bit! -
1 cup shredded coconut
Sweetened, unsweetened, or even toasted, the choice is yours! It adds that wonderful nutty flavor and chewiness we love. -
1 cup crushed pineapple, drained
Use fresh if you can! If you’re using canned, make sure to drain it well so your batter isn’t too runny. -
1/4 cup sugar
Just enough to give it a touch of sweetness. You can cut this down or use a sugar substitute if you prefer. -
1 teaspoon baking powder
This will help our fritters rise and get that lovely fluffy texture. -
1/2 teaspoon salt
A pinch of salt helps balance the sweetness. Trust me; it’s a must! -
1 egg
This binds everything together, helping our fritters hold their shape. You can substitute with a flax egg for a vegan option. -
1/2 cup milk
Use regular milk, plant-based milk, or even coconut milk for extra flavor! -
Oil for frying
I recommend vegetable oil or coconut oil for frying our fritters. The key here is to make sure it’s hot enough for a perfect golden crust.
Step-by-Step Instructions
Now that we’ve gathered all our ingredients, let’s cook up some magic!
-
Mix Dry Ingredients: In a large bowl, whisk together the flour, sugar, baking powder, and salt until well combined. This helps distribute the leavening agents evenly so that our fritters rise nicely.
-
Combine Wet Ingredients: In another bowl, beat the egg and then stir in the milk and drained crushed pineapple. Mix until it’s all well incorporated. The sight of that bright pineapple is just delightful!
-
Combine the Mixtures: Gradually add the wet mixture to the dry ingredients while stirring gently. You want to mix until just combined; it’s okay if there are a few lumps. Don’t over-mix! This is where the fritters get their fluffy texture.
-
Add Coconut: Fold in the shredded coconut. Just picture yourself adding all that goodness — it’s like confetti in the batter!
-
Heat the Oil: In a deep pan or skillet, add enough oil to cover the bottom generously (about an inch deep). Heat it over medium heat until a tiny drop of batter sizzles and floats to the top – that’s your cue!
-
Fry the Fritters: Using a tablespoon, carefully drop spoonfuls of batter into the hot oil, making sure not to overcrowd the pan. Fry them for about 3–4 minutes on each side until they turn golden brown and crispy. You might want to keep an eye on the heat; too hot and they’ll burn, too cool and they won’t crisp up.
-
Drain and Serve: Once golden, remove the fritters with a slotted spoon and place them on paper towels to drain any excess oil. While they’re still hot, you can dust them with powdered sugar if you like — it adds that extra touch of sweetness!
Serving Suggestions
These Pineapple Coconut Fritters are perfect for sharing! Serve them warm with a side of sweet dipping sauces like honey, maple syrup, or creamy coconut sauce. You can also top them off with a dollop of whipped cream or a scoop of vanilla ice cream for a delightful dessert twist. If you’re feeling adventurous, a sprinkle of toasted nuts or a drizzle of chocolate can take them to next-level indulgence!
Recipe Variations
Here are a few creative twists you can try to make these fritters your own:
-
Add a Zest: Incorporate the zest of a lime or orange for a zesty kick that complements the fruity flavors.
-
Spice It Up: Add a pinch of cinnamon or nutmeg to the batter for an aromatic warmth.
-
Nutty Delight: Try adding chopped macadamia nuts or cashews to give it a crunch and enhance the tropical vibe.
-
Dairy-Free: Use plant-based milk and skip the egg by substituting it with a flax egg for a vegan-friendly option.
-
Fruit Fusion: Swap the pineapple for other fruits like mangos or bananas for a whole new fruity experience!
Chef’s Notes
Oh, the stories I could tell about fritters gone wrong! I once got so caught up in chatting with friends while flipping these beauties that I lost track of time. Let’s just say the smoke alarm had almost as much fun as we did! The beauty of fritters is that they’re forgiving — even if they get a little darker on the outside, they’ll still be tasty on the inside. Embrace the process, and remember, chatting in the kitchen is half the fun!
FAQs and Troubleshooting
Q: Why are my fritters not crispy?
A: Make sure the oil is hot enough. If it’s too cool, the fritters will absorb oil and become soggy. You can test the heat by dropping a tiny bit of batter; if it sizzles and rises, you’re good to go!
Q: Can I bake these fritters instead of frying?
A: While they’re traditionally fried for that crispy texture, you can bake them at 375°F (190°C) on a parchment-lined baking sheet for about 15–20 minutes. Just be aware that the texture will be different!
Q: Can I make the batter ahead of time?
A: I wouldn’t recommend it. The baking powder will lose its leavening power if made too far in advance. It’s best to whip up the batter right before frying for that perfect fluffiness!
Q: What do I do with leftovers?
A: Should you find any leftover fritters (unlikely, but it happens!), store them in an airtight container in the fridge for up to 3 days. Reheat them in the oven to regain some crispiness!
Nutritional Info
Now, let’s chat about the nutritional aspect! Each fritter contains about 150 calories (give or take, depending on how much oil you use), with a mix of carbohydrates from the flour and sugars, healthy fats from the coconut, and some protein from the egg. They’re a delightful treat but are best enjoyed in moderation, especially if you’re loading on the syrup or ice cream. Feel free to tweak the recipe to make it your own!
Final Thoughts
There you have it, my lovely foodie friends! These Pineapple Coconut Fritters are more than just a recipe; they’re a window to cherished memories and moments spent in the kitchen. Whether you’re making them for yourself or sharing them with family and friends, I hope they bring as much joy to your table as they have to mine. So grab your spatula, throw on an apron, and let’s make some kitchen magic together!
Thanks for joining me at Feastical! I can’t wait to hear about your fritter adventures. Remember, kitchen stories always taste better with a sprinkle of laughter and a dash of love. Happy cooking!
Print
Pineapple Coconut Fritters
- Total Time: 30 minutes
- Yield: 4 servings 1x
- Diet: Vegetarian
Description
Delicious Pineapple Coconut Fritters bursting with sweet and tangy flavor, perfect for brunch or festive gatherings.
Ingredients
- 1 cup all-purpose flour
- 1 cup shredded coconut
- 1 cup crushed pineapple, drained
- 1/4 cup sugar
- 1 teaspoon baking powder
- 1/2 teaspoon salt
- 1 egg
- 1/2 cup milk
- Oil for frying
Instructions
- Mix Dry Ingredients: In a large bowl, whisk together the flour, sugar, baking powder, and salt until well combined.
- Combine Wet Ingredients: In another bowl, beat the egg and then stir in the milk and drained crushed pineapple.
- Combine the Mixtures: Gradually add the wet mixture to the dry ingredients, stirring gently until just combined.
- Add Coconut: Fold in the shredded coconut.
- Heat the Oil: In a deep pan, add enough oil to cover the bottom generously and heat over medium heat.
- Fry the Fritters: Carefully drop spoonfuls of batter into the hot oil, frying for 3–4 minutes on each side until golden brown.
- Drain and Serve: Remove the fritters with a slotted spoon and place them on paper towels to drain excess oil. Dust with powdered sugar if desired.
Notes
Serve warm with sweet dipping sauces or topped with whipped cream for a delightful dessert twist.
- Prep Time: 15 minutes
- Cook Time: 15 minutes
- Category: Dessert
- Method: Frying
- Cuisine: Tropical
Nutrition
- Serving Size: 1 fritter
- Calories: 150
- Sugar: 5g
- Sodium: 200mg
- Fat: 7g
- Saturated Fat: 6g
- Unsaturated Fat: 1g
- Trans Fat: 0g
- Carbohydrates: 21g
- Fiber: 1g
- Protein: 2g
- Cholesterol: 40mg
Keywords: pineapple, coconut, fritters, tropical, dessert, brunch

Coconut Dream Bars
Coconut Dream Bars: A Slice of Tropical Bliss
Hey there, fellow food lovers! Today, we’re diving into a heavenly treat that will surely make your taste buds dance—Coconut Dream Bars! I’m thrilled to share this delightful dessert that’s perfect for any occasion, from a sunny picnic to a cozy family movie night. What’s not to love about a buttery, sweet, and totally dreamy concoction of coconut goodness?
Picture this: you walk into your kitchen, and the aroma of sweet coconut fills the air. It’s like being transported to a tropical paradise right in your own home! These Coconut Dream Bars are everything you could wish for in a dessert and more. They’re rich, satisfying, and incredibly easy to whip up. With just a handful of ingredients, you’ll create a treat that will have your friends and family begging for the recipe!
But first, let’s talk about why I adore these bars. Growing up, my family had a special tradition where we would gather at my Aunt Linda’s house for Sunday brunch. It was a cozy ritual filled with laughter, heartwarming conversations, and, of course, delicious food. Aunt Linda was famous for her Coconut Dream Bars—she made them with love, and they were always the highlight of our brunch spread. The crispy graham cracker base combined with the sweet, gooey coconut filling was simply irresistible.
I can still remember my little cousin Matthew trying to sneak away with the last piece, and Aunt Linda playfully scolding him. As we savored every bite, she would share stories about her adventures in the kitchen, explaining the importance of not just cooking but doing it with flair. That’s the spirit I try to embody in my cooking, and I hope to inspire you to infuse your kitchen with joy and creativity as well.
So, grab your apron and let’s get started on these Coconut Dream Bars that are sure to create their own little slice of joy in your life!
Ingredients
Let’s gather what we need to bring these Coconut Dream Bars to life. You might already have some of these in your pantry! Here’s the lineup:
-
1 cup unsweetened shredded coconut
This is the star of our show! Unsweetened coconut gives the bars a delectable texture and depth of flavor. If you can’t find shredded coconut, you can use flaked coconut for a similar effect—just keep an eye on the texture! -
1/2 cup unsalted butter, melted
Butter is the magic ingredient here, providing richness and a luscious mouthfeel. If you’re looking for a dairy-free option, coconut oil works like a charm too. Just make sure it’s melted and cooled before mixing! -
1 cup sweetened condensed milk
This adds a creaminess that holds everything together. If you want to reduce sugar, consider using a low-sugar or sugar-free version of sweetened condensed milk, but keep in mind the texture may change slightly. -
1 cup graham cracker crumbs
The base of our bars! You can make your own crumbs by crushing graham crackers in a food processor or purchase pre-made ones to save time. For a gluten-free version, try using gluten-free graham crackers or crushed almond flour. -
1/2 cup powdered sugar
To sweeten things up just a notch! This ingredient also helps with the texture. If you’re avoiding sugar, powdered erythritol can be a great substitute—just note that the sweetness level might differ. -
1 teaspoon vanilla extract
A little splash of vanilla elevates the flavors beautifully. For an extra kick, you could experiment with coconut extract—a delightful twist that’ll take these bars to the next level!
Step-by-Step Instructions
Now that we’ve gathered our ingredients, let’s dive into the nitty-gritty of making these mouthwatering Coconut Dream Bars. Follow these steps, and you’ll be delighting in your creation in no time!
-
Preheat Your Oven:
Start by preheating your oven to 350°F (175°C). This is crucial as it ensures the bars bake evenly. A hot oven means golden-brown edges and a beautifully set center. -
Prepare Your Pan:
Line an 8×8 inch baking dish with parchment paper, leaving some overhang for easy removal later. This simple step saves you from the dreaded sticky situation when you’re trying to cut the bars! -
Mix the Base:
In a large mixing bowl, combine the graham cracker crumbs, melted butter, and powdered sugar. Stir until everything is well incorporated. The mixture should resemble damp sand—when squeezed, it should hold together nicely! -
Press the Mixture:
Pour the crumb mixture into the prepared baking dish and use the back of a measuring cup to press it down firmly. This creates a solid foundation for our dreamy filling. Pro tip: the firmer you press, the better the bars will hold together! -
Make the Filling:
In another bowl, mix the shredded coconut, sweetened condensed milk, and vanilla extract. Stir until all the ingredients are well combined. You should have a sticky, sweet mixture that looks like a tropical island in a bowl! -
Spread It Out:
Pour the coconut mixture over the pressed graham cracker base, spreading it evenly with a spatula. Don’t be shy—make sure to cover every corner! -
Bake the Bars:
Pop the baking dish into the preheated oven and let the bars bake for 25-30 minutes, or until the top is golden brown. The smell wafting through your kitchen will be enough to make anyone’s mouth water! -
Cool and Chill:
Once baked, remove the bars from the oven and let them cool in the pan at room temperature for about 10 minutes. Then, carefully lift them out using the parchment overhang and allow them to cool completely on a wire rack. For a cleaner cut, chill the bars in the refrigerator for a bit before slicing. -
Slice and Serve:
Use a sharp knife to cut the bars into squares or rectangles. I like to dust mine with a little extra powdered sugar for presentation!
Serving Suggestions
When it comes to enjoying your Coconut Dream Bars, the possibilities are endless! Here are some delightful serving suggestions to elevate your dessert experience:
-
Garnish with Fresh Fruit: Top the bars with slices of fresh pineapple or mango for an extra burst of tropical flavor. You can also add a sprinkle of toasted coconut flakes for that extra crunch.
-
Drizzle of Chocolate: Melt some dark or white chocolate and drizzle it over the sliced bars for a rich, decadent touch. The combination of coconut and chocolate is simply divine!
-
Pair with Ice Cream: Serve a warm piece of your Coconut Dream Bar alongside a scoop of vanilla ice cream. As it melts a little, it creates a creamy, dreamy experience that’s hard to beat.
-
Add Some Whipped Cream: A dollop of freshly whipped cream on top makes for a beautiful presentation and enhances the creamy texture.
Recipe Variations
Versatility is key in the kitchen, and these Coconut Dream Bars are no exception! Here are some fun variations to shake things up:
-
Chocolate Coconut Bars: Mix in chocolate chips with the coconut filling for a chocolatey twist. You’ll get pockets of melted chocolate that turn every bite into a flavor explosion!
-
Nutty Twist: Add chopped nuts, like pecans or almonds, into the crust or filling for an added crunch. The nutty flavor will complement the sweetness of the coconut beautifully.
-
Lemon Zest: For a zingy surprise, add a teaspoon of lemon zest to the coconut filling. It adds a refreshing brightness that balances the rich sweetness.
-
Almond Joy Variation: Mix in some chopped almonds and a few dark chocolate chips for an homage to the famous candy bar. Everyone will enjoy this nostalgic flavor combo!
-
Vegan Version: Replace the butter with coconut oil, use a plant-based sweetened condensed milk, and swap out powdered sugar for a vegan alternative. You won’t believe how scrumptious they still taste!
Chef’s Notes
As someone who loves experimenting in the kitchen, I can tell you that each batch of Coconut Dream Bars carries a little piece of my heart. Originally, I learned to make these delightful bars from Aunt Linda, but over the years, I’ve really made them my own by adding my favorite twists.
One of my funniest kitchen stories involves the time I accidentally mixed up the salty and sweet ingredients. I thought I was adding salt to the butter, but it turned out to be sugar! The mix-up produced the most unexpectedly delicious batch of bars. Now, I sometimes add a pinch of sea salt on top just to keep that surprise element alive!
FAQs and Troubleshooting
Here are some common questions you might have when making your Coconut Dream Bars, along with solutions to any potential hiccups:
1. My bars are too crumbly; what went wrong?
If your bars are falling apart and crumbling, it could be due to not packing the crust tightly enough. Use the back of a measuring cup to press it down firmly. Also, make sure your butter is fully melted and incorporated well!
2. Can I use sweetened shredded coconut instead?
Absolutely! If you prefer a sweeter filling, using sweetened shredded coconut can work, but reduce or omit the powdered sugar to balance the sweetness.
3. How do I store leftovers?
Keep your Coconut Dream Bars covered in the refrigerator for up to a week. You could also freeze them wrapped tightly in plastic wrap and aluminum foil, perfect for a sweet treat later on!
4. Why did my bars puff up while baking?
If your bars puff up during baking, it may be due to excess air trapped in the mixture. When mixing, be gentle but thorough. If they deflate after cooling, that’s completely normal!
Nutritional Info
While desserts are often more about enjoyment than counting calories, here’s a general breakdown of the Coconut Dream Bars per square (1/16th of the recipe):
- Calories: 180
- Total Fat: 10g
- Saturated Fat: 7g
- Cholesterol: 20mg
- Sodium: 50mg
- Total Carbohydrate: 22g
- Dietary Fiber: 1g
- Sugars: 10g
- Protein: 1g
Note that these values may vary based on the specific brands and substitutes you use, so always check your product labels if you have dietary restrictions.
Final Thoughts
There you have it, folks—a deliciously easy recipe for Coconut Dream Bars that’s bound to become a favorite in your household. Cooking is all about love and creativity, and I hope this recipe inspires you to make something delicious while creating your dreamy moments in the kitchen.
So next time you find yourself with a craving for something sweet or want to impress your friends, whip up a batch of these Coconut Dream Bars! They’re so simple to make, and trust me, the compliments will be pouring in.
I can’t wait to hear how yours turn out! Share your kitchen adventures with me, and remember, it’s all about having fun and making memories in the kitchen. Happy baking, and may your days be filled with coconut bliss!
Print
Coconut Dream Bars
- Total Time: 45 minutes
- Yield: 16 servings 1x
- Diet: Vegetarian
Description
Delightful Coconut Dream Bars that combine a buttery graham cracker base with a sweet, gooey coconut filling, perfect for any occasion.
Ingredients
- 1 cup unsweetened shredded coconut
- 1/2 cup unsalted butter, melted
- 1 cup sweetened condensed milk
- 1 cup graham cracker crumbs
- 1/2 cup powdered sugar
- 1 teaspoon vanilla extract
Instructions
- Preheat your oven to 350°F (175°C).
- Line an 8×8 inch baking dish with parchment paper.
- Mix the graham cracker crumbs, melted butter, and powdered sugar in a large bowl.
- Press the mixture into the prepared baking dish.
- Mix the shredded coconut, sweetened condensed milk, and vanilla extract in another bowl.
- Spread the coconut mixture over the pressed graham cracker base.
- Bake for 25-30 minutes, or until the top is golden brown.
- Cool in the pan for about 10 minutes before transferring to a wire rack to cool completely.
- Slice into squares and serve.
Notes
For a cleaner cut, chill the bars in the refrigerator for a bit before slicing. You can also garnish with fresh fruit or a drizzle of chocolate for extra flavor.
- Prep Time: 15 minutes
- Cook Time: 30 minutes
- Category: Dessert
- Method: Baking
- Cuisine: American
Nutrition
- Serving Size: 1 square
- Calories: 180
- Sugar: 10g
- Sodium: 50mg
- Fat: 10g
- Saturated Fat: 7g
- Unsaturated Fat: 2g
- Trans Fat: 0g
- Carbohydrates: 22g
- Fiber: 1g
- Protein: 1g
- Cholesterol: 20mg
Keywords: Coconut Dream Bars, dessert, tropical dessert, easy dessert recipe, sweet treats

No-Bake Coconut Cream Pie Cups: Fresh Weeknight Dessert Bite
Homemade Coconut Cream Pie Cups: A Sweet Slice of Paradise
Hey there! I’m Beau Collier, and today we’re embarking on a tropical journey right in your kitchen with these delightful Homemade Coconut Cream Pie Cups! If you’ve been craving the light, creamy, and oh-so-satisfying taste of coconut, then you’re in for a treat. These cups are not only easy to whip up but also an absolute crowd-pleaser for any occasion—be it a family gathering, a cozy dinner party, or just a little indulgence after a long day.
Why Coconut Cream Pie Cups?
Let’s be honest; sometimes a whole pie feels like too much, and that’s where these cups shine! They’re the perfect individual servings, bringing elegance and fun to your dessert routine without the fuss. Plus, they’re a breeze to make, so you’ll have more time to enjoy your friends and family or to cozy up with a good book!
Picture this: you’ve just pulled a batch from the fridge, and the creamy coconut aroma wafts through the air. Each bite is like a mini vacation—smooth, rich, and utterly satisfying. Yes, please! Ready to dive in? Grab your spatula, let’s create!
A Sweet Memory with Coconut Cream
Coconut has always held a special place in my heart. As a kid, my family spent our summers at my grandmother’s beach house, which had the most incredible view of the ocean. Along with the salty breeze and the sound of waves crashing, there was also a delightful sweet treat that was always on the table—my grandma’s coconut cream pie.
I vividly remember standing on a chair, helping her mix the filling. I’d sneak spoonfuls of the creamy goodness when she wasn’t looking, and she’d laugh, saying that the true secret to a great pie is “a generous amount of love.” You can bet that those tasty bites came loaded with her affection. Now, I’m passing that love along to you with these Coconut Cream Pie Cups—miniature tributes to my grandmother’s nostalgic masterpiece. Each cup is filled with the same warmth and joy I felt back then, and with every bite, I hope to spread that happiness to your home, too.
Ingredients
Let’s gather what you need! This simple yet delightful recipe comes together with just a handful of ingredients. Here’s the lineup:
-
1 cup coconut milk
Dairy-free and rich in flavor, coconut milk adds that dreamy creaminess. You could use regular milk, but you’d miss that delicious coconut flavor! -
1/2 cup heavy cream
Whipping cream adds an extra layer of silkiness. If you’re looking to lighten things up, you could swap with coconut cream or a lighter whipping cream, but it might reduce the luxurious texture. -
1/2 cup sugar
To sweeten things up! Feel free to substitute with coconut sugar or a sugar alternative like stevia for a healthier version. -
1/4 cup cornstarch
This is our magical thickening agent that creates that lovely custard consistency. If you’re gluten-free, no worries, cornstarch is your friend here! -
1/4 teaspoon salt
Just a pinch balances the sweetness beautifully, enhancing all the flavors! -
1 teaspoon vanilla extract
For a warm flavor that rounds out the coconut. You could also use coconut extract for an extra punch! -
1 cup shredded coconut
Unsweetened shredded coconut gives texture and a great coconut kick. Want a little more sweetness? Use the sweetened version! -
1 pre-made pie crust or graham cracker crust
The base of your cups! You can buy one or make your own for a personal touch. If gluten is a concern, a nut-based crust works wonders, too! -
Whipped cream for topping
Nothing is complete without a dollop of whipped cream up on top, right? You can use store-bought or homemade—your choice! -
Toasted coconut for garnish
To bring out an extra depth of flavor. Toasting the coconut before garnishing gives a delightful crunch—it’s all in the details!
Step-by-Step Instructions
Alright, now that we have everything ready, let’s get cooking! Follow my lead with these step-by-step instructions, complete with some chef tips along the way to help you nail it.
-
Prepare Your Crust:
In a small pie dish or muffin tin (for cups), fit your pre-made pie or graham cracker crust. Press it firmly into the bottom and up the sides. Don’t worry if it’s not perfect; rustic is charming! Bake according to package directions until lightly golden, then let it cool as we prepare the filling. -
Heat the Coconut Milk and Cream:
In a medium saucepan over medium heat, combine 1 cup of coconut milk and 1/2 cup heavy cream. Heat until it’s warm but not boiling. Stir occasionally to prevent sticking. This step releases the coconut’s aromas—your kitchen is going to smell divine! -
Whisk the Dry Ingredients:
In a separate bowl, whisk together 1/2 cup sugar, 1/4 cup cornstarch, 1/4 teaspoon salt, and 1 teaspoon vanilla extract. This is an important bit—making sure the cornstarch and sugar are well combined means no lumps later on. -
Combine and Thicken:
Pour the warm coconut-milk mixture slowly into the sugar mix, whisking continuously. This tempering will keep your filling smooth. Transfer the mixture back to the saucepan and continue to cook over medium heat, whisking constantly until it thickens. You’ll know it’s ready when it coats the back of a spoon! -
Add Shredded Coconut:
Remove from heat and fold in 1 cup of shredded coconut. This adds flavor and a great texture! Let it sit for a few minutes—it’ll thicken up even more. Trust the process! -
Fill the Crusts:
Spoon the warm coconut mixture into your prepared crusts. Be generous! Those cups should be overflowing with that creamy goodness. Cover with plastic wrap and refrigerate until set, usually about an hour. -
Top it Off:
Once the cups are chilled and set, pipe or spoon whipped cream onto the tops of your coconut cups. Finish with a generous sprinkling of toasted coconut for that crunchy texture and beautiful presentation!
Serving Suggestions
When you’re ready to serve, here’s how to add a touch of flair to your presentation!
-
Individual Cups: Serve the cups directly in the molds or remove them and plate them on a decorative dish. Either way, they look fantastic!
-
Add Fresh Fruit: A little slice of fresh pineapple or a few raspberries on the side not only adds color but also complements the coconut perfectly.
-
Drizzle with Caramel or Chocolate Sauce: For an extra indulgence, a light drizzle of warm caramel or chocolate sauce can elevate your dessert experience. You deserve it!
-
Garnish with Mint: A sprig of fresh mint on top adds a lovely pop of color and freshness. It’s the little things, right?
Recipe Variations
Want to switch things up a bit? Here are some fun variations!
-
Chocolate Coconut Cream Cups: Add cocoa powder to the filling for a chocolate twist! The combination of coconut and chocolate is a match made in dessert heaven.
-
Pineapple Coconut Cream Cups: Mix in some crushed pineapple for a tropical explosion! This variant brings that extra fruity zing, reminiscent of a piña colada.
-
Almond Joy Cups: Throw in some chopped nuts like almonds or pecans to replicate the classic Almond Joy candy. Layering the nuts in with the coconut filling gives a satisfying crunch.
-
Vegan Option: Use full-fat coconut milk and make your own whipped coconut cream. This keeps it creamy and utterly delicious without any dairy!
-
Key Lime Coconut Cups: For a zesty twist, add a splash of key lime juice to the filling. The sweet and tangy pairing is refreshing and uniquely delightful.
Chef’s Notes
When I first started playing with coconut cream recipes, I must confess that I had a few kitchen disasters. The first time I made this dessert, let’s just say that my filling ended up looking more like scrambled eggs than custard. The trick is low and slow, folks! Keeping that temperature just right will prevent those dreaded lumps.
Over time, I’ve learned the beauty of making coconut cream desserts lies in experimenting and finding what flavors spark joy in your kitchen. And the truth is, every attempt brings back those warm memories of my grandma. So dive in, have fun, and don’t be afraid to add your own spins!
FAQs and Troubleshooting
1. My filling didn’t thicken. What went wrong?
This can happen if the mixture didn’t reach the right temperature, or if it was stirred too aggressively. Make sure you cook the filling over medium heat while constantly whisking until it coats the back of a spoon before pouring it into the crust.
2. Can I use fresh coconut?
Absolutely! Fresh coconut adds a fantastic texture and flavor but requires a bit more work. Just make sure to toast it beforehand for that perfect crunch.
3. How do I store these cups?
Keep them in an airtight container in the refrigerator for up to three days. They’re great for meal prep and can also be made ahead of time for gatherings!
4. What consistency should the filling be?
Aim for a thick, pudding-like consistency. When cooled, it should be creamy enough to hold its shape without being too stiff.
Nutritional Info
Each Coconut Cream Pie Cup is a delightful treat, perfect for indulging. Let’s break down the nutrition:
- Calories: Approximately 300 per serving (this can vary based on crust and toppings)
- Fat: 20 grams, with healthy fats from coconut milk and cream
- Carbohydrates: 32 grams, mainly from sugar and the crust
- Protein: 3 grams, thanks to the coconut and cream
- Fiber: 1 gram, offering a tiny boost to digestion!
While these delightful cups may not be diet food, they fulfill that sweet tooth in moderation!
Final Thoughts
There you have it—Homemade Coconut Cream Pie Cups that will transport you straight to dessert paradise! I hope you’re as excited to try this recipe as I am to share it with you. Every spoonful is an experience filled with warmth, nostalgia, and a bit of adventure.
Cooking is all about the journey, and I’m so glad to share this one with you! Remember, it’s not just about the end product. Take your time in the kitchen, enjoy the process, and let those memories—old and new—dance around as you create.
So grab your ingredients, infuse a little love into your cooking, and let’s make some magic with these Coconut Cream Pie Cups. Happy eating, my friends!
Print
Homemade Coconut Cream Pie Cups
- Total Time: 45 minutes
- Yield: 4 servings 1x
- Diet: Vegetarian
Description
Delightful individual servings of creamy coconut goodness, perfect for any occasion.
Ingredients
- 1 cup coconut milk
- 1/2 cup heavy cream
- 1/2 cup sugar
- 1/4 cup cornstarch
- 1/4 teaspoon salt
- 1 teaspoon vanilla extract
- 1 cup shredded coconut
- 1 pre-made pie crust or graham cracker crust
- Whipped cream for topping
- Toasted coconut for garnish
Instructions
- Prepare Your Crust: Fit your pre-made pie or graham cracker crust into a small dish. Bake according to package directions until lightly golden, then let it cool.
- Heat the Coconut Milk and Cream: In a medium saucepan, combine coconut milk and heavy cream. Heat until warm but not boiling, stirring occasionally.
- Whisk the Dry Ingredients: In a separate bowl, whisk together sugar, cornstarch, salt, and vanilla extract.
- Combine and Thicken: Slowly pour the warm coconut milk mixture into the sugar mix, whisking continuously. Return to saucepan and cook over medium heat until it thickens.
- Add Shredded Coconut: Fold in shredded coconut and let it sit for a few minutes.
- Fill the Crusts: Spoon the mixture into your prepared crusts and refrigerate until set, about an hour.
- Top it Off: Pipe or spoon whipped cream onto the tops and sprinkle with toasted coconut.
Notes
Experiment with variations like adding cocoa powder or fresh fruit to customize your cups.
- Prep Time: 15 minutes
- Cook Time: 30 minutes
- Category: Dessert
- Method: Baking
- Cuisine: American
Nutrition
- Serving Size: 1 serving
- Calories: 300
- Sugar: 22g
- Sodium: 150mg
- Fat: 20g
- Saturated Fat: 16g
- Unsaturated Fat: 4g
- Trans Fat: 0g
- Carbohydrates: 32g
- Fiber: 1g
- Protein: 3g
- Cholesterol: 30mg
Keywords: coconut, dessert, cream pie, cups, easy recipe
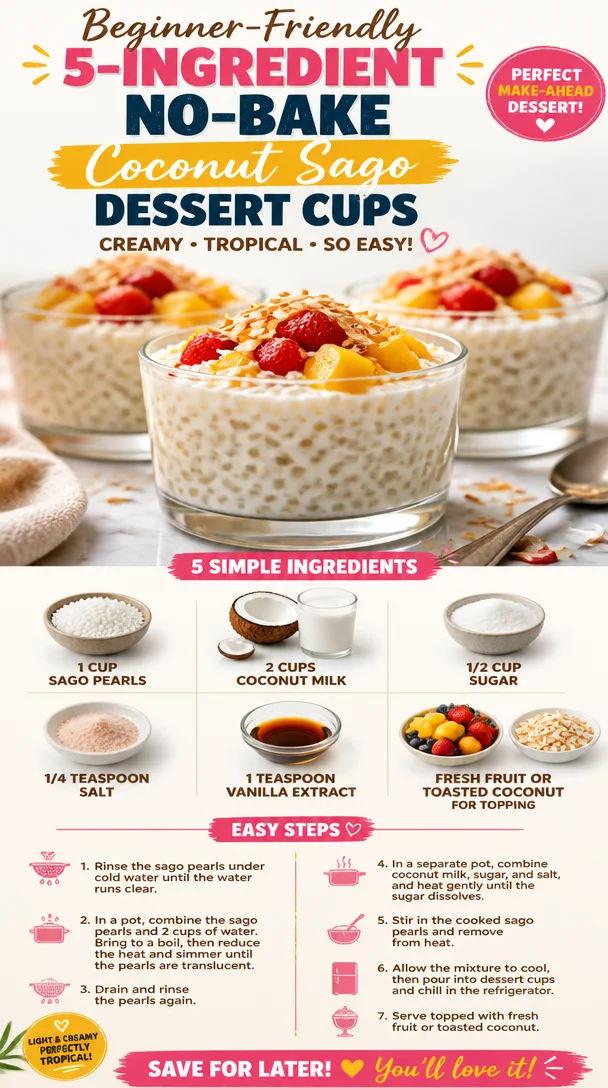
Beginner-Friendly 5-Ingredient No-Bake Coconut Sago Dessert Cups
Indulge in Sweet Bliss with Coconut Sago Dessert Cups
Hey there, fellow food lovers! Today, I’m beyond excited to share a delightful culinary treat that’s sure to tickle your taste buds – Coconut Sago Dessert Cups! Now, if you’ve never tasted this creamy, tropical dessert, you’re in for a treat. But fear not, because whether you’ve mastered the art of sago cooking or are navigating the kitchen like a curious cat, I’ll guide you through every step.
Picture this: a warm summer day, the sun shining bright, and the smell of fresh coconut wafting through the air. That was the setting of my first encounter with sago – a memory tucked away, wrapped in nostalgia and drizzled with sweet memories. I stumbled upon this luscious dessert at a local food market while I was traveling, and honestly? It was love at first bite!
Coconut sago is light, refreshing, and the perfect palate cleanser after any meal. Plus, it’s super easy to whip up at home! Today, I’ll share how to create these little cups of joy, complete with tips and tricks to make them your own.
So grab your apron, channel your inner chef, and let’s dive into the wonderful world of Coconut Sago Dessert Cups!
A Sweet Memory with Sago
Let me take you on a little journey back to a sunny afternoon in my childhood. I was at my grandmother’s house, bursting with the glee only a five-year-old can muster. She was a wizard in the kitchen, and while she had her classic recipes down to a science, there was one magical dish that stood out: her Coconut Sago.
As she stirred the pot, the sweet aroma of coconut filled the kitchen, and every time she ladled the warm mixture into bowls, I couldn’t help but feel a sense of anticipation. I remember the thrill of adding fresh mango slices on top, creating a beautiful contrast of colors. To this day, those dessert cups represent comfort, warmth, and the joy of sharing delicious food with loved ones. It’s no wonder I’ve been inspired to recreate this experience for all of you foodies!
Ingredients
Now that we’re all lined up for a delightful culinary adventure, let’s talk about the star ingredients. Here’s what you’ll need:
-
1 cup sago pearls
These tiny, translucent pearls are made from tapioca, and they bring a wonderful texture to the dessert. You can substitute them with tapioca pearls if needed, but keep in mind that cooking times may vary! -
2 cups coconut milk
Creamy and dreamy, coconut milk adds richness and a tropical twist. If you’re looking for a dairy-free option, this is your go-to! (Note: you can also use light coconut milk for a lighter version). -
1/2 cup sugar
Sweetness is key! You can adjust the sugar quantity based on your preference. Feel free to substitute with coconut sugar for deeper flavor or a sugar alternative like agave nectar for a low-calorie option. -
1/4 teaspoon salt
A pinch of salt enhances all those sweet flavors and keeps the dessert balanced. Trust me, it’s a game-changer! -
1 teaspoon vanilla extract
This will elevate the flavors and add warmth. You can also use almond extract for a different twist. -
Fresh fruit or toasted coconut for topping
This is where you can really get creative! Top your sago cups with seasonal fruit, granola, or even a sprinkle of toasted coconut flakes for extra crunch and flavor.
Step-by-Step Instructions
Now that we have our ingredients ready, let’s get cooking! Follow these steps to create your own Coconut Sago Dessert Cups:
-
Rinse the Sago Pearls
Start by rinsing the sago pearls under cold water. This helps to remove excess starch, which can make your dessert gummy. Give them a good swish and let them drain. -
Cook the Sago
In a medium-sized pot, bring 3 cups of water to a gentle boil. Add the rinsed sago pearls and reduce the heat to a simmer. Cook them for about 15-20 minutes, stirring occasionally, until they turn translucent and have a slightly chewy texture. If they’re not fully cooked, simply give them a few more minutes. They should be tender but not mushy – just like your favorite al dente pasta! -
Prepare the Coconut Mixture
Once the sago pearls are ready, drain them in a fine sieve and transfer them back to the pot. Pour in the 2 cups of coconut milk and stir. Now add the sugar, salt, and vanilla extract. This is where the magic happens! Cook this mixture on low heat, stirring continuously until the sugar dissolves. It should be thick and creamy – think of it as a warm hug for your taste buds. -
Chill the Dessert Cups
After about 5 minutes on low heat, remove the pot from the stove and let the sago cool down for a few minutes. Once it’s slightly cooler, spoon the mixture into individual dessert cups or bowls. Cover them with plastic wrap or lids and place them in the refrigerator for at least 2 hours, or until set. -
Top and Serve
When you’re ready to serve, take the cups out of the fridge and top them with your choice of fresh fruit or toasted coconut. Get creative! You can add sliced mango, strawberries, kiwi, or even some edible flowers for that Instagram-worthy look.
Serving Suggestions
These Coconut Sago Dessert Cups are all about simplicity and elegance. Serve them chilled in clear glass cups to showcase their beautiful layers. You could also garnish each cup with a sprig of mint for a pop of color.
For an added touch, consider drizzling some extra coconut milk or a quick homemade caramel sauce around the rim of the cup before adding the sago mixture. This enhances both the visual appeal and flavor.
If you’re throwing a gathering, why not make a sago dessert bar? Set out an array of toppings, including fresh fruits, nuts, and various syrups, allowing your guests to customize their own dessert cups!
Recipe Variations
Want to put your own twist on these delightful cups? Here are a few fun variations you might try:
- Tropical Bliss: Incorporate crushed pineapple into the coconut mixture for a fruity surprise.
- Chocolate Delight: Add cocoa powder to the coconut mixture, stir well, and enjoy a chocolatey spin on the classic dessert.
- Matcha Magic: Mix in some matcha powder for a vibrant green hue and earthy flavor.
- Nutty Coconut: Fold in some almond butter or peanut butter before chilling for that extra creamy, nutty goodness.
- Vegan Vibes: Use agave nectar instead of sugar and ensure your coconut milk is 100% vegan.
Chef’s Notes
Oh, the stories I could tell you from the kitchen! The first time I made these Coconut Sago Dessert Cups, let’s just say it was an adventure all on its own. I was so eager to impress my friends that I accidentally added too much salt (oops!).
Needless to say, my friends were very polite about trying it, and I learned my lesson on recipe testing! Over the years, I’ve tweaked and perfected this recipe, ensuring it’s not just delicious but also a breeze to whip up. Whether you’re celebrating a milestone or simply indulging on a quiet evening, I guarantee these little dessert cups will bring you joy.
FAQs and Troubleshooting
-
Why are my sago pearls not cooking properly?
Sometimes, they need a little more time. Just keep simmering them on low heat. If you’re using older sago, it might have lost its ability to cook through, so ensure you’re using fresh pearls. -
How can I prevent my sago from becoming too sticky?
A good rinse before cooking removes excess starch, which helps. Also, keep stirring them while cooking to prevent clumping. -
Can I make this dessert ahead of time?
Absolutely! These cups can be made a day in advance, making them perfect for parties or gatherings. Just be sure to keep them in the fridge! -
What should I do if my mixture is too thick?
If you find the mix is too thick once cooled, simply add a splash more coconut milk and stir well to loosen it up.
Nutritional Info
Now, let’s chat about the nutritional side of these delightful cups. Each serving (approximately 1/2 cup) offers a treat that’s not only delicious but also packed with some nutritional benefits.
- Calories: About 200-250 (depending on the toppings and sugar used)
- Healthy Fats: Thanks to the coconut milk, these cups provide healthy fats that are great for energy.
- Fiber: Adding fresh fruits on top brings natural fiber, which aids digestion and leaves you feeling satisfied.
Keep in mind that portion control is key here (though it’s hard to resist going for seconds).
Final Thoughts
And there you have it, friends! A delectable journey to savor Coconut Sago Dessert Cups, infused with warmth, memories, and a sprinkle of creativity. Cooking shouldn’t be a chore; it’s all about bringing joy to yourself and those around you.
So next time you’re looking for something special to delight in, consider whipping up these heavenly sago cups. They carry a piece of my heart, and I hope they will become a cherished part of your kitchen adventures as well!
Now, go on, gather your ingredients, and let’s make some sweet memories together! Happy cooking! 🍽️✨
Print
Coconut Sago Dessert Cups
- Total Time: 135 minutes
- Yield: 4 servings 1x
- Diet: Vegan
Description
A light and refreshing coconut sago dessert, perfect for warm days and gatherings.
Ingredients
- 1 cup sago pearls
- 2 cups coconut milk
- 1/2 cup sugar
- 1/4 teaspoon salt
- 1 teaspoon vanilla extract
- Fresh fruit or toasted coconut for topping
Instructions
- Rinse the sago pearls under cold water to remove excess starch.
- Cook the sago in boiling water for about 15-20 minutes until translucent and slightly chewy.
- Prepare the coconut mixture by combining cooked sago, coconut milk, sugar, salt, and vanilla in a pot over low heat.
- Chill the mixture in individual cups for at least 2 hours until set.
- Top with fresh fruit or toasted coconut before serving.
Notes
For added creativity, consider mixing in pineapple, cocoa powder, or matcha for unique flavors.
- Prep Time: 15 minutes
- Cook Time: 20 minutes
- Category: Dessert
- Method: Chilling
- Cuisine: Asian
Nutrition
- Serving Size: 1/2 cup
- Calories: 200
- Sugar: 10g
- Sodium: 100mg
- Fat: 8g
- Saturated Fat: 7g
- Unsaturated Fat: 1g
- Trans Fat: 0g
- Carbohydrates: 30g
- Fiber: 2g
- Protein: 2g
- Cholesterol: 0mg
Keywords: coconut, sago, dessert, vegan, tropical, summer treats
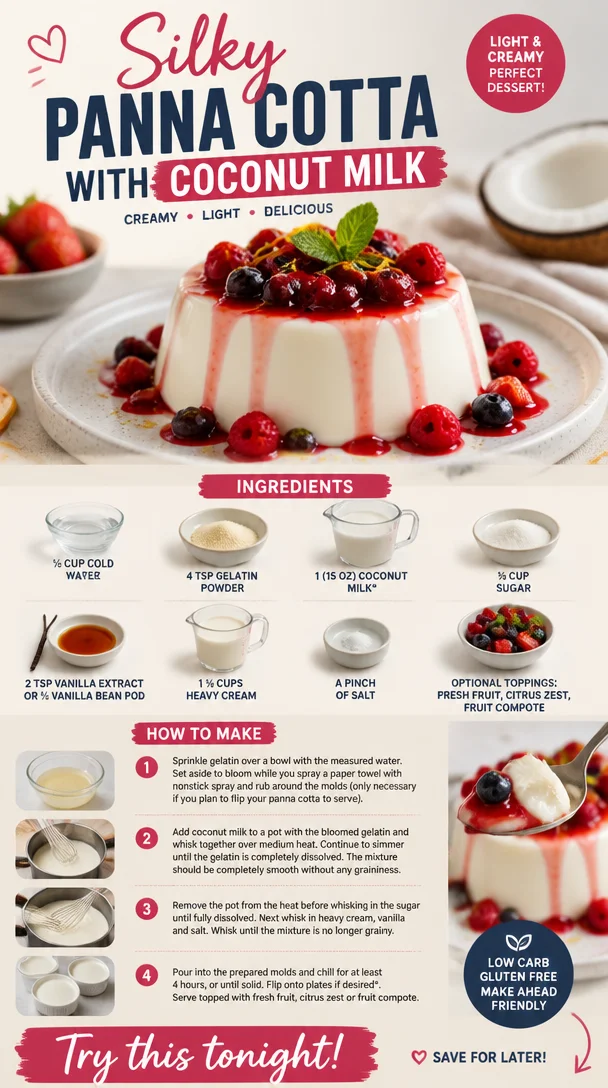
Silky Panna Cotta with Coconut Milk
Silky Panna Cotta with Coconut Milk: A Sweet Escape to Paradise
Hey, foodies! 🍽️ It’s Beau Collier here, and today we’re diving into a luscious dessert that dances on your palate and feels like a dreamy retreat to a tropical island—Silky Panna Cotta with Coconut Milk. Now, if you’ve never tried panna cotta, let me tell you, you’re in for a treat! This Italian classic is a staple in the dessert world—and for good reason. It’s creamy, sweet, and oh-so-versatile, making it a fantastic base for all sorts of flavor adventures.
Picture this: a smooth, silky custard that just jiggly enough to tease you, flavored with the exotic essence of coconut. It’s almost like a mini vacation in every spoonful! And the best part? It’s surprisingly easy to make, even for those of you who might not consider yourselves kitchen wizards yet. I’m a firm believer that cooking should be an enjoyable ride, not a chore, and panna cotta fits that bill perfectly.
One of my favorite memories tied up with this dessert goes way back to a sunny afternoon spent in the kitchen with my grandma. She taught me how to make traditional Italian panna cotta, sharing her tips and tricks while we whisked the cream and gelatin together. The laughter, the tunes playing in the background, and that sweet fragrance wafting through the kitchen were pure magic. Since then, I’ve fallen in love with experimenting, and that’s how this coconut milk version was born.
So grab your spatula, your favorite mug of coffee, and let’s whip up this tropical delight that truly satisfies the soul. Let’s get those taste buds ready for an adventure—they won’t regret it!
Personal Story
As I mentioned, my love affair with panna cotta began in my grandma’s cozy kitchen. She was a fabulous cook—not just a whiz with her herb garden, but a magician when it came to desserts. We spent lazy Sunday afternoons crafting sweets that would make anyone weak in the knees, but nothing resonated with me quite like her panna cotta.
I remember the first time we made it together; it was a warm summer day, and we used fresh strawberries from the garden as a topping. The sound of the gelatin blooming in cold water was so fascinating! She explained to me how it was like magic, turning a powder into something luxurious. The way it melted in my mouth left a lasting impression. Fast forward a few years, and I found myself wanting to give this dish a new twist by swapping out the traditional dairy with coconut milk.
That journey wasn’t just about making a dessert; it was also about keeping those cherished moments alive and infusing them with my own creativity. Every time I make this coconut panna cotta, I channel that sunny kitchen and the love that went into each spoonful. It feels like a secret handshake with memories, and I can’t wait for you to create your version of this warm hug in dessert form!
Ingredients
Here’s what you’ll need to whip up this delightful Silky Panna Cotta with Coconut Milk:
-
½ cup cold water
This is where the gelatin blooms, adding that silky texture without the need for eggs. Just remember: cold water is key! -
4 tsp gelatin powder
This magical ingredient thickens the panna cotta. If you’re after a plant-based alternative, agar-agar is a great substitute! Just adjust the quantity accordingly, as it can vary. -
1 (15 oz) can coconut milk
Rich in flavor, this brings a tropical twist that’s hard to resist! For a lighter version, you can use light coconut milk or even almond milk for a variation in taste. -
⅓ cup sugar
Sweetness to balance the creaminess. If you’re looking to reduce sugar, feel free to substitute with honey or a sugar alternative like stevia—just remember to adjust according to taste! -
2 tsp vanilla extract or ½ vanilla bean pod
This is where the magic happens! Using a whole vanilla bean pod will elevate the flavor. Scrape out those tiny seeds and watch your panna cotta shine with tiny specks of goodness. -
1 ½ cups heavy cream
This is what gives panna cotta its rich and creamy texture. For a lighter dessert, you could swap half for milk, but the richness may take a hit. -
A pinch of salt
This helps to amplify the flavors and balance sweetness. Don’t skip it! -
Optional toppings:
Fresh fruit, citrus zest, or fruit compote add that finishing touch. Go wild with your choice – tropical fruits like mango or kiwi work wonders!
Step-by-Step Instructions
Ready to make some magic? Let’s get started on our silky panna cotta!
-
Bloom the Gelatin:
In a small bowl, combine the cold water and gelatin. Let it sit for about 5–10 minutes until the mixture becomes thick and gelatinous. This step is crucial for achieving that smooth texture!Chef Tip: If your kitchen is warm, pop the bowl in the fridge to help the gelatin set quicker.
-
Heat the Coconut Milk:
In a saucepan over medium heat, pour in the coconut milk, sugar, and a pinch of salt. Stir regularly to dissolve the sugar completely, and make sure it doesn’t boil!Chef Hack: For an extra burst of flavor, you could toss in citrus zest while heating up the milk. Just strain it out before combining with other ingredients.
-
Incorporate the Gelatin:
Once your coconut milk mixture is warm and sugary bliss, remove it from heat and add the bloomed gelatin. Stir until completely dissolved—this should only take a minute or so.Pro Hint: If you find any lumps in the gelatin, don’t panic—just give it a quick blitz with an immersion blender to smooth it out.
-
Add the Cream and Vanilla:
Slowly whisk in the heavy cream and your choice of vanilla extract or the scraped vanilla bean. Keep whisking until the mixture is completely uniform.Chef Insight: The cream enhances the richness, while the vanilla brings warmth and balance to the dish.
-
Pour and Chill:
Divide the mixture evenly into serving cups or ramekins, allowing it to cool slightly at room temperature (15–20 minutes). Then, cover them with plastic wrap and place them in the refrigerator. Let them chill for at least 4 hours, or preferably overnight, until they’re firm and set.Tip: If you’re not a fan of waiting, you can speed up the cooling process by placing them in the freezer for about an hour, but make sure to keep a close eye on them!
-
Serve:
Once your panna cotta has set, remove them from the fridge, and get creative with your toppings. Fresh berries or a drizzle of fruit compote adds that final touch that takes it over the top!
Final Note: If the panna cotta gets stuck, dip the cups briefly in warm water, then invert on a plate. It should slide right out!
Serving Suggestions
Presentation is everything, my friends! For this panna cotta, we want to keep it elegant and inviting. You can serve it straight in the cups for a rustic feel or flip them out onto plates for that restaurant-quality touch.
Here are a few ideas for plating:
- Fresh fruit: Arrange vibrant slices of mango, kiwi, or strawberries around your panna cotta for a color pop.
- Citrus zest: Lightly sprinkle some lime or orange zest for a zesty touch that enhances the coconut flavor.
- Drizzle: You can add a drizzle of honey or a delicate fruit sauce on top for that sweet gloss.
Serve it up with forks or spoons, and watch as your guests dive right into this tropical indulgence!
Recipe Variations
Why stop at the classic panna cotta when you can put your own spin on it? Here are some fun variations to try:
-
Chocolate Coconut Panna Cotta:
Melt ½ cup of dark chocolate into the coconut milk for a decadent twist. Perfect for chocoholics! -
Mango Coconut Delight:
Puree ripe mango and layer it atop your panna cotta right before serving for that burst of tropical flavor. -
Almond Joy Version:
Add 1 tsp of almond extract and top with toasted almonds for that nutty flair reminiscent of the famous candy bar. -
Matcha Coconut Bliss:
Stir in a teaspoon of matcha powder for a green tea-infused panna cotta. Pair with sweetened red bean paste for an Asian dessert twist. -
Lemon-Basil Infusion:
Infuse the coconut milk with lemon zest and fresh basil while heating; this brightens up the entire dessert in a refreshing way!
Chef’s Notes
To me, this panna cotta recipe is a canvas for creativity! What started as a grandmother’s traditional treat has morphed into something that reflects my personality and love for culinary experimentation. I think of it as a conversation starter—a way to share not just food, but stories.
Over time, I’ve learned to play with different flavor profiles, and each new ingredient brings back memories of fun kitchen experiments and family gatherings. Every time I whip it up, I find joy in the simplicity and accessibility of the recipe. Anyone can master this dessert as long as you’ve got patience and love in your heart.
FAQs and Troubleshooting
1. Why did my panna cotta not set?
First off, no worries! If it didn’t set, it’s likely due to not enough gelatin or not being heated properly. Make sure you’re using fresh gelatin and following the blooming process correctly.
2. Can I make panna cotta in advance?
Absolutely! In fact, panna cotta tastes better after chilling. Make it a day ahead, and it will be even more delightful when you serve it.
3. What can I use instead of coconut milk?
If you prefer a different flavor, try almond milk or dairy milk, but you may need to adjust the quantity of sugar depending on sweetness.
4. How do I store leftovers?
Store any leftover panna cotta in an airtight container in the refrigerator for up to 3 days. Just keep toppings separate until serving!
Nutritional Info
{Nutritional information usually depends on specific measurements and brands used. Below is an estimate for our panna cotta.}
This delightful panna cotta serves about four and gives you a satisfying dessert experience. Each serving (without toppings) is approximately:
- Calories: 350
- Protein: 3g
- Fat: 25g
- Carbohydrates: 30g
- Sugars: 26g
While it’s indulging, remember moderation is key! You could always tone down the portions and sweeteners as needed.
Final Thoughts
So there you have it! Silky Panna Cotta with Coconut Milk is not just a recipe; it’s a delightful experience waiting to happen in your kitchen. Whether you’re looking for the perfect dessert to impress your friends or a cozy treat for yourself, this panna cotta has got your back.
I hope this little journey inspires you to experiment in your own kitchen and spark some magical memories just like those sunny afternoons I spent with my grandma. Dive into the world of panna cotta, explore, and most importantly, enjoy!
Now, it’s time for you to grab those ingredients and get creating! Don’t forget to share your creations with me on social media—I’d love to see your spin on this tropical delight. Happy cooking, foodies! 🚀✨
Print
Silky Panna Cotta with Coconut Milk
- Total Time: 4 hours 25 minutes
- Yield: 4 servings 1x
- Diet: Vegetarian
Description
A luscious dessert that combines the creamy goodness of panna cotta with the tropical essence of coconut milk.
Ingredients
- ½ cup cold water
- 4 tsp gelatin powder
- 1 (15 oz) can coconut milk
- ⅓ cup sugar
- 2 tsp vanilla extract or ½ vanilla bean pod
- 1 ½ cups heavy cream
- A pinch of salt
- Optional toppings: Fresh fruit, citrus zest, or fruit compote
Instructions
- Bloom the Gelatin: In a small bowl, combine the cold water and gelatin. Let it sit for about 5–10 minutes until the mixture becomes thick and gelatinous.
- Heat the Coconut Milk: In a saucepan over medium heat, pour in the coconut milk, sugar, and a pinch of salt. Stir regularly to dissolve the sugar completely, and make sure it doesn’t boil!
- Incorporate the Gelatin: Once your coconut milk mixture is warm, remove it from heat and add the bloomed gelatin. Stir until completely dissolved.
- Add the Cream and Vanilla: Slowly whisk in the heavy cream and your choice of vanilla extract or the scraped vanilla bean.
- Pour and Chill: Divide the mixture evenly into serving cups or ramekins, allow to cool slightly, then refrigerate for at least 4 hours, or preferably overnight.
- Serve: Once set, remove from the fridge and add your desired toppings.
Notes
For a lighter version, use light coconut milk or almond milk.
- Prep Time: 15 minutes
- Cook Time: 10 minutes
- Category: Dessert
- Method: Chilling
- Cuisine: Italian
Nutrition
- Serving Size: 1 serving
- Calories: 350
- Sugar: 26g
- Sodium: 50mg
- Fat: 25g
- Saturated Fat: 22g
- Unsaturated Fat: 3g
- Trans Fat: 0g
- Carbohydrates: 30g
- Fiber: 0g
- Protein: 3g
- Cholesterol: 100mg
Keywords: panna cotta, coconut milk, dessert, Italian dessert, creamy dessert, tropical dessert

Ingredient Pineapple Coconut Dream Cake (No-Bake, Summer)
Pineapple Coconut Dream Cake: A Slice of Paradise
Hey there, food lovers! If there’s one thing that can transport you to a tropical island, it’s a bite of Pineapple Coconut Dream Cake. Picture this: a moist, fluffy cake bursting with sweet pineapple goodness and a hint of coconut, topped with cloud-like whipped topping. Every forkful feels like a warm hug! Whether you’re hosting a summer barbecue, celebrating a birthday, or just craving something sweet, this cake is sure to impress. So, let’s roll up our sleeves, unleash our inner bakers, and dive into this delightful cake that’ll make your taste buds dance.
My Tropical Kitchen Memory
Let me take you back to a sunny afternoon at my grandma’s house. I was a little kid, all wide-eyed and curious, standing on a stool beside her as she whipped up one of her signature desserts. The kitchen was filled with laughter, the aroma of baked goods, and a sprinkle of love. That day, we decided to make a pineapple, coconut cake—the same dreamy creation I’m sharing with you now. Grandma’s secret? A generous helping of crushed pineapple and shredded coconut. She’d often say, “Food tastes better when you make it with love.”
As we mixed, stirred, and tasted, I remember sneaking bites of the sweet, tropical mixture that was destined for the cake. The sheer joy on her face as we pulled the cake from the oven and the delicious scent wafting through the air made that memory unforgettable. Years later, when I created Feastical, I knew I had to share this recipe. It held the spirit of community, family, and unbridled joy in every bite!
Ingredients You’ll Need
-
1 box yellow cake mix
This is the base of our cake, bringing a simple and classic flavor. If you’re feeling adventurous, you can use a gluten-free cake mix for a gluten-free option. -
1 can (20 oz) crushed pineapple, with juice
This is where our tropical flavor shines! The pineapple keeps the cake moist and delicious. In a pinch, you could substitute it with crushed peaches or another fruity alternative. -
1 cup sweetened shredded coconut
Coconut adds that irresistible tropical flair! For a less sweet option, use unsweetened shredded coconut and adjust the sugar in the recipe accordingly. -
1 package (3.4 oz) instant vanilla pudding mix
This will add creaminess and stability to your cake. You can swap it for coconut cream pudding for an even richer coconut flavor. -
1 cup cold milk
This helps in mixing all the ingredients smoothly. Use almond milk or coconut milk as a creamy alternative if you’re dairy-free. -
1 container (8 oz) whipped topping, thawed
The final touch! It gives the cake a light, fluffy finish. If you’re feeling fancy, you can make your own whipped cream for a homemade touch.
Step-by-Step Instructions
-
Preheat the Oven
Start by preheating your oven to 350°F (175°C). This gives you a perfectly baked cake without any surprises! Trust me, nothing beats the smell of a warm cake in the oven. -
Prepare Your Baking Pan
Grab a 9×13-inch baking dish and grease it with a little non-stick spray or butter. This is key to preventing any cake disasters when it’s time to flip! -
Mix the Cake Batter
In a large mixing bowl, combine the yellow cake mix, crushed pineapple with its juice, and shredded coconut. Mix it until it’s well combined—about 2-3 minutes will do. Don’t overmix; we want a fluffy cake, not a dense brick! -
Add the Pudding and Milk
Now, stir in the instant pudding mix and cold milk until everything is smooth. This is where the magic happens! You’ll see that luscious texture forming. Make sure it’s all well incorporated, but again, don’t overdo it. -
Pour into the Baking Dish
Gently pour your batter into the prepared baking dish. Use a spatula to spread it evenly to the edges. This ensures that it bakes evenly, creating a beautiful cake. -
Bake
Pop your cake in the preheated oven and let it bake for 25-30 minutes. You’ll know it’s done when a toothpick inserted in the center comes out clean. Remember to watch for that gorgeous golden color! -
Cool the Cake
Once done, remove it from the oven and let it cool in the pan for about 10 minutes. Then, carefully transfer it to a wire rack to cool completely. Patience is key; cutting into a hot cake can lead to a crumbly mess. -
Top It Off
After the cake has completely cooled (trust me, it’s worth the wait!), spread the thawed whipped topping evenly across the top. This adds that dreamy touch we all love.
Serving Suggestions
Now that your beautiful Pineapple Coconut Dream Cake is ready, it’s time to serve it up! Consider presenting it on a vibrant platter garnished with fresh pineapple slices and a sprinkle of coconut for a tropical flair. If you’re feeling extra bold, add a drizzle of chocolate or a sprinkle of toasted coconut on top. For serving, slice it into squares and pair with a scoop of vanilla bean ice cream or a dollop of extra whipped cream. Trust me, this dessert is perfect for sharing (or not)!
Recipe Variations
-
Tropical Fruit Twist
Add some diced mango or finely chopped strawberries into the batter to mix things up. The more fruity, the better! -
Lemon Zing
For an added citrusy kick, incorporate the zest of one lemon or lime into the cake batter. -
Nutty Delight
Mix in some chopped macadamia nuts for that delicious crunch and flavor. This is perfect for nut lovers! -
Gluten-Free Version
Swap the yellow cake mix out for a gluten-free cake mix and use almond or coconut milk for a delicious gluten-free treat. -
Vegan Dream Cake
Use a vegan cake mix, substitute the milk with a plant-based alternative, and opt for coconut whipped cream to make it vegan-friendly!
Chef’s Notes
This Pineapple Coconut Dream Cake has evolved over the years. I remember experimenting with the recipe, adding different spices, and tinkering with flavors. Did you know that the combination of pineapple and coconut pairs perfectly with a hint of rum? Although traditional, it’s not just for piña coladas! Once for a summer bake sale, I added rum extract to the whipped topping, and it was a total hit! Mixing food and memories in the kitchen is what I love the most. If you have fond modifications or storytelling through food, drop by my site and share!
FAQs and Troubleshooting
-
Q: My cake is too dense. What happened?
A: Overmixing your batter can lead to a dense cake. Remember, mix just until combined to keep the fluffiness! -
Q: How do I know when my cake is done?
A: Stick a toothpick in the center; if it comes out clean or with a few crumbs, it’s done! -
Q: Can I use fresh pineapple instead of canned?
A: Absolutely! Just ensure it’s finely chopped and drained to keep the moisture balance. -
Q: How do I store leftovers?
A: Cover the cake and store it in the fridge. It should stay fresh for up to 4-5 days. Just make sure to bring it to room temperature before serving for the best flavor!
Nutritional Info
This Pineapple Coconut Dream Cake is packed with flavor but also with calories. Depending on how you serve it and the specific ingredients you choose, one piece (about 1/12 of the cake) typically contains:
- Calories: 280
- Fat: 11g
- Carbohydrates: 44g
- Sugar: 26g
- Protein: 2g
While it’s one indulgent dessert, remember that moderation is key. Enjoying this cake during special occasions or as a treat can keep it deliciously guilt-free!
Final Thoughts
There you have it—your very own Pineapple Coconut Dream Cake, ready to brighten up any gathering! The joy of cooking is not just about the food itself; it’s about the stories you create, the laughter you share, and those sunny moments that make life sweet. So, as you venture into your kitchen, remember: it’s not only about the destination, but the delicious journey along the way! So gather your loved ones, whip up this tropical delight, and let the smiles and memories unfold. Until next time, happy baking!
Print
Pineapple Coconut Dream Cake
- Total Time: 45 minutes
- Yield: 12 servings 1x
- Diet: Vegetarian
Description
A moist and fluffy cake bursting with sweet pineapple and a hint of coconut, topped with cloud-like whipped topping.
Ingredients
- 1 box yellow cake mix
- 1 can (20 oz) crushed pineapple, with juice
- 1 cup sweetened shredded coconut
- 1 package (3.4 oz) instant vanilla pudding mix
- 1 cup cold milk
- 1 container (8 oz) whipped topping, thawed
Instructions
- Preheat the oven to 350°F (175°C).
- Prepare a 9×13-inch baking dish by greasing it.
- Mix the yellow cake mix, crushed pineapple with juice, and shredded coconut for 2-3 minutes.
- Add the instant pudding mix and cold milk until smooth.
- Pour the batter into the prepared baking dish.
- Bake for 25-30 minutes, or until a toothpick comes out clean.
- Cool the cake in the pan for 10 minutes, then transfer it to a wire rack.
- Top with the thawed whipped topping evenly across the top.
Notes
This cake serves well with fresh pineapple slices and a sprinkle of coconut. Consider adding a drizzle of chocolate or a sprinkle of toasted coconut on top for extra flair.
- Prep Time: 15 minutes
- Cook Time: 30 minutes
- Category: Dessert
- Method: Baking
- Cuisine: Tropical
Nutrition
- Serving Size: 1 slice
- Calories: 280
- Sugar: 26g
- Sodium: 200mg
- Fat: 11g
- Saturated Fat: 8g
- Unsaturated Fat: 2g
- Trans Fat: 0g
- Carbohydrates: 44g
- Fiber: 1g
- Protein: 2g
- Cholesterol: 30mg
Keywords: cake, tropical cake, dessert, pineapple, coconut
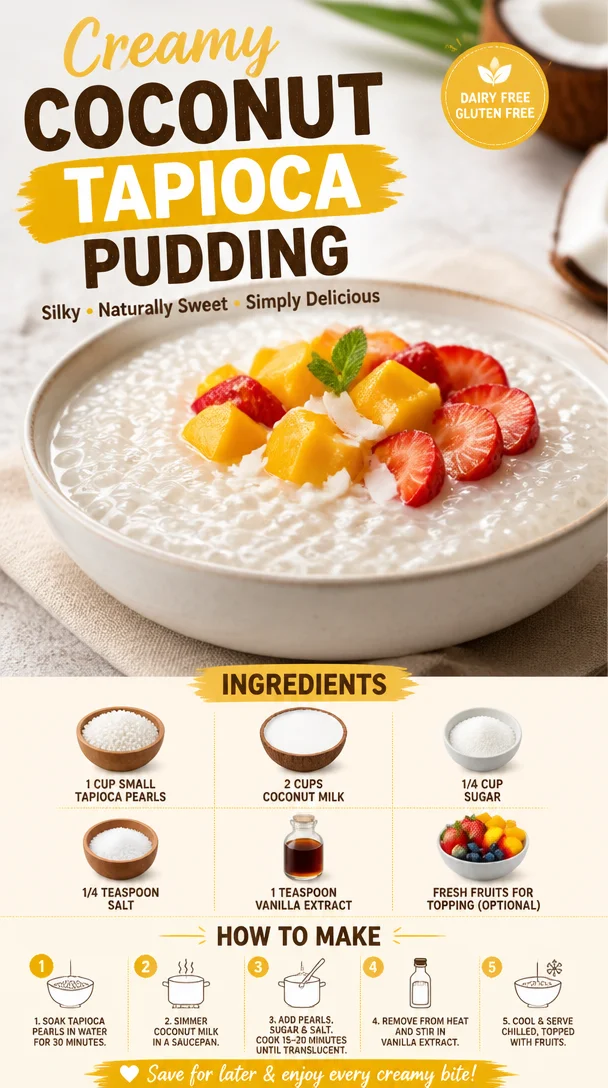
Coconut Tapioca Pudding
Coconut Tapioca Pudding: A Sweet Journey to Simplicity
Hey there, fellow food enthusiasts! Welcome back to Feastical! Today, we’re diving into a delightful dessert that’s as comforting as a favorite blanket on a chilly day—Coconut Tapioca Pudding. This dish is not just a treat for your taste buds; it’s a nostalgia-infused journey that brings back memories of simpler times when dessert was all about sweet simplicity and indulgent satisfaction. Get ready to whip up a batch, and allow my storytelling to whet your appetite!
A Sweet Memory
Let me take you back to my childhood kitchen, back when my grandmother would pull out her treasured recipe book every Sunday. She had a magical way of transforming ordinary ingredients into something extraordinarily delicious. One recipe that stood out was her coconut tapioca pudding, a dish that would fill the house with a sweet, nutty aroma that hinted at the joy to come.
I vividly remember the day she enlisted me as her sous-chef. With my tiny hands, I’d measure and pour while she stirred the creamy concoction on the stove, sharing stories of her own childhood and the flavors that shaped her life. The best part? The texture of the small tapioca pearls! They felt playful between my fingers, reminding me that cooking is not just about the final product but also about the joy in the process.
Fast forward to today, every time I make this comforting pudding, it evokes those precious memories of time spent with my grandma—stories shared and laughter exchanged around the kitchen table. And now, I’m thrilled to share this simple yet satisfying recipe with you.
Ingredients
Here’s what you’ll need to create this dreamy coconut tapioca pudding:
-
1 cup small tapioca pearls
These little gems serve as the star of the show! Small tapioca pearls are naturally gluten-free and add a delightful chewy texture. If you can’t find them, you can use instant tapioca, but the texture will be different. For a more adventurous option, try using sago pearls! -
2 cups coconut milk
This is where the magic happens! Coconut milk brings a rich creaminess and a tropical twist to your dessert. If you’re looking for a lighter version, feel free to use light coconut milk or even unsweetened almond milk for a different flavor profile. -
1/4 cup sugar
Sweetness, of course, is key! You can adjust the sugar to your liking. If you prefer a natural sweetener, honey or maple syrup will work, but you’ll want to adjust the quantities to taste. -
1/4 teaspoon salt
A pinch of salt enhances all the flavors, balancing the sweetness beautifully. If you like a deeper flavor, consider using sea salt. -
1 teaspoon vanilla extract
For an aromatic touch! If you’re feeling adventurous, you can infuse this pudding with other flavors—like almond extract or even a splash of rum. -
Fresh fruits for topping (optional)
Topping it with fresh fruits like mango, kiwi, or berries not only enhances the flavor but also adds a beautiful pop of color and nutrition. Use whatever fruits you love or that are in season!
Step-by-Step Instructions
Now that we have our ingredients, let’s get cooking! Follow these steps to make your own coconut tapioca pudding:
-
Prep the Tapioca Pearls
Start by rinsing the tapioca pearls with cold water in a fine-mesh sieve. This helps them release some of the excess starch and ensures they cook evenly. No one likes sticky tapioca! -
Combine Ingredients
In a medium saucepan, whisk together the coconut milk, sugar, and salt. Place over medium heat and stir occasionally until the sugar is dissolved and the mixture is warm—but not boiling. This step is where the sweet aromas start to fill your kitchen! -
Add the Tapioca
Once the coconut mixture is warm, gently stir in the rinsed tapioca pearls. Keep stirring occasionally over medium heat. You’ll notice the pearls start to absorb the liquid and become transparent—this is a sign they’re cooking! It usually takes about 15-20 minutes of cooking (depending on the brand), so keep an eye on them! -
Thickening the Pudding
Once the tapioca pearls are cooked and the pudding has thickened (it should coat the back of a spoon), remove the saucepan from the heat. Stir in the vanilla extract. Take a moment and breathe in that wonderful smell—it’s heavenly, right? -
Chill the Pudding
Transfer the pudding to serving cups or bowls and let it cool at room temperature for about 30 minutes. Then, cover them with plastic wrap and refrigerate for at least 2 hours. Chilling allows the pudding to firm up, making it easier to serve. -
Serve and Enjoy
Once chilled, it’s time to plate! Garnish each serving with fresh fruits, a sprinkle of toasted coconut flakes, or even a drizzle of honey for an extra touch of sweetness. Don’t forget to grab a spoon and dig in!
Serving Suggestions
Presentation is everything, my friends! When serving your coconut tapioca pudding, consider using clear glass cups or dessert bowls to showcase that beautiful pudding and toppings. Layering your pudding with fruits can create an eye-catching effect that’ll impress your family or guests. For an extra touch of flair, sprinkle a few mint leaves on top for that fresh finish. Not only does it look good, but it also adds a delightful aroma!
Recipe Variations
Ready to get creative? Here are some fun twists and variations on this classic dessert:
-
Matcha Coconut Tapioca: Add a teaspoon of matcha powder to the coconut milk mixture while it’s warming for a vibrant green hue and an earthy flavor.
-
Chocolate Coconut Tapioca: Stir in some cocoa powder or melted dark chocolate after cooking to elevate your pudding into a chocolate lover’s dream!
-
Tropical Rainbow: Mix in diced tropical fruits (like pineapple and papaya) into the pudding right before chilling for a burst of color and flavor throughout.
-
Nutty Delight: Fold in chopped nuts (like pistachios or almonds) once it’s cooled for added crunch and flavor.
-
Dairy-Free Chocolate Version: Substitute coconut milk with almond or cashew milk and then mix in cocoa for a dairy-free delight.
Chef’s Notes
I’ll let you in on a little secret—this pudding gets better with time! The flavors meld beautifully if you let it sit for a day in the fridge. Just be sure to give it a good stir before serving, and don’t be alarmed if the consistency thickens a bit more. Remember, cooking is all about experimentation and making the dish your own.
Speaking of kitchen stories, I once tried adding cardamom to a batch, thinking it’d provide a unique twist. Let’s just say my taste buds couldn’t handle that unexpected warmth! Experimentation can lead to incredible breakthroughs or a few giggles in the kitchen.
FAQs and Troubleshooting
Q: Why are my tapioca pearls not cooking properly?
A: If your pearls aren’t cooking through, double-check that you’re using small tapioca and not the instant kind. Remember to keep stirring and simmering gently; patience is key!
Q: Can I use regular milk instead of coconut milk?
A: Sure! You can substitute with whole milk or a non-dairy option, but remember, this changes the flavor profile. Coconut milk gives that tropical flair you crave.
Q: How can I make the pudding thicker?
A: If you want a thicker pudding, cook it a bit longer, or add an extra tablespoon of tapioca pearls. It’s all about finding that sweet spot for your personal preference.
Q: Can I freeze this pudding?
A: While it’s not ideal to freeze pudding because it can change the texture, you could store it in the fridge for 3-4 days if covered properly.
Nutritional Info
This delectable coconut tapioca pudding not only satisfies your sweet tooth but also brings some nutritional benefits to the table. It’s naturally gluten-free and can easily be made dairy-free, accommodating a range of dietary needs. Made with coconut milk, it’s rich in healthy fats and provides quick energy. Plus, if you load it up with fruits, you’re boosting the fiber, vitamins, and antioxidants right in your dessert!
Here’s a rough nutritional information breakdown per serving (with fruits):
- Calories: 210-250
- Protein: 3g
- Fat: 12g
- Carbohydrates: 28g
- Fiber: 2g
- Sugar: 14g
Final Thoughts
As we wrap up this delightful culinary adventure, I hope you’re inspired to give this coconut tapioca pudding a try! It’s a dish that encompasses the joy of cooking, the warmth of cherished memories, and the sweetness of indulging in something that feels like home.
Whether you make it for yourself, share it with friends, or whip it up for a family gathering, remember that the heart of cooking lies not just in the ingredients but in the love you put into it. So grab your ingredients, channel your inner chef, and let’s create some edible joy together!
Thank you for stopping by Feastical! Until next time, happy cooking and happy eating!
Print
Coconut Tapioca Pudding
- Total Time: 2 hours 30 minutes
- Yield: 4 servings 1x
- Diet: Gluten-Free
Description
A comforting and nostalgic coconut tapioca pudding that brings back memories of simpler times and indulgent satisfaction.
Ingredients
- 1 cup small tapioca pearls
- 2 cups coconut milk
- 1/4 cup sugar
- 1/4 teaspoon salt
- 1 teaspoon vanilla extract
- Fresh fruits for topping (optional)
Instructions
- Prep the tapioca pearls by rinsing them with cold water in a fine-mesh sieve.
- Combine the coconut milk, sugar, and salt in a medium saucepan over medium heat, stirring until the sugar dissolves.
- Add the rinsed tapioca pearls to the warm coconut mixture and stir occasionally as they cook, about 15-20 minutes, until transparent.
- Thicken the pudding by removing it from heat once it coats the back of a spoon, then stir in the vanilla extract.
- Chill the pudding in serving cups for at least 2 hours after cooling at room temperature for 30 minutes.
- Serve and enjoy with toppings like fresh fruits, toasted coconut flakes, or honey.
Notes
This pudding tastes best after a day in the fridge, allowing the flavors to meld. Stir before serving.
- Prep Time: 10 minutes
- Cook Time: 20 minutes
- Category: Dessert
- Method: Stovetop
- Cuisine: Asian
Nutrition
- Serving Size: 1 serving
- Calories: 230
- Sugar: 14g
- Sodium: 100mg
- Fat: 12g
- Saturated Fat: 10g
- Unsaturated Fat: 2g
- Trans Fat: 0g
- Carbohydrates: 28g
- Fiber: 2g
- Protein: 3g
- Cholesterol: 0mg
Keywords: Coconut Tapioca, Dessert, Gluten-Free, Pudding, Easy Dessert