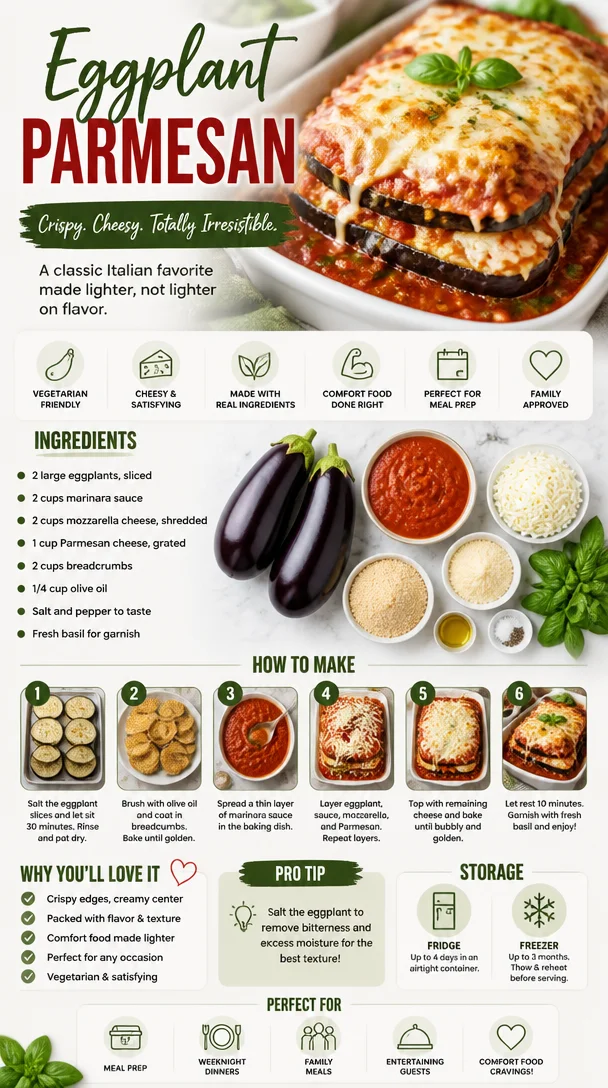
Eggplant Parmesan
Create a Cozy Kitchen Aroma with Eggplant Parmesan: A Slice of Happiness
Hey there, food friends! Welcome back to Feastical, where we whip up hearty masterpieces with love, laughter, and a dash of seasoning! Today, we’re diving into a classic that warms the heart and feeds the soul: Eggplant Parmesan. Yes, you heard it right! This dish is not just a wonderful vegetarian alternative to traditional parmesan; it’s a whole experience.
So, pull up a chair, roll up your sleeves, and let’s create something together that showcases the beauty of simplicity and flavor!
A Slice of Nostalgia
Growing up in my grandmother’s kitchen, I learned the magic of food as an emotional connector. Nothing screamed family love more than her homemade Eggplant Parmesan on Sunday nights. The delicious aroma floated through the air as we gathered around the table, laughter echoing off the walls. I can still picture the way she lovingly layered each slice of eggplant, sauce, and cheese while sharing stories of her childhood in Italy.
One particular memory stands out: I was about ten years old, desperate to help in the kitchen. I was given the task of sprinkling the breadcrumbs on top. “Just a sprinkle, sweetheart,” she’d say with a chuckle, but with each sprinkle, I would practically shower the dish in breadcrumbs. My reckless abandon made us both giggle, and in my heart, I felt like a real chef.
After what felt like an eternity of baking, we finally dug in. The cheesy, melty goodness was like a warm hug that wrapped around me, creating an everlasting association between eggplant Parmesan and love. It’s amazing how a single dish can transport you back in time and fill you with nostalgia—often the best ingredient of all!
Ingredients to Gather
Ready to roll? Here’s what you’ll need to make this divine Eggplant Parmesan:
-
2 large eggplants, sliced
The star of the show! Look for firm and glossy eggplants. If they’re a bit wrinkly, they’re past their prime. Roasting helps to enhance their flavor. If you’re looking for a lighter version, you can use zucchini instead. -
2 cups marinara sauce
A good marinara is essential! You can certainly use store-bought, but homemade is the way to go if you have time. If you want a twist, a spicy arrabbiata sauce can bring some heat! -
2 cups mozzarella cheese, shredded
This cheese melts beautifully! For a deep, sophisticated flavor, try fresh mozzarella. Lots of stores offer pre-shredded options, but be wary of the anti-caking agents used. -
1 cup Parmesan cheese, grated
Aged Parmesan packs a punch! This cheese adds a salty depth that balances out the richness of the dish. If unavailable, Pecorino Romano can be a lovely substitute for a sharper flavor. -
2 cups breadcrumbs
Use plain or seasoned breadcrumbs to create that delightful crunch. If you want to ditch the gluten, gluten-free breadcrumbs or crushed nuts are great alternatives! -
1/4 cup olive oil
This beaut will help in roasting the eggplants and add a lovely flavor to the dish. You could also use avocado oil for a different taste profile. -
Salt and pepper to taste
These are the heroes of seasoning! Always taste as you go along! -
Fresh basil for garnish
This is the finishing touch to your dish. It not only looks delightful but adds a refreshing aroma.
Step-by-Step Cooking Instructions
Let’s get cooking! Follow these steps to create your delicious Eggplant Parmesan:
-
Prepare the Eggplant
Start by slicing your eggplants into 1/4-inch rounds. Sprinkle them liberally with salt to draw out moisture and bitterness. Let them sit for about 30 minutes. Rinse and pat dry afterward, and you’ll find they’re tender and ready to devour! -
Preheat your Oven
Preheat your oven to 375°F (190°C). This is essential for that perfect bake! While waiting, this is a good time to grab your favorite kitchen tunes and dance a little! -
Roast the Eggplant
On a baking sheet, spread your eggplant rounds out evenly. Drizzle with olive oil, then bake for about 25-30 minutes, turning halfway through. You’re looking for a nice golden color and a tender texture. Pro tip: if you want extra flavor, sprinkle some Italian herbs on top before roasting! -
Layer it Up
Get ready to build your culinary masterpiece. Start with a generous layer of marinara in a baking dish, followed by a layer of roasted eggplant. Sprinkle with a layer of mozzarella and a sprinkle of Parmesan. Repeat until all ingredients are used, finishing with a light sprinkle of breadcrumbs, mozzarella, and Parmesan on top. For an extra crunch, you can add a drizzle of olive oil over the breadcrumbs! -
The Magic of Baking
Cover the baking dish with aluminum foil and bake for 30 minutes. Then remove the foil and bake for another 15-20 minutes until the cheese is bubbly and golden brown. -
Let it Rest
Once out of the oven, allow your dish to rest for about 10-15 minutes. This helps the layers set and makes for easier servings. It’s tough to wait, but trust me on this one!
Serving Suggestions
When it comes to serving up your Eggplant Parmesan, presentation is key! Use a sharp knife for slicing, and serve each piece on a warm plate. Drizzle a touch of extra marinara around the base for a pop of color, then add a generous sprinkle of grated Parmesan and a few fresh basil leaves for that beautiful gourmet finish.
Feeling extra fancy? Pair it with a side of garlic bread, a fresh salad with tangy vinaigrette, or some lightly sautéed greens to pack in those nutrients. You can’t go wrong with a glass of red wine, either!
Recipe Variations
Now for the fun part—let’s mix it up a little! Here are some delicious variations to elevate this classic recipe:
-
Spinach and Ricotta Layer: For a twist, mix some cooked spinach and ricotta cheese for a creamy layer between the eggplant layers.
-
Spicy Eggplant Parmesan: Spruce up the marinara with crushed red pepper flakes or add some sautéed jalapeños for a spicy kick.
-
Meaty Addition: If you want to make it a non-vegetarian dish, you can add cooked ground beef or sausage between the layers.
-
Herb-Infused Breadcrumbs: Mix in some fresh herbs into your breadcrumbs. Oregano, thyme, or rosemary would be excellent choices!
-
Vegan Version: Replace cheese with cashew cheese or store-bought vegan cheese along with panko breadcrumbs to keep things plant-based.
Chef’s Notes
Over the years, my Eggplant Parmesan has evolved from a family recipe to a more personalized creation inspired by many culinary influences. One funny story: I once ran out of marinara sauce and substituted with a can of diced tomatoes and some garlic, which turned out to be a fantastic accident! That’s the beauty of cooking—sometimes the little mistakes lead to delicious discoveries.
FAQs and Troubleshooting
Q: My eggplant turned out bitter; what happened?
A: If your eggplant tastes bitter, it’s likely because it wasn’t salted long enough or it wasn’t fresh. Always choose shiny, firm eggplants and salt generously before cooking.
Q: Can I make this ahead of time?
A: Absolutely! You can assemble the dish ahead of time, refrigerate it, and bake it when you’re ready. Just add a few extra minutes to the baking time.
Q: What can I do with leftovers?
A: Leftovers can be refrigerated for about 3-4 days. They also freeze beautifully! Just reheat in the oven when you’re ready to enjoy it again.
Q: Why did my cheese not melt properly?
A: Using pre-shredded cheese can sometimes lead to this. They often have anti-caking agents that prevent smooth melting. Try using fresh cheese!
Nutritional Info
Eggplant Parmesan is more than just delicious; it can be nutrient-rich! Eggplants are a great source of fiber, vitamins B1 and B6, potassium, and antioxidants. When combined with marinara sauce, mozzarella, and Parm, you’ve got a balanced meal with healthy fats, protein, and ample vitamins.
However, keep in mind that the cheese adds calories, so you may wish to adjust portions based on your dietary needs. If you’re watching calories, try reducing the amount of cheese or using lighter alternatives.
Final Thoughts
As we wrap up this Eggplant Parmesan adventure, remember that cooking is all about love, creativity, and joy. Each time you make this dish, you’re not just feeding your belly; you’re also feeding your soul. Celebrate the process, share it with friends and family, and revive those fond memories around the table!
So, what are you waiting for? Let’s get cooking and turn ordinary ingredients into something extraordinary! Dive into your kitchen—your Eggplant Parmesan awaits! Happy cooking!
PrintEggplant Parmesan
- Total Time: 85 minutes
- Yield: 4 servings 1x
- Diet: Vegetarian
Description
A classic Eggplant Parmesan recipe that warms the heart with its layers of flavorful eggplant, rich marinara, and gooey cheese.
Ingredients
- 2 large eggplants, sliced
- 2 cups marinara sauce
- 2 cups mozzarella cheese, shredded
- 1 cup Parmesan cheese, grated
- 2 cups breadcrumbs
- 1/4 cup olive oil
- Salt and pepper to taste
- Fresh basil for garnish
Instructions
- Prepare the Eggplant: Slice the eggplants into 1/4-inch rounds. Sprinkle with salt to draw out moisture, let sit for 30 minutes, then rinse and pat dry.
- Preheat your Oven: Preheat to 375°F (190°C) to ensure perfect baking.
- Roast the Eggplant: Spread eggplant rounds on a baking sheet, drizzle with olive oil, and bake for 25-30 minutes, turning halfway through.
- Layer it Up: In a baking dish, layer marinara, roasted eggplant, mozzarella, and Parmesan. Repeat the layers and finish with breadcrumbs, mozzarella, and Parmesan.
- Bake: Cover with foil and bake for 30 minutes, then remove foil and bake for another 15-20 minutes until the cheese is bubbly and golden.
- Let it Rest: Allow the dish to rest for 10-15 minutes before serving.
Notes
For a lighter version, zucchini can be used instead of eggplant. You can also add cooked ground beef or sausage for a non-vegetarian option.
- Prep Time: 30 minutes
- Cook Time: 55 minutes
- Category: Main Course
- Method: Baking
- Cuisine: Italian
Nutrition
- Serving Size: 1 serving
- Calories: 350
- Sugar: 5g
- Sodium: 400mg
- Fat: 12g
- Saturated Fat: 4g
- Unsaturated Fat: 6g
- Trans Fat: 0g
- Carbohydrates: 45g
- Fiber: 3g
- Protein: 15g
- Cholesterol: 30mg
Keywords: Eggplant Parmesan, Vegetarian, Italian Recipe, Comfort Food, Pasta Alternative
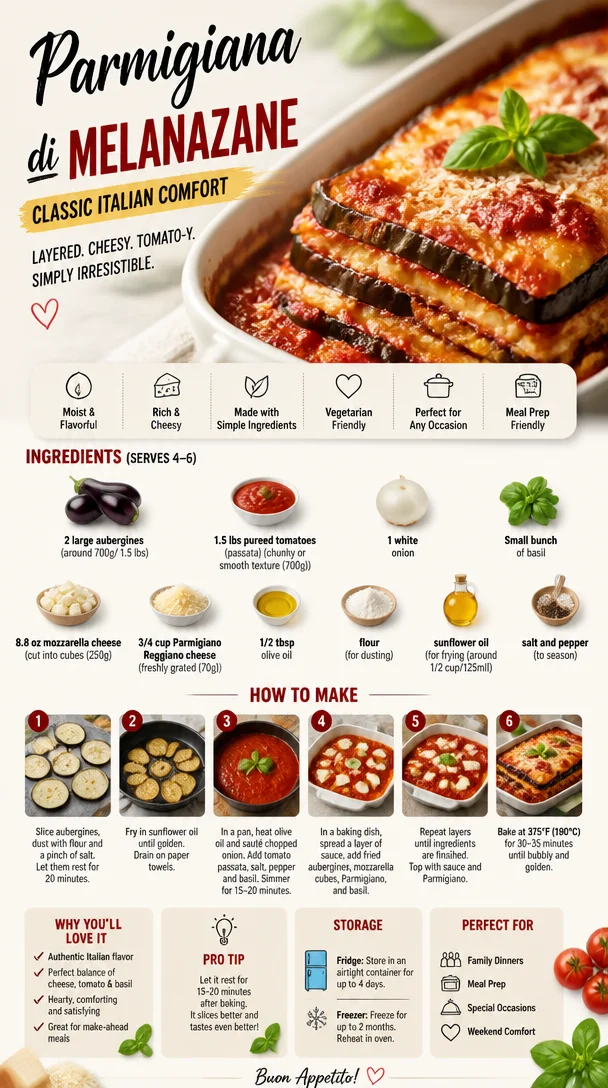
Parmigiana di Melanazane
Discovering the Deliciousness of Parmigiana di Melanzane: A Comforting Classic
Hey there, food lovers! I’m Beau Collier, your culinary companion, and I’m absolutely thrilled to dive into the world of one of Italy’s most beloved dishes—Parmigiana di Melanzane. If you’re here for a taste of something truly heartwarming, you’re in for a treat. This dish is not just a recipe; it’s a celebration of flavors, memories, and the joy that food brings to our lives.
Let’s face it: life can sometimes feel a bit hectic, and when it does, there’s nothing quite like a comforting plate of Parmigiana di Melanzane to soothe the soul. Picture layers of tender eggplant, rich tomato sauce, creamy mozzarella, and that signature sprinkle of Parmigiano Reggiano—all baked to perfection. It’s like a warm hug from your Italian grandmother, right? Whether you’re cooking for yourself after a long day, hosting friends for a cozy dinner, or simply wanting to relive cherished memories around the dinner table, this dish is your ticket to comfort.
Now, Parmigiana di Melanzane is not just a staple of Italian cuisine; it’s a canvas for creativity! You’ll find numerous variations sprinkled throughout Italy, each infused with personal touches and family secrets. So, get ready to roll up your sleeves and join me in the kitchen as we whip up this delightful recipe together!
A Nostalgic Kitchen Memory
Let me take you back to my childhood—a summer spent at my nonna’s house in the sun-kissed hills of Tuscany. The air was filled with the aroma of ripe tomatoes and fragrant basil, as she prepared her legendary Parmigiana di Melanzane. I still chuckle when I recall her meticulousness; she would proclaim it as “sacred” cooking. Her eggplants were always perfectly sliced, with just the right amount of salt to draw out the bitterness, and she’d often tell me, “Beau, cooking is all about love!”
That summer, I learned not only how to prepare this dish but also the importance of patience and teamwork. I would help her pick basil from the garden while she hummed traditional Italian songs. Each layer of eggplant, sauce, and cheese became a loving memory crafted with care.
Today, every time I make Parmigiana di Melanzane, I can’t help but feel that same warmth. It reminds me that food is not just nourishment; it’s a keeper of memories, traditions, and culture that brings us back to our roots.
Ingredients You’ll Need
Now, let’s gather our ingredients to create this mouthwatering dish. Here’s what you’ll need:
-
2 large aubergines (eggplants, around 700g/ 1.5 lbs): Choose firm, shiny eggplants. If they’re a bit bitter, salting them beforehand will help draw out excess moisture.
-
1.5 lbs pureed tomatoes (passata, chunky or smooth texture, 700g): A good quality tomato passata makes a world of difference in flavor. You can also use fresh tomatoes if you have them!
-
1 white onion: The onion adds a subtle sweetness to the sauce. Feel free to substitute with shallots or red onions for a unique twist.
-
Small bunch of basil: Fresh basil is a must for that aromatic touch. Dried basil can be used in a pinch, but you’ll miss that fresh pop of flavor.
-
8.8 oz mozzarella cheese (cut into cubes, 250g): Fresh mozzarella is ideal for its melting qualities. If you’re in a bind, pre-shredded mozzarella will work, though fresh is always best.
-
3/4 cup Parmigiano Reggiano cheese (freshly grated, 70g): This hard cheese brings depth and nuttiness. Avoid the green can—trust me!
-
1/2 tbsp olive oil: Just a splash to sauté the onion and add richness. Extra virgin olive oil is preferable for its flavor.
-
Flour (for dusting): A light dusting helps the eggplant crisp up without becoming too greasy.
-
Sunflower oil (for frying, around 1/2 cup/125ml): A neutral oil that’s ideal for frying. You could also use olive oil, though it might impart a stronger taste.
-
Salt and pepper (to season): Essential for flavoring all your ingredients. Always season to taste!
Step-by-Step Instructions
Alright! Let’s get our hands dirty and start cooking. Here’s a step-by-step guide so you can create your own Parmigiana di Melanzane masterpiece.
-
Prepare the Eggplants: Start by washing and slicing the eggplants into about ½-inch thick slices. If they’re a bit bitter, sprinkle them lightly with salt and let them sit for about 30 minutes to draw out moisture. This not only takes out bitterness but also helps in achieving that beautiful golden color when fried. After 30 minutes, rinse them under cold water and pat dry with paper towels.
-
Make the Tomato Sauce: In a large skillet, heat the olive oil over medium heat, then add the diced onion. Sauté until translucent, about 5 minutes. This is where the aroma starts to build, and your kitchen will smell heavenly. Once the onion is soft, add the pureed tomatoes. Season with salt and pepper. Let the sauce simmer for about 15–20 minutes, stirring occasionally until it thickens a bit. The flavors will meld beautifully.
-
Fry the Eggplants: While your sauce is simmering, heat the sunflower oil in a large, deep skillet over medium-high heat. Dust each slice of eggplant lightly with flour—this is key for that crispy texture! Once the oil is hot, carefully add the eggplants in batches, frying them for about 3-4 minutes on each side until golden brown. Place the fried eggplant on a plate lined with paper towels to absorb excess oil. This will help them stay crisp and not soggy.
-
Assemble the Dish: Preheat your oven to 375°F (190°C). In a baking dish, start layering your ingredients. Begin with a layer of tomato sauce at the bottom, then a layer of fried eggplant. Top with mozzarella cubes, a sprinkle of Parmigiano Reggiano, and a few basil leaves. Repeat this layering until you’ve used all the ingredients, finishing with a final layer of sauce and a generous topping of cheese. Trust me; that gooey cheesy top is what you’re living for!
-
Bake: Cover the dish with aluminum foil (to prevent excessive browning) and place it in the preheated oven for about 30 minutes. Remove the foil and bake for an additional 15–20 minutes until the top is golden and bubbly. You want that cheese to be irresistibly melted.
-
Cool and Serve: Once out of the oven, let it cool for about 10 minutes. This will help everything hold together when you cut into it. Slice, serve, and – most importantly – enjoy the fruits of your labor!
Serving Suggestions
Now that you have created this delectable dish, how do you serve it up? A few tips for the perfect presentation:
-
Plate it Simply: Serve the Parmigiana di Melanzane in the baking dish to keep it rustic and homey. You can garnish with additional fresh basil leaves for a pop of color.
-
Pair with Sides: This dish pairs beautifully with a simple arugula salad dressed with lemon and olive oil. The peppery arugula plays nicely against the richness of the eggplant.
-
Wine Pairing: A glass of Chianti or a light Pinot Grigio will complement the flavors wonderfully. Just imagine enjoying a relaxing dinner with friends, a plate of warm Parmigiana, and a glass of good wine in hand—pure bliss!
Recipe Variations
Why not switch things up? Here are some creative twists and variations to customize your Parmigiana di Melanzane:
-
Spicy Kick: Add red pepper flakes to your tomato sauce or layer in some sliced jalapeños for a spicy version.
-
Roasted Veggie Barrage: Mix in other veggies like zucchini or bell peppers for a colorful dish loaded with flavor.
-
Vegan Version: Replace cheese with vegan mozzarella and use nutritional yeast in the sauce for a cheesy flavor without dairy.
-
Herby Twist: Add some oregano or thyme into the sauce for additional depth of flavor if you’re feeling herby!
-
Baked vs. Fried: For a lighter version, roast the eggplant slices in the oven instead of frying. Toss them lightly with oil, salt, and pepper before roasting for about 25 minutes.
Chef’s Notes
Over the years, I’ve seen this dish evolve in countless ways—each version comes with its tales and trials. Once during a cooking class, I had a student accidentally grab an entire jar of dried herbs instead of salt! We ended up with a very herby version of Parmigiana that surprisingly became a crowd favorite! It taught me that sometimes kitchen blunders can lead to unexpected delights. So, embrace those moments when they happen!
FAQs and Troubleshooting
Here are some common questions or issues you might face while whipping up this delicious dish:
-
Why Is My Eggplant Soggy?
- If your eggplant ends up soggy, it’s likely due to not salting it beforehand! Salting helps to draw out moisture.
-
Can I Prepare This Ahead of Time?
- Absolutely! Assemble it up to a day in advance and keep it covered in the fridge. Just bake it fresh when ready to serve.
-
Can I Freeze Parmigiana di Melanzane?
- Yes! This dish freezes wonderfully. Just let it cool completely, wrap tightly, and freeze for up to three months. Reheat in the oven.
-
What If My Sauce Is Too Acidic?
- If you find your tomato sauce is too acidic, adding a teaspoon of sugar can help balance it out.
Nutritional Info
While this dish is best enjoyed in moderation, here’s a quick glimpse at the nutritional aspects per serving (assuming 6 servings total):
- Calories: Approximately 350
- Protein: 14g
- Fat: 21g
- Carbohydrates: 22g
- Fiber: 5g
- Sodium: 450mg
Keep in mind that these are estimates and can vary based on specific ingredients and portion sizes.
Final Thoughts
There you have it—your cozy kitchen adventure awaits with this traditional Parmigiana di Melanzane! Cooking this dish is more than just making a meal; it’s about creating memories and sharing warmth with loved ones. Next time you sit around the dinner table, let it be with plates piled high with this delightful creation.
Thanks for joining me on this culinary journey! Get ready to experience the joy each bite brings, passing it through generations and savor the comfort that food provides. Until we cook again, happy feasting, my friends!
PrintParmigiana di Melanzane
- Total Time: 80 minutes
- Yield: 6 servings 1x
- Diet: Vegetarian
Description
A comforting Italian classic featuring layers of eggplant, rich tomato sauce, and creamy cheeses baked to perfection.
Ingredients
- 2 large aubergines (eggplants, around 700g)
- 1.5 lbs pureed tomatoes (700g)
- 1 white onion
- Small bunch of basil
- 8.8 oz mozzarella cheese (250g, cut into cubes)
- 3/4 cup Parmigiano Reggiano cheese (70g, freshly grated)
- 1/2 tbsp olive oil
- Flour (for dusting)
- 1/2 cup sunflower oil (125ml, for frying)
- Salt and pepper (to season)
Instructions
- Prepare the eggplants: Wash and slice into ½-inch thick slices, sprinkle with salt, and let sit for 30 minutes to draw out moisture.
- Make the tomato sauce: Heat olive oil in a skillet, sauté the diced onion until translucent, then add pureed tomatoes and season. Simmer for 15–20 minutes.
- Fry the eggplants: Heat sunflower oil, dust eggplant slices with flour, fry until golden brown, and place on paper towels.
- Assemble the dish: Layer tomato sauce, fried eggplant, mozzarella, and Parmigiano Reggiano in a baking dish until all ingredients are used.
- Bake: Cover with aluminum foil and bake at 375°F (190°C) for 30 minutes, then remove foil and bake for an additional 15-20 minutes until golden.
- Cool and serve: Let cool for 10 minutes, slice, and enjoy!
Notes
For a lighter version, roast eggplant slices instead of frying.
- Prep Time: 30 minutes
- Cook Time: 50 minutes
- Category: Main Course
- Method: Baking
- Cuisine: Italian
Nutrition
- Serving Size: 1 serving
- Calories: 350
- Sugar: 6g
- Sodium: 450mg
- Fat: 21g
- Saturated Fat: 10g
- Unsaturated Fat: 8g
- Trans Fat: 0g
- Carbohydrates: 22g
- Fiber: 5g
- Protein: 14g
- Cholesterol: 30mg
Keywords: Italian, Comfort Food, Eggplant, Vegetarian, Bake

Minute Ricotta-Stuffed Zucchini Involtini for Weeknights
Ricotta Stuffed Zucchini Involtini: A Flavorful Journey
Hey there, food lovers! Welcome back to Feastical, where I whip up delicious meals that make your kitchen feel like home! Today, we’re diving into a dish that’s as comforting as it is elegant—Ricotta Stuffed Zucchini Involtini. This delightful recipe takes humble zucchini and transforms it into tender rolls filled with creamy ricotta and fresh herbs, nestled in a warm bath of savory tomato sauce. It’s perfect for a cozy family dinner or when you want to impress friends without breaking a sweat.
Picture this: the sun-drenched afternoon of a late summer day, the garden bursting with fresh veggies, and you’re feeling inspired to cook! There’s something magical about zucchinis in July; they seem to multiply overnight. And of course, that means it’s time for some stuffed zucchini! This dish not only satisfies your cravings but also brings back memories of cooking with family and friends during those warm, carefree days. So, grab your apron, and let’s make some culinary magic happen!
Not only is this recipe a feast for the senses with its vibrant colors and heavenly aromas, but it’s also uncomplicated. If you’ve ever felt daunted by the thought of a fancy dinner, fear not! This Ricotta Stuffed Zucchini Involtini is approachable and packed with flavor. And the best part? It looks like you’ve spent hours in the kitchen, but really, it comes together in a snap! Ready to fill your home with the aroma of baked goodness? Let’s get rolling!
Personal Story
I remember the first time I made Zucchini Involtini—it was an experiment, to say the least! On a lazy Sunday, I had a bunch of zucchini that I desperately needed to use up, along with some leftover ricotta from my usual lasagna-making spree. Thinking outside the box, I decided to roll the ricotta in thinly sliced zucchini and bake them with some marinara sauce. The result was pure magic!
My family gathered around the table, and you could almost hear the taste buds dancing in delight as they took their first bites. The combination of warm, cheesy filling harmonized beautifully with the rich tomato sauce. It turned out to be one of those dishes that, after the first taste, beckons you to come back for more.
That day was a reminder that the best meals often come from using what you have on hand. Now, every time zucchini season rolls around, so does this yummy recipe, bringing back those warm family moments and laughter around the dinner table.
Ingredients
Here’s what you’ll need to create this delightful dish along with some insider tips to enhance your cooking experience:
-
4 zucchinis: Choose firm, bright green zucchinis; they hold up beautifully when rolled. If zucchinis are not available, eggplant or bell peppers can be delicious substitutes.
-
1 tbsp olive oil: A drizzle adds flavor and helps the zucchinis caramelize beautifully. You can swap it for avocado oil if you prefer a higher smoke point.
-
Pinch of salt & pepper: Essential for seasoning! Don’t skimp here. You can also use garlic salt or seasoned salt for added flavor.
-
1 cup ricotta cheese: This creamy filling is the star of the show. If you’re dairy-free, try using cashew cream instead for a similar texture.
-
1/4 cup grated parmesan cheese: Adds a lovely depth of flavor. If you prefer a vegan version, nutritional yeast is a great alternative.
-
1/4 cup chopped basil leaves: Fresh basil adds that quintessential Italian flair. You can substitute with parsley or spinach if you’re in a pinch.
-
1 garlic clove, minced: Garlic lovers, rejoice! If you’re not a fan, you can omit it or replace it with garlic powder (about 1/4 tsp).
-
Salt & pepper to taste: Taste as you go! Adding seasoning gradually lets you control the flavor.
-
1 egg: This helps bind the filling together. For a vegan option, you can use a flaxseed egg (1 tbsp flaxseed meal + 3 tbsp water, mixed and let sit).
-
1 jar of your favorite tomato sauce: Pick a sauce that you absolutely adore—homemade or store-bought will do the trick!
-
1 cup shredded mozzarella cheese: A melty topping that completes the dish. You can opt for a dairy-free cheese if you prefer.
-
Fresh basil to garnish: Because who doesn’t love a pop of green? Plus, it makes your dish visually stunning!
Step-by-Step Instructions
Follow these simple steps to create your own Ricotta Stuffed Zucchini Involtini!
-
Prep the Zucchini: Start by trimming the ends of your zucchinis. Slice them lengthwise into thin strips (about 1/4-inch thick). This is key! You want them thin enough to roll but thick enough to hold the filling. If you have a mandoline, use it for consistent slices.
-
Salt the Zucchini: Lay the zucchini strips on a paper towel and sprinkle lightly with salt. This step draws out excess moisture—helpful to prevent sogginess later on! Let them sit for about 15 minutes, then pat dry.
-
Make the Filling: In a mixing bowl, combine the ricotta cheese, grated parmesan, chopped basil, minced garlic, salt, pepper, and egg. Mix until all the ingredients are well incorporated; this will create a creamy, flavorful filling. If you find the mixture too thick, a splash of milk or extra olive oil can help thin it.
-
Prep the Sauce and Plate: Preheat your oven to 375°F (190°C). In a medium-sized baking dish, pour a layer of your favorite tomato sauce (about 1 cup)—just enough to cover the bottom. This helps the zucchini not to stick and infuses some lovely flavor!
-
Assemble the Involtini: Now, take your zucchini strips and place about a tablespoon of the ricotta mixture on one end. Gently roll it up, securing the filling in the center. Repeat with the remaining strips and filling until everything is used.
-
Arrange in the Dish: Place the rolled zucchini seam-side down in the prepared baking dish, snugly against each other. Once all rolls are in, cover them with the remaining tomato sauce, and sprinkle with shredded mozzarella on top. What a sight!
-
Bake to Perfection: Pop the dish in the oven and bake for about 25-30 minutes, or until bubbly and golden. The aroma will be utterly irresistible!
-
Serve Warm: Remove from the oven, allowing it to sit for a few minutes. Garnish with freshly torn basil leaves before serving to add a touch of elegance.
Serving Suggestions
Now that your Ricotta Stuffed Zucchini Involtini is gloriously baked to perfection, how do you serve it? It’s as simple as this:
-
Plating Style: Serve the rolls on a large platter, spoon extra sauce from the dish on top, and sprinkle with more mozzarella for that extra touch of beauty. A drizzle of olive oil over the top makes for a stunning finish!
-
Pairings: These involtini pair wonderfully with a side salad—think peppery arugula tossed with a lemon vinaigrette for a fresh balance to the rich flavors of the dish. A crusty loaf of garlic bread never hurts either!
-
Wine Pairing: If you’re in the mood for wine, a light-bodied red like Pinot Noir complements the tomato sauce beautifully. Alternatively, a crisp white like Pinot Grigio can also work well.
Recipe Variations
Feel free to get creative in the kitchen! Here are some variations to make your Ricotta Stuffed Zucchini Involtini even more exciting:
-
Mediterranean Twist: Add sun-dried tomatoes, olives, or feta cheese to the ricotta filling for a tangy Mediterranean flair!
-
Spicy Kick: If you’re feeling bold, add red pepper flakes to the sauce or filling for a generous kick of heat.
-
Herb Explosion: Swap out the basil for fresh thyme or oregano, or even try a mix of both for a flavorful herb medley.
-
Quinoa Boost: For added nutrition, mix cooked quinoa into the ricotta filling—this adds texture and lovely nutty flavor!
-
Vegan Delight: Use tofu or cashew ricotta in place of the dairy, and a chickpea flour mix to bind instead of an egg for a completely plant-based dish.
Chef’s Notes
One of the best parts about cooking is the evolution of recipes over time. My Ricotta Stuffed Zucchini Involtini has morphed through the years, often picking up hints of flavors from other cultures as I explore. I once made a version that had a hint of Indian spice—think cumin and coriander in the ricotta—that was a smash hit at a potluck!
And let me tell you, every time I roll those zucchinis, I’m reminded of all the memories tied to them: the laughter in the kitchen, the clinking of plates, the glorious feeling of sharing a delicious meal with loved ones. So, feel free to make this recipe your own!
FAQs and Troubleshooting
Here are some questions you might have as you tackle your Ricotta Stuffed Zucchini Involtini:
-
What if my zucchini strips are too thick?: Don’t worry! If they feel a bit unruly, you can gently steam them for a couple of minutes to soften them, making rolling easier.
-
How can I store leftovers?: Store any leftovers in an airtight container in the fridge for up to 3 days. Reheat gently in an oven or microwave.
-
Can I freeze these?: Absolutely! Assemble but don’t bake—just freeze until solid, then transfer to a freezer-safe container. Bake from frozen; just add 10-15 minutes to the cooking time.
-
Why did my filling get watery?: This can happen if the zucchini strips aren’t dried well enough. Additionally, if your ricotta has excess moisture, drain it in a cheesecloth before mixing to achieve a thicker filling.
Nutritional Info
For you nutrition-conscious foodies, here’s a breakdown of what’s in a serving of Ricotta Stuffed Zucchini Involtini:
- Calories: Approximately 250 per serving (2 rolls)
- Protein: 14g from ricotta and mozzarella
- Carbohydrates: 15g primarily from zucchinis and sauce
- Fat: 15g, mostly from cheese and olive oil
- Fiber: 4g from zucchini
This dish is packed with nutrients, especially fiber and protein, making it a satisfying option that won’t leave you feeling heavy. Just remember to adjust your portion sizes and ingredient quantities to fit your dietary needs!
Final Thoughts
There you have it, friends—a culinary adventure straight to Italy with a modern twist! Ricotta Stuffed Zucchini Involtini is more than just a dish; it’s an experience, a warm embrace of flavors that draws you to the table.
As you embark on this cooking journey, I encourage you to make it your own. Sprinkle in those family traditions, swap ingredients as you please, and savor every moment spent in the kitchen. Whether you’re cooking for yourself or a crowd, remember that good food brings happiness, and sharing it makes it even better.
Now, gather your ingredients and give this delightful recipe a try! I can’t wait to hear how it turns out for you. Until next time, keep spreading those positive vibes and delicious flavors. Happy cooking!
Print
Ricotta Stuffed Zucchini Involtini
- Total Time: 60 minutes
- Yield: 4 servings 1x
- Diet: Vegetarian
Description
Delicious zucchini rolls filled with creamy ricotta and fresh herbs in savory tomato sauce, perfect for dinner gatherings.
Ingredients
- 4 zucchinis
- 1 tbsp olive oil
- Pinch of salt & pepper
- 1 cup ricotta cheese
- 1/4 cup grated parmesan cheese
- 1/4 cup chopped basil leaves
- 1 garlic clove, minced
- 1 egg
- 1 jar of your favorite tomato sauce
- 1 cup shredded mozzarella cheese
- Fresh basil to garnish
Instructions
- Prep the Zucchini: Trim the ends and slice lengthwise into thin strips.
- Salt the Zucchini: Lay on paper towel, sprinkle with salt, and let sit for 15 minutes.
- Make the Filling: Combine ricotta, parmesan, basil, garlic, salt, pepper, and egg in a bowl.
- Prep the Sauce and Plate: Preheat oven to 375°F (190°C) and cover the bottom of a baking dish with tomato sauce.
- Assemble the Involtini: Place a tablespoon of filling on the zucchini strips and roll them up.
- Arrange in the Dish: Place rolls seam-side down in the baking dish and cover with more tomato sauce and mozzarella.
- Bake to Perfection: Bake for 25-30 minutes until bubbly and golden.
- Serve Warm: Garnish with fresh basil before serving.
Notes
Feel free to experiment with different herbs and spices for unique flavor profiles.
- Prep Time: 30 minutes
- Cook Time: 30 minutes
- Category: Main Course
- Method: Baking
- Cuisine: Italian
Nutrition
- Serving Size: 2 rolls
- Calories: 250
- Sugar: 5g
- Sodium: 500mg
- Fat: 15g
- Saturated Fat: 8g
- Unsaturated Fat: 4g
- Trans Fat: 0g
- Carbohydrates: 15g
- Fiber: 4g
- Protein: 14g
- Cholesterol: 50mg
Keywords: zucchini, ricotta, vegetarian, Italian, stuffed vegetables, comfort food
Min Tomato Basil Pasta: Fresh, Fast Weeknight Dinner
Tomato Basil Pasta: A Flavorful Embrace
Hey there, food lover! Today, we’re diving into one of the coziest, heartwarming dishes that effortlessly blends simplicity and flavor—Tomato Basil Pasta. If you’re like me, nothing says “I’ve got this cooking thing down” quite like a plate of spaghetti drenched in vibrant tomato and fresh basil. It’s comfort food at its finest, and I can promise you, it’ll tickle your taste buds in the best way possible!
A Slice of Nostalgia
Let me take you back to a sun-drenched kitchen, the kind with bright checkered curtains and the aroma of Italian herbs swirling in the air. I remember the first time I made Tomato Basil Pasta. I was just a teenager, trying to impress my friends with my supreme culinary skills (or at least my hot-off-the-press pasta creation!). My grandma had just gifted me her treasured handwritten recipe—dog-eared and splattered with evidence of years of love.
I remember the laughter echoing around the dining table, the clinking of forks against bowls, and the unanimous “Mmm” that punctuated every bite. The magic was not just in the pasta; it was in that moment of sharing, of bonding, and of flavors coming together like old friends. Fast forward to today, and I still find myself reaching for this recipe. It’s an eternal source of comfort and joy. So, are you ready to whip up some pasta magic? Let’s get cooking!
Ingredients
Here’s what you’ll need to create this fabulously simple Tomato Basil Pasta dish:
-
2 tablespoons olive oil
A key player in our flavor dance! Olive oil not only adds richness but helps to sauté and release the essential oils from our veggies. You can substitute it with avocado oil for a high smoke point or even butter if you want a creamier taste. -
1 small yellow onion, diced
Onions provide a delightful sweetness and depth of flavor. The smallest size will cook down nicely while adding just the right touch of sweetness. If you’re sensitive to onions, feel free to swap this out for leeks or chives—they bring a milder yet fragrant note! -
4 garlic cloves, minced
Garlic is the heart of Italian cuisine. It’s aromatic and naturally pairs beautifully with tomatoes. If you’re looking to make it milder, try roasting the garlic before adding it, or if you’re in a pinch, garlic powder will do, but use a little less since it’s quite concentrated. -
Salt and pepper
The simplest seasoning duo, but essential for bringing all the flavors to life! Use kosher salt for cooking, and feel free to finish with cracked black pepper for a little gourmet flair. -
1 (28-ounce) can diced tomatoes, drained
The star of this dish! Canned tomatoes are a time-saver and packed with flavor. Look for whole peeled tomatoes that you can crush by hand for a fresher taste. If you prefer fresh tomatoes, about 6 ripe ones will work too—just chop them and remove excess liquid. -
1-2 tablespoons balsamic vinegar
This little splash adds a fantastic layer of acidity and sweetness. If you’re looking for a different note, red wine vinegar or even a squeeze of lemon could do the trick! -
½-1 cup pasta water
Our secret weapon for a silky sauce! The starchy pasta water helps bind and thicken our dish. Just remember to reserve some before draining the pasta. The amount depends on how saucy you like it! -
16 ounces thin spaghetti or angel hair
This is your carb hit! You can switch it up with whole grain for a healthier twist or even spiralized zucchini or spaghetti squash for a low-carb alternative. -
½ cup basil, chopped
Fresh basil is crucial for that vibrant flavor. If you can’t find fresh, dried basil will work—just use about a third of the amount since dried is more concentrated. -
½ cup Parmesan cheese, grated
Oh, cheese—what’s life without you? The nuttiness of Parmesan sings in this dish. For dairy-free options, try nutritional yeast or a vegan cheese substitute.
Step-by-Step Instructions
Now that we’ve gathered all our ingredients, let’s get cooking! Follow these easy steps for a mouthwatering Tomato Basil Pasta that will have everyone asking for seconds!
-
Heat the Oil
In a large skillet, heat the 2 tablespoons of olive oil over medium heat. Feel the oil warming up as it coats the bottom of your pan. This is where the magic begins! -
Sauté the Onions
Next, toss in the diced onion. Stir occasionally until they become translucent—about 5 minutes. This releases the onion’s sweet aroma. If they happen to stick to the pan, don’t fret! A quick splash of water will help loosen them up without losing flavor. -
Add the Garlic
Time to add your minced garlic. Sauté for about 1-2 minutes, keeping an eye out—garlic can go from perfect to burnt in a blink! The magic moment is when you can just start to smell that glorious garlicky goodness! -
In with the Tomato
Pour in the drained diced tomatoes and mix them with the presence of your caramelized onions and garlic. Let them simmer for about 10-15 minutes. The longer it cooks, the richer the flavor. Stir occasionally and enjoy the intoxicating smell filling your kitchen! -
Season It Up
Season your tomato mixture with salt, pepper, and balsamic vinegar. Taste as you go! A little balancing act of acidity will make all the difference. Let it simmer for another 5 minutes. -
Cook the Pasta
While your sauce is bubbling away, boil a pot of salted water and cook your spaghetti or angel hair according to the package instructions. For al dente perfection, aim for a minute less than what it states. Remember to save that precious pasta water before draining! -
Combine Everything
Add your cooked pasta directly into the skillet with the sauce. If things seem a bit dry, gradually add in the reserved pasta water, a little at a time, until you achieve the desired sauce consistency. The starchiness will help marry everything together beautifully. -
Finish With Basil and Cheese
Toss in the chopped basil and grated Parmesan, giving one last stir to blend it all in. The fresh basil brings a burst of summer to the dish! Just like that, your Tomato Basil Pasta is ready to rock on your plates!
Serving Suggestions
Now it’s time to plate up your labor of love! For the ultimate serving experience, twirl your pasta onto a plate or into a shallow bowl. A sprinkle of extra Parmesan on top adds that little touch of decadence. Maybe even a few fresh basil leaves for a pop of color and a drizzle of good-quality olive oil. Pair your pasta with a crisp green salad or some crusty garlic bread, and you’ve got a meal that’s not just delicious but Instagram-ready!
Recipe Variations
If you’re feeling adventurous, here are some fun twists you can put on this Tomato Basil Pasta:
-
Add Protein: Toss in grilled chicken, sautéed shrimp, or even chickpeas for a heartier meal.
-
Veggie Boost: Toss in some spinach, zucchini, or bell peppers just before adding the pasta for extra nutrition and flavor.
-
Spicy Kick: If you love a little heat, add red pepper flakes when you cook the garlic. It’ll give your dish a delightful kick!
-
Creamy Version: Stir in a splash of heavy cream or a dollop of cream cheese for an ultra-rich sauce that’s oh-so-satisfying.
-
Herb Infusion: Experiment with different herbs like oregano, thyme, or even a hint of rosemary for a flavor profile that speaks to your palate.
Chef’s Notes
This Tomato Basil Pasta recipe has seen its fair share of modifications and love over the years. I remember a time when I added way too much balsamic vinegar and turned it into a sweet disaster (oops!). After some tweaks and plenty of taste-testing, I learned that less is more—especially when it comes to balancing flavors.
I also love to make this dish on lazy Sundays, where I can take my time, sip some wine, and immerse myself in nostalgia. For me, it’s not just about the cooking; it’s about the stories and memories we create in the kitchen!
FAQs and Troubleshooting
Here are some common questions and issues you might encounter while cooking this delicious dish:
-
Why is my sauce watery?
This could be due to excess liquid in canned tomatoes or not cooking long enough. Keep simmering to reduce the sauce and concentrate flavors. -
Can I make this ahead of time?
Yes! Prepare the sauce ahead of time and store it in the fridge. Just cook your pasta fresh for an easy, quick mealtime! -
What if my pasta is sticky?
This usually happens when pasta is overcrowded or not cooked enough. Ensure your pot is large and generously salted! -
Can I use dried herbs instead?
Absolutely! Just remember dried herbs are more potent, so go with about one-third of the fresh amount.
Nutritional Info
This Tomato Basil Pasta is not just scrumptious but packed with nutrients, too!
- Calories: Approximately 350-400 per serving (depending on additions)
- Protein: Around 12 grams per serving
- Carbohydrates: Approximately 55 grams per serving
- Fats: About 8-10 grams per serving
- Fiber: Roughly 3 grams per serving
Pair it with a protein source or side salad, and you’ve got a balanced meal any day of the week!
Final Thoughts
As we wrap up our cooking adventure, remember that cooking is about joy and connection. Whether you’re whipping this up for yourself, your family, or a group of friends, it’s about sharing love through food. Tomato Basil Pasta isn’t just a meal; it’s a hug on a plate, a reminder of simpler times, and a delicious gateway to new memories.
So grab your apron, hold that spatula like a wand, and let’s make some culinary magic happen! Bon appétit!
Print
Tomato Basil Pasta
- Total Time: 45 minutes
- Yield: 4 servings 1x
- Diet: Vegetarian
Description
A heartwarming and cozy Tomato Basil Pasta recipe that blends simplicity and flavor, perfect for any occasion.
Ingredients
- 2 tablespoons olive oil
- 1 small yellow onion, diced
- 4 garlic cloves, minced
- Salt and pepper to taste
- 1 (28-ounce) can diced tomatoes, drained
- 1–2 tablespoons balsamic vinegar
- ½–1 cup pasta water
- 16 ounces thin spaghetti or angel hair
- ½ cup basil, chopped
- ½ cup Parmesan cheese, grated
Instructions
- Heat the oil in a large skillet over medium heat.
- Sauté the diced onion until translucent, about 5 minutes.
- Add the minced garlic and sauté for 1-2 minutes.
- Pour in the drained diced tomatoes and let them simmer for about 10-15 minutes.
- Season the mixture with salt, pepper, and balsamic vinegar, and simmer for another 5 minutes.
- Cook the spaghetti or angel hair according to the package instructions.
- Combine the cooked pasta with the sauce, adding reserved pasta water as needed.
- Finish by tossing in the basil and Parmesan cheese.
Notes
For variations, consider adding protein or extra veggies, or try a creamy version with heavy cream.
- Prep Time: 15 minutes
- Cook Time: 30 minutes
- Category: Main Course
- Method: Baking
- Cuisine: Italian
Nutrition
- Serving Size: 1 serving
- Calories: 375
- Sugar: 6g
- Sodium: 420mg
- Fat: 10g
- Saturated Fat: 4g
- Unsaturated Fat: 5g
- Trans Fat: 0g
- Carbohydrates: 55g
- Fiber: 3g
- Protein: 12g
- Cholesterol: 30mg
Keywords: pasta, tomato, basil, Italian, comfort food

Pizza Bombs
The Ultimate Guide to Making Irresistible Pizza Bombs
Hey there, food enthusiasts! I’m Beau Collier, and today we’re diving into the cheesy, gooey world of Pizza Bombs. You may know them as those delightful little bites bursting with flavor, but to me, they represent so much more. They epitomize family gatherings, game nights, and the kind of comfort food that makes you smile from ear to ear. I can’t wait to share my favorite recipe with you, complete with nostalgic memories, fun facts, and tips to ensure your pizza bombs turn out perfect every time!
Introduction
Picture this: It’s a chilly Friday evening. The house has that cozy glow of warm lights flickering in the corners. You’re gathering with friends or family, ready for a night filled with laughter and good times. What are you going to make? If you haven’t guessed it yet, allow me to introduce our star of the evening—Pizza Bombs!
These delectable little guys are like a fusion of pizza and comfort food, conveniently bundled into bite-sized morsels that are as fun to eat as they are to make. If you’ve ever bitten into one and felt that cheesy goodness ooze out, you already know they’re the life of any gathering. They’re easy to whip up, using straightforward ingredients you likely have in your pantry, and they’re highly adaptable, which makes them perfect for any occasion.
Throughout this blog post, I’ll take you step by step through my beloved Pizza Bombs recipe. But more than just a recipe, I’ll share some of my own kitchen tales along the way, sprinkle in pro tips, and highlight variations that will keep your pizza bombs exciting every time you whip them up. Whether you’re a kitchen novice or a seasoned chef, you’ll find something to inspire your culinary journey. Grab that spatula, and let’s get cooking!
Personal Story
I can still remember the first time I made Pizza Bombs. It was during a family get-together at my grandmother’s house, and I was in charge of snacks. Now, cooking in Grandma’s kitchen was a rite of passage; her recipes were on lock! I decided to take a little creative leap and went for these delicious pizza bites I spotted scrolling Instagram.
With her classic Italian tunes playing softly in the background and the aroma of fresh garlic nestled in olive oil floating around, I felt an overwhelming sense of nostalgia. I gathered the ingredients, rolled out the pizza dough, and filled them with gooey mozzarella and spicy pepperoni. Before long, the kitchen was filled with laughter as family members scampered in to steal bites before they even hit the table!
The first batch came out golden brown, perfectly crispy on the outside and oozing with cheesy goodness on the inside. Never before did I feel so accomplished, nor did I witness such joy from my family! Pizza Bombs became our go-to snack, forever associated with laughter and cherished memories around the dinner table. To this day, every time I make them, I’m transported back to that magical evening.
Ingredients
To create your own mouthwatering Pizza Bombs, you’ll need the following ingredients:
-
Pizza Dough: The base of your pizza bomb! You can make your own from scratch (it’s easier than you think) or buy pre-made dough from the store. If you’re looking for a gluten-free option, many retailers offer gluten-free dough!
-
Pepperoni: The classic choice! It adds a nice spice and flavor. If you’re looking for alternatives, try salami, turkey pepperoni, or even veggies for a meatless twist.
-
Mozzarella Cheese: Ooey-gooey goodness! Opt for fresh mozzarella for creaminess or shredded mozzarella for easier handling. Want to mix it up? Try using cheddar or provolone for a different cheesy flavor.
-
Olive Oil: This will be drizzled over the tops before baking for a golden finish. If you’re out, melted butter works magic too, adding a rich flavor.
-
Garlic Powder: Because everything is better with a little garlic! Fresh minced garlic can also work; just adjust to taste.
-
Italian Seasoning: A wonderful herbal blend that ties all the flavors together. You can make your own using dried basil, oregano, and thyme if you prefer to go fresh.
-
Parmesan Cheese: For a finishing touch! It adds a salty, nutty flavor. You can substitute it with any hard cheese like pecorino Romano or skip it altogether for a dairy-free version.
Step-by-Step Instructions
Let’s roll up those sleeves and make some Pizza Bombs!
-
Preheat the Oven: Preheat your oven to 400°F (200°C). This lets your oven get nice and hot, ensuring crispy bomb goodness. Don’t skip this step; the key to a great crust is a fully preheated oven!
-
Prepare Your Work Surface: Lightly flour your work surface to prevent stickiness. If you’re working with pre-made dough, let it sit out for about 10-15 minutes, so it’s easier to stretch.
-
Roll Out the Dough: Grab your dough and roll it out into approximately 1/4-inch thick sheets. Use a pizza cutter or sharp knife to cut it into squares, about 4 inches wide.
-
Add Your Fillings: Place a slice of pepperoni (or any alternative you prefer) and a generous amount of mozzarella cheese in the center of each square. Don’t be shy—this is where the magic happens!
-
Seal the Bombs: Carefully fold the dough over the filling and pinch the edges tightly to seal in all that cheesy goodness. You want these bad boys to stay intact while cooking, so take your time with this step!
-
Brush with Olive Oil: Place the sealed bombs on a baking sheet lined with parchment paper. Give them a little love with a brush of olive oil. This not only adds flavor but helps achieve a beautiful golden finish.
-
Seasoning Time: Sprinkle a bit of garlic powder, Italian seasoning, and grated Parmesan over the tops, if desired, for extra flavor. These little touches can elevate your Pizza Bombs from good to unforgettable!
-
Bake: Pop your baking sheet into the oven and bake for about 15-20 minutes or until the tops are golden brown and your kitchen is filled with that heavenly aroma. You’ll know they’re done when they look irresistibly golden and bubbly.
-
Cool and Serve: Once baked to perfection, take them out and allow them to cool slightly before serving. A little patience goes a long way—trust me, your taste buds will thank you later.
Serving Suggestions
When it’s time to serve your Pizza Bombs, the presentation can elevate the experience to a whole new level. You might want to serve them on a rustic wooden board or a colorful platter for that inviting touch. Pair them with a small bowl of marinara sauce or ranch dressing for dipping—it adds a delightful twist and enhances those comforting flavors.
Consider garnishing with freshly chopped basil or parsley sprinkled on top for a pop of color. The fresh greens can make your Pizza Bombs look enticing and add a little freshness to each bite.
If you’re feeling extra fancy, you can drizzle a touch of balsamic glaze for a sweet contrast that perfectly complements the flavors. Trust me; your friends will swoon over this snack!
Recipe Variations
Why settle for one flavor when you can explore a multitude? Here are a few delightfully creative variations for your Pizza Bombs:
-
Veggie Pizza Bombs: Swap the pepperoni for diced bell peppers, mushrooms, and olives. Don’t forget the cheese—spinach and artichokes also work wonders!
-
BBQ Chicken Bombs: Use shredded cooked chicken, BBQ sauce, and mozzarella cheese for a tangy twist. Pair it with a cilantro garnish to bring freshness to the table.
-
Caprese Bombs: Stuff your dough with fresh mozzarella, sliced tomatoes, and basil for a refreshing summer bite. You could even drizzle balsamic reduction over them for a zesty kick.
-
Breakfast Bombs: Who says Pizza Bombs can’t be for breakfast? Fill them with scrambled eggs, crispy bacon, and cheddar cheese for a morning treat that will start your day off right.
-
Dessert Bombs: Feeling adventurous? Fill the dough with Nutella and mini marshmallows and bake them up for a sweet treat! Serve with a dusting of powdered sugar for the ultimate sweet tooth indulgence.
Chef’s Notes
Now that you’ve got that recipe down, let me share a few fun tidbits about my journey with Pizza Bombs. Over the years, I’ve experimented with countless variations, some successful and others humorously disastrous. I once thought it would be clever to use pastry dough instead of pizza dough. Let’s just say the results were less “pizza perfection” and more “creamy puff mess”!
I’ve learned the importance of sealing them properly—no one wants a cheese eruption while biting into one. And if you want an extra crispy bottom, baking them on a preheated pizza stone works wonders, giving you that authentic pizzeria vibe.
FAQs and Troubleshooting
-
Why did my Pizza Bombs explode?
- This usually occurs when they weren’t sealed properly. Make sure to pinch those seams tight before baking, and don’t overfill them!
-
How can I make my dough rise better?
- If you’re making your dough from scratch, ensure that your yeast is fresh and active. Warm water (not hot) really helps with the activation!
-
Can I freeze Pizza Bombs?
- Absolutely! Freeze them before baking, and when you’re ready to enjoy, pop them straight into the oven from frozen. Just add a few extra minutes to your baking time.
-
My dough is too sticky! What should I do?
- Work on a well-floured surface and add a touch of flour to your hands while handling the dough. Just remember, a little stickiness is a good sign—it means your dough is hydrated!
Nutritional Info
It’s always good to know what you’re indulging in! Here’s a rough estimate of the nutritional info per Pizza Bomb, assuming you make about eight servings:
- Calories: 250
- Protein: 10g
- Fat: 12g
- Carbohydrates: 25g
- Fiber: 1g
- Sugar: 1g
Keep in mind that variations and portion sizes can lead to different nutritional values, but one thing’s for certain: these little bites of comfort are worth every calorie!
Final Thoughts
Whether you’re hosting a casual get-together or simply wish to treat yourself, Pizza Bombs are your go-to solution for delightful, satisfying bites that leave you smiling. They represent not only a dish; they’re an experience filled with warmth and togetherness.
As you embark on this culinary journey at home, I hope that each bite of your Pizza Bombs ignites fond memories and sparks joy in your kitchen—much like they do for me. Don’t forget to share your creations and tag #Feastical so I can see your delicious masterpieces. So grab that spatula, get creative, and let’s keep the flavors coming! Happy cooking, friends!
Print
Irresistible Pizza Bombs
- Total Time: 35 minutes
- Yield: 8 servings
- Diet: Vegetarian
Description
Delicious bite-sized Pizza Bombs filled with cheese and pepperoni, perfect for gatherings and family nights.
Ingredients
- Pizza Dough: Make your own or buy pre-made gluten-free dough.
- Pepperoni: Classic choice or swap for salami, turkey pepperoni, or veggies.
- Mozzarella Cheese: Fresh or shredded for ooey-gooey goodness.
- Olive Oil: Drizzled on top for a golden finish.
- Garlic Powder: Adds a fantastic flavor boost.
- Italian Seasoning: A blend of dried basil, oregano, and thyme.
- Parmesan Cheese: Optional, for a salty finish.
Instructions
- Preheat the oven to 400°F (200°C).
- Prepare your work surface with flour.
- Roll out the dough into 1/4-inch thick squares.
- Add a slice of pepperoni and mozzarella in the center of each square.
- Seal the bombs tightly.
- Brush with olive oil and sprinkle with seasonings.
- Bake for 15-20 minutes until golden brown.
- Cool slightly before serving.
Notes
Feel free to experiment with different fillings for unique flavor profiles.
- Prep Time: 15 minutes
- Cook Time: 20 minutes
- Category: Snack
- Method: Baking
- Cuisine: Italian
Nutrition
- Serving Size: 1 bomb
- Calories: 250
- Sugar: 1g
- Sodium: 600mg
- Fat: 12g
- Saturated Fat: 5g
- Unsaturated Fat: 6g
- Trans Fat: 0g
- Carbohydrates: 25g
- Fiber: 1g
- Protein: 10g
- Cholesterol: 20mg
Keywords: pizza bombs, comfort food, snack, party food, cheesy bites

Caesar Pasta Salad
Caesar Pasta Salad: A Fresh Take on a Classic Favorite
Hey there, fellow food lovers! If you’re ready for a delightful twist on an all-time classic, you’re in for a treat with my Caesar Pasta Salad. This dish combines the creamy, zesty flavors of traditional Caesar salad with heartwarming pasta goodness. I’m Beau Collier, and I believe that food should not only bring comfort but also bring us together. Nothing sparks joy like gathering around a table, sharing laughter and delight over a delicious meal.
Picture this: it’s a sun-drenched afternoon, and you find yourself whipping up this salad for friends and family. It’s simple yet elegant, a true crowd-pleaser, perfect for picnics, potlucks, or even a cozy dinner at home. You get to enjoy the crunchy romaine, succulent cherry tomatoes, and delightful croutons, all coated in a luscious Caesar dressing that dances on your palate. Plus, you can spice things up with grilled chicken or shrimp for an extra protein punch.
In this post, I’m diving deep into the world of Caesar Pasta Salad—sharing not only the recipe, but also personal stories, savvy tips, and some extra delicious variations. Whether you’ve been cooking for years or are just starting your culinary adventure, this recipe is designed to be accessible, fun, and, above all, tasty. So grab your apron, and let’s get cooking!
Personal Story
As a child, my culinary journeys often began in my grandmother’s kitchen. She had this authentic way of crafting meals filled with love and warmth—it was where I fell in love with cooking. I remember one sunny afternoon, perched on a stool, watching her prepare a classic Caesar salad. The way she expertly tossed the crisp romaine and creamy dressing brought a twinkle to my young eyes. She would tell stories about her youth as she made her famous homemade dressing, and I was completely captivated.
Years later, inspired by those memories, I wanted to recreate that experience in my kitchen, but with a twist. Enter the Caesar Pasta Salad, which became a staple at family gatherings. Bringing that same love and joy into a modern dish was my goal. It’s more than just food; it’s a heartfelt connection to my past, a way to honor those cherished moments while creating new memories. Now, every time I make this salad, I can hear her voice, guiding me along the way. It’s a dish that reminds us of the joys of cooking with loved ones, making it a perfect addition to any table.
Ingredients
Gather your ingredients, and let’s get started on this delightful Caesar Pasta Salad! Here’s what you’ll need:
-
8 ounces of pasta (e.g., rotini or penne): I love using rotini because the spirals catch the dressing perfectly, but feel free to use any pasta you have on hand! Whole wheat or gluten-free varieties work great, too.
-
2 cups romaine lettuce, chopped: Fresh romaine adds the perfect crunch! If you’re feeling adventurous, you can mix in some kale or spinach for added greens.
-
1/2 cup cherry tomatoes, halved: These little bursts of sweetness are essential. If you can’t find cherry tomatoes, diced regular tomatoes will do just fine.
-
1/2 cup croutons: Store-bought is fine, but if time allows, homemade croutons are a fun and crispy addition! Just toss some bread cubes in olive oil and season them before baking until golden.
-
1/4 cup grated Parmesan cheese: Freshly grated cheese will elevate the dish—don’t skimp on this! You can also substitute with Pecorino Romano for a sharper taste.
-
1/2 cup Caesar dressing: A good, creamy dressing is key! You can go store-bought for convenience or whip up your own if you’re feeling ambitious.
-
Salt and pepper to taste: Basic yet crucial for enhancing all the flavors in the salad.
-
Optional: Grilled chicken or shrimp: If you’re looking to make this a wholesome meal, adding grilled chicken or shrimp will amp up the protein and flavor!
Step-by-Step Instructions
Alright, let’s jump into the cooking process! Follow these steps to whip up your Caesar Pasta Salad:
-
Cook the Pasta:
- Bring a large pot of salted water to a boil. Add the pasta and cook according to package instructions until al dente. This usually takes about 8 to 10 minutes, depending on the type of pasta.
- Tip: Reserve a cup of pasta water before draining! This starchy liquid can help loosen your dressing later if needed.
-
Prep the Veggies:
- While the pasta is cooking, chop your romaine lettuce and halve the cherry tomatoes. Set them aside in a large mixing bowl.
- Chef Hack: To keep lettuce crispier for longer, rinse it in cold water and dry it right before use.
-
Combine Ingredients:
- Once the pasta is cooked, drain it and let it cool for a few minutes in a colander. This prevents wilting the lettuce when you combine everything.
- Add the cooled pasta to the bowl with the lettuce and tomatoes.
-
Dress it Up:
- Pour in the Caesar dressing and toss everything gently to coat the pasta and veggies evenly. If the mixture appears too thick, add a splash of your reserved pasta water to loosen it up.
- Commentary: Mind the dressing—different brands have varying flavors and thickness! Taste as you go and adjust according to your preference.
-
Add the Crunch:
- Toss in the croutons and grated Parmesan cheese. Give it one last gentle mix to combine everything without crushing the croutons.
- Chef Hack: You can save some cheese and croutons for topping later to keep that crunchiness intact!
-
Season and Serve!:
- Season your salad with salt and pepper to taste. Now it’s time to plate!
- Tip: If you’re adding grilled chicken or shrimp, slice them up and place them on top of the salad for that restaurant-style presentation.
Serving Suggestions
Now that your beautiful Caesar Pasta Salad is ready, how can you serve it up like a pro?
-
Plating: Grab a sizable bowl or serving platter and fill it generously with the salad. If you want to impress your guests, layer it—start with the pasta, then add the lettuce and top with a sprinkle of croutons and Parmesan.
-
Garnishes: Consider garnishing with a few additional cherry tomatoes for color or a drizzle of extra Caesar dressing for that restaurant flair. A sprinkle of fresh parsley can elevate the visual appeal as well.
-
Sides: Pair your salad with a warm baguette on the side or a light soup for a complete meal.
Recipe Variations
Let’s get a little adventurous! Here are some ways to give your Caesar Pasta Salad a flavorful twist:
-
Add More Veggies: Incorporate bell peppers for color and crunch, or throw in some sliced cucumbers for extra freshness.
-
Zesty Lemon: For a citrusy kick, squeeze some lemon juice over the salad just before serving. It brightens up the flavors wonderfully!
-
Protein Swaps: Instead of grilled chicken or shrimp, try adding canned tuna, chickpeas, or even roasted tofu for a vegetarian option.
-
Creamy Avocado: Mash up some ripe avocado and mix it in or cut it into slices as a topping for a creamy texture.
-
Herbed Twist: Experiment with adding fresh herbs like basil or dill for a unique flavor punch! A sprinkle of fresh herbs can really elevate the taste.
Chef’s Notes
This Caesar Pasta Salad is a recipe that has evolved since I first started making it. Initially, I strictly followed my grandmother’s Caesar salad recipe, but over the years, I began to incorporate pasta and other ingredients as I got more experimental in the kitchen. The beauty of this dish is its versatility; you can tailor it to fit seasonal ingredients or flavor profiles that tickle your fancy.
One cooking mishap I laugh about happened during a family barbecue. I accidentally threw in too much dressing and turned the salad into something resembling a pasta soup! We laughed it off and labeled it "experimental cuisine." It’s stories like these that keep cooking fun and lead to new favorites!
FAQs and Troubleshooting
-
Q: My pasta is too sticky! What did I do wrong?
- A: If your pasta sticks together, it could be that it wasn’t stirred during cooking or was overcooked. Remember to give it a good stir in the boiling water, and try to drain it immediately after reaching al dente.
-
Q: How can I prevent my lettuce from wilting?
- A: After slicing your lettuce, keep it washed and chilled in the refrigerator until you’re ready to serve. Always add the dressing just before serving to keep it crisp.
-
Q: What if my dressing is too tangy?
- A: If your dressing is overly tangy, try balancing it out with a pinch of sugar or a splash of cream to mellow the flavors. Taste as you go to find the perfect balance!
-
Q: Can I make this salad ahead of time?
- A: You can prep the ingredients, but for the best results, mix everything just before serving to keep the textures fresh and crisp.
Nutritional Info
While the exact nutritional values depend on ingredient choices, here’s a rough estimate for one serving (without chicken or shrimp):
- Calories: 350
- Protein: 12g
- Carbohydrates: 40g
- Fat: 15g
- Fiber: 3g
Additions such as grilled chicken or shrimp will increase the protein content, making this salad more filling!
Final Thoughts
There you have it—my Caesar Pasta Salad recipe, soaked in nostalgia and bursting with flavor! I hope this dish brings you as much comfort and joy as it does for me. Whether you’re having a picnic, attending a potluck, or simply want a satisfying meal at home, this salad checks all the boxes. Don’t forget to share it with your loved ones; food is always better when it’s enjoyed together!
So, what are you waiting for? Grab your fork, toss on your apron, and let the cooking magic begin! If you have any fun stories or variations to share, I would love to hear them. Happy cooking, friends, and may your kitchens always be filled with laughter and delicious aromas!
Print
Caesar Pasta Salad
- Total Time: 25 minutes
- Yield: 4 servings 1x
- Diet: Vegetarian
Description
A delightful twist on a classic, this Caesar Pasta Salad combines creamy, zesty flavors with heartwarming pasta goodness.
Ingredients
- 8 ounces of pasta (e.g., rotini or penne)
- 2 cups romaine lettuce, chopped
- 1/2 cup cherry tomatoes, halved
- 1/2 cup croutons
- 1/4 cup grated Parmesan cheese
- 1/2 cup Caesar dressing
- Salt and pepper to taste
- Optional: Grilled chicken or shrimp
Instructions
- Bring a large pot of salted water to a boil. Add the pasta and cook according to package instructions until al dente, about 8 to 10 minutes.
- Chop the romaine lettuce and halve the cherry tomatoes. Set aside.
- Drain the cooked pasta and let it cool for a few minutes in a colander.
- Add the cooled pasta to the bowl with the lettuce and tomatoes.
- Pour in the Caesar dressing and toss everything gently to coat.
- Toss in the croutons and grated Parmesan cheese and mix gently.
- Season your salad with salt and pepper to taste and plate.
Notes
For added flavor, consider garnishing with extra cherry tomatoes or a sprinkle of fresh parsley.
- Prep Time: 15 minutes
- Cook Time: 10 minutes
- Category: Salad
- Method: Mixing
- Cuisine: American
Nutrition
- Serving Size: 1 serving
- Calories: 350
- Sugar: 3g
- Sodium: 400mg
- Fat: 15g
- Saturated Fat: 4g
- Unsaturated Fat: 6g
- Trans Fat: 0g
- Carbohydrates: 40g
- Fiber: 3g
- Protein: 12g
- Cholesterol: 30mg
Keywords: Caesar salad, pasta salad, vegetarian recipes, summer recipes, easy recipes
Creamy Tomato Garlic Pasta
# Creamy Tomato Garlic Pasta: A Comfort Classic!

## Introduction

Hey there, food lovers! 💖 Welcome back to Feastical! Today, I’m super excited to share a fabulous recipe that’s as comforting as a warm hug on a chilly evening—Creamy Tomato Garlic Pasta. It’s that dish you whip up when you’re craving something hearty, delicious, and downright soul-soothing. You know those days when nothing seems to go right? Well, a plate of this pasta can turn your mood around faster than a quick spin on a dance floor!

This recipe is perfect for busy weeknights when you want a satisfying meal without spending hours hunched over the stove. With its creamy sauce mingling beautifully with the sharpness of garlic and bright acidity of tomatoes, it’s a dish that warms the heart and the belly. Plus, it only takes about 30 minutes to throw together, so you can spend less time cooking and more time enjoying your feast with family or friends!

One of the best things about pasta is that it’s incredibly versatile. You can switch it up based on what you have in your pantry or add your favorite ingredients to make it uniquely yours. 🍝 Whether you’re throwing a dinner party or just treating yourself to a cozy night in, this Creamy Tomato Garlic Pasta will have you covered!

So, roll up your sleeves and put on your favorite apron. I promise this tasty dish will quickly become a staple in your kitchen, and I can’t wait for you to dig in! Let’s dive into a bit of my history with this creamy delight.

## Personal Story

Speaking of pasta, I vividly recall the first time I made this Creamy Tomato Garlic Pasta. I was in college, and let me tell you—the struggle was real! My cooking skills were about as refined as a microwave burrito. One evening, after a long day of classes, I craved something comforting but didn't want to settle for takeout (again!). So, I rummaged through my fridge and pantry and found a few simple ingredients: pasta, some garlic, a can of tomatoes, and cream.

I’ll never forget the moment I mixed it all together. As the garlic hit the hot olive oil, my little kitchen filled with that heavenly aroma—the kind that makes your heart skip a beat. I checked to see if my housemates were around to share, but I was home alone! So naturally, I plated myself a generous portion and promptly dove in. With every bite, I felt like a gourmet chef! It was a transformative experience; a burst of flavor on a plater that felt polished and sophisticated, yet so easy to make.

Since then, this dish has remained a symbol of my culinary journey. It's not just food—it's a reminder that you don't need to be a master chef to create something incredible in your kitchen. Fast forward to today, and I’m thrilled to share this beloved dish with you, bringing that same joy and comfort to your table.

## Ingredients

Here's what you'll need for this creamy sensational dish:

- **8 oz of penne or fettuccine pasta**
  Whichever you prefer—penne is great for capturing that sauce, while fettuccine brings a smooth and light texture. Don’t have either? Any pasta shape will work—just adjust the cooking time based on the type!

- **4 cloves of fresh garlic, minced**
  Freshly minced garlic is the secret to a punch of flavor! But if you’re in a pinch, you can use garlic powder—just use about 1 teaspoon. However, nothing beats fresh!

- **1 can (14.5 oz) of diced tomatoes (no added sugar)**
  Opt for the no-sugar variety to keep it natural and healthy. If fresh tomatoes are in season, chop up about 2 cups—they’ll create a wonderfully vibrant sauce!

- **1 cup of heavy cream**
  This is where the creamy magic happens! You can substitute with half-and-half for a lighter option or even full-fat coconut milk for a dairy-free twist.

- **1/2 cup of grated Parmesan cheese**
  Freshly grated Parm adds a lovely nutty flavor. If you’re dairy-free, feel free to use nutritional yeast, or you can swap in a vegan cheese alternative.

- **2 tbsp of extra virgin olive oil**
  Opt for high-quality olive oil; it elevates the dish with its rich flavor. Don’t have it? Any neutral oil like canola or avocado oil will do, but you’ll lose some of that fantastic taste!

- **Salt and pepper, to taste**
  Seasoning is key! Always taste as you go to make sure it's just right.

## Step-by-Step Instructions

Alright, let’s get cooking! Follow these steps to create your creamy masterpiece.

1. **Cook Your Pasta**
   Bring a large pot of salted water to a boil. Add in your penne or fettuccine and cook according to package instructions until al dente. Remember, pasta will continue to cook in the sauce, so don’t overdo it! Stir it occasionally to prevent sticking. Once done, reserve about 1/2 cup of pasta water (trust me, this will help thin out the sauce if it gets too thick) and then drain the rest.

2. **Sauté the Garlic**
   In a large skillet over medium heat, add the olive oil. Once it’s shimmering, throw in the minced garlic and sauté for about 1-2 minutes until fragrant. Watch carefully—garlic burns quickly and nobody wants a bitter flavor in their dish!

3. **Add the Diced Tomatoes**
   Pour in the can of diced tomatoes (juice and all). Stir well, and let the mixture simmer for about 5-7 minutes until slightly thickened. This is where the magic happens—your kitchen will start smelling divine!

4. **Create the Creamy Sauce**
   Lower the heat and pour in the heavy cream. Stir until well combined. It will transform from a tomato base into a luscious cream sauce that wraps around the pasta like a warm blanket.

5. **Incorporate the Parmesan**
   Gradually add the grated Parmesan, stirring continuously until it melts into the sauce. If the sauce seems too thick, add some reserved pasta water little by little until you achieve your preferred consistency.

6. **Toss in the Pasta**
   Gently fold the cooked pasta into the sauce, ensuring every noodle is coated in that velvety goodness. Taste, and season with salt and pepper as needed.

7. **Plate It Up**
   Grab your favorite serving bowls and plate the creamy pasta! Top with additional Parmesan, a drizzle of olive oil, or even some freshly chopped parsley for a pop of color!

## Serving Suggestions

Dishing up this Creamy Tomato Garlic Pasta is where you can really let your creativity shine! Here are some serving ideas to elevate your dining experience:

- **Garnish with Fresh Herbs**
  Add a sprinkle of finely chopped basil or parsley right before serving for a burst of freshness.

- **Add a Side Salad**
  Pair it with a light arugula salad dressed with lemon vinaigrette to balance out the creaminess.

- **Serve with Garlic Bread**
  Nothing says “comfort food” like buttery garlic toast on the side! It’s perfect for mopping up any extra sauce.

- **A Splash of Chili Oil**
  For the spicy food lovers out there, drizzle a little chili oil over the top before serving for an exciting kick!

## Recipe Variations

Want to switch things up? Check out these creative variations:

- **Add Spinach and Cherry Tomatoes**
  Toss in a couple of handfuls of fresh spinach and halved cherry tomatoes just before adding the cream for added nutrients and flavor!

- **Add Protein**
  Drop in cooked chicken, shrimp, or even crispy bacon bits for a heartier meal. Veggie lovers can swap in grilled zucchini or mushrooms for some added depth.

- **Make It Spicy**
  Add red pepper flakes along with garlic for that fiery kick. You can also stir in some sliced jalapeños!

- **Try Different Cheeses**
  Experiment with other cheeses like goat cheese or mozzarella for a different flavor experience.

- **Vegan Twist**
  Substitute heavy cream for cashew cream and use nutritional yeast instead of Parmesan for a comforting vegan pasta dish!

## Chef’s Notes

As I've explored the world of pasta over the years, this recipe has easily become a favorite amongst friends and family. It's hard to believe how something so simple can create such joy around the dinner table! I vividly remember one Christmas Eve when I made this dish for a large gathering—my aunt raved about it for weeks! It’s funny to think how it has evolved from a college cookbook staple to a comforting classic in my kitchen.

Always feel free to play around with this recipe! It’s about making it your own and reflecting what flavors you love. And remember, if you ever feel like the sauce didn't quite turn out right, don't fret—grab a little more cheese! Cheese solves most culinary conundrums!

## FAQs and Troubleshooting

Here are some common questions and potential mistakes you might encounter:

- **Why is my sauce too thick?**
  No worries! Just add some of the reserved pasta water, a little at a time, to loosen the sauce until you reach your desired consistency.

- **My pasta is overcooked. What now?**
  If you realize it’s mushy, try tossing it in a hot sauce quickly to bring back some flavor! You can also add some fresh herbs or cheese to mask the texture.

- **Can I make this ahead of time?**
  Absolutely! Just store the cooked pasta and sauce separately in airtight containers. When you’re ready to eat, reheat gently on the stove, adding a splash of cream or pasta water to rehydrate.

- **What if I don’t have garlic?**
  While fresh garlic is best, you can use garlic powder instead. Just remember that the flavor won’t be as punchy—around 1 teaspoon should do.

## Nutritional Info

Let's break down the nutritional goodness of this comforting meal! For one generous serving of Creamy Tomato Garlic Pasta (based on the ingredients listed):

- **Calories**: Approximately 550 calories.
- **Total Fat**: About 30g
- **Saturated Fat**: 17g
- **Cholesterol**: 110mg
- **Sodium**: Moderate (varies based on added salt)
- **Carbohydrates**: 55g
- **Fiber**: 3g
- **Sugars**: 4g
- **Protein**: 16g

Bear in mind, actual nutritional values may vary based on brands and specific ingredients used!

## Final Thoughts

There you have it—a guide to one of the most heartwarming pasta dishes you’ll find! Creamy Tomato Garlic Pasta is not just something to eat; it’s a story—a journey through flavors that warms your heart and fills your belly with joy.

I hope this recipe brings as much comfort to you and your loved ones as it has to me over the years. Every meal is an opportunity to create memories, and with a recipe as inviting as this one, you're sure to gather round the table with smiles all around.

Thank you for joining me today on this culinary adventure! Remember, cooking is all about experimentation and having fun! So don’t be afraid to add your unique spin to any recipe. Until next time—grab a fork, dig in, and enjoy every bite!

Creamy Tomato Garlic Pasta
- Total Time: 30 minutes
- Yield: 4 servings 1x
- Diet: Vegetarian
Description
A comforting and creamy tomato garlic pasta dish that is easy to prepare and perfect for busy weeknights.
Ingredients
- 8 oz penne or fettuccine pasta
- 4 cloves fresh garlic, minced
- 1 can (14.5 oz) diced tomatoes (no added sugar)
- 1 cup heavy cream
- 1/2 cup grated Parmesan cheese
- 2 tbsp extra virgin olive oil
- Salt and pepper, to taste
Instructions
- Cook your pasta by bringing a large pot of salted water to a boil, adding in your pasta, and cooking according to package instructions until al dente.
- Sauté the garlic in olive oil over medium heat for about 1-2 minutes until fragrant.
- Add the diced tomatoes and let it simmer for 5-7 minutes until slightly thickened.
- Create the creamy sauce by pouring in the heavy cream and stirring until well combined.
- Incorporate the grated Parmesan, stirring continuously until it melts into the sauce.
- Toss the cooked pasta into the sauce, coating every noodle well and seasoning with salt and pepper as needed.
- Plate the creamy pasta and serve with additional Parmesan or fresh herbs if desired.
Notes
Feel free to add spinach, proteins, or spice to customize this pasta dish to your liking. Serve with garlic bread or a side salad for a complete meal!
- Prep Time: 10 minutes
- Cook Time: 20 minutes
- Category: Main Course
- Method: Baking
- Cuisine: Italian
Nutrition
- Serving Size: 1 serving
- Calories: 550
- Sugar: 4g
- Sodium: 400mg
- Fat: 30g
- Saturated Fat: 17g
- Unsaturated Fat: 10g
- Trans Fat: 0g
- Carbohydrates: 55g
- Fiber: 3g
- Protein: 16g
- Cholesterol: 110mg
Keywords: Creamy Pasta, Tomato Garlic Pasta, Comfort Food, Vegetarian Pasta, Easy Dinner
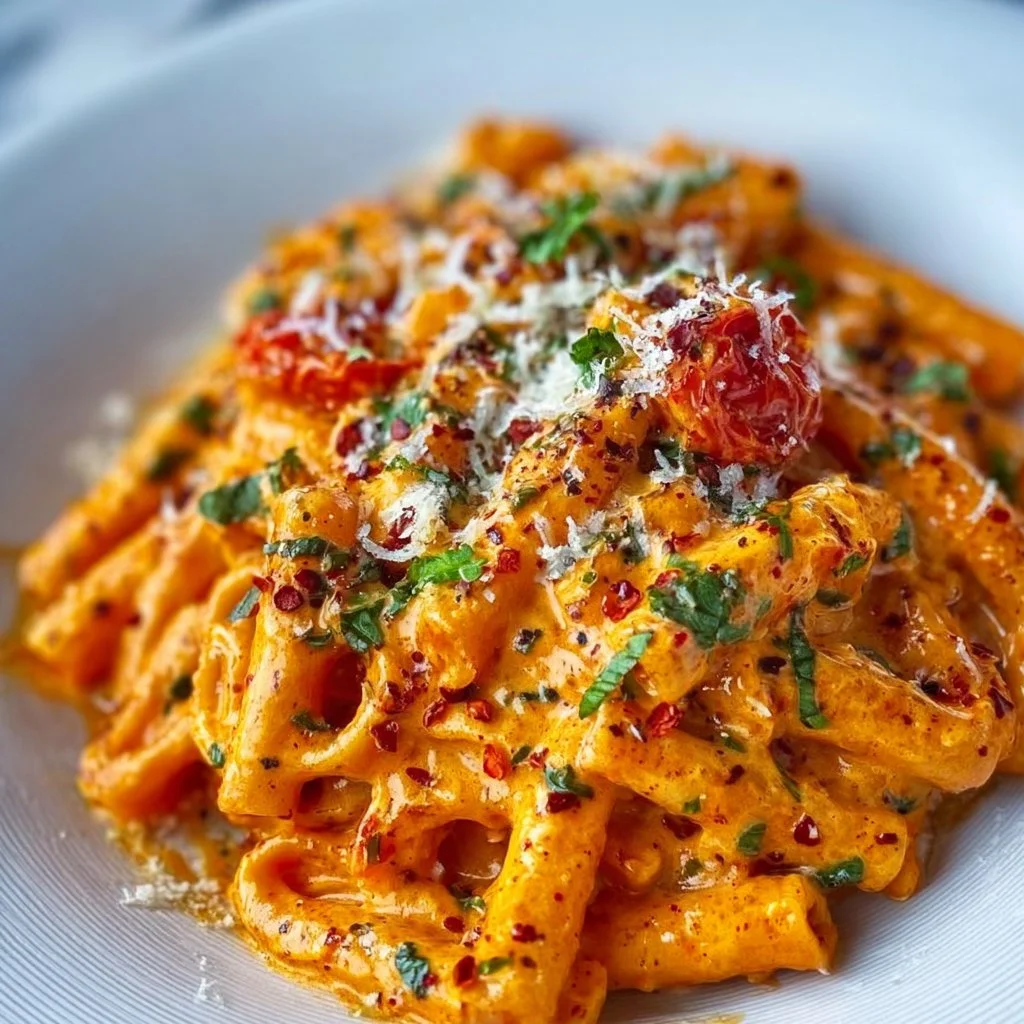
Creamy Tomato Garlic Pasta Recipe
Creamy Tomato Garlic Pasta Recipe: A Feel-Good Classic
Hey there, food lovers! Welcome back to Feastical, where we whip up love and laughter one delicious bite at a time. If you’re in the mood for something that warms your soul and fills your belly, then you’re going to love today’s star dish: Creamy Tomato Garlic Pasta. This beauty is all about simplicity wrapped in exquisite flavor—the kind of dish that feels like a cozy hug after a long day.
Picture this: A plate of pasta smothered in creamy garlic sauce, dotted with sweet cherry tomatoes, and crowned with fresh herbs. It’s the kind of meal that feels fancy but is incredibly easy to whip up, making it perfect for date nights, family dinners, or that “treat yourself” moment after a difficult week. Trust me; this recipe will quickly become a staple in your kitchen repertoire.
With just a handful of ingredients and a dash of love, we’re going to create something truly magical. So grab your apron, channel your inner chef, and let’s dive into this creamy, dreamy pasta that’s bound to impress. Whether you’re cooking for yourself or sharing with loved ones, each bite will have everyone grinning from ear to ear. Let’s get cooking!
Personal Story
This creamy tomato garlic pasta brings back some of my fondest memories from my early cooking days. I remember the first time I made it; I was a college student, living in a tiny apartment with a kitchen so small that if I turned around too quickly with my spatula, I’d risk a kitchen catastrophe. On a rainy Thursday evening, I decided to throw together a meal that could warm up my little sanctuary. Armed with a few ingredients I had on hand, I channeled my inner chef and set to work.
As the garlic sizzled in the pan, filling the air with its inviting aroma, I couldn’t help but think about all those nights spent in my grandmother’s kitchen—her wisdom always lingering in the air like that heavenly scent. She taught me that cooking isn’t just about the food; it’s about the stories shared, laughter exchanged, and memories created. Fast forward to now, and every time I make this dish, I’m reminded of those special moments and the important lessons I learned along the way.
So grab a fork and a friend or family member; it’s time to create those beautiful memories over a bowl of this creamy tomato garlic pasta!
Ingredients
Let’s gather our star players for this dish!
-
8 Garlic Cloves (minced): Garlic is the aromatic backbone of this recipe. It adds depth and flavor that transforms the dish. Substitute with garlic powder if you’re in a pinch, but fresh garlic truly reigns supreme.
-
3 cups Cherry Tomatoes (halved): These juicy gems are sweet and vibrant. You can use grape tomatoes or even canned diced tomatoes in a pinch, but fresh is always best when in season.
-
4 tbsp Olive Oil: Use extra virgin for that rich flavor, or substitute with avocado oil for a different taste profile. Not a fan of olive oil? Try grapeseed or canola oil.
-
1 cup Dry White Wine: This adds an elegant touch. Go for something you’d sip on; wines like Sauvignon Blanc are perfect. Don’t drink wine? Replace it with vegetable broth or additional chicken stock for a flavorful kick.
-
1 tsp White Sugar: To balance the acidity of the tomatoes, this little trick goes a long way. You can use honey or maple syrup as alternatives.
-
1 tsp Chili Flakes: A pinch of heat makes all the difference! If spice isn’t your thing, leave it out or replace it with a sprinkle of smoked paprika for warmth without the heat.
-
2 tbsp Tomato Paste: This gives the sauce a robust tomato flavor. Don’t have it on hand? You could blend in a bit of chopped canned tomatoes instead.
-
2 cups Heavy Cream (or Alt milk – 1:1 swap): The creamy base of the dish! If you’re looking for a lighter option, full-fat coconut milk or even cashew cream work magic here.
-
1 tbsp Flour: A thickener to help achieve that dreamy consistency. Use a gluten-free flour blend for a gluten-conscious option.
-
1/2 cup Chopped Parsley: Fresh herbs bring vibrancy and freshness! Basil or even arugula could be delightful substitutes if you want a flavor twist.
-
8 oz Rigatoni Pasta (cooked al dente): I love rigatoni for its ability to hold sauce. You can swap it with penne or spaghetti based on your preference.
-
1 tsp Smoked Paprika: Infuses a lovely smokiness to the dish, enhancing its depth. You can skip it, but I wouldn’t—trust me!
-
1 tsp Garlic Powder: If you’re a garlic lover (like me!) this adds an extra depth. You can completely omit it if you want to keep it simple.
-
Salt & Pepper (to taste): Essential seasonings that highlight all other flavors. Always taste as you go!
-
Freshly Grated Parmesan: Optional but recommended! It adds the sophistication we all love. If you’re dairy-free, nutritional yeast can be a great substitute.
Step-by-Step Instructions
Now, onto the fun part! Let’s make this pasta dish. Ready? Here we go!
-
Cook the Pasta:
Start by boiling a large pot of salted water. Add the rigatoni and cook according to package directions until al dente. This usually takes about 10-12 minutes. Remember, you want them firm since they’ll continue cooking later in the sauce. Once done, reserve about 1 cup of the pasta water and drain the rest. A little pasta water goes a long way in achieving the perfect creamy consistency later! -
Sauté the Aromatics:
In a large skillet, heat the olive oil over medium heat. Add the minced garlic and sauté for about 1-2 minutes until fragrant, but be careful not to burn it—it can turn bitter quickly! Here’s a little cheat: if you add a pinch of salt to the garlic, it will help it brown evenly and prevent it from burning. -
Add the Cherry Tomatoes:
Toss in those halved cherry tomatoes along with the white wine. Give it a gentle stir and allow them to cook for about 5-7 minutes until they start to soften and burst. The beautiful thing about this step is how the tomatoes create their sauce as they release juices. Don’t forget to scrape the bottom of the pan to incorporate all the delicious bits! -
Stir in the Tomato Paste:
Add the tomato paste, white sugar, and chili flakes. Mix well, letting it cook for another 2-3 minutes to bring the flavors together. A little tip—cooking the tomato paste for a minute intensifies its flavor. Trust me; your taste buds will thank you! -
Create the Creamy Sauce:
Reduce the heat to low and slowly whisk in the heavy cream, followed by the flour. This is where the magic happens! Stay vigilant, stirring continuously until everything is well-combined and thickens to your liking. If it seems too thick, add a splash of your reserved pasta water to loosen it up. -
Seasoning:
Sprinkle in smoked paprika, garlic powder, and season generously with salt and pepper. Taste and adjust your seasoning as needed—this is your dish, after all! -
Combine Pasta with Sauce:
Carefully add the cooked rigatoni to your creamy tomato sauce. Toss gently until every noodle is beautifully coated in that luscious sauce. This is where you can add a bit more pasta water if you want to achieve your desired sauce consistency. -
Final Touches:
Just before serving, fold in the chopped parsley for a burst of freshness. The color contrast is visually appealing and, more importantly, it adds extra flavor! -
Serve:
Plate your creamy tomato garlic pasta in generous portions. If you’re feeling fancy, top it with freshly grated Parmesan cheese (or a vegan alternative), a drizzle of olive oil, and a sprinkle of extra parsley or chili flakes for that pop of color.
Serving Suggestions
To elevate your dining experience, consider pairing this creamy tomato garlic pasta with a crisp green salad or a side of garlic bread for an all-out flavor fest. A glass of chilled white wine complements this dish beautifully, enhancing the flavors of the creamy sauce.
You could also serve it in deep pasta bowls, garnishing with fresh basil leaves for that restaurant-quality experience. Don’t forget to set the table with your favorite dinnerware, dim the lights a bit, and play some cozy music. It’s all about the ambiance, my friends!
Recipe Variations
Here are a few creative twists to make this dish your own:
-
Add Protein: Toss in grilled chicken, shrimp, or sautéed mushrooms for added protein. If you’re vegetarian, chickpeas or lentils make a great hearty option.
-
Vegetable Boost: Add zucchini, spinach, or bell peppers to the mix for an extra serving of veggies. You can sauté them alongside the garlic for more flavor.
-
Herb-Infused: Experiment with different herbs like basil, oregano, or thyme in place of or in addition to parsley. Each herb will impart a unique flavor profile, making the dish your own.
-
Cheesy Delight: Mix in some ricotta or cream cheese for an ultra-creamy texture. It’s like a creamy cheesy hug for your pasta!
-
Vegan Version: For a completely plant-based dish, use coconut cream instead of heavy cream, and nutritional yeast in place of Parmesan.
Chef’s Notes
Every cook has their own tips and tricks that make a recipe shine. One of my favorite things about this creamy tomato garlic pasta is its adaptability. It’s like a canvas, waiting for your personal brushstrokes. Plus, it has aged like fine wine in my kitchen; I’ve tweaked it over the years, striving for that perfect balance of flavors.
And speaking of tweaking, I once served this to a group of friends during a small dinner party. Just as I was about to make the sauce, I realized I was out of heavy cream. A quick panic settled in until I discovered a can of coconut milk chilling in the fridge. From that day on, I made it a habit to keep a stash of coconut milk on hand; it gives the dish a unique creamy texture that’s simply divine!
FAQs and Troubleshooting
1. Why is my sauce too thick?
If the sauce seems thicker than you’d like, just add a splash of reserved pasta water, and it will loosen up nicely!
2. It’s too acidic—help!
If you find the sauce too acidic from the tomatoes, you can add a pinch more sugar or a bit of baking soda to help neutralize the acidity.
3. Can I prep this in advance?
Absolutely! You can make the sauce ahead of time and store it in the fridge. Just reheat slowly, and add freshly cooked pasta right before serving.
4. What’s the best way to reheat leftovers?
To reheat, gently warm it on the stovetop with a splash of water or cream to help bring it back to life. Stir frequently so it doesn’t stick to the pan!
Nutritional Info
This creamy tomato garlic pasta is not only a feast for the taste buds but can also fit into a balanced meal if enjoyed in moderation. Here’s a quick rundown of the nutritional info per serving (based on four servings):
- Calories: Approximately 450-500
- Protein: About 10-12g
- Fat: 25-30g (including healthy fats from olive oil)
- Carbohydrates: Roughly 45g
- Fiber: 3g (depending on your pasta choice)
- Sugars: 3-5g
Feel free to adjust portions and ingredient swaps to fit your dietary needs or cravings—after all, cooking is all about personalization!
Final Thoughts
And there you have it, my friends! Your very own recipe for creamy tomato garlic pasta that’s sure to satisfy your cravings and wrap you in a warm culinary hug. I hope this dish brings as much joy to your table as it has to mine over the years.
Remember: cooking is about experimenting and enjoying the process. Don’t be afraid to add your own flair, share the experience with others, and create lovely memories. Until next time, keep stirring up those delightful dishes, and never hesitate to bring a little extra love into your kitchen! Happy cooking! 🍝✨
Print
Creamy Tomato Garlic Pasta
- Total Time: 45 minutes
- Yield: 4 servings 1x
- Diet: Vegetarian
Description
A comforting and flavorful creamy tomato garlic pasta perfect for any occasion.
Ingredients
- 8 Garlic Cloves (minced)
- 3 cups Cherry Tomatoes (halved)
- 4 tbsp Olive Oil
- 1 cup Dry White Wine
- 1 tsp White Sugar
- 1 tsp Chili Flakes
- 2 tbsp Tomato Paste
- 2 cups Heavy Cream (or Alt milk – 1:1 swap)
- 1 tbsp Flour
- 1/2 cup Chopped Parsley
- 8 oz Rigatoni Pasta (cooked al dente)
- 1 tsp Smoked Paprika
- 1 tsp Garlic Powder
- Salt & Pepper (to taste)
- Freshly Grated Parmesan (optional)
Instructions
- Cook the pasta in a large pot of salted water according to package directions until al dente. Reserve 1 cup of pasta water and drain the rest.
- Sauté the olive oil over medium heat, add the minced garlic, and sauté for 1-2 minutes until fragrant.
- Add the cherry tomatoes and white wine, stirring gently, and allow to cook for 5-7 minutes until the tomatoes soften.
- Stir in the tomato paste, white sugar, and chili flakes. Cook for another 2-3 minutes.
- Reduce heat to low and whisk in the heavy cream and flour, stirring continuously until well-combined and thickened.
- Season with smoked paprika, garlic powder, salt, and pepper, adjusting to taste.
- Combine the cooked rigatoni with the creamy sauce, tossing gently to coat.
- Fold in the chopped parsley before serving. Plate the pasta and top with freshly grated Parmesan if desired.
Notes
For a lighter option, substitute heavy cream with coconut milk or cashew cream. This dish can be customized further with protein or extra veggies.
- Prep Time: 15 minutes
- Cook Time: 30 minutes
- Category: Main Course
- Method: Baking
- Cuisine: Italian
Nutrition
- Serving Size: 1 serving
- Calories: 475
- Sugar: 4g
- Sodium: 500mg
- Fat: 28g
- Saturated Fat: 15g
- Unsaturated Fat: 8g
- Trans Fat: 0g
- Carbohydrates: 45g
- Fiber: 3g
- Protein: 12g
- Cholesterol: 80mg
Keywords: creamy pasta, tomato garlic pasta, Italian cuisine, vegetarian pasta, comfort food
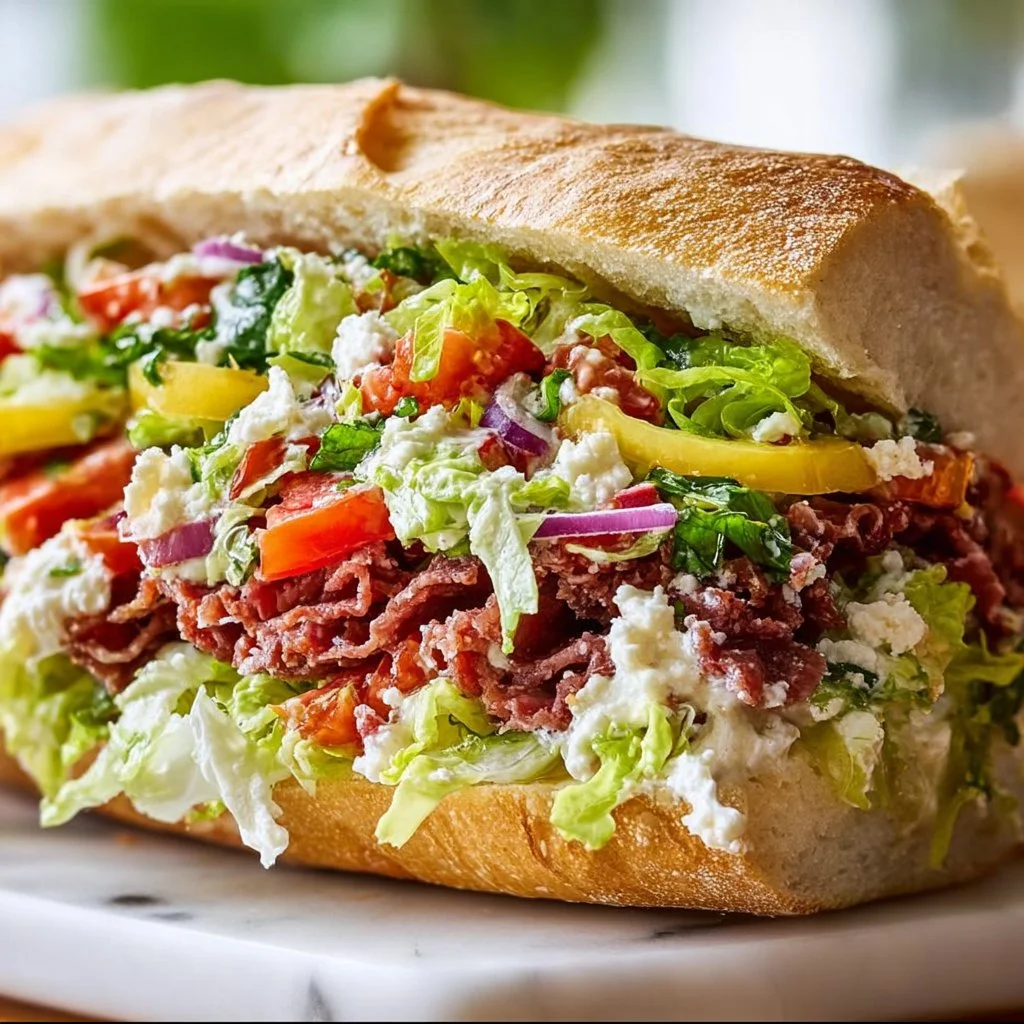
Italian Grinder Salad Sandwich
Italian Grinder Salad Sandwich: A Flavorful Twist on a Classic
Hey there, food lovers! It’s Beau Collier here, and today we’re diving into something a little different: the Italian Grinder Salad Sandwich! If you’re in the mood for a vibrant, hearty, and flavorful dish that brings together all the best elements of an Italian deli, you’ve come to the right place. This sandwich packs in a punch of flavors, a crunch of textures, and a whole lot of comfort, making it the perfect meal for any occasion. So, grab your apron, and let’s get started on this culinary adventure!
There’s something magical about sandwiches, don’t you think? They’re like little edible packages of joy, holding together flavors, textures, and memories. Growing up, I have vivid memories of raiding the local deli with my family, soaking in the lively atmosphere while the salty air filled my lungs. I loved watching the deli workers artfully stack layers of meats, cheeses, and fresh veggies onto crusty rolls, all while my mouth watered with anticipation.
The Italian Grinder Sandwich was a star attraction on those visits, and I’m sure you’ll understand why. It brings together layers of delicious Italian cured meats, a medley of fresh veggies, and an irresistible dressing that ties it all together. Plus, this sandwich is incredibly customizable! Whether you want to enjoy it as a hearty meal or a light snack, there’s a way to make it work for you.
So, are you ready to create your own Italian Grinder Salad Sandwich? Trust me, this dish is more than just a meal; it’s an experience! Let’s explore the flavors that will make your taste buds dance and the memories that truly make food come alive.
Personal Story
One summer, during a family vacation to the picturesque coasts of Italy, I discovered the soul of Italian cuisine at a small, quaint café. After a long day of exploring, we stumbled upon this hidden gem tucked away from the busy tourist streets. The aroma of freshly baked bread wafted through the air as we stepped inside.
I ordered a classic Italian sandwich, unknowingly stepping into my love affair with the Grinder. As I took my first delightful bite, I was transfixed by the contrasting flavors and textures—the spiciness of the salami, the creaminess of the provolone, and the brightness of the fresh veggies enveloped in a crusty roll. I remember smiling at my family as we shared bites and stories, laughing until our faces hurt over the simplest pleasures of food.
That moment ignited my passion for creating and sharing recipes, like the Grinder Sandwich! Each time I make this sandwich, I’m not just cooking; I’m reliving that beautiful summer day filled with flavors and fellowship. So, let’s make our own memories as we whip up this simple yet delicious recipe!
Ingredients
Here’s what you’ll need to whip up your Italian Grinder Salad Sandwich:
-
Ciabatta or Hoagie Rolls
These are the perfect vehicles for our Italian goodies! Ciabatta has a chewy crust and soft inside, while hoagie rolls bring a classic sandwich vibe. If you prefer whole grain or gluten-free options, feel free to swap them in! -
Salami
Rich and flavorful, salami adds the perfect salty kick. You can substitute it with any cured meat like pepperoni or prosciutto for a different spin! -
Capicola
This is a slightly spicy and smoky Italian cured pork that takes your sandwich up a notch. If you can’t find it, try substituting with pastrami or another savory deli meat. -
Provolone Cheese
Creamy and slightly tangy, provolone melts beautifully in this sandwich. If you want a bolder flavor, opt for sharp provolone or mozzarella for a milder, softer finish. -
Lettuce
Crisp lettuce adds a refreshing crunch. Romaine or iceberg works wonderfully, but arugula adds a robust peppery flavor if you’re feeling adventurous! -
Tomatoes
Juicy tomatoes give your sandwich a colorful and tasty twist. Use ripe, in-season tomatoes if you can for the best flavor! -
Red Onions
Thinly sliced, red onions add a pop of sharpness. If you find them too strong, soak them in water for a few minutes before adding them to the sandwich. -
Banana Peppers
These tangy and mildly spicy peppers elevate the flavor profile. You can replace them with pickles or jalapeños if you want a different kick! -
Olive Oil
A drizzle of good-quality olive oil enhances the sandwich’s overall taste. Try flavored oils like garlic or herbs to make it extra special. -
Red Wine Vinegar
This adds a delightful tang that complements the savory elements of the sandwich. Apple cider vinegar works great as a substitute if needed. -
Italian Seasoning
A blend of herbs like oregano, basil, and thyme brings that authentic Italian flavor to your sandwich. You can use fresh herbs too, just adjust the quantity! -
Salt and Pepper
Season to taste! These staples enhance the flavors and bring the whole sandwich together.
Step-by-Step Instructions
Now that we’ve got our ingredients ready, let’s put this beauty together:
Step 1: Slice the Rolls
Start by slicing your ciabatta or hoagie rolls lengthwise. Make sure not to cut all the way through; leave a hinge so you can easily fill them later. This is your canvas!
Chef tip: Toasting these rolls lightly can add a delightful crunch and sturdiness to support all the delicious fillings!
Step 2: Layer the Meats
Spread a thin layer of salami and capicola on the bottom half of each roll. You want a good amount of meat—this is an Italian Grinder after all!
Chef hack: Feel free to mix things up! Use any combination of deli meats you like for a fun twist or use leftover roasted meats if you have them.
Step 3: Add Cheese
Next, layer in the provolone cheese on top of the meat. Make sure to distribute it evenly so every bite has that melty goodness.
Quick note: If you’re planning to heat your sandwiches, you can add the cheese and pop the whole thing in the toaster oven for a few minutes before adding the veggies!
Step 4: Pile on the Veggies
Now comes the fun part! Layer the crisp lettuce, sliced tomatoes, red onions, and banana peppers on top. Don’t be shy here—load it up! All these fresh ingredients provide amazing flavors and textures.
Tip: To prevent sogginess, you can lay the lettuce down first as a barrier.
Step 5: Dress It Up
In a small bowl, whisk together the olive oil, red wine vinegar, Italian seasoning, salt, and pepper. Drizzle this dressing over the sandwich fillings, making sure to coat everything evenly.
Chef secret: If you’re feeling adventurous, add a hint of your favorite mustard to the dressing for an extra zip!
Step 6: Close It Up
Once the sandwich is dressed and ready to go, carefully close it up. You can secure it with toothpicks if you’re worried about everything spilling out!
Step 7: Serve & Enjoy
Your Italian Grinder Salad Sandwich is now ready! You can serve it immediately, or if you prefer, wrap it in foil and let it sit for a bit so the flavors meld together even more.
Serving Suggestions
When it comes to serving your Italian Grinder Salad Sandwich, there are endless options!
You can slice it into halves or quarters to share with friends or family or serve individual sandwiches with a side of crunchy potato chips or a simple green salad.
You could also set up a fun sandwich bar with various condiments and toppings, allowing everyone to build their own perfect grinder. It’s a great way to involve guests at a gathering or simply for a personal touch on family dinner night!
Recipe Variations
Get ready to shake things up with these creative twists on the Italian Grinder Salad Sandwich:
-
Mediterranean Style
Swap the meats for roasted vegetables and feta cheese, then add olives and a drizzle of balsamic glaze. -
Vegan Grinder
Use plant-based deli slices or marinated tofu as the base and load up on all the fresh veggies and some avocado for creaminess. -
Spicy Grinder
Add in spicy giardiniera or crushed red pepper for a kick, and try pepper jack cheese for an extra layer of heat! -
Breakfast Grinder
Layer in scrambled eggs along with breakfast meats, cheese, and avocado for a delicious breakfast take on this classic sandwich. -
Savory Breakfast Bowl
Throw everything in a bowl instead of a sandwich, with a base of grains like quinoa or farro, and top it with a sunny-side-up egg!
Chef’s Notes
I’ve been making this Italian Grinder Salad Sandwich for years, and it never fails to satisfy! Over time, I’ve learned to embrace different ingredient combinations based on what I have in my fridge, and I encourage you to do the same.
One time, I was out of the usual ingredients and substituted some leftover grilled chicken and some homemade pesto. Let’s just say it was a delicious detour! Food is all about creativity and improvisation—there are no hard and fast rules.
And remember, making these sandwiches can be a wonderful bonding experience! Get your family or friends to join in; it makes the process even more enjoyable.
FAQs and Troubleshooting
Q: Can I prepare the sandwich in advance, or will it get soggy?
A: It’s best to assemble the sandwich right before serving for the freshest taste. However, you can prep all ingredients and store them separately until you’re ready to put it all together!
Q: How do I store leftovers?
A: Wrapped tightly in plastic wrap or foil, leftover sandwiches may be stored in the fridge for up to two days. Just note that they should be enjoyed cold or reheated in an oven for best results.
Q: What if I don’t like certain ingredients?
A: Feel free to swap out any ingredient you’re not a fan of! The beauty of this recipe is its adaptability to your taste preferences.
Q: Could I turn this into a grilled sandwich?
A: Absolutely! Butter the outside of the bread and grill it on a skillet until golden brown for a crispy, melty delight!
Nutritional Info
Nutritional info can vary based on the exact ingredients used, but here’s a rough estimate per sandwich:
- Calories: 400-600 (depending on bread and fillings)
- Protein: 25-30g
- Fat: 20-30g
- Carbohydrates: 35-50g
- Fiber: 2-5g
This sandwich is packed with proteins and healthy fats while providing a delightful mix of flavors. Pair it with a side salad, and you’ve got yourself a satisfying meal!
Final Thoughts
There you have it, foodies! Your guide to creating an Italian Grinder Salad Sandwich that’ll capture the essence of vibrant Italian dining right at home.
Like every good meal, this sandwich has the power to bring people together, spark joy, and create memories. Whether you’re flipping through recipe ideas or crafting your own variations, one thing is certain: every bite will remind you of the love and warmth tied to each ingredient.
I hope you’ve enjoyed this culinary journey as much as I have! Now roll up your sleeves, gather your ingredients, and let that lovely kitchen aroma fill your space. Happy cooking, and remember—the best flavors come from the happiest hearts! Buon Appetito!
Print
Italian Grinder Salad Sandwich
- Total Time: 20 minutes
- Yield: 2 servings
- Diet: Vegetarian Option Available
Description
A vibrant and hearty sandwich featuring layers of Italian cured meats, fresh veggies, and a delicious dressing, perfect for any occasion.
Ingredients
- Ciabatta or Hoagie Rolls
- Salami
- Capicola
- Provolone Cheese
- Lettuce
- Tomatoes
- Red Onions
- Banana Peppers
- Olive Oil
- Red Wine Vinegar
- Italian Seasoning
- Salt and Pepper
Instructions
- Slice the rolls lengthwise, making sure not to cut all the way through.
- Layer the salami and capicola on the bottom half of each roll.
- Add the provolone cheese on top of the meat.
- Pile on the crisp lettuce, sliced tomatoes, red onions, and banana peppers.
- Dress the sandwich fillings with olive oil, red wine vinegar, Italian seasoning, salt, and pepper.
- Close the sandwich carefully and secure it with toothpicks if desired.
- Serve immediately, or wrap in foil to let the flavors meld together.
Notes
Customize your sandwich with different meats, cheeses, or veggies. Great for a fun sandwich bar with various toppings.
- Prep Time: 15 minutes
- Cook Time: 5 minutes
- Category: Sandwich
- Method: Assembly
- Cuisine: Italian
Nutrition
- Serving Size: 1 sandwich
- Calories: 500
- Sugar: 6g
- Sodium: 900mg
- Fat: 25g
- Saturated Fat: 10g
- Unsaturated Fat: 12g
- Trans Fat: 0g
- Carbohydrates: 45g
- Fiber: 3g
- Protein: 30g
- Cholesterol: 50mg
Keywords: italian sandwich, grinder salad, deli sandwich
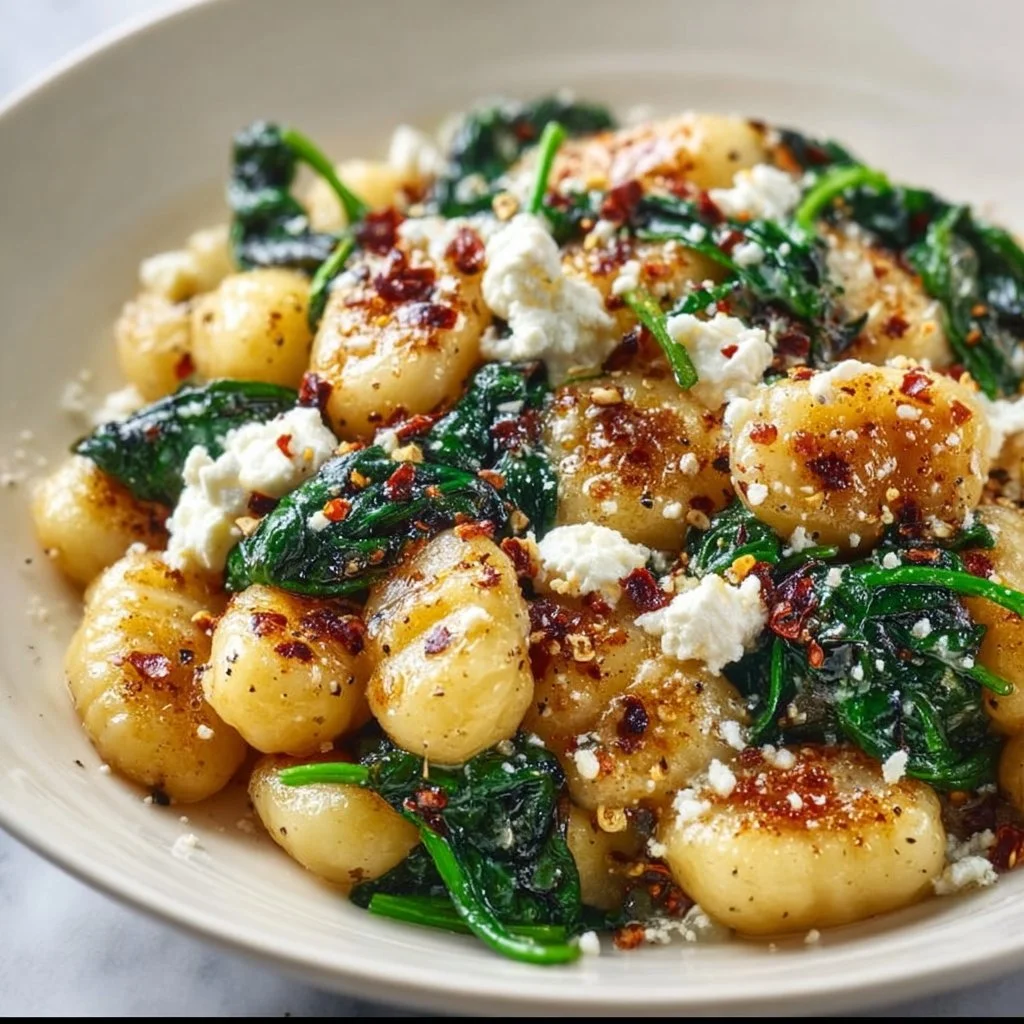
Creamy Gnocchi with Spinach and Feta
# Creamy Gnocchi with Spinach and Feta: A Cozy Comfort Dish

## Introduction

Hey friends! Beau Collier here, and today I'm excited to take you on a culinary journey with one of my all-time favorite comfort dishes: Creamy Gnocchi with Spinach and Feta. You know, something magical happens when the crispy edges of gnocchi meet the lush embrace of cream and the invigorating zest of fresh spinach. It’s like a warm hug from the inside out—perfect for any day that calls for a sprinkle of joy!

Now, you might be wondering: what’s gnocchi, and why should I be excited? Well, these delightful little dumplings are made of potatoes and flour, giving them that wonderfully tender yet slightly chewy texture. They’re not just a skill trick to impress your friends; they’re a canvas for creativity in the kitchen! And when paired with the lusciousness of cream, vibrant greens, and the sharp tang of feta, it becomes a dish that’s not only supper-worthy, but also packed full of flavor and nostalgia.

Speaking of nostalgia, this dish is super special to me—it brings back fond memories of long Sunday dinners at my grandma’s house. After a day filled with laughter and love, we’d gather around the table as she plopped down generous servings of deliciously creamy gnocchi. As a kid, I was convinced her secret ingredient was love, but really it was a handful of simple ingredients crafted into something spectacular. If you’re ready to dive into this creamy world of deliciousness with me, roll up your sleeves, and let's make some magic in the kitchen!

## Personal Story

I still remember the first time I tried making gnocchi for myself. I was a young culinary enthusiast, armed with an apron, a YouTube tutorial, and a dream. I thought, “How hard can it be?” Well, let me tell you—it was a comedy of errors. The dough was either too sticky, or I overworked it and ended up with little gummy dumplings. After a few trials (and a mountain of flour that could rival Mount Everest), I finally got the hang of it.

One evening, I invited a bunch of friends over, and with a (mostly) confident grin, I presented them with my very own version of creamy gnocchi. As the bites melted in our mouths, their faces lit up with delight. I was overjoyed—not just because they loved it, but because I knew that I had created something that would bring folks together. We spent hours laughing, reminiscing about life, and gooey bits of gnocchi made everything feel incredibly special. That night, I knew I had found my groove, and since then, this Creamy Gnocchi with Spinach and Feta has become a staple dish in my kitchen!

## Ingredients

Let’s get into the nitty-gritty of what you'll need for this creamy delight! Here’s my list of ingredients:

- **1 package of gnocchi**: The perfect base for our dish! You can find gnocchi in the pasta aisle or even make your own if you’re feeling adventurous. If you want to keep it gluten-free, look for rice or sweet potato gnocchi!

- **2 cups fresh spinach**: Beautiful, vibrant, and packed with nutrients! You can swap it with kale or arugula if that's what you have on hand, just remember they cook differently!

- **1 cup feta cheese, crumbled**: This cheese brings a delightful salty zing to our dish. If you’re not a fan of feta, you could use goat cheese instead for a creamier texture.

- **1 tablespoon olive oil**: For sautéing those delightful garlic flavors. You can use any neutral oil if you’re out of olive oil—canola or avocado oil works too.

- **2 cloves garlic, minced**: Oh, the aroma of garlic sizzling in the pan—it’s heaven! Feel free to increase the amount if you like a punch of garlic flavor or substitute with shallots for a milder base.

- **1/2 cup heavy cream or half-and-half**: Richness alert! This gives the sauce its creaminess, but if you’re watching calories, you can opt for low-fat milk or a dairy-free cream substitute.

- **Salt and pepper to taste**: The classic seasoning duo! Use sea salt and freshly cracked pepper for the best flavor.

- **Grated Parmesan cheese (optional, for serving)**: Because, let’s be honest, everything’s better with a sprinkle of cheesy goodness on top!

## Step-by-Step Instructions

Alright, kitchen warriors, let’s get cooking! Here’s how to make this creamy gnocchi masterpiece in no time.

1. **Boil the Gnocchi**:
   - Bring a large pot of salted water to a boil. Carefully drop in the gnocchi and cook according to the package instructions until they float to the surface (usually just a few minutes). This is how you know they’re done!
   - **Chef’s Tip**: Keep an eye on them! They can go from perfect to mushy in a flash, so once they float, give them just another minute of cooking time before draining.

2. **Sauté the Garlic and Spinach**:
   - In a large skillet, heat the olive oil over medium heat. Add the minced garlic and sauté it until fragrant (around 30 seconds).
   - Now add in the fresh spinach and cook until it wilts down. This will only take about 2-3 minutes.
   - **Little Chef Hack**: Adding a pinch of salt to the spinach while it cooks helps it break down faster and enhances its flavor!

3. **Mix in the Cream**:
   - Lower the heat and pour in the heavy cream or half-and-half. Stir to combine with the garlic and spinach. Allow it to simmer gently for 1-2 minutes to let the flavors meld beautifully.
   - **Chef Insight**: If you want to amp up the flavor, toss in a pinch of nutmeg—it pairs beautifully with creamy sauces.

4. **Combine Everything**:
   - Once the cream is heated through, gently fold in the cooked gnocchi and the crumbled feta. Toss everything together until the gnocchi is coated in that luscious sauce.
   - **Bonus Tip**: If the sauce becomes too thick, add a splash of pasta cooking water to loosen it up. This will help bind the sauce to the gnocchi perfectly!

5. **Season to Taste**:
   - Give it a taste and season with salt and pepper as needed. Trust your instincts here; everyone’s taste is a little different!
   - **Final Flourish**: If you're feeling fancy, reserve a bit of feta to sprinkle on top right before serving for that extra pop of flavor and presentation!

## Serving Suggestions

Here’s where we get a little creative! Serve your creamy gnocchi warm, right from the skillet to the table. I suggest plating it up in shallow bowls or pasta dishes for that cozy, home-cooked feel.

Garnish with a sprinkle of freshly grated Parmesan cheese and a drizzle of olive oil for a touch of elegance that will impress your friends. If you’re feeling adventurous, toss in a handful of toasted pine nuts, chopped fresh herbs (like dill or basil), or a squeeze of lemon juice for an unexpected zest. Don’t forget to have some crusty bread on the side for sopping up any leftover sauce—you'll want to savor every last bite!

## Recipe Variations

Want to shake things up? Here are some delicious variations you can try:

1. **Mushroom Medley**: Add some sautéed mushrooms to the skillet along with the garlic for an earthy flavor that complements the creaminess beautifully.

2. **Sun-Dried Tomatoes**: For a Mediterranean twist, toss in some chopped sun-dried tomatoes along with the spinach—this will elevate the dish with a burst of tangy goodness.

3. **Protein-Packed**: Mix in grilled chicken, shrimp, or even some chickpeas for extra protein and a heartier meal.

4. **Spicy Kick**: Add a pinch of red pepper flakes when sautéing the garlic to introduce a delightful hint of heat.

5. **Herby Goodness**: Fresh herbs like basil, thyme, or oregano can be added for a fresh, aromatic element that brightens the dish.

## Chef’s Notes

This recipe has come a long way since my chaotic first attempts at gnocchi-making! Over the years, I’ve swapped ingredients, tried new techniques, and even experimented with different toppings. One thing remains true: the key to perfect creamy gnocchi lies in balancing the flavors and staying true to what you enjoy. I've had friends tell me they've added everything from lemon zest to bacon bits, and let me tell you, they were not wrong! Embrace the versatility, adjust to your taste buds, and make it your own.

## FAQs and Troubleshooting

- **Why did my gnocchi turn out mushy?**
  - Watched them too long? It happens! Aim to cook gnocchi until just floating, then drain them immediately.

- **Can I make this dish ahead of time?**
  - While it’s best fresh, you can prepare the sauce in advance and keep it stored in the fridge. Just reheat, and add the gnocchi when you’re ready to serve!

- **What if I want to make it vegetarian?**
  - You’re in luck! This recipe is already vegetarian. Just ensure your dairy ingredients are animal rennet-free if you're looking for a fully veg option.

- **How can I thicken the sauce?**
  - If your sauce is looking too thin, simmer it a bit longer or add in a bit of cream cheese for extra creaminess.

## Nutritional Info

Let’s break down the goodness! This Creamy Gnocchi with Spinach and Feta can be a filling, satisfying dish. Here’s a quick look at what you can expect per serving (approximately, based on common ingredients):

- **Calories**: 450-500
- **Protein**: 15g
- **Carbohydrates**: 44g
- **Fat**: 25g
- **Fiber**: 2g

Keep in mind that adding proteins, more veggies, or other toppings can adjust the nutritional value. It's a comforting dish, but by adding a bit more spinach or swapping out some heavy cream for milk, you can lighten it up!

## Final Thoughts

And there you have it, my friends! A delightful dish of Creamy Gnocchi with Spinach and Feta that’s sure to bring smiles to the table. Cooking isn’t just about the food; it’s about sharing love and laughter with those we cherish. So whether you’re cooking for yourself, a loved one, or a group of friends, remember: every bite is an opportunity to create new memories.

I’d love to hear how your creamy gnocchi turns out! Share your experiences and tweaks in the comments below. Until next time, keep spreading the joy of cooking, and remember, every good meal is a celebration. Happy cooking!
Creamy Gnocchi with Spinach and Feta
- Total Time: 30 minutes
- Yield: 4 servings 1x
- Diet: Vegetarian
Description
A cozy comfort dish featuring tender gnocchi, fresh spinach, and tangy feta in a creamy sauce.
Ingredients
- 1 package of gnocchi
- 2 cups fresh spinach
- 1 cup feta cheese, crumbled
- 1 tablespoon olive oil
- 2 cloves garlic, minced
- 1/2 cup heavy cream or half-and-half
- Salt and pepper to taste
- Grated Parmesan cheese (optional, for serving)
Instructions
- Boil the gnocchi: Bring a large pot of salted water to a boil. Carefully drop in the gnocchi and cook according to the package instructions until they float to the surface (usually just a few minutes). Drain.
- Sauté the garlic and spinach: In a large skillet, heat the olive oil over medium heat. Add the minced garlic and sauté until fragrant (around 30 seconds), then add the fresh spinach and cook until wilted (2-3 minutes).
- Mix in the cream: Lower the heat, pour in the heavy cream or half-and-half, and stir to combine. Allow it to simmer for 1-2 minutes.
- Combine everything: Gently fold in the cooked gnocchi and crumbled feta until coated in the sauce.
- Season to taste: Add salt and pepper as needed, and sprinkle reserved feta on top for serving if desired.
Notes
Feel free to add toasted pine nuts or fresh herbs for extra flavor. Serve with crusty bread for sopping up the sauce.
- Prep Time: 10 minutes
- Cook Time: 20 minutes
- Category: Main Course
- Method: Baking
- Cuisine: Italian
Nutrition
- Serving Size: 1 serving
- Calories: 470
- Sugar: 3g
- Sodium: 600mg
- Fat: 25g
- Saturated Fat: 13g
- Unsaturated Fat: 8g
- Trans Fat: 0g
- Carbohydrates: 44g
- Fiber: 2g
- Protein: 15g
- Cholesterol: 50mg
Keywords: creamy gnocchi, spinach, feta, vegetarian comfort food, Italian recipes, cozy meals