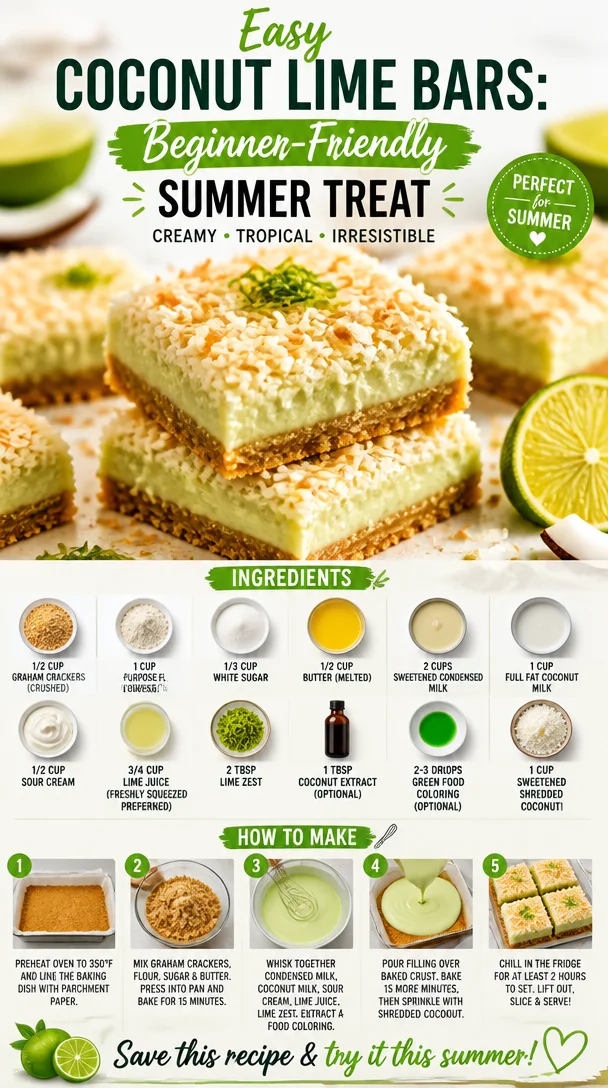
Easy Coconut Lime Bars: Beginner-Friendly Summer Treat
Coconut Lime Bars: A Slice of Sunshine!
Hey there, fellow food lovers! If you’re looking for a treat that brings a splash of summer into your kitchen all year round, then grab your mixing bowl and get ready to whip up some Coconut Lime Bars. These little squares of bliss are perfect for any occasion, be it a sunny picnic, a cozy gathering, or just because you deserve something sweet in your life. With their buttery graham cracker crust and a zesty lime coconut filling, these bars are sure to make your taste buds dance.
As I sit here typing with a warm mug of coffee in hand, I can’t help but reminisce about the first time I made these heavenly bars. It was a lazy Saturday afternoon, and I was craving something tropical. I recalled my childhood on those sun-soaked beaches, playing in the sand, and sipping on coconut drinks. I decided that what I needed was a little bit of that nostalgia in edible form. After a round of trial and error (who knew bars could be so tricky?), I finally got it just right—and let me tell you, it was worth every minute! The moment these bars came out of the oven, the kitchen filled with the irresistible aroma of lime and coconut, and I knew I had stumbled upon something special.
These Coconut Lime Bars are super easy to make—even if you’re more of a novice in the kitchen. With just a handful of ingredients and a few simple steps, you can create a refreshing dessert that will have your friends and family raving. So, put on your apron, grab a spatula, and let’s dive into this festive recipe!
Personal Story: A Slice of Nostalgia
The inspiration for Coconut Lime Bars came from fond memories of summer vacations spent with my family. My grandmother had a little beach house where we would spend long, sun-drenched days playing in the surf and hunting for seashells. Every evening, she would whip up something sweet for us to enjoy after dinner. I remember one trip when she surprised us with a coconut key lime pie she made from scratch. The combo of tangy lime and rich coconut was pure magic. Those flavors have stuck with me, and they often lead my culinary journey.
Years later, as I started experimenting in the kitchen, I aimed to recreate that same feeling of joy and nostalgia—a dessert that captures the essence of summer but in a bar form. That’s how Coconut Lime Bars came to life in my kitchen. The first bite transported me back to those sandy shores, bringing with it a wave of sweet memories. And now, I’m thrilled to share this recipe with you, so you can create your own beachy memories with each delicious bite!
Ingredients:
Here’s what you need to whip up these delightful Coconut Lime Bars:
-
1/2 cup graham crackers (crushed): Essential for the crust, they add that sweet, crumbly base. Want a gluten-free option? Use gluten-free graham crackers!
-
1 cup all-purpose flour: This provides structure to the filling. If you’re looking for a healthier option, swap it with almond flour for a nutty flavor.
-
1/3 cup white sugar: To balance the tartness of the lime. Coconut sugar or brown sugar can also be used for a deeper flavor.
-
1/2 cup butter (melted): This binds everything together. Use vegan butter if you’re looking for a dairy-free alternative.
-
2 cups sweetened condensed milk: The star of the filling! It makes everything wonderfully creamy. For a lighter version, you can use coconut cream.
-
1 cup full-fat coconut milk: Adds richness and a tropical flavor. Light coconut milk works too, but you’ll lose some creaminess.
-
1/2 cup sour cream: Incorporates a bit of tang. Greek yogurt can be a great substitute!
-
3/4 cup lime juice (freshly squeezed preferred): Fresh lime juice is essential for that zesty punch. Bottled lime juice works in a pinch but taste test for any differences.
-
2 tbsp lime zest: It’s all about the zing! Buy a zester or grater to incorporate every bit of that bright flavor.
-
1 tbsp coconut extract (optional): For super coconut flavor! It’s not necessary, but if you love coconut, go for it.
-
2-3 drops green food coloring (optional): Just a fun little addition to make it look extra pretty.
-
1 cup sweetened shredded coconut: Topping off the filling with a bit of shredded coconut adds texture and sweetness.
Step-by-Step Instructions:
Now that we have our ingredients ready, let’s jump into the cooking process! Follow these steps, and you’ll be on your way to Coconut Lime Bar glory.
-
Preheat the Oven: First things first, preheat your oven to 350°F (175°C). An adequately preheated oven helps the crust become perfectly golden.
-
Prepare the Crust: In a mixing bowl, combine the crushed graham crackers, flour, sugar, and melted butter. Keep mixing until the mixture resembles wet sand. A little tip: If the mixture is too dry, add a splash of coconut milk until you reach the right consistency!
-
Press It Down: Take that sweet graham cracker mixture and press it firmly into the bottom of an 8×8-inch baking dish. I like to use the back of a measuring cup to ensure it’s nice and even. Pop it in the oven for 8-10 minutes, just until it’s golden brown.
-
Meanwhile, Whisk the Filling: In another bowl, whisk together the sweetened condensed milk, full-fat coconut milk, sour cream, lime juice, lime zest, and coconut extract (if using). If you want a touch more lime zest, feel free to add it here! And don’t be shy with the whisking—make it airy!
-
Add the Food Coloring: If you want to add those fun green food coloring drops, this is the moment! Just a few drops will do—you want a subtle hint of color. Just be cautious, or you might end up with green bars that look more suited for Halloween!
-
Pour the Filling: Once your crust is out of the oven and slightly cooled, pour the coconut-lime filling over the crust. Spread it evenly using a spatula.
-
Sprinkle the Coconut: Top with sweetened shredded coconut, covering the surface. The coconut will toast beautifully as it bakes.
-
Bake Again: Return everything to the oven for 20-25 minutes. Keep an eye on it; you’ll know it’s ready when the edges are set, and the center has a little jiggle, similar to a cheesecake.
-
Cool Down: Allow them to cool at room temperature first, and then transfer them to the refrigerator for at least 2 hours. This helps the filling to firm up nicely.
-
Cut and Serve: Once chilled, cut into squares and serve! A little dusting of powdered sugar on top adds a nice touch!
Serving Suggestions
These Coconut Lime Bars are versatile when it comes to serving! Here’s how I like to present them:
-
On a Platter: Arrange the bars on a colorful platter, garnished with lime wedges and maybe a sprinkle of coconut for an eye-catching display.
-
With Whipped Cream: For an extra indulgence, serve with a dollop of whipped cream on top. A scoop of coconut whipped cream? Yes, please!
-
Tea Time Treat: Pair these bars with a refreshing cup of iced tea or lemonade for a delightful snack. Trust me; the flavors really complement each other!
Recipe Variations
Want to take your Coconut Lime Bars to the next level? Here are a few fun twists:
-
Mango Madness: Replace some of the lime juice with mango puree for a tropical mango twist—think beach vibes!
-
Berry Burst: Add a layer of fresh raspberries or blueberries in the filling for a fruity explosion.
-
Choco-Coconut Delight: Drizzle some melted dark chocolate on top for a decadent finish.
-
Nutty Delights: Toss in some chopped macadamia nuts into the filling or on top for that crunchy texture contrast.
-
Vegan Version: Swap out dairy for all coconut alternatives—use coconut yogurt and vegan sweetened condensed milk. Perfect for plant-based friends!
Chef’s Notes
As a chef and home cook, I can tell you that recipes are often just the beginning of your culinary adventure. This Coconut Lime Bars recipe has evolved over time; I’ve tried it with different fruit combinations, crust types, and even different sweetness levels. What really matters is that you have fun with it! Don’t be afraid to get creative—this is your kitchen, after all.
And speaking of fun, I remember one time I added a bit too much lime juice and ended up with a very tangy batch. It became a running joke in my family, and we laughed about the “super sour squares.” I learned to balance it out with a hint more sugar in the next round!
FAQs and Troubleshooting
1. Why did my bars turn out too watery?
If your filling is runny, it could be due to too much lime juice. Make sure you’re measuring accurately, especially with the liquid ingredients. Remember, lime juice can vary in tartness, so start with a little less and add to taste!
2. Can I freeze these bars?
Absolutely! Once fully cooled and cut, wrap them in plastic wrap and store them in an airtight container. They freeze well for up to a month—just thaw them overnight in the fridge when you’re ready to indulge again.
3. What can I use instead of sour cream?
Greek yogurt is a fantastic substitute! It will yield a similar texture and a slight tang, keeping your bars delicious.
4. How can I tell when the bars are done?
You’re looking for a firm edge and a slightly jiggly center. If you insert a toothpick, it should come out with a few moist crumbs but not wet batter.
Nutritional Info
If you’re curious about the nutritional values, here’s a rough breakdown per serving (assuming 16 servings):
- Calories: 220
- Protein: 3g
- Fat: 10g
- Carbohydrates: 30g
- Fiber: 1g
- Sugar: 16g
Keep in mind these values can vary based on specific brands and measurements. Adjust your ingredients according to your dietary needs, and remember that balance is key!
Final Thoughts
Coconut Lime Bars are much more than just a dessert; they’re a celebration of flavors and family memories, a little sunshine on a plate! Whether you’re crafting them for a gathering or treating yourself to a little sweet indulgence, these bars embody the heartwarming nature of cooking.
So, as we tie this all together, don’t forget to add your personal touch, share them with loved ones, and create even more beautiful memories around the kitchen table. I can’t wait to hear how your Coconut Lime Bars turn out—tag me in your delicious pictures and let’s keep the foodie love spreading! Until next time, keep cooking with passion and love!
Print
Coconut Lime Bars
- Total Time: 45 minutes
- Yield: 16 servings 1x
- Diet: Vegetarian
Description
Delight in these zesty Coconut Lime Bars, featuring a buttery graham cracker crust and a creamy lime coconut filling – the perfect treat to brighten any day.
Ingredients
- 1/2 cup graham crackers (crushed)
- 1 cup all-purpose flour
- 1/3 cup white sugar
- 1/2 cup butter (melted)
- 2 cups sweetened condensed milk
- 1 cup full-fat coconut milk
- 1/2 cup sour cream
- 3/4 cup lime juice (freshly squeezed preferred)
- 2 tbsp lime zest
- 1 tbsp coconut extract (optional)
- 2–3 drops green food coloring (optional)
- 1 cup sweetened shredded coconut
Instructions
- Preheat the oven to 350°F (175°C).
- Combine the graham crackers, flour, sugar, and melted butter until it resembles wet sand.
- Press the mixture into the bottom of an 8×8-inch baking dish.
- Bake for 8-10 minutes until golden brown.
- Whisk together sweetened condensed milk, coconut milk, sour cream, lime juice, lime zest, and coconut extract in a bowl.
- Add food coloring if using and mix until combined.
- Pour the filling over the crust once cooled.
- Sprinkle shredded coconut on top.
- Bake again for 20-25 minutes until set.
- Cool at room temperature, then chill in the refrigerator for at least 2 hours.
- Cut into squares and serve.
Notes
Feel free to experiment with different fruits and toppings. Enjoy with whipped cream or iced tea!
- Prep Time: 15 minutes
- Cook Time: 30 minutes
- Category: Dessert
- Method: Baking
- Cuisine: American
Nutrition
- Serving Size: 1 serving
- Calories: 220
- Sugar: 16g
- Sodium: 100mg
- Fat: 10g
- Saturated Fat: 6g
- Unsaturated Fat: 3g
- Trans Fat: 0g
- Carbohydrates: 30g
- Fiber: 1g
- Protein: 3g
- Cholesterol: 30mg
Keywords: Coconut, Lime, Bars, Dessert, Summer, Sweet
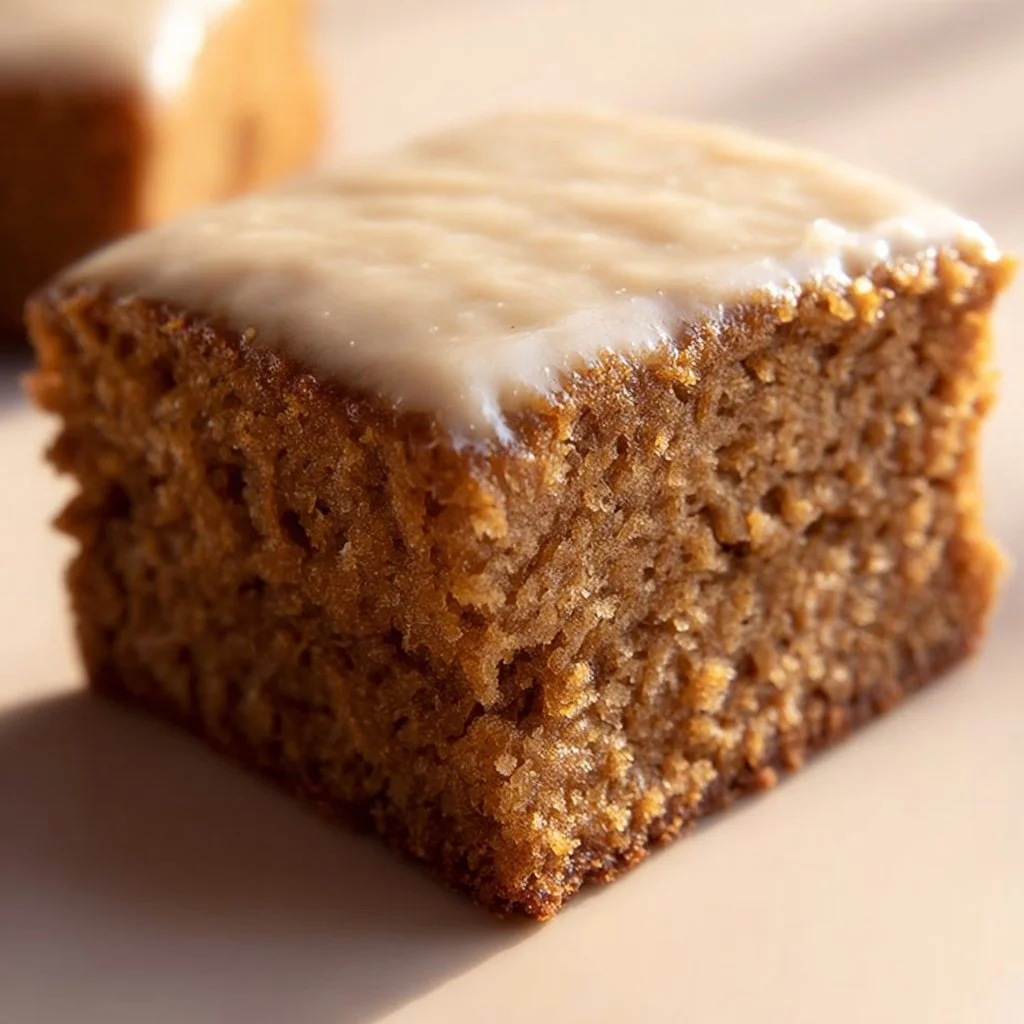
100 Calorie Applesauce Snack Cake
# The Ultimate 100 Calorie Applesauce Snack Cake

Hey, food lovers! 🌟 Today, I’m thrilled to share one of my all-time favorite recipes that hits all the right notes of deliciousness without weighing on your calorie count. It’s the **100 Calorie Applesauce Snack Cake**—a delightfully moist dessert that’s perfect for those moments when you crave something sweet but want to keep it light.

So grab your mixing bowls and your favorite whisk because we’re about to embark on a delightful culinary adventure. Let’s make some magic happen!

## Introduction

There’s something incredibly satisfying about whipping up a dish that not only tastes amazing but also gives a warm, fuzzy feeling inside. If you’re like me, many of your fondest memories are tied to food. We gather around tables, share stories, and create a delicious tapestry of flavors that linger long after the last bite. The beauty of this 100 Calorie Applesauce Snack Cake is that it embodies all of that: simplicity, warmth, and joy in every slice.

Imagine the scent of cinnamon wafting through your kitchen as this cake bakes to perfection. Made with wholesome, readily available ingredients, this snack cake is your perfect companion for afternoon tea or a cozy family gathering. Best of all? It's guilt-free! With just 100 calories per serving, you can indulge without worrying about your waistline.

Embracing a healthier lifestyle doesn’t mean sacrificing taste or comfort. This cake is proof that you can have your snack and eat it too! Plus, with the right pairings and toppings, you can elevate this dish from simple to show-stopping. Are you ready to get baking? Let’s dive into the story behind this recipe and share the joy of making something so delightful together!

## Personal Story

I still remember the first time I tasted an applesauce cake. It was at a local bake sale, standing beside my mom, who was busily chatting with a friend while I munched on that divine slice of moistness topped with a sprinkle of powdered sugar. The sweet, tangy applesauce and the warm spices danced on my taste buds like a joyful melody!

From that moment, I was hooked. I went home brimming with enthusiasm and convinced my mom to teach me her version of this fabulous cake. At that age, I didn’t realize the significance of what we were making – it was just about the excitement of stirring up ingredients and watching them transform into something oh-so-delicious.

Fast forward to today, and I’ve taken that nostalgic cake and created a healthier version that still captures the essence of my childhood flavors. Every time I bake this cake, I smile, thinking about that innocent joy and the stories we share over slices of something scrumptious.

## Ingredients

Here’s what you’ll need to whip up this delightful snack cake:

- **1 cup unsweetened applesauce**
  - Provides natural sweetness and moisture, making your cake tender. You can also use homemade applesauce if you have some on hand—a fun kitchen project!

- **1 cup whole wheat flour**
  - I love using whole wheat flour for added fiber and nutrition. If you're gluten-free, substitute with almond flour or a 1:1 gluten-free flour blend.

- **1/2 cup sugar or a sugar substitute**
  - Feel free to swap in a sugar substitute like Stevia or erythritol if you’re watching your sugar intake. Just be mindful of the conversion ratios, as they can vary.

- **1 teaspoon baking soda**
  - This is our leavening agent that'll help make the cake rise and become fluffy. Ensure it’s fresh for the best results!

- **1 teaspoon cinnamon**
  - Because, let’s get real—cinnamon makes everything better! It adds that cozy, warming flavor to our cake. Dive into a mix of nutmeg or allspice if you want to switch things up!

- **1/2 teaspoon vanilla extract**
  - A splash of vanilla gives depth to the flavor. You can also use almond extract for a slightly different vibe.

- **1/4 teaspoon salt**
  - Balances the sweetness and enhances the flavors in the cake. You won’t even notice it’s there, but it’s crucial!

- **1/2 cup unsweetened almond milk (or any plant-based milk)**
  - This keeps our cake moist. You can swap in regular milk or even oat milk depending on what you prefer.

- **1 tablespoon lemon juice**
  - A little acidity brightens up the flavors and complements the sweetness of the applesauce beautifully. If you don't have lemon, try apple cider vinegar!

Together, these ingredients create a wholesome snack cake packed with flavor and memories.

## Step-by-Step Instructions

Now that we have our ingredients lined up, let's get down to baking. Follow these steps for a cake that’ll make your taste buds dance:

1. **Preheat Your Oven**:
   - Preheat your oven to 350°F (175°C). This ensures an even bake. While the oven heats up, you can gather the ingredients and prepare your batter!

2. **Mix the Wet Ingredients**:
   - In a large mixing bowl, combine the applesauce, almond milk, lemon juice, and vanilla extract. Whisk until smooth. This is where all that beautiful moisture comes from!

3. **Combine the Dry Ingredients**:
   - In a separate bowl, whisk together whole wheat flour, sugar (or substitute), baking soda, cinnamon, and salt. This step is crucial: mixing dry ingredients before combining helps ensure an even distribution of baking soda and salt.

4. **Combine Wet and Dry**:
   - Slowly fold the dry ingredients into the wet mixture using a spatula to avoid overmixing. It's okay if there are small lumps; trust me, that’s what keeps our cake soft and fluffy!

5. **Grease the Pan**:
   - Grease an 8-inch round or square baking pan with cooking spray or a light coat of oil. You can also line it with parchment paper for an easy release.

6. **Pour the Batter**:
   - Pour the batter evenly into the prepared pan, smoothing the top with a spatula. Patience pays off here—take a moment to make sure it’s even.

7. **Bake**:
   - Pop your cake in the oven and bake for about 25-30 minutes. Keep an eye on it after 20 minutes; it's done when a toothpick inserted into the center comes out clean!

8. **Cool and Serve**:
   - Once baked, allow the cake to cool in the pan for about 10 minutes, then transfer it to a wire rack to cool completely.

9. **Slice and Enjoy**:
   - Once cooled, slice into squares or wedges.

## Serving Suggestions

Here’s where the fun really begins! Serve your 100 Calorie Applesauce Snack Cake with a light sprinkle of powdered sugar or a dollop of whipped coconut cream on top for that extra flair. You can also add fresh fruits like berries or a scoop of low-calorie vanilla ice cream—yum!

For a picnic or a potluck, consider serving it in a tiered cake stand, dressed up with seasonal fruits or alongside other healthy snacks. Trust me, it’s not just eye-catching; it’ll have everyone asking for your secret recipe.

## Recipe Variations

Feeling adventurous? Here are some creative twists you can try:

1. **Chocolate Chip Applesauce Cake**:
   - Fold in half a cup of dark chocolate chips for a decadent treat. This adds just a hint of indulgence while still keeping it light!

2. **Carrot Applesauce Cake**:
   - Incorporate a cup of finely grated carrots for a delightful twist that adds moisture and nutrition.

3. **Nutty Addition**:
   - Toss in a handful of chopped nuts like walnuts or pecans. They add a delightful crunch and elevate the cake's flavor.

4. **Spiced Version**:
   - Amp up the spices! A teaspoon of nutmeg or a hint of ginger will give this cake a warm flavor perfect for fall.

5. **Coconut Flour Swap**:
   - If you want a gluten-free version, substitute half the whole wheat flour with coconut flour. Just note: you may need to add a bit more liquid, so adjust as necessary.

## Chef’s Notes

This recipe has evolved over the years, and each iteration brings back memories of baking with my family. Sometimes, I toss in extra spices or change up the liquid base. The beauty of cooking is that it’s all about experimentation! One kitchen blunder I remember was using baking powder instead of baking soda—let’s just say the cake turned out to be a little more… "fluffy" than intended. But hey, that’s the charm of home cooking!

## FAQs and Troubleshooting

**Q: Why is my cake sinking in the middle?**
*This can happen if the oven temperature is too low or if the batter was overmixed. Make sure to preheat and mix your batter gently!*

**Q: Can I use sweetened applesauce?**
*Absolutely! Just reduce the sugar in the recipe accordingly, as sweetened applesauce will contribute additional sweetness.*

**Q: How do I store leftover cake?**
*Store it in an airtight container at room temperature, and it should stay fresh for up to three days! If you want it to last longer, pop it in the fridge.*

**Q: Can I freeze this cake?**
*Yes! Wrap it tightly in plastic wrap and then aluminum foil to avoid freezer burn. Thaw it in the fridge overnight before enjoying!*

## Nutritional Info

Each serving of this delicious 100 Calorie Applesauce Snack Cake clocks in at about 100 calories. Here’s the breakdown per serving:
- **Total Fat**: 1g
- **Sodium**: 100mg
- **Total Carbohydrates**: 21g
  - **Dietary Fiber**: 2g
  - **Sugars**: 8g
- **Protein**: 2g

This makes it a fantastic option when you're craving something sweet without overdoing it!

## Final Thoughts

There you have it, my wonderful foodie friends—your journey to creating a delectable 100 Calorie Applesauce Snack Cake. It’s more than just a recipe; it's a way to enjoy the little moments, nourish your body, and share love through food.

So, whether you bake this for a cozy night in, a rainy day treat, or to impress your friends at your next gathering, remember to enjoy every step of the process. Cooking is about the joy of discovery, and each bite carries a story—just like the first memory of my applesauce cake at that bake sale.

I can’t wait to hear how your cake turns out! Share your baking adventures and any personal twists you make. Until next time, happy baking! 🍰✨
100 Calorie Applesauce Snack Cake
- Total Time: 40 minutes
- Yield: 8 servings 1x
- Diet: Vegetarian
Description
A moist and delicious applesauce snack cake that’s only 100 calories per serving, perfect for a guilt-free treat.
Ingredients
- 1 cup unsweetened applesauce
- 1 cup whole wheat flour
- 1/2 cup sugar or a sugar substitute
- 1 teaspoon baking soda
- 1 teaspoon cinnamon
- 1/2 teaspoon vanilla extract
- 1/4 teaspoon salt
- 1/2 cup unsweetened almond milk (or any plant-based milk)
- 1 tablespoon lemon juice
Instructions
- Preheat your oven to 350°F (175°C).
- Mix the wet ingredients: combine applesauce, almond milk, lemon juice, and vanilla extract in a large bowl and whisk until smooth.
- Combine the dry ingredients in a separate bowl: whisk together whole wheat flour, sugar (or substitute), baking soda, cinnamon, and salt.
- Combine the wet and dry mixtures: slowly fold the dry ingredients into the wet mixture using a spatula.
- Grease an 8-inch round or square baking pan.
- Pour the batter evenly into the prepared pan.
- Bake for 25-30 minutes, or until a toothpick comes out clean.
- Cool the cake in the pan for 10 minutes, then transfer to a wire rack.
- Slice and enjoy!
Notes
Serve with a sprinkle of powdered sugar or a dollop of whipped coconut cream for added flavor.
- Prep Time: 10 minutes
- Cook Time: 30 minutes
- Category: Dessert
- Method: Baking
- Cuisine: American
Nutrition
- Serving Size: 1 serving
- Calories: 100
- Sugar: 8g
- Sodium: 100mg
- Fat: 1g
- Saturated Fat: 0g
- Unsaturated Fat: 1g
- Trans Fat: 0g
- Carbohydrates: 21g
- Fiber: 2g
- Protein: 2g
- Cholesterol: 0mg
Keywords: applesauce cake, healthy dessert, low calorie cake, moist snack cake, guilt-free dessert