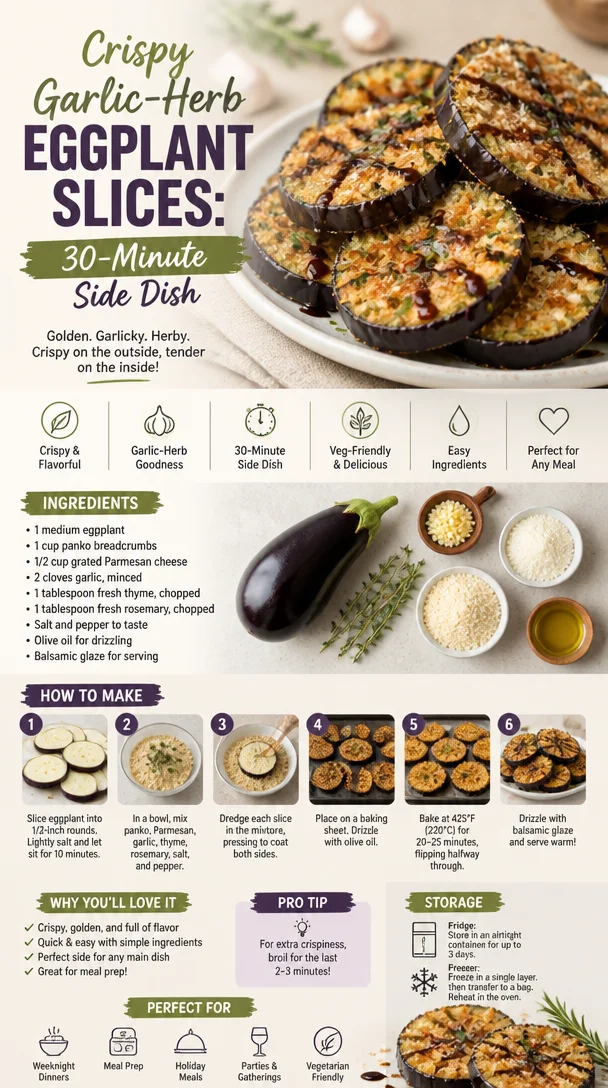
Crispy Garlic-Herb Eggplant Slices: 30-Minute Side Dish
Garlic Herb Crusted Eggplant Slices: A Comforting Culinary Adventure
Hey there, food lovers! If you’ve ever been on the hunt for a comfort food dish that delights your taste buds while feeling light and wholesome, you’ve hit the jackpot today. Meet my Garlic Herb Crusted Eggplant Slices! This flavorful gem is the perfect way to elevate your veggie game while also indulging in a crispy, savory embrace of garlic and herbs.
Now, let’s set the stage. Picture this: It’s a warm summer evening, and the scent of herbs fills the air as you step into your kitchen. There’s something about cooking with seasonal vegetables, right? Eggplants are one of those underrated beauties that not only bring a pop of color to your plate but also pack a hearty punch in terms of taste and nutrition. Let’s face it, they can easily go unnoticed, sitting quietly in the produce aisle, yet they’ve got so much to offer.
I still remember the first time I roasted a big batch of eggplant. It was a weekend afternoon, and I was experimenting with flavors alone in my kitchen. The eggplant was like a sponge, soaking up all the delicious garlic and herbs. As I pulled that dish out of the oven, the aroma wrapped around me as if it was a warm hug. The crispy outside and soft, creamy inside made me realize—I had struck culinary gold!
So, grab your favorite apron, and let’s dive into the beautiful world of Garlic Herb Crusted Eggplant Slices. This recipe will become an instant classic in your kitchen, perfect for a cozy family dinner or a stunning dish to impress friends on game night. Let’s get cooking!
Personal Story
The first time I cooked eggplant was during a family gathering at my grandmother’s house. She was known for her incredible Italian cuisine, and I was determined to impress her. I remember her towering over me in her floral apron, a grin plastered across her face as I tiptoed around the bustling kitchen.
“Just cut it into thick slices, Beau! Don’t be shy with the garlic and herbs!” she chuckled, playfully nudging me with her elbow. Her confidence in me reignited my passion for cooking. We roasted our eggplant slices side by side, infusing the air with garlic and ground pepper. That day, I learned that cooking is not just about following a recipe but also about infusing your essence into the food—creating memories and shared moments over plates filled with love.
So here I am, years later, still channeling that joy and freshness through these Garlic Herb Crusted Eggplant Slices. It’s become a symbolic dish for me, representing both nostalgia and innovation in the kitchen. Trust me, you’re gonna want to make this yourself!
Ingredients
Let’s gather our delicious lineup of ingredients that will turn this eggplant into a feast for the senses:
-
1 medium eggplant: This vibrant beauty will be the star of the show. Look for one that feels firm and has smooth, shiny skin. If you’re not keen on eggplant, zucchini or portobello mushrooms are great alternatives!
-
1 cup panko breadcrumbs: These Japanese-style breadcrumbs add a fluffy, light crunch that’s irresistible. If you’re gluten-free, you can find gluten-free panko or use crushed cornflakes for a similar texture.
-
1/2 cup grated Parmesan cheese: This cheese brings the umami! Feel free to swap in nutritional yeast for a vegan alternative without compromising on flavor.
-
2 cloves garlic, minced: Garlic is where the flavor explosion begins! If you’re a garlic lover like me, consider adding an extra clove or two to really amp up the fragrance.
-
1 tablespoon fresh thyme, chopped: Thyme is aromatic and earthy, perfect for complementing the eggplant. If fresh isn’t available, dried thyme will work, but use only half as much since dried herbs can be more potent.
-
1 tablespoon fresh rosemary, chopped: Rosemary goes hand-in-hand with hearty dishes. It adds a distinctive aroma. Dried rosemary can also be used—just rub it between your fingers before adding to release its oils.
-
Salt and pepper to taste: These essential flavors bring it all together. Always taste before serving; seasoning is key!
-
Olive oil for drizzling: This will help create a stunning golden crust. You can substitute with avocado oil or any oil of your choice.
-
Balsamic glaze for serving: This sweet and tangy drizzle enhances the dish further. You can make your own by simmering balsamic vinegar until reduced, or use store-bought to save time.
Let’s round up our ingredients and set ourselves up for a delightful cooking experience!
Step-by-Step Instructions
Now, let’s do this! Follow my lead for making these Garlic Herb Crusted Eggplant Slices step-by-step.
Step 1: Preheat Your Oven
Start by preheating your oven to 400°F (200°C). A hot oven is crucial for getting that lovely crispy texture on the outside of your eggplant.
Step 2: Prepare the Eggplant
Slice the medium eggplant into 1/2-inch thick rounds. This size is essential since it allows the eggplant to cook evenly and absorb all those amazing flavors without becoming mushy. If you’ve got a vegetable peeler, consider peeling alternating strips for a bit of aesthetic flair!
Step 3: Salt the Eggplant
Sprinkle salt generously on both sides of the eggplant slices. This not only seasons the eggplant but also helps draw out excess moisture, preventing the slices from becoming soggy. Let them sit for about 10 minutes, then rinse and pat dry. This will help achieve that crispy crust we’re aiming for!
Step 4: Make the Coating Mixture
In one bowl, combine your panko breadcrumbs, grated Parmesan cheese, minced garlic, thyme, rosemary, salt, and pepper. Give it a good mix! This blend of ingredients will make your crust delightful.
Step 5: Coat the Eggplant
In another bowl, prepare to assemble your flavor masterpiece! Lightly drizzle a bit of olive oil onto a baking sheet. Now, dip each eggplant slice into the breadcrumb mixture, ensuring it gets fully coated on both sides. The oil will help the breadcrumbs stick, giving you that gorgeous crust on each piece.
Step 6: Bake the Eggplant
Place the coated eggplant slices on the prepared baking sheet, making sure they’re not overlapping—this promotes even cooking. Drizzle a little olive oil over the top (just a teaspoon of love goes a long way), then pop the baking sheet into your preheated oven.
Bake for about 25-30 minutes, flipping the slices halfway through. You want them to be beautifully golden brown and crisp. The smell is going to be out of this world—trust me, your neighbors will be dancing to the aroma wafting from your kitchen!
Step 7: Add the Finishing Touch
Once they’re done, take them out of the oven and let them cool for a minute. A light drizzle of balsamic glaze on top is the cherry on top; this adds a sweet, tangy finish that complements the earthiness of the eggplant beautifully.
There you have it—hot, crispy Garlic Herb Crusted Eggplant Slices ready to wow your taste buds!
Serving Suggestions
Alright, let’s get to the fun part—serving! These Garlic Herb Crusted Eggplant Slices are versatile, making them great for various occasions.
-
As a Main Course: Serve them alongside a fresh salad drizzled with lemon vinaigrette for a light yet satisfying meal. Add some quinoa or couscous for extra heartiness.
-
As an Appetizer: Slice them into bite-sized pieces for a stunning platter with a side of marinara or homemade tzatziki for dipping. Guests will devour them!
-
Garnish: A sprinkle of freshly chopped herbs like parsley or a dash of chili flakes will create a showstopping presentation and add flavor.
No matter how you serve them, these slices are a great way to share comfort and joy around your dining table.
Recipe Variations
Let’s get creative, shall we? Here are some fun variations to put your own spin on these Garlic Herb Crusted Eggplant Slices:
-
Spicy Kick: Add some red pepper flakes or cayenne pepper to the breadcrumb mixture for those who crave a little heat.
-
Cheesy Goodness: Mix in some crumbled feta or mozzarella cheese into the breadcrumb mixture for an added cheesy surprise.
-
Mediterranean Twist: Instead of thyme and rosemary, try oregano and a hint of lemon zest to bring a taste of the Mediterranean right to your kitchen!
-
Smoky Flavor: For a BBQ flair, add a sprinkle of smoked paprika to the breadcrumb mixture for a depth of flavor that will transport you to summer cookouts.
-
Herbed Yogurt Dip: Blend some Greek yogurt with herbs and a touch of lemon juice as a refreshing dip to pair with the slices, enhancing the flavor profile beautifully.
Experimenting with these variations can help you discover your favorite version or create a personalized dish that resonates with your culinary style!
Chef’s Notes
Over the years, I’ve whipped up these Garlic Herb Crusted Eggplant Slices countless times, and they never cease to amaze both me and anyone lucky enough to taste them. It’s fascinating how a simple dish can change and evolve based on the flavor profiles you experiment with.
One funny memory that still makes me smile happened during a dinner party. I mistakenly grabbed the cayenne pepper instead of regular black pepper and ended up serving my guests spicy eggplant slices. To my surprise, they went crazy for the unexpected heat! That experience taught me that sometimes, the best dishes emerge from happy accidents in the kitchen.
FAQs and Troubleshooting
1. Why is my eggplant soggy?
Sometimes undercooked or overly moist eggplant can be an issue. Ensure you salt the slices and let them sit to draw out excess moisture before cooking.
2. How can I make this vegan?
You can easily swap out the Parmesan for nutritional yeast, and use vegan mayonnaise instead of olive oil for a luscious coating.
3. Can I prep this dish ahead of time?
Absolutely! You can coat the eggplant slices a few hours before baking. Store them in the refrigerator, then pop them in the oven right before serving.
4. How do I store leftovers?
Keep any leftovers in an airtight container in the fridge for up to 3 days. Reheat in the oven to regain that crispy texture before enjoying!
Nutritional Info
Each serving of Garlic Herb Crusted Eggplant Slices not only bursts with flavor but also packs a nutritious punch. Eggplant is rich in antioxidants and vitamins, particularly vitamins C and K.
When you add in the health benefits of garlic as an anti-inflammatory element, along with the fresh herbs contributing essential vitamins, this dish checks off several boxes on the nutritional list! Each slice is hearty yet light, making it perfect for those looking to balance indulgence with nutrition.
This recipe overall is a wonderful way to incorporate more vegetables into your meals without sacrificing taste. And let’s be honest—who wouldn’t want more delicious comfort food in their life?
Final Thoughts
So there you have it—my beloved recipe for Garlic Herb Crusted Eggplant Slices! Not only is it simple and satisfying, but it’s also a canvas for all your culinary creativity. Whether you make it as is, or experiment with the variations I’ve suggested, this dish is bound to be a hit in your kitchen.
Gather your friends and family, fire up that oven, and get ready to create some mouthwatering memories. Food is all about experience, and I can guarantee these slices will bring joy to your table and be the talk of the night.
As always, I’m excited to hear how your journey with these garlic herb delights goes! Let’s keep spreading that food love, one delicious dish at a time. Happy cooking!
PrintGarlic Herb Crusted Eggplant Slices
- Total Time: 45 minutes
- Yield: 4 servings 1x
- Diet: Vegetarian
Description
Elevate your veggie game with these crispy, savory Garlic Herb Crusted Eggplant Slices, perfect for any occasion.
Ingredients
- 1 medium eggplant
- 1 cup panko breadcrumbs
- 1/2 cup grated Parmesan cheese
- 2 cloves garlic, minced
- 1 tablespoon fresh thyme, chopped
- 1 tablespoon fresh rosemary, chopped
- Salt and pepper to taste
- Olive oil for drizzling
- Balsamic glaze for serving
Instructions
- Preheat your oven to 400°F (200°C).
- Slice the eggplant into 1/2-inch thick rounds.
- Sprinkle salt on both sides of the eggplant slices and let sit for 10 minutes.
- Combine panko breadcrumbs, Parmesan cheese, minced garlic, thyme, rosemary, salt, and pepper in a bowl.
- Lightly drizzle olive oil on a baking sheet.
- Dip each eggplant slice into the breadcrumb mixture.
- Place the coated eggplant slices on the baking sheet and drizzle with olive oil.
- Bake for 25-30 minutes, flipping halfway through.
- Drizzle with balsamic glaze before serving.
Notes
Feel free to experiment with different herbs and spices to create your own variations!
- Prep Time: 15 minutes
- Cook Time: 30 minutes
- Category: Main Course
- Method: Baking
- Cuisine: Italian
Nutrition
- Serving Size: 1 serving
- Calories: 350
- Sugar: 5g
- Sodium: 400mg
- Fat: 12g
- Saturated Fat: 4g
- Unsaturated Fat: 6g
- Trans Fat: 0g
- Carbohydrates: 45g
- Fiber: 3g
- Protein: 15g
- Cholesterol: 30mg
Keywords: eggplant, vegetarian, crispy, baked, comfort food
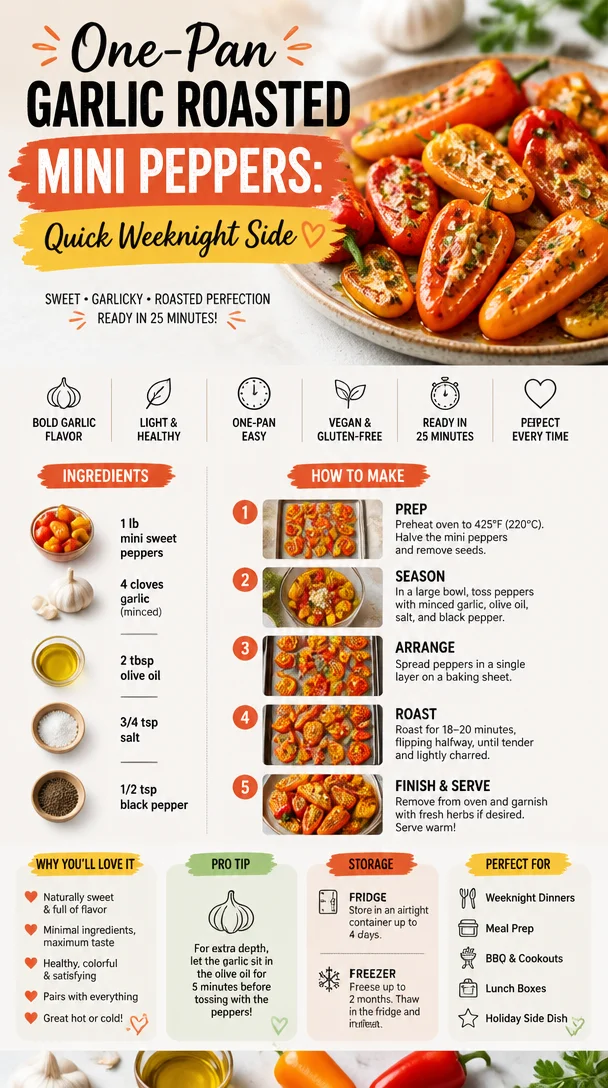
One-Pan Garlic Roasted Mini Peppers: Quick Weeknight Side
Garlic Roasted Mini Peppers: A Flavorful Delight
Hey there, fellow food lovers! I’m Beau Collier, and today we’re diving into a colorful, vibrant dish that’s guaranteed to brighten your day and your table: Garlic Roasted Mini Peppers. These little gems pack a punch of flavor and are super easy to whip up. Whether you’re looking for a zesty side dish, a party starter, or a simple snack to munch on, you’ve hit the jackpot with these beauties!
Introduction
Let’s be honest: everyone loves a good roasted pepper. They’re sweet, tender, and can elevate any dish from mundane to magnificent in just a matter of minutes. But what’s the secret? It’s all about roasting them to that perfect level of caramelization, infusing them with garlic goodness that’s simply irresistible.
Now, I can vividly remember my first encounter with mini peppers. I was at a local farmer’s market, and they caught my eye with their vibrant reds, yellows, and oranges. I couldn’t resist loading my basket full of these bite-sized beauties. Fast forward a few weekends later, and I found myself experimenting with different flavors and cooking methods. My kitchen transformed into a mini pepper paradise, and every time I roasted a batch, I was transported back to that sunny market day.
The great thing about garlic roasted mini peppers is they’re not just beautiful—they’re delicious! The creamy texture paired with the slight crunch makes every bite a burst of flavor. Plus, you’ll love the aroma that fills your kitchen as they roast. It’s like a warm hug welcomed by your senses, making this simple dish part of your comfort food repertoire.
As we cook together today, I want you to enjoy every step of the process. Embrace the smell of garlic wafting through your kitchen and the vibrant colors of these mini peppers. So, grab your favorite apron, crank up that oven, and let’s get cooking!
Personal Story
I still remember the summer of my culinary awakening. One beautiful Saturday, I invited a few close friends over for a backyard BBQ. Of course, I went a little overboard planning the menu—it’s just how I roll! Amidst the marinated meats and scrumptious salads, I wanted something unique to wow my guests.
That’s when I remembered those mini peppers. I quickly roasted a tray, drizzling them with olive oil, sea salt, and plenty of garlic. As they baked away, the anticipation built in the air. Once they were done, the vibrant colors and those savory smells brought everyone rushing over to the table.
The moment they took their first bite, I was flooded with compliments. People went back for more, and those mini peppers quickly became the star of the meal. Everyone loved how easy they were to make and how they complemented the barbecue spread perfectly. It was a small moment, but I realized how food brings people together and creates lasting memories. Whenever I make garlic roasted mini peppers now, I’m transported back to that summer BBQ, surrounded by laughter and good company.
Ingredients
To make these delectable Garlic Roasted Mini Peppers, you’ll need the following ingredients:
-
Mini Sweet Peppers: These bite-sized beauties come in a variety of colors and have a sweet, mild flavor. You can use red, yellow, or orange ones, or a mix for a colorful presentation. If you can’t find mini sweet peppers, feel free to use regular bell peppers, though you may need to adjust the roasting time.
-
Garlic: Fresh garlic is a game-changer in this recipe. It adds depth and aromatic flavor. You can substitute it with garlic powder in a pinch, though fresh will always yield the best results. Mince it finely or thinly slice it to achieve different flavor levels.
-
Olive Oil: A good quality extra virgin olive oil enhances the dish’s richness. It’s perfect for roasting and adds a wonderful flavor. If you’re looking for a lighter option, you can use avocado oil or a bit of melted butter instead.
-
Salt: A sprinkling of sea salt enhances all the natural flavors. If you want to experiment, consider using smoked salt for an added depth of flavor, or keep it simple with table salt.
-
Pepper: Freshly cracked black pepper is key to balancing the sweetness of the peppers. You can use white pepper for a different taste or even a pinch of cayenne for a little kick.
Step-by-Step Instructions
Now that we’ve gathered our ingredients, let’s dive into the cooking process. It’s time to transform those vibrant mini peppers into a mouthwatering dish.
-
Preheat Your Oven
Start by preheating your oven to 425°F (220°C). This high temperature will help caramelize the peppers, bringing out their natural sweetness. -
Prepare the Peppers
Rinse your mini sweet peppers under cold water and pat them dry with a clean kitchen towel. Slice each pepper in half lengthwise and remove the seeds. Feel free to leave the stems on for presentation—just a little more rustic and charming! -
Mince Garlic
While your oven heats up, let’s prep the garlic! Peel the garlic cloves and mince them finely. If you love a stronger garlic flavor, don’t be shy—add more! Just be aware that this recipe is all about balance, so taste as you go. -
Toss with Oil and Seasoning
In a large bowl, combine the halved peppers, minced garlic, olive oil, salt, and pepper. Use your hands to toss everything together until the peppers are well-coated. This is where the magic begins; the oil carries the flavors and helps them roast to perfection. -
Spread on a Baking Sheet
Arrange the seasoned peppers in a single layer on a baking sheet. Make sure they have some space between them—crowding the pan will lead to steaming rather than roasting, and we want those lovely browned edges! -
Roast in the Oven
Now’s the fun part! Place the baking sheet in the preheated oven and roast for about 20–25 minutes. The sweet smell of garlic will fill your kitchen—absolutely delightful! Give them a little toss halfway through to ensure even cooking. -
Check for Doneness
You’ll know they’re done when the peppers are tender and slightly charred around the edges. Keep an eye on them during the last few minutes—they can go from perfectly roasted to burnt pretty quickly! -
Taste and Adjust Seasoning
Once they’re ready, take them out of the oven and allow them to cool for a few minutes. Taste one pepper and see if it needs more salt or pepper. That’s the beauty of cooking—you get to personalize your dish! -
Serve and Enjoy!
Transfer the roasted mini peppers to a serving platter. They can be served warm or at room temperature, depending on your preference.
Serving Suggestions
When plating your garlic roasted mini peppers, think about how to enhance their presentation and flavor. A simple serving suggestion is to position them on a beautiful platter, and drizzle a little extra olive oil on top for sheen.
For an extra visual punch, consider adding fresh herbs like parsley or basil on top—their bright green colors will contrast beautifully with the vibrant peppers. You can also offer a bowl of feta cheese or goat cheese on the side for a creamy finish that complements the sweetness of the peppers.
These mini peppers can stand alone as a side dish, but they’re also wonderful as part of a charcuterie board or a tasty addition to salads. Serve them alongside some crusty bread for dipping, or toss them into pasta for an added twist.
Recipe Variations
Now that you’ve mastered the basic garlic roasted mini peppers, let’s have some fun with variations! Here are a few creative twists to try:
-
Honey Balsamic Glaze: Drizzle some honey balsamic reduction over the roasted peppers for a sweet-tangy finish.
-
Spicy Sriracha Kick: Add a splash of sriracha sauce into the oil mixture before roasting for a spicy punch.
-
Cheesy Delight: Top the peppers with shredded cheese (like mozzarella or parmesan) during the last 5 minutes of cooking for a melty finish.
-
Mediterranean Flair: Toss some olives and sun-dried tomatoes in with the peppers pre-roast for a Mediterranean twist.
-
Herb-Infused Oil: Instead of plain olive oil, blend in some fresh herbs like oregano or thyme with the oil for extra flavor.
Chef’s Notes
This recipe has become one of my go-to favorites over the years. It’s versatile, forgiving, and can be adapted to whatever you have on hand. The first time I made these, I overdid it on the garlic—who knew that much could be overwhelming? After some trial and error, I found the right balance that pleases most palates.
The best part is that garlic roasted mini peppers always bring smiles and satisfaction. Whenever friends come over for dinner, I know I can count on these lovely little bites to steal the show. Plus, they make a killer leftovers snack—if you have any left, that is!
FAQs and Troubleshooting
-
Why are my peppers not browning?
Make sure your oven is preheated and that you’re using high heat. Give the peppers space on the baking sheet to roast properly. -
Can I use frozen mini peppers?
While fresh is best, you can use frozen mini peppers. Just be sure to thaw and drain any excess water before tossing them with oil and seasoning. -
What can I do with leftovers?
Leftover roasted peppers are great in salads, on sandwiches, or blended into a pesto. They also freeze well for future meals! -
How do I know when the peppers are done?
They should be tender to the fork and have slightly charred edges. Keep an eye on them to avoid overcooking!
Nutritional Info
While garlic roasted mini peppers are a treat, they’re also packed with nutritional goodness! Mini sweet peppers are low in calories, making them a guilt-free addition to any meal. They’re rich in vitamins A and C, helping to boost your immune system and keep your skin glowing.
Olive oil, the base of our recipe, is known for its heart-healthy monounsaturated fats, which can help lower bad cholesterol. Plus, garlic has antioxidant properties and has been linked to various health benefits, including improved heart health. So, you can enjoy this dish knowing you’re also treating your body well!
Final Thoughts
So, there you have it—garlic roasted mini peppers that are bound to become a staple in your kitchen. They’re simple, satisfying, and downright delicious!
As you gather around the table with friends and family, remember that the best part of cooking is not just the end result but the experience—and the memories made together through good food. So the next time you find yourself at the grocery store, don’t forget to snag those little sweet peppers.
I can’t wait to hear how your garlic roasted mini peppers turn out. Let’s keep this culinary journey going—next up, I might just share my secret to a creamy garlic dip that pairs perfectly with these beauties. Happy cooking, and eat with joy!
PrintGarlic Roasted Mini Peppers
- Total Time: 35 minutes
- Yield: 4 servings 1x
- Diet: Vegetarian
Description
A colorful and flavorful dish of garlic roasted mini peppers, perfect as a side or snack.
Ingredients
- 1 pound Mini Sweet Peppers
- 4 cloves Garlic, minced
- 2 tablespoons Olive Oil
- 1 teaspoon Sea Salt
- 1/2 teaspoon Freshly Cracked Black Pepper
Instructions
- Preheat your oven to 425°F (220°C).
- Rinse the mini sweet peppers under cold water and pat them dry. Slice each pepper in half lengthwise and remove the seeds.
- Mince the garlic cloves finely.
- Combine the halved peppers, minced garlic, olive oil, salt, and pepper in a large bowl and toss until well coated.
- Arrange the seasoned peppers in a single layer on a baking sheet.
- Roast in the oven for about 20–25 minutes, tossing halfway through for even cooking.
- Check for doneness; they should be tender and slightly charred.
- Taste and adjust seasoning as needed.
- Serve the roasted mini peppers warm or at room temperature.
Notes
For a colorful presentation, use a mix of red, yellow, and orange mini peppers. Optionally, drizzle with extra olive oil and garnish with fresh herbs before serving.
- Prep Time: 10 minutes
- Cook Time: 25 minutes
- Category: Side Dish
- Method: Roasting
- Cuisine: Mediterranean
Nutrition
- Serving Size: 1 serving
- Calories: 150
- Sugar: 3g
- Sodium: 200mg
- Fat: 10g
- Saturated Fat: 1.5g
- Unsaturated Fat: 8g
- Trans Fat: 0g
- Carbohydrates: 15g
- Fiber: 4g
- Protein: 2g
- Cholesterol: 0mg
Keywords: mini peppers, roasted peppers, garlic, healthy side dish, easy recipes, Mediterranean