Salted Caramel Cheesecake
The Ultimate Salted Caramel Cheesecake Recipe
Hey there, fellow foodies! I’m Beau Collier, and today, we’re diving into a dessert that’s not just a feast for your taste buds, but also a memory-maker in the kitchen: Salted Caramel Cheesecake. Are you ready to embark on this buttery, creamy, and oh-so indulgent journey? Grab your apron, and let’s get cooking!
Introduction
There’s something utterly enchanting about a slice of cheesecake. Maybe it’s the dense, rich texture, or the creamy sweetness that dances on your palate, but for me, calling it “just dessert” doesn’t do it justice. Cheesecake has an emotional resonance; it’s a reminder of gatherings, celebrations, and sometimes even quiet evenings spent with a good book. When you add salted caramel to the mix? Well, get ready for a taste explosion that will have you dreaming of seconds.
Imagine this: a buttery crust made from Biscoff cookies—those deliciously spiced morsels that are so good you could eat them straight out of the package. Then, we layer a creamy cheesecake filling that’s smooth enough to make a jazz musician jealous, topped off with a warm, gooey homemade salted caramel sauce. Each bite is a little slice of heaven that whispers, “You’re in for a treat!”
In this post, I’ll guide you step-by-step through the process of making this decadent dessert from scratch. Whether you’re a cheesecake aficionado or a kitchen newbie on a culinary quest, my aim is to make this approachable and fun. So let’s roll up our sleeves and bring this gorgeous creation to life!
Personal Story
Ah, the first time I made a cheesecake! It was my sister’s birthday, and my mother had passed down her well-loved recipe, scribbled in her own handwriting on a well-worn index card. I remember the kitchen filled with the sweet aroma of cream cheese mixing with sugar and vanilla. The excitement was palpable as I poured the filling into the crust.
But here’s where the nostalgia really kicks in: halfway through baking, when I nervously opened the oven to check if it was setting properly, I accidentally let out a rush of steam that fogged up my glasses! My little sister burst out laughing, claiming I looked like a mad scientist. In that moment, I realized that cooking is not just about the food; it’s about the joy, laughter, and sometimes the minor disasters that turn into great stories. I was determined to make my cheesecake a showstopper, and I did! It went on to become a family favorite, a classic at every birthday celebration.
Since then, I’ve added my twists to the recipes—salted caramel being one of them. It’s become a family tradition, connecting the past to the present, one sweet slice at a time.
Ingredients
Let’s get into the nitty-gritty of this recipe! Here’s what you need to make your Salted Caramel Cheesecake shine.
-
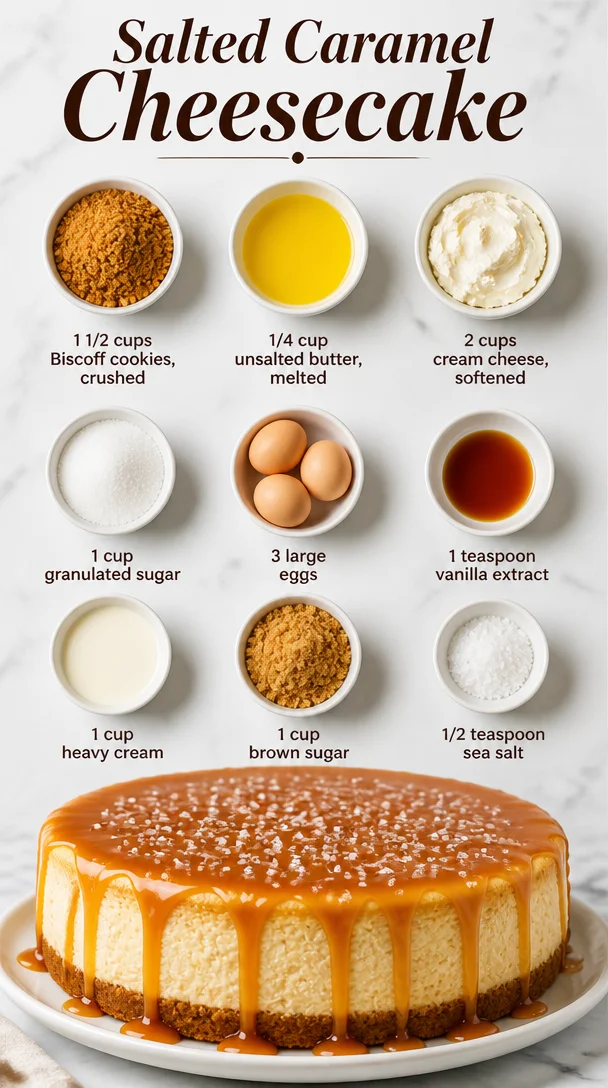
1 1/2 cups Biscoff cookies, crushed: These delightful cookies lend an aromatic spiced flavor and a perfect crispy texture for the crust. In a pinch, you can substitute them with graham crackers or Oreos for a chocolate twist.
-
1/4 cup unsalted butter, melted: This binds the crumbs together and gives your crust that rich buttery goodness. If you’re in a dairy-free mood, coconut oil is a solid alternative.
-
2 cups cream cheese, softened: The star of your cheesecake! Make sure it’s room temperature (no one wants chunky cream cheese), or switch to mascarpone for a slightly different creamy feel.
-
1 cup granulated sugar: This provides the necessary sweetness that balances the tang of the cream cheese. If you want to cut back on refined sugar, try coconut sugar or even honey.
-
3 large eggs: They help the cheesecake set to perfection. You could use flaxseed or chia seed substitutes (1 tablespoon of ground flax or chia mixed with 2.5 tablespoons water per egg) if you need a vegan option!
-
1 teaspoon vanilla extract: This adds warmth and depth to your filling. Consider using fresh vanilla beans for an intense flavor!
-
1 cup heavy cream: The heavy cream gives you that luscious, velvety texture. For a lighter version, opt for light cream or even Greek yogurt, but be aware that it may alter the flavor slightly.
-
1 cup brown sugar: This goes into the caramel and brings a deeper, more complex sweetness. If you’re out, regular granulated sugar will work in a pinch.
-
1/2 teaspoon sea salt: Salt enhances the flavor of caramel and balances sweetness. You can play with different salts: Himalayan pink salt or smoked salt can add a surprising twist!
Step-by-Step Instructions
1. Prepare the Crust
- Preheat your oven to 350°F (175°C). A hot oven equals a perfectly baked crust.
- In a medium bowl, mix the crushed Biscoff cookies and melted butter until it resembles wet sand. This is one of my favorite parts; the aroma is divine!
- Press this mixture firmly into the bottom of a 9-inch springform pan. Use the bottom of a measuring cup to really pack it down! Bake for 10 minutes. This step ensures your crust is sturdy enough to hold all the delicious filling in.
2. Make the Cheesecake Filling
- While the crust is baking, grab a mixing bowl and beat the softened cream cheese with an electric mixer until it’s smooth and creamy—no lumps allowed here! Add in the granulated sugar and mix until combined.
- Next, add in the eggs one at a time, mixing well after each addition. This keeps your cheesecake from cracking later! Add in the vanilla extract and blend until fluffy. It should look like a dreamy cloud.
- Beat in the heavy cream until the mixture is thick and creamy. This gives your cheesecake that luxurious mouthfeel. Pour that luscious filling over the baked crust, smoothing it out.
3. Bake Your Cheesecake
- Place the springform pan in the oven. Here’s a little hack: to prevent cracks, place a pan filled with water on the rack below your cheesecake. The steam helps keep your cheesecake moist, just like a hot bath for your dessert!
- Bake for about 55 to 60 minutes. The edges should be set while the center will still have a light jiggle. Don’t worry; it’ll firm up as it cools.
4. Make the Salted Caramel
- Combine the brown sugar and heavy cream in a saucepan over medium heat. Stir constantly until it smooths out and begins to bubble, about 5–7 minutes.
- Reduce the heat to low and let it simmer for an additional 5 minutes without stirring. Then remove it from the heat and stir in the sea salt—this is where the magic happens! Let it cool for a bit before drizzling it over your cooled cheesecake.
5. Cool and Chill
- Once your cheesecake is out of the oven, let it cool for at least an hour on the counter before moving it to the refrigerator. Chill for at least 4 hours or overnight if you’re really planning ahead. I know, it’s patience-testing, but it’s worth every moment!
Serving Suggestions
When it’s time to serve your Salted Caramel Cheesecake, here are a few tips to make it extra special:
- Presentation: Remove the sides of the springform pan carefully. Place the cheesecake on a decorative cake stand or a sleek serving plate to showcase it!
- Drizzle: Warm your salted caramel slightly and drizzle it over the top in swooping motions for that professional touch. Don’t forget to add a sprinkle of flaky sea salt for a gorgeous contrast.
- Garnish: Top with a dollop of freshly whipped cream and maybe some caramel popcorn for texture, if you’re feeling fancy. You could also add a few chocolate shavings for an extra decadent flair!
Recipe Variations
Here are a few fun twists you can try with this Salted Caramel Cheesecake recipe:
-
Nutty Twist: Add crushed pecans or walnuts into the crust for an added crunch. You could also add a layer of nut butter to the filling for extra richness.
-
Chocolate Lovers: Pour in half a cup of melted dark chocolate into the cheesecake batter for a rich mocha flavor. You can top it with chocolate ganache for extra indulgence.
-
Fruit Flavor: Incorporate fresh fruit like raspberries or strawberries into the cheesecake filling. The tartness will cut through the richness beautifully.
-
Spiced Autumn Delight: Add a teaspoon of cinnamon and a dash of nutmeg to the filling for a cozy, spiced version that’s perfect for fall gatherings.
-
Vegan Option: Use cashews soaked overnight, blended with maple syrup and coconut cream instead of the cream cheese and heavy cream.
Chef’s Notes
Ah, what a journey! Since that fateful first cheesecake, I’ve become a self-proclaimed cheesecake enthusiast. Each experiment I’ve taken has taught me something new. One quirky tradition I have is to name every cheesecake I make; this one? I call it “Hug in a Slice.”
When you sit down with a generous slice, take a moment to savor the flavors and the memories they bring. And remember, every kitchen has its mishaps, like that time I forgot the sugar altogether—let’s just say, that was a very different kind of ‘cheesecake’!
FAQs and Troubleshooting
1. Why did my cheesecake crack?
Cracks can occur if the cheesecake is overbaked or if it was cooled too quickly. Ensure you use the water bath method and let it cool gradually in the oven with the door cracked.
2. Can I freeze the cheesecake?
Absolutely! Wrap it tightly in plastic wrap and then aluminum foil. It can last frozen for up to 2 months. Thaw it overnight in the fridge before serving.
3. It didn’t set properly; what went wrong?
This can be because the cream cheese wasn’t softened enough or it needed more time to bake. If the center is still wobbly after cooling, that’s okay! It’ll firm up after chilling in the fridge.
4. How do I make this gluten-free?
Swap the Biscoff cookies for gluten-free cookie options, or a ground nut and date crust works brilliantly too!
Nutritional Info
While it varies based on your specific ingredients, here’s an approximate nutritional breakdown per slice (assuming 12 servings):
- Calories: 450
- Fat: 30g
- Carbohydrates: 40g
- Protein: 6g
- Sugar: 28g
- Sodium: 220mg
Final Thoughts
There you have it, friends! A recipe that not only satisfies but resonates with nostalgia and the joy of togetherness. Each slice of Salted Caramel Cheesecake is an invitation to celebrate life’s sweet moments and create new memories in the kitchen. So whether it’s for a birthday, a dinner party, or just because you deserve a treat, this cheesecake is ready to impress.
I hope this article lights a fire in your kitchen and inspires you to whip up this delightful dessert. Remember, cooking is a blend of art, science, and a whole lot of love. So go ahead, make your Salted Caramel Cheesecake, and don’t forget to share your edible masterpieces with the world (or just your family—no judgment here!). Happy baking, and see you next time at Feastical!
Print
Ultimate Salted Caramel Cheesecake
- Total Time: 90 minutes
- Yield: 12 servings 1x
- Diet: Vegetarian
Description
A decadent salted caramel cheesecake with a buttery Biscoff crust, rich cream cheese filling, and a homemade caramel drizzle.
Ingredients
- 1 1/2 cups Biscoff cookies, crushed
- 1/4 cup unsalted butter, melted
- 2 cups cream cheese, softened
- 1 cup granulated sugar
- 3 large eggs
- 1 teaspoon vanilla extract
- 1 cup heavy cream
- 1 cup brown sugar
- 1/2 teaspoon sea salt
Instructions
- Preheat your oven to 350°F (175°C).
- Mix the crushed Biscoff cookies and melted butter until it resembles wet sand.
- Press this mixture firmly into the bottom of a 9-inch springform pan and bake for 10 minutes.
- Beat the softened cream cheese with an electric mixer until smooth, then add the granulated sugar and mix.
- Add the eggs one at a time, mixing well after each addition, followed by the vanilla extract.
- Beat in the heavy cream until thick and creamy, then pour the filling over the baked crust.
- Place the springform pan in the oven and bake for about 55-60 minutes.
- Combine the brown sugar and heavy cream in a saucepan over medium heat, stirring constantly until bubbly.
- Reduce heat and let it simmer for 5 minutes; then stir in the sea salt.
- Cool the cheesecake on the counter for at least an hour, then chill for at least 4 hours or overnight before serving.
Notes
Drizzle with warm salted caramel and top with whipped cream for extra indulgence.
- Prep Time: 30 minutes
- Cook Time: 60 minutes
- Category: Dessert
- Method: Baking
- Cuisine: American
Nutrition
- Serving Size: 1 slice
- Calories: 450
- Sugar: 28g
- Sodium: 220mg
- Fat: 30g
- Saturated Fat: 18g
- Unsaturated Fat: 12g
- Trans Fat: 0g
- Carbohydrates: 40g
- Fiber: 1g
- Protein: 6g
- Cholesterol: 150mg
Keywords: salted caramel, cheesecake, dessert, baking
Fall Apple Pie Cookies with Salted Caramel: Easy & Chewy
Salted Caramel Apple Pie Cookies: A Fusion of Comfort and Flavor
Hey there, fellow food lover! If you’ve ever been caught in the sweet embrace of a caramel apple while wandering a fairground, then you’ll understand the delight that comes with my Salted Caramel Apple Pie Cookies. Imagine crisp, buttery cookies packed with the flavor of fresh apples and laced with decadent salted caramel. This recipe is a hug in cookie form, perfect for everything from cozy evenings on the couch to festive gatherings with friends and family.
Why do I love these cookies so much? Well, it’s simple. They combine the warmth of home-baked treats with a hint of that carnival magic we all cherish. Plus, they bring back memories of my childhood, running around in the fall air, savoring that perfect balance of sweet and salty. As I share this recipe with you, I can almost hear the scents of cinnamon and caramel wafting through the kitchen—let’s dive in and create some sweet memories together!
A Memory to Savor
Let me take you back to a chilly October afternoon when I was just a kid. My mom had carefully crafted her famous apple pie, the recipe handed down through generations. The kitchen was a whirlwind of activity: flour dust in the air, apples being diced, and whispers of cinnamon making their presence known. After what felt like an eternity, we finally pulled the pie from the oven, and I can still remember the feeling of warmth radiating from that kitchen.
But here’s the twist—I had gone to the fair that weekend and tasted the most divine caramel apple! That contrast of buttery caramel against the tart bite of an apple sparked joy within me. It got my creative juices flowing and inspired my new spin on my mom’s traditional apple pie recipe: Salted Caramel Apple Pie Cookies! I knew these cookies would evoke the same warmth, nostalgia, and gratitude that my mom’s pie did while adding an exciting twist. Now, I can’t wait to pass on that magic to you.
Ingredients
Let’s talk about what you’ll need to pull off these drool-worthy cookies. Here’s what’s on the shopping list:
-
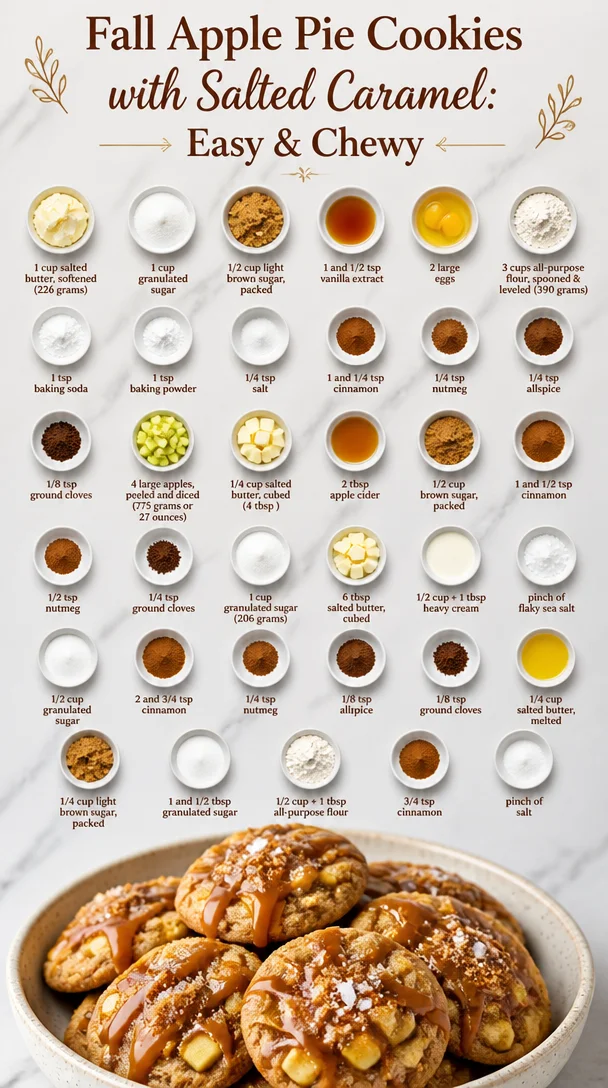
1 cup salted butter, softened (226 grams): The star ingredient! Softened butter ensures a rich, creamy texture. If you’re in a pinch, unsalted butter works too—just add a pinch more salt in the dough.
-
1 cup granulated sugar: Regular sugar gives sweetness and helps with that desirable crispy edge.
-
1/2 cup light brown sugar, packed: Brown sugar adds moisture and depth of flavor. Have dark brown sugar on hand? That’s an excellent substitute!
-
1 and 1/2 tsp vanilla extract: Pure vanilla is a game changer. If you run out, feel free to use vanilla bean paste or almond extract for a unique twist.
-
2 large eggs: These help bind the ingredients together. You can replace them with flax eggs for a vegan version (1 tablespoon ground flaxseed + 2.5 tablespoons water per egg).
-
3 cups all-purpose flour, spooned & leveled (390 grams): Spoon and level to prevent dense cookies. For gluten-free options, try a 1:1 gluten-free flour blend.
-
1 tsp baking soda: This adds a lift to our cookies!
-
1 tsp baking powder: More leavening for that soft, chewy texture.
-
1/4 tsp salt: Balances the sweetness.
-
1 and 1/4 tsp cinnamon: Classic fall flavor! You can swap in pumpkin spice for a different twist.
-
1/4 tsp nutmeg: A little nutmeg gives warmth.
-
1/4 tsp allspice: Elevates the dish! You can skip it or use a touch of cloves instead.
-
1/8 tsp ground cloves: Just a hint—takes these flavors to the next level!
-
4 large apples, peeled and diced (775 grams or 27 ounces of diced apple): Go for a mix of sweet and tart apples, like Granny Smith and Honeycrisp.
-
1/4 cup salted butter, cubed (4 tbsp): Adds richness to the caramel mixture.
-
2 tbsp apple cider: A splash adds acidity—substitute with lemon juice if you’re short!
-
1/2 cup brown sugar, packed: For initial caramelizing greatness!
-
1 and 1/2 tsp cinnamon: Because, why not more cinnamon?
-
1/2 tsp nutmeg: Amplifies that warm, spicy essence.
-
1/4 tsp ground cloves: Just a hint in the caramel mix as well.
-
1 cup granulated sugar (206 grams): To achieve gooey caramel perfection.
-
6 tbsp salted butter, cubed: More richness please!
-
1/2 cup + 1 tbsp heavy cream: This is where the magic happens, making the caramel luxuriously creamy.
-
Pinch of flaky sea salt (I love Maldon brand!): Elevates the overall flavor and gives that salty sweet perfection.
-
1/2 cup granulated sugar: Another grainy friend for a crumbly topping.
-
2 and 3/4 tsp cinnamon: Yes, even more!
-
1/4 tsp nutmeg: We need balance here.
-
1/8 tsp allspice: A sprinkle here will do the trick.
-
1/8 tsp ground cloves: Final touch!
-
1/4 cup salted butter, melted: For the crumbly topping.
-
1/4 cup light brown sugar, packed: For extra sweetness.
-
1 and 1/2 tbsp granulated sugar: A little continuation of sweetness and crunch.
-
1/2 cup + 1 tbsp all-purpose flour: More structure for our topping.
-
3/4 tsp cinnamon: Yep, you’ve guessed it—more cinnamon!
-
Pinch of salt: Enhances all the flavors in every layer.
Step-by-Step Instructions
Alright, chef friends—let’s get our hands doughy! Here’s how to craft these delightful cookies step by step.
1. Preheat the Oven
Start by preheating your oven to 350°F (175°C). This way, you’ll have the perfect baking environment ready when your dough comes together.
2. Make the Dough
In a large mixing bowl, blend your softened salted butter, granulated sugar, and brown sugar until creamy and fluffy (about 3-4 minutes). This step is essential! The sugars should almost disappear into the butter, creating an inviting mix.
3. Eggs and Vanilla
Now, let’s beat in those eggs, one at a time, and add in that fragrant vanilla extract. Incorporating air at this stage creates lightness! Don’t forget to scrape down the sides of the bowl—no sugar left behind!
4. Whisk Together Dry Ingredients
In another bowl, whisk together the flour, baking soda, baking powder, salt, cinnamon, nutmeg, allspice, and cloves until well mixed. This helps to ensure that the leavening agents and spices are evenly distributed in your cookies.
5. Combine Wet and Dry
Gradually add the flour mix to the butter mixture, stirring just until combined. Overmixing can lead to tough cookies—no one wants that!
6. Add the Apples
Gently fold your diced apples into the dough. The texture will be gorgeous and chunky.
7. Create Caramel Sauce
In a saucepan over medium heat, melt the salted butter for the caramel. Add brown sugar and apple cider; stir until it’s well combined. Continue to cook, stirring frequently, until the mixture reaches a gentle boil. It should become a rich golden brown, about 4-6 minutes. Remove from heat and stir in the heavy cream carefully (it may bubble!). Add that pinch of flaky sea salt, and let the caramel cool just slightly before using.
8. Scoop the Cookies
Using a cookie scoop or tablespoon, drop hefty mounds of dough onto your lined baking sheets, leaving enough space between each to allow for spreading.
9. Drizzle with Caramel
Spoon some of that beautiful caramel sauce on top of each mound. Don’t be shy—it’s the star of the show!
10. Bake
Bake in the preheated oven for 12-15 minutes or until golden brown around the edges, and the centers are just set. You want them soft and slightly underbaked—this is crucial for that chewy texture.
11. Cool and Top with Crumble
Once out of the oven, let the cookies cool slightly before transferring them onto a wire rack. While they cool, prep the crumble topping by mixing together melted butter, brown sugar, flour, cinnamon, and salt in a small bowl. Sprinkle this mix generously over the cookies while they’re still warm for extra texture and flavor.
Serving Suggestions
Now, here’s where the creative magic happens! When serving these Salted Caramel Apple Pie Cookies, think about presentation. A beautiful rustic platter lined with parchment paper amps up the charm! Garnish with a light dusting of powdered sugar or a drizzle of extra caramel for that ‘wow’ factor.
Pair them with a big scoop of vanilla bean ice cream or a dollop of whipped cream. Don’t forget to add a sprinkle of flaky sea salt on top just before serving. The contrast between the warm cookies and the cold ice cream melts hearts—trust me!
Recipe Variations
I love that this recipe is versatile! Here are a few creative twists to elevate your cookies:
-
Chocolate Chip Twist: Add a half-cup of dark chocolate chips to the dough for a sweet surprise.
-
Spiced Nuts: Chopped pecans or walnuts bring a delightful crunch and nutty flavor when added to the cookie mix.
-
Dried Fruits: Swap out some apples for cranberries or raisins for a fun texture that captures the essence of fall.
-
Gluten-Free Version: Use a 1:1 gluten-free blend instead of all-purpose flour. Make sure it includes a binding agent for the best results.
-
Vegan Alternative: Swap butter for coconut oil, use flax eggs, and coconut sugar instead of granulated sugar for a plant-based treat!
Chef’s Notes
Every great recipe has a story, and I’ve cherished many baking sessions with friends while perfecting this one! I’ll never forget the first time my best buddy tried these cookies. We were celebrating a fall festival, and I brought them along. He couldn’t decide whether he liked the cookies or the pie more! This recipe has evolved over the years—from a simple apple pie to these spectacular cookies, and every tweak has made it better!
Also, a little tip: make sure all your ingredients are at room temperature before you start mixing. It makes a world of difference in texture!
FAQs and Troubleshooting
Q: Why are my cookies spreading too much?
A: There’s a chance your butter was too warm or melted when you started. Make sure it’s softened but not oily! If you notice this happening, try chilling your dough in the fridge for about 30 minutes before baking.
Q: Can I use a different type of apple?
A: Absolutely! Granny Smith, Fuji, Honeycrisp—all are fantastic in this recipe. It’s often fun to mix sweet and tart for a balanced flavor!
Q: My cookies came out too chewy. What did I do wrong?
A: Overmixing can lead to tough cookies, or they may have been baked too long. Check them a minute or two earlier; remember that cookies continue to cook once they come out of the oven!
Q: How do I store these cookies?
A: Store them in an airtight container at room temperature for up to a week. You can also freeze them (without the caramel drizzle) for up to three months! Just thaw and add caramel when you’re ready to indulge.
Nutritional Info
Now, for my health-conscious friends, here’s a little insight into the nutritional aspects of our fancy cookies.
- Calories: Approximately 250-280 per cookie.
- Total Fat: 12g
- Saturated Fat: 7g
- Cholesterol: 40mg
- Sodium: 220mg
- Total Carbohydrates: 35g
- Dietary Fiber: 1g
- Sugars: 20g
- Protein: 2g
Keep in mind that ingredients and portion sizes can vary, so these are estimates. If you’re looking for even healthier options, consider reducing the amount of sugar or using alternatives like honey or agave.
Final Thoughts
There you have it, friends! Salted Caramel Apple Pie Cookies. What’s not to love about bringing the deliciousness of fall into bite-sized pieces? Each cookie encapsulates nostalgia, warmth, and the allure of caramel goodness, making them perfect for cozy nights or festive gatherings.
Make a batch (or two), invite some loved ones over, and savor the moments you create in the kitchen. Keep experimenting, have fun, and share your creations with me—I am eager to hear all about your cookie adventures! Happy baking! 💖🍏🍪
Print
Salted Caramel Apple Pie Cookies
- Total Time: 35 minutes
- Yield: 24 cookies 1x
- Diet: Vegetarian
Description
Delightful cookies combining the flavors of caramel apples with a comforting apple pie twist, perfect for cozy evenings and festive gatherings.
Ingredients
- 1 cup salted butter, softened (226 grams)
- 1 cup granulated sugar
- 1/2 cup light brown sugar, packed
- 1 and 1/2 tsp vanilla extract
- 2 large eggs
- 3 cups all-purpose flour, spooned & leveled (390 grams)
- 1 tsp baking soda
- 1 tsp baking powder
- 1/4 tsp salt
- 1 and 1/4 tsp cinnamon
- 1/4 tsp nutmeg
- 1/4 tsp allspice
- 1/8 tsp ground cloves
- 4 large apples, peeled and diced (775 grams)
- 1/4 cup salted butter, cubed (4 tbsp)
- 2 tbsp apple cider
- 1/2 cup brown sugar, packed
- 1 and 1/2 tsp cinnamon
- 1/2 tsp nutmeg
- 1/4 tsp ground cloves
- 1 cup granulated sugar (206 grams)
- 6 tbsp salted butter, cubed
- 1/2 cup + 1 tbsp heavy cream
- Pinch of flaky sea salt
- 1/2 cup granulated sugar
- 2 and 3/4 tsp cinnamon
- 1/4 tsp nutmeg
- 1/8 tsp allspice
- 1/8 tsp ground cloves
- 1/4 cup salted butter, melted
- 1/4 cup light brown sugar, packed
- 1 and 1/2 tbsp granulated sugar
- 1/2 cup + 1 tbsp all-purpose flour
- 3/4 tsp cinnamon
- Pinch of salt
Instructions
- Preheat the oven to 350°F (175°C).
- Blend the softened salted butter, granulated sugar, and brown sugar until creamy and fluffy.
- Beat in the eggs one at a time and add vanilla extract.
- Whisk together flour, baking soda, baking powder, salt, cinnamon, nutmeg, allspice, and cloves.
- Add the flour mixture to the butter mixture gradually, stirring until combined.
- Fold the diced apples into the dough.
- Melt salted butter for caramel in a saucepan; add brown sugar and apple cider and stir.
- Cook until the caramel mixture reaches a gentle boil, about 4-6 minutes.
- Scoop mounds of dough onto lined baking sheets.
- Spoon caramel sauce over each mound.
- Bake for 12-15 minutes until golden brown.
- Cool slightly and top with the prepared crumble topping.
Notes
For different variations, try adding chocolate chips, nuts, or dried fruits. For a gluten-free version, use a 1:1 gluten-free blend.
- Prep Time: 20 minutes
- Cook Time: 15 minutes
- Category: Dessert
- Method: Baking
- Cuisine: American
Nutrition
- Serving Size: 1 cookie
- Calories: 280
- Sugar: 20g
- Sodium: 220mg
- Fat: 12g
- Saturated Fat: 7g
- Unsaturated Fat: 3g
- Trans Fat: 0g
- Carbohydrates: 35g
- Fiber: 1g
- Protein: 2g
- Cholesterol: 40mg
Keywords: cookies, salted caramel, apple pie, fall dessert, baking