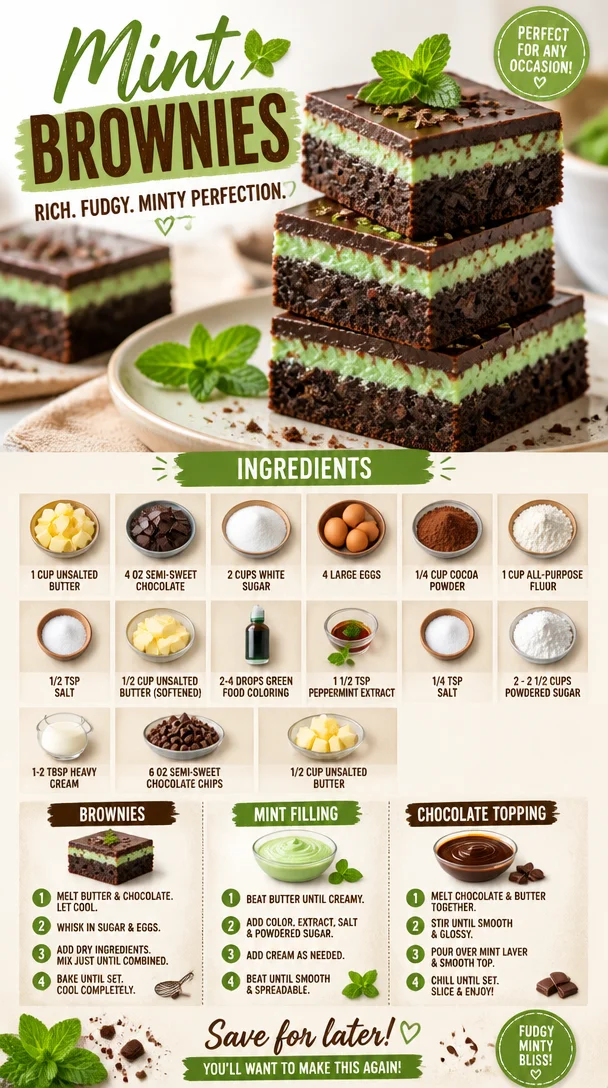
Mint Brownies
Hey there, fellow foodies! I’m thrilled to have you here at Feastical, where we whip up joy, one delicious recipe at a time. Today, we’re diving into a dessert that boasts a perfect blend of rich chocolate and refreshing mint: Mint Brownies! If you’ve ever experienced that blissful moment when you bite into a chewy brownie with a hint of mint, you know exactly what I mean. These Mint Brownies are not just a treat; they’re a delightful excuse to gather your friends and family around the table, share stories, and indulge in a sweet, nostalgic experience.
But let me tell you, these brownies didn’t just pop into my life overnight. Oh no! They come with a little history, a sprinkle of love, and a dash of memory. Growing up, the smell of rich chocolate wafting through the air was a clue that something special was happening in the kitchen. My mom would often make a version of these brownies whenever we had friends over. The laughter, the chatter, and that unmistakable scent created a cozy atmosphere that I still cherish to this day. Fast forward to today, and I’m excited to bring you a recipe that not only captures that essence of home but also adds a modern twist that’s absolutely irresistible.
Imagine serving these Mint Brownies at your next gathering, the vibrant green and decadent chocolate enticing everyone to take a bite. And once they do? Smiles all around! Get ready to treat yourself and your loved ones to a dessert that feels like a warm hug. So, without further ado, let’s roll up our sleeves and get cooking!
Personal Story
Back in the day, my best friend and I would spend our weekends embarking on a “bake-off” challenge at my house. You see, my mom was a powerhouse in the kitchen, and she inspired us to try our hand at everything from bread to cookies to brownies. One sunny Saturday, armed with a generous helping of chocolate and a bottle of peppermint extract that somehow made its way into our pantry, we decided to take our brownie game to the next level.
What began as a simple brownie recipe morphed into the most glorious Mint Brownies we could have imagined! As we sprinkled in those minty drops and watched the batter transform into a lush green masterpiece, we couldn’t wait to taste our creation. The moment we took that first bite, a magical experience took over; the chocolate was rich, the mint was refreshing, and it was pure bliss.
That carefree kitchen adventure brought us together as friends and as the taste testers of our own creation. To this day, whenever I whip up these Mint Brownies, I’m reminded of those laughter-filled afternoons, the little messes we made, and the creations we celebrated. It’s a reminder of the joy that food brings to our lives and how sharing it can create memories that last forever.
Ingredients
For the Brownies:
- 1 cup unsalted butter (226 grams): The base of our brownies, creating that moist, fudgy texture we love. Unsalted is preferred so we can control the saltiness.
- 4 oz semi-sweet chocolate (112 grams) (or 50-70% dark chocolate): This adds depth and richness; feel free to swap with dark chocolate if you prefer a more intense flavor!
- 2 cups white sugar (400 grams): Sweetness is key! This will balance the dark chocolate and create a lovely crust on top of your brownies.
- 4 large eggs (room temperature): Eggs are the binding agents; room temperature ensures they mix evenly with other ingredients.
- 1/4 cup cocoa powder (22 grams): For that extra chocolatey goodness! You can substitute with extra flour if you’re in a pinch.
- 1 cup all-purpose flour (125 grams): This provides structure and stability to our brownies.
- 1/2 teaspoon salt: Enhances the overall flavor—it’s surprising how much this little ingredient can do!
For the Mint Cream Layer:
- 1/2 cup unsalted butter (112 grams) (softened): Softened butter combines easily with sugar to create a creamy mint layer.
- 2-4 drops green food coloring: Just a touch to achieve that charming minty hue; you can leave this out if you prefer a natural look!
- 1 1/2 teaspoons peppermint extract (to taste): This is the star of our mint layer—adjust according to your taste buds!
- 1/4 teaspoon salt: Helps balance the sweetness of the powdered sugar.
- 2 – 2 1/2 cups powdered sugar (220 – 275 grams): This gives the mint layer its sweetness and creamy texture.
- 1-2 tablespoons heavy cream (or whipping cream or milk, as needed): Helps achieve that perfect frosting consistency—add more for a thinner layer!
For the Chocolate Glaze:
- 6 oz semi-sweet chocolate (about 3/4 cup, 170 grams): A rich chocolate glaze to crown our brownies!
- 1/2 cup unsalted butter (112 grams): Adds shine and richness to our glaze.
Step-by-Step Instructions
Now that we have our ingredients lined up, let’s get cooking! Follow these steps to make the most delicious Mint Brownies from scratch.
Step 1: Preheat and Prep
First things first, preheat your oven to 350°F (175°C). While it’s warming up, grease a 9×13-inch baking pan (or line it with parchment paper) to ensure those brownies come out without a hitch. Your future self will thank you!
Step 2: Melt Butter and Chocolate
In a medium saucepan over low heat, melt the 1 cup of unsalted butter and the 4 oz of semi-sweet chocolate. Stir them together until they’re smooth and shiny. Pro Tip: Remove the pan from the heat as soon as it’s melted – you don’t want to burn the chocolate. Take a moment to inhale that heavenly chocolate aroma!
Step 3: Mix Wet Ingredients
Once melted, transfer the mixture to a large mixing bowl (if you used a saucepan). Add 2 cups of white sugar and stir it in until it’s combined. Then, crack in 4 large eggs, one by one, mixing well after each addition. This will create a beautiful, glossy batter. Then, mix in the 1/4 cup of cocoa powder and 1/2 teaspoon of salt until fully blended.
Step 4: Add Dry Ingredients
Next, gently fold in 1 cup of all-purpose flour. Don’t overmix; we want our brownies to be dense but not tough. A few streaks of flour are okay; they’ll blend more as you spread the batter into the pan.
Step 5: Bake the Brownies
Pour the brownie batter into your prepared baking pan and spread it out evenly. Bake in the preheated oven for about 20-25 minutes. To test for doneness, insert a toothpick into the center—it should come out with a few moist crumbs but not wet batter.
Step 6: Cool the Brownies
Once baked, take them out of the oven and let them cool in the pan on a wire rack. Patience is key here, folks! You want them to set properly for that perfect bite.
Step 7: Make the Mint Cream Layer
While those brownies are cooling, it’s time for the minty magic! In a mixing bowl, cream together the 1/2 cup softened unsalted butter and 2 cups powdered sugar. Then, mix in the 1 1/2 teaspoons peppermint extract and 2-4 drops of green food coloring, blending until smooth and creamy. If your frosting is too thick, use the 1-2 tablespoons of heavy cream to loosen it up a bit.
Step 8: Spread It On
Once the brownies are cool, spread the mint cream layer evenly over the top. Take your time; you want it to look as lovely as it tastes!
Step 9: Prepare the Chocolate Glaze
Now for the pièce de résistance! In a saucepan, melt 6 oz semisweet chocolate and 1/2 cup butter over low heat, stirring until smooth. Once melted, pour the chocolate glaze over the mint layer and spread it evenly. Victory is yours!
Step 10: Chill and Slice
Pop the brownies back into the fridge for about 30 minutes to let the glaze set. Once set, slice them into squares or triangles (or any shape your heart desires) and serve!
Serving Suggestions
Ah, the moment of truth! Time to serve your Mint Brownies in style. Plate them up on a colorful dessert platter, and don’t be shy with the presentation. For that extra touch, you could sprinkle some crushed peppermint candies on top or even drizzle some additional melted chocolate along the plate. It adds a sophisticated flair and makes passing them around a breeze!
Pair these Mint Brownies with a scoop of vanilla ice cream for an indulgent dessert. The temperature and creaminess of the ice cream paired with the rich chocolate and refreshing mint create a symphony of flavors that’ll make your taste buds sing! Want to dress it up even more? Garnish with fresh mint leaves for a beautiful, aromatic touch. Who doesn’t love a dish that looks stunning and tastes divine?
Recipe Variations
Let’s get creative! Here are a few twists you can take on these classic Mint Brownies:
-
Nutty Delight: Add 1 cup of chopped walnuts or pecans to the brownie batter for a crunchy texture.
-
Mint Chocolate Chip: Fold in 1 cup of chocolate mint chips or green chocolate chips right before pouring into the baking pan for even more minty goodness.
-
Caramel Swirl: Drizzle some store-bought or homemade caramel sauce into the brownie batter before baking for an added layer of sweetness.
-
Gluten-Free Option: Substitute the all-purpose flour with a 1:1 gluten-free baking blend—still delicious and fudge-like!
-
Vegan Twist: Use dairy-free butter, flax eggs (1 tablespoon flaxseed meal mixed with 2.5 tablespoons water, let it sit to thicken), and dark chocolate without milk for a vegan-friendly treat.
Chef’s Notes
You know, I’ve played around with this recipe over the years, and it always brings back joyful memories of baking sessions with friends and family. One time, I decided to experiment with green tea powder to give it an Asian twist, and let’s just say that was a “no-go”—the mint flavor is just too perfect as it stands! And don’t get me started on the time we got into a heated debate over the right amount of peppermint extract. Turns out, it can be quite polarizing; some love it intense, while others prefer subtle. Play around; find what suits your palate!
FAQs and Troubleshooting
Q: Why are my brownies too cakey?
A: If the brownies turned out cakey, it might be that you overmixed the batter or incorporated too much air, or you may have baked them too long. Aim for a fudgier texture!
Q: How can I fix a mint cream layer that’s too runny?
A: If your mint cream layer is runny, simply add more powdered sugar a tablespoon at a time until it reaches the desired consistency.
Q: Can I make these brownies ahead of time?
A: Absolutely! You can prep these Mint Brownies a day or two ahead. Just keep them in an airtight container to maintain freshness.
Q: How do I store leftover brownies?
A: Keep any leftovers in an airtight container, either at room temperature for a few days or in the fridge for longer-lasting freshness.
Nutritional Info
Let’s chat about nutritional facts. Each square of these Mint Brownies is a decadent treat, but a single serving can average around 220 calories, featuring about 10g of fat, 32g of carbohydrates, and 2g of protein. Customize your baked goods with my suggestions above; it’s possible to create lighter or even healthier versions if you’re looking to indulge without straying too far from your nutritional goals. Remember, moderation is key—enjoy every delicious bite!
Final Thoughts
As we wrap up this Mint Brownie journey, I hope you feel inspired to channel your inner chef and create this delightful treat! Food has the magical ability to bring us closer, spark memories, and create new ones around the table. So grab your loved ones, whip up these Mint Brownies, and get ready to share smiles galore.
Let me know your thoughts and triumphs in the kitchen; I love hearing your stories and recipe adaptations! Until next time, keep cooking, keep sharing, and most importantly, keep enjoying the journey of food! Happy baking!
Print
Mint Brownies
- Total Time: 45 minutes
- Yield: 16 servings 1x
- Diet: Vegetarian
Description
A delightful blend of rich chocolate and refreshing mint, these brownies are perfect for gatherings and family celebrations.
Ingredients
- 1 cup unsalted butter (226 grams)
- 4 oz semi-sweet chocolate (112 grams)
- 2 cups white sugar (400 grams)
- 4 large eggs (room temperature)
- 1/4 cup cocoa powder (22 grams)
- 1 cup all-purpose flour (125 grams)
- 1/2 teaspoon salt
- 1/2 cup unsalted butter (112 grams) (softened) for mint layer
- 2–4 drops green food coloring
- 1 1/2 teaspoons peppermint extract (to taste)
- 1/4 teaspoon salt for mint layer
- 2–2 1/2 cups powdered sugar (220–275 grams)
- 1–2 tablespoons heavy cream (or whipping cream)
- 6 oz semi-sweet chocolate (170 grams) for glaze
- 1/2 cup unsalted butter (112 grams) for glaze
Instructions
- Preheat your oven to 350°F (175°C). Grease a 9×13-inch baking pan.
- Melt the butter and chocolate in a saucepan over low heat until smooth.
- Mix the sugar into the melted mixture, then add the eggs one by one, mixing well.
- Add the cocoa powder and salt, combining until blended.
- Fold in the flour gently to avoid overmixing.
- Bake for 20-25 minutes in the preheated oven until a toothpick comes out with a few moist crumbs.
- Cool the brownies in the pan on a wire rack.
- Make the mint cream layer by creaming together softened butter and powdered sugar, then mixing in peppermint extract and food coloring.
- Spread the mint cream layer over the cooled brownies.
- Prepare the chocolate glaze by melting chocolate and butter, then pour it over the mint layer.
- Chill in the fridge for 30 minutes, then slice into squares.
Notes
Serve with a scoop of vanilla ice cream for extra indulgence. You can also customize with nuts or mint chips.
- Prep Time: 15 minutes
- Cook Time: 25 minutes
- Category: Dessert
- Method: Baking
- Cuisine: American
Nutrition
- Serving Size: 1 brownie
- Calories: 220
- Sugar: 30g
- Sodium: 80mg
- Fat: 10g
- Saturated Fat: 6g
- Unsaturated Fat: 4g
- Trans Fat: 0g
- Carbohydrates: 32g
- Fiber: 1g
- Protein: 2g
- Cholesterol: 40mg
Keywords: brownies, mint, chocolate dessert, baking, sweet treats
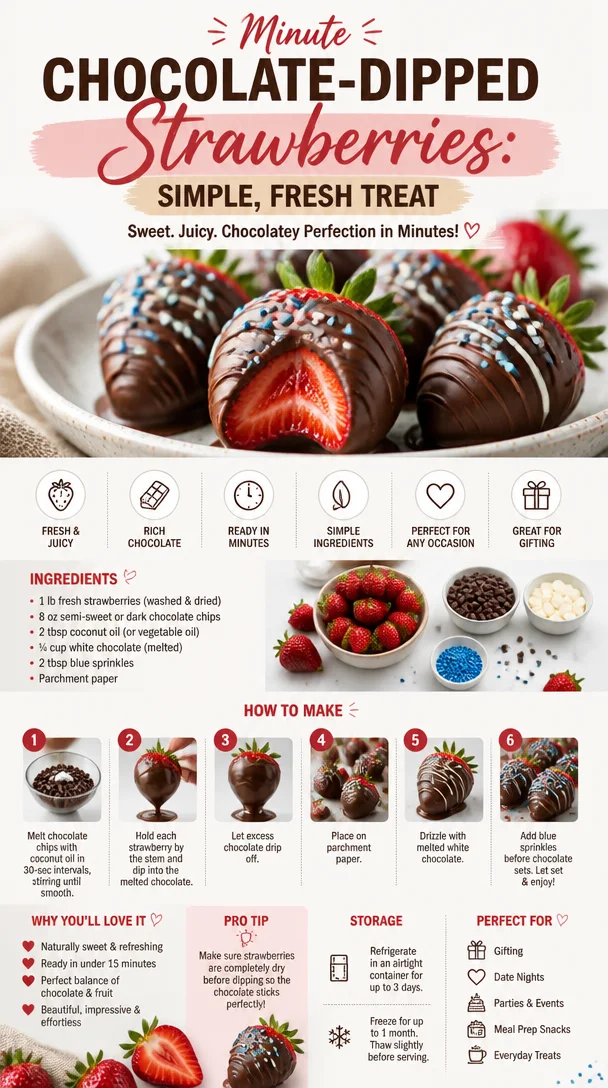
Minute Chocolate-Dipped Strawberries: Simple, Fresh Treat
Dive into Delight: Chocolate Dipped Strawberries
Hey there, fellow food lovers! Today, we’re plunging into the delectable world of chocolate-dipped strawberries. This sweet treat is not just an indulgence; it’s a celebration of simplicity, love, and a touch of nostalgia. Whether you’re looking to impress someone special, dress up a party platter, or simply satisfy your sweet tooth, these strawberries are here to save the day!
I remember the first time I made chocolate-dipped strawberries. It was a sunny afternoon in my grandmother’s cozy kitchen. She was whipping up a batch for a family gathering, and I was her eager little sous chef. The air was filled with laughter, and as we melted the chocolate, she shared stories of her own childhood baking adventures. Those strawberries weren’t just a dessert; they were a bridge connecting generations, rich with memories and love.
Now, I like to believe that anyone can recreate that moment, and I’m here to guide you through it! So, roll up your sleeves, and let’s get to work on these scrumptious treats that come together in a snap but carry a whole lot of joy!
Ingredients
Here’s what you’ll need to whip up these delightful treats:
-
Fresh Strawberries:
- Look for plump, ripe strawberries with a bright red hue. The fresher, the better! If strawberries aren’t in season, you can swap them for other fruits like bananas or pineapple.
-
White Chocolate:
- I prefer using high-quality white chocolate chips because they melt smoothly and taste heavenly. If you want to keep things dairy-free, look for plant-based options!
-
Blue Sprinkles:
- These add a fun pop of color! Feel free to get creative—switch it up with different colored sprinkles to match any theme or occasion.
The combination of these ingredients makes for not just a treat but a canvas for creativity. They’re perfect for romantic date nights, birthday bashes, or just a fun Saturday in with your best friends!
Step-by-Step Instructions
Let’s get down to the nitty-gritty, shall we? Here’s how to make those chocolate-dipped strawberries:
-
Preparation:
- Rinse your strawberries gently under cold water, pat them dry with a clean towel, and leave the green tops intact. This helps with handling them later and adds a rustic touch to your presentation.
- Chef’s Tip: Ensure the strawberries are completely dry. Any moisture can make the chocolate seize up!
-
Melt the White Chocolate:
- Place the white chocolate chips in a microwave-safe bowl and pop them in the microwave. Start with 30 seconds on high and stir. Continue in 15-second intervals until it’s smooth.
- Chef’s Tip: Stirring often will help avoid any burning, and using a glass bowl can give you an even melt!
-
Dipping Time:
- Hold a strawberry by its green stem and dip it into the melted white chocolate, swirling to coat it evenly. Don’t forget to scrape off the excess chocolate on the bowl’s edge before setting it down!
- Chef’s Tip: For a chic finish, dip the strawberry at an angle for a beautiful tapered look.
-
Adding Sprinkles:
- While the chocolate is still warm and gooey, sprinkle those blue sprinkles on top. Feel free to go wild—there’s no such thing as too much joy here!
- Chef’s Note: If you want a two-tone effect, allow the first layer of white chocolate to harden before dipping the strawberry into a contrasting chocolate.
-
Chill:
- Place your strawberries on a lined tray or cooling rack and pop them into the fridge for at least 30 minutes. This will help the chocolate set perfectly into a shiny coat of goodness.
- Chef’s Tip: For an extra smoothing effect, you can gently warm the chocolate again if it starts to thicken.
-
Serve and Enjoy:
- Once the chocolate is firmly set, arrange the strawberries on a festive platter or serve them in individual cups.
- Chef’s Suggestion: Pair them with whipped cream or a drizzle of dark chocolate for a delightful contrast!
Serving Suggestions
Now that you’ve made these beauties, let’s talk presentation! The way you serve your chocolate-dipped strawberries can elevate the whole experience.
-
Festive Platter:
- Arrange them on a decorative plate with mint leaves for a pop of color. Use a mix of berries around them for a beautiful berry medley!
-
In a Glass:
- Serve them upright in a tall glass filled with colored candies or rice. They’ll look like a bouquet that’s both edible and gorgeous!
-
On a Stick:
- For a fun twist, consider inserting a skewer into each strawberry and arranging them like a fruit bouquet. Kids and adults alike will love this playful option!
Recipe Variations
Get ready to shake things up! Here are some creative twists you can try with this recipe:
-
Chocolate Combo:
- Instead of just using white chocolate, dip half the strawberry in dark chocolate for a beautiful contrast and an added flavor twist.
-
Nutty Crunch:
- After dipping in white chocolate, roll the strawberries in crushed nuts like almonds or pistachios for a crunchy layer.
-
Caramel Drizzle:
- Drizzle melt caramel over the dipped strawberries for an extra layer of sweetness—who doesn’t love caramel?
-
Spicy Kick:
- Mix a dash of cayenne pepper into your white chocolate for a surprising kick!
-
Fruit Variety:
- Swap strawberries for other fruits like apples or grapes for a fun fruit fondue night!
Chef’s Notes
These chocolate-dipped strawberries have become a staple in my kitchen. They have evolved over the years, but one thing remains true: they bring people together. I remember the first batch I made for my best friend’s surprise birthday party; it was a hit! Not only was it a delicious dessert, but it also sparked a night full of laughter and memorable moments.
Sometimes, I play around with the chocolate flavors depending on the season or occasion. Remember, cooking is all about the journey and the stories we create along the way!
FAQs and Troubleshooting
Here are some common questions I often receive about chocolate-dipped strawberries:
-
Why does my chocolate seize?
- If even a drop of water gets into your chocolate, it can seize. Always make sure the bowl, strawberries, and utensils are completely dry.
-
How can I store chocolate-dipped strawberries?
- Store them in the fridge in a single layer in an airtight container. They’re best consumed within 1-2 days for optimal freshness!
-
What if the chocolate doesn’t coat well?
- If your chocolate is too thick, you can reheat it slightly and add a teaspoon of vegetable oil to thin it out!
-
Can I use milk chocolate instead?
- Absolutely! Feel free to experiment with any type of chocolate you love.
Nutritional Info
Here’s a quick breakdown of the nutritional info (per serving of 3 strawberries):
- Calories: Approximately 150
- Fat: 8g
- Carbohydrates: 20g
- Sugar: 15g
- Protein: 1g
These figures may vary based on the exact type of chocolate and strawberries used, so feel free to calculate based on your specific ingredients. Just remember, moderation is key—indulge guilt-free!
Final Thoughts
Chocolate-dipped strawberries are such a simple yet profound treat that can spark joy on any occasion. From the first bite to the last, they remind us of shared moments and sweet memories. With just a few ingredients and simple techniques, you can create something truly beautiful. So, gather your friends, whip up a batch, and dig in. I can’t wait to hear your stories—let’s keep the joy of cooking alive!
Happy dipping, foodies! 🍓🍫
PrintChocolate Dipped Strawberries
- Total Time: 20 minutes
- Yield: 12 servings
- Diet: Vegetarian
Description
Sweet and simple chocolate-dipped strawberries perfect for any occasion.
Ingredients
- Fresh strawberries
- High-quality white chocolate chips
- Blue sprinkles
Instructions
- Rinse your strawberries gently under cold water, pat them dry with a clean towel, and leave the green tops intact.
- Place the white chocolate chips in a microwave-safe bowl and pop them in the microwave. Start with 30 seconds on high and stir, continuing in 15-second intervals until smooth.
- Hold a strawberry by its green stem and dip it into the melted white chocolate, swirling to coat it evenly.
- While the chocolate is still warm, sprinkle blue sprinkles on top.
- Place your strawberries on a lined tray and pop them into the fridge for at least 30 minutes.
- Once the chocolate is firmly set, arrange the strawberries on a festive platter or serve them in individual cups.
Notes
Store chocolate-dipped strawberries in the fridge in a single layer for best freshness. Enjoy within 1-2 days.
- Prep Time: 15 minutes
- Cook Time: 5 minutes
- Category: Dessert
- Method: Chilling
- Cuisine: American
Nutrition
- Serving Size: 3 strawberries
- Calories: 150
- Sugar: 15g
- Sodium: 0mg
- Fat: 8g
- Saturated Fat: 5g
- Unsaturated Fat: 3g
- Trans Fat: 0g
- Carbohydrates: 20g
- Fiber: 1g
- Protein: 1g
- Cholesterol: 0mg
Keywords: chocolate, strawberries, dessert, easy recipe, party treat, sweet treats
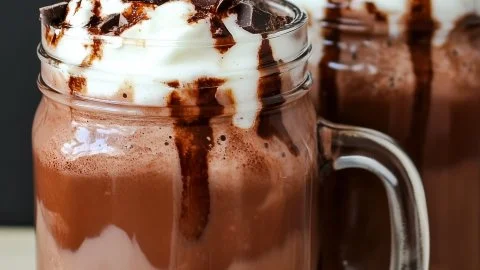
The Best Frozen Hot Chocolate
# The Best Frozen Hot Chocolate: A Chill Twist on a Classic Delight

## Introduction

Hey there, fellow foodies! If there’s one drink that perfectly bridges the gap between warmth and coolness, it has to be **frozen hot chocolate**. That magical concoction that screams indulgence is a delightful treat to sip on, regardless of the season. Today, we're diving deep into the world of this delicious drink that gives a nostalgic nod to cozy nights spent with friends, yet adds a refreshing twist perfect for sizzling summer days.

Picture this: a balmy summer evening, the sun setting in hues of pink and gold, and a group of friends gathered around, laughing animatedly. Suddenly, a tray of frozen hot chocolates appears, garnished with fluffy whipped cream and drizzled with rich chocolate syrup. There’s nothing quite like that chocolatey goodness in a chilled version to take your taste buds on a rollercoaster ride of flavors. Let’s just say, we’ve come a long way from those pesky powdered mixes we used to rely on! My mission today is to guide you through making the best frozen hot chocolate that will leave your taste buds saying, “Oh my cocoa goodness!”

No need to be a master chef here—what I love about this recipe is its simplicity. It’s all about celebrating the joy of creating something delicious, one spoonful at a time. Whether you’re looking to cool off on a hot day or whip up a fun treat for friends, this frozen hot chocolate is your ticket to dessert heaven. So, grab your blender, and let’s get to it!

---

## Personal Story

You know, I’ve always had a soft spot for hot chocolate. As a kid, nothing felt better than coming home from a chilly day outside, cheeks flushed, and sipping a warm cup of cocoa while nestled beneath a cozy blanket. Fast forward to my college years, where that same comforting drink evolved into something more adventurous. One chilly evening, my friend Jess and I had a little spontaneous gathering. Armed with a blender and a love for chocolate, we decided it was time we brought summer to winter with frozen hot chocolate.

With just a few simple ingredients, our late-night concoction transformed into a decadent dessert drink that had everyone swooning. To this day, that evening remains etched in my memory—not just because of the drink itself, but because of the laughter and joy we shared. It was a reminder of how food has the incredible power to unite us. And now, I’m thrilled to pass that joy on to you with my version of the **Best Frozen Hot Chocolate**!

---

## Ingredients

Here’s what you’ll need to whip up this frosty delight:

- **3½ cups ice**
  The backbone of your frozen drink; use crushed or cubed ice, depending on what you have on hand! Crush it up if you prefer a smoother texture.

- **2 cups milk (dairy or non-dairy)**
  Feel free to use your favorite milk—whole, almond, coconut, or oat milk work wonderfully. Each brings a different flavor, so go with what suits your taste!

- **4 packets hot cocoa mix**
  Grab your favorite brand or make homemade hot cocoa mix if you want to take it up a notch! (I’ll share a simple recipe for a DIY hot cocoa mix below!)

- **2 tablespoons chocolate syrup**
  This gives our frozen hot chocolate that irresistible chocolatey kick! Use store-bought or make your own for a richer taste.

- **2 teaspoons vanilla extract**
  A splash of vanilla brightens the flavors and takes this drink from good to phenomenal. Fresh vanilla pods work too for gourmet flair!

- **Whipped cream (for topping)**
  Because what’s a dessert drink without a cloud of whipped goodness on top? You can use store-bought or whip up your own at home.

- **Extra chocolate syrup (optional, for drizzle)**
  Go ahead and get a little extra with chocolate syrup drizzled on top of that whipped cream for an Instagram-worthy finish!

---

## Step-by-Step Instructions

Alright, let’s bring it all together! Here’s a straightforward guide to creating your **Best Frozen Hot Chocolate**.

1. **Blend the Base**
   Begin by grabbing your blender. Throw in the 3½ cups of ice, 2 cups of your chosen milk, and the 4 packets of hot cocoa mix. Don’t hold back on the blending; we’re going for a frosty, creamy consistency. Start on low and gradually increase the speed. A minute should do it, but feel free to blend longer for a smoother texture. *Chef’s hack:* If the mixture is too thick, add a splash more milk!

2. **Add in the Good Stuff**
   Next, drizzle in those 2 tablespoons of chocolate syrup and 2 teaspoons of vanilla extract. Keep blending until all the ingredients are well incorporated. You’ll notice the mixture turning smooth and velvety. *Tip:* Taste for sweetness! This is when you can adjust by adding more chocolate syrup or cocoa, depending on how rich you want it.

3. **Serve it Up**
   Grab your favorite glasses—yes, presentation matters! You can chill them in the freezer for a bit if you like. Pour the blended mixture into the glasses, filling each one to the brim. It’s fine—everyone deserves extra!

4. **The Crown Jewel: Whipped Cream**
   Top each drink with a generous swirl of whipped cream. Go wild here! The fluffier, the better! *Chef's insight:* For an extra treat, sprinkle some cocoa powder or chocolate shavings on top to jazz it up.

5. **Drizzle on Extra Chocolate**
   If you’re feeling adventurous (and I know you are!), finish off with a drizzle of chocolate syrup over the whipped cream. It’s the cherry on top for this dessert drink!

---

## Serving Suggestions

Now that your **frozen hot chocolate** is ready, it’s time to serve it up with style! You can consider these fun options:

- **Garnish with Chocolate Shavings or Sprinkles**
  Before you present these delicious drinks to your guests, adding chocolate shavings or fun sprinkles gives a delightful visual touch. Kids and adults alike go crazy for those!

- **Pair with a Side Treat**
  Serve these beauties alongside a crispy cookie or a slice of cake. Imagine dunking a buttery shortbread cookie into that chocolatey goodness—heavenly!

- **Create a Frozen Hot Chocolate Bar**
  Set up a DIY station where guests can customize their drinks with flavored syrups, crushed cookies, whipped cream, and toppings like marshmallows or caramel. This adds a fun and interactive element to your gathering!

---

## Recipe Variations

Looking to mix things up? Check out these creative twists that make this frozen hot chocolate your own:

1. **Mint Chocolate Chip**
   Add a few drops of mint extract for that peppermint flavor! This creates a festive holiday vibe that transports you to winter Wonderland—regardless of the weather!

2. **Peanut Butter Cup**
   Blend in a spoonful of creamy peanut butter to amplify that chocolaty flavor. Top off with crushed peanuts or mini Reese’s for a nutty crunch!

3. **Mexican Spiced Hot Chocolate**
   Kick it up a notch by adding a sprinkle of cinnamon and a hint of cayenne pepper. It’s a fun way to add warmth and flavor!

4. **Coffee Lover's Frappe**
   Screw in an espresso shot or a splash of brewed coffee to add an extra jolt. For coffee aficionados, this is the ultimate pick-me-up!

5. **Bananas Foster Fusion**
   Toss in a frozen banana before blending for a creamy, dreamy taste with hints of banana flavor. You can even top with caramel drizzle for that classic twist!

---

## Chef’s Notes

A little backstory on how this recipe evolved: When I first made frozen hot chocolate, it was a trial-and-error journey. I discovered through unfortunate mishaps that my original version was WAY too sweet. Over time, I adapted it by focusing on balance and using high-quality ingredients. The transformation into a silky, creamy drink packed with a flavor punch was a labor of love. Now, I can’t imagine summer without it!

Plus, this drink has been a crowd-pleaser at many of my family gatherings. Friends started requesting variations, and it quickly turned into a tradition. My only frustration? Getting the right balance of texture that’s not too icy but still a frozen treat! It’s all part of the fun of cooking, right?!

---

## FAQs and Troubleshooting

Let’s tackle some of the common questions and mistakes when making frozen hot chocolate:

1. **What if my frozen hot chocolate is too thick?**
   If your drink turns out too dense, don’t fret! Just add a splash of milk and give it another quick blend until you reach your desired consistency.

2. **Can I use homemade hot cocoa mix?**
   Absolutely! If you want to make your own hot cocoa mix, simply whisk together unsweetened cocoa powder, sugar, and a pinch of salt. Use this in place of store-bought packets for a personalized touch.

3. **How can I store leftovers?**
   If by some miracle you have leftovers, store them in an airtight container in the freezer. When you’re ready to sip again, thaw just a bit and re-blend for that fresh texture.

4. **Can I make this in advance?**
   While the frozen hot chocolate is best enjoyed fresh, you can prep your ingredients (like the cocoa mix and syrup) ahead of time. Just blend and serve when you're ready for a treat!

---

## Nutritional Info

Now, let’s chat about the nutrition aspect. A serving of this decadent frozen hot chocolate (approximately 1 cup) weighs in around:

- **Calories:** 250–350 (depending on milk choice and added toppings)
- **Fat:** 10g (can vary with milk and whipped cream)
- **Carbohydrates:** 42g
- **Protein:** 6g
- **Sugar:** 25g

Keep in mind, these numbers can shift based on your ingredient choices. Opting for a lower-calorie syrup or non-dairy milk can create a lighter version.

Whatever your preference, remember that moderation is key, and indulging occasionally keeps happiness in our lives!

---

## Final Thoughts

Well, there you have it—my take on the **Best Frozen Hot Chocolate**! You’ve got the recipe, the variations, and all the tips you need to rock this sweet temptation. I hope you’re inspired to create some wonderful memories around this drink just like I did with my friends back in the day.

So, whatever occasion you have in mind—be it a warm-weather gathering, an evening movie night, or simply a moment of self-indulgence—this frozen hot chocolate is sure to be a hit. Share it with loved ones, get creative with your toppings, and most importantly, enjoy every chocolatey sip!

Thanks for joining me in my kitchen today! Until next time, keep stirring up joy and flavor in everything you make. Cheers!

The Best Frozen Hot Chocolate
- Total Time: 10 minutes
- Yield: 4 servings 1x
- Diet: Vegetarian
Description
A refreshing twist on a classic treat, this frozen hot chocolate will indulge your taste buds and cool you down on hot days.
Ingredients
- 3½ cups ice
- 2 cups milk (dairy or non-dairy)
- 4 packets hot cocoa mix
- 2 tablespoons chocolate syrup
- 2 teaspoons vanilla extract
- Whipped cream (for topping)
- Extra chocolate syrup (optional, for drizzle)
Instructions
- Blend the base: Combine 3½ cups of ice, 2 cups of milk, and 4 packets of hot cocoa mix in a blender.
- Add in the good stuff: Drizzle in 2 tablespoons of chocolate syrup and 2 teaspoons of vanilla extract. Blend until smooth.
- Serve it up: Pour the blended mixture into chilled glasses, filling them to the brim.
- Top with whipped cream: Generously swirl whipped cream on top of each drink.
- Drizzle on extra chocolate: Finish with a drizzle of chocolate syrup over the whipped cream if desired.
Notes
For variations, consider adding mint extract, peanut butter, or even espresso for a coffee twist. Adjust sweetness to your preference.
- Prep Time: 10 minutes
- Cook Time: 0 minutes
- Category: Dessert
- Method: Blending
- Cuisine: American
Nutrition
- Serving Size: 1 serving
- Calories: 300
- Sugar: 25g
- Sodium: 150mg
- Fat: 10g
- Saturated Fat: 5g
- Unsaturated Fat: 4g
- Trans Fat: 0g
- Carbohydrates: 45g
- Fiber: 1g
- Protein: 6g
- Cholesterol: 20mg
Keywords: frozen hot chocolate, chocolate drink, summer drinks, dessert recipes

Oreo Balls Recipe
The Ultimate Oreo Balls Recipe: A Sweet, No-Bake Delight
Hey there, foodie friends! Welcome back to Feastical! If you’re ready for a treat that’s as easy to make as it is delicious, then let’s dive into the wonderful world of Oreo Balls. These delightful little bites are perfect for any occasion, whether you’re hosting a party, craving something sweet, or looking to recreate a nostalgic memory tied to everyone’s favorite cookie.
Sweet Beginnings: My Love for Oreo Balls
Let me take you back in time to a sunny afternoon in my childhood kitchen, where the sweet smell of crushed Oreo cookies mingled with laughter and chatter. My mom, a kitchen wizard, would whisk me off to our cozy space, declaring it Oreo Ball day! I remember her showing me how to crush the cookies into a fine powder—my little hands working hard through the butter and cream cheese mixture. With every roll, we made these chocolatey spheres of joy that would be adorned with chocolate drizzles and colorful sprinkles.
These little bites packed with flavor became a family favorite, often appearing at dessert tables during holidays or birthday parties. There’s something so special about making them—almost magical—and even more so when you’re sharing them with loved ones. Each bite carries with it a sense of nostalgia, laughter, and those cozy moments. And best of all, they’re no-bake, making them easy for anyone to master.
So grab your spatula, let’s get rolling, and whip up a batch of Oreo Balls that’ll warm your heart and tantalize your taste buds.
Ingredients You’ll Need for Oreo Balls
Before we jump into the fun part—making these little sweet bites—let’s gather our ingredients. Here’s what you’ll need:
-
30 (340g) Oreo cookies
A classic choice! Feel free to use regular or gluten-free Oreos. They provide that signature chocolatey taste. -
3 tablespoons (45g) unsalted butter, melted and cooled
This ingredient adds richness and binds everything together. If you’re looking for a non-dairy option, coconut oil works great too! -
2-5 tablespoons whole milk
This ensures your Oreo mixture achieves the perfect creamy consistency. Adjust according to your preference—more milk for a softer texture or less for a denser ball! -
8 ounces (225g) dark, semi-sweet, or white chocolate, chopped
The chocolate coating gives your Oreo Balls a lovely finish. You can mix it up with flavored chocolates or even candy melts for a fun twist. -
1 teaspoon vegetable oil (optional)
Adding a touch of oil to your chocolate can help it melt smoothly and gives it a shinier finish. Plus, it’s totally optional, so if you want to keep it pure chocolate, go for it!
Let’s Get Cooking: Step-by-Step Instructions
Now that we’ve rounded up our ingredients, it’s time to roll up our sleeves and create some magic! Follow these simple steps:
Step 1: Crush the Oreos
Start by placing your Oreos in a food processor. If you don’t have one, don’t fret! You can put them in a zip-top bag and crush them with a rolling pin. Make sure they’re finely ground—kind of like sand! This ensures even mixing with the other ingredients.
Chef Tip: If you want a little extra texture, reserve a tablespoon or two of crushed Oreos to sprinkle on top later. This adds a nice touch and shows off the Oreo goodness!
Step 2: Mix It Up
In a mixing bowl, combine the crushed Oreo cookies with the melted butter and 2 tablespoons of milk. Stir until well combined. If the mixture seems too dry, slowly add another tablespoon of milk until it reaches a dough-like consistency.
Chef Hack: Don’t overdo the milk! You want the mixture to hold together but not be too soggy. The right texture is key!
Step 3: Roll Into Balls
Using your hands, take about a tablespoon of the mixture and roll it into a ball. Repeat until all of the mixture is formed into little bites of joy. Place them on a parchment-lined baking sheet for easy cleanup!
Legacy Story: I once rolled these too large and ended up creating “Oreo boulders,” as my friends affectionately nicknamed them. They’re just as delicious but a little harder to eat in one bite!
Step 4: Chill Out
Once all the balls are rolled, pop them in the freezer for about 30 minutes. This makes them firm up nicely and allows the chocolate coating to adhere better.
Step 5: Melt the Chocolate
While the Oreo balls are chilling, let’s melt the chocolate. You can do this in a microwave or over a double boiler. If using the microwave, heat in 30-second intervals, stirring in between to ensure it doesn’t burn. Add the vegetable oil if you’re using it; this will help your chocolate sheen beautifully!
Chef Insight: If you’re feeling adventurous, adding a splash of flavoring essence (like peppermint or orange) to your melted chocolate can take this treat to the next level.
Step 6: Dunk and Decorate
Once your Oreo balls are firm and your chocolate is perfectly melted, it’s time for the fun part. Take each ball and dip it into the chocolate coating, using a fork to help shake off excess. Return them to the parchment-lined tray.
Step 7: Add Toppings (Optional)
If you reserved some crushed Oreos earlier, sprinkle them on top while the chocolate is still wet. You can also use sprinkles, chopped nuts, or even drizzle contrasting chocolate on top for that final flair.
Step 8: Let ‘Em Set
Allow the chocolate to set fully at room temperature or pop them back in the fridge for a faster result.
Serving Suggestions: Plating Your Creation
When it comes to serving these Oreo Balls, let your personality shine through! You can present them on a festive plate, making sure to space them apart so they have room to shine. If it’s a party, consider adding a mini toothpick in each ball for easy grabbing.
For a more elegant touch, place them in mini cupcake liners or on a tiered cake stand. This not only looks delightful but also elevates the experience of enjoying them, making every bite feel special.
Fun Fact: I once whipped up a batch for a friend’s wedding as party favors. They turned out to be a hit, and each little bag was tied with a ribbon. Just imagine—Oreo Balls on a wedding table—it was as sweet as the union!
Recipe Variations: Get Creative!
Let’s spice things up a bit! Here are some of my favorite variations that you can try:
-
Peanut Butter Oreo Balls: Swap out some crushed Oreos for peanut butter cookies or add a spoonful of creamy peanut butter to the mixture for a rich, nutty flavor.
-
Minty Fresh Oreo Balls: Add a few drops of mint extract to your mixture for an invigorating mint-chocolate combo. Perfect for holiday celebrations!
-
Cake Batter Oreo Balls: Substitute a small amount of the crushed Oreos with funfetti cake mix to capture that birthday cake flavor. Yum!
-
Chocolate Drizzle: Instead of covering the entire ball in chocolate, drizzle melted white chocolate over the top for a beautiful contrast.
-
Nutty Bliss: Roll them in crushed nuts like almonds or hazelnuts instead of chocolate for a delightful crunch!
Chef’s Notes: Tales from the Kitchen
As I’ve grown and cooked through the years, this recipe has become a beloved staple among my family and friends. What started as a simple treat transformed into a canvas for creativity and joy. I love how versatile Oreo Balls can be—each batch tells a different story depending on the variations I choose. Plus, they are a great way to get little ones involved in the kitchen! Watching their faces light up as they roll the balls and practically devour the leftovers is worth every moment.
And don’t get me started on leftovers! These sweet bites never last long in my house. They’re perfect as a midnight snack or even as a last-minute gift when you need something quick and sweet to share.
FAQs and Troubleshooting
Q1: Can I use a different type of cookie?
Absolutely! While Oreos are classic, any chocolate sandwich cookie will work. Try it with other flavored cookies, too. Just remember to adjust according to taste!
Q2: How long do these last?
If stored in an airtight container in the fridge, they can last about a week. If you want to keep them longer, they freeze well, too!
Q3: My chocolate didn’t melt smoothly. What did I do wrong?
This can happen if you overheated it. Always melt in short bursts and stir often. If it seizes up, adding a tiny bit of shortening or butter can help bring it back to life.
Q4: Can I make these vegan?
Yes! Use dairy-free chocolate, non-dairy milk, and a vegan butter alternative to make these Oreo Balls entirely plant-based!
Nutritional Info
When it comes to indulging in sweet treats, moderation is key! Here’s a general breakdown of the nutrition per Oreo Ball, assuming you cut them into 30 equal pieces:
- Calories: ~90–100
- Fat: 5g (varies according to chocolate used)
- Carbohydrates: 12g
- Sugar: 8g
- Protein: 1g
Keep in mind, ingredients and quantities can vary based on your choices, especially if you opt for variations or substitution ingredients!
Final Thoughts
There you have it, dear friends—a delightful dessert that’s easy, fun, and brings more than just flavor to the table. Oreo Balls aren’t just a treat; they are a collection of memories wrapped in sweetness, a way to connect with those around you, and a canvas for your creativity.
So next time you’re in the kitchen, why not gather your loved ones, roll up your sleeves, and dive into the delicious realm of Oreo Balls? Whip up these sweet nuggets of joy and relish the smiles they bring. Happy cooking, and remember—you’re always just a few ingredients away from creating something wonderful! Keep it soulful, simple, and always satisfying! 🍪✨
Print
The Ultimate Oreo Balls Recipe
- Total Time: 45 minutes
- Yield: 30 servings 1x
- Diet: Vegetarian
Description
A sweet and easy no-bake treat made with crushed Oreo cookies, butter, and chocolate coating, perfect for any occasion.
Ingredients
- 30 (340g) Oreo cookies
- 3 tablespoons (45g) unsalted butter, melted and cooled
- 2–5 tablespoons whole milk
- 8 ounces (225g) dark, semi-sweet, or white chocolate, chopped
- 1 teaspoon vegetable oil (optional)
Instructions
- Crush the Oreos by placing them in a food processor or a zip-top bag and using a rolling pin until finely ground.
- Mix the crushed Oreo cookies with melted butter and 2 tablespoons of milk until well combined.
- Roll about a tablespoon of the mixture into a ball and place on a parchment-lined baking sheet.
- Chill the balls in the freezer for about 30 minutes.
- Melt the chocolate in the microwave or over a double boiler, stirring frequently.
- Dunk each Oreo ball into the melted chocolate, then return them to the parchment-lined tray.
- Add reserved crushed Oreos or toppings while the chocolate is still wet.
- Let the chocolate set at room temperature or refrigerate for a faster result.
Notes
These Oreo Balls can be customized with various mix-ins and toppings. Perfect for sharing or as a party favor!
- Prep Time: 15 minutes
- Cook Time: 0 minutes
- Category: Dessert
- Method: No-Bake
- Cuisine: American
Nutrition
- Serving Size: 1 ball
- Calories: 90
- Sugar: 8g
- Sodium: 50mg
- Fat: 5g
- Saturated Fat: 2.5g
- Unsaturated Fat: 2.5g
- Trans Fat: 0g
- Carbohydrates: 12g
- Fiber: 0g
- Protein: 1g
- Cholesterol: 5mg
Keywords: Oreo Balls, no-bake dessert, easy recipe, chocolate treat, holiday treats

Gourmet Brownie Cookies
Indulge in Gourmet Brownie Cookies: A Delight for Every Sweet Tooth!
Hey there, fellow food lovers! Beau Collier here, and I can’t wait to dive into the sweet, decadent world of gourmet brownie cookies with you. If there’s one thing we can all agree on, it’s that cookies have their own special place in our hearts (and stomachs!). So, get ready because we’re about to embark on a delicious journey that combines the fudginess of brownies with the classic crispiness of cookies. What’s not to love, right?
Ah, the aroma of freshly baked cookies wafting through the kitchen! It’s like a cozy hug that creeps under your skin and warms your soul. For me, cookie season is year-round, but there’s something intrinsically special about gourmet brownie cookies. They bring together the best of both worlds: the gooey richness of brownies and the finger-licking joy of cookies. Imagine biting into a soft, chocolatey treat that promises both chewiness and a crumbly texture. That, my friend, is pure bliss!
So, here’s the lowdown: one bite of these gourmet brownie cookies, and they will transport you straight to chocolate heaven! Whether you’re whipping them up for a last-minute gathering, a cozy night in with loved ones, or simply because it’s Tuesday (and that’s reason enough!), these cookies will never let you down.
In today’s post, I’ll take you through every step of my favorite brownie cookie recipe, share stories from my kitchen adventures, and sprinkle in a few of my secret baking tips along the way. So grab your apron, fire up that oven, and let’s create something magical together!
Personal Story
Growing up, my grandmother was the reigning queen of the cookie jar. Whether it was soft and chewy chocolate chip cookies or her legendary oatmeal raisin delights, she had an unwavering knack for sweet treats. But one memory that stands out is when she introduced me to her "special" brownie cookies. I still remember the day she pulled them out of the oven—puffy, gooey, and topped with a sprinkle of sea salt. As soon as I took a bite, I was instantly transported to euphoria. The chocolate melted in my mouth, and I could hardly believe that such a simple recipe could produce such rich flavors.
It was one of those moments that planted the seed of my passion for cooking. And can you believe it? I still use her recipe today! Over the years, I’ve played with it, adding my own twists and turns while keeping that original flavor intact. Just like grandma taught me, sharing freshly baked goodness with others is one of life’s simplest joys.
Ingredients
Let’s gather our ingredients! Each component plays a key role in crafting the perfect brownie cookies. Here’s what you’ll need:
-
1 cup butter, melted: This adds richness and helps achieve that gooey texture. You can use unsalted or salted butter based on your taste preference.
-
1 cup granulated sugar: This sweetens the cookies and helps with that lovely crispy exterior. For a healthier option, consider coconut sugar.
-
1 cup brown sugar: Adding depth and moisture, brown sugar gives these cookies that signature caramel flavor. If you’re out of brown sugar, you can mix granulated sugar with a dash of molasses as a substitute.
-
2 large eggs: The binding agents that create structure and stability. For a vegan alternative, you can use flaxseed meal mixed with water.
-
1 teaspoon vanilla extract: Adds warmth and enhances the overall flavor profile. Feel free to use almond extract for a fun twist.
-
1 cup all-purpose flour: The backbone of our cookies. For a gluten-free option, almond flour or a gluten-free blend works well.
-
1/2 cup cocoa powder: This is where the chocolate magic happens! Use unsweetened cocoa for the best results.
-
1/2 teaspoon baking powder: This gives the cookies a slight lift, helping them puff up nicely.
-
1/4 teaspoon salt: A touch of salt elevates the flavors and balances the sweetness. Sea salt is my favorite!
-
1 cup chocolate chips: Because one can never have too much chocolate! Go for semi-sweet or dark chocolate for a richer flavor.
Step-by-Step Instructions
Ready to make some magic in the kitchen? Let’s get rolling! Here’s how to whip up these gourmet brownie cookies step by step.
-
Preheat your oven to 350°F (175°C). This is crucial for ensuring your cookies bake evenly. While the oven heats up, it’s the perfect time to gather your ingredients and tools!
-
Melt the butter: In a medium-sized bowl, combine your melted butter with the granulated sugar and brown sugar. Give it a good mix until it’s smooth and well combined. The heat from the melted butter helps dissolve the sugar, leading to super chewy cookies!
-
Add the eggs and vanilla: One by one, crack in those eggs, mixing well after each addition. Then, stir in the vanilla extract. This will create a beautiful, glossy batter that’s rich in flavor.
-
Combine the dry ingredients: In a separate bowl, whisk together the all-purpose flour, cocoa powder, baking powder, and salt. This step helps ensure everything is well-distributed and prevents any clumps.
-
Combine wet and dry: Gradually fold the dry ingredients into the wet mixture, being careful not to overmix. It’s totally OK to have a few lumps; we want that fudgy texture!
-
Chocolate chips magic: Stir in the chocolate chips (or chunks, if you’re feeling wild!). Now’s the perfect time to add in any extras you love—walnuts, hazelnuts, or even a sprinkle of espresso powder for an added flavor punch!
-
Scoop and bake: Use a cookie scoop to portion the dough onto a lined baking sheet, leaving space between each scoop. These beauties will spread a bit during baking, so don’t cramp their style! Bake for about 10-12 minutes or until the edges are slightly firm but the center still looks soft.
-
Cool down: Once out of the oven, let the cookies cool on the baking sheet for about 5 minutes before transferring them to a wire rack. This helps them finish setting up while still keeping that soft, chewy center.
Serving Suggestions
Now for the fun part—serving your gourmet brownie cookies! Here’s how to impress your friends and family:
-
Plate with style: Use a rustic wooden board or a chic white platter to display your cookies. Stack them high for a dramatic effect, or line them up for a more casual vibe.
-
Add a scoop of ice cream: Nothing pairs better with warm cookies than a scoop of vanilla or salted caramel ice cream. Place the cookies in a bowl and top them off with a generous scoop. Heaven in a dish!
-
Dust with powdered sugar: For a fancy touch, dust some powdered sugar over the top right before serving. It adds a little elegance and makes everything just a bit sweeter!
-
Drizzle with chocolate: Melt some chocolate and drizzle it artfully over your cookies for an Instagram-worthy creation. You can even sprinkle some sea salt on top to elevate the flavor even more.
Recipe Variations
Now, let’s get creative! Here are a few fun variations to shake things up:
-
Mint Chocolate Brownie Cookies: Add a few drops of mint extract to impart a refreshing minty flavor. You can also toss in some Andes mints or chocolate chips with a hint of mint.
-
Nutty Delight: Fold in some chopped nuts, like pecans or hazelnuts, for added texture and a nutty flavor. Toasting the nuts beforehand enhances their taste!
-
Spicy Kick: Want to take your cookies to the next level? Add a pinch of cayenne pepper or chili powder for an unexpected heat that balances the sweetness. Trust me!
-
Dark Chocolate Chunk: Swap regular chocolate chips for dark chocolate chunks for an intense chocolate experience. The extra bits of chocolate create surprises in every bite!
-
Gluten-Free Option: Substitute all-purpose flour with a gluten-free flour blend to make it suitable for those with gluten sensitivities. They’ll be just as delicious!
Chef’s Notes
Ah, the kitchen! It’s where all the best stories happen, and oh, do I have a few! I’ll let you in on a little secret: recipe testing often goes awry, leading to some hilarious moments. At one point, I misread a measuring cup and added a full cup of salt instead of a quarter teaspoon. 🤦♂️ Let’s just say, those cookies went straight to the trash and not a single friend would take them!
Each time I make these brownie cookies, I make sure to tweak the recipe slightly—trying different flavor combinations or using organic ingredients. Revisiting the same base recipe has led to numerous delicious outcomes, proving that there’s always room for creativity in the kitchen!
FAQs and Troubleshooting
As with any recipe, it’s completely normal to run into some hiccups. Here are a few common questions and solutions to ensure your brownie cookies turn out perfectly.
Q1: Why are my cookies too chewy?
Chewy cookies need moisture, but if they’re too chewy, you might have added too much flour or not baked them long enough. Make sure to measure your flour accurately and stick to the baking time!
Q2: My cookies spread too much while baking. What happened?
If your cookies spread excessively, try chilling the dough for about 30 minutes before baking. This will help solidify the butter and prevent excessive spreading.
Q3: Can I freeze these brownie cookies?
Absolutely! These cookies freeze really well. Just place them in an airtight container or zip-top bag, and they’ll keep their freshness for a few months. Thaw at room temperature before enjoying!
Q4: How do I store leftover cookies?
Keep them in an airtight container at room temperature for about a week, or in the fridge if you want to prolong their freshness. Just remember to let them come to room temperature before serving for the ultimate chewy experience!
Nutritional Info
While I believe that life’s too short not to indulge every once in a while, it’s still good to have an idea of what’s going into our favorite treats! Here’s a basic rundown of the nutritional info per cookie (assuming about 24 cookies in one batch):
- Calories: Approximately 200
- Total Fat: 10g (Saturated fat: 6g)
- Cholesterol: 40mg
- Sodium: 50mg
- Total Carbohydrates: 28g (Dietary fiber: 1g, Sugars: 18g)
- Protein: 2g
Remember, moderation is key; balance those calories with plenty of veggies and healthy meals throughout the week!
Aside from satisfying your sweet tooth, these cookies provide a host of enjoyable flavors and delightful moments around the table with loved ones.
Final Thoughts
There you have it! Gourmet brownie cookies that are sure to win over hearts and tantalize taste buds. This recipe is not just a combination of ingredients; it’s about creating lasting memories, sharing joy, and perhaps, a little bit of chocolate-induced happiness!
So here’s my challenge to you: try these out for your next gathering or cozy night in, and I guarantee people will be asking for your secret recipe. And who knows? You might even find some kitchen inspiration for your own variations down the line.
Thank you for joining me on this delicious adventure. I can’t wait to hear how your gourmet brownie cookies turn out! Spread the love (and cookie crumbs), and remember: the heart of every home is the kitchen. Now go forth and bake with joy!
Happy cooking! 🍪✨
Print
Gourmet Brownie Cookies
- Total Time: 27 minutes
- Yield: 24 cookies 1x
- Diet: Vegetarian
Description
Decadent cookies combining the fudginess of brownies with classic cookie crispiness.
Ingredients
- 1 cup butter, melted
- 1 cup granulated sugar
- 1 cup brown sugar
- 2 large eggs
- 1 teaspoon vanilla extract
- 1 cup all-purpose flour
- 1/2 cup cocoa powder
- 1/2 teaspoon baking powder
- 1/4 teaspoon salt
- 1 cup chocolate chips
Instructions
- Preheat your oven to 350°F (175°C).
- Melt the butter and mix it with the granulated and brown sugar until smooth.
- Add the eggs one at a time, mixing well after each addition, then stir in vanilla.
- Combine the flour, cocoa powder, baking powder, and salt in a separate bowl.
- Combine the dry ingredients into the wet mixture, folding gently.
- Stir in the chocolate chips or other additions if desired.
- Scoop the dough onto a lined baking sheet and bake for about 10-12 minutes.
- Cool the cookies on the baking sheet for 5 minutes before transferring to a wire rack.
Notes
Adjust baking time for preferred cookie texture; if too chewy, consider measuring flour more accurately.
- Prep Time: 15 minutes
- Cook Time: 12 minutes
- Category: Dessert
- Method: Baking
- Cuisine: American
Nutrition
- Serving Size: 1 cookie
- Calories: 200
- Sugar: 18g
- Sodium: 50mg
- Fat: 10g
- Saturated Fat: 6g
- Unsaturated Fat: 4g
- Trans Fat: 0g
- Carbohydrates: 28g
- Fiber: 1g
- Protein: 2g
- Cholesterol: 40mg
Keywords: cookies, brownie cookies, chocolate cookies, dessert, sweet treats