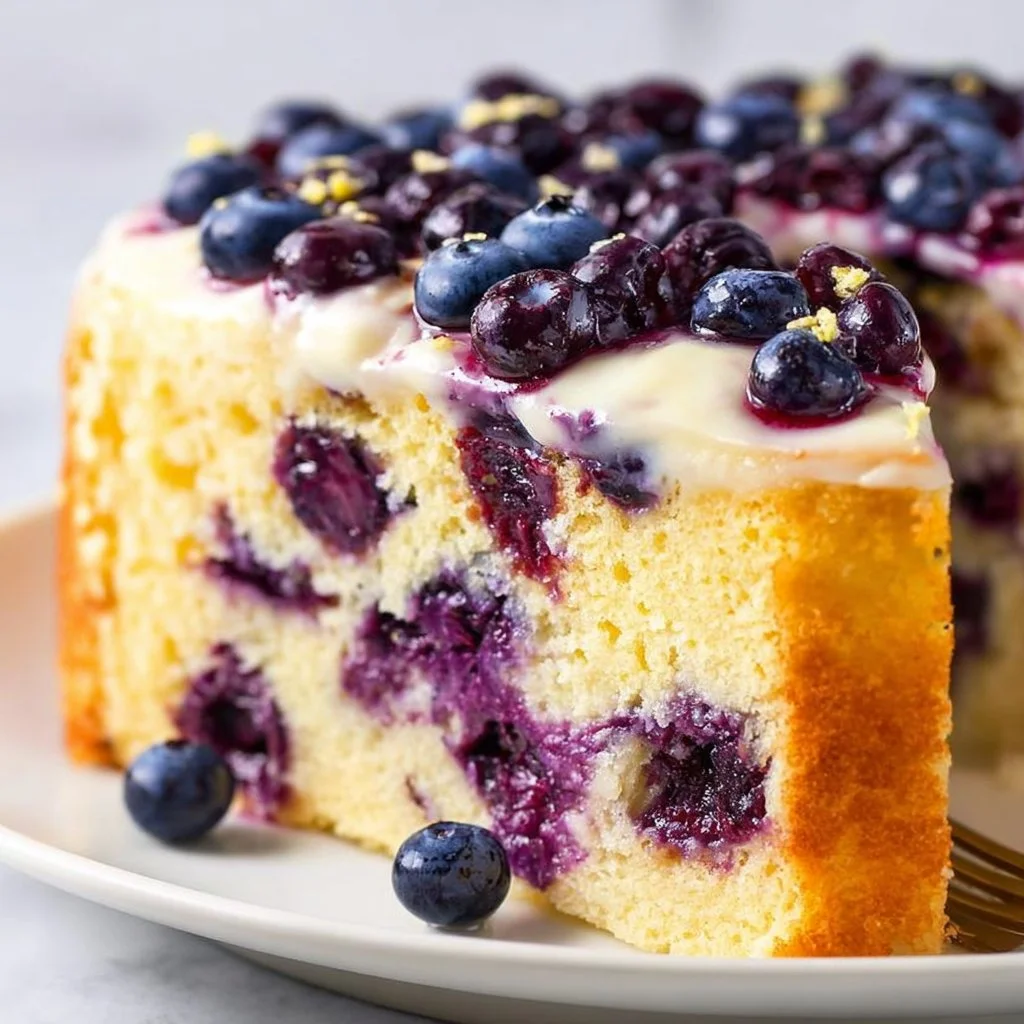
Healthy Lemon Blueberry Cake
The Bright and Zesty Healthy Lemon Blueberry Cake Recipe That Will Make Your Taste Buds Dance!
Hey there, fellow food enthusiasts! I’m Beau Collier, and today we’re diving into a recipe that embodies sunshine on a plate: Healthy Lemon Blueberry Cake. Imagine a cake that’s not just delicious but also crafted to be a little kinder on your waistline. You read that right! This cake brings together the vibrant zing of fresh lemons and the sweetness of blueberries, creating a dessert that feels indulgent while being mindful of your health.
This delightful cake is perfect for any occasion—whether you’re celebrating a birthday, hosting a brunch, or simply treating yourself to a slice of happiness on a Wednesday afternoon. Trust me; each bite is like a mini celebration, bursting with flavor and joy. The best part? It’s so easy to whip up that you won’t have to spend an entire afternoon in the kitchen. So, grab your apron, and let’s create some sweet memories together!
But let’s not just jump into the recipe without some kitchen storytelling. Every dish holds a memory, and this cake is no different. Let me take you back to a sunny day when I stumbled upon the perfect blend of lemon and blueberry: a flavor combo that would forever change how I look at dessert!
Personal Story
I remember the first time I baked a lemon blueberry dessert. It was a warm Saturday afternoon during my summer break in college. My best friend, Alex, and I were on a mission to challenge our culinary skills. We decided to create something fresh and fruity for our outdoor picnic.
After rummaging through the fridge, we found an abundance of lemons and a basket laden with blueberries. An idea sparked! We wanted to create a cake that sang with summer flavors, and what unfolded was pure magic. We laughed, spilled flour all over the counters, and savored the scent of freshly squeezed lemon juice wafting through our tiny apartment. It felt like the world slowed down for a moment as we indulged in the sweet and tangy batter.
We shared that delicious creation with friends, and I’ll never forget the joy we all felt as we relished each bite. That experience not only bonded us in the kitchen but also taught me the beautiful lesson that cooking is all about sharing and love. Now, years later, I’m excited to pass this vibrant lemon blueberry cake recipe onto you, so you can create your own memorable moments!
Ingredients
Let’s gather our ingredients for the Healthy Lemon Blueberry Cake! Here’s what you’ll need:
-
1 ½ cups almond flour
- Why almond flour? It’s gluten-free, low in carbs, and adds a lovely nutty flavor. If you don’t have almond flour, you can use oat flour or all-purpose flour, but the texture and taste may vary!
-
1 cup blueberries (fresh or frozen)
- Tip: Either works great! Fresh blueberries are bursting with flavor, while frozen ones are super convenient. If using frozen, no need to thaw. Just pop them straight into the batter!
-
½ cup maple syrup
- Sweetness made natural! Maple syrup gives a rich flavor, but you can swap it out for honey or agave syrup if that’s what you have on hand.
-
¼ cup coconut oil, melted
- For a moist cake! Coconut oil adds a subtle flavor and healthy fats. If you’re looking for a different option, melted butter or any neutral oil will work just fine.
-
¼ cup lemon juice
- Freshly squeezed is best! It gives your cake that vibrant tang. If you’re in a pinch, bottled lemon juice can work, but it might lack some of the freshness.
-
1 tablespoon lemon zest
- Don’t skip this! The zest provides a concentrated burst of lemon flavor. Use a Microplane to finely zest your lemons without getting too much pith.
-
1 teaspoon baking powder
- A must for rising! Make sure it’s fresh for proper leavening.
-
½ teaspoon baking soda
- A little extra lift. This will help the cake achieve a fluffy texture.
-
¼ teaspoon salt
- Don’t forget the salt! Just a pinch keeps the flavors balanced and enhances the sweetness.
-
½ teaspoon vanilla extract
- Add warmth and depth. You can use almond extract for a unique twist!
Step-by-Step Instructions
Alright, let’s roll up those sleeves and get cooking! Follow these detailed steps, and you’ll soon have a beautiful cake to wow your friends and family.
Step 1: Preheat Your Oven
Start by preheating your oven to 350°F (175°C). This is an essential step, as a properly preheated oven ensures even baking. Trust me; you don’t want to put your batter in a cold oven and mess with your cake’s rise!
Step 2: Prepare Your Baking Pan
Grab an 8-inch round cake pan and grease it with cooking spray or coconut oil. You can also line the bottom with parchment paper for easy removal, especially if you’re feeling fancy!
Step 3: Mix the Dry Ingredients
In a large mixing bowl, combine your almond flour, baking powder, baking soda, and salt. Whisk them together until they are well combined. This step helps distribute the leavening agents evenly throughout the flour for a consistent rise!
Step 4: Mix the Wet Ingredients
In another bowl, whisk together the maple syrup, melted coconut oil, lemon juice, lemon zest, and vanilla extract. Take a moment to inhale the bright aromas; they’re simply divine!
Step 5: Combine Wet and Dry
Now, pour the wet mixture into the bowl of dry ingredients. Gently fold the ingredients together using a spatula. Be careful not to overmix; we want a light, tender crumb in our cake, not a dense brick!
Step 6: Fold in the Blueberries
Once your batter is combined, it’s time to add the star of the show—blueberries! Gently fold them in, preserving their shape and juiciness. The last thing you want is a purple cake, so handle them with care!
Step 7: Pour and Spread
Transfer the batter into the prepared cake pan. Use a spatula to smooth it out evenly, making sure it reaches the edges. A flat surface helps it bake evenly.
Step 8: Bake Away!
Pop your cake into the preheated oven and let it bake for 25-30 minutes until it’s golden brown and a toothpick inserted into the center comes out clean. The kitchen will start to smell unreal—just wait for it!
Step 9: Cool and Serve
Once baked, remove the cake from the oven and let it cool in the pan for about 10 minutes. Then, turn it out onto a wire rack to cool completely. This step is crucial; you don’t want a gooey center when you’re ready to slice!
Serving Suggestions
Now that your cake has cooled, it’s time to serve it up! I love to dust this healthy lemon blueberry cake with a sprinkle of powdered sugar, which adds a touch of elegance.
For an extra kick of flavor, why not serve a dollop of Greek yogurt or whipped coconut cream on the side? Both options add creaminess and contrast beautifully with the cake’s bright flavors. You could even add a few fresh blueberries on top for a pop of color—plus, who can resist that gorgeous berry goodness?
Consider pairing your cake with a refreshing herbal tea or a tall glass of iced lemonade. It’s the perfect way to elevate your dessert experience!
Recipe Variations
Feeling adventurous? Here are some fun and creative twists on this classic lemon blueberry cake:
-
Lemon Poppy Seed Cake: Add 2 tablespoons of poppy seeds to the batter for a delightful crunch and extra aesthetic appeal.
-
Coconut-Lemon Cake: Mix ½ cup of unsweetened shredded coconut into the batter for a tropical feel.
-
Lavender Lemon Cake: Incorporate 1 teaspoon of culinary lavender into your wet ingredients for a sophisticated floral note.
-
Berry Medley Cake: Replace the blueberries with a mix of raspberries, blackberries, and strawberries for a berry blast!
-
Lemon Almond Cake: Add a tablespoon or two of almond extract for an extra layer of flavor that complements the almond flour beautifully.
Chef’s Notes
I’ve been making versions of this cake for years now, and I’ve learned a thing or two along the way. For example, the freshness of your lemons can make a world of difference! Look for bright yellow lemons that feel heavy for their size; they’ll yield the juiciest juice.
Also, I can’t stress enough how important it is to let the cake cool fully before slicing it—patience pays off here! And if you’re ever feeling adventurous, try swirling some lemon curd through the batter before baking for an extra tart surprise.
FAQs and Troubleshooting
1. Why is my cake dense?
This usually happens if the batter is overmixed. Be gentle and fold until just combined!
2. Can I substitute the almond flour?
Absolutely! You can use oat flour, but keep in mind that almond flour has a higher fat content, affecting the moisture and texture.
3. How should I store the cake?
Store your cake in an airtight container at room temperature for 2-3 days. You can also refrigerate it for up to a week, but be sure to bring it back to room temperature before serving for the best texture.
4. Can I freeze the cake?
Yes! Wrap individual slices in plastic wrap and store them in an airtight container in the freezer for up to 2 months. Just defrost at room temperature when you’re ready to enjoy a slice!
Nutritional Info
Now, let’s talk about how this cake fits into a healthy lifestyle! Thanks to its wholesome ingredients, this Healthy Lemon Blueberry Cake packs in some significant nutritional benefits. Here’s a quick breakdown of its health highlights:
-
Almond Flour: High in protein, healthy fats, and vitamin E—making it more nutritious than traditional flour.
-
Blueberries: Loaded with antioxidants, vitamins, and fiber, blueberries help boost heart health and support digestion.
-
Maple Syrup: Naturally sweet, maple syrup is a fantastic alternative to refined sugars, adding minerals and nutrients to your sweet fix.
-
Coconut Oil: Provides healthy medium-chain triglycerides (MCTs), which can provide energy and support brain health.
This cake is not just a treat for your taste buds; it’s a treat for your body too!
Final Thoughts
There you have it, my fabulous foodies! A healthy lemon blueberry cake that’s bursting with flavor and vitality. Whether you’re baking it for a special occasion or just because it’s a Tuesday, you’re creating not just a dessert but also memories filled with joy and love.
Remember, cooking is all about experimentation, and I encourage you to put your own spin on this recipe. Maybe it’ll become a favorite in your kitchen, too! So next time you need a sweet pick-me-up or a go-to dessert for gatherings, you know what to make.
As always, I’d love to hear how your cake turns out or any fun variations you come up with. Happy baking, and until next time, keep spreading love through food!
Let’s keep the feast going at Feastical—where every meal tells a story, and every recipe is a celebration! 🍋💙
Print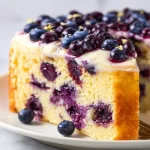
Healthy Lemon Blueberry Cake
- Total Time: 45 minutes
- Yield: 8 servings 1x
- Diet: Vegetarian
Description
A delightful and healthy cake that combines the vibrant zing of fresh lemons with the sweetness of blueberries, perfect for any occasion.
Ingredients
- 1 ½ cups almond flour
- 1 cup blueberries (fresh or frozen)
- ½ cup maple syrup
- ¼ cup coconut oil, melted
- ¼ cup lemon juice
- 1 tablespoon lemon zest
- 1 teaspoon baking powder
- ½ teaspoon baking soda
- ¼ teaspoon salt
- ½ teaspoon vanilla extract
Instructions
- Preheat your oven to 350°F (175°C).
- Prepare an 8-inch round cake pan by greasing it or lining with parchment paper.
- Mix the dry ingredients: almond flour, baking powder, baking soda, and salt in a large mixing bowl.
- Whisk together the wet ingredients: maple syrup, melted coconut oil, lemon juice, lemon zest, and vanilla extract in another bowl.
- Combine the wet mixture with the dry ingredients and gently fold together.
- Fold in the blueberries carefully to preserve their shape.
- Transfer the batter into the prepared cake pan and smooth it out evenly.
- Bake for 25-30 minutes or until golden brown and a toothpick comes out clean.
- Cool in the pan for 10 minutes and then turn it out onto a wire rack to cool completely.
Notes
Dust with powdered sugar or serve with Greek yogurt or whipped coconut cream for added flavor.
- Prep Time: 15 minutes
- Cook Time: 30 minutes
- Category: Dessert
- Method: Baking
- Cuisine: American
Nutrition
- Serving Size: 1 slice
- Calories: 250
- Sugar: 8g
- Sodium: 180mg
- Fat: 13g
- Saturated Fat: 5g
- Unsaturated Fat: 6g
- Trans Fat: 0g
- Carbohydrates: 30g
- Fiber: 3g
- Protein: 7g
- Cholesterol: 0mg
Keywords: lemon cake, blueberry cake, healthy dessert, gluten-free cake, spring dessert

Healthy Chocolate Cake
Healthy Chocolate Cake: A Sweet Treat Without the Guilt
Hey there, fellow food enthusiasts! It’s Beau Collier, your culinary companion over here at Feastical. Today, we’re diving into something truly special: a Healthy Chocolate Cake that brings all the rich indulgence of chocolate without the added guilt. Yes, you heard me right! This cake is moist, decadent, and easy enough to whip up on a whim—perfect for a weeknight treat or a special occasion.
You see, I believe that we shouldn’t have to compromise on flavor to enjoy healthier choices. It can be tough to juggle a busy lifestyle while trying to eat right, and that’s where this recipe shines. It’s packed with wholesome ingredients that lend just the right amount of sweetness, coming from natural sources—like applesauce and maple syrup—rather than refined sugars. Whether you’re trying to eat clean, jump on a gluten-free trend, or just craving something sweet, this cake is a fantastic addition to your repertoire.
And for those of you who think baking is reserved for the overly ambitious home chef, don’t worry! I’ve designed this recipe to be straightforward and, as always, fun! So, roll up your sleeves, preheat that oven, and get ready to indulge in a little chocolatey goodness that will have everyone asking for seconds (or thirds!).
Personal Story
Let me take you back to a sunny afternoon in my grandmother’s kitchen, where my love affair with chocolate cakes began. I was about six or seven, standing on a stool, peering over the counter as Grandma prepared her famous chocolate cake for my cousin’s birthday. The scent of cocoa mingling with hints of vanilla sent my little heart into a flutter. I can still hear her humming away, classical music softly drifting through the air, creating the perfect setting.
I remember asking her if we could make it healthier someday, and she chuckled, giving me a twinkle of mischief in her eye. "Well, we could use apples instead of sugar," she said. "But why would we ever do that?" Many years later, her playful words sparked an idea that grew into my passion for creating delectably healthy desserts. This Healthy Chocolate Cake is an ode to those sunny kitchen adventures, combining nostalgia with wholesome ingredients.
Ingredients
Here’s what you’ll need to whip up your Healthy Chocolate Cake:
-
1 cup almond flour
A great gluten-free option! Almond flour adds moisture and a subtle nuttiness. If you don’t have almond flour, you can swap it for oat flour or make a homemade version by blending whole almonds into a fine powder. -
1/2 cup cocoa powder
Unsweetened cocoa powder is what gives this cake its rich chocolate flavor. Look for good quality cocoa for the best results. You can also substitute this with carob powder for a caffeine-free twist! -
1/2 teaspoon baking soda
This will help the cake rise and create a light, fluffy texture. If you’re out of baking soda, you can use baking powder, but keep in mind that you’ll need to adjust the quantities since they have different strengths. -
1/4 teaspoon salt
A pinch of salt elevates the flavors in sweet treats. If you’re watching your sodium intake, feel free to omit it or use a salt substitute. -
1/2 cup unsweetened applesauce
This is your natural sweetener and moisture booster. If you don’t have applesauce, blended bananas make for an excellent substitute, giving the cake a delightful flavor twist! -
1/4 cup maple syrup or agave
Both add a touch of sweetness while keeping the cake moist. Honey can also be used, but note that it’s not vegan if that’s important to you. -
1 teaspoon vanilla extract
An absolute must for adding depth to the flavor—don’t skip it! If you prefer a hint of something different, you can use almond extract or even coffee for a unique twist. -
1/2 cup unsweetened almond milk
This helps blend the ingredients smoothly, giving your cake the perfect consistency. If you’re not a fan of almond milk, any other non-dairy milk will work, like oat or soy milk.
Step-by-Step Instructions
Now, let’s get to the fun part—baking our delicious Healthy Chocolate Cake! Follow these steps, and you’ll be digging into a slice of heaven in no time.
-
Preheat Your Oven:
Preheat your oven to 350°F (175°C). This ensures that the oven is hot enough for your cake to rise beautifully. While it warms up, gather your mixing bowls and measuring cups because we’re about to bake! -
Prepare the Pan:
Grab an 8-inch round cake pan and lightly grease it with a bit of coconut oil or spray. You can also line it with parchment paper for easy removal; nobody wants a cake that sticks to the pan. Trust me! -
Mix Dry Ingredients:
In a mixing bowl, whisk together the almond flour, cocoa powder, baking soda, and salt. This step is crucial because it’ll help evenly distribute the baking soda, preventing any bitter bites in the cake. -
Combine Wet Ingredients:
In a separate bowl, mix the unsweetened applesauce, maple syrup (or agave), vanilla extract, and almond milk. Whisk until combined. If you’re like me and love to get creative, try adding a splash of espresso—chocolate and coffee make an unbeatable duo! -
Blend Dry and Wet:
Gradually pour the wet mixture into the dry mixture, stirring gently with a spatula. Be careful not to overmix; a few lumps are perfectly fine. Overmixing can result in a dense cake, and we want it fluffy! -
Pour into Pan:
Once your batter is mixed to the right consistency, pour it into the prepared cake pan. Spread it evenly with your spatula, giving it a gentle shake to settle. -
Bake:
Time to pop that pan in the oven! Bake for 25-30 minutes or until a toothpick inserted comes out clean. If you find any batter on it, pop it back in for a few more minutes. -
Cool Down:
After baking, let the cake cool in the pan for about 10 minutes. Then, carefully invert it onto a wire rack to cool completely. This is the toughest part—patience pays off! -
Frost (If You Want):
Once completely cooled, feel free to add a healthy frosting. A simple mix of Greek yogurt and cocoa powder makes for a yummy topping. Or, go classic with some diced strawberries or raspberries on top—nature’s garnish!
Serving Suggestions
Oh, presentation is everything when it comes to desserts! Slice up your Healthy Chocolate Cake and place it on a decorative cake stand. For a simple but chic vibe, sprinkle some powdered sugar or cocoa powder on top before serving.
You can pair it with a scoop of coconut whipped cream or a drizzle of dark chocolate sauce if you’re feeling extra indulgent. And of course, a cup of steaming coffee or a glass of almond milk complements this sweet treat perfectly. Just imagine everyone’s faces lighting up when they see your beautiful creation!
Recipe Variations
Getting creative with recipes is where the fun truly begins! Here are a few variations to spice up your Healthy Chocolate Cake:
-
Add Nuts:
Fold chopped walnuts or pecans into the batter for a delightful texture and added crunch. -
Fruit Fusion:
Swap out the applesauce for pumpkin puree for a fall-inspired twist. Or fold in some sliced strawberries or raspberries before baking for an added fruity surprise. -
Minty Fresh:
Add a dash of peppermint extract to the batter for a refreshing mint chocolate experience that’s perfect for holidays. -
Spicy Chocolate:
A pinch of cayenne or chili powder can turn up the heat and make for an interesting flavor profile that’s sure to tantalize the taste buds. -
Vegan Option:
To make it fully vegan, ensure you’re using maple syrup and substitute the almond milk for a plant-based milk of your choice. You can also swap the applesauce for silken tofu blended until smooth.
Chef’s Notes
This Healthy Chocolate Cake is not only a reflection of my childhood memories but also a testament to how any recipe can evolve over time to meet healthier choices without sacrificing flavor. A few tinkers—like swapping out conventional ingredients for wholesome options—can create a dish that aligns with our health goals.
I often share this cake at gatherings, and you’d be surprised how many people are shocked when they find out it’s a healthier version! Think of it as your secret weapon—delicious and nutritious, yet so simple that it can become your go-to birthday cake recipe.
Speaking of which, I once tried this cake recipe at a family reunion, but with my cousin’s addition of crushed chili flakes. The looks on everyone’s faces were priceless! Safe to say, it was a hit but only for daring souls!
FAQs and Troubleshooting
Q1: Why did my cake sink in the middle?
A: This can happen if you overmix the batter or open the oven door too early while baking. Aim for a smooth batter but don’t be overly vigorous when mixing!
Q2: My cake turned out too dense; what went wrong?
A: Dense cakes usually result from overmixing the batter or measuring the flour incorrectly. Use light, fluffy scoops when measuring your almond flour.
Q3: Can I make this cake ahead of time?
A: Absolutely! Bake the cake, allow it to cool completely, and store it in an airtight container in the fridge for up to five days. It can also freeze wonderfully—wrap it tightly in foil or plastic wrap, and it should keep for up to three months.
Q4: How do I know when the cake is done?
A: Insert a toothpick in the center of the cake; if it comes out clean or with a few moist crumbs, your cake is ready. If it’s coated in batter, pop it back in that oven for a few more minutes!
Nutritional Info
This Healthy Chocolate Cake makes about 8 servings. Here’s a rough nutritional breakdown per serving (without icing):
- Calories: Approximately 160
- Protein: 4g
- Carbohydrates: 18g
- Dietary Fiber: 3g
- Sugars: 6g
- Fat: 7g
Including hearty ingredients like almond flour and applesauce not only makes each slice delicious but also adds healthy fats and nutrients to your day. And remember, indulging doesn’t mean overindulging—enjoy your cake without the guilt!
Final Thoughts
There you have it, foodies—your guide to making an irresistible Healthy Chocolate Cake that checks all the boxes: delicious, simple, and good for you! I hope you embrace this recipe as a staple in your baking adventures and find joy in making it your own.
Remember, cooking isn’t just about carelessly following instructions; it’s about experimentation, sharing laughter, and creating sweet memories. So, don’t shy away from adding your own twists and spins. Every cake tells a story—let yours be filled with happy moments and yummy bites.
Now grab your forks, gather your loved ones, and enjoy a slice of this delightful cake together. Until next time, happy cooking and may your kitchen be filled with all the good vibes and delicious aromas!
Get ready to dig in—your taste buds will thank you! 🍰
Print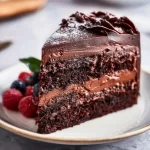
Healthy Chocolate Cake
- Total Time: 45 minutes
- Yield: 8 servings 1x
- Diet: Vegan
Description
A moist and decadent chocolate cake made with wholesome ingredients, perfect for guilt-free indulgence.
Ingredients
- 1 cup almond flour
- 1/2 cup cocoa powder
- 1/2 teaspoon baking soda
- 1/4 teaspoon salt
- 1/2 cup unsweetened applesauce
- 1/4 cup maple syrup or agave
- 1 teaspoon vanilla extract
- 1/2 cup unsweetened almond milk
Instructions
- Preheat your oven to 350°F (175°C).
- Prepare an 8-inch round cake pan by greasing it or lining it with parchment paper.
- Mix in a bowl the almond flour, cocoa powder, baking soda, and salt.
- Combine the wet ingredients: applesauce, maple syrup, vanilla, and almond milk in another bowl.
- Blend the wet mixture into the dry mixture gently, avoiding overmixing.
- Pour the batter into the prepared pan and spread evenly.
- Bake for 25-30 minutes or until a toothpick comes out clean.
- Cool the cake in the pan for about 10 minutes, then invert onto a wire rack to cool completely.
- Frost with Greek yogurt and cocoa powder, or serve with fresh fruits if desired.
Notes
This cake can be stored in the fridge for up to five days and freezes well for up to three months. Perfect for gatherings and celebrations.
- Prep Time: 15 minutes
- Cook Time: 30 minutes
- Category: Dessert
- Method: Baking
- Cuisine: American
Nutrition
- Serving Size: 1 slice
- Calories: 160
- Sugar: 6g
- Sodium: 50mg
- Fat: 7g
- Saturated Fat: 0.5g
- Unsaturated Fat: 6g
- Trans Fat: 0g
- Carbohydrates: 18g
- Fiber: 3g
- Protein: 4g
- Cholesterol: 0mg
Keywords: chocolate cake, healthy dessert, vegan baking, gluten-free baking, guilt-free treats
Healthy No-Bake Oreo Cheesecake Bites Recipe
Healthy No-Bake Oreo Cheesecake Bites Recipe
Hey there, fellow food lovers! I’m Beau Collier, and I’m thrilled you’re here at Feastical! Today, we’re diving into a recipe that’s not only a crowd-pleaser but also super easy to whip up—Healthy No-Bake Oreo Cheesecake Bites. Yep, you heard that right! These little gems pack all the flavors of a classic cheesecake but without the guilt. Plus, they require zero baking, which means more time for you to kick back with a cold drink while indulging your sweet tooth!
Now, before we get into the nitty-gritty of the recipe, let’s chat about what makes these cheesecake bites so special. First off, who doesn’t love cookies and cream? The rich, velvety texture of cream cheese, combined with the tanginess of Greek yogurt, creates a deliciously smooth filling that’s just begging to be devoured. And with the added crunch from those delightful Oreo Thins, you get the perfect balance of creamy and crunchy. The best part? These bites are healthier than traditional cheesecake, making them a fabulous choice for dessert lovers who want to stay on the lighter side.
Picture this: It’s a sunny Sunday afternoon, and you’re hosting a get-together with friends and family. You’ve spent the day laughing, reminiscing, and sharing stories, and just when you think everyone is full from the savory dishes you’ve laid out, you present these delightful cheesecake bites. The moment you see those smiles of delight as your guests sink their teeth into them is nothing short of magical. You might even hear “wow” repeated more times than you can count.
So grab your mixing bowl and let’s jump into this no-bake adventure that will leave your taste buds dancing and your heart full!
Personal Story
Ah, desserts have always held a special place in my heart. Growing up, my family had a tradition of Sunday dinners followed by something sweet. My grandmother, bless her heart, was the reigning queen of cheesecakes. She introduced me to the world of creamy delights and taught me the magic of blending flavors. I can still picture her in the kitchen, apron on, whisking away while I stood on a stool beside her, my little hands eager to help.
One of my fondest memories involves a particularly hot summer day. We’d spent the afternoon by the pool, and the idea of a heavy, baked cheesecake felt overwhelming. That’s when Grandma decided to get creative. She tossed together a no-bake version that became the star of our summer gatherings. Inspired by her genius, I’ve continued to play around with different flavors and ingredients, blending nostalgia with a modern twist.
When I recently discovered how to craft a healthier version of this childhood favorite—and I settled on these Healthy No-Bake Oreo Cheesecake Bites—I couldn’t help but feel like I was channeling Grandma’s spirit. This recipe brings me joy every time I create it, and I can’t wait for you to share that same experience.
Ingredients
Here’s what you’ll need for these scrumptious cheesecake bites:
-
8 oz. Fat-Free Cream Cheese
This provides a rich, creamy texture without loading on unnecessary calories. Low-fat cream cheese can work as a substitute, but it may alter the texture. -
1/2 cup Non-Fat Vanilla Greek Yogurt
Great for adding protein and a smooth consistency! If you want to switch things up, plain Greek yogurt works too—though it’ll be less sweet. -
1 tsp. Vanilla Extract
This little ingredient brings warmth and depth to all your desserts. Feel free to experiment with almond extract for a unique flavor twist! -
1/4 tsp. Salt
Don’t skip this! A touch of salt intensifies sweetness and balances flavors perfectly. If you’re watching your sodium, you can omit this, but it does enhance the overall taste. -
8 oz. Tub Low-Fat Cool Whip
This will give your cheesecake bites that airy, whipped texture. You can use whipped coconut cream for a dairy-free option, or make your own whipped cream if you prefer that fresh taste. -
24 Oreo Thins
These are key for crust and crunch! If you’re looking for a gluten-free option, there are gluten-free chocolate sandwich cookies available that work beautifully.
Now that we have our ingredients all lined up, it’s time to get cooking (well, kinda)!
Step-by-Step Instructions
Alright, let’s roll up our sleeves and get to work! Here’s how to create these fantastic no-bake cheesecake bites:
-
Prep Your Ingredients:
- Before anything, make sure your cream cheese is softened. Pull it out of the fridge about 30 minutes before you start mixing; room temperature cream cheese will blend seamlessly.
-
Mix Cream Cheese and Yogurt:
- In a large mixing bowl, combine the softened cream cheese and the Greek yogurt. Use an electric mixer on medium speed for about 2 minutes, just until it’s creamy and smooth. Here’s the chef hack: mixing these ingredients well will ensure there are no lumps—and we want a velvety texture!
-
Add Vanilla and Salt:
- Next up, add the vanilla extract and salt. Beat for another 30 seconds until fully incorporated. I always say this step is what truly elevates the flavor profile—it’s those small details that make all the difference!
-
Fold in the Cool Whip:
- Now gently fold in the Low-Fat Cool Whip using a spatula. This is where things get fluffy! Make sure to take your time with this step; stirring too vigorously can deflate the goodness we want. Your mixture should be light and airy.
-
Crush the Oreo Thins:
- Grab those Oreo Thins and crush them into fine crumbs. You can do this by placing them in a resealable plastic bag and giving them a whack with a rolling pin or by using a food processor if you have one handy. Just make sure they’re finely crushed for the best texture in your bites!
-
Combine Crumbs and Filling:
- Here’s a fun part: take about 1 cup of the crushed Oreo mixture and fold it into your cheesecake mixture. This adds that chocolatey goodness right into the filling! Set aside the remaining crumbs for topping.
-
Portion Out the Mixture:
- Now, using a cookie scoop (or just a spoon if you’re feeling adventurous), portion out the mixture into small, bite-sized rounds. The charm of these bites is all about the perfect size, so aim for around 1 inch in diameter.
-
Chill to Set:
- Place your cheesecake bites on a baking sheet lined with parchment paper. Once you’ve portioned all of them out, pop them in the fridge for at least 1 hour to let them firm up. Trust me, the wait is totally worth it!
-
Serve and Enjoy:
- Once they’ve chilled and set, serve them cold! If you want to make them extra special, sprinkle the reserved crushed Oreos on top just before serving to add a little crunch!
Serving Suggestions
These cheesecake bites are fantastic on their own, but let’s take it up a notch for presentation. Try arranging them on a charming platter, and drizzle some chocolate sauce around the edges. You could even dab a bit of whipped cream on the plate alongside the bites for a fun, restaurant-style aesthetic. Want to wow your guests? Use mini dessert cups and layer them—first a layer of the cheesecake mixture, followed by a sprinkle of crushed Oreo, then another layer of cheesecake, and top it off with whipped cream and a dusting of Oreos. It’s an impressive but easy way to elevate dessert!
Recipe Variations
Now, while these bites are undeniably delicious as is, let’s sprinkle in some ideas to give a fun twist or cater to different dietary needs:
-
Peanut Butter Chocolate Oreo Bites: Mix in 1/4 cup of creamy peanut butter into the cream cheese mixture for a nutty flair.
-
Minty Fresh Twist: Add a few drops of peppermint extract to the filling for a refreshing version. Perfect for mint lovers!
-
Fruit-Filled Delight: Fold in some fresh strawberries or raspberries into the cream cheese mix for a fruity contrast. This add-in also brightens up the flavor profile!
-
Sugar-Free Alternative: If you’re looking to cut down on sugar, opt for sugar-free cream cheese and a no-sugar-added Cool Whip. Just keep an eye on the sweetness—you may need to adjust it!
-
Cocoa Powder Add-In: For an extra chocolate kick, sift in a bit of cocoa powder into the batter. It’ll add depth and a beautiful richly dark color without being overwhelming.
Chef’s Notes
Let me tell you, creating this recipe has been quite the delightful journey! I’ve played around with different versions over the years, even experimenting with mix-ins like crushed nuts or toppings of fresh fruit. One of the funniest moments was when I made these bites for a potluck and accidentally grabbed the salt instead of sugar—I can still hear the collective “oops” when everyone tasted that first bite. Thankfully, everyone had a good laugh, and it gave me the idea for the salt in the recipe!
These bites have evolved from my grandma’s no-bake cheesecake into something uniquely mine, showcasing flavors while keeping it healthy. Just goes to show you, food is all about creativity and memories!
FAQs and Troubleshooting
-
Can I make these bites ahead of time?
Absolutely! These cheesecake bites can be made a day or two in advance. Just keep them in an airtight container in the fridge, and they’ll be ready when you are! -
What if my cream cheese isn’t soft enough?
If you forget to take it out of the fridge in advance, simply cut it into smaller cubes and microwave it for about 15 seconds—just be sure not to melt it! -
Can I use regular Oreos instead of Oreo Thins?
You can, but the texture and calorie content will change slightly. Regular Oreos are thicker and will give you a more substantial crust, but they’ll still taste incredible! -
What should I do if my filling is too runny?
If you find that your mixture is too soft, try chilling it for longer. If that doesn’t work, you can fold in a bit more crushed Oreo and/or a spoonful of Greek yogurt to help it set.
Nutritional Info
Here’s a rough breakdown of the nutritional info for one cheesecake bite (assuming you make 24 bites):
- Calories: 63
- Protein: 2g
- Fat: 2g
- Carbohydrates: 9g
- Fiber: 1g
- Sugar: 4g
These bites are not only less caloric than traditional cheesecake slices, but they’re also packed with some protein, thanks to the Greek yogurt and cream cheese. It’s a sweet way to indulge without the burden of excess calories!
Final Thoughts
There you have it! Your guide to whipping up delicious Healthy No-Bake Oreo Cheesecake Bites that will impress your friends, family, and even your stubborn sweet tooth. I hope you’ve enjoyed this culinary journey with me! Feel free to experiment, make this recipe your own, and let the memories flow. Food is more than just ingredients; it’s about connection, nostalgia, and making moments deliciously unforgettable.
So, next time you need a quick and delightful dessert, remember these bites. They’re perfect for any occasion—be it a casual family dinner or a fabulous summer soirée. I’m excited for you to savor every delicious bite!
Now, go grab those ingredients, and let’s make some magic happen in the kitchen. Happy cooking!
Print
Healthy No-Bake Oreo Cheesecake Bites
- Total Time: 75 minutes
- Yield: 24 bites 1x
- Diet: Vegetarian
Description
Delicious and healthier no-bake Oreo cheesecake bites that offer all the flavors of classic cheesecake without the guilt.
Ingredients
- 8 oz. Fat-Free Cream Cheese
- 1/2 cup Non-Fat Vanilla Greek Yogurt
- 1 tsp. Vanilla Extract
- 1/4 tsp. Salt
- 8 oz. Tub Low-Fat Cool Whip
- 24 Oreo Thins
Instructions
- Prep your ingredients: Soften the cream cheese by taking it out of the fridge 30 minutes before mixing.
- Mix cream cheese and yogurt in a large mixing bowl with an electric mixer on medium speed for 2 minutes until creamy.
- Add vanilla extract and salt; beat for an additional 30 seconds to incorporate.
- Fold in the Low-Fat Cool Whip gently with a spatula.
- Crush the Oreo Thins into fine crumbs using a resealable plastic bag or food processor.
- Combine about 1 cup of crushed Oreos into the cheesecake mixture, setting aside the rest for topping.
- Portion the mixture into small, bite-sized rounds using a cookie scoop.
- Chill the bites on a baking sheet lined with parchment paper for at least 1 hour.
- Serve cold and top with reserved crushed Oreos if desired.
Notes
These bites can be made ahead of time and stored in an airtight container in the fridge for a day or two.
- Prep Time: 15 minutes
- Cook Time: 0 minutes
- Category: Dessert
- Method: No-Bake
- Cuisine: American
Nutrition
- Serving Size: 1 bite
- Calories: 63
- Sugar: 4g
- Sodium: 100mg
- Fat: 2g
- Saturated Fat: 1g
- Unsaturated Fat: 1g
- Trans Fat: 0g
- Carbohydrates: 9g
- Fiber: 1g
- Protein: 2g
- Cholesterol: 10mg
Keywords: cheesecake, no-bake, dessert, Oreo, healthy

Creamy Yogurt Cake
The Ultimate Creamy Yogurt Cake Recipe: A Slice of Bliss!
Hey there, fellow food lovers! I’m Beau Collier, and I’m so excited to dive into a dish that’s close to my heart—and my taste buds—today: Creamy Yogurt Cake. This recipe is perfect for those who crave something sweet yet light, super easy to whip up, and unbelievably satisfying. So, pull up a chair, and let’s explore this delightful dessert together!
Introduction: A Slice of Joy
There’s something magical about desserts that bring back fond memories. When I was a kid, summers at my grandmother’s house in the countryside were filled with the smells of fresh-baked cakes and treats that made our hearts sing. One unforgettable sweet was her yogurt cake. It was a simple dish but one that embodied everything I loved about food. As the sun dipped below the horizon, we’d gather around the table, sharing stories and laughter, all while enjoying a slice of her creamy creation.
Fast forward to today, and here I am, crafting my version of that beloved dessert—a creamy yogurt cake that’s sure to be a showstopper at your next gathering or a cozy evening at home. This cake is light, fluffy, and boasts a delicate flavor that marries the creaminess of yogurt with a touch of sweetness. Whether it’s a family celebration, a potluck, or just a day that needs a little cheering up, this yogurt cake has got you covered!
The beauty of this recipe is not just in its taste; it’s also in its simplicity. With just a handful of ingredients and minimal prep time, you’ll be surprised at how easy it is to create a dessert that feels special and indulgent. So, dust off those mixing bowls and let’s make some magic happen in the kitchen!
Personal Story: A Slice of Home
The first time I attempted to recreate my grandmother’s yogurt cake was a bit of an adventure. I was about ten years old and passionate about becoming a chef (little did I know I’d eventually make it a reality!). Armed with her worn-out recipe card—scribbled with little notes in the margins—I strutted into the kitchen, confident I could whip up the same cake that had graced so many family gatherings.
As I mixed the ingredients, I could almost hear my grandmother’s voice, guiding me through each step. I had a mix of concentration and excitement as I poured the batter into the pan and popped it into the oven. The aroma soon flooded the house, and I couldn’t resist peeking inside. To my delight, there it was—a golden cake rising beautifully, just like hers. I couldn’t wait to take a bite!
When it finally cooled and I sliced into it, the texture was a bit different than I remembered—more dense, perhaps. But when I bit into it, a wave of nostalgia washed over me, wrapping me in a warm embrace. It wasn’t the exact cake from my childhood, but it held its own special charm. That day sparked my journey into the world of flavors, and I learned that every kitchen adventure is about not just the food but the memories we create along the way. Now, let’s create some delicious memories together!
Ingredients
Now that you’re ready to create some deliciousness, let’s gather our ingredients! Here’s what you’ll need for your creamy yogurt cake—simple, wholesome, and oh-so-good:
-
2 cups plain yogurt: The star of the show! Any type of plain yogurt will work—Greek, regular, or even a dairy-free version if needed. Greek yogurt will give you a denser cake, while regular yogurt yields a lighter texture.
-
1/2 cup honey or maple syrup: Sweetness is essential, and you can choose between honey for a floral note or maple syrup for a touch of earthiness. You can also reduce the amount of sweetener if you prefer a less sweet cake!
-
1/4 cup cornstarch: This is our secret ingredient to achieve a moist and fluffy texture. Cornstarch helps stabilize the batter; if you don’t have any, you can substitute it with all-purpose flour, though it may alter the final texture slightly.
Step-by-Step Instructions
Ready to get your hands dirty? Here’s how to bring this creamy yogurt cake to life, step by step!
Step 1: Preheat the Oven
Start by preheating your oven to 350°F (175°C). This is crucial; we want our cake to bake evenly and come out just right. While the oven warms up, you’ll have the perfect chance to get your ingredients ready!
Step 2: Prepare the Cake Pan
Take an 8-inch round cake pan (or a similar size) and grease it with a little butter or non-stick spray. To make sure the cake releases beautifully, line the bottom with parchment paper! A little chef’s tip: Sprinkle some flour on the greased pan for added insurance against sticking.
Step 3: Combine the Yogurt and Sweetener
In a large bowl, combine your 2 cups of plain yogurt and 1/2 cup of honey (or maple syrup). Use a whisk to blend them together until smooth. The yogurt will take on a silky texture, and you’ll see those sweet flavors mingling beautifully!
Step 4: Add Cornstarch and Mix
Next, sift in your 1/4 cup of cornstarch. Sifting helps avoid lumps and ensures a nice, fluffy cake. Stir gently until fully incorporated. Here’s a little kitchen hack: You can use a spatula to scrape down the sides of the bowl to make sure everything is mixed beautifully.
Step 5: Pour into the Pan
Once your batter is smooth, pour it into your prepared cake pan. Give the pan a little shake to level the batter evenly. This is the moment to take a step back and admire your handiwork. You’re doing great!
Step 6: Bake the Cake
Place the pan in your preheated oven and bake for about 30-35 minutes. The cake is ready when the edges are lightly golden and a toothpick inserted into the center comes out clean. Bonus tip: Don’t open the oven door too soon—this can cause the cake to sink!
Step 7: Cool and Serve
Once baked, remove the cake from the oven and let it cool in the pan for about 10 minutes. Then, gently flip it out onto a wire rack to cool completely. You’ll be met with a lovely aroma wafting through your kitchen—pure bliss!
Serving Suggestions
Serving this creamy yogurt cake is just as delightful as making it! Once completely cooled, I love to slice it into wedges and serve it with a dollop of whipped cream or a scoop of fresh berries. Drizzle a little extra honey or maple syrup on top for that added touch of sweetness!
For a more rustic vibe, you could even serve it straight from the pan. Place it on the table with a few decorative plates and forks, and let everyone serve themselves! This gets everyone engaged and ready for fun.
Recipe Variations
As a chef, I cherish the beauty of creativity in the kitchen! Here are a few fun variations on our creamy yogurt cake:
-
Citrus Twist: Add the zest of one lemon or orange to the batter for a zesty kick that brightens the flavors beautifully.
-
Berry-licious: Fold in a cup of fresh or frozen berries, like blueberries or raspberries, for bursts of flavor throughout the cake.
-
Choco-Joy: Add in some cocoa powder (1/4 cup should do) to make a chocolatey version—and who could resist that?
-
Nutty Goodness: Fold in some chopped nuts like walnuts or almonds for added crunch. Alternatively, sprinkle chopped nuts on top before baking!
-
Spiced Surprise: Add a pinch of cinnamon or nutmeg to the batter to give it a warm, cozy feel—perfect for cooler months!
Chef’s Notes
One of my favorite parts about cooking is the stories that unfold. I’ve played around with this recipe over the years and had a few kitchen fails, too! I once added way too much cornstarch, resulting in a cake that was more like a brick than a fluffy delight. But hey, that’s how we learn, right?
This cake has evolved over time, mirroring different experiences and flavors I’ve come to love. The key takeaway? Don’t be afraid to experiment! Whether it’s trying a new ingredient or altering flavors, those surprises often lead to delightful results.
FAQs and Troubleshooting
1. Why did my cake sink in the middle?
This could be due to a couple of reasons: either the oven temperature was too low, or the cake was still too wet in the center. Make sure to check the oven temperature with a thermometer and bake longer if necessary!
2. Can I use flavored yogurt?
Absolutely! Flavored yogurt will add an exciting twist to the cake. Just make sure it’s not overly sweet, so adjust the honey/maple syrup accordingly!
3. What should I do if my cake sticks to the pan?
Ensure you grease and line your pan well. If it does stick, run a knife around the edges to help release it—don’t fret, the flavors will be just as delightful!
4. How do I store leftovers?
Keep your cake wrapped in plastic wrap or in an airtight container at room temperature for a day. If you want to store it for longer, pop it in the fridge where it can last for about 3-4 days.
Nutritional Info
(Serving size: 1 slice, approx. 1/8 of cake)
- Calories: 160
- Protein: 4g
- Carbohydrates: 28g
- Fat: 3g
- Fiber: 0g
- Sugar: 11g
Note: Nutritional values may vary based on specific ingredients used and serving sizes.
Final Thoughts
There you have it—a deliciously creamy yogurt cake that’s sure to impress! I hope you’ve enjoyed this journey with me and feel excited to create your own version of this delightful dessert. Remember, cooking is all about connecting with food, flavors, and, most importantly, each other. So gather your loved ones around the table, share a slice, and create beautiful memories together!
Thank you for joining me in the kitchen today. I can’t wait to hear about your yogurt cake adventures. Happy baking, foodies! 🍰
Print
Creamy Yogurt Cake
- Total Time: 45 minutes
- Yield: 8 servings 1x
- Diet: Vegetarian
Description
A light and fluffy yogurt cake that’s easy to make and perfect for any occasion.
Ingredients
- 2 cups plain yogurt
- 1/2 cup honey or maple syrup
- 1/4 cup cornstarch
Instructions
- Preheat the oven to 350°F (175°C).
- Prepare an 8-inch round cake pan by greasing it and lining the bottom with parchment paper.
- Combine the yogurt and honey (or maple syrup) in a large bowl and whisk until smooth.
- Add the cornstarch and mix until fully incorporated.
- Pour the batter into the prepared cake pan and level it.
- Bake for 30-35 minutes until lightly golden and a toothpick comes out clean.
- Cool in the pan for 10 minutes, then flip onto a wire rack to cool completely.
Notes
Serve with whipped cream or fresh berries, and drizzle with extra honey or maple syrup for added sweetness.
- Prep Time: 10 minutes
- Cook Time: 35 minutes
- Category: Dessert
- Method: Baking
- Cuisine: American
Nutrition
- Serving Size: 1 slice
- Calories: 160
- Sugar: 11g
- Sodium: 120mg
- Fat: 3g
- Saturated Fat: 1g
- Unsaturated Fat: 2g
- Trans Fat: 0g
- Carbohydrates: 28g
- Fiber: 0g
- Protein: 4g
- Cholesterol: 5mg
Keywords: yogurt cake, dessert, easy baking, creamy cake, sweet treat

Moist Lemon Yogurt Cake
Moist Lemon Yogurt Cake: A Slice of Sunshine for Every Occasion
Hey there, food lover! 🍋 If you’re anything like me, there’s nothing quite as magical as the aroma of a cake baking in the oven—especially when that cake is a zesty, moist lemon yogurt delight that practically sparkles with sunshine. Welcome to the world of Feastical, where we celebrate the joy of good food and the stories they tell!
When I think about the perfect dessert, my mind races back to that iconic lemon yogurt cake my grandma used to whip up on sunny afternoons. Her kitchen would transform into a mini bakery, with flour dust dancing in the sunlight and that sharp, sweet scent of lemons filling the air. It became our family tradition to gather around the table, share stories, and, more importantly, savor every last crumb of that glorious cake. It was never just about the food; it was about connection, laughter, and memories crafted over cake slices and cups of tea.
Now, with a few classic and personal twists, I’m excited to share my version of this beloved recipe with you! This Moist Lemon Yogurt Cake is simple yet has the power to evoke the warmest of memories and the brightest of smiles. Not only is it easy to make—perfect for both the seasoned chef and the kitchen newbie—but it also boasts a texture so moist and a flavor so vibrant that one slice simply won’t do!
So, grab your apron and let’s get to work bringing a little sunshine into your kitchen!
Personal Story
Growing up, my summers were spent at my grandparents’ quaint little house in the countryside. They had a beautiful lemon tree in their backyard that seemed to grow the biggest, juiciest lemons you’ve ever seen. My grandma was a firm believer in using fresh ingredients, and what’s fresher than lemons straight from the tree?
I can’t remember a single visit where we didn’t bake something together, and it was always this lemon yogurt cake that stole the show! I fondly recall the thrill of helping her mix and measure—trying to sneak a taste of the batter when she wasn’t looking. Her laughter would fill the room when I inevitably ended up with a smudge of flour on my nose. As it baked, we’d sit on the porch, listening to the cheerful birds and plotting what flavor we’d experiment with next. This cake was more than just a sweet treat; it was a cherished family ritual.
Now, as an adult, every time I whip up this cake, I’m transported back to those sun-soaked afternoons, bringing with me the same joy and excitement that filled my childhood kitchen. Let’s carry that spirit forward together as we dive into the delightful world of flavors!
Ingredients
Here’s what you’ll need to bring this Citrus Wonder to life. Each ingredient plays a crucial role in creating that perfect moist texture and refreshing flavor.
-
1 cup plain yogurt
You can use any type of plain yogurt (Greek, regular, or even non-dairy). Greek yogurt will give you extra creaminess and protein while regular yogurt provides adequate moisture. -
3/4 cup sugar
This is essential for that balanced sweetness. If you want a healthier option, you can substitute with honey or coconut sugar, but be mindful of the moisture levels. -
3 large eggs
Eggs are your binding agents! If you’re vegan or allergic, replace them with flax eggs (1 tablespoon ground flaxseed mixed with 2.5 tablespoons water for each egg) for a similar binding effect. -
1/2 cup vegetable oil
This adds richness to the cake without making it heavy. You can swap it with melted coconut oil for a tropical twist or applesauce for a healthier alternative, but be cautious about the additional moisture. -
1 teaspoon vanilla extract
For that warm, fragrant undertone. Feel free to use almond extract for a different flavor profile! -
2 cups almond flour
The secret to that delicate texture! If you don’t have almond flour, you can try using all-purpose flour, but it will change the texture slightly. -
1 tablespoon baking powder
This helps the cake rise beautifully. Double-check its freshness—old baking powder might leave you with a flat cake! -
1/4 teaspoon salt
A pinch of salt enhances sweetness. Don’t skip it! -
Zest of 2 lemons
For that bold, bright flavor. Be sure to zest before juicing! You can substitute with limes if you’re feeling adventurous. -
1/4 cup fresh lemon juice
This is where the magic happens—adding acidity and freshness. Fresh is always best, but store-bought juice works in a pinch.
Step-by-Step Instructions
Now, let’s get our hands dirty and make this lemony goodness happen! 🍰
-
Preheat Your Oven
Preheat your oven to 350°F (175°C). This step is crucial for an even bake. Also, don’t forget to grease your cake pan! A 9-inch round or a loaf pan works great. -
Mix Your Wet Ingredients
In a large mixing bowl, whisk together the yogurt, sugar, and eggs until smooth. This is where all the magic begins. The yogurt gives structure and moisture, while the sugar helps the cake to rise. Make sure not to skip the whisking; let it blend harmoniously! -
Incorporate the Oil and Vanilla
Gradually drizzle in the vegetable oil while whisking, followed by the vanilla extract. You want to make sure the mixture is light and airy. I like to imagine it’s like a dance—gentle yet invigorating! -
Combine Dry Ingredients
In a separate bowl, mix together the almond flour, baking powder, salt, and lemon zest. The zest adds that pop of citrus flavor right from the get-go. This is also a good time to mentally prepare for the zesty burst that’ll soon fill your kitchen! -
Bring It All Together
Gently fold the dry ingredients into the wet mixture. Be careful not to overmix; a few lumps are perfectly okay! This is where our loving approach to baking comes into play—gentleness brings about the best texture! -
Infuse with Lemon Juice
Once mixed, gently fold in the lemon juice. Feel free to take a quick taste—it’s bursting with freshness! -
Pour and Bake
Pour the batter into your prepared pan and smooth the top. Place it in your preheated oven and bake for 40-45 minutes, or until a toothpick inserted in the center comes out clean. The aroma wafting from your oven will be irresistible! -
Cool and Enjoy
Once baked, allow the cake to cool in the pan for about 10 minutes before transferring it to a wire rack. Against all urges, let it cool completely before serving. The flavors meld beautifully as it cools!
Serving Suggestions
Now that your cake has cooled, it’s time to serve it up and impress your family or guests! You can slice it into generous wedges and dust with powdered sugar for a touch of elegance. A dollop of whipped cream or a scoop of vanilla ice cream served alongside will take this treat to the next level.
For an added twist, consider drizzling a simple lemon glaze over the top. Just mix together powdered sugar and fresh lemon juice until smooth. It adds a delightful shine and is easier than you’d think!
Perhaps you could also serve it with a vibrant fruit salad to balance the richness of the cake. Berries, in particular, complement the lemon perfectly, creating a refreshing burst when you take that first bite.
Recipe Variations
While the classic moist lemon yogurt cake is simply divine, why not shake things up? Here are some fun variations to try:
-
Berry Lemon Swirl
Fold in some fresh or frozen berries (like blueberries or raspberries) into the batter for a delicious fruity twist. It’s like a mini explosion of flavor in every bite! -
Coconut-Lemon Cake
Swap out half of the almond flour for shredded coconut. This will add a tropical flair that brightens up the cake. -
Lavender Lemon Delight
Add a dash of culinary lavender to the batter—around 1 tablespoon—before baking to create an aromatic experience that’s simply unforgettable. -
Choco-Lemon Hybrid
Mix in some mini chocolate chips into the batter—it’s a delightful contrast with the tangy lemon! -
Gluten-Free Version
Use a gluten-free flour blend instead of almond flour if you or your guests have dietary restrictions. It will still turn out great!
Chef’s Notes
When I first experimented with this recipe, I made the classic mistake of forgetting the baking powder! It turned out to be a dense lemon pie instead—a delicious accident! Over the years, I’ve learned to adapt the recipe based on what I had on hand and even discovered how versatile it could be. It became a canvas for whatever flavors excited me.
Baking is like life—it’s all about trial and error, serendipitous accidents, and learning what works best for you. Remember that this cake is about more than just ingredients. Try to feel the joy in making it, just as my grandma taught me.
FAQs and Troubleshooting
-
Why is my cake dense?
This usually happens from overmixing the batter, which can develop the gluten in the flour (especially if using regular flour). Be gentle when combining your ingredients! -
Can I make this ahead of time?
Absolutely! This cake actually tastes even better the next day after the flavors have melded. Just keep it covered to maintain moisture. -
What if my cake sinks in the middle?
This might be due to underbaking. Always check with a toothpick before pulling it out of the oven. If it’s too wet, pop it back in for a few more minutes. -
How do I store my leftovers?
Keep any leftover cake in an airtight container in the fridge for up to a week. It can be enjoyed cold or warmed slightly in the microwave!
Nutritional Info (if applicable)
This Moist Lemon Yogurt Cake packs a punch for quality ingredients! Here’s a breakdown of the nutritional facts for one slice (assuming 12 slices per cake):
- Calories: Approximately 200
- Total Fat: 10g (from the vegetable oil and almond flour)
- Carbohydrates: 25g
- Sugars: 10g (from the sugar and natural fruit sugars)
- Protein: 5g
- Fiber: 2g (from the almond flour)
Keep in mind that these are estimates and may vary based on any substitutions made!
Final Thoughts
And there you have it—your very own slice of the sunshine that is Moist Lemon Yogurt Cake! Isn’t it great how food can weave us into a tapestry of memories and connect us with those we love?
This recipe embodies that spirit perfectly: simple, refreshing, and bursting with flavor. So, let the baking begin! As you whip up this cake, may it bring back your own delightful stories and inspire countless new ones.
Thank you for joining me on this culinary adventure today! I can’t wait to hear how your cake turns out! Share your creations, stories, and variations, and let’s keep the feast going! Happy baking, and don’t forget—food tastes better when shared! 🍰✨
Print
Moist Lemon Yogurt Cake
- Total Time: 60 minutes
- Yield: 12 servings 1x
- Diet: Vegetarian
Description
A zesty and moist lemon yogurt cake that brings sunshine to every occasion.
Ingredients
- 1 cup plain yogurt
- 3/4 cup sugar
- 3 large eggs
- 1/2 cup vegetable oil
- 1 teaspoon vanilla extract
- 2 cups almond flour
- 1 tablespoon baking powder
- 1/4 teaspoon salt
- Zest of 2 lemons
- 1/4 cup fresh lemon juice
Instructions
- Preheat your oven to 350°F (175°C) and grease your cake pan.
- Mix together the yogurt, sugar, and eggs until smooth.
- Incorporate the vegetable oil and vanilla extract gradually while whisking.
- Combine the almond flour, baking powder, salt, and lemon zest in a separate bowl.
- Bring the dry ingredients into the wet mixture gently.
- Infuse with lemon juice and taste for freshness.
- Pour the batter into the prepared pan and bake for 40-45 minutes.
- Cool the cake in the pan for 10 minutes before transferring to a wire rack to cool completely.
Notes
For serving, dust with powdered sugar or drizzle with lemon glaze. Enjoy with whipped cream or fruit salad.
- Prep Time: 15 minutes
- Cook Time: 45 minutes
- Category: Dessert
- Method: Baking
- Cuisine: American
Nutrition
- Serving Size: 1 slice
- Calories: 200
- Sugar: 10g
- Sodium: 150mg
- Fat: 10g
- Saturated Fat: 1g
- Unsaturated Fat: 9g
- Trans Fat: 0g
- Carbohydrates: 25g
- Fiber: 2g
- Protein: 5g
- Cholesterol: 50mg
Keywords: lemon cake, yogurt cake, dessert, baking, moist cake

Sugar Free Yogurt Cake
Sugar-Free Yogurt Cake: A Slice of Happiness
Introduction
Hey there, fellow food lovers! Today, I’m super excited to share with you one of my absolute favorite desserts: the Sugar-Free Yogurt Cake! Now, I know what you might be thinking: “How can a cake be both delicious and sugar-free?” Well, let me tell you—this cake is not only a guilt-free indulgence, but it’s also moist, light, and utterly scrumptious. Whether you’re hosting a cozy weekend brunch, looking for the perfect dessert to share with friends, or simply treating yourself on a weekday, this cake fits the bill perfectly.
You see, desserts don’t always have to be loaded with sugar to be satisfying. I believe that food is about finding balance, joy, and love in every bite, and this yogurt cake embodies that philosophy beautifully. Made with simple, wholesome ingredients, it’s a delightful way to enjoy a sweet treat without the sugar crash that typically follows. Plus, it’s incredibly versatile, so you can dress it up or down as your taste buds desire!
Picture this: a warm slice of cake fresh out of the oven, served with a dollop of whipped cream or fresh berries. Yum! So, grab your apron and let’s dive into this scrumptious recipe that’s sure to become a staple in your kitchen!
Personal Story
This yogurt cake holds a special place in my heart. I remember the first time I decided to make it when my sister was visiting from out of town. She had been raving about healthy desserts, and I wanted to surprise her with something delightful that wouldn’t make her cringe at the thought of “healthy.” Buzzing with excitement, I rummaged through my pantry and found a few simple ingredients: Greek yogurt, eggs, and monkfruit sweetener.
As I mixed everything in my cozy little kitchen, the familiar scent of vanilla wafted through the air, and I could feel my excitement bubble over. When I pulled the cake out of the oven, it puffed up beautifully, golden and inviting. We eagerly waited for it to cool, and when it was finally ready to slice, we couldn’t resist diving in! The first bite was pure bliss. The cake was not only delightfully moist but also incredibly satisfying. My sister’s eyes lit up, and we couldn’t stop talking about how amazing it was to enjoy such a delicious dessert without the remorse of excess sugar. That day solidified my love for this yogurt cake and for the joy that homemade desserts can bring.
Ingredients
Before we get started, let’s gather all the goodies you’ll need for our Sugar-Free Yogurt Cake:
-
4 Large Eggs (separated)
Eggs provide structure and moisture, giving the cake its fluffy texture. If you’re vegan or looking for an egg substitute, you can use flax eggs (1 tablespoon of flaxseed meal mixed with 2.5 tablespoons of water per egg). -
1.5 Cups Non-Fat Greek Yogurt (350 g/12.5 oz)
Greek yogurt lends creaminess and a slight tang to the cake, which balances the sweetness beautifully. Want to add more flavor? Try using vanilla or lemon-flavored yogurt! -
⅓ Cup Monkfruit Sweetener (70 g/2.5 oz)
This natural sweetener offers a low-calorie alternative to sugar. It’s great for sugar-free baking! If you don’t have monkfruit sweetener, you could use stevia or erythritol, but make sure to adjust the quantities according to the sweetness level. -
⅓ Cup Cornstarch (40 g/1.4 oz)
Cornstarch is key for a light, fluffy texture. You can easily substitute it with arrowroot powder or even almond flour for a different flavor profile. Just be aware this might slightly adjust the texture! -
1 tsp Vanilla Extract (optional)
Vanilla extract enhances the flavors in the cake, making it taste heavenly! If you want to get a little creative, you can swap this out for almond extract or a splash of citrus juice for bright notes.
In total, these simple yet wholesome ingredients come together to create a cake that you’ll love letting melt in your mouth!
Step-by-Step Instructions
Now that we have everything ready, let’s get baking! Follow these steps, and we’ll whip up a delicious Sugar-Free Yogurt Cake.
-
Preheat Your Oven:
Start by preheating your oven to 350°F (175°C). This step ensures your cake bakes evenly and nicely. -
Prepare Your Baking Pan:
Grease a 9-inch round cake pan with a little olive oil or non-stick spray, and then line the bottom with parchment paper. This makes sure your cake comes out without a hitch! -
Separate the Eggs:
In two separate bowls, crack your eggs and separate the whites from the yolks. When beating the egg whites, you want them to whip up into soft peaks—this will help your cake rise beautifully! -
Mix the Egg Yolks and Yogurt:
In a large mixing bowl, combine the egg yolks with Greek yogurt and the monkfruit sweetener. Mix until well combined—no lumps here! This mixture will be creamy and luscious. -
Add Cornstarch and Vanilla:
Gradually add the cornstarch and vanilla extract to the yolk and yogurt mixture. Stir until fully combined. Your batter should start to come together beautifully at this stage. -
Whip the Egg Whites:
Grab a clean bowl and your electric mixer, and start whipping the egg whites until they form soft peaks. This is where the magic happens—whipped egg whites will give your cake that airy, fluffy texture! -
Fold in the Egg Whites:
Gently fold the whipped egg whites into the yogurt mixture. Do this slowly and lovingly, as you want to keep as much air in the batter as possible. You’ll see the color lighten; that’s a great sign! -
Pour the Batter into the Pan:
Transfer the batter to your prepared cake pan, spreading it evenly to level out the top. Don’t worry about perfection; it’ll all even out in the oven! -
Bake to Perfection:
Place the cake in the preheated oven and let it bake for about 30-35 minutes. You’ll know it’s done when the top is golden, and a toothpick inserted into the center comes out clean. -
Cool and Unmold:
Once baked, take it out of the oven and allow it to cool in the pan for about 15 minutes. Then, gently remove it from the pan, peel off the parchment paper, and let it cool completely on a wire rack. -
Time to Serve and Enjoy!:
Once cooled, slice it up and serve it your favorite way, whether that’s plain, with some whipped cream, or topped with fresh fruit. Let your guests marvel at your baking prowess!
Serving Suggestions
Now that your Sugar-Free Yogurt Cake is out of the oven and looking fabulous, let’s talk about how to serve it up! Here are a few of my favorite ways:
-
Classic Slice: Just serve it as is. This cake is naturally delicious and doesn’t need much dressing up. Serve slices at room temperature with a sprinkle of powdered monkfruit sweetener if you’d like, for a little extra flair!
-
Whipped Cream: Top slices with a dollop of whipped cream (or whipped coconut cream for a dairy-free option). A little cinnamon sprinkled on top adds warmth and a lovely aroma.
-
Fruit Toppings: Fresh berries such as strawberries, blueberries, or raspberries add a burst of color and flavor. Drizzle a bit of honey or a sugar-free syrup over the fruits for an extra touch.
-
Yogurt Parfait: Turn your cake into a delightful parfait! Crumble leftover cake into a glass, layer with Greek yogurt, and top with fresh fruits or a berry compote for an impressive dessert.
Recipe Variations
Feeling a little adventurous? Here are some easy twists or variations you can try with this Sugar-Free Yogurt Cake:
-
Chocolate Yogurt Cake: Add 1/3 cup of unsweetened cocoa powder to the dry ingredients for a rich chocolate flavor. Replace the vanilla extract with an espresso shot for a mocha twist!
-
Citrus Infusion: Add zest from one lemon or orange, along with a tablespoon of juice, to give your cake a bright, fresh flavor that’s especially lovely in spring or summer.
-
Nutty Crunch: Fold in a handful of chopped nuts or seeds (like almonds or walnuts) for added texture and nutritional benefits. They will add a wonderful crunch and flavor!
-
Spiced Sensation: For a warming twist, try adding a pinch of nutmeg or cinnamon to the batter. Alternatively, some ginger will give it a cozy kick!
-
Gluten-Free Option: Substitute cornstarch with a gluten-free all-purpose flour blend. Your cake will be equally marvelous for your gluten-sensitive friends!
Chef’s Notes
Over the years, this recipe has evolved to suit my taste and needs. I initially stumbled upon a similar yogurt cake recipe but quickly personalized it to make it sugar-free and lighter. It’s fun to experiment with flavors and textures, always keeping in mind the essence of comfort and joy in the kitchen. And I must share: every time I serve this cake, it prompts stories and happy memories, whether it’s from sharing slices with friends or enjoying it solo on a cozy evening.
Once, I even made it for a potluck and came back with an empty dish—that’s a sure sign of success! Remember, cooking is a journey, and this cake has been a part of mine, transforming from an experiment into a beloved staple.
FAQs and Troubleshooting
1. Why did my cake turn out dense?
If your cake came out denser than expected, it may be due to overmixing the batter after adding the egg whites. Be gentle when folding them in to keep that nice airy texture!
2. Can I use regular yogurt instead of Greek yogurt?
Absolutely! Just be aware that the texture and flavor profile might change a bit. Regular yogurt will make the cake a little less thick and creamy, but it can still be delicious!
3. How long can I store the cake?
You can store the cake in an airtight container at room temperature for up to 3 days, or refrigerate it for about a week. If you want to keep it longer, slice and freeze—thaw it out whenever you’re craving a sweet treat!
4. What if I don’t have monkfruit sweetener?
No worries! Feel free to substitute with another sugar-free sweetener, like stevia or erythritol, adjusting the amount according to sweetness levels. Just ensure it’s a one-to-one substitution if possible for best results.
Nutritional Info
Let’s break down the nutrition in a single slice of this fantastic Sugar-Free Yogurt Cake (assuming the recipe yields 12 slices):
- Calories: Approximately 80
- Protein: 6g
- Carbohydrates: 10g
- Fat: 3g
- Fiber: 1g
- Sugar: 1g (depending on your sweetener)
With a healthy protein boost from the Greek yogurt and low sugars, this cake is a great option for those looking to satisfy their sweet tooth without the guilt!
Final Thoughts
There you have it—a delicious and simple recipe for Sugar-Free Yogurt Cake that will surely put a smile on your face! Remember, the best meals are the ones shared with friends and family, bringing together laughter, memories, and, of course, fantastic food. So whether you’re making this cake for a gathering or just to treat yourself, know that you’re creating something wonderful!
As you embark on your baking journey, make sure to enjoy every moment of the process. Cooking is as much about the experience as it is about the food itself. Don’t forget to share your creation with loved ones or put your unique twist on the recipe—this is just the beginning!
Thanks for joining me in the kitchen today, and happy cooking! Until next time, keep those spatulas twirling and those taste buds tingling!
Print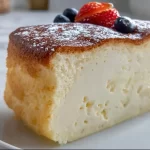
Sugar-Free Yogurt Cake
- Total Time: 45 minutes
- Yield: 12 servings 1x
- Diet: Sugar-Free
Description
A delicious and moist yogurt cake that’s sugar-free, perfect for any occasion!
Ingredients
- 4 Large Eggs (separated)
- 1.5 Cups Non-Fat Greek Yogurt (350 g/12.5 oz)
- ⅓ Cup Monkfruit Sweetener (70 g/2.5 oz)
- ⅓ Cup Cornstarch (40 g/1.4 oz)
- 1 tsp Vanilla Extract (optional)
Instructions
- Preheat your oven to 350°F (175°C).
- Prepare a 9-inch round cake pan with olive oil and parchment paper.
- Separate the eggs into whites and yolks in two bowls.
- Mix egg yolks with Greek yogurt and monkfruit sweetener until creamy.
- Add cornstarch and vanilla to the mixture and stir until combined.
- Whip egg whites in a clean bowl until soft peaks form.
- Fold the whipped egg whites into the yogurt mixture gently.
- Pour the batter into the prepared cake pan, leveling the top.
- Bake for about 30-35 minutes until golden and a toothpick comes out clean.
- Cool for 15 minutes in the pan before transferring to a wire rack to cool completely.
- Serve plain, with whipped cream, or topped with fresh fruit.
Notes
This cake can be stored in an airtight container at room temperature for up to 3 days, or refrigerated for about a week. It can also be sliced and frozen for future cravings.
- Prep Time: 10 minutes
- Cook Time: 35 minutes
- Category: Dessert
- Method: Baking
- Cuisine: American
Nutrition
- Serving Size: 1 slice
- Calories: 80
- Sugar: 1g
- Sodium: 50mg
- Fat: 3g
- Saturated Fat: 1g
- Unsaturated Fat: 2g
- Trans Fat: 0g
- Carbohydrates: 10g
- Fiber: 1g
- Protein: 6g
- Cholesterol: 120mg
Keywords: sugar-free, yogurt cake, healthy dessert, light cake, guilt-free dessert

Gourmet Brownie Cookies
Indulge in Gourmet Brownie Cookies: A Delight for Every Sweet Tooth!
Hey there, fellow food lovers! Beau Collier here, and I can’t wait to dive into the sweet, decadent world of gourmet brownie cookies with you. If there’s one thing we can all agree on, it’s that cookies have their own special place in our hearts (and stomachs!). So, get ready because we’re about to embark on a delicious journey that combines the fudginess of brownies with the classic crispiness of cookies. What’s not to love, right?
Ah, the aroma of freshly baked cookies wafting through the kitchen! It’s like a cozy hug that creeps under your skin and warms your soul. For me, cookie season is year-round, but there’s something intrinsically special about gourmet brownie cookies. They bring together the best of both worlds: the gooey richness of brownies and the finger-licking joy of cookies. Imagine biting into a soft, chocolatey treat that promises both chewiness and a crumbly texture. That, my friend, is pure bliss!
So, here’s the lowdown: one bite of these gourmet brownie cookies, and they will transport you straight to chocolate heaven! Whether you’re whipping them up for a last-minute gathering, a cozy night in with loved ones, or simply because it’s Tuesday (and that’s reason enough!), these cookies will never let you down.
In today’s post, I’ll take you through every step of my favorite brownie cookie recipe, share stories from my kitchen adventures, and sprinkle in a few of my secret baking tips along the way. So grab your apron, fire up that oven, and let’s create something magical together!
Personal Story
Growing up, my grandmother was the reigning queen of the cookie jar. Whether it was soft and chewy chocolate chip cookies or her legendary oatmeal raisin delights, she had an unwavering knack for sweet treats. But one memory that stands out is when she introduced me to her "special" brownie cookies. I still remember the day she pulled them out of the oven—puffy, gooey, and topped with a sprinkle of sea salt. As soon as I took a bite, I was instantly transported to euphoria. The chocolate melted in my mouth, and I could hardly believe that such a simple recipe could produce such rich flavors.
It was one of those moments that planted the seed of my passion for cooking. And can you believe it? I still use her recipe today! Over the years, I’ve played with it, adding my own twists and turns while keeping that original flavor intact. Just like grandma taught me, sharing freshly baked goodness with others is one of life’s simplest joys.
Ingredients
Let’s gather our ingredients! Each component plays a key role in crafting the perfect brownie cookies. Here’s what you’ll need:
-
1 cup butter, melted: This adds richness and helps achieve that gooey texture. You can use unsalted or salted butter based on your taste preference.
-
1 cup granulated sugar: This sweetens the cookies and helps with that lovely crispy exterior. For a healthier option, consider coconut sugar.
-
1 cup brown sugar: Adding depth and moisture, brown sugar gives these cookies that signature caramel flavor. If you’re out of brown sugar, you can mix granulated sugar with a dash of molasses as a substitute.
-
2 large eggs: The binding agents that create structure and stability. For a vegan alternative, you can use flaxseed meal mixed with water.
-
1 teaspoon vanilla extract: Adds warmth and enhances the overall flavor profile. Feel free to use almond extract for a fun twist.
-
1 cup all-purpose flour: The backbone of our cookies. For a gluten-free option, almond flour or a gluten-free blend works well.
-
1/2 cup cocoa powder: This is where the chocolate magic happens! Use unsweetened cocoa for the best results.
-
1/2 teaspoon baking powder: This gives the cookies a slight lift, helping them puff up nicely.
-
1/4 teaspoon salt: A touch of salt elevates the flavors and balances the sweetness. Sea salt is my favorite!
-
1 cup chocolate chips: Because one can never have too much chocolate! Go for semi-sweet or dark chocolate for a richer flavor.
Step-by-Step Instructions
Ready to make some magic in the kitchen? Let’s get rolling! Here’s how to whip up these gourmet brownie cookies step by step.
-
Preheat your oven to 350°F (175°C). This is crucial for ensuring your cookies bake evenly. While the oven heats up, it’s the perfect time to gather your ingredients and tools!
-
Melt the butter: In a medium-sized bowl, combine your melted butter with the granulated sugar and brown sugar. Give it a good mix until it’s smooth and well combined. The heat from the melted butter helps dissolve the sugar, leading to super chewy cookies!
-
Add the eggs and vanilla: One by one, crack in those eggs, mixing well after each addition. Then, stir in the vanilla extract. This will create a beautiful, glossy batter that’s rich in flavor.
-
Combine the dry ingredients: In a separate bowl, whisk together the all-purpose flour, cocoa powder, baking powder, and salt. This step helps ensure everything is well-distributed and prevents any clumps.
-
Combine wet and dry: Gradually fold the dry ingredients into the wet mixture, being careful not to overmix. It’s totally OK to have a few lumps; we want that fudgy texture!
-
Chocolate chips magic: Stir in the chocolate chips (or chunks, if you’re feeling wild!). Now’s the perfect time to add in any extras you love—walnuts, hazelnuts, or even a sprinkle of espresso powder for an added flavor punch!
-
Scoop and bake: Use a cookie scoop to portion the dough onto a lined baking sheet, leaving space between each scoop. These beauties will spread a bit during baking, so don’t cramp their style! Bake for about 10-12 minutes or until the edges are slightly firm but the center still looks soft.
-
Cool down: Once out of the oven, let the cookies cool on the baking sheet for about 5 minutes before transferring them to a wire rack. This helps them finish setting up while still keeping that soft, chewy center.
Serving Suggestions
Now for the fun part—serving your gourmet brownie cookies! Here’s how to impress your friends and family:
-
Plate with style: Use a rustic wooden board or a chic white platter to display your cookies. Stack them high for a dramatic effect, or line them up for a more casual vibe.
-
Add a scoop of ice cream: Nothing pairs better with warm cookies than a scoop of vanilla or salted caramel ice cream. Place the cookies in a bowl and top them off with a generous scoop. Heaven in a dish!
-
Dust with powdered sugar: For a fancy touch, dust some powdered sugar over the top right before serving. It adds a little elegance and makes everything just a bit sweeter!
-
Drizzle with chocolate: Melt some chocolate and drizzle it artfully over your cookies for an Instagram-worthy creation. You can even sprinkle some sea salt on top to elevate the flavor even more.
Recipe Variations
Now, let’s get creative! Here are a few fun variations to shake things up:
-
Mint Chocolate Brownie Cookies: Add a few drops of mint extract to impart a refreshing minty flavor. You can also toss in some Andes mints or chocolate chips with a hint of mint.
-
Nutty Delight: Fold in some chopped nuts, like pecans or hazelnuts, for added texture and a nutty flavor. Toasting the nuts beforehand enhances their taste!
-
Spicy Kick: Want to take your cookies to the next level? Add a pinch of cayenne pepper or chili powder for an unexpected heat that balances the sweetness. Trust me!
-
Dark Chocolate Chunk: Swap regular chocolate chips for dark chocolate chunks for an intense chocolate experience. The extra bits of chocolate create surprises in every bite!
-
Gluten-Free Option: Substitute all-purpose flour with a gluten-free flour blend to make it suitable for those with gluten sensitivities. They’ll be just as delicious!
Chef’s Notes
Ah, the kitchen! It’s where all the best stories happen, and oh, do I have a few! I’ll let you in on a little secret: recipe testing often goes awry, leading to some hilarious moments. At one point, I misread a measuring cup and added a full cup of salt instead of a quarter teaspoon. 🤦♂️ Let’s just say, those cookies went straight to the trash and not a single friend would take them!
Each time I make these brownie cookies, I make sure to tweak the recipe slightly—trying different flavor combinations or using organic ingredients. Revisiting the same base recipe has led to numerous delicious outcomes, proving that there’s always room for creativity in the kitchen!
FAQs and Troubleshooting
As with any recipe, it’s completely normal to run into some hiccups. Here are a few common questions and solutions to ensure your brownie cookies turn out perfectly.
Q1: Why are my cookies too chewy?
Chewy cookies need moisture, but if they’re too chewy, you might have added too much flour or not baked them long enough. Make sure to measure your flour accurately and stick to the baking time!
Q2: My cookies spread too much while baking. What happened?
If your cookies spread excessively, try chilling the dough for about 30 minutes before baking. This will help solidify the butter and prevent excessive spreading.
Q3: Can I freeze these brownie cookies?
Absolutely! These cookies freeze really well. Just place them in an airtight container or zip-top bag, and they’ll keep their freshness for a few months. Thaw at room temperature before enjoying!
Q4: How do I store leftover cookies?
Keep them in an airtight container at room temperature for about a week, or in the fridge if you want to prolong their freshness. Just remember to let them come to room temperature before serving for the ultimate chewy experience!
Nutritional Info
While I believe that life’s too short not to indulge every once in a while, it’s still good to have an idea of what’s going into our favorite treats! Here’s a basic rundown of the nutritional info per cookie (assuming about 24 cookies in one batch):
- Calories: Approximately 200
- Total Fat: 10g (Saturated fat: 6g)
- Cholesterol: 40mg
- Sodium: 50mg
- Total Carbohydrates: 28g (Dietary fiber: 1g, Sugars: 18g)
- Protein: 2g
Remember, moderation is key; balance those calories with plenty of veggies and healthy meals throughout the week!
Aside from satisfying your sweet tooth, these cookies provide a host of enjoyable flavors and delightful moments around the table with loved ones.
Final Thoughts
There you have it! Gourmet brownie cookies that are sure to win over hearts and tantalize taste buds. This recipe is not just a combination of ingredients; it’s about creating lasting memories, sharing joy, and perhaps, a little bit of chocolate-induced happiness!
So here’s my challenge to you: try these out for your next gathering or cozy night in, and I guarantee people will be asking for your secret recipe. And who knows? You might even find some kitchen inspiration for your own variations down the line.
Thank you for joining me on this delicious adventure. I can’t wait to hear how your gourmet brownie cookies turn out! Spread the love (and cookie crumbs), and remember: the heart of every home is the kitchen. Now go forth and bake with joy!
Happy cooking! 🍪✨
Print
Gourmet Brownie Cookies
- Total Time: 27 minutes
- Yield: 24 cookies 1x
- Diet: Vegetarian
Description
Decadent cookies combining the fudginess of brownies with classic cookie crispiness.
Ingredients
- 1 cup butter, melted
- 1 cup granulated sugar
- 1 cup brown sugar
- 2 large eggs
- 1 teaspoon vanilla extract
- 1 cup all-purpose flour
- 1/2 cup cocoa powder
- 1/2 teaspoon baking powder
- 1/4 teaspoon salt
- 1 cup chocolate chips
Instructions
- Preheat your oven to 350°F (175°C).
- Melt the butter and mix it with the granulated and brown sugar until smooth.
- Add the eggs one at a time, mixing well after each addition, then stir in vanilla.
- Combine the flour, cocoa powder, baking powder, and salt in a separate bowl.
- Combine the dry ingredients into the wet mixture, folding gently.
- Stir in the chocolate chips or other additions if desired.
- Scoop the dough onto a lined baking sheet and bake for about 10-12 minutes.
- Cool the cookies on the baking sheet for 5 minutes before transferring to a wire rack.
Notes
Adjust baking time for preferred cookie texture; if too chewy, consider measuring flour more accurately.
- Prep Time: 15 minutes
- Cook Time: 12 minutes
- Category: Dessert
- Method: Baking
- Cuisine: American
Nutrition
- Serving Size: 1 cookie
- Calories: 200
- Sugar: 18g
- Sodium: 50mg
- Fat: 10g
- Saturated Fat: 6g
- Unsaturated Fat: 4g
- Trans Fat: 0g
- Carbohydrates: 28g
- Fiber: 1g
- Protein: 2g
- Cholesterol: 40mg
Keywords: cookies, brownie cookies, chocolate cookies, dessert, sweet treats

Cottage Cheese Brownies
Whip Up a Batch of Delicious Cottage Cheese Brownies!
Hey there, fellow foodies! I’m Beau Collier, your go-to guide for all things delicious here at Feastical. Today, we’re diving into a recipe that’s sure to tickle your taste buds and wrap you in a cozy blanket of nostalgia and sweetness — Cottage Cheese Brownies! Yes, you read that right! These dreamy, chocolaty squares are not just a treat for your taste buds but also a healthier twist on a classic favorite. So, grab your apron and let’s get baking!
A Sweet Slice of Nostalgia
Let me take you back to my childhood kitchen on a rainy Saturday, where the aroma of something sweet wafted through the air. My mom would often whip up her famous brownies, gooey and rich, with a crackly top that promised a chocolatey treasure within. She always said the best desserts are the ones that bring people together. That concept sticks with me today as I create and share my own take on this beloved treat.
Years later, during my culinary explorations, I stumbled upon a surprisingly delightful ingredient: cottage cheese! As someone who is forever on a quest to balance comfort food with healthier options, it sparked a little lightbulb moment. What if I could use cottage cheese in brownies? Could it really compete with my mom’s legendary recipe? Spoiler alert: it can!
The first batch I baked was met with skeptical looks from my family, but after one bite, they were sold. Not only were these brownies rich and fudgy, but they also packed a protein punch and left us feeling just a little less guilty about indulging. Each bite was reminiscent of childhood sweetness, yet packed with a modern twist—just like how I love cooking. By the end of that rainy day, I not only had a new recipe but also a kitchen victory that was a far cry from that skeptical start.
Ready to create your own batch of cottage cheese brownies that will warm your soul and thrill your taste buds? Let’s gather our ingredients and get started!
Ingredients You’ll Need
Here’s what you’ll need for these fabulous Cottage Cheese Brownies:
-
1 cup cottage cheese
This is the star ingredient! It keeps the brownies moist while adding protein. If you’re in a pinch, Greek yogurt can serve as a fantastic substitute. -
1/2 cup unsweetened cocoa powder
Cocoa powder is the key to a rich, chocolaty flavor. Unsweetened is essential for keeping the sugar in balance. If you want a milder cocoa flavor, you could use Dutch-processed cocoa. -
1/2 cup granulated sugar
This will naturally sweeten our brownies. If you’d prefer a lower-calorie option, coconut sugar or a sugar substitute could work. Just remember it may alter the taste slightly! -
1/4 cup honey or maple syrup
This adds a natural sweetness and a hint of moisture. Feel free to swap this with agave syrup if you’re aiming for a vegan option. -
2 large eggs
They help bind the ingredients together while adding moisture. If you’re looking for a vegan substitute, mashed bananas or flaxseed meal mixed with water would do the trick. -
1/3 cup all-purpose flour
Flour gets our brownie structure just right. If gluten is a concern, almond flour or gluten-free flour mixes work wonder here as alternatives! -
1/2 teaspoon baking powder
This little helper makes the brownies rise slightly, giving them that dreamy chewy texture. -
1/2 teaspoon vanilla extract
Vanilla adds a warm, aromatic flavor. For an extra twist, consider infusing it with orange zest! -
1/4 cup chocolate chips (optional)
Because more chocolate is always a good idea! Dark chocolate, white chocolate, or even peanut butter chips can jazz things up.
Step-by-Step Instructions to Brownie Bliss
Let’s get those brownies in the oven! Follow these steps, and trust me, it’ll be worth the tasty journey:
Step 1: Preheat Your Oven
Preheat your oven to 350°F (175°C) — a crucial step! This ensures even baking. Reliability is key here, folks! You don’t want to put raw batter into a cold oven and just wait… trust me, I know from experience!
Step 2: Prepare Your Baking Dish
Grab an 8-inch square baking dish (or a similar-sized dish). Grease it lightly with oil or line it with parchment paper for easy removal. (Here’s a tip: if you’re using parchment, leave a little overhang on two sides, which acts like handles for easy lifting!)
Step 3: Blend the Cottage Cheese
In a blender or food processor, combine the cottage cheese, eggs, honey (or maple syrup), and vanilla extract. Blend until smooth and creamy — you want to eliminate any lumps as much as possible. This is where the magic happens! The cottage cheese becomes undetectable, and it’s all about that gooey texture.
Step 4: Mix the Dry Ingredients
In a large mixing bowl, whisk together the cocoa powder, flour, sugar, and baking powder. Make sure they’re combined well so you don’t end up with a surprise clump of cocoa in one bite!
Step 5: Combine Wet and Dry Mixtures
Pour the creamy cottage cheese mixture into your dry ingredient bowl. Gently fold them together with a spatula until fully combined. Don’t overmix—bcaking is an art, not a workout!
Step 6: Add Chocolate Chips
If you’re feeling extra indulgent, fold in those chocolate chips! This step is strictly optional, but I highly recommend it. Each bite will feel like a little explosion of chocolate flavor!
Step 7: Bake Those Brownies
Pour your luscious brownie batter into the prepared baking dish, smoothing the top. Bake for about 30-35 minutes, or until a toothpick comes out clean (with a few crumbs is a good sign!). Now’s the perfect time to just sit back and admire the intoxicating aroma of chocolate filling your kitchen!
Step 8: Cooling Time
Once baked, allow your brownies to cool in the pan for about 10-15 minutes, then transfer them to a wire rack to cool completely. Patience is a virtue—just try not to dig in right away!
Serving Suggestions
Now that you have your decadent cottage cheese brownies beautifully baked, it’s time to serve them up! For an elegant touch, dust the top with a sprinkle of powdered sugar or cocoa powder. You can also drizzle a little melted chocolate over the top or serve with a scoop of vanilla ice cream for that classic brownie sundae vibe.
To plate, cut the brownies into squares or rectangles (I like to aim for 16 perfect pieces!). Place them on a decorative plate or a baking sheet lined with parchment and serve them to your family and friends — prepare for compliments flowing your way!
Recipe Variations
If you’re feeling adventurous in the kitchen, here are some creative twists for your Cottage Cheese Brownies:
-
Nutty Brownies: Fold in 1/2 cup chopped walnuts or pecans for an added crunch.
-
Peanut Butter Swirl: Drop spoonfuls of peanut butter into the batter before baking and use a knife to swirl it through for an irresistible flavor combo.
-
Mint-Chocolate Bliss: Add a few drops of peppermint extract or some crushed mint candies into the mix for a refreshing twist.
-
Berry Burst: Toss in a handful of fresh blueberries or raspberries for a fruity punch — they pair beautifully with chocolate!
-
Spicy Chocolate: A pinch of cayenne pepper or cinnamon can give the brownies a kick and elevate the chocolate flavor.
Chef’s Notes
Each time I bake these brownies, I’m reminded of that rainy day filled with familiar warmth and the enticing scent of something sweet bubbling in the oven. These cottage cheese brownies have come a long way from my mom’s classic recipe, and each variation I create connects me to that memory. They’ve evolved based on what I learn and experience, but the love stays the same.
Random fun fact: I once tried to bake these in a waffle maker just to see if I could create “brownie waffles.” The results were a bit crumbly, but it turned out to be an unexpected hit at brunch!
FAQs and Troubleshooting
1. Why are my brownies too dry?
This could be due to overmixing, overbaking, or incorrect oven temperature. Make sure to check your oven with an oven thermometer next time you bake!
2. Can I use low-fat cottage cheese?
Absolutely! You can use low-fat or even nonfat cottage cheese, but the texture and richness may vary slightly.
3. Why won’t my brownies come out of the pan?
A gentle greasing with oil or lining with parchment paper should prevent sticking. If they still cling, let them cool a touch longer before trying to remove them.
4. How do I store leftovers?
Store any uneaten brownies in an airtight container at room temperature for 2-3 days. You can also freeze them for up to 3 months, but bring them to room temperature before devouring!
Nutritional Info
Here’s a quick glance at the nutritional content of these Cottage Cheese Brownies per square if you cut them into 16 pieces (assuming no chocolate chips):
- Calories: 100
- Protein: 4g
- Fat: 2g
- Carbohydrates: 17g
- Fiber: 1g
These brownies are not just delicious but also a bit more balanced than your standard brownie recipe, making them a fantastic treat any time of day.
Final Thoughts
So there you have it, my friend! Cottage Cheese Brownies that are wholesome, delicious, and will transport you back to your happy kitchen moments, just like they do for me. I hope you enjoy making and sharing these as much as I do! Remember, cooking is all about connection, creativity, and that sweet adventure we embark on in our kitchens.
Grab your spatula and bake up a magical batch of these goodies. I’d love to hear how yours turn out! Leave me a comment below and don’t forget to share the love with fellow bakers in your life!
Happy baking! 🍫✨
Print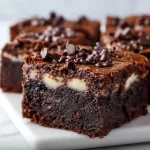
Cottage Cheese Brownies
- Total Time: 50 minutes
- Yield: 16 servings 1x
- Diet: Vegetarian
Description
A healthier twist on classic brownies using cottage cheese for added moisture and protein.
Ingredients
- 1 cup cottage cheese
- 1/2 cup unsweetened cocoa powder
- 1/2 cup granulated sugar
- 1/4 cup honey or maple syrup
- 2 large eggs
- 1/3 cup all-purpose flour
- 1/2 teaspoon baking powder
- 1/2 teaspoon vanilla extract
- 1/4 cup chocolate chips (optional)
Instructions
- Preheat your oven to 350°F (175°C).
- Grab an 8-inch square baking dish and grease it lightly with oil or line it with parchment paper.
- Blend the cottage cheese, eggs, honey (or maple syrup), and vanilla extract until smooth and creamy.
- In a large mixing bowl, whisk together the cocoa powder, flour, sugar, and baking powder.
- Pour the creamy cottage cheese mixture into your dry ingredient bowl and gently fold together until fully combined.
- Add in chocolate chips if desired and fold gently into the batter.
- Pour the brownie batter into the prepared baking dish and smooth the top.
- Bake for about 30-35 minutes or until a toothpick comes out clean with a few crumbs.
- Allow the brownies to cool in the pan for about 10-15 minutes before transferring them to a wire rack to cool completely.
Notes
For a creative twist, try adding nuts, peanut butter, or fruit to the batter!
- Prep Time: 15 minutes
- Cook Time: 35 minutes
- Category: Dessert
- Method: Baking
- Cuisine: American
Nutrition
- Serving Size: 1 brownie
- Calories: 100
- Sugar: 5g
- Sodium: 50mg
- Fat: 2g
- Saturated Fat: 1g
- Unsaturated Fat: 1g
- Trans Fat: 0g
- Carbohydrates: 17g
- Fiber: 1g
- Protein: 4g
- Cholesterol: 40mg
Keywords: Cottage Cheese Brownies, Healthy Brownies, Dessert Recipe, Baking

Cottage Cheese Blueberry Cloud Bread
Cottage Cheese Blueberry Cloud Bread: Your New Favorite Recipe
Hey there, foodies! Welcome back to Feastical! Today, I’ve got something incredibly light, fluffy, and totally delicious that you’re going to love – Cottage Cheese Blueberry Cloud Bread! Now, I know what you might be thinking: "Cloud bread?" What a whimsical name, right? But trust me when I say, it’s as dreamy and pillowy as it sounds. This delightful bread is not just a treat for the taste buds but also a fantastic alternative for those wanting to cut back on carbs or looking for gluten-free options.
Growing up, my kitchen always echoed with laughter, the clinking of pots, and the unmistakable aroma of baked goods in the oven. My grandma was a master in the art of light, fluffy bread, always testing out new ingredients. I remember her pulling a loaf out of the oven, its warm, golden crust beckoning us. We would gather around the kitchen, all anticipation, as a slice was cut, steam wafting up into the air.
Fast forward to today, my appreciate for lighter versions of traditional recipes has led me to whip up this cottage cheese cloud bread. Not only does it bring back fond memories of family gatherings, but it also offers a unique twist with the addition of fresh blueberries. Sweet, delectable, and oh-so-simple, this recipe is perfect for breakfast, snacks, or even an indulgent dessert. So, let’s float into the kitchen together and create this cloud-like experience that will elevate your meal!
Personal Story
Let me take you back to my childhood for a moment. Picture a sunlit kitchen, the smell of flour dust floating in the air, and the best company one could ask for – my grandma. She was my kitchen muse. Though we baked traditional breads and sweet treats together, it was the "experiments" that brought out the most fun. One day, she had a wild idea to swap half of the flour for cottage cheese. I was skeptical, but once we mixed in blueberries, my curiosity got the better of me. We called it "Grandma’s Surprise Bread."
As we pulled it out of the oven, the aroma filled every corner of our tiny home, and the bread came out such a beautiful shade of golden brown. When we took that first bite, it was light, airy, and mildly sweet – a real revelation! That whimsical loaf sparked something in me every time I stepped into the kitchen, urging me to explore more, to adapt and create. Today, I’ve taken inspiration from that sweet memory and applied it to my Cottage Cheese Blueberry Cloud Bread, adding a modern twist that honors those good old times while introducing new flavors and textures.
Ingredients
Now that you’re fully immersed in both nostalgia and excitement, let’s take a closer look at the stars of the show: the ingredients. Here’s what you’ll need to make Cottage Cheese Blueberry Cloud Bread:
-
1 cup cottage cheese
This is the key ingredient that gives the bread a lovely, airy texture. It’s also packed with protein! If you’re looking for dairy-free options, you can try using almond or soy yogurt; just ensure it’s thick enough to mimic cottage cheese. -
3 large eggs
These bad boys are the binding agents here! They add richness and moisture. You can replace them with chia eggs if you’re going vegan (1 tablespoon chia seeds soaked in 2.5 tablespoons water equals 1 egg). -
1/4 cup almond flour
This gluten-free flour adds a nutty flavor, making every bite a pleasure. If almond flour isn’t available, you can use oat flour or all-purpose flour if gluten isn’t a concern. -
1/4 cup blueberries (fresh or frozen)
These little gems burst with flavor and add natural sweetness to your cloud bread. If blueberries aren’t your jam, feel free to swap them out for other berries or even dark chocolate chips! -
1 teaspoon baking powder
This is our little helper for that fluffy texture. It’s essential for making the bread rise. Be cautious with your baking powder – too much can lead to a bitter taste. -
1 teaspoon vanilla extract
A dash of vanilla makes any sweet dish warmer and more inviting, adding depth to flavors. If you’re out of vanilla, a hint of almond extract works wonders too. -
Pinch of salt
This may seem minor, but a pinch of salt elevates flavors, balancing the sweetness of your bread.
Gathering these ingredients is as easy as pie (but way fluffier)! And you’ll notice they’re mostly staples, making this bread effortless and accessible for any budding chef.
Step-by-Step Instructions
Now that you have your ingredients prepped, it’s time to bring them together. Here’s how to create your Cottage Cheese Blueberry Cloud Bread from scratch, step by step.
Step 1: Preheat the Oven
Preheat your oven to 350°F (175°C). This is crucial! An adequately preheated oven ensures that your bread rises beautifully, keeping that cloud-like texture. While it’s heating, grab a trusty 9-inch round baking dish or loaf pan and grease it lightly. You don’t want your ginormous cloud to get stuck!
Step 2: Whisk the Eggs
In a large mixing bowl, crack your three eggs and whisk them together. You want to create a lovely froth – this is where the magic begins! Look for a light and airy texture; it’s crucial for the rise you need. If you have a hand mixer, this is a perfect time to use it.
Step 3: Add the Cottage Cheese and Vanilla
Next up, add in your cup of cottage cheese and that glorious teaspoon of vanilla extract. Mix until everything is well combined. You can’t skip this step, as it’s the secret for delectable creaminess and excellent flavor. If you prefer an even smoother texture, you could blend the cottage cheese before adding it.
Step 4: Mix in the Dry Ingredients
Now, it’s time to introduce the dry ingredients! First, sprinkle the almond flour, baking powder, and a pinch of salt into the wet mixture. Stir gently until just combined; be careful not to over-mix – think of how clouds float lazily in the sky. Nobody wants dense bread, right?
Step 5: Fold in the Blueberries
And now for my favorite part – adding those beautiful blueberries! Gently fold them into the batter, being cautious not to crush them too much. You want them whole, bursting with flavor in every bite. If you’re using frozen blueberries, there’s no need to thaw them; just toss them in straight from the freezer!
Step 6: Bake It Up
Pour your batter into the prepared baking dish and pop it into the oven. Bake for about 25-30 minutes or until it’s lightly golden on top and a toothpick comes out clean when poked into the center. Watch it closely in those last few minutes! An oven timer will be your best friend here!
Step 7: Cool and Serve
Once it’s finished baking, allow the bread to cool in the pan for about 10 minutes before transferring it onto a wire rack to cool completely. This not only prevents sogginess at the bottom but also gives it a lovely finish.
Serving Suggestions
Now, let’s talk about how to serve your fluffy creation! This Cottage Cheese Blueberry Cloud Bread is incredibly versatile. You can slice it up and enjoy it plain, spread it with a smear of butter or cream cheese, or pile fresh fruit on top for a beautiful presentation. Drizzle a tad of honey or maple syrup for an added sweetness that sends your taste buds into overdrive!
For a more decadent treat, why not serve it with Greek yogurt and a handful of berries for breakfast in bed? Or how about topping it with a dollop of whipped cream and a dusting of powdered sugar for a charming dessert? The possibilities are endless!
Recipe Variations
Now, since I want you to explore and have fun, here are some exciting variations to take your Cottage Cheese Blueberry Cloud Bread on new adventures:
-
Lemon Zest Delight: Add the zest of one lemon to the batter for a refreshing citrus twist. You can even substitute blueberries for raspberries or blackberries to enhance that zing!
-
Chocolate Chip Bliss: Swap the blueberries for dark chocolate chips. You can never go wrong with a fudgy, gooey treat!
-
Nuts and Seeds: Toss in some chopped walnuts or chia seeds for a bit of crunch. Not only do they add flavor, but they also pack a nutrient punch.
-
Savory Spin: Feel free to take a savory turn! Omit the sugar and blueberries, and add herbs like rosemary or thyme, and a sprinkle of cheese for a fabulous side with dinner.
-
Banana Bread Variation: Mash one ripe banana and fold it into the mix instead of blueberries. You can enjoy banana cloud bread all on its own or with a side of nut butter!
Chef’s Notes
As with every recipe, the beauty lies in its evolution. This Cottage Cheese Blueberry Cloud Bread has become an integral part of my repertoire. It started as a fun kitchen experiment inspired by my late grandmother and transformed into a staple for various occasions — brunch, snacks, or even the occasional midnight treat.
I once made it for a picnic gathering, and as I sliced into it, the fluffy layers and vibrant blueberries made it an instant hit. I encourage you to experiment with different flavors or toppings! Recipes should grow with you — let this dish spark creativity and memories, just like it did for me.
FAQs and Troubleshooting
-
Why is my cloud bread dense?
If your bread turned out more on the dense side, it’s likely that it was overmixed or the eggs didn’t aerate enough in the initial steps. Make sure those mixed eggs have a good froth before adding other ingredients. -
Can I make cloud bread without almond flour?
Absolutely! You can replace almond flour with oat flour or regular all-purpose flour. Just be mindful that the flavor and texture might slightly vary. -
How do I store leftover cloud bread?
If you have any leftover (which is a rarity!), wrap it in foil or place it in an airtight container. It can stay fresh for about 2-3 days at room temperature, or freeze it for up to a month! -
What can I do if the bread sticks to the pan?
Always ensure you’ve greased the pan adequately before pouring in the batter. If it does stick, a gentle wiggle with a knife around the edges should help you release it without any damage.
Nutritional Info
Curious about the nutrition? Here’s a rough breakdown to give you an idea of what to expect per slice (approximately 12 slices from the recipe):
- Calories: 80-90 (depending on add-ins)
- Protein: 6-7g
- Carbohydrates: 4-6g
- Fat: 4g
- Fiber: 1g
With all those wholesome ingredients, you’re indulging in something not just delightful but packed with nutrition as well!
Final Thoughts
Alright, my fellow food lovers, there you have it! Your guide to crafting the most delightful Cottage Cheese Blueberry Cloud Bread! I hope you’ve enjoyed this cooking adventure as much as I did sharing it with you. Remember, cooking is all about joy, creativity, and the love you put into each bite.
Whether you’re serving this up at a brunch, enjoying it solo, or sharing it with loved ones, each slice will surely spark smiles and fond memories, just like it did for me. So roll up your sleeves, grab your mixing bowl, and let that creative culinary spirit soar! I can’t wait to see how your Cloud Bread turns out; be sure to share your delightful creations with us! Happy cooking, and see you next time at Feastical!
Print
Cottage Cheese Blueberry Cloud Bread
- Total Time: 40 minutes
- Yield: 12 servings 1x
- Diet: Gluten-Free
Description
A light and fluffy cloud bread made with cottage cheese and fresh blueberries, perfect for breakfast, snacks, or dessert.
Ingredients
- 1 cup cottage cheese
- 3 large eggs
- 1/4 cup almond flour
- 1/4 cup blueberries (fresh or frozen)
- 1 teaspoon baking powder
- 1 teaspoon vanilla extract
- Pinch of salt
Instructions
- Preheat your oven to 350°F (175°C). Grease a 9-inch round baking dish or loaf pan.
- Whisk the eggs together in a large mixing bowl until frothy.
- Add the cottage cheese and vanilla extract, mixing until well combined.
- Mix in the almond flour, baking powder, and a pinch of salt until just combined.
- Fold in the blueberries gently without crushing them.
- Pour the batter into the prepared baking dish and bake for about 25-30 minutes or until golden and a toothpick comes out clean.
- Cool in the pan for 10 minutes before transferring to a wire rack to cool completely.
Notes
Serve plain, with butter, or top with fruit and honey for a delightful treat.
- Prep Time: 10 minutes
- Cook Time: 30 minutes
- Category: Bread
- Method: Baking
- Cuisine: American
Nutrition
- Serving Size: 1 slice
- Calories: 85
- Sugar: 2g
- Sodium: 150mg
- Fat: 4g
- Saturated Fat: 1g
- Unsaturated Fat: 3g
- Trans Fat: 0g
- Carbohydrates: 6g
- Fiber: 1g
- Protein: 6g
- Cholesterol: 70mg
Keywords: cloud bread, cottage cheese bread, blueberry bread, gluten-free bread
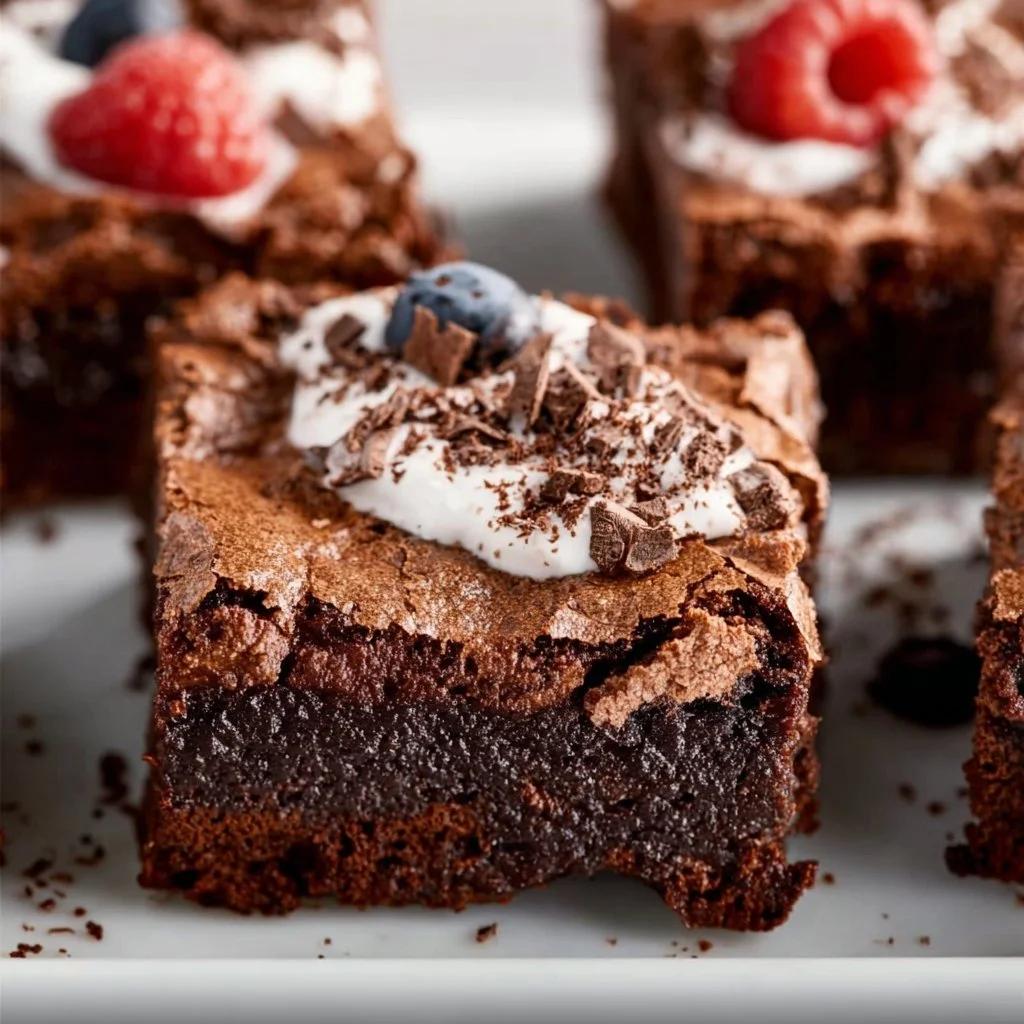
Zero Sugar Brownies with Greek Yogurt
Dive Into Decadence: Zero Sugar Brownies with Greek Yogurt
Hey there, fellow foodies! I’m Beau Collier, and today we’re on a delicious mission to make dessert a guilt-free pleasure without sacrificing flavor. Let’s talk about brownies—the quintessential sweet treat that conjures up feelings of nostalgia and warmth. You know the kind, right? The fudgey, chewy bites that remind you of lazy afternoons and cozy movie nights. But what if I told you that you could indulge in these deliciousness while keeping it healthy? That’s right! Enter the magical realm of Zero Sugar Brownies with Greek Yogurt.
These brownies are not just good for the palate; they’re a feel-good treat that will have your taste buds doing the happy dance. You might be wondering how we’re ditching the sugar while still keeping the sweetness. The secret lies in a few key ingredients that we’ll dive into shortly. Trust me—once you whip up a batch of these beauties, you’ll be sharing them with friends, family, and anyone who crosses your delicious path!
Whether you’re counting calories, watching your sugar intake, or simply looking for a healthier dessert option, this recipe checks all the boxes. And the best part? You can whip these up in no time, making it a simple, quick treat that fits right into your busy life. So, grab your apron, and let’s embark on this sweet adventure together, where flavor and health unite in perfect harmony.
Personal Story
You know, every great recipe comes with a story, and mine definitely does! I remember being a wide-eyed kid standing on a stool in my grandma’s kitchen, watching her whisk together ingredients for her infamous brownies. The aroma of chocolate would waft through the air, wrapping around me like a warm hug. No matter how many dishes had to be washed, those moments spent with her, laughing and creating, were etched into my heart.
Grandma always believed that the best treats were made with love, and I’ve carried that thought into my own cooking adventures. Fast forward to today, I wanted to channel that same love into a healthier version that everyone could enjoy—with no sugar crash afterwards! These Zero Sugar Brownies with Greek Yogurt are my modern twist on a timeless classic, and they’re perfect for sharing—just like Grandma would’ve wanted. So, let’s get into the fun part: the ingredients!
Ingredients
Before we get to baking, let’s gather our ingredients! Here’s what you’ll need for these luscious brownies, plus some handy tips:
-
1 cup Greek yogurt: This creamy delight is our secret weapon. It adds moisture, richness, and a hefty dose of protein. If you need a dairy-free alternative, look for a plant-based yogurt that’s thick and creamy.
-
1/2 cup unsweetened cocoa powder: Choose a high-quality cocoa powder for an intense chocolate flavor. If you’re feeling adventurous, try using dark cocoa for an even deeper chocolate experience!
-
1/2 cup almond flour (or any flour of choice): Almond flour gives a nice nuttiness and moisture to our brownies. Don’t have it? No problem! You can swap it out for whole wheat flour, oat flour, or even coconut flour (just use less of it, as it’s denser).
-
1/4 cup unsweetened applesauce: This is our natural sweetener that also adds moisture. Feel free to substitute it with mashed bananas or a bit of pumpkin puree if you’re looking for a flavor twist!
-
1/4 cup sweetener of choice (e.g., erythritol, stevia): Picking your sweetener can be fun; however, make sure to adjust the quantity according to your sweetness preference. If you’re using granulated sweeteners, erythritol works really well for baking.
-
1 teaspoon vanilla extract: A little splash of vanilla elevates the flavors beautifully. If you want to amp things up, try using vanilla bean paste!
-
1/4 teaspoon salt: A pinch of salt enhances the chocolate taste, so don’t skip it. It’s like a magic trick for flavor!
-
1/2 teaspoon baking powder: This is our little leavening agent that gives our brownies that perfect texture. You can also use baking soda if you’re in a pinch, but be aware that it’ll give a different flavor.
Step-by-Step Instructions
Alright, let’s roll up our sleeves and dive into the fun part—baking these heavenly brownies!
Step 1: Preheat Your Oven
Start by preheating your oven to 350°F (175°C). This little step is vital for ensuring that your brownies bake evenly. While that’s warming up, you can throw together all your ingredients!
Step 2: Prepare Your Baking Dish
Grab an 8×8-inch baking pan and line it with parchment paper or lightly grease it. This will make it super easy to pop the brownies out after baking—trust me, it’s a game changer!
Step 3: Mix the Wet Ingredients
In a mixing bowl, add the Greek yogurt, unsweetened applesauce, and vanilla extract. Using a whisk (or a fork if that’s what you have on hand!), mix these ingredients together until smooth. This is where your kitchen will start to smell amazing!
Step 4: Combine the Dry Ingredients
In a separate bowl, combine the unsweetened cocoa powder, almond flour, sweetener, salt, and baking powder. Whisk them together to break up any lumps. Remember, this is where the brownie magic happens!
Step 5: Merge Wet and Dry
Now, pour the dry mix into the bowl with the wet ingredients. Gently fold the dry mixture in until just combined—don’t over-mix or your brownies will be tough! Aim for a smooth batter with some airflow still in it. That’ll give you that fudgy texture!
Step 6: Bake It Up
Pour the batter into your prepared baking dish and smooth the top with a spatula. Pop it into the preheated oven and let it bake for about 25-30 minutes, or until a toothpick inserted in the center comes out with a few moist crumbs (not wet batter!).
Step 7: Cool and Slice
Once baked, remove the brownies from the oven, and let them cool in the pan for at least 10-15 minutes. Patience pays off—cooling helps them firm up, leading to cleaner cuts later! Once cool, lift them out using the parchment paper, slice them into squares, and prepare for pure bliss.
Serving Suggestions
Now that your scrumptious brownies are baked and cooled, it’s time to serve them up in style! Here are a few engaging serving suggestions to elevate your presentation:
-
Elegant Plate: Place a square of brownie on a beautiful white plate and dust it with a dash of cocoa powder or powdered sweetener for a touch of sophistication.
-
Pair with Whipped Topping: Top a warm brownie with a dollop of sugar-free whipped cream or a scoop of your favorite Greek yogurt swirled with a bit of honey.
-
Add Fresh Berries: Fresh strawberries or raspberries add a vibrant pop of color and a refreshing contrast to the rich brownies.
-
Drizzle of Chocolate: Melting a little sugar-free chocolate and drizzling it over the top makes for a photographer’s dream and a chocolate lover’s paradise!
Get creative and remember to serve these up warm for that gooey-hug vibe!
Recipe Variations
If you’re looking to switch things up a bit, here are a few fun variations for these brownies:
-
Nutty Brownies: Stir in a handful of chopped walnuts or pecans before baking for an added crunch and flavor.
-
Mint Chocolate Swirl: Add a teaspoon of peppermint extract to your batter and swirl in some unsweetened cocoa and Greek yogurt mixture for a refreshing minty twist.
-
Fruity Delight: Fold in some dark chocolate chips or dried cherries into the batter for bursts of sweetness and texture.
-
Spiced Version: Sprinkle in some cinnamon or chili powder for a tantalizing twist on flavor. It’ll take you by surprise!
-
Coconut Bliss: Fold in shredded coconut for a tropical vibe; you’ll create a brownie with a chewy texture that’s surprisingly delightful!
Chef’s Notes
Cooking is such a journey of love, and this recipe has gone through its evolution just like I have! Initially, I used regular sugar and butter in my experimenting phase. As I learned more and embraced healthier eating, I found the wonders of Greek yogurt and natural sweeteners, and the brownies transformed! They became not just a sweet treat but a good-for-you dessert bursting with flavor.
And you know, brownies are like a blank canvas—completely open for creativity. I remember a funny kitchen mishap when I accidentally swapped baking soda for baking powder. The resulting brownies were a funky mountain of goo! But hey, those spontaneous moments often lead to the best “don’t do this, but try that!” stories.
FAQs and Troubleshooting
-
Why didn’t my brownies rise?
If your brownies didn’t rise, double-check your baking powder’s freshness. An expired leavening agent can lead to flat brownies. -
How do I store leftovers?
These brownies stay fresh in an airtight container at room temperature for a few days or in the fridge for up to a week. You can also freeze them for longer storage — just make sure to wrap them tightly! -
Can I substitute the Greek yogurt with something else?
Absolutely! You can use a silken tofu or any thick plant-based yogurt for a non-dairy version. Just keep the texture similar! -
What do I do if my brownies are too dry?
If your brownies come out dry, next time, try reducing the baking time slightly. An oven thermometer can also ensure your oven is at the correct temperature. And remember, a little gooeyness is perfectly okay!
Nutritional Info
Let’s break down the nutrition in these delightful brownies a bit!
- Per Brownie (assuming you cut into 16 servings):
- Calories: Approximately 70-80
- Protein: 2g (bless you, Greek yogurt!)
- Fat: 3g (depending on your flour choice)
- Carbohydrates: 10g
- Sugar: 0g!
These figures may vary based on specific brands used, but overall, you’re looking at a guilt-free indulgence that truly satisfies your sweet tooth without the sugar overload!
Final Thoughts
So there you have it—my exciting journey into the world of Zero Sugar Brownies with Greek Yogurt! I hope you enjoyed it as much as I loved sharing it. Baking should always feel like a joyful adventure in the kitchen. Don’t forget, cooking is about experimenting and making it your own, so feel free to put your unique twist on these brownies.
Gather your loved ones, serve those brownies warm with a side of laughter and delicious conversations, and watch how they bring everyone together. Here at Feastical, we believe in the magic of food, and these delightful brownies are a perfect example of how a little creativity can lead to something truly wonderful. Happy baking, folks!
Print
Zero Sugar Brownies with Greek Yogurt
- Total Time: 40 minutes
- Yield: 16 servings 1x
- Diet: Vegetarian
Description
Guilt-free, delicious brownies made with Greek yogurt, perfect for satisfying your sweet tooth without the sugar crash.
Ingredients
- 1 cup Greek yogurt
- 1/2 cup unsweetened cocoa powder
- 1/2 cup almond flour
- 1/4 cup unsweetened applesauce
- 1/4 cup sweetener of choice (e.g., erythritol, stevia)
- 1 teaspoon vanilla extract
- 1/4 teaspoon salt
- 1/2 teaspoon baking powder
Instructions
- Preheat your oven to 350°F (175°C).
- Prepare an 8×8-inch baking pan by lining it with parchment paper or greasing it.
- Mix the Greek yogurt, unsweetened applesauce, and vanilla extract until smooth.
- Combine the cocoa powder, almond flour, sweetener, salt, and baking powder in another bowl.
- Merge the dry mixture into the wet ingredients, gently folding until just combined.
- Pour the batter into the prepared baking dish, smoothing the top with a spatula.
- Bake for about 25-30 minutes, or until a toothpick comes out with a few moist crumbs.
- Cool the brownies in the pan for at least 10-15 minutes, then slice and serve.
Notes
For variations, consider adding nuts, chocolate chips, or spices. Serve warm with chocolate drizzle or fresh berries.
- Prep Time: 10 minutes
- Cook Time: 30 minutes
- Category: Dessert
- Method: Baking
- Cuisine: American
Nutrition
- Serving Size: 1 brownie
- Calories: 75
- Sugar: 0g
- Sodium: 50mg
- Fat: 3g
- Saturated Fat: 0.5g
- Unsaturated Fat: 2g
- Trans Fat: 0g
- Carbohydrates: 10g
- Fiber: 1g
- Protein: 4g
- Cholesterol: 5mg
Keywords: zero sugar brownies, healthy dessert, Greek yogurt dessert, guilt-free brownies, low sugar brownies