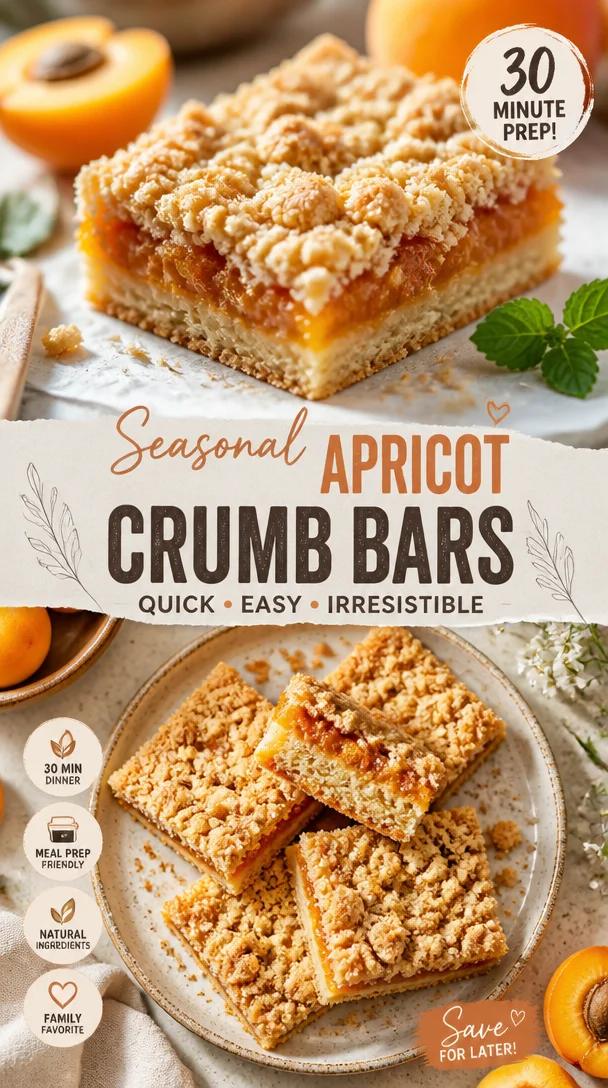
Seasonal Apricot Crumb Bars: Quick 30-Minute Prep Recipe
Apricot Crumb Bars: A Slice of Sunshine in Your Day
Hey there, friends! If you’re looking for a treat that brings a burst of sunshine into your kitchen, you’ve just hit the jackpot! Apricot crumb bars are the perfect blend of sweet, tart, and buttery goodness, offering a delightful way to enjoy one of summer’s brightest fruits all year round. I can just picture these bars on a sunny picnic blanket, or served warm with a scoop of vanilla ice cream as the sun sets. So, buckle up as we dive deep into creating these incredible bars together!
A Little Nostalgia
Let’s take a stroll down memory lane for a moment, shall we? I remember my grandmother’s garden filled with the sweetest apricot trees. In the late summer, when the fruits were ready for picking, it felt like we had stumbled onto nature’s candy store. The warm sun on our backs and the scent of ripe apricots was absolutely intoxicating! One warm afternoon, we gathered in her kitchen, apricots littering the counters, and decided to bake our very first batch of apricot crumb bars. I was her little sous-chef, learning to slice fruits and mix the crumb topping. It was messy, it was sweet, and trust me, we devoured those bars before they even cooled down! That experience not only sparked my love for baking but also ingrained a deep appreciation for using fresh, seasonal ingredients. Each time I bake these crumb bars now, that memory comes rushing back, and I can’t help but feel grateful.
Ingredients
Before we start whipping up a storm in the kitchen, let’s gather our ingredients. Here’s what you’ll need for these scrumptious apricot crumb bars:
-
2 cups all-purpose flour
A versatile staple that forms the base of our crumb bars. If you’re looking for a healthier option, you could swap it out for whole wheat flour. -
1 cup rolled oats
Adds texture and a delightful chewiness. If you’re gluten-free, make sure to use certified gluten-free oats! -
1 cup brown sugar
Bring in that rich, caramel-like sweetness. If you’re short on brown sugar, just mix granulated sugar with a tablespoon of molasses as a quick substitute. -
1/2 cup granulated sugar
A bit of sweetness to balance the tartness of our apricots. If you’re watching your sugar intake, you can reduce this to 1/4 cup. -
1 cup unsalted butter, melted
This makes our crumbly topping irresistibly buttery. If you need a dairy-free option, coconut oil can step in nicely! -
1/2 teaspoon baking powder
Helps the bars rise just slightly, creating a lovely texture. -
1/4 teaspoon salt
A pinch of salt enhances all the flavors. Don’t skip this step! -
2 cups fresh apricots, pitted and sliced
The star of the show! Feel free to mix in other fruits like peaches or nectarines if you can’t find apricots. -
1 tablespoon lemon juice
Brightens the flavor of the apricots and adds a wonderful twist. Lime juice works too if you’re in a pinch. -
1/4 cup sliced almonds
Adds a nutty crunch on top. You can easily swap it with chopped walnuts or pecans for a different bite!
Step-by-Step Instructions
Alright, let’s get down to business! Grab your apron and let’s get baking!
-
Preheat Your Oven
Preheat that oven of yours to 350°F (175°C). Trust me; you want to start with a warm oven for those crumb bars! -
Prepare Your Baking Dish
Grab a 9×13-inch baking dish and line it with parchment paper, leaving a bit of an overhang. This will make it super easy to lift out the bars once they’re done! -
Mix the Dry Ingredients
In a large bowl, combine the flour, oats, brown sugar, granulated sugar, baking powder, and salt. Give it a good mix to ensure everything is well combined. A whisk works wonders here! -
Add the Melted Butter
Pour in that melted butter, stirring until you’ve got a crumbly mixture. It should resemble sand with tiny pebbles, and that’s just the way we want it. Reserve about 1 cup of this mixture for the topping! -
Prep the Apricots
In another bowl, toss your sliced apricots with the lemon juice. This will not only enhance the flavor but also help keep them vibrant and fresh. -
Assemble the Bars
Press the crumb mixture evenly into the bottom of your prepared baking dish. Don’t worry about perfection; it doesn’t have to be too neat! -
Add the Apricots
Distribute the sliced apricots over the crumb base, making sure to spread them out evenly for a slice of fruit in every bite. -
Top It Off
Sprinkle the reserved crumb mixture over the apricots. Don’t forget to sprinkle those sliced almonds on top for a nutty crunch! -
Bake to Perfection
Place the dish in the preheated oven and bake for about 30-35 minutes until the top is golden and the apricots are bubbling. Your kitchen will smell heavenly! -
Cool and Slice
Once baked, allow the bars to cool in the baking dish for about 10-15 minutes before using the parchment to lift them out. Slice them into squares and serve at room temperature—or slightly warm, if you can’t resist!
Serving Suggestions
The beauty of these apricot crumb bars is in their versatility. You can enjoy them straight from the pan or dress them up for a proper dessert. Here’s how I love to serve them:
- With a dollop of whipped cream: A light, airy topping beautifully complements the fruit and crumb.
- A scoop of vanilla ice cream: Because who doesn’t love warm desserts with ice cream on top? It’s pure indulgence!
- Garnished with fresh mint leaves: Adds a pop of color and a hint of freshness when serving at gatherings.
- Drizzled with caramel sauce: If you want to take it up a notch, a sweet drizzle can elevate these bars to gourmet status!
Recipe Variations
Let’s get creative, shall we? Here are a few ways to twist this recipe to keep things exciting:
-
Peach and Apricot Mix: Combine fresh apricots with peaches for a blend of flavors that’ll take you straight to summer.
-
Coconut Crust: Add shredded coconut to the crumb mixture for a tropical vibe.
-
Spiced Crumb Bars: Add a pinch of cinnamon or vanilla extract to your crumb mixture for that playful, aromatic note.
-
Nut-Free Version: Omit the almonds and replace them with more oats for crunch or just keep the crumb topping nut-free.
-
Vegan Option: Substitute the butter with coconut oil and replace the eggs with a flax egg or applesauce for a healthier twist.
Chef’s Notes
Let me tell you, these apricot crumb bars have a special place in my heart. Over the years, I’ve tried countless variations and tweaks, but there’s something magical about the classic recipe. My grandmother always said, “Recipes are just guidelines; the secret ingredient is love.” So, make this your own, and don’t be afraid to experiment. Your kitchen is a playground, so grab those apricots and let the magic happen!
FAQs and Troubleshooting
Here are some common questions I get, along with helpful solutions:
-
Why are my crumb bars falling apart?
Make sure you’re using enough melted butter! It binds the crumb. If they still crumble, you’re likely cutting them while they’re still warm—let them cool enough to hold their shape. -
Can I use dried apricots instead of fresh?
Absolutely! But remember, dried apricots are much sweeter, so adjust the sugar down a bit to prevent it from getting overly sweet. -
How can I store leftover bars?
Store them in an airtight container at room temperature for up to a week. They also freeze beautifully—just wrap them in plastic wrap and pop them in a freezer bag! -
What can I do if I don’t like nuts?
Simply omit the almonds! The bars will still be delicious on their own, or you can replace the nuts with more oats or granola for that extra crunch.
Nutritional Info
These apricot crumb bars are perfect for sharing blissful moments, but they’re also a delightful indulgence. Each serving offers a burst of vitamins and fiber thanks to the fresh apricots and oats. While I don’t have exact nutritional figures on hand, here’s a quick breakdown of what’s good in them:
- Apricots: Rich in Vitamin A and C, making your skin glow and your immune system strong.
- Oats: A great source of fiber, perfect for keeping you satisfied and aiding digestion.
- Butter: In moderation, adds heart-healthy fats.
Just remember to enjoy these bars in moderation, and they’ll fit nicely into a balanced diet!
Final Thoughts
And there you have it, my dear foodie friends! Apricot crumb bars that are not only delicious but also filled with fond memories and warm encounters. These bars are perfect any time—whether for a casual dessert, a picnic snack, or even a comforting breakfast treat. Just remember, the joy of cooking comes from sharing, so whip up a batch, gather your loved ones, and create your own beautiful memories.
Until next time, keep spreading the love through your food and happy baking!
Print
Apricot Crumb Bars
- Total Time: 50 minutes
- Yield: 12 servings 1x
- Diet: Vegetarian
Description
Delightful apricot crumb bars that perfectly blend sweet, tart, and buttery goodness, embodying the essence of summer.
Ingredients
- 2 cups all-purpose flour
- 1 cup rolled oats
- 1 cup brown sugar
- 1/2 cup granulated sugar
- 1 cup unsalted butter, melted
- 1/2 teaspoon baking powder
- 1/4 teaspoon salt
- 2 cups fresh apricots, pitted and sliced
- 1 tablespoon lemon juice
- 1/4 cup sliced almonds
Instructions
- Preheat your oven to 350°F (175°C).
- Prepare a 9×13-inch baking dish lined with parchment paper.
- Mix the flour, oats, brown sugar, granulated sugar, baking powder, and salt in a large bowl.
- Add the melted butter and stir until crumbly, reserving about 1 cup for topping.
- Prep the sliced apricots with lemon juice in another bowl.
- Assemble by pressing the crumb mixture into the baking dish.
- Add the apricots over the crumb base.
- Top with reserved crumb mixture and sliced almonds.
- Bake for 30-35 minutes until golden.
- Cool for 10-15 minutes, then slice and serve.
Notes
These bars can be enjoyed plain, with whipped cream, or vanilla ice cream. Experiment with fruits and toppings!
- Prep Time: 15 minutes
- Cook Time: 35 minutes
- Category: Dessert
- Method: Baking
- Cuisine: American
Nutrition
- Serving Size: 1 bar
- Calories: 270
- Sugar: 15g
- Sodium: 150mg
- Fat: 12g
- Saturated Fat: 7g
- Unsaturated Fat: 4g
- Trans Fat: 0g
- Carbohydrates: 38g
- Fiber: 2g
- Protein: 4g
- Cholesterol: 30mg
Keywords: apricot crumb bars, dessert, baking, summer treats, fruit desserts
Minute Apple Pie Cupcakes: Weeknight-Ready Recipe
Apple Pie Cupcakes: A Sweet Twist on a Classic Comfort
Hey there, food lovers! If you’re anything like me, there’s just something magical about the smell of apple pie wafting through the kitchen. It brings back warm memories of family gatherings, lazy Sundays, and the comforting embrace of homemade goodness. Today, I’m thrilled to share a delightful twist on that classic treat: Apple Pie Cupcakes! Yes, you heard it right—cupcakes that encapsulate all the nostalgic flavors of apple pie, but in a fun, portable package that’s perfect for sharing (or not!).
Imagine biting into a soft, fluffy cupcake filled with sweet cinnamon apples, topped with a creamy frosting that makes your taste buds dance. These little gems not only bring the flavors of fall but also add a sweet touch to any occasion—whether it’s a birthday party, a cozy afternoon snack, or even a festive holiday dessert table. Grab your mixing bowl and let’s create something scrumptious!
Personal Story: A Family Tradition Revived
Growing up, apple pie was a non-negotiable staple in my household. My grandmother had a special recipe that made her pies the stuff of legends in our family. Every autumn, she would host pie-making days where the kitchen was transformed into a whirlwind of flour, apples, and love. I can still remember the sound of her laugh mingling with the clatter of pans, and the sweet aroma that filled the air as the pies baked in the oven.
One particular day stands out vividly. I was about ten, anxiously trying to keep up with her in the kitchen. She let me peel the apples—an honorable task—while she meticulously crafted the perfect flaky crust. I can still see her beaming smile when I proudly presented my very first apple peel. That day, we didn’t just make a pie; we baked memories. Inspired by that wonderful experience and the joy of apple pies, I developed these Apple Pie Cupcakes to merge tradition with modern flair, while ensuring a piece of my childhood could be shared with everyone.
Ingredients
Let’s dive into the list of scrumptious ingredients you’ll need to whip up these Apple Pie Cupcakes. Each one plays an essential role in creating that delightful flavor we love.
-
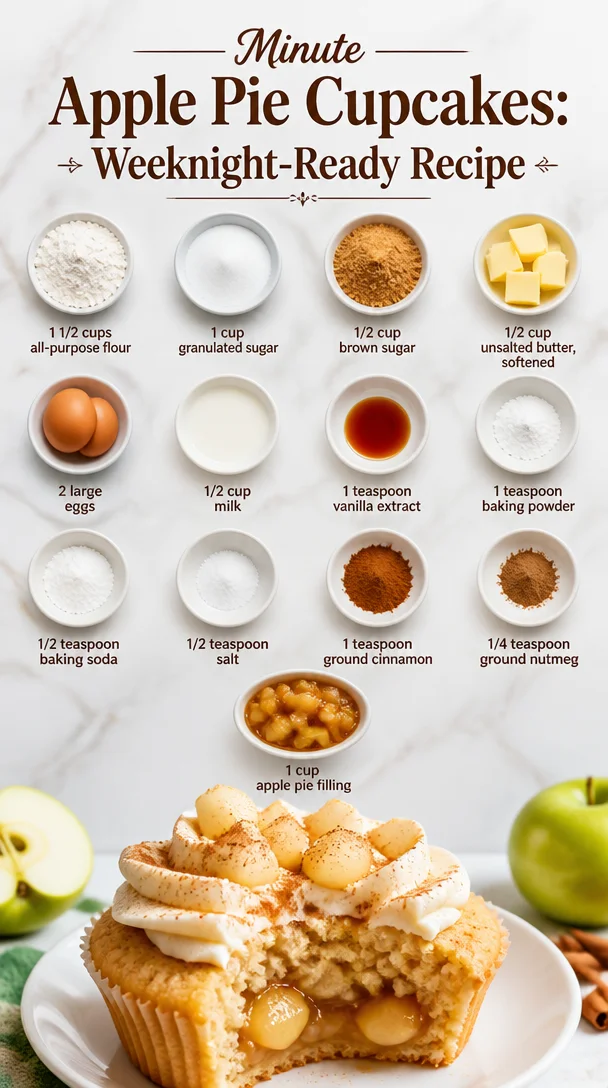
1 1/2 cups all-purpose flour
This is your standard cupcake base. If you want to go gluten-free, almond flour or a 1:1 gluten-free blend can work well too! -
1 cup granulated sugar
Sweetness is key! You can reduce the sugar slightly for a less sweet version or use coconut sugar for a caramel-like flavor. -
1/2 cup brown sugar
This adds moisture and a deeper flavor—think of it as the brown-sugar hug for your cupcakes! For a subtle twist, try using dark brown sugar for a richer taste. -
1/2 cup unsalted butter, softened
Butter makes everything better! If you’re looking for a dairy-free option, coconut oil or vegan butter can be good substitutes. -
2 large eggs
Eggs lock in moisture and provide structure. For a vegan alternative, you could use flaxseed meal mixed with water or unsweetened applesauce. -
1/2 cup milk
Milk brings everything together. Almond milk or oat milk can easily take its place if you prefer non-dairy options. -
1 teaspoon vanilla extract
A splash of vanilla rounds out all the flavors beautifully. If you have any bourbon vanilla on hand, it’ll elevate your cupcakes to the next level! -
1 teaspoon baking powder
This is your rising agent that helps the cupcakes fluff up beautifully. -
1/2 teaspoon baking soda
Baking soda works hand-in-hand with baking powder to ensure your cupcakes rise perfectly—a little baking chemistry never hurt anyone! -
1/2 teaspoon salt
Salt enhances sweetness, making it crucial in any baking recipe. -
1 teaspoon ground cinnamon
Apple pie wouldn’t be the same without cinnamon! If you’re feeling adventurous, add a pinch of cardamom for a unique touch. -
1/4 teaspoon ground nutmeg
A hint of nutmeg compliments the apples beautifully, adding warmth to each bite. -
1 cup apple pie filling
You can use store-bought or get adventurous and make your own! If making from scratch, simply sauté some diced apples with sugar and spices until tender.
Step-by-Step Instructions
Alright, let’s get down to the nitty-gritty of baking these delightful cupcakes! Gather your ingredients and let’s get started.
-
Preheat the Oven
Set your oven to 350°F (175°C). While it warms up, line a muffin tin with cupcake liners. This makes for easy serving and a fun way to dress up your cupcakes! -
Mix Dry Ingredients
In a large bowl, whisk together the all-purpose flour, baking powder, baking soda, salt, cinnamon, and nutmeg until well combined. This step is crucial because it ensures even distribution of the dry ingredients, creating uniform baking results! -
Cream the Butter and Sugars
In another bowl, beat the softened unsalted butter, granulated sugar, and brown sugar together until it’s light and fluffy. This usually takes about 3-4 minutes. A little tip: use room-temperature butter for the best creaming results—it makes your cupcakes light and airy! -
Incorporate the Eggs and Vanilla
Add in your eggs one at a time, mixing well after each addition. Then, mix in the vanilla extract. Take a moment to savor that sweet aroma—this is where the magic begins! -
Mix in Milk
Gradually stir in the milk until just combined. Be careful not to overmix—this will help keep your cupcakes tender and delicious. -
Combine Wet and Dry Ingredients
Slowly add the dry ingredient mixture to the wet ingredients, folding gently until everything is just combined. This is a good time to channel your inner zen chef—gentle folding is the name of the game! -
Add Apple Pie Filling
Fold in the apple pie filling, being sure to distribute those delicious apple chunks throughout the batter evenly. The smell should be heavenly by now! -
Fill the Cupcake Liners
Using a scoop or spoon, fill each cupcake liner about two-thirds full. Leave some space for them to rise. Don’t worry if they look a little messy—these are homemade cupcakes, after all! -
Bake
Place your muffin tin in the oven and bake for about 18-20 minutes or until a toothpick comes out clean. While they’re baking, take a moment to appreciate the sweet aroma filling your kitchen! -
Cool Down
Once out of the oven, let the cupcakes cool in the tin for about 5 minutes before transferring them to a wire rack to cool completely. Patience is key—this will help you avoid soggy cupcakes!
Serving Suggestions
Now that your Apple Pie Cupcakes are fully baked and irresistibly fragrant, it’s time to serve them up! Here are a few fun ideas to get you started:
-
Frost Them Up
A classic cream cheese frosting would be a delightful addition, providing a tangy contrast to the sweetness of the cupcakes. For a fun twist, you can whip together some cinnamon and sugar into your buttercream for an extra zing! -
Garnish with a Dusting of Powdered Sugar
For a simple yet elegant touch, dust the tops of your cooled cupcakes with powdered sugar right before serving. It gives a beautiful finish and reminds everyone of freshly fallen snow. -
Top with Caramel Drizzle
Drizzle some homemade or store-bought caramel sauce over the top. It not only adds a lovely flavor contrast but takes the presentation up to a whole new level! -
Pair with Ice Cream
Serve them warm with a scoop of vanilla ice cream on the side. Trust me; the combination of warm cupcake and cold ice cream is simply divine.
Recipe Variations
Feeling adventurous? Here are a few creative twists to customize your Apple Pie Cupcakes:
-
Caramel Apple
Mix in some caramel bits into the batter for gooey surprises in every bite, or drizzle caramel on top as a finishing touch. -
Nutty Crunch
Fold in some chopped walnuts or pecans for added texture and flavor. The nuttiness pairs beautifully with the sweetness of the apple filling. -
Maple Apple
Replace granulated sugar with maple syrup or maple sugar for a unique take on sweetness, adding a lovely depth of flavor. -
Spiced Up
Add a pinch of cloves or ginger to your spices to give it an extra punch of fall flavors—perfect for those who love a little warmth in their desserts. -
Vegan Version
Swap out eggs for flax eggs and replace dairy with plant-based options to create a totally vegan-friendly version without sacrificing flavor!
Chef’s Notes
Creating these Apple Pie Cupcakes has truly been a labor of love for me. As I baked and tasted, I reminisced about those days in my grandmother’s kitchen. Each cupcake holds not just the flavors but also the blessings of family and togetherness. These cupcakes have evolved from a simple desire to explore new culinary ideas, bridging a classic with contemporary dessert trends. My kitchen adventures always remind me that cooking is as much about the journey as it is about the result!
Each time I whip these up, I enjoy experimenting and finding new ways to nail that perfect apple pie taste while keeping it cupcake friendly. Plus, the smiles I see on friends’ faces when they bite into one? Well, that’s just the cherry on top!
FAQs and Troubleshooting
-
Why are my cupcakes dense?
This could be due to overmixing the batter. Remember to fold gently when combining dry and wet ingredients. You want to mix just enough to incorporate everything without overworking that gluten! -
Can I use fresh apples instead of apple pie filling?
You absolutely can! Just be sure to sauté them with a bit of sugar and cinnamon to soften them up and enhance their flavor. -
Why do my cupcakes sink in the middle?
If your cupcakes sink, they may have been underbaked or your oven temperature may not have been accurate. Always check with a toothpick to ensure they are cooked through! -
How do I store leftover cupcakes?
Store these beauties in an airtight container at room temperature for up to 2 days. If you have leftovers beyond that, pop them in the fridge for another 2-3 days, but they’ll rarely last that long—they’re just too good!
Nutritional Info
These Apple Pie Cupcakes are a treat, but they also include wholesome ingredients you can feel good about! Here’s a rough overview of the nutritional information per cupcake (without frosting):
- Calories: 220
- Total Fat: 8g
- Saturated Fat: 5g
- Cholesterol: 40mg
- Sodium: 150mg
- Total Carbohydrates: 35g
- Dietary Fiber: 1g
- Sugars: 15g
- Protein: 2g
*Note: Nutritional values can vary significantly based on ingredient brands and preparation methods, so feel free to check and adjust according to your preferences!
Final Thoughts
As we wrap up this delicious journey, I hope you’re feeling inspired to take a trip back to your childhood and bake up your very own batch of Apple Pie Cupcakes. Remember, baking is not just about the sweets—it’s about the joy, the memories, and the people we share them with. Whether it’s a simple gathering or a lively celebration, these cupcakes are perfect for creating moments worth savoring.
So roll up your sleeves, preheat that oven, and get ready to create some new kitchen memories! I can’t wait to hear how your apple pie cupcakes turn out. Happy baking, friends! 🍏🧁
Print
Apple Pie Cupcakes
- Total Time: 35 minutes
- Yield: 12 servings 1x
- Diet: Vegetarian
Description
A delightful twist on the classic apple pie, these cupcakes are filled with sweet cinnamon apples and topped with creamy frosting, perfect for any occasion.
Ingredients
- 1 1/2 cups all-purpose flour
- 1 cup granulated sugar
- 1/2 cup brown sugar
- 1/2 cup unsalted butter, softened
- 2 large eggs
- 1/2 cup milk
- 1 teaspoon vanilla extract
- 1 teaspoon baking powder
- 1/2 teaspoon baking soda
- 1/2 teaspoon salt
- 1 teaspoon ground cinnamon
- 1/4 teaspoon ground nutmeg
- 1 cup apple pie filling
Instructions
- Preheat the oven to 350°F (175°C). Line a muffin tin with cupcake liners.
- Mix the dry ingredients: In a large bowl, whisk together flour, baking powder, baking soda, salt, cinnamon, and nutmeg until well combined.
- Cream the butter and sugars: In another bowl, beat the unsalted butter, granulated sugar, and brown sugar until light and fluffy (about 3-4 minutes).
- Incorporate the eggs one at a time, mixing well after each addition. Then mix in the vanilla extract.
- Mix in the milk gradually until just combined, avoiding overmixing.
- Combine the dry ingredients with the wet ingredients by gently folding them together until just combined.
- Add the apple pie filling, distributing evenly throughout the batter.
- Fill each cupcake liner about two-thirds full.
- Bake for 18-20 minutes or until a toothpick comes out clean.
- Cool in the tin for about 5 minutes before transferring to a wire rack to cool completely.
Notes
For a delightful touch, frost with cream cheese frosting or a dusting of powdered sugar. Pair with ice cream for a delicious dessert.
- Prep Time: 15 minutes
- Cook Time: 20 minutes
- Category: Dessert
- Method: Baking
- Cuisine: American
Nutrition
- Serving Size: 1 cupcake
- Calories: 220
- Sugar: 15g
- Sodium: 150mg
- Fat: 8g
- Saturated Fat: 5g
- Unsaturated Fat: 3g
- Trans Fat: 0g
- Carbohydrates: 35g
- Fiber: 1g
- Protein: 2g
- Cholesterol: 40mg
Keywords: apple pie, cupcakes, dessert, fall flavors, baking

One-Bowl Cherry Chocolate Chip Blondies for Busy Weeknights
Cherry Chocolate Chip Blondies: A Sweet Nostalgia
Hey there, fellow food lovers! I’m beyond excited to share a recipe that’s bound to light up your kitchen and give your taste buds a little adventure. Today, we’re diving into the world of deliciousness with Cherry Chocolate Chip Blondies. These luscious little bars are a delightful mix of sweet cherries and rich chocolate—because why not have the best of both worlds, right?
A Journey Down Memory Lane
I’ll let you in on a little secret: the first time I ever made blondies, it was in my parents’ kitchen during a rainy afternoon. I was about twelve, and my only goal was to impress my friends who were stopping by later that day after school. I remember rummaging through the pantry, feeling like a culinary detective looking for treasure. When I stumbled upon an old family recipe with chocolate, I decided to get creative and toss in some cherries from our backyard.
I’ll never forget the rich smell that wafted through the house as they baked. I was filled with both excitement and trepidation, unsure how these experimental goodies would turn out. But let me tell you, when those blondies emerged from the oven—golden brown, warm, and gooey—they didn’t last more than a few moments. My friends practically devoured them! That day taught me the power of combining flavors, and it ignited my passion for baking and sharing good food with others.
So, pull out your mixing bowls and let’s get into this sweet adventure together!
Ingredients for Cherry Chocolate Chip Blondies
Here’s what you’ll need to make these scrumptious blondies:
-
1 cup unsalted butter, melted
- Chef Insight: Unsalted butter is perfect here as it allows you to control the saltiness. If you’re in a pinch, you can substitute with coconut oil for a unique twist!
-
1 cup brown sugar
- Quick Tip: Brown sugar gives that lovely caramel depth. You can use light brown for a milder flavor or dark brown for a more robust taste.
-
1/2 cup granulated sugar
- Swapping Advice: If you want to cut back on refined sugar, try coconut sugar instead for a more natural sweetness.
-
2 large eggs
- Substitution Tip: For a vegan alternative, you can use flaxseed meal—mix 1 tablespoon of flaxseed with 2.5 tablespoons of water to create one “flax egg.”
-
2 teaspoons vanilla extract
- Chef’s Note: Always use pure vanilla extract for the best flavor. It makes a significant difference!
-
2 cups all-purpose flour
- Go Gluten-Free: You can use a 1:1 gluten-free flour blend without affecting the texture too much.
-
1 teaspoon baking powder
- Why It Matters: This leavening agent gives your blondies that soft, chewy texture.
-
1/2 teaspoon salt
- Secret Tip: Salt is essential! It enhances the sweetness and richness of the blondies.
-
1 cup dark chocolate chips
- Flavor Hack: Semi-sweet chocolate chips work beautifully as well; just pick your favorite type!
-
1 cup fresh cherries, pitted and chopped
- Fresh vs. Frozen: Feel free to use frozen cherries if fresh ones aren’t available—just thaw and drain them before adding to the batter.
Step-by-Step Instructions
Now that we’ve gathered our ingredients, let’s get to the fun part—baking!
1. Preheat Your Oven
Start by preheating your oven to 350°F (175°C). This ensures your blondies bake evenly and are perfectly gooey.
2. Prepare Your Pan
Grab a 9×13 inch baking dish and line it with parchment paper, leaving some overhang for easy removal of the blondies later. This is a little hack to help keep things clean and tidy, plus it’ll make cutting them easier.
3. Melt the Butter
In a large bowl, melt the unsalted butter. You can do this in the microwave or on the stove—whichever you prefer. Just be careful not to overheat it. After melting, let it cool for a minute or two before mixing in your sugars.
4. Combine the Sugars
Add both the brown sugar and granulated sugar to the melted butter. Whisk them together until smooth and creamy. This step is crucial; the sugars will dissolve better when combined with warm butter.
5. Add Eggs and Vanilla
Next, beat in the eggs one at a time with your whisk, followed by the vanilla extract. Make sure you’re incorporating everything well—this will result in a richer flavor.
6. Mix the Dry Ingredients
In a separate bowl, whisk together your flour, baking powder, and salt. Once combined, slowly add this dry mix to your wet ingredients. Stir gently—overmixing can lead to tough blondies!
7. Fold in the Good Stuff
Finally, fold in your dark chocolate chips and chopped cherries. This is where the magic happens—imagine those melty chocolate chunks mingling with sweet cherry pieces.
8. Pour and Bake
Pour the batter into your prepared baking dish and spread it evenly. Bake for 25-30 minutes or until a toothpick inserted into the center comes out clean.
9. Cool and Cut
Once baked, remove from the oven and let it cool in the pan for about 10 minutes. Then, use that parchment paper to lift the blondies out and cool them completely on a wire rack before cutting them into squares. Patience pays off!
Serving Suggestions
Now that your kitchen smells like a dream, it’s time to serve up these gorgeous blondies! I love serving them warm with a scoop of vanilla ice cream on the side for an irresistible dessert. Drizzle a little chocolate sauce or caramel over the top for an elegant touch. You can dust them with powdered sugar for a simple yet beautiful finish. Want to impress your guests? Serve them on a rustic wooden board, accompanied by fresh cherries or chocolate shavings.
Recipe Variations
While the classic Cherry Chocolate Chip Blondies are simply divine, here are a couple of creative variations to shake things up:
-
Nutty Delight: Toss in some chopped walnuts or pecans for a delightful crunch!
-
Tropical Twist: Substitute the cherries with pineapple chunks and add shredded coconut for a fun summertime treat.
-
Zesty Lemon: Add the zest of one lemon to the batter for a pop of citrus flavor that pairs beautifully with the sweetness.
-
Spiced Up: A dash of cinnamon or nutmeg in the batter can add a lovely warmth—think cozy fall flavors!
-
Monster Blondies: Add a variety of mix-ins like peanut butter chips, butterscotch chips, or even some crushed cookies for a “monster” version that’s sure to impress!
Chef’s Notes
As I look back on those early days of trial and error in the kitchen, I’m grateful for all the happy accidents that became beloved family recipes. This blondie recipe has evolved over time with the seasons and the ingredients available. I’ve switched from using whatever chocolate chips were on sale to making my own using high-quality chocolate. It’s amazing how a simple tweak can morph a good recipe into something truly special!
And believe me, shared moments with family and friends over platefuls of these blondies bring a warmth that’s irreplaceable.
FAQs and Troubleshooting
Q1: Why did my blondies turn out dry?
- A: Overbaking can lead to dry blondies. Make sure to check your oven earlier than the recommended time, and remember that they will continue to cook a bit once out of the oven.
Q2: Can I make this recipe ahead of time?
- A: Absolutely! You can make these blondies a day before. Just store them in an airtight container at room temperature to keep them soft.
Q3: What can I do if I don’t have any cherries?
- A: No problem! You can easily swap them for any berries, dried fruits, or even chunks of your favorite candy.
Q4: What’s the best way to store leftover blondies?
- A: Keep them in an airtight container at room temperature for up to a week. They can also be frozen for later enjoyment! Just wrap them well and store in a freezer-safe bag.
Nutritional Info
These Cherry Chocolate Chip Blondies are rich, indulgent, and meant to be enjoyed in moderation! Here’s a rough breakdown of the caloric content per blondie if you cut them into 12 squares:
- Calories: ~250
- Total Fat: 12g
- Saturated Fat: 7g
- Cholesterol: 40mg
- Sodium: 220mg
- Total Carbohydrates: 37g
- Dietary Fiber: 1g
- Sugars: 22g
- Protein: 3g
Keep in mind that these values can vary based on your specific ingredients and portion sizes!
Final Thoughts
Cherry Chocolate Chip Blondies are more than just a dessert; they’re a delightful reminder of the memories we create in the kitchen. They invite family and friends to gather around the table, sharing laughter and sweetness. Simple, easy, and oh-so-satisfying, this recipe is simply designed for making delightful moments.
So whether it’s a rainy day or a celebration, whip up these blondies and bask in the joy that good food brings. I can’t wait to hear how they turn out for you! Happy baking! 🍒🍫❤️
Print
Cherry Chocolate Chip Blondies
- Total Time: 45 minutes
- Yield: 12 servings 1x
- Diet: Vegetarian
Description
Delightful blondies with sweet cherries and rich chocolate chips, perfect for any occasion.
Ingredients
- 1 cup unsalted butter, melted
- 1 cup brown sugar
- 1/2 cup granulated sugar
- 2 large eggs
- 2 teaspoons vanilla extract
- 2 cups all-purpose flour
- 1 teaspoon baking powder
- 1/2 teaspoon salt
- 1 cup dark chocolate chips
- 1 cup fresh cherries, pitted and chopped
Instructions
- Preheat your oven to 350°F (175°C).
- Prepare a 9×13 inch baking dish by lining it with parchment paper.
- Melt the unsalted butter and let it cool for a minute.
- Combine the brown sugar and granulated sugar with the melted butter until smooth.
- Add the eggs one at a time and then the vanilla extract.
- Mix the flour, baking powder, and salt in a separate bowl, then gradually add to the wet ingredients.
- Fold in the dark chocolate chips and chopped cherries.
- Pour the batter into the prepared baking dish and spread it evenly.
- Bake for 25-30 minutes or until a toothpick inserted comes out clean.
- Cool in the pan for 10 minutes, then lift out and cool completely on a wire rack before cutting.
Notes
Serve warm with vanilla ice cream and drizzled chocolate or caramel for an extra treat.
- Prep Time: 15 minutes
- Cook Time: 30 minutes
- Category: Dessert
- Method: Baking
- Cuisine: American
Nutrition
- Serving Size: 1 blondie
- Calories: 250
- Sugar: 22g
- Sodium: 220mg
- Fat: 12g
- Saturated Fat: 7g
- Unsaturated Fat: 4g
- Trans Fat: 0g
- Carbohydrates: 37g
- Fiber: 1g
- Protein: 3g
- Cholesterol: 40mg
Keywords: blondies, dessert, chocolate, cherries, sweet treats