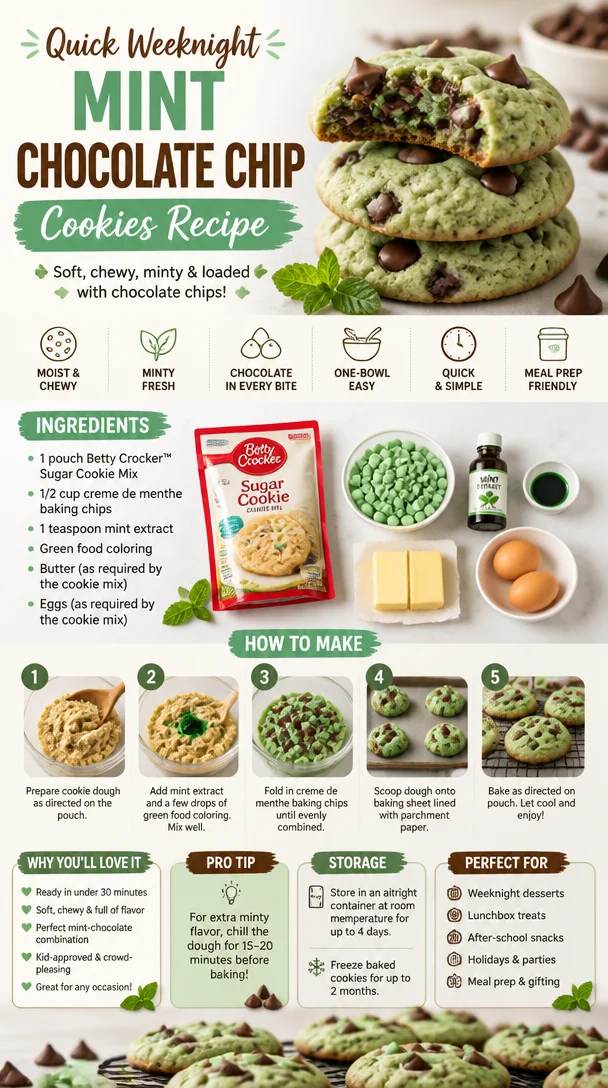
Quick Weeknight Mint Chocolate Chip Cookies Recipe
The Ultimate Mint Chocolate Chip Cookie Recipe: A Nostalgic Twist on a Classic Favorite
Hey there, food lovers! Welcome to Feastical! Today, we’re diving into a dessert that’s bound to tickle your taste buds and spark delightful memories—Mint Chocolate Chip Cookies. Now, I know what you might be thinking: “Mint and chocolate? Isn’t that just for ice cream?” I used to think so, too, until I embarked on a deliciously nostalgic journey back to my childhood kitchen. Get ready to whip up some sweet, minty goodness that not only satisfies your cravings but also warms your heart!
A Sweet Slice of Nostalgia
Picture this: it’s a warm summer afternoon, and the scent of freshly baked cookies wafts through the air. I remember my mom in her sunny yellow apron, the kind that had a little bit of flour on the front because, let’s be honest, no good baker comes out without a sprinkle on their clothes. She’d mix up her standard chocolate chip cookie batter, but then she’d bring out a special secret ingredient—mint extract! Little me would bounce around the kitchen, hardly able to contain my excitement, waiting for that moment when the cookies came out of the oven, all warm and gooey.
The first bite was always magical—the coolness of mint melding perfectly with rich chocolate as they danced on my taste buds. Those cookies became the highlight of family get-togethers, often stealing the spotlight from more traditional desserts. And so, this recipe is as much about memory as it is about flavor. Inspired by those sunny afternoons, I’m here to share my version of Mint Chocolate Chip Cookies, complete with a few fun twists inspired by my own kitchen adventures. Ready to roll up your sleeves? Let’s get baking!
Ingredients You’ll Need
Here’s what you’ll need to bring this minty wonder to life:
-
1 pouch of classic Betty Crocker™ sugar cookie mix: The base of our delicious cookies. This mix is perfect for making things quick and easy without sacrificing any taste. If you’re feeling adventurous, you could swap it out for homemade sugar cookie dough.
-
1/2 cup of creme de menthe baking chips: For those bursts of minty flavor. If you can’t find these, don’t sweat it! You can use mint chocolate chips or even break up some regular chocolate with a drop of peppermint extract added in.
-
1 teaspoon of mint extract: This is where the magic happens. It intensifies the mint flavor beyond just the chips. But remember, a little goes a long way! If you’re not a huge mint fan, feel free to reduce this.
-
Green food coloring: Just a few drops to give your cookies that classic minty green hue. It’s optional, but it definitely adds a fun touch! You can skip this entirely or even replace it with all-natural coloring if you prefer.
-
Butter and eggs as required by the cookie mix: These are key to making your cookies rich and chewy. If you’re looking for a lighter version, go for applesauce as a butter substitute, and a flax egg instead of a regular egg.
Step-by-Step Instructions
Ready to get those mint chocolate chip cookies into your oven? Here’s how to do it in just a few simple steps:
-
Preheat your oven: Heat it up to 350°F (175°C). This is where the magic begins! A properly preheated oven ensures your cookies bake evenly.
-
Mix the ingredients: In a large bowl, combine the sugar cookie mix, butter, and eggs according to the package instructions. The dough should be thick and a bit sticky. Here’s a little tip: let your butter come to room temperature before mixing—it makes for a smoother dough!
-
Add your flavors: Slowly stir in the creme de menthe baking chips and the teaspoon of mint extract. Don’t forget to taste the dough—it’s a crucial step in quality control (make sure to leave some for the cookies, though!).
-
Get colorful: Now, this is the fun part! Add a few drops of green food coloring. You can mix until you achieve your desired shade of minty green. Just remember, you’re going for a festive vibe—don’t hold back!
-
Scoop the dough: Using a spoon or a cookie scoop, place rounded tablespoons of dough on a cookie sheet lined with parchment paper. Space them about 2 inches apart; they’ll spread out as they bake.
-
Bake them to perfection: Pop your cookie sheet into the oven and bake for about 9-11 minutes, or until the edges are lightly golden. Keep an eye on them; overbaking will turn them crisp instead of chewy.
-
Cool it down: Once they’re done, take them out of the oven and let them cool on the sheet for a few minutes before transferring them to a wire rack. This helps them firm up and retain that chewy goodness!
-
Enjoy!: Now, the best part! Grab a glass of milk, pour a cup of coffee, or enjoy them as they are. You’re in for a treat!
Serving Suggestions
Serving these Mint Chocolate Chip Cookies is half the fun! You can present them on a rustic wooden board for a cozy gathering, or stack them high for a more dramatic dessert effect. For an added touch of indulgence, serve them alongside a scoop of mint chocolate chip ice cream—trust me, the flavors complement each other perfectly!
For a festive twist, you could dust them lightly with powdered sugar or drizzle with melted chocolate as a finishing touch. If you’re feeling extra creative, sandwich two cookies around a scoop of your favorite ice cream for a delightful mint chocolate chip cookie ice cream sandwich!
Recipe Variations
Now that you’ve got the base recipe down, let’s get creative! Here are a few fun variations you can try:
-
Double chocolate mint cookies: Add 1/4 cup of cocoa powder to the dough for a rich, chocolatey flavor that pairs beautifully with mint.
-
Nutty crunch: Fold in some chopped nuts like walnuts or pecans for extra texture. They’ll add a delightful crunch to the chewy cookies.
-
Gluten-free version: Use a gluten-free sugar cookie mix instead of the classic Betty Crocker™. The mint flavor will still shine through!
-
Minty mocha cookies: For a caffeine kick, add 1-2 teaspoons of instant coffee or espresso powder to the dough for a mocha mint twist.
-
Fruity mint cookies: Toss in some finely chopped dried cherries or raspberries for a sweet and tangy surprise that brightens the mint flavor.
Chef’s Notes
These Mint Chocolate Chip Cookies have a special place in my heart. Over the years, I’ve experimented with various mint chocolate recipes, trying everything from brownies to cakes, but there’s something about a simple cookie that takes me back to those sun-filled days in my childhood kitchen.
Sometimes, though, cooking can lead to some funny mishaps! I remember one time I misread a recipe and added too much mint extract—let’s just say, those cookies were… a little more minty than most people prefer. But hey, that’s what cooking is about: learning, adapting, and laughing through the mishaps.
FAQs and Troubleshooting
-
Why are my cookies spreading too much?
- This can happen if your butter is too warm or if you didn’t chill the dough. If your cookies spread too much, try chilling the dough for 30 minutes before baking.
-
How can I store leftover cookies?
- Keep them in an airtight container at room temperature for about a week. You can also freeze them for up to three months—perfect for whenever those cravings hit!
-
Can I substitute the sugar cookie mix?
- Absolutely! You can use any sugar cookie recipe or even oat flour for a gluten-free option, just make sure to adjust the measurements accordingly.
-
How can I make my cookies chewier?
- For chewier cookies, try using a little more brown sugar in place of some of the granulated sugar, or add a little extra butter.
Nutritional Info
While indulging in these minty delights, it’s good to know what you’re munching on! Each cookie (depending on size) provides roughly 120 calories, with 5g of fat, 16g of carbs, and 1g of protein. These cookies are great for a sweet treat, but keep moderation in mind, especially if you’re watching your intake.
For a healthier perspective, consider pairing them with a fresh fruit salad or smoothies to balance it all out!
Final Thoughts
I hope you had as much fun reading about and making these Mint Chocolate Chip Cookies as I did sharing them! There’s just something magical about baking—how it brings us together and creates joyous memories, delicious aromas, and sweet moments worth savoring.
So roll up those sleeves, grab a spatula (and maybe a spoon for tasting), and dive into this delightful journey of baking. I can’t wait to hear how your cookies turn out and what memories they bring back for you! Happy baking, my friends—until next time here at Feastical!
PrintMint Chocolate Chip Cookies
- Total Time: 26 minutes
- Yield: 24 cookies 1x
- Diet: Vegetarian
Description
A nostalgic twist on classic chocolate chip cookies with refreshing mint flavor.
Ingredients
- 1 pouch of classic Betty Crocker™ sugar cookie mix
- 1/2 cup of creme de menthe baking chips
- 1 teaspoon of mint extract
- Green food coloring (optional)
- Butter and eggs as required by the cookie mix
Instructions
- Preheat your oven to 350°F (175°C).
- Mix the sugar cookie mix, butter, and eggs according to the package instructions.
- Add the creme de menthe baking chips and mint extract; taste the dough.
- Get colorful by adding green food coloring until desired shade is achieved.
- Scoop rounded tablespoons of dough onto a lined cookie sheet, spacing them 2 inches apart.
- Bake for about 9-11 minutes, until edges are lightly golden.
- Cool on the sheet for a few minutes before transferring to a wire rack.
- Enjoy with a glass of milk or your favorite beverage!
Notes
For chewier cookies, use a bit more brown sugar or extra butter. Store in an airtight container for up to a week or freeze for three months.
- Prep Time: 15 minutes
- Cook Time: 11 minutes
- Category: Dessert
- Method: Baking
- Cuisine: American
Nutrition
- Serving Size: 1 cookie
- Calories: 120
- Sugar: 8g
- Sodium: 200mg
- Fat: 5g
- Saturated Fat: 3g
- Unsaturated Fat: 2g
- Trans Fat: 0g
- Carbohydrates: 16g
- Fiber: 0g
- Protein: 1g
- Cholesterol: 40mg
Keywords: Mint Chocolate Chip Cookies, dessert, baking, nostalgic recipes
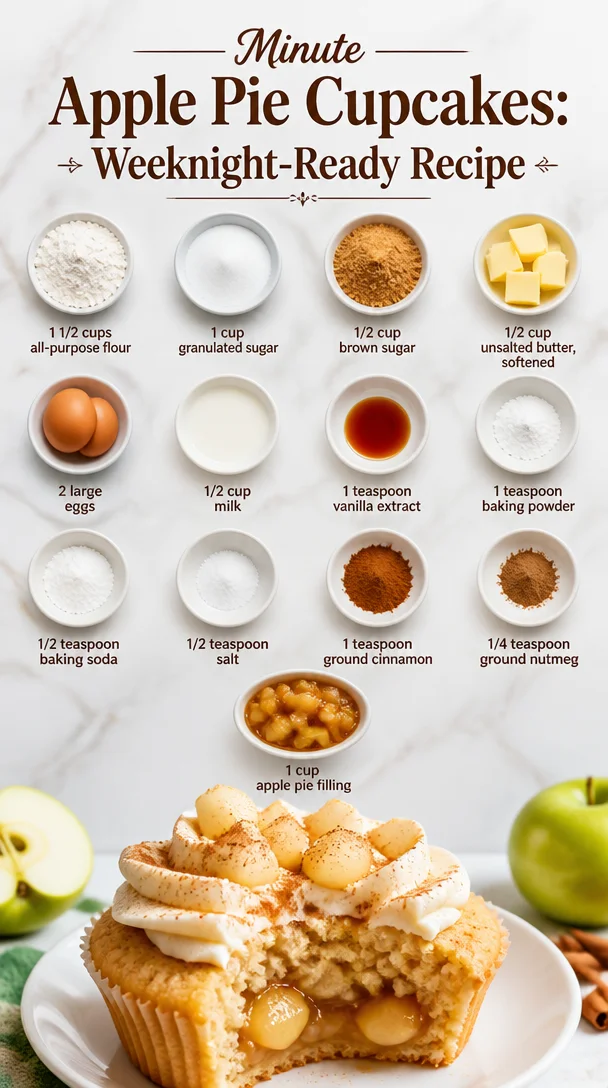
Minute Apple Pie Cupcakes: Weeknight-Ready Recipe
Apple Pie Cupcakes: A Sweet Twist on a Classic Comfort
Hey there, food lovers! If you’re anything like me, there’s just something magical about the smell of apple pie wafting through the kitchen. It brings back warm memories of family gatherings, lazy Sundays, and the comforting embrace of homemade goodness. Today, I’m thrilled to share a delightful twist on that classic treat: Apple Pie Cupcakes! Yes, you heard it right—cupcakes that encapsulate all the nostalgic flavors of apple pie, but in a fun, portable package that’s perfect for sharing (or not!).
Imagine biting into a soft, fluffy cupcake filled with sweet cinnamon apples, topped with a creamy frosting that makes your taste buds dance. These little gems not only bring the flavors of fall but also add a sweet touch to any occasion—whether it’s a birthday party, a cozy afternoon snack, or even a festive holiday dessert table. Grab your mixing bowl and let’s create something scrumptious!
Personal Story: A Family Tradition Revived
Growing up, apple pie was a non-negotiable staple in my household. My grandmother had a special recipe that made her pies the stuff of legends in our family. Every autumn, she would host pie-making days where the kitchen was transformed into a whirlwind of flour, apples, and love. I can still remember the sound of her laugh mingling with the clatter of pans, and the sweet aroma that filled the air as the pies baked in the oven.
One particular day stands out vividly. I was about ten, anxiously trying to keep up with her in the kitchen. She let me peel the apples—an honorable task—while she meticulously crafted the perfect flaky crust. I can still see her beaming smile when I proudly presented my very first apple peel. That day, we didn’t just make a pie; we baked memories. Inspired by that wonderful experience and the joy of apple pies, I developed these Apple Pie Cupcakes to merge tradition with modern flair, while ensuring a piece of my childhood could be shared with everyone.
Ingredients
Let’s dive into the list of scrumptious ingredients you’ll need to whip up these Apple Pie Cupcakes. Each one plays an essential role in creating that delightful flavor we love.
-
1 1/2 cups all-purpose flour
This is your standard cupcake base. If you want to go gluten-free, almond flour or a 1:1 gluten-free blend can work well too! -
1 cup granulated sugar
Sweetness is key! You can reduce the sugar slightly for a less sweet version or use coconut sugar for a caramel-like flavor. -
1/2 cup brown sugar
This adds moisture and a deeper flavor—think of it as the brown-sugar hug for your cupcakes! For a subtle twist, try using dark brown sugar for a richer taste. -
1/2 cup unsalted butter, softened
Butter makes everything better! If you’re looking for a dairy-free option, coconut oil or vegan butter can be good substitutes. -
2 large eggs
Eggs lock in moisture and provide structure. For a vegan alternative, you could use flaxseed meal mixed with water or unsweetened applesauce. -
1/2 cup milk
Milk brings everything together. Almond milk or oat milk can easily take its place if you prefer non-dairy options. -
1 teaspoon vanilla extract
A splash of vanilla rounds out all the flavors beautifully. If you have any bourbon vanilla on hand, it’ll elevate your cupcakes to the next level! -
1 teaspoon baking powder
This is your rising agent that helps the cupcakes fluff up beautifully. -
1/2 teaspoon baking soda
Baking soda works hand-in-hand with baking powder to ensure your cupcakes rise perfectly—a little baking chemistry never hurt anyone! -
1/2 teaspoon salt
Salt enhances sweetness, making it crucial in any baking recipe. -
1 teaspoon ground cinnamon
Apple pie wouldn’t be the same without cinnamon! If you’re feeling adventurous, add a pinch of cardamom for a unique touch. -
1/4 teaspoon ground nutmeg
A hint of nutmeg compliments the apples beautifully, adding warmth to each bite. -
1 cup apple pie filling
You can use store-bought or get adventurous and make your own! If making from scratch, simply sauté some diced apples with sugar and spices until tender.
Step-by-Step Instructions
Alright, let’s get down to the nitty-gritty of baking these delightful cupcakes! Gather your ingredients and let’s get started.
-
Preheat the Oven
Set your oven to 350°F (175°C). While it warms up, line a muffin tin with cupcake liners. This makes for easy serving and a fun way to dress up your cupcakes! -
Mix Dry Ingredients
In a large bowl, whisk together the all-purpose flour, baking powder, baking soda, salt, cinnamon, and nutmeg until well combined. This step is crucial because it ensures even distribution of the dry ingredients, creating uniform baking results! -
Cream the Butter and Sugars
In another bowl, beat the softened unsalted butter, granulated sugar, and brown sugar together until it’s light and fluffy. This usually takes about 3-4 minutes. A little tip: use room-temperature butter for the best creaming results—it makes your cupcakes light and airy! -
Incorporate the Eggs and Vanilla
Add in your eggs one at a time, mixing well after each addition. Then, mix in the vanilla extract. Take a moment to savor that sweet aroma—this is where the magic begins! -
Mix in Milk
Gradually stir in the milk until just combined. Be careful not to overmix—this will help keep your cupcakes tender and delicious. -
Combine Wet and Dry Ingredients
Slowly add the dry ingredient mixture to the wet ingredients, folding gently until everything is just combined. This is a good time to channel your inner zen chef—gentle folding is the name of the game! -
Add Apple Pie Filling
Fold in the apple pie filling, being sure to distribute those delicious apple chunks throughout the batter evenly. The smell should be heavenly by now! -
Fill the Cupcake Liners
Using a scoop or spoon, fill each cupcake liner about two-thirds full. Leave some space for them to rise. Don’t worry if they look a little messy—these are homemade cupcakes, after all! -
Bake
Place your muffin tin in the oven and bake for about 18-20 minutes or until a toothpick comes out clean. While they’re baking, take a moment to appreciate the sweet aroma filling your kitchen! -
Cool Down
Once out of the oven, let the cupcakes cool in the tin for about 5 minutes before transferring them to a wire rack to cool completely. Patience is key—this will help you avoid soggy cupcakes!
Serving Suggestions
Now that your Apple Pie Cupcakes are fully baked and irresistibly fragrant, it’s time to serve them up! Here are a few fun ideas to get you started:
-
Frost Them Up
A classic cream cheese frosting would be a delightful addition, providing a tangy contrast to the sweetness of the cupcakes. For a fun twist, you can whip together some cinnamon and sugar into your buttercream for an extra zing! -
Garnish with a Dusting of Powdered Sugar
For a simple yet elegant touch, dust the tops of your cooled cupcakes with powdered sugar right before serving. It gives a beautiful finish and reminds everyone of freshly fallen snow. -
Top with Caramel Drizzle
Drizzle some homemade or store-bought caramel sauce over the top. It not only adds a lovely flavor contrast but takes the presentation up to a whole new level! -
Pair with Ice Cream
Serve them warm with a scoop of vanilla ice cream on the side. Trust me; the combination of warm cupcake and cold ice cream is simply divine.
Recipe Variations
Feeling adventurous? Here are a few creative twists to customize your Apple Pie Cupcakes:
-
Caramel Apple
Mix in some caramel bits into the batter for gooey surprises in every bite, or drizzle caramel on top as a finishing touch. -
Nutty Crunch
Fold in some chopped walnuts or pecans for added texture and flavor. The nuttiness pairs beautifully with the sweetness of the apple filling. -
Maple Apple
Replace granulated sugar with maple syrup or maple sugar for a unique take on sweetness, adding a lovely depth of flavor. -
Spiced Up
Add a pinch of cloves or ginger to your spices to give it an extra punch of fall flavors—perfect for those who love a little warmth in their desserts. -
Vegan Version
Swap out eggs for flax eggs and replace dairy with plant-based options to create a totally vegan-friendly version without sacrificing flavor!
Chef’s Notes
Creating these Apple Pie Cupcakes has truly been a labor of love for me. As I baked and tasted, I reminisced about those days in my grandmother’s kitchen. Each cupcake holds not just the flavors but also the blessings of family and togetherness. These cupcakes have evolved from a simple desire to explore new culinary ideas, bridging a classic with contemporary dessert trends. My kitchen adventures always remind me that cooking is as much about the journey as it is about the result!
Each time I whip these up, I enjoy experimenting and finding new ways to nail that perfect apple pie taste while keeping it cupcake friendly. Plus, the smiles I see on friends’ faces when they bite into one? Well, that’s just the cherry on top!
FAQs and Troubleshooting
-
Why are my cupcakes dense?
This could be due to overmixing the batter. Remember to fold gently when combining dry and wet ingredients. You want to mix just enough to incorporate everything without overworking that gluten! -
Can I use fresh apples instead of apple pie filling?
You absolutely can! Just be sure to sauté them with a bit of sugar and cinnamon to soften them up and enhance their flavor. -
Why do my cupcakes sink in the middle?
If your cupcakes sink, they may have been underbaked or your oven temperature may not have been accurate. Always check with a toothpick to ensure they are cooked through! -
How do I store leftover cupcakes?
Store these beauties in an airtight container at room temperature for up to 2 days. If you have leftovers beyond that, pop them in the fridge for another 2-3 days, but they’ll rarely last that long—they’re just too good!
Nutritional Info
These Apple Pie Cupcakes are a treat, but they also include wholesome ingredients you can feel good about! Here’s a rough overview of the nutritional information per cupcake (without frosting):
- Calories: 220
- Total Fat: 8g
- Saturated Fat: 5g
- Cholesterol: 40mg
- Sodium: 150mg
- Total Carbohydrates: 35g
- Dietary Fiber: 1g
- Sugars: 15g
- Protein: 2g
*Note: Nutritional values can vary significantly based on ingredient brands and preparation methods, so feel free to check and adjust according to your preferences!
Final Thoughts
As we wrap up this delicious journey, I hope you’re feeling inspired to take a trip back to your childhood and bake up your very own batch of Apple Pie Cupcakes. Remember, baking is not just about the sweets—it’s about the joy, the memories, and the people we share them with. Whether it’s a simple gathering or a lively celebration, these cupcakes are perfect for creating moments worth savoring.
So roll up your sleeves, preheat that oven, and get ready to create some new kitchen memories! I can’t wait to hear how your apple pie cupcakes turn out. Happy baking, friends! 🍏🧁
Print
Apple Pie Cupcakes
- Total Time: 35 minutes
- Yield: 12 servings 1x
- Diet: Vegetarian
Description
A delightful twist on the classic apple pie, these cupcakes are filled with sweet cinnamon apples and topped with creamy frosting, perfect for any occasion.
Ingredients
- 1 1/2 cups all-purpose flour
- 1 cup granulated sugar
- 1/2 cup brown sugar
- 1/2 cup unsalted butter, softened
- 2 large eggs
- 1/2 cup milk
- 1 teaspoon vanilla extract
- 1 teaspoon baking powder
- 1/2 teaspoon baking soda
- 1/2 teaspoon salt
- 1 teaspoon ground cinnamon
- 1/4 teaspoon ground nutmeg
- 1 cup apple pie filling
Instructions
- Preheat the oven to 350°F (175°C). Line a muffin tin with cupcake liners.
- Mix the dry ingredients: In a large bowl, whisk together flour, baking powder, baking soda, salt, cinnamon, and nutmeg until well combined.
- Cream the butter and sugars: In another bowl, beat the unsalted butter, granulated sugar, and brown sugar until light and fluffy (about 3-4 minutes).
- Incorporate the eggs one at a time, mixing well after each addition. Then mix in the vanilla extract.
- Mix in the milk gradually until just combined, avoiding overmixing.
- Combine the dry ingredients with the wet ingredients by gently folding them together until just combined.
- Add the apple pie filling, distributing evenly throughout the batter.
- Fill each cupcake liner about two-thirds full.
- Bake for 18-20 minutes or until a toothpick comes out clean.
- Cool in the tin for about 5 minutes before transferring to a wire rack to cool completely.
Notes
For a delightful touch, frost with cream cheese frosting or a dusting of powdered sugar. Pair with ice cream for a delicious dessert.
- Prep Time: 15 minutes
- Cook Time: 20 minutes
- Category: Dessert
- Method: Baking
- Cuisine: American
Nutrition
- Serving Size: 1 cupcake
- Calories: 220
- Sugar: 15g
- Sodium: 150mg
- Fat: 8g
- Saturated Fat: 5g
- Unsaturated Fat: 3g
- Trans Fat: 0g
- Carbohydrates: 35g
- Fiber: 1g
- Protein: 2g
- Cholesterol: 40mg
Keywords: apple pie, cupcakes, dessert, fall flavors, baking