Tenderized Chicken Breast
Tenderized Chicken Breast: A Delicious Journey to Comfort Food Bliss
Hey there, fellow food enthusiasts! I’m Beau Collier, and today, we’re diving into the world of tenderized chicken breast—a dish that embodies the essence of comfort food. There’s something magical about a perfectly tender chicken breast; it’s like a warm hug on a plate that brings back fond memories and creates new ones. Whether you’re hosting a cozy dinner party or looking for a quick weeknight dinner idea, this recipe is your go-to.
Imagine biting into a beautifully cooked chicken breast, golden on the outside, juicy on the inside, bursting with flavors that dance on your taste buds. That’s the beauty of tenderized chicken! It’s versatile, easy to prepare, and can be the star of any meal. Plus, with just a few simple ingredients, you can elevate this classic dish to new heights.
Cooking, for me, has always been about connection – not only with our ingredients but also with the people we share our meals with. In my house, the kitchen is a gathering spot filled with laughter, storytelling, and of course, delicious aromas that waft through the air. So, roll up your sleeves and let’s get tenderizing because we’re about to turn a simple chicken breast into something truly spectacular!
Personal Story
Let me take you back to a chilly autumn evening when I was just a budding chef, eager to impress my friends with my culinary skills. I had invited them over for dinner, and I was determined to serve them something memorable. I recall pacing around my tiny kitchen, feeling the gentle hum of the oven preheating while listening to my favorite tunes.
For the main event, I chose tenderized chicken breasts – thanks to my grandmother’s not-so-secret technique of using a meat mallet to flatten the chicken for juiciness. It was a family recipe passed down through the generations, and I was excited to keep the tradition alive.
As I pounded the chicken, my friends arrived, each bringing their own contributions to the meal: a decadent dessert, a bottle of wine, and, of course, their contagious laughter. For them, it was just another dinner, but for me, it was a chance to create something special—to share a piece of my family’s culinary history.
The chicken turned out perfectly! Crispy on the outside, tender on the inside, and it filled our dining table with delightful aromas. We dug in, chatting and reminiscing about old times, while I stood back with a smile, knowing I had created not only a meal but a moment we would cherish forever. And that’s why tenderized chicken breast holds a special place in my heart—it’s about love, family, and the power of good food to bring us all together.
Ingredients
To create this dish, we’ll need a handful of ingredients. Here’s what you’ll need to gather:
-
4 boneless skinless chicken breasts: This is your canvas! Feel free to go for organic or free-range for a flavor boost. Not a chicken fan? Try turkey cutlets or tofu for a plant-based option.
-
2 tablespoons olive oil: A healthy fat that adds richness and promotes browning. If you’re looking for a different flavor, avocado oil or melted coconut oil are great alternatives.
-
1 teaspoon garlic powder: For a robust flavor without the mess of fresh garlic. If you prefer fresh, swap it with 2-3 cloves minced garlic.
-
1 teaspoon onion powder: It adds a subtle sweetness and depth. You can use shallot powder if you want a more delicate flavor.
-
1 teaspoon paprika: This brings both color and a bit of smokiness. Sweet, smoked, or even hot paprika can be used, depending on your preference.
-
Salt and pepper to taste: Essential for enhancing all the flavors in this dish. Always taste as you go!
-
Fresh herbs (like thyme or parsley) for garnish: A pop of color and freshness to elevate your dish. Basil or cilantro are great substitutes if you’re feeling adventurous!
Step-by-Step Instructions
Ready to unleash your inner chef? Let’s break down the steps to perfecting tenderized chicken breast!
Step 1: Preparation
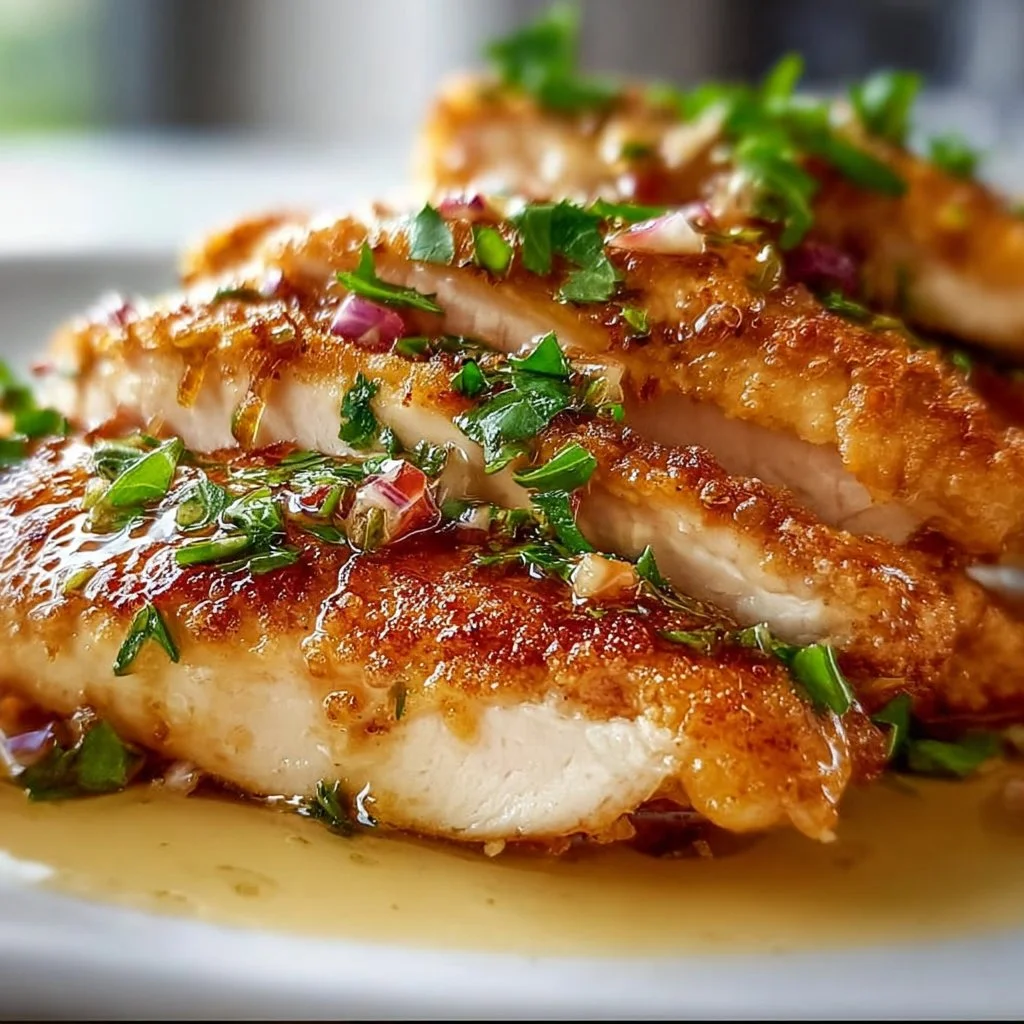
Start by preheating your oven to 400°F (200°C). This ensures your chicken gets that crispiness we’re aiming for. While that’s heating up, let’s flatten those chicken breasts!
Step 2: Tenderizing the Chicken
Place each chicken breast between two sheets of parchment paper or plastic wrap. Using a meat mallet or rolling pin, pound the chicken to an even thickness of about ½ inch. This ensures uniform cooking and helps keep the chicken juicy.
Chef Hack: If you don’t have a mallet, a heavy skillet or even a can of veggies works just fine. Just be gentle; you want to tenderize, not obliterate!
Step 3: Seasoning
Once tenderized, pat your chicken dry with paper towels. This helps achieve a beautiful crust later. Drizzle the olive oil over each breast and rub it in to coat evenly. Then sprinkle the garlic powder, onion powder, paprika, salt, and pepper over both sides of the chicken. Make sure to evenly distribute the seasoning so every bite is flavorful!
Step 4: Cooking the Chicken
Heat a large, oven-proof skillet over medium-high heat. Add a little more olive oil—just enough to coat the bottom of the pan. Once the oil is shimmering but not smoking, carefully place the chicken breasts in the skillet. Sear them for about 4-5 minutes on one side until golden brown.
Chef Tip: Don’t overcrowd the pan! If you have too many pieces, you might steam instead of sear, so do it in batches if necessary.
Step 5: Baking
Once the chicken is beautifully browned, carefully flip each breast over. Transfer the skillet to your preheated oven and bake for an additional 15-20 minutes, until the chicken is cooked through and the internal temperature reaches 165°F (75°C).
Pro Tip: For added juiciness, let the chicken rest for 5-10 minutes after taking it out of the oven. This allows the juices to redistribute.
Step 6: Garnishing and Plating
When it’s time to serve, sprinkle your fresh herbs over the chicken for a bright finish. Now, you’re ready to plate up!
Serving Suggestion: Pair your tenderized chicken breasts with a side of roasted vegetables or a fresh salad. The colors on your plate will be a feast for the eyes, and the flavors will leave everyone wanting more!
Recipe Variations
Why stick to the classic when the world of flavors is at your fingertips? Here are a few creative twists to make this dish your own:
-
Herb-Infused Chicken: Marinate the chicken in a mix of olive oil, lemon juice, and fresh herbs (like rosemary or dill) for a zesty punch before cooking.
-
Spicy Southwest Chicken: Add some cumin and chili powder to the seasoning, and serve it with a corn salsa. You’ll have a fiesta on your plate!
-
Italian Style: Top the finished chicken with marinara sauce and mozzarella cheese before baking. You can create a chicken parmesan that’s sure to impress!
-
Sticky Honey Garlic Chicken: Create a glaze of honey, soy sauce, and minced garlic to brush over the chicken during the last few minutes of cooking for a sweet and savory mix.
-
Mediterranean Flavor: Mix in some olives, sun-dried tomatoes, and feta cheese. This twist will transport you to a sunny Mediterranean locale!
Chef’s Notes
As I reflect on my cooking journey, I realize how this tenderized chicken breast recipe has evolved over the years. Initially, I made it with just basic seasonings, but as my palate expanded, so did my creativity in the kitchen! I love experimenting with different flavor profiles and inviting friends to taste-test my efforts.
It’s remarkable how a simple dish can tell a story—one that’s filled with memories of laughter, shared plates, and the joy of cooking together. And remember, if something goes wrong, embrace it! Sometimes those “oops” moments lead to the best kitchen discoveries.
FAQs and Troubleshooting
Why is my chicken dry?
Overcooking is usually the culprit! Make sure to use a meat thermometer to check for doneness, and remember to let it rest post-cooking to keep it juicy.
Can I use bone-in chicken breasts?
Absolutely! Just adjust the cooking time, as bone-in chicken takes longer to cook through. Make sure the internal temperature is 165°F (75°C) before serving.
What if I don’t have an oven-proof skillet?
No problem! You can start in a regular skillet and transfer the chicken to a baking dish. Just ensure it’s well-seasoned before going into the oven!
Can I make this recipe ahead of time?
Definitely! You can prepare chicken breasts in advance and store them in the fridge. Reheat gently in the oven or a skillet to avoid drying them out.
Nutritional Info
Now, let’s chat nutrition! One serving of our tenderized chicken breast (approximately 4 ounces) will provide you with:
- Calories: About 200
- Protein: 30g
- Fat: 8g
- Carbohydrates: 0g
- Fiber: 0g
This dish is packed with protein, making it a great choice for a healthy meal. Pair it with vegetables to round out your plate, and you’re all set for a delicious dinner!
Final Thoughts
And there you have it! Tenderized chicken breast is a simple dish that can adapt to any occasion or flavor preference. The heart of this recipe lies not only in its ease of preparation but in the sense of community and togetherness it fosters. I hope this recipe encourages you to invite friends and family into your kitchen—whether around the stove, the table, or even over a glass of wine!
So grab your ingredients, gather your loved ones, and celebrate the beauty of shared meals. Remember, cooking is all about joy, experimentation, and love. Until next time, keep cooking up wonderful memories and remember that a good meal is always just a recipe away. Happy cooking, my friends, and let’s dig in!
Print
Tenderized Chicken Breast
- Total Time: 35 minutes
- Yield: 4 servings 1x
- Diet: Paleo
Description
A delicious and comforting recipe for tenderized chicken breast, perfect for any occasion.
Ingredients
- 4 boneless skinless chicken breasts
- 2 tablespoons olive oil
- 1 teaspoon garlic powder
- 1 teaspoon onion powder
- 1 teaspoon paprika
- Salt and pepper to taste
- Fresh herbs (like thyme or parsley) for garnish
Instructions
- Preheat your oven to 400°F (200°C).
- Place each chicken breast between two sheets of parchment paper or plastic wrap. Using a meat mallet or rolling pin, pound the chicken to an even thickness of about ½ inch.
- Pat your chicken dry with paper towels, drizzle olive oil over each breast, and rub it in to coat evenly. Sprinkle with garlic powder, onion powder, paprika, salt, and pepper.
- Heat a large, oven-proof skillet over medium-high heat. Add a little more olive oil. Once shimmering, carefully place the chicken in the skillet. Sear for about 4-5 minutes until golden brown.
- Flip the chicken over and transfer the skillet to your preheated oven. Bake for 15-20 minutes until cooked through (internal temperature should reach 165°F/75°C).
- Let the chicken rest for 5-10 minutes before garnishing with fresh herbs and serving.
Notes
Pair with roasted vegetables or a fresh salad for a complete meal.
- Prep Time: 10 minutes
- Cook Time: 25 minutes
- Category: Main Course
- Method: Searing and Baking
- Cuisine: American
Nutrition
- Serving Size: 1 serving
- Calories: 200
- Sugar: 0g
- Sodium: 300mg
- Fat: 8g
- Saturated Fat: 1g
- Unsaturated Fat: 7g
- Trans Fat: 0g
- Carbohydrates: 0g
- Fiber: 0g
- Protein: 30g
- Cholesterol: 70mg
Keywords: chicken breast, comfort food, easy dinner, weeknight meal
Flavorful Mushroom Stuffed Chicken Breast
Flavorful Mushroom Stuffed Chicken Breast: A Comforting Classic
Hey there, fellow food lovers! I’m Beau Collier, and I’m thrilled you’re here at Feastical, where the kitchen is always buzzing with delicious energy! Today, we’re diving into a recipe that’s sure to become a staple in your household: Flavorful Mushroom Stuffed Chicken Breast. This dish radiates comfort, warmth, and the kind of cozy vibes that can make even the most mundane weeknight feel like a special occasion.
Picture this: It’s a chilly evening, you’re winding down from a long day, and the aroma of garlic and earthy mushrooms fills the air as you prepare dinner. You can hear the sizzle as the chicken cooks to golden perfection, and you can’t help but feel excited about the delightful meal that’s just moments away. This dish isn’t just delicious; it’s a memory-maker, a conversation starter, and a downright hug on a plate!
Why stuffed chicken, you may wonder? Well, it’s versatile, impressive, and, let’s be real, absolutely delicious! Plus, stuffing chicken breast means you get to infuse it with all sorts of flavor—think creamy, cheesy goodness combined with earthy mushrooms and vibrant spinach. Whether you’re planning a romantic dinner, a cozy gathering with friends, or just treating yourself to something special, this recipe is the ticket to a fabulous culinary experience!
So, grab your favorite apron, put on some tunes, and let’s embark on this tasty journey together! I promise to make this recipe not only simple and approachable but also show you a few chef hacks along the way—a dash of love and creativity is all it takes to serve up something magical. Are you ready? Let’s get cooking!
Personal Story
Ah, the memories! Allow me to take you back to one of my favorite childhood culinary moments. Growing up, my grandmother was the undisputed queen of the kitchen. No occasion was too small for a lovingly prepared feast, and she had a knack for taking ordinary ingredients and turning them into unforgettable meals.
One rainy afternoon, I remember her teaching me how to make stuffed chicken breasts, reigning over her cozy kitchen with her vibrant personality and infectious laughter. As we chopped mushrooms and sautéed garlic, she shared stories of her own mom teaching her the same recipe. The kitchen was filled with the scent of savory delights, an experience that felt like magic.
That day, we made a glorious mess, giggling over spilled flour and wrestling with stubborn knife skills. What stuck with me the most wasn’t just the technique, but the joy we shared—how food has this magical ability to bring people together, create connection, and exchange love. Today, as I share this Flavorful Mushroom Stuffed Chicken Breast recipe with all of you, I carry that same love-filled spirit into my own kitchen. Let’s continue that beautiful legacy together—and trust me, your family and friends will appreciate it!
Ingredients
Here’s what you’ll need to whip up this delightful dish—don’t worry; I’ll share some insights and tips along the way!
-
4 Chicken Breasts
Look for boneless, skinless chicken breasts for ease. If you’re looking for a healthier alternative, you can try using turkey cutlets. -
2 Cups Mushrooms, Chopped
I recommend using cremini or button mushrooms for their earthy flavors. If you want to switch things up, try shiitake or portobello mushrooms for a deeper taste! -
1 Cup Spinach, Chopped
Fresh spinach adds a vibrant color and nutritious flair. If fresh isn’t available, frozen spinach works just fine—just make sure to squeeze out the excess moisture! -
1/2 Cup Cream Cheese, Softened
This creamy goodness acts as a rich binder. If you’re looking for a lighter version, try using ricotta or a dairy-free cream cheese for a similar effect. -
1/2 Cup Shredded Mozzarella Cheese
Mozzarella gives that delicious melty texture. Feel free to mix it up with provolone or even a sprinkle of parmesan for a flavor twist! -
2 Cloves Garlic, Minced
Garlic is a game-changer! Use fresh garlic for the best flavor. For a milder option, try roasted garlic, which brings a sweet, caramelized depth to the dish. -
1 Teaspoon Olive Oil
This helps sauté the veggies. You can substitute it with another oil, like avocado oil, for a high smoke point. -
Salt and Pepper to Taste
These staples are essential for brightness! Experiment with herbs like thyme or rosemary for extra flavor. -
Fresh Parsley for Garnish
Fresh herbs brighten the dish beautifully. If parsley isn’t your thing, try fresh basil or cilantro for a twist!
Step-by-Step Instructions
Are you ready to bring this dish to life? Let’s break it down step by step and add those little chef hacks along the way!
Step 1: Prepare the Stuffing
-
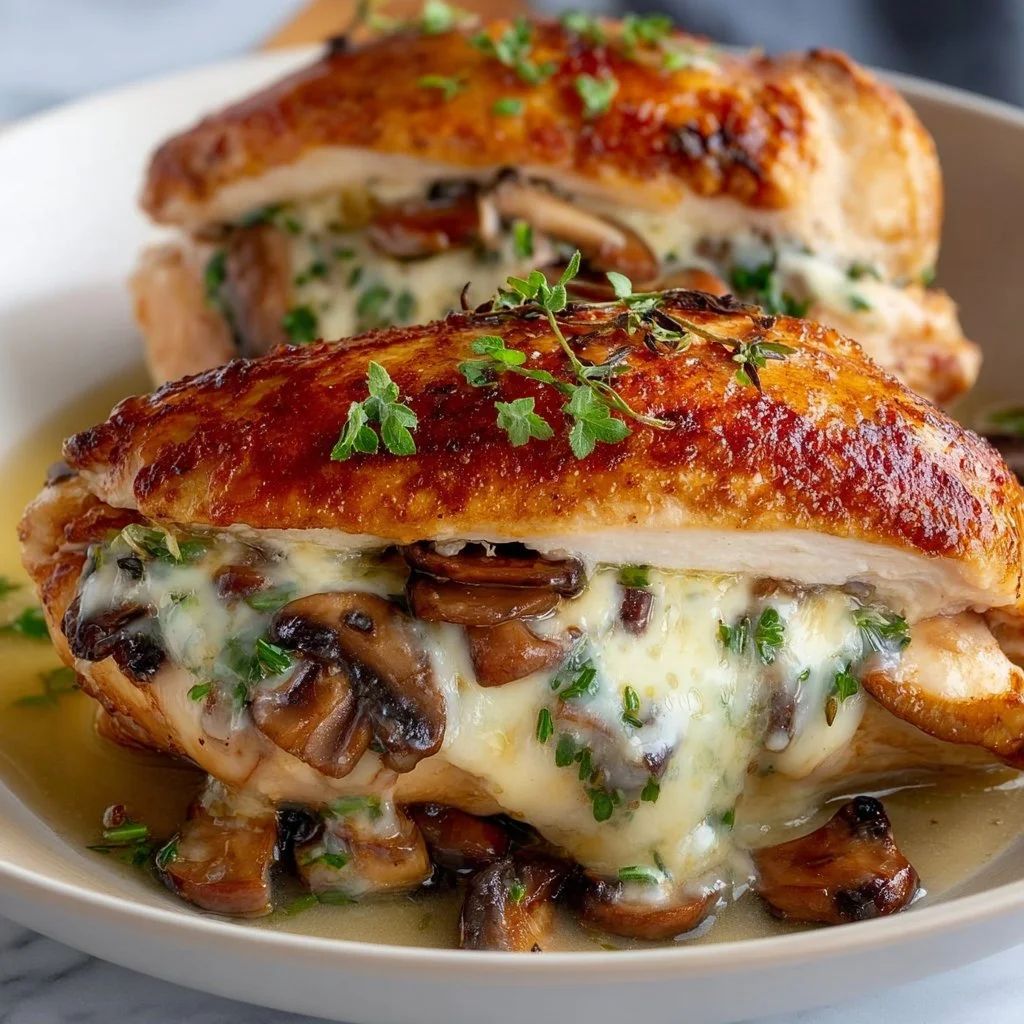
Sauté the Veggies: In a skillet over medium heat, add 1 teaspoon of olive oil. Once hot, toss in the minced garlic and sauté until fragrant—about 30 seconds. Now, add the chopped mushrooms and spinach. Cook for around 4-5 minutes or until the mushrooms are tender and the spinach is wilted. Chef Tip: Season with a pinch of salt and pepper while sautéing to build flavor right from the start.
-
Mix in the Creaminess: Transfer the sautéed mixture to a bowl and allow it to cool slightly. Then, mix in the softened cream cheese and shredded mozzarella until combined. You want it creamy but not too runny. Chef Insight: This stuffing is super versatile, so feel free to add chopped herbs or spices for an extra flavor kick!
Step 2: Prepare the Chicken
-
Butterfly the Chicken: Using a sharp knife, carefully butterfly each chicken breast. This means slicing them horizontally, being careful not to cut all the way through, creating a pocket for your scrumptious stuffing. Quick Chef Hack: If you pound the chicken breasts gently with a meat mallet or rolling pin, they’ll cook evenly and stuff more easily!
-
Fill the Chicken: Spoon the mushroom and cheese mixture into the pocket of each chicken breast. Be generous, but don’t overstuff—otherwise, it may burst while cooking. Use toothpicks to secure the openings if needed. Tip: Just make sure to remove the toothpicks before serving!
Step 3: Cook to Golden Perfection
-
Pan-Seer the Chicken: In the same skillet, add a bit more olive oil (about 1 tablespoon) and heat over medium-high. Once hot, place the stuffed chicken breasts in the skillet. Sear for about 4-5 minutes on one side until browned before flipping them over. Chef Tip: Try not to move them too much—let that glorious golden crust develop!
-
Finish Cooking: Once flipped, reduce the heat to medium. Cover the skillet to help the chicken cook through (about 7-10 minutes more, depending on thickness). Check for doneness using a meat thermometer (165°F internal temperature). Quick Note: If your chicken breasts are thick, you can transfer them to a preheated oven at 375°F for about 15-20 minutes to finish cooking.
Step 4: Serve and Enjoy
- Let It Rest: Once cooked, remove the chicken from the skillet and let it rest for 5 minutes. Resting allows the juices to redistribute, keeping it tender and flavorful. Pro Tip: This is a great time to whip up a quick salad or side!
Serving Suggestions
Now that you’ve got your stunning Flavorful Mushroom Stuffed Chicken Breast ready to shine, let’s talk about presentation! I love serving this dish on a warm plate, garnished with freshly chopped parsley for that vibrant touch.
Plate it Up
- Serve with Sides: Pair it with a light salad, roasted vegetables, or creamy mashed potatoes to create a plate that’s as colorful as it is delicious!
- Drizzle Some Sauce: Elevate your dish by drizzling a simple balsamic reduction or homemade garlic butter over the top—talk about a flavor explosion!
- Garnish, Garnish, Garnish: A sprinkle of parmesan or fresh basil will not only add more flavor but will also look stunning for your dinner guests!
Recipe Variations
Want to spice things up? Here are a few creative twists to customize your Flavorful Mushroom Stuffed Chicken Breast!
-
Add Bacon: For that irresistible savory twist, sauté some crumbled bacon with the mushrooms—because who doesn’t love bacon?
-
Cheesy Spinach & Artichoke: Swap the mushroom stuffing for a spinach-artichoke blend—perfect for all the cream cheese lovers out there!
-
Mediterranean Style: Toss in some sun-dried tomatoes, feta cheese, and olives for a Mediterranean flair—a delicious way to switch up the flavor profile.
-
Herb Infusion: Mix in fresh herbs like dill, tarragon, or oregano into the stuffing for a burst of fresh flavor that’s simply delightful.
-
Gluten-Free Options: If you’re keeping it gluten-free, you can use gluten-free breadcrumbs instead of the stuffing for a lovely texture.
Chef’s Notes
I have to share this little tidbit—my very first attempt at making stuffed chicken didn’t go as planned. Let’s just say it was a bit of a kitchen disaster! I was in such a rush that I didn’t seal the chicken properly, and it burst open in the pan—yikes! Although I was a bit disheartened, that experience taught me invaluable lessons about patience in the kitchen. Cooking is all about learning and growing, and I hope this recipe brings you as much joy as it has me over the years!
Over the years, this recipe has evolved, and I love experimenting with different flavors and ingredients. It’s become a crowd-pleaser at my family gatherings, and every time I make it, it brings me back to that rainy afternoon in my grandmother’s kitchen, where it all started.
FAQs and Troubleshooting
1. Can I make this dish ahead of time?
Absolutely! Stuff the chicken breasts a day in advance and store them in the refrigerator. When you’re ready to cook, simply take them out and let them sit at room temperature for about 15 minutes before cooking.
2. What if my chicken breasts are uneven in thickness?
If you notice some parts are thicker, you can pound them down using a meat mallet, ensuring even cooking. Alternatively, you can slice them into smaller portions for more equal sizes.
3. How do I know when the chicken is done?
The best way to check is by using a meat thermometer. You’ll want it to reach 165°F for perfect doneness. No thermometer? Just cut into the chicken—if the juices run clear and there’s no pink, you’re good to go!
4. Can I freeze leftovers?
Definitely! Cooked stuffed chicken can be frozen for up to 3 months. Just make sure to let it cool before storing, and wrap it tightly to prevent freezer burn!
Nutritional Info (Estimated Per Serving)
- Calories: 350
- Protein: 30g
- Fat: 22g
- Carbohydrates: 5g
- Fiber: 1g
(Please note that nutritional info can vary based on exact measurements and brands used.)
Final Thoughts
And there you have it, my food-loving friends! Your Flavorful Mushroom Stuffed Chicken Breast is ready to shine on your dinner table, bringing comfort and joy to your evening. I hope this recipe not only fills your belly but also fills your heart with the warmth of cooking and sharing meals together.
Remember, cooking is all about creativity, experimentation, and most importantly, fun! So don’t be afraid to tweak this recipe to suit your taste or let it inspire you to create something entirely new! Whether you whip it up for family, friends, or just for yourself, I know this dish will deliver that soulful comfort we all crave.
Thank you for joining me in the kitchen today, and I can’t wait to hear about your adventures with this recipe. Until next time, keep cooking, keep exploring, and most importantly, keep sharing love through food—because that’s what it’s all about! Happy cooking!
Print
Flavorful Mushroom Stuffed Chicken Breast
- Total Time: 45 minutes
- Yield: 4 servings 1x
- Diet: Poultry
Description
A comforting and delicious stuffed chicken breast filled with earthy mushrooms, creamy cheese, and fresh spinach.
Ingredients
- 4 Chicken Breasts
- 2 Cups Mushrooms, Chopped
- 1 Cup Spinach, Chopped
- 1/2 Cup Cream Cheese, Softened
- 1/2 Cup Shredded Mozzarella Cheese
- 2 Cloves Garlic, Minced
- 1 Teaspoon Olive Oil
- Salt and Pepper to Taste
- Fresh Parsley for Garnish
Instructions
- Sauté the Veggies: In a skillet over medium heat, add 1 teaspoon of olive oil. Once hot, toss in the minced garlic and sauté until fragrant—about 30 seconds. Add the chopped mushrooms and spinach. Cook for around 4-5 minutes until tender.
- Mix in the Creaminess: Transfer the sautéed mixture to a bowl and allow it to cool slightly. Mix in the softened cream cheese and shredded mozzarella until combined.
- Butterfly the Chicken: Using a sharp knife, carefully butterfly each chicken breast to create a pocket.
- Fill the Chicken: Spoon the mushroom and cheese mixture into the pocket of each chicken breast. Use toothpicks to secure if needed.
- Pan-Seer the Chicken: In the same skillet, add more olive oil and heat over medium-high. Sear the stuffed chicken breasts for about 4-5 minutes on one side until browned before flipping.
- Finish Cooking: Reduce the heat to medium, cover, and cook for about 7-10 minutes more or until the internal temperature reaches 165°F.
- Let It Rest: Remove the chicken from the skillet and let it rest for 5 minutes before serving.
Notes
Serve with a light salad or roasted vegetables. Drizzling a balsamic reduction enhances the dish beautifully.
- Prep Time: 15 minutes
- Cook Time: 30 minutes
- Category: Main Course
- Method: Sautéing
- Cuisine: Italian
Nutrition
- Serving Size: 1 serving
- Calories: 350
- Sugar: 2g
- Sodium: 450mg
- Fat: 22g
- Saturated Fat: 9g
- Unsaturated Fat: 10g
- Trans Fat: 0g
- Carbohydrates: 5g
- Fiber: 1g
- Protein: 30g
- Cholesterol: 90mg
Keywords: stuffed chicken, mushroom, comfort food, easy dinner, flavorful chicken
Irresistible Ruth’s Chris Stuffed Chicken Copycat Recipe Revealed!
Irresistible Ruth’s Chris Stuffed Chicken Copycat Recipe Revealed!
Hey there, fellow foodies! I’m Beau Collier, and I’m thrilled to welcome you to Feastical, where comfort-food dreams come to life. If you’ve ever dined at the iconic Ruth’s Chris Steak House, then you know their stuffed chicken is nothing short of a culinary marvel. But let me tell you—it’s not just a star on their menu; it can shine brightly right in your kitchen too!
Today, I’m here to unveil my very own take on this irresistible stuffed chicken, and trust me, it’s just as delightful, without the hefty price tag. What’s more, you’ll find that cooking this dish isn’t just about the final meal; it’s a journey filled with savory aromas, delightful flavors, and the joy of creating something special. So, whether you’re planning a cozy dinner for two, or you just want to impress your friends at a gathering, this recipe has got you covered!
We’re diving deep into every aspect of this scrumptious dish, from seasoning and stuffing to cooking hacks that’ll leave your guests begging for seconds! You might think that this classic dish is reserved for special occasions, but I’m here to tell you that you can whip it up anytime you want. Let’s have some fun in the kitchen as we roll up our sleeves and fetch those spatulas! Ready? Let’s get cooking!
Personal Story
Ah, stuffed chicken! It takes me back to a warm summer evening when I was just sixteen, helping my mom prepare dinner for a family gathering. We loved hosting our loved ones, and nothing said “celebrate” quite like a delicious homemade meal. I remember the scent of garlic sautéing in olive oil wafting through the kitchen as I stirred in the spinach, cream cheese, and mozzarella—my mom’s secret weapon. That night, we stuffed chicken breasts to bursting, and they were a hit!
We spent hours laughing and reminiscing around the dinner table, the once-quiet house transformed into a lively gathering place filled with love and laughter. Each slice of the stuffed chicken revealed a warm, cheesy center, and I watched everyone’s faces light up with joy—a memory etched in my heart forever. That experience not only sparked my love for cooking but taught me the importance of sharing good food with great company. So, every time I whip up this dish, it’s not just about the flavors; it’s about creating those same warm, joyful moments that bring people together!
Ingredients
Let’s gather our ingredients for this delicious stuffed chicken!
-
2 boneless, skinless chicken breasts
The star of the show! Choose chicken breasts that are plump and fresh. If you’re looking for a healthier option, try using chicken thighs for a juicier bite. -
1 cup spinach, chopped
Fresh spinach adds a lovely color and nutritional boost! If you can’t find fresh spinach, frozen will do just fine—just be sure to thaw and drain any excess water. -
1/2 cup cream cheese, softened
This creamy delight brings richness to the filling. Feel free to substitute with goat cheese or ricotta for a different flavor profile! -
1/2 cup mozzarella cheese, shredded
Mozzarella ties everything together with its irresistible melt! Want a smokier flavor? Try smoked mozzarella or gouda! -
1/4 cup grated Parmesan cheese
This adds a nice salty kick that elevates the dish. Pecorino Romano is a fantastic alternative if you’re seeking a sharper taste. -
2 cloves garlic, minced
Garlic is a must in my kitchen. It adds depth and flavor to the filling. If you’re in a pinch, garlic powder will work as a substitute! -
1 teaspoon Italian seasoning
A blend of herbs that takes this dish to the next level. If you have fresh herbs on hand, feel free to chop some up instead! -
Salt and pepper to taste
Don’t skip these; they’re essential for flavor. Kosher salt is preferable due to its grain size for even seasoning! -
Olive oil for cooking
I love using extra virgin olive oil for its flavor and heart-healthy benefits. You can also use avocado oil if you prefer a higher smoke point!
Step-by-Step Instructions
Step 1: Preheat the Oven
Let’s kick things off! Preheat your oven to 375°F (190°C). Preheating your oven ensures that your chicken will cook evenly and retain its juiciness. No one wants dry chicken, right?
Step 2: Prepare the Filling
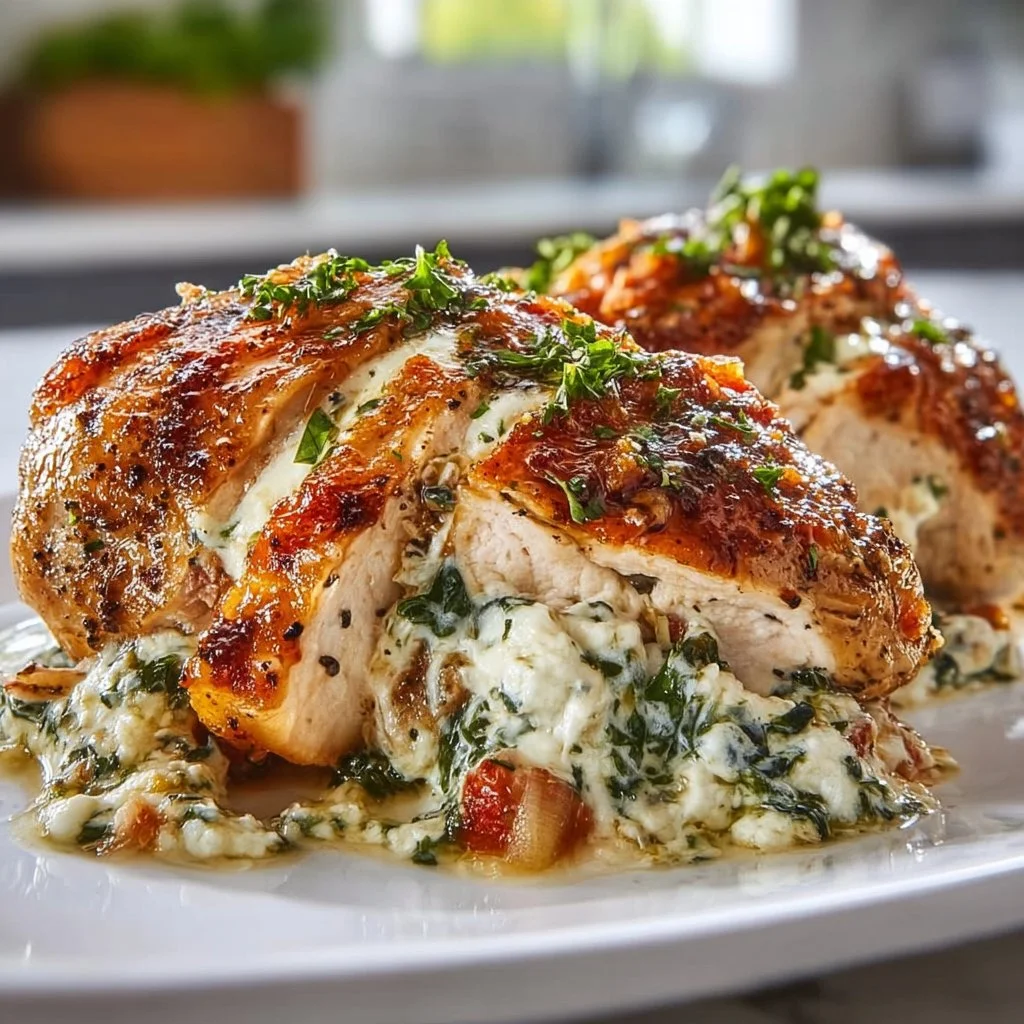
In a medium mixing bowl, combine your chopped spinach, cream cheese, mozzarella, Parmesan, minced garlic, and Italian seasoning. Use a fork or spatula to blend everything together until it’s nicely mixed. You want the cheese to be evenly distributed among the spinach. If it looks a bit lumpy, don’t worry; that’s all part of its charm!
Step 3: Season the Chicken
Next up, let’s season our chicken breasts! Give them a gentle rinse and pat them dry with some paper towels. This step is crucial because you want to avoid any excess moisture on the surface. Season both sides generously with salt and pepper. Got any favorite spice blends? Feel free to sprinkle those on too!
Step 4: Stuff the Chicken
Now comes the fun part! To stuff the chicken, create a pocket by slicing into the side of each breast (don’t cut all the way through!). Grab a generous spoonful of your creamy spinach filling and stuff it right in there. Don’t be shy; you want that filling to be nice and full!
Step 5: Secure the Chicken
Use toothpicks to secure the openings of the stuffed chicken breasts. This will prevent that luscious filling from spilling out while it cooks. A little kitchen hack? Soak the toothpicks in water for about 10 minutes before using them. This prevents them from burning!
Step 6: Cook the Chicken
In an oven-safe skillet, heat about a tablespoon of olive oil over medium-high heat. Once the oil is shimmering, carefully add the stuffed chicken breasts. Sear them for about 4–5 minutes on each side until they turn beautiful golden brown. This step not only locks in all that moisture but also gives it an appetizing color.
Step 7: Bake to Perfection
Once browned, transfer the skillet to your preheated oven. Bake for 25-30 minutes, or until the chicken reaches an internal temperature of 165°F (74°C). Use your meat thermometer to check. Juicy, perfectly cooked chicken is the goal!
Step 8: Rest Before Serving
Remove the skillet from the oven and let the chicken rest for about 5 minutes. This allows the juices to redistribute for that tender bite. You know you’ve got a great dish when the chicken is juicy and oozes that heavenly filling as you slice into it!
Serving Suggestions
Time to plate this beauty! For a stunning presentation, I suggest serving your stuffed chicken over a bed of fluffy risotto or creamy mashed potatoes. Drizzle some extra virgin olive oil over the top for shine, and sprinkle with fresh herbs like parsley or basil for that pop of color. You can even try pairing it with a refreshing side salad or seasonal roasted vegetables to balance the richness!
Recipe Variations
-
Mediterranean Twist: Swap out the cream cheese for feta and add sun-dried tomatoes and Kalamata olives into the spinach filling for a Mediterranean feast!
-
Spicy Kick: Add some crushed red pepper flakes or sliced jalapeños into the filling to give your chicken a kick that will spice up your dinner!
-
Herbaceous Delight: Use fresh herbs like basil and thyme instead of Italian seasoning for a vibrant, fresh taste. Combine with some lemon zest for zesty brightness!
-
Cheesy Broccoli Stuffing: Instead of spinach, use finely chopped steamed broccoli with cheddar cheese for a different veggie-packed version.
-
Wild Mushroom Medley: Sauté some wild mushrooms with garlic and mix them into the filling for an earthy flavor profile that elevates this dish even further!
Chef’s Notes
As this dish has evolved over time, it remains a staple in my kitchen repertoire! I’ve played around with various ingredients and fillings, and each twist brings back delightful memories of that summer evening with my mom. One funny kitchen story? The first time I attempted this recipe, I got too excited and stuffed the chicken until it burst in the skillet! So, remember the golden rule—stuff generously, but not excessively! Everyone makes mistakes in the kitchen. It’s part of the cooking journey!
FAQs and Troubleshooting
-
What can I do if my chicken breasts are uneven in thickness?
- If you have uneven chicken breasts, you can gently pound them to an even thickness using a meat mallet. This will ensure even cooking and tenderness throughout.
-
Why is my cheese oozing out?
- If your filling is too much for the pocket, it may ooze out as it cooks. Just make sure not to overstuff your chicken and secure those openings well!
-
How do I know when the chicken is done?
- The safest way to check is by using a meat thermometer. Chicken should reach an internal temperature of 165°F (74°C) for it to be safe to eat!
-
Can I make this ahead of time?
- Absolutely! You can prepare and stuff the chicken earlier in the day. Just keep it in the fridge, and when you’re ready, pop it in the oven. Cooking time might need a slight adjustment!
Nutritional Info
This copycat Ruth’s Chris stuffed chicken packs a punch with flavor and nutrition! Each serving is approximately 400 calories, rich in protein from the chicken and cheese, and boasts vitamins and minerals from the spinach. Packed with healthy fats from olive oil and cheese, it also delivers comfort without compromise. But remember, portion control is key if you’re watching your calorie intake. Serve it with a side of veggies or a salad for a balanced meal!
Final Thoughts
And there you have it, foodie friends! The deliciousness of a classic Ruth’s Chris stuffed chicken right in your very own home. Cooking is all about bringing people together and enjoying those flavorful moments of joy—all while having fun. I hope you’ll make this dish a part of your kitchen adventures!
Don’t forget, cooking is just as much about experimentation and creativity as it is about following the recipe. So, feel free to customize it to suit your tastes! I’d love to hear about your unique takes on this dish, so drop a comment below or tag me when you share your creations. Remember, as long as you cook with love and laughter, you can never go wrong in the kitchen. Happy cooking, and may your plates always be filled with joy! ✨
Print
Irresistible Ruth’s Chris Stuffed Chicken Copycat
- Total Time: 45 minutes
- Yield: 2 servings 1x
- Diet: Paleo
Description
Enjoy the flavors of Ruth’s Chris Steak House with this delightful stuffed chicken recipe, featuring a creamy spinach filling.
Ingredients
- 2 boneless, skinless chicken breasts
- 1 cup spinach, chopped
- 1/2 cup cream cheese, softened
- 1/2 cup mozzarella cheese, shredded
- 1/4 cup grated Parmesan cheese
- 2 cloves garlic, minced
- 1 teaspoon Italian seasoning
- Salt and pepper to taste
- Olive oil for cooking
Instructions
- Preheat your oven to 375°F (190°C).
- Combine chopped spinach, cream cheese, mozzarella, Parmesan, minced garlic, and Italian seasoning in a bowl.
- Season both sides of the chicken breasts with salt and pepper.
- Stuff each chicken breast by creating a pocket and filling it with the spinach mixture.
- Secure the openings with toothpicks to keep the filling inside.
- Heat olive oil in an oven-safe skillet and sear the chicken for 4–5 minutes on each side.
- Transfer the skillet to the preheated oven and bake for 25-30 minutes until the chicken is cooked through.
- Rest for 5 minutes before serving.
Notes
This dish can be prepared ahead of time; just refrigerate and bake when ready.
- Prep Time: 15 minutes
- Cook Time: 30 minutes
- Category: Main Course
- Method: Baking
- Cuisine: American
Nutrition
- Serving Size: 1 serving
- Calories: 400
- Sugar: 2g
- Sodium: 500mg
- Fat: 24g
- Saturated Fat: 10g
- Unsaturated Fat: 10g
- Trans Fat: 0g
- Carbohydrates: 8g
- Fiber: 1g
- Protein: 35g
- Cholesterol: 90mg
Keywords: stuffed chicken, creamy spinach, copycat recipe, Ruth's Chris, comfort food
Korean Chicken Breasts
Unleashing Flavor: Savory Korean Chicken Breasts
Introduction
Hey there, fellow food lovers! It’s your buddy Beau Collier here, and I’m thrilled you’ve decided to join me at Feastical. Today, we’re going to dive into a dish that’s as comforting as your favorite cozy sweater and bursting with flavors that will make your taste buds dance – Korean Chicken Breasts!
Now, I know what you’re thinking. Chicken? Come on, Beau, we’re looking for something more exciting! But hear me out. This isn’t your run-of-the-mill chicken dish; this is chicken brought to life with a vibrant marinade that combines the umami of soy sauce, the warmth of garlic and ginger, and a touch of sweetness that’ll have you coming back for seconds (or thirds). Whether you’re cooking for a weeknight family dinner or prepping for some friends over the weekend, this dish is beautifully simple yet wonderfully irresistible.
So roll up those sleeves, don your favorite apron, and let’s whip up some Korean Chicken Breasts that will revolutionize your dinner table. By the end of this post, you’ll have not just a recipe but a mouthwatering experience to enjoy and share. Trust me, everyone will be asking for your secrets, and you can proudly say it all came from the heart (and a pinch of kitchen magic). Ready? Let’s get cooking!
Personal Story
Ah, Korean chicken! For me, it’s more than just a recipe; it’s a memory packed with laughter and love. I remember the first time I tried this dish at a small, family-run Korean restaurant in my hometown. I was on a mission to find the best comfort food, and there it was – the rich scent of garlic and sesame oil wafting through the air. When I finally took my first bite, it felt like a warm hug from an old friend.
That night, I sat with my family, sharing stories around the table. It was one of those moments where the flavors seemed to draw us closer together, erasing the day’s worries and filling our hearts with joy. From then on, I knew I had to create my own version of that unforgettable dish. And thus, my journey in the kitchen began! Every time I whip up Korean chicken, I’m reminded of that beautiful night, the laughter echoing, and the flavors igniting our senses. It’s a reminder that food is not just about nourishment—it’s about connection.
Ingredients
Let’s talk about what you need to make these Korean Chicken Breasts sing! Here’s your ingredient lineup, complete with a little insight into each one:
-
4 Chicken Breasts: I recommend using boneless and skinless chicken breasts for this dish. They cook evenly and soak up the marinade beautifully. If you’re looking for a lighter option, boneless, skinless chicken thighs work just as well!
-
1/4 Cup Soy Sauce: This is the star of the show. It adds that unmistakable umami flavor. If you want a gluten-free option, feel free to replace it with tamari sauce.
-
2 Cloves Garlic, Minced: Fresh garlic brings a depth of flavor that dried herbs just can’t compete with. If you’re in a pinch, garlic powder will suffice, though the flavor won’t be as robust.
-
1 Tablespoon Fresh Ginger, Grated: Ginger adds a zesty warmth that is quintessential in Korean cuisine. If fresh ginger isn’t available, ground ginger can work in a pinch—use half the amount.
-
1 Tablespoon Honey or Sugar: A hint of sweetness balances the savory flavors beautifully. Swap honey for maple syrup for a vegan alternative.
-
2 Tablespoons Sesame Oil: This oil adds a lovely nutty flavor and aroma. Plus, it’s rich in healthy fats! If you’re out, you can use olive oil, but it won’t have that distinct taste.
-
Salt and Pepper to Taste: Don’t forget to season! Just a sprinkle enhances the flavors.
-
Steamed Rice (for serving): A bowl of soft, fluffy rice is the perfect partner for this chicken when soaking up those savory juices.
-
Steamed Vegetables (for serving): Serve up some bright greens like broccoli, bok choy, or snap peas for a pop of color and nutrition on your plate!
Step-by-Step Instructions
Okay, let’s get cooking! Here’s how to turn those simple ingredients into a feast fit for a king (or queen):
-
Prepare the Marinade:
- In a medium bowl, combine the soy sauce, minced garlic, grated ginger, and honey (or sugar). Whisk it all together until well mixed.
- Chef’s Tip: Give the marinade a taste and adjust as needed! If you prefer it sweeter, add a bit more honey.
-
Marinate the Chicken:
- Place the chicken breasts in a large resealable bag or a shallow dish. Pour the marinade over the chicken, ensuring it’s well coated. Seal the bag or cover the dish, and pop it in the fridge for at least 30 minutes (or up to a few hours).
- Chef’s Hack: For maximum flavor, marinate overnight if you can. You’ll be amazed at how much more delicious the chicken becomes!
-
Preheat Your Pan:
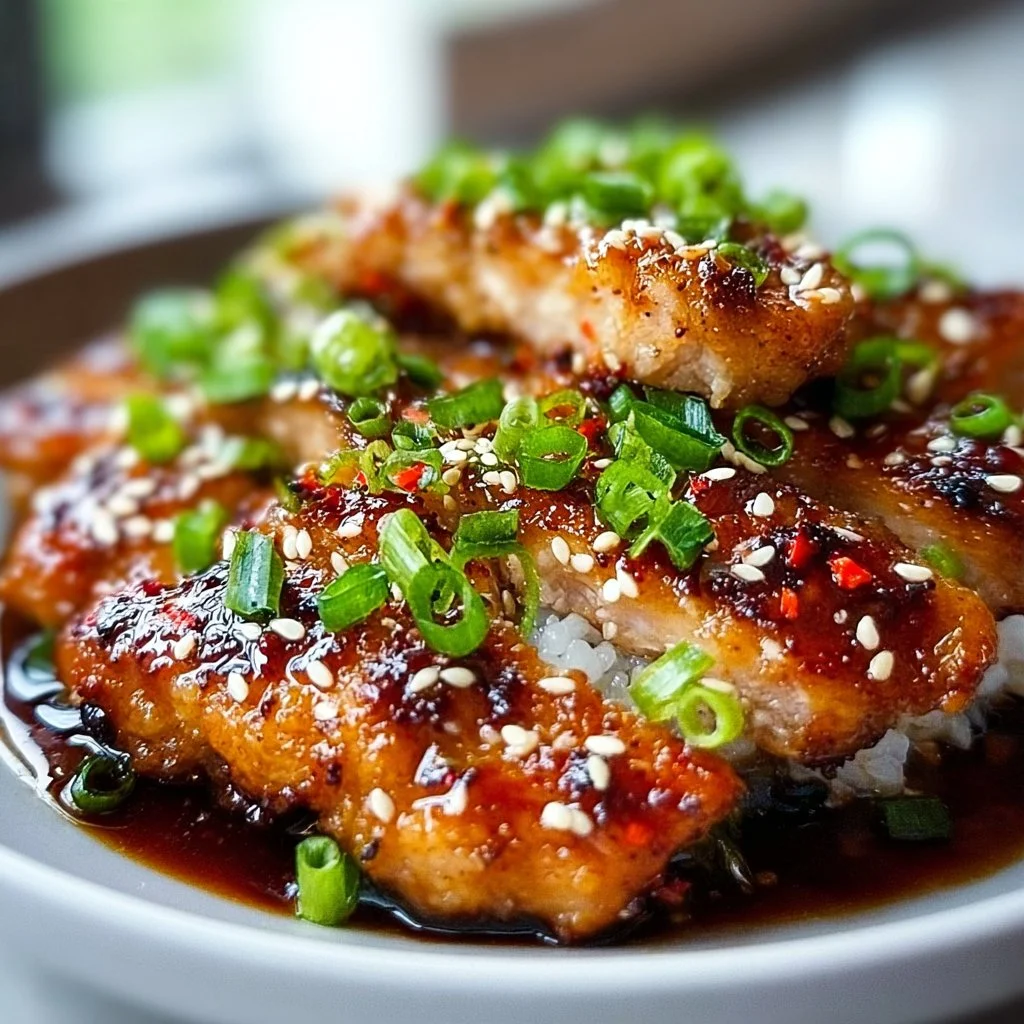
- Heat a large skillet over medium-high heat and add the sesame oil. Let it heat up until it shimmers—this is key for that perfect sear!
- Tip: If you want extra flavor, toss in a few sesame seeds to toast them lightly just before adding the chicken!
-
Sear the Chicken:
- Once the oil is hot, remove the chicken from the marinade (don’t toss the marinade just yet!) and place it in the skillet. Cook for about 5-7 minutes on each side until it’s golden brown and the internal temperature reaches 165°F (75°C).
- Chef Insight: Resist the urge to flip the chicken too early! This lets you achieve a nice brown crust, enhancing the flavor and texture.
-
Make the Sauce:
- Once the chicken is done, remove it from the skillet and let it rest for a few minutes. While it rests, pour the reserved marinade into the skillet. Bring it to a simmer for about 2-3 minutes to cook off the raw garlic and ginger.
- Tip: If you want a thicker sauce, whisk in a cornstarch slurry (1 tablespoon cornstarch mixed with 2 tablespoons water) and simmer until it thickens.
-
Serve the Chicken:
- Slice the chicken breasts and spoon the warm sauce over the top. Serve them alongside steamy rice and a medley of vibrant steamed veggies.
- Final Touch: Garnish with chopped green onions or sesame seeds for an extra pop of flavor and visual appeal!
Serving Suggestions
Once your Korean Chicken Breasts are plated, it’s time to dig in! I love serving this dish family-style, so everyone can grab their favorites. Here’s how to make it look extra tempting on the table:
- Layer It Up: Start with a bed of fluffy steamed rice, making a little well in the center for the chicken to nestle in.
- Colorful Vegetables: Arrange the steamed vegetables alongside the chicken for a burst of color. Try broccoli florets, vibrant bell peppers, or even vibrant purple cabbage for some flair!
- Garnish Like a Pro: Sprinkle a few sesame seeds and sliced green onions on top. A drizzle of extra sesame oil will elevate those flavors even more.
Let your guests scoop up each bite, mixing in the vegetables, sauce, and rice. Trust me; they won’t be able to resist going back for seconds!
Recipe Variations
Looking to get creative? Here are some tasty twists on the classic Korean Chicken Breasts to spark your culinary imagination:
-
Spicy Korean Chicken: Add a teaspoon of gochujang (Korean red chili paste) to the marinade for some spice. Adjust based on your heat preference!
-
Orange Ginger Chicken: Substitute half of the soy sauce with fresh orange juice and add a tablespoon of zest for a refreshing citrus burst.
-
Honey Mustard Twist: Mix in a tablespoon of Dijon mustard with the marinade for a zesty tang that pairs beautifully with the chicken.
-
Kaleo and Quinoa Bowl: Turn this dish into a nourishing bowl by serving it over quinoa and tossing in some kale, avocado, and sliced radishes for crunch.
-
Over the Top Wraps: Shred the cooked chicken and toss it with some of the sauce, then wrap it in tortillas with fresh veggies and spicy mayo for a Korean-inspired wrap.
Chef’s Notes
As with all great recipes, this one has evolved over the years, bringing together little bits and pieces I’ve learned. I can’t tell you how many times I forgot to marinate the chicken and ended up pan-searing it straight away! But don’t worry; it still tasted good—just a little less tender.
I’ve also had my fair share of mishaps in the kitchen. The time I added too much honey and ended up with a cloyingly sweet marinade. But hey, cooking is about experimenting, right? The best part of creating these dishes is that each attempt teaches me something new, and that’s the joy of cooking!
FAQs and Troubleshooting
-
What if my chicken turns out dry?
- This can happen if cooked too long or over high heat. Always ensure you use a meat thermometer to check that the internal temperature reaches 165°F without going over.
-
Can I use frozen chicken breasts?
- You can! Just make sure to thaw them in the refrigerator beforehand. If they won’t thaw in time, this recipe can be prepared with fresh chicken to avoid the marathon of thawing.
-
What is the best way to store leftovers?
- Keep any leftovers in an airtight container in the fridge for up to 3 days. Reheat gently in the microwave or pan over low heat to keep the chicken succulent.
-
Can I skip the marination step?
- Technically, yes, but marinating supercharges the flavor! If you’re short on time, you can still cook the chicken directly; just be mindful to spice up your cooking with extra seasonings or sauces!
Nutritional Info
These Korean Chicken Breasts offer a balanced meal packed with protein and healthy fats when paired with vegetables and rice. Here’s a general idea of what to expect per serving (based on 1 chicken breast with half the marinade):
- Calories: Approximately 280
- Protein: 30g
- Fat: 15g (with the inclusion of sesame oil)
- Carbohydrates: 7g
- Fiber: 1g
Opening your heart to wholesome foods can positively impact your health. Opt for brown rice instead of white for extra dietary fiber, or load up on veggies for added vitamins and minerals!
Final Thoughts
And there you have it! A delicious, easy-to-follow recipe for Korean Chicken Breasts that’s sure to impress your family and friends. I sincerely hope this dish becomes a staple in your kitchen, just like it is in mine. Cooking is all about love, connection, and creating memories, and I can’t wait for you to share this experience with those you care about.
So, the next time you’re looking for something satisfying yet simple to whip up, invite these Korean Chicken Breasts onto your table. And don’t forget to tag me on social media when you make it! I love seeing how you bring the feast to your kitchen. Now, grab your fork and dig in—let’s keep the deliciousness rolling here at Feastical!
Until next time, foodies! Happy cooking and even happier eating! 🍗🥡✨
Print
Savory Korean Chicken Breasts
- Total Time: 45 minutes
- Yield: 4 servings 1x
- Diet: Gluten-Free
Description
Delicious Korean Chicken Breasts marinated in a flavorful sauce, perfect for family dinners or gatherings.
Ingredients
- 4 Chicken Breasts, boneless and skinless
- 1/4 Cup Soy Sauce or tamari for gluten-free
- 2 Cloves Garlic, Minced
- 1 Tablespoon Fresh Ginger, Grated
- 1 Tablespoon Honey or Sugar
- 2 Tablespoons Sesame Oil
- Salt and Pepper to Taste
- Steamed Rice (for serving)
- Steamed Vegetables (for serving)
Instructions
- Prepare the Marinade: In a medium bowl, combine the soy sauce, minced garlic, grated ginger, and honey. Whisk it all together until well mixed.
- Marinate the Chicken: Place the chicken breasts in a large resealable bag or a shallow dish. Pour the marinade over the chicken, ensuring it’s well coated. Seal the bag or cover, and refrigerate for at least 30 minutes.
- Preheat Your Pan: Heat a large skillet over medium-high heat and add sesame oil until it shimmers.
- Sear the Chicken: Remove the chicken from the marinade and place it in the skillet. Cook for about 5-7 minutes on each side until golden brown and the internal temperature reaches 165°F.
- Make the Sauce: Remove the chicken from the skillet, pour the reserved marinade into the skillet, and simmer for about 2-3 minutes.
- Serve the Chicken: Slice the chicken breasts, spoon the warm sauce over the top, and serve with rice and steamed vegetables.
Notes
For maximum flavor, marinate overnight. You can substitute half of the soy sauce with fresh orange juice for a citrus twist.
- Prep Time: 30 minutes
- Cook Time: 15 minutes
- Category: Main Course
- Method: Pan-Frying
- Cuisine: Korean
Nutrition
- Serving Size: 1 serving
- Calories: 350
- Sugar: 6g
- Sodium: 700mg
- Fat: 15g
- Saturated Fat: 2g
- Unsaturated Fat: 9g
- Trans Fat: 0g
- Carbohydrates: 7g
- Fiber: 1g
- Protein: 30g
- Cholesterol: 70mg
Keywords: Korean chicken, marinated chicken, comfort food, easy weeknight dinner, flavorful chicken

Dark Chocolate and Sea Salt Nut Bars
Dark Chocolate and Sea Salt Nut Bars: A Sweet & Savory Adventure
Hey there, fellow food lovers! I’m Beau Collier, and today we’re diving into a deliciously nutty world with my Dark Chocolate and Sea Salt Nut Bars. If you’re someone who enjoys a delightful snack that balances sweet and savory, you’re in for a treat! Whether you need a quick breakfast, a pick-me-up during your day, or a satisfying after-dinner treat, these little bars have got you covered.
The beauty of this recipe is in its simplicity and the wholesome ingredients that come together to create something truly special. I’ve always believed that food is a way to connect with those we love, and this recipe is no exception. It’s perfect for sharing with friends or savoring alone while curled up on the couch watching your favorite show. Plus, they pack a nutritional punch—full of healthy fats, protein, and fiber that leaves you feeling good!
What I love most about these bars is that they are totally customizable. You can mix and match nuts, adjust sweetness levels, and really make this recipe your own. You’ll have the power to create a snack that’s as unique as you are! So, let’s roll up our sleeves and dive into this adventure in the kitchen together.
Personal Story
Now, let me take you on a little trip down memory lane. I can vividly remember the first time I experimented with nut bars. I was in my college years, juggling classes and a part-time job while trying to maintain some semblance of a social life. One late-night study session, I found myself rummaging through my pantry, searching for something to munch on. I stumbled upon a bag of mixed nuts, a half-eaten bag of dark chocolate chips, and a packet of pitted dates. Intrigued by the combination, I decided to throw it all into a bowl with some cocoa powder and sweetener.
What emerged was something unpredictable and wonderfully delicious. I took a bite and was instantly transported! It felt like a satisfying hug for my taste buds. The crunch of the nuts, the rich chocolate, and just the right hint of sea salt turned into fuel for my late-night cramming sessions and, probably more importantly, the foundation for these nut bars we’re making today! Those long nights in the kitchen led to countless variations over the years, and I’m thrilled to finally share this delightful recipe with you. It’s simple, it’s nostalgic, and most importantly—it tastes AMAZING!
Ingredients
Here’s what you’ll need to whip up your own Dark Chocolate and Sea Salt Nut Bars:
-
1 cup mixed nuts (almonds, cashews, walnuts)
*A variety of nuts will give your bars extra flavor and texture. Feel free to use your favorites or whatever you have on hand! -
1/2 cup pitted dates
Dates add natural sweetness and are great as a binding agent. If you don’t have dates, you can substitute with dried figs or prunes for a similar texture. -
1/4 cup unsweetened cocoa powder
This gives a rich chocolate flavor. If you prefer a sweeter taste, consider using cacao powder instead. -
1/4 cup honey or maple syrup
Both options work beautifully as sweeteners. Maple syrup will add a hint of caramel flavor, while honey offers floral notes. Vegan? Go for maple! -
1/4 teaspoon sea salt
This is your magic ingredient! It enhances the flavors and balances the sweetness. You might want to sprinkle a little extra on top for that finishing touch. -
1 teaspoon vanilla extract
Vanilla ties everything together with its warm flavor. Pure vanilla extract is the best for an authentic taste, but you can also use vanilla essence. -
2 tablespoons dark chocolate chips
These are for that extra chocolatey goodness! You can use vegan chocolate chips for a dairy-free version. -
Optional: Additional sea salt for topping
Just a sprinkle on top will elevate your bars from good to sublime!
Step-by-Step Instructions
Ready to make some magic happen in the kitchen? Let’s break down the steps to create these glorious nut bars:
Step 1: Prep Your Ingredients
Before diving in, you’ll want to prepare all your ingredients. Make sure your dates are pitted and soft—if they’re a bit stiff, soak them in warm water for 10-15 minutes and then drain. Roughly chop your mixed nuts into smaller pieces. This helps them distribute evenly throughout the bars, ensuring every bite is delightful!
Step 2: Blend Those Dates
In a food processor (or a strong blender), add your pitted dates and pulse them until they break down into a paste. You’ll want a sticky consistency that acts like glue for your nut bars. If you find them hard to blend, adding a splash of water or honey will help.
Step 3: Combine the Dry Ingredients
In a separate bowl, sift together your cocoa powder and sea salt. This little step helps break up any clumps in the cocoa powder and ensures even distribution throughout the bars. It also saves you from that chalky bite that can happen if it’s not mixed well!
Step 4: Mix it All Together
Now, toss your mixed nuts into the bowl with your cocoa mixture. Make sure they’re coated well! Then, add your date paste, honey (or maple syrup), and vanilla extract. This is where you get to get your hands dirty—mix everything together until well combined! You want a sticky yet firm mixture that holds together when pressed.
Step 5: Add the Chocolate Chunks
Next up, fold in the dark chocolate chips—this is where the magic happens! Feel free to reserve a few chips to press into the top of your mixture before refrigerating for that extra aesthetic appeal.
Step 6: Press Into the Pan
Line an 8×8-inch baking dish with parchment paper, leaving some overhang to make removing the bars easier. Transfer your nut mixture into the prepared dish, and press it down firmly using a spatula or your hands (dampening your fingers with water will keep them from sticking). The firmer it’s packed, the less likely it is to crumble later.
Step 7: Chill Out
Pop your baking dish into the fridge for at least 1-2 hours to set—it’s the hardest part of the process! The chilling allows the bars to firm up, so they are easier to cut. If you’re really impatient (I get it!) 30 minutes will suffice, but more time is always better.
Step 8: Slice & Serve
Once your bars have set, take them out of the fridge and lift them out using the parchment paper. Slice the block into squares or rectangles, whatever floats your boat, and enjoy! Sprinkle a little additional sea salt on top for that ultimate sweet-and-salty finish.
Serving Suggestions
These nut bars can stand alone, but a few presentation tips can really elevate the experience! Arrange them on a rustic wooden board or a vibrant plate with a smear of nut butter or yogurt for dipping on the side. You could even pair them with a fresh fruit compote or some juicy berries to contrast their rich flavors. And let’s not forget about coffee or tea—these bars make a delightful afternoon snack alongside your favorite warm drink!
Recipe Variations
Here are a few fun twists to consider for your nut bars:
-
Tropical Crunch: Swap out half of the nuts for unsweetened shredded coconut and add dried pineapple or mango for a tropical vibe.
-
Nut-Free Version: If you’re heading into nut-free territory, use seeds like pumpkin and sunflower seeds instead. They’ll add a different yet equally delicious crunch!
-
Spiced Chocolate: Add a pinch of cinnamon or cayenne pepper for a spiced kick. It adds warmth and elevates the chocolate flavor!
-
Protein Power-Up: Mix in a scoop of your favorite protein powder to give these bars an extra boost.
-
Flavor Infusion: Consider adding a tablespoon of almond or coconut extract for an extra layer of flavor that pairs beautifully with chocolate!
Chef’s Notes
From my fun kitchen story back in college to experimenting with textures and flavors, this recipe has evolved quite beautifully over the years. I’ve had my fair share of oops moments—like forgetting to add the sweetener and ending up with a bitter chocolate disaster! Embrace the journey and understand it’s all about finding the right balance.
I still whip up these bars when I’m diving into a new project or need a snack for road trips. They never disappoint! Each batch brings a fresh sense of creativity, and I can’t wait to hear how yours turn out.
FAQs and Troubleshooting
-
Can I make these bars ahead of time?
Absolutely! These bars can be made up to a week in advance. Just make sure to store them in an airtight container in the fridge. -
Why did my bars crumble?
This can happen if the mixture wasn’t pressed down firmly enough or if there wasn’t enough sweetener to hold things together. Try adding a little extra honey or dates next time. -
How do I store the nut bars?
Keep them in the fridge in an airtight container. You can also freeze them for up to three months—just make sure to wrap them well! -
What can I serve these with?
These bars go wonderfully with yogurt, coffee, or even on their own. They’re perfect for any time of the day!
Nutritional Info
These Dark Chocolate and Sea Salt Nut Bars not only satisfy your sweet tooth but also pack a nutritional punch. Each bar provides:
- Approx. 200 calories (depending on the size and specific ingredients)
- Healthy fats from nuts
- Natural sweetness from dates
- Fiber that keeps you full
- Antioxidants from dark chocolate
They’re a fantastic option for a quick snack, pre-workout energy boost, or a post-lunch pick-me-up!
Final Thoughts
And there you have it, folks—my Dark Chocolate and Sea Salt Nut Bars! I hope you enjoy making these as much as I do. They’re perfect for any occasion, easy to customize, and loaded with flavors that will keep you coming back for more.
Remember, cooking should always be fun and creative. So mix it up, make it your own, and share it with those you love. Now, go grab those ingredients and let’s get to snacking! Happy cooking, friends! 🍫🥜
Print
Dark Chocolate and Sea Salt Nut Bars
- Total Time: 120 minutes
- Yield: 10 servings 1x
- Diet: Vegetarian
Description
Satisfy your sweet tooth with these deliciously nutty bars that balance sweet and savory flavors, perfect for breakfast or a snack.
Ingredients
- 1 cup mixed nuts (almonds, cashews, walnuts)
- 1/2 cup pitted dates
- 1/4 cup unsweetened cocoa powder
- 1/4 cup honey or maple syrup
- 1/4 teaspoon sea salt
- 1 teaspoon vanilla extract
- 2 tablespoons dark chocolate chips
- Optional: Additional sea salt for topping
Instructions
- Prep your ingredients: Ensure dates are pitted and soft. Chop mixed nuts into smaller pieces.
- Blend those dates: Pulse pitted dates in a food processor until they form a paste.
- Combine the dry ingredients: Sift together cocoa powder and sea salt in a separate bowl.
- Mix it all together: Add the mixed nuts to the cocoa mixture, followed by date paste, honey (or maple syrup), and vanilla extract.
- Add the chocolate chunks: Fold in dark chocolate chips.
- Press into the pan: Line an 8×8-inch baking dish with parchment paper and firmly press the mixture down.
- Chill out: Refrigerate for at least 1-2 hours to firm up.
- Slice & serve: Remove from the fridge, lift out using parchment, and slice into bars.
Notes
These bars can be made ahead of time and stored in an airtight container for up to a week. Add extra toppings or flavors to customize!
- Prep Time: 15 minutes
- Cook Time: 0 minutes
- Category: Snacks
- Method: No Bake
- Cuisine: American
Nutrition
- Serving Size: 1 bar
- Calories: 200
- Sugar: 10g
- Sodium: 50mg
- Fat: 10g
- Saturated Fat: 2g
- Unsaturated Fat: 8g
- Trans Fat: 0g
- Carbohydrates: 20g
- Fiber: 3g
- Protein: 5g
- Cholesterol: 0mg
Keywords: nut bars, snack recipe, chocolate, healthy snack, no bake bars

Low Carb (Keto-Friendly) Blueberry Butter Cake
A Slice of Joy: Low Carb (Keto-Friendly) Blueberry Butter Cake
Hey food lovers! I’m Beau Collier, and today, we’re diving headfirst into a sweet treat that’s not just delicious but also kind to your keto lifestyle. Buckle up, because this low carb blueberry butter cake is about to rock your world! It’s the perfect companion for your afternoon coffee break or a delightful dessert to cap off a cozy dinner.
You see, cake isn’t just a dessert; it’s a celebration, a memory, a moment of pure bliss. Whether it’s a birthday, a Sunday brunch, or just a Tuesday craving, having a slice of cake can brighten your day. And the best part? You won’t have to feel guilty about indulging in this deliciousness!
I remember the first time I experimented with a keto-friendly cake. I was convinced that baking without sugar and flour would lead to some sad, crumbly mess. But with a little curiosity and a journey through trial and error, I created something magical! This blueberry butter cake was born from that experience, and let me tell you—it’s been a hit with everyone I’ve shared it with, keto enthusiasts and cake lovers alike.
So, ready your mixing bowls, and let’s get this baking party started! This cake is simple to whip up, and you’ll only need a handful of ingredients. Plus, it’s gluten-free and packed with delightful blueberry goodness. Trust me, you’ll want to make this again and again!
Personal Story
Let me take you back to my childhood kitchen where the aroma of baked goods filled the air. My grandma, a self-proclaimed queen of desserts, was a master at whipping up cakes that made our mouths water. I still remember the afternoons when we’d pick fresh blueberries from the garden, their sweetness bursting under our fingers as we popped them straight into our mouths. Those moments were pure bliss, and they laid the foundation for my love of baking.
One sunny Saturday, we decided to make a cake using those freshly picked blueberries. It was a simple recipe, but the joy of mixing the batter with her was what made it memorable. The way she’d teach me to fold in the blueberries gently so they wouldn’t burst was something I cherished. That day, we whipped up a classic blueberry pound cake that is still etched in my memory.
Fast forward to today, and even though I’m living a low carb lifestyle, that memory inspired me to create a guilt-free version that still captures the essence of those sweet, sunny days. This blueberry butter cake is my modern take that promises to spark joy and bring people together, just like those memories did. So let’s roll up our sleeves and make our own delicious memories!
Ingredients
Here’s what you’ll need to create your low carb blueberry butter cake. Each ingredient has its own special place in this recipe, and I’ll share little chef insights along the way!
-
2 cups almond flour
A great gluten-free substitute for traditional flour, almond flour adds a lovely nutty flavor and keeps the cake moist. If you need a nut-free option, consider sunflower seed flour, but be aware that it may alter the color of your cake. -
1 cup fresh blueberries
*These sweet little gems are full of antioxidants and will burst with flavor in every bite! Frozen blueberries work too, but be sure to thaw and drain them to avoid excess moisture. * -
4 oz cream cheese, cubed
Cream cheese adds a rich, moist texture. If you’re dairy-free, try using a vegan cream cheese alternative. I promise it won’t compromise the cake’s integrity! -
3 large eggs
These act as binders and help give the cake its structure. For a vegan twist, you can substitute with flax eggs (1 tablespoon of ground flaxseed mixed with 3 tablespoons of water for each egg). -
1/2 cup unsalted butter, softened
Butter brings that rich taste we all love. You can swap it for coconut oil if you want a dairy-free version, but it will impart a different flavor. -
2/3 cup erythritol
This zero-calorie sweetener makes our cake keto-friendly while still adding the sweetness we crave. If you prefer, you can use another sugar substitute like monk fruit or stevia, but check their conversion guidelines as sweetness levels vary. -
1 tsp vanilla extract
A must-have for flavor! You can also experiment with almond extract for a different twist. -
1 1/2 tsp baking powder
This is the secret to our cake rising perfectly! If you’re using a self-rising almond flour blend, you can omit this. -
1 tsp lemon zest
Lemon zest brightens the flavors and elevates the cake. It pairs beautifully with the blueberries! -
1/4 tsp salt
A pinch of salt enhances sweetness and balances flavors. Don’t skip it, even in sweet recipes!
Step-by-Step Instructions
Now that we have all our ingredients ready, let’s get down to the delicious details of how to whip up this cake. You’ll be amazed at how easy it is!
-
Preheat Your Oven
Start by preheating your oven to 350°F (175°C). This step is crucial because we want our cake to bake evenly. While that’s happening, you can prepare your baking pan. Grease a 9-inch round cake pan with butter or line it with parchment paper. #ProTip: Parchment paper helps avoid sticking and makes for easy removal! -
Mix the Wet Ingredients
In a mixing bowl, cream the softened butter and erythritol together until it’s light and fluffy. This could take about 3-5 minutes. You can use a hand mixer or a stand mixer for this, but a sturdy wooden spoon works if you’re feeling old-school. Add the cubed cream cheese, and continue mixing until well combined. Finally, add in the eggs and vanilla extract, blending until smooth. Trust me; you want this mixture to be super creamy! -
Combine Dry Ingredients
In a separate bowl, whisk together the almond flour, baking powder, lemon zest, and salt. Mixing these together before adding them to the wet ingredients prevents clumps from forming. It’s like giving your ingredients a warm hug! -
Mix Everything Together
Gradually fold the dry mixture into the wet mixture. Use a spatula, and be gentle! You want to keep the batter light and fluffy. Feel free to scrape the sides of the bowl and make sure everything is combined. -
Add the Blueberries
Now it’s time for the showstopper: the blueberries! Gently fold them into the batter, being careful not to break them. This is where your cake gets its beautiful pop of color and flavor! -
Pour and Bake
Pour the batter into the prepared cake pan, smoothing out the top. Bake for 30-35 minutes or until a toothpick inserted in the center comes out clean. The smell in your kitchen at this point will have you salivating! -
Cool and Serve
Once baked, let the cake cool in the pan for about 10 minutes before transferring it to a wire rack to cool completely. This helps maintain its moistness. And here’s a little trick: don’t rush this part. The cooling process lets the flavors develop even more!
Serving Suggestions
When it comes to serving your low carb blueberry butter cake, the possibilities are as wide as your creativity! For a classic approach, slice yourself a generous piece and sprinkle a bit of powdered erythritol on top for a beautiful finish. If you’re feeling extra fancy, serve it with a dollop of whipped cream or a scoop of sugar-free vanilla ice cream.
Want to elevate that experience further? Try adding a drizzle of sugar-free lemon glaze on top, using powdered erythritol mixed with a splash of lemon juice. It’s a delightful contrast with the blueberries and truly takes it to the next level!
You can also pair it with fresh berries on the side for a pop of color and freshness. This cake not only tastes amazing but looks gorgeous on any table—a perfect centerpiece for your gatherings.
Recipe Variations
Ready for some fun twists? Here are a few flavor variations and ideas to spruce up your blueberry butter cake:
-
Lemon Blueberry Combo
Add a little extra lemon zest and a splash of lemon juice into the batter for a zesty kick. Combining the sweet blueberries with tart lemon brings a refreshing dimension! -
Chocolate Chip Surprise
Toss in a handful of sugar-free chocolate chips along with the blueberries for a decadent chocolate-blueberry experience! -
Peach Bliss
Swap out some of the blueberries for fresh diced peaches or apricots – a summer dream! They pair wonderfully with almond flour’s nuttiness. -
Nutty Crust
Blend some crushed almonds into the batter for an extra crunch. Just toss in about 1/4 cup of chopped almonds or pecans. -
Spiced Up
Add a dash of cinnamon or nutmeg to the batter for a warm, comforting flavor that’s perfect for those fall vibes!
Chef’s Notes
This blueberry butter cake is a fantastic canvas for creativity and flavor exploration! I first whipped this recipe up during a cozy evening with friends, and it was a delightful hit. We laughed, exchanged stories, and savored each bite together, reminding me exactly why I started baking in the first place.
What’s kept this recipe fresh for me is the constant play with flavors. Sometimes, I like to change things up by adding a pinch of cardamom or tossing in some nuts for that extra crunch. This cake has evolved over the years, and every new variation feels like discovering a hidden treasure.
Remember, baking is about joy, exploration, and making those cherished memories. Embrace the little mishaps along the way—they often lead to the best stories!
FAQs and Troubleshooting
Q: My cake didn’t rise—what happened?
A: This could happen if your baking powder is expired or if the batter was overmixed. Try checking your baking powder’s freshness before making it again; it’s vital for that perfect rise!
Q: Can I make this ahead of time?
A: Absolutely! Bake it a day in advance, let it cool completely, and store it in an airtight container. It can be kept on the counter for up to three days, or you can freeze it for longer storage.
Q: Why does my cake taste too eggy?
A: This can sometimes happen if the eggs are too prominent in flavor or if you added too many. Make sure to follow the recipe measurements for the best results!
Q: Can I substitute almond flour entirely for other flours?
A: Almond flour has a unique texture, so it’s best to stick with it. However, if you need to substitute, look for a keto-friendly flour blend designed for baking—just adjust the liquid as needed!
Nutritional Info
For those tracking their macros, here’s a quick breakdown of what you can expect from one slice of this low carb blueberry butter cake (based on 12 servings):
- Calories: Approximately 180 per slice
- Total Fat: 15g
- Carbohydrates: 6g
- Fiber: 2g
- Net Carbs: 4g
- Protein: 5g
- Sugar Alcohols: 2/3g
Keep in mind that the nutritional values will vary based on ingredient brands and measurements, so adjust as necessary.
Final Thoughts
Baking this low carb blueberry butter cake isn’t just about creating something delicious; it’s about reveling in the joy of cooking and the memories that come with it. Whether it’s a simple treat for yourself, or you’ve invited friends over to share in a slice or two, I hope this cake brings warmth and comfort to your kitchen.
Remember, each time you bake, you create new stories, new experiences, and new joyous connections—with yourself or with friends gathered around. So grab your spatula, preheat that oven, and get ready to create something wonderful. Can’t wait to hear about your baking adventures and what delightful twists you come up with!
Here’s to sweet memories and delicious moments—happy baking, my friends! 🍰
Print
Low Carb Blueberry Butter Cake
- Total Time: 50 minutes
- Yield: 12 servings 1x
- Diet: Keto, Gluten-Free
Description
A delightful low carb blueberry butter cake that’s perfect for your keto lifestyle, packed with sweet blueberries and rich flavors.
Ingredients
- 2 cups almond flour
- 1 cup fresh blueberries
- 4 oz cream cheese, cubed
- 3 large eggs
- 1/2 cup unsalted butter, softened
- 2/3 cup erythritol
- 1 tsp vanilla extract
- 1 1/2 tsp baking powder
- 1 tsp lemon zest
- 1/4 tsp salt
Instructions
- Preheat your oven to 350°F (175°C) and prepare a 9-inch round cake pan.
- Mix the softened butter and erythritol together until light and fluffy.
- Add the cubed cream cheese, eggs, and vanilla extract, blending until smooth.
- Combine the almond flour, baking powder, lemon zest, and salt in a separate bowl.
- Mix the dry ingredients into the wet mixture gently.
- Add the blueberries and fold them into the batter.
- Pour the batter into the prepared pan and bake for 30-35 minutes or until a toothpick comes out clean.
- Cool the cake in the pan for about 10 minutes before transferring it to a wire rack to cool completely.
Notes
Serve with powdered erythritol on top or a dollop of whipped cream. This cake is a great base for adding various flavors!
- Prep Time: 15 minutes
- Cook Time: 35 minutes
- Category: Dessert
- Method: Baking
- Cuisine: American
Nutrition
- Serving Size: 1 slice
- Calories: 180
- Sugar: 1g
- Sodium: 150mg
- Fat: 15g
- Saturated Fat: 8g
- Unsaturated Fat: 6g
- Trans Fat: 0g
- Carbohydrates: 6g
- Fiber: 2g
- Protein: 5g
- Cholesterol: 70mg
Keywords: low carb, keto, blueberry, dessert, butter cake

Fluffy Yogurt Cloud Cake
Fluffy Yogurt Cloud Cake: A Heavenly Delight!
Hey there, my wonderful foodie friends! It’s your pal Beau Collier here, and I’m ecstatic to share a recipe that has become a staple in my kitchen—the Fluffy Yogurt Cloud Cake. If you love the idea of indulging in something light and airy while still packing a punch of rich flavor, then you’re absolutely going to adore this recipe.
Now, you might be wondering, “What makes this cake so special?” Well, imagine biting into a slice of cake that tastes just like a fluffy cloud! It is incredibly moist from the full-fat Greek yogurt, subtly sweetened with just the right amount of sugar, and has a hint of vanilla that makes everything feels just a little dreamy. Seriously, it’s like a hug on a plate!
You know, I was inspired to create this cake after a trip to a little café in Paris—yes, the city of love and food! I ordered a yogurt cake that blew my mind; it was light yet rich, and I couldn’t get enough. As I immersed myself in the fluffy delight while sipping on a café crème, I thought, “This is something I have to recreate at home!” After plenty of testing and tweaking, the Fluffy Yogurt Cloud Cake was born, and trust me, it has graced my table more times than I can count.
Baking isn’t just about following a recipe; it’s about creating memories, evoking feelings, and sharing joy. Whether you whip this cake up for a cozy family gathering, a birthday celebration, or just to treat yourself after a long day, I promise you—this cake will make everything better.
So preheat your oven, grab your mixing bowls, and let’s dive into the delightful world of baking this Fluffy Yogurt Cloud Cake together!
Personal Story
Growing up, my grandmother was an incredible baker. She had this magic that turned ordinary ingredients into extraordinary desserts. One of my fondest memories is her whipping up sponge cakes on lazy Sunday afternoons. The whole house would fill with the comforting aroma of vanilla and sugar, luring us all into the kitchen like moths to a flame.
I remember one particular Sunday when she decided to introduce us to the world of yogurt-based desserts. She set out her ingredients, putting together a simple batter while telling us stories of her youth. The cake she made that day was nothing short of amazing. It was light, fluffy, and practically melted in our mouths. Little did I know, those Sundays spent laughing and baking with her would deeply influence my love of food, cooking, and the joy that homemade treats can bring.
Years later, that nostalgic flavor inspired me to create my own version—the Fluffy Yogurt Cloud Cake. Every time I bake it, I feel that connection to her and can almost hear her reassuring voice telling me to not rush and to enjoy every bite we take. I hope this recipe helps you create your own beautiful memories in the kitchen!
Ingredients
Here’s what you’ll need to create this cake of clouds:
-
1 cup all-purpose flour
This is the backbone of the cake! Use a good quality all-purpose flour for the best texture. For a gluten-free option, almond flour works like a charm. -
1 cup full-fat Greek yogurt
This is what keeps our cloud cake moist and gives it that creamy richness. You can substitute with a dairy-free yogurt if needed, but opt for a thicker variety. -
3/4 cup granulated sugar
A staple sweetener that provides the perfect amount of sweetness. For a healthier alternative, coconut sugar can work, but keep in mind the flavor will be slightly different. -
2 tsp baking powder
This is our leavening agent that helps the cake rise beautifully and gives it that airy texture. Make sure it’s fresh for the best results! -
3 large eggs
These contribute to the structure and moisture. For an egg-free option, you could replace each egg with 1/4 cup unsweetened applesauce or 1/4 cup of silken tofu. -
1 tsp vanilla extract
This adds a lovely, aromatic flavor to the cake. Always use pure vanilla extract if you can; the taste is unmatched! -
1/4 tsp salt
Salt enhances the flavors of the other ingredients. A little pinch goes a long way!
Step-by-Step Instructions
Now that we’ve rounded up our ingredients, let’s get into the fun part—baking the Fluffy Yogurt Cloud Cake!
-
Preheat Your Oven:
Begin by preheating your oven to 350°F (175°C). I’m telling you, nothing beats that warm pre-baking anticipation! This gives our cake the ideal environment to rise, fluffy, and light. -
Prepare Your Baking Pan:
Grab an 8-inch round cake pan and grease it using butter or cooking spray. You might also want to line the bottom with parchment paper for an effortless release later. Believe me, no one likes a cake sticking to the pan! -
Mix the Dry Ingredients:
In a medium bowl, sift together the flour, baking powder, and salt. This not only combines your dry ingredients but also adds air to the flour, which is exactly what we want for a light cake! Set it aside for now. -
Whisk the Eggs and Sugar:
In a separate large bowl, whisk together the eggs and granulated sugar until they become light and fluffy—about 3-4 minutes should do the trick! The mixture should pale in color and have a thick ribbon-like consistency. This is key for that airy cloud-like texture we desire. -
Incorporate the Yogurt and Vanilla:
Gently fold in the Greek yogurt and vanilla extract. Make sure everything is well mixed, but don’t overdo it; we want to keep that airiness! At this point, your batter will be creamy and divine. -
Combine with Dry Ingredients:
Now, gradually add the dry ingredients into the wet mixture. Use a spatula to fold everything together gently until just combined. Remember, we want to avoid over-mixing to keep that fluff! -
Transfer to the Pan:
Pour the cake batter into our prepared baking pan and smooth out the top. It should look so good you’d want to dive right in! -
Bake It Up:
Pop that pan into the preheated oven and bake for about 25-30 minutes, or until a toothpick inserted into the center comes out clean. While it’s baking, your house will begin to smell heavenly! -
Cool Down:
Once done, remove the pan from the oven and let it cool for about 10 minutes. Then, carefully transfer the cake to a wire rack to cool completely. This step is essential; we want it to be just right for slicing! -
Serve and Enjoy!
Once your cake is cool and ready to serve, slice it up, and enjoy the fruits of your labor! You might even want to garnish it with a dollop of whipped cream or fresh berries for that extra touch of magic.
Serving Suggestions
Now that your Fluffy Yogurt Cloud Cake is baked to perfection, it’s time to plate it up! You can keep it simple and serve it naked for that rustic feel—trust me, the taste speaks for itself! However, if you want to elevate the presentation a notch, here are some ideas:
- Dust with Powdered Sugar: A light dusting of powdered sugar adds a touch of elegance and a hint of sweetness without overwhelming the cake.
- Fresh Berries: Serve with a side of mixed berries like raspberries, strawberries, or blueberries for a pop of color and refreshing taste contrast.
- Whipped Cream: Top with a generous dollop of whipped cream or crème fraîche for a delightful creaminess that complements the cake’s light texture.
- Citrus Zest: Sprinkle some lemon or orange zest on top or mix some into your whipped cream to brighten up the flavors!
Serve this cake with a cup of tea or coffee for a cozy afternoon treat, or bring it to your next gathering – it’s bound to impress your friends and family!
Recipe Variations
Feeling adventurous? Here are some creative variations and twists you can try with the Fluffy Yogurt Cloud Cake:
-
Lemon Zest & Juice: Adding the zest and juice of one lemon can give this cake a refreshing citrus twist that brightens the overall flavor. Perfect for a summer dessert!
-
Cocoa Cloud Cake: For chocolate lovers, replace 1/4 cup of the flour with unsweetened cocoa powder. You’ll create a chocolate version that is just as fluffy and delightful!
-
Fruit-Infused Yogurt: Swap the full-fat Greek yogurt for flavored yogurts, like strawberry or raspberry, for a fruity flair. This will add subtle sweetness and deliciousness!
-
Nutty Goodness: Fold in some chopped nuts like almonds or pistachios into the batter before baking for a satisfying crunch.
-
Gluten-Free Version: Use a gluten-free flour blend as a direct substitute for the all-purpose flour for a gluten-free option! It’ll still be heavenly fluffy and delicious.
Chef’s Notes
Every recipe has its unique journey! While this Fluffy Yogurt Cloud Cake began as a tribute to my beautiful memories with my grandmother, it has evolved over the years. I’ve played with flavors, textures, and presentations. One time, I even made a version using lavender-infused yogurt, which added a delicate floral note that was a hit at a garden party!
And you know what? I’ve learned that every baking session is an opportunity for creativity. So don’t be afraid to throw in your own twists or adjustments based on what’s hanging out in your pantry. The kitchen is your playground—explore it!
FAQs and Troubleshooting
I love sharing this cake, but I often get a bunch of questions about it! Here are some common queries and handy solutions to keep your baking journey stress-free:
-
Why isn’t my cake rising?
This could be due to old baking powder or not mixing the batter enough. Always check the freshness of your baking powder before use! -
Can I use non-Greek yogurt?
Yes, but it won’t be as rich, and you may need to adjust your baking time. Full-fat is the way to go for that dreamy texture. -
What if my cake is too dense?
This might happen if the batter was overmixed. Remember, fold gently to keep that airiness intact. -
How should I store leftovers?
Store any remaining cloud cake slices in an airtight container at room temperature for up to 3 days. If refrigerated, they should last about a week, but I doubt they’ll last that long if they’re as delicious as I remember!
Nutritional Info
For those of you who like to keep track, here’s a general nutritional breakdown for a slice (1/12 of the cake):
- Calories: 180
- Protein: 5g
- Fat: 6g
- Carbohydrates: 28g
- Fiber: 0.5g
- Sugar: 9g
It’s always good to remember that baking isn’t just about calories—it’s about joy, flavor, and sharing experiences with others!
Final Thoughts
As I wrap up this delightful journey of baking the Fluffy Yogurt Cloud Cake with you, let me remind you that the heart of creating culinary magic lies in embracing the process. Whether it’s the smell of fresh batter, the anticipation of watching it rise in the oven, or the enjoyment of sharing it with friends, every step is an opportunity to create memories.
So, don your apron and head into the kitchen. I can’t wait for you to experience the fluffiness and flavor of this cake, and I’m sure it will become a lovely part of your own kitchen stories. Happy baking, and remember—life is too short for boring cakes. Let’s make every bite count!
From my kitchen to yours, happy feasting!
Print
Fluffy Yogurt Cloud Cake
- Total Time: 45 minutes
- Yield: 12 servings 1x
- Diet: Vegetarian
Description
A light, airy cake made with Greek yogurt that is subtly sweetened and rich in flavor, perfect for any occasion.
Ingredients
- 1 cup all-purpose flour
- 1 cup full-fat Greek yogurt
- 3/4 cup granulated sugar
- 2 tsp baking powder
- 3 large eggs
- 1 tsp vanilla extract
- 1/4 tsp salt
Instructions
- Preheat your oven to 350°F (175°C).
- Prepare an 8-inch round cake pan by greasing it with butter or cooking spray and lining the bottom with parchment paper.
- Mix the flour, baking powder, and salt in a medium bowl, then set aside.
- Whisk the eggs and granulated sugar in a large bowl until light and fluffy, about 3-4 minutes.
- Incorporate the Greek yogurt and vanilla extract gently into the egg mixture.
- Combine the wet and dry ingredients until just mixed.
- Transfer the cake batter into the prepared pan and smooth out the top.
- Bake for 25-30 minutes or until a toothpick comes out clean.
- Cool for 10 minutes in the pan, then transfer to a wire rack to cool completely.
- Serve and enjoy your fluffy cake!
Notes
Garnish with whipped cream, fresh berries, or a dusting of powdered sugar for an elegant touch.
- Prep Time: 15 minutes
- Cook Time: 30 minutes
- Category: Dessert
- Method: Baking
- Cuisine: French
Nutrition
- Serving Size: 1 slice
- Calories: 180
- Sugar: 9g
- Sodium: 100mg
- Fat: 6g
- Saturated Fat: 2g
- Unsaturated Fat: 4g
- Trans Fat: 0g
- Carbohydrates: 28g
- Fiber: 0.5g
- Protein: 5g
- Cholesterol: 90mg
Keywords: cake, yogurt cake, fluffy cake, dessert recipe, baking, French dessert

These banana oatmeal cookies are easy to make with a few simple ingredients in 20 … | Banana oatmeal cookies, Banana oatmeal cookies healthy, Healthy sweets recipes
Delightful Banana Oatmeal Cookies: A Simple Recipe for Sweet Moments
Hey there, fellow food enthusiasts! I’m Beau Collier, and I’m absolutely thrilled to share one of my all-time favorite treats with you – banana oatmeal cookies. Trust me; these beauties are the epitome of feel-good food! Not only are they a wonderfully satisfying snack, but they also happen to be a breeze to whip up with just a handful of ingredients.
Now, I know what you might be thinking: "Cookies? Easy peasy? Are you sure?" Absolutely! This recipe is all about simple, wholesome ingredients that come together in a flash. So, whether you’re whipping them up for an afternoon treat, school lunches, or simply to enjoy with your favorite cup of coffee, you’re in for a delightful experience.
Banana oatmeal cookies not only offer delightful flavor but also provide a wholesome twist, making them a healthier alternative to traditional cookies. Plus, they’re perfect for those ripe bananas that seem to be begging for a purpose. So, let’s dive in, grab those bananas, and let our baking adventure begin.
By the end of this blog post, you’ll be inspired, informed, and ready to bake a batch of these divine cookies that taste like home and happiness. So grab your apron, and let’s make some magic happen in the kitchen!
Personal Story
Growing up, cookies were always a family staple in our house. My mom had a special knack for baking desserts that could turn even the dreariest of days into something bright and beautiful. But there’s one specific memory that stands out, like it was just yesterday.
I remember a rainy Sunday afternoon, the kind where you’d find me curled up with a book in one hand and a warm cookie in the other. Mom decided it was the perfect time to experiment in the kitchen, and before I knew it, the smell of bananas and oats wafted through our home. She had a few overly ripe bananas lying around, and with her magical touch, we transformed them into the most delightful banana oatmeal cookies.
I stood beside her, eagerly measuring ingredients, my little hands trying to keep up with her expert movements. As we mixed, we shared stories, laughed, and filled our home with warmth. Those cookies didn’t just satisfy our sweet cravings; they created a cherished moment that I still hold close to my heart. Fast forward to today, and whenever I bake these cookies for my family and friends, I’m reminded of those rainy afternoons filled with laughter, learning, and love.
Ingredients
Let’s gather what we’ll need for our delectable banana oatmeal cookies. Here’s a simple list, along with some handy insights on each ingredient:
-
Ripe Bananas (2 large)
- Insight: The more speckles, the better! Riper bananas are sweeter and contribute to moister cookies. No ripe bananas? You can use applesauce as a substitute – about ½ cup will do the trick for added sweetness and moisture.
-
Old-Fashioned Oats (2 cups)
- Insight: Old-fashioned oats provide great texture and chewiness. If you’re looking for a gluten-free option, make sure to grab certified gluten-free oats.
-
Brown Sugar (½ cup)
- Insight: Brown sugar adds depth and extra moisture to the cookies. If you’re looking to cut back on sugar, feel free to reduce this to ¼ cup, or substitute with coconut sugar for a hint of caramel flavor.
-
Flour (1 cup, all-purpose or whole wheat)
- Insight: Use all-purpose for a classic cookie. Whole wheat flour provides a nuttier flavor and a nutritional boost. Coconut flour can also be used, but adjust the quantity to ⅓ cup, as it’s absorbent!
-
Cinnamon (1 teaspoon)
- Insight: This spice adds warmth and a cozy aroma, making these cookies even more irresistible. Experiment with nutmeg or pumpkin spice if you want to switch things up.
-
Baking Powder (1 teaspoon)
- Insight: This little ingredient helps provide lightness to the cookies. For a gluten-free option, you can use a gluten-free baking powder.
-
Salt (¼ teaspoon)
- Insight: Just a pinch helps balance the sweetness.
-
Vanilla Extract (1 teaspoon)
- Insight: Always go for pure vanilla extract if you can—it’s worth the investment! You can replace it with almond extract for a different flavor profile.
-
Optional Add-ins (chocolate chips, nuts, or dried fruit)
- Insight: Make these cookies your own! Chocolate chips are always a crowd-pleaser, but don’t shy away from throwing in some walnuts or dried cranberries for extra crunch and sweetness.
Step-by-Step Instructions
Are you ready to bake? I promise this will be a fun and straightforward process! Here’s how to make these delightful banana oatmeal cookies.
-
Preheat Your Oven
- Preheat your oven to 350°F (175°C). This step is essential to ensure your cookies bake evenly!
-
Mash Those Bananas
- Take your ripe bananas and put them in a mixing bowl. Using a fork or a potato masher, mash them into a smooth puree. You want to avoid lumps for the most uniform textures. Bonus: It’s a great arm workout!
-
Mix the Wet Ingredients
- To your mashed bananas, add the brown sugar, vanilla extract, and any optional add-ins (like chocolate chips or nuts if using). Stir to combine until you have a smooth, cohesive mixture.
-
Combine the Dry Ingredients
- In a separate bowl, mix together your oats, flour, baking powder, cinnamon, and salt. This helps ensure your leavening agents are evenly distributed, which is key to fluffy cookies.
-
Merge It All Together
- Gradually add the dry mixture to your wet ingredients, stirring until just combined. Don’t overmix; you want it to be a little lumpy and rustic. The dough should be thick and slightly sticky!
-
Scoop It Out
- Using a tablespoon or cookie scoop, dollop the cookie dough onto a parchment-lined baking sheet. Leave some space between each dollop, as they will spread slightly while baking.
-
Bake Time
- Pop the tray into the oven and bake for about 12-15 minutes or until the edges are golden brown. The tops might look a tad undercooked, but they will firm up as they cool.
-
Cooling Moment
- Once out of the oven, let the cookies cool on the baking sheet for 5 minutes before transferring them to a wire rack to cool completely. This step is crucial for that perfect chewy texture!
-
Enjoy Your Creation
- And there you have it! Dive into these delicious, warm banana oatmeal cookies. Trust me; they won’t last long!
Serving Suggestions
Plating and serving your banana oatmeal cookies can be just as fun as baking them! Here are some delicious ideas to elevate your cookie experience:
-
Classic Treat: Serve the cookies warm on a plate sprinkled with a bit of powdered sugar for a touch of elegance. Maybe pair them with a glass of cold milk or a steaming cup of herbal tea for a cozy afternoon.
-
Dessert Platter: Create a dessert platter by stacking the cookies high and draping them with melted chocolate. Add fresh fruits like berries and bananas, and a scoop of vanilla ice cream on the side for a mouthwatering dessert spread.
-
Cookie Sandwich: Take two cookies and sandwich a layer of cream cheese frosting or Nutella in between for an indulgent treat that will set your cookie game apart.
-
Scoop-It-Up: Crumble a cookie over a bowl of Greek yogurt and add fresh fruits for a nutritious breakfast or snack. A drizzle of honey on top will make it irresistible!
Recipe Variations
Let’s get creative with our banana oatmeal cookies! Here are some fun variations to try out:
-
Peanut Butter Banana Oatmeal Cookies:
- Add 1/3 cup of peanut butter to the wet ingredients for a nutty flavor. You’ll love that creamy texture!
-
Chocolate Chip Oatmeal Cookies:
- Fold in 1 cup of semisweet chocolate chips for a classic twist. Who can resist a chocolatey treat?
-
Coconut Oatmeal Cookies:
- Add ½ cup of shredded coconut to the mix for a tropical vibe—this is heavenly with the banana!
-
Vegan Version:
- Replace the brown sugar with maple syrup (about ⅓ cup) and use a flaxseed egg (1 tablespoon ground flaxseed mixed with 2.5 tablespoons of water) for a completely vegan cookie.
-
Spiced-Up Cookies:
- Consider adding a pinch of ginger or a hint of pumpkin spice for a seasonal twist. These flavors pair beautifully with bananas!
Chef’s Notes
These cookies are a labor of love, and every time I make them, they remind me of those cozy afternoons with my mom. The recipe has evolved over the years – I experimented with various mixes, and every iteration has brought a new flavor profile to the table.
One time, in a hilarious mishap, I accidentally grabbed salt instead of sugar. The look on my friends’ faces when they took a bite was priceless! It was a lesson learned that day: always double-check your ingredients!
But honestly, this recipe holds a special place in my heart, and I hope it brings you the same warmth and joy that it brings me every time I bake a batch.
FAQs and Troubleshooting
-
Can I freeze these cookies?
- Absolutely! Once cooled, place them in an airtight container or freezer bag, and they’ll last about 3 months. Just thaw them at room temperature, or pop them in the microwave for a few seconds for that fresh-out-of-the-oven experience.
-
Why are my cookies flat?
- Flat cookies can happen if your butter or bananas were too warm, leading to a spread. Also, make sure your baking powder is fresh, as expired leavening agents won’t give you the lift you desire!
-
Can I replace the oats with something else?
- Certainly! You can use quick oats in a pinch, though they won’t lend quite the same chewy texture. If you prefer grain-free, then almond flour or coconut flour can work as substitutes, but you may have to adjust the liquid accordingly.
-
They turned out too dry – what went wrong?
- If your cookies turned out dry, it’s likely you used too much flour. Make sure to measure correctly and avoid packing the flour into the measuring cup. A kitchen scale can be a great help to ensure accuracy!
Nutritional Info
Each banana oatmeal cookie (assuming you get about 18 cookies from this recipe) contains roughly:
- Calories: 90
- Protein: 2g
- Carbohydrates: 14g
- Fat: 2.5g
- Fiber: 1.5g
- Sugar: 5g
These numbers can vary based on your ingredient choices and additions, but overall, these cookies are a wholesome snack without the guilt!
Final Thoughts
I hope you’ve enjoyed this journey of banana oatmeal cookie-making as much as I do. This recipe is more than just a delightful treat; it’s a way to connect with loved ones in the kitchen, share memories, and create delicious moments.
So the next time you find yourself with some ripe bananas, don’t just pass them by. Embrace the joy of baking, and come back to this recipe again and again.
Share your creations with family, friends, or anyone who could use a warm hug in cookie form. Don’t forget to drop a comment if you try these out, or share your own twists and turns along the way. Happy baking, and remember—every cookie is a story waiting to be told!
Until next time, keep it cozy, keep it sweet, and most importantly, keep it delicious! 🍪✨
Print
Delightful Banana Oatmeal Cookies
- Total Time: 30 minutes
- Yield: 18 cookies 1x
- Diet: Vegetarian
Description
A simple and wholesome recipe for delicious banana oatmeal cookies that are perfect for any occasion.
Ingredients
- 2 large Ripe Bananas
- 2 cups Old-Fashioned Oats
- ½ cup Brown Sugar
- 1 cup all-purpose or whole wheat Flour
- 1 teaspoon Cinnamon
- 1 teaspoon Baking Powder
- ¼ teaspoon Salt
- 1 teaspoon Vanilla Extract
- Optional Add-ins (chocolate chips, nuts, or dried fruit)
Instructions
- Preheat your oven to 350°F (175°C).
- Mash the ripe bananas in a mixing bowl until smooth.
- Mix in the brown sugar, vanilla extract, and any optional add-ins.
- Combine the oats, flour, baking powder, cinnamon, and salt in a separate bowl.
- Merge the dry mixture into the wet ingredients until just combined.
- Scoop the dough onto a parchment-lined baking sheet.
- Bake for about 12-15 minutes or until golden brown.
- Cool on the baking sheet for 5 minutes before transferring to a wire rack.
- Enjoy your delicious cookies!
Notes
These cookies can be frozen and will last up to 3 months in an airtight container. Adjust the ingredients based on your preferences.
- Prep Time: 15 minutes
- Cook Time: 15 minutes
- Category: Dessert
- Method: Baking
- Cuisine: American
Nutrition
- Serving Size: 1 cookie
- Calories: 90
- Sugar: 5g
- Sodium: 50mg
- Fat: 2.5g
- Saturated Fat: 0.5g
- Unsaturated Fat: 2g
- Trans Fat: 0g
- Carbohydrates: 14g
- Fiber: 1.5g
- Protein: 2g
- Cholesterol: 0mg
Keywords: banana cookies, oatmeal cookies, healthy snacks, easy cookies, baking, dessert

The Best Greek Yogurt Brownies – Easy & Fudgy
# The Best Greek Yogurt Brownies – Easy & Fudgy

## Introduction

Hey there, fellow foodies! Today, we’re diving into something that’s equal parts dreamy and delicious—the best Greek yogurt brownies. Now, hold on a second! You might be raising an eyebrow, thinking that 'healthy' and 'brownies' don't really gel together. But let me tell you, these brownies are the perfect marriage of indulgence and healthiness. They’re fudgy, rich, and oh-so-fulfilling while sneaking in some protein and probiotics, thanks to that luscious Greek yogurt. It’s like enjoying a slice of heaven without guilt hanging over your head!

Feastical isn’t just about mouth-watering flavors; it’s about creating food that brings warmth to your heart and richness to your soul. Picture it: a rainy afternoon, the kind that makes you want to curl up on the couch with a good book, maybe a cup of tea, and a gooey brownie in hand. Who doesn't want that? You’ll get the feel-good vibes without skimping on flavor.

Plus, the process is super simple! You don’t need to be a kitchen wizard or have ten years of culinary experience under your belt. I’m here to guide you through every step like the friend that helps you out while you’re figuring out where that spatula went. So, slap on your apron, preheat that oven, and let’s get whirl into the world of these fudgy Greek yogurt brownies that’ll make you swoon!

## Personal Story

Growing up, dessert was always a family affair in my house. My mom had a soft spot for sweets, and every weekend, she’d roll up her sleeves and whip up something chocolaty and comforting. My favorite memories were of us gathered in the kitchen, laughter mixing with the smell of melting chocolate. One weekend, she decided to take a healthier spin on our usual brownies. She swapped out oil and butter for Greek yogurt.

At first, I didn’t believe it would work out. But when I took that first bite of her *healthy* brownies—I was blown away! They were just as fudgy as the classic version, with a rich chocolate flavor that kept us reaching for more. Those brownies taught me two important lessons: health and indulgence can exist hand-in-hand, plus, a little creativity in the kitchen goes a long way. That magical combination inspired me—even set me on the path to creating my own recipes to share with all of you!

## Ingredients

Here’s what you’ll need to whip up these brownies:

- **½ cup (120g) Greek yogurt**
  This creamy delight adds richness and moisture. You can substitute low-fat yogurt for a lighter version or even try a dairy-free option like coconut yogurt for a unique flavor twist.

- **¼ cup (60ml) maple syrup or honey**
  Here’s where the sweetness comes in! Maple syrup gives a wonderful depth of flavor, while honey adds that classic sweetness. If you prefer less sugar, you can use a sugar substitute like stevia—but do adjust according to taste.

- **2 large eggs**
  Eggs provide that essential binding element and help create a wonderful texture. You can use flax eggs (1 tablespoon ground flax mixed with 2.5 tablespoons water) for a vegan twist!

- **1 teaspoon vanilla extract**
  A must-have for any sweet treat! It brings a warm, inviting flavor. You can double up on the vanilla for an even richer taste if you’re feeling indulgent.

- **½ cup (45g) unsweetened cocoa powder**
  This is what gives our brownies their chocolatey kick! For a twist, try using dark cocoa powder for a deeper flavor profile.

- **½ teaspoon baking powder**
  This leavening agent helps our brownies rise slightly, making them light yet fudgy. If you’re keeping things gluten-free, make sure your baking powder is certified gluten-free.

- **¼ teaspoon salt**
  Salt enhances the sweetness and rounds out the flavors, making everything more delicious. A touch of sea salt as a topping can also add a lovely finishing touch!

- **½ cup (60g) almond flour or oat flour**
  Almond flour contributes a lovely nutty flavor, while oat flour adds more wholesome goodness. If you’re nut-free, go for oat flour or even all-purpose flour.

- **½ cup (90g) semi-sweet or dark chocolate chips**
  These are the cherry on top. Rich and melty, chocolate chips are a must! Go for dark chocolate if you want a less sweet, more sophisticated flavor.

## Step-by-Step Instructions

### Step 1: Preheat Your Oven

First things first! Preheat your oven to 350°F (175°C). Preheating is crucial to get that perfect bake and to keep your brownies wonderfully fudgy. Trust me, it makes a world of difference!

### Step 2: Prepare Your Baking Dish

Grab an 8x8-inch (20x20 cm) baking dish. Grease it lightly with cooking spray or line it with parchment paper for easy removal later on. If you want a more rustic look, skip the parchment and go straight to greasing—there’s just something homely about that!

### Step 3: Mix the Wet Ingredients

In a large mixing bowl, combine the Greek yogurt, maple syrup (or honey), eggs, and vanilla extract. Whisk them together until smooth. This is where the magic happens! Don’t rush this step—make sure all the ingredients meld together beautifully.

### Step 4: Add the Dry Ingredients

Now, sift in the cocoa powder, baking powder, and salt. This is a great opportunity to incorporate air into your brownie mixture, giving them that dreamy texture you crave. Mix until combined, but don’t over-stir! A few lumps are just fine.

### Step 5: Fold in the Flour

Next up, add the almond flour or oat flour. Gently fold it into the mixture until just combined. Again, this is where you want to be gentle. Overmixing can result in tough brownies, and we’re after fudgy, melt-in-your-mouth goodness here!

### Step 6: Stir in the Chocolate Chips

Now, let’s get chocolaty! Toss in the chocolate chips, giving a nice stir to ensure they are evenly distributed throughout the batter. Feel free to taste a chip—quality control is important, after all!

### Step 7: Pour and Spread

Pour the batter into your prepared baking dish and use a spatula to spread it evenly. Don’t fret if it looks a little thick; that’s what makes these brownies so fudgy!

### Step 8: Bake to Perfection

Slide your brownies into the oven and bake for 20-25 minutes. You want them to be set around the edges but still a bit soft in the middle. Remember, they’ll continue to cook a little as they cool, resulting in that perfect gooey center.

### Step 9: Cool and Cut

Once baked, remove them from the oven and allow them to cool in the dish for about 10 minutes. Then transfer them to a wire rack to cool completely. Or, if you're impatient like I am, dig in right away—just know that they might fall apart a bit! Once cooled, cut them into squares and prepare to be in brownie heaven!

## Serving Suggestions

So how do you serve up these delightful brownies? The options are endlessly delicious! For a touch of class, dust some powdered sugar or cocoa powder on top before serving. Pair them with a scoop of vanilla ice cream or a dollop of Greek yogurt to elevate them further. If you’re feeling playful, drizzle some melted chocolate or a homemade berry sauce on top—trust me, your taste buds will thank you!

## Recipe Variations

Now, let’s get creative! Here are a few ideas to switch up this classic recipe:

1. **Nutty Brownies:** Add ½ cup of chopped nuts like walnuts or pecans for added crunch and flavor.

2. **Minty Fresh:** Incorporate a few drops of peppermint extract into the batter for a refreshing mint chocolate brownie.

3. **Cherry Delight:** Mix in some chopped cherries or raspberries for a fruity twist that complements the chocolate beautifully.

4. **Spicy Twist:** Add a pinch of cayenne pepper or chili powder for an unexpected kick that balances the sweetness.

5. **Coconut Bliss:** Fold in some shredded coconut for a tropical flair that’ll transport you to summer days!

## Chef’s Notes

You know, I have to confess, this recipe has had its fair share of experiments! The first time I made these, I used way too much cocoa powder and forgot the sugar! It was pretty much a cocoa brick—but it inspired me to play with the recipe until it was just right. Now I can whip these brownies up in no time for parties or cozy nights in. You never know what kind of masterpiece you’ll create in the kitchen! It’s all about having fun and experimenting with flavors, so don’t be afraid to make it your own!

## FAQs and Troubleshooting

**1. Why are my brownies too dry?**
Make sure not to overbake them; they should be set at the edges and slightly gooey in the center. If you’ve accidentally baked them too long, try serving them with ice cream to soften them up!

**2. Can I make these brownies vegan?**
Absolutely! Use flax eggs instead of regular eggs and coconut yogurt in place of Greek yogurt, ensuring you check that all ingredients are plant-based.

**3. How do I store leftovers?**
Store any leftovers in an airtight container at room temperature for up to three days or in the refrigerator for up to a week. If you want to keep them longer, consider freezing them for later enjoyment!

**4. Can I use other types of flour?**
Definitely! You can use all-purpose flour or even a gluten-free blend. Just make sure to monitor the texture, as it can vary slightly with different flours.

## Nutritional Info (if applicable)

These rich Greek yogurt brownies pack a satisfying punch while still keeping things a bit lighter than your traditional brownie. Each brownie (based on a standard 16-serving batch) typically has around:

- **Calories:** 140
- **Protein:** 4g
- **Carbohydrates:** 18g
- **Fat:** 6g
- **Fiber:** 2g

That makes them a guilt-free treat you can enjoy without sacrificing flavor! Plus, the protein from the Greek yogurt gives you a nice little boost.

## Final Thoughts

And there you have it, folks! The best Greek yogurt brownies that are not only easy to make but downright delicious. I hope you gather your loved ones around to enjoy the magic that happens when you bake! Remember, every brownie is like a cozy little hug that reminds us to savor life’s sweeter moments. So next time you want to treat yourself, reach for this recipe, whip up some joy, and dig in! Happy baking, and don’t forget to share your creations with me over on Feastical! Let’s keep the food love flowing!

The Best Greek Yogurt Brownies – Easy & Fudgy
- Total Time: 35 minutes
- Yield: 16 servings 1x
- Diet: Vegetarian
Description
Indulge in these fudgy Greek yogurt brownies that perfectly blend healthiness with deliciousness, offering a rich chocolate flavor and a guilt-free treat.
Ingredients
- ½ cup (120g) Greek yogurt
- ¼ cup (60ml) maple syrup or honey
- 2 large eggs
- 1 teaspoon vanilla extract
- ½ cup (45g) unsweetened cocoa powder
- ½ teaspoon baking powder
- ¼ teaspoon salt
- ½ cup (60g) almond flour or oat flour
- ½ cup (90g) semi-sweet or dark chocolate chips
Instructions
- Preheat your oven to 350°F (175°C).
- Prepare your baking dish by greasing an 8×8-inch (20×20 cm) baking dish or lining it with parchment paper.
- Mix the Greek yogurt, maple syrup (or honey), eggs, and vanilla extract in a large mixing bowl until smooth.
- Add the cocoa powder, baking powder, and salt, and mix until combined.
- Fold in the almond flour or oat flour gently until just combined.
- Stir in the chocolate chips until evenly distributed.
- Pour the batter into the prepared baking dish and spread evenly.
- Bake for 20-25 minutes until set around the edges but slightly soft in the middle.
- Cool for 10 minutes before transferring to a wire rack to cool completely, then cut into squares.
Notes
These brownies can also be made vegan by substituting eggs with flax eggs and Greek yogurt with coconut yogurt.
- Prep Time: 10 minutes
- Cook Time: 25 minutes
- Category: Dessert
- Method: Baking
- Cuisine: Greek
Nutrition
- Serving Size: 1 brownie
- Calories: 140
- Sugar: 5g
- Sodium: 100mg
- Fat: 6g
- Saturated Fat: 2g
- Unsaturated Fat: 3g
- Trans Fat: 0g
- Carbohydrates: 18g
- Fiber: 2g
- Protein: 4g
- Cholesterol: 35mg
Keywords: brownies, Greek yogurt, healthy dessert, fudgy brownies, easy baking
No-Bake Energy Bites
No-Bake Energy Bites: The Ultimate Snack for Busy Foodies
Hey there, fellow food enthusiasts! I’m Beau Collier, and today I’m thrilled to take you on a delicious journey with one of my all-time favorite snack recipes: No-Bake Energy Bites. If you’re anything like me, life can get a bit hectic. Between work, family, and social commitments, finding time to whip up nutritious snacks can feel like a Herculean effort. That’s where these energy bites come in! They’re not just quick and easy to make, but they are also packed with wholesome goodness to fuel your busy lifestyle.
Picture this: it’s a Thursday afternoon, and you’re powering through your to-do list. You need a little pick-me-up, but you don’t want to reach for that sugary granola bar that leaves you crashing in an hour. That’s when your homemade energy bites can swoop in to save the day! With just a handful of ingredients and minimal effort, you can create a delightful snack that satisfies your cravings without the guilt.
The beauty of these No-Bake Energy Bites is that they’re not just a grab-and-go option for busy days; they’re also a great choice for kids, and they make an excellent addition to lunchboxes or as a post-workout treat. Plus, you can tailor them to your taste! Whether you’re a chocolate lover or someone who enjoys a nutty crunch, these little bites of joy are customizable to fit your preferences.
Let’s roll up our sleeves, put on some fun music, and get ready to whip up a batch of these no-bake wonders. Trust me, once you try them, you’ll keep a stash in your fridge or freezer for those moments when you need a little energy boost. Are you ready? Let’s dig in!
Personal Story
I’ll never forget the first time I made these No-Bake Energy Bites. It was a chilly Saturday morning, and my two kids were bouncing around the kitchen, bursting with energy. “Dad, can we have something fun for a snack?” they begged. As I scanned our pantry, looking for a quick solution, I stumbled upon the perfect mix of ingredients. I decided to turn our ordinary morning into a cooking adventure.
As we combined the oats, nut butter, and honey in a big bowl, the kitchen filled with laughter and little voices shouting, “More chocolate chips!” It was a delightful chaos, one that inevitably ended with chocolate smeared on noses and giggles all around. When we finally rolled the mixture into shiny little balls, it felt like a mini celebration. The first bites were a revelation! Crunchy, chewy, and sweet all at once, these energy bites became a family favorite.
Fast forward to today, and this recipe has followed us through busy school mornings, road trips, and even movie nights. It’s become a family tradition to whip up a new batch every weekend, experimenting with different ingredients while reminiscing about that first adventurous Saturday. These bites aren’t just a tasty snack; they are a reminder of the joy of cooking together.
Ingredients
Before we dive into the cooking process, let’s gather our stars of the show! Here’s what you’ll need to whip up these fabulous No-Bake Energy Bites:
-
1 cup rolled oats
- Rolled oats are the backbone of these bites, providing a hearty base. They’re packed with fiber and help keep you full! If you’re gluten-free, make sure to choose certified gluten-free oats.
-
1/2 cup peanut butter
- Creamy or crunchy, the choice is yours! Peanut butter adds essential protein and healthy fats. Looking for alternatives? Almond butter or sunflower seed butter work beautifully too!
-
1/3 cup honey
- This natural sweetener binds the ingredients together while offering a touch of sweetness. If you prefer a vegan option, agave syrup or maple syrup can replace honey.
-
1/2 cup chocolate chips
- Chocolate makes everything better, right? Use semi-sweet for a classic flavor or dark chocolate chips for a richer taste. You can swap them for dried fruit or nuts if you’re feeling adventurous.
-
1/4 cup flaxseed meal
- A powerhouse of nutrients, flaxseed meal is loaded with omega-3 fatty acids and fiber. If you don’t have it on hand, chia seeds make a great substitute!
-
1/2 teaspoon vanilla extract
- This little ingredient adds a warm, inviting flavor that ties everything together. Feel free to use almond extract for a nutty twist!
Gather these ingredients together, and let’s get cookin’!
Step-by-Step Instructions
Now that we have everything ready, it’s time to transform these humble ingredients into delightful No-Bake Energy Bites. Follow these easy steps, and make sure to add your personal touch along the way!
Step 1: Mix the Dry Ingredients
- In a large mixing bowl, begin by combining the rolled oats and flaxseed meal. Use a wooden spoon or spatula to make sure they’re evenly mixed! This will give you a great base for your bites.
- Chef’s Tip: The more you mix it now, the less you’ll have to do later!
Step 2: Add the Wet Ingredients
- Add the peanut butter, honey, and vanilla extract to the bowl. It might look a bit messy at first, but don’t worry! The peanut butter and honey will soon work their magic.
- Chef’s Insight: If your peanut butter is a little stiff, warm it slightly in the microwave (10-15 seconds) so it blends more easily.
Step 3: Stir Until Combined
- Mix everything together vigorously until you have a thick, sticky dough. If it feels too dry, add a splash of water or a bit more honey. Conversely, if it’s too gooey, sprinkle in some more oats.
- Chef Hack: Using your hands to mix can be messy but also super fun! It’s like you’re working with edible clay.
Step 4: Fold in Chocolate Chips
- Gently fold in the chocolate chips. This step is essential—no skimping here! You want that chocolate goodness in every bite.
- Pro Tip: Reserve a few chocolate chips to sprinkle on top for that Instagram-worthy finish!
Step 5: Shape the Bites
- Now, it’s time to roll! Using your hands, scoop out tablespoon-sized portions of the mixture and roll them into balls. Place them on a parchment-lined baking sheet or plate.
- Chef’s Note: If the mixture is too sticky, wet your hands slightly or dust them with a bit of powdered sugar.
Step 6: Chill
- Pop them into the fridge for about 30 minutes to firm up. This will help them hold their shape for snacking later.
- Fun Fact: Chilling not only helps with texture but also makes the flavors meld together beautifully!
Serving Suggestions
Once your No-Bake Energy Bites have chilled, it’s time to enjoy them! You can serve them as a simple snack or elevate the experience. Here are a few serving suggestions:
- On a Snack Platter: Arrange your energy bites on a lovely platter, garnished with fresh fruits like strawberries or apple slices. This makes for a fun party snack.
- In a Jar: Layer them in a mason jar for a cute grab-and-go option. You can even label it as "Energy Boosts" for a personal touch!
- With Coffee or Tea: Pair your bites with a warm cup of coffee or herbal tea for an afternoon pick-me-up. Trust me, the combination is divine!
Recipe Variations
The best part about No-Bake Energy Bites is that they’re super adaptable! Here are some fun twists you can try to mix things up:
- Coconut Crunch: Add 1/4 cup of shredded coconut for a tropical flair.
- Nutty Flavors: Try adding 1/4 cup of chopped nuts, like almonds or walnuts, for an added crunch and nutritional boost.
- Spiced Up: Mix in a pinch of cinnamon or nutmeg to infuse warm, cozy flavors throughout.
- Fruit Burst: Toss in some dried fruits like cranberries, raisins, or apricots for a chewy surprise.
- Protein Boost: Replace half of the oats with protein powder for extra fuel—great for after a workout!
Chef’s Notes
I love that this recipe has evolved over time, and every batch is a little different. One time, my kids decided to add shredded carrots because they thought it would be "healthy." Surprisingly, it worked! We ended up calling them “Energizing Bunny Bites” for the fun factor.
It’s these experiences that make cooking so special—finding joy in the kitchen, trying new things, and sharing it all with loved ones. No matter how you tweak this recipe, I promise you’ll have a tasty and wholesome snack to enjoy!
FAQs and Troubleshooting
Here are some common questions I’ve encountered about No-Bake Energy Bites that’ll help you make this recipe with ease:
Q1: My energy bites are too sticky; how can I fix them?
If your mixture feels too sticky to roll, you can either chill it in the fridge for 10-15 minutes or add extra oats, a little at a time, until the texture feels right.
Q2: How long do these bites last?
Stored in an airtight container in the fridge, these energy bites will last up to a week. You can also freeze them for up to three months—just make sure to separate layers with parchment paper!
Q3: Can I use quick oats instead of rolled oats?
While rolled oats provide a nicer texture, you can use quick oats if that’s what you have on hand. The bites will be a tad firmer, but still delicious!
Q4: What if I’m allergic to nuts?
No worries! You can easily substitute the peanut butter with sunflower seed butter or omit the nut butter altogether and increase the binding agents slightly with more honey or syrup.
Nutritional Info
Now, let’s talk numbers for those of you keeping track of your nutrition. Each No-Bake Energy Bite contains approximately:
- Calories: 120
- Protein: 3g
- Carbohydrates: 12g
- Dietary Fiber: 2g
- Sugars: 5g
- Fat: 6g
These bites keep you satisfied without the sugar crash, thanks to the combination of fiber, protein, and healthy fats. They’re excellent for providing that mid-afternoon energy boost!
Final Thoughts
I hope you’re as excited as I am about these No-Bake Energy Bites! They’re simple, satisfying, and oh-so-delicious. Whether you’re busy with work, heading out on an adventure, or simply looking for a healthy snack for the family, this recipe has got your back.
Remember, cooking is all about experimentation and fun, so don’t hesitate to try new ingredients or tweak the recipe to suit your taste. I’d love to hear about your own variations and any cooking adventures that come from this recipe!
So, grab your mixing bowl, put on your favorite tunes, and enjoy the delightful experience of creating these bites of joy. Happy snacking, and until next time, keep cooking with love and a sprinkle of creativity!
And there you have it! A delightful journey through the creation of No-Bake Energy Bites with insight, tips, and love. Enjoy!
Print
No-Bake Energy Bites
- Total Time: 45 minutes
- Yield: 24 servings 1x
- Diet: Vegetarian
Description
Quick and easy no-bake energy bites packed with wholesome ingredients, perfect for busy lifestyles.
Ingredients
- 1 cup rolled oats
- 1/2 cup peanut butter
- 1/3 cup honey
- 1/2 cup chocolate chips
- 1/4 cup flaxseed meal
- 1/2 teaspoon vanilla extract
Instructions
- Mix the dry ingredients in a large mixing bowl: rolled oats and flaxseed meal.
- Add the wet ingredients: peanut butter, honey, and vanilla extract.
- Stir until combined, creating a thick, sticky dough.
- Fold in the chocolate chips gently.
- Shape tablespoon-sized portions into balls.
- Chill in the fridge for about 30 minutes to firm up.
Notes
These bites are customizable with various ingredients like nuts or dried fruits. Store in the fridge for up to a week or freeze for up to three months.
- Prep Time: 15 minutes
- Cook Time: 0 minutes
- Category: Snack
- Method: Chilling
- Cuisine: American
Nutrition
- Serving Size: 1 bite
- Calories: 120
- Sugar: 5g
- Sodium: 10mg
- Fat: 6g
- Saturated Fat: 1g
- Unsaturated Fat: 4g
- Trans Fat: 0g
- Carbohydrates: 12g
- Fiber: 2g
- Protein: 3g
- Cholesterol: 0mg
Keywords: no-bake, energy bites, healthy snacks, quick snacks, easy recipes