Minute Honey Fig Pistachio Goat Cheese Appetizer
Honey Fig Pistachio Goat Cheese Appetizer: Irresistible Delight!
Hey there, fellow foodies! I’m so excited to share this super scrumptious appetizer that will have your guests raving and asking for seconds! Today, I’m diving into the delightful world of Honey Fig Pistachio Goat Cheese Appetizer – a dish that’s as easy to make as it is to eat. If you’re looking for something that packs a punch in flavor but doesn’t require a culinary degree, you’re in the right place!
Introduction
Picture this: a lively gathering of friends, laughter echoing off the walls, and the tantalizing aroma of something delectable wafting through the air. As your guests arrive, they’re greeted by a spread of vibrant colors and mouthwatering smells, and right at the center of it all is our star—Honey Fig Pistachio Goat Cheese Appetizer. The combination of creamy goat cheese, sweet dried figs, crunchy pistachios, and a drizzle of golden honey creates a charming dish that transforms any occasion into a feast.
What I love about this appetizer is its versatility—it works perfectly for special occasions, casual get-togethers, or even as a cozy night-in treat. And let me tell you, it’s incredibly simple to whip up. Just gather a handful of quality ingredients, and you’re well on your way to impressing your friends and family. Plus, each bite is a delightful explosion of flavors, transporting you to a sunny afternoon picnic or a rustic Italian bistro.
Beyond the flavor, there’s something wonderfully nostalgic about this dish. It reminds me of warm summer evenings spent surrounded by friends, where the simple act of breaking bread is a celebration in itself. So, let’s roll up our sleeves and embrace the joy of cooking together!
Personal Story
Ahh, figs. They’ve always held a special place in my heart. I remember as a kid, visiting my grandmother’s house every summer, she had the lushest fig tree right in the backyard. We would wander out there, basket in hand, and pluck the ripest figs, still warm from the sun. My grandma would turn those figs into a heavenly jam or the most delicious pastries you could ever imagine.
One particular summer, she taught me how to make a simple cheese platter, where we’d spread goat cheese and drizzle it with honey, then top it with those sweet figs and crunchy nuts. It was a moment of pure joy and nostalgia. That experience stayed with me, igniting my passion for cooking and sharing food that brings people together. Now, every time I prepare this Honey Fig Pistachio Goat Cheese Appetizer, it feels like a warm hug and a sweet trip down memory lane. Those treasured moments in the kitchen inspired me to create something that embodies that same feeling of joy and togetherness.
Ingredients
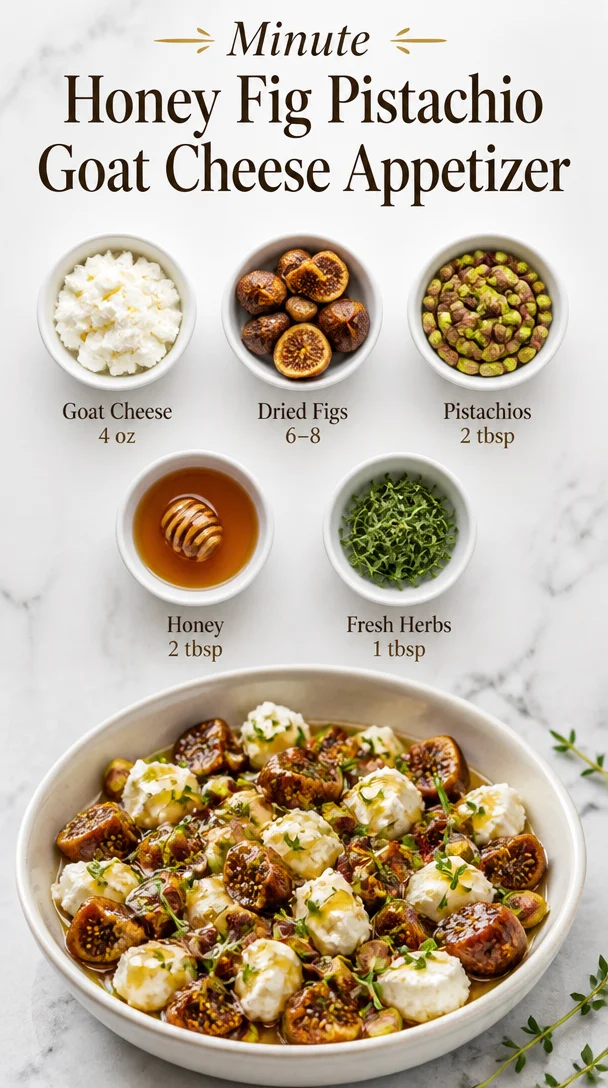
Now let’s talk about the ingredients that make this appetizer a true culinary gem:
-
Goat Cheese
This creamy, tangy cheese is the star of our dish. It’s perfect for spreading and creates a delightful contrast with the sweetness of figs. If you’re vegan or lactose intolerant, you can use a nut-based cheese or even a soft tofu spread seasoned with a bit of salt and lemon juice! -
Dried Figs
Chewy and sweet, dried figs add a rich flavor that complements the goat cheese beautifully. If figs aren’t your jam, you can swap them for dried apricots or dates—they’ll add a tasty touch as well! -
Pistachios
These little green nuts are not only crunchy but also add a burst of flavor! If you’re allergic to nuts or simply don’t have them on hand, sunflower seeds or pumpkin seeds work as an excellent substitute to maintain that crunch. -
Honey
A generous drizzle of honey elevates this dish to a whole new level. Local honey is always best for its unique flavor and health benefits. For those looking to reduce sugar, maple syrup or agave nectar can be used as a substitute. -
Fresh Herbs
Fresh herbs like thyme or rosemary create a refreshing note. Feel free to get creative—basil or mint could offer a unique twist if you’re feeling adventurous!
Step-by-Step Instructions
-
Prepare Your Ingredients
Gather all your ingredients and give yourself a pat on the back for choosing such fabulous items! It’s helpful to let the goat cheese come to room temperature, making it easier to spread. -
Slice the Dried Figs
Take your dried figs and slice them in half or into quarters—this will allow them to blend seamlessly with the goat cheese. Don’t waste those fig stems though; toss them in the compost bin! -
Chop the Pistachios
Use a sharp knife to chop your pistachios. Not too finely, though! You want that nice crunch with every bite. If you’re feeling wild, try toasting the nuts in a dry skillet for about 3-5 minutes to amplify their flavor. -
Prepare the Goat Cheese Base
In a serving dish, spread the goat cheese evenly. A spatula works wonders here—like a magical wand transforming your cheese into a creamy canvas. -
Assemble the Appetizer
Now it’s time to play artist! Layer on those sliced figs directly on top of the goat cheese. Then, sprinkle the chopped pistachios over the figs. Just look at that beautiful color combination! -
Drizzle with Honey
Grab that delicious honey and drizzle generously over your creation. Don’t be shy; this is where the magic happens! A little extra never hurt anyone, right? -
Garnish with Fresh Herbs
Finally, sprinkle your fresh herbs on top for that pop of color and flavor. This will make your appetizer look like a gourmet dish straight out of a fine dining restaurant! -
Chill (Optional)
If you’ll be serving the dish later, pop it in the fridge for about 30 minutes before serving. This helps the flavors meld beautifully.
Serving Suggestions
When it comes to serving this appetizer, presentation counts! Here’s how to make it pop on your table:
- Platter or Charcuterie Board: Serve it on a beautiful wooden board, arranging crackers, fresh bread slices, or veggie sticks around it for a lovely assortment.
- Garnish: Add some additional fresh herbs or edible flowers to add color and elegance!
- Small Plates: If hosting a dinner party, create small plates featuring a few bites of this dish alongside complementary items, like olives or cheese.
Recipe Variations
Why settle for one version when you can explore various flavor combinations? Here are a few fun twists you can try:
-
Spiced Honey: Infuse your honey with cinnamon or chili flakes for an exciting kick.
-
Balsamic Reduction: Drizzle a balsamic reduction over the top for a sweet-tangy contrast.
-
Roasted Figs: Instead of using dried figs, roast fresh figs in the oven with a sprinkle of brown sugar for a caramelized touch.
-
Fruit Pairing: Try adding some slices of fresh pear or apple for an extra layer of flavor and texture.
-
Herb Infusion: Swap out fresh herbs or mix a few into the goat cheese for added interest by combining various flavor profiles.
Chef’s Notes
This recipe has evolved over the years in my kitchen. Initially, my grandma’s version only featured goat cheese and honey, but as I’ve experimented, the addition of figs and pistachios really took it from "good" to "wow!" Every time I make it, I’m reminded of my grandmother teaching me the love of good food and simple joys.
Plus, I always have a little fun while making it. Whether it’s listening to my favorite tunes or trying to get the kids involved, preparing this dish is a joyful experience.
FAQs and Troubleshooting
Q: Can I use fresh figs instead of dried?
A: Yes! Fresh figs would add a lovely juiciness, though you will need to adjust the amount since they contain more moisture.
Q: What if my goat cheese is too crumbly?
A: No worries! If your goat cheese is crumbly, you can mix in a little cream cheese or Greek yogurt to soften it.
Q: How can I store leftovers?
A: Store any leftovers in an airtight container in the fridge for up to three days. Just be aware that the pistachios may lose some crunch over time.
Q: Can I make this ahead of time?
A: Absolutely! You can prepare it a few hours in advance. Just wait to drizzle the honey until right before serving to keep everything fresh.
Nutritional Info
This Honey Fig Pistachio Goat Cheese Appetizer is not only a crowd-pleaser, but it also packs a nutritional punch. Each serving is a source of protein from the goat cheese, coupled with healthy fats from the pistachios, and natural sweetness from the figs and honey. While values may vary based on specific brands or quantities, you can generally expect the following (based on a serving size of 2 tablespoons):
- Calories: ~150
- Protein: 5g
- Carbohydrates: 20g
- Fats: 8g
- Fiber: 2g (thanks to the figs and nuts!)
Keep in mind, while it’s indulgent, portion control is key—if you can, share it with friends!
Final Thoughts
So there you have it, my dear food lovers! The Honey Fig Pistachio Goat Cheese Appetizer is a delightful way to elevate your next gathering or even to enjoy a quiet night at home. With its simple preparation and stunning presentation, you’ll not only impress your guests but create lasting memories with every bite.
This recipe is all about enjoying good food, sharing stories, and creating connections around the table. So why not give it a try? Gather your ingredients, put on your apron, and let the magic happen! Remember, cooking should be fun and fulfilling, just like our favorite meals. Can’t wait to hear how yours turns out—happy cooking!
Print
Honey Fig Pistachio Goat Cheese Appetizer
- Total Time: 15 minutes
- Yield: 4 servings 1x
- Diet: Vegetarian
Description
A delightful appetizer featuring creamy goat cheese topped with sweet dried figs, crunchy pistachios, and a drizzle of honey.
Ingredients
- 8 oz Goat Cheese
- 1 cup Dried Figs, sliced
- 1/2 cup Pistachios, chopped
- 1/4 cup Honey
- Fresh Herbs (e.g., thyme or rosemary)
Instructions
- Prepare your ingredients by gathering everything and letting the goat cheese come to room temperature.
- Slice the dried figs in half or quarters.
- Chop the pistachios, optionally toasting them in a dry skillet for 3-5 minutes.
- Prepare the goat cheese base by spreading it evenly in a serving dish.
- Assemble the appetizer with sliced figs on top of the goat cheese and sprinkled pistachios.
- Drizzle honey generously over the layered ingredients.
- Garnish with fresh herbs for added flavor and color.
- Chill in the fridge for 30 minutes if serving later.
Notes
This recipe can be made ahead of time. Drizzle honey just before serving for best results.
- Prep Time: 15 minutes
- Cook Time: 0 minutes
- Category: Appetizer
- Method: No Cooking
- Cuisine: Mediterranean
Nutrition
- Serving Size: 1 serving
- Calories: 150
- Sugar: 10g
- Sodium: 200mg
- Fat: 8g
- Saturated Fat: 3g
- Unsaturated Fat: 5g
- Trans Fat: 0g
- Carbohydrates: 20g
- Fiber: 2g
- Protein: 5g
- Cholesterol: 15mg
Keywords: appetizer, goat cheese, figs, pistachios, honey, Mediterranean, party food
Pizza Bombs
The Ultimate Guide to Making Irresistible Pizza Bombs
Hey there, food enthusiasts! I’m Beau Collier, and today we’re diving into the cheesy, gooey world of Pizza Bombs. You may know them as those delightful little bites bursting with flavor, but to me, they represent so much more. They epitomize family gatherings, game nights, and the kind of comfort food that makes you smile from ear to ear. I can’t wait to share my favorite recipe with you, complete with nostalgic memories, fun facts, and tips to ensure your pizza bombs turn out perfect every time!
Introduction
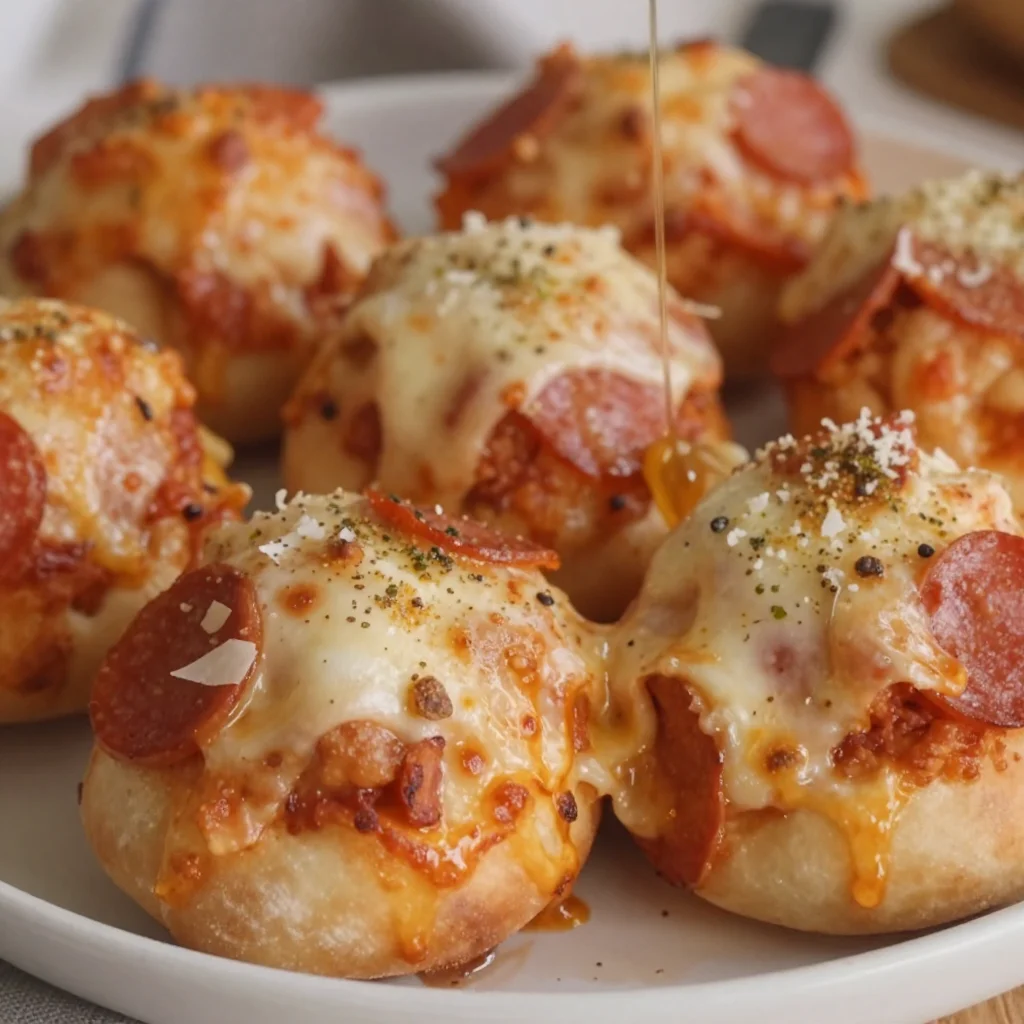
Picture this: It’s a chilly Friday evening. The house has that cozy glow of warm lights flickering in the corners. You’re gathering with friends or family, ready for a night filled with laughter and good times. What are you going to make? If you haven’t guessed it yet, allow me to introduce our star of the evening—Pizza Bombs!
These delectable little guys are like a fusion of pizza and comfort food, conveniently bundled into bite-sized morsels that are as fun to eat as they are to make. If you’ve ever bitten into one and felt that cheesy goodness ooze out, you already know they’re the life of any gathering. They’re easy to whip up, using straightforward ingredients you likely have in your pantry, and they’re highly adaptable, which makes them perfect for any occasion.
Throughout this blog post, I’ll take you step by step through my beloved Pizza Bombs recipe. But more than just a recipe, I’ll share some of my own kitchen tales along the way, sprinkle in pro tips, and highlight variations that will keep your pizza bombs exciting every time you whip them up. Whether you’re a kitchen novice or a seasoned chef, you’ll find something to inspire your culinary journey. Grab that spatula, and let’s get cooking!
Personal Story
I can still remember the first time I made Pizza Bombs. It was during a family get-together at my grandmother’s house, and I was in charge of snacks. Now, cooking in Grandma’s kitchen was a rite of passage; her recipes were on lock! I decided to take a little creative leap and went for these delicious pizza bites I spotted scrolling Instagram.
With her classic Italian tunes playing softly in the background and the aroma of fresh garlic nestled in olive oil floating around, I felt an overwhelming sense of nostalgia. I gathered the ingredients, rolled out the pizza dough, and filled them with gooey mozzarella and spicy pepperoni. Before long, the kitchen was filled with laughter as family members scampered in to steal bites before they even hit the table!
The first batch came out golden brown, perfectly crispy on the outside and oozing with cheesy goodness on the inside. Never before did I feel so accomplished, nor did I witness such joy from my family! Pizza Bombs became our go-to snack, forever associated with laughter and cherished memories around the dinner table. To this day, every time I make them, I’m transported back to that magical evening.
Ingredients
To create your own mouthwatering Pizza Bombs, you’ll need the following ingredients:
-
Pizza Dough: The base of your pizza bomb! You can make your own from scratch (it’s easier than you think) or buy pre-made dough from the store. If you’re looking for a gluten-free option, many retailers offer gluten-free dough!
-
Pepperoni: The classic choice! It adds a nice spice and flavor. If you’re looking for alternatives, try salami, turkey pepperoni, or even veggies for a meatless twist.
-
Mozzarella Cheese: Ooey-gooey goodness! Opt for fresh mozzarella for creaminess or shredded mozzarella for easier handling. Want to mix it up? Try using cheddar or provolone for a different cheesy flavor.
-
Olive Oil: This will be drizzled over the tops before baking for a golden finish. If you’re out, melted butter works magic too, adding a rich flavor.
-
Garlic Powder: Because everything is better with a little garlic! Fresh minced garlic can also work; just adjust to taste.
-
Italian Seasoning: A wonderful herbal blend that ties all the flavors together. You can make your own using dried basil, oregano, and thyme if you prefer to go fresh.
-
Parmesan Cheese: For a finishing touch! It adds a salty, nutty flavor. You can substitute it with any hard cheese like pecorino Romano or skip it altogether for a dairy-free version.
Step-by-Step Instructions
Let’s roll up those sleeves and make some Pizza Bombs!
-
Preheat the Oven: Preheat your oven to 400°F (200°C). This lets your oven get nice and hot, ensuring crispy bomb goodness. Don’t skip this step; the key to a great crust is a fully preheated oven!
-
Prepare Your Work Surface: Lightly flour your work surface to prevent stickiness. If you’re working with pre-made dough, let it sit out for about 10-15 minutes, so it’s easier to stretch.
-
Roll Out the Dough: Grab your dough and roll it out into approximately 1/4-inch thick sheets. Use a pizza cutter or sharp knife to cut it into squares, about 4 inches wide.
-
Add Your Fillings: Place a slice of pepperoni (or any alternative you prefer) and a generous amount of mozzarella cheese in the center of each square. Don’t be shy—this is where the magic happens!
-
Seal the Bombs: Carefully fold the dough over the filling and pinch the edges tightly to seal in all that cheesy goodness. You want these bad boys to stay intact while cooking, so take your time with this step!
-
Brush with Olive Oil: Place the sealed bombs on a baking sheet lined with parchment paper. Give them a little love with a brush of olive oil. This not only adds flavor but helps achieve a beautiful golden finish.
-
Seasoning Time: Sprinkle a bit of garlic powder, Italian seasoning, and grated Parmesan over the tops, if desired, for extra flavor. These little touches can elevate your Pizza Bombs from good to unforgettable!
-
Bake: Pop your baking sheet into the oven and bake for about 15-20 minutes or until the tops are golden brown and your kitchen is filled with that heavenly aroma. You’ll know they’re done when they look irresistibly golden and bubbly.
-
Cool and Serve: Once baked to perfection, take them out and allow them to cool slightly before serving. A little patience goes a long way—trust me, your taste buds will thank you later.
Serving Suggestions
When it’s time to serve your Pizza Bombs, the presentation can elevate the experience to a whole new level. You might want to serve them on a rustic wooden board or a colorful platter for that inviting touch. Pair them with a small bowl of marinara sauce or ranch dressing for dipping—it adds a delightful twist and enhances those comforting flavors.
Consider garnishing with freshly chopped basil or parsley sprinkled on top for a pop of color. The fresh greens can make your Pizza Bombs look enticing and add a little freshness to each bite.
If you’re feeling extra fancy, you can drizzle a touch of balsamic glaze for a sweet contrast that perfectly complements the flavors. Trust me; your friends will swoon over this snack!
Recipe Variations
Why settle for one flavor when you can explore a multitude? Here are a few delightfully creative variations for your Pizza Bombs:
-
Veggie Pizza Bombs: Swap the pepperoni for diced bell peppers, mushrooms, and olives. Don’t forget the cheese—spinach and artichokes also work wonders!
-
BBQ Chicken Bombs: Use shredded cooked chicken, BBQ sauce, and mozzarella cheese for a tangy twist. Pair it with a cilantro garnish to bring freshness to the table.
-
Caprese Bombs: Stuff your dough with fresh mozzarella, sliced tomatoes, and basil for a refreshing summer bite. You could even drizzle balsamic reduction over them for a zesty kick.
-
Breakfast Bombs: Who says Pizza Bombs can’t be for breakfast? Fill them with scrambled eggs, crispy bacon, and cheddar cheese for a morning treat that will start your day off right.
-
Dessert Bombs: Feeling adventurous? Fill the dough with Nutella and mini marshmallows and bake them up for a sweet treat! Serve with a dusting of powdered sugar for the ultimate sweet tooth indulgence.
Chef’s Notes
Now that you’ve got that recipe down, let me share a few fun tidbits about my journey with Pizza Bombs. Over the years, I’ve experimented with countless variations, some successful and others humorously disastrous. I once thought it would be clever to use pastry dough instead of pizza dough. Let’s just say the results were less “pizza perfection” and more “creamy puff mess”!
I’ve learned the importance of sealing them properly—no one wants a cheese eruption while biting into one. And if you want an extra crispy bottom, baking them on a preheated pizza stone works wonders, giving you that authentic pizzeria vibe.
FAQs and Troubleshooting
-
Why did my Pizza Bombs explode?
- This usually occurs when they weren’t sealed properly. Make sure to pinch those seams tight before baking, and don’t overfill them!
-
How can I make my dough rise better?
- If you’re making your dough from scratch, ensure that your yeast is fresh and active. Warm water (not hot) really helps with the activation!
-
Can I freeze Pizza Bombs?
- Absolutely! Freeze them before baking, and when you’re ready to enjoy, pop them straight into the oven from frozen. Just add a few extra minutes to your baking time.
-
My dough is too sticky! What should I do?
- Work on a well-floured surface and add a touch of flour to your hands while handling the dough. Just remember, a little stickiness is a good sign—it means your dough is hydrated!
Nutritional Info
It’s always good to know what you’re indulging in! Here’s a rough estimate of the nutritional info per Pizza Bomb, assuming you make about eight servings:
- Calories: 250
- Protein: 10g
- Fat: 12g
- Carbohydrates: 25g
- Fiber: 1g
- Sugar: 1g
Keep in mind that variations and portion sizes can lead to different nutritional values, but one thing’s for certain: these little bites of comfort are worth every calorie!
Final Thoughts
Whether you’re hosting a casual get-together or simply wish to treat yourself, Pizza Bombs are your go-to solution for delightful, satisfying bites that leave you smiling. They represent not only a dish; they’re an experience filled with warmth and togetherness.
As you embark on this culinary journey at home, I hope that each bite of your Pizza Bombs ignites fond memories and sparks joy in your kitchen—much like they do for me. Don’t forget to share your creations and tag #Feastical so I can see your delicious masterpieces. So grab that spatula, get creative, and let’s keep the flavors coming! Happy cooking, friends!
Print
Irresistible Pizza Bombs
- Total Time: 35 minutes
- Yield: 8 servings
- Diet: Vegetarian
Description
Delicious bite-sized Pizza Bombs filled with cheese and pepperoni, perfect for gatherings and family nights.
Ingredients
- Pizza Dough: Make your own or buy pre-made gluten-free dough.
- Pepperoni: Classic choice or swap for salami, turkey pepperoni, or veggies.
- Mozzarella Cheese: Fresh or shredded for ooey-gooey goodness.
- Olive Oil: Drizzled on top for a golden finish.
- Garlic Powder: Adds a fantastic flavor boost.
- Italian Seasoning: A blend of dried basil, oregano, and thyme.
- Parmesan Cheese: Optional, for a salty finish.
Instructions
- Preheat the oven to 400°F (200°C).
- Prepare your work surface with flour.
- Roll out the dough into 1/4-inch thick squares.
- Add a slice of pepperoni and mozzarella in the center of each square.
- Seal the bombs tightly.
- Brush with olive oil and sprinkle with seasonings.
- Bake for 15-20 minutes until golden brown.
- Cool slightly before serving.
Notes
Feel free to experiment with different fillings for unique flavor profiles.
- Prep Time: 15 minutes
- Cook Time: 20 minutes
- Category: Snack
- Method: Baking
- Cuisine: Italian
Nutrition
- Serving Size: 1 bomb
- Calories: 250
- Sugar: 1g
- Sodium: 600mg
- Fat: 12g
- Saturated Fat: 5g
- Unsaturated Fat: 6g
- Trans Fat: 0g
- Carbohydrates: 25g
- Fiber: 1g
- Protein: 10g
- Cholesterol: 20mg
Keywords: pizza bombs, comfort food, snack, party food, cheesy bites

11-Minute Cheesy Pepperoni Pizza Roll Ups
11-Minute Cheesy Pepperoni Pizza Roll Ups: A Quick and Delicious Delight
Hey there, pizza lovers! If you’re looking for a quick and tasty way to satisfy your pizza cravings, you’ve stumbled upon the right spot! I’m Beau Collier, and today I’m excited to share one of my all-time favorite recipes: 11-Minute Cheesy Pepperoni Pizza Roll Ups. These delightful bites are not only incredibly easy to whip up, but they also pack a punch of cheesy goodness and savory pepperoni flavor. Perfect for a movie night, a snack, or even a fun lunch with the kids—these roll ups are the epitome of comfort food.
I remember the first time I made these little beauties. It was a rainy afternoon, and the kids were bouncing off the walls, desperate for anything that could distract them. I had some pizza dough lurking in the fridge and decided to get creative. Before I knew it, we had pepperoni and cheese roll-ups that transformed our gloomy day into a cheesy, giggly pizza party right in our kitchen! It was a hit, and ever since then, they’ve become a staple in our household. I’m sure you’ll create wonderful memories with them in your own kitchens too!
So, gather your ingredients and roll up your sleeves—let’s dive into this delicious recipe. Trust me; once you make these 11-Minute Cheesy Pepperoni Pizza Roll Ups, you’re going to want to share them (or maybe just keep them all to yourself!).
Personal Story
A couple of years ago, during a family gathering, I decided to put my fun twist on traditional pizza. As I prepared the ingredients, my niece Ella was intrigued and suggested we make “pizza burritos.” Now, in my kitchen, it doesn’t matter how crazy the idea sounds; we’re all about creativity!
We rolled out the pizza dough, layered it with cheese and pepperoni, and folded it like a burrito. They didn’t just taste amazing; they sparked a mini baking competition among the kids, who were all eager to make their own unique creations. Some stuffed theirs with extra cheese; others threw in a handful of bell peppers and olives. Watching them giggle and munch away at their homemade pizza roll-ups warmed my heart.
That day reinforced my belief that cooking is not just about the food; it’s about the stories and connections made along the way. So, come on, let’s add some magic to your kitchen with these Cheesy Pepperoni Pizza Roll Ups!
Ingredients
Here’s what you’ll need to assemble these cheesy delights:
-
Pizza Dough
A pre-made pizza dough saves you time, but if you’re feeling adventurous, you can whip up your own! Alternatively, crescent roll dough or even a tortilla could work for an interesting spin. -
Cheese (Mozzarella or Cheddar)
Mozzarella is a classic choice for its melty goodness, but don’t shy away from sharp cheddar for a flavorful kick! Feel free to explore other cheeses like provolone or pepper jack if you’re in the mood for something different. -
Pepperoni Slices
The quintessential pizza topping! You can substitute pepperoni with turkey or chicken pepperoni for a leaner option, or even try vegetarian alternatives for a meat-free fiesta. -
Pizza Sauce
You can use store-bought pizza sauce for convenience or make your own with crushed tomatoes, a splash of olive oil, and Italian herbs. -
Olive Oil
A drizzle of olive oil before baking gives the roll-ups a crispy, golden finish. For a flavor upgrade, try flavored oils like garlic-infused oil. -
Herbs (Optional)
Adding dried oregano or Italian seasoning can elevate the flavor profile. If you’re feeling fresh, sprinkle in some basil right before serving! -
Veggies (Optional)
Want to make these roll-ups healthier? Toss in some finely chopped veggies! Bell peppers, spinach, or mushrooms work great. Just be sure to chop them small enough to fit inside.
Step-by-Step Instructions
Ready to get cooking? Let’s make these tasty roll-ups step-by-step!
Step 1: Preheat the Oven
Preheat your oven to 425°F (220°C). This will ensure that your roll-ups bake evenly and become perfectly golden brown.
Step 2: Roll Out the Dough
On a lightly floured surface, roll out your pizza dough into a large rectangle, about ¼ inch thick. If you’re using a store-bought dough, follow the package instructions for rolling it out. Make sure there are no cracks in the dough, as this will keep all that cheesy goodness inside!
Step 3: Spread the Sauce
Spread a thin layer of pizza sauce over the rolled-out dough, leaving about an inch at the edges free of sauce. This prevents a mess when rolling it up.
Step 4: Layer the Cheese
Now, sprinkle a generous amount of your chosen cheese over the sauce. Make sure to cover the surface completely for maximum melty goodness! While you’re at it, don’t forget the edges.
Step 5: Add the Pepperoni
Scatter the pepperoni slices evenly over the cheese. If you chose to add any veggies, now’s the time to sprinkle those on, too!
Step 6: Roll It Up
Starting from one edge, carefully roll the dough into a tight log. Pinch the seams to seal it and tuck in the ends. If you notice the dough resisting, gently stretch it as you roll—keep it tight but don’t rip it!
Step 7: Slice the Roll
Using a sharp knife or a pizza cutter, slice the rolled log into about 1-inch pieces. You should have a lovely swirl of cheese and pepperoni peeking out!
Step 8: Bake the Roll Ups
Place your roll-ups on a baking sheet lined with parchment paper. Drizzle a little olive oil on top for that crispy finish and sprinkle some Italian herbs if you’d like. Toss them in the oven for 10–12 minutes until they’re golden brown and bubbly.
Step 9: Cool and Serve
Allow your roll-ups to cool slightly before diving in. Drizzle a bit more pizza sauce for dipping if you like!
Chef’s Tip:
If you want your roll-ups extra crispy, switch to the broiler for the last 1–2 minutes of baking (watch closely to avoid burning).
Serving Suggestions
When it comes to serving these cheesy delights, simplicity is key! Arrange the roll-ups on a large platter and serve with a side of warm pizza sauce for dipping. If you want to add a gourmet touch, garnish the plate with fresh basil leaves or even a sprinkle of crushed red pepper flakes for those who crave a bit of heat. Pair this dish with a simple side salad or some crunchy veggie sticks for a fun, satisfying meal. Enjoy them with friends over a movie or make them the star of your next game night!
Recipe Variations
Feeling adventurous? Here are a few fun twists to take your roll-ups to the next level:
-
Buffalo Chicken Roll Ups: Swap the pepperoni for shredded cooked chicken tossed in buffalo sauce. Add a little blue cheese for a spicy twist!
-
Breakfast Roll Ups: Fill with scrambled eggs, cheese, and cooked bacon or sausage for a breakfast treat!
-
Caprese Roll Ups: Substitute mozzarella cheese with fresh mozzarella, add diced tomatoes, fresh basil, and a drizzle of balsamic glaze before rolling.
-
Vegetarian Roll Ups: Load them with your choice of chopped veggies like mushrooms, spinach, and artichokes for a delightful herbaceous flavor.
-
Dessert Roll Ups: Got a sweet tooth? Spread Nutella and sliced strawberries instead of pizza ingredients for a fabulous dessert twist!
Chef’s Notes
One of the things I love most about cooking is how easy it is to adapt recipes. My Cheesy Pepperoni Pizza Roll Ups started as a “leftover clean-out” idea, but now they’re a hit! Every time I make them, the ingredients might change based on what I have handy, and that’s the beauty of this recipe—it’s flexible!
Oh! And don’t even get me started on the epic post-baking aroma in your kitchen. It’s basically a little slice of heaven, and it will have everyone running to the oven to see what’s cooking!
FAQs and Troubleshooting
1. My dough is too sticky; what should I do?
If your dough is sticky, sprinkle a little flour on the surface where you’re working. If it’s still too tacky, you might need to knead in a bit more flour until it’s manageable.
2. Can I make this pizza ahead of time?
Absolutely! You can assemble the roll-ups, refrigerate or freeze them, and then bake them when you’re ready. Just remember to let them sit at room temperature for about 10 minutes if they’ve been frozen.
3. My roll-ups are not cooking evenly; what gives?
Make sure your oven is properly preheated and check that the roll-ups are evenly spaced on the baking sheet. Crowding can obstruct airflow, leading to uneven cooking.
4. How do I keep them warm until serving?
You can place them in a warm oven (around 200°F) covered with a clean kitchen towel. Just make sure they’re not left too long, or they’ll lose that crispy texture!
Nutritional Info
While it’s tough to put exact numbers on these pizza roll-ups since variations vary by ingredients, here’s a general idea:
- Calories (per roll-up): ~150 calories
- Protein: 6g
- Carbohydrates: 20g
- Fat: 7g
- Fiber: 1g
Feel free to adjust ingredients to match your dietary needs, and remember to enjoy these in moderation as part of a balanced diet.
Final Thoughts
There you have it: the ultimate guide to whipping up 11-Minute Cheesy Pepperoni Pizza Roll Ups! I hope this recipe inspires you to get creative in your kitchen and maybe even share some gorgeous food memories with your loved ones. The beauty of cooking is in the joy it brings, and I believe these roll-ups are sure to become a favorite in your home, just like they are in mine.
So, what are you waiting for? Grab those ingredients and give this recipe a whirl. And don’t forget to share your delicious creations with me on social media! Happy Cooking! 🍕✨
Print
11-Minute Cheesy Pepperoni Pizza Roll Ups
- Total Time: 15 minutes
- Yield: 4 servings
- Diet: Vegetarian
Description
Quick and delicious cheesy pepperoni pizza roll-ups perfect for a snack, movie night, or lunch.
Ingredients
- Pizza Dough
- Cheese (Mozzarella or Cheddar)
- Pepperoni Slices
- Pizza Sauce
- Olive Oil
- Herbs (Optional)
- Veggies (Optional)
Instructions
- Preheat the oven to 425°F (220°C).
- Roll out the pizza dough into a large rectangle, about ¼ inch thick.
- Spread a thin layer of pizza sauce over the rolled-out dough.
- Layer a generous amount of cheese over the sauce.
- Add the pepperoni slices evenly over the cheese.
- Roll the dough into a tight log.
- Slice the rolled log into about 1-inch pieces.
- Bake the roll-ups on a baking sheet for 10–12 minutes.
- Cool slightly before serving with a drizzle of pizza sauce for dipping.
Notes
For extra crispy roll-ups, switch to broiler for the last 1–2 minutes of baking, watching closely.
- Prep Time: 5 minutes
- Cook Time: 10 minutes
- Category: Snack
- Method: Baking
- Cuisine: Italian
Nutrition
- Serving Size: 1 roll-up
- Calories: 150
- Sugar: 1g
- Sodium: 400mg
- Fat: 7g
- Saturated Fat: 3g
- Unsaturated Fat: 4g
- Trans Fat: 0g
- Carbohydrates: 20g
- Fiber: 1g
- Protein: 6g
- Cholesterol: 20mg
Keywords: pizza, roll ups, quick snack, cheesy, pepperoni

Mini Corndogs
Mini Corndogs Recipe: A Nostalgic Treat for All Ages!
Hey there, fellow food lovers! Welcome back to Feastical, your go-to destination for feel-good food and kitchen magic. Today, we’re diving into a recipe that’s bound to bring a smile to your face and a warm tingle to your belly: Mini Corndogs! These little bite-sized gems of deliciousness are perfect for game days, parties, or just a cozy night in. With a crispy cornmeal batter that hugs juicy hot dogs, they’ll have you reliving those carnival vibes right from the comfort of your own kitchen. So grab your apron, put on your favorite tunes, and let’s get cooking!
Personal Story: Carnival Memories and Kitchen Joy
Ah, the sweet nostalgia of summer fairs and vibrant carnivals! I can still remember the first time I indulged in a corndog. I was just a kid, standing in front of a colorful vendor stall, the smell of fried food wafting through the air. The sunlight glittered off a sea of laughter and excitement. I remember clutching that corndog, the hot dog encased in a golden-brown batter, and taking my first big bite. The contrast of the warm, savory hot dog and the crispy, slightly sweet outside was pure magic.
Fast forward a few years, and I found myself in the kitchen, inspired by those memories. It was time to recreate that carnival classic in a mini version! Mini corndogs not only capture the essence of what made the originals so special, but they also add a fun twist that makes them perfect for sharing. Plus, they’re a hit among both kids and adults—really, who can resist a mini corndog? So let’s stroll down memory lane as we whip up these delightful snacks together!
Ingredients: The Building Blocks of Delicious Mini Corndogs
Before we jump into the cooking process, let’s gather our ingredients. Here’s what you’ll need to bring these mini delights to life:
-
1 cup cornmeal: This provides that classic texture! If you’re looking for a gluten-free option, you can substitute with corn flour or a gluten-free all-purpose flour blend.
-
1 cup all-purpose flour: This helps bind everything together. If you’re going gluten-free, follow the tip above!
-
1 tablespoon baking powder: This is our trusty leavening agent that gives the batter some fluffiness. Ensure it’s fresh for the best rise.
-
1 tablespoon sugar: This little addition balances the savory flavor and adds a hint of sweetness to the batter. You could swap this for honey for a natural sweetener.
-
1/2 teaspoon salt: Essential for enhancing all our flavors. Not a fan of table salt? Sea salt works well too!
-
1 cup milk: This moistens the batter. For a dairy-free option, you can use almond milk or soy milk—just make sure to opt for unsweetened.
-
1 large egg: This acts as a binder, adding richness. If you’re looking to keep it vegan, a flaxseed egg (1 tablespoon ground flaxseed + 2.5 tablespoons water, let it sit for a few) works wonders!
-
1 package hot dogs: Feel free to select your favorites—beef, turkey, or even plant-based. There are so many tasty options these days!
-
Wooden skewers: These are perfect for holding up your mini corndogs. Soak them in water for about 30 minutes before using to prevent burning.
-
Oil for frying: Vegetable oil or canola oil works best for frying, but you can use any oil with a high smoke point.
Now that we have our ingredients ready, let’s move on to the fun part—cooking!
Step-by-Step Instructions: Let’s Get Cooking!
-
Prepare Your Station: Before you dive in, let’s get everything prepped. Set up a frying station with a large pot or deep skillet. Pour in enough oil for frying, about 2-3 inches deep, and heat it on medium-high. You want it to reach about 350°F (175°C). Use a thermometer to keep track!
-
Mix Your Dry Ingredients: In a large mixing bowl, combine the cornmeal, all-purpose flour, baking powder, sugar, and salt. Whisk these dry ingredients together until they’re well incorporated. This ensures an even distribution of flavors and leavening.
-
Whisk the Wet Ingredients: In another bowl, beat the egg and then add the milk. Mix well until they’re combined. Now, pour this egg-milk mixture into the bowl with the dry ingredients. Stir until just combined—don’t overmix! We want a few lumps for that fluffy texture.
-
Skewer the Hot Dogs: Take your hot dogs and cut them into halves or thirds, depending on how mini you want them. Skewer each piece with a wooden stick. This step makes them easy to dip into the batter and fry!
-
Coat the Hot Dogs: Dip each skewer of hot dog into the batter. Make sure it’s well-coated but not dripping. That’s the secret to a perfect corndog: a good batter-to-dog ratio!
-
Fry ‘Em Up: Carefully place the skewered hot dogs into the hot oil, frying in batches to avoid overcrowding. Fry for about 3-4 minutes, turning occasionally until they’re golden brown and crispy. Use a slotted spoon to flip them halfway through.
-
Drain and Cool: Transfer your cooked mini corndogs to a plate lined with paper towels. This will help soak up any excess oil, keeping them crispy.
-
Repeat: Keep frying in batches until all your batter and hot dogs are transformed into crispy, golden deliciousness!
Serving Suggestions: Time to Enjoy!
Once your mini corndogs have cooled just enough to touch, it’s time to serve! I love plating them up on a rustic wooden board, surrounded by a variety of dipping sauces. Your guests can choose their favorites, whether it’s classic mustard, tangy ketchup, or even a zesty ranch dressing.
Feel free to add in some crunchy veggies like carrot sticks or cucumber slices on the side for color and freshness! You can also garnish with fresh parsley or cilantro for that pop of color. Trust me, presentation matters!
Recipe Variations: A Twist on Tradition
Now, let’s talk about how you can get creative with these mini corndogs! Here are a few variations that could put a fun spin on the classic recipe:
-
Cheesy Corndogs: Add shredded cheese (cheddar or pepper jack) to the batter for a melty surprise inside!
-
Spicy Twist: Mix in some diced jalapeños or a pinch of cayenne pepper for those who love a kick of heat.
-
Herbed Corndogs: Incorporate fresh herbs like chopped chives or dill into your batter for an aromatic flavor.
-
Sweet Cornbatter: Add a bit of creamed corn into the batter for a pop of sweetness and moisture.
-
Vegan Delight: Using plant-based hot dogs and substituting the egg and milk will give you a delicious vegan version!
Chef’s Notes: More than Just a Recipe
This mini corndog recipe is so close to my heart! It has evolved over the years as I played with flavors and ingredients in the kitchen. One time, I even had a kitchen disaster—let’s just say the batter consistency was off, and I ended up with corndog balls instead of mini corndogs! But hey, embrace those happy accidents; they sometimes lead to the best kitchen stories.
I love making these with my kids—they turn frying into a game, and their laughter makes the whole experience even more enjoyable. So, grab your loved ones, chat, and share stories while cooking; that’s what it’s all about!
FAQs and Troubleshooting
1. Why does my batter seem too thick?
If your batter is too thick, simply add a little more milk, one tablespoon at a time, until you reach the desired consistency. Think pancake batter!
2. What should I do if my corndogs are cooking too fast?
If they’re browning too quickly, it could mean your oil is too hot. Lower the heat slightly and allow them to cook a bit longer to ensure the insides heat through without burning the outside.
3. Can I bake these instead of frying?
Absolutely! Preheat your oven to 400°F (200°C), place the coated hot dogs on a lined baking sheet, and spray them lightly with cooking spray. Bake for about 20 minutes, flipping halfway through, until golden brown. (Though, let’s be real—it won’t have that same crunchy texture as frying!)
4. How can I store leftovers?
Store any leftovers in an airtight container in the fridge for up to 3 days. Reheat in an air fryer or oven for a few minutes to restore some of that crispiness!
Nutritional Info: What’s in a Mini Corndog?
While these mini corndogs are definitely a treat, it’s good to know what you’re indulging in! Each mini corndog (depends on size) approximately contains:
- Calories: 120 kcal
- Protein: 4g
- Carbohydrates: 14g
- Fat: 5g
- Sugars: 1g
With protein-rich hot dogs, these mini corndogs pack a bit of a punch in terms of flavor and satisfaction while keeping the indulgence low-key. Just remember, moderation is key!
Final Thoughts: Let’s Keep Cooking Together!
And there you have it, my friends—deliciously crispy, bite-sized mini corndogs that are sure to be a hit at any gathering or simply as a weekday treat with the family. I hope this recipe inspires you to embrace your kitchen creativity and brings back some nostalgic moments from those carefree days at the fair.
So go ahead, whip these up for your next gathering or just to satisfy your cravings—because, at the end of the day, food is all about joy, connection, and love. Stay tuned for more fun recipes from Feastical, and keep sharing your kitchen adventures with me! Happy cooking, everyone!
Print
Mini Corndogs
- Total Time: 35 minutes
- Yield: 6 servings 1x
- Diet: Non-Vegetarian
Description
Deliciously crispy, bite-sized mini corndogs that are perfect for game days, parties, or cozy nights in.
Ingredients
- 1 cup cornmeal
- 1 cup all-purpose flour
- 1 tablespoon baking powder
- 1 tablespoon sugar
- 1/2 teaspoon salt
- 1 cup milk
- 1 large egg
- 1 package hot dogs
- Wooden skewers
- Oil for frying
Instructions
- Prepare Your Station: Set up a frying station with a large pot or deep skillet. Pour in enough oil for frying, about 2-3 inches deep, and heat it on medium-high to 350°F (175°C).
- Mix Your Dry Ingredients: In a bowl, combine the cornmeal, all-purpose flour, baking powder, sugar, and salt.
- Whisk the Wet Ingredients: In another bowl, beat the egg and mix it with the milk. Combine with the dry ingredients.
- Skewer the Hot Dogs: Cut hot dogs into halves or thirds and skewer each piece with wooden sticks.
- Coat the Hot Dogs: Dip each hot dog skewer into the batter, ensuring it’s well-coated.
- Fry ‘Em Up: Place the skewered hot dogs into the hot oil, frying in batches for about 3-4 minutes until golden brown.
- Drain and Cool: Transfer the cooked mini corndogs to a plate lined with paper towels to soak up excess oil.
- Repeat: Continue frying in batches until all are cooked.
Notes
Serve mini corndogs with a variety of dipping sauces and garnished with fresh veggies for added color and nutrition.
- Prep Time: 15 minutes
- Cook Time: 20 minutes
- Category: Snack
- Method: Frying
- Cuisine: American
Nutrition
- Serving Size: 1 mini corndog
- Calories: 120
- Sugar: 1g
- Sodium: 400mg
- Fat: 5g
- Saturated Fat: 1g
- Unsaturated Fat: 4g
- Trans Fat: 0g
- Carbohydrates: 14g
- Fiber: 1g
- Protein: 4g
- Cholesterol: 25mg
Keywords: mini corndogs, snack, party food, game day, nostalgic recipe