
Pizza Bombs
The Ultimate Guide to Making Irresistible Pizza Bombs
Hey there, food enthusiasts! I’m Beau Collier, and today we’re diving into the cheesy, gooey world of Pizza Bombs. You may know them as those delightful little bites bursting with flavor, but to me, they represent so much more. They epitomize family gatherings, game nights, and the kind of comfort food that makes you smile from ear to ear. I can’t wait to share my favorite recipe with you, complete with nostalgic memories, fun facts, and tips to ensure your pizza bombs turn out perfect every time!
Introduction
Picture this: It’s a chilly Friday evening. The house has that cozy glow of warm lights flickering in the corners. You’re gathering with friends or family, ready for a night filled with laughter and good times. What are you going to make? If you haven’t guessed it yet, allow me to introduce our star of the evening—Pizza Bombs!
These delectable little guys are like a fusion of pizza and comfort food, conveniently bundled into bite-sized morsels that are as fun to eat as they are to make. If you’ve ever bitten into one and felt that cheesy goodness ooze out, you already know they’re the life of any gathering. They’re easy to whip up, using straightforward ingredients you likely have in your pantry, and they’re highly adaptable, which makes them perfect for any occasion.
Throughout this blog post, I’ll take you step by step through my beloved Pizza Bombs recipe. But more than just a recipe, I’ll share some of my own kitchen tales along the way, sprinkle in pro tips, and highlight variations that will keep your pizza bombs exciting every time you whip them up. Whether you’re a kitchen novice or a seasoned chef, you’ll find something to inspire your culinary journey. Grab that spatula, and let’s get cooking!
Personal Story
I can still remember the first time I made Pizza Bombs. It was during a family get-together at my grandmother’s house, and I was in charge of snacks. Now, cooking in Grandma’s kitchen was a rite of passage; her recipes were on lock! I decided to take a little creative leap and went for these delicious pizza bites I spotted scrolling Instagram.
With her classic Italian tunes playing softly in the background and the aroma of fresh garlic nestled in olive oil floating around, I felt an overwhelming sense of nostalgia. I gathered the ingredients, rolled out the pizza dough, and filled them with gooey mozzarella and spicy pepperoni. Before long, the kitchen was filled with laughter as family members scampered in to steal bites before they even hit the table!
The first batch came out golden brown, perfectly crispy on the outside and oozing with cheesy goodness on the inside. Never before did I feel so accomplished, nor did I witness such joy from my family! Pizza Bombs became our go-to snack, forever associated with laughter and cherished memories around the dinner table. To this day, every time I make them, I’m transported back to that magical evening.
Ingredients
To create your own mouthwatering Pizza Bombs, you’ll need the following ingredients:
-
Pizza Dough: The base of your pizza bomb! You can make your own from scratch (it’s easier than you think) or buy pre-made dough from the store. If you’re looking for a gluten-free option, many retailers offer gluten-free dough!
-
Pepperoni: The classic choice! It adds a nice spice and flavor. If you’re looking for alternatives, try salami, turkey pepperoni, or even veggies for a meatless twist.
-
Mozzarella Cheese: Ooey-gooey goodness! Opt for fresh mozzarella for creaminess or shredded mozzarella for easier handling. Want to mix it up? Try using cheddar or provolone for a different cheesy flavor.
-
Olive Oil: This will be drizzled over the tops before baking for a golden finish. If you’re out, melted butter works magic too, adding a rich flavor.
-
Garlic Powder: Because everything is better with a little garlic! Fresh minced garlic can also work; just adjust to taste.
-
Italian Seasoning: A wonderful herbal blend that ties all the flavors together. You can make your own using dried basil, oregano, and thyme if you prefer to go fresh.
-
Parmesan Cheese: For a finishing touch! It adds a salty, nutty flavor. You can substitute it with any hard cheese like pecorino Romano or skip it altogether for a dairy-free version.
Step-by-Step Instructions
Let’s roll up those sleeves and make some Pizza Bombs!
-
Preheat the Oven: Preheat your oven to 400°F (200°C). This lets your oven get nice and hot, ensuring crispy bomb goodness. Don’t skip this step; the key to a great crust is a fully preheated oven!
-
Prepare Your Work Surface: Lightly flour your work surface to prevent stickiness. If you’re working with pre-made dough, let it sit out for about 10-15 minutes, so it’s easier to stretch.
-
Roll Out the Dough: Grab your dough and roll it out into approximately 1/4-inch thick sheets. Use a pizza cutter or sharp knife to cut it into squares, about 4 inches wide.
-
Add Your Fillings: Place a slice of pepperoni (or any alternative you prefer) and a generous amount of mozzarella cheese in the center of each square. Don’t be shy—this is where the magic happens!
-
Seal the Bombs: Carefully fold the dough over the filling and pinch the edges tightly to seal in all that cheesy goodness. You want these bad boys to stay intact while cooking, so take your time with this step!
-
Brush with Olive Oil: Place the sealed bombs on a baking sheet lined with parchment paper. Give them a little love with a brush of olive oil. This not only adds flavor but helps achieve a beautiful golden finish.
-
Seasoning Time: Sprinkle a bit of garlic powder, Italian seasoning, and grated Parmesan over the tops, if desired, for extra flavor. These little touches can elevate your Pizza Bombs from good to unforgettable!
-
Bake: Pop your baking sheet into the oven and bake for about 15-20 minutes or until the tops are golden brown and your kitchen is filled with that heavenly aroma. You’ll know they’re done when they look irresistibly golden and bubbly.
-
Cool and Serve: Once baked to perfection, take them out and allow them to cool slightly before serving. A little patience goes a long way—trust me, your taste buds will thank you later.
Serving Suggestions
When it’s time to serve your Pizza Bombs, the presentation can elevate the experience to a whole new level. You might want to serve them on a rustic wooden board or a colorful platter for that inviting touch. Pair them with a small bowl of marinara sauce or ranch dressing for dipping—it adds a delightful twist and enhances those comforting flavors.
Consider garnishing with freshly chopped basil or parsley sprinkled on top for a pop of color. The fresh greens can make your Pizza Bombs look enticing and add a little freshness to each bite.
If you’re feeling extra fancy, you can drizzle a touch of balsamic glaze for a sweet contrast that perfectly complements the flavors. Trust me; your friends will swoon over this snack!
Recipe Variations
Why settle for one flavor when you can explore a multitude? Here are a few delightfully creative variations for your Pizza Bombs:
-
Veggie Pizza Bombs: Swap the pepperoni for diced bell peppers, mushrooms, and olives. Don’t forget the cheese—spinach and artichokes also work wonders!
-
BBQ Chicken Bombs: Use shredded cooked chicken, BBQ sauce, and mozzarella cheese for a tangy twist. Pair it with a cilantro garnish to bring freshness to the table.
-
Caprese Bombs: Stuff your dough with fresh mozzarella, sliced tomatoes, and basil for a refreshing summer bite. You could even drizzle balsamic reduction over them for a zesty kick.
-
Breakfast Bombs: Who says Pizza Bombs can’t be for breakfast? Fill them with scrambled eggs, crispy bacon, and cheddar cheese for a morning treat that will start your day off right.
-
Dessert Bombs: Feeling adventurous? Fill the dough with Nutella and mini marshmallows and bake them up for a sweet treat! Serve with a dusting of powdered sugar for the ultimate sweet tooth indulgence.
Chef’s Notes
Now that you’ve got that recipe down, let me share a few fun tidbits about my journey with Pizza Bombs. Over the years, I’ve experimented with countless variations, some successful and others humorously disastrous. I once thought it would be clever to use pastry dough instead of pizza dough. Let’s just say the results were less “pizza perfection” and more “creamy puff mess”!
I’ve learned the importance of sealing them properly—no one wants a cheese eruption while biting into one. And if you want an extra crispy bottom, baking them on a preheated pizza stone works wonders, giving you that authentic pizzeria vibe.
FAQs and Troubleshooting
-
Why did my Pizza Bombs explode?
- This usually occurs when they weren’t sealed properly. Make sure to pinch those seams tight before baking, and don’t overfill them!
-
How can I make my dough rise better?
- If you’re making your dough from scratch, ensure that your yeast is fresh and active. Warm water (not hot) really helps with the activation!
-
Can I freeze Pizza Bombs?
- Absolutely! Freeze them before baking, and when you’re ready to enjoy, pop them straight into the oven from frozen. Just add a few extra minutes to your baking time.
-
My dough is too sticky! What should I do?
- Work on a well-floured surface and add a touch of flour to your hands while handling the dough. Just remember, a little stickiness is a good sign—it means your dough is hydrated!
Nutritional Info
It’s always good to know what you’re indulging in! Here’s a rough estimate of the nutritional info per Pizza Bomb, assuming you make about eight servings:
- Calories: 250
- Protein: 10g
- Fat: 12g
- Carbohydrates: 25g
- Fiber: 1g
- Sugar: 1g
Keep in mind that variations and portion sizes can lead to different nutritional values, but one thing’s for certain: these little bites of comfort are worth every calorie!
Final Thoughts
Whether you’re hosting a casual get-together or simply wish to treat yourself, Pizza Bombs are your go-to solution for delightful, satisfying bites that leave you smiling. They represent not only a dish; they’re an experience filled with warmth and togetherness.
As you embark on this culinary journey at home, I hope that each bite of your Pizza Bombs ignites fond memories and sparks joy in your kitchen—much like they do for me. Don’t forget to share your creations and tag #Feastical so I can see your delicious masterpieces. So grab that spatula, get creative, and let’s keep the flavors coming! Happy cooking, friends!
Print
Irresistible Pizza Bombs
- Total Time: 35 minutes
- Yield: 8 servings
- Diet: Vegetarian
Description
Delicious bite-sized Pizza Bombs filled with cheese and pepperoni, perfect for gatherings and family nights.
Ingredients
- Pizza Dough: Make your own or buy pre-made gluten-free dough.
- Pepperoni: Classic choice or swap for salami, turkey pepperoni, or veggies.
- Mozzarella Cheese: Fresh or shredded for ooey-gooey goodness.
- Olive Oil: Drizzled on top for a golden finish.
- Garlic Powder: Adds a fantastic flavor boost.
- Italian Seasoning: A blend of dried basil, oregano, and thyme.
- Parmesan Cheese: Optional, for a salty finish.
Instructions
- Preheat the oven to 400°F (200°C).
- Prepare your work surface with flour.
- Roll out the dough into 1/4-inch thick squares.
- Add a slice of pepperoni and mozzarella in the center of each square.
- Seal the bombs tightly.
- Brush with olive oil and sprinkle with seasonings.
- Bake for 15-20 minutes until golden brown.
- Cool slightly before serving.
Notes
Feel free to experiment with different fillings for unique flavor profiles.
- Prep Time: 15 minutes
- Cook Time: 20 minutes
- Category: Snack
- Method: Baking
- Cuisine: Italian
Nutrition
- Serving Size: 1 bomb
- Calories: 250
- Sugar: 1g
- Sodium: 600mg
- Fat: 12g
- Saturated Fat: 5g
- Unsaturated Fat: 6g
- Trans Fat: 0g
- Carbohydrates: 25g
- Fiber: 1g
- Protein: 10g
- Cholesterol: 20mg
Keywords: pizza bombs, comfort food, snack, party food, cheesy bites
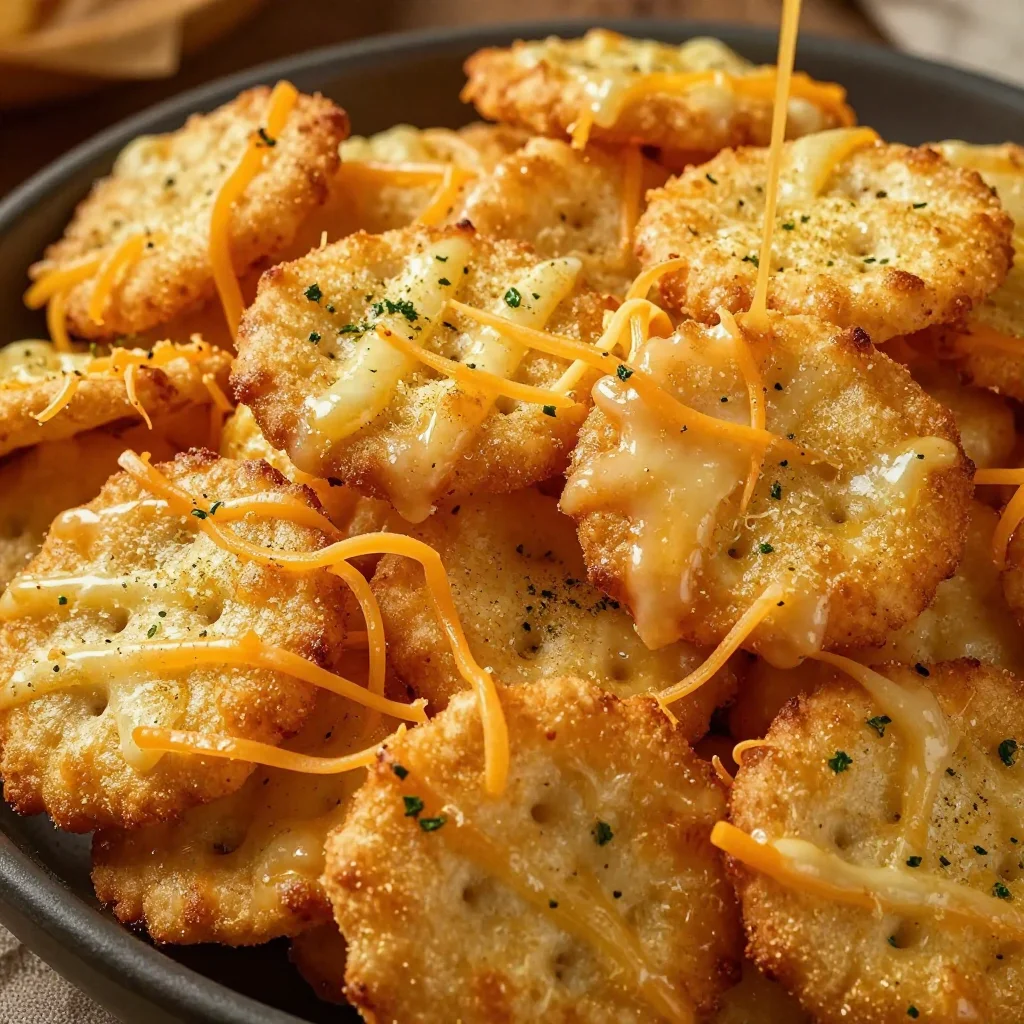
Crispy Garlic Cheese Ritz Bits: 15-Minute Weeknight Snack Hack
Cheesy Garlic Ritz Bits Snacks: A Culinary Hug for Your Taste Buds
Hey food lovers! It’s Beau Collier here, and today, I want to share with you a recipe that’s near and dear to my heart—Cheesy Garlic Ritz Bits Snacks. If you’re anything like me, there’s just something about tiny, crunchy snacks that come together effortlessly and pack a flavor punch. These cheesy, garlicky little bites not only make perfect party pleasers but also are fantastic for those cozy movie nights at home.
You might wonder why Ritz Bits? Let me tell you, they’re like little edible treasures. These bite-sized crackers are light, buttery, and, quite frankly, irresistible. The moment you pop that golden cracker in your mouth, it’s a mini explosion of comfort that brings back fond memories. Then, when you amp them up with cheese and garlic—oh boy—it’s a whole new level of deliciousness.
My First Kitchen Adventure with Ritz Bits
Let’s rewind to my childhood for a sec. I remember weekends at my grandmother’s house, and that meant something special was always cooking. She had these secret snacks—her “kitchen surprises”—that she would whip up like magic. One day, she decided to experiment with those classic Ritz Crackers, and let me tell you, it was a game-changer. As a kid, I was mesmerized watching her melt butter, sprinkle garlic powder, and introduce the cheesy goodness.
We would sit cross-legged on the floor, munching on these tasty bites while watching our favorite cartoons. The shared moments, full of laughter and crumbs, created an eternal bond between food and family for me. This recipe is my ode to those days—combining nostalgia with a touch of culinary creativity. Let’s dive into making these crunchy delights!
Ingredients
Here’s what you’ll need to create these Cheesy Garlic Ritz Bits Snacks:
-
1 box (12.5 oz) Ritz Bits Crackers, Original
- Perfectly bite-sized and buttery, these crackers are the foundation of our snack!
-
1/2 cup (1 stick) Unsalted Butter, melted
- Adds a rich flavor and helps everything stick together. You can swap this out for olive oil or a vegan butter alternative if you want to make it dairy-free.
-
2 tbsp Garlic Powder
- Because who doesn’t love garlic? If you’re feeling adventurous, feel free to use fresh minced garlic—1 clove gives you that vibrant flavor kick.
-
1 tbsp Onion Powder
- This adds depth to your snack. If you have fresh onions on hand, finely diced shallots can be an awesome substitute for a zestier version.
-
1 tsp Dried Parsley Flakes
- A pop of color and mild flavor. If you have fresh parsley lying around, use it! About a tablespoon of chopped fresh parsley will do the trick.
-
1/2 tsp Fine Sea Salt
- Enhances all the flavors. If you’re watching your salt intake, feel free to reduce this amount a tad.
-
1/4 tsp Freshly Ground Black Pepper
- Just a pinch gives a warm, peppery finish. Adjust according to your spice tolerance!
-
1/2 cup Finely Grated Parmesan Cheese
- Adds that irresistible cheesy flavor we all love. For a twist, try using Pecorino Romano for a more robust taste.
-
1/2 cup Finely Shredded Sharp Cheddar Cheese
- The sharpness of this cheese complements the richness perfectly. Feel free to use your favorite cheese or a blend of cheeses—it’s all good!
-
1/4 tsp Smoked Paprika (optional)
- For some added depth and smokiness. If you don’t have it, no worries—it’s fantastic either way.
-
Pinch Cayenne Pepper (optional)
- For those who like a little heat! A pinch adds excitement without overwhelming the flavor.
Step-by-Step Instructions
Alright, let’s get cooking! Here’s how to make your Cheesy Garlic Ritz Bits Snacks step by step:
-
Preheat Your Oven
Preheat your oven to 350°F (175°C). This will ensure that your snacks bake evenly and get to that perfect crispy state. -
Melt the Butter
In a small saucepan, melt the stick of unsalted butter over low heat. It’s not just about melting; stir it gently to prevent it from browning. As it melts, your kitchen will smell heavenly, and you’ll want to gobble it all up! -
Mix in the Spices
Once your butter is melted, take it off the heat. In a large bowl, combine the melted butter, garlic powder, onion powder, dried parsley, sea salt, black pepper, smoked paprika, and cayenne pepper if you’re using it. Just whisk it for about 30 seconds until it’s all combined, creating a luscious, fragrant marinade for our crackers. -
Add the Cheeses
Next, fold in the grated Parmesan and shredded cheddar cheese. The mixture will start to clump together, and that’s exactly what we want! This cheesy goodness is going to coat our Ritz Bits to perfection. -
Coat the Ritz Crackers
Now comes the fun part—gently add the Ritz Bits Crackers to the bowl. With a spatula or your hands, carefully toss the crackers in the buttery, cheesy mixture until every piece is beautifully coated. (And yes, it’s totally okay to sneak a taste; I won’t tell anyone!) -
Spread on a Baking Sheet
Line a baking sheet with parchment paper to prevent sticking. Spread the coated crackers out in a single layer. Make sure they aren’t overlapping too much; we want even baking! -
Bake to Golden Perfection
Pop them in the preheated oven and bake for 10-12 minutes, or until they turn a lovely golden brown. The smell in your kitchen will be absolutely irresistible, and you might find it hard to wait! -
Cool and Serve
Remove from the oven and let them cool on the baking sheet for a few minutes before serving. This helps them crisp up even more!
Now that you’ve made your Cheesy Garlic Ritz Bits Snacks, it’s time to enjoy the fruits of your labor!
Serving Suggestions
When it comes to serving your Cheesy Garlic Ritz Bits, the world is your oyster—or should I say, your cracker! Here’s how I love to plate them:
-
Classic Snack Bowl
Serve them warm in a beautiful bowl or dish. Let your guests dive in, either with their hands or with toothpicks, adding a touch of playful elegance. -
Pair with Dips
These snacks are fabulous on their own, but they shine even brighter alongside dips. Try a tangy ranch dressing or a warm, cheesy dip for that extra wow factor. -
Garnish with Fresh Herbs
Add a sprinkle of fresh parsley or chives on top right before serving for a pop of color and flavor. It adds a touch of gourmet flair that will impress your friends and family!
Recipe Variations
Now, let’s get creative! Here are some fun twists you can try with these Cheesy Garlic Ritz Bits Snacks:
-
Spicy Jalapeño: Mix in some finely chopped jalapeños for a spicy kick. You can also use pepper jack cheese for an extra cheesy heat.
-
Herb-Infused: Experiment with different herbs! Use fresh thyme or rosemary for a fragrant twist.
-
Italian Style: Add some Italian seasoning blend to the mix and swap out Parmesan for mozzarella for a pizza-flavored snack.
-
Sweet and Savory: Drizzle with honey after baking for a unique sweet-and-savory combo. You won’t regret it!
-
Buffalo Flavor: Toss in some buffalo sauce for a tangy, spicy zing, and pair with ranch for dipping.
Chef’s Notes
This recipe has seen a bit of evolution over time. Originally, I stumbled upon it during a potluck, where a friend brought a simple garlic cracker mix. I knew I could jazz it up with cheese and spices, turning it into something special. It’s become a go-to for me; be it a casual game night or a fancy gathering, it never disappoints!
And let me share a quick kitchen story—once, while trying to impress friends, I accidentally overbaked them. Instead of turning sad and mushy, they turned into the crispiest, cheesiest bites ever! Let’s just say, sometimes mistakes lead to delightful surprises, so keep experimenting!
FAQs and Troubleshooting
Here are some common questions I get about making these cheesy snacks:
-
Can I make these ahead of time?
Absolutely! You can prepare and coat the crackers, then store them in an airtight container in the fridge. To serve, just bake before the gathering! -
What do I do if they burn?
Baking speed varies by oven. If you see them browning quickly, turn your oven down to 325°F and check them frequently. Remember, they’ll continue to cook a little after coming out. -
Can I use other crackers?
Of course! Feel free to experiment with other types of crackers—just keep in mind the flavors might change slightly. -
How do I store leftovers?
Keep any leftovers in an airtight container at room temperature for a few days. They won’t last long—we can’t resist them too much, right?
Nutritional Info
For those keeping an eye on nutritional content, here’s a rough estimate per serving (based on 24 servings):
- Calories: 130
- Total Fat: 8g (Saturated Fat: 4g)
- Cholesterol: 20mg
- Sodium: 180mg
- Total Carbohydrates: 10g (Dietary Fiber: 0g, Sugars: 1g)
- Protein: 2g
Feel free to adjust the ingredients based on your dietary needs!
Final Thoughts
There you have it, my fabulous foodie friends—Cheesy Garlic Ritz Bits Snacks that are sure to become a staple in your kitchen. From family gatherings to cozy nights in, these bites bring joy and flavor to any occasion.
Remember, cooking is all about joy, exploration, and comfort—just like these snacks. So grab your ingredients, channel your inner chef, and get ready for your kitchen to smell like a warming hug of garlic and cheese.
Until next time, keep experimenting, keep enjoying, and most importantly—keep sharing good food with the people you love. Cheers to happy cooking!
Print
Cheesy Garlic Ritz Bits Snacks
- Total Time: 22 minutes
- Yield: 24 servings 1x
- Diet: Vegetarian
Description
Delicious, bite-sized cheesy and garlicky Ritz Bits that are perfect for parties or cozy movie nights.
Ingredients
- 1 box (12.5 oz) Ritz Bits Crackers, Original
- 1/2 cup (1 stick) Unsalted Butter, melted
- 2 tbsp Garlic Powder
- 1 tbsp Onion Powder
- 1 tsp Dried Parsley Flakes
- 1/2 tsp Fine Sea Salt
- 1/4 tsp Freshly Ground Black Pepper
- 1/2 cup Finely Grated Parmesan Cheese
- 1/2 cup Finely Shredded Sharp Cheddar Cheese
- 1/4 tsp Smoked Paprika (optional)
- Pinch Cayenne Pepper (optional)
Instructions
- Preheat your oven to 350°F (175°C).
- Melt the stick of unsalted butter over low heat in a small saucepan.
- Mix butter with garlic powder, onion powder, dried parsley, sea salt, black pepper, smoked paprika, and cayenne in a large bowl.
- Add the grated Parmesan and shredded cheddar cheese to the bowl and fold gently.
- Coat the Ritz Bits Crackers in the cheesy mixture with a spatula or your hands.
- Spread the coated crackers on a parchment-lined baking sheet in a single layer.
- Bake for 10-12 minutes, until golden brown.
- Cool on the baking sheet before serving.
Notes
You can substitute the butter with olive oil or vegan butter for a dairy-free version. To add heat, mix in chopped jalapeños or use pepper jack cheese.
- Prep Time: 10 minutes
- Cook Time: 12 minutes
- Category: Snack
- Method: Baking
- Cuisine: American
Nutrition
- Serving Size: 1 serving
- Calories: 130
- Sugar: 1g
- Sodium: 180mg
- Fat: 8g
- Saturated Fat: 4g
- Unsaturated Fat: 4g
- Trans Fat: 0g
- Carbohydrates: 10g
- Fiber: 0g
- Protein: 2g
- Cholesterol: 20mg
Keywords: Ritz snacks, cheesy snacks, garlic bites, party appetizers

Chilli Potato Recipe | Honey Chilli Potato Recipe
Honey Chilli Potato Recipe: A Flavorful Adventure You’ll Love!
Hello, food lovers! I’m Beau Collier, and today we’re diving into the world of comfort food with a delicious twist—let’s talk about Honey Chilli Potatoes! If you’re looking for a snack that’s crispy, sweet, spicy, and downright addictive, then grab your apron and join me as we whip up this delight!
Now, let’s paint a picture. Imagine a chilly evening, the aroma of frying potatoes wafting through the air, and the sizzle of ingredients meeting a hot pan. It’s the perfect moment for sharing stories, laughter, and, of course, food. Honey Chilli Potatoes are not just a dish—they’re an experience. This recipe takes humble potatoes and transforms them into crunchy bites of joy, coated with a sweet, spicy sauce that makes them irresistible.
This dish is perfect for serving guests, enjoying as a snack while binge-watching your favorite show, or even jazzing up a weeknight dinner. It’s simple, requires minimal ingredients, yet bursts with flavor! You’ll impress everyone with your culinary skills, and trust me, they’ll be coming back for seconds (and thirds)!
In this blog post, I’ll be guiding you step-by-step through this delightful recipe, sharing a personal story related to Honey Chilli Potatoes, some chef insights, and plenty of tips to help you create a dish that resonates with warmth and love. So let’s get cooking!
Personal Story
Growing up, my family had a tradition of gathering around the dinner table every Friday night. It was our happy place. I fondly remember the days when my mom would put on her apron, grab the biggest pot she could find, and start experimenting with whatever ingredients were left in the pantry. One rainy Friday evening, I walked into the kitchen, and there they were—Honey Chilli Potatoes sizzling in the pan.
The first bite was magic; the sweet honey contrasted perfectly with the heat from the chillies. My friends would raved about how addictive they were, and I half-joked that they could probably eat them all in one go. Now, every time I make this recipe, I think of those family nights and the playful banter that filled our home. Sharing food has this incredible way of bringing people closer, and I hope to share that sense of togetherness with you through this recipe!
Ingredients
Alright, let’s gather our cast of ingredients. Here’s what you’re going to need to create this mouthwatering Honey Chilli Potato dish:
-
4 medium-sized potatoes (small)
- Perfectly starchy and creamy, potatoes are the star of this dish! You could substitute with sweet potatoes for a slight twist.
-
1/4 cup cornflour
- This helps create that crispy coating! If you’re looking for a gluten-free option, use a gluten-free flour blend or arrowroot powder instead.
-
1/4 cup rice flour
- Adds an extra crunch! You could also use all-purpose flour for a similar effect.
-
1/4 teaspoon pepper powder
- A hint of warmth! Adjust this based on your spice tolerance.
-
Salt (to taste)
- Essential for enhancing all those flavors!
-
1 tablespoon oil
- Use any neutral oil for frying; sesame oil can give it a nice flavor!
-
1 tablespoon garlic (finely chopped)
- This adds a delicious aroma and rich flavor; you can substitute with garlic powder if in a pinch.
-
1 teaspoon ginger (finely chopped)
- A lovely zing! If you prefer, you can skip this or use ginger paste.
-
1 long green chili (sliced thin)
- For that spicy kick! Adjust the quantity based on your heat preference.
-
1/2 cup big onion (sliced thin)
- Adds sweetness and texture; red onions can offer a milder flavor.
-
1/2 cup capsicum (sliced thin)
- Colorful and crunchy! Feel free to use other bell peppers; it’s all about what you have on hand.
-
1 tablespoon spring onions (white part)
- For that extra oniony flavor.
-
1 teaspoon soya sauce
- Adds depth. For gluten-free, look for tamari.
-
2 to 3 tablespoon tomato sauce
- A little punch of sweetness; you can swap it with ketchup or salsa.
-
1 teaspoon chilli sauce / schezwan sauce
- For an extra layer of spice!
-
1/2 teaspoon pepper powder
- More heat, if you like it spicy!
-
1 teaspoon cornflour mixed with 2 tablespoons water
- This acts as your thickening agent for the sauce.
-
1 teaspoon vinegar (optional)
- This adds acidity. If you like a zesty bite, don’t skip this!
-
1 tablespoon spring onions (green part)
- For garnish and a pop of color!
-
Salt (to taste)
- Season throughout for maximum flavor!
-
2 tablespoons honey
- The star of the show! It binds everything and adds that sweet touch.
-
2 tablespoons sesame seeds
- Adds crunch and a nutty flavor; you can opt for toasted sesame seeds for an additional flavor boost.
Step-by-Step Instructions
Now that you have everything ready, let’s get to cooking! Follow these steps, and I promise you’ll end up with a plate of heavenly Honey Chilli Potatoes.
Step 1: Prep the Potatoes
Start by peeling your potatoes and cutting them into even matchstick pieces or wedges, depending on your preference. The key here is to make them uniform so they cook evenly. Soaking them in water for about 30 minutes removes excess starch and helps achieve that perfect crispiness—don’t skip this step!
Step 2: Coat the Potatoes
Once soaked, drain and pat the potatoes dry. In a mixing bowl, combine the cornflour, rice flour, pepper powder, and salt. Toss your potatoes in the flour mixture until they are well-coated. The coating makes all the difference! You can also give the potatoes a light spray of oil for an even crunchier texture.
Step 3: Fry ‘Em Up
Heat oil in a pan over medium heat. Make sure it’s hot enough to fry, but not so hot that it burns the coating. Fry the coated potatoes in batches, making sure not to overcrowd the pan. Fry until golden brown and crispy, about 6-8 minutes. Flip them occasionally for an even fry! Drain on paper towels to get rid of excess oil.
Step 4: The Flavor Bomb!
In another pan, heat a tablespoon of oil. Feel free to use the same oil from frying, just consider adding a dash more if needed. Add the finely chopped garlic and ginger, sautéing until fragrant. Toss in the green chili, onions, and capsicum, cooking until just softened but still vibrant. This is where the magic happens!
Step 5: Stir in the Sauces
Add the soy sauce, tomato sauce, Chilli/Schezwan sauce, and the prepared cornflour-water mixture to the pan. Stir vigorously, ensuring everything is well combined. Let it simmer for a couple of minutes until the sauce thickens. You’re going to want to keep this cooking until you achieve a glossy finish!
Step 6: Toss the Potatoes
Now comes the fun part! Gently toss your crispy potatoes into the pan with the sauce, coating them well. Add honey for sweetness and allow everything to simmer together for a couple of more minutes until the flavors are well melded. If you want that extra zing, drizzle in a bit of vinegar. It helps cut through the sweetness beautifully.
Step 7: Garnish and Serve
Turn off the heat and garnish with spring onions and sesame seeds. You’re all set to serve these gorgeous Honey Chilli Potatoes!
Serving Suggestions
Presentation can give your dish that gourmet touch! Serve the Honey Chilli Potatoes in a large bowl, sprinkled with additional spring onions and sesame seeds for that extra pop of color. You can also serve them on a rustic wooden platter, surrounded by some dipping sauces such as sweet chili sauce or a tangy yogurt dip. Pair with drinks like a chilled beer, zesty lemonade, or sparkling water to complete the experience.
Recipe Variations
There’s always room to get creative! Here are some fun variations to put your stamp on this dish:
-
Spicy Honey Garlic Potatoes: Add a teaspoon of red chili flakes or increase the heat with a touch more Sichuan sauce for a fiery bite.
-
Honey Mustard Potatoes: Mix some Dijon mustard with honey for a tangy twist.
-
Herb-infused Potatoes: Add dried herbs like oregano or cumin to your flour mixture for an aromatic touch.
-
Sweet and Savory: Mix in some diced pineapple for a pop of sweetness and texture.
-
Vegan Option: Simply replace honey with agave syrup or maple syrup for a plant-based alternative.
Chef’s Notes
Cooking is all about experimenting! I started making these Honey Chilli Potatoes from a friend’s recipe, adjusting it over the years based on my family’s preferences and the ingredients I have on hand. Sometimes, I throw in some leftover veggies or toss in a handful of nuts for extra crunch. The recipe has evolved, but the love for this dish remains unchanged. It’s a household favorite for a reason!
FAQs and Troubleshooting
Q: Why aren’t my potatoes crispy?
A: The most common culprit is moisture. Make sure to dry the potatoes thoroughly after soaking. Fry in small batches, and ensure the oil is hot enough!
Q: Can I bake these instead of frying?
A: Absolutely! For a healthier version, coat the potatoes and bake at 425°F (220°C) for about 25-30 minutes, flipping halfway through.
Q: What can I do if the sauce is too thick?
A: If the sauce thickens too much, just add a splash of water or stock to loosen it up.
Q: How do I store leftovers?
A: These are best enjoyed fresh, but you can store leftovers in an airtight container in the fridge for 2-3 days. Reheat in the oven for optimal crispiness!
Nutritional Info
Here’s a quick rundown of the nutritional benefits of Honey Chilli Potatoes (per serving):
- Calories: 250 (approximately)
- Fat: 12g
- Carbohydrates: 34g
- Protein: 3g
- Fiber: 3g
Keep in mind that the nutritional info may vary based on specific brands of ingredients used and portion size.
Final Thoughts
There you have it, folks! A tasty and soul-satisfying recipe for Honey Chilli Potatoes, perfect for any occasion. Remember, cooking is about joy, experimentation, and making memories. I hope you recreate this recipe in your kitchen and perhaps even share it with someone special, just as I’ve done with my family.
So don’t wait—get in that kitchen and create your own delectable dish today! Let me know how it goes, or if you have any questions, just reach out. Until next time, fellow foodies—keep it delicious, keep it fun, and keep it real! 🍽️❤️
Print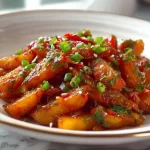
Honey Chilli Potatoes
- Total Time: 50 minutes
- Yield: 4 servings 1x
- Diet: Vegetarian
Description
Crispy Honey Chilli Potatoes coated in a sweet and spicy sauce, perfect for any occasion.
Ingredients
- 4 medium-sized potatoes (small)
- 1/4 cup cornflour
- 1/4 cup rice flour
- 1/4 teaspoon pepper powder
- Salt (to taste)
- 1 tablespoon oil
- 1 tablespoon garlic (finely chopped)
- 1 teaspoon ginger (finely chopped)
- 1 long green chili (sliced thin)
- 1/2 cup big onion (sliced thin)
- 1/2 cup capsicum (sliced thin)
- 1 tablespoon spring onions (white part)
- 1 teaspoon soya sauce
- 2 to 3 tablespoon tomato sauce
- 1 teaspoon chilli sauce / schezwan sauce
- 1/2 teaspoon pepper powder
- 1 teaspoon cornflour mixed with 2 tablespoons water
- 1 teaspoon vinegar (optional)
- 1 tablespoon spring onions (green part)
- Salt (to taste)
- 2 tablespoons honey
- 2 tablespoons sesame seeds
Instructions
- Prep the Potatoes: Peel and cut the potatoes into even matchstick pieces or wedges. Soak in water for 30 minutes.
- Coat the Potatoes: Drain and pat dry. In a bowl, mix cornflour, rice flour, pepper powder, and salt. Toss the potatoes until well-coated.
- Fry ‘Em Up: Heat oil in a pan. Fry the coated potatoes in batches until golden brown and crispy, about 6-8 minutes.
- The Flavor Bomb!: In another pan, heat a tablespoon of oil. Add garlic and ginger, sauté until fragrant. Add green chili, onions, and capsicum, cooking until softened.
- Stir in the Sauces: Add soy sauce, tomato sauce, Chilli/Schezwan sauce and cornflour-water mixture. Simmer until the sauce thickens.
- Toss the Potatoes: Gently toss the crispy potatoes into the sauce and add honey. Simmer together for a few minutes.
- Garnish and Serve: Turn off the heat and garnish with spring onions and sesame seeds.
Notes
Serve with dipping sauces like sweet chili or tangy yogurt dip. Can be made vegan by substituting honey with agave syrup.
- Prep Time: 30 minutes
- Cook Time: 20 minutes
- Category: Appetizer
- Method: Frying
- Cuisine: Indian
Nutrition
- Serving Size: 1 serving
- Calories: 250
- Sugar: 8g
- Sodium: 300mg
- Fat: 12g
- Saturated Fat: 2g
- Unsaturated Fat: 10g
- Trans Fat: 0g
- Carbohydrates: 34g
- Fiber: 3g
- Protein: 3g
- Cholesterol: 0mg
Keywords: Honey Chilli Potatoes, Vegetarian Snack, Appetizer, Indian Cuisine, Comfort Food