
Tuna Lettuce Wraps
Tuna Lettuce Wraps: A Fresh and Flavorful Delight
Introduction:
Hey there, food lovers! It’s your pal Beau Collier from Feastical, and today we’re diving into something that’s not only delicious but also fresh and breezy—Tuna Lettuce Wraps! If you’re anything like me, you love a meal that feels light yet filling, and these wraps are just the ticket.
Imagine sinking your teeth into crisp, refreshing lettuce filled with savory, perfectly seasoned tuna—sounds inviting, right? Whether you need a quick lunch, a fancy appetizer for your next gathering, or a healthy snack, these delightful wraps have got your back. Plus, they’re oh-so-simple to whip up, making them a perfect fit for anyone, from the seasoned chef to those still searching for their spatula. So, grab your butter lettuce or Bibb lettuce, and let’s get cooking!
I remember the first time I stumbled upon the idea of lettuce wraps. I was spending a lazy summer afternoon at my quirky Aunt Louisa’s house. She was the queen of inventive snacks, and that day she had a platter of tuna lettuce wraps, just waiting to spark joy. As I took my first bite, the crunch of the lettuce contrasted beautifully with the creamy tuna filling. It was a match made in heaven!
Since then, I’ve made my own versions of these wonderful wraps, each time adding a personal touch. Trust me, you’ll not only enjoy making them but also sharing them. So, let’s roll up our sleeves and create a dish that’s filled with culinary love, good vibes, and a sprinkle of creativity!
Personal Story:
Ah, memories in the kitchen! One of my fondest moments was when my daughter, little Sophie, decided to help me make these Tuna Lettuce Wraps for her first-ever picnic with friends. She was about seven, armed with a chef’s hat that was three sizes too big and an adventurous spirit that could conquer the world.
We pulled out the ingredients and got to work. I showed her how to open the canned tuna, and she giddily squished the contents into a mixing bowl. Together, we diced the celery and red onion while giggling and sharing stories of adventures from her kindergarten class.
Lettuce wraps became a tradition for our summer picnics, and from that day, Sophie became my little sous-chef. It made my heart swell to see her enthusiasm for cooking and eating healthy. We’d fill those greens with her favorite tuna mixture, decorating each one with bright sprigs of parsley. They became our signature treat!
As time passed and Sophie grew, so did our wrap-making skills. Those cherished moments in the kitchen not only turned out delicious food but also fostered a love for cooking that she carries with her today. It’s funny how something as simple as a tuna salad can become a heartwarming memory, isn’t it?
Ingredients:
Here’s what you’ll need to create your delectable Tuna Lettuce Wraps:
-
Butter Lettuce or Bibb Lettuce: 1 head (or about 8-10 leaves)
- Chef Insight: These leafy greens are sturdy enough to hold your filling, yet soft enough to deliver that refreshing crunch. The leaves are cupped, making them perfect little boats for our delicious tuna mixture!
-
Canned Albacore Tuna: 10 oz (2 5oz cans)
- Substitution Tip: If you’re feeling adventurous, swap from albacore to yellowfin or even canned salmon for a twist on the classic flavor.
-
Mayonnaise: 1/3 cup
- Chef Insight: This adds creaminess to the mixture. For a lighter option, try Greek yogurt or a vegan mayo if you’re keeping it plant-based.
-
Finely Diced Celery: 2 tbsp
- Substitution Tip: This gives a delightful crunch! Feel free to add diced bell peppers or cucumbers for an extra refreshing bite.
-
Finely Diced Red Onion: 2 tbsp (rinsed in cold water)
- Why Rinse?: Rinsing the onions helps tone down their sharpness while keeping that lovely crunch. If raw onion isn’t your jam, try scallions or shallots!
-
Whole Grain Mustard: 1 tsp
- Chef Insight: This adds a nice tangy flavor that rounds out the richness of the tuna. If you prefer a spicier kick, swap it for Dijon mustard.
-
Chopped Fresh Parsley: 1 tsp
- Flavor Boost: This herb acts as a fantastic fresh note. You could also use dill or cilantro depending on your preference.
-
Salt and Pepper: To taste
- Chef Tip: Always season as you go for the best flavor! A sprinkle here and a pinch there can make all the difference.
Step-by-Step Instructions:
Now that we’ve gathered our ingredients, let’s jump into the cooking process! Follow along for some chef hacks that’ll ensure your Tuna Lettuce Wraps turn out perfectly every time.
-
Prep the Lettuce: Start by washing the butter or Bibb lettuce leaves gently under cool running water. Pat them dry with a paper towel or a clean kitchen cloth.
- Chefs Tip: If you’re short on time, wash and dry them ahead of time and store them in an airtight container with a damp paper towel to keep them crisp.
-
Open the Tuna: Grab your cans of albacore tuna and open them. Drain the liquid carefully! Transfer the tuna to a mixing bowl.
- Chef Insight: I like to fluff it with a fork to break up any big chunks. This way, every bite is well-distributed and delicious!
-
Mix it Up: Add the mayonnaise, diced celery, and diced red onion to the tuna. Season with salt and pepper to taste. Drizzle in the whole grain mustard and fold everything gently until well combined.
- Hack Alert: If you want to get a bit creative, add a dash of hot sauce or some chopped pickles for an extra flavor boost!
-
Taste Test: Before proceeding, take a tiny spoonful and taste! Adjust seasoning if necessary.
- Chef Rule: Always remember that delicious food happens in layers of flavor. If it’s not tasting vibrant enough, a little more of this or that can work wonders.
-
Assemble the Wraps: Now comes the fun part! Take your prepared lettuce leaves and spoon a generous amount of the tuna mixture into each leaf. Don’t be shy—fill those cups!
- Serving Tip: If you like it a bit saucy, drizzle a little extra mayo or a squeeze of lemon juice on top.
-
Garnish: Sprinkle a bit of fresh parsley on top for color and added flavor.
- Final Touch: A slice of avocado or some cherry tomato halves on the side can elevate this plate even more!
-
Serve Immediately: Enjoy your tuna lettuce wraps right away while the lettuce is crisp and the flavors lively!
Serving Suggestions:
When it comes to serving these bad boys, presentation is key! Here are some fun ideas to get your Tuna Lettuce Wraps looking as delicious as they taste:
-
Platter Style: Arrange the stuffed lettuce leaves on a beautiful serving platter. You can even add some lemon wedges and herbs for a pop of color.
-
Dipping Sauces: Serve with little bowls of your favorite dipping sauces like soy sauce, sriracha, or a creamy dip to enhance those flavors.
-
Kids’ Picnic: For a fun twist, let the kids add their own toppings—like shredded carrots, sliced cucumbers, or even a dollop of guacamole!
-
Garnished Plate: For a fancy touch, sprinkle some microgreens or edible flowers around the plate to impress your guests.
-
Lunch Boxes: Perfect for meal prep! These wraps pack beautifully into lunch boxes; just keep the tuna filling and lettuce leaves separate until it’s time to eat.
Recipe Variations:
Feeling adventurous? Here are some creative variations to this basic recipe that’ll excite your taste buds!
-
Mediterranean Tuna Wraps: Swap in chopped kalamata olives and feta cheese for a Mediterranean flair. Toss in a few sun-dried tomatoes for extra oomph!
-
Tropical Twist: Add diced pineapple or mango to your mixture. The sweetness will balance beautifully with the savory tuna!
-
Spicy Sriracha Tuna: Mix in some Sriracha for a kick! Perfect for those who crave a bit of heat in their meals.
-
Avocado Tuna Wraps: Mash in some ripe avocado instead of mayonnaise for a creamy, nutrient-rich alternative that adds healthy fats.
-
Vegetarian Version: Replace tuna with chickpeas! Mash them up and season with the same ingredients for a satisfying plant-based option.
Chef’s Notes:
Every recipe tells a story, right? Tuna Lettuce Wraps have evolved over time in my kitchen! Initially, I made them for quick lunches, but over the years, they’ve become staples at parties and gatherings.
I remember one memorable dinner with friends where I doubled the batch, excited to share, only to find out they were devoured before I could even grab one! Let’s say I learned the hard way that these wraps disappear quickly!
I also love experimenting with leftovers—using turkey or chicken instead of tuna works great. It’s all about flexibility and finding joy in cooking!
FAQs and Troubleshooting:
1. My lettuce leaves are tearing when I fill them. What should I do?
- A gentle hand goes a long way! Look for larger, sturdier leaves and make sure they’re dry to avoid tearing. This way, they’ll hold up better against the filling.
2. Why does my tuna salad taste bland?
- Ah, the age-old kitchen conundrum! Don’t forget to taste as you mix. Adding a dash of acid like lemon juice or a splash of hot sauce can brighten the flavor remarkably!
3. Can I prepare these wraps ahead of time?
- Absolutely! Just keep the filling and lettuce separate until you’re ready to serve. Fill them just before eating to maintain that delightful crunch!
4. What if I’m sensitive to onions?
- No problem! Simply skip the onions, or substitute them with diced bell peppers, which provide a nice crunch without the sharpness.
Nutritional Info:
These Tuna Lettuce Wraps not only taste divine but they are also packed with nutrients, making them a guilt-free choice. Here’s a quick breakdown of what you’ll get in one serving (2 wraps):
- Calories: Approximately 230 calories
- Protein: 24 grams (thanks to that mighty tuna!)
- Fat: 14 grams (mostly from healthy sources like mayonnaise or avocado!)
- Carbohydrates: 4 grams (almost negligible, and it’s healthier from the lettuce!)
- Fiber: 1 gram (with all those fresh veggies!)
You’re fueling your body with lean protein, healthy fats, vitamins, and minerals without sacrificing flavor. It’s a win-win!
Final Thoughts:
And there you have it—Proud Tuna Lettuce Wraps that’ll make your taste buds sing! Whether you’re making them for a picnic, a quick dinner, or simply a snack, it’s all about embracing that ease and comfort of good food.
I hope you’ll whip these up and find joy in every bite, just like I do! Cooking doesn’t have to be complicated; it’s about connecting, sharing, and enjoying flavors. So, gather your loved ones around, make some memories, and enjoy these delightful wraps!
Remember, here at Feastical, it’s all about feeling good while eating delicious food. I can’t wait to hear about your adventures in the kitchen. Share your twists on these wraps or tell me your stories—it’s these delicious moments that bring us all together. Happy cooking, friends! 🥗✨
Print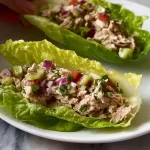
Tuna Lettuce Wraps
- Total Time: 25 minutes
- Yield: 4 servings 1x
- Diet: Low Carb
Description
Fresh and flavorful Tuna Lettuce Wraps perfect for a light meal or a healthy snack.
Ingredients
- 1 head Butter Lettuce or Bibb Lettuce (about 8–10 leaves)
- 10 oz Canned Albacore Tuna (2 5oz cans)
- 1/3 cup Mayonnaise
- 2 tbsp Finely Diced Celery
- 2 tbsp Finely Diced Red Onion (rinsed in cold water)
- 1 tsp Whole Grain Mustard
- 1 tsp Chopped Fresh Parsley
- Salt and Pepper to taste
Instructions
- Prep the Lettuce: Start by washing the butter or Bibb lettuce leaves gently under cool running water. Pat them dry with a paper towel or a clean kitchen cloth.
- Open the Tuna: Grab your cans of albacore tuna and open them. Drain the liquid carefully! Transfer the tuna to a mixing bowl.
- Mix it Up: Add the mayonnaise, diced celery, and diced red onion to the tuna. Season with salt and pepper to taste. Drizzle in the whole grain mustard and fold everything gently until well combined.
- Taste Test: Before proceeding, take a tiny spoonful and taste! Adjust seasoning if necessary.
- Assemble the Wraps: Now comes the fun part! Take your prepared lettuce leaves and spoon a generous amount of the tuna mixture into each leaf.
- Garnish: Sprinkle a bit of fresh parsley on top for color and added flavor.
- Serve Immediately: Enjoy your tuna lettuce wraps right away while the lettuce is crisp and the flavors lively!
Notes
These wraps are perfect for meal prep. Just keep the filling and lettuce leaves separate until you’re ready to eat.
- Prep Time: 15 minutes
- Cook Time: 10 minutes
- Category: Appetizer
- Method: No-Cook
- Cuisine: American
Nutrition
- Serving Size: 2 wraps
- Calories: 230
- Sugar: 1g
- Sodium: 500mg
- Fat: 14g
- Saturated Fat: 2g
- Unsaturated Fat: 10g
- Trans Fat: 0g
- Carbohydrates: 4g
- Fiber: 1g
- Protein: 24g
- Cholesterol: 30mg
Keywords: tuna, lettuce wraps, healthy snacks, meal prep, easy recipes

Healthy Mug Brownie
Indulgence in a Mug: Whipping Up a Healthy Mug Brownie
Hey there, foodies! Welcome to another delicious adventure on Feastical! Today, we’re diving into a decadent yet guilt-free treat that will satisfy your chocolate cravings in the most delightful way—yes, I’m talking about a Healthy Mug Brownie. Life can be hectic, and sometimes all you need is a quick dessert that feels like a warm hug without the post-sugar crash. With just a few simple ingredients, you can whip up this delicious brownie in less than five minutes. Trust me, it’ll give any fancy dessert a run for its money!
I remember the first time I stumbled upon the concept of a mug brownie. I was in my tiny college dorm, late at night, desperately craving something sweet. Like many of you, I was often held captive by my relentless sweet tooth. That night, a quick scroll online brought me to this miraculous invention: a brownie that could be made in a mug and, best of all, in the microwave! I threw together whatever I had in my mini pantry, and voilà! A deliciously gooey mug brownie emerged, fitting perfectly into my busy, budget-friendly lifestyle.
Fast forward to today, and my recipe has evolved, packed with wholesome ingredients that won’t send your blood sugar on a rollercoaster ride. It’s all about balance, right? This Healthy Mug Brownie is not only delicious and satisfying, but it’s also a step up in the healthy department. So whether you’re endless in your pursuit of chocolatey bliss or just craving a little midnight fun, roll up your sleeves and let’s bring this beauty to life!
Personal Story
Let me take you back to that fateful night in the dorm. My roommate and I had just finished a serious study session for finals week—needless to say, we were exhausted. As we were about to throw in the towel, I said, "What if we made something sweet?” The idea of baking an entire batch of brownies felt daunting. Plus, who had the time for that? We needed instant gratification!
That’s when I discovered the mug brownie recipe online, and I was instantly hooked. It was so simple and quick that I barely had time to grab a spoon before it was out of the microwave! The first ooey-gooey bite was magic; it felt like all the stress melted away with the chocolate. We high-fived and savored our culinary creation, gobbling it down before the microwave even beeped a second time. It became a tradition; whenever finals approached, we whipped up a fast mug brownie to ease our minds.
Now, all these years later, I still make this Healthier Mug Brownie. It’s a cozy way to bring back those nostalgic college vibes while keeping things nutrient-packed. Plus, I love how this adaptable recipe fits right into my healthy lifestyle. So gather your ingredients, and let’s revisit that perfect moment together!
Ingredients
Alright, let’s get into the nitty-gritty! Here’s what you need to function your own mug brownie masterpiece.
-
2 tablespoons almond flour
Almond flour gives the brownie a nutty flavor and a lovely texture. It’s lower in carbs and higher in healthy fats compared to regular flour. If you’re nut-free, oat flour works as a great substitute! -
1 tablespoon unsweetened cocoa powder
The star of the show! Cocoa powder adds rich chocolate flavor without the added sugar. Make sure you’re picking the unsweetened variety for the healthiest option. Want something even more indulgent? Go for dark cocoa powder for a deeper flavor. -
1 tablespoon sweetener (like stevia or erythritol)
To keep this brownie low-calorie, sweetener helps keep the gooey goodness without the sugar rush. If you’re not into sugar alternatives, coconut sugar or even honey would work fine; just adjust the quantity! -
1/8 teaspoon baking powder
This little guy helps your brownie rise and become fluffy. Don’t skip it! For a gluten-free alternative, you can also use baking soda, but remember to balance it with an acid like vinegar. -
1 tablespoon unsweetened applesauce
Applesauce gives moisture and sweetness without adding fat. This is a great ingredient for those of us trying to cut back on oils. You can substitute it with a mashed banana for a different flavor twist! -
1 tablespoon almond milk (or any milk of choice)
This helps bind all the ingredients together. I love almond milk for its creamy consistency, but feel free to use oat milk, cow’s milk, or even coconut milk! -
1/4 teaspoon vanilla extract
Just a splash of vanilla enhances the flavor and rounds out the brownie’s taste. It’s amazing how much depth this one little ingredient can add! -
Optional: dark chocolate chips or nuts for topping
Can you ever really have too much chocolate? I think not! Adding dark chocolate chips or crushed nuts not only amp up the flavor but also add texture. Enjoy some crunch with walnuts or pecans, or keep it classic with chocolate chips!
Step-by-Step Instructions
Now, let’s get down to business! Here’s how to whip up this Healthy Mug Brownie in just a few easy steps.
-
Gather Your Tools
First things first, grab a microwave-safe mug (or bowl if you prefer). You’ll also need a spoon for stirring—no fancy gadgets required! -
Mix the Dry Ingredients
In your mug, combine the almond flour, cocoa powder, sweetener, and baking powder. Use the back of your spoon to break up any clumps and mix them together well. This ensures a uniform blend, making sure you don’t have pockets of dry ingredients later on. -
Add the Wet Ingredients
Next, add the unsweetened applesauce, almond milk, and vanilla extract. Mix it all together until you get a smooth batter. Don’t overmix here—just until it comes together nicely! If the batter seems too thick, a little extra almond milk won’t hurt. -
Tweak and Taste
Here’s where you add your optional ingredients. Fold in chocolate chips or nuts if you’re feeling adventurous! A little taste test isn’t a bad idea either—hey, it’s quality control, right? -
Zap It
Time to fire things up! Pop your mug in the microwave and cook for about 30-40 seconds. Depending on your microwave’s power, you might need a bit more time. Keep a close eye—overcooking can lead to a dry brownie, and we don’t want that! -
Cool and Enjoy
Once that microwave timer goes off, let the brownie cool for a minute. It’ll be lava-like in the center, and it’s always best to let it rest before diving in. Top with a sprinkle of sea salt or a dollop of Greek yogurt or nut butter for a delightful finish!
Serving Suggestions
Plating is half the fun! Since this Healthy Mug Brownie is made right in its own serving vessel, you can either keep it cozy in your mug or scoop it out onto a plate. If you choose to plate it, try drizzling some almond butter on top or a sprinkle of chopped nuts for texture and a pop of color. You could even top it with a scoop of a healthy ice cream alternative if you feel like splurging a little.
I also love serving it with fresh berries for a tart contrast against the rich chocolate. A few strawberries or raspberries can add that beautiful splash of color while giving a juicy delight with each bite!
Recipe Variations
Here’s where the fun begins—let’s get creative! Having the flexibility to tailor this mug brownie can make it a key staple in your cooking repertoire. Consider these variations:
-
Peanut Butter Mug Brownie: Add a tablespoon of natural peanut butter directly to the batter for a heavenly nutty twist!
-
Mint Chocolate Brownie: A drop of peppermint extract gives an exciting flavor profile. Think Thin Mints, but healthier!
-
Coconut Bliss: Stir in unsweetened shredded coconut for a tropical touch. It’s a fantastic pairing with chocolate!
-
Gluten-Free: Swap almond flour for oat flour or coconut flour for another gluten-free option. Just remember the absorbency properties of coconut flour can call for a slightly adjusted liquid ratio.
-
Vegan: This recipe is already plant-based, but ensure your sweetener aligns with that if you’re avoiding animal products or consider vegan chocolate chips for those optional toppings.
Chef’s Notes
Over the years, I’ve made my fair share of mug brownies, and let me tell you, each batch seems to tell a story. There was that time I added too much baking powder and ended up with a brownie that ballooned over the mug like a volcano. It tasted fine, but let’s just say cleaning up was a little bit of a challenge!
As I’ve matured as a home chef, I’ve learned to appreciate the beauty of simplicity and balance in dessert recipes. Just a few high-quality ingredients can yield something that feels indulgent while feeding your body right. Also, my kids love it! That simple pleasure of making something together is priceless.
FAQs and Troubleshooting
Here are some common questions and helpful troubleshooting tips straight from the kitchen:
-
Why did my mug brownie come out too dry?
If it’s too dry, you may have overcooked it. Start with 30 seconds, then keep an eye out every 10 seconds after that for the perfect fudgy texture. Remember, it will continue to cook for a moment even after you remove it from the microwave! -
Can I make this in the oven?
Absolutely! Preheat your oven to 350°F (175°C) and pour your batter into a small baking dish or ramekin. Bake for 10-12 minutes or until a toothpick comes out clean but with a few crumbs. That’s the sweet spot! -
How do I store leftovers?
If you happen to have any leftovers, loves to them! Store in the refrigerator in a sealed container for up to 2-3 days. Simply reheat in the microwave for a quick treat! -
What if I don’t have almond flour?
No worries! You can use oat flour, whole wheat flour, or even all-purpose flour if you’re not gluten-sensitive. Adjust measurements as needed to retain the consistency.
Nutritional Info
This Healthy Mug Brownie checks off a few key nutritional boxes. Each serving provides a good source of fiber, healthy fats, and protein while being low in carbohydrates and sugar:
- Calories: Approximately 150
- Protein: 4 grams
- Fat: 6-7 grams (depending on whether you added nuts)
- Carbohydrates: 14 grams
- Fiber: 2 grams
It’s a balanced treat that fits well into a healthy eating plan. Enjoy the satisfaction of indulging without the guilt!
Final Thoughts
And there you have it, my dear culinary companions—a delicious, simple, and guilt-free Healthy Mug Brownie that’s perfect for any occasion (or no occasion at all!). This little gem captures what it means to enjoy food: deliciously, joyfully, and without stress.
Whether it’s a cozy night in, a quick energy boost, or a midnight snack loaded with nostalgia, this brownie can check all those boxes. So the next time life gets busy, or the craving hits, just remember you have the power to treat yourself in such a satisfying way, all in just minutes!
Now, go on, grab that mug and give this recipe a whirl! Happy baking!
Print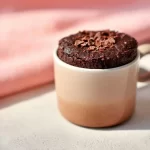
Healthy Mug Brownie
- Total Time: 6 minutes
- Yield: 1 serving 1x
- Diet: Vegetarian
Description
A quick and indulgent Healthy Mug Brownie recipe that satisfies your chocolate cravings in less than five minutes!
Ingredients
- 2 tablespoons almond flour
- 1 tablespoon unsweetened cocoa powder
- 1 tablespoon sweetener (like stevia or erythritol)
- 1/8 teaspoon baking powder
- 1 tablespoon unsweetened applesauce
- 1 tablespoon almond milk (or any milk of choice)
- 1/4 teaspoon vanilla extract
- Optional: dark chocolate chips or nuts for topping
Instructions
- Gather your tools: a microwave-safe mug and a spoon.
- Mix the dry ingredients: combine almond flour, cocoa powder, sweetener, and baking powder in the mug.
- Add the wet ingredients: mix in applesauce, almond milk, and vanilla extract until a smooth batter forms.
- Tweak and taste: fold in optional chocolate chips or nuts if desired.
- Zap the mug in the microwave for about 30-40 seconds; check often to avoid overcooking.
- Cool for a minute, then enjoy with toppings like sea salt, Greek yogurt, or almond butter.
Notes
Feel free to customize with add-ins like peanut butter or peppermint extract for different flavors.
- Prep Time: 5 minutes
- Cook Time: 1 minute
- Category: Dessert
- Method: Microwave
- Cuisine: American
Nutrition
- Serving Size: 1 serving
- Calories: 150
- Sugar: 2g
- Sodium: 100mg
- Fat: 6g
- Saturated Fat: 1g
- Unsaturated Fat: 5g
- Trans Fat: 0g
- Carbohydrates: 14g
- Fiber: 2g
- Protein: 4g
- Cholesterol: 0mg
Keywords: mug brownie, healthy dessert, quick recipe, chocolate