
Minute Crispy Cheesy Roll-Ups for Busy Weeknights
Crispy Cheesy Roll Ups: A Comfort Food Classic with a Twist
Hey there, food lovers! If you’re on a quest for the ultimate comfort food that’s crispy on the outside and ooey-gooey cheesy on the inside, then you’ve struck gold with my Crispy Cheesy Roll Ups. These delightful little bundles of joy not only hit the spot but also bring back sweet memories of childhood snacking and magic in the kitchen. Whether you’re whipping these up for a cozy night in or a gathering with friends, get ready to indulge in a dish that’s loved by both kids and adults alike!
A Cheesy Childhood Memory
Growing up, my kitchen was always a hub of bubbling pots and mouthwatering aromas. One of my fondest memories is of my grandmother, a culinary wizard, showing me how to make her cheesy roll-ups on a rainy Sunday afternoon. The rain tapped softly against the window as we huddled around the kitchen table, a pile of sliced bread, cheese, and a stick of butter in front of us. As my grandmother spread butter on every piece of bread with a dollop of love, I watched in awe as she transformed simple ingredients into something magical.
These roll-ups were our go-to snack, often eaten with a steaming bowl of tomato soup—a classic pairing that warmed our spirits. As we devoured these crispy delights, we shared stories, laughter, and the joy of good food. Fast forward to today, and I’m excited to share this treasured recipe with you all. So, let’s roll up our sleeves and dive in!
Ingredients
Here’s what you’ll need to create these crispy, cheesy morsels:
-
Sliced Bread
- Why: Any type of bread will work, but I love using white or whole grain for that soft, pillowy texture.
- Substitution Tip: If you want a gluten-free option, just grab a gluten-free bread that you love.
-
Cheese (cheddar, mozzarella, or your choice)
- Why: Cheese is the star of this dish! Cheddar brings sharpness while mozzarella adds that irresistible stretch.
- Substitution Tip: Feel free to mix and match your cheeses. Pepper jack for a spicy kick? Yes, please!
-
Butter (for spreading)
- Why: Butter adds a rich flavor and ensures that our roll-ups get that perfect crispness.
- Substitution Tip: You can use vegan butter or olive oil for a lighter option.
-
Tomato soup or marinara sauce (for dipping)
- Why: A warm bowl of tomato soup or zesty marinara brings a lovely acidity that complements the richness of the roll-ups.
- Substitution Tip: You can make a homemade dip by blending canned tomatoes, herbs, and spices or try basil pesto for something different!
Step-by-Step Instructions
-
Preheat Your Oven
- Start by preheating your oven to 400°F (200°C). This is crucial for getting that crispy texture we’re all after!
-
Prepare Your Bread
- Take your slices of bread and lay them flat on a clean countertop. If you’re feeling adventurous, use a rolling pin to flatten each slice slightly. This will allow you to roll up the bread easily, creating more surface area for that cheesy goodness!
-
Spread the Butter
- Generously spread a layer of butter on one side of each slice. Don’t be shy! A good butter coating is what gives you that golden crust when baking.
-
Add the Cheese
- Now, it’s time to layer on the cheese. Place a generous handful of shredded cheese on the unbuttered side of each slice. Remember, the more cheese, the merrier—so go wild!
-
Roll It Up
- Carefully roll each slice of bread starting from one end. Make sure to roll tightly to keep the cheese from spilling out during baking. If you have toothpicks on hand, go ahead and secure each roll with one.
-
Arrange on a Baking Sheet
- Place the roll-ups seam side down on a lightly greased baking sheet. Make sure they aren’t touching too much; we want them to crisp up nicely.
-
Bake
- Slide those cheesy rolls into the oven and bake for about 15-20 minutes or until they turn a lovely golden brown. Halfway through, you might want to flip them for a more even crisp.
-
Serve with Dipping Sauce
- Once they are crispy and delicious, serve them hot alongside your favorite dipping sauce. If you’re indulging in tomato soup, make sure it’s warm and comforting!
Serving Suggestions
When it comes to serving these crispy cheesy roll-ups, let your creativity shine! Arrange the roll-ups on a large platter, letting them cascade like a cheesy waterfall. Drizzle a little olive oil or sprinkle some fresh herbs on top for that burst of color.
You can present them with a cute little bowl of tomato soup or marinara for dipping, making it both functional and visually appealing. Want to jazz it up? Add some fresh basil leaves around the plate for a pop of green! And don’t forget—these roll-ups are delicious served with a side of crunchy veggies like carrot sticks or a fresh salad to balance that cheesiness.
Recipe Variations
Now that you’ve mastered the basics, let’s explore some fun twists you can make with these roll-ups!
- Spicy Kick: Add jalapeños or crushed red pepper flakes to the cheese before rolling for an extra spicy surprise!
- Herb Infusion: Mix fresh herbs like basil, cilantro, or thyme into your cheese filling for added flavor and freshness.
- Sweet and Savory: Swap traditional cheese for cream cheese with a touch of honey or jam, and serve with a fruity dipping sauce for a sweet treat.
- Veggie Delight: Sprinkle in some sautéed spinach, mushrooms, or bell peppers into the cheese before rolling for a delicious veggie-packed version.
- Savory Breakfast Roll-Up: Incorporate scrambled eggs and crispy bacon pieces for an indulgent breakfast twist!
Chef’s Notes
Here’s a little secret from my kitchen. I tend to make a bit more than I need because these roll-ups disappear faster than you can say "crispy." Friends and family absolutely love them, and every gathering turns into a mini feast with these crispy bites around. Plus, they’re super adaptable! Once, I made a mistake and added too much cheese. Instead of crying over spilled milk, I embraced the cheesy overflow and called it my "extra cheesy surprise." It turned out to be a crowd favorite!
FAQs and Troubleshooting
-
Why did my roll-ups not get crispy?
- Make sure you’re using enough butter and spacing them out on the baking sheet. If they’re too close together, they’ll steam instead of crisp!
-
Can I make these ahead of time?
- Absolutely! Assemble them ahead of time and keep them covered in the fridge until you’re ready to bake. Just add a few extra minutes to the baking time if they’re cold.
-
What if I don’t have an oven?
- No problem! You can cook them in a skillet over medium heat. Just keep an eye on them and flip them until they’re golden brown and crispy.
Nutritional Info
While these roll-ups are definitely a treat, if you’re counting calories, here’s a rough breakdown of nutritional information for one roll-up, making them a lovely guilty pleasure:
- Calories: Approximately 120
- Fat: 7g
- Carbohydrates: 10g
- Protein: 4g
The nutritional stats can vary based on the type of bread and cheese you choose, but they’re a hit when you’re looking for comfort and indulgence!
Final Thoughts
In the world of food, it’s all about what warms your heart and tickles your taste buds. My Crispy Cheesy Roll Ups may be simple, but they hold a wealth of memories and giggles—something every meal should have! Whether you savor them during a casual night with friends, celebrate a special occasion, or cozy up with a bowl of soup on a rainy day, each crunchy bite is full of love and nostalgia.
So, grab your ingredients, gather your friends or family, and let’s create something delightful together. The kitchen is more than just a place to cook; it’s where love is stirred, laughter is shared, and delicious memories are formed. Happy cooking, and may your roll-ups be forever crispy!
Print
Crispy Cheesy Roll Ups
- Total Time: 30 minutes
- Yield: 4 servings
- Diet: Vegetarian
Description
Delicious, crispy roll-ups filled with gooey cheese, perfect for a comfort food experience loved by all ages.
Ingredients
- Sliced Bread
- Cheese (cheddar, mozzarella, or your choice)
- Butter (for spreading)
- Tomato soup or marinara sauce (for dipping)
Instructions
- Preheat your oven to 400°F (200°C).
- Prepare your slices of bread and flatten them slightly if desired.
- Spread a generous layer of butter on one side of each slice.
- Add a generous handful of shredded cheese on the unbuttered side.
- Roll each slice tightly and secure with toothpicks if needed.
- Arrange on a greased baking sheet.
- Bake for about 15-20 minutes until golden brown, flipping halfway.
- Serve hot with your choice of dipping sauce.
Notes
You can make these roll-ups ahead of time and keep them in the fridge before baking. Perfect for gatherings!
- Prep Time: 10 minutes
- Cook Time: 20 minutes
- Category: Snack
- Method: Baking
- Cuisine: American
Nutrition
- Serving Size: 1 roll-up
- Calories: 120
- Sugar: 1g
- Sodium: 250mg
- Fat: 7g
- Saturated Fat: 4g
- Unsaturated Fat: 3g
- Trans Fat: 0g
- Carbohydrates: 10g
- Fiber: 1g
- Protein: 4g
- Cholesterol: 20mg
Keywords: crispy, cheesy, roll up, snack, comfort food, easy recipe
Lemon Garlic Chicken Meal Prep
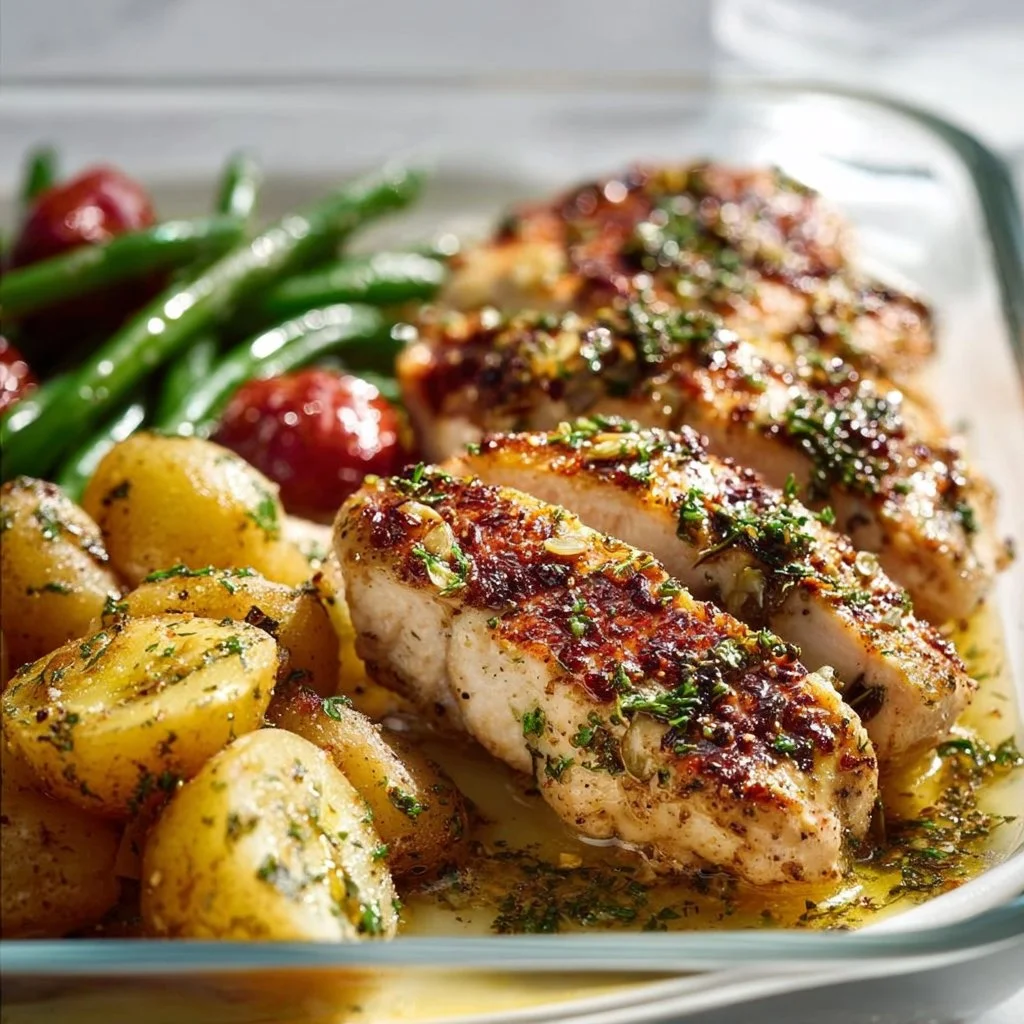
Lemon Garlic Chicken Meal Prep: A Flavorful Journey in Your Kitchen
Hey food lovers, and welcome back to Feastical, where we whip up flavor-packed meals that feed not just your body, but also your soul! Today, I’m thrilled to take you on a culinary adventure with my Lemon Garlic Chicken Meal Prep. This dish is a crowd-pleaser that’s bound to become a staple in your weekly meal rotation, whether you’re fueling up for a busy week ahead or prepping food for your friends and family.
Imagine the bright zesty flavors of lemon mingling with the aromatic warmth of garlic, all perfectly combining with juicy chicken and crisp veggies. This recipe is incredibly simple but bursting with vibrant tastes. Plus, it’s made with ingredients you might already have lying around! You’ll love how easy it is to make, not to mention how delicious it smells while cooking. But this isn’t just about throwing some food together; it’s about creating a nourishing meal that brings the comfort of home straight to your table.
Join me as we dive deep into this recipe that’s not only delicious but also packed with nutrition and love. And let’s be honest, nothing beats feeling good about what you eat. So, grab your apron and let’s embrace our inner chefs together, because it’s time to zest things up with Lemon Garlic Chicken Meal Prep!
Personal Story
This recipe holds a special place in my heart. I remember the first time I made Lemon Garlic Chicken for my family. It was a typical Sunday afternoon, and I was tasked with preparing dinner for a chaotic family gathering. You know how it goes—everyone is bustling about, catching up, and the kitchen becomes a whirlwind of activity. As our old family recipes settled in the air like a comforting hug, I wanted to bring something new to the table.
Feeling a little experimental, I rummaged through my pantry and pulled out some chicken, lemons, and garlic. The moment I squeezed that fresh lemon juice and minced the garlic, the kitchen was filled with a heavenly aroma, and my family’s curious heads started peeking in. I panicked for a minute, questioning if this would be a hit or a miss. But once I plated that vibrant meal and served it up, the smiles said it all.
They went for seconds, and the compliments came pouring in! That was a pivotal moment in my cooking journey—a reminder that food truly creates connections and memories. It transformed into a go-to meal prep option, because not only is it delicious, but it also sets the stage for tender family moments shared over a good meal. Now, I want to share this story and this dish with you so you can savor the same warmth and delight!
Ingredients
Here’s what you’ll need for this zesty and savory Lemon Garlic Chicken Meal Prep:
For the Chicken Marinade:
-
¼ cup fresh lemon juice: The star of the show! Fresh lemon juice brightens the dish and adds acidity. If you’re in a pinch, bottled lemon juice can work, but nothing beats that fresh flavor.
-
2 tablespoons olive oil: This helps keep the chicken moist and adds richness. Feel free to swap it with avocado oil if you prefer a higher smoke point.
-
2 cloves garlic, minced: Garlic adds depth and aroma. Not a fan? You can use garlic powder in its place, but fresh garlic is always best!
-
2 teaspoons dried oregano: A Mediterranean herb that complements the chicken perfectly. You can substitute it with thyme or Italian seasoning for a similar effect.
-
½ teaspoon paprika: This adds a subtle smokiness. If you like a kick, try smoked paprika!
-
½ teaspoon salt: Enhances all the flavors. You can adjust this to your taste or use sea salt for a cleaner taste.
-
½ teaspoon black pepper: For a little heat. White pepper can also be used for a milder flavor.
-
24 ounces boneless, skinless chicken breasts: Chicken breasts are lean and perfect for meal prep. Thighs are an excellent swap if you prefer a richer taste.
For the Vegetables:
-
1.5 pounds yellow potatoes, cut into 1-inch pieces: These yummy spuds soak up all the flavors. You can switch them out with sweet potatoes if you’re feeling adventurous!
-
1 tablespoon olive oil: Drizzled on the potatoes to enhance their natural flavor and crunch.
-
1 teaspoon garlic powder: A great addition to pack in even more garlicky goodness! Again, fresh garlic works, but the powder helps with even cooking.
-
1 teaspoon salt (plus more to taste): Balances the flavors of the potatoes. Adjust as needed!
-
1 teaspoon black pepper (plus more to taste): Feel free to amp up the pepper if you love that extra kick.
-
4 small zucchinis, sliced into 1-inch pieces: These delicate beauties add color and nutrition. You can swap them for bell peppers or asparagus, depending on your season!
Step-by-Step Instructions
Let’s get cooking! Follow these easy steps, and take a scoop of joy with every bite:
1. Prepare the Marinade:
In a bowl, whisk together the fresh lemon juice, olive oil, minced garlic, oregano, paprika, salt, and black pepper. The aroma will hit you—that’s the goodness we’re after!
2. Marinate the Chicken:
Place the chicken breasts in a resealable bag or shallow dish. Pour the marinade over the chicken, ensuring it’s well-coated. Don’t be shy; give it a little massage! Seal the bag or cover the dish and let it marinate in the fridge for at least 30 minutes, or up to 4 hours for maximum flavor. (I usually start prepping my veggies while I let it marinate.)
3. Preheat Your Oven:
While your chicken is soaking up all that love, preheat your oven to 400°F (200°C). This will give us that perfect roast!
4. Prepare the Veggies:
In a large bowl, toss the yellow potatoes with olive oil, garlic powder, salt, and black pepper. Spread them in an even layer on a large baking sheet. Chef hack: Line the baking sheet with parchment paper for easy cleanup!
5. Roast the Potatoes:
Pop the baking sheet into the oven and roast the potatoes for 15 minutes, giving them time to get crispy and golden.
6. Add the Chicken:
After 15 minutes, take the potatoes out and make some space on the baking sheet. Add the marinated chicken breasts to the sheet. There’s no need to overcrowd; if you need more space, use a second sheet!
7. Roast Again:
Return the baking sheet to the oven and roast everything for an additional 20-25 minutes. The internal temperature of the chicken should reach 165°F (75°C). Use a meat thermometer if you have one; it’s a handy tool!
8. Toss in the Zucchini:
About 10 minutes before the chicken is done, toss the zucchini pieces onto the baking sheet. They’ll cook quickly and soak up all the tasty juices from the chicken.
9. Rest and Serve:
Once everything is beautifully roasted, take it out of the oven and let it rest for about 5 minutes before serving. This allows the juices to settle back into the chicken, making every bite more succulent!
10. Meal Prep:
To store for meal prep, divide the chicken, potatoes, and zucchini into airtight containers. You can pop these into the fridge for up to 4 days, or they can be frozen for up to 3 months. Simply reheat when you’re ready to feast!
Serving Suggestions
When it comes to serving, presentation is key! For a beautiful plate, arrange a chicken breast in the center and surround it with a colorful bed of potatoes and zucchini. Drizzle a little extra lemon juice on top for that extra zing.
For an added boost, sprinkle fresh parsley or basil over the top. Serve it with a side of greens—like a spinny salad or sautéed spinach— for a beautiful finish. Your friends and family will appreciate the effort, and it’ll look like you spent hours in the kitchen!
Recipe Variations
One of the best things about this Lemon Garlic Chicken Meal Prep is its versatility. Here are a few creative twists you can try:
-
Herb Variations: Swap out the oregano for rosemary or thyme to give it a completely different flavor profile. Each herb brings its own unique taste!
-
Citrus Twist: For a touch of sweetness, add orange juice to the marinade instead of lemon or blend juices for a delightful citrus medley.
-
Spicy Kick: Want some heat? Add a pinch of red pepper flakes or a drizzle of sriracha to the marinade for a spicy twist.
-
Grains Galore: Serve it over quinoa or brown rice for a heartier meal. The grains will soak up all that yummy lemon-garlic goodness!
-
Keto Friendly: For a low-carb meal prep, skip the potatoes and use broccoli or cauliflower instead. They roast beautifully and pair perfectly with chicken.
Chef’s Notes
I initially stumbled upon this recipe when I was trying to impress my friends during Friendsgiving. They were all raving about how juicy the chicken was, and I just couldn’t stop smiling! Over the years, I’ve refined it to make it simpler while still keeping all those amazing flavors.
One of my favorite kitchen blunders happened the first time I made it—I accidentally used lime juice instead of lemon. While it was a totally different dish, it came out delicious! So don’t hesitate to play around and experiment a little; food is all about creativity!
FAQs and Troubleshooting
-
Can I use chicken thighs instead of breasts?
Absolutely! Chicken thighs are juicier and have more flavor. Just ensure to adjust the cooking time, as thighs may take a little longer to cook. -
What if my chicken isn’t fully cooked?
No worries! If you run into this situation, simply pop it back into the oven for another 5-10 minutes, checking the internal temperature frequently. -
My potatoes are not crispy. What can I do?
If they’re not crispy enough, try giving them a bit more space on the baking sheet. Overcrowding can cause them to steam rather than roast. -
Can I meal prep this if my meal plans change?
Totally! This dish holds up beautifully in the fridge or can be frozen. Just remember to reheat thoroughly!
Nutritional Info
This Lemon Garlic Chicken Meal Prep is not just delicious; it’s nutritious, too! Here’s a quick breakdown per serving (based on 4 servings):
- Calories: Approximately 400
- Protein: 30g
- Fat: 15g
- Carbohydrates: 35g
- Fiber: 5g
- Sugar: 2g
Rich in protein and fiber while packing in vitamins from the veggies, this dish keeps you satisfied without weighing you down. The lemon juice and garlic give a healthy kick of antioxidants, making it a well-rounded meal option!
Final Thoughts
And there you have it—a cheerful, vibrant journey through my Lemon Garlic Chicken Meal Prep! It’s an express ticket to flavor town that guarantees warm, fulfilling meals throughout your busy week.
Don’t forget, cooking should be fun and just a bit messy sometimes! So go ahead and give this recipe a try. Whether you’re cooking for yourself, family, or friends, remember that every meal is an opportunity to create new memories that last a lifetime!
If you make this recipe, I’d love to hear about it! Tag me in your photos, share your kitchen stories, and let’s build a vibrant food community together. Happy cooking, and remember, food is best enjoyed together! Now go out there and feast on life! 🍽️
Print
Lemon Garlic Chicken Meal Prep
- Total Time: 70 minutes
- Yield: 4 servings 1x
- Diet: Paleo
Description
A zesty and savory meal prep dish featuring marinated chicken breasts and roasted vegetables, perfect for a busy week.
Ingredients
- ¼ cup fresh lemon juice
- 2 tablespoons olive oil (plus 1 tablespoon for potatoes)
- 2 cloves garlic, minced
- 2 teaspoons dried oregano
- ½ teaspoon paprika
- ½ teaspoon salt
- ½ teaspoon black pepper
- 24 ounces boneless, skinless chicken breasts
- 1.5 pounds yellow potatoes, cut into 1-inch pieces
- 1 teaspoon garlic powder
- 1 teaspoon salt (plus more to taste)
- 1 teaspoon black pepper (plus more to taste)
- 4 small zucchinis, sliced into 1-inch pieces
Instructions
- Prepare the Marinade: In a bowl, whisk together the fresh lemon juice, olive oil, minced garlic, oregano, paprika, salt, and black pepper.
- Marinate the Chicken: Place the chicken breasts in a resealable bag or shallow dish. Pour the marinade over the chicken and let it marinate in the fridge for at least 30 minutes, or up to 4 hours.
- Preheat Your Oven: Preheat the oven to 400°F (200°C).
- Prepare the Veggies: In a bowl, toss the yellow potatoes with olive oil, garlic powder, salt, and black pepper. Spread them on a baking sheet.
- Roast the Potatoes: Bake in the oven for 15 minutes.
- Add the Chicken: Add the marinated chicken breasts to the baking sheet with the potatoes.
- Roast Again: Return to the oven for an additional 20-25 minutes, until the chicken reaches an internal temperature of 165°F (75°C).
- Toss in the Zucchini: About 10 minutes before the chicken is done, add the zucchini to the baking sheet.
- Rest and Serve: Let the dish rest for 5 minutes before serving.
- Meal Prep: Divide into airtight containers for storage. They can be kept in the fridge for up to 4 days or frozen for up to 3 months.
Notes
Feel free to experiment with herbs and vegetables in this meal prep recipe, and adjust seasoning to taste.
- Prep Time: 30 minutes
- Cook Time: 40 minutes
- Category: Main Course
- Method: Roasting
- Cuisine: Mediterranean
Nutrition
- Serving Size: 1 serving
- Calories: 400
- Sugar: 2g
- Sodium: 500mg
- Fat: 15g
- Saturated Fat: 2g
- Unsaturated Fat: 10g
- Trans Fat: 0g
- Carbohydrates: 35g
- Fiber: 5g
- Protein: 30g
- Cholesterol: 65mg
Keywords: chicken meal prep, lemon garlic chicken, healthy meal prep