
Cheesy Potato Burritos
Cheesy Potato Burritos: A Warm Hug in Every Bite
Hey there, food lovers! It’s Beau Collier here, and today I want to share a scrumptious recipe that’s close to my heart and will undoubtedly warm your soul—Cheesy Potato Burritos. Picture this: a blend of crispy tater tots, perfectly seasoned beef, and gooey melted cheddar cheese, all wrapped up in a warm, grilled tortilla. It’s a delightful medley of flavors and textures that screams comfort food, and I can’t wait for you to give it a try!
Life gets busy, and it’s easy to forget the simple joys of cooking. That’s why I started Feastical—to share recipes that are not just food but stories that you can recreate in your kitchen! These burritos are perfect for busy weeknights when you want something hearty without spending hours in the kitchen. So, whether you’re feeding a family or just treating yourself, let’s dive into this cheesy goodness together!
A Personal Story Behind the Dish
Let me take you back to a chilly autumn evening in my childhood home. My parents would often host cozy family dinners that were more than simply about food; they were about gathering around the table, laughter, and stories shared. One particular night, we decided to make a twist on traditional burritos.
Using leftover tater tots from our Sunday brunch, we layered them with seasoned ground beef and a generous sprinkle of cheddar cheese, all wrapped snugly in a tortilla. The moment our burritos hit the table, they became a hit! With each bite, we were having a blast of flavor, while the crispy tots added a unique twist. The cozy atmosphere and flavors made that sweet memory stick in my mind, and it inspired me to create this recipe for you all!
Ingredients
Let’s gather the stars of our show! Here’s what you need to whip up these delightful Cheesy Potato Burritos:
-
Crispy Tater Tots
These are the secret superstar of the burrito. You can use frozen tater tots or make your own from scratch! If you want a healthier twist, try swapping them with sweet potato tots for a bit of sweetness. -
Seasoned Beef
Ground beef is a classic choice for filling, but you can easily substitute it with turkey, chicken, or even black beans for a vegetarian version. Season it well with salt, pepper, and your favorite spices—think garlic powder and paprika for an extra kick! -
Melted Cheddar Cheese
The gooier, the better! Cheddar provides a rich flavor, but feel free to explore other cheese options like Monterey Jack or Pepper Jack for a spicy twist. You can also mix in some cream cheese for an ultra-creamy filling. -
Grilled Tortillas
Flour tortillas are my go-to for burritos because they roll up beautifully and hold everything in. However, whole wheat or corn tortillas can be excellent alternatives if you’re looking for something different.
Step-by-Step Instructions
Now that we’ve got our ingredients ready, let’s get cooking!
-
Prepare the Tater Tots
Start by baking your tater tots according to the package instructions or if you’re feeling adventurous, fry them in hot oil until golden brown. Pro tip: cooking them until they’re extra crispy will give your burrito that delightful crunch! -
Cook the Beef
In a large skillet over medium heat, add your seasoned beef. Use a wooden spoon to break it up and cook until it’s no longer pink—about 5-7 minutes. Don’t forget to season it liberally with salt, pepper, and any spices you fancy. Once cooked, drain excess fat and set it aside. -
Combine the Goodness
In a large bowl, combine the crispy tater tots and seasoned beef. Sprinkle in a generous handful of cheddar cheese while the mixture is still warm—this helps melt it just enough! -
Create the Burrito Filling
Lay your tortillas flat on a clean surface. Add a generous scoop of your cheesy beef and tater tot mixture into the center of each tortilla. Pro tip: don’t overfill! Aim for about ¾ of the way full to ensure a smooth folding process. -
Wrap It Up!
Fold the sides of the tortilla over the filling, then roll it up tightly from the bottom. Make sure it’s snug enough; you don’t want your deliciousness spilling out! Repeat with all your tortillas. -
Grill the Burritos
Heat a skillet over medium heat and add a little cooking oil or butter. Place the burritos seam-side down on the skillet. Grill for about 2-3 minutes on each side, or until golden brown and crispy. This step is key to getting that delightful crunch!
Serving Suggestions
Now, onto plating! When it comes to serving your Cheesy Potato Burritos, there’s a world of possibilities. My favorite way is to slice the burrito in half diagonally, which gives that beautiful cross-section of the crunchy filling peeking out at the world.
You can also serve them on a colorful plate garnished with fresh cilantro, lime wedges, and a small bowl of salsa on the side. The zesty salsa provides a refreshing contrast to the richness of the cheesy filling. If you’re feeling fancy, a dollop of sour cream or guacamole is always welcome!
Recipe Variations
Here are a few creative twists to take your burrito to the next level:
-
Buffalo Chicken Burritos: Substitute the seasoned beef with shredded buffalo chicken and toss in some blue cheese crumbles for an ultimate flavor explosion!
-
Breakfast Burrito: Swap the beef for breakfast sausage and add some scrambled eggs and a hint of salsa. Perfect for a morning treat!
-
Spicy Veggie Burritos: Replace the beef with sautéed bell peppers, onions, and black beans, and sprinkle in some jalapeños for a spicy kick.
-
Cheesy Taco Burritos: Mix taco seasoning into the beef and then pile on all your favorite toppings like lettuce, tomatoes, and avocado for a taco-inspired twist.
Chef’s Notes
As I’ve developed this recipe over the years, it’s become a family favorite! I can’t tell you how many times I’ve whipped these up for game nights, movie marathons, or those “I’m-too-tired-to-cook” evenings. It’s the perfect dish for any occasion.
Oh, and here’s a little kitchen confession—one time I accidentally added too much chili powder. Let’s just say the burritos had a kick that nobody forgot anytime soon! But hey, cooking is all about experimenting, right?
FAQs and Troubleshooting
1. What if my burritos fall apart?
Make sure you’re not overfilling them! A little less filling ensures they roll up snugly and securely. Also, sealing the edges with a bit of melted cheese can help hold everything together.
2. Can I make these ahead of time?
Absolutely! You can assemble your burritos, wrap them tightly in foil, and store them in the fridge. Just grill them when you’re ready to eat.
3. How do I store leftovers?
Place any uneaten burritos in an airtight container in the fridge for up to 3 days. You can reheat them in the oven or a skillet to keep that crispy texture intact.
4. What if my tater tots aren’t crispy?
If your tater tots aren’t crispy enough, give them a little extra time in the oven—they should be golden brown. Crispiness adds a lovely look and crucial texture to the burrito!
Nutritional Info
While exact nutritional values may vary, here’s a general idea of what you’ll find in a Cheesy Potato Burrito:
- Calories: Approx. 400-500 per burrito (depending on filling and toppings)
- Protein: 20-25 grams (thanks to the beef and cheese)
- Carbohydrates: 40-50 grams (mostly from the tater tots and tortillas)
- Fat: 20-30 grams (from the cheese and beef)
Feel free to adjust ingredients to suit your dietary needs!
Final Thoughts
There you have it, lovely people—a complete guide to making Cheesy Potato Burritos that will steal the show at your next meal! The beauty of this dish is its versatility, and it’s bound to become a favorite in your recipe collection.
Remember, cooking should never feel tedious. It’s about sharing moments with loved ones, embracing creativity, and enjoying the delicious meals we make. So, grab a fork—or maybe just your hands—and enjoy these burritos wrapped in love! Until next time, keep cooking with passion and joy!
Print
Cheesy Potato Burritos
- Total Time: 35 minutes
- Yield: 4 servings 1x
- Diet: Vegetarian (if using beans)
Description
A delightful medley of crispy tater tots, seasoned beef, and melted cheddar cheese, all wrapped in a warm tortilla. Perfect for busy weeknights!
Ingredients
- 2 cups crispy tater tots
- 1 lb ground beef
- 1 cup melted cheddar cheese
- 4 large flour tortillas
Instructions
- Prepare the tater tots by baking or frying until golden brown and crispy.
- Cook the seasoned beef in a skillet over medium heat for 5-7 minutes until no longer pink.
- Combine the crispy tater tots and seasoned beef in a large bowl, adding cheddar cheese while warm.
- Create the burrito filling by placing the mixture into the center of each tortilla.
- Wrap the tortillas snugly around the filling.
- Grill the burritos in a skillet for 2-3 minutes on each side until golden brown and crispy.
Notes
For a vegetarian version, substitute the beef with black beans. Pair with salsa or a dollop of sour cream.
- Prep Time: 15 minutes
- Cook Time: 20 minutes
- Category: Main Course
- Method: Grilling
- Cuisine: Mexican
Nutrition
- Serving Size: 1 burrito
- Calories: 450
- Sugar: 3g
- Sodium: 600mg
- Fat: 25g
- Saturated Fat: 10g
- Unsaturated Fat: 12g
- Trans Fat: 1g
- Carbohydrates: 43g
- Fiber: 3g
- Protein: 22g
- Cholesterol: 70mg
Keywords: burritos, cheesy, comfort food, easy recipe, family dinner
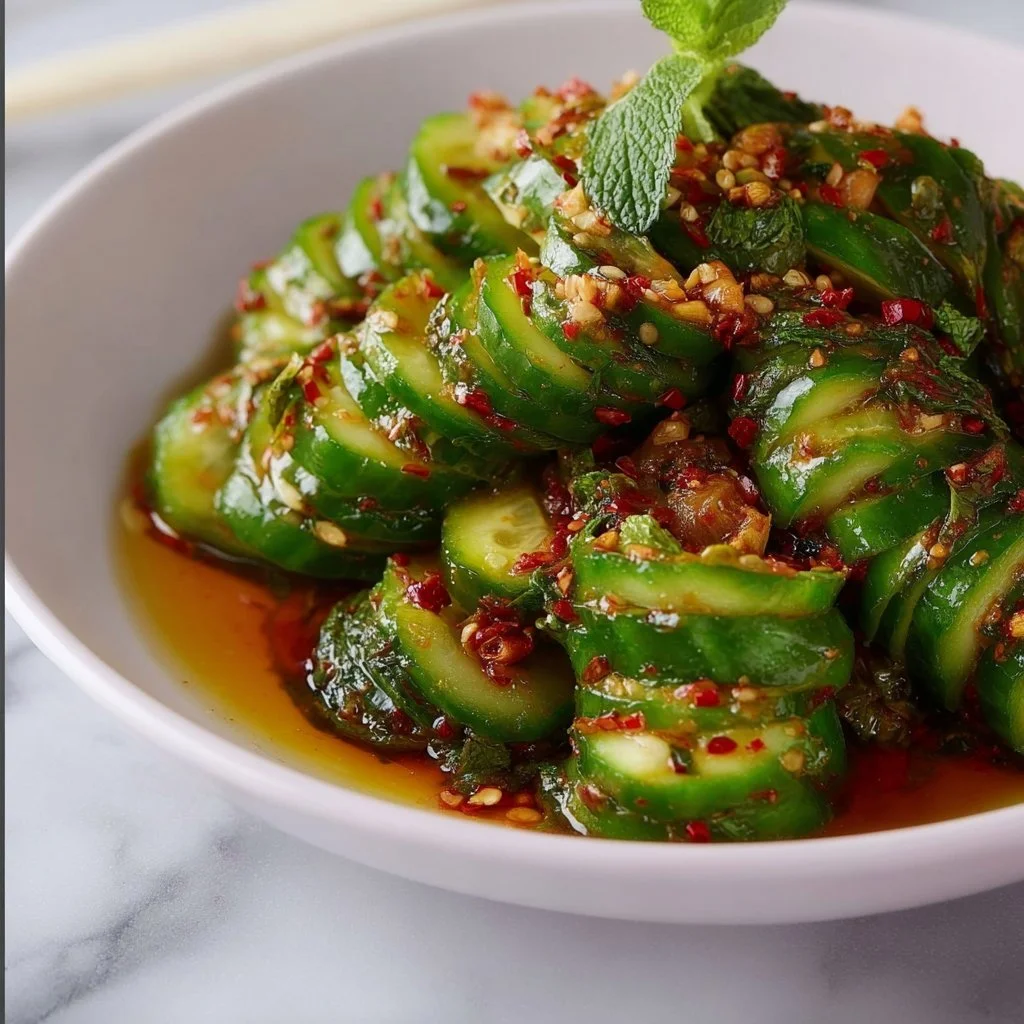
Asian Spicy Cucumber Salad
A Refreshing Twist: Asian Spicy Cucumber Salad Recipe
Welcome, food enthusiasts! Today, we’re diving into a dish that’s always a crowd-pleaser — the Asian Spicy Cucumber Salad! If you’re looking for something that’s not only light and refreshing but also packs a punch, you’ve hit the culinary jackpot with this one. Cucumbers, with their crisp texture, are like the perfect summer day in a salad, while the spicy kick from Sriracha brings in an exhilarating flavor that dances across your taste buds.
Picture this: it’s a warm afternoon, and you have family or friends gathered around. There’s laughter in the air, and the table is adorned with summer dishes that bring out the vibrant colors of the season. This salad isn’t just a side dish; it’s a joyful addition that complements any meal, whether you’re grilling outdoors or hosting a cozy indoor dinner.
One of the best parts? This salad is effortless to whip up! With just a handful of ingredients that you probably already have lying around in your kitchen, you can transform simple cucumbers into a vibrant, zesty salad that’s sure to impress. Play with the flavors or stick to the classic recipe; the choice is yours! So, roll up your sleeves, and let’s create something delicious.
Personal Story
I vividly remember the first time I tasted a cucumber salad like this. It was at my aunt’s house during a summer barbecue, and it was love at first bite! She tossed it together in moments and said it was a recipe she picked up while traveling internationally. I was captivated by her effortless kitchen style, and more so by how such simple ingredients could create so much flavor.
For me, that moment was more than just about food; it was about the joy of sharing and connecting over delicious dishes. We delved into countless stories, each bite igniting laughter, reminiscing about past summer adventures and the creative twists we all brought to our meals. This Asian Spicy Cucumber Salad became a staple in my own kitchen since that day. It reminds me to keep things simple, flavorful, and most importantly, to invite others into the joy of cooking together!
Ingredients
Let’s gear up for some culinary magic! Here’s what you’ll need for this delightful salad:
-
2 large cucumbers
The stars of the show! Choose firm, crisp cucumbers for the best texture. If you can find Persian or English cucumbers, they pack a sweeter flavor and are less bitter. Feel free to peel them if you prefer a milder taste! -
1 tablespoon salt
Salt serves two purposes: it enhances the flavor and helps draw out moisture from the cucumbers. If you’re watching your sodium, just sprinkle a little less or swap it out for a low-sodium alternative. -
1 tablespoon sesame oil
This oil adds a rich, nutty flavor that’s iconic in Asian cuisine. If you’re in a pinch, avocado oil can be a great substitute while still maintaining healthy fats. -
2 tablespoons rice vinegar
This gives our salad a tangy kick and balances out the heat. If you’re out of rice vinegar, apple cider vinegar is a fantastic alternative, bringing a subtly different, yet enjoyable flavor. -
1 tablespoon soy sauce
Ah, the umami factor! Soy sauce adds depth. For a gluten-free option, tamari works beautifully, too. -
1 tablespoon Sriracha or chili garlic sauce
Here’s where the fun begins! Adjust the heat to your liking here. If you’re feeling adventurous, go for a couple of tablespoons for an extra spicy kick! -
1 tablespoon sugar
A little sweetness brings everything together. If you prefer, you can swap this with honey or a sugar substitute for a low-calorie option. -
2 green onions, chopped
Adds a fresh, oniony crunch. Feel free to use chives for a milder taste if that’s your preference. -
Sesame seeds for garnish
Not just for decoration but for a lovely crunch! You can also toast the seeds for added flavor.
Step-by-Step Instructions
Ready to whip up this refreshing salad? Follow these easy steps, and you’ll have a bowl full of deliciousness in no time!
-
Prepare the Cucumbers
Start by slicing your cucumbers. For added flair, try cutting them into half-moon shapes or even julienne strips! Keep the skin on for extra color and nutrients or peel if you prefer a milder taste. -
Salting the Cucumbers
Place the sliced cucumbers in a bowl and sprinkle them with salt. Give them a gentle toss and let them sit for about 10-15 minutes. This step helps remove excess moisture and concentrates their flavor. The result is crisp, flavorful cucumber slices! -
Make the Dressing
In a separate bowl, whisk together sesame oil, rice vinegar, soy sauce, Sriracha (or chili garlic sauce), and sugar. Mix until the sugar is fully dissolved! This dressing is where the real magic happens — feel free to taste and adjust according to your spice preference. Do you want it sweeter? Add a bit more sugar. Need more heat? Go bold with the Sriracha! -
Combine and Toss
Once the cucumbers have drained and you’ve given them a squeeze to remove excess water, add the cucumber slices back into your mixing bowl. Pour your flavorful dressing over the cucumbers and toss everything together. Get your hands in there for the best mix! This is where the vibrant colors start to shine. -
Garnish and Serve
Right before serving, sprinkle the chopped green onions and sesame seeds on top for that finishing touch. Not only does this look appealing, but the seeds also add a delightful crunch! -
Enjoy!
This salad is best enjoyed fresh, but it can also be stored in the fridge for a short time if you need it to sit for a while. Just remember, the sassy crunch is best straight out of the mixing bowl!
Serving Suggestions
Now that you’ve got your salad ready, let’s talk about how to plate or serve it! Here are a few tips:
-
Serve in Bowls: For a casual gathering, serve the salad in a beautiful bowl and let everyone help themselves!
-
On Top of Protein: This salad acts as a refreshing side or topping for proteins like grilled chicken, shrimp, or tofu. The spicy kick complements the savory flavors beautifully.
-
Let It Shine: You can also layer it on a bed of greens like baby spinach or arugula to create a light, refreshing main dish!
-
Pair with Drinks: Consider serving this salad alongside light beverages, like iced green tea or a citrusy cocktail. The refreshing nature of both will mesh beautifully!
Recipe Variations
This salad is versatile, and there are countless ways to put your spin on it! Here are a few fun variations to consider:
-
Spicy Avocado Addition: Chop up some ripe avocado and toss it in for a creamy texture that balances the heat.
-
Add Fruits for Sweetness: Try adding slices of mango or pineapple for a tropical twist! They’ll pair perfectly with the cucumber and give it an unexpected sweet balance.
-
Herbs Galore: Toss in fresh herbs like cilantro or mint for an even more vibrant flavor.
-
Add Noodles: Want to bulk it up? Add in cooked vermicelli noodles! Just make sure to adjust the dressing accordingly so everything is balanced.
-
Pickled Cucumbers: For a tangy alternative, marinate your cucumbers in the rice vinegar for a couple of hours before proceeding. The flavors will deepen, and you’ll have a whole new delicious dish!
Chef’s Notes
Over the years, this recipe has really become a beloved favorite in my kitchen and at gatherings. I’ve seen my friends and family add their own creative twists, and that’s the beauty of cooking—each person can make a dish uniquely theirs. I laugh when I think of the time I hastily made this and accidentally grabbed red wine vinegar instead of rice vinegar. It turned out surprisingly delicious, proving that sometimes “mistakes” can yield beautiful results!
I always say that recipes are just a guide; feel free to explore flavors and find what feels right for you. Whether you choose to keep it straightforward or dance around with flavors, this salad will deliver satisfaction every time.
FAQs and Troubleshooting
Q: My cucumbers are still too salty, what can I do?
A: If your cucumbers are salty after using salt to draw moisture, rinse them under cold water before mixing in your dressing to tone down the saltiness.
Q: What if I don’t have Sriracha?
A: No worries! You can use any hot sauce or even crushed red pepper flakes for spiciness. Always taste as you go to find your ideal heat!
Q: Can I make this salad ahead of time?
A: It’s best enjoyed fresh, but you can certainly prepare the cucumbers and dressing in advance. Just combine them right before serving for optimal crunch!
Q: How long will leftovers last?
A: Enjoy your salad within 2-3 days for the best texture. After this time, the cucumbers may start to lose their crunch.
Nutritional Info
This Asian Spicy Cucumber Salad is not only tasty but also nutritious! Here’s a rough breakdown of the key nutrients per serving (based on 4 servings):
- Calories: 60 (without optional additions)
- Carbohydrates: 9g
- Fat: 4g (mostly from sesame oil)
- Protein: 1g
- Fiber: 1g
- Sugar: 3g
It’s low in calories, high in hydration, and thanks to the cucumbers, excellent for digestion. Plus, with the variety of flavors from the sauces and spices, you get a delightful experience without feeling heavy!
Final Thoughts
Creating this Asian Spicy Cucumber Salad is not just about the beautiful end product; it’s about the joy of combining fresh ingredients to forge connections and create happy memories. I’ve found that cooking is much like life—it’s all about finding balance, embracing flavors, and sharing with those you care about.
So whether you’re hosting a summer barbecue, enjoying a quiet evening, or needing a quick lunch fix, this salad embraces that warm hug of comfort food while keeping things refreshing and vibrant!
Try it out, make it yours, and remember to celebrate each bite! Happy cooking, my fellow foodies! 🍽️
Print
Asian Spicy Cucumber Salad
- Total Time: 15 minutes
- Yield: 4 servings 1x
- Diet: Vegetarian
Description
A light and refreshing cucumber salad with a spicy kick from Sriracha, perfect for summer gatherings.
Ingredients
- 2 large cucumbers
- 1 tablespoon salt
- 1 tablespoon sesame oil
- 2 tablespoons rice vinegar
- 1 tablespoon soy sauce
- 1 tablespoon Sriracha or chili garlic sauce
- 1 tablespoon sugar
- 2 green onions, chopped
- Sesame seeds for garnish
Instructions
- Prepare the cucumbers by slicing them. Cut into half-moon shapes or julienne strips.
- Salting the cucumbers: Place slices in a bowl, sprinkle with salt, toss gently, and let sit for 10-15 minutes.
- Make the dressing: In a separate bowl, whisk together sesame oil, rice vinegar, soy sauce, Sriracha, and sugar until dissolved.
- Combine and toss: Drain cucumbers and add back to the bowl. Pour dressing over and mix well.
- Garnish and serve: Sprinkle with green onions and sesame seeds before serving.
Notes
This salad is best enjoyed fresh but may be stored in the fridge for a short time.
- Prep Time: 15 minutes
- Cook Time: 0 minutes
- Category: Salad
- Method: Mixing
- Cuisine: Asian
Nutrition
- Serving Size: 1 serving
- Calories: 60
- Sugar: 3g
- Sodium: 400mg
- Fat: 4g
- Saturated Fat: 0.5g
- Unsaturated Fat: 3g
- Trans Fat: 0g
- Carbohydrates: 9g
- Fiber: 1g
- Protein: 1g
- Cholesterol: 0mg
Keywords: cucumber salad, spicy salad, refreshing salad, summer salad, Asian cuisine

Irresistible Easy Grilled Cheese Burrito You’ll Crave Again
Irresistible Easy Grilled Cheese Burrito You’ll Crave Again
Hey there, food lovers! It’s your pal Beau Collier, and I’m beyond excited to share one of my all-time favorite comfort food concoctions with you today – the Easy Grilled Cheese Burrito! Now, I know what you’re thinking: “What’s so special about a burrito?” Well, my foodie friends, this isn’t just any burrito; it’s a delicious melty masterpiece that wraps up all the goodness of grilled cheese with a taco twist!
Imagine biting into a warm, crispy tortilla that gives way to savory ground beef (or turkey… we’ll talk about options later) swaddled in ooey-gooey nacho cheese sauce, crowned with creamy sour cream, and topped with a decadent mix of cheddar and mozzarella. It’s the kind of dish that makes your taste buds do a happy little dance and your soul feel warm and fuzzy. Perfect for lazy weekends, quick dinners, or impromptu parties, it checks all the boxes for feel-good food.
The greatest part? You don’t need to be a culinary genius to whip this up! In fact, even if you just found your spatula after burying it under takeout menus and snack wrappers, don’t fret – this recipe is smooth sailing. So grab those ingredients and let’s dive deep into this scrumptious, cheesy adventure!
Personal Story
I still remember the first time I created this lovely burrito. It was a crisp fall weekend, and I found myself craving all the things that remind me of home—cozy blankets, the glowing warmth of a fireplace, and, of course, a mouthwatering meal. So, I rummaged through my pantry and fridge like a modern-day treasure hunter. I came across some leftover ground beef, a half-eaten block of cheddar, and those old tortillas in the back of my cupboard that needed a little love.
What started as a “let’s empty out the fridge” moment transformed into a delightful memory filled with laughter and flavor. My friends and I gathered around the stove, sipping our favorite drinks and playing DJ while I grilled these beauties up. Each bite led to oohs and aahs, and we ended up dubbing them the Grilled Cheese Burrito Extravaganza. It’s one of those cherished moments that reminds me of the joy food can bring, and I hope to replicate that joy in your kitchen!
Ingredients
Here’s what you’ll need to create your own Easy Grilled Cheese Burrito:
-
1 pound Ground Beef (or Turkey/Plant-based Meat)
- This is the heart of our burrito! Ground beef gives a rich flavor, but feel free to swap in ground turkey for a leaner option or plant-based meat for a vegetarian delight!
-
1 packet Taco Seasoning
- Spice it up! You can use store-bought or make your own with chili powder, cumin, garlic powder, and a pinch of salt for those who like it fresh and homemade.
-
2 cups Cooked White Rice
- Adds volume and texture. Brown rice or quinoa are great swaps if you’re looking for a nuttier flavor or extra health benefits!
-
1 cup Sour Cream (or Greek Yogurt/Dairy-Free Alternatives)
- The creaminess factor! Regular sour cream is lovely, but yogurt gives a tangy zip, and there are many great dairy-free yogurts if you prefer.
-
1 cup Nacho Cheese Sauce
- Go for the classic, or whip up homemade cheese sauce for a special touch. Vegan cheese sauce is an excellent choice for our plant-based friends!
-
1 cup Shredded Cheddar Cheese
- Adds that cheesy goodness! Feel free to mix in mozzarella or a Mexican blend to amp up the flavors.
-
1 cup Shredded Mozzarella Cheese (optional)
- More cheese equals more fun! If you’re watching your dairy intake, you can skip this or use a lower-fat cheese.
-
1 tablespoon Chipotle Sauce
- Adds a nice kick! Adjust according to your spice level—just a hint creates a fabulous smoky flavor.
-
4 large Flour Tortillas
- The ultimate wrap! Whole wheat tortillas are healthier, and gluten-free tortillas work perfectly too.
-
2 tablespoons Butter or Oil
- To grill those burritos to crispy perfection! Olive oil is a lovely substitute if you’re aiming for a healthier option.
Step-by-Step Instructions
Alrighty, let’s get cooking! Grab your apron (or that comfy shirt—no judgment here!), and let’s embark on this cheesy journey!
-
Cook the Ground Beef:
- Heat a large skillet over medium heat and add the ground beef. Cook until browned, breaking it apart with a spatula. It should take about 7–10 minutes. Chef tip: Drain the fat if you’re using beef to keep things from getting too greasy!
-
Season the Beef:
- Once the beef is cooked, sprinkle the taco seasoning over it. Pour in a splash of water if needed to help distribute those spices. Stir until everything is well coated. Let it simmer for a couple of minutes to let those flavors meld! Want a kick? Toss in some diced jalapeños or a pinch of cayenne pepper.
-
Mix with Rice:
- Remove your skillet from heat and fold in the cooked rice until well mixed. That rice gives a lovely fluffy texture and stretches those tasty ground flavors!
-
Prepare the Tortillas:
- On a clean countertop or cutting board, lay out your tortilla. Scoop about a generous half cup of the beef-rice mixture towards the center. Drizzle over the nacho cheese sauce, and add a dollop of sour cream. Don’t be stingy with the toppings!
-
Add the Cheeses:
- Sprinkle some shredded cheddar and mozzarella on top of the filling. Chef hack: Use pre-shredded cheeses for convenience or, if you’ve got time, shred your own for fresher flavors!
-
Roll ‘Em Up:
- Fold in the sides of the tortilla first, then roll it from the edge closest to you diagonally over the filling until you have a nice tight burrito. Protip: Make sure it’s snug, so nothing spills out while grilling!
-
Grill Time:
- In the same skillet or a griddle over medium heat, melt butter (or drizzle olive oil). Place the burrito seam side down and toast for about 3-4 minutes on each side until golden brown and crispy. Keep an eye on it! You want it to get that golden color without burning.
-
Slice and Serve:
- After that perfect crispiness is achieved, remove it from the skillet and slice it in half. The melty insides will ooze just a bit—yum! Let it cool for a moment before serving, but you’ll want to dive right in!
Serving Suggestions
Time to make it look as good as it tastes! Here’s how to plate your Easy Grilled Cheese Burrito:
-
Simple Plating: Place the halved burrito on a rustic wooden board or a colorful plate. You can add a drizzle of additional nacho cheese or a spoonful of sour cream on the side. A sprinkle of chopped cilantro or green onions for a fresh pop always looks gourmet!
-
Add Sides: Consider serving with a fresh side of guacamole or salsa for dipping. You want those vibrant colors and flavors to make everyone drool!
-
Garnish: If you’re feeling fancy, throw on some sliced jalapeños or a sprinkle of chili flakes for an extra sprinkle of flair. Your guests (or family!) will think you’re a culinary rock star!
Recipe Variations
Let’s keep things interesting! Here are a few creative twists and variations to try with your Easy Grilled Cheese Burrito:
-
Veggie Delight: Swap the ground beef for sautéed mushrooms, bell peppers, and black beans. Add some fresh spinach for a vibrant, healthy take!
-
Tex-Mex Spanish Fusion: Add some zesty chili con carne sauce instead of regular taco seasoning. Pair it with a Spanish rice mix instead of white rice for a fiesta in your mouth!
-
Buffalo Chicken Twist: Swap in shredded cooked chicken tossed in buffalo sauce and a sprinkle of blue cheese for a spicy kick! Pair it with a side of ranch dressing for dipping.
-
Breakfast Burrito: Add scrambled eggs and sautéed onions for a hearty breakfast option! Throw in some crispy bacon for extra flavor or chorizo for a Mexican twist.
-
Loaded Vegan: Use jackfruit or lentils as the protein base, and switch out all dairy ingredients for a vegan alternative. Top with avocado slices for healthy fats!
Chef’s Notes
Every kitchen has its adventures, and this recipe has evolved over time in my kitchen! I remember one particularly chaotic evening when I decided to get creative and accidentally added too much chipotle sauce. The result? A delicious smoky mess so good that my friends still ask for the ‘spicy version’ whenever they see me. Laughter was certainly the ingredient of the night!
Food should never be intimidating—it should be an adventure! So, feel free to take risks with this dish. Remember, the kitchen is your playground!
FAQs and Troubleshooting
Q: Why is my burrito falling apart?
- A: It could be a few factors! Make sure to roll it tightly and don’t overfill it. If the tortilla is too dry, it might crack, so warm them gently before adding the filling.
Q: Can I freeze these burritos?
- A: Absolutely! Wrap them tightly in foil or plastic wrap and freeze. When you’re ready to enjoy, just pop them in the oven at 375°F (190°C) for about 25 minutes, and they’ll be all warmed up!
Q: What is the best way to reheat leftovers?
- A: Try reheating in a skillet to maintain that crispness or the oven instead of the microwave. You want that cheesy goodness to stay melty without getting soggy!
Q: How can I make this dish vegetarian or vegan?
- A: Use plant-based ground meat, skip the cheese or choose vegan varieties, and switch out the sour cream for plant-based yogurt! Substitute the butter with olive oil, and you’re golden!
Nutritional Info
Let’s talk numbers! Each burrito (assuming you’re using ground beef and traditional ingredients) will range around:
- Calories: Approximately 525–575 calories
- Protein: 30–35 grams (depending on the meat)
- Fats: 25–30 grams
- Carbohydrates: 45–50 grams
Note: Adjustments based on swaps, such as using turkey or plant-based meat, will change nutritional values significantly for the better!
Final Thoughts
And there you have it—the Irresistible Easy Grilled Cheese Burrito that’s sure to become a staple in your home! Cooking is an expression, and combining ingredients doesn’t have to be about rigidity; it’s about joy, exploration, and bringing people together. Whether you’re sharing this with friends or enjoying it solo during a Netflix binge, it’s the kind of meal that fills not just your stomach but your heart as well.
So, don’t wait any longer—grab those ingredients, get into the kitchen, and whip up this delightful burrito. Remember, food is about community, laughter, and love—and with this dish, you’re sure to leave everyone craving for more! Happy cooking, my friends—let’s make some kitchen magic!
Print
Easy Grilled Cheese Burrito
- Total Time: 35 minutes
- Yield: 4 servings 1x
- Diet: Vegetarian
Description
A delicious melty masterpiece combining grilled cheese and burrito goodness, featuring ground beef or turkey and ooey-gooey cheese.
Ingredients
- 1 pound Ground Beef (or Turkey/Plant-based Meat)
- 1 packet Taco Seasoning
- 2 cups Cooked White Rice
- 1 cup Sour Cream (or Greek Yogurt/Dairy-Free Alternatives)
- 1 cup Nacho Cheese Sauce
- 1 cup Shredded Cheddar Cheese
- 1 cup Shredded Mozzarella Cheese (optional)
- 1 tablespoon Chipotle Sauce
- 4 large Flour Tortillas
- 2 tablespoons Butter or Oil
Instructions
- Heat a large skillet over medium heat and add the ground beef. Cook until browned, breaking it apart with a spatula for about 7–10 minutes.
- Sprinkle the taco seasoning over the cooked beef and stir until well coated. Let it simmer for a couple of minutes.
- Remove your skillet from heat and fold in the cooked rice until well mixed.
- Lay out your tortilla and scoop about half a cup of the beef-rice mixture towards the center.
- Drizzle over the nacho cheese sauce and add a dollop of sour cream.
- Sprinkle some shredded cheddar and mozzarella on top of the filling.
- Fold in the sides of the tortilla first, then roll it from the edge closest to you diagonally over the filling.
- Melt butter (or drizzle olive oil) in the same skillet and place the burrito seam side down. Toast for about 3-4 minutes on each side until golden brown.
- Remove from the skillet and slice it in half to reveal the melty insides.
Notes
Feel free to experiment with different fillings or swap the ground beef for plant-based options for a healthier or vegetarian delight.
- Prep Time: 15 minutes
- Cook Time: 20 minutes
- Category: Main Course
- Method: Grilling
- Cuisine: Mexican
Nutrition
- Serving Size: 1 burrito
- Calories: 550
- Sugar: 3g
- Sodium: 600mg
- Fat: 30g
- Saturated Fat: 15g
- Unsaturated Fat: 10g
- Trans Fat: 0g
- Carbohydrates: 45g
- Fiber: 3g
- Protein: 35g
- Cholesterol: 80mg
Keywords: grilled cheese, burrito, comfort food, easy recipe, quick dinner, beef burrito
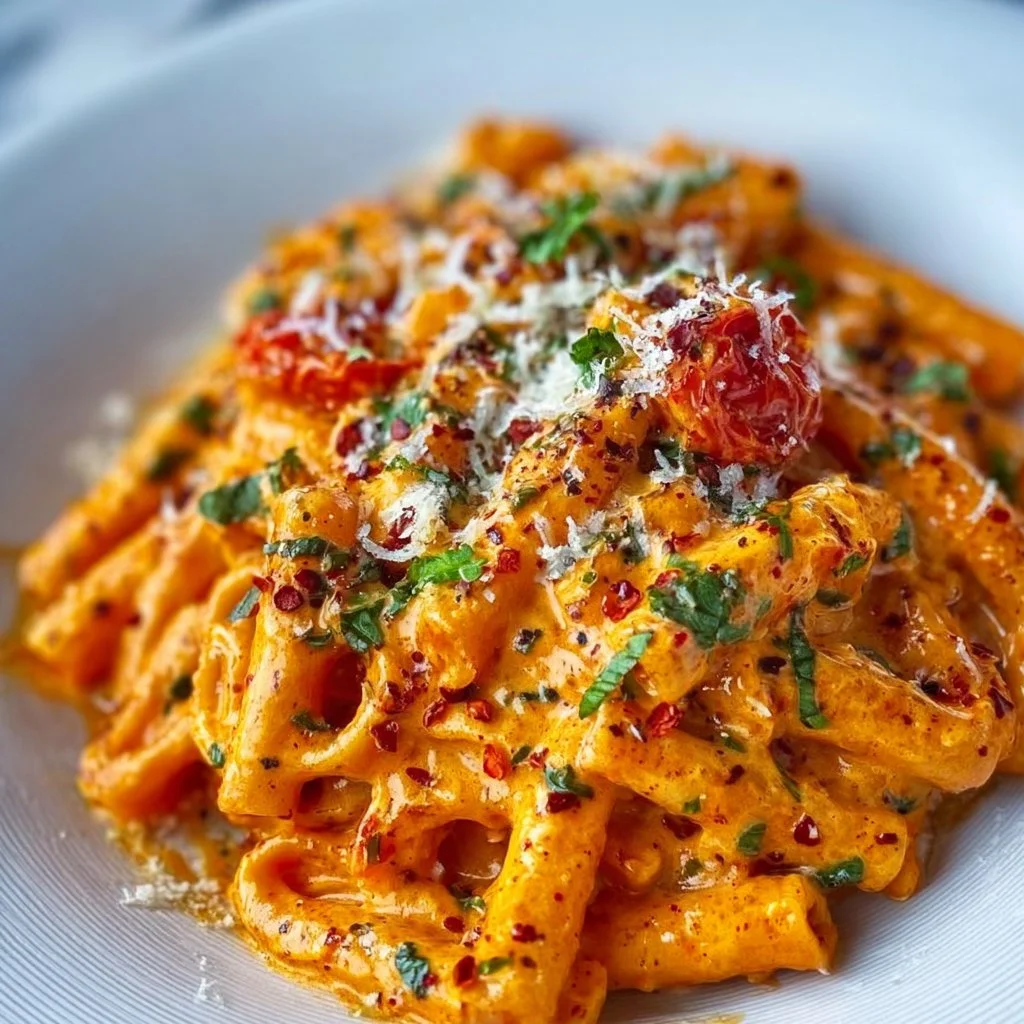
Creamy Tomato Garlic Pasta Recipe
Creamy Tomato Garlic Pasta Recipe: A Feel-Good Classic
Hey there, food lovers! Welcome back to Feastical, where we whip up love and laughter one delicious bite at a time. If you’re in the mood for something that warms your soul and fills your belly, then you’re going to love today’s star dish: Creamy Tomato Garlic Pasta. This beauty is all about simplicity wrapped in exquisite flavor—the kind of dish that feels like a cozy hug after a long day.
Picture this: A plate of pasta smothered in creamy garlic sauce, dotted with sweet cherry tomatoes, and crowned with fresh herbs. It’s the kind of meal that feels fancy but is incredibly easy to whip up, making it perfect for date nights, family dinners, or that “treat yourself” moment after a difficult week. Trust me; this recipe will quickly become a staple in your kitchen repertoire.
With just a handful of ingredients and a dash of love, we’re going to create something truly magical. So grab your apron, channel your inner chef, and let’s dive into this creamy, dreamy pasta that’s bound to impress. Whether you’re cooking for yourself or sharing with loved ones, each bite will have everyone grinning from ear to ear. Let’s get cooking!
Personal Story
This creamy tomato garlic pasta brings back some of my fondest memories from my early cooking days. I remember the first time I made it; I was a college student, living in a tiny apartment with a kitchen so small that if I turned around too quickly with my spatula, I’d risk a kitchen catastrophe. On a rainy Thursday evening, I decided to throw together a meal that could warm up my little sanctuary. Armed with a few ingredients I had on hand, I channeled my inner chef and set to work.
As the garlic sizzled in the pan, filling the air with its inviting aroma, I couldn’t help but think about all those nights spent in my grandmother’s kitchen—her wisdom always lingering in the air like that heavenly scent. She taught me that cooking isn’t just about the food; it’s about the stories shared, laughter exchanged, and memories created. Fast forward to now, and every time I make this dish, I’m reminded of those special moments and the important lessons I learned along the way.
So grab a fork and a friend or family member; it’s time to create those beautiful memories over a bowl of this creamy tomato garlic pasta!
Ingredients
Let’s gather our star players for this dish!
-
8 Garlic Cloves (minced): Garlic is the aromatic backbone of this recipe. It adds depth and flavor that transforms the dish. Substitute with garlic powder if you’re in a pinch, but fresh garlic truly reigns supreme.
-
3 cups Cherry Tomatoes (halved): These juicy gems are sweet and vibrant. You can use grape tomatoes or even canned diced tomatoes in a pinch, but fresh is always best when in season.
-
4 tbsp Olive Oil: Use extra virgin for that rich flavor, or substitute with avocado oil for a different taste profile. Not a fan of olive oil? Try grapeseed or canola oil.
-
1 cup Dry White Wine: This adds an elegant touch. Go for something you’d sip on; wines like Sauvignon Blanc are perfect. Don’t drink wine? Replace it with vegetable broth or additional chicken stock for a flavorful kick.
-
1 tsp White Sugar: To balance the acidity of the tomatoes, this little trick goes a long way. You can use honey or maple syrup as alternatives.
-
1 tsp Chili Flakes: A pinch of heat makes all the difference! If spice isn’t your thing, leave it out or replace it with a sprinkle of smoked paprika for warmth without the heat.
-
2 tbsp Tomato Paste: This gives the sauce a robust tomato flavor. Don’t have it on hand? You could blend in a bit of chopped canned tomatoes instead.
-
2 cups Heavy Cream (or Alt milk – 1:1 swap): The creamy base of the dish! If you’re looking for a lighter option, full-fat coconut milk or even cashew cream work magic here.
-
1 tbsp Flour: A thickener to help achieve that dreamy consistency. Use a gluten-free flour blend for a gluten-conscious option.
-
1/2 cup Chopped Parsley: Fresh herbs bring vibrancy and freshness! Basil or even arugula could be delightful substitutes if you want a flavor twist.
-
8 oz Rigatoni Pasta (cooked al dente): I love rigatoni for its ability to hold sauce. You can swap it with penne or spaghetti based on your preference.
-
1 tsp Smoked Paprika: Infuses a lovely smokiness to the dish, enhancing its depth. You can skip it, but I wouldn’t—trust me!
-
1 tsp Garlic Powder: If you’re a garlic lover (like me!) this adds an extra depth. You can completely omit it if you want to keep it simple.
-
Salt & Pepper (to taste): Essential seasonings that highlight all other flavors. Always taste as you go!
-
Freshly Grated Parmesan: Optional but recommended! It adds the sophistication we all love. If you’re dairy-free, nutritional yeast can be a great substitute.
Step-by-Step Instructions
Now, onto the fun part! Let’s make this pasta dish. Ready? Here we go!
-
Cook the Pasta:
Start by boiling a large pot of salted water. Add the rigatoni and cook according to package directions until al dente. This usually takes about 10-12 minutes. Remember, you want them firm since they’ll continue cooking later in the sauce. Once done, reserve about 1 cup of the pasta water and drain the rest. A little pasta water goes a long way in achieving the perfect creamy consistency later! -
Sauté the Aromatics:
In a large skillet, heat the olive oil over medium heat. Add the minced garlic and sauté for about 1-2 minutes until fragrant, but be careful not to burn it—it can turn bitter quickly! Here’s a little cheat: if you add a pinch of salt to the garlic, it will help it brown evenly and prevent it from burning. -
Add the Cherry Tomatoes:
Toss in those halved cherry tomatoes along with the white wine. Give it a gentle stir and allow them to cook for about 5-7 minutes until they start to soften and burst. The beautiful thing about this step is how the tomatoes create their sauce as they release juices. Don’t forget to scrape the bottom of the pan to incorporate all the delicious bits! -
Stir in the Tomato Paste:
Add the tomato paste, white sugar, and chili flakes. Mix well, letting it cook for another 2-3 minutes to bring the flavors together. A little tip—cooking the tomato paste for a minute intensifies its flavor. Trust me; your taste buds will thank you! -
Create the Creamy Sauce:
Reduce the heat to low and slowly whisk in the heavy cream, followed by the flour. This is where the magic happens! Stay vigilant, stirring continuously until everything is well-combined and thickens to your liking. If it seems too thick, add a splash of your reserved pasta water to loosen it up. -
Seasoning:
Sprinkle in smoked paprika, garlic powder, and season generously with salt and pepper. Taste and adjust your seasoning as needed—this is your dish, after all! -
Combine Pasta with Sauce:
Carefully add the cooked rigatoni to your creamy tomato sauce. Toss gently until every noodle is beautifully coated in that luscious sauce. This is where you can add a bit more pasta water if you want to achieve your desired sauce consistency. -
Final Touches:
Just before serving, fold in the chopped parsley for a burst of freshness. The color contrast is visually appealing and, more importantly, it adds extra flavor! -
Serve:
Plate your creamy tomato garlic pasta in generous portions. If you’re feeling fancy, top it with freshly grated Parmesan cheese (or a vegan alternative), a drizzle of olive oil, and a sprinkle of extra parsley or chili flakes for that pop of color.
Serving Suggestions
To elevate your dining experience, consider pairing this creamy tomato garlic pasta with a crisp green salad or a side of garlic bread for an all-out flavor fest. A glass of chilled white wine complements this dish beautifully, enhancing the flavors of the creamy sauce.
You could also serve it in deep pasta bowls, garnishing with fresh basil leaves for that restaurant-quality experience. Don’t forget to set the table with your favorite dinnerware, dim the lights a bit, and play some cozy music. It’s all about the ambiance, my friends!
Recipe Variations
Here are a few creative twists to make this dish your own:
-
Add Protein: Toss in grilled chicken, shrimp, or sautéed mushrooms for added protein. If you’re vegetarian, chickpeas or lentils make a great hearty option.
-
Vegetable Boost: Add zucchini, spinach, or bell peppers to the mix for an extra serving of veggies. You can sauté them alongside the garlic for more flavor.
-
Herb-Infused: Experiment with different herbs like basil, oregano, or thyme in place of or in addition to parsley. Each herb will impart a unique flavor profile, making the dish your own.
-
Cheesy Delight: Mix in some ricotta or cream cheese for an ultra-creamy texture. It’s like a creamy cheesy hug for your pasta!
-
Vegan Version: For a completely plant-based dish, use coconut cream instead of heavy cream, and nutritional yeast in place of Parmesan.
Chef’s Notes
Every cook has their own tips and tricks that make a recipe shine. One of my favorite things about this creamy tomato garlic pasta is its adaptability. It’s like a canvas, waiting for your personal brushstrokes. Plus, it has aged like fine wine in my kitchen; I’ve tweaked it over the years, striving for that perfect balance of flavors.
And speaking of tweaking, I once served this to a group of friends during a small dinner party. Just as I was about to make the sauce, I realized I was out of heavy cream. A quick panic settled in until I discovered a can of coconut milk chilling in the fridge. From that day on, I made it a habit to keep a stash of coconut milk on hand; it gives the dish a unique creamy texture that’s simply divine!
FAQs and Troubleshooting
1. Why is my sauce too thick?
If the sauce seems thicker than you’d like, just add a splash of reserved pasta water, and it will loosen up nicely!
2. It’s too acidic—help!
If you find the sauce too acidic from the tomatoes, you can add a pinch more sugar or a bit of baking soda to help neutralize the acidity.
3. Can I prep this in advance?
Absolutely! You can make the sauce ahead of time and store it in the fridge. Just reheat slowly, and add freshly cooked pasta right before serving.
4. What’s the best way to reheat leftovers?
To reheat, gently warm it on the stovetop with a splash of water or cream to help bring it back to life. Stir frequently so it doesn’t stick to the pan!
Nutritional Info
This creamy tomato garlic pasta is not only a feast for the taste buds but can also fit into a balanced meal if enjoyed in moderation. Here’s a quick rundown of the nutritional info per serving (based on four servings):
- Calories: Approximately 450-500
- Protein: About 10-12g
- Fat: 25-30g (including healthy fats from olive oil)
- Carbohydrates: Roughly 45g
- Fiber: 3g (depending on your pasta choice)
- Sugars: 3-5g
Feel free to adjust portions and ingredient swaps to fit your dietary needs or cravings—after all, cooking is all about personalization!
Final Thoughts
And there you have it, my friends! Your very own recipe for creamy tomato garlic pasta that’s sure to satisfy your cravings and wrap you in a warm culinary hug. I hope this dish brings as much joy to your table as it has to mine over the years.
Remember: cooking is about experimenting and enjoying the process. Don’t be afraid to add your own flair, share the experience with others, and create lovely memories. Until next time, keep stirring up those delightful dishes, and never hesitate to bring a little extra love into your kitchen! Happy cooking! 🍝✨
Print
Creamy Tomato Garlic Pasta
- Total Time: 45 minutes
- Yield: 4 servings 1x
- Diet: Vegetarian
Description
A comforting and flavorful creamy tomato garlic pasta perfect for any occasion.
Ingredients
- 8 Garlic Cloves (minced)
- 3 cups Cherry Tomatoes (halved)
- 4 tbsp Olive Oil
- 1 cup Dry White Wine
- 1 tsp White Sugar
- 1 tsp Chili Flakes
- 2 tbsp Tomato Paste
- 2 cups Heavy Cream (or Alt milk – 1:1 swap)
- 1 tbsp Flour
- 1/2 cup Chopped Parsley
- 8 oz Rigatoni Pasta (cooked al dente)
- 1 tsp Smoked Paprika
- 1 tsp Garlic Powder
- Salt & Pepper (to taste)
- Freshly Grated Parmesan (optional)
Instructions
- Cook the pasta in a large pot of salted water according to package directions until al dente. Reserve 1 cup of pasta water and drain the rest.
- Sauté the olive oil over medium heat, add the minced garlic, and sauté for 1-2 minutes until fragrant.
- Add the cherry tomatoes and white wine, stirring gently, and allow to cook for 5-7 minutes until the tomatoes soften.
- Stir in the tomato paste, white sugar, and chili flakes. Cook for another 2-3 minutes.
- Reduce heat to low and whisk in the heavy cream and flour, stirring continuously until well-combined and thickened.
- Season with smoked paprika, garlic powder, salt, and pepper, adjusting to taste.
- Combine the cooked rigatoni with the creamy sauce, tossing gently to coat.
- Fold in the chopped parsley before serving. Plate the pasta and top with freshly grated Parmesan if desired.
Notes
For a lighter option, substitute heavy cream with coconut milk or cashew cream. This dish can be customized further with protein or extra veggies.
- Prep Time: 15 minutes
- Cook Time: 30 minutes
- Category: Main Course
- Method: Baking
- Cuisine: Italian
Nutrition
- Serving Size: 1 serving
- Calories: 475
- Sugar: 4g
- Sodium: 500mg
- Fat: 28g
- Saturated Fat: 15g
- Unsaturated Fat: 8g
- Trans Fat: 0g
- Carbohydrates: 45g
- Fiber: 3g
- Protein: 12g
- Cholesterol: 80mg
Keywords: creamy pasta, tomato garlic pasta, Italian cuisine, vegetarian pasta, comfort food
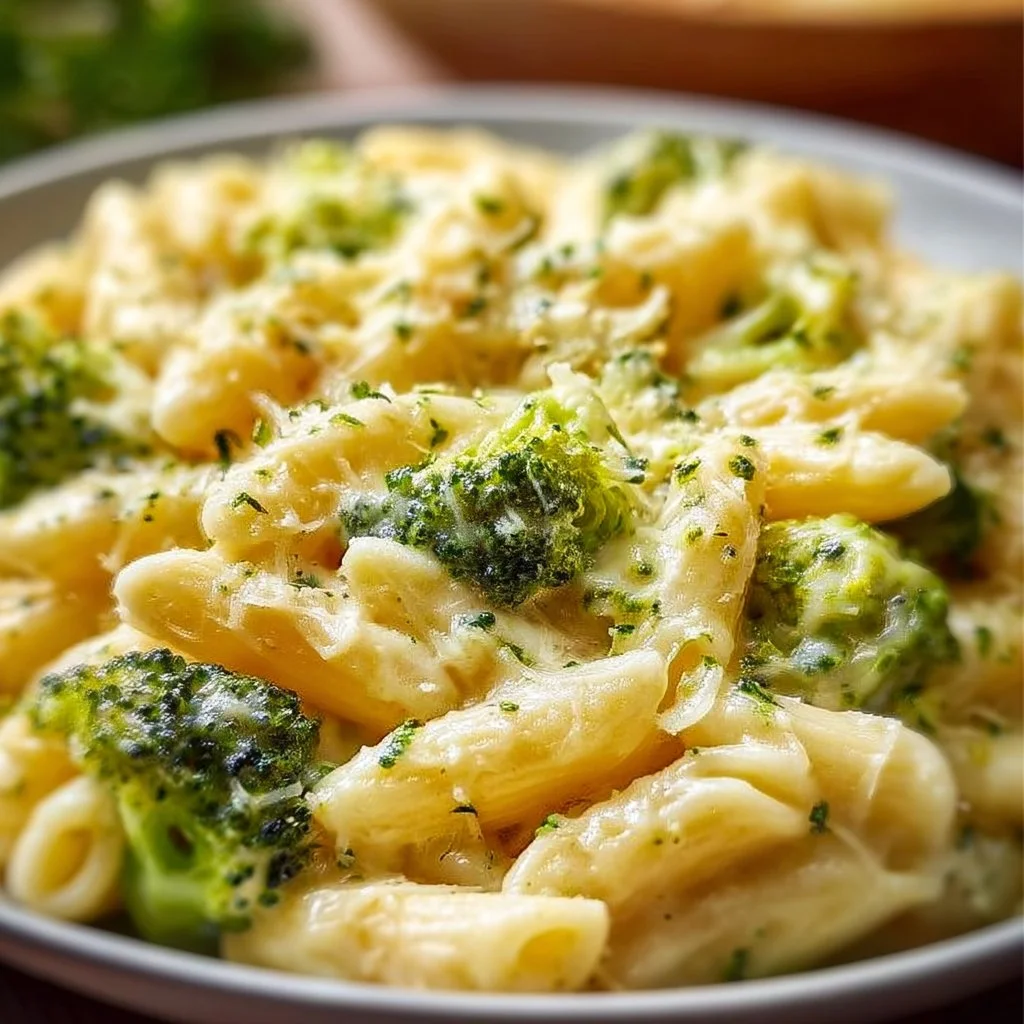
Creamy Cheesy Broccoli Pasta
Creamy Cheesy Broccoli Pasta: A Hug in a Bowl
Hey food lovers! Beau Collier here, and I’m thrilled to bring you one of my absolute favorite comfort dishes: Creamy Cheesy Broccoli Pasta. If you’re anything like me, sometimes you just need a dish that wraps around you like a warm hug after a long day. This dish embodies everything that’s cozy, creamy, and utterly satisfying—the perfect antidote to the chaos of life!
Picture this: the rich, velvety texture of cheese mingling effortlessly with perfectly cooked pasta, all while vibrant green broccoli florets peek through, adding a pop of color and crunch. It’s not just a meal; it’s an experience. The beauty of this recipe is that it’s not just simple to whip up—it’s also a wonderful way to sneak some veggies into your diet, especially for those picky eaters out there.
Whether you’re throwing together a quick weeknight dinner or planning a delightful weekend feast, this Creamy Cheesy Broccoli Pasta will have your family and friends leaning in for seconds. So, load up your spatula, invite your inner chef, and let’s embark on this cheesy adventure together!
Personal Story
Before we dive into the nitty-gritty of the recipe, let me share a fun kitchen memory that warms my heart every time I make this dish. I can vividly recall the very first time I attempted a version of this Creamy Cheesy Broccoli Pasta while living in a tiny apartment during my college days. My friends had planned a movie night, and I wanted to impress them with my not-so-unfounded culinary skills.
I remember rummaging through the fridge and pulling out just a few ingredients: some pasta, a bit of broccoli I’d forgotten about, and a pile of cheese that was definitely more than enough. With laughter filling the air and the comforting scent of broccoli and melting cheese wafting through the apartment, we gathered around my tiny kitchen table. Every bite earned cheers of delight and laughter, and by the end of the night, we had polished off the entire pot!
That experience taught me that food is not just about the ingredients but the memories we create around it. So let’s roll up our sleeves and make a dish that will not only nourish your belly but also your heart.
Ingredients
Okay, let’s break it down! Here’s what you’ll need for this delightful Creamy Cheesy Broccoli Pasta:
-
8 ounces pasta (e.g., penne or rotini)
This is your base! Penne and rotini work beautifully in this dish as they trap the cheese sauce perfectly in those little spirals and tubes. You can substitute with gluten-free pasta if you’re looking for a lighter option. -
2 cups fresh broccoli florets
Broccoli adds a wonderful crunch and a splash of color! Feel free to swap it for other veggies like cauliflower or spinach for a twist, or even cherry tomatoes for a burst of sweetness. -
2 cups milk
Whole milk gives the sauce its creaminess, but you can go for 2% or even non-dairy milk alternatives like almond or oat milk for a lighter version. -
1 cup shredded cheese (e.g., cheddar or mozzarella)
Cheddar provides that bold, cheesy punch, while mozzarella adds gooeyness. Mix it up! A blend of both can give you the best of both worlds. Vegan cheese works too, to keep it dairy-free! -
2 tablespoons butter
Butter is crucial for adding richness. If you’re avoiding dairy, you can use plant-based butter or olive oil. -
2 tablespoons all-purpose flour
This will help thicken your cheese sauce. If you need a gluten-free alternative, cornstarch or gluten-free flour works like a charm! -
Salt and pepper to taste
Never underestimate the power of seasoning! A little magic here enhances the overall flavor. Adjust to your palate. -
Optional: grated Parmesan and red pepper flakes for serving
Parmesan adds an extra savory kick—who can resist? And red pepper flakes bring a touch of heat for those who like it spicy!
Gather all these lovely ingredients, and we’ll be ready to light up the stovetop!
Step-by-Step Instructions
Let’s get cooking! Follow these simple steps, and you’ll whip up a delicious batch of Creamy Cheesy Broccoli Pasta in no time.
1. Cook the Pasta:
- Bring a large pot of salted water to a boil. Trust me, the salt makes a big difference! Add the pasta and cook according to package instructions until al dente—about 8 to 10 minutes.
- Chef tip: Reserve about half a cup of the pasta cooking water before draining! This starchy water can help adjust your sauce’s consistency later.
2. Blanch the Broccoli:
- In the last 2 minutes of the pasta cooking time, toss in the fresh broccoli florets. This will blanch them, giving that lovely vibrant color while keeping them crisp. Drain the pasta and broccoli together and set them aside.
- Hack: If you prefer your broccoli softer, you can steam it separately before adding, but I love the crunch it brings to the dish.
3. Make the Cheese Sauce:
- In a large skillet, melt 2 tablespoons of butter over medium heat. Once it’s bubbling, stir in the 2 tablespoons of flour, whisking continuously for about 1-2 minutes to create a roux. You want that slightly golden color—it’ll add depth to your sauce!
- Pro tip: Be patient! This step is crucial to eliminate any floury taste.
4. Add the Milk:
- Gradually pour in the 2 cups of milk while whisking constantly. Keep stirring until the mixture thickens—this will take about 3-5 minutes. It should coat the back of a spoon.
- Secret hack: If your sauce seems too thick, mix in a splash of that reserved pasta water to loosen it up.
5. Incorporate the Cheese:
- Reduce the heat to low; now it’s the fun part! Stir in 1 cup of shredded cheese until it’s completely melted and creamy. Feel free to add more cheese—who am I to stop you?
- Chef insight: Mixing in a splash of Dijon mustard adds a nifty sharpness that complements the cheesy goodness beautifully.
6. Combine with Pasta and Broccoli:
- Gently fold the drained pasta and broccoli into the cheese sauce, mixing to ensure everything is coated with that delightful, velvety goodness.
- Kicking it up a notch: If the pasta seems dry, add a touch more milk or pasta water until it’s just right!
7. Season It Up:
- Taste your creation and season with salt and pepper to your liking. I always say a pinch of love goes a long way!
- Final flair: If you love that little kick, sprinkle in some red pepper flakes right now!
8. Serve It Up:
- Spoon the pasta into bowls, and for that gourmet touch, sprinkle with grated Parmesan if you’re using it. Trust me; it takes the dish over the top!
Voilà! Your Creamy Cheesy Broccoli Pasta is ready.
Serving Suggestions
Presentation matters, folks! Here are some fun ideas on how to serve this bowl of joy:
- Family Style: Transfer the pasta and sauce to a large serving dish and let everyone dig in. It’s a communal experience that sparks joy and conversation!
- Individual Bowls: Serve in deep bowls garnished with a sprinkle of Parmesan and a few red pepper flakes for that pop of color. Add a drizzle of olive oil on top for a gourmet nod.
- Side Salads: Pair your pasta with a crisp side salad with a tangy vinaigrette to cut through the creaminess—balancing flavors is key!
Feel free to get creative and personalize each bowl according to everyone’s preferences!
Recipe Variations
Here’s where things get even more exciting! The beauty of Creamy Cheesy Broccoli Pasta lies in its versatility. Here are a few fun and flavorful variations you can try:
-
Chicken and Broccoli: For a heartier meal, add in some cooked chicken, maybe diced grilled chicken breast or rotisserie chicken. A great way to use up leftovers!
-
Pesto Delight: Mix in a couple of tablespoons of pesto for a fresh, herby twist. It’s like summery sunshine on a plate!
-
Sun-Dried Tomatoes: Add chopped sun-dried tomatoes in with the pasta for a tangy burst of flavor.
-
Mushroom Medley: For you fungi fans, sauté some mushrooms with the butter before adding the flour for an earthy flavor that pairs beautifully with the cheese.
-
Vegan Bliss: Swap dairy cheese with a non-dairy cheese blend and use nut milk or oat milk for a completely plant-based dish without losing the creamy goodness.
Feel free to get adventurous—there’s no wrong way to enjoy this pasta!
Chef’s Notes
You know, this recipe has been a continuous evolution in my kitchen. I remember when I used to throw in whatever cheese I had left in the fridge, and as a result, it became a staple in my home. It’s fascinating how kitchens can be laboratories of flavor!
And let me share a little secret with you. I once used a mix of ‘cheddar and whatever funky cheese I could find’ for a party, and it turned out to be a hit! My friends still reminisce about how creamy and comforting that one dish was, and they loved trying to identify all the cheese flavors.
By adapting it to what’s on hand, you can make it your own, each time a new chance to create memories!
FAQs and Troubleshooting
-
Why is my cheese sauce grainy?
- This usually happens if the cheese is added at a too-high temperature or if it’s overheated. Always lower the heat and choose high-quality cheese for the best results.
-
What if the pasta is too dry?
- Not to worry! Just stir in some of that reserved pasta water or a splash of milk to loosen it up and bring back that creamy texture.
-
Can I make this dish ahead of time?
- Absolutely! You can prepare it and store it in the fridge. Just reheat gently on the stovetop, adding a little milk to maintain that creamy consistency.
-
How can I make this dish spicier?
- If you’re daring, add sliced jalapeños or a dash of hot sauce to your cheese sauce for that extra kick! Some crushed red pepper flakes are a fantastic addition, too.
Nutritional Info
Now, for those keeping an eye on nutrition, here’s a quick breakdown! (Please note that values can vary based on brands and specific ingredients used).
- Calories: Approx. 400-500 per serving (depending on cheese and milk choices)
- Protein: 20g (thanks to the cheese and pasta!)
- Carbohydrates: 50g
- Fat: 20g (depending on the milk and butter used)
- Fiber: 3g
As always, moderation and balance make for a deliciously healthy lifestyle! Enjoying this meal occasionally is part of the joy of food!
Final Thoughts
And there you have it, my friends! Creamy Cheesy Broccoli Pasta—a delightful dish that’s as comforting as a warm embrace and as versatile as you want it to be. Each bite takes me back to those bustling college nights filled with laughter and good friends, and I hope it brings you just as much joy!
So, gather your loved ones, whip up this dish, and create new memories of your own. Food is about more than just feeding our bodies; it’s about nourishing our souls. Thank you for cooking along with me today. Until next time, keep exploring and enjoying every morsel. Happy cooking, foodies!
Print
Creamy Cheesy Broccoli Pasta
- Total Time: 45 minutes
- Yield: 4 servings 1x
- Diet: Vegetarian
Description
A comforting and creamy pasta dish featuring broccoli and cheese, perfect for weeknight dinners or weekend feasts.
Ingredients
- 8 ounces pasta (e.g., penne or rotini)
- 2 cups fresh broccoli florets
- 2 cups milk
- 1 cup shredded cheese (e.g., cheddar or mozzarella)
- 2 tablespoons butter
- 2 tablespoons all-purpose flour
- Salt and pepper to taste
- Optional: grated Parmesan and red pepper flakes for serving
Instructions
- Cook the Pasta: Bring a large pot of salted water to a boil. Add the pasta and cook according to package instructions until al dente—about 8 to 10 minutes.
- Blanch the Broccoli: In the last 2 minutes of cooking time, add broccoli florets. Drain pasta and broccoli together.
- Make the Cheese Sauce: In a skillet, melt butter over medium heat. Stir in flour and whisk for about 1-2 minutes to create a roux.
- Add the Milk: Gradually pour in milk while whisking until thickened, about 3-5 minutes.
- Incorporate the Cheese: Reduce heat and stir in shredded cheese until melted and creamy.
- Combine with Pasta and Broccoli: Fold in pasta and broccoli, ensuring everything is well coated.
- Season It Up: Taste and adjust seasoning with salt and pepper. Add red pepper flakes if desired.
- Serve It Up: Spoon the pasta into bowls and sprinkle with grated Parmesan if using.
Notes
Feel free to use gluten-free pasta or mix in other veggies like cauliflower or spinach. Add grilled chicken for a heartier meal or pesto for a fresh twist.
- Prep Time: 15 minutes
- Cook Time: 30 minutes
- Category: Main Course
- Method: Baking
- Cuisine: Italian
Nutrition
- Serving Size: 1 serving
- Calories: 450
- Sugar: 7g
- Sodium: 400mg
- Fat: 20g
- Saturated Fat: 10g
- Unsaturated Fat: 8g
- Trans Fat: 0g
- Carbohydrates: 50g
- Fiber: 3g
- Protein: 20g
- Cholesterol: 60mg
Keywords: Creamy Pasta, Cheesy Broccoli Pasta, Comfort Food

Pancakes
Flipping Fluffy Pancakes: A Breakfast Love Letter
If there’s one dish that brings smiles and fleeting moments of pure happiness in my kitchen, it’s pancakes. Picture this: soft, fluffy stacks of goodness, golden brown and kissed with syrup. Just the thought evokes nostalgia and takes me straight back to childhood mornings filled with laughter, syrupy fingers, and the aroma of something magical sizzling on the stovetop. Welcome to Feastical, my cozy corner of the culinary universe where your taste buds dance and your cooking confidence soars! So, let’s turn your kitchen into a breakfast haven as we explore the art of pancake making.
The Pancake Journey: From My Griddle to Yours
I vividly remember how pancakes were always my family’s weekend ritual. Saturday mornings held a special charm as the sun peeked through the curtains and the kitchen sprang to life. My dad, the self-proclaimed pancake king, had this delightful tradition of letting us pick toppings. I can still hear the gentle sizzle as he flipped those pancakes with the finesse of a pro—sometimes perfectly round, and other times a beautiful abstract art in syrup!
One particularly memorable Saturday, I decided to give my dad a run for his money by attempting my very first pancake. Armed with flour-dusted hands and an eager heart, I soon discovered that flipping pancakes is as much an art as it is a science! I learned quickly when my first pancake went rogue and stuck to the pan, but the laughter and cheers from my family made it all worthwhile. Each flap and flip was met with a chorus of “You can do it!” and, oh boy, did it feel good.
Now, every time I whip up a batch of my classic fluffy pancakes, I’m not just cooking; I’m resurrecting warm memories and creating new ones. And guess what? You can be part of that pancake magic too! Just gather your ingredients, roll up your sleeves, and let’s dive into the pancake adventure!
Ingredients That Make Pancake Magic Happen
To create the fluffiest, most delightful pancakes, you’ll need a handful of well-loved ingredients. Here’s what you’re going to need:
- 1 cup all-purpose flour: The heart of your pancakes! If you want a gluten-free option, go for almond flour or a gluten-free baking blend.
- 2 tablespoons sugar: For a touch of sweetness! You can substitute with honey or maple syrup for a natural alternative.
- 1 tablespoon baking powder: This is your secret ingredient for that fluffy texture. Always check the expiration date—fresh is best!
- 1/2 teaspoon salt: A pinch of salt elevates flavor, making those sweet notes pop.
- 1 cup milk: Whole milk is perfect for a rich flavor, but feel free to use almond milk or oat milk for a dairy-free version.
- 1 egg: Acts as a binder and provides richness. If you’re vegan, a flax egg (1 tbsp flaxseed meal + 2.5 tbsp water, left to sit until gelatinous) works like a charm!
- 2 tablespoons melted butter: For that rich, buttery flavor. Swap with coconut oil for a dairy-free twist!
- 1 teaspoon vanilla extract: This adds warmth and that signature pancake aroma. Go for pure vanilla extract for the best flavor.
Step-by-Step Instructions: Cooking Up Sunshine
Ready to cook? Let’s get flipping! Here are the step-by-step instructions to create pancake perfection.
Step 1: Whisk It Up
In a medium-sized bowl, combine the flour, sugar, baking powder, and salt. Whisk those dry ingredients together until no lumps remain. This step is crucial for aerating the flour, which leads to fluffy pancakes.
Step 2: Mix the Wet Ingredients
In another bowl, combine milk, egg, melted butter, and vanilla extract. Whisk until those eggs are fully integrated with the other ingredients. It helps to bring the ingredients to room temperature for even cooking.
Step 3: Combine Dry and Wet
Pour the wet ingredients into the dry mixture. Stir gently until just combined—it’s okay if a few lumps remain. Overmixing leads to tough pancakes, and we want them light and airy!
Step 4: Heat It Up
Preheat a non-stick skillet or griddle over medium heat. You can test if it’s ready by sprinkling a few drops of water—if they dance and evaporate, you’re good to go! Add a small pat of butter for flavor—remember to let it melt evenly across the surface.
Step 5: Pour and Flip
Using a 1/4 cup measuring cup, pour the pancake batter onto the skillet. Cook until small bubbles form on the surface (about 2-3 minutes). When the edges look set and the center is bubbly, gently flip your pancake with a spatula. Cook for another 1-2 minutes on the other side until golden brown. Ah, perfection!
Step 6: Stack It Up
Transfer the cooked pancakes to a plate and cover them with a clean kitchen towel to keep warm while you repeat the process with the remaining batter.
Serving Suggestions: Making It Instagrammable
Presentation matters, especially when pancakes are involved. Stack your golden rounds on a plate, creating a delightful tower. Drizzle with warm maple syrup (or your preferred syrup), and don’t skimp on that—why not go a little wild with a dollop of whipped cream? Add freshness with berries—think strawberries, blueberries, or bananas. A light dusting of powdered sugar adds a sweet finish.
For the ultimate breakfast experience, serve with crispy bacon or sausage on the side. This not only adds protein but also creates a delightful sweet-and-savory balance.
Recipe Variations: Make It Yours
Now that you’ve mastered the classic pancake, it’s time to get creative! Here are some delicious variations to try next time:
-
Blueberry Bliss Pancakes: Toss a cup of fresh or frozen blueberries into your batter just before cooking for a fruity explosion!
-
Chocolate Chip Delight: Add a handful of semi-sweet or dark chocolate chips to the batter for a sweet treat. Who said pancakes can’t be dessert?
-
Banana Oatmeal Pancakes: Replace half the flour with rolled oats and add a mashed banana to the batter for a heartier version.
-
Nutty Banana Pecan Pancakes: Sprinkle chopped pecans and banana slices into the batter for a nutty crunch.
-
Lemon Zest Pancakes: Add a teaspoon of lemon zest for a zesty twist—perfect for brightening up your breakfast!
Chef’s Notes: My Pancake Evolution
As I reflect on my pancake journey, I can’t help but chuckle at a few kitchen disasters along the way. I once mistakenly added baking soda instead of powder, resulting in a rather explosive breakfast! But we laugh, we learn, and we perfect our craft. It’s incredible how pancakes have evolved since my childhood experiment—now they are not just food; they are a vessel for memories, creativity, and tradition. I’ve come to appreciate that cooking is kind of like life—it’s messy, but the best moments often come from the unexpected surprises.
FAQs and Troubleshooting
If you’re new to pancake-making or looking to fine-tune your technique, you might have a few burning questions. Here are some FAQs:
1. Why are my pancakes dense?
Dense pancakes typically result from overmixing the batter or not using enough leavening agent. Make sure to mix until just combined!
2. My pancakes stick to the pan! What do I do?
Ensure your pan is adequately preheated and greased. Use a good-quality non-stick skillet or griddle for best results!
3. Can I make the batter ahead of time?
Absolutely! You can prepare the batter and store it in the fridge for up to 24 hours. Just give it a gentle stir before using.
4. What if my pancakes burn?
Lower the heat slightly. Pancakes need medium heat to cook evenly. A griddle with adjustable temperature settings can be a game-changer!
Nutritional Info
While pancakes are undeniably delicious, they can also be a part of a balanced diet. Each serving of classic pancakes (without toppings) typically contains around 150-200 calories. You’ll find about 30g of carbs, 4g of protein, and less than 5g of fat.
For added nutrition, consider mixing in whole grains or pairing with fruit, yogurt, or lean proteins. This creates a hearty breakfast that fuels you throughout the day!
Final Thoughts: Your Pancake Love Affair Awaits
With the right ingredients, a pinch of passion, and the right technique, pancakes can just elevate your breakfast game from mundane to magical. Do you want to relive the cherished breakfast tradition? Or maybe create entirely new rituals with your loved ones? Chat, laugh, and pour those delicious memories into each batter-filled bite!
So, roll up those sleeves, dust off that spatula, and let’s make some pancakes that taste not just like food, but like love served warm and sweet. Happy flipping!
Print
Flipping Fluffy Pancakes
- Total Time: 30 minutes
- Yield: 4 servings 1x
- Diet: Vegetarian
Description
Delightful fluffy pancakes that bring smiles and nostalgia to your breakfast table.
Ingredients
- 1 cup all-purpose flour
- 2 tablespoons sugar
- 1 tablespoon baking powder
- 1/2 teaspoon salt
- 1 cup milk
- 1 egg
- 2 tablespoons melted butter
- 1 teaspoon vanilla extract
Instructions
- Whisk the flour, sugar, baking powder, and salt in a medium-sized bowl until no lumps remain.
- Mix the milk, egg, melted butter, and vanilla extract in another bowl until fully combined.
- Pour the wet ingredients into the dry mixture and stir gently until just combined.
- Preheat a non-stick skillet over medium heat and add a small pat of butter.
- Pour 1/4 cup of pancake batter onto the skillet and cook until bubbles form (about 2-3 minutes), then flip and cook for 1-2 minutes more until golden brown.
- Transfer cooked pancakes to a plate and cover to keep warm while repeating with remaining batter.
Notes
For a gluten-free option, substitute with almond flour or a gluten-free blend. Enhance flavors by adding fruits or chocolate chips to the batter.
- Prep Time: 15 minutes
- Cook Time: 15 minutes
- Category: Breakfast
- Method: Griddle Cooking
- Cuisine: American
Nutrition
- Serving Size: 1 serving
- Calories: 200
- Sugar: 5g
- Sodium: 300mg
- Fat: 6g
- Saturated Fat: 3g
- Unsaturated Fat: 3g
- Trans Fat: 0g
- Carbohydrates: 30g
- Fiber: 1g
- Protein: 4g
- Cholesterol: 30mg
Keywords: pancakes, breakfast, fluffy pancakes, easy recipe

Healthy Korean Fried Chicken
The Ultimate Guide to Healthy Korean Fried Chicken
Hey there, food lovers! Welcome back to Feastical, where the heartwarming aroma of culinary delights fills the air. Today, we’re diving into a dish that combines crunch, flavor, and a unique twist on a classic favorite – Healthy Korean Fried Chicken! Picture the scent of golden, crispy chicken infused with the savory notes of soy sauce, garlic, and a touch of spice. If you’re a fan of fried chicken but want a lighter, healthier version, you’re going to fall head over heels in love with this recipe.
Now, you might be wondering—what’s the secret to making fried chicken feel a little less guilty? It’s all about balance and a few smart swaps. I remember when I first tried this recipe; I was skeptical but curious—could I really recreate that crispy texture without dousing it in oil? Through a blend of air frying and a coat of cornstarch, I discovered that yes, I could! Today, I’m excited to share my secrets and help you impress your friends and family with this feel-good dish that’s packed with flavor but without the heavy guilt.
So, gather your ingredients, summon your inner chef, and let’s transform chicken into something truly special. We’re going to create a dish that not only satisfies your cravings but also gives you all the feels without any of the regrets. Ready? Let’s get cooking!
Personal Story
Let me take you back to my first encounter with Korean fried chicken. It was a chilly evening, and I was visiting a bustling city filled with the vibrant sights and sounds of street vendors. The moment I caught a whiff of that crispy, spicy goodness frying up on the street corner, my mouth started watering. I remember standing in line, chatting with my fellow foodies, and sharing laughs as we eagerly awaited the moment when our plate would be filled with those finger-licking pieces.
When I finally took my first bite, it was a revelation—a crunch that gave way to tender, flavorful meat, all drizzled in a sticky, spicy sauce that danced on my palate. It was love at first bite, and I knew I had to recreate that magical experience at home. After many trials (and a few errors), I finally landed on this healthier version, which allows me to indulge in those delicious flavors guilt-free. Now, I’m thrilled to pass this joy on to you!
Ingredients
To make this scrumptious Healthy Korean Fried Chicken, you’ll need the following ingredients:
-
Chicken Pieces
The star of the show! Feel free to use drumsticks, thighs, or boneless breast meat. If you’re looking for a leaner option, chicken breast is your best bet. Just ensure they’re well-trimmed to avoid any excess fat! -
Cornstarch
This magical ingredient is what gives our chicken that crispy texture without all the oil. You can swap it with arrowroot powder if you want a gluten-free option. -
Soy Sauce
A key component for that savory depth of flavor. If you’re watching your sodium intake, feel free to use low-sodium soy sauce or tamari for a gluten-free alternative. -
Garlic Powder
Adds a wonderful aroma and flavor that tackles any chicken dish by bringing it to life. For a fresher touch, you can use minced garlic instead. -
Ginger Powder
This gives the dish that distinctive zing that’s characteristic of Korean food. If you have fresh ginger, feel free to swap out about a teaspoon of fresh grated ginger instead! -
Black Pepper
It adds a subtle kick. You can adjust the amount according to your taste—darker pepper means more heat! -
Hot Sauce (optional)
For those who like it spicy! Feel free to use your favorite brand or even a homemade chili sauce for a personalized touch. -
Cooking Oil Spray (for air frying)
This keeps everything light and crispy while avoiding all that unnecessary oil. If you’re deep frying, then just regular oil will do. -
Green Onions (for garnish)
They add a fresh crunch and pretty colors! If you don’t have any, feel free to leave them out or use sesame seeds for a nutty finish.
Step-by-Step Instructions
Now that we have our ingredients lined up, let’s jump into the cooking!
-
Prep the Chicken
Start by washing and patting the chicken pieces dry with paper towels. This ensures they’re not too moist, which can prevent crispiness later on. For extra flavor, consider marinating them in a mix of soy sauce, garlic powder, ginger, and black pepper for at least 30 minutes (or even overnight if you have the time!). -
Coat the Chicken
In a large bowl, combine the cornstarch, garlic powder, ginger powder, and black pepper. Toss the marinated chicken pieces in the mixture until they are evenly coated. This coating is key for that crispy exterior! Feel free to use your hands or a pair of tongs for an even coat. -
Preheat the Air Fryer
If you’re using an air fryer, preheat it to about 400°F (200°C) for approximately 5 minutes. This step ensures that the chicken will cook evenly and attain that perfect crispiness. -
Place Chicken in Air Fryer
Lightly spray the air fryer basket with a bit of cooking oil to prevent sticking. Arrange the chicken pieces in a single layer (you might need to work in batches if you’re making a lot). Just remember, overcrowding the basket can lead to soggy chicken—nobody wants that! -
Air Fry the Chicken
Cook the chicken in the preheated air fryer for about 15 to 20 minutes, flipping halfway through. You want a beautiful golden-brown color and an internal temperature of 165°F (74°C). Feel free to spritz a little extra cooking spray halfway through cooking to amp up the crunch! -
Prepare the Sauce (optional)
If you want to add a little more flair, you can whip up a simple sauce while the chicken is cooking. Just mix together some soy sauce, honey or maple syrup, and a dash of hot sauce over medium heat until it thickens slightly. Toss your cooked chicken pieces in this sauce for a sticky, sweet finish! -
Serve Up!
Once your chicken is perfectly crispy, it’s time to serve! Transfer it to a plate or serving platter, and feel free to drizzle some of that optional sauce over it before garnishing with chopped green onions.
Serving Suggestions
Now, presentation matters just as much as taste! To plate your Healthy Korean Fried Chicken, you can create a beautiful spread by serving it alongside a vibrant salad or some fragrant jasmine rice. You could also serve the chicken in a lively lettuce wrap—perfect for a fun, interactive meal.
For a delightful touch, add an extra sprinkle of sesame seeds and a few slices of cucumber or radish on the side for garnish. This serves not only to beautify the dish but also to offer a refreshing crunch that balances out the rich flavors of the chicken.
Recipe Variations
-
Spicy Gochujang Glaze
For those who love a little fire, add some gochujang (Korean chili paste) to your sauce for a spicy twist! Mix in a teaspoon of vinegar to give it a tangy kick. -
Crispy Baked Version
If you don’t have an air fryer, you can bake the chicken instead. Preheat your oven to 425°F (220°C), place on a lined baking sheet, and bake for 25-30 minutes until golden brown. -
Honey Garlic Version
Swap the sauce with a honey garlic glaze by mixing honey, soy sauce, minced garlic, and a splash of vinegar. Simmer until thick and toss with cooked chicken! -
Sweet and Tangy Pomegranate Sauce
For a seasonal twist, create a sauce out of pomegranate juice, a splash of soy sauce, and a touch of honey. It adds a vibrant color as well as a sweet and tangy flavor. -
Hot Honey Drizzle
For a trendy flavor, drizzle hot honey over the cooked chicken. It gives a sweet heat that pairs well with the crispy texture!
Chef’s Notes
As we embrace the magic of cooking, remember that recipes are starting points. I’ve evolved this Healthy Korean Fried Chicken over time through trial and error, experimenting with different spices and cooking methods. The joy is in the process, and I always encourage you to add your unique touch. Got herbs sitting lonely in your fridge? Toss them in! Leftover vegetables making their way out? Pair them alongside your chicken!
And let me tell you, there have been moments in my kitchen where things didn’t go as planned—like when I accidentally mistaken baking powder for cornstarch. Oops! But every mistake is a lesson, and every lesson brings us closer to delicious perfection.
FAQs and Troubleshooting
1. Why isn’t my chicken crispy?
Make sure you’re not overcrowding the air fryer or baking sheet. Crispiness comes from adequate airflow around the chicken pieces!
2. Can I use skin-on chicken?
Absolutely! Skin-on chicken can add extra flavor and texture, although it’ll be ready in a bit longer. Just be mindful of the extra fat.
3. How can I store leftovers?
To preserve that crunch, store the chicken in an airtight container in the fridge. Avoid stacking them, and heat them up in the air fryer for a crispy reheat.
4. Can I freeze the coated chicken before cooking?
Yes, you can freeze the coated chicken pieces for later! Just make sure to label and date them for the best results. When you’re ready to cook, there’s no need to thaw—just cook them straight from the freezer.
Nutritional Info
While fried chicken is often viewed as an indulgence, this version packs in lots of positive notes. Here’s a basic rundown to help you feel good about your meal!
- Calories: Approximately 150 per serving (without sauce)
- Protein: 20 grams
- Fat: 6 grams (mostly from cooking oil/butter if used)
- Carbohydrates: 7 grams
- Fiber: 0 grams
- Sodium: Approximately 300 mg (this can vary based on the amount of soy sauce used)
Remember, nutrition counts can change based on the cooking method and specific brands used.
Final Thoughts
Cooking is a beautiful journey where culinary adventures await. With this Healthy Korean Fried Chicken recipe, you’re not just following a set of instructions; you’re creating memories, tastes, and stories at home. Whether you’re making it for a casual family dinner, a party with friends, or simply a cozy night in, this dish is sure to be a hit!
Take pride in serving up that crispy golden goodness, and don’t forget to share your creations with your loved ones—after all, good food is meant to be shared! I can’t wait to hear how you make this recipe your own, so be sure to come back here and share your delicious results! Happy cooking, and let’s dig into that healthy twist on a classic dish!
Print
Healthy Korean Fried Chicken
- Total Time: 50 minutes
- Yield: 4 servings
- Diet: Healthy
Description
A lighter take on a classic favorite, this Healthy Korean Fried Chicken features a crispy exterior and savory flavors without the guilt.
Ingredients
- Chicken pieces (drumsticks, thighs, or boneless breast)
- Cornstarch
- Garlic powder
- Ginger powder
- Black pepper
- Hot sauce (optional)
- Cooking oil spray (for air frying)
- Green onions (for garnish)
<li<Soy sauce
Instructions
- Prep the chicken by washing and patting dry.
- Coat the chicken with a mixture of cornstarch, garlic powder, ginger powder, and black pepper.
- Preheat the air fryer to 400°F (200°C).
- Place the chicken in a single layer in the air fryer basket.
- Air fry the chicken for 15 to 20 minutes, flipping halfway through.
- Prepare the sauce, if desired, while the chicken is cooking.
- Serve the chicken garnished with green onions.
Notes
For extra flavor, marinate the chicken in soy sauce, garlic powder, ginger, and black pepper for at least 30 minutes.
- Prep Time: 30 minutes
- Cook Time: 20 minutes
- Category: Main Course
- Method: Air Frying
- Cuisine: Korean
Nutrition
- Serving Size: 1 serving
- Calories: 150
- Sugar: 1g
- Sodium: 300mg
- Fat: 6g
- Saturated Fat: 1g
- Unsaturated Fat: 4g
- Trans Fat: 0g
- Carbohydrates: 7g
- Fiber: 0g
- Protein: 20g
- Cholesterol: 60mg
Keywords: Korean fried chicken, healthy chicken, air fryer recipes
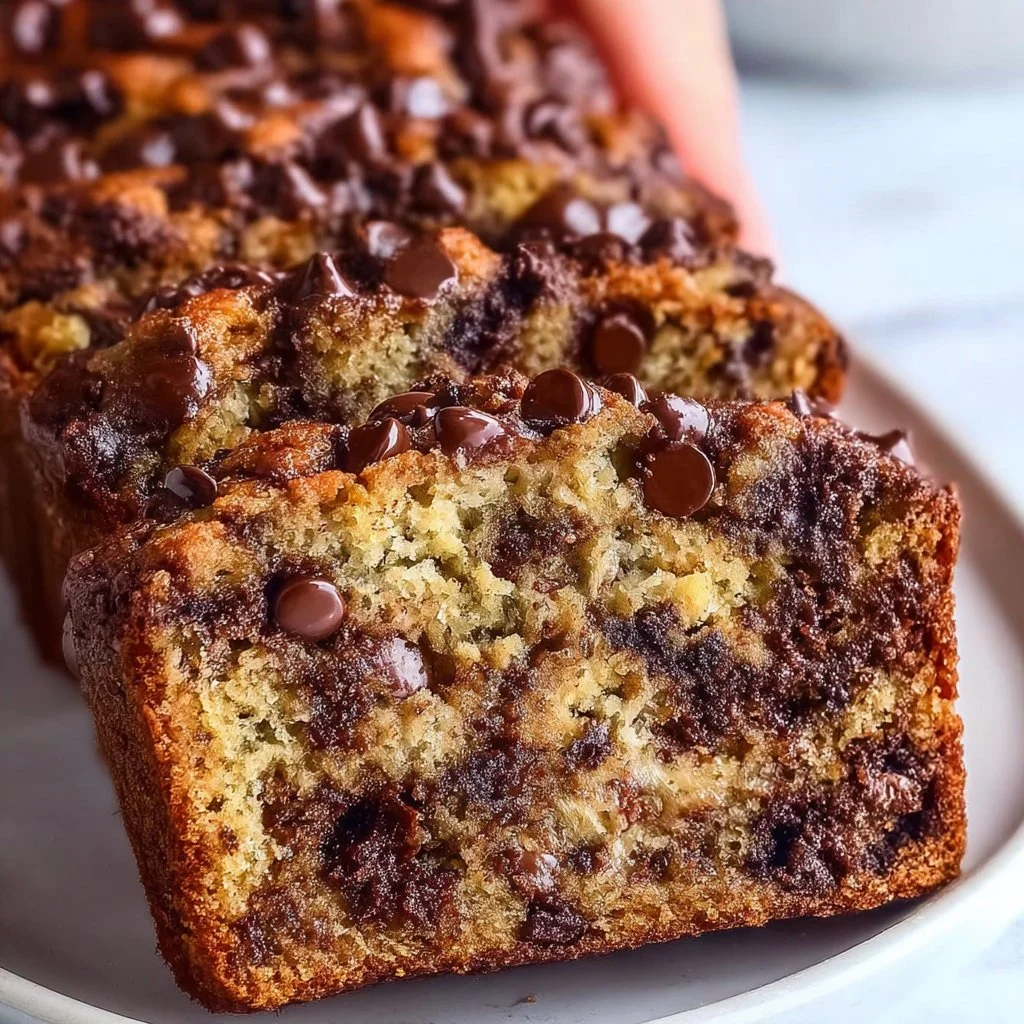
Chocolate Chip Banana Bread
The Ultimate Chocolate Chip Banana Bread: A Feel-Good Recipe
Hey there, food lovers! It’s Beau Collier here, and I’m absolutely thrilled to share one of my all-time favorite recipes with you today: Chocolate Chip Banana Bread! Whether you have a bunch of overripe bananas sitting on your counter, or you simply want to whip up something that smells like heaven and tastes even better, this recipe is your ticket to pure bliss. Seriously, nothing warms the soul quite like a fresh loaf of banana bread.
Banana bread might trigger nostalgic memories for many of you. Perhaps you remember the sweet aroma wafting through your home as a kid, or maybe you have that one friend who makes the best banana bread and has everyone begging for more. This is a dish that brings people together, one delightful slice at a time. Here at Feastical, we believe that food should not only nourish but also create moments and memories. So grab those bananas, crank up your oven, and let’s dive into this indulgent yet simple recipe.
This isn’t just regular banana bread, folks. No! We’re elevating it with rich, melty chocolate chips that will have your taste buds dancing from the first bite. Also, this banana bread is wonderfully versatile, making it perfect for breakfast, an afternoon snack, or even a decadent dessert. Trust me; you’ll be making this over and over!
So, let’s get started on this sweet adventure of baking together. Don’t worry, I’ll guide you every step of the way, and you’ll feel like a pro before you know it. Grab your apron, and let’s embark on this delicious journey!
Personal Story
I remember the first time I made a banana bread that truly blew my mind. I was a young chef in training, excited about the prospect of whipping up something comforting for my family. Our kitchen filled with the fragrant scent of baking bananas and chocolate, and everyone—yes, even my picky little brother—couldn’t resist wandering in for a taste. As the loaf cooled, I could hardly believe my eyes when, just minutes later, half of it disappeared.
It wasn’t just the deliciousness that made that day special; it was witnessing the joy on my family’s faces as they savored each bite. That experience stuck with me, leading me to experiment even more with banana bread recipes over the years. Every time I make it, I feel that same warmth spreading through my home and my heart. You’re not just creating a dish; you’re crafting a sweet moment in time.
Ingredients
Let’s break down the ingredients for this delightful Chocolate Chip Banana Bread. You’ll find that they’re simple, but each one adds a special touch to this masterpiece!
-
4 ripe bananas: The star ingredient! The riper the bananas, the sweeter and more flavorful your bread will be. If you only have green bananas, no worries—just let them ripen a few days, or you can speed up the process by placing them in a brown paper bag.
-
1/2 cup oil: This adds moisture to your banana bread. I like using vegetable or canola oil, but if you want a healthier option, feel free to swap in unsweetened applesauce or melted coconut oil!
-
1 cup sugar: The sugar sweetens the bread, and you can adjust this amount to your liking. Substitute half of it with brown sugar for a deeper flavor or use coconut sugar for a healthier option.
-
2 eggs: They help bind everything together and add richness. You can replace them with a flax egg (1 tablespoon of ground flaxseed mixed with 2.5 tablespoons water) for a vegan option.
-
1 teaspoon vanilla extract: This adds a warm, inviting essence to the bread that pairs beautifully with bananas and chocolate. Feel free to use almond extract if you want a different flair!
-
1 teaspoon baking soda: This is your leavening agent, helping the bread rise and achieve that soft, fluffy texture. Make sure it’s fresh for the best results!
-
1/2 teaspoon salt: A pinch of salt enhances the flavors and balances the sweetness. Don’t skip it!
-
1 1/2 cups all-purpose flour: The base of your bread. If you want, you can swap in whole wheat flour for a heartier bread or gluten-free flour to cater to dietary preferences.
-
1 cup chocolate chips: The cherry on top of this delightful muffin! Dark chocolate chips add a rich flavor, but you can also use milk chocolate for a sweeter bite or even white chocolate chips for something unique.
Step-by-Step Instructions
Now, let’s get down to the nitty-gritty of actually making this incredible Chocolate Chip Banana Bread. Follow these steps, and you’ll have a gorgeous loaf ready to devour!
-
Preheat your oven:
Preheat your oven to 350°F (175°C). This ensures an even bake, so don’t skip this part! It’s always good to start with a warm oven. -
Prepare your baking pan:
Grease a 9×5-inch loaf pan with cooking spray or butter, or line it with parchment paper for easy removal. Trust me, you don’t want your beautiful bread to stick! -
Mash those bananas:
In a large mixing bowl, mash your ripe bananas with a fork or potato masher. Aim for a smooth consistency—some small lumps are okay! This is where the sweetness and flavor will come from, so make it count! -
Mix wet ingredients:
Add in the oil, sugar, eggs, and vanilla extract to the bananas. Mix well until everything is combined and smooth. You want to ensure that the sugar is well incorporated into the banana mixture. -
Combine dry ingredients:
In a separate bowl, whisk together the flour, baking soda, and salt. Mixing the dry ingredients ahead of time will help ensure an even distribution of the leavening agent. -
Combine wet and dry mixtures:
Gradually add the dry ingredients to the wet mixture, stirring until just combined. Be careful not to over-mix—this helps keep your bread tender and soft. You want a few streaks of flour to remain! -
Fold in the chocolate chips:
Gently fold in the chocolate chips with a spatula. Feel free to add a few more on top for that gorgeous presentation! -
Pour the batter into the prepared pan:
Scrape your batter into the prepared loaf pan and smooth out the top with a spatula. -
Bake:
Place it in the preheated oven and bake for 55-65 minutes, or until a toothpick inserted in the center comes out clean. You might want to start checking around the 50-minute mark, just to be sure! -
Cool:
Once baked, remove your banana bread from the oven, and let it cool in the pan for about 10 minutes. Then, carefully transfer it to a wire rack to cool completely. No one likes soggy bread, and cooling helps develop that perfect texture!
Serving Suggestions
Once your masterpiece is cooled, it’s time to serve it up! Slice it into generous pieces, and you can enjoy it warm with a pat of butter for that extra cozy feeling. Want to take it to the next level? Serve it with a dollop of whipped cream or a scoop of ice cream on the side for an indulgent dessert!
Pair it with your favorite hot beverage—think a steaming cup of coffee or a comforting cup of tea. You might even want to drizzle a little melted chocolate on top or sprinkle some chopped nuts for an added texture and flavor boost. The possibilities are endless!
Recipe Variations
Why not mix it up a bit? Here are some fun variations to try with your Chocolate Chip Banana Bread:
-
Nutty Banana Bread: Add a cup of chopped walnuts or pecans for an extra crunch and flavor boost.
-
PB&J Twist: Swirl in a few tablespoons of peanut butter or your favorite jam before baking for a delightful surprise.
-
Cocoa Banana Bread: Mix in 1/4 cup of cocoa powder to turn your banana bread into a chocolate lover’s dream!
-
Dried Fruit Delight: Add a cup of dried cranberries or cherries for a burst of tartness that complements the sweetness of the bananas beautifully.
-
Spiced Banana Bread: Add a teaspoon of cinnamon or pumpkin spice for that warm, inviting aroma and flavor.
Chef’s Notes
This recipe has been a cherished staple in my kitchen for years and has been passed down through various iterations. A few years back, I decided to play around with the base recipe, and voilà! The Chocolate Chip Banana Bread was born, capturing all the joys of nostalgia while adding my personal touch. I love it more with each batch!
Remember, the best part about this recipe is that it can be adjusted to fit your preferences—don’t be afraid to experiment! I’ve had some mishaps in the kitchen along the way—like the time I accidentally swapped salt for sugar—but every mishap led to a masterpiece, and it can for you too!
FAQs and Troubleshooting
1. Why is my banana bread flat?
If your banana bread is flat, it could be due to expired baking soda or overmixing the batter. Ensure your leavening agent is fresh, and mix gently to keep the texture light and fluffy.
2. Can I freeze banana bread?
Absolutely! Wrap it tightly in plastic wrap and aluminum foil before freezing to maintain freshness. It’ll keep for up to three months—perfect for quick snacking!
3. How do I know when my banana bread is done?
Insert a toothpick in the center; if it comes out clean or with a few crumbs, it’s ready! If there’s wet batter, give it a few more minutes in the oven.
4. Can I use frozen bananas?
Definitely! Just ensure they’re thawed and well-drained before mashing them into your batter. This can work wonders in keeping your banana bread moist and flavorful!
Nutritional Information
Here’s a rough nutritional breakdown per slice (based on 12 slices per loaf):
- Calories: 200
- Protein: 2g
- Carbohydrates: 30g
- Fat: 9g
- Sugar: 10g
- Fiber: 1g
Keep in mind, nutritional values may vary based on your exact ingredients and portion sizes. Don’t let those numbers fool you—this is a recipe for the soul, and your happiness is invaluable!
Final Thoughts
And there you have it—a delightful journey through the making of the most scrumptious Chocolate Chip Banana Bread! I hope you’re feeling inspired and ready to create something magical in your kitchen. First and foremost, embrace the process and don’t shy away from adding your unique spin.
Food is meant for sharing, so once you’ve made this banana bread, slice it up, and share it with your loved ones—or keep it all to yourself if you wish (no judgment here!). Just make sure to savor every last bite, and most importantly, enjoy the moments that come with it.
Happy baking, friends! Until next time, keep the kitchen spirit alive and keep spreading the love one delicious dish at a time. Cheers! 🍌🍫
Print
The Ultimate Chocolate Chip Banana Bread
- Total Time: 80 minutes
- Yield: 12 slices 1x
- Diet: Vegetarian
Description
A heartwarming and indulgent recipe for chocolate chip banana bread, perfect for breakfast, snacks, or dessert.
Ingredients
- 4 ripe bananas
- 1/2 cup oil (vegetable or canola, or unsweetened applesauce for a healthier option)
- 1 cup sugar
- 2 eggs (or flax egg for a vegan option)
- 1 teaspoon vanilla extract
- 1 teaspoon baking soda
- 1/2 teaspoon salt
- 1 1/2 cups all-purpose flour (or whole wheat/gluten-free flour)
- 1 cup chocolate chips (dark, milk, or white)
Instructions
- Preheat your oven to 350°F (175°C).
- Prepare a 9 x 5-inch loaf pan with grease or parchment paper.
- Mash the ripe bananas in a large mixing bowl until smooth.
- Add the oil, sugar, eggs, and vanilla extract to the bananas, mixing until combined.
- Whisk together the flour, baking soda, and salt in a separate bowl.
- Combine the dry ingredients with the wet mixture, stirring gently until just combined.
- Fold in the chocolate chips.
- Pour the batter into the prepared loaf pan, smoothing the top.
- Bake for 55-65 minutes, or until a toothpick comes out clean.
- Cool in the pan for 10 minutes, then transfer to a wire rack.
Notes
You can customize the recipe by adding nuts, peanut butter, or cocoa powder for different flavor variations.
- Prep Time: 15 minutes
- Cook Time: 65 minutes
- Category: Dessert
- Method: Baking
- Cuisine: American
Nutrition
- Serving Size: 1 slice
- Calories: 200
- Sugar: 10g
- Sodium: 200mg
- Fat: 9g
- Saturated Fat: 1g
- Unsaturated Fat: 8g
- Trans Fat: 0g
- Carbohydrates: 30g
- Fiber: 1g
- Protein: 2g
- Cholesterol: 30mg
Keywords: banana bread, chocolate chip bread, comfort food

Sticky Garlic Chicken Noodles
Sticky Garlic Chicken Noodles
Hey there, fellow foodies! Welcome back to Feastical, where the aroma of delicious food fills the air, and the stories are served alongside the dishes. Today, I’m excited to share one of my all-time favorite recipes that never fails to bring a smile to my face—and hopefully, to yours too!
We’re diving into the wonderful world of Sticky Garlic Chicken Noodles, a dish that perfectly embodies comfort food with a twist of Asian flavors. Imagine tender, juicy chicken pieces enveloped in a glossy, sticky sauce that’s rich with garlic and just the right hint of sweetness. Pair it with noodles that soak up all that flavor, and you’ve got yourself a bowl of happiness.
One of the things I love about this dish is its versatility. It’s the kind of meal that you can whip up on a Wednesday night after a long day or make a special occasion out of by inviting friends over. And trust me, this dish will have everyone coming back for seconds!
As you prepare to create your own plate of Sticky Garlic Chicken Noodles, let’s set the stage. Think cozy kitchens where laughter mingles with sizzling sounds. Picture friends gathered around a table, sharing stories, and indulging in delicious food that warms the heart. So, grab your apron, let’s channel that kitchen magic, and embark on this culinary adventure together!
Personal Story
Let me take you back a few years to a rainy Saturday evening. The kind of day that felt perfect for lounging around with the smell of something delicious wafting through the house. My best friend, Jenna, and I decided to turn our gloomy day around by concocting something tasty. We rummaged through the fridge, which, believe me, was more of a surprise party than a well-stocked pantry.
After some quick brainstorming, we landed on the idea of sticky garlic chicken noodles! Armed with a few random ingredients, we got to work. The kitchen was our playground. We danced to our favorite tunes, giggling every time garlic made us sneeze and shouting "taste test!" more than we probably should have.
After a couple of hilarious mishaps involving flying noodles and overzealous spice pouring, we finally nailed the recipe! There we were with bowls in hand, and I kid you not, we ended up eating almost the whole thing in one sitting. We called it a victory and later dubbed that night “the Great Chicken Noodles Adventure.” Now, whenever I make this dish, it brings back those joyful memories of friendship, laughter, and, of course, the irresistible taste that made us feel right at home.
Ingredients
Here’s what you’ll need to get crackin’ with these scrumptious Sticky Garlic Chicken Noodles:
-
1 lb chicken breast or thighs, cut into bite-sized pieces
Tip: Breasts are leaner, but thighs offer more flavor and tenderness. Use thin cuts to ensure quicker cooking! -
1/4 cup soy sauce
Insight: This is the backbone of your sticky sauce. For a gluten-free option, feel free to use tamari! -
3 tbsp honey
Tip: Honey adds sweetness and stickiness. If you want a vegan option, maple syrup works great too! -
4 garlic cloves, minced
Insight: Fresh garlic is a must here! The flavor is way bolder than the dried option. Feel free to add more if you’re a garlic lover like me! -
1 tsp grated ginger
Tip: Ginger brings warmth and complexity. If you don’t have fresh ginger, ground ginger will do, but reduce to about 1/4 tsp. -
1/2 tsp red chili flakes (optional)
Insight: Spice level is all about preference! Remove it for a milder dish or crank it up if you love the heat. -
2 tbsp cornstarch
Tip: This thickens your sauce and gives it that coveted sticky texture. If cornstarch isn’t on hand, arrowroot powder can work too! -
2 tbsp vegetable oil
Insight: You need this for frying the chicken. Canola or peanut oils are also great choices for a high smoke point. -
8 oz noodles (rice noodles or egg noodles)
Tip: I love using rice noodles for their chewiness, but egg noodles add a lovely richness. Cook them according to package directions! -
2 green onions, chopped
Insight: Adds color and freshness! Use both the white and green parts for maximum flavor. -
1 tsp sesame seeds (optional)
Tip: Toast them for an extra nutty flavor! They make a fantastic garnish.
Step-by-Step Instructions
Let’s get your cooking game on and create some magic in the kitchen! Here’s how to make these sticky garlic chicken noodles step by step:
Step 1: Prepare the Chicken
Start by cutting your chicken into bite-sized pieces. Call your inner chef out! If you keep the pieces uniform, they’ll cook evenly. Season them with a pinch of salt and pepper.
Step 2: Whip Up the Sauce
In a mixing bowl, combine the soy sauce, honey, minced garlic, grated ginger, and chili flakes if you’re going for that kick. Give it a good whisk to blend everything and set it aside. Oh, the smell of garlic already has me excited!
Step 3: Coat the Chicken
Now comes the cornstarch! Sprinkle the cornstarch over the chicken and toss it well to coat. This little step ensures your chicken gets that awesome crispy texture when cooked—definitely a chef hack I swear by.
Step 4: Heat Things Up
In a large skillet or wok, heat the vegetable oil over medium-high heat. When the oil is shimmering, carefully add your chicken in a single layer. Avoid crowding, as that can lead to steaming instead of browning!
Step 5: Sauté the Chicken
Cook the chicken for about 4-5 minutes, until golden brown. Flip them occasionally for even cooking. The smell will be spectacular! You can also check to make sure the chicken is cooked through by slicing one piece—no pink means it’s perfection!
Step 6: Add the Sauce
Once the chicken is cooked, lower the heat to medium and pour in your prepared sauce. Stir it into the chicken, watching it bubble with excitement. This is where the magic happens!
Step 7: Thicken the Sauce
Continue to cook for an additional 2-3 minutes until the sauce becomes dark and sticky; your patience is about to be rewarded. If you want it thicker, mix an extra 1 tsp of cornstarch with a splash of water, then add it to the pan, stirring until combined.
Step 8: Cook Your Noodles
While the chicken is becoming perfect, cook your noodles according to the package instructions. Drain and add them to the skillet with the chicken and sauce. Toss everything together to coat the noodles in that glorious sticky goodness!
Step 9: Garnish and Serve
Once everything is evenly mixed, toss in the chopped green onions and give it one last stir. Yum! Now your sticky garlic chicken noodles are ready to shine.
Serving Suggestions
To plate this divine dish, take generous servings and twirl the noodles onto a large dish. Drizzle any remaining sauce on top to make it glisten. Sprinkle sesame seeds on top for that extra crunch and a pop of flavor.
Pair this dish with a side of steamed broccoli or snap peas for color and nutrition. If you’re feeling fancy, serve it up with chopsticks, or stick with a classic fork—no judgment here! This dish looks as good as it tastes, and your guests will be impressed!
Recipe Variations
Now that you have the base recipe, let’s unleash your culinary creativity! Here are some fun variations to consider:
-
Add Veggies: Toss in mixed veggies like bell peppers, carrots, or snap peas when you add the sauce for color and crunch.
-
Noodle Swap: Use soba noodles or udon for different textures. You can also try zucchini noodles for a lower-carb option!
-
Hermit’s Delight: Turn up the heat! Add sliced fresh chilies to the pan or a drizzle of sriracha for a fiery kick.
-
Crunchy Toppings: Consider topping with crushed peanuts or cashews for some added crunch and nutty flavors.
-
Make It Lemon-Garlic: Squeeze in some fresh lemon juice and add lemon zest for a bright twist on the dish.
Chef’s Notes
This recipe has definitely evolved over time. I remember making it for the first time with whatever I had on hand, and over the years, I played around with the flavors and ingredients until I hit pure gold. Each time I make it, it’s a little different depending on my mood or what’s in the fridge!
I still chuckle thinking about that first disastrous attempt at dinner with Jenna. Who knew a flying noodle could be so entertaining? It reminds me that cooking is about having fun and not taking everything too seriously. Enjoy the journey—the delicious destination is just a bonus!
FAQs and Troubleshooting
Q1: My sauce isn’t thickening. What went wrong?
If your sauce isn’t thickening, it might be due to not cooking it long enough after adding the cornstarch. Make sure to give it a few good minutes, letting it bubble away for the starch to activate.
Q2: Can I prepare the chicken in advance?
Absolutely! Marinate the chicken in the sauce overnight for deeper flavor, then cook it the next day for a quick meal.
Q3: What do I do if my noodles get clumpy?
If your noodles stick together, rinse them in cold water right after cooking, or toss them with a little oil before adding them to the main dish.
Q4: Can I freeze leftovers?
For sure! You can freeze the sticky garlic chicken noodles in an airtight container for up to 3 months. Just remember to reheat slowly to restore that sticky goodness.
Nutritional Info
While I don’t provide strict nutritional breakdowns (because let’s be real, we’re here for the joy of cooking and eating), I can share that this dish is well-balanced! You’ve got lean protein from the chicken, carbs from the noodles, and lots of flavor, thanks to the garlic and ginger. A balanced diet is all about moderation, so enjoy your sticky garlic chicken noodles guilt-free!
Final Thoughts
And there you have it—your very own bowl of sticky garlic chicken noodles, brimming with flavors and memories! I hope you had as much fun reading through this recipe as I did sharing it. Cooking is more than just whipping up a meal; it’s about creating moments and memories that last a lifetime.
Whether you enjoy it by yourself with a cozy movie or share it with friends around your dining table, this dish is sure to bring a smile to your face. So, the next time you’re looking for something that feels like a warm hug—and tastes even better—give these sticky garlic chicken noodles a try.
Thank you for joining me on this flavorful journey! Until next time, keep enjoying, experimenting, and most importantly, feasting!
Print
Sticky Garlic Chicken Noodles
- Total Time: 40 minutes
- Yield: 4 servings 1x
- Diet: Non-Vegetarian
Description
A comforting dish featuring tender chicken pieces in a glossy, sticky garlic sauce, paired with noodles that soak up all the flavors.
Ingredients
- 1 lb chicken breast or thighs, cut into bite-sized pieces
- 1/4 cup soy sauce
- 3 tbsp honey
- 4 garlic cloves, minced
- 1 tsp grated ginger
- 1/2 tsp red chili flakes (optional)
- 2 tbsp cornstarch
- 2 tbsp vegetable oil
- 8 oz noodles (rice noodles or egg noodles)
- 2 green onions, chopped
- 1 tsp sesame seeds (optional)
Instructions
- Prepare the Chicken: Cut your chicken into bite-sized pieces and season with salt and pepper.
- Whip Up the Sauce: Combine soy sauce, honey, minced garlic, grated ginger, and chili flakes in a bowl and set aside.
- Coat the Chicken: Sprinkle cornstarch over the chicken and toss to coat.
- Heat Things Up: In a skillet, heat vegetable oil over medium-high heat. Add chicken in a single layer.
- Sauté the Chicken: Cook for 4-5 minutes until golden brown, flipping occasionally.
- Add the Sauce: Pour in the prepared sauce, lower heat to medium, and stir into the chicken.
- Thicken the Sauce: Cook for an additional 2-3 minutes until the sauce is dark and sticky. Add more cornstarch if needed.
- Cook Your Noodles: Cook noodles according to package instructions, drain, and add to the skillet.
- Garnish and Serve: Mix in chopped green onions and serve garnished with sesame seeds.
Notes
For a gluten-free option, use tamari instead of soy sauce. Feel free to add mixed veggies or try different noodle varieties for unique twists!
- Prep Time: 15 minutes
- Cook Time: 25 minutes
- Category: Main Course
- Method: Stir-frying
- Cuisine: Asian
Nutrition
- Serving Size: 1 serving
- Calories: 450
- Sugar: 10g
- Sodium: 800mg
- Fat: 16g
- Saturated Fat: 2g
- Unsaturated Fat: 12g
- Trans Fat: 0g
- Carbohydrates: 50g
- Fiber: 2g
- Protein: 30g
- Cholesterol: 80mg
Keywords: chicken, noodles, garlic, Asian cuisine, comfort food

No-Bake Chocolate Cheesecake
Indulgence Awaits: No-Bake Chocolate Cheesecake Recipe
Introduction
Hey there, fellow food lovers! If you’re anything like me, the thrill of whipping up something scrumptious in the kitchen is hard to resist. And when it comes to desserts, let’s face it—nothing feels quite as decadent as a rich slice of chocolate cheesecake. But what if I told you there’s a way to enjoy this luscious treat without even turning on your oven? Yup, you guessed it! Today, we’re diving into the world of No-Bake Chocolate Cheesecake, the kind of dessert that’s both unbelievably delicious and incredibly easy to make.
I still remember the first time I discovered no-bake desserts. It was a sweltering summer afternoon, and I wanted to make something sweet for the family without heating up the house. My mom handed me her old, handwritten cookbook, and I stumbled upon a no-bake cheesecake recipe. I was intrigued! Could this really work? A quick trip to the kitchen, a few simple ingredients, and voilà—an amazing, creamy dessert appeared without the need for baking. That moment turned into a cherished family tradition, and to this day, my loved ones haven’t let me live it down when I “forget” to bring the cheesecake to gatherings!
So why does this No-Bake Chocolate Cheesecake stand out? It’s a delightful marriage of silky cream cheese filling, rich melted chocolate, and a crunchy Oreo crust that provides the perfect texture contrast. Plus, the beauty of this recipe is in its versatility! You can dress it up with toppings or keep it simple, and it’s absolutely foolproof.
Are you ready to become a no-bake cheesecake magician? Grab your apron—and maybe a spoon—because we’re about to embark on a chocolaty journey that will have your taste buds dancing with delight!
Personal Story
Just the other day, I found an old photo of my family gathered around the table for a backyard BBQ. There I was, grinning ear to ear, with my plate full of my famous No-Bake Chocolate Cheesecake. I can still hear my siblings arguing over who got the last piece, and the delightful chaos that followed. It was one of those perfect summer nights where laughter flowed as freely as the lemonade, and the stars twinkled overhead like a sparkle of happiness.
Reflecting on that memory takes me back to the kitchen, standing on a chair, eagerly mixing cream cheese and melted chocolate while sneaking bites (no shame!). Every time I make this cheesecake, I’m reminded of those joyful gatherings and how this one dessert can bring everyone together. It’s not just about satisfying a sweet tooth; it’s about creating moments that last a lifetime. So, let’s whip up this deliciousness and make some memories of our own!
Ingredients
To create this heavenly No-Bake Chocolate Cheesecake, you’ll need some simple ingredients that come together to make an unforgettable dessert. Here’s what you’ll need:
-
Oreo cookies (for crust): These delightful chocolate cookies bring the perfect crunch and flavor to the crust. You can substitute them with any chocolate cookie or graham crackers if you’re looking for a change or gluten-free option!
-
Butter (melted, for crust): Melted butter binds the cookie crumbs together to form a solid crust. If you want a lighter option, coconut oil can step in as a great alternative.
-
Cream cheese (softened): The star of our cheesecake! Make sure to use softened cream cheese for a creamy texture. If you’re after a lighter version, you can use reduced-fat cream cheese or even mascarpone cheese.
-
Sugar: A blend of granulated sugar adds sweetness to the filling. You could switch it for powdered sugar for a smoother texture.
-
Heavy cream: Whipping cream is key for that fluffy, velvety consistency. For a dairy-free version, coconut cream works wonderfully.
-
Chocolate (melted, for filling): Use high-quality dark chocolate for a rich, indulgent flavor. Milk chocolate or semi-sweet chocolate also make a delicious filling, depending on your preference.
-
Chocolate ganache (for topping): This decadent layer adds an extra touch of luxury. You can substitute with a simple chocolate glaze if you’re short on time!
-
Whipped cream (for topping): Light and airy, whipped cream completes the cheesecake beautifully. For a lower-cal option, whipped coconut cream is a fantastic substitute!
Step-by-Step Instructions
Now that we’ve gathered our ingredients, it’s time to dive into the fun part: making the No-Bake Chocolate Cheesecake! Follow these steps to create your masterpiece:
-
Prepare the Oreo Crust:
- In a food processor, pulse the Oreo cookies until they resemble fine crumbs. If you don’t have a food processor, you can place the cookies in a ziplock bag and crush them with a rolling pin—don’t forget to release your inner stress while doing so!
- In a medium bowl, mix the cookie crumbs with melted butter until fully combined. You want the mixture to hold together, so if it looks too dry, add a bit more butter.
-
Press the Crust:
- Take the crust mixture and firmly press it into the bottom of a 9-inch springform pan. Make sure it’s evenly spread and compact; you can use the bottom of a glass to help with this step. The firmer the crust, the better it will hold up once the cheesecake is chilling!
-
Make the Filling:
- In a large mixing bowl, beat the softened cream cheese with an electric mixer until smooth and creamy.
- Gradually add in the sugar, mixing until well-combined. If you’re like me and tend to sneak a taste, now’s your chance—just a little pinch won’t hurt!
-
Melt the Chocolate:
- You can melt your chocolate in the microwave in 30-second intervals or use a double boiler for precision. Allow the melted chocolate to cool slightly before adding it to the cream cheese mixture to prevent it from curdling the cheese.
-
Add Whipped Cream:
- In another bowl, whip the heavy cream until soft peaks form. This step is crucial for achieving that airy lightness in your cheesecake.
-
Combine Ingredients:
- Gently fold the melted chocolate into the cream cheese mixture until just combined. Then add the whipped cream, folding gently to maintain that fluffy texture. The key here is not to overmix!
-
Pour the Filling:
- Pour the cream cheese filling into the prepared crust and spread it evenly. This is the moment where every chocolate lover’s heart skips a beat!
-
Chill:
- Cover the cheesecake with plastic wrap and place it in the refrigerator for at least 4-6 hours, or overnight if you can wait. The longer it sets, the more flavorful and firm it becomes!
-
Prepare the Ganache:
- Once ready to serve, prepare the chocolate ganache by heating cream and pouring it over chopped chocolate. Let it sit for a minute, then stir until smooth. Pour over the chilled cheesecake for that stunning finish.
-
Serve:
- Decorate with dollops of whipped cream on top, maybe sprinkle a few crushed Oreos, or add a fresh berry for a pop of color. Slice and admire your creation before digging in!
Serving Suggestions
When it comes to plating, think about making it as visually appealing as it is delicious. Here are a few ideas to up your serving game:
-
Garnish: Top your cheesecake with whipped cream swirls and a sprinkle of crushed Oreo cookies for that extra touch. Add a chocolate drizzle for creativity that presents beautifully.
-
Plating: For a chic presentation, cut your cheesecake into elegant wedges and plate with a fresh raspberry or a mint leaf beside it. A drizzle of chocolate sauce on the plate can elevate the look!
-
Pairing: Serve with a side of fresh berries or a dollop of vanilla ice cream. The berry tartness contrasts nicely with the rich chocolate flavor, creating a flavor explosion in every bite!
Recipe Variations
Why stick to just one flavor when you can have a variety? Here are a few creative twists you might consider trying:
-
Peanut Butter Chocolate Cheesecake: Swirl in creamy peanut butter into the filling for a decadent twist!
-
Mint Chocolate Cheesecake: Add a few drops of peppermint extract to the filling for a refreshing minty experience.
-
Mocha Cheesecake: For a coffee kick, add a tablespoon of instant coffee granules to the melted chocolate—perfect for coffee lovers!
-
Fruit Toppings: Top with fresh strawberries, raspberries, or even caramelized bananas for a fruit-forward dessert that brings brightness to each bite.
-
Nutty Crunch: Mix crushed nuts such as pecans or walnuts into the crust for a luxurious crunch and nutty flavor.
Chef’s Notes
This recipe has seen many iterations over the years! Initially, it started as a simple dessert made with just cream cheese and chocolate. However, I have found that incorporating a rich buttery crust and a fluffy whipped cream texture takes it to the next level. Plus, my family has grown to love the variations—sometimes I even have to make two different cheesecakes to keep the peace at gatherings!
Oh, and I’ll admit, there have been some memorable moments in the kitchen where my siblings ‘helped’ by sneaking bites of the filling, leaving less for the cheesecake itself. Memories like that remind me that cooking isn’t just about the food; it’s about the laughter and love that fill the air.
FAQs and Troubleshooting
-
Why did my cheesecake not set well?
- Ensure your cream cheese was softened to room temperature and that you allowed enough time for it to chill in the refrigerator. A good 4-6 hours is essential for a firm texture.
-
Can I freeze the cheesecake?
- Absolutely! Just make sure to wrap it tightly in plastic wrap and aluminum foil. When you’re ready to serve, let it thaw in the fridge before slicing.
-
How long does the cheesecake last?
- This delightful dessert can last about 4-5 days in the fridge. Just be sure to cover it well!
-
Can I use flavored cream cheese?
- Sure thing! Chocolate or even strawberry flavored cream cheese can add an interesting twist to your cheesecake!
Nutritional Info
This No-Bake Chocolate Cheesecake is rich and creamy, perfect for indulgent moments! If you’re mindful of calories, a typical slice has about 350-400 calories. To reduce calories, consider using reduced-fat cream cheese and a lighter whipped cream option. Here’s a quick rundown of the average nutritional values per slice:
- Calories: 350
- Total Fat: 25g
- Saturated Fat: 15g
- Carbohydrates: 30g
- Sugars: 20g
- Protein: 5g
Final Thoughts
And there you have it! A No-Bake Chocolate Cheesecake that’s simple to make, deliciously decadent, and perfect for any occasion. Whether you’re hosting a dinner party, bringing a sweet treat to a potluck, or just indulging yourself on a cozy evening, this recipe promises to bring smiles and love to your table.
As you take your first bite, relish the creamy chocolate goodness and think of how easy it was to create! So get out there, get mixing, and remember: cooking is best when shared—and every slice comes with a side of joy. Happy baking (or should I say, mixing?)! Enjoy!
Print
No-Bake Chocolate Cheesecake
- Total Time: 360 minutes
- Yield: 8 servings 1x
- Diet: Vegetarian
Description
Indulge in this rich and creamy No-Bake Chocolate Cheesecake, perfect for any occasion.
Ingredients
- 24 Oreo cookies (for crust)
- 1/2 cup melted butter (for crust)
- 16 oz cream cheese (softened)
- 3/4 cup granulated sugar
- 2 cups heavy cream
- 8 oz chocolate (melted, for filling)
- 1 cup chocolate ganache (for topping)
- 1 cup whipped cream (for topping)
Instructions
- Prepare the Oreo crust by pulsing cookies in a food processor until fine crumbs, then mix with melted butter.
- Press the crust mixture into the bottom of a 9-inch springform pan.
- Make the filling by beating softened cream cheese until smooth, then gradually adding sugar.
- Melt the chocolate in the microwave or double boiler and allow it to cool slightly.
- Add the cooled melted chocolate to the cream cheese mixture.
- Whip the heavy cream until soft peaks form, then fold it into the cream cheese mixture.
- Pour the cream cheese filling into the prepared crust and spread evenly.
- Chill in the refrigerator for at least 4-6 hours, or overnight.
- Prepare the chocolate ganache by heating cream and pouring it over chopped chocolate.
- Serve with dollops of whipped cream on top and enjoy!
Notes
For variations, consider adding peanut butter or mint extract for different flavors.
- Prep Time: 20 minutes
- Cook Time: 0 minutes
- Category: Dessert
- Method: No-Bake
- Cuisine: American
Nutrition
- Serving Size: 1 slice
- Calories: 350
- Sugar: 20g
- Sodium: 250mg
- Fat: 25g
- Saturated Fat: 15g
- Unsaturated Fat: 7g
- Trans Fat: 0g
- Carbohydrates: 30g
- Fiber: 1g
- Protein: 5g
- Cholesterol: 60mg
Keywords: chocolate cheesecake, no-bake dessert, easy dessert, cream cheese, Oreo crust