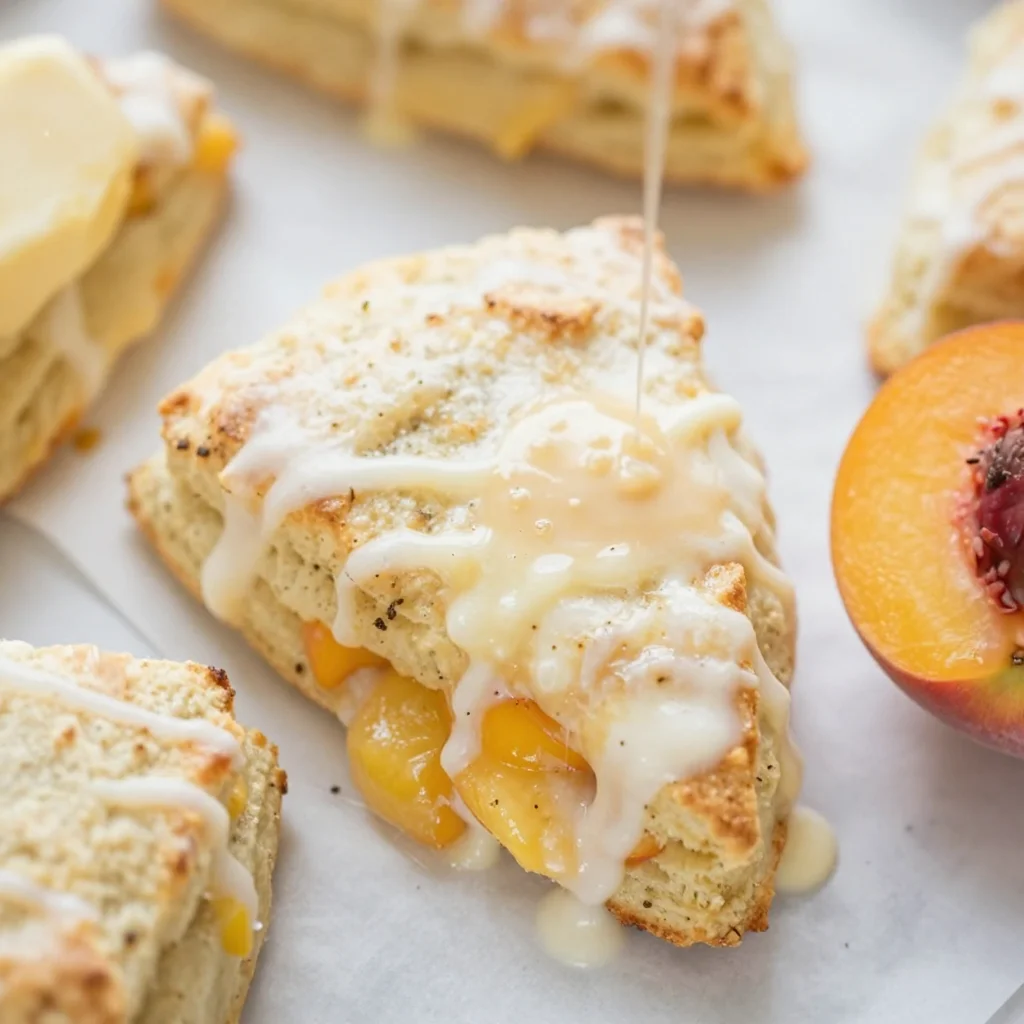
Peach Scones
Peach Scones: Baked Memories in Every Bite
Hey there, food lover! Let’s chat about one of my absolute favorite treats in the world of baking: peach scones. There’s something so comforting and delightful about biting into a warm, flaky scone filled with juicy peaches, especially when the sun is rising, and the aroma dances through the kitchen. Just the thought of it makes me smile! Now pull up a chair and let’s dive into the sweet and buttery world of peach scones together.
A Slice of Nostalgia
Back in my childhood, summer meant one thing: fresh peaches were in season. My family would take annual trips to the local orchard, where we’d spend the day picking the ripest peaches we could find. I still remember the joy of selecting the fruit, and of course, that meaningful competition with my siblings—who could pick the biggest and juiciest peach? Those summer days were filled with laughter, sun, and the sweet scent of peaches in the air.
Once we returned home, my mom would whip up peach scones that made the entire house smell heavenly. The scones emerged from the oven, golden and warm, and each bite was a delightful mix of tender dough and ripe peaches. It’s one of those traditions that stuck with me, a little slice of my past that I still cherish today. This recipe isn’t just for baking—it’s a way to keep those warm memories alive. Now let’s get baking!
Ingredients
To create your own batch of delicious peach scones, you’ll need the following ingredients:
-
2 cups all-purpose flour
This is the base of your scones. If you want a lighter texture, you can substitute half with cake flour. -
1/4 cup sugar
Adds just the right amount of sweetness. Feel free to swap it with honey or maple syrup (reducing the liquid content elsewhere slightly). -
2 teaspoons baking powder
This is your leavening agent, making those scones fluffy! Be sure it’s fresh for the best rise. -
1/2 teaspoon baking soda
Adds tenderness to the scone, especially when paired with the buttermilk. -
1/2 teaspoon salt
Enhances flavor beautifully—don’t skip it! -
1/2 cup unsalted butter, chilled and cubed
Cold butter is essential for creating that flaky texture. If you’re dairy-free, coconut oil can work as a substitute—just make sure it’s solid! -
3/4 cup buttermilk
Adds richness and flavor. You can make a quick substitute by mixing 3/4 cup milk with 1 tablespoon vinegar and letting it sit for a few minutes. -
1 cup fresh peaches, diced
The star of the show! Choose ripe peaches for maximum sweetness. For a twist, try using blueberries or strawberries instead. -
1 teaspoon vanilla extract
Adds depth to the flavor. You could experiment with almond extract for a unique spin!
Step-by-Step Instructions
Now, let’s get you to the fun part—baking your peach scones! Follow these steps to create something magical:
-
Preheat your oven to 400°F (200°C). This is the perfect temperature for baking scones, ensuring they rise beautifully and become golden brown.
-
Whisk the dry ingredients together. In a large mixing bowl, combine the flour, sugar, baking powder, baking soda, and salt. Stir until everything is evenly mixed. This step is crucial; it helps distribute the leavening agents evenly so every bite is perfect!
-
Add the butter. Toss those chilled, cubed chunks of unsalted butter right into the flour mixture. Using a pastry cutter or your fingers, work the butter into the mix until it resembles coarse crumbs. You want those bits of butter to stay cold and chunky for that lovely, flaky texture.
-
Pour in the buttermilk and vanilla. Gently mix these liquids into the dry ingredients until just combined. Here’s a pro tip: overmixing can lead to tough scones, which we definitely want to avoid, so be gentle!
-
Fold in the peaches. Carefully incorporate your diced fresh peaches into the dough. Use a spatula or your hands, being mindful not to crush those lovely peach pieces.
-
Shape the dough. Lightly flour a clean work surface and turn the dough out. Gather it into a ball, then flatten it into a disk about 1-inch thick. Use a knife (or pizza cutter) to slice the disk into wedges, like a pizza!
-
Transfer to a baking sheet. Line a baking sheet with parchment paper and arrange the scone wedges on it, leaving space between each piece. Brush the tops with a bit of buttermilk for that perfect golden finish.
-
Bake those beauties! Pop your tray into the preheated oven and bake for 15-20 minutes or until the scones are puffed up and golden brown. Your kitchen will smell incredible during these minutes!
-
Cool and enjoy. Once baked, let them cool for a few minutes on a wire rack. A little patience here is worth it—those warm, flaky scones are coming your way!
Serving Suggestions
Now that your peach scones are baked to perfection, let’s talk about serving them. They shine brightest when served warm, maybe with a little dab of butter or a drizzle of honey. If you’re feeling extra indulgent, whip up some fresh whipped cream or pair them with a side of clotted cream for a touch of elegance.
You could also serve these scones alongside a cup of tea or coffee for a cozy afternoon treat. Arrange them on a pretty platter or even within a rustic basket lined with a linen napkin. They’ll be the star of any brunch table!
Recipe Variations
While peach scones are divine as they are, let me tempt you with a few creative twists to keep things exciting:
-
Spicy Peach Scones: Add a 1/2 teaspoon of ground cinnamon or ginger to the dry ingredients for a warm, spicy kick that perfectly complements the sweetness of the peaches.
-
Cream Cheese Peach Scones: Incorporate small chunks of cream cheese into the dough for a richer, creamier texture. You can replace 1/4 cup of butter with room temperature cream cheese.
-
Savory Peaches: Go unexpected by adding crumbled feta or sharp cheddar cheese along with some fresh herbs (like thyme or basil) for a delicious savory twist!
-
Chilled Peach Scones: For summer, you could experiment by adding lemon zest and a touch of lemon juice, making the flavors refreshing and perfect for warm-weather eating.
-
Vegan Version: Substitute the butter with coconut oil and use almond milk mixed with vinegar instead of buttermilk for a vegan-friendly scone.
Chef’s Notes
As I’ve cooked and shared this recipe over the years, I’ve found a few tweaks that you might find amusing. The best scones often come from a bit of improvisation! There was one time when I accidentally added too much flour and turned out a batch that resembled boulders instead of scones. A little laughter ensued, and my friends and I jokingly called them ‘rock scones’. We ended up scooping out the insides to save the flavor and left the ‘rocks’ behind—kitchen mishaps can bring joy too!
FAQs and Troubleshooting
Here are a few common questions you might have while whipping up these peach scones:
1. My scones didn’t rise much—what went wrong?
Ensure that your baking powder and baking soda are fresh! Age can diminish their effectiveness. Also, avoid overmixing the dough, as it needs to be tender for that lovely rise.
2. Can I use frozen peaches?
Absolutely! Just be sure to thaw and drain some of the excess moisture before adding them to your dough, to avoid sogginess.
3. What’s the best way to store leftover scones?
Let them cool completely, then store them in an airtight container at room temperature. They’re best enjoyed fresh but will last for a couple of days.
4. Can I freeze the dough?
Definitely! You can shape the scones and freeze them before baking. Just pop them directly into the oven from the freezer—just add a few extra minutes to the baking time.
Nutritional Info
These delightful peach scones can vary in nutrition based on the specific ingredients used, but let’s break down an average serving (one scone):
- Calories: Approximately 200-250
- Total Fat: 10-12g
- Carbohydrates: 28-30g
- Fiber: 1-2g
- Sugar: 4-6g
- Protein: 3-4g
Remember, the fresh peaches infuse some essential vitamins, and baking treats like this is all about balance and enjoyment!
Final Thoughts
Baking peach scones is so much more than just following a recipe—it’s about the memories, the love, and the joy of bringing people together around good food. With each delicious bite, you’ll be reminded of summer days spent under the sun. So whether you’re savoring these scones on a leisurely weekend or surprising a friend with a warm batch, your kitchen will be filled with warmth, love, and a hint of nostalgia.
So, what are you waiting for? Grab those ingredients, preheat the oven, and embrace the sweet aroma of peach scones filling your home. Let those flavors come together, and enjoy every moment—both in the kitchen and around the table. Happy baking, my friends! 🍑
Print
Peach Scones
- Total Time: 35 minutes
- Yield: 8 servings 1x
- Diet: Vegetarian
Description
Delightful peach scones that evoke memories of summer days with a warm and flaky texture complemented by juicy peaches.
Ingredients
- 2 cups all-purpose flour
- 1/4 cup sugar
- 2 teaspoons baking powder
- 1/2 teaspoon baking soda
- 1/2 teaspoon salt
- 1/2 cup unsalted butter, chilled and cubed
- 3/4 cup buttermilk
- 1 cup fresh peaches, diced
- 1 teaspoon vanilla extract
Instructions
- Preheat your oven to 400°F (200°C).
- Whisk the dry ingredients together in a large mixing bowl.
- Add the chilled, cubed unsalted butter to the flour mixture and mix until coarse crumbs form.
- Pour in the buttermilk and vanilla, gently mixing until just combined.
- Fold in the diced peaches, being careful not to crush them.
- Shape the dough into a disk about 1-inch thick, and slice into wedges.
- Transfer the wedges to a lined baking sheet, brushing tops with buttermilk.
- Bake for 15-20 minutes or until golden brown.
- Cool on a wire rack for a few minutes before serving.
Notes
Serve warm with butter or honey. Great for brunch or as an afternoon treat with tea or coffee.
- Prep Time: 15 minutes
- Cook Time: 20 minutes
- Category: Breakfast
- Method: Baking
- Cuisine: American
Nutrition
- Serving Size: 1 scone
- Calories: 225
- Sugar: 5g
- Sodium: 300mg
- Fat: 11g
- Saturated Fat: 6g
- Unsaturated Fat: 4g
- Trans Fat: 0g
- Carbohydrates: 30g
- Fiber: 1g
- Protein: 3g
- Cholesterol: 30mg
Keywords: peach, scones, breakfast, baking, dessert, summer
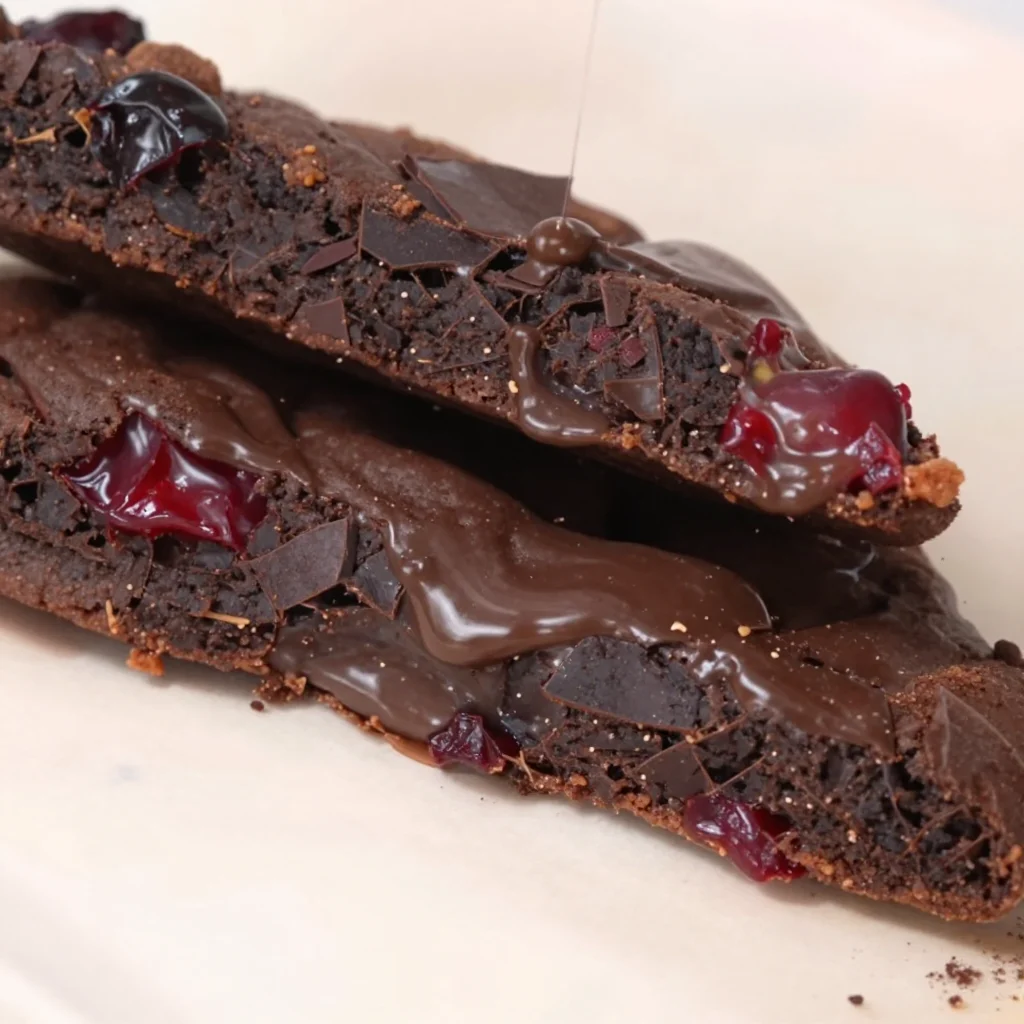
Martha Stewart–Style Chocolate Cookies with Sour Cherries
Chocolate Cookies with Sour Cherries: A Sweet Adventure in Baking
Hey there, fellow food lovers! I’m Beau Collier, and today we’re diving into a delightful world where chocolate and cherries dance together in sweet harmony. If you’re a fan of indulgent cookies that bring a little joy to your day, you’re in the right place! Picture this: a chewy chocolate cookie, rich in flavor, studded with tangy dried sour cherries that add a delightful pop of color and zing. It’s the kind of treat that makes you want to pull up a chair, sip on your favorite beverage, and just take a moment to savor.
This recipe is inspired by a classic Martha Stewart creation. Now, you might be wondering, “What’s so special about these cookies?” Well, they’re not your run-of-the-mill chocolate chip cookies. When you bite into these beauties, you’ll be greeted with that rich, dark chocolate flavor, balanced perfectly by the tartness of sour cherries. Whether you’re at a family gathering, a cozy evening in, or just treating yourself after a long day, these cookies are here to impress.
So, roll up your sleeves, preheat that oven, and let’s embark on this delicious baking adventure together! Trust me; you won’t be able to stop at just one.
A Sweet Memory
Before we get right into the ingredients and instructions, let me take you down memory lane. One of my fondest baking memories is from when I was a teenager, back in the day when I was just starting to experiment in the kitchen. I remember the first time I baked chocolate cookies for my family. I had scoured cookbooks and stumbled upon Martha Stewart’s classic recipes. Naturally, I was both excited and anxious.
Picture this: me, flour dusting my apron, chocolate melting on the stove, and those delectable dried cherries sitting on the counter, waiting to be mixed in. I remember the aroma that filled the house—rich chocolate intermingling with the fruity scent of cherries. It was magical! When those cookies finally came out of the oven, they didn’t just look beautiful; they tasted like happiness in every bite. That day, we turned a simple baking session into a family celebration, sharing stories around the kitchen table, all while devouring cookie after cookie.
So many memories are wrapped in those cookies, and I can’t wait for you to create your own cherished moments with this delightful recipe!
Ingredients
To make these incredible chocolate cookies with sour cherries, you’ll need the following ingredients:
-
1 3/4 cups all-purpose flour
This is the base of your cookies, providing stability and structure. If you want to lighten things up, you can substitute half with whole wheat flour for a nuttier flavor. -
1 1/4 cups unsweetened Dutch process cocoa powder
Richer than regular cocoa, Dutch-processed cocoa adds deep color and an intense chocolate flavor. Don’t have it? Regular cocoa will work in a pinch—just know the flavor may be a tad lighter. -
2 teaspoons baking soda
This is the leavening agent that helps your cookies rise. Make sure it’s fresh; nothing bakes worse than stale baking soda! -
1/4 teaspoon salt
A little salt enhances all the sweet flavors, making them pop! Don’t skip it; your taste buds will thank you. -
1 1/4 cups unsalted butter, softened
Butter adds moisture and flavor. Make sure it’s at room temperature for easy creaming, or you can microwave it for a few seconds if you’re in a hurry (just watch it doesn’t melt). -
1 1/4 cups granulated sugar
For that signature sweetness! You can substitute this with coconut sugar if you’re looking for a less refined option. -
3/4 cup packed brown sugar
Brown sugar adds moisture and a touch of caramel flavor. You can use light or dark brown sugar—dark will give you a more robust flavor! -
2 large eggs
Eggs help bind everything together, giving your cookies their texture. Ensure they’re at room temperature for best results. -
1/4 teaspoon vanilla extract
Vanilla is the magic ingredient that rounds out the flavors. You can try almond extract if you’re feeling adventurous! -
12 ounces bittersweet chocolate, chopped
A must for that decadent chocolate experience! If bittersweet isn’t your jam, semisweet works too. Just keep in mind the sweetness level might change slightly. -
1 1/2 cups dried sour cherries
They add a sweet-tart flavor explosion! If you can’t find dried sour cherries, dried cranberries or blueberries work as tasty substitutes.
Step-by-Step Instructions
Let’s get your baking underway! Follow these steps for cookie perfection:
-
Preheat the Oven:
Start by preheating your oven to 350°F (175°C). This step is crucial as it ensures your cookies bake evenly. -
Prepare Your Baking Sheets:
While the oven preheats, line two baking sheets with parchment paper. This helps prevent sticking and makes for easy cleanup. -
Mix the Dry Ingredients:
In a medium bowl, whisk together your flour, cocoa powder, baking soda, and salt. This ensures that the cocoa powder and baking soda are evenly distributed, leading to consistently baked cookies. -
Cream the Butter and Sugars:
In a large mixing bowl, add your softened butter, granulated sugar, and brown sugar. Using an electric mixer (or a whisk if you’re feeling old school), beat on medium speed until the mixture is light and fluffy, about 2-3 minutes. This step introduces air into the batter, ensuring your cookies are light and tender. -
Add in the Eggs and Vanilla:
Beat in the eggs one at a time, ensuring each is fully incorporated before adding the next. Then mix in the vanilla extract. Give your mixture a little taste—a culinary delight awaits! -
Combine Dry and Wet Ingredients:
Gradually add the dry mixture to the wet ingredients, mixing until just combined. Be careful not to overmix; you want to keep that lovely texture! -
Fold in Chocolate and Cherries:
Gently fold in the chopped bittersweet chocolate and sour cherries. This is where the magic happens—watch how the chocolate and cherries create a beautiful swirl in the dough. -
Scoop the Dough:
Using a cookie scoop or tablespoon, drop rounded scoops of dough onto the prepared baking sheets, spacing them about 2 inches apart. This allows room for the cookies to spread. -
Bake:
Bake in the preheated oven for 10-12 minutes, or until the edges are set and the centers look slightly underbaked. They’ll firm up as they cool, so don’t overbake! -
Cool Down:
Once out of the oven, let the cookies cool on the baking sheets for about 5 minutes before transferring them to wire racks. This step is crucial; it permits them to develop the perfect chewy texture.
Serving Suggestions
When it comes to serving these delectable cookies, presentation matters! Here are a couple of suggestions:
-
Platter Style: Arrange the cookies on a beautiful serving platter with a sprinkle of powdered sugar on top for a picturesque effect. Maybe even pair them with fresh cherries for a pop of color!
-
Cookie Sandwich: Feeling adventurous? Take two cookies, spread a dollop of whipped cream or ice cream in between, and make your very own cookie sandwich. Perfect for those hot summer days!
-
Coffee Pairing: Serve them alongside a mug of hot coffee or a glass of cold milk. The pairing of chocolate and coffee is a match made in heaven!
Recipe Variations
Now, just because this recipe is scrumptiously perfect as it is doesn’t mean we can’t experiment a little! Here are some creative twists you might enjoy:
-
Nutty Delight: Add ½ cup of chopped walnuts or pecans for an extra crunchy texture. The nuttiness beautifully complements the chocolate and cherries.
-
Minty Fresh: Mix in a teaspoon of peppermint extract for a festive twist! Think chocolate-mint girl scout cookies with a sour cherry added zing.
-
Spicy Chocolate: Feeling a little fiery? Add a pinch of cayenne pepper or cinnamon to the batter. You’ll be amazed at how these spices enhance the chocolate flavor!
-
Orange Zest: For a refreshing twist, incorporate the zest of an orange into the cookie dough. The citrus will brighten up the flavors and complement the chocolate and cherries wonderfully.
-
Gluten-Free Version: Swap out the all-purpose flour for a gluten-free flour blend, and make sure your cocoa powder and other ingredients are also gluten-free!
Chef’s Notes
These cookies have a special place in my heart. Over the years, I’ve experimented with countless recipes, but this one has remained a steadfast favorite. I’ve swapped in different additions, tried various chocolate types, and even played around with the dough—every time I make them, they bring back that warm memory of baking with family.
Oh, and here’s a fun story: the very first time I made these cookies for a big gathering, I was so excited that I accidentally mixed up the baking soda and baking powder! Let me tell you, the cookies were more like chocolate frisbees! I rolled with it, though, and we laughed it off. Now, every time I bake these beauties, I can’t help but chuckle at my baking blunder!
FAQs and Troubleshooting
-
Why are my cookies flat?
If your cookies spread too much and end up flat, it could be due to the butter being too warm or melted. Make sure to creak the butter until it’s just softened, not melted. -
Can I use fresh cherries instead of dried?
Yes! However, if you do, make sure to pit and chop them into smaller pieces, and consider reducing the amount of additional liquid in the recipe. -
How do I store leftover cookies?
Keep them in an airtight container at room temperature for up to a week. You can also freeze them! Just make sure they’re fully cooled before freezing, and layer them with parchment to prevent sticking. -
What if I don’t have bittersweet chocolate?
Semisweet chocolate works well as a substitute, just keep in mind it may make your cookies a tad sweeter. Dark chocolate is also an excellent alternative!
Nutritional Info
While we all love to indulge every now and then, here’s a quick breakdown of the nutritional info for one cookie (based on about 24 cookies):
- Calories: 180
- Protein: 2g
- Carbohydrates: 25g
- Fat: 8g
- Saturated Fat: 5g
- Sugar: 10g
- Fiber: 1g
These cookies are best enjoyed in moderation, but hey, who’s counting when you have a treat that brings joy to your day?
Final Thoughts
And there you have it—my beloved recipe for chocolate cookies with sour cherries! Baking these delightful treats isn’t just about feeding your belly; it’s about creating memories, sharing laughter, and indulging in the joy that food brings into our lives. I hope you have as much fun baking them as I do, and I can’t wait to hear about your adventures in the kitchen.
So, grab your ingredients, rally your friends or family, and let’s get baking! Remember, the best part of food is sharing it, so once you whip up a batch (or a double batch, I won’t judge!), share them with someone special or keep them all to yourself. Either way, you’re in for a treat that’s sure to warm your heart with every scrumptious bite.
Happy baking, friends! Let’s keep the love of food alive—one cookie at a time!
Print
Chocolate Cookies with Sour Cherries
- Total Time: 27 minutes
- Yield: 24 cookies 1x
- Diet: Vegetarian
Description
Indulgent chocolate cookies studded with tangy dried sour cherries for a delightful treat.
Ingredients
- 1 3/4 cups all-purpose flour
- 1 1/4 cups unsweetened Dutch process cocoa powder
- 2 teaspoons baking soda
- 1/4 teaspoon salt
- 1 1/4 cups unsalted butter, softened
- 1 1/4 cups granulated sugar
- 3/4 cup packed brown sugar
- 2 large eggs
- 1/4 teaspoon vanilla extract
- 12 ounces bittersweet chocolate, chopped
- 1 1/2 cups dried sour cherries
Instructions
- Preheat the oven to 350°F (175°C).
- Prepare two baking sheets with parchment paper.
- Mix the flour, cocoa powder, baking soda, and salt in a medium bowl.
- Cream together the butter, granulated sugar, and brown sugar until light and fluffy.
- Add the eggs one at a time, then mix in the vanilla extract.
- Combine the dry ingredients with the wet ingredients until just mixed.
- Fold in the chopped chocolate and sour cherries.
- Scoop dough onto the prepared sheets, spacing 2 inches apart.
- Bake for 10-12 minutes until the edges are set.
- Cool on the baking sheets for 5 minutes before transferring to wire racks.
Notes
For variation, consider adding nuts, mint, or spices for a unique flavor.
- Prep Time: 15 minutes
- Cook Time: 12 minutes
- Category: Dessert
- Method: Baking
- Cuisine: American
Nutrition
- Serving Size: 1 cookie
- Calories: 180
- Sugar: 10g
- Sodium: 50mg
- Fat: 8g
- Saturated Fat: 5g
- Unsaturated Fat: 3g
- Trans Fat: 0g
- Carbohydrates: 25g
- Fiber: 1g
- Protein: 2g
- Cholesterol: 30mg
Keywords: chocolate cookies, sour cherries, baking, dessert, treats

The Ultimate Chocolate Milkshake
The Ultimate Chocolate Milkshake: A Delicious Dive into Decadence
Hey there, chocolate lovers! Welcome to the sweetest corner of Feastical! Today, we’re diving headfirst into a creamy, dreamy, chocolatey wonderland—the ultimate chocolate milkshake! This recipe isn’t just a drink; it’s an experience, a nostalgic journey back to those sunny days of summer, picnics, and the simpler joys of life. So, buckle up, grab your blender, and get ready to whip up something truly magical.
A Sweet Trip Down Memory Lane
Ah, the chocolate milkshake—my childhood’s liquid gold! I fondly remember hot summer afternoons spent at the local diner with my family. The air would be filled with the sounds of laughter and clinking glasses, and the aroma of fries and burgers would dance around me. I would plop down at the counter, looking forward to that cool, frothy shake that felt like a celebration in a glass.
I remember the thrill of watching the server expertly blend ice cream, milk, and chocolate syrup into a thick, luscious shake. The first sip was always a symphony of chocolatey bliss! The toppings would be a joyous surprise—whipped cream piled high and chocolate sprinkles adding just the right amount of crunch. It’s a memory that still brings a smile to my face every time I sip one of these heavenly creations. It was not just a dessert; it was a moment shared, a sweet memory made.
Now, let’s recreate that magic together! Are you ready to indulge? Let’s go!
Ingredients
Here’s your lineup for the ultimate chocolate milkshake. Trust me; you’re gonna want to grab a pen and jot these down!
-
1 cup Heavy Whipping Cream, cold
A key ingredient for that rich, velvety texture. You can substitute with coconut cream for a dairy-free version. -
5 Tbsp Confectioner’s Sugar
This sweetens the whipping cream for the perfect topper. If you need a healthier option, try using stevia or another sugar substitute! -
3 Tbsp Cocoa Powder, sifted
This bitter-sweet beauty enhances the chocolate flavor. Opt for Dutch-processed cocoa for a deeper taste. -
2 pt Chocolate Ice Cream
The star of the show! Want something different? Try using vanilla ice cream and mixing in chocolate syrup for a twist. -
1/3 cup Chocolate Milk
Extra chocolate? Yes, please! Use almond or soy chocolate milk for a non-dairy option. -
3 Tbsp Chocolate Syrup (plus more for drizzling)
This will make everything sweet and moist. For a gourmet touch, consider homemade syrup! -
Chocolate Sprinkles (to serve)
Because who doesn’t love a little crunch? Use rainbow sprinkles for a fun twist! -
Chocolate Shavings (to serve)
These add an elegant touch. You can shave dark chocolate bar for a richer flavor.
With these ingredients gathered and ready, let’s transform them into something unforgettable!
Step-by-Step Instructions
-
Whip the Cream
- In a large bowl, pour that cold heavy whipping cream. Add the confectioner’s sugar and cocoa powder.
- Using a hand mixer, whip on medium speed until soft peaks form (about 2-3 minutes).
- Chef’s Tip: Don’t overwhip! You want it fluffy, not dry.
-
Blend the Milkshake
- In a blender, combine the chocolate ice cream, chocolate milk, and chocolate syrup. Blend until smooth and creamy.
- Commentary: You can adjust the thickness by adding more milk for a thinner shake or more ice cream for a thicker indulgence.
-
Combine the Goodness
- Once smooth, carefully fold half of the whipped cream into the blender with the milkshake mixture. This step creates a marbled effect of creaminess!
- Chef Hack: Mixing in parts of the whipped cream also helps maintain that airy texture.
-
Prepare Your Glass
- Drizzle chocolate syrup on the insides of your glass. This little touch makes every sip feel like a celebration!
- Showing Off: Make swirls or zigzag patterns for an artistic flair! It’s also Instagram-worthy!
-
Serve It Up
- Pour your smooth chocolate milkshake into the prepared glass, adding a dollop of that delicious whipped cream on top.
- Extra Points: Garnish with chocolate sprinkles and chocolate shavings for that wow factor.
-
Enjoy it
- Grab a big straw, or a spoon if you’re feeling classy, and dig in—because you deserve every delicious sip!
Serving Suggestions
To serve your ultimate chocolate milkshake, consider pairing it with some freshly baked cookies or a slice of warm pie. You can also top it with a maraschino cherry for a traditional diner-style feel. Feeling adventurous? Serve alongside a small plate of salted pretzels for that sweet-salty combo that will have taste buds dancing!
When entertaining friends, create a little milkshake bar with various toppings like crushed Oreos, whipped cream flavors, or fresh fruits. Let them customize their shakes! It’s a fun experience that adds a special touch to any gathering.
Recipe Variations
-
Mint Chocolate Milkshake
- Add a few drops of peppermint extract for a refreshing twist. Top it with crushed peppermint candy for extra crunch!
-
Peanut Butter Chocolate Milkshake
- Mix in 2 tablespoons of creamy peanut butter before blending for a nutty richness. Garnish with crushed peanuts!
-
Spicy Chocolate Milkshake
- Add a pinch of cayenne pepper for a surprising kick. It’s unexpected, but trust me—it’s divine!
-
Mocha Milkshake
- Substitute half of the chocolate milk with brewed coffee. Perfect for coffee lovers!
-
Banana Chocolate Milkshake
- Blend in a ripe banana for added creaminess and natural sweetness. It’s like a delicious breakfast in a cup!
Chef’s Notes
The ultimate chocolate milkshake is not just a recipe; it’s a canvas! Over the years, I’ve tried countless variations based on seasons, holidays, and my mood. One of the funniest mishaps happened when I accidentally blended vanilla ice cream instead of chocolate. I panicked, but added a generous swirl of chocolate syrup, and guess what? It turned out fantastic! Never underestimate the power of improvisation in the kitchen!
FAQs and Troubleshooting
-
Why is my milkshake too thin?
- Simply add more ice cream to thicken it up. Blend again and see if it reaches your desired texture.
-
How can I make a dairy-free milkshake?
- Substitute heavy cream with coconut cream, use non-dairy chocolate ice cream, and chocolate milk made from almond, soy, or oat milk.
-
What if my whipped cream isn’t thickening?
- Ensure your heavy cream is cold, as the cold temperature allows it to whip better. If it still doesn’t thicken, try using a bowl chilled in the freezer beforehand.
-
Can I make this ahead of time?
- It’s best to enjoy it fresh, but you can prepare the whipped cream and blend the shake base separately. Store in the fridge until ready to combine!
Nutritional Info
Per serving (based on the recipe above), you’ll be treating yourself to approximately:
- Calories: 620
- Protein: 10g
- Fat: 36g
- Carbohydrates: 70g
- Sodium: 150mg
- Fiber: 2g
Keep in mind that these values can vary based on ingredient brands and portion sizes. Want a lighter treat? Consider using lower-fat ice cream or reducing the chocolate syrup!
Final Thoughts
In a world filled with complicated recipes and kitchen gadgets, sometimes, you just need to savor something simple yet extravagant. The ultimate chocolate milkshake is a true testament to that. It’s not just a recipe; it’s a celebration of flavors, nostalgia, and the joy of being in the kitchen. I hope you cherish every chocolatey sip and create your own beautiful memories, just like I did.
So, what are you waiting for? Grab your ingredients, make this delightful milkshake, and share it with someone who needs a little sweetness in their life. Remember, food is best when shared, and there’s always room for more joy in our lives. Cheers to tasty adventures! Let’s shake it up! 🍫🥤❤️
Print
The Ultimate Chocolate Milkshake
- Total Time: 20 minutes
- Yield: 4 servings 1x
- Diet: Vegetarian
Description
A delicious and creamy chocolate milkshake that brings back nostalgic memories of summer days and family outings.
Ingredients
- 1 cup Heavy Whipping Cream, cold
- 5 Tbsp Confectioner’s Sugar
- 3 Tbsp Cocoa Powder, sifted
- 2 pt Chocolate Ice Cream
- 1/3 cup Chocolate Milk
- 3 Tbsp Chocolate Syrup (plus more for drizzling)
- Chocolate Sprinkles (to serve)
- Chocolate Shavings (to serve)
Instructions
- Whip the cream: In a large bowl, pour that cold heavy whipping cream. Add the confectioner’s sugar and cocoa powder. Using a hand mixer, whip on medium speed until soft peaks form (about 2-3 minutes).
- Blend the milkshake: In a blender, combine the chocolate ice cream, chocolate milk, and chocolate syrup. Blend until smooth and creamy.
- Combine the goodness: Once smooth, carefully fold half of the whipped cream into the blender with the milkshake mixture.
- Prepare your glass: Drizzle chocolate syrup on the insides of your glass.
- Serve it up: Pour your smooth chocolate milkshake into the prepared glass, adding a dollop of that delicious whipped cream on top.
- Enjoy it: Grab a big straw, or a spoon if you’re feeling classy, and indulge!
Notes
Pair with freshly baked cookies or a slice of warm pie. Consider creating a milkshake bar for a fun gathering experience.
- Prep Time: 15 minutes
- Cook Time: 5 minutes
- Category: Dessert
- Method: Blending
- Cuisine: American
Nutrition
- Serving Size: 1 serving
- Calories: 620
- Sugar: 70g
- Sodium: 150mg
- Fat: 36g
- Saturated Fat: 21g
- Unsaturated Fat: 10g
- Trans Fat: 0g
- Carbohydrates: 70g
- Fiber: 2g
- Protein: 10g
- Cholesterol: 130mg
Keywords: chocolate milkshake, dessert, creamy drink, nostalgic recipe, summer treat
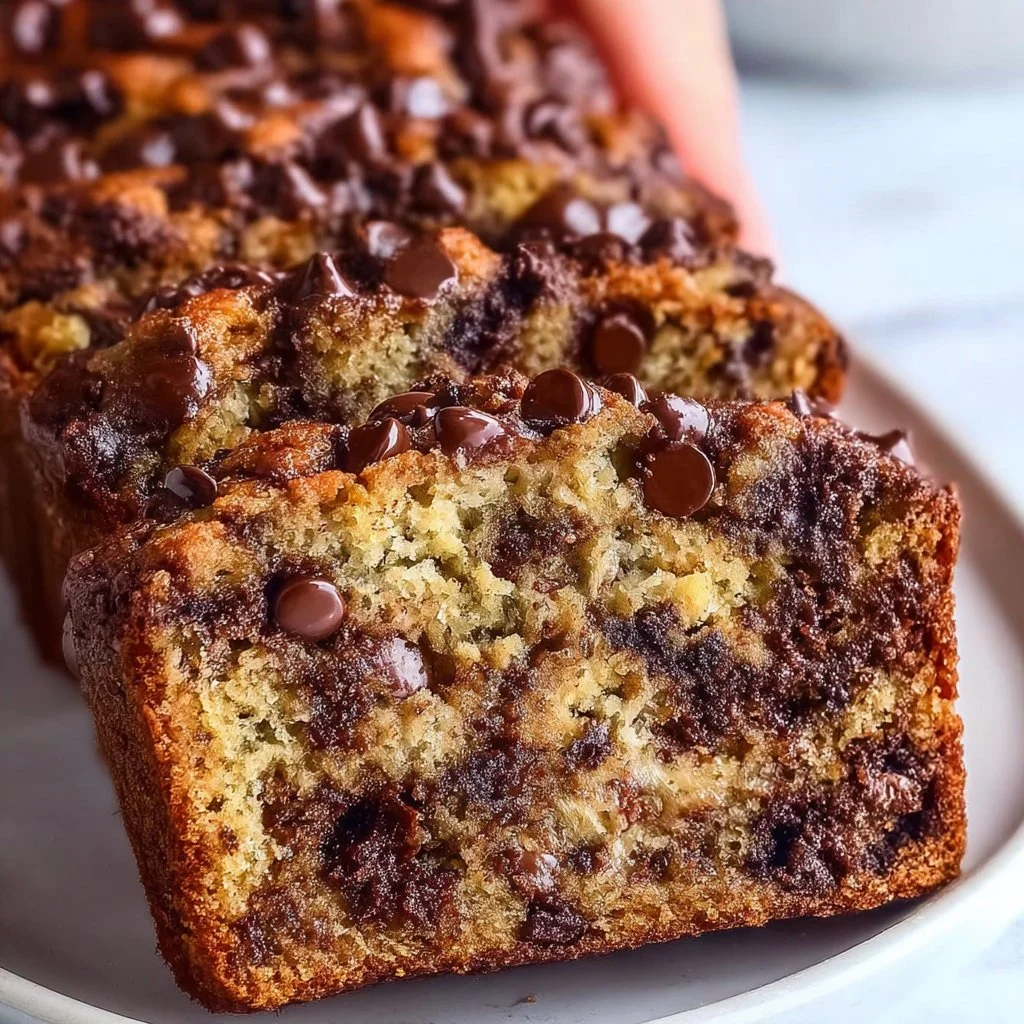
Chocolate Chip Banana Bread
The Ultimate Chocolate Chip Banana Bread: A Feel-Good Recipe
Hey there, food lovers! It’s Beau Collier here, and I’m absolutely thrilled to share one of my all-time favorite recipes with you today: Chocolate Chip Banana Bread! Whether you have a bunch of overripe bananas sitting on your counter, or you simply want to whip up something that smells like heaven and tastes even better, this recipe is your ticket to pure bliss. Seriously, nothing warms the soul quite like a fresh loaf of banana bread.
Banana bread might trigger nostalgic memories for many of you. Perhaps you remember the sweet aroma wafting through your home as a kid, or maybe you have that one friend who makes the best banana bread and has everyone begging for more. This is a dish that brings people together, one delightful slice at a time. Here at Feastical, we believe that food should not only nourish but also create moments and memories. So grab those bananas, crank up your oven, and let’s dive into this indulgent yet simple recipe.
This isn’t just regular banana bread, folks. No! We’re elevating it with rich, melty chocolate chips that will have your taste buds dancing from the first bite. Also, this banana bread is wonderfully versatile, making it perfect for breakfast, an afternoon snack, or even a decadent dessert. Trust me; you’ll be making this over and over!
So, let’s get started on this sweet adventure of baking together. Don’t worry, I’ll guide you every step of the way, and you’ll feel like a pro before you know it. Grab your apron, and let’s embark on this delicious journey!
Personal Story
I remember the first time I made a banana bread that truly blew my mind. I was a young chef in training, excited about the prospect of whipping up something comforting for my family. Our kitchen filled with the fragrant scent of baking bananas and chocolate, and everyone—yes, even my picky little brother—couldn’t resist wandering in for a taste. As the loaf cooled, I could hardly believe my eyes when, just minutes later, half of it disappeared.
It wasn’t just the deliciousness that made that day special; it was witnessing the joy on my family’s faces as they savored each bite. That experience stuck with me, leading me to experiment even more with banana bread recipes over the years. Every time I make it, I feel that same warmth spreading through my home and my heart. You’re not just creating a dish; you’re crafting a sweet moment in time.
Ingredients
Let’s break down the ingredients for this delightful Chocolate Chip Banana Bread. You’ll find that they’re simple, but each one adds a special touch to this masterpiece!
-
4 ripe bananas: The star ingredient! The riper the bananas, the sweeter and more flavorful your bread will be. If you only have green bananas, no worries—just let them ripen a few days, or you can speed up the process by placing them in a brown paper bag.
-
1/2 cup oil: This adds moisture to your banana bread. I like using vegetable or canola oil, but if you want a healthier option, feel free to swap in unsweetened applesauce or melted coconut oil!
-
1 cup sugar: The sugar sweetens the bread, and you can adjust this amount to your liking. Substitute half of it with brown sugar for a deeper flavor or use coconut sugar for a healthier option.
-
2 eggs: They help bind everything together and add richness. You can replace them with a flax egg (1 tablespoon of ground flaxseed mixed with 2.5 tablespoons water) for a vegan option.
-
1 teaspoon vanilla extract: This adds a warm, inviting essence to the bread that pairs beautifully with bananas and chocolate. Feel free to use almond extract if you want a different flair!
-
1 teaspoon baking soda: This is your leavening agent, helping the bread rise and achieve that soft, fluffy texture. Make sure it’s fresh for the best results!
-
1/2 teaspoon salt: A pinch of salt enhances the flavors and balances the sweetness. Don’t skip it!
-
1 1/2 cups all-purpose flour: The base of your bread. If you want, you can swap in whole wheat flour for a heartier bread or gluten-free flour to cater to dietary preferences.
-
1 cup chocolate chips: The cherry on top of this delightful muffin! Dark chocolate chips add a rich flavor, but you can also use milk chocolate for a sweeter bite or even white chocolate chips for something unique.
Step-by-Step Instructions
Now, let’s get down to the nitty-gritty of actually making this incredible Chocolate Chip Banana Bread. Follow these steps, and you’ll have a gorgeous loaf ready to devour!
-
Preheat your oven:
Preheat your oven to 350°F (175°C). This ensures an even bake, so don’t skip this part! It’s always good to start with a warm oven. -
Prepare your baking pan:
Grease a 9×5-inch loaf pan with cooking spray or butter, or line it with parchment paper for easy removal. Trust me, you don’t want your beautiful bread to stick! -
Mash those bananas:
In a large mixing bowl, mash your ripe bananas with a fork or potato masher. Aim for a smooth consistency—some small lumps are okay! This is where the sweetness and flavor will come from, so make it count! -
Mix wet ingredients:
Add in the oil, sugar, eggs, and vanilla extract to the bananas. Mix well until everything is combined and smooth. You want to ensure that the sugar is well incorporated into the banana mixture. -
Combine dry ingredients:
In a separate bowl, whisk together the flour, baking soda, and salt. Mixing the dry ingredients ahead of time will help ensure an even distribution of the leavening agent. -
Combine wet and dry mixtures:
Gradually add the dry ingredients to the wet mixture, stirring until just combined. Be careful not to over-mix—this helps keep your bread tender and soft. You want a few streaks of flour to remain! -
Fold in the chocolate chips:
Gently fold in the chocolate chips with a spatula. Feel free to add a few more on top for that gorgeous presentation! -
Pour the batter into the prepared pan:
Scrape your batter into the prepared loaf pan and smooth out the top with a spatula. -
Bake:
Place it in the preheated oven and bake for 55-65 minutes, or until a toothpick inserted in the center comes out clean. You might want to start checking around the 50-minute mark, just to be sure! -
Cool:
Once baked, remove your banana bread from the oven, and let it cool in the pan for about 10 minutes. Then, carefully transfer it to a wire rack to cool completely. No one likes soggy bread, and cooling helps develop that perfect texture!
Serving Suggestions
Once your masterpiece is cooled, it’s time to serve it up! Slice it into generous pieces, and you can enjoy it warm with a pat of butter for that extra cozy feeling. Want to take it to the next level? Serve it with a dollop of whipped cream or a scoop of ice cream on the side for an indulgent dessert!
Pair it with your favorite hot beverage—think a steaming cup of coffee or a comforting cup of tea. You might even want to drizzle a little melted chocolate on top or sprinkle some chopped nuts for an added texture and flavor boost. The possibilities are endless!
Recipe Variations
Why not mix it up a bit? Here are some fun variations to try with your Chocolate Chip Banana Bread:
-
Nutty Banana Bread: Add a cup of chopped walnuts or pecans for an extra crunch and flavor boost.
-
PB&J Twist: Swirl in a few tablespoons of peanut butter or your favorite jam before baking for a delightful surprise.
-
Cocoa Banana Bread: Mix in 1/4 cup of cocoa powder to turn your banana bread into a chocolate lover’s dream!
-
Dried Fruit Delight: Add a cup of dried cranberries or cherries for a burst of tartness that complements the sweetness of the bananas beautifully.
-
Spiced Banana Bread: Add a teaspoon of cinnamon or pumpkin spice for that warm, inviting aroma and flavor.
Chef’s Notes
This recipe has been a cherished staple in my kitchen for years and has been passed down through various iterations. A few years back, I decided to play around with the base recipe, and voilà! The Chocolate Chip Banana Bread was born, capturing all the joys of nostalgia while adding my personal touch. I love it more with each batch!
Remember, the best part about this recipe is that it can be adjusted to fit your preferences—don’t be afraid to experiment! I’ve had some mishaps in the kitchen along the way—like the time I accidentally swapped salt for sugar—but every mishap led to a masterpiece, and it can for you too!
FAQs and Troubleshooting
1. Why is my banana bread flat?
If your banana bread is flat, it could be due to expired baking soda or overmixing the batter. Ensure your leavening agent is fresh, and mix gently to keep the texture light and fluffy.
2. Can I freeze banana bread?
Absolutely! Wrap it tightly in plastic wrap and aluminum foil before freezing to maintain freshness. It’ll keep for up to three months—perfect for quick snacking!
3. How do I know when my banana bread is done?
Insert a toothpick in the center; if it comes out clean or with a few crumbs, it’s ready! If there’s wet batter, give it a few more minutes in the oven.
4. Can I use frozen bananas?
Definitely! Just ensure they’re thawed and well-drained before mashing them into your batter. This can work wonders in keeping your banana bread moist and flavorful!
Nutritional Information
Here’s a rough nutritional breakdown per slice (based on 12 slices per loaf):
- Calories: 200
- Protein: 2g
- Carbohydrates: 30g
- Fat: 9g
- Sugar: 10g
- Fiber: 1g
Keep in mind, nutritional values may vary based on your exact ingredients and portion sizes. Don’t let those numbers fool you—this is a recipe for the soul, and your happiness is invaluable!
Final Thoughts
And there you have it—a delightful journey through the making of the most scrumptious Chocolate Chip Banana Bread! I hope you’re feeling inspired and ready to create something magical in your kitchen. First and foremost, embrace the process and don’t shy away from adding your unique spin.
Food is meant for sharing, so once you’ve made this banana bread, slice it up, and share it with your loved ones—or keep it all to yourself if you wish (no judgment here!). Just make sure to savor every last bite, and most importantly, enjoy the moments that come with it.
Happy baking, friends! Until next time, keep the kitchen spirit alive and keep spreading the love one delicious dish at a time. Cheers! 🍌🍫
Print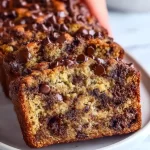
The Ultimate Chocolate Chip Banana Bread
- Total Time: 80 minutes
- Yield: 12 slices 1x
- Diet: Vegetarian
Description
A heartwarming and indulgent recipe for chocolate chip banana bread, perfect for breakfast, snacks, or dessert.
Ingredients
- 4 ripe bananas
- 1/2 cup oil (vegetable or canola, or unsweetened applesauce for a healthier option)
- 1 cup sugar
- 2 eggs (or flax egg for a vegan option)
- 1 teaspoon vanilla extract
- 1 teaspoon baking soda
- 1/2 teaspoon salt
- 1 1/2 cups all-purpose flour (or whole wheat/gluten-free flour)
- 1 cup chocolate chips (dark, milk, or white)
Instructions
- Preheat your oven to 350°F (175°C).
- Prepare a 9 x 5-inch loaf pan with grease or parchment paper.
- Mash the ripe bananas in a large mixing bowl until smooth.
- Add the oil, sugar, eggs, and vanilla extract to the bananas, mixing until combined.
- Whisk together the flour, baking soda, and salt in a separate bowl.
- Combine the dry ingredients with the wet mixture, stirring gently until just combined.
- Fold in the chocolate chips.
- Pour the batter into the prepared loaf pan, smoothing the top.
- Bake for 55-65 minutes, or until a toothpick comes out clean.
- Cool in the pan for 10 minutes, then transfer to a wire rack.
Notes
You can customize the recipe by adding nuts, peanut butter, or cocoa powder for different flavor variations.
- Prep Time: 15 minutes
- Cook Time: 65 minutes
- Category: Dessert
- Method: Baking
- Cuisine: American
Nutrition
- Serving Size: 1 slice
- Calories: 200
- Sugar: 10g
- Sodium: 200mg
- Fat: 9g
- Saturated Fat: 1g
- Unsaturated Fat: 8g
- Trans Fat: 0g
- Carbohydrates: 30g
- Fiber: 1g
- Protein: 2g
- Cholesterol: 30mg
Keywords: banana bread, chocolate chip bread, comfort food