
Cheesy Potato Burritos
Cheesy Potato Burritos: A Warm Hug in Every Bite
Hey there, food lovers! It’s Beau Collier here, and today I want to share a scrumptious recipe that’s close to my heart and will undoubtedly warm your soul—Cheesy Potato Burritos. Picture this: a blend of crispy tater tots, perfectly seasoned beef, and gooey melted cheddar cheese, all wrapped up in a warm, grilled tortilla. It’s a delightful medley of flavors and textures that screams comfort food, and I can’t wait for you to give it a try!
Life gets busy, and it’s easy to forget the simple joys of cooking. That’s why I started Feastical—to share recipes that are not just food but stories that you can recreate in your kitchen! These burritos are perfect for busy weeknights when you want something hearty without spending hours in the kitchen. So, whether you’re feeding a family or just treating yourself, let’s dive into this cheesy goodness together!
A Personal Story Behind the Dish
Let me take you back to a chilly autumn evening in my childhood home. My parents would often host cozy family dinners that were more than simply about food; they were about gathering around the table, laughter, and stories shared. One particular night, we decided to make a twist on traditional burritos.
Using leftover tater tots from our Sunday brunch, we layered them with seasoned ground beef and a generous sprinkle of cheddar cheese, all wrapped snugly in a tortilla. The moment our burritos hit the table, they became a hit! With each bite, we were having a blast of flavor, while the crispy tots added a unique twist. The cozy atmosphere and flavors made that sweet memory stick in my mind, and it inspired me to create this recipe for you all!
Ingredients
Let’s gather the stars of our show! Here’s what you need to whip up these delightful Cheesy Potato Burritos:
-
Crispy Tater Tots
These are the secret superstar of the burrito. You can use frozen tater tots or make your own from scratch! If you want a healthier twist, try swapping them with sweet potato tots for a bit of sweetness. -
Seasoned Beef
Ground beef is a classic choice for filling, but you can easily substitute it with turkey, chicken, or even black beans for a vegetarian version. Season it well with salt, pepper, and your favorite spices—think garlic powder and paprika for an extra kick! -
Melted Cheddar Cheese
The gooier, the better! Cheddar provides a rich flavor, but feel free to explore other cheese options like Monterey Jack or Pepper Jack for a spicy twist. You can also mix in some cream cheese for an ultra-creamy filling. -
Grilled Tortillas
Flour tortillas are my go-to for burritos because they roll up beautifully and hold everything in. However, whole wheat or corn tortillas can be excellent alternatives if you’re looking for something different.
Step-by-Step Instructions
Now that we’ve got our ingredients ready, let’s get cooking!
-
Prepare the Tater Tots
Start by baking your tater tots according to the package instructions or if you’re feeling adventurous, fry them in hot oil until golden brown. Pro tip: cooking them until they’re extra crispy will give your burrito that delightful crunch! -
Cook the Beef
In a large skillet over medium heat, add your seasoned beef. Use a wooden spoon to break it up and cook until it’s no longer pink—about 5-7 minutes. Don’t forget to season it liberally with salt, pepper, and any spices you fancy. Once cooked, drain excess fat and set it aside. -
Combine the Goodness
In a large bowl, combine the crispy tater tots and seasoned beef. Sprinkle in a generous handful of cheddar cheese while the mixture is still warm—this helps melt it just enough! -
Create the Burrito Filling
Lay your tortillas flat on a clean surface. Add a generous scoop of your cheesy beef and tater tot mixture into the center of each tortilla. Pro tip: don’t overfill! Aim for about ¾ of the way full to ensure a smooth folding process. -
Wrap It Up!
Fold the sides of the tortilla over the filling, then roll it up tightly from the bottom. Make sure it’s snug enough; you don’t want your deliciousness spilling out! Repeat with all your tortillas. -
Grill the Burritos
Heat a skillet over medium heat and add a little cooking oil or butter. Place the burritos seam-side down on the skillet. Grill for about 2-3 minutes on each side, or until golden brown and crispy. This step is key to getting that delightful crunch!
Serving Suggestions
Now, onto plating! When it comes to serving your Cheesy Potato Burritos, there’s a world of possibilities. My favorite way is to slice the burrito in half diagonally, which gives that beautiful cross-section of the crunchy filling peeking out at the world.
You can also serve them on a colorful plate garnished with fresh cilantro, lime wedges, and a small bowl of salsa on the side. The zesty salsa provides a refreshing contrast to the richness of the cheesy filling. If you’re feeling fancy, a dollop of sour cream or guacamole is always welcome!
Recipe Variations
Here are a few creative twists to take your burrito to the next level:
-
Buffalo Chicken Burritos: Substitute the seasoned beef with shredded buffalo chicken and toss in some blue cheese crumbles for an ultimate flavor explosion!
-
Breakfast Burrito: Swap the beef for breakfast sausage and add some scrambled eggs and a hint of salsa. Perfect for a morning treat!
-
Spicy Veggie Burritos: Replace the beef with sautéed bell peppers, onions, and black beans, and sprinkle in some jalapeños for a spicy kick.
-
Cheesy Taco Burritos: Mix taco seasoning into the beef and then pile on all your favorite toppings like lettuce, tomatoes, and avocado for a taco-inspired twist.
Chef’s Notes
As I’ve developed this recipe over the years, it’s become a family favorite! I can’t tell you how many times I’ve whipped these up for game nights, movie marathons, or those “I’m-too-tired-to-cook” evenings. It’s the perfect dish for any occasion.
Oh, and here’s a little kitchen confession—one time I accidentally added too much chili powder. Let’s just say the burritos had a kick that nobody forgot anytime soon! But hey, cooking is all about experimenting, right?
FAQs and Troubleshooting
1. What if my burritos fall apart?
Make sure you’re not overfilling them! A little less filling ensures they roll up snugly and securely. Also, sealing the edges with a bit of melted cheese can help hold everything together.
2. Can I make these ahead of time?
Absolutely! You can assemble your burritos, wrap them tightly in foil, and store them in the fridge. Just grill them when you’re ready to eat.
3. How do I store leftovers?
Place any uneaten burritos in an airtight container in the fridge for up to 3 days. You can reheat them in the oven or a skillet to keep that crispy texture intact.
4. What if my tater tots aren’t crispy?
If your tater tots aren’t crispy enough, give them a little extra time in the oven—they should be golden brown. Crispiness adds a lovely look and crucial texture to the burrito!
Nutritional Info
While exact nutritional values may vary, here’s a general idea of what you’ll find in a Cheesy Potato Burrito:
- Calories: Approx. 400-500 per burrito (depending on filling and toppings)
- Protein: 20-25 grams (thanks to the beef and cheese)
- Carbohydrates: 40-50 grams (mostly from the tater tots and tortillas)
- Fat: 20-30 grams (from the cheese and beef)
Feel free to adjust ingredients to suit your dietary needs!
Final Thoughts
There you have it, lovely people—a complete guide to making Cheesy Potato Burritos that will steal the show at your next meal! The beauty of this dish is its versatility, and it’s bound to become a favorite in your recipe collection.
Remember, cooking should never feel tedious. It’s about sharing moments with loved ones, embracing creativity, and enjoying the delicious meals we make. So, grab a fork—or maybe just your hands—and enjoy these burritos wrapped in love! Until next time, keep cooking with passion and joy!
Print
Cheesy Potato Burritos
- Total Time: 35 minutes
- Yield: 4 servings 1x
- Diet: Vegetarian (if using beans)
Description
A delightful medley of crispy tater tots, seasoned beef, and melted cheddar cheese, all wrapped in a warm tortilla. Perfect for busy weeknights!
Ingredients
- 2 cups crispy tater tots
- 1 lb ground beef
- 1 cup melted cheddar cheese
- 4 large flour tortillas
Instructions
- Prepare the tater tots by baking or frying until golden brown and crispy.
- Cook the seasoned beef in a skillet over medium heat for 5-7 minutes until no longer pink.
- Combine the crispy tater tots and seasoned beef in a large bowl, adding cheddar cheese while warm.
- Create the burrito filling by placing the mixture into the center of each tortilla.
- Wrap the tortillas snugly around the filling.
- Grill the burritos in a skillet for 2-3 minutes on each side until golden brown and crispy.
Notes
For a vegetarian version, substitute the beef with black beans. Pair with salsa or a dollop of sour cream.
- Prep Time: 15 minutes
- Cook Time: 20 minutes
- Category: Main Course
- Method: Grilling
- Cuisine: Mexican
Nutrition
- Serving Size: 1 burrito
- Calories: 450
- Sugar: 3g
- Sodium: 600mg
- Fat: 25g
- Saturated Fat: 10g
- Unsaturated Fat: 12g
- Trans Fat: 1g
- Carbohydrates: 43g
- Fiber: 3g
- Protein: 22g
- Cholesterol: 70mg
Keywords: burritos, cheesy, comfort food, easy recipe, family dinner

Street Corn Chicken Rice Bowl
# Street Corn Chicken Rice Bowl: A Flavorful Fiesta on a Plate

## Introduction

Hey there, food lover! If you're anything like me, you believe that food is more than just sustenance; it's a way to connect, create memories, and, most importantly, enjoy life! Today, I’m excited to share with you one of my favorite dishes that captures the vibrant spirit of summer: the Street Corn Chicken Rice Bowl. Imagine a sunny day filled with laughter, friends, and delicious aromas wafting through the air—that's what this dish is all about!

Street corn, or ‘elote’ as it’s known in Mexico, is a staple at lively street fairs and food carts, featuring charred corn smeared with creamy goodness and sprinkled with cheese. I wanted to encapsulate that joyful explosion of flavor in a bowl that’s not only easy to whip up but also strikes a perfect balance between comfort and freshness. This rice bowl, topped with grilled chicken and all those scrumptious toppings, can bring that street-food experience right to your dinner table.

Whether you're feeding a crowd or treating yourself, this dish is versatile enough to suit any occasion. Plus, it’s great for meal prep, making those busy weeknights so much simpler. You can customize it with your favorite ingredients or special dietary needs. So, put on your apron, grab your spatula, and let’s embark on this flavorful journey together!

## Personal Story

Ah, corn—the star of so many warm-weather memories! Growing up in a tight-knit community, summer gatherings were almost always centered around family barbecues and outdoor potlucks. I remember the beaming smiles of my family as my mom whipped up her famous corn salad, loaded with fresh veggies and a tangy dressing. We'd sit around the table, laughter filling the air like the scent of grilled meat.

But it was those adventurous street fair outings with friends that truly awakened my love for corn. I’d rush from booth to booth, savoring all the delightful variations. One summer, I stumbled upon a food truck serving elote, and each bite was a burst of creamy, cheesy, and spicy joy. As I stood there, appreciating the culinary masterpiece, I knew I had to capture that essence in my cooking. And thus, the Street Corn Chicken Rice Bowl was born—bringing all those fantastic memories back with every satisfying bite!

## Ingredients

Alright, friends, let’s gather our ingredients! Here’s what you’ll need to build this delicious bowl, packed full of flavor and nutrients:

- **2 cups cooked rice**: You can choose white, brown, or even cilantro-lime rice for an extra zing. For a healthier option, brown rice offers more fiber.

- **2 chicken breasts**: Grilled and sliced to perfection. Skinless chicken is great, but if you're short on time, rotisserie chicken works wonderfully!

- **1 cup corn kernels**: Fresh, frozen, or canned—whatever you have on hand. Fresh corn adds sweetness, while frozen corn is a quick and easy option.

- **½ cup black beans**: Rinsed and drained, these add protein. Swap with pinto beans or kidney beans for a different flavor profile.

- **¼ cup diced red onion**: For a pop of color and flavor. If red onion's too sharp for your taste, try green onions instead!

- **¼ cup diced tomatoes**: Fresh tomatoes bring brightness, but cherry tomatoes are a superb option too—just cut them in half.

- **¼ cup crumbled cotija cheese**: This Mexican cheese adds creaminess. If you can't find it, feta makes a great substitute.

- **2 tablespoons chopped fresh cilantro**: A sprinkle for garnish that uplifts the entire dish! Don’t like cilantro? Basil or parsley works nicely.

- **1 tablespoon olive oil**: Essential for grilling the chicken and enhancing flavors. Avocado oil is a good alternative.

- **1 teaspoon chili powder**: This spice adds depth. For a kick, opt for cayenne pepper instead!

- **½ teaspoon smoked paprika**: Smoky and rich—it brings a whole new level to your bowl.

- **½ teaspoon cumin**: Earthy and warm; it's a great spice to balance the dish.

- **¼ teaspoon salt & ¼ teaspoon black pepper**: Simple seasoning to taste.

- **½ cup sour cream or Greek yogurt**: A creamy, tangy element. Greek yogurt is great for a healthier twist.

- **Juice of 1 lime**: This brightens up every flavor and adds zest!

- **½ teaspoon garlic powder**: Because everything tastes better with garlic, right?

- **¼ teaspoon salt**: For the final touch of flavor.

## Step-by-Step Instructions

Now that we have our ingredients, let's get cooking! Follow these simple steps to craft your Street Corn Chicken Rice Bowl:

1. **Cook Your Rice**: If you haven't already, prepare your rice following the package instructions. Keep it fluffy and let it cool a bit while you prep the rest of your ingredients.

2. **Grill the Chicken**: Preheat your grill or stovetop grill pan over medium-high heat. Drizzle your chicken breasts with olive oil, and season them with chili powder, smoked paprika, cumin, salt, and black pepper. Grill for about 5-7 minutes on each side or until fully cooked and juices run clear. Remove from the grill and let it rest for a few minutes before slicing—it keeps the juices locked in!

3. **Prep the Corn**: If you’re using fresh corn, grill it until charred all over (about 8-10 minutes), then cut the kernels off the cob. For frozen corn, sauté it in a bit of olive oil until warmed through. If you’re using canned corn, just drain and rinse! Place the corn in a bowl, add lime juice, and season with a pinch of salt and pepper.

4. **Mix the Black Beans**: In a separate bowl, combine the rinsed black beans with diced tomatoes and red onion. Stir in a squeeze of lime juice, some salt, and pepper to taste. This creates a fresh salsa variation that’s colorful and zesty!

5. **Slice the Chicken**: Now that your chicken has rested, slice it against the grain into bite-sized pieces.

6. **Assemble the Bowls**: In bowls, start with a generous scoop of rice as your base. Layer on the sliced chicken, followed by the corn mixture, and then the black bean salsa.

7. **Garnish Like a Pro**: Top your creation with crumbled cotija cheese, a sprinkle of fresh cilantro, and a dollop of sour cream or Greek yogurt for that creamy finish.

8. **Enjoy**: Grab a fork (or your favorite spoon), and dig into that beautiful bowl of happiness!

## Serving Suggestions

When it comes to serving, presentation is key! I love using deep, colorful bowls to really make those vibrant greens, yellows, and reds pop. You can also add a lime wedge on the side for that extra squeeze of zing! Drizzling some extra sour cream or yogurt on top just before serving adds a lovely creaminess that balances the flavors beautifully.

For a more festive look, consider adding a sprinkle of extra cotija cheese or even tossing in some avocado slices for richness. If you’re serving this bowl at a party or gathering, you can set up a DIY rice bowl bar. Lay out all the ingredients separately, and let guests customize their own creations!

## Recipe Variations

The beauty of the Street Corn Chicken Rice Bowl lies in its versatility! Here are some creative twists to inspire you:

1. **Shrimp Swap**: Instead of chicken, grill up some shrimp seasoned with lime, chili, and garlic for a fantastic seafood twist.

2. **Vegan Delight**: Replace chicken with grilled portobello mushrooms or marinated tofu. Use cashew cream instead of sour cream for a creamy vegan alternative.

3. **Spicy Kick**: Add sliced jalapeños or a splash of hot sauce into the black bean mix for added heat.

4. **Taco Inspiration**: Turn it into a taco bowl by layering tortilla chips instead of rice at the base! Top with all your favorite toppings like guacamole and pico de gallo.

5. **Quinoa or Cauliflower Rice**: For a low-carb version, swap the rice for quinoa or cauliflower rice for a lighter, protein-packed alternative.

## Chef’s Notes

This recipe has evolved over time, but the spirit of joy around it has remained the same! When I first created this dish, I was experimenting with leftovers from a taco night, and what came out was nothing short of culinary magic!

Whenever I make this dish, I am reminded of those sun-soaked summer days at the fair, and I can’t help but chuckle at my little kitchen mishaps—like the time I tried to multitask and nearly burned the corn. (Spoiler: it didn’t deter me from my mission!) Food is all about the experience, not perfection, and that’s what I truly cherish.

## FAQs and Troubleshooting

**1. Can I make this dish ahead of time?**
Absolutely! You can prepare the components separately and store them in airtight containers in the fridge for up to four days. Just reassemble when you're ready to eat.

**2. How can I add more greens?**
You can toss in some fresh spinach or chopped kale right before serving, or layer in some roasted zucchini to amp up the vegetable content.

**3. What do I do if the rice is sticky?**
If your rice turns out sticky, fluff it with a fork after cooking. Rinse the rice before cooking to help combat stickiness!

**4. Can I customize the spiciness?**
Yes! Adjust the amount of chili powder, or skip the spicy component altogether if you prefer a milder flavor!

## Nutritional Info (If Applicable)

While I encourage you to enjoy this bowl of joy without counting every calorie, here's a rough estimate of the nutritional breakdown per serving (when using chicken and all the toppings):

- Calories: 520
- Protein: 35g
- Carbohydrates: 62g
- Fats: 16g
- Fiber: 12g

Keep in mind; exact nutritional values may vary based on brands and preparation methods.

## Final Thoughts

Cooking is a joyful experience, and the Street Corn Chicken Rice Bowl encapsulates everything I love about food—flavor, creativity, and a connection to memories! I hope this dish brightens your dinner table and inspires you to gather around, share, and savor each bite with friends and family. Don't be afraid to explore different variations, and remember, every meal is an opportunity to create new memories.

So, dust off that spatula and let’s get cooking! If you give this dish a whirl, I’d love to hear how it turns out. Drop a comment or tag me on social media @Feastical. Bon appétit, my friends!
Street Corn Chicken Rice Bowl
- Total Time: 35 minutes
- Yield: 4 servings 1x
- Diet: Non-Vegetarian
Description
A delicious rice bowl inspired by street corn, featuring grilled chicken and vibrant toppings.
Ingredients
- 2 cups cooked rice
- 2 chicken breasts
- 1 cup corn kernels
- ½ cup black beans
- ¼ cup diced red onion
- ¼ cup diced tomatoes
- ¼ cup crumbled cotija cheese
- 2 tablespoons chopped fresh cilantro
- 1 tablespoon olive oil
- 1 teaspoon chili powder
- ½ teaspoon smoked paprika
- ½ teaspoon cumin
- ¼ teaspoon salt
- ¼ teaspoon black pepper
- ½ cup sour cream or Greek yogurt
- Juice of 1 lime
- ½ teaspoon garlic powder
- ¼ teaspoon salt
Instructions
- Cook your rice according to package instructions and let it cool.
- Grill the chicken breasts seasoned with olive oil and spices until fully cooked, then let rest before slicing.
- Prep the corn by grilling or sautéing it until warmed. Add lime juice and season.
- Mix black beans with diced tomatoes, onion, lime juice, salt, and pepper for a salsa.
- Slice the chicken into bite-sized pieces.
- Assemble the bowls starting with rice, then adding chicken, corn mixture, and black bean salsa.
- Garnish with cotija cheese, cilantro, and sour cream.
- Enjoy your vibrant and flavorful dish!
Notes
Great for meal prep; customize with your favorite ingredients.
- Prep Time: 15 minutes
- Cook Time: 20 minutes
- Category: Main Course
- Method: Grilling
- Cuisine: Mexican
Nutrition
- Serving Size: 1 serving
- Calories: 520
- Sugar: 5g
- Sodium: 500mg
- Fat: 16g
- Saturated Fat: 5g
- Unsaturated Fat: 7g
- Trans Fat: 0g
- Carbohydrates: 62g
- Fiber: 12g
- Protein: 35g
- Cholesterol: 75mg
Keywords: street corn, chicken, rice bowl, Mexican, elote, healthy meal, summer recipes

EASY TACO CUPS
Easy Taco Cups: A Comforting Culinary Adventure
Hey there, food lovers! I’m Beau Collier, and I’m so excited to bring you one of my all-time favorite recipes right here at Feastical! If you’re looking for a dish that’s not only lip-smacking good but also easy to whip up, you’ve landed in the right spot. Today, we’re diving into the world of Easy Taco Cups, a fun and versatile recipe that’s perfect for any occasion—be it a cozy dinner with family, a fun party with friends, or just a little self-care night with your favorite show.
These delightful little cups are not only a feast for your taste buds but also a blast to make! Picture this: savory ground beef mingling with zesty taco seasoning, nestled inside crispy tortillas and topped with gooey melted cheese. Can you say yum? But that’s not all—they’re super customizable, so everyone can create their masterpiece. Trust me, once you dig into these taco cups, they’re bound to become a staple in your recipe rotation.
Now, let’s kick things off with a tasty memory I have related to this dish that shaped my love for Mexican cuisine.
A Taco Memory
Growing up, our family had a tradition of Taco Tuesdays. Every Tuesday, my mom would pull out her colorful array of ingredients and set up a DIY taco bar on the kitchen table. The aroma of simmering spices would fill the house, and all the kids would gather around, excitement bubbling over. As we built our tacos, laughter and chatter echoed through the room. It wasn’t just about filling up our bellies; it was about connection and creativity.
One Tuesday, my mom decided to surprise us with something new—she made mini taco cups using muffin tins. We were all intrigued! She handed us the spoons and let us build our own taco cups with the toppings of our choice. That night, each cup turned out unique, and the table was a colorful masterpiece of flavors and textures. It was a winning combination of fun and flavor! To this day, those taco cups are a delicious reminder of that cozy kitchen filled with love, laughter, and plenty of seasoning.
So, let’s heat up those ovens and gather our ingredients; it’s time to create your own taco memories!
Ingredients
Here’s what you’ll need to whip up these scrumptious Easy Taco Cups:
-
Ground Beef (450 g): This is the backbone of the dish. You can swap it out for ground turkey, chicken, or even a meat substitute if you’re looking for a vegetarian option. It’s your taco, so feel free to experiment!
-
Small Flour Tortillas (8 tortillas, cut into rounds): Look for soft tortillas that are easy to shape. If you want a crunchy texture, you could opt for corn tortillas instead or even use wonton wrappers for a fun twist!
-
Onion (1 medium, finely chopped): A great flavor booster! If you’re not a huge fan of onions, you can leave them out or use green onions for a milder taste.
-
Garlic (2 cloves, minced): Because every great dish starts with garlic! You can use garlic powder in a pinch, but fresh garlic brings that vibrant zing.
-
Taco Seasoning (2 tablespoons): This is where the magic happens! You can use store-bought or mix your own with chili powder, cumin, oregano, and paprika. Adjust the spice level according to your taste!
-
Tomato Sauce (120 ml): It adds moisture and a nice acidity to balance the richness of the beef. You could substitute with salsa for a chunkier texture.
-
Shredded Cheddar Cheese (150 g): This melty goodness is what dreams are made of! Feel free to mix it up with Monterey Jack or pepper jack for a little kick.
-
Canned Corn (120 g, drained): Sweet corn adds a pop of color and sweetness. You can substitute it with fresh corn or even black olives for a different flavor profile.
-
Canned Black Beans (120 g, rinsed and drained): Beans add protein and fiber to your taco cups. If you’re not a fan, you could swap them for lentils or another bean variety.
-
Olive Oil (1 tablespoon): A little olive oil keeps everything from sticking and adds a subtle richness. You can also use avocado oil or melted butter.
Step-by-Step Instructions
Ready to assemble your taco cups? Let’s do this! Follow these easy steps to create your mouthwatering masterpiece:
Step 1: Preheat and Prep
First things first, preheat your oven to 190°C (375°F). While that’s heating up, chop your onion and mince your garlic. I love using a garlic press—it saves time and ensures the perfect mince!
Step 2: Sizzle the Beef
In a large skillet, heat the olive oil over medium heat. Add the chopped onion and sauté for about 3-5 minutes until soft and translucent. Now, toss in the minced garlic and stir it around for about 30 seconds until fragrant—there’s nothing quite like the smell of garlic sautéing!
Next, add the ground beef to the skillet. Cook it until it’s browned, stirring regularly. Don’t forget to break up the meat with your spatula for even cooking. This should take about 5-7 minutes. Once the beef is browned, drain the excess fat if necessary. Your house should smell incredible by now!
Step 3: Add Flavor
Now that your beef is perfectly cooked, it’s time to introduce the seasonings! Sprinkle in the taco seasoning and the tomato sauce—mix everything together until well combined. Continue to cook for another 2-3 minutes until everything is heated through. This is the moment when all those flavors start to meld together!
Step 4: Topping It Off
Now it’s time for the star of the show! Remove the skillet from heat and gently fold in the drained corn and black beans. This adds extra layers of texture and flavor. Take a taste and adjust the seasoning if necessary—maybe add a pinch of salt or a dash of hot sauce if you’re feeling spicy!
Step 5: Shape Those Tortillas
Now comes the fun part—shaping those tortillas! Cut circles from your tortillas using a cookie cutter or the rim of a glass. Gently press each round into a greased muffin tin. They should fit snugly, creating little cups for our delicious filling.
Step 6: Load ‘Em Up
Spoon the meat mixture into each tortilla cup, filling them generously but not overflowing. Top each cup with a sprinkle of shredded cheddar cheese; this is where the magic happens! The cheese will melt and create a gooey layer on top—you can’t go wrong!
Step 7: Bake to Perfection
Place the muffin tin in the preheated oven and bake for about 15-20 minutes, or until the tortillas are crispy and the cheese is bubbly and golden. Keep an eye on them; you want that perfect golden hue!
Step 8: Cool and Serve
Once they’re done, let them cool for a few minutes. This allows the cups to set and makes them easier to remove from the muffin tin. Carefully lift them out and place them on a serving platter. It’s time to dig in!
Serving Suggestions
When it comes to serving, I like to set up a garnish bar! Serve your taco cups with an array of toppings like sour cream, fresh cilantro, diced tomatoes, sliced jalapeños, and avocado. Let your guests get creative! You can even provide some crispy tortilla chips on the side for an added crunch.
To plate them, arrange the taco cups on a vibrant platter or a rustic wooden board for a charming presentation. Don’t forget to sprinkle a bit of lime juice on top for that fresh zing!
Recipe Variations
Feeling adventurous? Here are some creative twists you can try with your Easy Taco Cups:
-
Spicy Taco Cups: Add diced jalapeños or a sprinkle of cayenne pepper to your beef mixture for an extra kick.
-
Vegetarian Taco Cups: Substitute the ground beef with sautéed mushrooms, lentils, or a mix of your favorite roasted veggies for a plant-based version packed with flavor.
-
Cheesy Fiesta Taco Cups: Mix different cheeses like pepper jack, mozzarella, or even crumbled feta for a fun flavor twist.
-
Southwestern Taco Cups: Add black olives and some diced bell peppers to the filling for a south-of-the-border flair.
-
Breakfast Taco Cups: Scramble some eggs and mix them with cooked sausage or bacon, then top with cheese for a breakfast take on taco cups.
Chef’s Notes
Over the years, this taco cups recipe has evolved, and it’s become a family favorite! I love how adaptable it is, allowing me to explore different flavor profiles. Plus, every time I make them, it takes me back to those joyful moments in my childhood kitchen.
One time, I had some leftover taco filling and decided to stuff it in bell peppers. Let me tell you—it was a hit! So, don’t be afraid to get creative with your leftovers! Cooking should be fun and experimental; embrace it.
FAQs and Troubleshooting
-
Can I make these ahead of time?
Absolutely! You can prepare the filling in advance and store it in the fridge. When you’re ready to serve, just assemble the cups and bake them. A great timesaver! -
What if my tortilla cups are sticking?
Make sure to grease your muffin tin well. You could also lightly flour the cups before pressing the tortillas in. If you’re using non-stick or silicone pans, that helps too! -
How can I tell when the taco cups are done?
Look for golden-brown edges on the tortillas and bubbly cheese. If you notice the tortillas are browning too quickly, cover them with aluminum foil to avoid burning. -
Can I freeze these taco cups?
Yes! Assemble the uncooked taco cups, cover them tightly, and stash them in the freezer. Just bake from frozen when you’re ready to enjoy. Baking time may be slightly longer.
Nutritional Info
As we enjoy these delicious Easy Taco Cups, here’s a rough idea of the nutritional breakdown per serving:
- Calories: Approximately 250 kcal per cup
- Protein: 15g
- Carbohydrates: 25g
- Fat: 12g
- Fiber: 4g
These numbers will vary based on ingredient choices and portion sizes, so always adjust according to your own dietary needs.
Final Thoughts
So there you have it—your new go-to recipe for Easy Taco Cups! I hope you feel inspired to gather your loved ones and make some wonderful memories in the kitchen. Whether you enjoy them as an appetizer, a party dish, or just a comforting meal, these taco cups are sure to bring smiles and satisfaction.
Remember, cooking should be fun, so don’t hesitate to tweak the ingredients and make them your own. Life is too short for boring food! Keep exploring, keep tasting, and always keep that kitchen love alive. Happy cooking, friends! 🥳
Print
Easy Taco Cups
- Total Time: 45 minutes
- Yield: 8 servings 1x
- Diet: None
Description
Delicious and customizable taco cups filled with savory ground beef, zesty seasonings, and topped with melted cheese, perfect for any occasion.
Ingredients
- 450 g Ground Beef
- 8 Small Flour Tortillas, cut into rounds
- 1 medium Onion, finely chopped
- 2 cloves Garlic, minced
- 2 tablespoons Taco Seasoning
- 120 ml Tomato Sauce
- 150 g Shredded Cheddar Cheese
- 120 g Canned Corn, drained
- 120 g Canned Black Beans, rinsed and drained
- 1 tablespoon Olive Oil
Instructions
- Preheat your oven to 190°C (375°F). Chop your onion and mince your garlic.
- Heat olive oil in a skillet over medium heat, add onion and sauté for 3-5 minutes until soft.
- Add minced garlic and stir for 30 seconds until fragrant.
- Add ground beef, cook until browned (5-7 minutes); drain excess fat if necessary.
- Sprinkle in taco seasoning and tomato sauce; mix well and cook for an additional 2-3 minutes.
- Fold in drained corn and black beans, adjust seasoning to taste.
- Cut circles from tortillas and press them into a greased muffin tin.
- Spoon the beef mixture into each tortilla cup and top with shredded cheese.
- Bake for 15-20 minutes until tortillas are crispy and cheese is bubbly.
- Cool for a few minutes before serving.
Notes
You can customize the filling with different meats or make it vegetarian. Serve with toppings like sour cream, fresh cilantro, and diced tomatoes.
- Prep Time: 15 minutes
- Cook Time: 30 minutes
- Category: Appetizer
- Method: Baking
- Cuisine: Mexican
Nutrition
- Serving Size: 1 cup
- Calories: 250
- Sugar: 3g
- Sodium: 600mg
- Fat: 12g
- Saturated Fat: 6g
- Unsaturated Fat: 4g
- Trans Fat: 0g
- Carbohydrates: 25g
- Fiber: 4g
- Protein: 15g
- Cholesterol: 40mg
Keywords: taco cups, easy recipe, Mexican cuisine, party food, comfort food
Loaded Potato Taco Bowl
The Loaded Potato Taco Bowl: A Comfort Food Extravaganza
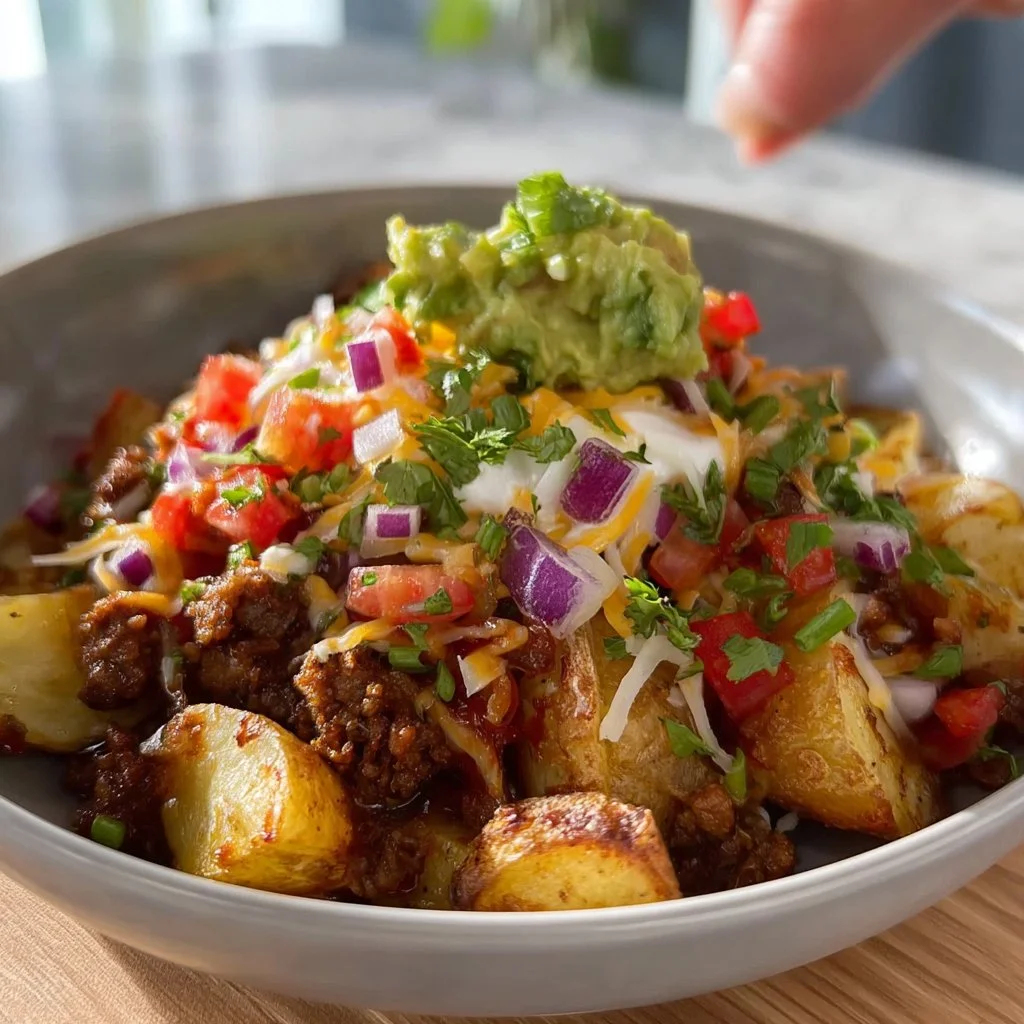
Hey food lovers! Beau Collier here, and today, I’m bringing you one of my all-time favorite comfort food creations— the Loaded Potato Taco Bowl. Imagine this: perfectly baked potatoes nestled in a warm bowl, filled to the brim with seasoned ground beef, savory taco flavors, and all of your favorite toppings. Sounds heavenly, right? Well, it gets better because this dish combines two of our ultimate guilty pleasures: loaded baked potatoes and tacos! It’s like a fiesta in a bowl, which is exactly what life is all about, right?
Now, let’s dive into the inspiration behind this recipe. Back in the day, I used to spend weekends at my grandma’s house. There was always a hearty meal waiting for me whenever I arrived. She had this magical ability to turn simple ingredients into little hugs for the tummy. However, tacos were my absolute favorite! On those lazy Sundays, when we didn’t feel like cooking something too labor-intensive, my grandma would whip up potato skins filled with taco fixings. Fast forward to now, and I’ve turned that delightful memory into my own Loaded Potato Taco Bowl. It’s an easy, versatile dish that’s perfect for family dinners, game nights, or even a solo binge-watching session of your favorite show. So grab your apron, and let’s get cooking!
Personal Story
One of my fondest memories growing up revolves around the delicious meals shared over the family table. I remember one evening in particular when my grandma decided to host a taco night. The air was filled with the aroma of seasoned beef, and I could hear the sound of laughter as we passed around toppings. Each person had their own twist to their tacos, and my creative little mind was bursting with ideas! That was the night I realized that food could be an expression of love and creativity.
After dinner, we had an abundance of baked potatoes left over from a previous meal. Not wanting anything wasted, my grandma said, “Let’s make some taco potato skins!” We scooped out the insides, mixed it with taco fillings, and then piled the loaded goodies back in for a feast. It was a hit! So, that memory stuck with me like melted cheddar on a hot potato. Now, I’ve married that nostalgic experience with a few twists of my own to create this Loaded Potato Taco Bowl, allowing you to bring that same joy to your kitchen!
Ingredients
Here’s what you’ll need:
-
Potatoes: Use russet or Yukon gold for a fluffy interior. If you prefer, you can also use sweet potatoes for a sweeter, nutrient-packed twist.
-
Ground Beef: The classic choice! However, feel free to swap it for ground turkey, chicken, or even black beans for a vegetarian option.
-
Taco Seasoning: A blend of spices to give your beef that authentic taco flavor. You can use store-bought or whip up your own with chili powder, cumin, garlic powder, and onion powder.
-
Guacamole: Because what’s a taco bowl without this creamy delight? You can make your own or buy a fresh batch from the store.
-
Salsa: A spoonful of tangy salsa adds freshness. Opt for homemade or your favorite brand, though fresh pico de gallo is always a great choice!
-
Cheddar Cheese: Sharp cheddar works best for that mouthwatering cheesiness, but feel free to use pepper jack for a kick or even a dairy-free cheese.
-
Olive Oil: A splash of this healthy fat adds flavor while helping the potatoes get that crispy skin when baked.
-
Salt & Pepper: Essential for seasoning! Always taste as you go to get the perfect balance.
A little pro tip: If you’re short on time, you can microwave your potatoes, but baking them yields the best texture!
Step-by-Step Instructions
Now that we have our ingredients ready, let’s get to the fun part—cooking! Follow these simple steps:
Step 1: Bake Your Potatoes
- Preheat your oven to 425°F (220°C).
- Scrub the potatoes thoroughly under running water. Pat them dry with a towel.
- Poke a few holes in each potato with a fork. This allows steam to escape during baking, preventing them from bursting!
- Rub each potato with a bit of olive oil and sprinkle generously with salt. This helps create a crisp skin.
- Place the potatoes directly on the oven rack or on a baking sheet (for easier cleanup) and bake for about 45-60 minutes, until they’re fork-tender.
Chef Hack: To speed things up, you can microwave the potatoes for 5-10 minutes before transferring them to the oven for crispiness.
Step 2: Cook the Ground Beef
- While the potatoes are baking, heat a skillet over medium heat and add a drizzle of olive oil (about 1 tablespoon).
- Once hot, add the ground beef and break it apart with a spatula. Cook for about 5-7 minutes until it browns, stirring occasionally to ensure even cooking.
- Drain any excess fat (unless you’re using lean beef, then you’re all set).
- Add taco seasoning and a splash of water. Stir to combine and simmer for another 5 minutes. This will allow the flavors to meld beautifully.
Extra Tip: If you want a bit more heat, add a pinch of cayenne pepper or some diced jalapeños!
Step 3: Assemble Your Taco Bowl
- Once the potatoes are done, take them out of the oven and let them cool for a few minutes.
- Carefully slice each potato in half lengthwise and scoop out a little bit of the insides, creating the “bowl” for our stuffing.
- Load up the scooped potatoes with the seasoned ground beef generously.
- Top with a heaping spoonful of guacamole and salsa.
- Finally, sprinkle shredded cheddar cheese on top.
Fun Twist: Put the assembled bowls back in the oven for a few minutes, just until the cheese is melted and bubbly.
Step 4: Plate and Serve!
- Transfer the loaded taco bowls to individual servings, or keep them family-style on the table for everyone to help themselves!
- Garnish with fresh cilantro, diced onions, or sliced jalapeños for added flair.
Serving Tip: Pair with crispy tortilla chips and a refreshing drink like homemade lemonade or a fun mocktail to complete the vibe!
Recipe Variations
Let’s get creative! Here are some flavor twists to give your Loaded Potato Taco Bowls a fun makeover:
-
Buffalo Chicken Loaded Potato Bowl: Substitute ground beef with shredded buffalo chicken and top with blue cheese dressing for a zesty twist.
-
BBQ Pulled Pork Potato Bowl: Swap ground beef for pulled pork mixed with your favorite BBQ sauce and top with coleslaw for a Southern spin.
-
Vegetarian Style: Replace beef with black beans or lentils and top with corn salsa, avocado slices, and queso fresco for a hearty meatless option.
-
Taco Verde: Use ground turkey instead of beef, and top with a green salsa (salsa verde) and crumbled feta for a refreshing flavor.
-
Breakfast Taco Bowl: Whip up some scrambled eggs instead of ground beef and top with pico de gallo, avocado, and cheese. Perfect for brunch!
Chef’s Notes
Ah, the memories this recipe brings! I’ve done countless variations over the years. One time, I decided to host a taco bowl party and had guests bring their favorite toppings to share. It was a big ol’ taco buffet that turned into a hilarious competition for the best topping! Another time, my neighbor wanted to impress their partner with a homemade dinner. They made this recipe and it ended up being a hit. The best part? Bonding over delicious food brings people together, and that’s what Feastical is all about!
FAQs and Troubleshooting
1. My potatoes didn’t cook through! What did I do wrong?
Make sure to poke enough holes in the potatoes before baking to allow steam to escape. If you’re still having trouble, you may need to bake them longer or check the size of your potatoes. Larger ones can take more time!
2. How can I keep my guac from turning brown?
The best way to keep guacamole fresh is to press plastic wrap directly onto its surface to limit exposure to air. You can also add a bit of lime juice on top before covering to slow down oxidation.
3. Can I prep the taco filling in advance?
Absolutely! The taco filling can be made ahead and stored in the fridge for up to three days. Just reheat before assembling your bowls!
4. My filling is too dry. What can I do?
If your beef mixture is on the dry side, you can add a splash of beef broth or water while simmering to loosen it up. Also, don’t skip finishing with a sprinkle of fresh toppings for moisture!
Nutritional Info
While this recipe can vary depending on portion sizes and modifications, here’s a rough estimate per bowl using standard ingredients:
- Calories: 620
- Protein: 35g
- Carbohydrates: 53g
- Fat: 30g
- Fiber: 7g
Note: For lower-calorie options, consider swapping in less cheese and/or using leaner meat or beans to boost fiber and decrease fat content!
Final Thoughts
Creating the Loaded Potato Taco Bowl experience is not just about what’s on your plate but the memories you create while cooking. This dish is simple yet full of flavor, perfect for any occasion, from casual family dinners to lively gatherings with friends. So, roll up your sleeves, dive into the kitchen, and make it your own. Let your creativity shine through, and please do come back to share your own variations and stories! Happy cooking and taco-eating, everyone! 🥔🌮✨
Print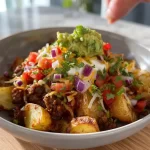
Loaded Potato Taco Bowl
- Total Time: 75 minutes
- Yield: 4 servings 1x
- Diet: Non-Vegetarian
Description
A comforting fusion of baked potatoes and taco fixings, perfect for family dinners or solo binge-watching.
Ingredients
- 2 large Russet potatoes
- 1 lb ground beef
- 2 tbsp taco seasoning
- 1/2 cup guacamole
- 1/2 cup salsa
- 1 cup shredded cheddar cheese
- 2 tbsp olive oil
- Salt and pepper to taste
Instructions
- Preheat your oven to 425°F (220°C).
- Scrub the potatoes thoroughly and poke a few holes in each with a fork.
- Rub each potato with olive oil and sprinkle with salt.
- Bake the potatoes directly on the oven rack for about 45-60 minutes until fork-tender.
- Heat a skillet over medium heat and add olive oil.
- Add the ground beef, breaking it apart as it cooks for 5-7 minutes.
- Drain any excess fat, then add taco seasoning and a splash of water.
- Simmer the mixture for an additional 5 minutes to meld flavors.
- Slice each baked potato in half and scoop out some insides.
- Load with seasoned beef, then top with guacamole, salsa, and cheddar cheese.
- Optional: Return to oven to melt the cheese.
- Serve garnished with fresh cilantro, diced onions, or jalapeños.
Notes
For lower-calorie versions, use less cheese or leaner meat. Feel free to customize toppings according to your preferences.
- Prep Time: 15 minutes
- Cook Time: 60 minutes
- Category: Main Course
- Method: Baking
- Cuisine: Mexican
Nutrition
- Serving Size: 1 serving
- Calories: 620
- Sugar: 4g
- Sodium: 600mg
- Fat: 30g
- Saturated Fat: 12g
- Unsaturated Fat: 12g
- Trans Fat: 0g
- Carbohydrates: 53g
- Fiber: 7g
- Protein: 35g
- Cholesterol: 85mg
Keywords: loaded potato taco bowl, comfort food, baked potatoes, taco fixings, family dinner
High Protein Taco Bowl
Dive into Flavor: High Protein Taco Bowl Recipe
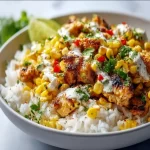
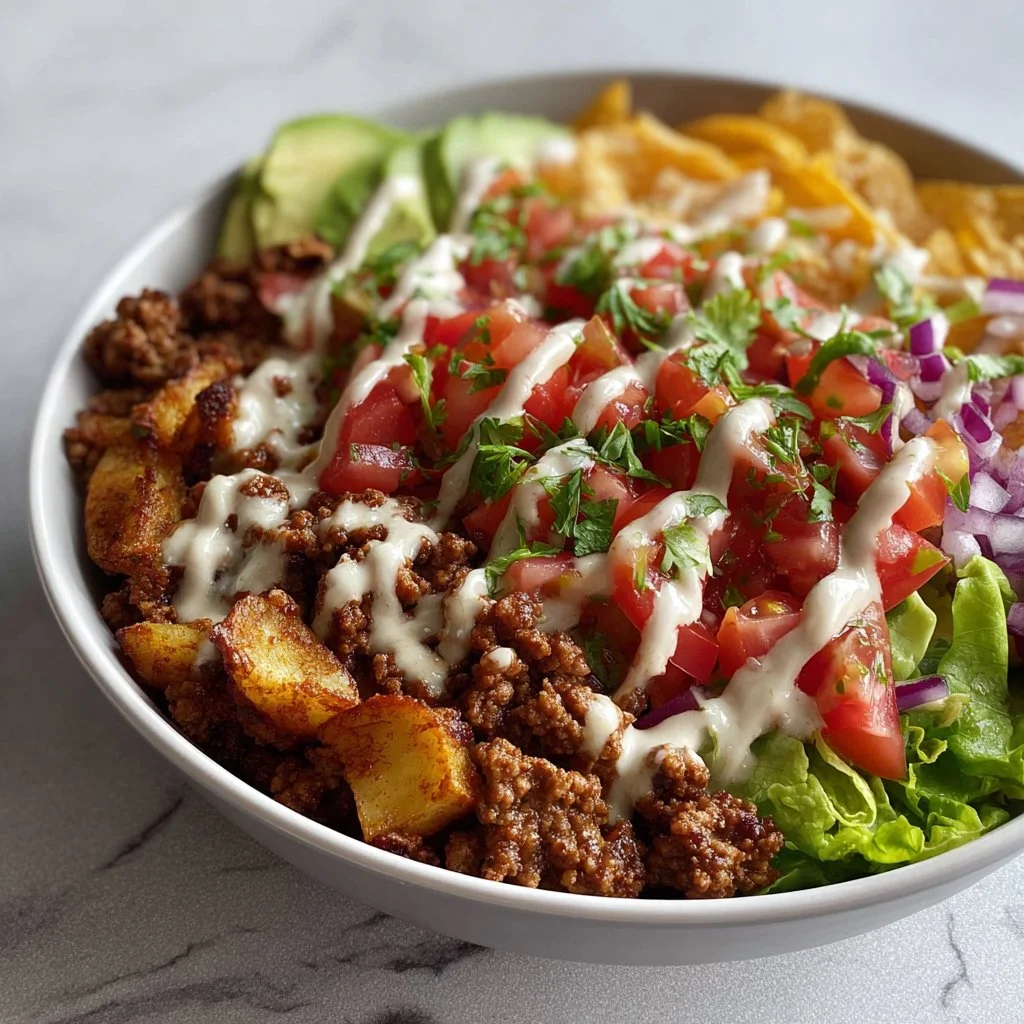
Hey there, food lovers! I’m so excited to share one of my all-time favorite recipes with you today – the High Protein Taco Bowl! If you’ve been looking for a dish that’s not only packed with flavor but also satisfies your comfort food cravings, you’re in for a treat. Picture this: layers of seasoned ground beef, crispy potatoes, fresh pico de gallo, and creamy avocado, all sitting in a cozy bowl, just waiting to be devoured. Trust me, this bowl is like a fiesta in your mouth!
Now, taco bowls are all the rage right now, and for good reason. They are incredibly versatile and perfect for those busy weeknights when you want something wholesome yet quick. Plus, it’s a delightful social dish – everyone can customize their bowls just how they like it! Ready to whip up some magic in the kitchen? Let’s get this taco party started!
A Tasty Memory
Thinking back on my taco experiences, there’s one occasion that really lights up my culinary memories. It was a warm summer evening during my college days, when I invited a few friends over to celebrate the end of our finals. I wanted to make something special that was both filling and fun – a taco night! We set up an assembly line in the kitchen, with bowls of seasoned ground beef, fresh vegetables, and various toppings. As we built our taco creations, laughter filled the air, and each bite was an explosion of flavor. Those students’ faces lit up with each spoonful, showcasing a blend of joy and satisfaction that I’ll always cherish.
That’s what food does – brings people together, creating lasting memories with every bite. And now, I get to share my Taco Bowl with you, so let’s recreate that magic!
Ingredients
Here’s what you’ll need to conjure up this delightful High Protein Taco Bowl:
-
Ground Beef: The star of the dish! I recommend using lean ground beef for a healthier option. You can also substitute with turkey or plant-based protein for a lighter twist.
-
Potatoes: I love using diced potatoes for their crispy texture. Sweet potatoes can be a great alternative for a touch of sweetness and extra nutrients.
-
Pico de Gallo: A fresh blend of diced tomatoes, onions, cilantro, lime juice, and a hint of chili. If you’re short on time, store-bought salsa also works well.
-
Avocado: Creamy and nutritious, it adds a rich texture to your bowl. If you’re out of avocado, you can use guacamole or Greek yogurt for creaminess.
-
Taco Sauce: A must-have for that authentic flavor! You can whip up your own or grab your favorite from the store.
-
Salt and Pepper: Basic seasonings that elevate your dish. I always recommend fresh cracked pepper for an extra kick!
-
Olive Oil: Perfect for sautéing your ingredients and adding richness. Avocado oil can be a great swap.
-
Favorite Toppings: Get creative! Cheese, beans, corn, jalapeños, or fresh herbs are all fantastic ways to customize your taco bowl.
With these ingredients in hand, you’re set to create a deliciously satisfying meal!
Step-by-Step Instructions
Ready to get cooking? Let’s dive into the taco bowl bliss!
-
Prep Your Ingredients: Start by washing and dicing your potatoes into small cubes. You want them to be bite-sized so they can cook evenly. For added flavor, you could toss them in a bit of olive oil, salt, and pepper before cooking.
-
Cook the Potatoes: Heat a tablespoon of olive oil in a large skillet over medium heat. Add your diced potatoes and cook until they are golden brown and crispy, about 15–20 minutes. Here’s a little chef hack: cover the skillet for the first 10 minutes to steam them slightly, ensuring they cook through!
-
Sauté the Ground Beef: In the same skillet, push the potatoes to one side and add a little more olive oil if needed. Add the ground beef, breaking it up with a spatula. Season with salt and pepper, and cook for about 5–7 minutes until browned, stirring occasionally. Make sure to drain excess fat if necessary.
-
Add Flavor: Once the beef is cooked, stir in your taco sauce. Let it simmer for an additional 2 minutes to allow all those flavors to meld together. You can adjust the seasoning here to suit your taste. Want a kick? Toss in some chili powder or cayenne pepper!
-
Build Your Bowl: Grab your favorite serving bowls and start layering! Start with a hearty base of crispy potatoes, followed by a generous scoop of seasoned ground beef.
-
Top It Off: Add a heap of fresh pico de gallo on top, followed by sliced avocado. Drizzle with extra taco sauce to add that zesty flair.
-
Personalize: Don’t forget your favorite toppings! A sprinkle of cheese or a dollop of sour cream always elevates the flavors. Get creative here – corn, jalapeños, or even a handful of leafy greens work wonders too!
And voilà! You have yourself a delicious High Protein Taco Bowl ready to please any crowd (or just yourself, no judgment here!).
Serving Suggestions
Now that everything is all layered and beautifully displayed, let’s talk presentation. Here are a couple of serving ideas to make your taco bowl really pop:
-
Colorful Bowls: Use clear or colorful bowls to showcase the vibrant layers of your taco bowl. The various colors of the ingredients from the green avocado to the red pico de gallo create a feast for the eyes!
-
Garnishes Galore: Finish plating with freshly chopped cilantro or green onions for a touch of freshness. A few slices of lime on the side not only look good but also allows everyone to add a zest of flavor to their bowls if they desire.
-
Make it Shareable: If you’re hosting a gathering, consider serving the taco contents on a large platter, letting everyone build their own bowl. It sparks creativity and can lead to fun flavor pairings!
Recipe Variations
Here are some fun twists to keep things fresh every time you make your Taco Bowl!
-
Fiesta Chicken Bowl: Swap out the ground beef for shredded chicken marinated in taco spices for a deliciously different version.
-
Cali Style: Add a layer of cilantro lime rice instead of potatoes for a California-inspired taco bowl. Yum!
-
Veggie Lovers Delight: For plant-based options, try using lentils or cooked quinoa. You’ll get a great texture with a protein punch!
-
Southwestern Flair: Toss in some black beans and corn for an extra heartiness. They also contribute a lovely sweetness!
-
Spice it Up: If you’re feeling adventurous, add some chipotle sauce or chopped green chilies for a smoky flavor.
Chef’s Notes
Every recipe tells a story, and this taco bowl has certainly evolved over the years. I started out using pre-packaged taco seasoning when I was a newbie in the kitchen – can you relate? As I experimented with spices, I discovered the beauty of making my own blends. Now, I love adding a bit of cumin and smoked paprika for a unique twist.
And let me tell you, there’s nothing quite as satisfying as hearing your family or friends rave about a meal you made. I’ve had taco bowls turn into surprise dish battles at gatherings – who can come up with the best topping combo? That laughter, those moments, all tied together with food. That’s what really makes this dish special to me.
FAQs and Troubleshooting
Here are some common questions you might have while making your High Protein Taco Bowl:
Q1: What if I don’t have ground beef?
No worries! Ground turkey, chicken or a plant-based substitute (like tempeh or chickpeas) work just as well.
Q2: How do I keep my potatoes crispy?
Make sure to not overcrowd the pan while cooking the potatoes. Giving them space allows for optimal browning.
Q3: I’m not a fan of pico de gallo. What can I use instead?
No problem! You can substitute with your favorite salsa, or even experiment with roasted vegetables for added texture!
Q4: How can I store leftovers?
Store your bowl components separately in airtight containers in the fridge. They’ll last about 3-4 days. Reheat the beef and potatoes before assembling your bowl to keep everything fresh.
Nutritional Info
Let’s chat a bit about that nutrition aspect! With high-protein ground beef and healthy fats from avocado, this taco bowl is balanced and filling.
For one serving, you’ll typically find:
- Calories: ~600-700 kcal (depending on toppings)
- Protein: ~40g (thank you, ground beef!)
- Carbohydrates: ~45g (from potatoes)
- Fat: ~30g (healthy fats from avocado and olive oil)
Of course, the nutrition will vary based on your choices for toppings and any substitutions made.
Final Thoughts
In closing, the High Protein Taco Bowl is more than just a meal — it’s a delightful experience filled with flavor, creativity, and love. Whether you’re serving it up solo or sharing it with loved ones, remember, it’s all about enjoying the process of cooking, tasting, and, most importantly, making bond-worthy memories around the table.
So, go ahead, get your taco vibe on! I’m so excited for you to create this dish. Don’t forget to leave me a comment with your thoughts or your own taco bowl spins. Happy cooking, my foodie friends – let’s keep the kitchen magic alive!
Let’s dig in! 🎉
Print
High Protein Taco Bowl
- Total Time: 35 minutes
- Yield: 4 servings 1x
- Diet: High Protein
Description
A deliciously satisfying taco bowl packed with seasoned ground beef, crispy potatoes, fresh pico de gallo, and creamy avocado.
Ingredients
- 1 lb ground beef (or turkey/plant-based substitute)
- 2 cups diced potatoes (or sweet potatoes)
- 1 cup pico de gallo
- 1 avocado, sliced
- 1/2 cup taco sauce
- Salt and pepper to taste
- 2 tbsp olive oil
- Favorite toppings: cheese, beans, corn, jalapeños, fresh herbs
Instructions
- Prep your ingredients: Wash and dice your potatoes into small cubes.
- Cook the potatoes: Heat olive oil in a large skillet over medium heat and add diced potatoes, cooking until golden brown and crispy (15–20 minutes).
- Sauté the ground beef: Push the potatoes to one side, add more oil if needed, and cook ground beef for about 5–7 minutes until browned.
- Add flavor: Stir in taco sauce and let it simmer for 2 minutes.
- Build your bowl: Layer crispy potatoes at the bottom, followed by seasoned ground beef.
- Top it off: Add pico de gallo and sliced avocado, then drizzle with extra taco sauce.
- Personalize: Add your favorite toppings like cheese or sour cream.
Notes
For a lighter version, use ground turkey or plant-based protein. Store leftovers separately in airtight containers.
- Prep Time: 10 minutes
- Cook Time: 25 minutes
- Category: Main Course
- Method: Sautéing
- Cuisine: Mexican
Nutrition
- Serving Size: 1 bowl
- Calories: 600
- Sugar: 4g
- Sodium: 600mg
- Fat: 30g
- Saturated Fat: 10g
- Unsaturated Fat: 15g
- Trans Fat: 0g
- Carbohydrates: 45g
- Fiber: 5g
- Protein: 40g
- Cholesterol: 105mg
Keywords: taco bowl, high protein, healthy dinner, customizable meal, Mexican food