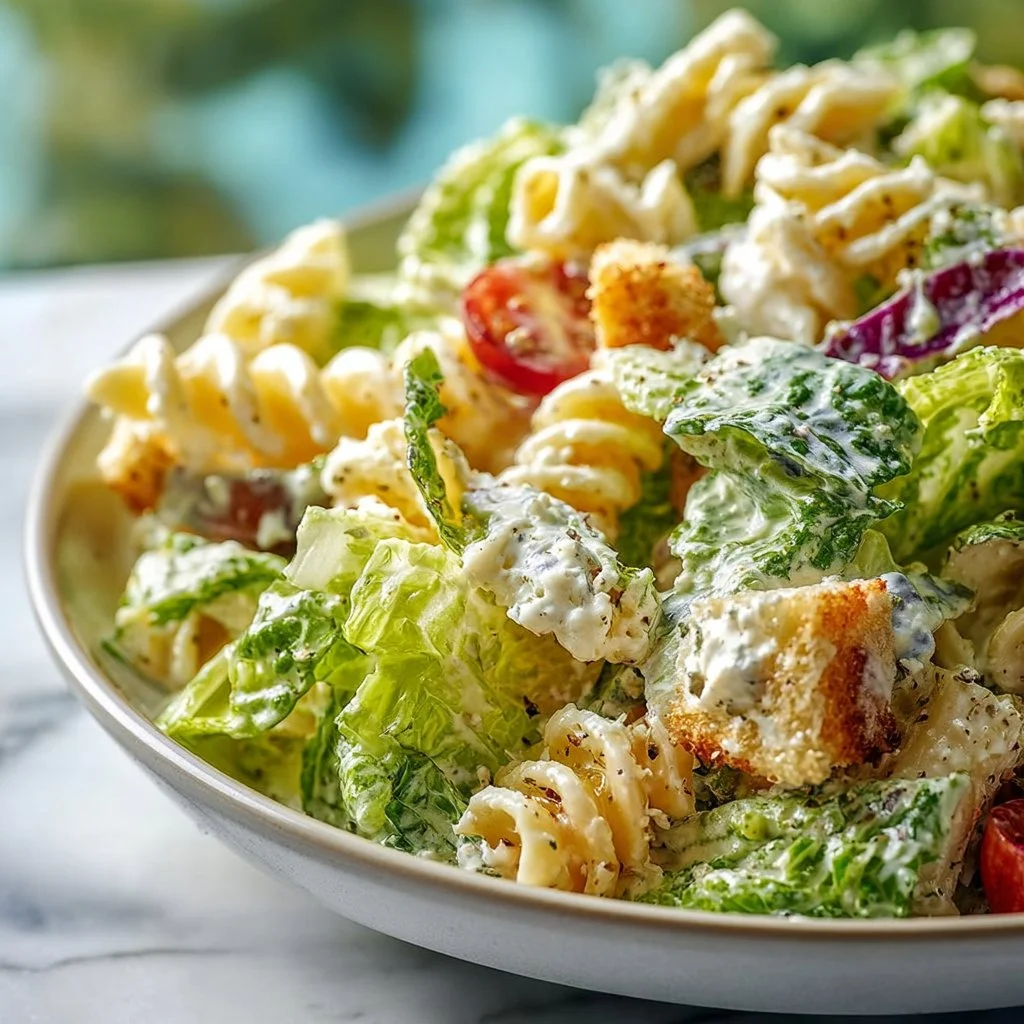
Simple Greek Yogurt Caesar Pasta Salad
Simple Greek Yogurt Caesar Pasta Salad: A Fresh Twist on a Classic Favorite
Hey there, food lovers! It’s Beau Collier here, and I’m so excited to welcome you to my kitchen today! If you’re on the hunt for a refreshing dish to bring to those summer potlucks or a quick dinner that’s good for the soul, you’ve landed in the right spot. Today, we’re whipping up a Simple Greek Yogurt Caesar Pasta Salad that’s not just flavorful—it’s also a healthier spin on the traditional version.
Picture this: twirling your fork around creamy, tangy goodness, combined with the delightful crunch of fresh vegetables. Doesn’t that sound perfect? The best part of this dish is how versatile it is. You can serve it warm or cold, making it a fantastic option for all seasons. Plus, it’s loaded with protein from the Greek yogurt, making it a hearty dish that can stand on its own or work as a side.
But this dish isn’t just about the food; it’s about the memories that come with it. When I think of pasta salads, I’m instantly transported to sun-drenched backyard barbecues with friends and family, where laughter mingles with the aroma of grilled goodies wafting through the air. So grab your pots and pans because we’re about to create something delicious that will add a sprinkle of joy to your table!
Personal Story
I’ll never forget the first time I made a pasta salad. I was just a kid, helping out in my grandma’s kitchen. The sun was shining, and we had a family gathering planned. She put me to work, gathering fresh tomatoes from the garden—all while telling me about her secret ingredient that made her pasta salad the talk of the town.
She swore by using a mix of creamy dressings, but I remember her saying, “Beau, darling, you need to know that the secret is all in the love you sprinkle into the dish.” Fast forward a few years, and my love for that pasta salad grew stronger! But as I learned more about healthy eating, I made tweaks to her classic recipes, including a lighter version of that beloved salad.
This Simple Greek Yogurt Caesar Pasta Salad is one of those creations that carries my grandma’s spirit. The use of Greek yogurt keeps it creamy without the extra calories, reminding me of Sunday family dinners while giving it a fresh, modern edge. So, let’s create some new memories together, shall we?
Ingredients
Here’s what you’ll need to make this delicious dish:
-
8 ounces pasta (such as rotini or penne)
Choose your favorite type—whole wheat or gluten-free works beautifully too! A fun chef hack? The shape of your pasta can affect the overall texture. Twisted pasta like rotini holds onto the dressing better than straight shapes. -
1 cup Greek yogurt
Opt for plain, low-fat Greek yogurt for that creamy consistency. Don’t worry about the tang; it’ll elevate the dish. Feel free to replace it with sour cream for a different flavor, or if you’re dairy-free, try coconut yogurt. -
2 tablespoons Caesar dressing
This is where the magic begins! You can use store-bought for convenience, or make your own. If you’re looking for a homemade version, blend anchovy paste, garlic, lemon juice, and olive oil with your yogurt! -
1/4 cup grated Parmesan cheese
Freshly grated adds a nice flavor kick! If you’re vegan, try nutritional yeast for that cheesy taste without the dairy. -
1/2 cup cherry tomatoes, halved
The popping flavor of fresh tomatoes adds sweetness. Substitute with sun-dried tomatoes for a different profile or use your favorite seasonal veggies. -
1/4 cup diced cucumber
Crisp and cool, cucumbers help balance out the creaminess. For a twist, consider bell peppers or radishes for added crunch! -
Salt and pepper to taste
Adjust according to your preferences; a little pinch enhances all those bright flavors. -
Chopped parsley for garnish (optional)
A sprinkle adds color and freshness! Basil or arugula can also work beautifully, giving a slightly different flavor palette.
Step-by-Step Instructions
Ready to get cooking? Let’s break it down step by step!
-
Cook the Pasta
Start by boiling a large pot of salted water. Toss in your pasta and cook until al dente according to the package instructions (usually around 8-10 minutes). Remember: undercooking just a tad is key, as the pasta will soften further when mixed with the dressing. Drain and rinse under cold water to stop the cooking process and keep that bounce. -
Prepare Your Veggies
While the pasta is cooking, let’s tackle those cherry tomatoes and cucumbers. Halving the tomatoes makes them burst with flavor, while dicing cucumbers adds that satisfying crunch. Getting messy in the process is often part of the fun! -
Make the Dressing
In a large bowl, combine Greek yogurt and Caesar dressing. Mix well until you have a smooth, creamy base. If you’re feeling adventurous, add a splash of lemon juice for a zesty kick. This step is so much easier than tackling a traditional egg-based Caesar dressing! -
Combine Ingredients
Once the pasta has cooled, toss it into the bowl with the dressing. Stir gently until the pasta is fully coated. It’s really satisfying to see all that creamy goodness enveloping every piece of pasta! -
Add Veggies and Cheese
Next, fold in the halved cherry tomatoes, diced cucumbers, and grated Parmesan cheese. Again, gently mix, being careful not to squish those vibrant veggies. Feel free to taste at this stage and adjust salt and pepper as needed! -
Serve it Right
Give your salad a final look over—how vibrant and fresh it looks! If you’re serving it immediately, plate directly onto bowls, or transfer it to a serving dish. Top it off with some chopped parsley for that added touch of color.
Chef Hack:
Remember, this salad can be made ahead of time. Just keep it chilled in the fridge for 1-2 hours before serving to allow the flavors to meld!
Serving Suggestions
This Simple Greek Yogurt Caesar Pasta Salad is incredibly versatile in terms of serving. You can plate it in individual bowls, garnished with parsley, or serve it family-style in a large platter, drawing everyone in with its vibrant colors. For a little flair, consider serving it alongside some grilled chicken or shrimp for protein.
If you want to elevate your presentation effort, use a ring mold to stack the salad into beautiful rounds topped with more cheese and a sprig of parsley. Don’t forget to set out some extra dressing on the side for those who like a little extra!
Recipe Variations
Here are some fun twists you can try to shake things up:
-
Mediterranean Style: Add kalamata olives, artichokes, and roasted red peppers for a delightful Mediterranean flair.
-
Bacon Bliss: Prosciutto or bacon bits can infuse a smoky flavor. Just be sure to cook them up nice and crispy!
-
Protein-Packed: Toss in grilled chicken or chickpeas to turn this side dish into a complete meal.
-
Herb-Infused: Consider adding fresh herbs like dill or chives for a burst of freshness that enhances the overall flavor.
-
Spicy Kick: If you enjoy heat, add a pinch of red pepper flakes or some diced jalapeños for a zingy surprise!
Chef’s Notes
Ah, what a ride it’s been creating this dish! Over time, each time I made variations to my pasta salad, I realized how much room there is to play with flavors and ingredients. From creamy to bursting with fresh tastes, food is truly the best medium for creativity.
One of my funniest moments in the kitchen? I once mistook cinnamon for my pasta salad dressing mix. Let’s just say, it’s a memory I won’t forget anytime soon—and it certainly taught me to keep my labels tidy!
FAQs and Troubleshooting
Here are a few common questions I get about this dish, along with some troubleshooting tips:
-
Can I make this salad ahead of time?
Absolutely! It’s perfect for meal prep. Just store it in an airtight container in the fridge for up to 3 days. The flavors will develop even more! -
What can I do if the salad is too thick?
If you find your dressing too thick, simply thin it out with a splash of olive oil or a little bit of water until you reach your desired consistency. -
What if I don’t have Greek yogurt?
Not a problem! Regular plain yogurt or even a nut-based yogurt can be excellent alternatives. Just check for a good consistency. -
How do I store leftovers?
Store any leftovers in an airtight container in the fridge. It’s typically best consumed within 3 days to retain its fresh taste.
Nutritional Info
While exact nutritional information can vary based on the exact ingredients you use, here’s an estimate per serving:
- Calories: Approx. 275
- Protein: 12g (thanks to the Greek yogurt!)
- Carbohydrates: 36g
- Fat: 8g
- Fiber: 2g
- Sugar: 2g
This pasta salad is not only delicious but balanced too!
Final Thoughts
There you have it, folks! A Simple Greek Yogurt Caesar Pasta Salad that’s as easy to make as it is to enjoy. Bringing together creamy yogurt, fresh veggies, and the nostalgic comfort of pasta, this dish is bound to inspire hearts and appetites alike.
Whether you’re hosting a summer barbecue, prepping for an easy weeknight dinner, or simply craving something delicious and wholesome, this dish delivers. So give it a try and let your kitchen be filled with love, laughter, and delightful flavors.
Join me again for another tasty culinary adventure, because there’s always something new to discover in the world of food! Happy cooking, friends!
Print
Simple Greek Yogurt Caesar Pasta Salad
- Total Time: 25 minutes
- Yield: 4 servings 1x
- Diet: Vegetarian
Description
A refreshing twist on a classic Caesar salad, featuring creamy Greek yogurt for a healthier alternative. Perfect for potlucks or a quick dinner!
Ingredients
- 8 ounces pasta (such as rotini or penne)
- 1 cup Greek yogurt
- 2 tablespoons Caesar dressing
- 1/4 cup grated Parmesan cheese
- 1/2 cup cherry tomatoes, halved
- 1/4 cup diced cucumber
- Salt and pepper to taste
- Chopped parsley for garnish (optional)
Instructions
- Cook the pasta in a large pot of salted water until al dente, about 8-10 minutes. Drain and cool under cold water.
- Prepare the cherry tomatoes and cucumbers by halving and dicing them, respectively.
- Make the dressing by mixing Greek yogurt and Caesar dressing in a large bowl until smooth.
- Combine the cooled pasta with the dressing until coated.
- Add the cherry tomatoes, cucumbers, and Parmesan cheese, and mix gently.
- Serve immediately or chill in the fridge for 1-2 hours before serving.
Notes
This salad can be made ahead of time and stored in the fridge for up to 3 days. Adjust salt and pepper according to taste.
- Prep Time: 15 minutes
- Cook Time: 10 minutes
- Category: Side Dish
- Method: Mixing
- Cuisine: Mediterranean
Nutrition
- Serving Size: 1 serving
- Calories: 275
- Sugar: 2g
- Sodium: 400mg
- Fat: 8g
- Saturated Fat: 3g
- Unsaturated Fat: 4g
- Trans Fat: 0g
- Carbohydrates: 36g
- Fiber: 2g
- Protein: 12g
- Cholesterol: 10mg
Keywords: pasta salad, healthy recipe, Greek yogurt, Caesar salad, summer dish
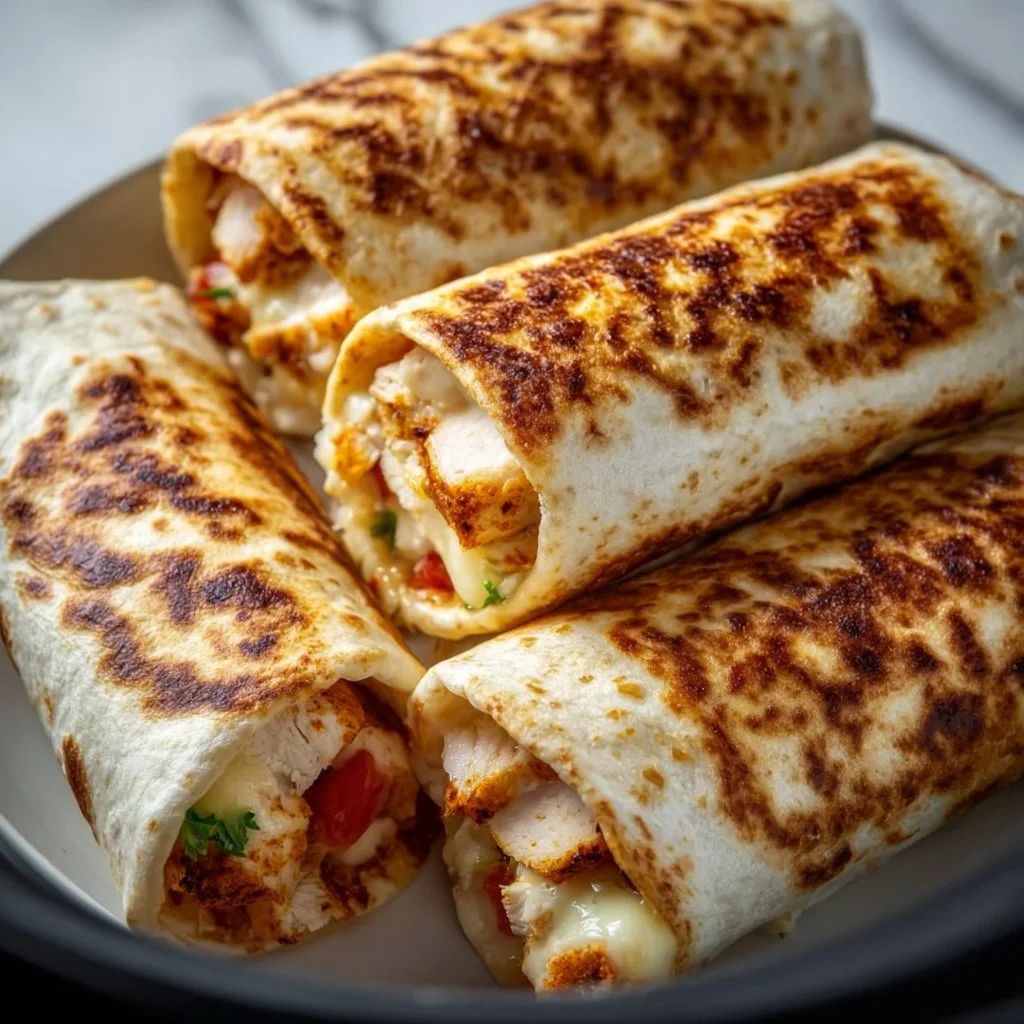
Air Fryer Chicken & Mozzarella Wraps
Air Fryer Chicken & Mozzarella Wraps: A Feast of Flavors
Hey there, fellow food lovers! I’m Beau Collier, and if you’re looking for a scrumptious meal that brings a little comfort and a whole lot of flavor to your kitchen, then boy, do I have a treat for you! Today, we’re diving into the delightful world of Air Fryer Chicken & Mozzarella Wraps. This dish is a definite crowd-pleaser—perfect for family dinners, casual get-togethers, or just a cozy night in.
You know those meals that just make you feel good? The ones that wrap you in a warm hug and remind you of good times? Well, this recipe is exactly that! These wraps are not only mouthwateringly delicious but also incredibly easy to whip up, especially with the magic of the air fryer. I love using the air fryer because it makes cooking quicker and gives your food that perfectly crispy texture—without drowning everything in oil. If you’re like me and prefer your meals to be satisfying but not overly complicated, you’re in for a real treat!
Now, let’s talk about these wraps! With juicy chicken breasts seasoned to perfection, melty mozzarella cheese, and a fresh crunch from spinach, all snugly tucked in a whole wheat tortilla, it’s a breeze to prepare. I’ll guide you through every step of the way, sharing tips, tricks, and my personal thoughts to make your cooking experience as enjoyable as the meal itself.
So grab your apron and let’s get cooking; we’re about to make some magic happen in the kitchen!
Personal Story
Okay, picture this: It was a chilly evening a few years back, and I was back home visiting my family. My niece had just finished her first week at school and was buzzing with excitement as she shared stories about her day. Inspired by my sister’s hectic schedule of working and managing family life, I decided to whip us up some quick and easy chicken wraps for dinner.
I took out some chicken breasts from the fridge, sprinkled them with a mix of spices—my trusty garlic powder and paprika (my flavor pals)—and popped them in the air fryer. The aroma wafted through the house, and my niece’s eyes lit up! As I assembled the wraps with gooey mozzarella and fresh spinach, laughter filled the kitchen. That night wasn’t just about the food; it was about bonding over good eats and making memories. Since then, Air Fryer Chicken & Mozzarella Wraps have become a staple in my house—a reminder of those lovely moments around the table.
Ingredients
Let’s break it down! Here’s everything you’ll need to make these scrumptious wraps. Each ingredient plays a key role in creating the flavor profile and texture of the dish!
-
2 large chicken breasts (about 1 pound total)
- The star of the show! Choose fresh, boneless chicken for juiciness. For a quicker option, you can use pre-cooked grilled chicken.
-
1 teaspoon garlic powder
- Adds a punch of flavor! Feel free to substitute with minced fresh garlic (1 clove = about 1/8 teaspoon powder) if you want a fresh kick.
-
1 teaspoon paprika
- This adds a warm color and smoky flavor. Smoked paprika can amp up the taste even more!
-
1/2 teaspoon salt
- Don’t skimp here! It enhances all the flavors, but if you’re on a low-sodium diet, you can cut this down or use a salt substitute.
-
1/2 teaspoon black pepper
- For a touch of heat and complexity. White pepper can be used if you want a milder flavor.
-
4 whole wheat tortillas
- Opt for whole wheat for added fiber and nutrients. You can also swap these for gluten-free tortillas if necessary.
-
1 cup shredded mozzarella cheese
- Melts beautifully! If you’re feeling adventurous, use a mix of mozzarella and cheddar for an extra zing.
-
1 cup fresh spinach leaves
- For a burst of color and nutrition. Kale or arugula could be a fun twist!
-
1/4 cup ranch dressing (optional, for serving)
- This creamy dressing is a great finishing touch, but feel free to swap it out for your favorite dressing, or even a dollop of Greek yogurt for a healthier spin!
Step-by-Step Instructions
Ready to get cooking? Here’s how to turn those simple ingredients into a mouthwatering feast!
-
Prep the Chicken:
Begin by trimming any excess fat from the chicken breasts. Rinse them under cold water, then pat them dry with paper towels. This step is crucial because it helps the seasoning to adhere better! -
Season the Chicken:
Rub the chicken with garlic powder, paprika, salt, and black pepper, making sure to cover every nook and cranny. This seasoning not only enhances flavor but also showcases that beautiful, golden color once cooked! -
Preheat the Air Fryer:
While you’re seasoning, preheat your air fryer to 375°F (190°C) for about 3-5 minutes. This step ensures that the chicken cooks evenly and gets that crispy exterior. -
Air Fry the Chicken:
Place the seasoned chicken breasts in the air fryer basket. Cook for 15-20 minutes, flipping halfway through. The internal temperature should reach 165°F (74°C). Pro tip: Use a meat thermometer to avoid overcooking! -
Shred the Chicken:
Once cooked, remove the chicken from the air fryer and let it rest for about 5 minutes—it helps retain moisture. Then, using two forks, shred the chicken. This is a great time to sneak a bite to check if it’s as tasty as it smells! -
Assemble the Wraps:
Lay a tortilla flat and sprinkle some shredded mozzarella in the center. Add a generous amount of shredded chicken on top, followed by a handful of fresh spinach. You can sprinkle a bit more cheese on top for extra stretchiness. -
Wrap It Up:
Roll the tortilla tightly from the bottom up, folding in the sides as you go to keep all that goodness inside. You want these wraps snug so you don’t lose any filling during cooking! -
Air Fry Again:
Place the wraps seam-side down in the air fryer basket. Air fry at 375°F (190°C) for another 5-7 minutes until the tortillas are golden and crispy. Keep an eye on them, as different air fryers can vary in cooking time! -
Serve:
Carefully remove the wraps from the air fryer and let them rest for a minute. Cut in half for that Instagram-ready pic, and serve with ranch dressing on the side for dipping. Voilà!
Serving Suggestions
There’s nothing like the way these wraps look on a plate! For an attractive presentation, serve them on a wooden board or a colorful platter. You could slice them in half to reveal the melting cheese and vibrant colors inside, or serve them whole for a rustic feel.
For an extra touch, drizzle some ranch dressing over the top or garnish with fresh herbs like cilantro or parsley. A side of crunchy carrot sticks or a light salad can really round out the meal, adding a refreshing element to each bite.
Recipe Variations
Feeling creative? Here are some fun variations you can try with these wraps!
-
Buffalo Chicken Wraps:
Swap in some spicy buffalo sauce for a kick! Just mix some sauce with the shredded chicken before assembling. Serve with blue cheese dressing on the side. -
Southwestern Style:
Add some black beans, corn, and a sprinkle of cumin to the chicken before wrapping. Top with jalapeños for an extra heat wave! -
Mediterranean Twist:
Mix in some chopped olives and sun-dried tomatoes with the spinach. Serve with tzatziki on the side for a refreshing dip. -
Veggie-Loaded:
For a vegetarian option, skip the chicken altogether and use roasted veggies like bell peppers, zucchini, and red onion, with added feta cheese. -
Breakfast Wraps:
Use scrambled eggs or egg whites instead of chicken, adding in some diced tomatoes and avocado slices for a breakfast twist.
Chef’s Notes
I’ve made these wraps countless times, and each time they seem to get better! A funny memory that comes to mind is when I forgot to flip the chicken halfway through cooking once. While they were still delicious, I had a bit of a crisis when one side was perfectly golden, and the other side looked like it needed a little TLC.
Over the years, I’ve played with spices and ingredients based on what I had in the fridge, and I realized that this recipe is so adaptable! If you ever find yourself with leftover roasted vegetables or that last bit of cheese at the bottom of the fridge, toss it in! It’s the perfect canvas for culinary creativity.
FAQs and Troubleshooting
Here are some common questions you might have—and my friendly solutions!
Q: What if I don’t have an air fryer?
A: No worries! You can bake these wraps in the oven at 400°F (200°C) for about 20-25 minutes or until the tortillas are golden brown. Just be sure to flip them halfway through!
Q: My wraps fell apart! What went wrong?
A: They may have been too stuffed or not rolled tightly enough. Just practice makes perfect! Use less filling if needed, and really tuck those sides in while rolling.
Q: Can I make these ahead of time?
A: You can! Just prepare the chicken and assemble the wraps, but store them in the refrigerator and air fry just before serving. They’re best eaten fresh!
Q: How do I know when the chicken is fully cooked?
A: Using a meat thermometer is the best way to check! Chicken should register 165°F (74°C) internally. If you don’t have one, ensuring the juices run clear when poked is a good indicator, too.
Nutritional Info
While I’m not one to obsess over numbers, I’ll share a rough idea of the nutrition in these wraps to keep your mind at ease:
- Calories: Approximately 400-500 per wrap (depending on additions and portion sizes)
- Protein: 35g (thanks to the chicken and cheese!)
- Carbohydrates: 40g (mostly from the whole wheat tortilla)
- Fat: 15g (mainly from cheese; consider using low-fat for a lighter option)
- Fiber: Around 5g (great job choosing whole wheat!)
Feel free to adjust ingredients to meet your dietary needs. Adding more veggies can boost fiber and nutrients while keeping those calories down!
Final Thoughts
And there you have it, my friends! Air Fryer Chicken & Mozzarella Wraps are a simple yet soul-satisfying meal that can easily become a favorite in your home. They’re great for any occasion, and I hope they become just as special to you as they have to me. Cooking should be fun, a little messy, and, most importantly, full of love.
Next time you find yourself feeling blue or just want to enjoy something delicious, reach for these wraps! Remember, life is short—make it delicious. Until next time, keep experimenting, keep smiling, and keep sharing those kitchen stories. Happy cooking!
Print
Air Fryer Chicken & Mozzarella Wraps
- Total Time: 30 minutes
- Yield: 4 servings 1x
- Diet: Gluten-Free, Dairy-Free options available
Description
Enjoy a scrumptious meal with Air Fryer Chicken & Mozzarella Wraps, featuring juicy chicken, melty cheese, and fresh spinach, all enveloped in whole wheat tortillas.
Ingredients
- 2 large chicken breasts (about 1 pound total)
- 1 teaspoon garlic powder
- 1 teaspoon paprika
- 1/2 teaspoon salt
- 1/2 teaspoon black pepper
- 4 whole wheat tortillas
- 1 cup shredded mozzarella cheese
- 1 cup fresh spinach leaves
- 1/4 cup ranch dressing (optional, for serving)
Instructions
- Prep the chicken: Trim any excess fat and rinse under cold water, then pat dry.
- Season the chicken: Rub with garlic powder, paprika, salt, and black pepper.
- Preheat the air fryer: Set to 375°F (190°C) for about 3-5 minutes.
- Air fry the chicken: Place in basket and cook for 15-20 minutes, flipping halfway through.
- Shred the chicken: Remove from air fryer, let rest, and then shred with two forks.
- Assemble the wraps: Lay a tortilla flat, add mozzarella, chicken, and spinach.
- Wrap it up: Roll tightly from the bottom and tuck in the sides.
- Air fry again: Place wraps seam-side down and cook at 375°F (190°C) for 5-7 minutes.
- Serve: Remove, let rest, and cut in half for serving with ranch dressing on the side.
Notes
Feel free to customize with different proteins or add more veggies for a unique twist.
- Prep Time: 10 minutes
- Cook Time: 20 minutes
- Category: Main Course
- Method: Air Frying
- Cuisine: American
Nutrition
- Serving Size: 1 wrap
- Calories: 450
- Sugar: 2g
- Sodium: 600mg
- Fat: 15g
- Saturated Fat: 8g
- Unsaturated Fat: 6g
- Trans Fat: 0g
- Carbohydrates: 40g
- Fiber: 5g
- Protein: 35g
- Cholesterol: 80mg
Keywords: air fryer, chicken wraps, mozzarella wraps, easy dinner, comfort food
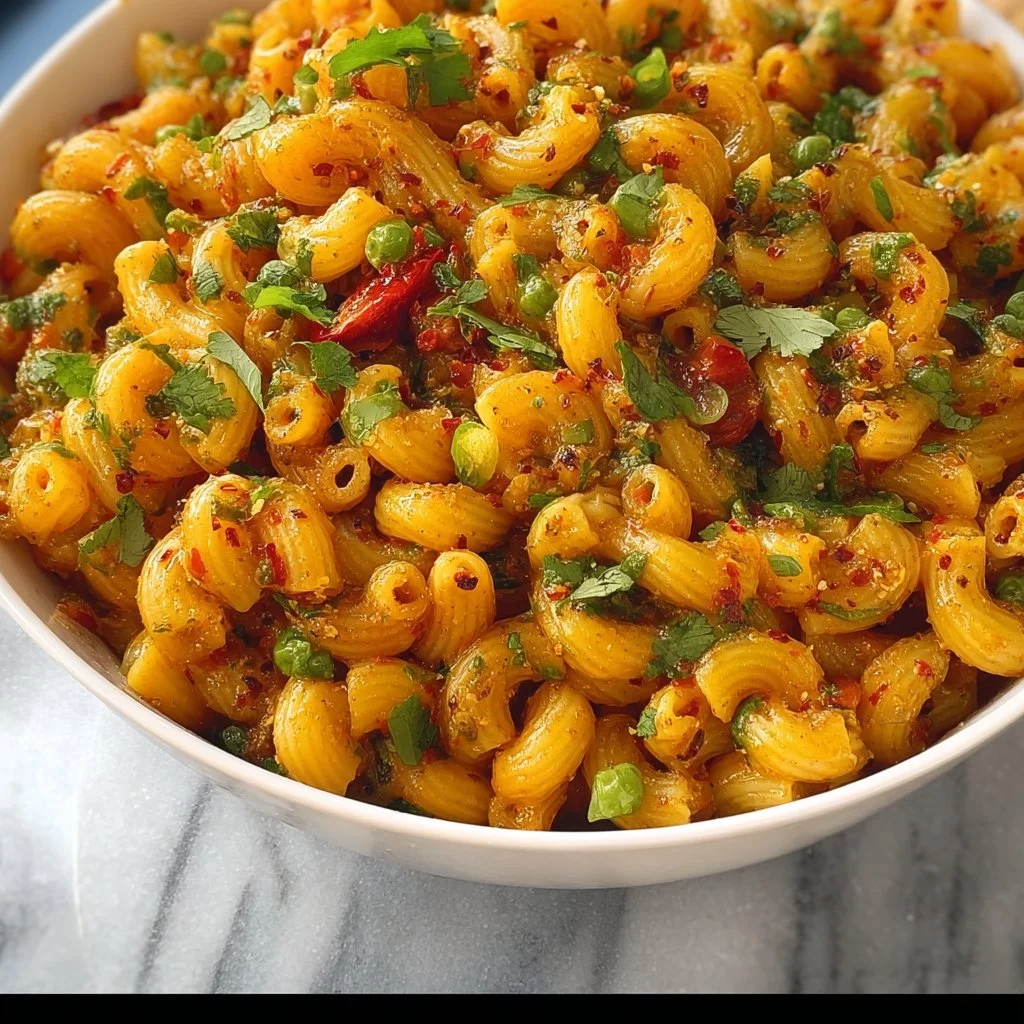
Spiced Macaroni Pasta
Discover the Joy of Spiced Macaroni Pasta
Hey there, foodies! Welcome back to Feastical! Today, we’re diving into a delightful dish that’s sure to bring a smile to your face and warmth to your belly: Spiced Macaroni Pasta! This dish promises cozy flavors combined with a hint of excitement, making it a perfect addition to your kitchen repertoire.
When the weather turns a little chilly or you’ve had a long day filled with the hustle and bustle of life, sometimes all you crave is a bowl of comforting pasta. Spiced Macaroni Pasta is exactly what the doctor ordered! With its vibrant colors and mouthwatering flavors, it’s not just a dish; it’s an experience. Imagine twirling perfectly al dente macaroni around your fork, coated in a luscious, aromatic sauce that tingles your taste buds with warmth and joy.
This isn’t your average macaroni dish. Think of sun-kissed spices bringing simple pasta to life, creating a whirlwind of flavors and sensations that evoke those cozy feelings of home. Whether you’re craving a quick weeknight meal or a dish to impress your friends at a dinner party, Spiced Macaroni Pasta has got you covered!
As I share this recipe, I’m not just giving you a set of instructions; I’m sharing a piece of my kitchen adventures and those moments that turn cooking from a chore into joyful creation. Let’s gather our ingredients, roll up our sleeves, and embark on this delicious culinary journey together!
Personal Story
Ah, macaroni—a humble yet beloved staple that has carried me through countless moments in my life. One particularly vivid memory comes to mind: my childhood kitchen, bursting with laughter and chatter as my family gathered around the table every Sunday. My grandmother, the family’s culinary queen, would whip up large batches of her famous pasta. I remember peeking around the corner, the fragrant aroma wafting through the house, making my little tummy grumble in anticipation.
While her version was a traditional cream-based mac and cheese, I remember the first time I decided to put my spin on it by adding spices. With a touch of curry powder and a pinch of chili powder, my macaroni transformed into a spicy delight that made my taste buds dance! Ever since then, I’ve embraced the joy of combining the familiar comfort of macaroni with exciting flavors, and that’s how this Spiced Macaroni Pasta was born. It’s a dish that celebrates both nostalgia and adventure—a true reflection of my culinary journey.
Ingredients
Here’s what you’ll need to bring this delightful dish to life. Each ingredient is handpicked not only for its flavor but also for the comfort it brings to the dish:
-
200g macaroni pasta: The star of our show! Macaroni is perfect for this recipe because it holds onto the flavors and spices beautifully. You could also use penne or fusilli for a twist.
-
2 tablespoons oil: I love using olive oil, but feel free to substitute with coconut oil for a hint of sweetness or sunflower oil for a neutral flavor.
-
4 cloves garlic, minced: Ah, garlic—the magical ingredient that adds depth and richness to any dish. If you’re not a fan of garlic, you can omit it or use garlic powder instead.
-
1 onion, chopped: Onions lend a lovely sweetness when sautéed. If you’re short on time, shallots can be a great substitute.
-
1 bell pepper, chopped: Whether you choose red, green, or yellow, bell peppers add crunch and a splash of color. Zucchini or asparagus are fantastic alternatives if you want to mix things up.
-
1 carrot, chopped: Carrots not only provide a sweet crunch but also bring a pop of color. For a quicker cook, use frozen peas instead.
-
1 cup mixed vegetables (peas, corn, etc.): This is where the fun happens! Use whatever veggies you have on hand or prefer. Frozen mixed vegetables work great for this!
-
2 tablespoons curry powder: This is the magic ingredient that takes our macaroni on an adventure! Feel free to adjust based on your taste, or swap it out for your favorite spice blend.
-
1 teaspoon chili powder: For those who like a little heat! You can reduce the amount if spicy food isn’t your thing or substitute with smoked paprika for a different flavor.
-
Salt to taste: A basic yet essential ingredient. Always taste as you go to ensure balanced seasoning!
-
Fresh cilantro for garnish: A burst of freshness to finish off the dish! If cilantro isn’t your favorite, consider using parsley or green onions for garnish instead.
Step-by-Step Instructions
Alright, friends! Now it’s time to roll up those sleeves and get cooking. Follow these simple, step-by-step instructions to whip up your Spiced Macaroni Pasta:
-
Cook the Macaroni: Begin by bringing a large pot of salted water to a boil. Once it’s bubbling away, add the macaroni and cook according to the package instructions, usually around 8-10 minutes. Remember to stir occasionally to keep things from sticking! When done, drain the pasta and reserve a cup of the pasta water—it’s liquid gold!
-
Sauté the Vegetables: In a large skillet or pan, heat the oil over medium heat. Once shimmering, add the chopped onions and sauté until they become translucent (about 3-4 minutes). This step really enhances the sweetness of the onions and sets a flavorful base for our dish. Tip: If the pan seems dry, add a splash of reserved pasta water!
-
Add Garlic and Peppers: Toss in the minced garlic and chopped bell pepper. Cook for another 2-3 minutes until fragrant and the peppers begin to soften. Chef Hack: If you love roasted flavors, try grilling the peppers beforehand!
-
Incorporate the Rest of the Veggies: Add the chopped carrot and mixed vegetables to the skillet. Stir well and let them cook for another 3-4 minutes until they’re nice and tender. The colors will start to pop, making your kitchen feel as warm and inviting as it smells!
-
Spice It Up: Now, it’s time to sprinkle in that curry powder and chili powder! Stir everything together for about a minute, allowing the spices to bloom and really bring the dish together. Quick Tip: If you want an even stronger flavor, you can toast the spices in the hot oil before adding veggies!
-
Combine with Pasta: Add the drained macaroni to the skillet, tossing it together with the spiced veggie mixture. If it seems a bit dry, add small amounts of the reserved pasta water until you reach your desired consistency. You want it to be creamy and cohesive!
-
Final Seasoning: Taste your creation and add salt as needed. It’s important to get the seasoning just right. And there you have it! Your dish is ready to be plated up.
Serving Suggestions
Presentation is key, my friends! Here’s how to serve your Spiced Macaroni Pasta in a way that makes it irresistible. Grab a large serving bowl or dinner plates and pile on those vibrant noodles. For an extra touch of elegance, garnish with a handful of fresh cilantro on top—its bright green color pops against the warm pasta.
If you’re feeling fancy, serve it with a wedge of lemon or lime on the side; the zesty squeeze will enhance the flavors. Pair it with warm, crusty bread or a fresh garden salad for a complete meal that’s not just satisfying, but also visually stunning. Trust me, your friends and family will be impressed!
Recipe Variations
Ready to customize your dish? Here are some fun twists you can explore:
-
Cheesy Delight: Stir in some grated cheese (like cheddar or mozzarella) into the macaroni right before serving for a creamy, cheesy finish.
-
Protein Boost: Add shredded cooked chicken, chickpeas, or even crumbled sausage to amp up the protein content.
-
Herb Explosion: Mix in fresh herbs such as basil, thyme, or oregano for a fragrant kick.
-
Vegan Version: Simply substitute the pasta with chickpea or lentil pasta for a plant-based protein punch and omit any cheese.
-
Pasta Salad: Let it cool and toss with a light vinaigrette to make it a delightful cold pasta salad, perfect for summer gatherings!
Chef’s Notes
One of my favorite kitchen memories involves an "oops" moment that turned into a delicious surprise! One day, I misread a recipe and accidentally added double the amount of curry powder! Rather than starting over, I decided to go with it and give it a taste. Much to my delight, the flavors were even more vibrant than I’d expected, and now it’s a fun anecdote I tell when making this dish.
Every kitchen mishap is an opportunity to learn and create something uniquely delicious. Cooking is about exploration and embracing imperfections, so don’t shy away from mixing things up!
FAQs and Troubleshooting
1. My pasta is clumpy. What went wrong?
Ensure you stir the pasta during cooking to prevent it from sticking together. Adding a splash of reserved pasta water can help loosen it when combining with the sauce.
2. Can I use different vegetables?
Absolutely! This dish is incredibly versatile. Use any vegetables you love or have on hand! Just remember to cut them into small, uniform pieces for even cooking.
3. How can I adjust the spice level?
If you prefer a milder dish, you can reduce the curry and chili powder or omit the latter altogether.
4. Can I make this ahead of time?
Yes! You can prepare this dish in advance. Just store it in an airtight container in the fridge and reheat it on the stove with a little added water or oil to prevent it from getting too dry.
Nutritional Info
Per serving (based on 4 servings), here’s a general breakdown:
- Calories: Approximately 350 kcal
- Protein: 10g
- Carbohydrates: 60g
- Dietary Fiber: 4g
- Sugars: 5g
- Total Fat: 8g
- Saturated Fat: 1g
This comforting meal is not only delicious but also packed with goodness from the veggies and spices!
Final Thoughts
There you have it, lovely people! Your very own Spiced Macaroni Pasta is ready to be enjoyed. Cooking is so much more than just creating a meal; it’s an opportunity to create memories and share joy with those around you. I hope this recipe sparks new traditions for you, just like it did for me.
Feel free to personalize this dish and make it your own. I’d love to hear about your adventures in the kitchen—whether you decided to spice it up or make it your own way. So, grab your fork and dig in! Until next time, happy cooking from your friend Chef Beau at Feastical!
Print
Spiced Macaroni Pasta
- Total Time: 30 minutes
- Yield: 4 servings 1x
- Diet: Vegetarian
Description
A comforting and vibrant macaroni dish infused with aromatic spices that evoke feelings of home and joy.
Ingredients
- 200g macaroni pasta
- 2 tablespoons olive oil
- 4 cloves garlic, minced
- 1 onion, chopped
- 1 bell pepper, chopped
- 1 carrot, chopped
- 1 cup mixed vegetables (peas, corn, etc.)
- 2 tablespoons curry powder
- 1 teaspoon chili powder
- Salt to taste
- Fresh cilantro for garnish
Instructions
- Cook the Macaroni: Begin by bringing a large pot of salted water to a boil. Once it’s bubbling away, add the macaroni and cook according to the package instructions, usually around 8-10 minutes. Remember to stir occasionally to keep things from sticking! When done, drain the pasta and reserve a cup of the pasta water—it’s liquid gold!
- Sauté the Vegetables: In a large skillet or pan, heat the oil over medium heat. Once shimmering, add the chopped onions and sauté until they become translucent (about 3-4 minutes). This step really enhances the sweetness of the onions and sets a flavorful base for our dish. Tip: If the pan seems dry, add a splash of reserved pasta water!
- Add Garlic and Peppers: Toss in the minced garlic and chopped bell pepper. Cook for another 2-3 minutes until fragrant and the peppers begin to soften. Chef Hack: If you love roasted flavors, try grilling the peppers beforehand!
- Incorporate the Rest of the Veggies: Add the chopped carrot and mixed vegetables to the skillet. Stir well and let them cook for another 3-4 minutes until they’re nice and tender. The colors will start to pop, making your kitchen feel as warm and inviting as it smells!
- Spice It Up: Now, it’s time to sprinkle in that curry powder and chili powder! Stir everything together for about a minute, allowing the spices to bloom and really bring the dish together. Quick Tip: If you want an even stronger flavor, you can toast the spices in the hot oil before adding veggies!
- Combine with Pasta: Add the drained macaroni to the skillet, tossing it together with the spiced veggie mixture. If it seems a bit dry, add small amounts of the reserved pasta water until you reach your desired consistency. You want it to be creamy and cohesive!
- Final Seasoning: Taste your creation and add salt as needed. It’s important to get the seasoning just right. And there you have it! Your dish is ready to be plated up.
Notes
Garnish with fresh cilantro for an extra touch. Pair with crusty bread or a garden salad.
- Prep Time: 10 minutes
- Cook Time: 20 minutes
- Category: Main Course
- Method: Boiling, Sautéing
- Cuisine: Italian
Nutrition
- Serving Size: 1 serving
- Calories: 350
- Sugar: 5g
- Sodium: 400mg
- Fat: 12g
- Saturated Fat: 4g
- Unsaturated Fat: 6g
- Trans Fat: 0g
- Carbohydrates: 45g
- Fiber: 3g
- Protein: 15g
- Cholesterol: 0mg
Keywords: Spiced Macaroni, Pasta Recipe, Vegetarian Pasta

11-Minute Cheesy Pepperoni Pizza Roll Ups
11-Minute Cheesy Pepperoni Pizza Roll Ups: A Quick and Delicious Delight
Hey there, pizza lovers! If you’re looking for a quick and tasty way to satisfy your pizza cravings, you’ve stumbled upon the right spot! I’m Beau Collier, and today I’m excited to share one of my all-time favorite recipes: 11-Minute Cheesy Pepperoni Pizza Roll Ups. These delightful bites are not only incredibly easy to whip up, but they also pack a punch of cheesy goodness and savory pepperoni flavor. Perfect for a movie night, a snack, or even a fun lunch with the kids—these roll ups are the epitome of comfort food.
I remember the first time I made these little beauties. It was a rainy afternoon, and the kids were bouncing off the walls, desperate for anything that could distract them. I had some pizza dough lurking in the fridge and decided to get creative. Before I knew it, we had pepperoni and cheese roll-ups that transformed our gloomy day into a cheesy, giggly pizza party right in our kitchen! It was a hit, and ever since then, they’ve become a staple in our household. I’m sure you’ll create wonderful memories with them in your own kitchens too!
So, gather your ingredients and roll up your sleeves—let’s dive into this delicious recipe. Trust me; once you make these 11-Minute Cheesy Pepperoni Pizza Roll Ups, you’re going to want to share them (or maybe just keep them all to yourself!).
Personal Story
A couple of years ago, during a family gathering, I decided to put my fun twist on traditional pizza. As I prepared the ingredients, my niece Ella was intrigued and suggested we make “pizza burritos.” Now, in my kitchen, it doesn’t matter how crazy the idea sounds; we’re all about creativity!
We rolled out the pizza dough, layered it with cheese and pepperoni, and folded it like a burrito. They didn’t just taste amazing; they sparked a mini baking competition among the kids, who were all eager to make their own unique creations. Some stuffed theirs with extra cheese; others threw in a handful of bell peppers and olives. Watching them giggle and munch away at their homemade pizza roll-ups warmed my heart.
That day reinforced my belief that cooking is not just about the food; it’s about the stories and connections made along the way. So, come on, let’s add some magic to your kitchen with these Cheesy Pepperoni Pizza Roll Ups!
Ingredients
Here’s what you’ll need to assemble these cheesy delights:
-
Pizza Dough
A pre-made pizza dough saves you time, but if you’re feeling adventurous, you can whip up your own! Alternatively, crescent roll dough or even a tortilla could work for an interesting spin. -
Cheese (Mozzarella or Cheddar)
Mozzarella is a classic choice for its melty goodness, but don’t shy away from sharp cheddar for a flavorful kick! Feel free to explore other cheeses like provolone or pepper jack if you’re in the mood for something different. -
Pepperoni Slices
The quintessential pizza topping! You can substitute pepperoni with turkey or chicken pepperoni for a leaner option, or even try vegetarian alternatives for a meat-free fiesta. -
Pizza Sauce
You can use store-bought pizza sauce for convenience or make your own with crushed tomatoes, a splash of olive oil, and Italian herbs. -
Olive Oil
A drizzle of olive oil before baking gives the roll-ups a crispy, golden finish. For a flavor upgrade, try flavored oils like garlic-infused oil. -
Herbs (Optional)
Adding dried oregano or Italian seasoning can elevate the flavor profile. If you’re feeling fresh, sprinkle in some basil right before serving! -
Veggies (Optional)
Want to make these roll-ups healthier? Toss in some finely chopped veggies! Bell peppers, spinach, or mushrooms work great. Just be sure to chop them small enough to fit inside.
Step-by-Step Instructions
Ready to get cooking? Let’s make these tasty roll-ups step-by-step!
Step 1: Preheat the Oven
Preheat your oven to 425°F (220°C). This will ensure that your roll-ups bake evenly and become perfectly golden brown.
Step 2: Roll Out the Dough
On a lightly floured surface, roll out your pizza dough into a large rectangle, about ¼ inch thick. If you’re using a store-bought dough, follow the package instructions for rolling it out. Make sure there are no cracks in the dough, as this will keep all that cheesy goodness inside!
Step 3: Spread the Sauce
Spread a thin layer of pizza sauce over the rolled-out dough, leaving about an inch at the edges free of sauce. This prevents a mess when rolling it up.
Step 4: Layer the Cheese
Now, sprinkle a generous amount of your chosen cheese over the sauce. Make sure to cover the surface completely for maximum melty goodness! While you’re at it, don’t forget the edges.
Step 5: Add the Pepperoni
Scatter the pepperoni slices evenly over the cheese. If you chose to add any veggies, now’s the time to sprinkle those on, too!
Step 6: Roll It Up
Starting from one edge, carefully roll the dough into a tight log. Pinch the seams to seal it and tuck in the ends. If you notice the dough resisting, gently stretch it as you roll—keep it tight but don’t rip it!
Step 7: Slice the Roll
Using a sharp knife or a pizza cutter, slice the rolled log into about 1-inch pieces. You should have a lovely swirl of cheese and pepperoni peeking out!
Step 8: Bake the Roll Ups
Place your roll-ups on a baking sheet lined with parchment paper. Drizzle a little olive oil on top for that crispy finish and sprinkle some Italian herbs if you’d like. Toss them in the oven for 10–12 minutes until they’re golden brown and bubbly.
Step 9: Cool and Serve
Allow your roll-ups to cool slightly before diving in. Drizzle a bit more pizza sauce for dipping if you like!
Chef’s Tip:
If you want your roll-ups extra crispy, switch to the broiler for the last 1–2 minutes of baking (watch closely to avoid burning).
Serving Suggestions
When it comes to serving these cheesy delights, simplicity is key! Arrange the roll-ups on a large platter and serve with a side of warm pizza sauce for dipping. If you want to add a gourmet touch, garnish the plate with fresh basil leaves or even a sprinkle of crushed red pepper flakes for those who crave a bit of heat. Pair this dish with a simple side salad or some crunchy veggie sticks for a fun, satisfying meal. Enjoy them with friends over a movie or make them the star of your next game night!
Recipe Variations
Feeling adventurous? Here are a few fun twists to take your roll-ups to the next level:
-
Buffalo Chicken Roll Ups: Swap the pepperoni for shredded cooked chicken tossed in buffalo sauce. Add a little blue cheese for a spicy twist!
-
Breakfast Roll Ups: Fill with scrambled eggs, cheese, and cooked bacon or sausage for a breakfast treat!
-
Caprese Roll Ups: Substitute mozzarella cheese with fresh mozzarella, add diced tomatoes, fresh basil, and a drizzle of balsamic glaze before rolling.
-
Vegetarian Roll Ups: Load them with your choice of chopped veggies like mushrooms, spinach, and artichokes for a delightful herbaceous flavor.
-
Dessert Roll Ups: Got a sweet tooth? Spread Nutella and sliced strawberries instead of pizza ingredients for a fabulous dessert twist!
Chef’s Notes
One of the things I love most about cooking is how easy it is to adapt recipes. My Cheesy Pepperoni Pizza Roll Ups started as a “leftover clean-out” idea, but now they’re a hit! Every time I make them, the ingredients might change based on what I have handy, and that’s the beauty of this recipe—it’s flexible!
Oh! And don’t even get me started on the epic post-baking aroma in your kitchen. It’s basically a little slice of heaven, and it will have everyone running to the oven to see what’s cooking!
FAQs and Troubleshooting
1. My dough is too sticky; what should I do?
If your dough is sticky, sprinkle a little flour on the surface where you’re working. If it’s still too tacky, you might need to knead in a bit more flour until it’s manageable.
2. Can I make this pizza ahead of time?
Absolutely! You can assemble the roll-ups, refrigerate or freeze them, and then bake them when you’re ready. Just remember to let them sit at room temperature for about 10 minutes if they’ve been frozen.
3. My roll-ups are not cooking evenly; what gives?
Make sure your oven is properly preheated and check that the roll-ups are evenly spaced on the baking sheet. Crowding can obstruct airflow, leading to uneven cooking.
4. How do I keep them warm until serving?
You can place them in a warm oven (around 200°F) covered with a clean kitchen towel. Just make sure they’re not left too long, or they’ll lose that crispy texture!
Nutritional Info
While it’s tough to put exact numbers on these pizza roll-ups since variations vary by ingredients, here’s a general idea:
- Calories (per roll-up): ~150 calories
- Protein: 6g
- Carbohydrates: 20g
- Fat: 7g
- Fiber: 1g
Feel free to adjust ingredients to match your dietary needs, and remember to enjoy these in moderation as part of a balanced diet.
Final Thoughts
There you have it: the ultimate guide to whipping up 11-Minute Cheesy Pepperoni Pizza Roll Ups! I hope this recipe inspires you to get creative in your kitchen and maybe even share some gorgeous food memories with your loved ones. The beauty of cooking is in the joy it brings, and I believe these roll-ups are sure to become a favorite in your home, just like they are in mine.
So, what are you waiting for? Grab those ingredients and give this recipe a whirl. And don’t forget to share your delicious creations with me on social media! Happy Cooking! 🍕✨
Print
11-Minute Cheesy Pepperoni Pizza Roll Ups
- Total Time: 15 minutes
- Yield: 4 servings
- Diet: Vegetarian
Description
Quick and delicious cheesy pepperoni pizza roll-ups perfect for a snack, movie night, or lunch.
Ingredients
- Pizza Dough
- Cheese (Mozzarella or Cheddar)
- Pepperoni Slices
- Pizza Sauce
- Olive Oil
- Herbs (Optional)
- Veggies (Optional)
Instructions
- Preheat the oven to 425°F (220°C).
- Roll out the pizza dough into a large rectangle, about ¼ inch thick.
- Spread a thin layer of pizza sauce over the rolled-out dough.
- Layer a generous amount of cheese over the sauce.
- Add the pepperoni slices evenly over the cheese.
- Roll the dough into a tight log.
- Slice the rolled log into about 1-inch pieces.
- Bake the roll-ups on a baking sheet for 10–12 minutes.
- Cool slightly before serving with a drizzle of pizza sauce for dipping.
Notes
For extra crispy roll-ups, switch to broiler for the last 1–2 minutes of baking, watching closely.
- Prep Time: 5 minutes
- Cook Time: 10 minutes
- Category: Snack
- Method: Baking
- Cuisine: Italian
Nutrition
- Serving Size: 1 roll-up
- Calories: 150
- Sugar: 1g
- Sodium: 400mg
- Fat: 7g
- Saturated Fat: 3g
- Unsaturated Fat: 4g
- Trans Fat: 0g
- Carbohydrates: 20g
- Fiber: 1g
- Protein: 6g
- Cholesterol: 20mg
Keywords: pizza, roll ups, quick snack, cheesy, pepperoni
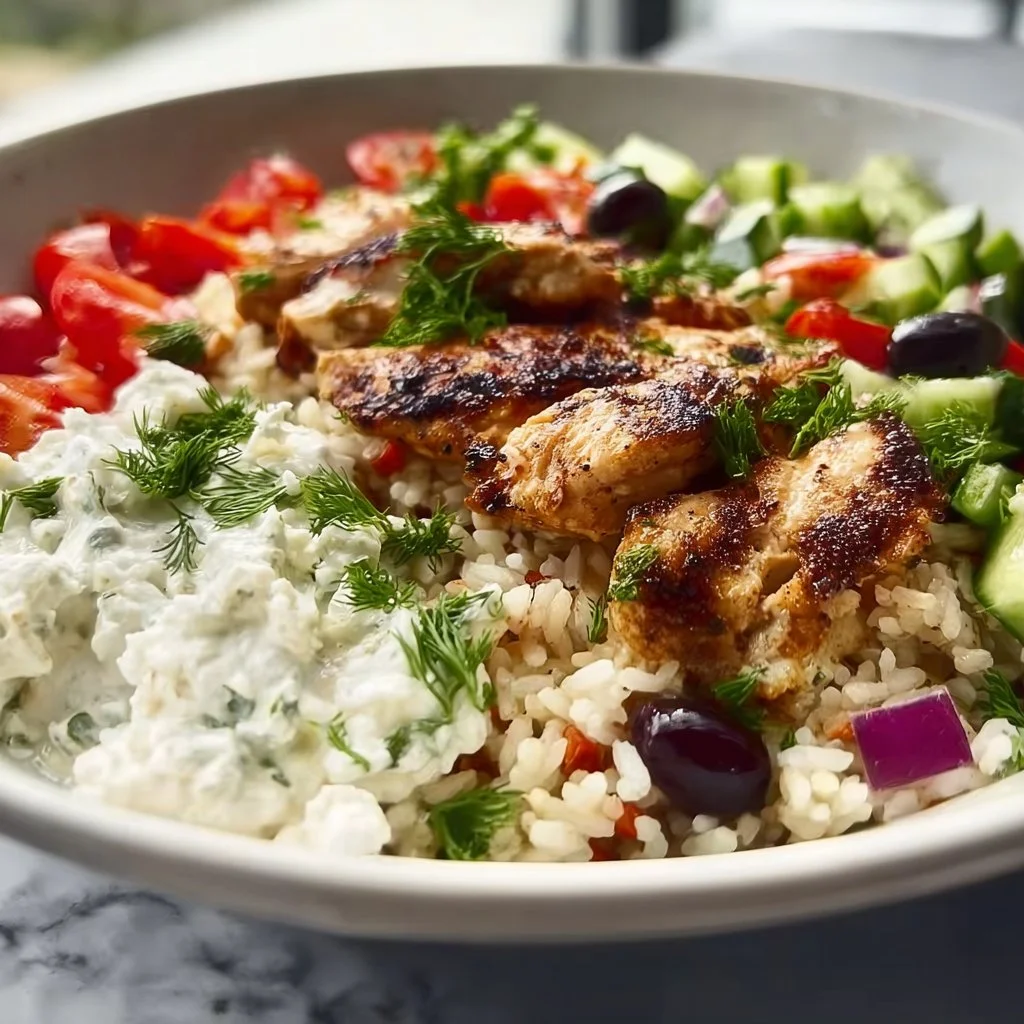
Greek Chicken & Rice Bowl
Greek Chicken & Rice Bowl: A Mediterranean Delight for Every Foodie
Hey there, fellow food lovers! If you’re anything like me, food isn’t just something to fill your belly; it’s an experience, a connection, and sometimes even a mini-vacation for the taste buds! Welcome to Feastical, where I’m thrilled to share one of my all-time favorites—the Greek Chicken & Rice Bowl. Picture yourself diving into a vibrant bowl brimming with grilled chicken, fresh veggies, and just the right touch of feta cheese. It’s a plate filled with sunshine, love, and the kind of flavors that will transport you straight to a sun-soaked Mediterranean terrace.
Growing up, I was fortunate to experience a whirlwind of cultures and cuisines that shaped my cooking style today. Whether it was my grandmother’s chirpy laughter while whipping up her famous Italian spaghetti or my childhood friend’s mother bringing homemade Greek dishes to potlucks, every bite told a story. Greek cuisine always had a way of pulling me in; its bold flavors and fresh ingredients made it a staple in our kitchen, and that’s why today, I’m excited to share my own take on a classic.
This Greek Chicken & Rice Bowl doesn’t just taste heavenly; it’s also a breeze to whip up in your kitchen—perfect for busy weeknights or lazy weekends. Plus, it’s customizable! Mix and match ingredients to suit your palate or dietary preferences, and before you know it, you’ll be dishing out bowfuls of deliciousness to your loved ones—simply irresistible! So grab your apron, and let’s get cooking!
Personal Story
Ah, the first time I made this Greek Chicken & Rice Bowl—what a day that was! It all started when I decided to have a little gathering at my place. I wanted to impress my friends, showing off a dish that was both beautiful and tasty. Photos of colorful Greek salads and mouth-watering grilled chicken lined my social media feed, and I knew I had to try my hand at it.
But, just to keep things interesting, I decided to challenge myself a bit. Not only would I be cooking for a crowd, but I also wanted to put a twist on the traditional recipes I grew up with. I gathered fresh ingredients from the local farmer’s market (you could smell the freshness!), enlisted a trusty buddy to help with the chopping, and before I knew it, the house was filled with laughter, aromas, and a little kitchen chaos.
Fast forward to that first bite, and let me tell you, something magical happened! Everyone went silent as they savored the mix of tender chicken, crunchy veggies, and tangy feta cheese. The bowl was a hit! We ended up debating who could make the best version, which turned into a hilarious cook-off tradition between friends. Who knew a simple chicken bowl would spark so much joy and fun? That’s the beauty of cooking—never a dull moment and always a story to tell!
Ingredients
Alright, let’s get down to the nitty-gritty. Here’s what you’ll need to craft this mouth-watering dish:
-
1 pound chicken breast: The star of the show! You can grill, bake, or pan-sear these for extra flavor. If you prefer plant-based options, try grilled tofu or chickpeas.
-
1 cup Kaizen low carb high protein rice: This is my go-to for a healthful twist. Need a substitute? Quinoa or traditional rice work wonderfully, too.
-
1 cup cherry tomatoes, halved: Bursting with sweetness, they add vibrant color to your bowl. If you don’t have cherry tomatoes, diced regular tomatoes can do the trick.
-
1 cucumber, diced: Fresh and crunchy! You could also use a zucchini or bell peppers for more variety.
-
1/2 red onion, diced: A little zing never hurt anyone! You can use green onions or sweet onions for a milder taste.
-
1/4 cup feta cheese, crumbled: This tangy cheese really brings the Greek vibes. If you’re dairy-free, try a nut-based cheese or omit it altogether!
-
2 tablespoons olive oil: A drizzle of quality oil enhances the dish; choose extra-virgin for the best flavor. Avocado oil is a suitable substitute.
-
1 tablespoon lemon juice: For that citrusy brightness! Lime juice works in a pinch if you’re out of lemons.
-
Salt and pepper to taste: Don’t skimp on these! They elevate all the flavors. Spice it up with some red pepper flakes if you like a kick.
-
Fresh parsley, for garnish: A sprinkle of greenery adds a lovely touch. Feel free to swap cilantro in if that’s more your style!
Step-by-Step Instructions
Ready to whip up your Greek Chicken & Rice Bowl? Let’s walk through the steps together.
1. Marinate the Chicken
Start by preparing your chicken. In a bowl, combine olive oil, lemon juice, salt, and pepper. Toss the chicken breast in the mixture and let it marinate for about 30 minutes. This step not only infuses flavor but also keeps your chicken juicy and tender. Pro tip: if you’re in a hurry, even 10 minutes of marination will give you a flavor boost!
2. Cook the Rice
While the chicken is soaking up that delicious marinade, get your rice cooking. If you’re using Kaizen low-carb rice, follow the package instructions. Normally, it boils in just a few minutes—super quick! If you’re going with traditional rice, remember the golden ratio: 1 part rice to 2 parts water. A little secret? Add a pinch of salt to the water for extra flavor.
3. Grill the Chicken
When it’s time to cook, heat the grill or a skillet over medium-high heat. Cook the marinated chicken breast for about 6-8 minutes on each side, or until it’s nice and golden, with no pink inside. If you’re using a grill, those lovely char marks will carry the flavor even further! If you don’t have a grill, cooking them in a skillet works like a charm too.
4. Prepare the Veggies
While the chicken cooks, let’s slice and dice our veggies! Halve the cherry tomatoes and a cucumber, and finely chop the red onion. I like to prep my veggies while the chicken is cooking to make sure everything is fresh and crunchy. Your kitchen might start to smell incredible right about now!
5. Assemble the Bowl
Once everything is cooked, it’s time for the fun part! Take a generous scoop of rice and place it in your bowl. Top it with sliced chicken, cherry tomatoes, diced cucumbers, and red onions. Don’t forget a sprinkle of feta cheese on top! Drizzle a little extra olive oil and a squeeze of lemon juice for that zing!
6. Garnish and Serve
To finish, garnish with fresh parsley for that pop of color and extra flavor. The bowl should look bursting with freshness and vibrancy. I like serving it with pita bread or a dollop of tzatziki sauce on the side—just a little extra indulgence! Serve it immediately and watch the ‘oohs’ and ‘aahs’ as you present your masterpiece.
Serving Suggestions
When it comes to presenting your Greek Chicken & Rice Bowl, think color, texture, and freshness. Here are a few serving tips:
-
Bowl vs. Plate: I prefer a deep bowl for this dish because it keeps everything cozy and brings out the Pantone-worthy colors of the ingredients. If you’re feeling fancy, you could layer it on a large white plate, giving it a bit more height.
-
Pita Bread on the Side: Warm some pita bread on the grill or in the oven and serve it alongside your bowl for an extra touch. You can even use it to scoop up all the tasty bits!
-
Extra Olive Oil: Serve a small dish of high-quality olive oil with some fresh herbs to dip your bread; it’s the perfect pair!
-
Food Styling: A little sprinkle of extra parsley across the top doesn’t hurt, and make sure to arrange your vegetables artfully. A good-looking plate always tastes better!
Recipe Variations
Let’s get adventurous—here are a few creative twists to consider:
-
Spicy Greek Chicken Bowl: Add some chopped jalapeños or a drizzle of sriracha for a kick. It’ll give your bowl an exciting twist!
-
Mediterranean Quinoa Bowl: Swap out the rice for quinoa for a hearty, protein-packed version. Add olives and roasted red peppers for an extra layer of Mediterranean goodness.
-
Grilled Shrimp Greek Bowl: Replace chicken with grilled shrimp! Season them with lemon and herbs for a delicious seafood twist that’s light yet satisfying.
-
Vegan Greek Bowl: Use chickpeas or grilled eggplant in place of chicken, and top with a dollop of vegan tzatziki sauce made from cashews or avocado—this will give you that creamy texture without any dairy.
-
Breakfast Bowl: Add a fried or poached egg on top! The runny yolk melds beautifully with the other flavors for a rich breakfast option.
Chef’s Notes
This recipe has had its fair share of evolution in my kitchen. I remember the early days when I would throw everything into a bowl without any care for presentation. However, as I explored and learned, I discovered that arranging the colors brings life to each dish. Plus, sharing these meals with friends is what makes cooking so rewarding; food is about bringing people together and creating lasting memories.
Also, here’s a little kitchen story for you: the first time my friend tried this bowl, he confidently claimed he could have it every day for the rest of his life—and guess what? He goes on to do just that! The flavors are simple yet versatile, making it easy to enjoy any day of the week.
FAQs and Troubleshooting
-
What if my chicken is dry?
- Chicken can dry out if overcooked. To avoid this, use a meat thermometer and remove it from heat at 165°F (75°C). Letting it rest for a few minutes also helps retain moisture.
-
Can I prepare this in advance?
- Absolutely! You can grill and store the chicken and cook the rice a day in advance. Just keep your veggies fresh until serving to maintain that crunchiness.
-
Why does my rice stick?
- If you find your rice is sticking together, it may be due to overcooking or not rinsing it beforehand. Rinsing the rice removes excess starch, resulting in fluffy grains.
-
What can I use instead of feta cheese?
- If you’re not a fan of feta, try goat cheese, fresh mozzarella, or even a sprinkle of nutritional yeast for a unique twist.
Nutritional Info
Here’s a quick breakdown of the nutritional benefits of our Greek Chicken & Rice Bowl:
- Calories: Approximately 450 calories per serving (chicken & rice included)
- Protein: Around 40 grams from the chicken and added rice
- Carbohydrates: Approximately 35 grams (low if using Kaizen rice)
- Fats: Roughly 15 grams (healthy fats from olive oil and feta)
- Vitamins and Minerals: This dish packs in Vitamin C from tomatoes and cucumbers, Calcium from feta cheese, and Iron from the chicken.
Feel free to adjust the portions to match your dietary goals, and remember that fresh ingredients are always best!
Final Thoughts
As we wrap up this delicious adventure through the world of Greek Chicken & Rice Bowls, I hope you’re feeling inspired to dive into your kitchen this week! Cooking is meant to be joyful and exploratory, so don’t hesitate to tweak the ingredients and make it your own footprint in the culinary world.
Remember, each bowl tells a story. Whether you’re gathering with family, prepping for a busy week, or treating yourself, this dish brings forth warmth and connection. So, embrace the process, savor every bite, and share the love with those around you.
Let’s keep the conversation going! Drop your questions, substitutions, or stories about your own kitchen adventures in the comments below. Until next time, keep those spatulas swiveling and those plates full of joy!
Happy cooking, my friends! 🍽️
Print
Greek Chicken & Rice Bowl
- Total Time: 45 minutes
- Yield: 4 servings 1x
- Diet: Gluten-Free
Description
A vibrant and customizable Greek Chicken & Rice Bowl brimming with grilled chicken, fresh veggies, and feta cheese, perfect for any occasion.
Ingredients
- 1 pound chicken breast
- 1 cup Kaizen low carb high protein rice
- 1 cup cherry tomatoes, halved
- 1 cucumber, diced
- 1/2 red onion, diced
- 1/4 cup feta cheese, crumbled
- 2 tablespoons olive oil
- 1 tablespoon lemon juice
- Salt and pepper to taste
- Fresh parsley, for garnish
Instructions
- Marinate the chicken by combining olive oil, lemon juice, salt, and pepper in a bowl. Toss the chicken breast in the mixture and let it marinate for about 30 minutes.
- Cook the rice according to the package instructions. If using traditional rice, remember the ratio of 1 part rice to 2 parts water.
- Grill the marinated chicken breast for about 6-8 minutes on each side, until golden and cooked through.
- Prepare the veggies by slicing cherry tomatoes, dicing the cucumber, and chopping the red onion.
- Assemble the bowl by placing a scoop of rice, topped with sliced chicken, cherry tomatoes, diced cucumber, and red onions. Sprinkle with feta cheese and drizzle olive oil and lemon juice.
- Garnish with fresh parsley before serving and enjoy immediately.
Notes
Customize your bowl by swapping out ingredients to suit your palate. Consider serving with pita bread or tzatziki on the side.
- Prep Time: 30 minutes
- Cook Time: 15 minutes
- Category: Main Course
- Method: Grilling
- Cuisine: Mediterranean
Nutrition
- Serving Size: 1 bowl
- Calories: 450
- Sugar: 5g
- Sodium: 400mg
- Fat: 15g
- Saturated Fat: 4g
- Unsaturated Fat: 9g
- Trans Fat: 0g
- Carbohydrates: 35g
- Fiber: 3g
- Protein: 40g
- Cholesterol: 70mg
Keywords: Greek, chicken, rice bowl, Mediterranean, healthy, customizable
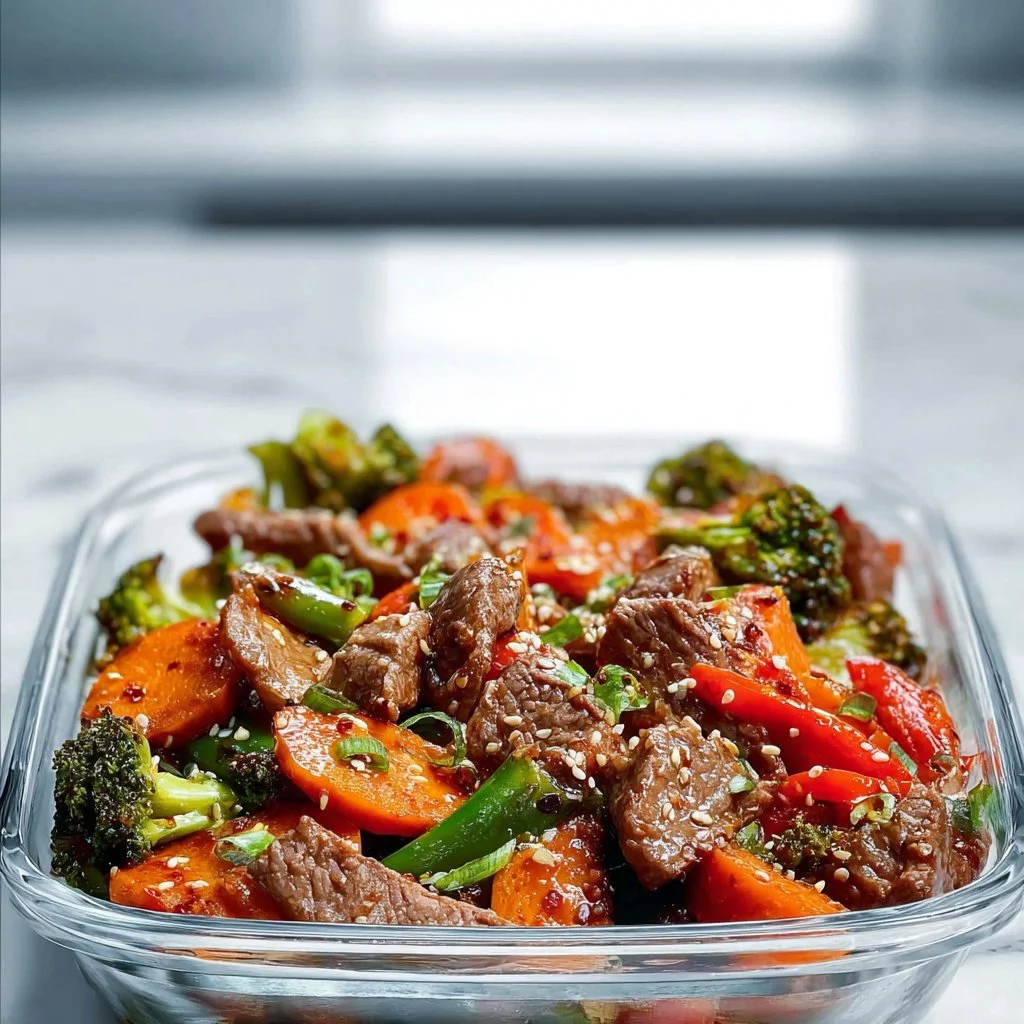
Super Easy Beef Stir Fry
Super Easy Beef Stir Fry: Your New Weeknight Wonder
Hey there, fellow food enthusiasts! It’s Beau Collier here, and I can’t wait to share a gem of a recipe that’s going to jazz up your weeknight dinners: Super Easy Beef Stir Fry. If you’re busy and looking for a dish that’s quick, delicious, and satisfies the soul, then this is it! There’s something about a sizzling stir fry that brings a burst of flavor and a sense of excitement to the dinner table, right? Let’s dive into this culinary adventure that’s not just easy on the eyes but also on your schedule.
Introduction: Sizzle and Pop in 30 Minutes or Less
Picture this: it’s a Wednesday night, and the clock is ticking. You’ve had a long day, and the last thing you want is to be in the kitchen for hours. Enter the stir fry—a magical way to transform a few fresh ingredients into a hearty meal in less than 30 minutes!
Stir frying is not only one of the quickest methods to whip up dinner, but it also allows you to play with flavors and textures to keep things interesting. That vivid, colorful plate can brighten even the gloomiest of days. Plus, with a couple of nifty tricks, anyone can master this technique—even if you think your cooking skills end at boiling water.
This recipe features tender beef sirloin paired with a medley of vibrant veggies, all coated in a savory sauce that will have your taste buds doing a happy dance. Yet, what I love most about stir fry is that it embodies comfort food without the guilt of hours spent slaving away in the kitchen. You can enjoy it from a bowl or plate, alone or with friends and family. Ready to get those chopping skills honed? Let’s do it!
Personal Story: The Family Kitchen Connection
Growing up, nothing screamed “family bonding” quite like our Sunday dinners. My mom had a magic touch with her wok, and her stir fry was legendary in our household. I remember standing on a stool beside her, eagerly watching as she tossed slices of marinated beef into that hot, sizzling pan. The aroma filled the kitchen, turning everything into a sensory playground.
We were a big family, so my mom always made a feast. The best part? Sibling rivalries over who could grab the most greens (because who doesn’t want to be a “veg champion,” right?) and the laughter that echoed as we caught up over each plate of colorful goodness. In hindsight, those meals taught me so much—about food, love, and how a simple dish could bring everyone together. It wasn’t just about eating; it was about enjoying that time together, and I hope this Super Easy Beef Stir Fry does the same for you and yours!
Ingredients: What You’ll Need and a Few Chef Tips
Here’s a sneak peek into my pantry for this stellar dish. Let’s chat through the ingredients so you know exactly what you need and some quick tips to keep in your back pocket:
-
1 lb beef sirloin, thinly sliced
Sirloin is lean and packs a great beefy flavor. If you’re looking for a budget-friendly option, flank steak or even chicken breast could be delicious substitutes. -
2 cups mixed vegetables (bell peppers, broccoli, carrots)
Mix it up! While bell peppers and broccoli are staples, feel free to add snap peas, zucchini, or bok choy for a pop of color and diversity. The more the merrier! -
2 tablespoons soy sauce
Soy sauce is your flavor king here, bringing that umami punch! Low-sodium soy sauce works great if you’re watching your salt intake; just keep an eye on the overall seasoning as you cook. -
1 tablespoon olive oil
This helps us get that sizzle going! You can always swap in sesame oil for an extra flavor kick, especially if you love that delightful nutty essence. -
1 clove garlic, minced
Garlic is the aromatic hero of many dishes. Fresh is best, but pre-minced garlic works in a pinch—just don’t tell my mom! -
1 teaspoon ginger, minced
Ginger adds a lovely zing! If you’re not a fan, you can skip it or use ginger paste as a time-saver. It’s packed with flavor and brings that refreshing warmth. -
Salt and pepper to taste
Keep it simple! You can tweak this duo to your liking, but I’d suggest starting light. You can always add more, but it’s hard to dial it back once it’s in there!
Step-by-Step Instructions: Let’s Get Cooking!
Alright, grab your favorite wok or large, sturdy skillet and let’s do this!
-
Prep Your Ingredients:
Start by slicing your beef into thin strips, about 1/4 inch thick. This will help it cook quickly and evenly. Chef tip: If your beef is slightly frozen, it will be easier to slice thinly. Just a quick 20 minutes in the freezer should do the trick! -
Heat the Wok:
Hit that burner to medium-high heat and let your wok or skillet become hot—this is key for a good stir fry. Add the olive oil, swirling it around to coat the pan. -
Cook the Beef:
Once the oil is shimmering, add the sliced beef in a single layer, and let it sear without stirring for about 1-2 minutes. This allows it to caramelize. After that, stir it every so often until it’s browned and cooked through, about 5 minutes. Chef hack: Doing this in batches can give your beef an even better texture, so if you have a lot, consider cooking it in two rounds. -
Add Aroma:
Toss in the minced garlic and ginger, stirring for about 30 seconds until fragrant (your kitchen will smell incredible!). This is the moment the dish really starts to come alive. -
Veggie Time:
Now it’s vegetable time! Add the mixed veggies to the pan, and stir them in. We want them to retain some crunch, so keep stirring for about 3-5 minutes until they’re bright and tender. -
The Sauce:
Drizzle the soy sauce over the beef and veggies, and toss everything together so each piece is coated in that yummy goodness. Cook for another minute to let the sauce glaze the ingredients. -
Taste & Adjust:
Here’s your chance! Give it a taste and see if it needs a pinch of salt or pepper. Maybe a splash more soy sauce? You’re the chef, so make it yours! -
Final Toss & Plate:
Once everything is sizzling and the colors are popping, it’s time to serve. Carefully plate your stir fry while it’s hot—let those vibrant colors shine!
Serving Suggestions: How to Present Your Creation
Plating is everything, my friends! Here are some ideas to make your stir fry look as good as it tastes:
- Rice Base: Serve your stir fry over fluffy white rice, brown rice, or even quinoa for a nutritious twist.
- Bowl It Up: Use a deep bowl if you’ll be enjoying dinner with a spoon. Garnish with sesame seeds for an elegant touch.
- Wrap It Up: Looking for a unique way to serve? Try using large lettuce leaves to create wraps. Fill ’em up with stir fry for a fun, low-carb option!
- Garnish: A sprinkle of green onions or a handful of crushed peanuts on top can elevate the dish and add extra flavor and crunch.
Recipe Variations: Switch It Up!
The beauty of stir fry is its versatility! Here are some twists to make this dish your own:
- Saucy Variation: Add a tablespoon of oyster sauce for a richer flavor profile.
- Sweet and Spicy: Toss in a teaspoon of chili paste or sriracha for a kick of heat! Balance it with a splash of honey to even things out.
- Vegetarian Delight: Swap the beef for tofu and add extra veggies like mushrooms and bok choy.
- Curry Twist: Add a splash of coconut milk and a tablespoon of curry powder for a deliciously aromatic spin on this stir fry.
- Herb Infusion: Fresh herbs like basil or cilantro can elevate the flavor profile. Add them just before serving for a refreshing touch!
Chef’s Notes: A Dish of Growth
One of the things I love most about cooking is how it allows us to grow and learn. This Super Easy Beef Stir Fry has evolved from those family dinners to being my go-to dish whenever I have hungry guests or need a quick meal fix. The method is so forgiving, and I get to play with flavors every time I make it.
Isn’t it amazing how food is more than just sustenance? It’s a way to connect, celebrate, and make memories. I still hear my mom’s laughter and feel her love every time I whip up a stir fry. Cooking is a beautiful journey, and I’m so grateful to share it with you.
FAQs and Troubleshooting
Here are some common questions I get about stir fry and a few tips on avoiding potential pitfalls:
-
Why is my stir fry watery?
Ensure you’re cooking on high heat and not overcrowding the pan! If it’s too crowded, the ingredients steam instead of sear. Consider cooking in batches. -
Can I prep this ahead of time?
Absolutely! You can slice your veggies and beef the night before. Just store them separately in the fridge to keep them fresh. -
What if my beef is tough?
When slicing, always cut against the grain. This will help keep it tender. Also, marinating your beef in soy sauce and a bit of cornstarch for 15 minutes before cooking can really help. -
How can I store leftovers?
Place any leftovers in an airtight container and refrigerate for up to 3 days. Reheat on the stove for the best texture.
Nutritional Info
While comfort food often comes laden with calories, this Super Easy Beef Stir Fry packs in the nutrition without compromising on flavor:
- Calories: Approximately 350-400 per serving (based on 4 servings)
- Protein: 30g (thanks to the beef!)
- Carbohydrates: 30g
- Fiber: 6g (varies with the type and amount of veggies)
- Fat: 15g (mostly from olive oil)
Feel free to customize to your dietary needs by swapping out proteins or adjusting the oil content!
Final Thoughts
So there you have it—a delightful journey into the world of stir fry! I hope this Super Easy Beef Stir Fry finds a special place in your kitchen and becomes your trusty weeknight go-to. Remember, cooking is all about joy, creativity, and, of course, a dash of love. Don’t shy away from experimenting, tweaking, and making this dish uniquely yours.
Now, get chopping, stir-frying, and make some memorable meals with the ones you love. I can’t wait to hear about your own culinary adventures! Until next time, happy cooking, friends! 🍽️✨
Print
Super Easy Beef Stir Fry
- Total Time: 30 minutes
- Yield: 4 servings 1x
- Diet: Low-Carb
Description
A quick and delightful beef stir fry featuring tender beef sirloin and a medley of vibrant veggies, all coated in a savory sauce.
Ingredients
- 1 lb beef sirloin, thinly sliced
- 2 cups mixed vegetables (bell peppers, broccoli, carrots)
- 2 tablespoons soy sauce
- 1 tablespoon olive oil
- 1 clove garlic, minced
- 1 teaspoon ginger, minced
- Salt and pepper to taste
Instructions
- Prep your ingredients by slicing the beef into thin strips, about 1/4 inch thick.
- Heat the wok over medium-high heat and add the olive oil.
- Cook the sliced beef in a single layer for about 1-2 minutes, then stir until browned, about 5 minutes.
- Add the minced garlic and ginger, stirring for about 30 seconds until fragrant.
- Veggie time! Add mixed veggies and stir for about 3-5 minutes until bright and tender.
- Drizzle the soy sauce over the beef and veggies, toss to coat, and cook for another minute.
- Taste the stir fry and adjust seasoning if needed before serving.
- Plate the stir fry while hot and enjoy!
Notes
Cooking in batches can improve the texture of the beef. You can personalize the stir fry with different veggies or proteins.
- Prep Time: 10 minutes
- Cook Time: 20 minutes
- Category: Main Course
- Method: Stir Fry
- Cuisine: Asian
Nutrition
- Serving Size: 1 serving
- Calories: 375
- Sugar: 5g
- Sodium: 600mg
- Fat: 15g
- Saturated Fat: 2g
- Unsaturated Fat: 10g
- Trans Fat: 0g
- Carbohydrates: 30g
- Fiber: 6g
- Protein: 30g
- Cholesterol: 70mg
Keywords: beef, stir fry, weeknight dinner, quick recipe, Asian cuisine