
Hearty Blueberry Protein Muffins
Hearty Blueberry Protein Muffins: Fuel Your Day the Delicious Way
Hey there, foodie fam! If there’s one thing I absolutely love, it’s starting my day with something that not only tastes divine but packs a healthy punch too. That’s where my Hearty Blueberry Protein Muffins come into play! They’re fluffy, delicious, and perfect for breakfast on-the-go or a satisfying pick-me-up any time of day.
Now, let’s chat about food for a second. We all know that typical breakfast foods can sometimes leave us feeling sluggish or unsatisfied, am I right? Well, fear not, because these muffins are here to revolutionize your morning routine! With the delightful burst of blueberries bringing juicy sweetness and the protein powder giving your body the fuel it needs, these aren’t your average muffins. They’re like a little hug in muffin form, keeping you energized and satisfied throughout your busy day.
But before I dive in and share how to whip up these beauties, let me whisk you away to a little kitchen story of mine. This recipe has roots in my childhood memories, where the love for cooking started to bloom. Grab your favorite mug and let’s dig into some muffin magic!
Personal Story
Growing up, my mom had a go-to recipe for muffins that brought the entire family together every Sunday morning. We’d wake up to the sweet smell of baked goods wafting through the house, and suddenly, everyone would shuffle their way to the kitchen, hungry and eager to help. I remember standing on a chair, carefully measuring flour and sneaking in bits of chocolate chips when I thought no one was watching!
Fast forward to today—my mom’s traditional recipe has morphed into something that not only satisfies my sweet tooth but also aligns with my nutrition goals. Enter these Hearty Blueberry Protein Muffins! They perfectly capture the nostalgia of those Sunday mornings, but they also reflect the healthier lifestyle I’ve embraced. Plus, I love how they keep everyone in my household happy—my kids can’t resist the sweet-tartness of blueberries, and I beam knowing they’re getting protein-packed nourishment right at the start of their days.
Now, let’s get into the fun part—the ingredients that make these muffins a hit!
Ingredients
Here’s what you’ll need to whip up a batch of these Hearty Blueberry Protein Muffins:
-
1 cup rolled oats
Perfect for adding texture and fiber, rolled oats keep you full longer. If you’re gluten-free, make sure to grab certified gluten-free oats! -
1 cup protein powder
This is the game changer—choose your favorite flavor, whether it’s vanilla, chocolate, or berry! For a plant-based option, try pea protein or hemp protein powder. -
1/2 cup honey or maple syrup
Sweetness alert! Honey gives a natural sweetness along with a hint of floral notes, while maple syrup offers a deliciously rich flavor. You can also use agave syrup if you prefer. -
1/2 cup unsweetened almond milk
Keep things dairy-free with almond milk. You could swap it out for oat milk or regular cow’s milk if that’s your jam! -
1/4 cup coconut oil, melted
Coconut oil adds a tropical flair along with healthy fats. If you’re not a fan, melted butter works perfectly too. -
1 teaspoon vanilla extract
Because vanilla makes everything better! It’s a delightful flavor booster. -
1 cup fresh or frozen blueberries
The star of the show! Fresh blueberries burst with flavor, while frozen ones are just as tasty and make this recipe easy year-round. -
1 teaspoon baking powder
Vital for that fluffy rise everyone loves! -
1/2 teaspoon baking soda
This keeps the muffins light and airy—don’t skip this one! -
1/4 teaspoon salt
A pinch of salt enhances all the flavors beautifully.
Let’s get to the fun part—mixing all these goodies together!
Step-by-Step Instructions
-
Preheat the Oven
Preheat your oven to 350°F (175°C) and line a muffin tin with paper liners or lightly grease it with coconut oil. This step is crucial because no one wants to bake muffins in a cold oven—they could turn out dense and sad! -
Mix Dry Ingredients
In a large bowl, combine the rolled oats, protein powder, baking powder, baking soda, and salt. Give it a good whisk! This is your foundation, and mixing the dry ingredients first helps distribute the leavening agents evenly. -
Combine Wet Ingredients
In another bowl, whisk together the melted coconut oil, honey or maple syrup, almond milk, and vanilla extract. Make sure the coconut oil isn’t too hot, or it’ll cook the other ingredients when combined. You want it warm—just enough to melt! -
Bring It All Together
Pour the wet mixture into the dry ingredients and stir until just combined. Don’t overmix; you want those muffins to be soft! Carefully fold in the blueberries—gently does it! No one likes a squished berry. -
Scoop and Bake
Using a spoon or ice cream scoop, fill each muffin cup about three-quarters full. This gives them room to rise without overflowing. Bake for about 15-20 minutes, or until a toothpick inserted in the center comes out clean! -
Cool and Enjoy
Once baked, let them cool in the tin for a few minutes before transferring them to a wire rack. The smell that fills your kitchen during baking? Pure magic!
Serving Suggestions
When it comes to serving your Hearty Blueberry Protein Muffins, the options are just as delightful as the muffins themselves! Enjoy them warm, straight out of the oven, with a smear of almond or peanut butter. You can also sprinkle a little powdered sugar on top for a sweet touch, or serve with a side of Greek yogurt for an extra protein boost.
If you’re feeling fancy, plate them up with some fresh fruit and a drizzle of honey or maple syrup. They make a fantastic addition to a brunch spread, just nestled next to a fresh fruit salad or avocado toast.
Recipe Variations
Let’s shake things up a bit! Here are some creative twists you can try with your muffins:
-
Mixed Berry Muffins: Swap blueberries for an assortment of raspberries, blackberries, or strawberries. Just make sure to chop the strawberries into smaller pieces.
-
Chocolate Chip Delight: Add semi-sweet chocolate chips in place of some of the blueberries. Who said you can’t have chocolate for breakfast?
-
Nutty Banana Muffins: Add a mashed ripe banana to the wet ingredients for natural sweetness and a hint of banana flavor. Don’t forget to adjust the honey or maple syrup!
-
Cinnamon Spice: Add a teaspoon of cinnamon to the dry ingredients for a warm, cozy flavor! It pairs perfectly with the berries.
-
Savory Spinach and Cheese: For a protein-rich savory option, consider mixing in some sautéed spinach and crumbled feta for a delightful breakfast treat!
Chef’s Notes
When I first started making these muffins, I experimented with different layers of flavor, and there were a few flops along the way. I added too much baking powder once—let me tell you, “muffin volcano” was not the morning fun I envisioned! But, through trial and error, I’ve perfected this recipe to share with you all. These muffins not only show up on our breakfast table but also in the lunchboxes for school, and they’ve become a family favorite.
Baking is always an adventure, right? Some days are a wild ride while others are smooth sailing. No matter the outcome, embrace the journey and keep laughing along the way!
FAQs and Troubleshooting
-
Why are my muffins too dense?
If your muffins turned out dense, it could be from overmixing the batter or not enough leavening agents. Make sure you mix until just combined and check that your baking powder and soda are fresh! -
Can I replace almond milk with another liquid?
Absolutely! Regular milk, soy milk, oat milk, or even coconut milk works great. Just remember to adjust based on your dietary needs! -
How can I store my muffins?
Store them in an airtight container at room temperature for up to three days. You can also freeze them for up to three months! Just pop them in the microwave or oven for quick reheating. -
What if I don’t have protein powder?
You can increase the rolled oats a bit and add almond meal or flour to boost the protein levels.
Nutritional Info
Let’s not overlook the benefits here! Each muffin is packed with protein and fiber—exactly what you need to fuel your day. They clock in at approximately 150 calories each, depending on the specific ingredients you choose. With about 5 grams of protein per muffin and a good source of healthy fats from the coconut oil, you’ll feel great about indulging in these during your morning routine. Plus, the antioxidants from the blueberries support overall health—what’s not to love?
Final Thoughts
I hope you’re as excited as I am to bake up a batch of these Hearty Blueberry Protein Muffins! Remember, cooking is fun, and the kitchen should be a place where creativity runs wild. So grab your apron, turn up the music, and let’s get baking!
Happy cooking, my friends! I can’t wait to hear about your adventures with these muffins. Tag me with your creations on social media, and let’s keep the foodie love going! Until next time, keep it simple, soulful, and always satisfying—because that’s what Feastical is all about. Enjoy your muffin magic!
Print
Hearty Blueberry Protein Muffins
- Total Time: 35 minutes
- Yield: 12 muffins 1x
- Diet: Vegetarian
Description
Fluffy and delicious muffins packed with protein and the sweet burst of blueberries, perfect for breakfast or a snack.
Ingredients
- 1 cup rolled oats
- 1 cup protein powder
- 1/2 cup honey or maple syrup
- 1/2 cup unsweetened almond milk
- 1/4 cup coconut oil, melted
- 1 teaspoon vanilla extract
- 1 cup fresh or frozen blueberries
- 1 teaspoon baking powder
- 1/2 teaspoon baking soda
- 1/4 teaspoon salt
Instructions
- Preheat your oven to 350°F (175°C) and line a muffin tin with paper liners or lightly grease it with coconut oil.
- Mix the rolled oats, protein powder, baking powder, baking soda, and salt in a large bowl.
- Combine the melted coconut oil, honey or maple syrup, almond milk, and vanilla extract in another bowl.
- Pour the wet mixture into the dry ingredients and stir until just combined. Fold in the blueberries.
- Scoop the batter into the muffin tin, filling each cup about three-quarters full.
- Bake for 15-20 minutes, or until a toothpick inserted comes out clean.
- Cool the muffins in the tin for a few minutes then transfer to a wire rack.
Notes
Enjoy warm with almond or peanut butter, or serve with Greek yogurt for an extra protein boost.
- Prep Time: 15 minutes
- Cook Time: 20 minutes
- Category: Breakfast
- Method: Baking
- Cuisine: American
Nutrition
- Serving Size: 1 muffin
- Calories: 150
- Sugar: 10g
- Sodium: 200mg
- Fat: 6g
- Saturated Fat: 4g
- Unsaturated Fat: 2g
- Trans Fat: 0g
- Carbohydrates: 20g
- Fiber: 3g
- Protein: 5g
- Cholesterol: 0mg
Keywords: blueberry muffins, protein muffins, healthy breakfast

Cottage Cheese Egg Bites
Cottage Cheese Egg Bites: The Ultimate Comfort Food!
Hey, foodies! Welcome back to Feastical, where we blend deliciousness with a dash of love for the kitchen. Today, I’m thrilled to dive into a recipe that’s as versatile as it is satisfying: Cottage Cheese Egg Bites! This dish isn’t just your average egg scramble; it’s a delightful fusion that incorporates healthy cottage cheese, eggs, and your favorite add-ins into perfect little bites of joy.
Why am I so passionate about this recipe? Well, imagine biting into a fluffy, cheesy morsel that brings together the nutritious goodness of cottage cheese with the comfort of eggs. These egg bites are great for breakfast, brunch, or even a snack, and they’re packed with protein, making them a fantastic choice for any meal. Whether you’re running out the door or having a leisurely Sunday brunch, these bites are here to save the day.
We’ll explore how this humble dish can be jazzed up with your favorite veggies, spices, and cheeses. Plus, I’ll share some kitchen hacks that will guarantee your egg bites come out perfectly every time. So, grab your mixing bowl and let’s make some kitchen magic happen with these Cottage Cheese Egg Bites that promise a warm hug in every bite!
Personal Story
You know, every great recipe has a story behind it. For me, Cottage Cheese Egg Bites evoke memories of lazy Sunday mornings spent with my family. My mom used to whip them up for us as a quick breakfast before we raced off to soccer games or art classes. I remember the aromatic scent wafting through our small kitchen, and how we’d eagerly huddle around the table, forks poised and ready to dig in.
Years later, I attempted to recreate those delightful bites in my college apartment, trying to reproduce that same comfort so intricately tied to my childhood. Armed with a few kitchen gadgets and my trusty stoneware muffin pan, I began experimenting. Armed with enthusiasm and a need for a shortcut breakfast option, I learned that adding things like spinach or bell peppers was not only delicious but full of color and variety—just like those mornings with the family.
So, every time I make these Cottage Cheese Egg Bites, it feels like a warm embrace from the past, bringing back those cozy mornings and the love we shared over tasty food. Now, let’s get our ingredients together and create our own memories!
Ingredients
Here’s what you’ll need to whip up a batch of these scrumptious Cottage Cheese Egg Bites. I’ve included some substitutions and chef’s insights with each ingredient to make sure you can customize your bites just the way you like them!
-
1 cup cottage cheese
A superstar ingredient that brings moisture and a creamy texture to the bites. You can use low-fat or even dairy-free versions made from almond or soy milk if you’re looking for lighter alternatives! -
6 large eggs
These are the backbone of our recipe, providing essential protein and structure. For an egg-free option, you can try using flaxseed meal (1 tbsp flaxseed meal + 2.5 tbsp water = 1 egg). -
1/2 cup shredded cheese (cheddar or your choice)
Go for sharp cheddar for a kick, or mozzarella if you want something mild. Feel free to use dairy-free cheese alternatives for a lactose-free option. -
1/2 cup spinach (optional)
Fresh or frozen, spinach adds both a pop of color and vital nutrients. If you don’t have spinach, try kale or some finely diced broccoli instead! -
1/2 cup diced bell peppers (optional)
These add a sweet crunch and vibrant colors. Mix it up with red, yellow, or orange peppers, and if you’re adventurous, throw in some jalapeños for a spicy twist! -
Salt and pepper to taste
Essential for bringing all flavors alive! Be sure to season generously, as these egg bites can be a blank canvas for flavors.
Picking out the right ingredients is fundamental in cooking, and I can’t stress enough how using fresh, high-quality options makes a world of difference in taste!
Step-by-Step Instructions
Now that we’ve got our ingredients ready, let’s jump right into the cooking process. Don’t worry; I’ll keep it simple, and you’ll have these bites in no time!
-
Preheat the Oven: Start by preheating your oven to 350°F (175°C). This is crucial! A hot oven ensures that your egg bites rise beautifully and develop a lovely golden top.
-
Prepare Your Muffin Pan: Grease a standard-sized muffin tin with cooking spray or olive oil. This step is essential so that your egg bites release easily when they’re done baking. Alternatively, you could also use silicone muffin cups for easy removal.
-
Mix the Eggs and Cottage Cheese: In a large mixing bowl, whisk together the eggs and cottage cheese until well combined. You want to achieve a smooth consistency, so take your time here. The cottage cheese should break down just a bit but still provide those delightful curds for texture.
-
Add in the Cheese and Veggies: Fold in your shredded cheese, spinach, and diced bell peppers (if using). For added flavor, you can sprinkle in some garlic powder or herbs like dill or chives. This is the point where you can really make it your own!
-
Season Generously: Don’t forget to sprinkle in some salt and pepper! A good rule of thumb is about 1/2 teaspoon of salt and a few cracks of black pepper, but try to taste it to find your sweet spot.
-
Pour the Mixture into the Muffin Tin: Use a ladle or measuring cup to pour the mixture into the prepared muffin tin, filling each cup about 3/4 full. This is when the excitement builds as you watch your creations take shape!
-
Bake: Pop your muffin tin into the preheated oven and let them bake for 20-25 minutes. Keep an eye on them after the 20-minute mark! They should look puffed up and golden, with a slight jiggle in the center. If they look too wet, give them a few more minutes.
-
Cool and Serve: Once done, let your egg bites cool in the pan for about 5 minutes before carefully removing them. They’re a bit delicate right out of the oven, so be gentle!
-
Enjoy: Now the best part! You can enjoy them warm, or let them chill and store them in the fridge for later. Reheat in the microwave for a quick snack!
Serving Suggestions
So, how do we serve these beauties? Here are a few delightful ideas to elevate your brunch experience:
-
On a Platter: Arrange the egg bites on a colorful platter, garnished with fresh herbs such as parsley or cilantro. Pair it with a side of sliced avocado and fresh fruit for a complete and eye-catching spread.
-
With Dipping Sauces: Provide an array of dipping sauces! Think sriracha for the spice lovers, and a cool ranch or yogurt sauce for a creamy counterpart. This adds a fun interactive element to your meal!
-
As Part of a Breakfast Bowl: Create a desayuno bowl by tossing your egg bites with sautéed veggies, grains like quinoa or brown rice, and a squeeze of lemon for that zesty kick.
The way you serve your egg bites can turn a simple meal into a delightful feast!
Recipe Variations
Let’s shake things up! Here are some fun ideas for personalizing your Cottage Cheese Egg Bites:
-
Southwestern Style: Add black beans, corn, and taco seasoning. Serve with salsa and avocado for a fiesta in your mouth!
-
Mediterranean Delight: Mix in feta cheese, chopped sun-dried tomatoes, and olives. Serve with a drizzle of olive oil and a side of pita bread.
-
Herbed Mushroom Medley: Sauté some mushrooms and fresh herbs like thyme or rosemary, then fold into your base mixture for an earthy flavor explosion.
-
Savory Breakfast Casserole: Instead of muffin tin, pour into a baking dish, layer with crusty bread, and bake for a delightful brunch casserole.
-
Sweet Breakfast Option: For a sweet spin, mix in some cinnamon and berries and opt for sweet cheese like ricotta instead of cottage cheese! Top with a dollop of yogurt for a delightful breakfast treat.
With these variations, you’ll never get tired of the same old egg bites, and they can easily suit any taste!
Chef’s Notes
Oh, the memories I have of experimenting with this recipe! I’ve tried countless combinations, once mistakenly tossing in nutmeg instead of salt—which was a culinary disaster, let me tell you. But it was during one of those trials that I discovered just how versatile these egg bites are. My friends thought they wouldn’t love cottage cheese, yet they were converted after just one bite!
Every time I revisit this recipe, I’m amazed at how it adapts to my mood, the season, or even what’s leftover in my fridge. Whether I’m feeling vibrant with spring veggies or cozy with hearty cheddar and bacon, there’s always a way to fuse flavors and create something both nourishing and joyful.
FAQs and Troubleshooting
1. Can I make these egg bites ahead of time?
Absolutely! They store beautifully in the fridge for up to 4 days. Simply reheat in the microwave for quick breakfasts!
2. What can I do if my egg bites are soggy?
Make sure you’re not overloading on veggies that release too much moisture. If they still turn out soggy, try reducing your baking time, or cooking them a bit longer if needed.
3. Can I freeze these?
Yes! They freeze very well. Just wrap them individually in plastic wrap, and pop them in the freezer. They can last up to a month. To reheat, let them thaw in the fridge overnight before warming them in the microwave.
4. Can I bake it in a different pan?
Absolutely! You can use any oven-safe dish; just check the cooking time as it may vary depending on the size and shape of your pan.
Nutritional Info
A delicious boost of energy, here’s what you can expect per egg bite (with standard ingredients):
- Calories: 80
- Protein: 7g
- Fat: 5g
- Carbohydrates: 2g
- Fiber: 0g
- Sugar: 2g
These bites are not just tasty; they pack a nutritional punch, especially with the addition of veggies and diverse proteins!
Final Thoughts
There you have it, friends—your go-to recipe for Cottage Cheese Egg Bites! Easy to make, dreamy to eat, and endlessly versatile. Whether you enjoy them for breakfast, as an afternoon snack, or at brunch with friends, they have a unique charm that brings comfort to any table.
Let the scent of these pastries waft through your home as you share not just a meal, but a memory. Each bite is a chance to savor life’s moments, big and small. So, roll up those sleeves and get cooking! I’m sure you’ll find your own twists along the way that make this recipe even more special.
Remember, cooking is more than just a task; it’s an experience to relish. Let’s keep celebrating food that lifts our spirits and brings joy to our gatherings because, after all, nothing unites people quite like delicious food. Happy cooking, and until next time—stay hungry for flavor!
Print
Cottage Cheese Egg Bites
- Total Time: 35 minutes
- Yield: 12 servings 1x
- Diet: Vegetarian
Description
Delicious and versatile Cottage Cheese Egg Bites perfect for breakfast, brunch, or a snack, packed with protein and customizable with your favorite add-ins.
Ingredients
- 1 cup cottage cheese
- 6 large eggs
- 1/2 cup shredded cheese (cheddar or your choice)
- 1/2 cup spinach (optional)
- 1/2 cup diced bell peppers (optional)
- Salt and pepper to taste
Instructions
- Preheat the Oven: Start by preheating your oven to 350°F (175°C).
- Prepare Your Muffin Pan: Grease a standard-sized muffin tin with cooking spray or olive oil.
- Mix the Eggs and Cottage Cheese: In a large mixing bowl, whisk together the eggs and cottage cheese until well combined.
- Add in the Cheese and Veggies: Fold in your shredded cheese, spinach, and diced bell peppers (if using).
- Season Generously: Sprinkle in some salt and pepper.
- Pour the Mixture into the Muffin Tin: Fill each cup about 3/4 full.
- Bake: Bake for 20-25 minutes until puffed up and golden.
- Cool and Serve: Let your egg bites cool in the pan for about 5 minutes before removing them.
- Enjoy: Serve warm or store in the fridge for later.
Notes
These bites can be customized with different veggies and cheese to suit your taste. They can also be made ahead and stored in the fridge for easy reheating.
- Prep Time: 10 minutes
- Cook Time: 25 minutes
- Category: Breakfast
- Method: Baking
- Cuisine: American
Nutrition
- Serving Size: 1 serving
- Calories: 80
- Sugar: 2g
- Sodium: 200mg
- Fat: 5g
- Saturated Fat: 2g
- Unsaturated Fat: 3g
- Trans Fat: 0g
- Carbohydrates: 2g
- Fiber: 0g
- Protein: 7g
- Cholesterol: 186mg
Keywords: Cottage Cheese, Egg Bites, Breakfast, Healthy Snacks, Comfort Food
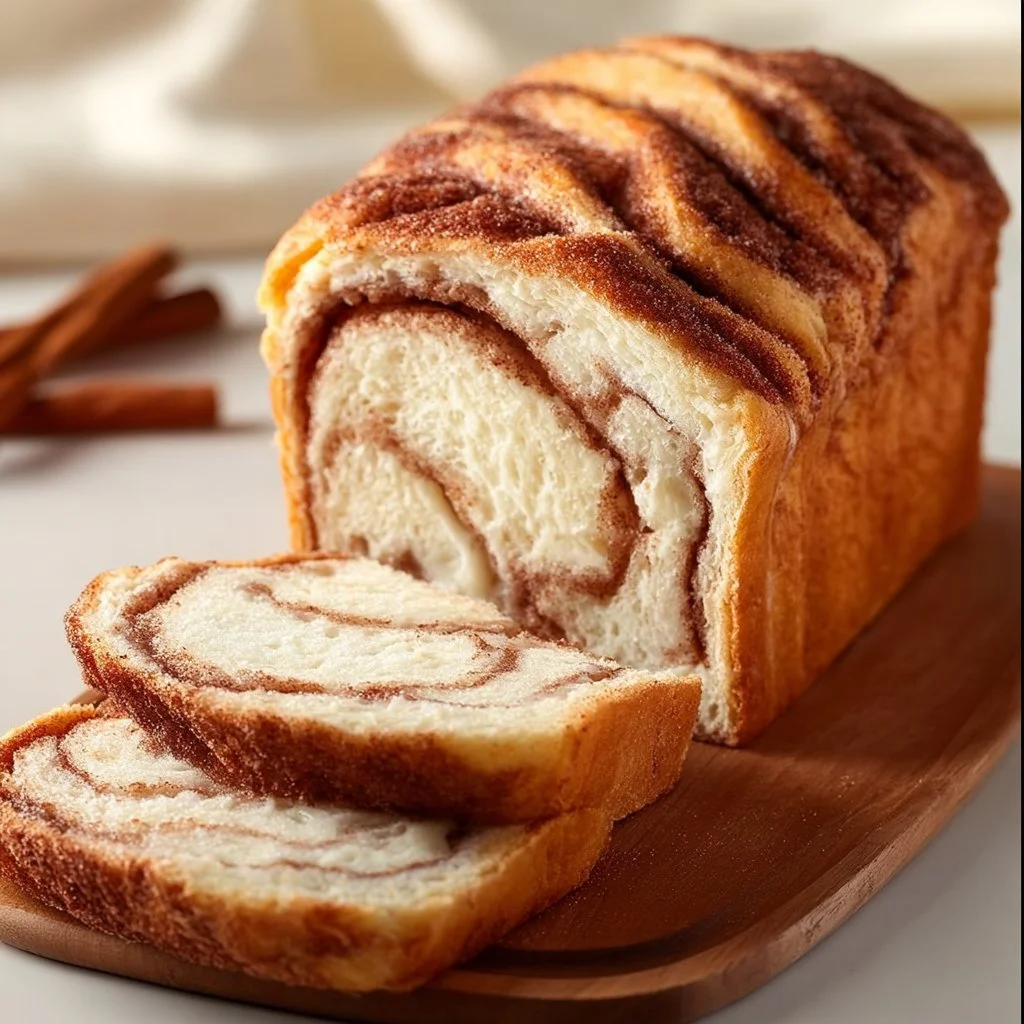
Cinnamon Roll Cottage Cheese Loaf
# The Ultimate Cinnamon Roll Cottage Cheese Loaf: A Comforting Treat to Savor!

## Introduction

Hey there, fellow foodies! Welcome back to Feastical, where delicious recipes meet heartfelt stories that make your kitchen feel just a bit cozier. Today, I’m thrilled to share with you one of my absolute favorite comfort food creations—a dish that embodies both nostalgia and innovation: the **Cinnamon Roll Cottage Cheese Loaf**. Imagine sinking your teeth into a sweet, tender loaf that combines the rich, creamy goodness of cottage cheese with the warm, inviting flavors of a classic cinnamon roll. It’s like a big hug from grandma but in loaf form!

Have you ever found yourself craving something sweet but comforting, something that feels just right with a cup of coffee in hand? This loaf hits all the right notes! It’s perfect for breakfast, an afternoon snack, or even a cheeky dessert after dinner. Plus, it’s simple to whip up and uses ingredients you probably have on hand, which makes it a go-to for any day of the week. So, whether you’re gearing up for a busy morning or looking for that end-of-the-day treat, this loaf is bound to be a crowd-pleaser—just like it is in my home!

But you know what? It’s not just about the flavors—it’s about sharing the love that goes into cooking. Nothing brings people together quite like a fresh-baked loaf that fills the air with cinnamon-spiced aromas and happy chatter. So why not roll up those sleeves, get your apron on, and let’s create something magical together in the kitchen? Ready to dive in? Let’s roll!

## Personal Story

This Cinnamon Roll Cottage Cheese Loaf holds a special place in my heart, and let me tell you why. Growing up, my grandmother had a knack for baking the most incredible cinnamon rolls. The entire house would come alive on those lazy Sunday mornings with the smell of cinnamon wafting through the air, mingling with the sounds of laughter and chatter. It was a ritual of sorts. We'd all gather around the kitchen table, relishing each gooey, warm bite of her creations.

As I became more passionate about cooking and sharing my love for food, I wanted to capture that nostalgia but with a twist. One morning, feeling inspired to mix things up while keeping that familiar cozy essence alive, I decided to throw cottage cheese into the mix—for moisture, protein, and a touch of tang. The result? A delightful loaf that not only nods to those cherished cinnamon rolls of my childhood but also makes it easy for anyone to whip up in their own kitchen. Now, whenever I bake this loaf, I’m taken back to those simple Sunday mornings, and I can’t help but smile. It’s more than just a recipe; it’s a slice of my past, ready to be enjoyed by each new generation!

## Ingredients

To whip up this Cinnamon Roll Cottage Cheese Loaf, you’ll need the following ingredients:

- **1 cup cottage cheese**
  *This creamy ingredient adds moisture and protein.* Look for a full-fat version for the richest flavor or a low-fat option if you’re watching calories.

- **2 cups all-purpose flour**
  *The backbone of any good loaf! A regular all-purpose flour does the trick, but you could substitute with whole wheat flour for a heartier version (just adjust the liquid slightly).*

- **1/2 cup granulated sugar**
  *This little sweetener balances the flavors. For a healthier option, you can swap it with coconut sugar or even honey (just adjust the liquid if needed).*

- **1/4 cup melted butter**
  *Adds richness and flavor. You can use coconut oil if you prefer a dairy-free option, or even applesauce for a lighter twist!*

- **2 large eggs**
  *They provide structure and moisture to the loaf. If you’re looking for an egg-free option, try using flax eggs (1 tablespoon of ground flaxseed mixed with 2.5 tablespoons of water per egg).*

- **1 tablespoon ground cinnamon**
  *The star of the show! Feel free to add a little more if you’re a cinnamon lover.*

- **2 teaspoons baking powder**
  *Essential for that perfect rise! If you only have baking soda, pair it with a bit of vinegar or lemon juice for leavening.*

- **1/2 teaspoon salt**
  *A pinch brings out the flavors and balances the sweetness. Always use the right amount so the loaf is truly scrumptious!*

- **1 teaspoon vanilla extract**
  *This elevates the flavor profile beautifully. You can use almond extract for an extra nutty twist if you’d like!*

## Step-by-Step Instructions

Now, let’s bring this delicious loaf to life! Here's how to do it step by step:

1. **Preheat Your Oven**
   Set your oven to 350°F (175°C). This step is crucial because a preheated oven ensures uniform cooking and a perfectly risen loaf. While it's warming up, you can prep your ingredients!

2. **Prepare Your Loaf Pan**
   Grease a 9x5-inch loaf pan with butter or spray it with non-stick cooking spray. This will make it easy to lift the loaf out after baking. For a little extra flavor and a rustic look, you might even consider dusting it with a bit of flour.

3. **Mix Dry Ingredients**
   In a large bowl, whisk together the flour, sugar, baking powder, cinnamon, and salt. This ensures even distribution of the leavening agents and spices throughout your loaf. Pro tip: sifting your flour before adding is a great way to enhance texture!

4. **Combine Wet Ingredients**
   In another bowl, mix the cottage cheese, melted butter, eggs, and vanilla extract until well combined. The cottage cheese may look lumpy, but don’t worry; that’s all part of its charm!

5. **Blend Wet and Dry Mixtures**
   Gradually pour the wet mixture into the dry ingredients. Stir gently with a spatula or wooden spoon until just combined. Be careful not to overmix—overmixing can lead to a dense loaf!

6. **Transfer to Pan**
   Pour the batter into your prepared loaf pan, using a spatula to smooth the top. Give it a little shake to level it out. This is your loaf starting to come together, and oh boy, it’s going to smell heavenly!

7. **Bake to Perfection**
   Place the loaf in your preheated oven and bake for 50-60 minutes. Start checking at the 50-minute mark by inserting a toothpick into the center—if it comes out clean or with a few moist crumbs, you’re all set!

8. **Cool Down**
   Once baked, welcome that golden loaf out of the oven and let it cool for about 15 minutes in the pan. After cooling, transfer it to a wire rack to cool completely. This helps maintain that lovely crust.

9. **Slice and Serve**
   Once the loaf is cool, grab a serrated knife and slice it up! Enjoy that first piece while it’s still warm, maybe with a pat of butter or a drizzle of honey.

## Serving Suggestions

Now that your Cinnamon Roll Cottage Cheese Loaf is baked and perfectly golden, let’s talk about how to serve it. You can keep it simple—just a slice on its own is enough to make anyone smile. Or, for an indulgent twist, toast a slice and slather it with cream cheese frosting or a warm glaze made from powdered sugar and milk!

Another fun idea? Serve it with fresh fruit on the side—think berries or sliced bananas—maybe even a dollop of yogurt for that extra creaminess to balance the sweetness. This loaf also makes for a wonderful breakfast option paired with a warm cup of coffee or tea. Trust me, that morning ritual will feel even more special with a slice of this loveable loaf!

## Recipe Variations

Now, let’s make things interesting! Here are some creative twists to take your loaf to the next level:

1. **Chocolate Chip Delight**
   Toss in a handful of chocolate chips right before transferring the batter to the loaf pan. It adds a rich surprise with each bite, perfect for the chocolate lovers in your life!

2. **Nutty Crunch**
   Chopped walnuts or pecans can add a delightful crunch. Just toss about half a cup into the batter for added texture and flavor.

3. **Fruity Infusion**
   Add a cup of fresh or frozen berries like blueberries or raspberries into the mix! They’ll add a tartness that perfectly balances the sweetness.

4. **Pumpkin Spice Dream**
   Looking for an autumnal twist? Substitute mashed pumpkin for half of the cottage cheese and increase the cinnamon to 2 teaspoons for a spicy pumpkin loaf.

5. **Gluten-Free Option**
   Swap out the all-purpose flour for a gluten-free all-purpose blend. Make sure it contains xanthan gum for that perfect loaf texture.

## Chef’s Notes

This Cinnamon Roll Cottage Cheese Loaf has quickly become a staple in my home, especially during cozy seasons when the weather cools down, and we crave warmth and comfort. It’s funny how a simple combination of ingredients can evolve into something so delightful!

When I first created this recipe, I was just looking for a way to utilize the cottage cheese that had been sitting in my fridge. What started as an experiment turned into a crowd favorite! I love to share it at potlucks, and you wouldn’t believe the smiles it brings. Trust me, once you share this loaf with your friends and family, you’ll be asked for the recipe in no time!

## FAQs and Troubleshooting

**1. Why is my loaf dense?**
If your loaf is dense, it may be due to overmixing the batter. Remember, mix just until combined, and you should be golden!

**2. How do I store leftovers?**
Store your loaf in an airtight container at room temperature for up to 3 days. For longer storage, slice it and freeze individual pieces for a quick treat later!

**3. Can I use different sized loaf pans?**
Absolutely! If you're using a smaller pan, keep an eye on the baking time as it may require less time. Pour in the batter until it’s about two-thirds full to avoid overflow.

**4. How do I know when my loaf is done?**
The toothpick test is your best friend! If it comes out clean or with a few moist crumbs (not wet batter), your loaf is ready to come out.

## Nutritional Info

While I believe in enjoying food that comes straight from the heart, it’s always good to have a peek at the nutritional side of things, especially if you're trying to be mindful about your diet! One slice (about 1/12 of the loaf) contains roughly:

- Calories: 180
- Protein: 6g
- Carbohydrates: 25g
- Fat: 7g
- Fiber: 1g

Of course, these numbers can vary depending on the ingredients you choose, but this loaf offers a balance of protein from the cottage cheese and some carbs to keep your energy up. Plus, it’s a fantastic way to treat yourself while incorporating cottage cheese's benefits!

## Final Thoughts

And there you have it, friends! A **Cinnamon Roll Cottage Cheese Loaf** that’s not only scrumptious but also brings a sense of nostalgia and warmth, perfect for any occasion. I truly hope you give this recipe a try because once you taste that first slice, you’ll understand why it’s become an instant favorite in my kitchen.

Remember, the magic of cooking lies in experimentation and love. So don’t be afraid to adapt the recipe, make it your own, and share your creations with loved ones. I can’t wait to hear how your Cinnamon Roll Cottage Cheese Loaf turns out, so be sure to pop back in and share your experiences! Until next time, keep cooking up those feel-good flavors, and let’s keep this delightful community growing. Happy baking!

Cinnamon Roll Cottage Cheese Loaf
- Total Time: 75 minutes
- Yield: 12 servings 1x
- Diet: Vegetarian
Description
A comforting loaf that combines the creamy goodness of cottage cheese with the warm flavors of cinnamon rolls.
Ingredients
- 1 cup cottage cheese
- 2 cups all-purpose flour
- 1/2 cup granulated sugar
- 1/4 cup melted butter
- 2 large eggs
- 1 tablespoon ground cinnamon
- 2 teaspoons baking powder
- 1/2 teaspoon salt
- 1 teaspoon vanilla extract
Instructions
- Preheat your oven to 350°F (175°C).
- Prepare a 9×5-inch loaf pan by greasing it with butter or non-stick spray.
- Mix the dry ingredients: whisk together flour, sugar, baking powder, cinnamon, and salt in a large bowl.
- Combine the wet ingredients: mix cottage cheese, melted butter, eggs, and vanilla in another bowl.
- Blend the wet mixture into the dry ingredients until just combined.
- Transfer the batter to the prepared loaf pan and smooth the top.
- Bake for 50-60 minutes, checking for doneness with a toothpick.
- Cool for 15 minutes in the pan, then transfer to a wire rack.
- Slice and serve warm, optionally with butter or honey.
Notes
This loaf can be customized with chocolate chips, nuts, or fruits for extra flavor.
- Prep Time: 15 minutes
- Cook Time: 60 minutes
- Category: Dessert
- Method: Baking
- Cuisine: American
Nutrition
- Serving Size: 1 slice
- Calories: 180
- Sugar: 6g
- Sodium: 200mg
- Fat: 7g
- Saturated Fat: 4g
- Unsaturated Fat: 3g
- Trans Fat: 0g
- Carbohydrates: 25g
- Fiber: 1g
- Protein: 6g
- Cholesterol: 50mg
Keywords: cinnamon roll, cottage cheese, loaf, comfort food, baking, dessert