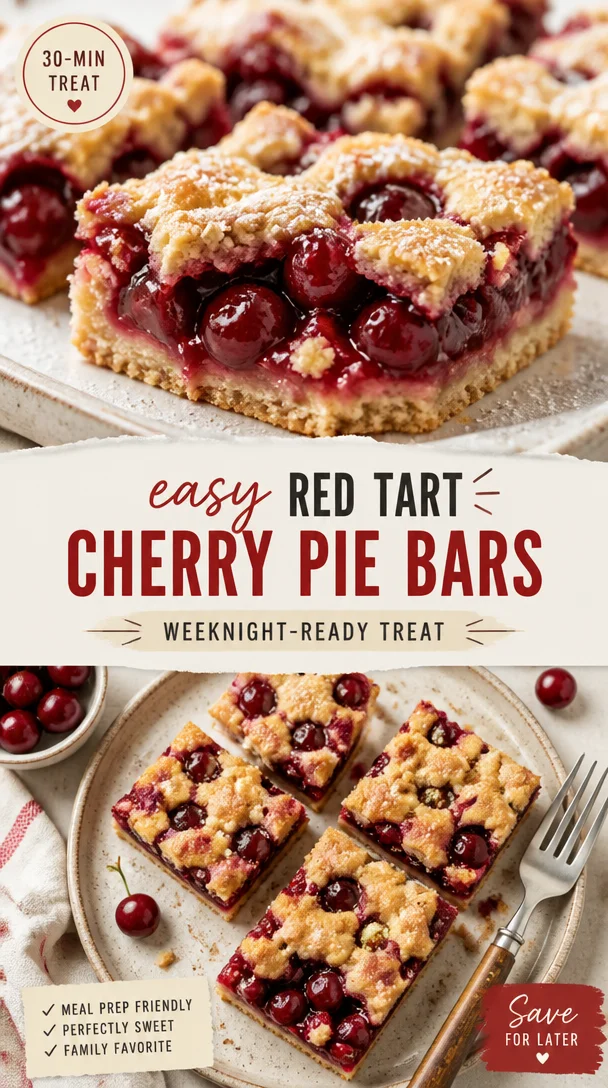
The Sweet and Tart Symphony of Red Tart Cherry Pie Bars
Hey there, fellow food lovers! Today we’re diving into a delightful treat that’s sure to tickle your taste buds and create a little magic in your kitchen: Red Tart Cherry Pie Bars. Picture this: a buttery crust, a vibrant cherry filling bursting with flavor, and a sprinkle of coconut for that extra touch. Sounds divine, right? Trust me, these bars are the ultimate comfort dessert that’ll have everyone coming back for seconds.
When I first stumbled upon red tart cherries, I was instantly captivated. Their sweet yet slightly tart flavor spoke to me, and I knew they would be the star of a scrumptious recipe. Fast forward to many at-home baking sessions, and these cherry pie bars quickly became a staple in my kitchen—perfect for potlucks, picnics, or just a cozy night in with family. Let’s embark on this dreamy culinary journey together and create something memorable!
A Slice of Nostalgia
Let me take you back to one of my fondest childhood memories. Every summer, my family would pile into the car and head to our favorite local orchard. The air was filled with the fragrant aroma of ripe cherries, and I could barely contain my excitement. My mom would hand me a small bucket, and we’d race through the orchard, plucking the brightest red cherries we could find. The experience was thrilling, as I enjoyed the one-of-a-kind sweetness of those tart cherries fresh from the tree.
Later, my mom would whip up her famous cherry pie, filling the house with the most delightful aroma. The buttery crust, vibrant cherry filling, and sweet-tart flavor combination created a sense of warmth and joy. As we gathered around the dining table after dinner, I always savored that first bite. Fast forward to today, and those cherished memories inspired my rendition of cherry pie—just in a more portable and fun form: Red Tart Cherry Pie Bars. Now, every time I bake these bars, I relive those sweet summer days, and I can’t wait for you to create your own beautiful memories!
Ingredients
Let’s gather our ingredients and prepare to create these spectacular cherry pie bars. Here’s what you’ll need:
-
2 cans (14 ounces each) Oregon Fruit Red Tart Cherries: The star of the show! These canned cherries save us time while packing in loads of flavor. If you’re feeling adventurous, you can easily swap them with fresh cherries when they’re in season, just be sure to adjust the sweetness accordingly!
-
1/2 cup (100 grams) sugar: This will balance the tartness of the cherries. Feel free to reduce the sugar for a less sweet filling or substitute with a natural sweetener, like honey or maple syrup.
-
2 tablespoons (18 grams) cornstarch: Cornstarch acts as a thickener for our cherry filling. If you find yourself out of cornstarch, you can use flour, but keep in mind it may alter the texture a bit.
-
1/4 teaspoon kosher salt: A pinch of salt brings all the flavors to life. You can use regular table salt if that’s what you have, but kosher salt is my go-to for a more delicate touch.
-
1 tablespoon lemon juice: Just a splash brightens the flavors and enhances the cherries’ natural tartness. If you prefer, you can use lime juice for a fun twist.
-
1 teaspoon vanilla extract: Because, let’s be honest, everything is better with a hint of vanilla. If you’re feeling fancy, consider using a high-quality vanilla bean or vanilla paste.
-
2 5/8 cups (336 grams) unbleached all-purpose flour: This forms the base of our buttery crust. You can substitute whole wheat flour for a nuttier flavor or gluten-free flour for a dietary adjustment.
-
3/4 cup (150 grams) granulated sugar: More sweetness for our crust, which creates a lovely contrast with the tart filling.
-
1/2 teaspoon kosher salt: Just like before, this balances the sweetness.
-
1/4 teaspoon baking powder: A bit of leavening agent for that perfect texture.
-
16 tablespoons (227 grams) unsalted butter: Melted down, this will create a rich and delicious crust. If you’re looking for a dairy-free option, coconut oil works wonderfully!
-
3 tablespoons sweetened shredded coconut: This adds a delightful texture and tropical flair to our crust. If you prefer a classic flavor, feel free to omit it.
Step-by-Step Instructions
Ready to get baking? Let’s roll up our sleeves and dive into the detailed steps for creating these fabulous Red Tart Cherry Pie Bars!
-
Preheat the Oven: Preheat your oven to 350°F (175°C). Preheating helps ensure a uniform baking temperature from the start, resulting in even cooking.
-
Prepare the Pan: Grab a 9×13-inch baking pan (that’s the perfect size for bar recipes!) and brush the sides and bottom with melted butter. This will help prevent sticking.
-
Create the Crust:
- In a large mixing bowl, combine the flour, granulated sugar, salt, and baking powder.
- Next, stir in the melted butter until it forms a crumbly mixture. You can use a fork or your hands for that homestyle vibe. If you like a thicker crust, you can reserve a little of the mixture to sprinkle on top of the cherry filling later.
-
Press the Crust: Pour the crumbly crust mixture into the prepared pan and press it evenly across the bottom with your fingers or a spatula. This will create a solid foundation for our juicy filling!
-
Bake the Crust: Pop the crust into the preheated oven and bake for about 15-20 minutes or until it’s lightly golden. Keep an eye on it, as we want a lovely golden hue without overbaking.
-
Prepare the Filling: While the crust is baking, it’s time to whip up the cherry filling!
- In a mixing bowl, combine the drained red tart cherries, sugar, cornstarch, salt, lemon juice, and vanilla extract. Gently toss until the cherries are coated well, letting those flavors meld beautifully.
-
Assemble the Bars: Once your crust is done baking and has cooled for just a moment, pour the cherry filling over the warm crust. Spread it evenly, making sure every inch is covered with luscious cherry goodness.
-
Add Toppings (if desired): If you saved a bit of the crust mixture, sprinkle it over the cherry filling for a crumble topping! Alternatively, you can sprinkle shredded coconut over the cherries for that extra delicious touch.
-
Bake Again: Return the pan to the oven and bake for an additional 25-30 minutes. The filling should be bubbling, and the top should be lightly golden.
-
Cool and Slice: Once out of the oven, let the pie bars cool completely in the pan. I know it’s tough to wait, but trust me—it’ll be worth it! Once cooled, slice them into generous squares or rectangles, and get ready for the taste explosion.
Serving Suggestions
These Red Tart Cherry Pie Bars are perfect for any occasion! Here are some fun ways to plate and serve them:
-
Classic Presentation: Simply serve the bars as is, dusted with powdered sugar for a charming touch. It adds an enchanting visual and a hint of sweetness with every bite.
-
À la Mode: Get decadent by serving warm bars with a scoop of vanilla ice cream on top. The creamy ice cream beautifully balances the tart cherries and buttery crust.
-
Tart Cherry Drizzle: For an extra burst of flavor, drizzle a simple sauce made from reduced cherry juice over the bars before serving.
-
Pair with Coffee or Tea: These bars are perfect for a cozy afternoon treat. Serve them alongside a steaming cup of coffee or tea, and enjoy the delightful combination of flavors.
Recipe Variations
Why stop at just one version? Here are some fun twists you can explore with your Red Tart Cherry Pie Bars:
-
Almond Joy Bars: Add sliced almonds and use almond extract instead of vanilla for a nutty flavor.
-
Chocolate Cherry Bars: Incorporate chocolate chips into the crust for a chocolatey complement to the cherries.
-
Cranberry Cherry Combo: Mix in some fresh cranberries with the red tart cherries for a festive red-and-white bar, perfect for the holidays!
-
Vegan Friendly: Substitute the butter with coconut oil or vegan butter and use a flax egg to bind the crust for a plant-based take.
-
Spicy Kick: Add a sprinkle of cayenne pepper or cinnamon to the filling for a little bit of heat that pairs beautifully with the tartness.
Chef’s Notes
These Red Tart Cherry Pie Bars have evolved over the years in my kitchen. Initially, I only used fresh cherries, but life has a way of steering us toward simplicity—canned cherries are now my go-to! They save time and still deliver an amazing flavor. And don’t get me started on how helpful they are during cherry off-seasons. I’ll never forget the first time I made these for a summer gathering. Everyone dove in and schooled me on not reserving enough for leftovers. It was that good!
FAQs and Troubleshooting
1. Why did my cherry filling turn out runny?
If your filling is runny, it could be because the cherries released too much juice, or you didn’t use enough cornstarch. Make sure to drain canned cherries well before mixing or add a little extra cornstarch next time.
2. Can I use frozen cherries instead of canned?
Absolutely! Just be sure to thaw them and drain off excess liquid before using. You might need to adjust the sugar and cornstarch, depending on your taste.
3. My crust didn’t bake evenly; what happened?
Make sure your oven temperature is accurate—an oven thermometer can help you check this. Also, ensure the crust mixture is pressed down evenly in the pan.
4. Can I make these bars ahead of time?
Yes! These bars can be made a day in advance. Just store them in an airtight container in the fridge. The flavors often deepen, making them even more delicious!
Nutritional Info
When it comes to baking, it’s essential to balance indulgence with nutritional awareness. Here’s a rough breakdown per serving (if you cut the batch into 12 bars):
- Calories: Approximately 250-300
- Total Fat: 13g (saturated fat approx. 8g)
- Cholesterol: 30mg
- Sodium: 80mg
- Total Carbohydrates: 34g (fiber approx. 1g, sugars approx. 20g)
- Protein: 2g
Remember, these numbers can vary based on the specific ingredients you choose. Enjoy these bars in moderation—every bite is worth it!
Final Thoughts
There you have it—your guide to creating delightful Red Tart Cherry Pie Bars! I hope this recipe inspires you to get into the kitchen and whip up something delectable that also holds a part of your heart, just as it does for me. Whether you share these bars with friends and family or savor them solo on a cozy evening, the joy they bring is sure to warm your soul.
So, let’s keep the oven warm and the cherries rolling! I can’t wait to hear your own stories and twists on this recipe. After all, every memorable meal has a story, and I’m thrilled to have shared this one with you. Happy baking, foodies! 🥧✨
Print
Red Tart Cherry Pie Bars
- Total Time: 70 minutes
- Yield: 12 servings 1x
- Diet: Vegetarian
Description
Delicious and portable cherry pie bars with a buttery crust and vibrant cherry filling, sprinkled with coconut.
Ingredients
- 2 cans (14 ounces each) Oregon Fruit Red Tart Cherries
- 1/2 cup (100 grams) sugar
- 2 tablespoons (18 grams) cornstarch
- 1/4 teaspoon kosher salt
- 1 tablespoon lemon juice
- 1 teaspoon vanilla extract
- 2 5/8 cups (336 grams) unbleached all-purpose flour
- 3/4 cup (150 grams) granulated sugar
- 1/2 teaspoon kosher salt
- 1/4 teaspoon baking powder
- 16 tablespoons (227 grams) unsalted butter, melted
- 3 tablespoons sweetened shredded coconut
Instructions
- Preheat your oven to 350°F (175°C).
- Prepare a 9×13-inch baking pan by brushing it with melted butter.
- In a large mixing bowl, combine flour, sugar, salt, and baking powder.
- Stir in melted butter until the mixture is crumbly.
- Pour the crust mixture into the prepared pan and press it evenly across the bottom.
- Bake in the preheated oven for 15-20 minutes until golden.
- Combine drained cherries, sugar, cornstarch, salt, lemon juice, and vanilla extract in a mixing bowl.
- Pour the cherry filling over the warm crust and spread evenly.
- Sprinkle reserved crust mixture or coconut over the filling, if desired.
- Bake again for 25-30 minutes until bubbly and golden.
- Cool completely in the pan before slicing into bars.
Notes
Serve with powdered sugar, vanilla ice cream, or a drizzle of cherry sauce for added flavor.
- Prep Time: 20 minutes
- Cook Time: 50 minutes
- Category: Dessert
- Method: Baking
- Cuisine: American
Nutrition
- Serving Size: 1 bar
- Calories: 275
- Sugar: 20g
- Sodium: 100mg
- Fat: 13g
- Saturated Fat: 8g
- Unsaturated Fat: 5g
- Trans Fat: 0g
- Carbohydrates: 36g
- Fiber: 2g
- Protein: 3g
- Cholesterol: 30mg
Keywords: cherry pie bars, dessert recipe, baking, sweet treat