
Raspberry Chia Pudding
Embrace the Creamy Goodness of Raspberry Chia Pudding with Me!
Hey there, food lovers! Welcome back to Feastical, your go-to spot for delicious recipes that are as comforting as they are exciting. Today, we’re diving into the world of a delightful treat that has become a staple in many kitchens—Raspberry Chia Pudding. This dish isn’t just a feast for your taste buds; it’s also a canvas for your creativity!
So grab your aprons, and let’s get hopping into this creamy, dreamy pudding that’s perfect for breakfast or as a midday snack. Trust me, you’ll want to know how to whip this up in a flash!
A Sweet Slice of Nostalgia: My First Chia Encounter
Let me share a little story with you! I remember the first time I tasted chia pudding. It was at a cozy little cafe in my neighborhood, a spot that smelled of freshly baked bread and brewed coffee. I was sitting with my friend, browsing through an eclectic menu, and then I spotted it: Chia and berry parfait. Intrigued, I ordered it, and oh boy, I was not disappointed!
The flavor explosion of raspberries balanced with the nuttiness of chia seeds was something I’d never experienced. I felt as if I had stumbled upon a magical health potion! After that day, I was determined to recreate it in my own kitchen. It took a couple of tries—some with a bit too much liquid, some overly sweet—but the journey was nothing short of joyful.
Now, every time I make Raspberry Chia Pudding, I’m reminded of that cozy cafe and the excitement of discovering something new in the culinary world. So, let’s recreate that deliciousness right in your kitchen. Are you ready? Let’s get started!
Ingredients that Make the Magic Happen
Here’s what you’ll need for your Raspberry Chia Pudding, with some tips and tricks along the way:
-
1/2 cup chia seeds
- These little black seeds are packed with fiber, protein, and omega-3 fatty acids, making them a superfood superstar! If you don’t have chia seeds, you could try flaxseeds, but know that they will change the texture.
-
2 cups almond milk (or any plant-based milk)
- Almond milk adds a lovely creaminess, but feel free to use coconut, soy, or oat milk for different flavor profiles. If you’re not dairy-free, regular milk works just as well!
-
1/4 cup maple syrup (or sweetener of choice)
- Maple syrup isn’t just sweet; it adds a nice caramel note. Honey works too if you’re not strictly vegan. You can also adjust the sweetness to your taste, or even use a sugar substitute if that’s your jam.
-
1 cup fresh raspberries (or frozen)
- Fresh raspberries lend a beautiful color and flavor boost. If you can’t find them, frozen will work, just make sure to thaw them beforehand. You might even consider blending them for a smoother consistency!
-
1 teaspoon vanilla extract
- The secret weapon! A touch of vanilla elevates the whole dish. Got only vanilla bean on hand? Even better—fresher flavor right there.
-
Pinch of salt
- This little addition may seem tiny, but salt enhances all the flavors, making your pudding pop! Don’t skip it!
Step-by-Step Instructions to Your Yummy Pudding
Alright, my fellow kitchen adventurers, let’s put this all together with some simple steps.
Step 1: Combine the Ingredients
In a medium-sized mixing bowl, combine the chia seeds, almond milk, maple syrup, vanilla extract, and a pinch of salt. Use a whisk and blend them until everything is well mixed. I like to let the chia seeds sit for about a minute at this stage; it helps them absorb the liquid better and reduces clumping.
Step 2: Stir and Spend Time with Your Pudding
Let your mixture rest for about 10 minutes, but don’t just stand there—give it a stir every couple of minutes. You want to break up any clumps that may form as the seeds begin to gel.
Step 3: Chilling Time
Once you’ve got a homogenous mix, transfer your pudding into a mason jar or an airtight container. Seal it up and pop it in the fridge. Let it chill for at least 4 hours, ideally overnight. Trust me; this waiting game is worth it! The chia seeds will absorb all that goodness and turn into a glorious pudding.
Step 4: Add Those Raspberries
When you’re ready to serve, take out your pudding and give it a stir. Gently fold in your fresh or thawed raspberries. Feel free to mash some of them for a more blended flavor!
Step 5: Serve and Enjoy!
Spoon your delicious pudding into bowls or jars. Top it with some extra raspberries, nuts, or even a sprig of mint for a pop of color. Don’t forget to take a picture before you dive in!
Serving Suggestions
Now that your Raspberry Chia Pudding is beautifully assembled, how about presenting it in style? You can layer your pudding in a parfait glass with granola for an elegant breakfast or serve it in a bowl with a drizzle of honey and a sprinkle of seeds for added crunch. Garnishing with a few mint leaves can add that fresh touch! And if you have leftover berries, toss them on top for an eye-catching finish.
Recipe Variations to Keep Things Fresh
-
Flavor Burst: Add some cocoa powder for a chocolatey twist. Mix in about a tablespoon to the base for a chocolate raspberry chia pudding—think dessert!
-
Tropical Vibe: Replace raspberries with mango or pineapple for a tropical take! You can also mix in some shredded coconut while you’re at it.
-
Nutty Delight: Stir in a couple of tablespoons of almond butter or peanut butter for a richer, more filling treat.
-
Spicy Kick: Want to live on the edge? A dash of cinnamon or even cayenne can give your pudding a spicy flair.
-
Layer It Up: Create a layered chia pudding dessert by alternating the raspberry chia pudding with a banana-strawberry blend!
Chef’s Notes
This recipe has definitely evolved in my kitchen! Originally, I made it using just water and chia seeds, but let me tell you… boring! Once I discovered almond milk and maple syrup, it was love at first taste. Cooking is all about spontaneity for me, so now I play around with different toppings, be it nuts, granola, or other berries.
And a funny kitchen story—once I totally forgot the salt and ended up with a pudding that tasted flat. I thought, “How could I messed this up?” Oh, my dear foodies, adding just that pinch salvaged my pudding perfectly!
FAQs and Troubleshooting
Why did my chia pudding not set?
This can happen if there’s not enough liquid, or if you skipped the refrigeration step. Make sure the ratio of chia seeds to liquid is proportionate, and give it enough time to gel.
Can I prepare this ahead of time?
Absolutely! This pudding is perfect for meal prep. It will store in the fridge for up to a week, so you can make a batch to fuel your week with healthy breakfasts or snacks!
Is this pudding healthy?
Yes! Chia seeds are packed with nutrients, and the addition of almond milk and fruits makes it a nutritious powerhouse.
Can I sweeten it differently?
For sure! You can use agave, stevia, or any sweetener you fancy. Just remember to adjust the quantity according to your taste.
Nutritional Info
Raspberry Chia Pudding is not just a treat—it’s a nutrient-dense option that fits perfectly into a balanced diet! Here’s the approximate breakdown per serving:
- Calories: Around 250
- Protein: 8 grams
- Fat: 10 grams (mostly healthy fats from chia seeds and almond milk)
- Carbohydrates: 35 grams
- Fiber: 12 grams
- Sugar: 8 grams (from maple syrup and fruit)
Whether you’re looking for a healthy breakfast or a sweet treat, it checks all the boxes!
Final Thoughts
There you have it, my lovely food enthusiasts! Raspberry Chia Pudding is a delicious and versatile treat that’s fun to make, easy to customize, and oh-so-good for you! I hope you feel inspired to give it a try in your kitchen. Remember, cooking can be a delightful journey, and every dish tells a story.
So, share your creations with me. What twists did you put on your Raspberry Chia Pudding? Until next time, keep spreading the joy of food, and let’s embark on more tasty adventures together. Happy cooking!
Print
Raspberry Chia Pudding
- Total Time: 255 minutes
- Yield: 4 servings 1x
- Diet: Vegan
Description
A creamy and nutritious pudding made with chia seeds and fresh raspberries, perfect for breakfast or as a snack.
Ingredients
- 1/2 cup chia seeds
- 2 cups almond milk (or any plant-based milk)
- 1/4 cup maple syrup (or sweetener of choice)
- 1 cup fresh raspberries (or frozen)
- 1 teaspoon vanilla extract
- Pinch of salt
Instructions
- Combine the chia seeds, almond milk, maple syrup, vanilla extract, and salt in a medium bowl.
- Let the mixture rest for about 10 minutes, stirring occasionally to break up clumps.
- Transfer the pudding to a mason jar and refrigerate for at least 4 hours or overnight.
- Fold in the fresh or thawed raspberries just before serving.
- Serve in bowls or jars and enjoy!
Notes
This pudding can be customized with various toppings and can be made ahead of time for meal prep.
- Prep Time: 15 minutes
- Cook Time: 240 minutes
- Category: Dessert
- Method: Refrigerating
- Cuisine: Healthy
Nutrition
- Serving Size: 1 serving
- Calories: 250
- Sugar: 8g
- Sodium: 5mg
- Fat: 10g
- Saturated Fat: 1g
- Unsaturated Fat: 7g
- Trans Fat: 0g
- Carbohydrates: 35g
- Fiber: 12g
- Protein: 8g
- Cholesterol: 0mg
Keywords: chia pudding, raspberry pudding, healthy dessert, vegan recipe, meal prep

The Best Greek Yogurt Brownies – Easy & Fudgy
# The Best Greek Yogurt Brownies – Easy & Fudgy

## Introduction

Hey there, fellow foodies! Today, we’re diving into something that’s equal parts dreamy and delicious—the best Greek yogurt brownies. Now, hold on a second! You might be raising an eyebrow, thinking that 'healthy' and 'brownies' don't really gel together. But let me tell you, these brownies are the perfect marriage of indulgence and healthiness. They’re fudgy, rich, and oh-so-fulfilling while sneaking in some protein and probiotics, thanks to that luscious Greek yogurt. It’s like enjoying a slice of heaven without guilt hanging over your head!

Feastical isn’t just about mouth-watering flavors; it’s about creating food that brings warmth to your heart and richness to your soul. Picture it: a rainy afternoon, the kind that makes you want to curl up on the couch with a good book, maybe a cup of tea, and a gooey brownie in hand. Who doesn't want that? You’ll get the feel-good vibes without skimping on flavor.

Plus, the process is super simple! You don’t need to be a kitchen wizard or have ten years of culinary experience under your belt. I’m here to guide you through every step like the friend that helps you out while you’re figuring out where that spatula went. So, slap on your apron, preheat that oven, and let’s get whirl into the world of these fudgy Greek yogurt brownies that’ll make you swoon!

## Personal Story

Growing up, dessert was always a family affair in my house. My mom had a soft spot for sweets, and every weekend, she’d roll up her sleeves and whip up something chocolaty and comforting. My favorite memories were of us gathered in the kitchen, laughter mixing with the smell of melting chocolate. One weekend, she decided to take a healthier spin on our usual brownies. She swapped out oil and butter for Greek yogurt.

At first, I didn’t believe it would work out. But when I took that first bite of her *healthy* brownies—I was blown away! They were just as fudgy as the classic version, with a rich chocolate flavor that kept us reaching for more. Those brownies taught me two important lessons: health and indulgence can exist hand-in-hand, plus, a little creativity in the kitchen goes a long way. That magical combination inspired me—even set me on the path to creating my own recipes to share with all of you!

## Ingredients

Here’s what you’ll need to whip up these brownies:

- **½ cup (120g) Greek yogurt**
  This creamy delight adds richness and moisture. You can substitute low-fat yogurt for a lighter version or even try a dairy-free option like coconut yogurt for a unique flavor twist.

- **¼ cup (60ml) maple syrup or honey**
  Here’s where the sweetness comes in! Maple syrup gives a wonderful depth of flavor, while honey adds that classic sweetness. If you prefer less sugar, you can use a sugar substitute like stevia—but do adjust according to taste.

- **2 large eggs**
  Eggs provide that essential binding element and help create a wonderful texture. You can use flax eggs (1 tablespoon ground flax mixed with 2.5 tablespoons water) for a vegan twist!

- **1 teaspoon vanilla extract**
  A must-have for any sweet treat! It brings a warm, inviting flavor. You can double up on the vanilla for an even richer taste if you’re feeling indulgent.

- **½ cup (45g) unsweetened cocoa powder**
  This is what gives our brownies their chocolatey kick! For a twist, try using dark cocoa powder for a deeper flavor profile.

- **½ teaspoon baking powder**
  This leavening agent helps our brownies rise slightly, making them light yet fudgy. If you’re keeping things gluten-free, make sure your baking powder is certified gluten-free.

- **¼ teaspoon salt**
  Salt enhances the sweetness and rounds out the flavors, making everything more delicious. A touch of sea salt as a topping can also add a lovely finishing touch!

- **½ cup (60g) almond flour or oat flour**
  Almond flour contributes a lovely nutty flavor, while oat flour adds more wholesome goodness. If you’re nut-free, go for oat flour or even all-purpose flour.

- **½ cup (90g) semi-sweet or dark chocolate chips**
  These are the cherry on top. Rich and melty, chocolate chips are a must! Go for dark chocolate if you want a less sweet, more sophisticated flavor.

## Step-by-Step Instructions

### Step 1: Preheat Your Oven

First things first! Preheat your oven to 350°F (175°C). Preheating is crucial to get that perfect bake and to keep your brownies wonderfully fudgy. Trust me, it makes a world of difference!

### Step 2: Prepare Your Baking Dish

Grab an 8x8-inch (20x20 cm) baking dish. Grease it lightly with cooking spray or line it with parchment paper for easy removal later on. If you want a more rustic look, skip the parchment and go straight to greasing—there’s just something homely about that!

### Step 3: Mix the Wet Ingredients

In a large mixing bowl, combine the Greek yogurt, maple syrup (or honey), eggs, and vanilla extract. Whisk them together until smooth. This is where the magic happens! Don’t rush this step—make sure all the ingredients meld together beautifully.

### Step 4: Add the Dry Ingredients

Now, sift in the cocoa powder, baking powder, and salt. This is a great opportunity to incorporate air into your brownie mixture, giving them that dreamy texture you crave. Mix until combined, but don’t over-stir! A few lumps are just fine.

### Step 5: Fold in the Flour

Next up, add the almond flour or oat flour. Gently fold it into the mixture until just combined. Again, this is where you want to be gentle. Overmixing can result in tough brownies, and we’re after fudgy, melt-in-your-mouth goodness here!

### Step 6: Stir in the Chocolate Chips

Now, let’s get chocolaty! Toss in the chocolate chips, giving a nice stir to ensure they are evenly distributed throughout the batter. Feel free to taste a chip—quality control is important, after all!

### Step 7: Pour and Spread

Pour the batter into your prepared baking dish and use a spatula to spread it evenly. Don’t fret if it looks a little thick; that’s what makes these brownies so fudgy!

### Step 8: Bake to Perfection

Slide your brownies into the oven and bake for 20-25 minutes. You want them to be set around the edges but still a bit soft in the middle. Remember, they’ll continue to cook a little as they cool, resulting in that perfect gooey center.

### Step 9: Cool and Cut

Once baked, remove them from the oven and allow them to cool in the dish for about 10 minutes. Then transfer them to a wire rack to cool completely. Or, if you're impatient like I am, dig in right away—just know that they might fall apart a bit! Once cooled, cut them into squares and prepare to be in brownie heaven!

## Serving Suggestions

So how do you serve up these delightful brownies? The options are endlessly delicious! For a touch of class, dust some powdered sugar or cocoa powder on top before serving. Pair them with a scoop of vanilla ice cream or a dollop of Greek yogurt to elevate them further. If you’re feeling playful, drizzle some melted chocolate or a homemade berry sauce on top—trust me, your taste buds will thank you!

## Recipe Variations

Now, let’s get creative! Here are a few ideas to switch up this classic recipe:

1. **Nutty Brownies:** Add ½ cup of chopped nuts like walnuts or pecans for added crunch and flavor.

2. **Minty Fresh:** Incorporate a few drops of peppermint extract into the batter for a refreshing mint chocolate brownie.

3. **Cherry Delight:** Mix in some chopped cherries or raspberries for a fruity twist that complements the chocolate beautifully.

4. **Spicy Twist:** Add a pinch of cayenne pepper or chili powder for an unexpected kick that balances the sweetness.

5. **Coconut Bliss:** Fold in some shredded coconut for a tropical flair that’ll transport you to summer days!

## Chef’s Notes

You know, I have to confess, this recipe has had its fair share of experiments! The first time I made these, I used way too much cocoa powder and forgot the sugar! It was pretty much a cocoa brick—but it inspired me to play with the recipe until it was just right. Now I can whip these brownies up in no time for parties or cozy nights in. You never know what kind of masterpiece you’ll create in the kitchen! It’s all about having fun and experimenting with flavors, so don’t be afraid to make it your own!

## FAQs and Troubleshooting

**1. Why are my brownies too dry?**
Make sure not to overbake them; they should be set at the edges and slightly gooey in the center. If you’ve accidentally baked them too long, try serving them with ice cream to soften them up!

**2. Can I make these brownies vegan?**
Absolutely! Use flax eggs instead of regular eggs and coconut yogurt in place of Greek yogurt, ensuring you check that all ingredients are plant-based.

**3. How do I store leftovers?**
Store any leftovers in an airtight container at room temperature for up to three days or in the refrigerator for up to a week. If you want to keep them longer, consider freezing them for later enjoyment!

**4. Can I use other types of flour?**
Definitely! You can use all-purpose flour or even a gluten-free blend. Just make sure to monitor the texture, as it can vary slightly with different flours.

## Nutritional Info (if applicable)

These rich Greek yogurt brownies pack a satisfying punch while still keeping things a bit lighter than your traditional brownie. Each brownie (based on a standard 16-serving batch) typically has around:

- **Calories:** 140
- **Protein:** 4g
- **Carbohydrates:** 18g
- **Fat:** 6g
- **Fiber:** 2g

That makes them a guilt-free treat you can enjoy without sacrificing flavor! Plus, the protein from the Greek yogurt gives you a nice little boost.

## Final Thoughts

And there you have it, folks! The best Greek yogurt brownies that are not only easy to make but downright delicious. I hope you gather your loved ones around to enjoy the magic that happens when you bake! Remember, every brownie is like a cozy little hug that reminds us to savor life’s sweeter moments. So next time you want to treat yourself, reach for this recipe, whip up some joy, and dig in! Happy baking, and don’t forget to share your creations with me over on Feastical! Let’s keep the food love flowing!

The Best Greek Yogurt Brownies – Easy & Fudgy
- Total Time: 35 minutes
- Yield: 16 servings 1x
- Diet: Vegetarian
Description
Indulge in these fudgy Greek yogurt brownies that perfectly blend healthiness with deliciousness, offering a rich chocolate flavor and a guilt-free treat.
Ingredients
- ½ cup (120g) Greek yogurt
- ¼ cup (60ml) maple syrup or honey
- 2 large eggs
- 1 teaspoon vanilla extract
- ½ cup (45g) unsweetened cocoa powder
- ½ teaspoon baking powder
- ¼ teaspoon salt
- ½ cup (60g) almond flour or oat flour
- ½ cup (90g) semi-sweet or dark chocolate chips
Instructions
- Preheat your oven to 350°F (175°C).
- Prepare your baking dish by greasing an 8×8-inch (20×20 cm) baking dish or lining it with parchment paper.
- Mix the Greek yogurt, maple syrup (or honey), eggs, and vanilla extract in a large mixing bowl until smooth.
- Add the cocoa powder, baking powder, and salt, and mix until combined.
- Fold in the almond flour or oat flour gently until just combined.
- Stir in the chocolate chips until evenly distributed.
- Pour the batter into the prepared baking dish and spread evenly.
- Bake for 20-25 minutes until set around the edges but slightly soft in the middle.
- Cool for 10 minutes before transferring to a wire rack to cool completely, then cut into squares.
Notes
These brownies can also be made vegan by substituting eggs with flax eggs and Greek yogurt with coconut yogurt.
- Prep Time: 10 minutes
- Cook Time: 25 minutes
- Category: Dessert
- Method: Baking
- Cuisine: Greek
Nutrition
- Serving Size: 1 brownie
- Calories: 140
- Sugar: 5g
- Sodium: 100mg
- Fat: 6g
- Saturated Fat: 2g
- Unsaturated Fat: 3g
- Trans Fat: 0g
- Carbohydrates: 18g
- Fiber: 2g
- Protein: 4g
- Cholesterol: 35mg
Keywords: brownies, Greek yogurt, healthy dessert, fudgy brownies, easy baking
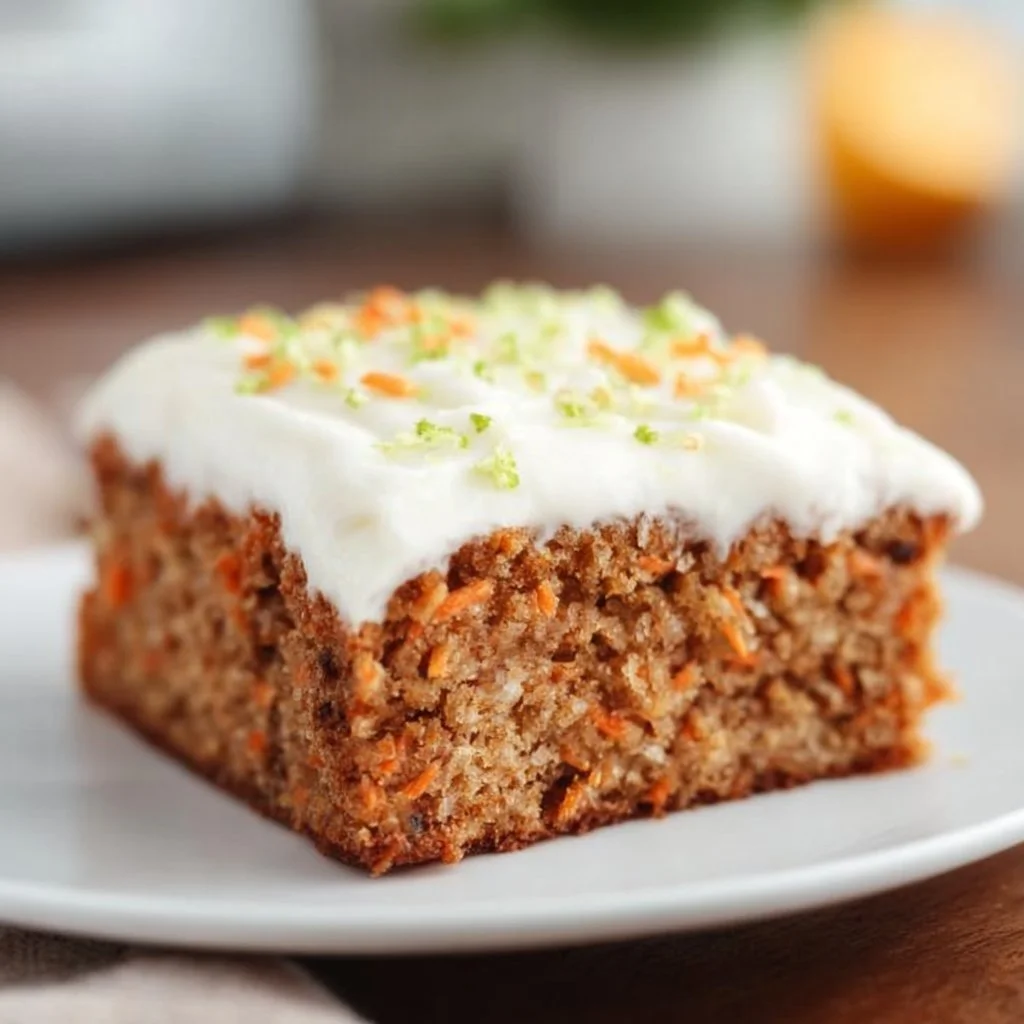
Healthy Classic Carrot Cake
A Slice of Sunshine: Healthy Classic Carrot Cake Recipe
Hey there, food-loving friends! It’s Beau Collier, and I’m so glad to have you here at Feastical! If there’s one classic dessert that brings a smile to my face, it’s carrot cake. Seriously, friends, this isn’t just any sweet treat; it’s a delightful slice of nostalgia wrapped in a warm blanket of spices! I grew up savoring my grandma’s moist and fragrant carrot cake, which was always a staple during family gatherings and special events. The aroma wafting through the kitchen, followed by everyone fighting over the last piece—pure magic!
Today, I’m sharing my twist on this beloved classic: a Healthy Classic Carrot Cake that you can feel good about indulging in. Made with wholesome ingredients like grated carrots, whole wheat flour, and naturally sweetened with applesauce and honey, this carrot cake not only pleases the palate but also nourishes the body. Plus, it’s simple to whip up, making it perfect for both seasoned chefs and kitchen newbies alike.
With its cozy blend of cinnamon and nutmeg, this cake is like a warm hug on a plate. Grab your favorite mixing bowl, preheat that oven, and let’s jump into this delicious, guilt-free dessert that will impress all your friends and family!
Personal Story
Ah, the memories flood back! I vividly remember the day my grandma decided it was time for me to learn the art of baking. It was a sunny Saturday afternoon, and despite my toddler-sized attention span, the smell of her carrot cake pulling me into the kitchen was irresistible. As we grated carrots together, her laughter filled the air, and I marveled at how something so ordinary could turn into something extraordinary. I loved that she used to sneak extra spices into her recipes; her secret ingredient was always love, of course!
Fast forward a few decades, and I’ve created my take on her recipe! While I still cherish the flavors and warmth of my childhood memories, I wanted to make this carrot cake a healthier option, perfect for everyday enjoyment without sacrificing flavor. Each time I bake it, I find myself back in that sunlit kitchen, surrounded by laughter and the sweetest aroma of baked goodies. This Healthy Classic Carrot Cake is the essence of those times—simple, heartwarming, and filled with love.
Ingredients
Here’s what you’ll need to create your very own Healthy Classic Carrot Cake. Each ingredient brings unique flavor and purpose, so let’s break them down!
-
2 cups grated carrots
Fresh, grated carrots add moisture and natural sweetness. For a twist, try using a mix of carrots and sweet potatoes! -
1 cup whole wheat flour
This adds a hearty texture and nutty flavor. If you’re gluten-free, feel free to swap it with almond or oat flour! -
1/2 cup unsweetened applesauce
Applesauce helps to keep our cake moist and reduces the need for added fats. If you don’t have applesauce, try using mashed bananas instead! -
1/4 cup honey or maple syrup
Natural sweeteners that enhance the cake’s flavor. Maple syrup adds a lovely earthiness; however, for a sugar-free option, you could use stevia or Erythritol. -
1/4 cup almond milk
This keeps the batter easy to mix while adding creaminess. Substitute it with any milk you love—oat, soy, or regular dairy work just fine. -
1 teaspoon baking soda
Helps the cake rise and become wonderfully fluffy. Make sure it’s fresh! -
1 teaspoon baking powder
A little added lift for our cake. If you’re out, you can replace it with another teaspoon of baking soda but omit the salt in the recipe. -
1 teaspoon ground cinnamon
A must-have for that classic carrot cake flavor. Feel free to add more if you love spice! -
1/2 teaspoon nutmeg
This aromatic spice complements the cinnamon beautifully. If you’re not a fan, you can leave this out or swap it for allspice. -
1/4 teaspoon salt
A pinch of salt balances the sweetness! -
1/2 cup vanilla ricotta cheese
Ricotta gives a lovely creaminess to the cake. If you’d like to substitute, Greek yogurt works well for a tangy flavor! -
1 tablespoon vanilla extract
This adds an aromatic sweetness. For an extra kick, consider using vanilla bean paste!
Step-by-Step Instructions
Now that we have our ingredients lined up, let’s get cooking! Follow these steps, and soon you’ll have a delightful Healthy Classic Carrot Cake ready for sharing (or keeping all to yourself—no judgement here!).
Step 1: Preheat the Oven
Preheat your oven to 350°F (175°C). This is crucial! A warm oven ensures your cake rises beautifully, resulting in that classic fluffy texture we love in carrot cakes.
Step 2: Prep Your Baking Pan
Grease a 9-inch round cake pan with a little olive oil or non-stick spray. For easy removal later, consider lining the bottom with parchment paper!
Step 3: Mix Wet Ingredients
In a large mixing bowl, whisk together the grated carrots, unsweetened applesauce, honey or maple syrup, almond milk, ricotta cheese, and vanilla extract. Take a moment to enjoy the vibrant colors around you; cooking is all about engaging your senses, right?
Step 4: Combine Dry Ingredients
In another bowl, mix your whole wheat flour, baking soda, baking powder, ground cinnamon, nutmeg, and salt. I like to give my dry ingredients a good whisk to break up any lumps and ensure even distribution before combining them with the wet mix.
Step 5: Combine Wet and Dry Ingredients
Gradually fold the dry ingredients into the wet mixture. Be gentle! You don’t want to over-mix; just stir until combined. A few flour streaks are okay—this will keep your cake tender and moist!
Step 6: Pour and Bake
Pour your batter into the prepped cake pan. Give it a nice smoothing pat to ensure even distribution and pop that lovely creation in the oven. Bake for about 30-35 minutes, or until a toothpick inserted into the center comes out clean. The aroma wafting through your kitchen will be heavenly!
Step 7: Cool the Cake
Once baked, remove your cake from the oven and allow it to cool in the pan for about 10 minutes before transferring it to a wire rack to cool completely. Patience is key here, friends—let it cool!
Step 8: Frosting Time (Optional)
If you’re feeling a bit indulgent, top your cooled cake with a simple cream cheese frosting made from reduced-fat cream cheese or additional ricotta! I like mixing in a little honey or maple syrup and a splash of vanilla for a delightful finish.
Serving Suggestions
Serving this Healthy Classic Carrot Cake is just as satisfying as making it! Slice this beauty into generous wedges, placing each slice on a cute plate. If you’re feeling extra fancy, dust a bit of powdered sugar on top or drizzle some of that luscious frosting for added flair. Pair it with a dollop of Greek yogurt or a scoop of vanilla ice cream for a delightful dessert experience. Perfect for a cozy evening in, a friendly gathering, or even a solo indulgence while binge-watching your favorite shows.
Recipe Variations
Here are a few fun twists on our Healthy Classic Carrot Cake that’ll keep your friends guessing!
- Tropical Twist: Add 1/2 cup crushed pineapple and a handful of toasted coconut flakes to give a tropical flair.
- Nutty Delight: Fold in 1/2 cup chopped walnuts or pecans for an added crunch. If you’re feeling adventurous, try using pistachios!
- Spice It Up: Boost the warming spices by adding 1/4 teaspoon ground ginger or allspice for an added zing.
- Chocolate Lovers: Incorporate 1/2 cup cocoa powder for a chocolatey take on this classic cake. You can make it a chocolate carrot cake—incredible, right?
- Dairy-Free: Swap out ricotta for silken tofu, blended until smooth, for a vegan-friendly option!
Chef’s Notes
Over the years, this recipe has morphed beautifully, changing with my own culinary journey. I originally began with my grandma’s version, loaded with sugar and fat. As I experimented with healthier alternatives, I discovered so many delightful options. I still hold dear the nostalgia that this cake brings, yet I cherish how I can share a healthier version without losing any of those cherished flavors.
And who knew? Carrot cake can be the perfect backdrop for experimentation. While test-baking one afternoon, I accidentally spilled some cinnamon into the batter. I thought it was a huge mistake, but it turned out to be a happy accident, leading to a flavorful twist I still embrace today! Remember, the kitchen is all about creativity, so don’t be afraid to get a little messy!
FAQs and Troubleshooting
Q1: My cake didn’t rise. What went wrong?
A: Make sure your baking powder and baking soda are fresh! Old leavening agents won’t give your cake the rise it needs. Also, be careful not to over-mix your batter!
Q2: Can I use other types of flour?
A: Absolutely! You can use almond flour or gluten-free flour blends. Just remember that baking times may vary slightly, so keep an eye on it!
Q3: How do I store leftovers?
A: Store any leftover cake in an airtight container at room temperature for a day or so, or refrigerate it for longer freshness. It’s just as delicious cold!
Q4: Can I freeze this cake?
A: Yes! Wrap slices in plastic wrap and place them in a freezer-safe container. It can stay fresh for up to three months. Just thaw at room temperature when ready to enjoy!
Nutritional Info
This Healthy Classic Carrot Cake is not only delicious but also packed with nutrients! Each slice is a good source of fiber, vitamins, and minerals, thanks to the carrots and whole wheat flour. While the exact nutritional information can vary based on specific ingredients and serving sizes, here’s an estimated breakdown for one slice (assuming 12 servings):
- Calories: 150
- Protein: 3g
- Carbohydrates: 24g
- Fat: 4.5g
- Fiber: 2g
- Sugar: 6g
The beautiful medley of ingredients offers an array of health benefits, from improved digestion to maintaining steady energy levels. Without the guilt of traditional options, you can enjoy dessert without holding back!
Final Thoughts
And there you have it, folks! A delightful and healthier take on the classic carrot cake that embodies the joy and comfort of home cooking. No need for extra fuss; this cake can fit beautifully into busy lives, making it easy to share and enjoy good food with friends and family.
So, grab your favorite plate, serve a slice (or two!), and relish in the good vibes and flavors! Keep cooking, keep experimenting, and let the joy of food keep bringing us together—one recipe at a time. Until next time, happy eating!
Print
Healthy Classic Carrot Cake
- Total Time: 45 minutes
- Yield: 12 servings 1x
- Diet: Vegetarian
Description
A delightful and healthier twist on the classic carrot cake, made with wholesome ingredients like grated carrots and whole wheat flour.
Ingredients
- 2 cups grated carrots
- 1 cup whole wheat flour
- 1/2 cup unsweetened applesauce
- 1/4 cup honey or maple syrup
- 1/4 cup almond milk
- 1 teaspoon baking soda
- 1 teaspoon baking powder
- 1 teaspoon ground cinnamon
- 1/2 teaspoon nutmeg
- 1/4 teaspoon salt
- 1/2 cup vanilla ricotta cheese
- 1 tablespoon vanilla extract
Instructions
- Preheat the oven to 350°F (175°C).
- Grease a 9-inch round cake pan with olive oil or non-stick spray.
- Whisk together the grated carrots, applesauce, honey or maple syrup, almond milk, ricotta cheese, and vanilla extract.
- Mix the whole wheat flour, baking soda, baking powder, cinnamon, nutmeg, and salt in another bowl.
- Fold the dry ingredients into the wet mixture until combined.
- Pour the batter into the prepared cake pan and smooth the top.
- Bake for 30-35 minutes, or until a toothpick inserted comes out clean.
- Cool the cake in the pan for 10 minutes before transferring to a wire rack.
Notes
Optional frosting can be made with reduced-fat cream cheese or ricotta mixed with honey or maple syrup.
- Prep Time: 15 minutes
- Cook Time: 30 minutes
- Category: Dessert
- Method: Baking
- Cuisine: American
Nutrition
- Serving Size: 1 slice
- Calories: 150
- Sugar: 6g
- Sodium: 200mg
- Fat: 4.5g
- Saturated Fat: 2g
- Unsaturated Fat: 2g
- Trans Fat: 0g
- Carbohydrates: 24g
- Fiber: 2g
- Protein: 3g
- Cholesterol: 10mg
Keywords: carrot cake, healthy dessert, baking, classic dessert, comfort food
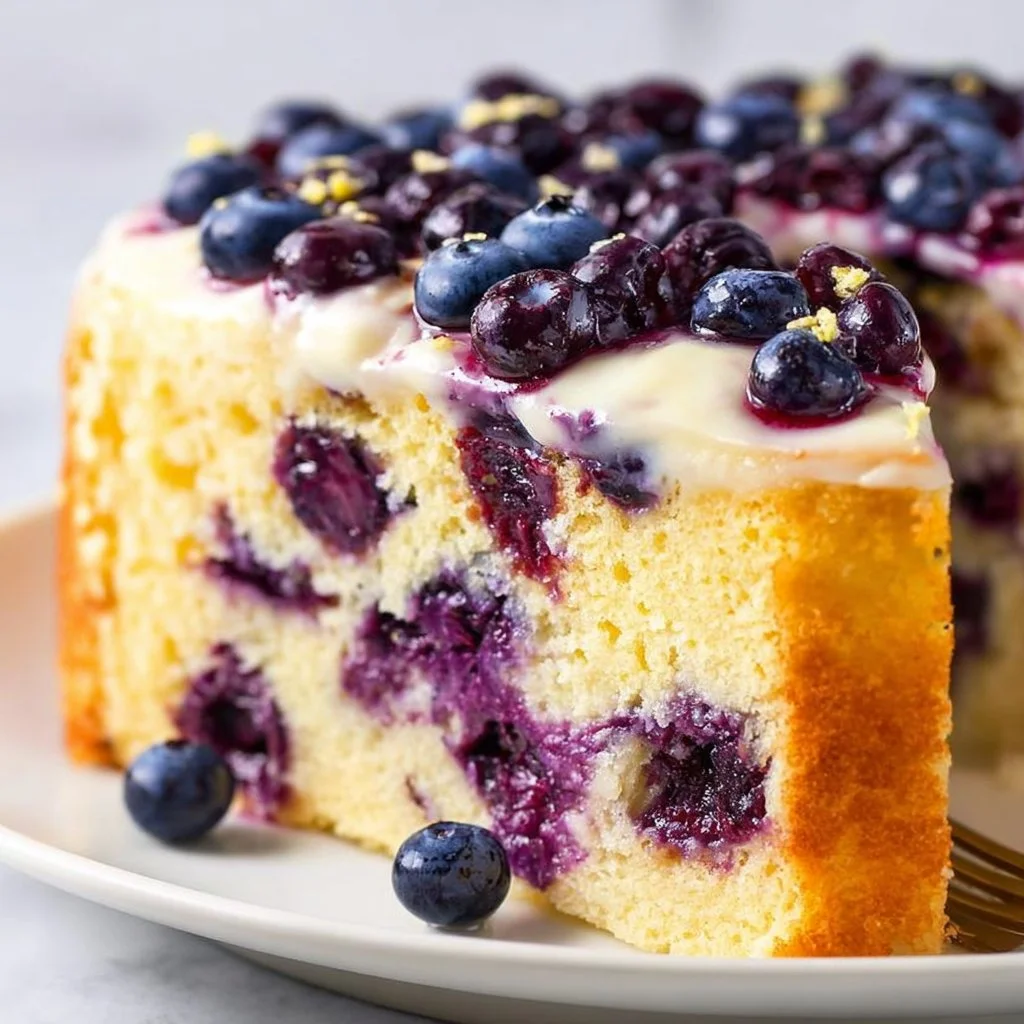
Healthy Lemon Blueberry Cake
The Bright and Zesty Healthy Lemon Blueberry Cake Recipe That Will Make Your Taste Buds Dance!
Hey there, fellow food enthusiasts! I’m Beau Collier, and today we’re diving into a recipe that embodies sunshine on a plate: Healthy Lemon Blueberry Cake. Imagine a cake that’s not just delicious but also crafted to be a little kinder on your waistline. You read that right! This cake brings together the vibrant zing of fresh lemons and the sweetness of blueberries, creating a dessert that feels indulgent while being mindful of your health.
This delightful cake is perfect for any occasion—whether you’re celebrating a birthday, hosting a brunch, or simply treating yourself to a slice of happiness on a Wednesday afternoon. Trust me; each bite is like a mini celebration, bursting with flavor and joy. The best part? It’s so easy to whip up that you won’t have to spend an entire afternoon in the kitchen. So, grab your apron, and let’s create some sweet memories together!
But let’s not just jump into the recipe without some kitchen storytelling. Every dish holds a memory, and this cake is no different. Let me take you back to a sunny day when I stumbled upon the perfect blend of lemon and blueberry: a flavor combo that would forever change how I look at dessert!
Personal Story
I remember the first time I baked a lemon blueberry dessert. It was a warm Saturday afternoon during my summer break in college. My best friend, Alex, and I were on a mission to challenge our culinary skills. We decided to create something fresh and fruity for our outdoor picnic.
After rummaging through the fridge, we found an abundance of lemons and a basket laden with blueberries. An idea sparked! We wanted to create a cake that sang with summer flavors, and what unfolded was pure magic. We laughed, spilled flour all over the counters, and savored the scent of freshly squeezed lemon juice wafting through our tiny apartment. It felt like the world slowed down for a moment as we indulged in the sweet and tangy batter.
We shared that delicious creation with friends, and I’ll never forget the joy we all felt as we relished each bite. That experience not only bonded us in the kitchen but also taught me the beautiful lesson that cooking is all about sharing and love. Now, years later, I’m excited to pass this vibrant lemon blueberry cake recipe onto you, so you can create your own memorable moments!
Ingredients
Let’s gather our ingredients for the Healthy Lemon Blueberry Cake! Here’s what you’ll need:
-
1 ½ cups almond flour
- Why almond flour? It’s gluten-free, low in carbs, and adds a lovely nutty flavor. If you don’t have almond flour, you can use oat flour or all-purpose flour, but the texture and taste may vary!
-
1 cup blueberries (fresh or frozen)
- Tip: Either works great! Fresh blueberries are bursting with flavor, while frozen ones are super convenient. If using frozen, no need to thaw. Just pop them straight into the batter!
-
½ cup maple syrup
- Sweetness made natural! Maple syrup gives a rich flavor, but you can swap it out for honey or agave syrup if that’s what you have on hand.
-
¼ cup coconut oil, melted
- For a moist cake! Coconut oil adds a subtle flavor and healthy fats. If you’re looking for a different option, melted butter or any neutral oil will work just fine.
-
¼ cup lemon juice
- Freshly squeezed is best! It gives your cake that vibrant tang. If you’re in a pinch, bottled lemon juice can work, but it might lack some of the freshness.
-
1 tablespoon lemon zest
- Don’t skip this! The zest provides a concentrated burst of lemon flavor. Use a Microplane to finely zest your lemons without getting too much pith.
-
1 teaspoon baking powder
- A must for rising! Make sure it’s fresh for proper leavening.
-
½ teaspoon baking soda
- A little extra lift. This will help the cake achieve a fluffy texture.
-
¼ teaspoon salt
- Don’t forget the salt! Just a pinch keeps the flavors balanced and enhances the sweetness.
-
½ teaspoon vanilla extract
- Add warmth and depth. You can use almond extract for a unique twist!
Step-by-Step Instructions
Alright, let’s roll up those sleeves and get cooking! Follow these detailed steps, and you’ll soon have a beautiful cake to wow your friends and family.
Step 1: Preheat Your Oven
Start by preheating your oven to 350°F (175°C). This is an essential step, as a properly preheated oven ensures even baking. Trust me; you don’t want to put your batter in a cold oven and mess with your cake’s rise!
Step 2: Prepare Your Baking Pan
Grab an 8-inch round cake pan and grease it with cooking spray or coconut oil. You can also line the bottom with parchment paper for easy removal, especially if you’re feeling fancy!
Step 3: Mix the Dry Ingredients
In a large mixing bowl, combine your almond flour, baking powder, baking soda, and salt. Whisk them together until they are well combined. This step helps distribute the leavening agents evenly throughout the flour for a consistent rise!
Step 4: Mix the Wet Ingredients
In another bowl, whisk together the maple syrup, melted coconut oil, lemon juice, lemon zest, and vanilla extract. Take a moment to inhale the bright aromas; they’re simply divine!
Step 5: Combine Wet and Dry
Now, pour the wet mixture into the bowl of dry ingredients. Gently fold the ingredients together using a spatula. Be careful not to overmix; we want a light, tender crumb in our cake, not a dense brick!
Step 6: Fold in the Blueberries
Once your batter is combined, it’s time to add the star of the show—blueberries! Gently fold them in, preserving their shape and juiciness. The last thing you want is a purple cake, so handle them with care!
Step 7: Pour and Spread
Transfer the batter into the prepared cake pan. Use a spatula to smooth it out evenly, making sure it reaches the edges. A flat surface helps it bake evenly.
Step 8: Bake Away!
Pop your cake into the preheated oven and let it bake for 25-30 minutes until it’s golden brown and a toothpick inserted into the center comes out clean. The kitchen will start to smell unreal—just wait for it!
Step 9: Cool and Serve
Once baked, remove the cake from the oven and let it cool in the pan for about 10 minutes. Then, turn it out onto a wire rack to cool completely. This step is crucial; you don’t want a gooey center when you’re ready to slice!
Serving Suggestions
Now that your cake has cooled, it’s time to serve it up! I love to dust this healthy lemon blueberry cake with a sprinkle of powdered sugar, which adds a touch of elegance.
For an extra kick of flavor, why not serve a dollop of Greek yogurt or whipped coconut cream on the side? Both options add creaminess and contrast beautifully with the cake’s bright flavors. You could even add a few fresh blueberries on top for a pop of color—plus, who can resist that gorgeous berry goodness?
Consider pairing your cake with a refreshing herbal tea or a tall glass of iced lemonade. It’s the perfect way to elevate your dessert experience!
Recipe Variations
Feeling adventurous? Here are some fun and creative twists on this classic lemon blueberry cake:
-
Lemon Poppy Seed Cake: Add 2 tablespoons of poppy seeds to the batter for a delightful crunch and extra aesthetic appeal.
-
Coconut-Lemon Cake: Mix ½ cup of unsweetened shredded coconut into the batter for a tropical feel.
-
Lavender Lemon Cake: Incorporate 1 teaspoon of culinary lavender into your wet ingredients for a sophisticated floral note.
-
Berry Medley Cake: Replace the blueberries with a mix of raspberries, blackberries, and strawberries for a berry blast!
-
Lemon Almond Cake: Add a tablespoon or two of almond extract for an extra layer of flavor that complements the almond flour beautifully.
Chef’s Notes
I’ve been making versions of this cake for years now, and I’ve learned a thing or two along the way. For example, the freshness of your lemons can make a world of difference! Look for bright yellow lemons that feel heavy for their size; they’ll yield the juiciest juice.
Also, I can’t stress enough how important it is to let the cake cool fully before slicing it—patience pays off here! And if you’re ever feeling adventurous, try swirling some lemon curd through the batter before baking for an extra tart surprise.
FAQs and Troubleshooting
1. Why is my cake dense?
This usually happens if the batter is overmixed. Be gentle and fold until just combined!
2. Can I substitute the almond flour?
Absolutely! You can use oat flour, but keep in mind that almond flour has a higher fat content, affecting the moisture and texture.
3. How should I store the cake?
Store your cake in an airtight container at room temperature for 2-3 days. You can also refrigerate it for up to a week, but be sure to bring it back to room temperature before serving for the best texture.
4. Can I freeze the cake?
Yes! Wrap individual slices in plastic wrap and store them in an airtight container in the freezer for up to 2 months. Just defrost at room temperature when you’re ready to enjoy a slice!
Nutritional Info
Now, let’s talk about how this cake fits into a healthy lifestyle! Thanks to its wholesome ingredients, this Healthy Lemon Blueberry Cake packs in some significant nutritional benefits. Here’s a quick breakdown of its health highlights:
-
Almond Flour: High in protein, healthy fats, and vitamin E—making it more nutritious than traditional flour.
-
Blueberries: Loaded with antioxidants, vitamins, and fiber, blueberries help boost heart health and support digestion.
-
Maple Syrup: Naturally sweet, maple syrup is a fantastic alternative to refined sugars, adding minerals and nutrients to your sweet fix.
-
Coconut Oil: Provides healthy medium-chain triglycerides (MCTs), which can provide energy and support brain health.
This cake is not just a treat for your taste buds; it’s a treat for your body too!
Final Thoughts
There you have it, my fabulous foodies! A healthy lemon blueberry cake that’s bursting with flavor and vitality. Whether you’re baking it for a special occasion or just because it’s a Tuesday, you’re creating not just a dessert but also memories filled with joy and love.
Remember, cooking is all about experimentation, and I encourage you to put your own spin on this recipe. Maybe it’ll become a favorite in your kitchen, too! So next time you need a sweet pick-me-up or a go-to dessert for gatherings, you know what to make.
As always, I’d love to hear how your cake turns out or any fun variations you come up with. Happy baking, and until next time, keep spreading love through food!
Let’s keep the feast going at Feastical—where every meal tells a story, and every recipe is a celebration! 🍋💙
Print
Healthy Lemon Blueberry Cake
- Total Time: 45 minutes
- Yield: 8 servings 1x
- Diet: Vegetarian
Description
A delightful and healthy cake that combines the vibrant zing of fresh lemons with the sweetness of blueberries, perfect for any occasion.
Ingredients
- 1 ½ cups almond flour
- 1 cup blueberries (fresh or frozen)
- ½ cup maple syrup
- ¼ cup coconut oil, melted
- ¼ cup lemon juice
- 1 tablespoon lemon zest
- 1 teaspoon baking powder
- ½ teaspoon baking soda
- ¼ teaspoon salt
- ½ teaspoon vanilla extract
Instructions
- Preheat your oven to 350°F (175°C).
- Prepare an 8-inch round cake pan by greasing it or lining with parchment paper.
- Mix the dry ingredients: almond flour, baking powder, baking soda, and salt in a large mixing bowl.
- Whisk together the wet ingredients: maple syrup, melted coconut oil, lemon juice, lemon zest, and vanilla extract in another bowl.
- Combine the wet mixture with the dry ingredients and gently fold together.
- Fold in the blueberries carefully to preserve their shape.
- Transfer the batter into the prepared cake pan and smooth it out evenly.
- Bake for 25-30 minutes or until golden brown and a toothpick comes out clean.
- Cool in the pan for 10 minutes and then turn it out onto a wire rack to cool completely.
Notes
Dust with powdered sugar or serve with Greek yogurt or whipped coconut cream for added flavor.
- Prep Time: 15 minutes
- Cook Time: 30 minutes
- Category: Dessert
- Method: Baking
- Cuisine: American
Nutrition
- Serving Size: 1 slice
- Calories: 250
- Sugar: 8g
- Sodium: 180mg
- Fat: 13g
- Saturated Fat: 5g
- Unsaturated Fat: 6g
- Trans Fat: 0g
- Carbohydrates: 30g
- Fiber: 3g
- Protein: 7g
- Cholesterol: 0mg
Keywords: lemon cake, blueberry cake, healthy dessert, gluten-free cake, spring dessert

Healthy Chocolate Cake
Healthy Chocolate Cake: A Sweet Treat Without the Guilt
Hey there, fellow food enthusiasts! It’s Beau Collier, your culinary companion over here at Feastical. Today, we’re diving into something truly special: a Healthy Chocolate Cake that brings all the rich indulgence of chocolate without the added guilt. Yes, you heard me right! This cake is moist, decadent, and easy enough to whip up on a whim—perfect for a weeknight treat or a special occasion.
You see, I believe that we shouldn’t have to compromise on flavor to enjoy healthier choices. It can be tough to juggle a busy lifestyle while trying to eat right, and that’s where this recipe shines. It’s packed with wholesome ingredients that lend just the right amount of sweetness, coming from natural sources—like applesauce and maple syrup—rather than refined sugars. Whether you’re trying to eat clean, jump on a gluten-free trend, or just craving something sweet, this cake is a fantastic addition to your repertoire.
And for those of you who think baking is reserved for the overly ambitious home chef, don’t worry! I’ve designed this recipe to be straightforward and, as always, fun! So, roll up your sleeves, preheat that oven, and get ready to indulge in a little chocolatey goodness that will have everyone asking for seconds (or thirds!).
Personal Story
Let me take you back to a sunny afternoon in my grandmother’s kitchen, where my love affair with chocolate cakes began. I was about six or seven, standing on a stool, peering over the counter as Grandma prepared her famous chocolate cake for my cousin’s birthday. The scent of cocoa mingling with hints of vanilla sent my little heart into a flutter. I can still hear her humming away, classical music softly drifting through the air, creating the perfect setting.
I remember asking her if we could make it healthier someday, and she chuckled, giving me a twinkle of mischief in her eye. "Well, we could use apples instead of sugar," she said. "But why would we ever do that?" Many years later, her playful words sparked an idea that grew into my passion for creating delectably healthy desserts. This Healthy Chocolate Cake is an ode to those sunny kitchen adventures, combining nostalgia with wholesome ingredients.
Ingredients
Here’s what you’ll need to whip up your Healthy Chocolate Cake:
-
1 cup almond flour
A great gluten-free option! Almond flour adds moisture and a subtle nuttiness. If you don’t have almond flour, you can swap it for oat flour or make a homemade version by blending whole almonds into a fine powder. -
1/2 cup cocoa powder
Unsweetened cocoa powder is what gives this cake its rich chocolate flavor. Look for good quality cocoa for the best results. You can also substitute this with carob powder for a caffeine-free twist! -
1/2 teaspoon baking soda
This will help the cake rise and create a light, fluffy texture. If you’re out of baking soda, you can use baking powder, but keep in mind that you’ll need to adjust the quantities since they have different strengths. -
1/4 teaspoon salt
A pinch of salt elevates the flavors in sweet treats. If you’re watching your sodium intake, feel free to omit it or use a salt substitute. -
1/2 cup unsweetened applesauce
This is your natural sweetener and moisture booster. If you don’t have applesauce, blended bananas make for an excellent substitute, giving the cake a delightful flavor twist! -
1/4 cup maple syrup or agave
Both add a touch of sweetness while keeping the cake moist. Honey can also be used, but note that it’s not vegan if that’s important to you. -
1 teaspoon vanilla extract
An absolute must for adding depth to the flavor—don’t skip it! If you prefer a hint of something different, you can use almond extract or even coffee for a unique twist. -
1/2 cup unsweetened almond milk
This helps blend the ingredients smoothly, giving your cake the perfect consistency. If you’re not a fan of almond milk, any other non-dairy milk will work, like oat or soy milk.
Step-by-Step Instructions
Now, let’s get to the fun part—baking our delicious Healthy Chocolate Cake! Follow these steps, and you’ll be digging into a slice of heaven in no time.
-
Preheat Your Oven:
Preheat your oven to 350°F (175°C). This ensures that the oven is hot enough for your cake to rise beautifully. While it warms up, gather your mixing bowls and measuring cups because we’re about to bake! -
Prepare the Pan:
Grab an 8-inch round cake pan and lightly grease it with a bit of coconut oil or spray. You can also line it with parchment paper for easy removal; nobody wants a cake that sticks to the pan. Trust me! -
Mix Dry Ingredients:
In a mixing bowl, whisk together the almond flour, cocoa powder, baking soda, and salt. This step is crucial because it’ll help evenly distribute the baking soda, preventing any bitter bites in the cake. -
Combine Wet Ingredients:
In a separate bowl, mix the unsweetened applesauce, maple syrup (or agave), vanilla extract, and almond milk. Whisk until combined. If you’re like me and love to get creative, try adding a splash of espresso—chocolate and coffee make an unbeatable duo! -
Blend Dry and Wet:
Gradually pour the wet mixture into the dry mixture, stirring gently with a spatula. Be careful not to overmix; a few lumps are perfectly fine. Overmixing can result in a dense cake, and we want it fluffy! -
Pour into Pan:
Once your batter is mixed to the right consistency, pour it into the prepared cake pan. Spread it evenly with your spatula, giving it a gentle shake to settle. -
Bake:
Time to pop that pan in the oven! Bake for 25-30 minutes or until a toothpick inserted comes out clean. If you find any batter on it, pop it back in for a few more minutes. -
Cool Down:
After baking, let the cake cool in the pan for about 10 minutes. Then, carefully invert it onto a wire rack to cool completely. This is the toughest part—patience pays off! -
Frost (If You Want):
Once completely cooled, feel free to add a healthy frosting. A simple mix of Greek yogurt and cocoa powder makes for a yummy topping. Or, go classic with some diced strawberries or raspberries on top—nature’s garnish!
Serving Suggestions
Oh, presentation is everything when it comes to desserts! Slice up your Healthy Chocolate Cake and place it on a decorative cake stand. For a simple but chic vibe, sprinkle some powdered sugar or cocoa powder on top before serving.
You can pair it with a scoop of coconut whipped cream or a drizzle of dark chocolate sauce if you’re feeling extra indulgent. And of course, a cup of steaming coffee or a glass of almond milk complements this sweet treat perfectly. Just imagine everyone’s faces lighting up when they see your beautiful creation!
Recipe Variations
Getting creative with recipes is where the fun truly begins! Here are a few variations to spice up your Healthy Chocolate Cake:
-
Add Nuts:
Fold chopped walnuts or pecans into the batter for a delightful texture and added crunch. -
Fruit Fusion:
Swap out the applesauce for pumpkin puree for a fall-inspired twist. Or fold in some sliced strawberries or raspberries before baking for an added fruity surprise. -
Minty Fresh:
Add a dash of peppermint extract to the batter for a refreshing mint chocolate experience that’s perfect for holidays. -
Spicy Chocolate:
A pinch of cayenne or chili powder can turn up the heat and make for an interesting flavor profile that’s sure to tantalize the taste buds. -
Vegan Option:
To make it fully vegan, ensure you’re using maple syrup and substitute the almond milk for a plant-based milk of your choice. You can also swap the applesauce for silken tofu blended until smooth.
Chef’s Notes
This Healthy Chocolate Cake is not only a reflection of my childhood memories but also a testament to how any recipe can evolve over time to meet healthier choices without sacrificing flavor. A few tinkers—like swapping out conventional ingredients for wholesome options—can create a dish that aligns with our health goals.
I often share this cake at gatherings, and you’d be surprised how many people are shocked when they find out it’s a healthier version! Think of it as your secret weapon—delicious and nutritious, yet so simple that it can become your go-to birthday cake recipe.
Speaking of which, I once tried this cake recipe at a family reunion, but with my cousin’s addition of crushed chili flakes. The looks on everyone’s faces were priceless! Safe to say, it was a hit but only for daring souls!
FAQs and Troubleshooting
Q1: Why did my cake sink in the middle?
A: This can happen if you overmix the batter or open the oven door too early while baking. Aim for a smooth batter but don’t be overly vigorous when mixing!
Q2: My cake turned out too dense; what went wrong?
A: Dense cakes usually result from overmixing the batter or measuring the flour incorrectly. Use light, fluffy scoops when measuring your almond flour.
Q3: Can I make this cake ahead of time?
A: Absolutely! Bake the cake, allow it to cool completely, and store it in an airtight container in the fridge for up to five days. It can also freeze wonderfully—wrap it tightly in foil or plastic wrap, and it should keep for up to three months.
Q4: How do I know when the cake is done?
A: Insert a toothpick in the center of the cake; if it comes out clean or with a few moist crumbs, your cake is ready. If it’s coated in batter, pop it back in that oven for a few more minutes!
Nutritional Info
This Healthy Chocolate Cake makes about 8 servings. Here’s a rough nutritional breakdown per serving (without icing):
- Calories: Approximately 160
- Protein: 4g
- Carbohydrates: 18g
- Dietary Fiber: 3g
- Sugars: 6g
- Fat: 7g
Including hearty ingredients like almond flour and applesauce not only makes each slice delicious but also adds healthy fats and nutrients to your day. And remember, indulging doesn’t mean overindulging—enjoy your cake without the guilt!
Final Thoughts
There you have it, foodies—your guide to making an irresistible Healthy Chocolate Cake that checks all the boxes: delicious, simple, and good for you! I hope you embrace this recipe as a staple in your baking adventures and find joy in making it your own.
Remember, cooking isn’t just about carelessly following instructions; it’s about experimentation, sharing laughter, and creating sweet memories. So, don’t shy away from adding your own twists and spins. Every cake tells a story—let yours be filled with happy moments and yummy bites.
Now grab your forks, gather your loved ones, and enjoy a slice of this delightful cake together. Until next time, happy cooking and may your kitchen be filled with all the good vibes and delicious aromas!
Get ready to dig in—your taste buds will thank you! 🍰
Print
Healthy Chocolate Cake
- Total Time: 45 minutes
- Yield: 8 servings 1x
- Diet: Vegan
Description
A moist and decadent chocolate cake made with wholesome ingredients, perfect for guilt-free indulgence.
Ingredients
- 1 cup almond flour
- 1/2 cup cocoa powder
- 1/2 teaspoon baking soda
- 1/4 teaspoon salt
- 1/2 cup unsweetened applesauce
- 1/4 cup maple syrup or agave
- 1 teaspoon vanilla extract
- 1/2 cup unsweetened almond milk
Instructions
- Preheat your oven to 350°F (175°C).
- Prepare an 8-inch round cake pan by greasing it or lining it with parchment paper.
- Mix in a bowl the almond flour, cocoa powder, baking soda, and salt.
- Combine the wet ingredients: applesauce, maple syrup, vanilla, and almond milk in another bowl.
- Blend the wet mixture into the dry mixture gently, avoiding overmixing.
- Pour the batter into the prepared pan and spread evenly.
- Bake for 25-30 minutes or until a toothpick comes out clean.
- Cool the cake in the pan for about 10 minutes, then invert onto a wire rack to cool completely.
- Frost with Greek yogurt and cocoa powder, or serve with fresh fruits if desired.
Notes
This cake can be stored in the fridge for up to five days and freezes well for up to three months. Perfect for gatherings and celebrations.
- Prep Time: 15 minutes
- Cook Time: 30 minutes
- Category: Dessert
- Method: Baking
- Cuisine: American
Nutrition
- Serving Size: 1 slice
- Calories: 160
- Sugar: 6g
- Sodium: 50mg
- Fat: 7g
- Saturated Fat: 0.5g
- Unsaturated Fat: 6g
- Trans Fat: 0g
- Carbohydrates: 18g
- Fiber: 3g
- Protein: 4g
- Cholesterol: 0mg
Keywords: chocolate cake, healthy dessert, vegan baking, gluten-free baking, guilt-free treats
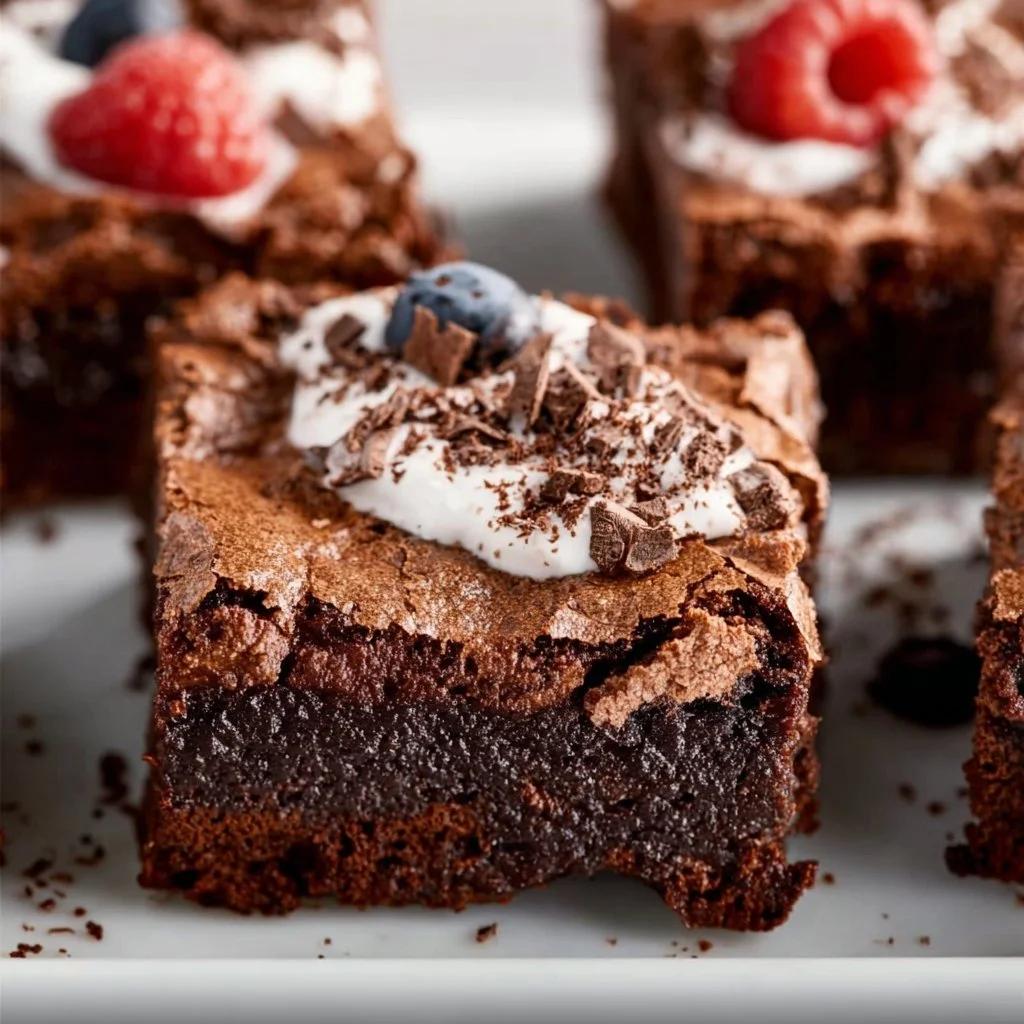
Zero Sugar Brownies with Greek Yogurt
Dive Into Decadence: Zero Sugar Brownies with Greek Yogurt
Hey there, fellow foodies! I’m Beau Collier, and today we’re on a delicious mission to make dessert a guilt-free pleasure without sacrificing flavor. Let’s talk about brownies—the quintessential sweet treat that conjures up feelings of nostalgia and warmth. You know the kind, right? The fudgey, chewy bites that remind you of lazy afternoons and cozy movie nights. But what if I told you that you could indulge in these deliciousness while keeping it healthy? That’s right! Enter the magical realm of Zero Sugar Brownies with Greek Yogurt.
These brownies are not just good for the palate; they’re a feel-good treat that will have your taste buds doing the happy dance. You might be wondering how we’re ditching the sugar while still keeping the sweetness. The secret lies in a few key ingredients that we’ll dive into shortly. Trust me—once you whip up a batch of these beauties, you’ll be sharing them with friends, family, and anyone who crosses your delicious path!
Whether you’re counting calories, watching your sugar intake, or simply looking for a healthier dessert option, this recipe checks all the boxes. And the best part? You can whip these up in no time, making it a simple, quick treat that fits right into your busy life. So, grab your apron, and let’s embark on this sweet adventure together, where flavor and health unite in perfect harmony.
Personal Story
You know, every great recipe comes with a story, and mine definitely does! I remember being a wide-eyed kid standing on a stool in my grandma’s kitchen, watching her whisk together ingredients for her infamous brownies. The aroma of chocolate would waft through the air, wrapping around me like a warm hug. No matter how many dishes had to be washed, those moments spent with her, laughing and creating, were etched into my heart.
Grandma always believed that the best treats were made with love, and I’ve carried that thought into my own cooking adventures. Fast forward to today, I wanted to channel that same love into a healthier version that everyone could enjoy—with no sugar crash afterwards! These Zero Sugar Brownies with Greek Yogurt are my modern twist on a timeless classic, and they’re perfect for sharing—just like Grandma would’ve wanted. So, let’s get into the fun part: the ingredients!
Ingredients
Before we get to baking, let’s gather our ingredients! Here’s what you’ll need for these luscious brownies, plus some handy tips:
-
1 cup Greek yogurt: This creamy delight is our secret weapon. It adds moisture, richness, and a hefty dose of protein. If you need a dairy-free alternative, look for a plant-based yogurt that’s thick and creamy.
-
1/2 cup unsweetened cocoa powder: Choose a high-quality cocoa powder for an intense chocolate flavor. If you’re feeling adventurous, try using dark cocoa for an even deeper chocolate experience!
-
1/2 cup almond flour (or any flour of choice): Almond flour gives a nice nuttiness and moisture to our brownies. Don’t have it? No problem! You can swap it out for whole wheat flour, oat flour, or even coconut flour (just use less of it, as it’s denser).
-
1/4 cup unsweetened applesauce: This is our natural sweetener that also adds moisture. Feel free to substitute it with mashed bananas or a bit of pumpkin puree if you’re looking for a flavor twist!
-
1/4 cup sweetener of choice (e.g., erythritol, stevia): Picking your sweetener can be fun; however, make sure to adjust the quantity according to your sweetness preference. If you’re using granulated sweeteners, erythritol works really well for baking.
-
1 teaspoon vanilla extract: A little splash of vanilla elevates the flavors beautifully. If you want to amp things up, try using vanilla bean paste!
-
1/4 teaspoon salt: A pinch of salt enhances the chocolate taste, so don’t skip it. It’s like a magic trick for flavor!
-
1/2 teaspoon baking powder: This is our little leavening agent that gives our brownies that perfect texture. You can also use baking soda if you’re in a pinch, but be aware that it’ll give a different flavor.
Step-by-Step Instructions
Alright, let’s roll up our sleeves and dive into the fun part—baking these heavenly brownies!
Step 1: Preheat Your Oven
Start by preheating your oven to 350°F (175°C). This little step is vital for ensuring that your brownies bake evenly. While that’s warming up, you can throw together all your ingredients!
Step 2: Prepare Your Baking Dish
Grab an 8×8-inch baking pan and line it with parchment paper or lightly grease it. This will make it super easy to pop the brownies out after baking—trust me, it’s a game changer!
Step 3: Mix the Wet Ingredients
In a mixing bowl, add the Greek yogurt, unsweetened applesauce, and vanilla extract. Using a whisk (or a fork if that’s what you have on hand!), mix these ingredients together until smooth. This is where your kitchen will start to smell amazing!
Step 4: Combine the Dry Ingredients
In a separate bowl, combine the unsweetened cocoa powder, almond flour, sweetener, salt, and baking powder. Whisk them together to break up any lumps. Remember, this is where the brownie magic happens!
Step 5: Merge Wet and Dry
Now, pour the dry mix into the bowl with the wet ingredients. Gently fold the dry mixture in until just combined—don’t over-mix or your brownies will be tough! Aim for a smooth batter with some airflow still in it. That’ll give you that fudgy texture!
Step 6: Bake It Up
Pour the batter into your prepared baking dish and smooth the top with a spatula. Pop it into the preheated oven and let it bake for about 25-30 minutes, or until a toothpick inserted in the center comes out with a few moist crumbs (not wet batter!).
Step 7: Cool and Slice
Once baked, remove the brownies from the oven, and let them cool in the pan for at least 10-15 minutes. Patience pays off—cooling helps them firm up, leading to cleaner cuts later! Once cool, lift them out using the parchment paper, slice them into squares, and prepare for pure bliss.
Serving Suggestions
Now that your scrumptious brownies are baked and cooled, it’s time to serve them up in style! Here are a few engaging serving suggestions to elevate your presentation:
-
Elegant Plate: Place a square of brownie on a beautiful white plate and dust it with a dash of cocoa powder or powdered sweetener for a touch of sophistication.
-
Pair with Whipped Topping: Top a warm brownie with a dollop of sugar-free whipped cream or a scoop of your favorite Greek yogurt swirled with a bit of honey.
-
Add Fresh Berries: Fresh strawberries or raspberries add a vibrant pop of color and a refreshing contrast to the rich brownies.
-
Drizzle of Chocolate: Melting a little sugar-free chocolate and drizzling it over the top makes for a photographer’s dream and a chocolate lover’s paradise!
Get creative and remember to serve these up warm for that gooey-hug vibe!
Recipe Variations
If you’re looking to switch things up a bit, here are a few fun variations for these brownies:
-
Nutty Brownies: Stir in a handful of chopped walnuts or pecans before baking for an added crunch and flavor.
-
Mint Chocolate Swirl: Add a teaspoon of peppermint extract to your batter and swirl in some unsweetened cocoa and Greek yogurt mixture for a refreshing minty twist.
-
Fruity Delight: Fold in some dark chocolate chips or dried cherries into the batter for bursts of sweetness and texture.
-
Spiced Version: Sprinkle in some cinnamon or chili powder for a tantalizing twist on flavor. It’ll take you by surprise!
-
Coconut Bliss: Fold in shredded coconut for a tropical vibe; you’ll create a brownie with a chewy texture that’s surprisingly delightful!
Chef’s Notes
Cooking is such a journey of love, and this recipe has gone through its evolution just like I have! Initially, I used regular sugar and butter in my experimenting phase. As I learned more and embraced healthier eating, I found the wonders of Greek yogurt and natural sweeteners, and the brownies transformed! They became not just a sweet treat but a good-for-you dessert bursting with flavor.
And you know, brownies are like a blank canvas—completely open for creativity. I remember a funny kitchen mishap when I accidentally swapped baking soda for baking powder. The resulting brownies were a funky mountain of goo! But hey, those spontaneous moments often lead to the best “don’t do this, but try that!” stories.
FAQs and Troubleshooting
-
Why didn’t my brownies rise?
If your brownies didn’t rise, double-check your baking powder’s freshness. An expired leavening agent can lead to flat brownies. -
How do I store leftovers?
These brownies stay fresh in an airtight container at room temperature for a few days or in the fridge for up to a week. You can also freeze them for longer storage — just make sure to wrap them tightly! -
Can I substitute the Greek yogurt with something else?
Absolutely! You can use a silken tofu or any thick plant-based yogurt for a non-dairy version. Just keep the texture similar! -
What do I do if my brownies are too dry?
If your brownies come out dry, next time, try reducing the baking time slightly. An oven thermometer can also ensure your oven is at the correct temperature. And remember, a little gooeyness is perfectly okay!
Nutritional Info
Let’s break down the nutrition in these delightful brownies a bit!
- Per Brownie (assuming you cut into 16 servings):
- Calories: Approximately 70-80
- Protein: 2g (bless you, Greek yogurt!)
- Fat: 3g (depending on your flour choice)
- Carbohydrates: 10g
- Sugar: 0g!
These figures may vary based on specific brands used, but overall, you’re looking at a guilt-free indulgence that truly satisfies your sweet tooth without the sugar overload!
Final Thoughts
So there you have it—my exciting journey into the world of Zero Sugar Brownies with Greek Yogurt! I hope you enjoyed it as much as I loved sharing it. Baking should always feel like a joyful adventure in the kitchen. Don’t forget, cooking is about experimenting and making it your own, so feel free to put your unique twist on these brownies.
Gather your loved ones, serve those brownies warm with a side of laughter and delicious conversations, and watch how they bring everyone together. Here at Feastical, we believe in the magic of food, and these delightful brownies are a perfect example of how a little creativity can lead to something truly wonderful. Happy baking, folks!
Print
Zero Sugar Brownies with Greek Yogurt
- Total Time: 40 minutes
- Yield: 16 servings 1x
- Diet: Vegetarian
Description
Guilt-free, delicious brownies made with Greek yogurt, perfect for satisfying your sweet tooth without the sugar crash.
Ingredients
- 1 cup Greek yogurt
- 1/2 cup unsweetened cocoa powder
- 1/2 cup almond flour
- 1/4 cup unsweetened applesauce
- 1/4 cup sweetener of choice (e.g., erythritol, stevia)
- 1 teaspoon vanilla extract
- 1/4 teaspoon salt
- 1/2 teaspoon baking powder
Instructions
- Preheat your oven to 350°F (175°C).
- Prepare an 8×8-inch baking pan by lining it with parchment paper or greasing it.
- Mix the Greek yogurt, unsweetened applesauce, and vanilla extract until smooth.
- Combine the cocoa powder, almond flour, sweetener, salt, and baking powder in another bowl.
- Merge the dry mixture into the wet ingredients, gently folding until just combined.
- Pour the batter into the prepared baking dish, smoothing the top with a spatula.
- Bake for about 25-30 minutes, or until a toothpick comes out with a few moist crumbs.
- Cool the brownies in the pan for at least 10-15 minutes, then slice and serve.
Notes
For variations, consider adding nuts, chocolate chips, or spices. Serve warm with chocolate drizzle or fresh berries.
- Prep Time: 10 minutes
- Cook Time: 30 minutes
- Category: Dessert
- Method: Baking
- Cuisine: American
Nutrition
- Serving Size: 1 brownie
- Calories: 75
- Sugar: 0g
- Sodium: 50mg
- Fat: 3g
- Saturated Fat: 0.5g
- Unsaturated Fat: 2g
- Trans Fat: 0g
- Carbohydrates: 10g
- Fiber: 1g
- Protein: 4g
- Cholesterol: 5mg
Keywords: zero sugar brownies, healthy dessert, Greek yogurt dessert, guilt-free brownies, low sugar brownies
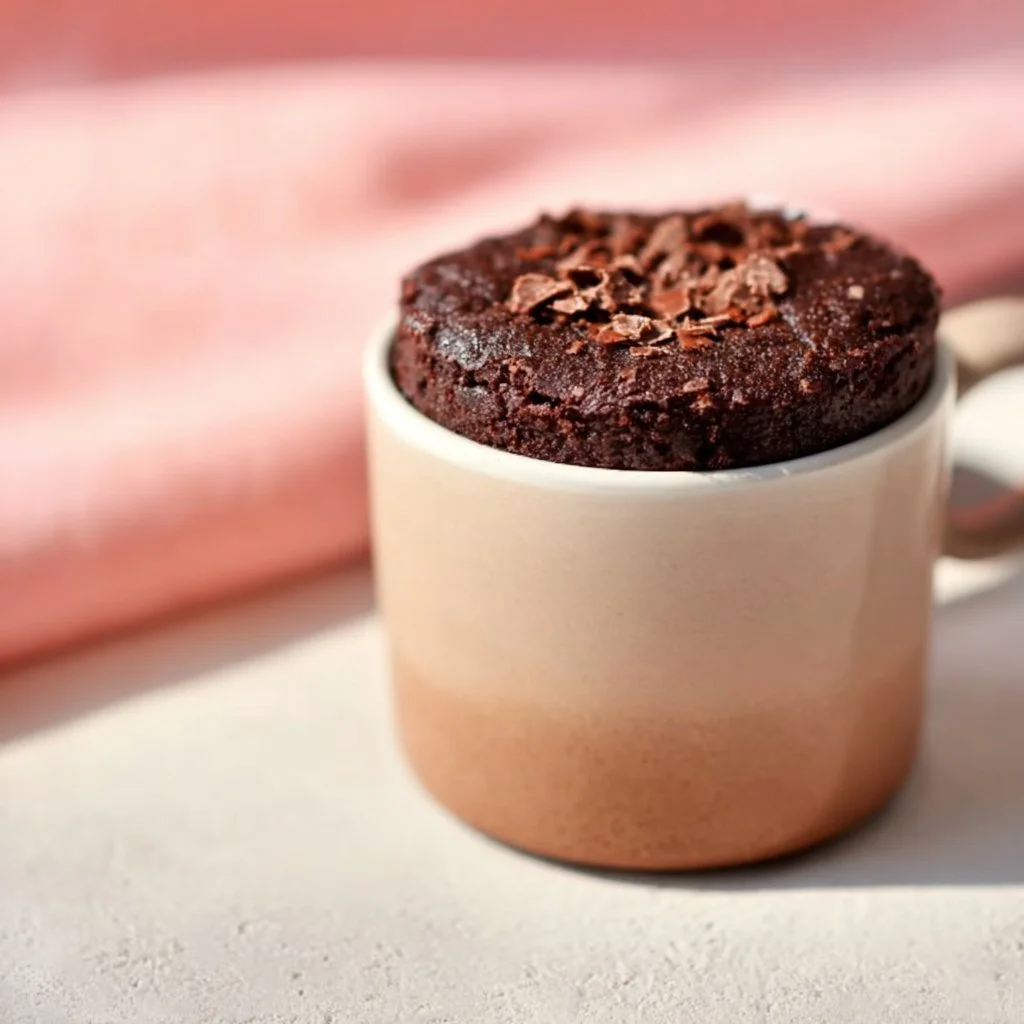
Healthy Mug Brownie
Indulgence in a Mug: Whipping Up a Healthy Mug Brownie
Hey there, foodies! Welcome to another delicious adventure on Feastical! Today, we’re diving into a decadent yet guilt-free treat that will satisfy your chocolate cravings in the most delightful way—yes, I’m talking about a Healthy Mug Brownie. Life can be hectic, and sometimes all you need is a quick dessert that feels like a warm hug without the post-sugar crash. With just a few simple ingredients, you can whip up this delicious brownie in less than five minutes. Trust me, it’ll give any fancy dessert a run for its money!
I remember the first time I stumbled upon the concept of a mug brownie. I was in my tiny college dorm, late at night, desperately craving something sweet. Like many of you, I was often held captive by my relentless sweet tooth. That night, a quick scroll online brought me to this miraculous invention: a brownie that could be made in a mug and, best of all, in the microwave! I threw together whatever I had in my mini pantry, and voilà! A deliciously gooey mug brownie emerged, fitting perfectly into my busy, budget-friendly lifestyle.
Fast forward to today, and my recipe has evolved, packed with wholesome ingredients that won’t send your blood sugar on a rollercoaster ride. It’s all about balance, right? This Healthy Mug Brownie is not only delicious and satisfying, but it’s also a step up in the healthy department. So whether you’re endless in your pursuit of chocolatey bliss or just craving a little midnight fun, roll up your sleeves and let’s bring this beauty to life!
Personal Story
Let me take you back to that fateful night in the dorm. My roommate and I had just finished a serious study session for finals week—needless to say, we were exhausted. As we were about to throw in the towel, I said, "What if we made something sweet?” The idea of baking an entire batch of brownies felt daunting. Plus, who had the time for that? We needed instant gratification!
That’s when I discovered the mug brownie recipe online, and I was instantly hooked. It was so simple and quick that I barely had time to grab a spoon before it was out of the microwave! The first ooey-gooey bite was magic; it felt like all the stress melted away with the chocolate. We high-fived and savored our culinary creation, gobbling it down before the microwave even beeped a second time. It became a tradition; whenever finals approached, we whipped up a fast mug brownie to ease our minds.
Now, all these years later, I still make this Healthier Mug Brownie. It’s a cozy way to bring back those nostalgic college vibes while keeping things nutrient-packed. Plus, I love how this adaptable recipe fits right into my healthy lifestyle. So gather your ingredients, and let’s revisit that perfect moment together!
Ingredients
Alright, let’s get into the nitty-gritty! Here’s what you need to function your own mug brownie masterpiece.
-
2 tablespoons almond flour
Almond flour gives the brownie a nutty flavor and a lovely texture. It’s lower in carbs and higher in healthy fats compared to regular flour. If you’re nut-free, oat flour works as a great substitute! -
1 tablespoon unsweetened cocoa powder
The star of the show! Cocoa powder adds rich chocolate flavor without the added sugar. Make sure you’re picking the unsweetened variety for the healthiest option. Want something even more indulgent? Go for dark cocoa powder for a deeper flavor. -
1 tablespoon sweetener (like stevia or erythritol)
To keep this brownie low-calorie, sweetener helps keep the gooey goodness without the sugar rush. If you’re not into sugar alternatives, coconut sugar or even honey would work fine; just adjust the quantity! -
1/8 teaspoon baking powder
This little guy helps your brownie rise and become fluffy. Don’t skip it! For a gluten-free alternative, you can also use baking soda, but remember to balance it with an acid like vinegar. -
1 tablespoon unsweetened applesauce
Applesauce gives moisture and sweetness without adding fat. This is a great ingredient for those of us trying to cut back on oils. You can substitute it with a mashed banana for a different flavor twist! -
1 tablespoon almond milk (or any milk of choice)
This helps bind all the ingredients together. I love almond milk for its creamy consistency, but feel free to use oat milk, cow’s milk, or even coconut milk! -
1/4 teaspoon vanilla extract
Just a splash of vanilla enhances the flavor and rounds out the brownie’s taste. It’s amazing how much depth this one little ingredient can add! -
Optional: dark chocolate chips or nuts for topping
Can you ever really have too much chocolate? I think not! Adding dark chocolate chips or crushed nuts not only amp up the flavor but also add texture. Enjoy some crunch with walnuts or pecans, or keep it classic with chocolate chips!
Step-by-Step Instructions
Now, let’s get down to business! Here’s how to whip up this Healthy Mug Brownie in just a few easy steps.
-
Gather Your Tools
First things first, grab a microwave-safe mug (or bowl if you prefer). You’ll also need a spoon for stirring—no fancy gadgets required! -
Mix the Dry Ingredients
In your mug, combine the almond flour, cocoa powder, sweetener, and baking powder. Use the back of your spoon to break up any clumps and mix them together well. This ensures a uniform blend, making sure you don’t have pockets of dry ingredients later on. -
Add the Wet Ingredients
Next, add the unsweetened applesauce, almond milk, and vanilla extract. Mix it all together until you get a smooth batter. Don’t overmix here—just until it comes together nicely! If the batter seems too thick, a little extra almond milk won’t hurt. -
Tweak and Taste
Here’s where you add your optional ingredients. Fold in chocolate chips or nuts if you’re feeling adventurous! A little taste test isn’t a bad idea either—hey, it’s quality control, right? -
Zap It
Time to fire things up! Pop your mug in the microwave and cook for about 30-40 seconds. Depending on your microwave’s power, you might need a bit more time. Keep a close eye—overcooking can lead to a dry brownie, and we don’t want that! -
Cool and Enjoy
Once that microwave timer goes off, let the brownie cool for a minute. It’ll be lava-like in the center, and it’s always best to let it rest before diving in. Top with a sprinkle of sea salt or a dollop of Greek yogurt or nut butter for a delightful finish!
Serving Suggestions
Plating is half the fun! Since this Healthy Mug Brownie is made right in its own serving vessel, you can either keep it cozy in your mug or scoop it out onto a plate. If you choose to plate it, try drizzling some almond butter on top or a sprinkle of chopped nuts for texture and a pop of color. You could even top it with a scoop of a healthy ice cream alternative if you feel like splurging a little.
I also love serving it with fresh berries for a tart contrast against the rich chocolate. A few strawberries or raspberries can add that beautiful splash of color while giving a juicy delight with each bite!
Recipe Variations
Here’s where the fun begins—let’s get creative! Having the flexibility to tailor this mug brownie can make it a key staple in your cooking repertoire. Consider these variations:
-
Peanut Butter Mug Brownie: Add a tablespoon of natural peanut butter directly to the batter for a heavenly nutty twist!
-
Mint Chocolate Brownie: A drop of peppermint extract gives an exciting flavor profile. Think Thin Mints, but healthier!
-
Coconut Bliss: Stir in unsweetened shredded coconut for a tropical touch. It’s a fantastic pairing with chocolate!
-
Gluten-Free: Swap almond flour for oat flour or coconut flour for another gluten-free option. Just remember the absorbency properties of coconut flour can call for a slightly adjusted liquid ratio.
-
Vegan: This recipe is already plant-based, but ensure your sweetener aligns with that if you’re avoiding animal products or consider vegan chocolate chips for those optional toppings.
Chef’s Notes
Over the years, I’ve made my fair share of mug brownies, and let me tell you, each batch seems to tell a story. There was that time I added too much baking powder and ended up with a brownie that ballooned over the mug like a volcano. It tasted fine, but let’s just say cleaning up was a little bit of a challenge!
As I’ve matured as a home chef, I’ve learned to appreciate the beauty of simplicity and balance in dessert recipes. Just a few high-quality ingredients can yield something that feels indulgent while feeding your body right. Also, my kids love it! That simple pleasure of making something together is priceless.
FAQs and Troubleshooting
Here are some common questions and helpful troubleshooting tips straight from the kitchen:
-
Why did my mug brownie come out too dry?
If it’s too dry, you may have overcooked it. Start with 30 seconds, then keep an eye out every 10 seconds after that for the perfect fudgy texture. Remember, it will continue to cook for a moment even after you remove it from the microwave! -
Can I make this in the oven?
Absolutely! Preheat your oven to 350°F (175°C) and pour your batter into a small baking dish or ramekin. Bake for 10-12 minutes or until a toothpick comes out clean but with a few crumbs. That’s the sweet spot! -
How do I store leftovers?
If you happen to have any leftovers, loves to them! Store in the refrigerator in a sealed container for up to 2-3 days. Simply reheat in the microwave for a quick treat! -
What if I don’t have almond flour?
No worries! You can use oat flour, whole wheat flour, or even all-purpose flour if you’re not gluten-sensitive. Adjust measurements as needed to retain the consistency.
Nutritional Info
This Healthy Mug Brownie checks off a few key nutritional boxes. Each serving provides a good source of fiber, healthy fats, and protein while being low in carbohydrates and sugar:
- Calories: Approximately 150
- Protein: 4 grams
- Fat: 6-7 grams (depending on whether you added nuts)
- Carbohydrates: 14 grams
- Fiber: 2 grams
It’s a balanced treat that fits well into a healthy eating plan. Enjoy the satisfaction of indulging without the guilt!
Final Thoughts
And there you have it, my dear culinary companions—a delicious, simple, and guilt-free Healthy Mug Brownie that’s perfect for any occasion (or no occasion at all!). This little gem captures what it means to enjoy food: deliciously, joyfully, and without stress.
Whether it’s a cozy night in, a quick energy boost, or a midnight snack loaded with nostalgia, this brownie can check all those boxes. So the next time life gets busy, or the craving hits, just remember you have the power to treat yourself in such a satisfying way, all in just minutes!
Now, go on, grab that mug and give this recipe a whirl! Happy baking!
Print
Healthy Mug Brownie
- Total Time: 6 minutes
- Yield: 1 serving 1x
- Diet: Vegetarian
Description
A quick and indulgent Healthy Mug Brownie recipe that satisfies your chocolate cravings in less than five minutes!
Ingredients
- 2 tablespoons almond flour
- 1 tablespoon unsweetened cocoa powder
- 1 tablespoon sweetener (like stevia or erythritol)
- 1/8 teaspoon baking powder
- 1 tablespoon unsweetened applesauce
- 1 tablespoon almond milk (or any milk of choice)
- 1/4 teaspoon vanilla extract
- Optional: dark chocolate chips or nuts for topping
Instructions
- Gather your tools: a microwave-safe mug and a spoon.
- Mix the dry ingredients: combine almond flour, cocoa powder, sweetener, and baking powder in the mug.
- Add the wet ingredients: mix in applesauce, almond milk, and vanilla extract until a smooth batter forms.
- Tweak and taste: fold in optional chocolate chips or nuts if desired.
- Zap the mug in the microwave for about 30-40 seconds; check often to avoid overcooking.
- Cool for a minute, then enjoy with toppings like sea salt, Greek yogurt, or almond butter.
Notes
Feel free to customize with add-ins like peanut butter or peppermint extract for different flavors.
- Prep Time: 5 minutes
- Cook Time: 1 minute
- Category: Dessert
- Method: Microwave
- Cuisine: American
Nutrition
- Serving Size: 1 serving
- Calories: 150
- Sugar: 2g
- Sodium: 100mg
- Fat: 6g
- Saturated Fat: 1g
- Unsaturated Fat: 5g
- Trans Fat: 0g
- Carbohydrates: 14g
- Fiber: 2g
- Protein: 4g
- Cholesterol: 0mg
Keywords: mug brownie, healthy dessert, quick recipe, chocolate