
Sweet Pineapple Chicken Quinoa Salad
Sweet Pineapple Chicken Quinoa Salad: A Vibrant Bowl of Flavor
Hey there, food lovers! Welcome back to Feastical, where I’m all about sharing joy through delicious meals that make your taste buds dance! Today, I’m thrilled to introduce you to a recipe that’s not just a feast for the eyes, but also a harmony of flavors that’s as bright as a sun-soaked tropical afternoon. Let’s talk about my Sweet Pineapple Chicken Quinoa Salad—the perfect dish for those sunny days when you want something fresh, satisfying, and effortless!
Imagine this: a colorful bowl packed with fluffy quinoa, succulent chicken, and the charming sweetness of pineapple all tossed together with zesty lemon and fresh herbs. Seriously, does it get better than this? And because it’s not just about the food but the experience, let’s take a moment to bask in the aroma of sweet and savory ingredients melding together to create something magical.
As you dive into this recipe, I encourage you to let your creativity shine. After all, cooking should never feel like a chore; it should feel like a joyful adventure! Whether you’re serving it at a summer barbecue or packing it for a picnic, this salad is sure to impress anyone lucky enough to snag a bite. I invite you to grab your apron, put on some amusing tunes, and let’s whip up this delicious Sweet Pineapple Chicken Quinoa Salad together!
Personal Story
Thinking back on my culinary journey, one summer stands out as a colorful blur of flavors and laughter—my first summer working at a local beach café. I was only a few years into my cooking escapades, and though I was still mastering the art of searing chicken and balancing spices, I was eager to create dishes that brought people together.
One day, we had a group of sun-kissed beachgoers rush in, hoping to escape the midday sun with something refreshing. In a lightbulb moment, I decided to toss together a quick quinoa salad topped with juicy grilled chicken and pineapple. The vibrant colors captured everyone’s attention, and the combination of tropical sweetness paired with savory meat was a hit! That day, I watched strangers bond over bowls of food, sharing stories and laughter under the café’s awning. That salad, much like the one we’re making today, not only satisfied their hunger but fed their spirits.
From that day on, I knew I wanted to keep sharing meals that made people feel good, nourishing not just their bellies but their souls. That feeling is what inspired this Sweet Pineapple Chicken Quinoa Salad—a dish meant to celebrate life’s flavors and create lasting memories. So, here’s to reliving those moments and creating new ones, one delicious bite at a time!
Ingredients
Before we dive into the cooking steps, let’s gather our ingredients. Here’s what you’ll need:
-
4 cups water
Essential for cooking the quinoa. Use vegetable or chicken broth for added flavor! -
2 cups uncooked quinoa
This is our star ingredient! Quinoa is packed with protein and adds a lovely nutty flavor. If you’re aiming for a gluten-free option, this is your go-to grain! You can also swap it out for couscous if you prefer. -
2 Tablespoons olive oil
A good-quality extra virgin brings a rich flavor. You can substitute with avocado oil for a lovely twist. -
2 Tablespoons lemon juice
This brightens up the salad! Freshly squeezed lemon juice is best; however, bottled works in a pinch too. -
2 teaspoons ground ginger
A hint of warmth and spice! Fresh grated ginger can elevate the dish even more if you have it on hand. -
1 1/4 teaspoon ground cumin
Adding an earthy flavor that pairs beautifully with our other ingredients. If you’re not a cumin fan, smoked paprika can also work. -
1 teaspoon salt
Enhances all the flavors; adjust to taste based on your dietary preference. -
4 cups fresh arugula (roughly chopped)
This peppery green adds depth and goes well with the sweetness of the pineapple. Spinach or kale can be great substitutes if you prefer. -
2 cups cooked chicken breast (chopped)
Grilled, rotisserie, or even canned chicken work well here. Use whatever you have on hand! To keep it plant-based, feel free to swap it for chickpeas. -
1 1/2 cup shelled (whole) pistachios
These add a delightful crunch! If you can’t have nuts, sunflower seeds are a great option. -
1 cup chopped green onions
Adds brightness! If you’re not a fan of onions, try using diced bell peppers instead. -
1 cup fresh cilantro (rinsed and finely chopped)
A burst of freshness that ties everything together. If cilantro isn’t your jam, fresh parsley works wonders too. -
1 cup chopped dried pineapple
For that dreamy sweetness. You can also use mango or apricots to change the flavor profile if you like! -
1 cup dried cherries (roughly chopped)
These add a lovely tart contrast. Any dried fruit, such as cranberries or raisins, could easily replace them. -
1 cup flaked (unsweetened) coconut
Brings a delightful chew and a hint of tropical flair! If you want to skip the coconut, feel free to omit it.
With all our ingredients prepped and ready, let’s make some magic happen!
Step-by-Step Instructions
-
Rinse and Cook Quinoa:
- Start by rinsing the quinoa under cold water. This removes the natural coating called saponin that can taste bitter. I promise it’s worth the effort!
- In a medium saucepan, combine the rinsed quinoa with the 4 cups of water. Bring it to a boil over medium-high heat. Once boiling, reduce the heat to low, cover, and let it simmer for about 15 minutes until all the water has been absorbed. Quinoa is done when it’s fluffy and the little germ curls off the grain.
-
Prep Your Dressing:
- In a small bowl, whisk together the olive oil, lemon juice, ground ginger, ground cumin, and salt. Feel free to taste and adjust. A pinch more ginger never hurt anyone!
-
Chop and Combine:
- Once the quinoa is cooked and has cooled for a few minutes, it’s time to chop! In a large mixing bowl, combine your cooked quinoa, arugula, chopped chicken, pistachios, green onions, cilantro, dried pineapple, dried cherries, and coconut. Just imagine all those colors coming together—pure bliss!
-
Mix the Dressing:
- Drizzle your beautiful dressing over the salad mixture. Use tongs (or your hands, if you’re feeling it) to gently fold everything together. Really want to make sure every ingredient is coated in that delicious dressing!
-
Taste and Adjust:
- Here’s a little chef hack: always taste your creation! Does it need more salt? A splash more lemon? Cooking is all about finding that perfect balance that suits your palate!
-
Chill Out (Optional):
- For best results, let the salad chill in the refrigerator for about 30 minutes. This will let the flavors meld together beautifully. However, if you’re craving it immediately, go ahead and dive in!
Serving Suggestions
Now comes the fun part—plating and serving this vibrant salad! Grab your favorite serving bowl or individual plates and start by layering the salad. I love to create a colorful pattern so each bite is a fiesta of flavors. Garnish with a sprinkle of fresh cilantro or extra pistachios for an eye-catching presentation.
If you’re hosting guests, feel free to serve it alongside grilled shrimp or a zesty yogurt sauce. Alternatively, pack this beauty into meal prep containers for a week of delicious lunches. It’s even great on its own for a quick snack!
Recipe Variations
-
Tropical Twist:
- Add diced mango or papaya for an even fruitier vibe. You can also swap the dried cherries for dried mango for an extra tropical touch!
-
Mediterranean Delight:
- Swap the chicken for feta cheese and toss in some kalamata olives and cherry tomatoes for a Mediterranean take. You can also use couscous instead of quinoa!
-
Vegan Friendly:
- Skip the chicken and pistachios, replacing them with chickpeas, sunflower seeds, or roasted lentils for a protein boost that’s plant-based.
-
Spiced Up Version:
- Add a jalapeño for a kick! You can also replace the ground ginger with fresh minced ginger and a hint of chili powder for a zesty punch.
-
Herb-Infused:
- Mix in some fresh basil or mint to create a refreshing herbaceous palette that dances on your palate!
Chef’s Notes
This Sweet Pineapple Chicken Quinoa Salad has been a star in my kitchen for years, and it’s amazing how it evolves with every gathering. The first time I made it was an experiment, and I’ll admit I was a bit nervous about the mix of flavors; but just like life, it turned out to be a delightful surprise!
Over the years, I’ve personalized it and discovered all sorts of variations, but the essence of bringing people together remains. Seeing friends and family gobble it up at barbecues and potlucks gives me all the feels. It’s those little moments—grown-ups swiping a second helping, kids laughing over shared bites—that remind me why I started cooking in the first place.
FAQs and Troubleshooting
-
Can I make this salad ahead of time?
Absolutely! You can prepare it a day in advance. Store it in an airtight container in the fridge, and it’s even better the next day as the flavors meld together. -
Why is my quinoa mushy?
- If your quinoa turns mushy, it likely had too much water added. For perfect quinoa, use a 2:1 water-to-quinoa ratio, and don’t skip rinsing!
-
What if I’m allergic to nuts?
- No problem! Omit the pistachios and try sunflower seeds or pumpkin seeds for added crunch.
-
Can I use fresh chicken instead of cooked?
- Definitely! Just grill or roast it before chopping it up, and it’ll add a wonderful freshness to the salad.
Nutritional Info
Here’s the approximate nutritional info for one serving (assuming six servings total) of the Sweet Pineapple Chicken Quinoa Salad:
- Calories: 350
- Protein: 20g
- Fat: 15g
- Carbohydrates: 40g
- Fiber: 5g
- Sugar: 8g
This salad is loaded with beneficial nutrients, thanks to the quinoa and colorful veggies! Plus, it offers a great mix of protein, healthy fats, and fiber to keep you feeling satisfied and energized.
Final Thoughts
So, there you have it—a delightful and vibrant Sweet Pineapple Chicken Quinoa Salad that will brighten your table and your spirit! Remember, cooking is an adventure, and it’s all about experimenting with flavors and making memories. I’d love to hear how your version turns out, so don’t hesitate to share your experiences!
As we close this delicious chapter today, I encourage you to embrace the joy of cooking and share it with everyone around you. Food has a remarkable way of bringing people together, and I’m all about fostering those connections through flavorful experiences. Until next time, stay hungry for flavor and keep spreading the love one plate at a time! Happy cooking! 🍍🥗✨
Print
Sweet Pineapple Chicken Quinoa Salad
- Total Time: 30 minutes
- Yield: 6 servings 1x
- Diet: Gluten-Free
Description
A vibrant bowl of flavor combining fluffy quinoa, succulent chicken, and the sweetness of pineapple tossed with zesty lemon and fresh herbs.
Ingredients
- 4 cups water
- 2 cups uncooked quinoa
- 2 Tablespoons olive oil
- 2 Tablespoons lemon juice
- 2 teaspoons ground ginger
- 1 1/4 teaspoon ground cumin
- 1 teaspoon salt
- 4 cups fresh arugula (roughly chopped)
- 2 cups cooked chicken breast (chopped)
- 1 1/2 cup shelled (whole) pistachios
- 1 cup chopped green onions
- 1 cup fresh cilantro (rinsed and finely chopped)
- 1 cup chopped dried pineapple
- 1 cup dried cherries (roughly chopped)
- 1 cup flaked (unsweetened) coconut
Instructions
- Rinse and cook quinoa: start by rinsing the quinoa under cold water. In a medium saucepan, combine the rinsed quinoa with the 4 cups of water. Bring it to a boil, reduce the heat to low, cover, and let it simmer for about 15 minutes until water is absorbed.
- Prep your dressing: In a small bowl, whisk together the olive oil, lemon juice, ground ginger, ground cumin, and salt. Adjust to taste.
- Chop and combine: In a large mixing bowl, combine your cooked quinoa, arugula, chopped chicken, pistachios, green onions, cilantro, dried pineapple, dried cherries, and coconut.
- Mix the dressing: Drizzle your dressing over the salad mixture and gently fold everything together.
- Taste and adjust: Always taste your creation! Adjust seasoning as necessary.
- Chill out (optional): Let the salad chill in the refrigerator for about 30 minutes to meld flavors.
Notes
For a tropical twist, add diced mango or papaya. You can also substitute chickpeas for the chicken for a vegan option.
- Prep Time: 15 minutes
- Cook Time: 15 minutes
- Category: Salad
- Method: Mixing
- Cuisine: Tropical
Nutrition
- Serving Size: 1 serving
- Calories: 350
- Sugar: 8g
- Sodium: 500mg
- Fat: 15g
- Saturated Fat: 1g
- Unsaturated Fat: 10g
- Trans Fat: 0g
- Carbohydrates: 40g
- Fiber: 5g
- Protein: 20g
- Cholesterol: 60mg
Keywords: quinoa salad, chicken salad, tropical salad, healthy salad, summer salad

Easy Cheesy Potato Burritos
Easy Cheesy Potato Burritos: A Fusion of Comfort and Flavor
Hey food lovers! Beau Collier here, and today we’re diving into a recipe that’s as cozy as your favorite fuzzy blanket—Easy Cheesy Potato Burritos! This dish is not just a meal; it’s an experience, a reminder of all those spontaneous kitchen adventures that turned out surprisingly awesome. Think about it: the crunch of crispy tater tots wrapped in soft, warm tortillas, paired with seasoned ground beef and a melty cheese streak. It’s like having a delightful reunion around the dinner table, where everyone unwraps their burrito and finds a tasty surprise inside.
Whether you’re rushing home from work or just looking to whip up something deliciously satisfying for the family, these burritos will have everyone asking for seconds. And if you’re a fan of feel-good food (which I know you are!), you’re about to love this recipe. Not only is it straightforward, but it also lets you get as creative as your heart desires. So, grab your favorite apron, and let’s make some burritos that’ll have you saying, “Why didn’t I make these sooner?” Ready to dig in? Let’s roll!
Personal Story
Ah, burritos—a true comfort food! I often think back to late-night study sessions during my college days. My roommate and I would hit up the local taco joint after a long week, and nothing felt better than sinking our teeth into a burrito stuffed with all the good stuff. I remember one night, we got a little too adventurous with our order and ended up with a wild combination that involved way too much cheese and some questionable toppings. We laughed until we cried as we tried to fit those burritos in our mouths. Despite the chaotic combination, it was one of the best memories we’ve shared!
Years later, as I started my culinary journey, I realized that I could recreate that nostalgic experience in my own kitchen. Enter these Easy Cheesy Potato Burritos! They evoke the same warmth and laughter shared over those late-night meals. It’s amazing how a simple dish can revive beautiful memories and forge new ones in the process. Let’s make some burritos that are sure to create some kitchen stories of their own!
Ingredients
Here’s what you’ll need for these crowd-pleasing burritos:
-
4 Flour Tortillas
These soft wraps can carry a world of flavors! While I love classic flour tortillas, feel free to experiment with whole wheat or gluten-free options. Just make sure they’re big enough to hold all your delicious fillings! -
1 Cup Cooked and Seasoned Ground Beef
A great protein choice, seasoned to your taste! If you prefer chicken, turkey, or even a meat substitute like lentils or black beans, go for it! Adjust the seasoning accordingly for vegetarian options. -
1 Cup Crispy Tater Tots
The star of the show! These little bites add crunch and comfort. Use frozen tater tots for convenience, or if feeling crafty, homemade seasoned potatoes work wonderfully too! -
1 Cup Shredded Cheese (Cheddar or Mexican Blend)
Cheese is the glue that holds the burrito together! Cheddar gives a classic flavor, while a Mexican blend brings extra zest. For dairy-free options, go with vegan cheese shreds or nutritional yeast for a cheesy flavor! -
1/2 Cup Sour Cream
Creamy and tangy, sour cream is the perfect dollop! Greek yogurt also makes a wonderful, healthy substitute, while a cashew-based sour cream can suit vegan diets. -
1/2 Cup Salsa
Bright and zesty! Use your favorite store-bought salsa or make your own for a fresh twist. You can also spice it up with a mango salsa for added sweetness! -
1 Tablespoon Taco Seasoning
Packed with flavors like chili powder, cumin, and paprika. You can find pre-made seasoning or mix your own. Spice it up as you like according to your palate! -
Salt and Pepper to Taste
These two classic seasonings help enhance all our flavorful ingredients. Don’t skip these for that perfect balance!
Step-by-Step Instructions
Let’s get cooking! Here’s how to bring these burritos to life:
-
Preheat Your Oven
Preheat your oven to 350°F (175°C). This will give your burritos that perfect, warm finish once they’re all wrapped up. -
Prepare the Beef
In a skillet over medium heat, add your cooked ground beef. Sprinkle in the taco seasoning, and mix well. If you’re using leftovers, this is a great way to incorporate flavor. Allow it to warm through, and stir occasionally—let those spices mingle! -
Add the Tater Tots
Now comes the fun part! Add the crispy tater tots to your skillet. You want them to become acquainted with the seasoned beef. Give them a good mix, ensuring everything is evenly coated with seasoning. This step is all about layering flavors! -
Mix in the Cheese
Toss in your shredded cheese! Stir continuously until it’s melted into the beef and tater tots. You’ll love how gooey and wonderful it looks. This is also where you can add an extra sprinkle of taco seasoning if you’re feeling bold. -
Assemble Your Burritos
Lay out a tortilla on a flat surface. Spoon a generous helping of the beef and tater tot mixture onto the center. Drizzle with some sour cream and salsa (don’t hold back!). Fold in the sides and roll it up tightly, making sure nothing spills out. -
Repeat
Do this for the remaining tortillas. Place your burritos seam-side down on a baking sheet. If you ended up with a bit of a mess, that’s totally fine! It means you’ve loaded them with love. -
Warm in the Oven
Pop those burritos in the preheated oven for about 10-15 minutes until they’re warmed through and the tortillas are just lightly crispy. It’s time for the tortillas to bask in that cozy warmth! -
Serve
Take them out and let them cool for a minute (as tempting as it is, don’t burn your tongue!). Serve them alongside extra sour cream and salsa for dipping. You can add a side salad or fresh guac for that extra hit of freshness!
Pro tip: If you want some extra crispy burritos, you can give them a quick sear in a pan with a bit of oil after baking—a golden brown crust is worth the extra step!
Serving Suggestions
These Easy Cheesy Potato Burritos can be plated in some fun and delightful ways. Here’s how to jazz them up:
-
Presentation is Key: Slice your burrito in half to showcase that cheesy, potato-filled goodness. Serve them on a vibrant plate for some color contrast.
-
Garnish: Top them with a sprinkle of fresh cilantro or sliced green onions for that pop of green. Trust me, adding a bit of color always enhances the meal’s appeal!
-
Side Kicks: Serve with a side of homemade salsa or guacamole and a little bowl of sour cream for dipping. Adding some crunchy tortilla chips or a fresh side salad complements the meal beautifully.
-
Drink Pairing: A cool drink helps balance all those flavors. Consider pairing with some chilled lemonade, a creamy horchata, or even a light beer for the adults!
Feel free to get creative—use your favorite platters, colorful napkins, and let the burritos be the stars of the night!
Recipe Variations
The beauty of these burritos is their versatility! Here are some fun variations to keep your taste buds dancing:
-
Veggie Lovers’ Burritos
Swap the ground beef for seasoned black beans or a medley of sautéed bell peppers and onions. It’s a fresh, vibrant take, perfect for meat-free Mondays! -
Breakfast Burritos
Add scrambled eggs to the mix to turn these into a heavenly breakfast option. You can even dive into adding diced tomatoes or jalapeños for that early-morning kick! -
Spicy Cheesy Option
Add chopped jalapeños or a splash of hot sauce for an extra spicy kick. If you love heat, don’t be shy! -
Sweet and Savory Twist
Try adding finely diced pineapple or some apple slices to your beef mixture. The sweetness complements the savory flavors perfectly! -
Loaded with Greens
Mix in shredded spinach or kale for that added nutrient boost. No one will know it’s tucked inside a cheesy burrito!
Chef’s Notes
Each kitchen experience is unique, and these burritos have been a labor of love for me over the years. I remember the first batch I whipped up—let’s just say it could have been classified more as a casserole than the burrito I envisioned! There was cheese oozing out all over the baking dish, but the laughter and joy it brought made every effort worth it.
Over time, I’ve learned the secret of rolling a burrito tightly for the best end result. Experimenting with flavors can be fantastic; you never know when you’ll discover your new favorite filling. So, don’t be afraid to make this recipe your own.
FAQs and Troubleshooting
-
What if my burritos fall apart?
Make sure to wrap them tightly and not overfill them. You can also secure them with a toothpick if need be. -
Can I freeze these burritos?
Absolutely! Make a batch ahead of time, let them cool completely, wrap them in foil, and store them in a freezer-safe bag for up to 2 months. Just reheat directly from the freezer in the oven! -
What can I substitute if I don’t like beef?
Try chicken, turkey, or even a mix of beans and veggies! The world is your oyster, so get creative! -
How can I make these healthier?
Use whole grain tortillas, swap in lean protein choices, and pile on the veggies. You can even use low-fat cheese for a lighter version.
Nutritional Info
For all the health-conscious foodies, here’s a breakdown of the nutritional info for one Easy Cheesy Potato Burrito (approximate values):
- Calories: 500
- Protein: 20g
- Carbohydrates: 45g
- Fat: 25g
- Fiber: 5g
- Sodium: 750mg
Keep in mind that the values can fluctuate based on ingredient choices and portion sizes!
Final Thoughts
And there you have it! Easy Cheesy Potato Burritos that not only taste amazing but also hold the potential for creating beautiful memories in your kitchen. As you gather around the table with family or friends, remember that cooking isn’t just about the food; it’s about sharing love and laughter with those you care about.
The next time you find yourself wondering what’s for dinner, I hope you think back to this recipe! Enjoy the process and all the delicious flavors that come together. Here’s to good food, good company, and unforgettable experiences—now grab a fork and dig in! Happy cooking!
Print
Easy Cheesy Potato Burritos
- Total Time: 45 minutes
- Yield: 4 servings 1x
- Diet: None
Description
A delightful fusion of crispy tater tots, seasoned ground beef, and melty cheese wrapped in warm tortillas, perfect for a cozy meal.
Ingredients
- 4 Flour Tortillas
- 1 Cup Cooked and Seasoned Ground Beef
- 1 Cup Crispy Tater Tots
- 1 Cup Shredded Cheese (Cheddar or Mexican Blend)
- 1/2 Cup Sour Cream
- 1/2 Cup Salsa
- 1 Tablespoon Taco Seasoning
- Salt and Pepper to Taste
Instructions
- Preheat your oven to 350°F (175°C).
- Prepare the ground beef in a skillet, mixing in taco seasoning and warming through.
- Add the crispy tater tots to the skillet and mix well.
- Mix in the shredded cheese until melted.
- Assemble the burritos with the beef and tater tot mixture, sour cream, and salsa.
- Repeat with remaining tortillas, placing them seam-side down on a baking sheet.
- Warm in the oven for 10-15 minutes.
- Serve with extra sour cream and salsa for dipping.
Notes
For extra crispy burritos, give them a quick sear in a pan with oil after baking.
- Prep Time: 15 minutes
- Cook Time: 30 minutes
- Category: Main Course
- Method: Baking
- Cuisine: Mexican
Nutrition
- Serving Size: 1 burrito
- Calories: 500
- Sugar: 5g
- Sodium: 750mg
- Fat: 25g
- Saturated Fat: 10g
- Unsaturated Fat: 15g
- Trans Fat: 0g
- Carbohydrates: 45g
- Fiber: 5g
- Protein: 20g
- Cholesterol: 70mg
Keywords: burritos, cheesy, potatoes, easy recipes, comfort food, quick meals

Quick & Easy Homemade Butter Chicken Recipe
Quick & Easy Homemade Butter Chicken Recipe
Hey there, fellow food lovers! I’m Beau Collier, your culinary guide here at Feastical, where we whip up feel-good food that’s as easy to make as it is to devour. Today, I’m excited to share one of my all-time favorite recipes—Butter Chicken. Now, if you’ve ever enjoyed the rich, creamy goodness of this dish at your favorite Indian restaurant, you’ll be thrilled to learn just how easy it is to replicate in your own kitchen!
Butter Chicken, or "Murgh Makhani," is a dish that radiates warmth and comfort. It’s a luscious blend of tender chicken thighs bathed in a buttery, tangy tomato sauce, with a delightful kick of spices. Whether it’s a cozy weeknight dinner or a show-stopping meal for friends, this recipe is guaranteed to impress. And the best part? You’ll have this dish on the table in less than an hour!
I’ll guide you through each step of the process, sprinkling in some of my chef insights and kitchen hacks, because I believe cooking should always be about joy, not stress. So, put on that apron, grab your favorite cooking playlist, and let’s dive into the heart of what makes Butter Chicken so special!
Personal Story
I’ll never forget the first time I tasted Butter Chicken. I was a wide-eyed teenager on a family trip to a local Indian restaurant. As the rich aroma filled the air, my taste buds danced with anticipation. When that first bite of chicken, drenched in that velvety sauce, hit my palate, it was like a flavor explosion! The combination of spices, the creaminess, and that touch of tomato—it was mesmerizing!
From that moment on, I was hooked. I began experimenting with Indian dishes at home, inspired by my love for the vibrant flavors and aromas. Over the years, I fine-tuned my Butter Chicken recipe, making it accessible, quick, and, yes, always comforting. It has become a staple in my kitchen, often bringing friends and family together around the dinner table, sharing laughter and stories—all while savoring every last bite.
Ingredients
Here’s what you’ll need to whip up your own batch of Butter Chicken:
-
1 ½ pounds skinless boneless chicken thighs: Tender chicken thighs add richness and flavor. If you prefer, you can substitute boneless chicken breasts, but they may dry out quicker, so be mindful of cooking time!
-
3 tablespoons vegetable oil: A neutral oil works best here to sauté the chicken without altering its flavors. Olive oil or canola oil are great alternatives.
-
3 tablespoons butter: The star of the show! Butter adds a creamy richness that is quintessential to Butter Chicken. If you’re looking for a dairy-free version, try using coconut oil.
-
6 garlic cloves (minced): Fresh garlic is essential for that pungent aroma. If you’re in a pinch, garlic powder can work, but fresh is always preferable!
-
1 medium onion (diced): Onions provide a fantastic base for the sauce. Yellow or white onions are perfect here. If you’re short on time, try using a pre-diced onion!
-
1 can (15 ounces) tomato sauce: This creates the rich tomato base. You could also use crushed tomatoes for added texture.
-
2 cups heavy cream: The magic ingredient that turns a simple sauce into something decadent! For a lighter option, you can swap with half-and-half, but it won’t be as creamy.
-
1 teaspoon salt: Essential for bringing out all the flavors.
-
1 teaspoon garlic powder: An extra punch of garlic flavor! You can skip it if you like, but more flavor never hurts, right?
-
1 teaspoon sweet paprika: Sweet paprika adds depth and color to the dish. If you want some smokiness, try smoked paprika as a substitution.
-
½ teaspoon curry powder: This blend typically includes turmeric, cumin, and coriander, offering a hint of warmth. Feel free to adjust the amount based on your taste preference.
-
1 tablespoon Greek yogurt: This adds a tangy creaminess to balance the richness of the sauce. You can substitute with sour cream or omit it entirely if you wish.
-
1 teaspoon sugar: A little sugar balances the acidity from the tomatoes. You can leave it out if you prefer a more savory dish.
-
½ teaspoon black pepper: Freshly ground black pepper brings in a subtle heat.
-
½ teaspoon cayenne pepper (optional): For those who like a kick! Adjust it based on your heat tolerance.
-
1 teaspoon garam masala: This aromatic blend is the finishing touch that elevates the flavors. If you don’t have it, a mixture of cumin, coriander, and cardamom can be a helpful substitute (though it won’t be exactly the same).
Step-by-Step Instructions
Ready to cook up this delight? Let’s do this!
-
Prep Your Station: Before we start cooking, gather all your ingredients and tools—this makes everything go super smoothly! You’ll need a large skillet or sauté pan, a spatula, and some measuring cups and spoons.
-
Sear the Chicken: Heat the vegetable oil in your skillet over medium-high heat. Once hot, add the chicken thighs (cut into bite-size pieces, if you prefer) and sprinkle with salt and pepper. Sear for about 6-8 minutes until golden brown on all sides. (Chef Tip: Don’t overcrowd the pan! Cook in batches if necessary to really get that nice color on the chicken.)
-
Sauté the Aromatics: Remove the chicken from the skillet and set it aside. In the same skillet, add the butter and let it melt. Toss in the diced onion and sauté for about 5 minutes until they’re translucent (nothing beats that sweet, sautéed onion aroma!). Now, add the minced garlic and sauté for an additional minute—just until fragrant.
-
Build the Sauce: Pour in the can of tomato sauce and mix it in. Now, add the heavy cream and stir until combined. Whoo! This is where things get creamy. Bring the sauce to a gentle simmer (don’t let it boil), and add in garlic powder, curry powder, and paprika. Let it simmer gently for about 10 minutes, stirring occasionally. This allows the flavors to meld beautifully.
-
Return the Chicken: Add the seared chicken back into the skillet and mix to coat the chicken in that gorgeous sauce. Reduce the heat to low and stir in the Greek yogurt, sugar, black pepper, and cayenne pepper (if using). Let everything simmer together for another 5-7 minutes so that the chicken becomes tender and flavorful.
-
Finishing Touches: Just before serving, stir in the garam masala. This herby spice blend is what really takes it over the top. Let it simmer for an additional minute, and voilà! Your Butter Chicken is ready!
Serving Suggestions
Now that your dish is all done, let’s talk presentation. A serving of Butter Chicken looks fantastic over a bed of fluffy basmati rice. You can also add some warm naan or roti on the side for digging into all that creamy goodness.
For the perfect finish, garnish with fresh cilantro (or parsley if you’re not a cilantro fan), a drizzle of cream, or even a squeeze of fresh lime for a pop of brightness.
Remember, it’s all about creating that inviting, cozy vibe—you want your guests (or family) to feel right at home while they dive into this delicious plate!
Recipe Variations
Get creative with this Butter Chicken recipe! Here are some fun variations and twists you can try:
-
Vegetarian Delight: Substitute chicken with chickpeas or paneer for a fantastic vegetarian alternative. Just make sure to sauté them slightly before adding them to the sauce.
-
Spicy Twist: Love heat? Add in diced green chilies or increase the cayenne pepper to kick it up another notch!
-
Creamy Coconut: Try using coconut milk instead of heavy cream for a tropical flair—this adds a mild sweetness that pairs beautifully with the spices.
-
One-Pot Wonder: Make it a one-pot meal by adding vegetables like bell peppers or peas!
-
Slow Cooker Version: For a hands-off approach, throw it all into a slow cooker on low for 4-6 hours. Just remember to add the cream toward the end to keep it rich and luscious!
Chef’s Notes
As much as I adore classic Butter Chicken, this dish has evolved for me over the years. I started experimenting with adding different spices or tweaking the level of creaminess. One time, in a rooftop dinner party frenzy, I accidentally added too much cayenne. Instead of despairing, I adjusted with extra cream and sugar—and guess what? It turned out to be a crowd-pleaser!
So, always feel free to adapt recipes to suit your taste. Cooking is a journey, not a destination—each tweak makes it more personal.
FAQs and Troubleshooting
Q: My sauce is too thin; how can I thicken it?
A: If your sauce isn’t thickening to your liking, you can mix a tablespoon of cornstarch with a bit of water to create a slurry and stir it into the simmering sauce. Let it cook for a couple more minutes until thickened.
Q: Can I make this ahead of time?
A: Absolutely! Butter Chicken tastes even better the next day after the flavors have melded together. Just store it in the fridge and reheat gently before serving.
Q: How can I reduce the creaminess of the dish?
A: If you’re looking for a lighter version, simply reduce the amount of heavy cream and substitute with low-fat milk or additional tomato sauce.
Q: Is this recipe dairy-free?
A: To make it dairy-free, swap out the butter and heavy cream for coconut oil and coconut milk. The taste will be different, but it will still be delicious!
Nutritional Info
While Butter Chicken is undeniably delicious, it’s also rich in calories and fat due to the cream and butter. Here’s a general idea of the nutritional information for a typical serving (1 cup, without rice):
- Calories: Approximately 500
- Total Fat: 35g
- Saturated Fat: 20g
- Cholesterol: 150mg
- Sodium: 800mg
- Carbohydrates: 10g
- Fiber: 1g
- Sugar: 5g
- Protein: 40g
Enjoy it in moderation, and it can be part of a delightful meal!
Final Thoughts
There you have it, friends! A quick and easy Butter Chicken recipe that you can whip up any night of the week. It’s packed with flavor, fun, and a whole lot of love. I hope you enjoy making this dish as much as I do, and remember to tag us at Feastical when you share your culinary creations!
Cooking is about joy and connection, and Butter Chicken is the perfect dish to bring everyone together around the table. So, roll up those sleeves, gather your loved ones, and dig into this warm, comforting delight. Until next time—happy cooking! 🍽️
Feel free to customize any portion of this recipe to suit your tastes and dietary preferences. Enjoy your culinary journey!
Print
Quick & Easy Homemade Butter Chicken
- Total Time: 45 minutes
- Yield: 4 servings 1x
- Diet: Non-Vegetarian
Description
A rich and creamy Butter Chicken recipe that’s easy to make at home, perfect for cozy dinners.
Ingredients
- 1 ½ pounds skinless boneless chicken thighs
- 3 tablespoons vegetable oil
- 3 tablespoons butter
- 6 garlic cloves (minced)
- 1 medium onion (diced)
- 1 can (15 ounces) tomato sauce
- 2 cups heavy cream
- 1 teaspoon salt
- 1 teaspoon garlic powder
- 1 teaspoon sweet paprika
- ½ teaspoon curry powder
- 1 tablespoon Greek yogurt
- 1 teaspoon sugar
- ½ teaspoon black pepper
- ½ teaspoon cayenne pepper (optional)
- 1 teaspoon garam masala
Instructions
- Prep your station: Gather all your ingredients and tools.
- Sear the chicken: Heat vegetable oil in skillet, add chicken, and sear until golden brown (6-8 minutes).
- Sauté the aromatics: Remove chicken, add butter and diced onion, sauté for 5 minutes, then add garlic for 1 minute.
- Build the sauce: Pour in tomato sauce, stir in heavy cream, and let it simmer for 10 minutes.
- Return the chicken: Add chicken back, reduce heat, and stir in yogurt, sugar, black pepper, and cayenne (if using). Simmer for 5-7 minutes.
- Finishing touches: Stir in garam masala and simmer for another minute.
Notes
Serve over basmati rice or with naan. Garnish with fresh cilantro and a drizzle of cream.
- Prep Time: 15 minutes
- Cook Time: 30 minutes
- Category: Main Course
- Method: Sautéing
- Cuisine: Indian
Nutrition
- Serving Size: 1 cup
- Calories: 500
- Sugar: 5g
- Sodium: 800mg
- Fat: 35g
- Saturated Fat: 20g
- Trans Fat: 0g
- Carbohydrates: 10g
- Fiber: 1g
- Protein: 40g
- Cholesterol: 150mg
Keywords: Butter Chicken, Indian Cuisine, Easy Recipes
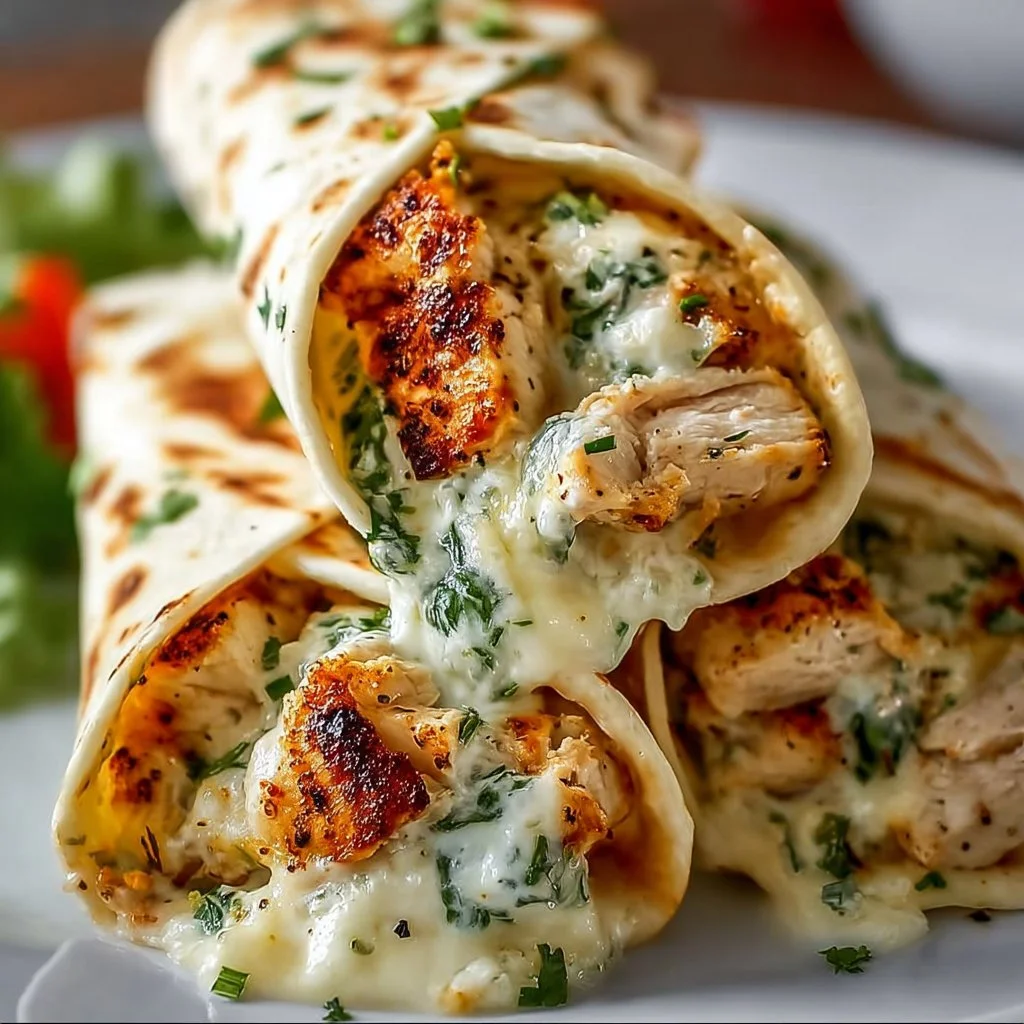
Cheesy Garlic Chicken Wraps
Cheesy Garlic Chicken Wraps: A Wholesome and Flavor-Packed Delight!
Hey there, food lovers! I’m Beau Collier — your friendly neighborhood chef. Today, we’re diving into a delicious creation that’s sure to lick all your culinary worries away: Cheesy Garlic Chicken Wraps! If you’re looking for a meal that’s not only easy to whip up but also bursting with flavor, you’re in for a treat. Grab your apron and let’s get started!
Picture this: It’s a calm weeknight, and the last thing you want to do is hover over the stove for hours. Sound familiar? We’ve all had those days when cooking feels more like a chore than a joy, and that’s why I created Feastical! Life is too short for boring food and endless clean-up. That’s where these Cheesy Garlic Chicken Wraps come in! They’re quick, scrumptious, and a delightful way to enjoy wholesome ingredients without the fuss.
These wraps are like a warm hug after a long day; they combine juicy shredded chicken, gooey melted cheese, and the aromatic allure of garlic — all enveloped in a clever lettuce leaf or wrap of your choice. The beauty of this dish is its flexibility; whether you’re low-carb, gluten-free, or just in the mood to be a bit creative in the kitchen, these wraps can fit the bill.
Let’s unleash your inner chef! I promise you this is a recipe that’s bound to become a family favorite. From meal prep to a spontaneous weeknight dinner, Cheesy Garlic Chicken Wraps are your new go-to. Now, let’s unravel the layers of flavor together!
Personal Story
Growing up, weekends meant family dinners around the table, filled with laughter, stories, and of course, delicious food. One of my fondest childhood memories revolves around my mom’s incredible chicken dishes. No matter how crazy the week had been, her cooking brought us back together. Often, she would whip up a sautéed chicken dish infused with garlic and cheese, which we would wrap in whatever we had – bread, tortillas, or even lettuce!
The smell of garlic sizzling in the pan still evokes warmth and nostalgia for me. Fast-forward to today, I’ve taken that comforting recipe and turned it into these easy, cheesy wraps. Each bite transports me back to those cherished moments — and I want you to feel that same joy when you make them!
Ingredients
-
2 cups cooked chicken, shredded
This is the star of the dish! Use rotisserie chicken for convenience, or roast your own. If you’re vegetarian, you can substitute with shredded jackfruit or tofu for a meaty texture. -
1 cup shredded cheese (cheddar or mozzarella)
Cheese adds that gooey goodness we’re all craving! Cheddar delivers rich flavor, while mozzarella gives you that stretch factor. Feel free to switch it up with pepper jack for a kick! -
4 large lettuce leaves or low carb wraps
Iceberg or romaine works perfectly for a fresh crunch. If you prefer wraps, look for whole grain or gluten-free options. Experiment with your favorite flatbreads, just make sure they’re sturdy enough to hold all that delicious filling. -
2 cloves garlic, minced
Garlic is my secret love. It elevates any dish! You can substitute with garlic powder if that’s all you have on hand—about 1 teaspoon should do the trick. -
1 tablespoon olive oil
This adds a bit of richness. If you’re keen on flavor, try infused oils, like garlic or chili oil. -
Salt and pepper to taste
These basics are essential! Adjust according to your taste — feel free to spice it up with paprika or cayenne for an extra zing! -
Optional: diced tomatoes, avocado, or your choice of veggies
Customize your wrap! Fresh veggies add crunch and color. Avocado gives that creamy texture, while diced tomatoes burst with freshness.
Remember, cooking isn’t a strict science; it’s about experimenting and making it your own!
Step-by-Step Instructions
Now, let’s bring all these glorious ingredients together! Here’s how to create your Cheesy Garlic Chicken Wraps:
Step 1: Prepare Your Chicken
If you’re using leftover cooked chicken or rotisserie chicken, shred it into bite-sized pieces. If you’re cooking from scratch, season chicken breasts with salt and pepper, then grill or bake until cooked through (about 20-30 minutes). Let it cool a bit before shredding—trust me, those fingertips will thank you!
Step 2: Sauté the Garlic
In a skillet, warm the olive oil over medium heat. Once it’s shimmering (but not smoking!), toss in the minced garlic. Cook for 1-2 minutes until it becomes fragrant—be careful not to burn it! This will create a wonderful base for the chicken.
Step 3: Add Chicken and Cheese
Now, add the shredded chicken to the skillet, stirring it to coat with that garlicky goodness. Sprinkle in half (or all!) of the shredded cheese at this point. You want it to melt and mingle well with the chicken. Cook for another 2-3 minutes — that’s right, let it ooze and combine!
Step 4: Prepare the Lettuce or Wraps
While the chicken and cheese are merging into pure bliss, prepare your lettuce or wrap. If using lettuce leaves, rinse and pat them dry. If you’re using low carb wraps, heat them slightly in a dry pan or microwave until they’re pliable.
Step 5: Assemble Your Wraps
Spoon the cheesy chicken mixture onto each lettuce leaf or wrap. Here’s the fun part: add any optional toppings like diced tomatoes, zesty avocado, or extra cheese. You want to create a festive explosion of color and flavor!
Step 6: Roll and Enjoy!
If you’ve opted for wraps, fold them up and secure with a toothpick or simply embrace the mess! If you’ve chosen lettuce leaves, fold them over and dive in. These wraps are best enjoyed fresh and warm!
Serving Suggestions
Now that you have your wraps ready, let’s talk presentation! Serve your Cheesy Garlic Chicken Wraps on a beautiful platter, garnished with fresh herbs like cilantro or parsley to add freshness. A squeeze of lemon or lime juice on top brightens the dish and adds a pop of acidity.
Pair these wraps with a crisp side salad, maybe a tangy vinaigrette dressing to complement the richness of the cheese and chicken. You could even set up a little wrap bar, allowing everyone to customize their own with their favorite toppings — how fun is that?
Recipe Variations
One of the best things about this recipe is its adaptability! Here are a few tasty twists you can try:
-
Buffalo Chicken Wraps: Add buffalo sauce to your chicken mixture for a fiery kick. Top with some crumbled blue cheese and celery sticks.
-
Mediterranean Style: Toss in some diced cucumbers, Kalamata olives, and feta cheese for a Mediterranean spin. You could also switch to pita wraps.
-
Veggie-Packed: Load it with additional veggies like bell peppers, corn, or spinach for a heartier, nutrient-focused wrap.
-
BBQ Twist: Instead of olive oil and garlic, use BBQ sauce with the chicken. Add pickles, too, for that classic BBQ chicken flavor.
-
Breakfast Wrap: Feel free to scramble some eggs and mix it into the chicken. It makes a versatile breakfast or brunch option!
Whatever your taste buds crave, these wraps are here for it!
Chef’s Notes
I’ve played around with this recipe over the years, and it’s developed into something I adore. It originally started as just a quick meal, but every time I make these wraps, I discover new ways to enjoy them. One time, I added caramelized onions, and boy, did that create a flavor explosion!
And hey, don’t sweat the small stuff in the kitchen! I once dropped an entire plate of wraps right before serving; instead of panicking, I grabbed a round casserole dish, piled everything in there, and called it a “deconstructed wrap.” It got rave reviews! Cooking is as much about creativity as it is about following a recipe.
FAQs and Troubleshooting
-
Q: What if my chicken is dry?
A: Moisture is key! If your chicken is a bit dry, try adding a splash of chicken broth or extra cheese when mixing to bring it back to life. -
Q: Can I make these ahead of time?
A: Absolutely! Just store each element in separate airtight containers in the fridge. Assemble just before serving to keep everything fresh. -
Q: What can I use instead of cheese?
A: If you’re looking to skip dairy, Daiya or other vegan cheeses work wonders. You can also opt for a creamy avocado spread. -
Q: How do I ensure my wraps don’t fall apart?
A: Here’s the chef’s secret: don’t overfill! Make sure to leave enough space to fold or roll without bursting at the seams.
Nutritional Info
Let’s break down the nutrition of these delightful wraps per serving (assuming basic ingredients):
- Calories: Approximately 320
- Protein: 30g
- Fat: 15g
- Carbohydrates: 20g (depending on the wrap used)
- Fiber: 4g
Of course, variations will change this, but you get a good pantry of protein and healthy fats. Pairing it with veggies also adds essential vitamins and minerals to the dish!
Final Thoughts
There you have it, my friends — a scrumptious, soul-satisfying recipe for Cheesy Garlic Chicken Wraps! Whether you opt for these as a solo meal or something to share with the fam, they are sure to leave you all wanting more.
Cooking doesn’t have to be complicated or time-consuming; it’s all about embracing fresh ingredients, experimenting, and ultimately enjoying the process. So, roll up your sleeves and dive into your own kitchen adventure.
I can’t wait to hear your thoughts and stories about these wraps. Remember, at Feastical, every bite should feel like a celebration! Until next time, keep cooking with love and laughter — let the culinary magic flow!
Happy cooking, and let’s keep this kitchen love rolling! 🍽️💖
Print
Cheesy Garlic Chicken Wraps
- Total Time: 25 minutes
- Yield: 4 servings 1x
- Diet: Gluten-Free
Description
Delicious and easy-to-make cheesy garlic chicken wraps, perfect for a quick weeknight meal.
Ingredients
- 2 cups cooked chicken, shredded
- 1 cup shredded cheese (cheddar or mozzarella)
- 4 large lettuce leaves or low carb wraps
- 2 cloves garlic, minced
- 1 tablespoon olive oil
- Salt and pepper to taste
- Optional: diced tomatoes, avocado, or your choice of veggies
Instructions
- Prepare your chicken by shredding it into bite-sized pieces.
- Sauté the garlic in olive oil over medium heat until fragrant.
- Add the shredded chicken and cheese to the skillet and cook until melted.
- Prepare the lettuce or wraps for assembling.
- Assemble your wraps by spooning the cheesy chicken mixture onto each leaf or wrap.
- Roll the wraps and enjoy fresh and warm!
Notes
Feel free to customize the wraps with your choice of additional toppings or variations.
- Prep Time: 10 minutes
- Cook Time: 15 minutes
- Category: Main Course
- Method: Sautéing
- Cuisine: American
Nutrition
- Serving Size: 1 wrap
- Calories: 320
- Sugar: 2g
- Sodium: 500mg
- Fat: 15g
- Saturated Fat: 6g
- Unsaturated Fat: 7g
- Trans Fat: 0g
- Carbohydrates: 20g
- Fiber: 4g
- Protein: 30g
- Cholesterol: 60mg
Keywords: cheesy wraps, garlic chicken, quick meal, easy dinner, family favorite
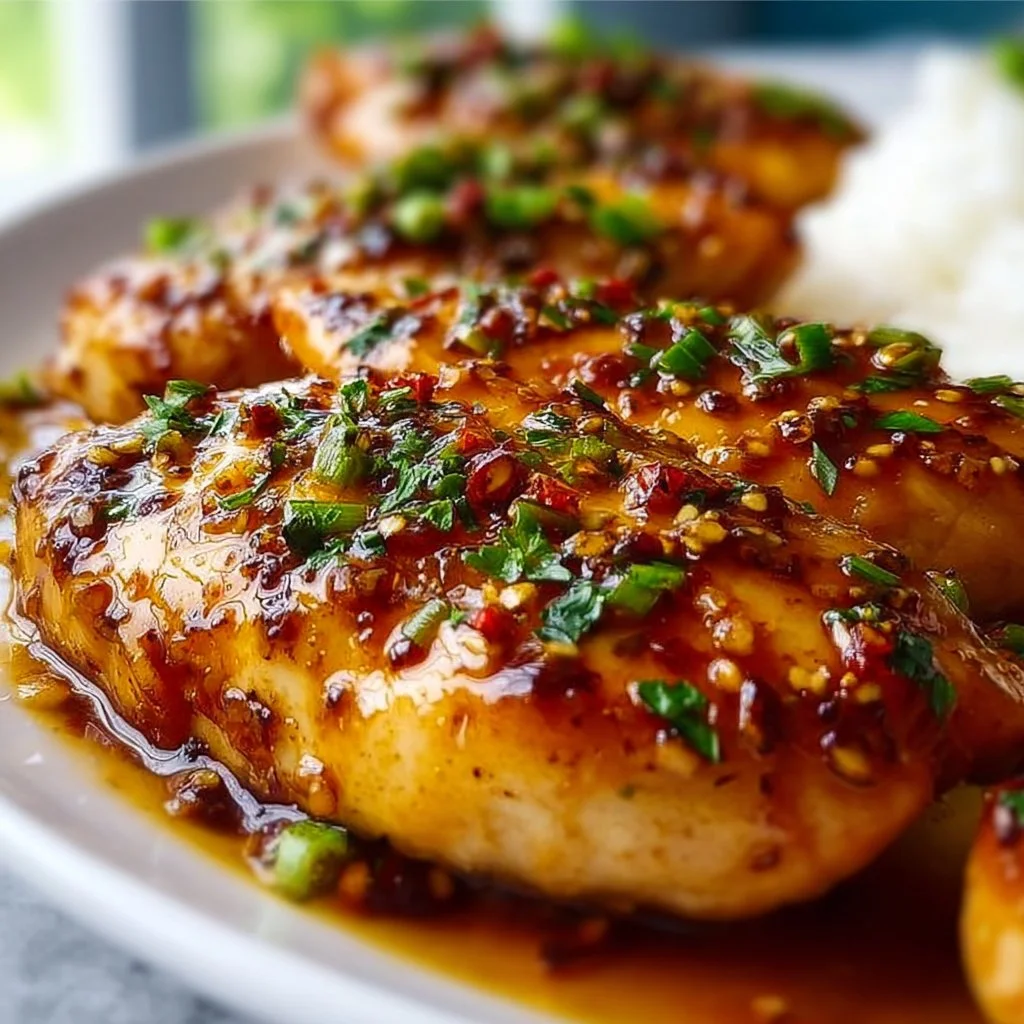
Honey Garlic Chicken Breasts
Honey Garlic Chicken Breasts: Your New Go-To Comfort Dish
Hello, culinary explorers! Beau Collier here, and today we’re diving into a dish that’s been a staple in my kitchen for years: Honey Garlic Chicken Breasts. If you’re looking for a recipe that’s not only easy to whip up but also bursting with flavor, you’re in the right place. This dish combines the sweet embrace of honey with the savory kick of garlic, all slathered over tender, juicy chicken. Grab your spatula, and let’s get cooking!
Introduction: Comfort Food at Its Best
There’s something magical about the combination of honey and garlic—it’s like they were made for each other. The sweetness of honey perfectly complements the boldness of garlic, creating a dance of flavors that will leave your taste buds singing. When I first discovered this recipe, I was on a mission to find a quick yet satisfying dish that could double as my weeknight dinner and impress my weekend guests.
Plus, let’s be honest—who doesn’t love a dish where the aromatic garlic fills your kitchen, wrapping you in warmth and comfort as it cooks? This Honey Garlic Chicken takes only about 30 minutes from start to finish, leaving you plenty of time to kick back with a glass of wine or a cozy movie. It’s perfect for busy evenings when you want a homemade meal without the fuss. So, throw on your apron and prepare for a culinary journey that will leave your family and friends begging for seconds!
Personal Story: A Memory from Mom’s Kitchen
I can still remember the first time my mom whipped up Honey Garlic Chicken in our tiny, bustling kitchen. It was one of those rainy Sunday afternoons where we always found ourselves gathered around the stove, the aroma of something delicious wafting through the house. I was about ten years old and terribly curious about what went into ‘the magic.’ As Mom stirred the sauce, she let me in on her secrets—the perfect balance of sweetness and savory flavor.
That day, not only did we enjoy a fantastic meal, but it also sparked my lifelong passion for cooking. I learned that food has an incredible power to bring people together, bridge generations, and create lasting memories. Fast forward to today, and I’m delighted to share this recipe with you, hoping it brings the same joy and flavor to your kitchen that it did to mine.
Ingredients
Here’s what you’ll need for this delightful dish:
-
4 boneless chicken breasts
Tender and juicy, boneless chicken breasts are super versatile. If you’re not a fan, feel free to swap them for thighs for a more flavorful option. -
1/2 cup honey
The star of the show! Honey adds sweetness and gloss to your chicken. If you’re looking for a fabulous alternative, try maple syrup or agave nectar for a similar texture and flavor. -
4 cloves garlic, minced
Garlic brings the punch! Freshly minced garlic is ideal, but if you’re in a pinch, pre-minced from a jar works in a cluck—but don’t tell my mom! -
1 tablespoon soy sauce
A little umami! It blends nicely with the honey and helps to enhance the flavors. For a gluten-free version, opt for tamari or coconut aminos. -
1 tablespoon olive oil
This not only helps in cooking the chicken but also adds a touch of richness. If you’re looking for a lighter alternative, avocado oil is a great choice. -
Salt and pepper to taste
Simple yet essential seasonings! Remember to season thoughtfully—salt enhances the flavors while pepper gives a little kick. -
Cooked rice or vegetables for serving
This dish pairs beautifully with fluffy rice or steamed veggies, soaking up all that sweet garlic goodness.
Step-by-Step Instructions
Ready to get started? Let’s transform those ingredients into a meal that your taste buds will never forget!
-
Prep the Chicken:
Start by placing the chicken breasts on a cutting board. Pat them dry with paper towels. This ensures a great sear. Sprinkle both sides generously with salt and pepper. Pro tip: Let the chicken sit at room temperature for about 15-20 minutes—this helps it cook evenly. -
Make the Sauce:
In a mixing bowl, whisk together the honey, minced garlic, soy sauce, and olive oil. Taste your sauce and adjust as needed. If you love a little heat, toss in a pinch of red pepper flakes. It’s amazing what a little spice can do! -
Cook the Chicken:
Heat a large skillet over medium-high heat and drizzle in some olive oil—just enough to coat the bottom. When the oil shimmers, place the chicken breasts in the skillet. Sear for about 5-7 minutes without moving them. Flip and let them cook until the internal temperature reaches 165°F (about another 5-7 minutes).Chef Hack: For extra tenderness, don’t overcook! Use a meat thermometer for precise results.
-
Glaze the Chicken:
When your chicken is nearly done, pour the honey garlic sauce over it. Baste the chicken with the sauce as it cooks for an additional minute or two, creating a beautiful glaze. Don’t let the sauce burn—or you’ll be left with an unappetizing sticky mess. Keep an eye on it! -
Rest and Serve:
Once cooked, transfer the chicken to a plate and let it rest for about 5 minutes. This is crucial for retaining juices and ensuring every bite is perfect.Serving Tip: Serve the chicken over a bed of rice or beside a colorful medley of steamed veggies. Drizzle some of that glorious sauce over everything—no need to be shy!
Serving Suggestions
Presentation is key! You want your dish to look as good as it tastes. Here are some fun ideas for plating your Honey Garlic Chicken:
-
Rice Bowl: Create a rice bowl with heaps of rice, sliced chicken, and drizzles of extra sauce. Top with sesame seeds and chopped green onions for a pop of color.
-
Plate it Up: For an elegant dinner, arrange the chicken slices on a white plate and garnish with fresh cilantro or parsley. This adds a beautiful touch and a hint of freshness.
-
Vegetable Medley: Pair it with roasted or steamed vegetables. Think broccoli, bell peppers, or snap peas. They not only complement the chicken brilliantly but also add vibrant colors to your plate!
Recipe Variations
Let’s get a bit creative! Here are some tasty twists on this classic recipe:
-
Spicy Honey Garlic Chicken: Add 1-2 tablespoons of sriracha or chili paste to the glaze for a spicy kick. This gives your dish a delightful heat that balances perfectly with the sweetness!
-
Lemon Zest: For a bright and zesty flavor, add the zest of one lemon to the honey garlic mixture. It elevates the taste and adds a refreshing note!
-
Pineapple Twist: Incorporate diced pineapples into the glaze for a tropical vibe. This adds a juicy sweetness that pairs beautifully with the savory notes.
-
Baked Version: For a healthier option, bake the chicken in the oven. Preheat to 375°F and bake for 25-30 minutes, drizzling the glaze halfway through cooking.
-
Vegetarian Option: Swap the chicken for firm tofu or tempeh for a delicious vegetarian alternative. Just ensure to press the tofu to remove excess moisture before cooking.
Chef’s Notes
This recipe has evolved over time. What started as a simple weeknight meal turned into my signature dish among friends and family. I remember one dinner party where I had an unexpected surprise guest. I had to make this dish on the fly and let me tell you, it was a hit! Everyone raved about it and demanded the recipe—what a compliment!
Cooking is an adventure, and this Honey Garlic Chicken has taught me that simplicity is key. You don’t need fancy equipment or hours in the kitchen to create greatness; just a dash of love and a sprinkle of creativity!
FAQs and Troubleshooting
-
Why is my glaze too thick?
If the glaze thickens too much while cooking, just add a splash of water or chicken broth to loosen it up. This helps maintain that saucy goodness! -
What if my chicken is dry?
Overcooking is the main culprit. Always use a meat thermometer for the best results. If you find yourself with dry chicken, slice it and serve with extra sauce to inject moisture. -
Can I make this ahead of time?
Absolutely! You can marinate the chicken in the honey garlic mixture for a few hours or overnight for more flavor. Cook it fresh when you’re ready! -
What can I serve this with?
Besides rice and veggies, feel free to serve with quinoa, naan bread, or even a fresh salad. The possibilities are endless!
Nutritional Information
Per serving (based on 4 servings):
- Calories: 290
- Protein: 29g
- Total Fat: 7g
- Saturated Fat: 1g
- Carbohydrates: 31g
- Fiber: 1g
- Sugar: 23g
This dish hits the sweet spot for satisfying flavor without packing on the extra calories—perfect for your weekly menu!
Final Thoughts
I can confidently say that Honey Garlic Chicken Breasts are a dish everyone should have in their recipe repertoire. Whether you’re cooking for yourself, your family, or a special occasion, this recipe is sure to impress! It’s a wonderful reminder that cooking doesn’t have to be complicated to be delicious.
So, what are you waiting for? Gather your ingredients, roll up your sleeves, and let’s make some magic in the kitchen! And remember, if you love this recipe, let me know! Share your creations with me on social media—I’d love to see your delicious versions!
Happy cooking, and until next time, keep spreading the joyous flavors! 🍽️
Print
Honey Garlic Chicken Breasts
- Total Time: 45 minutes
- Yield: 4 servings 1x
- Diet: Gluten-Free
Description
A quick and flavorful dish combining the sweetness of honey and the savory kick of garlic over tender chicken.
Ingredients
- 4 boneless chicken breasts
- 1/2 cup honey
- 4 cloves garlic, minced
- 1 tablespoon soy sauce
- 1 tablespoon olive oil
- Salt and pepper to taste
- Cooked rice or vegetables for serving
Instructions
- Prep the chicken: Place the chicken breasts on a cutting board and pat them dry with paper towels. Season with salt and pepper.
- Make the sauce: In a mixing bowl, whisk together honey, minced garlic, soy sauce, and olive oil.
- Cook the chicken: Heat a skillet over medium-high heat and add olive oil. Sear the chicken for 5-7 minutes on each side until cooked through.
- Glaze the chicken: Pour the honey garlic sauce over the chicken and baste for an additional couple of minutes.
- Rest and serve: Transfer the chicken to a plate and let it rest for 5 minutes before serving.
Notes
For a spicy kick, add sriracha to the glaze. You can also bake the chicken for a healthier option.
- Prep Time: 15 minutes
- Cook Time: 30 minutes
- Category: Main Course
- Method: Stovetop
- Cuisine: American
Nutrition
- Serving Size: 1 serving
- Calories: 290
- Sugar: 23g
- Sodium: 500mg
- Fat: 7g
- Saturated Fat: 1g
- Unsaturated Fat: 4g
- Trans Fat: 0g
- Carbohydrates: 31g
- Fiber: 1g
- Protein: 29g
- Cholesterol: 80mg
Keywords: honey garlic chicken, easy chicken recipe, weeknight dinner