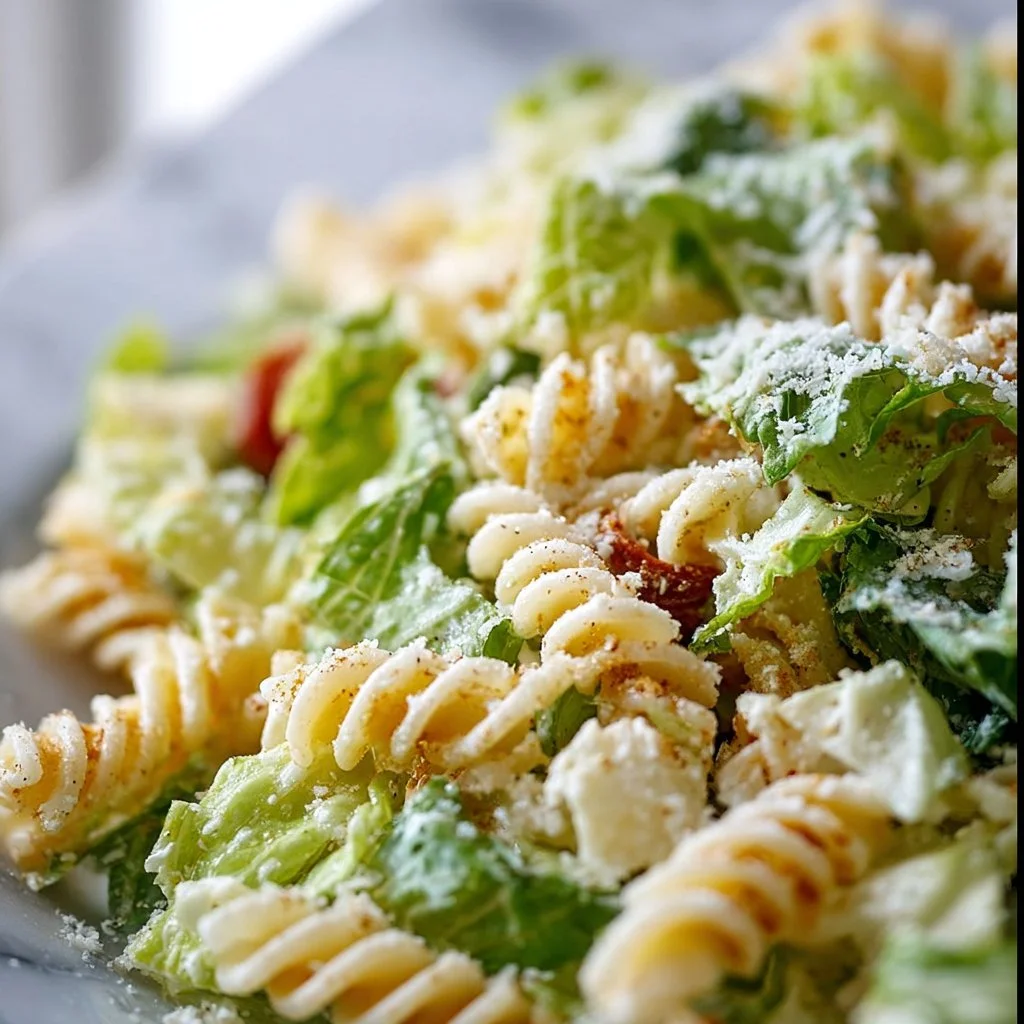
Fusilli Caesar Salad
The Delectable Delight of Fusilli Caesar Salad
Introduction
Hey food lovers! It’s a sunny day here, and you know what that means—it’s the perfect opportunity to whip up something fresh, delightful, and utterly satisfying. Today, we are diving into a beloved classic with a twist: Fusilli Caesar Salad! Now I know what you might be thinking: “Caesar salad? What’s so special about that?” But let me tell you, this isn’t just any Caesar salad. We’re taking the traditional flavors you know and love and marrying them with the fun, spiral shape of fusilli pasta. Trust me; it’s a match made in kitchen heaven!
Fusilli pasta, with its whimsical twists and turns, serves as the ideal base for all those classic Caesar flavors. Imagine sinking your fork into a spiraled piece of pasta, coated with creamy Caesar dressing, crispy romaine, and a sprinkle of nutty Parmesan, all topped with crunchy croutons. It’s not only delicious but also incredibly satisfying! Whether you’re preparing lunch for yourself, impressing friends at a dinner party, or just wanting to enjoy a big bowl of comfort food, this recipe is your golden ticket.
But hang tight! This isn’t just about tossing some ingredients together. There’s a little story behind this dish and plenty of tips to ensure it turns out perfectly every time. So, roll up those sleeves, grab your favorite apron, and let’s dive into the wonderful world of Fusilli Caesar Salad!
Personal Story
Before we get into the nitty-gritty of the recipe, I want to share a little something about where my love for Caesar salad began. Picture this: I was just a little kid, tagging along with my mom to our favorite Italian restaurant—Mama Mia’s—that was the spot in our neighborhood. The ambiance was always buzzing with laughter, clinking glasses, and the smell of homemade garlic bread wafting through the air.
Every visit, I would eye that glorious Caesar salad on the menu. Mom always ordered it as a starter, and sometimes—okay, most times—she would share a bit with me. I remember that crisp romaine, creamy dressing, and those crunchy croutons that would disappear in seconds! We’d joke that if I could bathe in Caesar dressing, I would.
Fast forward a few years, and I found myself experimenting in my own kitchen, trying to recreate that delicious memory. And guess what? I decided to add fusilli. The result? Pure magic! Now every time I make this salad, it takes me back to those fun lunches filled with laughter and love. Let me show you how to make this classic dish with my own little twist!
Ingredients
Here’s what you’ll need to create your delicious Fusilli Caesar Salad:
-
8 oz fusilli pasta
This corkscrew-shaped pasta is perfect for holding onto the creamy dressing. You can substitute it with any short pasta like rotini or farfalle, but I promise, fusilli is where the party’s at! -
2 cups romaine lettuce, chopped
Romaine adds that distinctive crunch and freshness. Feel free to use kale for a twist or baby spinach if you prefer a milder taste! -
1/2 cup cherry tomatoes, halved
These sweet little tomatoes add a pop of color and flavor. Instead, you can use diced cucumbers for a refreshing spin. -
1/4 cup grated Parmesan cheese
Parmesan brings a nutty depth of flavor. For a vegan option, nutritional yeast is a great cheese substitute! -
1/4 cup Caesar dressing
The heart and soul of this salad! You can go with store-bought or make your own. Preferences vary, but creamy or light dressings both work! -
Salt and pepper to taste
A pinch of salt and a dash of pepper elevate all the flavors. Experiment with seasoning to taste! -
Croutons for topping
The crunchy finish that makes everything better! You can buy them pre-made or easily make your own by toasting bread bits in the oven.
Step-by-Step Instructions
Now that you have all your ingredients lined up, let’s get cooking! Follow these simple steps, and I promise you’ll create a masterpiece.
-
Boil the Fusilli
Start by bringing a large pot of salted water to a rolling boil. Add your fusilli pasta and cook according to package instructions (usually around 8-10 minutes). Trust your instincts here—al dente is key! It should be firm yet tender. Chef’s tip: Reserve about a half-cup of pasta water before draining; you might need it later for that perfect creamy texture! -
Drain and Rinse
Once cooked, drain the pasta in a colander. This step is crucial—rinsing your pasta under cold water will stop the cooking process and keep it from sticking! Pro tip: Use this moment to make sure you shake out any excess water; otherwise, your salad may get a bit soggy. -
Prepare the Lettuce & Tomatoes
While your pasta cools, grab a large mixing bowl and chop your romaine lettuce. Add it to the bowl along with the halved cherry tomatoes. I love to toss the tomatoes in a light drizzle of olive oil and a sprinkle of salt to enhance their natural sweetness. Your taste buds will thank you! -
Mix in the Pasta
Once the fusilli is completely cooled, toss it into the bowl with the lettuce and tomatoes. Now for the fun part: drizzle your Caesar dressing over the mix! Make sure you stir it all together so every curly piece of pasta gets coated. This is the moment to add a little reserved pasta water if you want to thin out the dressing for better coverage. -
Cheesy Goodness
Now, sprinkle that grated Parmesan cheese over the top and give it another gentle toss. The cheese will meld beautifully with the dressing; it’s like a warm hug for your salad! -
Season It
Take a moment to taste your salad. Season with salt and pepper to your liking. It’s essential to adjust the seasoning, as this will elevate the other flavors, trust me! -
Top with Croutons
Just before serving, pile on those crispy croutons. They add that incredible crunch that every perfect salad needs. You can also toss in some extra Parmesan for good measure!
Serving Suggestions
Now that your Fusilli Caesar Salad is prepared, it’s time to serve! I love plating it in pretty bowls or on a large family-style platter. Drizzle a touch more dressing on top, and for a creative visual flair, you might sprinkle some additional Parmesan cheese around. If you’re feeling vibrant, chop some fresh herbs like parsley or basil and sprinkle them over the top for an aromatic touch! It’s not just about flavor; it’s about making a dish that looks inviting too.
Serve this salad as a main dish for a light lunch or alongside grilled chicken or fish for dinner— it’s perfect for gathering around the table with family and friends. Pair it with a chilled glass of white wine or sparkling water with lemon slices, and you have a culinary experience that feels like a special occasion!
Recipe Variations
In the spirit of creativity, let’s explore some fun variations for your Fusilli Caesar Salad! Here are a few ideas to get those culinary juices flowing:
-
Grilled Chicken Caesar Salad
Spice things up by adding slices of grilled chicken breast. Marinate the chicken in lemon juice, olive oil, and garlic before grilling for extra flavor! -
Shrimp Caesar Salad
Swap out chicken for grilled shrimp—just season them lightly and grill until they’re perfectly pink and juicy! -
Veggie-loaded Caesar
Add roasted veggies like bell peppers, zucchini, or asparagus for an earthy twist. It’s a perfect way to sneak in more nutrients! -
Spicy Caesar Salad
If you’re looking to kick it up a notch, add a hint of sriracha to your dressing or sprinkle chili flakes on top for that extra kick! -
Vegan Caesar Salad
Substitute the Caesar dressing with tahini-based dressing and replace the Parmesan with nutritional yeast for a tasty vegan alternative.
Chef’s Notes
Cooking is not just about following a recipe; it’s about personalizing it and making it your own. This Fusilli Caesar Salad has evolved over time in my kitchen. What started as a nostalgic reflection of days gone by is now a canvas for creativity. Every time I make it, I think back to my childhood, but I also explore new flavors and ingredients to keep things fresh!
A funny kitchen story? One time, I was trying to impress some friends by whipping up this salad for the first time using homemade croutons. In my excitement, I burned them! Instead of tossing them, I embraced the crunch, and to my surprise, it turned into a humorous conversation starter. Sometimes kitchen mishaps lead to the best memories!
FAQs and Troubleshooting
-
Why is my salad too soggy?
Dust that pasta off! If you don’t rinse your fusilli after cooking, residual heat and moisture can make everything mushy. Always rinse under cold water! -
My dressing is too thick. What can I do?
If your dressing is on the thicker side, add a splash of lemon juice or reserved pasta water. Stir well to loosen it up! -
Can I make this ahead of time?
You can prepare the ingredients ahead of time but toss everything together just before serving to keep that crispness! -
What if I don’t have croutons?
No problem! You can rough up some stale bread, season it, and toast it in the oven to create your own croutons in a pinch!
Nutritional Info
Now, let’s break down the nutritional side of this delicious dish!
- Calories: Approximately 350 calories per serving
- Protein: 12g
- Fat: 15g
- Carbohydrates: 42g
- Fiber: 3g
- Sugars: 2g
This salad is well-balanced with carbs from the pasta, healthy fats from the dressing and cheese, and the added benefits of fresh veggies. Plus, it’s customizable to meet dietary needs without sacrificing flavor!
Final Thoughts
Embrace the spirit of fun and creativity in the kitchen, because that’s where the real magic happens! Fusilli Caesar Salad is not just a dish; it’s a joyous blend of flavors and memories designed to bring people together.
I hope this recipe finds its way into your heart (and your recipe collection!). Let it inspire your own kitchen adventures, and feel free to play around with ingredients. Whether you’re hosting a gathering or enjoying a cozy night in, remember to savor each bite!
I can’t wait for you to share your own Fusilli Caesar Salad stories. Drop me a comment once you try it out, or better yet—snap a pic of your scrumptious creation and tag me on social media! Let’s keep feeding the love for food together.
Happy cooking, my friends! 🍽️💚
Print
Fusilli Caesar Salad
- Total Time: 25 minutes
- Yield: 4 servings 1x
- Diet: Vegetarian
Description
A delightful twist on a classic Caesar salad, featuring fusilli pasta, crunchy romaine, and creamy dressing.
Ingredients
- 8 oz fusilli pasta
- 2 cups romaine lettuce, chopped
- 1/2 cup cherry tomatoes, halved
- 1/4 cup grated Parmesan cheese
- 1/4 cup Caesar dressing
- Salt and pepper to taste
- Croutons for topping
Instructions
- Boil the fusilli by bringing a large pot of salted water to a boil and cooking according to package instructions (around 8-10 minutes).
- Drain and rinse the pasta in cold water to stop the cooking process.
- Prepare the lettuce and tomatoes by chopping the romaine and adding it to a mixing bowl with the halved cherry tomatoes.
- Mix in the pasta, drizzle Caesar dressing, and toss to coat everything evenly.
- Cheesy goodness: sprinkle grated Parmesan cheese over the top and give it a gentle toss.
- Season with salt and pepper to taste.
- Top with croutons just before serving.
Notes
For a vegan option, substitute Parmesan with nutritional yeast and use a tahini-based dressing.
- Prep Time: 15 minutes
- Cook Time: 10 minutes
- Category: Salad
- Method: Mixing
- Cuisine: Italian
Nutrition
- Serving Size: 1 serving
- Calories: 350
- Sugar: 2g
- Sodium: 400mg
- Fat: 15g
- Saturated Fat: 6g
- Unsaturated Fat: 7g
- Trans Fat: 0g
- Carbohydrates: 42g
- Fiber: 3g
- Protein: 12g
- Cholesterol: 20mg
Keywords: Fusilli, Caesar Salad, Pasta Salad, Vegetarian Salad, Healthy Salad

Easy Cheesy Potato Burritos
Easy Cheesy Potato Burritos: A Fusion of Comfort and Flavor
Hey food lovers! Beau Collier here, and today we’re diving into a recipe that’s as cozy as your favorite fuzzy blanket—Easy Cheesy Potato Burritos! This dish is not just a meal; it’s an experience, a reminder of all those spontaneous kitchen adventures that turned out surprisingly awesome. Think about it: the crunch of crispy tater tots wrapped in soft, warm tortillas, paired with seasoned ground beef and a melty cheese streak. It’s like having a delightful reunion around the dinner table, where everyone unwraps their burrito and finds a tasty surprise inside.
Whether you’re rushing home from work or just looking to whip up something deliciously satisfying for the family, these burritos will have everyone asking for seconds. And if you’re a fan of feel-good food (which I know you are!), you’re about to love this recipe. Not only is it straightforward, but it also lets you get as creative as your heart desires. So, grab your favorite apron, and let’s make some burritos that’ll have you saying, “Why didn’t I make these sooner?” Ready to dig in? Let’s roll!
Personal Story
Ah, burritos—a true comfort food! I often think back to late-night study sessions during my college days. My roommate and I would hit up the local taco joint after a long week, and nothing felt better than sinking our teeth into a burrito stuffed with all the good stuff. I remember one night, we got a little too adventurous with our order and ended up with a wild combination that involved way too much cheese and some questionable toppings. We laughed until we cried as we tried to fit those burritos in our mouths. Despite the chaotic combination, it was one of the best memories we’ve shared!
Years later, as I started my culinary journey, I realized that I could recreate that nostalgic experience in my own kitchen. Enter these Easy Cheesy Potato Burritos! They evoke the same warmth and laughter shared over those late-night meals. It’s amazing how a simple dish can revive beautiful memories and forge new ones in the process. Let’s make some burritos that are sure to create some kitchen stories of their own!
Ingredients
Here’s what you’ll need for these crowd-pleasing burritos:
-
4 Flour Tortillas
These soft wraps can carry a world of flavors! While I love classic flour tortillas, feel free to experiment with whole wheat or gluten-free options. Just make sure they’re big enough to hold all your delicious fillings! -
1 Cup Cooked and Seasoned Ground Beef
A great protein choice, seasoned to your taste! If you prefer chicken, turkey, or even a meat substitute like lentils or black beans, go for it! Adjust the seasoning accordingly for vegetarian options. -
1 Cup Crispy Tater Tots
The star of the show! These little bites add crunch and comfort. Use frozen tater tots for convenience, or if feeling crafty, homemade seasoned potatoes work wonderfully too! -
1 Cup Shredded Cheese (Cheddar or Mexican Blend)
Cheese is the glue that holds the burrito together! Cheddar gives a classic flavor, while a Mexican blend brings extra zest. For dairy-free options, go with vegan cheese shreds or nutritional yeast for a cheesy flavor! -
1/2 Cup Sour Cream
Creamy and tangy, sour cream is the perfect dollop! Greek yogurt also makes a wonderful, healthy substitute, while a cashew-based sour cream can suit vegan diets. -
1/2 Cup Salsa
Bright and zesty! Use your favorite store-bought salsa or make your own for a fresh twist. You can also spice it up with a mango salsa for added sweetness! -
1 Tablespoon Taco Seasoning
Packed with flavors like chili powder, cumin, and paprika. You can find pre-made seasoning or mix your own. Spice it up as you like according to your palate! -
Salt and Pepper to Taste
These two classic seasonings help enhance all our flavorful ingredients. Don’t skip these for that perfect balance!
Step-by-Step Instructions
Let’s get cooking! Here’s how to bring these burritos to life:
-
Preheat Your Oven
Preheat your oven to 350°F (175°C). This will give your burritos that perfect, warm finish once they’re all wrapped up. -
Prepare the Beef
In a skillet over medium heat, add your cooked ground beef. Sprinkle in the taco seasoning, and mix well. If you’re using leftovers, this is a great way to incorporate flavor. Allow it to warm through, and stir occasionally—let those spices mingle! -
Add the Tater Tots
Now comes the fun part! Add the crispy tater tots to your skillet. You want them to become acquainted with the seasoned beef. Give them a good mix, ensuring everything is evenly coated with seasoning. This step is all about layering flavors! -
Mix in the Cheese
Toss in your shredded cheese! Stir continuously until it’s melted into the beef and tater tots. You’ll love how gooey and wonderful it looks. This is also where you can add an extra sprinkle of taco seasoning if you’re feeling bold. -
Assemble Your Burritos
Lay out a tortilla on a flat surface. Spoon a generous helping of the beef and tater tot mixture onto the center. Drizzle with some sour cream and salsa (don’t hold back!). Fold in the sides and roll it up tightly, making sure nothing spills out. -
Repeat
Do this for the remaining tortillas. Place your burritos seam-side down on a baking sheet. If you ended up with a bit of a mess, that’s totally fine! It means you’ve loaded them with love. -
Warm in the Oven
Pop those burritos in the preheated oven for about 10-15 minutes until they’re warmed through and the tortillas are just lightly crispy. It’s time for the tortillas to bask in that cozy warmth! -
Serve
Take them out and let them cool for a minute (as tempting as it is, don’t burn your tongue!). Serve them alongside extra sour cream and salsa for dipping. You can add a side salad or fresh guac for that extra hit of freshness!
Pro tip: If you want some extra crispy burritos, you can give them a quick sear in a pan with a bit of oil after baking—a golden brown crust is worth the extra step!
Serving Suggestions
These Easy Cheesy Potato Burritos can be plated in some fun and delightful ways. Here’s how to jazz them up:
-
Presentation is Key: Slice your burrito in half to showcase that cheesy, potato-filled goodness. Serve them on a vibrant plate for some color contrast.
-
Garnish: Top them with a sprinkle of fresh cilantro or sliced green onions for that pop of green. Trust me, adding a bit of color always enhances the meal’s appeal!
-
Side Kicks: Serve with a side of homemade salsa or guacamole and a little bowl of sour cream for dipping. Adding some crunchy tortilla chips or a fresh side salad complements the meal beautifully.
-
Drink Pairing: A cool drink helps balance all those flavors. Consider pairing with some chilled lemonade, a creamy horchata, or even a light beer for the adults!
Feel free to get creative—use your favorite platters, colorful napkins, and let the burritos be the stars of the night!
Recipe Variations
The beauty of these burritos is their versatility! Here are some fun variations to keep your taste buds dancing:
-
Veggie Lovers’ Burritos
Swap the ground beef for seasoned black beans or a medley of sautéed bell peppers and onions. It’s a fresh, vibrant take, perfect for meat-free Mondays! -
Breakfast Burritos
Add scrambled eggs to the mix to turn these into a heavenly breakfast option. You can even dive into adding diced tomatoes or jalapeños for that early-morning kick! -
Spicy Cheesy Option
Add chopped jalapeños or a splash of hot sauce for an extra spicy kick. If you love heat, don’t be shy! -
Sweet and Savory Twist
Try adding finely diced pineapple or some apple slices to your beef mixture. The sweetness complements the savory flavors perfectly! -
Loaded with Greens
Mix in shredded spinach or kale for that added nutrient boost. No one will know it’s tucked inside a cheesy burrito!
Chef’s Notes
Each kitchen experience is unique, and these burritos have been a labor of love for me over the years. I remember the first batch I whipped up—let’s just say it could have been classified more as a casserole than the burrito I envisioned! There was cheese oozing out all over the baking dish, but the laughter and joy it brought made every effort worth it.
Over time, I’ve learned the secret of rolling a burrito tightly for the best end result. Experimenting with flavors can be fantastic; you never know when you’ll discover your new favorite filling. So, don’t be afraid to make this recipe your own.
FAQs and Troubleshooting
-
What if my burritos fall apart?
Make sure to wrap them tightly and not overfill them. You can also secure them with a toothpick if need be. -
Can I freeze these burritos?
Absolutely! Make a batch ahead of time, let them cool completely, wrap them in foil, and store them in a freezer-safe bag for up to 2 months. Just reheat directly from the freezer in the oven! -
What can I substitute if I don’t like beef?
Try chicken, turkey, or even a mix of beans and veggies! The world is your oyster, so get creative! -
How can I make these healthier?
Use whole grain tortillas, swap in lean protein choices, and pile on the veggies. You can even use low-fat cheese for a lighter version.
Nutritional Info
For all the health-conscious foodies, here’s a breakdown of the nutritional info for one Easy Cheesy Potato Burrito (approximate values):
- Calories: 500
- Protein: 20g
- Carbohydrates: 45g
- Fat: 25g
- Fiber: 5g
- Sodium: 750mg
Keep in mind that the values can fluctuate based on ingredient choices and portion sizes!
Final Thoughts
And there you have it! Easy Cheesy Potato Burritos that not only taste amazing but also hold the potential for creating beautiful memories in your kitchen. As you gather around the table with family or friends, remember that cooking isn’t just about the food; it’s about sharing love and laughter with those you care about.
The next time you find yourself wondering what’s for dinner, I hope you think back to this recipe! Enjoy the process and all the delicious flavors that come together. Here’s to good food, good company, and unforgettable experiences—now grab a fork and dig in! Happy cooking!
Print
Easy Cheesy Potato Burritos
- Total Time: 45 minutes
- Yield: 4 servings 1x
- Diet: None
Description
A delightful fusion of crispy tater tots, seasoned ground beef, and melty cheese wrapped in warm tortillas, perfect for a cozy meal.
Ingredients
- 4 Flour Tortillas
- 1 Cup Cooked and Seasoned Ground Beef
- 1 Cup Crispy Tater Tots
- 1 Cup Shredded Cheese (Cheddar or Mexican Blend)
- 1/2 Cup Sour Cream
- 1/2 Cup Salsa
- 1 Tablespoon Taco Seasoning
- Salt and Pepper to Taste
Instructions
- Preheat your oven to 350°F (175°C).
- Prepare the ground beef in a skillet, mixing in taco seasoning and warming through.
- Add the crispy tater tots to the skillet and mix well.
- Mix in the shredded cheese until melted.
- Assemble the burritos with the beef and tater tot mixture, sour cream, and salsa.
- Repeat with remaining tortillas, placing them seam-side down on a baking sheet.
- Warm in the oven for 10-15 minutes.
- Serve with extra sour cream and salsa for dipping.
Notes
For extra crispy burritos, give them a quick sear in a pan with oil after baking.
- Prep Time: 15 minutes
- Cook Time: 30 minutes
- Category: Main Course
- Method: Baking
- Cuisine: Mexican
Nutrition
- Serving Size: 1 burrito
- Calories: 500
- Sugar: 5g
- Sodium: 750mg
- Fat: 25g
- Saturated Fat: 10g
- Unsaturated Fat: 15g
- Trans Fat: 0g
- Carbohydrates: 45g
- Fiber: 5g
- Protein: 20g
- Cholesterol: 70mg
Keywords: burritos, cheesy, potatoes, easy recipes, comfort food, quick meals
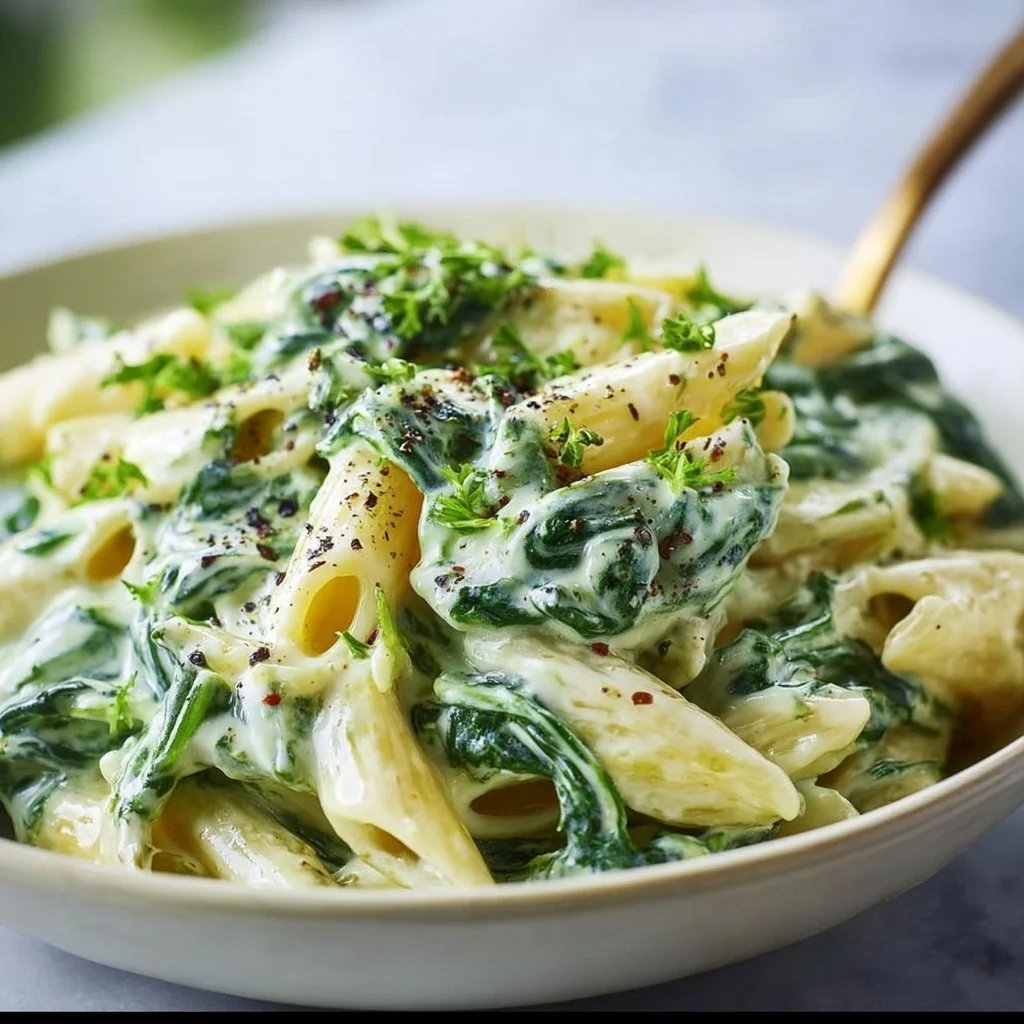
Creamy Spinach Pasta
Creamy Spinach Pasta: A Heartfelt Dish to Cozy Up With
Hey there, fellow foodies! Welcome back to Feastical, where deliciousness reigns supreme and my kitchen is always filled with laughter and love. Today, I’m serving up a luxurious yet simple recipe that’s bound to become your go-to comfort dish: Creamy Spinach Pasta. If you’re looking for something that warms your soul and tucks you in like your favorite blanket on a chilly evening, keep reading!
There’s just something about pasta that makes everything feel right in the world, isn’t there? Maybe it’s the way it twirls on your fork or how it can transport you to Italy with just one bite. But let’s not settle for the ordinary! With my Creamy Spinach Pasta, you’ll experience a dish that’s not just about filling your stomach, but also feeding your soul.
Picture this: a cozy evening, Italian music playing softly in the background, and the rich, creamy aroma wafting through the air as you whip up this delightful dish. It’s easy to make, and even easier to love. You won’t spend hours scrubbing pots and pans, and your kitchen will be filled with laughter and stories—just like mine.
This Creamy Spinach Pasta is not just a recipe; it’s a culinary hug. The fresh spinach adds a pop of color and nutrition, while the heavy cream and Parmesan cheese create a silken sauce that clings lovingly to each strand of pasta, making every bite pure bliss. Whether you’re twirling the noodles in your bowl or spooning it into your plate, this dish is all about celebration—and yes, love!
So, put on your apron, grab that spatula, and let’s dive into the wonderful world of creamy goodness that is my Creamy Spinach Pasta!
Personal Story
Let me take you back to a Sunday afternoon at my grandma’s kitchen table, a place where the magic of family and food intertwined. The smell of garlic filled the air as she sautéed fresh spinach, a staple in her cooking. It was one of those dishes that melted away any worries, reminding me of carefree days spent laughing with loved ones.
I remember watching her closely—her nimble fingers dancing around the kitchen, slicing and stirring with such finesse. She would always turn to me, smile, and say, "Food is love, Beau! So let’s keep the love coming!" And oh, how she did! Every bowl of pasta she served, topped with her signature creamy spinach sauce, felt like warm hugs for the soul. It was a staple during family gatherings, and the joy it brought us reminded me that cooking is as much about sharing as it is about eating.
That creamy spinach pasta became my benchmark for comfort food, and it only feels right for me to pass on that legacy to you today. So, with a sprinkle of my grandma’s love, let’s create our own delicious memories!
Ingredients
Here’s what you’ll need to whip up this delightful dish:
-
8 oz pasta of choice
- Tip: Feel free to use anything you love! Spaghetti, penne, or even gluten-free options all work beautifully.
-
2 cups fresh spinach
- Substitution: If fresh isn’t available, you can use canned spinach, but drain well, or frozen spinach that’s thawed and drained.
-
1 cup heavy cream
- Chef insight: Heavy cream gives that luscious texture, but you can swap it for half-and-half for a lighter version.
-
1/2 cup grated Parmesan cheese
- Quick tip: Freshly grated cheese melts better, but pre-grated works in a pinch.
-
2 tbsp olive oil
- Substitution: Butter is a lovely swap for a richer flavor!
-
3 cloves garlic, minced
- Insight: Garlic is a flavor powerhouse! You can increase or decrease according to your taste.
-
Salt to taste
- Tip: Always taste as you go! It makes a world of difference.
-
Black pepper to taste
- Quick insight: Freshly cracked pepper elevates your dish, but pre-ground will work!
Step-by-Step Instructions
Now that we’ve got our ingredients lined up and prepped, let’s get cooking! Follow these steps for a fabulous Creamy Spinach Pasta:
-
Boil the Pasta:
- Fill a large pot with water, add a pinch of salt, and bring it to a rolling boil. Toss in your pasta and cook according to the package instructions until al dente. And remember, don’t forget to stir occasionally! This will help prevent sticking.
Chef’s Hack: Reserve about a cup of pasta water before draining. It’s liquid gold for adjusting your sauce!
-
Sauté the Garlic:
- While your pasta is cooking, grab a large skillet and heat up the olive oil over medium heat. Add the minced garlic and sauté for about a minute until fragrant. Be careful not to burn it; burnt garlic is no bueno!
Tip: If you want extra flavor, throw in a pinch of red pepper flakes for a little kick!
-
Add the Spinach:
- Toss in the fresh spinach and cook, stirring occasionally, for about two minutes, or until the spinach has wilted. It shrinks down quite a bit, but don’t worry, it’s still packed with flavor!
Chef Insight: If you want an earthy kick, you can add in some chopped mushrooms along with the spinach!
-
Make it Creamy:
- Lower the heat and pour in the heavy cream. Gently stir to combine, and let it simmer for a couple of minutes until it thickens slightly.
Hack: If you find your sauce a bit too thick, add a splash of that reserved pasta water to loosen things up!
-
Cheesy Goodness:
- Gradually sprinkle in the grated Parmesan cheese while stirring continuously. This will create a luscious, gooey sauce that clings lovingly to your pasta!
Tip: For a stronger cheese flavor, feel free to add more cheese!
-
Combine It All:
- Add in your drained pasta to the skillet, and toss everything together until the pasta is well coated in that creamy goodness. Season with salt and black pepper to taste.
Chef’s Note: This is where you can really personalize the dish—adjust seasonings, add more garlic, or sprinkle in some dried herbs if you wish!
-
Serve It Up:
- Plate your creamy spinach pasta while it’s hot! Garnish with a sprinkle of extra Parmesan and perhaps some fresh basil if you’ve got it on hand.
Pro Tip: A few toasted pine nuts or walnuts can add a delightful crunch on top!
Serving Suggestions
Now that your Creamy Spinach Pasta is all dressed and ready to impress, here’s how I like to serve it:
- Plate It Beautifully: Twirl a generous serving of pasta in the center of your plate. A little mound goes a long way!
- Garnish to Impress: Add a sprinkle of freshly grated Parmesan and a light dusting of black pepper on top. A pop of color with fresh basil or parsley not only looks gorgeous but adds delightful freshness!
- Side Sidekicks: Pair this dish with a crisp green salad drizzled with lemon vinaigrette or some garlic bread for a decadent meal.
Recipe Variations
Want to get creative? Here are a few spins on my Creamy Spinach Pasta:
-
Add Protein: Sauté some shrimp or grilled chicken to toss in for a heartier meal!
-
Make It Vegan: Replace the heavy cream with coconut cream and the cheese with nutritional yeast. You won’t miss the creaminess, I promise!
-
Zesty Lemon Spinach Pasta: Add a squeeze of fresh lemon juice right before serving for a zesty pop of flavor!
-
Mushroom & Spinach Delight: Incorporate sautéed mushrooms into the dish for an earthy flavor that pairs perfectly with the creaminess.
-
Cheesy Broccoli Spinach Pasta: Add some steamed broccoli florets for a nutritious twist!
Chef’s Notes
As I look back on many kitchen adventures, I can’t help but chuckle at the disaster casserole I once attempted to create. Let’s just say that it was an unfortunate mix of burnt cheese and “interesting” spices. But it guided me toward the comfort dishes I create today!
With time, I’ve learned that less can definitely be more. This Creamy Spinach Pasta embodies simplicity without compromising on flavor. It’s grown familiar in my kitchen, and just as my grandma taught me, cooking is all about sharing love—and a bit of laughter!
FAQs and Troubleshooting
Q: What can I do if my sauce is too watery?
- If the sauce is too thin, continue to simmer it over low heat to reduce it, and consider adding more cheese for thickness!
Q: My spinach is overcooked! What now?
- Don’t fret! Spinach gives a wonderful dose of nutrition even when slightly wilted. Just season it to make up for lost texture!
Q: Can I make this ahead of time?
- Absolutely! You can prepare the sauce in advance and store it in the fridge. Just reheat on low and toss in the pasta when ready to serve.
Q: How do I store leftovers?
- Keep any leftovers in an airtight container in the fridge for up to 3 days. Just be aware that pasta can absorb some sauce over time, so you may want to add a splash of cream when reheating.
Nutritional Info
While comfort food is all about taste, I know many of us look for a bit of nutritional awareness too! This Creamy Spinach Pasta is hearty and filling, yet features spinach for some essential vitamins. Here’s a rough idea of what you’re looking at per serving:
- Calories: Approximately 450
- Protein: 15g
- Carbohydrates: 50g
- Fat: 20g
- Fiber: 3g
Of course, the numbers may vary based on the ingredients you use, so feel free to adjust as you see fit!
Final Thoughts
And there you have it! My Creamy Spinach Pasta—a dish that embraces the comforting memories of my grandmother while allowing you to create new ones in your own kitchen.
Food is more than just sustenance; it’s a journey filled with flavors, love, and shared stories. So gather your loved ones, dig into this creamy delight, and savor every moment. Remember, cooking should be fun and forgiving, so don’t be afraid to add your own flair to this recipe!
Whether you decide to stick to the classic or put your twist on it, I encourage you to enjoy the process. After all, the heart of any kitchen is the love poured into every dish. Until next time, keep those spatulas at the ready and stay hungry! Bon appétit!
Print
Creamy Spinach Pasta
- Total Time: 45 minutes
- Yield: 4 servings 1x
- Diet: Vegetarian
Description
A luxurious yet simple creamy spinach pasta dish that’s perfect for cozy evenings.
Ingredients
- 8 oz pasta of choice
- 2 cups fresh spinach
- 1 cup heavy cream
- 1/2 cup grated Parmesan cheese
- 2 tbsp olive oil
- 3 cloves garlic, minced
- Salt to taste
- Black pepper to taste
Instructions
- Boil the Pasta: Fill a large pot with water, add a pinch of salt, and bring it to a rolling boil. Toss in your pasta and cook according to the package instructions until al dente. Remember to stir occasionally!
- Sauté the Garlic: While your pasta is cooking, heat up the olive oil over medium heat. Add the minced garlic and sauté for about a minute until fragrant. Be careful not to burn it!
- Add the Spinach: Toss in the fresh spinach and cook, stirring occasionally, for about two minutes, or until the spinach has wilted.
- Make it Creamy: Lower the heat and pour in the heavy cream. Stir to combine, and let it simmer for a couple of minutes until it thickens slightly.
- Cheesy Goodness: Gradually sprinkle in the grated Parmesan cheese while stirring continuously.
- Combine It All: Add in your drained pasta to the skillet, and toss everything together until the pasta is well coated. Season with salt and black pepper to taste.
- Serve It Up: Plate your creamy spinach pasta while it’s hot! Garnish with a sprinkle of extra Parmesan and perhaps some fresh basil.
Notes
For a lighter version, swap heavy cream with half-and-half. You can also add protein like shrimp or chicken for a heartier meal.
- Prep Time: 15 minutes
- Cook Time: 30 minutes
- Category: Main Course
- Method: Sautéing & Boiling
- Cuisine: Italian
Nutrition
- Serving Size: 1 serving
- Calories: 450
- Sugar: 3g
- Sodium: 300mg
- Fat: 20g
- Saturated Fat: 10g
- Unsaturated Fat: 8g
- Trans Fat: 0g
- Carbohydrates: 50g
- Fiber: 3g
- Protein: 15g
- Cholesterol: 60mg
Keywords: creamy spinach pasta, comfort food, vegetarian pasta, Italian recipe, quick pasta dish