
Chicken Caesar Pasta Salad
Chicken Caesar Pasta Salad: A Delicious and Easy Recipe to Savor
Hey there, food lovers! It’s your pal Beau Collier here, and I’m excited to share a fantastic recipe that perfectly blends the classic vibes of Caesar salad with the heartiness of pasta. Yes, you guessed it—I’m talking about Chicken Caesar Pasta Salad! If you’re looking to whip up something delightful and satisfying for lunch, dinner, or a potluck, this dish has got your back. It’s light yet filling, zesty, and super easy to make.
This salad stands out because it captures all the yummy flavors of a Caesar salad while transforming it into a comforting pasta dish. Whether you’re sitting down for a relaxed family meal or treating yourself to a lovely solo dinner, this Chicken Caesar Pasta Salad is everything you could want and more.
Let me tell you, there’s something downright heartwarming about salads. Growing up, my grandmother made a killer Caesar salad for our Sunday family dinners. I can still remember the aroma of garlic and anchovies wafting through the kitchen and her little secret twist that always made it pop. We’d pile our plates high, catch up on stories and just enjoy that meal together. Those dinners were the perfect blend of fun, laughter, and fantastic food, exactly what inspired me to dive deeper into the culinary world.
Now, combining that memory with pasta, I thought, “Why not take those flavors I adore and elevate them into a pasta salad?” And voilà! Here we are, ready to create a crowd-pleaser that’s confident in its deliciousness yet easy enough for even the kitchen novices among us. Grab your apron and let’s get cooking!
Personal Story
Every dish we create has a little piece of our heart in it, doesn’t it? For me, the memory of my grandmother making her famous Caesar salad brings an avalanche of nostalgia. I remember the warmth of her kitchen, the clinking of utensils, and the happiness that swirled around like the delicious scents wafting from the stove. One particular summer evening stands out; we had just finished a game of backyard frisbee, and my cousins and I were starving.
Grandma had her apron on, and with a wink, she got us all involved in prepping the meal. I remember mangling the romaine lettuce, while she’d laugh and say, “It’s not about perfection; it’s about enjoying what you make.” We tossed in the croutons and grated cheese, and, of course, everyone was sneaking bites of that creamy dressing. When dinner was finally served, we gathered around the rickety old table outside, with the sun setting, laughter ringing, and our plates overflowing. That dish became the star of every Sunday dinner, reminding me that food has this magical power to unite us.
As I developed the Chicken Caesar Pasta Salad, I channeled the essence of those unforgettable gatherings and went on a quest to recreate that joy. It’s about taking the simple pleasures of life, like a homemade salad, and sharing it with others, just like grandma did. So if you’re ready to put on your chef hat, let’s make something that can generate beautiful memories for you, too!
Ingredients
Before we dive in, here’s what you’ll need to make this scrumptious Chicken Caesar Pasta Salad. Let’s break it down:
-
2 cups cooked pasta (penne or rotini)
Any pasta works, but I adore penne for its shape and texture—it holds onto the dressing beautifully! You can substitute whole grain or gluten-free pasta if preferred. -
1 cup cooked chicken, diced
Use rotisserie chicken for the ultimate convenience—just shred and toss it in. If you want to keep it plant-based, opt for chickpeas or make it a vegetarian delight with seitan. -
2 cups romaine lettuce, chopped
Crisp and fresh, romaine holds up nicely in salads. If you’re feeling adventurous, you can use kale for a twist or even spinach for a softer bite. -
1/2 cup cherry tomatoes, halved
Juicy, sweet, and pop-in-your-mouth goodness! You can swap these with diced bell peppers for a more colorful option or roasted tomatoes for a caramelized flavor. -
1/4 cup grated Parmesan cheese
Cheese? Yes, please! This adds richness to your salad. If you’re lactose intolerant, try nutritional yeast or a dairy-free Parmesan cheese. -
1/4 cup Caesar dressing
Classic dressing brings it all together! You can either use store-bought or whip up a homemade version. For a lighter option, substitute with Greek yogurt-based dressing. -
Salt and pepper to taste
Don’t forget to season! The right balance pulls everything together. Feel free to add other herbs and spices to customize the flavor. -
Croutons (optional)
Crispy crunch is a winner! Make your own by baking bread cubes with olive oil and garlic for a delightful homemade touch.
Step-by-Step Instructions
Now, let’s get into the fun part: cooking! Follow these steps to create your delicious Chicken Caesar Pasta Salad.
Step 1: Cook the Pasta
Begin by bringing a large pot of salted water to a boil. Add your chosen pasta—penne or rotini—and cook according to the package instructions until al dente. This usually takes about 8-10 minutes. Why salted water, you ask? It flavors the pasta as it cooks! Drain and rinse under cold water for a minute to stop the cooking process and cool it down for your salad. Set it aside while you prep the other ingredients.
Step 2: Prepare the Chicken
If you haven’t already, dice your cooked chicken into bite-sized pieces. If you’re using rotisserie chicken, simply shred the meat using two forks or your hands. It makes everything so easy! Pro tip: You can grill up chicken breasts with simple seasoning (salt, pepper, and a squeeze of lemon) to add that smoky charred flavor if you’re in the mood for some extra effort.
Step 3: Chop the Veggies
Next, grab a chopping board and dice up the crisp romaine lettuce, halving the cherry tomatoes. Don’t sweat it if things get a little messy; that’s part of the fun! I love to use a large bowl to mix everything together as I go to save on dishes.
Step 4: Combine in the Bowl
In your large mixing bowl, combine the cooked pasta, diced chicken, chopped romaine, and halved cherry tomatoes. Give everything a gentle toss to combine. You want every piece of pasta to be coated with that Caesar dressing!
Step 5: Add Dressing and Cheese
Drizzle in the Caesar dressing and sprinkle the grated Parmesan cheese over the top. Now the fun begins! Using tongs or a spatula, gently toss until everything is evenly coated in that creamy, dreamy dressing. This is your chance to taste and adjust the seasoning. A splash of lemon juice or a sprinkle of pepper can take it to the next level!
Step 6: Final Touches and Serve
If you’re opting for croutons, sprinkle them on top just before serving, so they maintain that delightful crunch. Serve immediately or refrigerate for about 30 minutes to let the flavors mingle even more. If serving later, toss in a bit more dressing and croutons right before it hits the table.
Serving Suggestions
When it comes to serving, presentation matters! You can plate this Chicken Caesar Pasta Salad in a big bowl for family-style dining or serve individual portions in wide bowls. Add a few extra cherry tomato halves on top and a light sprinkle of more Parmesan for that appealing look.
Consider pairing it with some crusty garlic bread or grilled veggies on the side for an extra colorful touch! If you’re feeling fancy, garnish with fresh parsley or basil to elevate those visuals. Either way, ensure to have forks at the ready because this dish is about to become a new favorite!
Recipe Variations
Want to jazz things up? Here are some creative twists you can try:
-
Mediterranean Delight: Swap out Roman lettuce for spinach, add kalamata olives, diced cucumbers, and feta cheese. Toss in a lemon vinaigrette for a fresh vibe.
-
Spicy Kick: Incorporate some sliced jalapeños or a spicy Caesar dressing for those who enjoy a bit of heat. You can also toss in some roasted red peppers for an additional flavor burst!
-
Vegan-Friendly: Keep the salad plant-based by using chickpeas instead of chicken, vegan Parmesan, and a dairy-free Caesar dressing. It’s just as satisfying!
-
Whole Wheat Wonder: Utilize whole wheat pasta for added fiber and protein. It’s perfect for health-conscious individuals looking for a wholesome meal.
-
Pesto Caesar Twist: Add a swirl of basil pesto along with the dressing for a herby Italian twist and a pop of color!
Chef’s Notes
As much as I love this Chicken Caesar Pasta Salad, every time I make it, I’m reminded of how adaptable it is! I started this recipe to create a quick lunch option, but over time, I’ve turned it into a party favorite by mixing and matching ingredients. There was one memorable summer BBQ where I experimented by adding crispy bacon bits, and let me tell you, that was a hit!
Salads like this one remind us that cooking is all about happiness, love, and creativity. So, don’t be afraid to make it your own! The kitchen is your playground, and food is just a canvas waiting for your masterpiece!
FAQs and Troubleshooting
Let’s dive into some common questions and potential mishaps you might encounter while making this dish:
-
Can I make it ahead of time?
Absolutely! You can prep all the ingredients a day in advance. Just store the dressing separately so the pasta doesn’t get mushy before serving. -
What if my pasta is too soft?
No worries! You can use it as is, as long as it’s not mushy. Tossing the pasta with ice-cold water immediately after cooking locks in what’s left of that al dente texture. -
Is it healthy?
This dish has protein from the chicken and a good amount of veggies, making it relatively healthy! If you’re aiming for fewer calories, light dressings work wonders! -
How do I prevent the pasta salad from getting soggy?
To keep it fresh, use less dressing until you’re ready to serve. Toss in more as needed right before digging in!
Nutritional Info
A typical serving (about 1.5 cups) of your Chicken Caesar Pasta Salad contains approximately:
- Calories: 350
- Protein: 28g
- Carbohydrates: 40g
- Fat: 12g (mostly from the dressing and cheese)
- Fiber: 3g
Of course, these figures can vary based on the specific brands and ingredients you choose, but it’s generally a wholesome option packed with flavor and good-for-you components.
Final Thoughts
There you have it! Your very own Chicken Caesar Pasta Salad recipe, a harmonious blend of flavors and memories that brings joy to the table. Remember, the kitchen is a place for exploration—feel free to tweak this recipe to suit your tastes.
Maybe it’s a dish for your busy weekdays or a go-to at gatherings—you can’t go wrong with this crowd-pleaser! So grab a fork, invite your friends or family, and share those good vibes! Here’s to tasty food and the great moments it creates together. Bon appétit!
Hope you enjoyed this recipe just as much as I love sharing it. Whether it’s the tiny details or a dash of love, the meal you prepare can create unforgettable moments. Until next time, keep cooking, and stay fabulous!
Print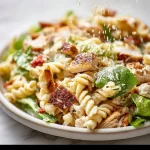
Chicken Caesar Pasta Salad
- Total Time: 25 minutes
- Yield: 4 servings 1x
- Diet: Gluten-Free
Description
A delicious and easy Chicken Caesar Pasta Salad that blends the classic flavors of Caesar salad with hearty pasta.
Ingredients
- 2 cups cooked pasta (penne or rotini)
- 1 cup cooked chicken, diced
- 2 cups romaine lettuce, chopped
- 1/2 cup cherry tomatoes, halved
- 1/4 cup grated Parmesan cheese
- 1/4 cup Caesar dressing
- Salt and pepper to taste
- Croutons (optional)
Instructions
- Cook the Pasta: Bring a large pot of salted water to a boil. Add pasta and cook according to package instructions until al dente. Drain and rinse under cold water.
- Prepare the Chicken: Dice or shred your cooked chicken into bite-sized pieces.
- Chop the Veggies: Dice romaine lettuce and halve the cherry tomatoes.
- Combine in the Bowl: In a large mixing bowl, combine cooked pasta, diced chicken, chopped romaine, and halved tomatoes.
- Add Dressing and Cheese: Drizzle Caesar dressing and sprinkle grated Parmesan cheese over the salad and toss gently.
- Final Touches and Serve: Top with croutons if desired and serve immediately, or refrigerate to let flavors mingle.
Notes
This salad is versatile and can be made ahead of time; just keep the dressing separate to prevent sogginess.
- Prep Time: 15 minutes
- Cook Time: 10 minutes
- Category: Salad
- Method: Mixing
- Cuisine: American
Nutrition
- Serving Size: 1 serving
- Calories: 350
- Sugar: 4g
- Sodium: 400mg
- Fat: 12g
- Saturated Fat: 4g
- Unsaturated Fat: 6g
- Trans Fat: 0g
- Carbohydrates: 45g
- Fiber: 3g
- Protein: 28g
- Cholesterol: 30mg
Keywords: Chicken Caesar Salad, Pasta Salad, Easy Salad Recipe, Quick Dinner
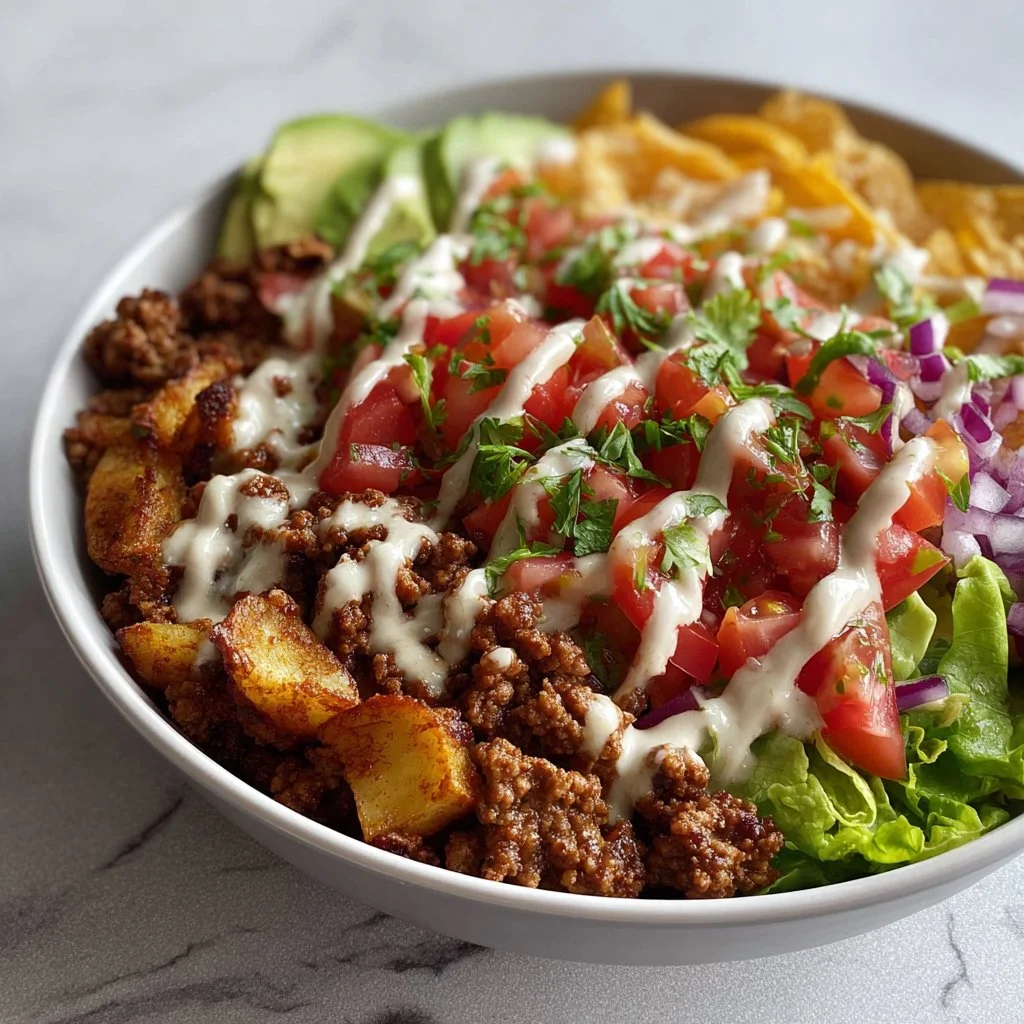
High Protein Taco Bowl
Dive into Flavor: High Protein Taco Bowl Recipe
Hey there, food lovers! I’m so excited to share one of my all-time favorite recipes with you today – the High Protein Taco Bowl! If you’ve been looking for a dish that’s not only packed with flavor but also satisfies your comfort food cravings, you’re in for a treat. Picture this: layers of seasoned ground beef, crispy potatoes, fresh pico de gallo, and creamy avocado, all sitting in a cozy bowl, just waiting to be devoured. Trust me, this bowl is like a fiesta in your mouth!
Now, taco bowls are all the rage right now, and for good reason. They are incredibly versatile and perfect for those busy weeknights when you want something wholesome yet quick. Plus, it’s a delightful social dish – everyone can customize their bowls just how they like it! Ready to whip up some magic in the kitchen? Let’s get this taco party started!
A Tasty Memory
Thinking back on my taco experiences, there’s one occasion that really lights up my culinary memories. It was a warm summer evening during my college days, when I invited a few friends over to celebrate the end of our finals. I wanted to make something special that was both filling and fun – a taco night! We set up an assembly line in the kitchen, with bowls of seasoned ground beef, fresh vegetables, and various toppings. As we built our taco creations, laughter filled the air, and each bite was an explosion of flavor. Those students’ faces lit up with each spoonful, showcasing a blend of joy and satisfaction that I’ll always cherish.
That’s what food does – brings people together, creating lasting memories with every bite. And now, I get to share my Taco Bowl with you, so let’s recreate that magic!
Ingredients
Here’s what you’ll need to conjure up this delightful High Protein Taco Bowl:
-
Ground Beef: The star of the dish! I recommend using lean ground beef for a healthier option. You can also substitute with turkey or plant-based protein for a lighter twist.
-
Potatoes: I love using diced potatoes for their crispy texture. Sweet potatoes can be a great alternative for a touch of sweetness and extra nutrients.
-
Pico de Gallo: A fresh blend of diced tomatoes, onions, cilantro, lime juice, and a hint of chili. If you’re short on time, store-bought salsa also works well.
-
Avocado: Creamy and nutritious, it adds a rich texture to your bowl. If you’re out of avocado, you can use guacamole or Greek yogurt for creaminess.
-
Taco Sauce: A must-have for that authentic flavor! You can whip up your own or grab your favorite from the store.
-
Salt and Pepper: Basic seasonings that elevate your dish. I always recommend fresh cracked pepper for an extra kick!
-
Olive Oil: Perfect for sautéing your ingredients and adding richness. Avocado oil can be a great swap.
-
Favorite Toppings: Get creative! Cheese, beans, corn, jalapeños, or fresh herbs are all fantastic ways to customize your taco bowl.
With these ingredients in hand, you’re set to create a deliciously satisfying meal!
Step-by-Step Instructions
Ready to get cooking? Let’s dive into the taco bowl bliss!
-
Prep Your Ingredients: Start by washing and dicing your potatoes into small cubes. You want them to be bite-sized so they can cook evenly. For added flavor, you could toss them in a bit of olive oil, salt, and pepper before cooking.
-
Cook the Potatoes: Heat a tablespoon of olive oil in a large skillet over medium heat. Add your diced potatoes and cook until they are golden brown and crispy, about 15–20 minutes. Here’s a little chef hack: cover the skillet for the first 10 minutes to steam them slightly, ensuring they cook through!
-
Sauté the Ground Beef: In the same skillet, push the potatoes to one side and add a little more olive oil if needed. Add the ground beef, breaking it up with a spatula. Season with salt and pepper, and cook for about 5–7 minutes until browned, stirring occasionally. Make sure to drain excess fat if necessary.
-
Add Flavor: Once the beef is cooked, stir in your taco sauce. Let it simmer for an additional 2 minutes to allow all those flavors to meld together. You can adjust the seasoning here to suit your taste. Want a kick? Toss in some chili powder or cayenne pepper!
-
Build Your Bowl: Grab your favorite serving bowls and start layering! Start with a hearty base of crispy potatoes, followed by a generous scoop of seasoned ground beef.
-
Top It Off: Add a heap of fresh pico de gallo on top, followed by sliced avocado. Drizzle with extra taco sauce to add that zesty flair.
-
Personalize: Don’t forget your favorite toppings! A sprinkle of cheese or a dollop of sour cream always elevates the flavors. Get creative here – corn, jalapeños, or even a handful of leafy greens work wonders too!
And voilà! You have yourself a delicious High Protein Taco Bowl ready to please any crowd (or just yourself, no judgment here!).
Serving Suggestions
Now that everything is all layered and beautifully displayed, let’s talk presentation. Here are a couple of serving ideas to make your taco bowl really pop:
-
Colorful Bowls: Use clear or colorful bowls to showcase the vibrant layers of your taco bowl. The various colors of the ingredients from the green avocado to the red pico de gallo create a feast for the eyes!
-
Garnishes Galore: Finish plating with freshly chopped cilantro or green onions for a touch of freshness. A few slices of lime on the side not only look good but also allows everyone to add a zest of flavor to their bowls if they desire.
-
Make it Shareable: If you’re hosting a gathering, consider serving the taco contents on a large platter, letting everyone build their own bowl. It sparks creativity and can lead to fun flavor pairings!
Recipe Variations
Here are some fun twists to keep things fresh every time you make your Taco Bowl!
-
Fiesta Chicken Bowl: Swap out the ground beef for shredded chicken marinated in taco spices for a deliciously different version.
-
Cali Style: Add a layer of cilantro lime rice instead of potatoes for a California-inspired taco bowl. Yum!
-
Veggie Lovers Delight: For plant-based options, try using lentils or cooked quinoa. You’ll get a great texture with a protein punch!
-
Southwestern Flair: Toss in some black beans and corn for an extra heartiness. They also contribute a lovely sweetness!
-
Spice it Up: If you’re feeling adventurous, add some chipotle sauce or chopped green chilies for a smoky flavor.
Chef’s Notes
Every recipe tells a story, and this taco bowl has certainly evolved over the years. I started out using pre-packaged taco seasoning when I was a newbie in the kitchen – can you relate? As I experimented with spices, I discovered the beauty of making my own blends. Now, I love adding a bit of cumin and smoked paprika for a unique twist.
And let me tell you, there’s nothing quite as satisfying as hearing your family or friends rave about a meal you made. I’ve had taco bowls turn into surprise dish battles at gatherings – who can come up with the best topping combo? That laughter, those moments, all tied together with food. That’s what really makes this dish special to me.
FAQs and Troubleshooting
Here are some common questions you might have while making your High Protein Taco Bowl:
Q1: What if I don’t have ground beef?
No worries! Ground turkey, chicken or a plant-based substitute (like tempeh or chickpeas) work just as well.
Q2: How do I keep my potatoes crispy?
Make sure to not overcrowd the pan while cooking the potatoes. Giving them space allows for optimal browning.
Q3: I’m not a fan of pico de gallo. What can I use instead?
No problem! You can substitute with your favorite salsa, or even experiment with roasted vegetables for added texture!
Q4: How can I store leftovers?
Store your bowl components separately in airtight containers in the fridge. They’ll last about 3-4 days. Reheat the beef and potatoes before assembling your bowl to keep everything fresh.
Nutritional Info
Let’s chat a bit about that nutrition aspect! With high-protein ground beef and healthy fats from avocado, this taco bowl is balanced and filling.
For one serving, you’ll typically find:
- Calories: ~600-700 kcal (depending on toppings)
- Protein: ~40g (thank you, ground beef!)
- Carbohydrates: ~45g (from potatoes)
- Fat: ~30g (healthy fats from avocado and olive oil)
Of course, the nutrition will vary based on your choices for toppings and any substitutions made.
Final Thoughts
In closing, the High Protein Taco Bowl is more than just a meal — it’s a delightful experience filled with flavor, creativity, and love. Whether you’re serving it up solo or sharing it with loved ones, remember, it’s all about enjoying the process of cooking, tasting, and, most importantly, making bond-worthy memories around the table.
So, go ahead, get your taco vibe on! I’m so excited for you to create this dish. Don’t forget to leave me a comment with your thoughts or your own taco bowl spins. Happy cooking, my foodie friends – let’s keep the kitchen magic alive!
Let’s dig in! 🎉
Print
High Protein Taco Bowl
- Total Time: 35 minutes
- Yield: 4 servings 1x
- Diet: High Protein
Description
A deliciously satisfying taco bowl packed with seasoned ground beef, crispy potatoes, fresh pico de gallo, and creamy avocado.
Ingredients
- 1 lb ground beef (or turkey/plant-based substitute)
- 2 cups diced potatoes (or sweet potatoes)
- 1 cup pico de gallo
- 1 avocado, sliced
- 1/2 cup taco sauce
- Salt and pepper to taste
- 2 tbsp olive oil
- Favorite toppings: cheese, beans, corn, jalapeños, fresh herbs
Instructions
- Prep your ingredients: Wash and dice your potatoes into small cubes.
- Cook the potatoes: Heat olive oil in a large skillet over medium heat and add diced potatoes, cooking until golden brown and crispy (15–20 minutes).
- Sauté the ground beef: Push the potatoes to one side, add more oil if needed, and cook ground beef for about 5–7 minutes until browned.
- Add flavor: Stir in taco sauce and let it simmer for 2 minutes.
- Build your bowl: Layer crispy potatoes at the bottom, followed by seasoned ground beef.
- Top it off: Add pico de gallo and sliced avocado, then drizzle with extra taco sauce.
- Personalize: Add your favorite toppings like cheese or sour cream.
Notes
For a lighter version, use ground turkey or plant-based protein. Store leftovers separately in airtight containers.
- Prep Time: 10 minutes
- Cook Time: 25 minutes
- Category: Main Course
- Method: Sautéing
- Cuisine: Mexican
Nutrition
- Serving Size: 1 bowl
- Calories: 600
- Sugar: 4g
- Sodium: 600mg
- Fat: 30g
- Saturated Fat: 10g
- Unsaturated Fat: 15g
- Trans Fat: 0g
- Carbohydrates: 45g
- Fiber: 5g
- Protein: 40g
- Cholesterol: 105mg
Keywords: taco bowl, high protein, healthy dinner, customizable meal, Mexican food

Greek Chicken & Rice Bowl
Greek Chicken & Rice Bowl: A Mediterranean Delight for Every Foodie
Hey there, fellow food lovers! If you’re anything like me, food isn’t just something to fill your belly; it’s an experience, a connection, and sometimes even a mini-vacation for the taste buds! Welcome to Feastical, where I’m thrilled to share one of my all-time favorites—the Greek Chicken & Rice Bowl. Picture yourself diving into a vibrant bowl brimming with grilled chicken, fresh veggies, and just the right touch of feta cheese. It’s a plate filled with sunshine, love, and the kind of flavors that will transport you straight to a sun-soaked Mediterranean terrace.
Growing up, I was fortunate to experience a whirlwind of cultures and cuisines that shaped my cooking style today. Whether it was my grandmother’s chirpy laughter while whipping up her famous Italian spaghetti or my childhood friend’s mother bringing homemade Greek dishes to potlucks, every bite told a story. Greek cuisine always had a way of pulling me in; its bold flavors and fresh ingredients made it a staple in our kitchen, and that’s why today, I’m excited to share my own take on a classic.
This Greek Chicken & Rice Bowl doesn’t just taste heavenly; it’s also a breeze to whip up in your kitchen—perfect for busy weeknights or lazy weekends. Plus, it’s customizable! Mix and match ingredients to suit your palate or dietary preferences, and before you know it, you’ll be dishing out bowfuls of deliciousness to your loved ones—simply irresistible! So grab your apron, and let’s get cooking!
Personal Story
Ah, the first time I made this Greek Chicken & Rice Bowl—what a day that was! It all started when I decided to have a little gathering at my place. I wanted to impress my friends, showing off a dish that was both beautiful and tasty. Photos of colorful Greek salads and mouth-watering grilled chicken lined my social media feed, and I knew I had to try my hand at it.
But, just to keep things interesting, I decided to challenge myself a bit. Not only would I be cooking for a crowd, but I also wanted to put a twist on the traditional recipes I grew up with. I gathered fresh ingredients from the local farmer’s market (you could smell the freshness!), enlisted a trusty buddy to help with the chopping, and before I knew it, the house was filled with laughter, aromas, and a little kitchen chaos.
Fast forward to that first bite, and let me tell you, something magical happened! Everyone went silent as they savored the mix of tender chicken, crunchy veggies, and tangy feta cheese. The bowl was a hit! We ended up debating who could make the best version, which turned into a hilarious cook-off tradition between friends. Who knew a simple chicken bowl would spark so much joy and fun? That’s the beauty of cooking—never a dull moment and always a story to tell!
Ingredients
Alright, let’s get down to the nitty-gritty. Here’s what you’ll need to craft this mouth-watering dish:
-
1 pound chicken breast: The star of the show! You can grill, bake, or pan-sear these for extra flavor. If you prefer plant-based options, try grilled tofu or chickpeas.
-
1 cup Kaizen low carb high protein rice: This is my go-to for a healthful twist. Need a substitute? Quinoa or traditional rice work wonderfully, too.
-
1 cup cherry tomatoes, halved: Bursting with sweetness, they add vibrant color to your bowl. If you don’t have cherry tomatoes, diced regular tomatoes can do the trick.
-
1 cucumber, diced: Fresh and crunchy! You could also use a zucchini or bell peppers for more variety.
-
1/2 red onion, diced: A little zing never hurt anyone! You can use green onions or sweet onions for a milder taste.
-
1/4 cup feta cheese, crumbled: This tangy cheese really brings the Greek vibes. If you’re dairy-free, try a nut-based cheese or omit it altogether!
-
2 tablespoons olive oil: A drizzle of quality oil enhances the dish; choose extra-virgin for the best flavor. Avocado oil is a suitable substitute.
-
1 tablespoon lemon juice: For that citrusy brightness! Lime juice works in a pinch if you’re out of lemons.
-
Salt and pepper to taste: Don’t skimp on these! They elevate all the flavors. Spice it up with some red pepper flakes if you like a kick.
-
Fresh parsley, for garnish: A sprinkle of greenery adds a lovely touch. Feel free to swap cilantro in if that’s more your style!
Step-by-Step Instructions
Ready to whip up your Greek Chicken & Rice Bowl? Let’s walk through the steps together.
1. Marinate the Chicken
Start by preparing your chicken. In a bowl, combine olive oil, lemon juice, salt, and pepper. Toss the chicken breast in the mixture and let it marinate for about 30 minutes. This step not only infuses flavor but also keeps your chicken juicy and tender. Pro tip: if you’re in a hurry, even 10 minutes of marination will give you a flavor boost!
2. Cook the Rice
While the chicken is soaking up that delicious marinade, get your rice cooking. If you’re using Kaizen low-carb rice, follow the package instructions. Normally, it boils in just a few minutes—super quick! If you’re going with traditional rice, remember the golden ratio: 1 part rice to 2 parts water. A little secret? Add a pinch of salt to the water for extra flavor.
3. Grill the Chicken
When it’s time to cook, heat the grill or a skillet over medium-high heat. Cook the marinated chicken breast for about 6-8 minutes on each side, or until it’s nice and golden, with no pink inside. If you’re using a grill, those lovely char marks will carry the flavor even further! If you don’t have a grill, cooking them in a skillet works like a charm too.
4. Prepare the Veggies
While the chicken cooks, let’s slice and dice our veggies! Halve the cherry tomatoes and a cucumber, and finely chop the red onion. I like to prep my veggies while the chicken is cooking to make sure everything is fresh and crunchy. Your kitchen might start to smell incredible right about now!
5. Assemble the Bowl
Once everything is cooked, it’s time for the fun part! Take a generous scoop of rice and place it in your bowl. Top it with sliced chicken, cherry tomatoes, diced cucumbers, and red onions. Don’t forget a sprinkle of feta cheese on top! Drizzle a little extra olive oil and a squeeze of lemon juice for that zing!
6. Garnish and Serve
To finish, garnish with fresh parsley for that pop of color and extra flavor. The bowl should look bursting with freshness and vibrancy. I like serving it with pita bread or a dollop of tzatziki sauce on the side—just a little extra indulgence! Serve it immediately and watch the ‘oohs’ and ‘aahs’ as you present your masterpiece.
Serving Suggestions
When it comes to presenting your Greek Chicken & Rice Bowl, think color, texture, and freshness. Here are a few serving tips:
-
Bowl vs. Plate: I prefer a deep bowl for this dish because it keeps everything cozy and brings out the Pantone-worthy colors of the ingredients. If you’re feeling fancy, you could layer it on a large white plate, giving it a bit more height.
-
Pita Bread on the Side: Warm some pita bread on the grill or in the oven and serve it alongside your bowl for an extra touch. You can even use it to scoop up all the tasty bits!
-
Extra Olive Oil: Serve a small dish of high-quality olive oil with some fresh herbs to dip your bread; it’s the perfect pair!
-
Food Styling: A little sprinkle of extra parsley across the top doesn’t hurt, and make sure to arrange your vegetables artfully. A good-looking plate always tastes better!
Recipe Variations
Let’s get adventurous—here are a few creative twists to consider:
-
Spicy Greek Chicken Bowl: Add some chopped jalapeños or a drizzle of sriracha for a kick. It’ll give your bowl an exciting twist!
-
Mediterranean Quinoa Bowl: Swap out the rice for quinoa for a hearty, protein-packed version. Add olives and roasted red peppers for an extra layer of Mediterranean goodness.
-
Grilled Shrimp Greek Bowl: Replace chicken with grilled shrimp! Season them with lemon and herbs for a delicious seafood twist that’s light yet satisfying.
-
Vegan Greek Bowl: Use chickpeas or grilled eggplant in place of chicken, and top with a dollop of vegan tzatziki sauce made from cashews or avocado—this will give you that creamy texture without any dairy.
-
Breakfast Bowl: Add a fried or poached egg on top! The runny yolk melds beautifully with the other flavors for a rich breakfast option.
Chef’s Notes
This recipe has had its fair share of evolution in my kitchen. I remember the early days when I would throw everything into a bowl without any care for presentation. However, as I explored and learned, I discovered that arranging the colors brings life to each dish. Plus, sharing these meals with friends is what makes cooking so rewarding; food is about bringing people together and creating lasting memories.
Also, here’s a little kitchen story for you: the first time my friend tried this bowl, he confidently claimed he could have it every day for the rest of his life—and guess what? He goes on to do just that! The flavors are simple yet versatile, making it easy to enjoy any day of the week.
FAQs and Troubleshooting
-
What if my chicken is dry?
- Chicken can dry out if overcooked. To avoid this, use a meat thermometer and remove it from heat at 165°F (75°C). Letting it rest for a few minutes also helps retain moisture.
-
Can I prepare this in advance?
- Absolutely! You can grill and store the chicken and cook the rice a day in advance. Just keep your veggies fresh until serving to maintain that crunchiness.
-
Why does my rice stick?
- If you find your rice is sticking together, it may be due to overcooking or not rinsing it beforehand. Rinsing the rice removes excess starch, resulting in fluffy grains.
-
What can I use instead of feta cheese?
- If you’re not a fan of feta, try goat cheese, fresh mozzarella, or even a sprinkle of nutritional yeast for a unique twist.
Nutritional Info
Here’s a quick breakdown of the nutritional benefits of our Greek Chicken & Rice Bowl:
- Calories: Approximately 450 calories per serving (chicken & rice included)
- Protein: Around 40 grams from the chicken and added rice
- Carbohydrates: Approximately 35 grams (low if using Kaizen rice)
- Fats: Roughly 15 grams (healthy fats from olive oil and feta)
- Vitamins and Minerals: This dish packs in Vitamin C from tomatoes and cucumbers, Calcium from feta cheese, and Iron from the chicken.
Feel free to adjust the portions to match your dietary goals, and remember that fresh ingredients are always best!
Final Thoughts
As we wrap up this delicious adventure through the world of Greek Chicken & Rice Bowls, I hope you’re feeling inspired to dive into your kitchen this week! Cooking is meant to be joyful and exploratory, so don’t hesitate to tweak the ingredients and make it your own footprint in the culinary world.
Remember, each bowl tells a story. Whether you’re gathering with family, prepping for a busy week, or treating yourself, this dish brings forth warmth and connection. So, embrace the process, savor every bite, and share the love with those around you.
Let’s keep the conversation going! Drop your questions, substitutions, or stories about your own kitchen adventures in the comments below. Until next time, keep those spatulas swiveling and those plates full of joy!
Happy cooking, my friends! 🍽️
Print
Greek Chicken & Rice Bowl
- Total Time: 45 minutes
- Yield: 4 servings 1x
- Diet: Gluten-Free
Description
A vibrant and customizable Greek Chicken & Rice Bowl brimming with grilled chicken, fresh veggies, and feta cheese, perfect for any occasion.
Ingredients
- 1 pound chicken breast
- 1 cup Kaizen low carb high protein rice
- 1 cup cherry tomatoes, halved
- 1 cucumber, diced
- 1/2 red onion, diced
- 1/4 cup feta cheese, crumbled
- 2 tablespoons olive oil
- 1 tablespoon lemon juice
- Salt and pepper to taste
- Fresh parsley, for garnish
Instructions
- Marinate the chicken by combining olive oil, lemon juice, salt, and pepper in a bowl. Toss the chicken breast in the mixture and let it marinate for about 30 minutes.
- Cook the rice according to the package instructions. If using traditional rice, remember the ratio of 1 part rice to 2 parts water.
- Grill the marinated chicken breast for about 6-8 minutes on each side, until golden and cooked through.
- Prepare the veggies by slicing cherry tomatoes, dicing the cucumber, and chopping the red onion.
- Assemble the bowl by placing a scoop of rice, topped with sliced chicken, cherry tomatoes, diced cucumber, and red onions. Sprinkle with feta cheese and drizzle olive oil and lemon juice.
- Garnish with fresh parsley before serving and enjoy immediately.
Notes
Customize your bowl by swapping out ingredients to suit your palate. Consider serving with pita bread or tzatziki on the side.
- Prep Time: 30 minutes
- Cook Time: 15 minutes
- Category: Main Course
- Method: Grilling
- Cuisine: Mediterranean
Nutrition
- Serving Size: 1 bowl
- Calories: 450
- Sugar: 5g
- Sodium: 400mg
- Fat: 15g
- Saturated Fat: 4g
- Unsaturated Fat: 9g
- Trans Fat: 0g
- Carbohydrates: 35g
- Fiber: 3g
- Protein: 40g
- Cholesterol: 70mg
Keywords: Greek, chicken, rice bowl, Mediterranean, healthy, customizable