Banana Sushi
Banana Sushi: A Fun Twist on a Classic Snack!
Hey there, fellow food lovers! Welcome back to Feastical! Today, I’m thrilled to share a quirky recipe that combines two of my favorite things: bananas and sushi! Wait, wait—before you raise an eyebrow and click away, let me explain why you should keep reading. This delightful dish is a playful take on traditional sushi, and it’s perfect for a snack, a fun breakfast, or even a dessert. Trust me; it’s as tasty as it is entertaining!
Why banana sushi? Well, we all know bananas are a fantastic source of potassium and they make for an easy, healthy snack. But why stop there when we can jazz them up with a little creativity? Imagine wrapping those bananas in a tortilla and slathering them with scrumptious spreads, then rolling them up like sushi. This recipe is as simple as it sounds, and it’s a hit with both kids and adults alike. Not only is it a blast to make, but it’s also a perfect way to get picky eaters excited about fruit!
So, whether you’re a busy parent looking for creative snacks for your little ones or simply someone who loves to experiment in the kitchen, banana sushi is for you. Grab your favorite toppings, and let’s roll!
A Nostalgic Kitchen Memory
Let me take you back to my childhood for a moment. Picture this: I’m about nine years old, standing on a stool in the kitchen, playing mad scientist with my mom. We loved to create weird and wonderful food combinations. One sunny Saturday morning, when we were supposed to be making pancakes, I spied a bunch of bananas on the counter. My mind immediately went wild with ideas. “What if we rolled them up in something?” I shouted in excitement.
Mom, always the adventurous spirit, decided to go along with my crazy idea. We pulled out the tortillas and the peanut butter—it’s always peanut butter in our house! Fast forward to our first taste of the banana sushi, and it was love at first bite! The creamy peanut butter, the sweetness of the banana, and that satisfying crunch from the peanuts created a flavor explosion in my mouth! That moment sparked a tradition in our home. Whenever we were feeling creative or needed a fun snack, we went straight for the banana sushi.
As I grew older, I would show my friends this quirky dish, and every single time, it elicited gasps and giggles. The creativity and joy of wrapping up a banana in a tortilla and jazzing it up with spreads and toppings always reminded me of those carefree weekends spent in the kitchen with Mom. Join me in rediscovering this childhood favorite, and let that same joy roll into your kitchen as we make banana sushi together today!
Ingredients
Let’s gather our ingredients! This recipe is incredibly versatile, but here’s the basic lineup for your banana sushi creation:
-
1 taco-size flour tortilla: Soft and pliable; it’s the perfect base. You can also use gluten-free tortillas for a healthier option or if you’re gluten-sensitive.
-
1 ripe but firm banana: You want it ripe enough for sweetness but firm enough to hold the roll together! If it’s too ripe, it could get mushy.
-
3 tablespoons peanut butter (divided): This nutty spread is a classic choice! Don’t have peanut butter? Almond butter or any nut butter will work wonderfully.
-
½ cup chopped peanuts: The crunchy texture adds an awesome contrast. If you’re nut-free, try using crispy rice cereal for the same crunch.
-
3 tablespoons softened cream cheese (divided): Creamy and smooth; it complements the flavors beautifully. For a vegan option, go for dairy-free cream cheese.
-
2 strawberries (thinly sliced): Fresh fruit is an excellent way to add brightness to your sushi! Any berry would work; think blueberries or raspberries, too!
-
2 tablespoons crushed freeze-dried strawberries: They pack a punch of flavor and a bit of whimsy. You can swap these out for crushed nuts or granola.
-
3 tablespoons Nutella (divided): Chocolate lovers will adore this! For a twist, try using cookie butter or a caramel spread if that tickles your fancy.
-
2 tablespoons shredded coconut: A tropical touch that brings it all together! Use sweetened or unsweetened depending on your preference.
With these ingredients, the flavor combinations are endless—so don’t be afraid to mix and match!
Step-by-Step Instructions
Ready to roll? Here’s how to whip up your very own banana sushi!
-
Prepare Your Workspace: Clear a space on your kitchen counter and gather all your tools—your tortillas, spreads, toppings, and a good knife. Making sushi is more fun when everything is within reach!
-
Spread the Goodness: Take one flour tortilla and place it on a clean surface. Using a spatula, spread one tablespoon of peanut butter evenly across the tortilla. Don’t be shy—leave a little bit of room around the edges so it doesn’t ooze out when you roll it. The peanut butter acts like glue, keeping everything together.
-
Bring On the Banana: Next, grab your ripe banana. Peel it and place it roughly in the center of the tortilla. Feel free to lay it diagonally for a more appealing roll! This is your anchor, so make sure it’s stable.
-
Top It Off: If you’re making the peanut butter version, sprinkle half of your chopped peanuts over the banana. Need extra crunch? Go crazy and add sugary granola or crispy rice cereal instead!
-
Roll It Up: Now we’re getting to the fun part! To roll, fold in both edges of the tortilla, then take one end and start rolling tightly but gently over the banana. Just like rolling a burrito, but with more flair! When you reach the end, it should hold together well.
-
Slice and Serve: With a sharp knife, slice the banana sushi into rounds—about 1-inch pieces work perfectly! Arrange them beautifully on a plate. It’s like sushi, but way sweeter and way less intimidating.
-
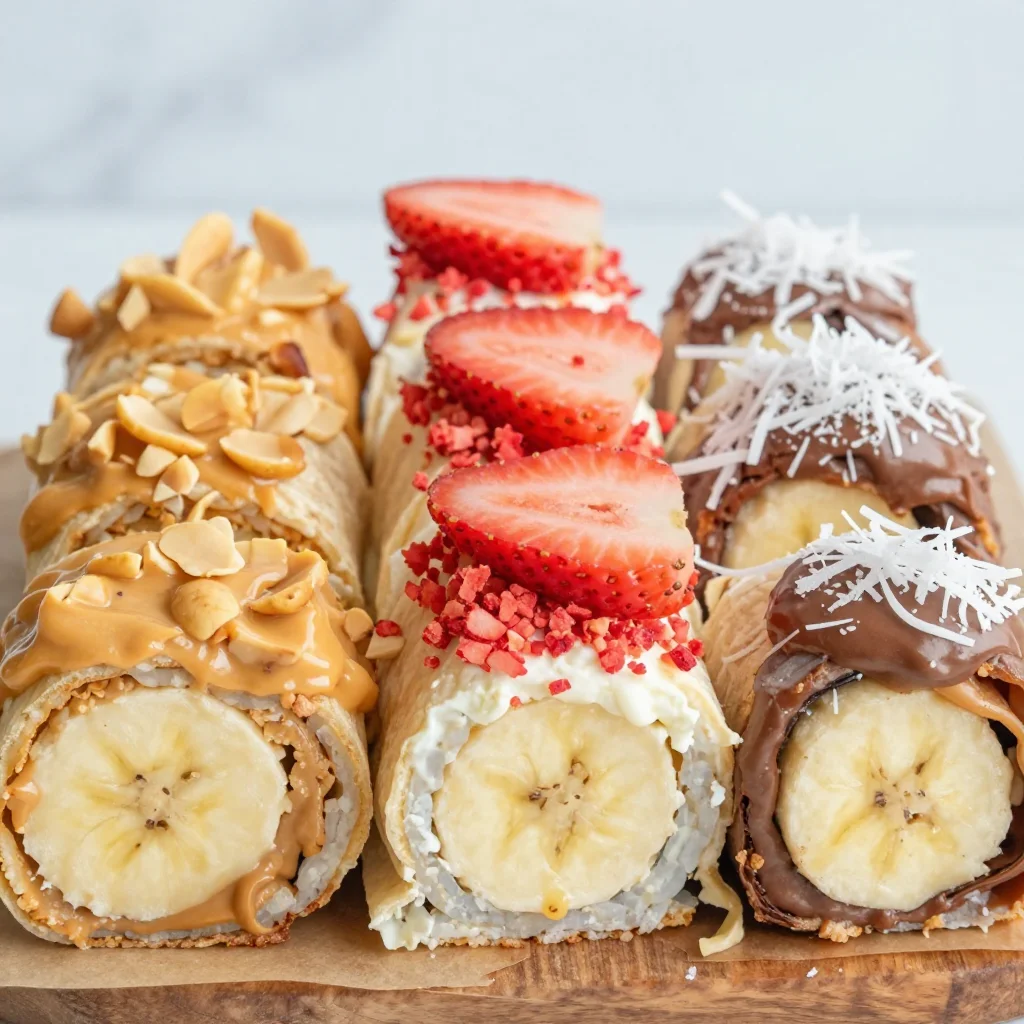
Repeat for More Flavors: Come on, you know you want to try all the variations. Repeat steps 2 through 6 with your cream cheese and strawberry combo, and your Nutella and coconut option! Mix up the spreads and toppings for each roll—your plate will look like a work of art!
-
Taste Test Time: Now, dig in! Enjoy the gooey goodness of the peanut butter, the creaminess of the cream cheese, or the chocolate-flavor explosion from Nutella. Each different combination will tickle your taste buds!
Serving Suggestions
Serving banana sushi is an art—so let’s make it look as delicious as it tastes! Here’s how to plate up your creation:
-
Colorful Platter: Use a bright, colorful plate to make your banana sushi pop. A vibrant platter not only enhances the aesthetic but also invites you to dive in.
-
Garnish with Fresh Fruit: Surround your sushi with fresh fruit like sliced strawberries or kiwi. This adds color and freshness while complimenting the flavors beautifully.
-
Drizzle of Honey or Chocolate: For extra sweetness, drizzle honey or some melted chocolate on top of your sushi platter. This simple touch elevates the dish and provides a delightful finishing touch.
-
Fun Dipping Sauces: Serve with small bowls of yogurt, chocolate sauce, or maple syrup for an interactive experience! Who doesn’t love to dip?
-
Creative Stacking: Stack the sushi rolls high and secure them with a toothpick or small skewer. It makes for an eye-catching display at any gathering or snack time!
Recipe Variations
Now that you’ve mastered the classic banana sushi, it’s time to get creative! Here are some fun variations to try:
-
Tropical Coconut Delight: Use almond butter instead of peanut butter and top with shredded coconut and crushed pineapple for a tropical twist.
-
Chocolate Lover’s Dream: Layer Nutella on the tortilla and sprinkle mini marshmallows and graham cracker crumbles on the banana for a s’mores-style sushi!
-
Berry Blast: Swap in cream cheese for whipped cream cheese sweetened with a touch of honey, and top with a medley of mixed berries like blueberries, raspberries, and strawberries.
-
Savory Spin: If you’re feeling adventurous, try a savory version by spreading hummus on the tortilla and adding some sliced veggies like cucumber or bell peppers to the roll.
-
Nut-Free Version: If you’re looking for something nut-free, try a sun butter (sunflower seed butter) as your spread, and toss in some raisins or dried cranberries for added texture.
Chef’s Notes
This banana sushi recipe has become a staple in my house over the years. It’s fascinating to see how something so simple can bring so much joy. I often tell my friends that this dish is a reminder that food doesn’t have to be fancy to create happy moments. The laughter in the kitchen while making these sushi rolls is worth more than a Michelin star in my book!
Through the years, banana sushi has evolved for me—I’ve introduced different spreads and toppings to keep it fresh and exciting. Don’t be afraid to branch out! Get the kids involved; they’ll love the DIY aspect of it. And who knows? You might create a few new family traditions of your own!
FAQs and Troubleshooting
1. What if my banana is too ripe?
If your banana has become too soft, switch it up! Instead of rolling the banana directly, you can slice it into thick rounds and layer them on the tortilla with your spreads. It won’t hold the traditional roll shape, but it’ll still be delicious!
2. Can I use other spreads besides peanut butter or Nutella?
Absolutely! The beauty of banana sushi is its adaptability. Feel free to experiment with other spreads such as almond butter, tahini, or even yogurt. The possibilities are endless!
3. What if my tortillas are breaking while I roll?
If your tortillas are cracking, try warming them slightly in the microwave for about 10 seconds to make them more pliable. Or, look for freshly made tortillas that are softer.
4. How do I store leftovers?
If you happen to have any leftovers (a rare occurrence with this recipe!), wrap them in plastic wrap and store them in the fridge for a few hours. They’re best enjoyed fresh, so I recommend making them right before serving whenever possible.
Nutritional Info
Banana sushi can be a fun and nutritious snack or dessert. Here’s a rough estimate of the nutritional values for one roll of banana sushi (based on a recipe with a peanut butter filling):
- Calories: 280
- Protein: 8g
- Fat: 12g
- Carbohydrates: 40g
- Fiber: 5g
- Sugars: 10g
(Bear in mind that nutritional values will vary depending on the specific ingredients used.)
Final Thoughts
Banana sushi isn’t just a recipe; it’s an experience—a fun way to get creative in the kitchen and share delightful flavors with family and friends. It’s all about embracing the joy of cooking and making memories. So next time you’re craving something yummy, don’t reach for the same old snack. Instead, whip up some banana sushi!
Whether you keep it classic with peanut butter or venture into more exotic flavors, the underlying joy is what counts. Get your loved ones involved, turn on some music, and make it a little celebration in your kitchen. Remember, the best meals are made not just with ingredients but with laughter, love, and a sprinkle of creativity!
Happy sushi rolling! 🍌🍣
Print
Banana Sushi
- Total Time: 10 minutes
- Yield: 2 servings 1x
- Diet: Vegetarian
Description
A fun twist on a classic snack combining bananas and sushi, perfect for a snack, breakfast, or dessert.
Ingredients
- 1 taco-size flour tortilla
- 1 ripe but firm banana
- 3 tablespoons peanut butter (divided)
- ½ cup chopped peanuts
- 3 tablespoons softened cream cheese (divided)
- 2 strawberries (thinly sliced)
- 2 tablespoons crushed freeze-dried strawberries
- 3 tablespoons Nutella (divided)
- 2 tablespoons shredded coconut
Instructions
- Prepare Your Workspace: Clear a space on your kitchen counter and gather all your tools—your tortillas, spreads, toppings, and a good knife.
- Spread the Goodness: Take one flour tortilla and place it on a clean surface. Using a spatula, spread one tablespoon of peanut butter evenly across the tortilla.
- Bring On the Banana: Peel your ripe banana and place it roughly in the center of the tortilla.
- Top It Off: If you’re making the peanut butter version, sprinkle half of your chopped peanuts over the banana.
- Roll It Up: Fold in both edges of the tortilla, then take one end and start rolling tightly but gently over the banana.
- Slice and Serve: With a sharp knife, slice the banana sushi into rounds—about 1-inch pieces work perfectly!
- Repeat for More Flavors: Repeat steps 2 through 6 with your cream cheese and strawberry combo, and your Nutella and coconut option.
- Taste Test Time: Enjoy the gooey goodness of the peanut butter, the creaminess of the cream cheese, or the chocolate flavor explosion from Nutella.
Notes
Mix and match various spreads and toppings for endless flavor combinations.
- Prep Time: 10 minutes
- Cook Time: 0 minutes
- Category: Snack
- Method: No-Cook
- Cuisine: Fusion
Nutrition
- Serving Size: 1 roll
- Calories: 280
- Sugar: 10g
- Sodium: 200mg
- Fat: 12g
- Saturated Fat: 3g
- Unsaturated Fat: 6g
- Trans Fat: 0g
- Carbohydrates: 40g
- Fiber: 5g
- Protein: 8g
- Cholesterol: 5mg
Keywords: banana sushi, fun snacks, healthy snacks, dessert, kid-friendly recipe

Minute Ham and Cheese Sticks: Crispy, Kid-Friendly Bite
Ham and Cheese Sticks: An Easy, Feel-Good Snack
Hey there, food lovers! Today, I’m thrilled to share one of my absolute favorite comfort food recipes with you—Ham and Cheese Sticks. These delightful bites are not only delicious but also incredibly simple to whip up. Picture this: crispy, flaky dough wrapping around savory ham and gooey cheddar cheese, bringing joy to every single bite. They’re perfect for a quick snack, a party appetizer, or even a cozy movie night treat.
You know, it’s funny how certain foods can take you back in time, isn’t it? These Ham and Cheese Sticks remind me of weekends spent in my grandma’s kitchen, where fresh-from-the-oven snacks would fill the air with mouthwatering aromas. Grandma would often make a similar version, but hers were a bit more elaborate. I remember sitting around the kitchen table, eagerly cutting into these gooey delights, almost burning my tongue because I couldn’t wait a second longer!
As I grew older, my love for food transformed into a passion for cooking, and I realized I didn’t need fancy techniques to create something extraordinary. My recipe for Ham and Cheese Sticks reflects that ethos—it’s about embracing simplicity while savoring every flavor.
So let’s put on our aprons and dive into this wonderful world of flaky, cheesy goodness!
Personal Story
Growing up, food was a central theme in my family—an abundant source of joy, comfort, and creativity. Every Friday night was pizza night at my house, but occasionally, my grandma would surprise us with her legendary Ham and Cheese Sticks. We’d practically race to the kitchen when we heard the oven timer ding, the allure of melted cheese and golden pastry filling the air was simply irresistible.
I can still hear her laughter ringing through the house as we devoured her creations. These snacks became a family tradition, a simple pleasure that strengthened our bonds. She always believed that the best recipes are rooted in love and the stories behind them. Her kitchen was infused with warmth and laughter, and now, I try to replicate that spirit with my own twist.
With each batch of Ham and Cheese Sticks, I feel connected to those beautiful memories. It’s not just about the food; it’s about the people we share it with. So grab your apron, a friend, or your family, and let’s create some more magic in the kitchen!
Ingredients
Now, let’s gather all the ingredients you’ll need for these Ham and Cheese Sticks:
-
1 can of flaky crescent dough
- This is the base of our sticks. You can find it in almost any grocery store. If you want to mix things up, you can use puff pastry instead, which will give you an even flakier texture.
-
8 slices of deli ham
- I love using black forest ham for its rich flavor, but feel free to switch it up! Honey ham or even turkey slices work wonderfully if you’re looking for a lighter option.
-
8 slices of cheddar cheese
- You can’t go wrong with classic cheddar here! For an extra flavor kick, try using pepper jack or gouda. Just remember, not all cheeses melt the same, so choose wisely!
-
2 tablespoons of butter
- Melted butter brushed on top gives your sticks that beautiful golden crust. You could also mix in a bit of olive oil if you want to lighten things up.
-
1 teaspoon of garlic powder
- Adds a delightful kick of flavor. If you’re feeling adventurous, you can use minced fresh garlic instead for a more robust taste.
-
Salt and pepper to taste
- Always adjust seasoning to your preference; a little sprinkle can elevate your dish to another level!
Step-by-Step Instructions
Let’s get cooking! Here’s how to turn these humble ingredients into your new favorite snack:
Step 1: Preheat Your Oven
Preheat your oven to 375°F (190°C). This ensures your Ham and Cheese Sticks will bake perfectly.
Step 2: Prepare Your Baking Sheet
Line a baking sheet with parchment paper. This will prevent sticking and make for easier cleanup—plus, who doesn’t love a clean kitchen?
Step 3: Roll Out the Crescent Dough
Open your can of flaky crescent dough and unroll it on a clean surface. Don’t be shy—this is the part where you can let your creativity shine! Pinch the seams together if they separate; we want each stick to hold its filling.
Step 4: Cut & Assemble
Using a pizza cutter or sharp knife, slice each dough triangle into two smaller triangles. Now, place a slice of ham and a slice of cheddar cheese on the wider part of the triangle. Don’t hold back—stack as much as your heart desires!
Step 5: Roll Them Up
Starting from the wider end, roll the dough triangle toward the point. As you roll, the ham and cheese will snuggle inside the dough. Place the rolled sticks seam-side down on your baking sheet, and repeat until you’ve used up all your dough.
Step 6: Butter Up!
Now it’s time to brush melted butter over each stick. This is where the magic happens; the butter will help turn your sticks a beautiful golden brown. Sprinkle garlic powder, salt, and pepper on top for extra flavor.
Step 7: Bake & Enjoy!
Slide your baking sheet into the preheated oven and bake for about 12-15 minutes, or until they’re golden brown and your kitchen smells amazing. The result is a warm kitchen filled with mouthwatering scents that will have everyone gathering around as you pull them out.
Step 8: Cool & Serve
Let your Ham and Cheese Sticks cool for a few minutes on a wire rack before digging in. This helps the cheese set a bit so you don’t burn your mouth! Trust me, patience is a virtue when cheesy goodness is involved.
Serving Suggestions
These Ham and Cheese Sticks are incredibly versatile when it comes to serving. Here are a few fun ideas:
-
Serve with Dipping Sauces: A side of spicy mustard, ranch dressing, or a tangy barbecue sauce can elevate your snacking experience. If you’re in the mood for something special, try making a simple garlic aioli.
-
Garnish with Fresh Herbs: A sprinkle of chopped parsley or chives on top adds a lovely burst of color and freshness.
-
Create a Snack Platter: Pair your sticks with an assortment of veggies and dips, or alongside a charcuterie board featuring various meats and cheeses.
-
Pack for Lunch: These tasty treats are perfect for lunchboxes! They’re easy to grab on the go and taste fantastic even when they’re not hot from the oven.
Recipe Variations
Feeling adventurous? Here are some creative twists to try out:
-
Spicy Ham and Cheese Sticks: Add jalapeño slices or red pepper flakes to give your sticks a fiery kick.
-
Herbed Cream Cheese Filling: Swap out the deli ham for a spread of herbed cream cheese and a slice of smoked salmon for a delightful brunch option.
-
Vegetarian Delight: Use roasted vegetables and mozzarella cheese for a veggie-packed version that even meat-lovers will enjoy!
-
Sweet and Savory: Spread some fig jam or peach preserves inside before adding the ham and cheese for a deliciously unique take.
-
Breakfast Version: Use scrambled eggs, breakfast sausage, and cheese to create a breakfast treat that’s perfect for lazy Sunday mornings.
Chef’s Notes
Ah, my dear friends, every recipe has a story, and this one is no exception. These Ham and Cheese Sticks have evolved over time. I remember experimenting with all sorts of fillings and doughs when I first made them and ultimately found that the classic version is still my favorite. The combination of rich cheese, savory ham, and flaky dough creates that comforting embrace we all crave.
There was a time when I was trying to impress my then-girlfriend (now wife) with my culinary skills, and I totally flubbed the first batch of these sticks. The dough split, the cheese oozed out everywhere—it was a disaster! But we had such a laugh about it, and we spent the evening in the kitchen together, creating something entirely new. And let’s be honest, sometimes the best memories come from those culinary flops.
FAQs and Troubleshooting
Let’s tackle some common questions and troubleshoot any potential hiccups you might encounter:
1. Why are my sticks not crispy?
If your Ham and Cheese Sticks come out soggy, it might be due to too much filling or not enough baking time. Make sure to roll the dough tightly and give them a good 12-15 minutes in the oven.
2. Can I prepare these in advance?
Absolutely! You can assemble them ahead of time and store them in the fridge. Just pop them in the oven when you’re ready for a delicious snack.
3. What should I do if my cheese isn’t melting?
Be sure to use a good melting cheese like cheddar or mozzarella. If you’re using alternatives, check that they’re suitable for melting to avoid disappointment!
4. Can I freeze these?
Yes, you can freeze the assembled sticks before baking! Just wrap them tightly in plastic wrap and store them in an airtight container. When you’re ready to enjoy them, bake from frozen—just add a few extra minutes to the baking time.
Nutritional Info
For those keeping an eye on nutritional content, here’s a general breakdown for one Ham and Cheese Stick (based on the recipe as is):
- Calories: Approx 130
- Protein: 6g
- Fat: 9g
- Carbohydrates: 8g
- Fiber: 0g
- Sodium: 300mg
Keep in mind that these values can vary based on the specific brands and ingredients you choose.
Final Thoughts
So, there you have it, my fellow foodies— a delightful dive into the world of Ham and Cheese Sticks! These easy, flavor-packed snacks embody the spirit of comfort food and are sure to bring smiles to the faces of everyone who tries them. Whether you whip them up for a casual get-together, a party, or just as a special treat for yourself, they are bound to be a hit.
Remember, cooking is about exploration, joy, and love. So don’t be afraid to add your own twist to this recipe, just like I did with that unforgettable batch in my grandma’s kitchen. Every morsel tells a story, and I can’t wait for you to share yours!
Happy cooking, my friends—now go forth and create some magic in your own kitchen!
Print
Ham and Cheese Sticks
- Total Time: 30 minutes
- Yield: 8 servings 1x
- Diet: None
Description
Crispy, flaky dough wrapped around savory ham and gooey cheddar cheese—perfect for a snack or appetizer.
Ingredients
- 1 can of flaky crescent dough
- 8 slices of deli ham
- 8 slices of cheddar cheese
- 2 tablespoons of butter
- 1 teaspoon of garlic powder
- Salt and pepper to taste
Instructions
- Preheat your oven to 375°F (190°C).
- Line a baking sheet with parchment paper.
- Open your can of flaky crescent dough and unroll it on a clean surface.
- Using a pizza cutter, slice each dough triangle into two smaller triangles.
- Place a slice of ham and a slice of cheddar cheese on the wider part of the triangle.
- Starting from the wider end, roll the dough triangle toward the point.
- Brush melted butter over each stick and sprinkle with garlic powder, salt, and pepper.
- Slide your baking sheet into the preheated oven and bake for 12-15 minutes.
- Let your Ham and Cheese Sticks cool for a few minutes on a wire rack.
Notes
For a twist, try using different types of cheese or adding spices to the filling.
- Prep Time: 15 minutes
- Cook Time: 15 minutes
- Category: Snack
- Method: Baking
- Cuisine: American
Nutrition
- Serving Size: 1 stick
- Calories: 130
- Sugar: 1g
- Sodium: 300mg
- Fat: 9g
- Saturated Fat: 4g
- Unsaturated Fat: 5g
- Trans Fat: 0g
- Carbohydrates: 8g
- Fiber: 0g
- Protein: 6g
- Cholesterol: 15mg
Keywords: ham, cheese, snack, appetizer, comfort food