
How to Meal Prep – Healthy Chicken Parmesan
How to Meal Prep: Healthy Chicken Parmesan
Hey there, fellow food lovers! I’m Beau Collier, and I’m thrilled to have you join me on this delicious journey towards mastering the art of meal prep with one of my all-time favorites: Healthy Chicken Parmesan.
Meal prepping can feel daunting, but it doesn’t have to be! Especially when you’re making a dish that’s not only nutritious but also unbelievably satisfying! Picture it: crispy, tender chicken coated in a golden crust, topped with fresh tomato sauce, and a sprinkle of cheese; it’s comfort food at its finest! And we’re doing it with a healthier twist that’s going to make your taste buds dance.
Whether you’re a busy parent trying to keep your family’s meals wholesome, a fitness enthusiast looking to stay on track, or simply someone who loves good food (who doesn’t?), this Healthy Chicken Parmesan meal prep is going to meet all your needs, and then some!
A Taste of Nostalgia
Let me take you back a bit. Growing up, Sundays at my grandmother’s house were a sacred tradition! The house would fill with simmering tomato sauce, and the aroma of cheesy goodness wafted through the air. My grandmother had a magic touch with her Chicken Parmesan. I remember standing on a stool next to her, watching those chicken breasts transform from plain to perfection as she coated them in breadcrumbs and herbs.
She always said, “Cooking is like love; it should be entered into with abandon or not at all.” And she poured every ounce of love—and garlic—into those meals. I’ve carried that spirit with me ever since. Today, we’re putting that nostalgic dish into a meal prep version, making it not just memory-worthy but also a friendlier fit for our health-conscious dinners.
Ingredients
Now let’s get into the mix. Here’s what you’re going to need for this blissful concoction:
-
4 boneless, skinless chicken breast halves
Chef Insight: Chicken breasts are lean sources of protein, perfect for meal prep. Feel free to swap in turkey cutlets if you prefer! -
1 cup almond meal
Tip: This gluten-free alternative to breadcrumbs adds a slightly nutty flavor and is a fantastic low-carb option. If you’re not gluten-sensitive, feel free to use whole wheat breadcrumbs! -
1/4 cup chickpea flour
Substitution Tip: Chickpea flour is great for adding a gluten-free crunch. You can replace it with your favorite flour or use an equal part of oat flour! -
1 tbsp dried oregano
Flavor Insight: Dried oregano brings a lovely Mediterranean touch. Fresh oregano can be substituted for a fresher taste if you have it on hand! -
1 tbsp dried basil
Fun Fact: If you throw in some fresh basil instead, you might just transport yourself back to Italy with every bite! -
1 tbsp dried thyme
Option: Feel free to swap this with Italian seasoning for an extra punch of flavor. -
2 tsp garlic powder
Chef’s Tip: Garlic powder is versatile; increase the amount if you’re like me and love that garlicky goodness! You can even use fresh minced garlic for a stronger kick. -
1 1/2 tsp sea salt
Cooking Hack: Salt enhances flavors, but don’t overdo it! It’s key when you’re coating your chicken. -
1 tsp ground black pepper
Pro Tip: Freshly ground black pepper takes the flavor to a whole new level! -
2-4 tbsp olive oil
Healthy Swap: Olive oil keeps things moist and adds a touch of healthy fat. Canola or avocado oil can work in a pinch. -
1 (25-oz) jar of tomato sauce
Advice: Choose a brand with no added sugars or make your own for a personalized touch! -
2 tbsp grated Parmesan cheese
Tip: You can use nutritional yeast for a cheesy flavor without the dairy if you’re vegan! -
4 medium zucchini
Why Zucchini? These can serve as a healthy pasta alternative, but feel free to use whole grain spaghetti if you’re not keen on zoodles! -
1 tbsp olive oil (for zoodles)
Tip: This will help roast and bring out the flavor of your zoodles! -
1/2 tsp sea salt
-
1/2 tsp black pepper
-
1/4 tsp garlic powder
And that’s the list! Gather your ingredients, and let’s turn them into something spectacular.
Step-by-Step Instructions
Ready to get cooking? Here’s how we’re going to pull this meal together!
1. Preheat Your Oven
Instructions: Preheat your oven to 400°F (200°C).
Chef Hack: This is essential! A hot oven guarantees that your chicken will cook evenly and get that perfect crispy coating we all crave.
2. Prepare the Chicken
Instructions: Place the chicken breasts between two sheets of plastic wrap and pound them gently with a meat mallet (or a rolling pin) until they’re about 1 inch thick.
Why Pound? This not only tenderizes the meat but allows for even cooking.
3. Create the Coating
Instructions: In a large bowl, mix together almond meal, chickpea flour, oregano, basil, thyme, garlic powder, salt, and black pepper.
Chef Note: You want a beautiful herb blend that sticks to your chicken and marks the beginning of its transformation.
4. Coat the Chicken
Instructions: Drag each chicken breast through the olive oil, making sure to coat it well before pressing it into the flour mixture on both sides.
Chef Tip: Don’t be shy with the coating! This is where all that flavor lies.
5. Arrange & Bake
Instructions: Place the coated chicken on a parchment-lined baking sheet and lightly drizzle with olive oil. Bake for about 20-25 minutes or until golden brown and the internal temperature reaches 165°F (75°C).
Cooking Insight: This method lets the chicken crisp up while keeping it juicy!
6. While the Chicken Bakes
Instructions: In the meantime, heat a skillet over medium heat, add more olive oil, and sauté your zucchini noodles (or whatever noodles you’re using) with salt, black pepper, and garlic powder for about 3-4 minutes or until tender.
Zucchini Hack: Don’t overcook—keep them al dente for a satisfying bite!
7. Assembly Time
Instructions: Once your chicken is perfectly baked, spread a generous layer of tomato sauce over each piece and top with Parmesan cheese. Return to the oven for an additional 5-10 minutes until the cheese is melted and bubbly.
Final Touch: You could even pop it under the broiler for a minute for that extra golden finish!
8. Serve It Up
Instructions: On a plate, serve your crispy chicken over the sautéed zucchini noodles, garnished with fresh basil if you have it.
Plating Hack: A drizzle of balsamic reduction over the top can make a fabulous, fancy presentation without much effort!
Serving Suggestions
Alright, my fellow foodies! When it comes to serving, presentation matters. You can make this meal absolutely swoon-inducing with just a few touches. Here’s how I like to serve it up:
- Color Splash: Garnish your plate with fresh basil leaves or even a sprinkle of microgreens. A pop of green brightens up the plate beautifully.
- Side Love: Serve with a side salad or some garlic bread (whole grain or gluten-free options are fantastic!) for an extra twist on the classic Italian meal.
- Meal Prep Container Tip: If you’re packing this for later, consider stacking the zoodles on the bottom, topped with the chicken parmesan. This way, the sauce adds moisture without making everything soggy.
Recipe Variations
I believe in versatility, and my kitchen is never one-note! Here are a few creative twists you might consider for your Healthy Chicken Parmesan:
-
Pesto Chicken Parmesan: Spread a layer of basil pesto over the chicken before adding the tomato sauce. It adds a fresh brightness that’s divine!
-
Spicy Variation: Toss some red pepper flakes into your almond meal mixture for an extra kick!
-
Cheesy Chicken Zucchini Bake: Instead of the layered plate, cube the chicken and mix everything in a baking dish with additional veggies like bell peppers or spinach and bake it all together.
-
No Frying, All Baking: If you’re looking to cut even more calories, omitting the almond meal coating will still yield flavorful, juicy chicken. Just roast it directly with the sauce on top!
-
Vegan Delight: For a completely plant-based twist, swap the chicken for chickpea patties or baked tofu sprinkled with nutritional yeast.
Chef’s Notes
Over the years, my recipe for Chicken Parmesan has undergone many playful transformations as my palate evolved. I’ve experimented with different coatings, vegetable pairings, and sauces. One time, I accidentally grabbed the cinnamon instead of garlic powder—it was an adventure in the kitchen, to say the least! But that’s the beauty of cooking; sometimes the “oops” moments can lead to authentic discoveries.
Why Meal Prep?
Meal prepping isn’t just about saving time; it’s about making healthier choices effortlessly. When you have a satisfying dish like this ready to go, it’s easier to skip the drive-thru. My grandmother’s Chicken Parmesan taught me that food isn’t just fuel; it’s something to be shared and celebrated, so let’s make it accessible every day.
FAQs and Troubleshooting
Let’s address a few common questions and potential hiccups you might run into while cooking up a storm:
1. Why is my chicken dry?
Cook times can vary based on the thickness of your chicken breasts. Be sure to check the internal temperature and remove it promptly from the oven when it hits 165°F (75°C). Also, let it rest for a few minutes before slicing to retain moisture!
2. Can I make this dish gluten-free?
Absolutely! With almond meal and chickpea flour, this recipe is already gluten-free. Just ensure your sauce doesn’t have any hidden gluten ingredients!
3. How long can I keep my meal prepped chicken?
Stored in an airtight container, your Chicken Parmesan will last 4-5 days in the fridge. Reheat in the oven or microwave and enjoy!
4. Can I freeze it?
Yes! You can freeze cooked chicken parmesan. It might lose a bit of its crunch upon reheating, but you’ll still have that wonderful flavor to savor later on.
Nutritional Information
Let’s talk numbers! Here’s what you’re looking at per serving for this Healthy Chicken Parmesan:
- Calories: ~350
- Protein: 38g
- Carbohydrates: 12g
- Fats: 18g
- Fiber: 3g
Keep in mind, nutrition may vary based on portion sizes and specific ingredients used!
Final Thoughts
And there you have it! A delightful, healthy twist on your beloved Chicken Parmesan—made easy for meal prep. The best part? Not only are you saving your time, but you’re also creating meals that nourish your body and warm your heart.
So, whether you’re indulging alone or sharing with loved ones, I hope this recipe brings a little joy to your table, just like my grandmother’s dishes did for me. Now, get out there, whip up some Chicken Parmesan, and let yourself bask in the warm flavors and beautiful memories that food can create!
Happy cooking, friends! Let’s feast! 🍽️
Print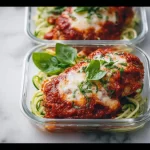
Healthy Chicken Parmesan
- Total Time: 45 minutes
- Yield: 4 servings 1x
- Diet: Gluten-Free
Description
A nutritious and satisfying twist on classic Chicken Parmesan, perfect for meal prep.
Ingredients
- 4 boneless, skinless chicken breast halves
- 1 cup almond meal
- 1/4 cup chickpea flour
- 1 tbsp dried oregano
- 1 tbsp dried basil
- 1 tbsp dried thyme
- 2 tsp garlic powder
- 1 1/2 tsp sea salt
- 1 tsp ground black pepper
- 2–4 tbsp olive oil
- 1 (25-oz) jar of tomato sauce
- 2 tbsp grated Parmesan cheese
- 4 medium zucchini
- 1 tbsp olive oil (for zucchini)
- 1/2 tsp sea salt
- 1/2 tsp black pepper
- 1/4 tsp garlic powder
Instructions
- Preheat your oven to 400°F (200°C).
- Place the chicken breasts between two sheets of plastic wrap and pound them gently with a meat mallet until they’re about 1 inch thick.
- In a large bowl, mix together almond meal, chickpea flour, oregano, basil, thyme, garlic powder, salt, and black pepper.
- Drag each chicken breast through the olive oil, making sure to coat it well before pressing it into the flour mixture on both sides.
- Place the coated chicken on a parchment-lined baking sheet and lightly drizzle with olive oil. Bake for about 20-25 minutes or until golden brown and internal temperature reaches 165°F (75°C).
- In the meantime, heat a skillet over medium heat, add more olive oil, and sauté your zucchini noodles with salt, black pepper, and garlic powder for about 3-4 minutes or until tender.
- Once your chicken is perfectly baked, spread a generous layer of tomato sauce over each piece and top with Parmesan cheese. Return to the oven for an additional 5-10 minutes until the cheese is melted and bubbly.
- On a plate, serve your crispy chicken over the sautéed zucchini noodles, garnished with fresh basil if desired.
Notes
Meal prep in airtight containers can last 4-5 days in the fridge. Can also be frozen for later enjoyment.
- Prep Time: 15 minutes
- Cook Time: 30 minutes
- Category: Main Course
- Method: Baking
- Cuisine: Italian
Nutrition
- Serving Size: 1 serving
- Calories: 350
- Sugar: 4g
- Sodium: 800mg
- Fat: 18g
- Saturated Fat: 4g
- Unsaturated Fat: 10g
- Trans Fat: 0g
- Carbohydrates: 12g
- Fiber: 3g
- Protein: 38g
- Cholesterol: 70mg
Keywords: Chicken Parmesan, Meal Prep, Healthy Recipes, Italian Cuisine, Gluten-Free
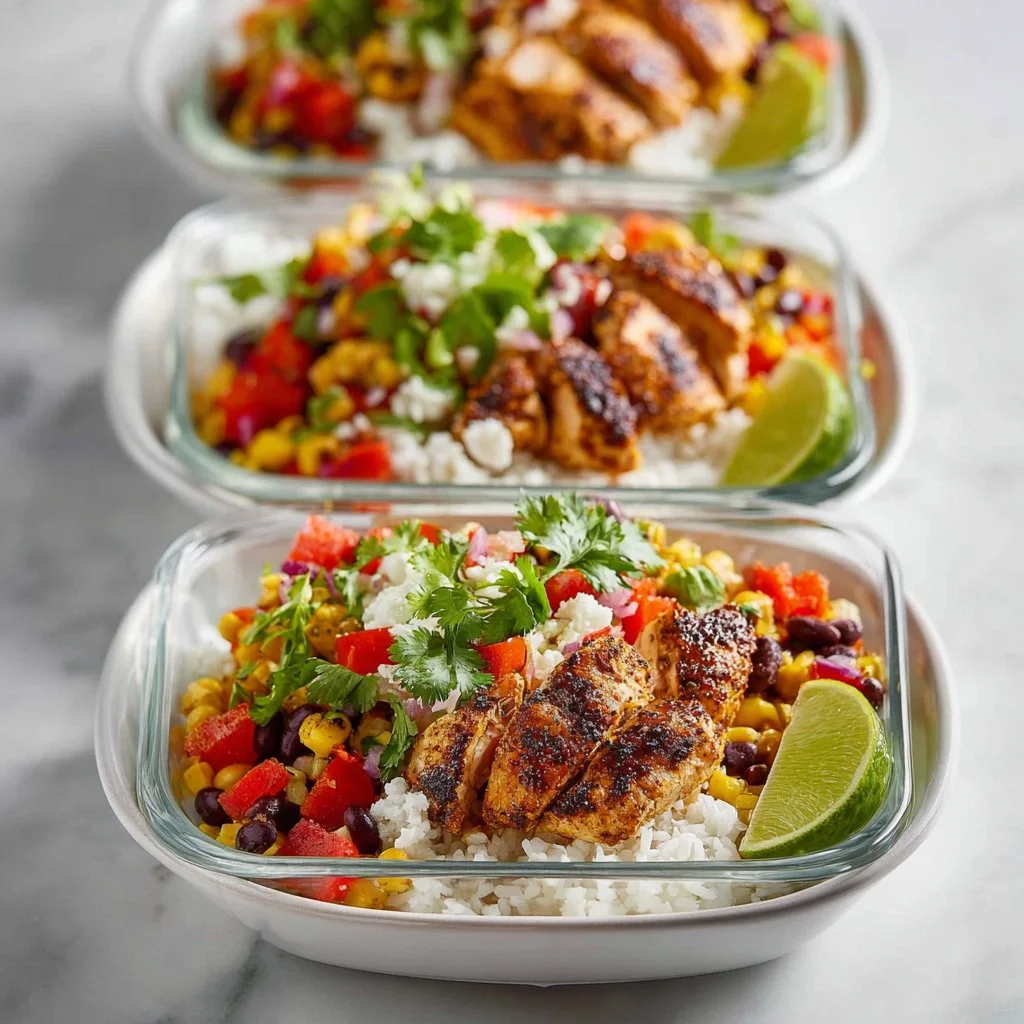
Southwest Chicken Meal Prep Bowls
Southwest Chicken Meal Prep Bowls
Hey there, food friends! If you’re craving something vibrant, filling, and super easy to make, you’ve landed in the right spot. Let’s dive into the world of Southwest Chicken Meal Prep Bowls—the perfect blend of wholesome ingredients that’ll keep your taste buds singing and your meal prep game strong. Whether you’re hustling through a busy week or just want to pack a healthy lunch without breaking a sweat, these bowls are your go-to solution.
Imagine a sunny afternoon, a little bump of Jimmy Buffett in the background, and the enticing aroma of seasoned chicken sizzling on the stove. That’s the vibe we’re going for with this dish. What I love about meal prep bowls is their incredible versatility—they’re not just a feast for your belly; they bring some color and sunshine to your week! With a mix of protein, carbs, and fresh veggies, you’ll feel nourished and energized, ready to tackle whatever life throws your way.
And the best part? You can customize these bowls to fit your taste preferences or those frantic demands of your busy schedule. Gather around because I’m about to share my secrets to building the ultimate Southwest bowl that’s as delicious as it is easy! Get ready, grab your apron, and let’s whip up something magical together!
Personal Story
Let me whisk you back to a summer day several years ago that holds a special place in my heart! It was a warm sunny weekend, and I was hosting a small get-together for my friends. You know, the kind of gathering where laughter floats in the air, and the smell of grilled food makes everyone’s stomach growl in excitement. I decided to showcase my new found love for southwest flavors by preparing my very first Southwest Chicken Meal Prep Bowls.
As I chopped up fresh veggies and marinated my chicken, I was surprised by how simple it all was. The vibrant colors of the ingredients dancing in my bowl made it hard not to smile. As I plated everything and called everyone to dig in, it felt like I was letting them in on a big, delicious secret! Watching them savor each bite, I realized this wasn’t just a dish; it was a memory in the making. That sunny afternoon became a tradition, and here I am, ready to share it with all of you!
Ingredients
Ready to get cooking? Here’s what you’ll need to whip up these delightful Southwest Chicken Meal Prep Bowls. Each ingredient packs a punch, so let’s break it down!
-
2 cups cooked rice
- Chef Insight: White, brown, or even cauliflower rice works great here. If you want those carbs to dance a little lighter, try quinoa for a protein boost!
-
1 lb seasoned chicken breast
- Substitution Tips: Grilled, roasted, or even shredded rotisserie chicken can shine in this dish. Season your usual chicken with taco or fajita spice blend for that authentic flair!
-
1 cup black beans, drained and rinsed
- Quick Chef Insight: If you’re in a pinch or avoid beans, try chickpeas or lentils—both will add fiber and a tasty twist.
-
1 cup corn, drained
- Substitution Tip: Frozen corn is a lifesaver; just toss it in and let it warm up! For a sweet kick, try using grilled corn.
-
1 red bell pepper, chopped
- Chef Insight: Feel free to mix in yellow or orange peppers for more colorful vibes!
-
1 avocado, diced
- Substitution Tip: If avocados aren’t ripe or available, try adding a dollop of Greek yogurt for creaminess or a spoonful of guacamole.
-
1/4 cup cilantro, chopped
- Chef Insight: A sprinkle of green onions or parsley can step in if cilantro is not your jam!
-
2 limes, juiced
- Quick Note: Fresh lime juice is a game-changer! It adds brightness. If you’re in a rush, bottled lime juice can suffice.
-
Salt and pepper to taste
- Chef Insight: Don’t skip the seasoning; a little pop of flavor makes a world of difference!
Step-by-Step Instructions
Alright, let’s get down to business! Here’s how to create these beautiful bowls step by step. And don’t worry—I’ve included some handy tips along the way to make your cooking experience even easier!
-
Cook the Rice:
- If you haven’t already, prepare your rice according to package instructions. This usually involves rinsing the rice and then bringing it to a boil in water or chicken broth for added flavor. Pro tip: cooking it in broth adds an extra layer of richness that your taste buds will thank you for!
-
Season and Cook the Chicken:
- While the rice is cooking, season your chicken breast with spices of your choice. I often grab some cumin, chili powder, garlic powder, and a pinch of salt—nothing too fancy, but it works wonders. Grill, pan-sear, or bake the chicken until the internal temperature reaches 165°F (75°C). Don’t forget to let it rest for at least 5 minutes before slicing; this keeps all those delicious juices locked in. Trust me; it’s worth the wait!
-
Prep the Veggies:
- While the chicken is resting, start chopping your bell pepper and dicing the avocado. A sharp knife helps here—safety first! Your goal is bite-sized pieces that are appealing and easy to eat. That red bell pepper adds not just color but also sweetness and crunch!
-
Rinse the Beans and Corn:
- Open your cans of black beans and corn, then drain and rinse them well to wash away any excess sodium. This is a simple way to get a cleaner flavor and keep your bowls from being too salty.
-
Assemble the Bowls:
- Now comes the fun part—assembling! In each meal prep container, start with a portion of rice at the bottom. Top it with layers of black beans, corn, diced bell pepper, and sliced chicken.
-
Garnish with Avocado and Cilantro:
- Add your diced avocado right before serving to keep it fresh. A squeeze of lime juice over everything not only gives it that zing but helps prevent the avocado from browning too quickly. Finish with a sprinkle of cilantro!
And voilà—you’ve created a beautiful bowl of goodness!
Serving Suggestions
Let’s make your Southwest Chicken Meal Prep Bowls look as incredible as they taste! For a picture-perfect presentation, use clear containers. This way, not only can you see the delightful layers, you’ll also make your friends a little envious when they see your Insta-worthy meal!
When it’s time to eat, simply grab a fork, give everything a gentle mix, and enjoy! Want to take it up a notch? Serve with a side of tortilla chips or homemade salsa for that extra crunch. Or, if you’re feeling especially indulgent, create a drizzle of creamy chipotle sauce on the top for an explosion of flavor!
Recipe Variations
Just because we love these bowls as-is doesn’t mean we can’t have fun with them! Here are some delightful twists you can consider:
-
Spicy Southwest Chicken Bowls:
- For a kick, mix some diced jalapeño into your black beans or sprinkle on some red pepper flakes for that heat!
-
Southwest Taco Salad:
- Swap the rice for a bed of fresh romaine lettuce, creating a refreshing salad version. Top with crushed tortilla chips for that satisfying crunch!
-
Vegan Option:
- Replace the chicken with marinated and grilled tofu or tempeh. Toss some avocado in for creaminess and watch your veggie friends swoon!
-
Quinoa Swap:
- Substitute rice with quinoa for an added protein boost, and sprinkle some nutritional yeast for a cheesy flavor without the dairy.
-
Mediterranean Fusion Bowl:
- Use feta cheese instead of avocado, toss in some olives, and season with oregano for a delightful Mediterranean twist!
Chef’s Notes
As with all recipes, feel free to make them your own. These bowls started as a simple summer meal but have since evolved into a staple in my cooking repertoire! I’ll never forget the first time I experimented with adding corn and black beans; the vibrant colors and flavors made it an instant crowd-pleaser.
A funny kitchen story: once, a friend mistook my spice rack for a game show. She thought, “Let’s try all the spices!” and threw in some cinnamon by accident. While we all laughed at the curious flavor, it was a reminder that cooking should always be fun and a little adventurous. Don’t shy away from experimentation—you never know what delightful accident might become your next favorite dish!
FAQs and Troubleshooting
1. What if my chicken is dry?
If your chicken turns out dry, it may have cooked too long. To prevent this, use a meat thermometer, and always let it rest before slicing. You can also add a little warm broth to the bowl to moisten it up!
2. Can I prep these bowls in advance?
Absolutely! These bowls keep well in the refrigerator for up to 4 days. Just hold off on adding the avocado until right before serving to keep it fresh and green.
3. How do I store leftovers?
Store each component in separate airtight containers to keep everything fresh. This way, you can mix and match as you desire throughout the week!
4. Can I freeze these bowls?
You can freeze the chicken and rice, but avoid freezing the fresh veggies and avocado. When reheating, let them thaw overnight in the fridge, then warm gently.
Nutritional Info
Here’s a peek into the nutritional breakdown of your Southwest Chicken Meal Prep Bowls (per serving):
- Calories: About 450
- Protein: 32g
- Carbohydrates: 54g
- Dietary Fiber: 12g
- Fat: 14g
Feel free to adjust the portion sizes according to your dietary needs or caloric goals. These bowls are packed with vitamins and nutrients, making them a wholesome choice for a meal prep-friendly week!
Final Thoughts
As we wrap up our journey through the vibrant world of Southwest Chicken Meal Prep Bowls, remember that cooking is all about joy! This colorful dish brings together flavors and ingredients that not only nourish the body but also warm the spirit. I hope you’ve found inspiration in these bowls and that each bite is a little reminder of good food, good friends, and good times.
So, are you ready to gather in the kitchen and whip up these stunning bowls? Share your creations on social media or with friends—I’d love to see how you make it your own. Here’s to delicious meals that feed the soul—happy cooking, and let’s make every day a Feastical day! 🌟
Print
Southwest Chicken Meal Prep Bowls
- Total Time: 45 minutes
- Yield: 4 servings 1x
- Diet: High Protein
Description
Vibrant and filling Southwest Chicken Meal Prep Bowls perfect for meal prep or a quick weeknight dinner.
Ingredients
- 2 cups cooked rice
- 1 lb seasoned chicken breast
- 1 cup black beans, drained and rinsed
- 1 cup corn, drained
- 1 red bell pepper, chopped
- 1 avocado, diced
- 1/4 cup cilantro, chopped
- 2 limes, juiced
- Salt and pepper to taste
Instructions
- Cook the rice according to package instructions.
- Season and cook the chicken breast until internal temperature reaches 165°F (75°C).
- Prep the veggies by chopping the bell pepper and dicing the avocado.
- Rinse the beans and corn to wash away excess sodium.
- Assemble the bowls with rice, beans, corn, bell pepper, and sliced chicken.
- Garnish with avocado and cilantro, and a squeeze of lime juice.
Notes
Enjoy with tortilla chips or homemade salsa for extra crunch!
- Prep Time: 15 minutes
- Cook Time: 30 minutes
- Category: Main Course
- Method: Assembling
- Cuisine: Southwestern
Nutrition
- Serving Size: 1 bowl
- Calories: 450
- Sugar: 3g
- Sodium: 500mg
- Fat: 14g
- Saturated Fat: 2g
- Unsaturated Fat: 11g
- Trans Fat: 0g
- Carbohydrates: 54g
- Fiber: 12g
- Protein: 32g
- Cholesterol: 70mg
Keywords: meal prep, chicken bowls, southwestern, healthy recipe, easy dinner
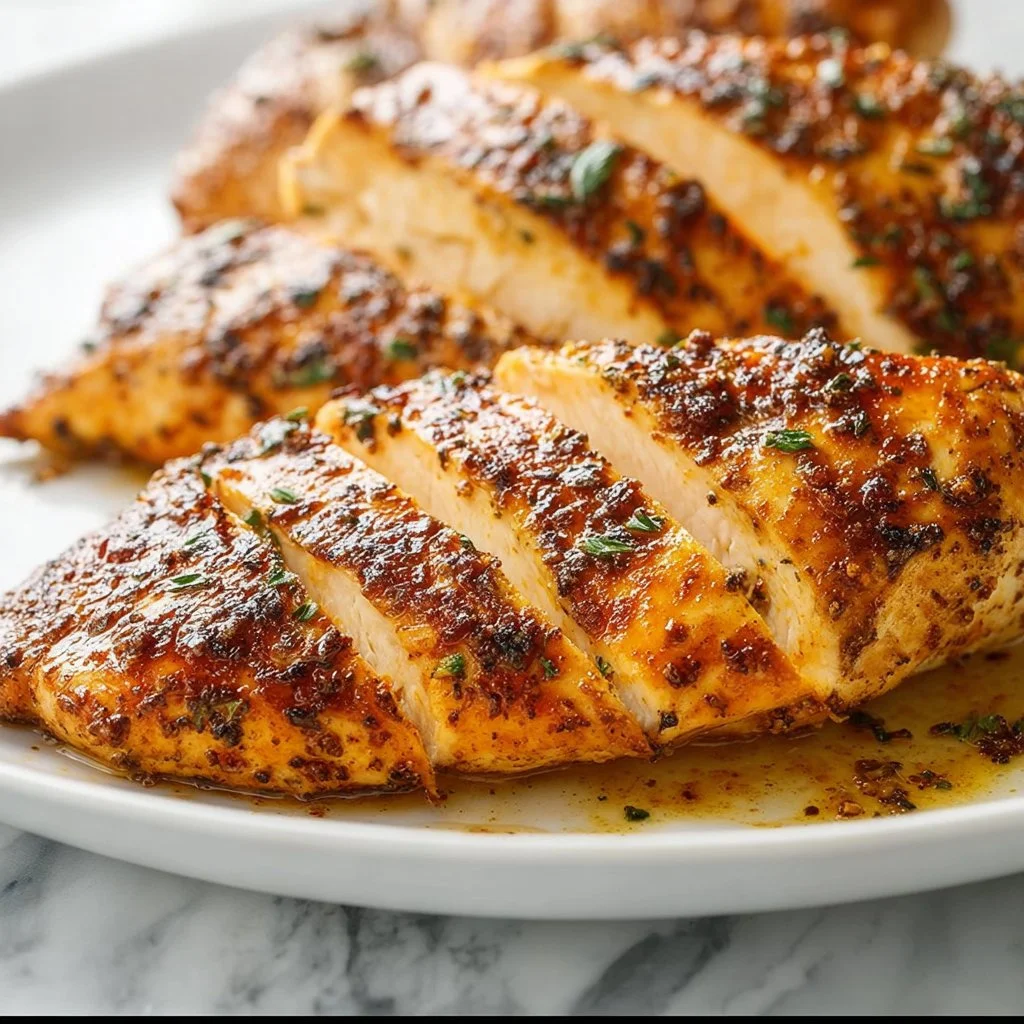
Juicy 30-Minute Baked Chicken Breast
Juicy 30-Minute Baked Chicken Breast: Your New Weekend Go-To!
Hey there, food lovers! I’m Beau Collier, and I’m so glad you’ve stopped by today. If you’re looking for a quick and simple way to whip up a juicy, delicious chicken breast in just 30 minutes, you’ve landed in the right place. Now, I know what you might be thinking: “Can chicken really be juicy and flavorful in such little time?” The answer is a resounding yes!
Today, we’re diving into the delightful world of juicy baked chicken breasts. Honestly, this is one of those recipes that both impresses and satisfies—the kind that can star in a busy weeknight dinner but also shine at special occasions. Imagine pulling a succulent piece of chicken out of the oven, its surface beautifully golden and aromatic, with the savory spices mingling in the air. That’s what I call a feast for the senses!
Personal Story: A Chicken Love Affair
When I think of baked chicken, I can’t help but be transported back to my childhood kitchen, where the air was always filled with the warm, inviting aroma of my mom’s cooking. Every Sunday, she’d roast a whole chicken for the family. It was a labor of love, one that took hours and left us salivating in anticipation as we crammed around the table, sharing stories and laughter.
As I stood on a stool to get a closer look, I admired how she seasoned that bird with a symphony of spices, effortlessly humming along to the kitchen tunes. Fast-forward to today, and I’ve made those memories my own by simplifying her traditional methods. Although I cannot replicate her mastery, I now bring you my 30-minute baked chicken breast—a quick yet scrumptious approach that’ll give you fond memories of your own in no time!
Ingredients
Let’s gather our superstar lineup for this dish, shall we? Here’s what you need to create your juicy baked chicken:
-
4 medium-sized chicken breasts (about 2 pounds total, or two large breasts cut in half horizontally)
- Choose fresh, high-quality chicken for maximum flavor. You can also use bone-in breasts for juicier meat, but you’ll need to adjust the cooking time.
-
1 teaspoon garlic powder
- A pantry staple! For a fresh twist, you could use minced garlic instead.
-
1 teaspoon onion powder
- Perfect for added depth. If you’re feeling adventurous, try using finely chopped fresh onions and sauté them before applying them to the chicken.
-
1 teaspoon paprika
- Paprika adds a subtle smokiness. For a more intense flavor, use smoked paprika.
-
1 teaspoon dried parsley
- A pinch of brightness! You can swap it out for fresh parsley if that’s what you have on hand—just remember to double the amount.
-
1/2 teaspoon dried mustard
- This adds a fantastic zing. If you don’t have it, a teaspoon of Dijon mustard will work in a pinch!
-
1/2 teaspoon chili powder (optional)
- For those who like a little heat! You can use cayenne for a spicier kick.
-
1 1/2 teaspoons kosher salt (or to taste)
- Kosher salt has larger grains, which help to season better. Sea salt works too, but be cautious as it can be saltier.
-
1/4 teaspoon black pepper
- Freshly cracked is best! Don’t be shy—crank it up a notch if you love that peppery taste.
-
2 tablespoons olive oil or avocado oil
- Choose oils with high smoke points for the best results. Olive oil will give a lovely flavor, while avocado oil is neutral and allows the spices to shine.
Step-by-Step Instructions
Alright, it’s time to roll up those sleeves and get cooking! Here’s how you’ll bring this juicy masterpiece to life:
-
Preheat Your Oven:
Preheat your oven to 425°F (220°C). Hot ovens make crispy skin—nobody wants a soggy chicken! -
Prepare Your Chicken:
While that oven heats up, grab your chicken breasts and pat them dry with paper towels. This helps with browning. If you’re using large breasts, slice them in half horizontally for quicker cooking time. -
Seasoning Time:
In a small bowl, mix together the garlic powder, onion powder, paprika, dried parsley, mustard powder, chili powder (if using), salt, and black pepper. Add the olive oil to the spice mix and stir until it forms a thick paste. -
Coat the Chicken:
Rub your spice mixture all over the chicken breasts. Make sure it’s evenly coated—you want every bite to be bursting with flavor! Don’t be shy; you can even gently lift the skin (if it’s skin-on) and apply some of that goodness right underneath. -
Arrange for Cooking:
Place the seasoned chicken in a single layer on a baking sheet lined with parchment paper or foil for easy cleanup. Give them a little space—this will help them cook evenly. -
Bake:
Pop the baking sheet in the oven and bake for 20-25 minutes. Chicken is done when it reaches an internal temperature of 165°F (75°C). If you’re using thin breasts, keep an eye on them—judgment is key! -
Rest Before Serving:
Once your chicken is out of the oven, let it rest for about 5 minutes. This helps the juices redistribute. Trust me; you don’t want to cut into it too soon!
Serving Suggestions
As you transition from oven time to mealtime, the way you plate your dish can elevate the experience! Slice the chicken into thick pieces and arrange them on a vibrant plate. Consider serving it alongside a colorful salad or fluffy garlic mashed potatoes. Perhaps a drizzle of citrusy vinaigrette or a few sprigs of fresh herbs could finish it off beautifully. This dish pairs wonderfully with roasted veggies or creamy coleslaw for that perfect comfort-food mashup!
Recipe Variations
Now for the fun part—mixing things up! Here are a few creative twists to keep this recipe fresh and exciting every time:
-
Herb-Infused: Swap out the dried parsley for your favorite herbs, like thyme, rosemary, or Italian seasoning for a fragrant twist.
-
Citrus Zing: Add a tablespoon of lemon or lime juice to your spice mixture for a bright, zesty contrast.
-
Asian-inspired: Replace the garlic and onion powder with ginger and sesame oil for a delightful Asian flair. Serve it with rice and steamed bok choy!
-
Barbecue Flavor: Brush the chicken with your favorite barbecue sauce in the last few minutes of baking for a sweet and smoky finish.
-
Cheesy Delight: Top your chicken with mozzarella or cheddar cheese in the last 5 minutes of baking and let it melt—hello, cheesy chicken heaven!
Chef’s Notes
As I’ve developed this recipe over the years, I’ve learned that chicken doesn’t have to be boring. It can evolve! My family loves when I switch things up with different spices or marinades. One time, I even experimented with a beer marinade, and I couldn’t believe how juicy the chicken turned out. It’s amazing how a simple recipe can bring together flavors that remind us of home, holidays, and gatherings with friends. So, don’t be afraid to inject your personality into this dish!
FAQs and Troubleshooting
1. Why is my chicken dry?
Overcooking is usually the culprit. Invest in a meat thermometer—chicken is perfect at 165°F (75°C).
2. Can I make this recipe in advance?
Absolutely! Marinate your chicken overnight for deeper flavor. Just be sure to store it in the fridge.
3. What should I serve with baked chicken?
This chicken pairs wonderfully with starches like rice, couscous, or potatoes, as well as steamed or sautéed vegetables. Get creative!
4. What if I only have frozen chicken?
You can use frozen chicken, but you’ll need to thaw it first! Ideally, place it in the fridge overnight. If time is short, submerge it in cold water for an hour or so.
Nutritional Info
Now, I know these days, we tend to pay more attention to nutritional facts. A serving of this juicy baked chicken breast (about 6 ounces) approximately contains:
- Calories: 330
- Protein: 52g
- Fat: 14g (depending on your choice of oil)
- Carbohydrates: 1g
- Sodium: 720mg (if using kosher salt; adjust according to your preference)
It’s a protein-rich choice that fits well in a balanced diet!
Final Thoughts
Thanks for hanging out with me in the kitchen today! I hope you’re feeling excited to give this juicy 30-minute baked chicken breast a try. Remember, cooking should always be an adventure—an opportunity to express yourself and create something wonderful for yourself and your loved ones. This recipe is your canvas. Add your flair, make it memorable, and enjoy every bite!
So grab your apron, put on your favorite tunes, and let’s make some chicken magic happen! If you give it a go, I’d love to see your creations—don’t forget to share with the Feastical family. Happy cooking, friends!
Print
Juicy 30-Minute Baked Chicken Breast
- Total Time: 35 minutes
- Yield: 4 servings 1x
- Diet: Paleo
Description
A quick and simple recipe for juicy, delicious chicken breasts baked to perfection in just 30 minutes.
Ingredients
- 4 medium-sized chicken breasts (about 2 pounds total)
- 1 teaspoon garlic powder
- 1 teaspoon onion powder
- 1 teaspoon paprika
- 1 teaspoon dried parsley
- 1/2 teaspoon dried mustard
- 1/2 teaspoon chili powder (optional)
- 1 1/2 teaspoons kosher salt (or to taste)
- 1/4 teaspoon black pepper
- 2 tablespoons olive oil or avocado oil
Instructions
- Preheat your oven to 425°F (220°C).
- Prepare your chicken breasts by patting them dry with paper towels.
- Mix together the garlic powder, onion powder, paprika, dried parsley, mustard powder, chili powder (if using), salt, and black pepper in a small bowl.
- Add the olive oil to the spice mix and stir until it forms a thick paste.
- Rub the spice mixture all over the chicken breasts, ensuring they are evenly coated.
- Place the seasoned chicken in a single layer on a baking sheet lined with parchment paper.
- Bake for 20-25 minutes until the chicken reaches an internal temperature of 165°F (75°C).
- Let the chicken rest for about 5 minutes before slicing.
Notes
This recipe is versatile. You can experiment with different spices or marinades for a unique flavor each time.
- Prep Time: 10 minutes
- Cook Time: 25 minutes
- Category: Main Course
- Method: Baking
- Cuisine: American
Nutrition
- Serving Size: 1 serving
- Calories: 350
- Sugar: 0g
- Sodium: 720mg
- Fat: 14g
- Saturated Fat: 2g
- Unsaturated Fat: 8g
- Trans Fat: 0g
- Carbohydrates: 1g
- Fiber: 0g
- Protein: 52g
- Cholesterol: 120mg
Keywords: baked chicken, quick dinner, healthy recipe, easy chicken recipes, weeknight meals
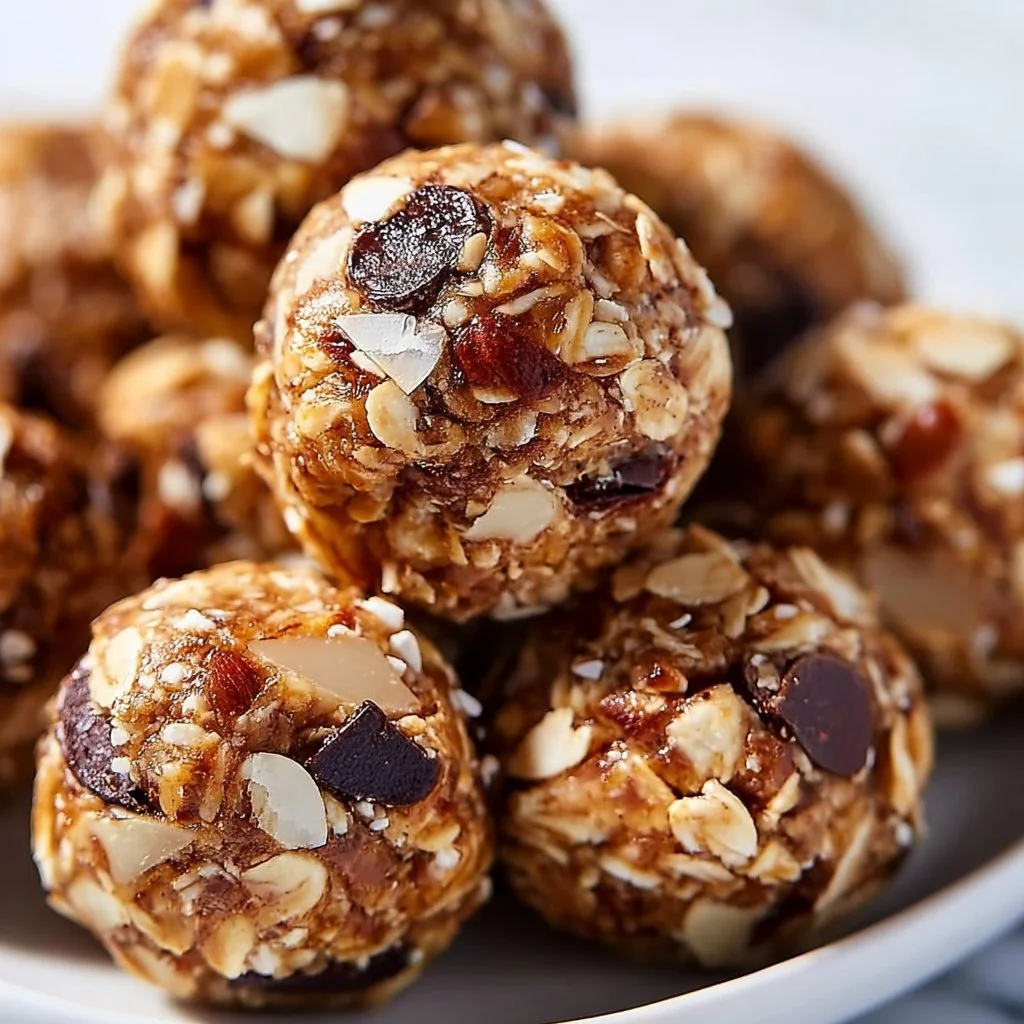
No-Bake Energy Bites
No-Bake Energy Bites: The Ultimate Snack for Busy Foodies
Hey there, fellow food enthusiasts! I’m Beau Collier, and today I’m thrilled to take you on a delicious journey with one of my all-time favorite snack recipes: No-Bake Energy Bites. If you’re anything like me, life can get a bit hectic. Between work, family, and social commitments, finding time to whip up nutritious snacks can feel like a Herculean effort. That’s where these energy bites come in! They’re not just quick and easy to make, but they are also packed with wholesome goodness to fuel your busy lifestyle.
Picture this: it’s a Thursday afternoon, and you’re powering through your to-do list. You need a little pick-me-up, but you don’t want to reach for that sugary granola bar that leaves you crashing in an hour. That’s when your homemade energy bites can swoop in to save the day! With just a handful of ingredients and minimal effort, you can create a delightful snack that satisfies your cravings without the guilt.
The beauty of these No-Bake Energy Bites is that they’re not just a grab-and-go option for busy days; they’re also a great choice for kids, and they make an excellent addition to lunchboxes or as a post-workout treat. Plus, you can tailor them to your taste! Whether you’re a chocolate lover or someone who enjoys a nutty crunch, these little bites of joy are customizable to fit your preferences.
Let’s roll up our sleeves, put on some fun music, and get ready to whip up a batch of these no-bake wonders. Trust me, once you try them, you’ll keep a stash in your fridge or freezer for those moments when you need a little energy boost. Are you ready? Let’s dig in!
Personal Story
I’ll never forget the first time I made these No-Bake Energy Bites. It was a chilly Saturday morning, and my two kids were bouncing around the kitchen, bursting with energy. “Dad, can we have something fun for a snack?” they begged. As I scanned our pantry, looking for a quick solution, I stumbled upon the perfect mix of ingredients. I decided to turn our ordinary morning into a cooking adventure.
As we combined the oats, nut butter, and honey in a big bowl, the kitchen filled with laughter and little voices shouting, “More chocolate chips!” It was a delightful chaos, one that inevitably ended with chocolate smeared on noses and giggles all around. When we finally rolled the mixture into shiny little balls, it felt like a mini celebration. The first bites were a revelation! Crunchy, chewy, and sweet all at once, these energy bites became a family favorite.
Fast forward to today, and this recipe has followed us through busy school mornings, road trips, and even movie nights. It’s become a family tradition to whip up a new batch every weekend, experimenting with different ingredients while reminiscing about that first adventurous Saturday. These bites aren’t just a tasty snack; they are a reminder of the joy of cooking together.
Ingredients
Before we dive into the cooking process, let’s gather our stars of the show! Here’s what you’ll need to whip up these fabulous No-Bake Energy Bites:
-
1 cup rolled oats
- Rolled oats are the backbone of these bites, providing a hearty base. They’re packed with fiber and help keep you full! If you’re gluten-free, make sure to choose certified gluten-free oats.
-
1/2 cup peanut butter
- Creamy or crunchy, the choice is yours! Peanut butter adds essential protein and healthy fats. Looking for alternatives? Almond butter or sunflower seed butter work beautifully too!
-
1/3 cup honey
- This natural sweetener binds the ingredients together while offering a touch of sweetness. If you prefer a vegan option, agave syrup or maple syrup can replace honey.
-
1/2 cup chocolate chips
- Chocolate makes everything better, right? Use semi-sweet for a classic flavor or dark chocolate chips for a richer taste. You can swap them for dried fruit or nuts if you’re feeling adventurous.
-
1/4 cup flaxseed meal
- A powerhouse of nutrients, flaxseed meal is loaded with omega-3 fatty acids and fiber. If you don’t have it on hand, chia seeds make a great substitute!
-
1/2 teaspoon vanilla extract
- This little ingredient adds a warm, inviting flavor that ties everything together. Feel free to use almond extract for a nutty twist!
Gather these ingredients together, and let’s get cookin’!
Step-by-Step Instructions
Now that we have everything ready, it’s time to transform these humble ingredients into delightful No-Bake Energy Bites. Follow these easy steps, and make sure to add your personal touch along the way!
Step 1: Mix the Dry Ingredients
- In a large mixing bowl, begin by combining the rolled oats and flaxseed meal. Use a wooden spoon or spatula to make sure they’re evenly mixed! This will give you a great base for your bites.
- Chef’s Tip: The more you mix it now, the less you’ll have to do later!
Step 2: Add the Wet Ingredients
- Add the peanut butter, honey, and vanilla extract to the bowl. It might look a bit messy at first, but don’t worry! The peanut butter and honey will soon work their magic.
- Chef’s Insight: If your peanut butter is a little stiff, warm it slightly in the microwave (10-15 seconds) so it blends more easily.
Step 3: Stir Until Combined
- Mix everything together vigorously until you have a thick, sticky dough. If it feels too dry, add a splash of water or a bit more honey. Conversely, if it’s too gooey, sprinkle in some more oats.
- Chef Hack: Using your hands to mix can be messy but also super fun! It’s like you’re working with edible clay.
Step 4: Fold in Chocolate Chips
- Gently fold in the chocolate chips. This step is essential—no skimping here! You want that chocolate goodness in every bite.
- Pro Tip: Reserve a few chocolate chips to sprinkle on top for that Instagram-worthy finish!
Step 5: Shape the Bites
- Now, it’s time to roll! Using your hands, scoop out tablespoon-sized portions of the mixture and roll them into balls. Place them on a parchment-lined baking sheet or plate.
- Chef’s Note: If the mixture is too sticky, wet your hands slightly or dust them with a bit of powdered sugar.
Step 6: Chill
- Pop them into the fridge for about 30 minutes to firm up. This will help them hold their shape for snacking later.
- Fun Fact: Chilling not only helps with texture but also makes the flavors meld together beautifully!
Serving Suggestions
Once your No-Bake Energy Bites have chilled, it’s time to enjoy them! You can serve them as a simple snack or elevate the experience. Here are a few serving suggestions:
- On a Snack Platter: Arrange your energy bites on a lovely platter, garnished with fresh fruits like strawberries or apple slices. This makes for a fun party snack.
- In a Jar: Layer them in a mason jar for a cute grab-and-go option. You can even label it as "Energy Boosts" for a personal touch!
- With Coffee or Tea: Pair your bites with a warm cup of coffee or herbal tea for an afternoon pick-me-up. Trust me, the combination is divine!
Recipe Variations
The best part about No-Bake Energy Bites is that they’re super adaptable! Here are some fun twists you can try to mix things up:
- Coconut Crunch: Add 1/4 cup of shredded coconut for a tropical flair.
- Nutty Flavors: Try adding 1/4 cup of chopped nuts, like almonds or walnuts, for an added crunch and nutritional boost.
- Spiced Up: Mix in a pinch of cinnamon or nutmeg to infuse warm, cozy flavors throughout.
- Fruit Burst: Toss in some dried fruits like cranberries, raisins, or apricots for a chewy surprise.
- Protein Boost: Replace half of the oats with protein powder for extra fuel—great for after a workout!
Chef’s Notes
I love that this recipe has evolved over time, and every batch is a little different. One time, my kids decided to add shredded carrots because they thought it would be "healthy." Surprisingly, it worked! We ended up calling them “Energizing Bunny Bites” for the fun factor.
It’s these experiences that make cooking so special—finding joy in the kitchen, trying new things, and sharing it all with loved ones. No matter how you tweak this recipe, I promise you’ll have a tasty and wholesome snack to enjoy!
FAQs and Troubleshooting
Here are some common questions I’ve encountered about No-Bake Energy Bites that’ll help you make this recipe with ease:
Q1: My energy bites are too sticky; how can I fix them?
If your mixture feels too sticky to roll, you can either chill it in the fridge for 10-15 minutes or add extra oats, a little at a time, until the texture feels right.
Q2: How long do these bites last?
Stored in an airtight container in the fridge, these energy bites will last up to a week. You can also freeze them for up to three months—just make sure to separate layers with parchment paper!
Q3: Can I use quick oats instead of rolled oats?
While rolled oats provide a nicer texture, you can use quick oats if that’s what you have on hand. The bites will be a tad firmer, but still delicious!
Q4: What if I’m allergic to nuts?
No worries! You can easily substitute the peanut butter with sunflower seed butter or omit the nut butter altogether and increase the binding agents slightly with more honey or syrup.
Nutritional Info
Now, let’s talk numbers for those of you keeping track of your nutrition. Each No-Bake Energy Bite contains approximately:
- Calories: 120
- Protein: 3g
- Carbohydrates: 12g
- Dietary Fiber: 2g
- Sugars: 5g
- Fat: 6g
These bites keep you satisfied without the sugar crash, thanks to the combination of fiber, protein, and healthy fats. They’re excellent for providing that mid-afternoon energy boost!
Final Thoughts
I hope you’re as excited as I am about these No-Bake Energy Bites! They’re simple, satisfying, and oh-so-delicious. Whether you’re busy with work, heading out on an adventure, or simply looking for a healthy snack for the family, this recipe has got your back.
Remember, cooking is all about experimentation and fun, so don’t hesitate to try new ingredients or tweak the recipe to suit your taste. I’d love to hear about your own variations and any cooking adventures that come from this recipe!
So, grab your mixing bowl, put on your favorite tunes, and enjoy the delightful experience of creating these bites of joy. Happy snacking, and until next time, keep cooking with love and a sprinkle of creativity!
And there you have it! A delightful journey through the creation of No-Bake Energy Bites with insight, tips, and love. Enjoy!
Print
No-Bake Energy Bites
- Total Time: 45 minutes
- Yield: 24 servings 1x
- Diet: Vegetarian
Description
Quick and easy no-bake energy bites packed with wholesome ingredients, perfect for busy lifestyles.
Ingredients
- 1 cup rolled oats
- 1/2 cup peanut butter
- 1/3 cup honey
- 1/2 cup chocolate chips
- 1/4 cup flaxseed meal
- 1/2 teaspoon vanilla extract
Instructions
- Mix the dry ingredients in a large mixing bowl: rolled oats and flaxseed meal.
- Add the wet ingredients: peanut butter, honey, and vanilla extract.
- Stir until combined, creating a thick, sticky dough.
- Fold in the chocolate chips gently.
- Shape tablespoon-sized portions into balls.
- Chill in the fridge for about 30 minutes to firm up.
Notes
These bites are customizable with various ingredients like nuts or dried fruits. Store in the fridge for up to a week or freeze for up to three months.
- Prep Time: 15 minutes
- Cook Time: 0 minutes
- Category: Snack
- Method: Chilling
- Cuisine: American
Nutrition
- Serving Size: 1 bite
- Calories: 120
- Sugar: 5g
- Sodium: 10mg
- Fat: 6g
- Saturated Fat: 1g
- Unsaturated Fat: 4g
- Trans Fat: 0g
- Carbohydrates: 12g
- Fiber: 2g
- Protein: 3g
- Cholesterol: 0mg
Keywords: no-bake, energy bites, healthy snacks, quick snacks, easy recipes
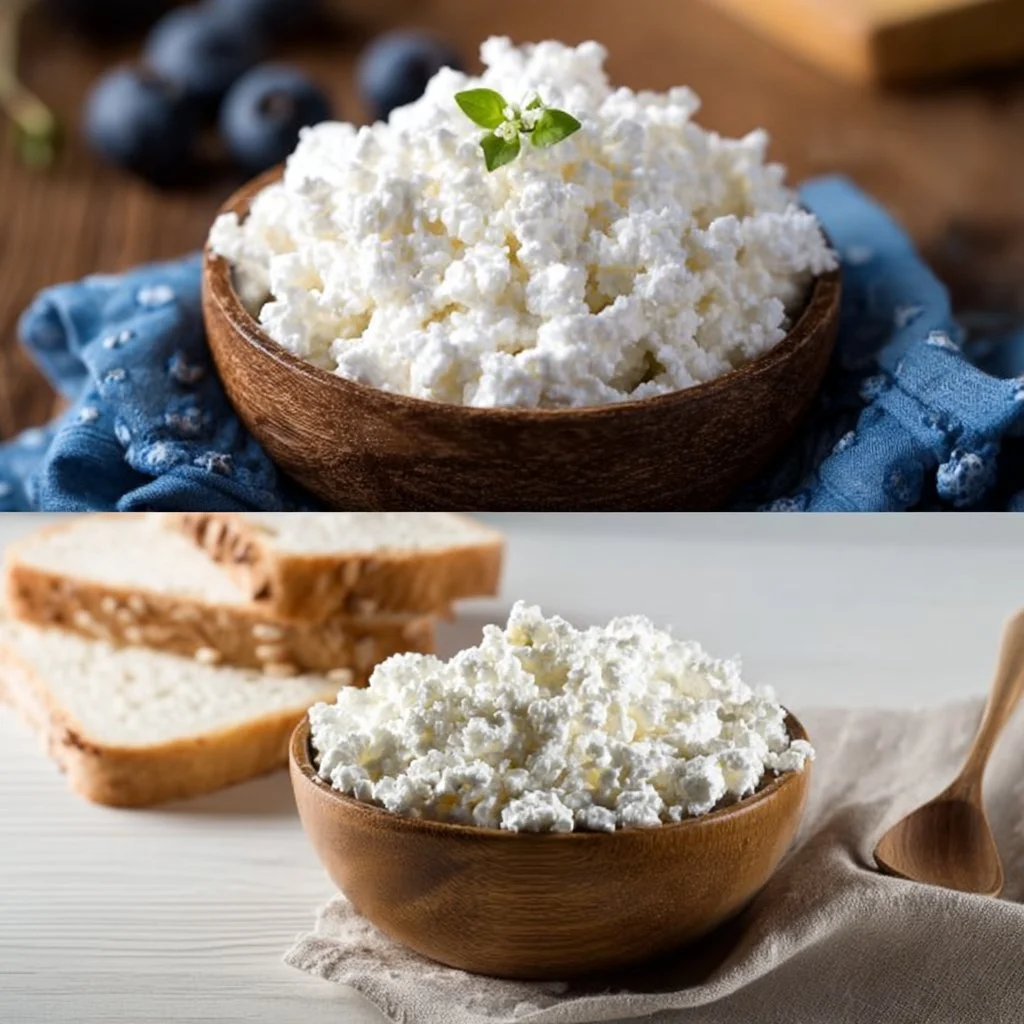
Creative Ways To Eat Cottage Cheese
Creative Ways to Eat Cottage Cheese
Hey there, fellow food lovers! It’s Beau Collier here, and today we’re diving into a delightful ingredient that’s often overlooked but is absolutely packed with flavor and nutritional goodness—cottage cheese! You might be thinking, “Cottage cheese? Really?” But hold onto your spoons because I’m about to show you that this humble dairy delight is more versatile than you ever imagined.
Whether you’re trying to up your protein game, enjoy a creamy treat without the guilt, or simply indulge in some comforting flavors, cottage cheese deserves a spotlight on your plate. From breakfast to dinner and everything in between, this little curd is the secret ingredient that can elevate your meals.
You may remember as a kid, scraping the bottom of a cottage cheese container—maybe you loved it, or maybe you thought it was just for wise old folks on diets! Either way, I’m here to change your mind and show you how cottage cheese can be your best friend in the kitchen. So, let’s roll up our sleeves and explore this creamy canvas together!
Personal Story
Growing up, my grandma was the queen of making simple ingredients shine. One of my favorite memories is her legendary “Cottage Cheese Fruit Delight.” Every summer, she’d whip up a big bowl of this sunny treat, layered with colorful fruits, a drizzle of honey, and a sprinkle of nuts. I can still hear her cheerful voice as she’d say, “Cooking is like a dance, Beau! Just follow the rhythm of the flavors!”
Those summer afternoons spent enjoying her Cottage Cheese Fruit Delight served not just as a tasty treat but as a bridge to family bonding. We’d gather around the kitchen table, armed with our forks, competing over who could make the most beautiful bowl. It wasn’t just about food; it was about love, laughter, and a shared passion for good eats. Now, as a grown-up chef, I cherish those memories, and my mission is to help you create your own delicious and heartwarming moments with simple, feel-good ingredients like cottage cheese.
Ingredients
Here’s what you’ll need for some creative cottage cheese delights:
-
Cottage Cheese: The star of the show! Creamy, protein-packed, and low in fat, cottage cheese can be enjoyed on its own or as a base for countless combinations. If you’re looking for a lower-fat option, go for the 1% or fat-free varieties.
-
Fruit (e.g., Pineapple, Peaches, Berries): Fresh, frozen, or canned; fruits add natural sweetness and vibrant color. Pineapple and peaches create a tropical vibe, while berries bring antioxidants and tartness. Feel free to swap with whatever fruits you have on hand!
-
Honey or Maple Syrup: A touch of sweetness elevates the dish. Honey is great for drizzling, while maple syrup adds a unique flavor. For a sugar-free option, consider using agave syrup or a sugar substitute of your choice.
-
Nuts (e.g., Almonds, Walnuts): Nuts add a crunchy texture and healthy fats. Almonds lend a delicate flavor, while walnuts provide a robust nutty profile. Use your favorites or even blend different types for a mixed-nut crunch!
-
Seeds (e.g., Chia Seeds, Flaxseeds): Nutritional powerhouses packed with omega-3s and fiber, seeds take your cottage cheese game to the next level. Mix them in for an extra health boost or sprinkle on top for a beautiful finish.
-
Granola: A crunchy topping that offers sweetness and texture. Choose a low-sugar variety or make your own! It’s great for adding crunchiness in breakfasts or snacks.
-
Vegetables (e.g., Cucumber, Bell Pepper): Who says cottage cheese is just for sweet dishes? Adding finely chopped veggies creates a savory base. Cucumber brings a refreshing crunch while bell pepper adds color and sweetness.
-
Herbs (e.g., Chives, Parsley): Fresh herbs enhance the flavor profile without adding calories. Chives work wonders in savory creations while parsley can brighten up both sweet and savory dishes.
-
Spices (e.g., Paprika, Black Pepper): Spice it up! A dash of paprika adds warmth, and black pepper gives a little kick. Experiment with your favorite spices to create unique flavors.
-
Olive Oil: A drizzle of high-quality olive oil balances flavors and enriches the dish. It’s essential for those savory options that meld cottage cheese with heartier ingredients.
-
Salt: Just a pinch gives depth to your dish, enhancing all the flavors. Remember, moderation is key!
Don’t worry if you don’t have all these ingredients at home. This recipe is incredibly adaptable, so swap things out based on your pantry’s contents and your personal preferences!
Step-by-Step Instructions
Ready to bring cottage cheese out of the shadows? Let’s dive into some creative ways to enjoy it!
1. Cottage Cheese Fruit Bowl
-
Step 1: Start with a generous scoop of cottage cheese in a bowl.
- Tip: For an even creamier texture, give it a quick whisk before serving!
-
Step 2: Chop your favorite fruits into bite-sized pieces.
- Note: If using canned fruits, make sure to drain them well to avoid excess liquid.
-
Step 3: Arrange the fruit artfully over the cottage cheese. Take your time! Presentation matters, and this is your chance to get creative!
-
Step 4: Drizzle honey or maple syrup over the top.
- Chef Hack: If your honey is thick, warm it slightly in the microwave to make drizzling easier.
-
Step 5: Sprinkle crunchy nuts and seeds on top for added texture.
-
Step 6: For the finishing touch, add a sprinkle of cinnamon or nutmeg for extra warmth.
2. Savory Cottage Cheese Snack
-
Step 1: Grab a bowl and add a serving of cottage cheese.
- Tip: Opt for the 2% or whole-fat versions for a more decadent flavor.
-
Step 2: Finely chop your choice of vegetables (cucumber and bell pepper are excellent options).
- Time-Saving Hint: You can use a food processor to make this step ultra-fast!
-
Step 3: Mix the veggies into the cottage cheese, ensuring everything is evenly distributed.
-
Step 4: Drizzle with olive oil and season with salt, black pepper, and paprika.
-
Step 5: Garnish with chopped fresh herbs for a pop of color and flavor.
3. Breakfast Cottage Cheese Parfait
-
Step 1: Start with a glass (or your favorite mug!) and layer cottage cheese at the bottom.
- Chef Insight: Using a clear container makes it visually stunning!
-
Step 2: Next, layer in granola for crunch.
-
Step 3: Follow it up with a layer of fruit, then repeat until you reach the top—cottage cheese, granola, fruit, repeat!
-
Step 4: Top it all off with a drizzle of honey and some extra berries for a showstopper breakfast!
4. Cottage Cheese Dip
-
Step 1: Use a bowl to combine cottage cheese with spices and herbs to create a smooth dip.
- Tip: Blend it in a food processor for a silky-smooth consistency.
-
Step 2: Adjust flavor with olive oil, salt, and pepper to taste.
-
Step 3: Serve this dip with fresh veggies, crackers, or pita bread for a light snack or appetizer!
Now that you’ve prepared these simple yet delightful recipes, let’s find out how to plate and serve them!
Serving Suggestions
When it comes to serving these cottage cheese creations, presentation is key! Here are some ideas:
-
For Fruit Bowls: Use colorful bowls that contrast with the creamy white of the cottage cheese. Garnish with a sprig of mint or edible flowers for that extra oomph.
-
Savory Snacks: Serve in a rustic wooden bowl or on a cheeseboard with assorted crackers, fresh vegetable sticks, and olives. This invites sharing and makes for an eye-catching display!
-
Breakfast Parfaits: The clear layering of your parfaits deserves the spotlight. Place them in tall glasses or mason jars, and don’t forget to top them with a sprinkle of additional granola and a fruit slice for a pop of color.
-
Dips: Present your dip in a small bowl in the center of a platter filled with colorful veggie sticks and sturdy crackers.
Recipe Variations
Feeling adventurous? Here are some creative twists you can put on your cottage cheese dishes:
-
Tropical Twist: Mix cottage cheese with diced mango, shredded coconut, and a squeeze of lime for a beachy vibe.
-
Spicy Cottage Cheese Dip: Stir in jalapeños, cumin, and lime juice for a zesty kick.
-
Herbed Cottage Cheese Spread: Add fresh herbs, garlic powder, and a sprinkle of lemon zest to create a delicious spread for sandwiches.
-
Dessert Delight: Blend cottage cheese with cocoa powder and sweetener for a healthy chocolate pudding that satisfies your sweet tooth.
-
Protein-Packed Smoothie: Blend cottage cheese with a banana, a handful of spinach, and almond milk for a smoothie that keeps you full and energized!
Chef’s Notes
The beauty of cottage cheese lies in its adaptability. When I was starting as a chef, I’d whip up a quick snack using whatever was in my fridge. From leftover veggies to that ripe avocado begging to be used, it’s a canvas that welcomes improvisation.
Remember when I told you about my grandma’s Cottage Cheese Fruit Delight? I’m now inspired to add an endless variety of twists to that classic recipe! Whether you’re enjoying it with a morning cup of coffee or a light lunch, cottage cheese is versatile enough to keep surprising you. With each meal, don’t hesitate to personalize it and make it your own.
FAQs and Troubleshooting
Q1: Can I use flavored cottage cheese?
A: Absolutely! Flavored varieties can add an unexpected twist. Just watch out for added sugars!
Q2: My cottage cheese is too watery! What can I do?
A: If your cottage cheese is watery, try draining it in a fine sieve or cheesecloth to remove excess liquid. It’ll create a creamier texture for your dishes.
Q3: How long does cottage cheese last in the fridge?
A: Typically, unopened cottage cheese can last up to a couple of weeks, while opened cheese is best consumed within five to seven days. Always check the expiration date!
Q4: What’s the best way to store leftover cottage cheese?
A: Seal it tightly in its original container or transfer it to an airtight container. Keep it stored in the fridge to maintain freshness.
Nutritional Info
Cottage cheese is a nutritional powerhouse! Here’s a quick rundown of what makes it so fantastic:
- Protein: Full of high-quality protein, it can help keep you full longer, perfect for muscle maintenance and weight management.
- Calcium: Rich in calcium, it’s excellent for bone health.
- Low in Calories: Compared to other dairy products, cottage cheese has fewer calories and fat, making it a healthy choice for snacking or meal prep.
- Versatile: Its mild flavor makes it an excellent canvas for both savory and sweet dishes—creating endless possibilities for nutrition!
Final Thoughts
Cottage cheese doesn’t have to be just a sidekick; it can be the star of your kitchen adventures! Whether it’s mixed with fruits for breakfast brimming with sweetness, doused with herbs and veggies for a savory snack, or even standing in as the base for your next favorite dip—cottage cheese brings creativity and health right to your bowl.
So next time you see that lonely tub of cottage cheese lurking in the fridge, remember this post and the endless possibilities it holds. Dive in, get creative, and let your taste buds lead the way. Here at Feastical, we believe food should offer comfort, joy, and a sense of togetherness—even when it’s just a dish of cottage cheese.
Until next time, happy cooking! ✨
Print
Creative Ways to Eat Cottage Cheese
- Total Time: 15 minutes
- Yield: 2 servings
- Diet: Vegetarian
Description
Explore versatile and delicious ways to enjoy cottage cheese, from sweet fruit bowls to savory snacks and dips.
Ingredients
- Cottage Cheese
- Fruit (e.g., Pineapple, Peaches, Berries)
- Honey or Maple Syrup
- Nuts (e.g., Almonds, Walnuts)
- Seeds (e.g., Chia Seeds, Flaxseeds)
- Granola
- Vegetables (e.g., Cucumber, Bell Pepper)
- Herbs (e.g., Chives, Parsley)
- Spices (e.g., Paprika, Black Pepper)
- Olive Oil
- Salt
Instructions
- Start with a generous scoop of cottage cheese in a bowl.
- Chop your favorite fruits into bite-sized pieces.
- Arrange the fruit artfully over the cottage cheese.
- Drizzle honey or maple syrup over the top.
- Sprinkle crunchy nuts and seeds on top for added texture.
- Add a sprinkle of cinnamon or nutmeg for extra warmth.
Notes
This recipe is highly adaptable; feel free to swap ingredients based on what you have on hand.
- Prep Time: 10 minutes
- Cook Time: 5 minutes
- Category: Snack
- Method: No Cooking
- Cuisine: American
Nutrition
- Serving Size: 1 serving
- Calories: 250
- Sugar: 15g
- Sodium: 360mg
- Fat: 10g
- Saturated Fat: 2g
- Unsaturated Fat: 8g
- Trans Fat: 0g
- Carbohydrates: 23g
- Fiber: 3g
- Protein: 20g
- Cholesterol: 10mg
Keywords: cottage cheese, healthy recipes, snacks, fruit bowl, savory snacks