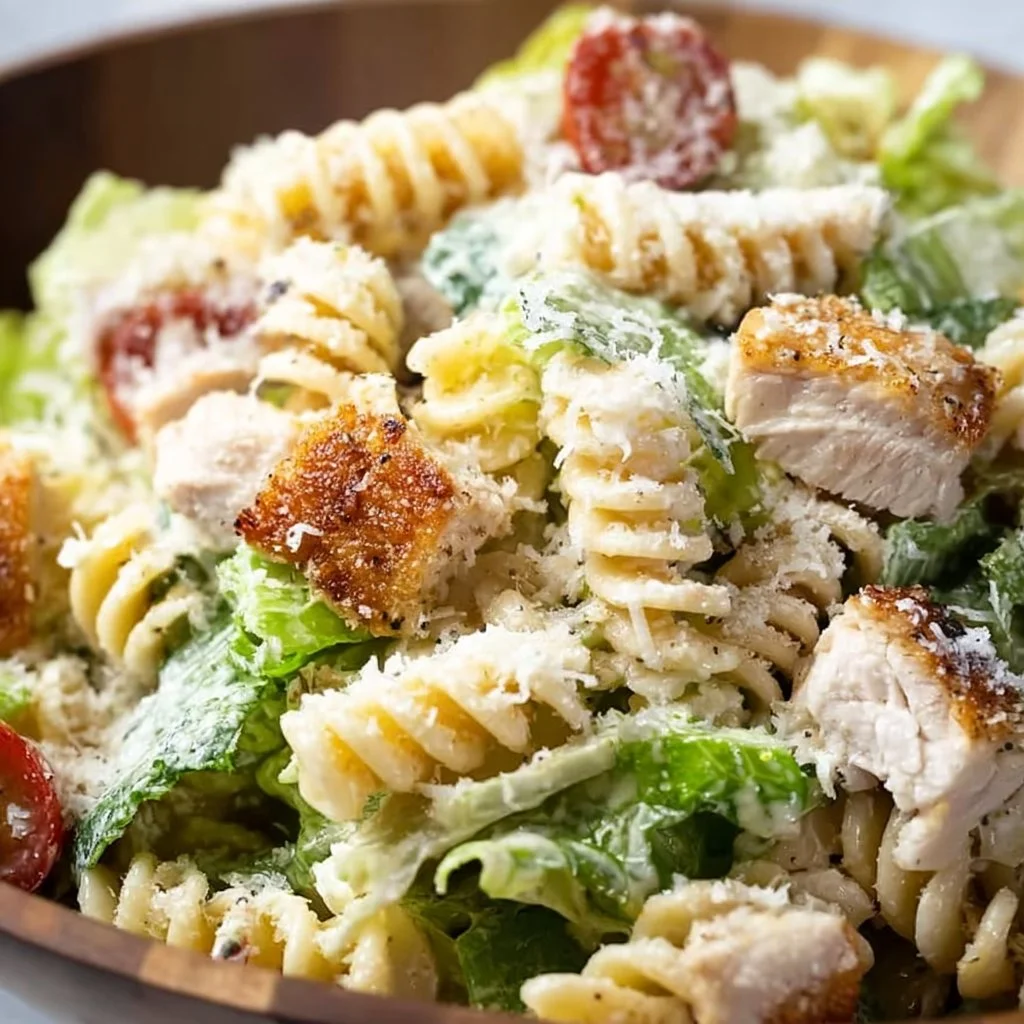
Chicken Caesar Salad with Pasta
# The Ultimate Chicken Caesar Salad with Pasta: A Comfort Food Classic!

Hey there, food lovers! I’m Beau Collier, and I cannot wait to dive into one of my all-time favorite dishes with you today: **Chicken Caesar Salad with Pasta**. If you’re anything like me, you know that salad doesn’t have to be all lettuce and bland. This beauty is packed with flavors, a delightful crunch, and a heartwarming history that’ll make your taste buds sing.

## Introduction

Picture this: a sun-kissed Sunday afternoon, the tantalizing aroma of grilled chicken filling the air, and laughter echoing from the backyard as friends and family gather for a shared meal. This is the backdrop of my early culinary adventures, which ultimately led me to create this delicious Chicken Caesar Salad with Pasta.

Not only does this dish embody everything I adore about cooking—simplicity, comfort, and a whole lot of love—it also strikes that perfect balance between a satisfying meal and a bright, refreshing salad. Who says you can’t have your pasta and salad too?

What I love most about this recipe is its versatility. Whether you’re looking for a quick weeknight dinner or a show-stopping centerpiece for your next gathering, this Chicken Caesar Salad with Pasta ticks all the boxes! Let’s get into the magic of this dish, shall we?

## Personal Story

One of my fondest memories associated with this dish goes way back to my college days. I was living in a tiny apartment with three roommates, all of whom were culinary novices, much like myself. We would rotate dinner duties, and let me tell you, when it was my turn, things got *interesting*. I decided to whip up a Chicken Caesar Salad with Pasta, thinking it would blend my love for the classic Caesar with a twist of pasta goodness.

As I tossed the ingredients together, laughter filled our cramped kitchen, and even the disasters—like a nearly burnt chicken and croutons that resembled miniature bricks—couldn’t dampen our spirits. That night, we savored every crunchy bite and creamy swirl, bonding over the delicious chaos. To this day, every time I make this dish, I’m transported back to that joyful, carefree time, and I can’t help but chuckle at our less-than-perfect initial attempts.

## Ingredients

Let’s gather up our ingredients, shall we? Here’s what you’ll need to create this mouthwatering dish:

- **2 cups cooked pasta (such as fusilli or penne)**: Choose your favorite pasta shape! Fusilli and penne are great for capturing the creamy dressing and adding texture.

- **2 cups romaine lettuce, chopped**: Freshness is key! Romaine adds that crunchy, crisp bite you want in any good salad. If you want to make it even healthier, try substituting kale or spinach.

- **1 cup cooked chicken breast, sliced**: Grilling or roasting the chicken adds fantastic flavor, but if you’re short on time, a store-bought rotisserie chicken works perfectly!

- **1/2 cup Caesar dressing**: Store-bought is fine for convenience, but homemade always hits differently. Just mix mayonnaise, garlic, lemon juice, anchovies (if you’re feeling adventurous), and Parmesan to make your own!

- **1/4 cup grated Parmesan cheese**: A sprinkle of Parmesan elevates the dish! For added flavor, try Pecorino Romano or nutritional yeast for a vegan alternative.

- **1/4 cup croutons**: Crunch, crunch! You can use store-bought or make your own by toasting cubed bread with olive oil and garlic.

- **Salt and pepper to taste**: Don’t forget to season! Simple salt and pepper will bring all the flavors together.

Each ingredient serves a purpose and contributes to that wholesome, hearty spirit of this salad. Keep in mind that you can easily customize based on your personal taste preferences.

## Step-by-Step Instructions

Alright, let's bring this delicious dish to life. Follow these steps, and I promise you’ll have yourself a vibrant Chicken Caesar Salad with Pasta that’ll have everyone asking for seconds!

### Step 1: Cook the Pasta
- **Bring a large pot of salted water to a boil.** Add in your pasta of choice and cook according to package instructions until al dente. Remember, it’s better to undercook it slightly since we’ll be mixing in the dressing and letting it sit.

**Tip**: Don’t forget to stir the pasta occasionally to prevent sticking.

### Step 2: Grill or Cook the Chicken
- While the pasta cooks, season the chicken breast with your favorite spices—salt, pepper, and maybe a pinch of garlic powder. Grill it over medium-high heat until it reaches an internal temperature of 165°F or until golden brown and cooked through.

**Chef Hack**: Leave the skin on during cooking to retain moisture! Just remove it later for a leaner meal.

### Step 3: Prepare the Dressing
- If you’re going the homemade route, mix your Caesar dressing ingredients in a bowl until smooth. You can combine the mayonnaise, a dash of Dijon mustard, minced garlic, Worcestershire sauce, lemon juice, and grated Parmesan for a zesty kick.

### Step 4: Chop the Romaine
- Rinse your romaine lettuce thoroughly and pat it dry. Roughly chop the lettuce into bite-sized pieces. The goal is to have tender, crispy leaves that will hold up to the dressing!

### Step 5: Combine Ingredients
- In a large bowl, combine the cooked pasta, sliced chicken, chopped romaine, and dressing. Toss everything together gently but thoroughly until every noodle and piece of lettuce is beautifully coated.

**Pro Tip**: If you'd like a creamy pasta dish, consider adding an extra splash of Caesar dressing or a dollop of crème fraîche.

### Step 6: Add Toppings
- Sprinkle the grated Parmesan cheese and croutons on top. Give the salad a final toss to mix in those crunchy goodies without smashing anything.

### Step 7: Taste Test
- Before serving, give it a taste! Adjust the salt, pepper, and dressing according to your liking. This salad is about creating a dish that speaks to your tastes, after all!

## Serving Suggestions

Now that you’ve created this delicious Chicken Caesar Salad with Pasta, it’s time to serve it up! Here are a few suggestions to fancy up your presentation:

- **Plate it Beautifully**: Use a large salad bowl for family-style sharing, or dish out individual servings on chilled plates. Layer the pasta and salad for a gorgeous layered look!

- **Garnish Wisely**: Add more fresh Parmesan on top and a sprinkle of freshly cracked black pepper for an eye-catching finish. A few lemon wedges on the side also provide a lovely color contrast!

- **Pair with Sides**: A rustic baguette or garlic bread on the side pairs wonderfully, making it a hearty meal.

Really, the aim is to create a visual feast that beckons everyone to come and indulge.

## Recipe Variations

Feeling adventurous? Here are a few creative twists you can try to switch up your Chicken Caesar Salad with Pasta:

- **Fruity Fusion**: Add in some diced fresh strawberries or mandarin oranges for a pop of sweetness that complements the creamy dressing.

- **Extra Protein**: Swap out chicken for grilled shrimp, or toss in some chickpeas for a plant-based protein burst.

- **Spicy Spin**: Add a kick by incorporating diced jalapeños or drizzling sriracha on top.

- **Herbaceous Zest**: Incorporate fresh herbs like basil or dill for a refreshing twist on the traditional flavor profile.

- **Veggie Boost**: Roast some broccoli or add cherry tomatoes for extra colour and nutrients.

Each variation brings a fresh spin on an already beloved classic!

## Chef’s Notes

This Chicken Caesar Salad with Pasta has been my trusty companion through many meals and gatherings. Over the years, I’ve tried countless variations—from incorporating grilled veggies to experimenting with different dressings. The best part? This recipe is as forgiving as it is scrumptious. Don’t fret over little mistakes; the heart of this dish is all about enjoying the process of cooking and sharing!

A funny mishap? There was that one time I accidentally swapped salt for sugar in my homemade dressing. Let’s just say the look on everyone’s faces was priceless!

## FAQs and Troubleshooting

**1. Can I use pre-cooked chicken?**
Absolutely! Rotisserie chicken is a fantastic shortcut that saves time. Just shred it and toss it in.

**2. How can I store leftovers?**
Keep the dressing separate to maintain the salad’s crunchiness. Store the components in airtight containers in the fridge, and they’ll last for about 2-3 days. Assemble fresh when ready to eat.

**3. What if my pasta is sticky?**
If you’ve overcooked your pasta or it’s sticky, rinse it under cold water immediately after draining. This stops the cooking process and helps separate the noodles.

**4. Can I make it vegan?**
Definitely! Use chickpeas for protein, a vegan Caesar dressing made with tahini, lemon, and nutritional yeast, and skip the cheese. It’s delicious!

## Nutritional Info

A serving of this Chicken Caesar Salad with Pasta is not only comforting but also packs a nutritional punch! Here’s an approximate breakdown per serving:

- **Calories**: 450
- **Protein**: 30g
- **Carbohydrates**: 35g
- **Fat**: 20g
- **Fiber**: 3g

Of course, these numbers vary based on specific brands and exact measurements, but you get the gist!

## Final Thoughts

So there you have it—my heartwarming Chicken Caesar Salad with Pasta recipe, complete with nostalgic memories, tasty options, and tips to help you create magic in your kitchen! Whether it's a rainy Tuesday night or a festive gathering, this dish brings everyone together with its array of flavors and textures.

I encourage you to embrace the fun, play with the ingredients, and let your creative culinary spirit shine. Nothing beats the joy of sharing a delicious meal with those you love. Now, grab your fork, pull up a chair, and let’s eat!

The Ultimate Chicken Caesar Salad with Pasta
- Total Time: 45 minutes
- Yield: 4 servings 1x
- Diet: Non-Vegetarian
Description
A delicious Chicken Caesar Salad with Pasta that combines flavors and textures for a comforting meal.
Ingredients
- 2 cups cooked pasta (such as fusilli or penne)
- 2 cups romaine lettuce, chopped
- 1 cup cooked chicken breast, sliced
- 1/2 cup Caesar dressing
- 1/4 cup grated Parmesan cheese
- 1/4 cup croutons
- Salt and pepper to taste
Instructions
- Cook the Pasta: Bring a large pot of salted water to a boil. Add in your pasta of choice and cook according to package instructions until al dente.
- Grill or Cook the Chicken: Season the chicken breast with your favorite spices and grill it until cooked through.
- Prepare the Dressing: Mix Caesar dressing ingredients in a bowl until smooth.
- Chop the Romaine: Rinse and pat dry, then chop into bite-sized pieces.
- Combine Ingredients: In a large bowl, combine the cooked pasta, sliced chicken, chopped romaine, and dressing. Toss gently.
- Add Toppings: Top with grated Parmesan cheese and croutons, then give it a final toss.
- Taste Test: Adjust salt, pepper, and dressing to your liking.
Notes
Feel free to customize with additional proteins or veggies based on your preferences.
- Prep Time: 15 minutes
- Cook Time: 30 minutes
- Category: Main Course
- Method: Grilling
- Cuisine: Italian
Nutrition
- Serving Size: 1 serving
- Calories: 450
- Sugar: 2g
- Sodium: 600mg
- Fat: 20g
- Saturated Fat: 5g
- Unsaturated Fat: 10g
- Trans Fat: 0g
- Carbohydrates: 35g
- Fiber: 3g
- Protein: 30g
- Cholesterol: 85mg
Keywords: Chicken Caesar Salad, Pasta Salad, Comfort Food, Easy Dinner, Healthy Salad

Chicken Caesar Pasta Salad
The Ultimate Chicken Caesar Pasta Salad: A Flavorful Toss of Comfort and Freshness
Hey there, food lovers! Welcome back to the virtual kitchen here at Feastical! Today, I’m thrilled to share one of my all-time favorite recipes: Chicken Caesar Pasta Salad. It’s easy to whip up, packed with flavor, and brings a delightful twist to the classic Caesar salad. Whether you’re hosting a summer cookout, packing lunch for work, or just craving a salad that feels like a meal, you’re in for a treat!
Imagine this: It’s a sunny Sunday afternoon, the kind of day that beckons you outside. The grill is sizzling with juicy chicken, the laughter of friends fills the air, and there’s a spread of vibrant dishes all around. We’re talking colorful salads, warm, crusty bread, and sweet treats—in short, a feast of epic proportions! It’s in moments like these that I find cooking, and sharing food, is not just a necessity but a way to connect with those we care about.
Today, I’m excited to combine two favorites—pasta and Caesar salad—into one irresistible dish. Chicken Caesar Pasta Salad perfectly marries the hearty fullness of pasta with the classic, creamy Caesar dressing and the crunch of fresh veggies. Whether you’re a kitchen pro or a newbie just figuring out the difference between a spatula and a ladle, this dish is approachable, fun to make, and delightful to devour. Plus, it’s a total crowd-pleaser!
So, grab your apron, let’s dive into this deliciously easy recipe, and create a bowl of Chicken Caesar Pasta Salad that’ll have everyone asking for seconds. Ready? Let’s dig in!
Personal Story
This recipe holds a special place in my heart. I remember the first time I made it for my family picnic— a hazy summer day filled with sunshine and laughter. It was my unofficial debut as a "chef," and I definitely had my fair share of kitchen mishaps leading up to that moment!
I learned by watching my grandmother whip up her famous Caesar salad with just the right amount of anchovies and lemon, making it burst with flavor. One day, I thought, “Why not take it up a notch and toss in some pasta?” I rushed to the kitchen, tossing ingredients together like I was preparing for a cooking competition. My excitement morphed into panic when I discovered I didn’t have anchovies in the fridge (oops!). But, thankfully, the Caesar dressing I had saved the day, and my Chicken Caesar Pasta Salad was born!
Everyone at the picnic couldn’t stop complimenting me (which was a huge confidence boost!), and I knew I had created something special. Every bite brought the nostalgic taste of summer gatherings and made memories that I cherish. This dish is not just a recipe; it’s a delicious memory that I love to re-create and share with friends, old and new!
Ingredients
Gathering ingredients for Chicken Caesar Pasta Salad is half the fun! Here’s what you’ll need:
-
8 oz of pasta (rotini or fusilli): These shapes hold the dressing well and give a delightful bite. Feel free to swap with gluten-free pasta or whole wheat for a healthier option!
-
2 cups cooked chicken breast, diced: A great way to use leftover chicken! For an exotic twist, try grilled or lemon pepper chicken.
-
1 cup romaine lettuce, chopped: Adds crunch and freshness. If you’re feeling adventurous, toss in some spinach or kale for added nutrients!
-
1/2 cup cherry tomatoes, halved: These little gems add a burst of sweetness. You can also use sun-dried tomatoes or roasted peppers if you prefer a different flavor profile.
-
1/4 cup Parmesan cheese, grated: The traditionally paired cheese with Caesar. For a dairy-free option, try nutritional yeast or leave it out entirely!
-
1/2 cup Caesar dressing: You can go store-bought or homemade. If you’re short on time, grab your favorite brand—just make sure it’s creamy!
-
Salt and pepper to taste: Essential seasonings! Always taste your dish as you go to find that perfect balance.
In my cookbook, I always note that choosing good ingredients can transform an ordinary dish into something extraordinary. So, don’t hesitate to seek fresh, high-quality products for the best results.
Step-by-Step Instructions
Let’s get cooking! Here’s how to make your Chicken Caesar Pasta Salad:
-
Cook the Pasta:
- Bring a large pot of salted water to a boil. Once boiling, add the rotini or fusilli pasta. Cook according to the package instructions, usually around 8-10 minutes for al dente.
- Chef Tip: The key here is to avoid overcooking. You want that perfect chewy bite! Once cooked, drain the pasta and rinse under cold water to halt the cooking process. This also helps prevent it from sticking together.
-
Prepare the Chicken:
- While the pasta is cooking, dice your cooked chicken breast into bite-sized pieces. If you’re using leftover chicken, be sure it’s thoroughly heated (but not dry!).
- Chef Hack: For an extra layer of flavor, toss the chicken with a splash of lemon juice or a sprinkle of garlic powder before adding it to the salad!
-
Chop the Veggies:
- Take your fresh romaine lettuce and chop it into bite-sized pieces. Slice your cherry tomatoes in half to release their juices and sweetness.
- Pro Tip: A sharp knife is your best friend in the kitchen—not only is it safer to use, but you’ll also create even bites.
-
Mix It All Together:
- In a large mixing bowl, combine the cooked pasta, diced chicken, chopped romaine, and halved cherry tomatoes.
- In a separate bowl, whisk together the Caesar dressing and a pinch of salt and pepper to taste. Don’t skip this step! This allows you to control the dressing’s flavor and consistency.
-
Toss and Garnish:
- Pour the creamy dressing over the pasta mixture and toss gently until everything is well-coated with that luscious, garlicky, tangy goodness.
- Finally, sprinkle the grated Parmesan cheese over the top and give one last gentle toss.
- Cooking Hack: If you like a cheesy bite, reserve a little Parmesan for garnishing before serving!
And there you have it! A colorful, hearty Chicken Caesar Pasta Salad ready to impress!
Serving Suggestions
Now, let’s talk about how to present this vibrant dish. Visual appeal is key, after all!
-
Plating: Transfer the salad to a large serving bowl and garnish with additional Parmesan cheese, fresh herbs (like parsley or basil), and if you’re fancy, a sprinkle of black pepper or a drizzle of olive oil for extra shine.
-
Individual Portions: Serve in clear mason jars for a fun, portable option! Layering the ingredients adds a pop of color and makes for a cute picnic or lunch presentation.
-
Sides: Pair your Chicken Caesar Pasta Salad with some crusty garlic bread or chips for a delightful crunch. A cold beverage like lemonade or iced tea rounds out the meal beautifully.
Recipe Variations
Feeling adventurous? Here are a few creative twists you can try for your Chicken Caesar Pasta Salad:
-
Spicy Kick: Add a pinch of red pepper flakes to your Caesar dressing or toss in some sliced jalapeños for a spicy twist!
-
Mediterranean Flair: Swap out the chicken for grilled shrimp and mix in Kalamata olives and feta cheese for a Mediterranean-inspired salad.
-
Veggie Delight: For a vegetarian version, replace chicken with roasted chickpeas and add bell peppers, cucumbers, and any of your favorite veggies!
-
Grain Swap: Use quinoa or farro instead of pasta for a healthful alternative that’s high in protein and fiber.
-
Dressing Switch-Up: Experiment with different dressings—how about ranch, blue cheese, or a zesty vinaigrette? The possibilities are endless!
Chef’s Notes
This Chicken Caesar Pasta Salad has evolved over the years in my kitchen. I started with the basic elements, but every time I make it, I’m inspired to add something fresh or seasonal. One of my funniest kitchen moments happened when I realized I’d forgotten to buy salad dressing! With a few pantry staples, I mixed up a quick homemade version, and it ended up becoming a staple in my house ever since.
It’s funny how cooking can lead to unexpected creations—sometimes, those happy accidents become your favorites! Now, I love to keep experimenting with flavors. Cooking should be fun, so don’t hesitate to embrace your inner chef and get creative!
FAQs and Troubleshooting
Q1: What if my pasta is too sticky?
A: Toss it with a drizzle of olive oil after draining and rinsing. This will help separate the pasta and add a nice flavor!
Q2: Can I make this salad ahead of time?
A: Absolutely! Prepare the ingredients separately, then combine them before serving. This keeps the lettuce crisp and prevents sogginess.
Q3: How can I make this gluten-free?
A: Simply use gluten-free pasta and ensure your dressing is also gluten-free. Many brands offer fantastic options that keep the flavor intact.
Q4: My dressing was too thick; how can I fix it?
A: You can thin out your dressing by whisking in a touch of water, lemon juice, or extra olive oil. This’ll give you that perfect pourable consistency!
Nutritional Info
While exact nutritional values can vary based on the specific ingredients and portion sizes you choose, here’s a general idea of what you’re getting with this Chicken Caesar Pasta Salad:
- Calories: Approximately 350 per serving (for a serving of about 1.5 cups)
- Protein: Around 30g, thanks primarily to the chicken
- Carbs: Roughly 40g—mainly from pasta and veggies
- Fat: About 15g, including the healthy fats from the dressing and cheese
- Vitamins & Minerals: A good source of vitamin A, vitamin C, calcium, and iron from fresh veggies and cheese.
Feel free to modify your ingredient choices to adjust this to your dietary preferences!
Final Thoughts
I hope you’re as excited to dive into this Chicken Caesar Pasta Salad as I am! It’s a versatile dish that embraces the heart of home cooking—comforting, flavorful, and always made with love. With every bite, you’ll taste the warmth of good times shared around the table.
If you try this recipe (and I hope you do!), be sure to take a picture and tag me on social media—I’d love to see your creations! Now get out there, gather your ingredients, channel your inner chef, and make your kitchen the heart of your home. Until next time, happy cooking, and remember: food tastes better when shared with the people you love. 🍽️💖
So, are you ready to share some tasty memories? Let’s get cooking! 🥗✨
Print
Chicken Caesar Pasta Salad
- Total Time: 25 minutes
- Yield: 4 servings 1x
- Diet: Balanced
Description
A delightful twist on the classic Caesar salad, this Chicken Caesar Pasta Salad combines hearty pasta with fresh veggies and creamy dressing, perfect for summer cookouts or lunch.
Ingredients
- 8 oz rotini or fusilli pasta
- 2 cups cooked chicken breast, diced
- 1 cup romaine lettuce, chopped
- 1/2 cup cherry tomatoes, halved
- 1/4 cup grated Parmesan cheese
- 1/2 cup Caesar dressing
- Salt and pepper to taste
Instructions
- Cook the pasta: Bring a large pot of salted water to a boil. Add the pasta and cook according to package instructions (8-10 minutes for al dente). Drain and rinse under cold water.
- Prepare the chicken: Dice cooked chicken breast into bite-sized pieces. If using leftover chicken, ensure it’s heated.
- Chop the veggies: Chop romaine lettuce and halve cherry tomatoes.
- Mix it all together: In a large bowl, combine cooked pasta, chicken, lettuce, and tomatoes. In a separate bowl, whisk Caesar dressing with a pinch of salt and pepper, then pour over the pasta mixture.
- Toss and garnish: Toss gently to coat, then sprinkle grated Parmesan on top and toss again.
Notes
For added flavor, toss the chicken with lemon juice or garlic powder before mixing. You can also add red pepper flakes for a spicy kick.
- Prep Time: 15 minutes
- Cook Time: 10 minutes
- Category: Salad
- Method: Mixing
- Cuisine: American
Nutrition
- Serving Size: 1 serving
- Calories: 350
- Sugar: 5g
- Sodium: 400mg
- Fat: 15g
- Saturated Fat: 5g
- Unsaturated Fat: 8g
- Trans Fat: 0g
- Carbohydrates: 40g
- Fiber: 3g
- Protein: 30g
- Cholesterol: 70mg
Keywords: pasta salad, chicken salad, Caesar salad, summer salad, easy recipe
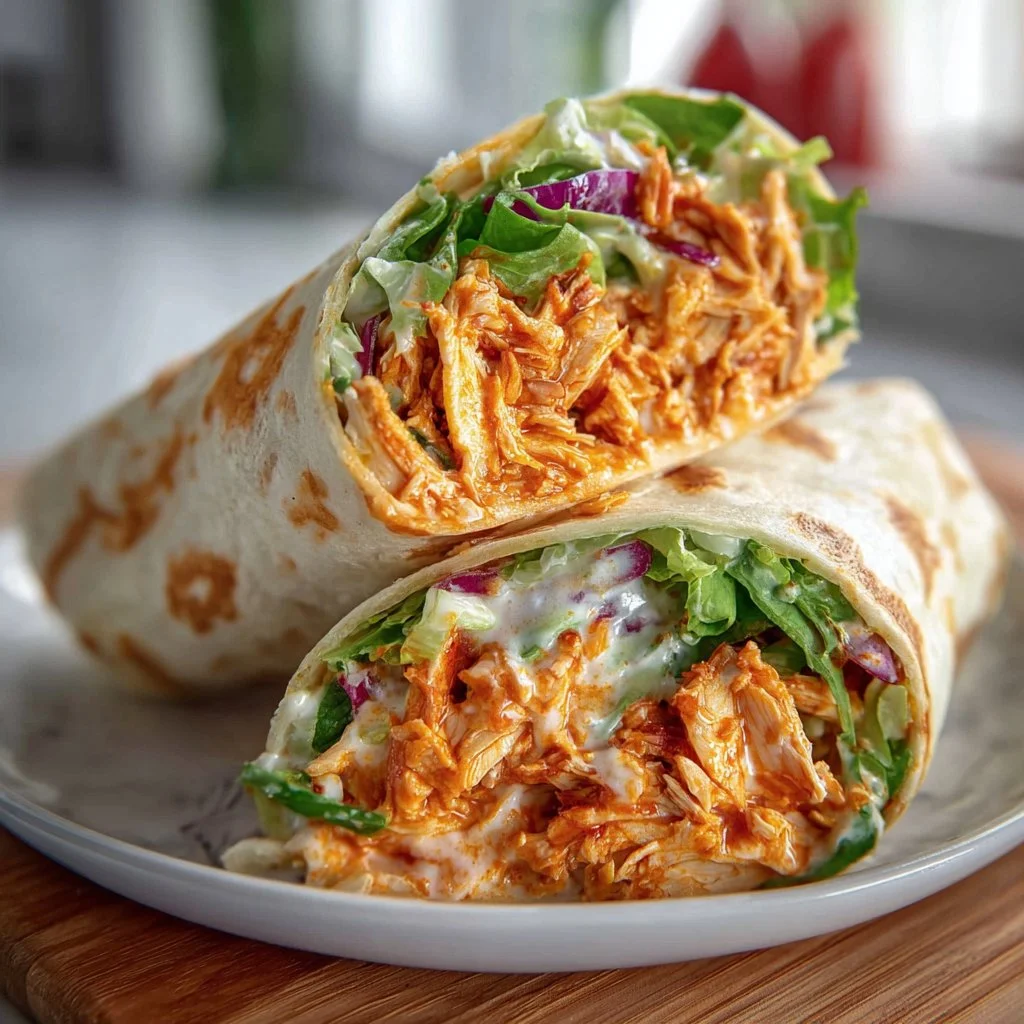
Spicy Buffalo Chicken Wraps for Two
Spicy Buffalo Chicken Wraps for Two: A Flavorful Adventure
Hey there, fellow foodies! If you’re anything like me—a lover of all things delicious, quick, and satisfying—then you’re in for a treat today. Let’s take a journey to flavor town with my spicy Buffalo chicken wraps. These wraps are not just a meal; they are a celebration of bold flavors and happy memories.
You may be wondering, “Why Buffalo chicken wraps?” The answer is simple: they are the perfect blend of spicy, creamy, and crunchy flavors all cradled within a warm tortilla. Whether you’re whipping these up for a lunch date, a game day snack, or just a cozy evening at home, these wraps are easy to make and super tasty. Believe me, one bite and you’ll feel like you’re at a lively tailgate party, even if you’re just lounging on your couch!
What I love most about these wraps is their versatility—be it a casual meal for two or a larger gathering; these spices can be tweaked to your heart’s desire. Plus, this recipe takes less than 30 minutes to whip up, making it a great weeknight dinner option. So grab your spatula and maybe even a friend to help out, and let’s dive into the kick of those spicy Buffalo chicken wraps!
Personal Story
The memory that always whisks me away involves my kitchen during those lazy summer afternoons when the warmth of the sun was just as comforting as my mom’s cooking. I remember coming home from school on those hot days, dropping my backpack at the door, and sprinting into the kitchen, lured by the mouthwatering scent of Buffalo chicken simmering on the stove. My mom had a knack for creating dishes that turned our family kitchen into a haven of flavor and comfort.
One specific afternoon stands out—she was experimenting with Buffalo chicken wraps. I watched, wide-eyed, as she whisked together ingredients and rolled them into tortillas. The cool ranch dressing and crisp lettuce balanced the spicy chicken, and I couldn’t wait to dig in. We’d sit outside, share the wraps, and chat about everything under the sun. Those moments stuck with me long after the plates were empty. Fast forward to today, I’ve made it my mission to recreate that sense of comfort and togetherness in my own kitchen, and these spicy Buffalo chicken wraps are a delicious reflection of those carefree days.
Ingredients
Here’s what you’ll need to create these scrumptious spicy Buffalo chicken wraps, along with some insights and handy substitutions:
-
2 medium tortillas
- Use whole wheat or spinach tortillas for a healthier twist. Flour or corn are classic options too!
-
1 cup cooked chicken, shredded
- You can use rotisserie chicken, leftover chicken, or quickly boil and shred some fresh chicken breast.
-
1/4 cup buffalo sauce
- Feel free to tweak the heat level based on your preference. There are plenty of brands out there, or you can make your own by mixing hot sauce with melted butter.
-
1/2 cup lettuce, shredded
- Romaine or iceberg works well for that crunch! For extra flavors, try adding arugula or spinach.
-
1/4 cup shredded cheese (cheddar or blue cheese)
- Cheddar brings a mild, creamy note, while blue cheese adds a tang. Stir in some pepper jack for more heat!
-
1/4 cup ranch dressing
- Ranch and Buffalo sauce are a match made in heaven! You can swap it for Greek yogurt or a vegan alternative for lighter options.
-
Optional: sliced jalapeños or diced tomatoes for toppings
- Add some slices of fresh jalapeño for an extra kick, or toss in some juicy diced tomatoes for a burst of freshness!
Step-by-Step Instructions
Ready to embark on this culinary adventure? Let’s get started!
-
Prep the Chicken: If you’re working with a rotisserie chicken, shred the meat with a fork in a large bowl until it resembles the goodness that will soon fill your wrap. If starting from scratch, boil your chicken breasts for about 15-20 minutes, or until cooked through, and then shred them while they’re still warm. Pro tip: the warmer the chicken, the easier it is to shred.
-
Mix the Buffalo Sauce: In a mixing bowl, combine the shredded chicken with the Buffalo sauce. Make sure to mix them well—every bite should be flavorful! If you prefer milder heat, start with a tablespoon of Buffalo sauce and gradually add more until you reach your desired spice level.
-
Assemble the Wraps: Lay down a tortilla on a clean surface. Spoon a generous amount of the chicken mixture onto the center of the tortilla, leaving about an inch of space on the sides. Layer on the shredded lettuce and sprinkle the cheese atop the chicken.
-
Roll it Up: Here’s the fun part! To roll the wrap, start from the side closest to you and fold it over the filling, tucking it in gently. Fold in the sides, then keep rolling until the wrap is compact. Don’t worry if it isn’t perfect—that’s part of the charm!
-
Warm the Wraps: For a crispy finish, heat a skillet over medium heat and add a little olive oil or cooking spray. Place the wraps seam-side down in the pan and toast for about 2-4 minutes on each side, or until golden brown and crispy. This step gives your wraps an irresistible crunch!
-
Slice and Serve: Once your wraps are golden and sizzling, remove them from the skillet. Allow them to cool for a minute, then slice them diagonally on a cutting board. Plating matters! Serve them alongside extra ranch dressing for dipping, and some crunchy veggies for snacking.
Serving Suggestions
Now that your spicy Buffalo chicken wraps are ready to rock, let’s talk about how to plate them beautifully! Toasted and slightly crisp, these wraps are fantastic on their own, but you can jazz up your presentation with a few tricks:
-
Dipping Options: Serve them with a small bowl of ranch or bleu cheese dressing strategically placed alongside for that perfect dip! You might even consider a side of carrot and celery sticks for that classic Buffalo experience.
-
Garnishing: A sprinkle of fresh cilantro or sliced green onions on top can add a fresh pop of color and flavor.
-
Plating: Try layering the wraps on a serving platter, drizzling a bit of Buffalo sauce over the top to entice your guests, or displaying them in a tall glass for a fun twist!
Recipe Variations
Feeling adventurous? Here are a few creative twists to transform your spicy Buffalo chicken wraps:
-
Buffalo Cauliflower Wraps: Substitute the chicken with roasted Buffalo-style cauliflower for a delightful vegetarian option that’s just as tasty.
-
Cheesy Spinach Overload: Mix in some sautéed spinach with the chicken for added nutrition and texture.
-
Tex-Mex Fusion: Add black beans and corn to the filling for a mouthwatering twist, then top with guacamole instead of ranch dressing!
-
Asian-Inspired: Swap out the buffalo sauce with teriyaki sauce, and top with crunchy coleslaw for an Asian-inspired delight.
-
Healthy Alternative: Try using lettuce leaves instead of tortillas for a gluten-free, low-carb version. Just layer the chicken and toppings and roll it up like a burrito.
Chef’s Notes
Cooking is as much about the experience as it is about the food! I love to keep my recipes simple but laden with flavor. The beauty of these wraps is that they can be a blank canvas! You can throw in your favorite ingredients or whatever’s left in the fridge to use it up—think leftover grilled veggies or even pulled pork if you’re feeling indulgent.
And speaking of indulgence, let’s not forget the time I decided to host a Buffalo wrap party. Everything was going smoothly until my buddy accidentally spilled a whole bottle of Buffalo sauce! It turned into a hilarious culinary disaster, but we ended up laughing and making the best of it—now that’s what food is all about!
FAQs and Troubleshooting
1. What if my wraps fall apart?
Don’t fret! If you overstuff them, they’ll likely split open. Start with less filling and keep your wrapping technique tight and secure!
2. How can I make it spicier?
To amp up the heat, add sliced jalapeños or use a hotter variety of Buffalo sauce. You can also mix hot sauce directly into the ranch dressing for extra kick!
3. Can I make these ahead?
Absolutely! Prepare the filling a day before and store it in the fridge. Just assemble your wraps right before you’re ready to serve.
4. I don’t have any tortillas. Can I use something else?
Sure thing! Lettuce leaves, pita pockets, or even flatbreads are excellent substitutes for wrapping up those flavorful goodies.
Nutritional Info
Curious about the nutritional breakdown? Here’s what you’re looking at for one spicy Buffalo chicken wrap:
- Calories: Approximately 400-500 calories (this can vary based on ingredient choices)
- Protein: 30g – thanks to the chicken!
- Carbs: 35g – primarily from the tortilla.
- Fats: 20g – will vary depending on the dressings and cheeses you use.
- Fiber: 3-5g – especially if you opt for whole grain tortillas or add veggies.
Don’t forget, you can adjust portions to suit your dietary needs or aim for lighter alternatives!
Final Thoughts
There you have it—spicy Buffalo chicken wraps that are sure to bring a smile to your face and a warmth to your heart! They are quick, easy to make, and utterly delicious, perfect for gatherings, quick dinners, or even satisfying weekday lunches. Food has a remarkable way of connecting us, and nothing beats sharing great flavors with friends and family.
So, give this recipe a whirl, take some creative liberties, and make it your own! And remember, there’s no right or wrong in the kitchen—just delicious adventures waiting to happen.
Now, what are you waiting for? Grab those ingredients and let the culinary fun begin! Enjoy every bite, fellow foodies!
Print
Spicy Buffalo Chicken Wraps for Two
- Total Time: 30 minutes
- Yield: 2 servings 1x
- Diet: Non-Vegetarian
Description
A flavorful adventure in spicy Buffalo chicken wraps, perfect for casual meals or gatherings.
Ingredients
- 2 medium tortillas
- 1 cup cooked chicken, shredded
- 1/4 cup buffalo sauce
- 1/2 cup lettuce, shredded
- 1/4 cup shredded cheese (cheddar or blue cheese)
- 1/4 cup ranch dressing
- Optional: sliced jalapeños or diced tomatoes for toppings
Instructions
- Prep the chicken: Shred the meat with a fork in a large bowl or boil chicken breasts for 15-20 minutes, then shred.
- Mix the buffalo sauce: Combine shredded chicken with buffalo sauce until well coated.
- Assemble the wraps: Lay a tortilla on a surface, add chicken mixture, lettuce, and cheese.
- Roll it up: Fold and tuck the tortilla around the filling tightly.
- Warm the wraps: Toast in a skillet over medium heat with olive oil for 2-4 minutes on each side.
- Slice and serve: Remove from skillet, cool slightly, slice diagonally, and serve with ranch dressing.
Notes
Experiment with different cheeses and add toppings to boost flavor.
- Prep Time: 10 minutes
- Cook Time: 20 minutes
- Category: Main Course
- Method: Baking
- Cuisine: American
Nutrition
- Serving Size: 1 wrap
- Calories: 450
- Sugar: 3g
- Sodium: 800mg
- Fat: 20g
- Saturated Fat: 8g
- Unsaturated Fat: 8g
- Trans Fat: 0g
- Carbohydrates: 35g
- Fiber: 3g
- Protein: 30g
- Cholesterol: 50mg
Keywords: Buffalo chicken, wraps, spicy, easy dinner, comfort food
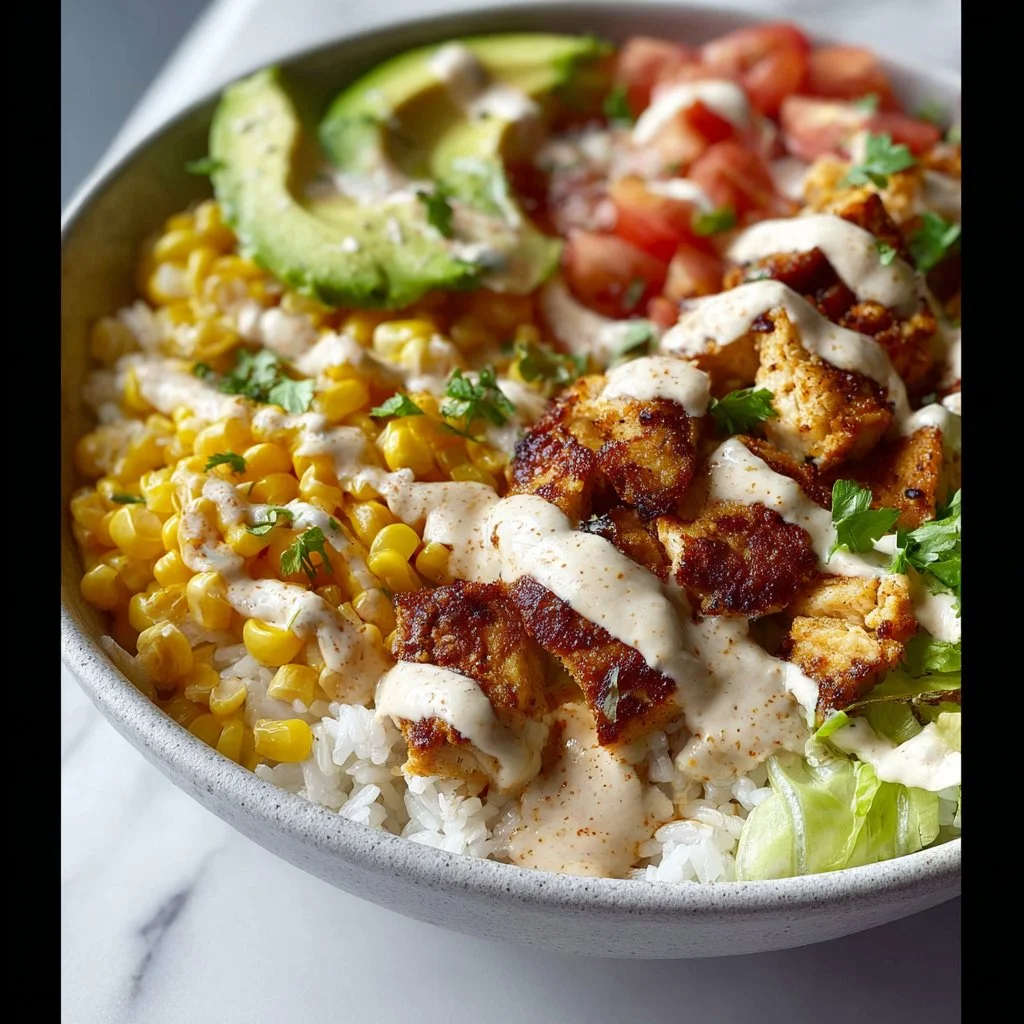
Street Corn Chicken Rice Bowls
Savoring the Sunshine: Street Corn Chicken Rice Bowls Recipe
Hey food lovers! 🌽✨ Today, we’re diving into a vibrant dish that’s equal parts comfort and adventure — Street Corn Chicken Rice Bowls. Inspired by the colorful street food carts of Mexico, this meal brings the magic of bustling streets right to your kitchen table. Trust me; you’re not going to want to miss this delight!
Imagine succulent chicken paired with creamy street corn, zesty cilantro-lime rice, and a smoky dressing that sends your taste buds into overdrive. Each component plays a vibrant role, creating a bowl that’s not just a meal, but an experience. And don’t worry if you’re not a pro in the kitchen — I’ll walk you through every step, sharing all my favorite tips and tricks along the way.
My love for street food began when I stumbled upon a food festival years ago. The air was filled with tantalizing aromas, and the sizzle of grilled meats was like a siren call to my senses. I ventured into a world of flavors I had never experienced before, with a delicious Mexican street corn dish stealing the show. The joy of enjoying food that brings people together buzzing with laughter and delicious bites replays in my mind whenever I whip up this recipe.
Whether you’re hosting friends or simply craving a fiesta for one, these Street Corn Chicken Rice Bowls are bound to impress! So roll up your sleeves, and let’s get cooking!
Personal Story
Back in college, my friends and I had a tradition of exploring food trucks every Friday. There was this particular truck called “The Corn Crib,” where a vibrant lady named Maria served up the most heavenly elote, or Mexican street corn. I still remember the first bite — the creamy cheese and spices mingled perfectly, creating a flavor explosion that still dances in my memory.
We’d gather around that truck with grins plastered on our faces, talking about our week under the glow of twinkling lights and laughter. I decided I had to take that joyful experience home to my kitchen. And that’s when I started experimenting with flavors, eventually creating this Street Corn Chicken Rice Bowl. It’s a joyful combination of flavors that fills your tummy and spirit, reminiscent of those Friday nights under the stars with friends who felt like family.
Ingredients
Let’s gather our stars for this culinary performance! Here’s everything you’ll need:
-
Chicken Breasts: The backbone of our dish! Use boneless, skinless breasts for quick cooking. If you’re going for a leaner option, turkey breast works too!
-
Creamy Street Corn: This is where the magic happens! For that sweet corn flavor combined with creamy goodness, use canned corn or fresh corn on the cob. For a vegetarian twist, swap in grilled zucchini or mushrooms.
-
Cilantro Lime Rice: We’re adding a refreshing zing here. Long-grain white or brown rice holds up well, or go with quinoa for a nutty flavor and added protein.
-
Smoky Dressing: Try a store-bought smoky chipotle sauce or make your own with olive oil, smoked paprika, and a dash of lime juice. This can be made vegan by omitting any dairy.
-
Salt and Pepper: Essential for enhancing flavors. Make sure to season your ingredients at each step — it really makes a difference!
-
Cilantro for Garnish: The finishing touch! Fresh cilantro adds brightness and a pop of color to your dish. If cilantro’s not your jam, parsley is a fabulous alternative!
Step-by-Step Instructions
Ready to get cooking? Here’s how to create these scrumptious bowls, step by step:
1. Prepare the Chicken:
Start by heating a skillet over medium-high heat. Add a splash of olive oil (about 2 tablespoons) and season your chicken breasts with salt and pepper.
- 🍗 Tip: Patting the chicken dry helps it brown nicely.
- Cook for approximately 6-7 minutes on each side until golden brown and cooked through (165°F internal temperature). Remove from heat and let it rest.
2. Make the Creamy Street Corn:
In the same skillet, add in 2 cups of canned corn (drained) or freshly shucked corn off the cob. Sauté for about 5 minutes to get a bit of char.
- 🌽 Chef Insight: This adds a deep, smoky flavor reminiscent of street carts!
- Next, mix in ½ cup of sour cream (or Greek yogurt for a lighter twist), lime juice (about 1 tablespoon), and crumbled cotija cheese for extra creaminess. Season to taste.
3. Cook the Cilantro Lime Rice:
Cook your rice according to package instructions. Once done, fluff with a fork and fold in a generous handful of fresh cilantro, lime juice (1-2 tablespoons), and a pinch of salt.
- 🍚 When using brown rice, it takes a bit longer, but it’s packed with nutrients!
4. Assemble Your Bowls:
Grab a large bowl! Start by spooning some cilantro lime rice on the bottom, followed by sliced or cubed chicken, then top with the creamy street corn.
- 🥄 Layering adds both aesthetics and fun texture!
5. Drizzle with Smoky Dressing:
Give each bowl a generous drizzle of your smoky dressing and a sprinkle of fresh cilantro on top to finish.
- 💡 A squeeze of lime over the top adds a magnificent zing!
Serving Suggestions
Presentation matters, my friend! Here’s how to plate your beautiful creation:
- Bowl it Up: Use a wide, shallow bowl to make your dish feel like a fiesta in a dish!
- Garnish: Add a slice of lime on the side and a sprinkle of chili powder for a pop of color.
- Extra Toppings: Fresh avocado slices, jalapeño rings, or crispy tortilla strips elevate your dish even more!
If you feel adventurous, serve it alongside some tortilla chips and salsa for an extra crunchy pairing.
Recipe Variations
Feel like shaking things up? Here are a few creative twists:
- Spicy Kick: Add diced jalapeños to your creamy street corn for an extra kick.
- Different Proteins: Swap the chicken for shrimp or grilled tofu for a lighter meal.
- Vegan Twist: Use chickpeas in place of chicken and plant-based yogurt in your street corn.
- Loaded Bowls: Top your bowls with black beans, diced tomatoes, and fresh avocado for a more filling option.
- Grain Swap: Try using cauliflower rice instead of traditional rice for a lower-carb option!
Chef’s Notes
I’ve made these bowls countless times, and they always remind me of summer nights filled with laughter and good food. I love how this recipe can transform so easily depending on what’s in your fridge. The Smoky Dressing has been a game-changer in my kitchen, too. I started with store-bought versions but now whip up my own for that fresh, homemade feel!
And here’s a little secret – I keep a jar of the smoky dressing in the fridge! It’s fabulous on salads, grilled veggies, and even as a dip for veggies. Versatility at its finest!
FAQs and Troubleshooting
Q: My chicken turned out dry; what did I do wrong?
A: Chicken breast can quickly dry out if overcooked. Always use a meat thermometer; pull it off the heat at 165°F for juicy chicken!
Q: Can I make the creamy corn ahead of time?
A: Absolutely! Just store it in the fridge for up to 3 days. Reheat gently before serving.
Q: What if I don’t have lime juice?
A: If you’re in a pinch, vinegar is great too! Apple cider vinegar can offer a similar zing.
Q: My rice is sticky; how do I prevent that next time?
A: Rinsing your rice before cooking to remove excess starch will create a fluffier texture.
Nutritional Info
Let’s talk nutrition! Here’s the breakdown for a standard serving:
- Calories: Approximately 500
- Protein: 30g
- Carbohydrates: 60g
- Fat: 15g
- Fiber: 5g
This bowl packs a punch with a great balance of protein, carbs, and healthy fats! Plus, with fresh corn and cilantro, you’re getting an array of vitamins boosting your health while treating your taste buds.
Final Thoughts
There you have it, folks! Street Corn Chicken Rice Bowls that sing with flavor and joy. This dish is perfect for friends, family dinners, or a cozy weeknight meal when you crave something delicious without too much fuss.
Remember to play with flavors and ingredients—cooking is about joy, experimentation, and, most importantly, togetherness. So get out there, throw on your apron, and bring your loved ones along for the culinary adventure!
Until next time, keep cooking with love and laughter. You’re one forkful away from something spectacular! 🍽️❤️
Print
Street Corn Chicken Rice Bowls
- Total Time: 45 minutes
- Yield: 4 servings 1x
- Diet: Gluten-Free
Description
A vibrant dish inspired by Mexican street food, featuring succulent chicken, creamy street corn, zesty cilantro-lime rice, and a smoky dressing.
Ingredients
- 4 boneless, skinless chicken breasts
- 2 cups canned corn or fresh corn off the cob
- ½ cup sour cream or Greek yogurt
- 1 tablespoon lime juice
- ½ cup crumbled cotija cheese
- 2 cups long-grain white rice or quinoa
- 2 tablespoons olive oil
- Salt and pepper to taste
- Fresh cilantro for garnish
- Smoky chipotle sauce or homemade smoky dressing
Instructions
- Prepare the chicken: Heat a skillet over medium-high heat, add olive oil, and season chicken with salt and pepper. Cook for 6-7 minutes on each side until golden brown and cooked through. Remove from heat and let it rest.
- Make the creamy street corn: In the same skillet, add corn and sauté for about 5 minutes. Mix in sour cream, lime juice, and cotija cheese. Season to taste.
- Cook the cilantro lime rice: Cook rice according to package instructions, fluff with a fork, and fold in fresh cilantro and lime juice.
- Assemble your bowls: Start with cilantro lime rice, followed by sliced chicken and creamy street corn.
- Drizzle with smoky dressing and a sprinkle of cilantro before serving.
Notes
For a vegetarian version, swap chicken for grilled zucchini or mushrooms. Store any leftover creamy corn in the fridge for up to 3 days.
- Prep Time: 15 minutes
- Cook Time: 30 minutes
- Category: Main Course
- Method: Sautéing
- Cuisine: Mexican
Nutrition
- Serving Size: 1 bowl
- Calories: 500
- Sugar: 6g
- Sodium: 600mg
- Fat: 15g
- Saturated Fat: 4g
- Unsaturated Fat: 8g
- Trans Fat: 0g
- Carbohydrates: 60g
- Fiber: 5g
- Protein: 30g
- Cholesterol: 80mg
Keywords: Mexican street food, chicken rice bowls, creamy corn, cilantro lime rice, smoky dressing
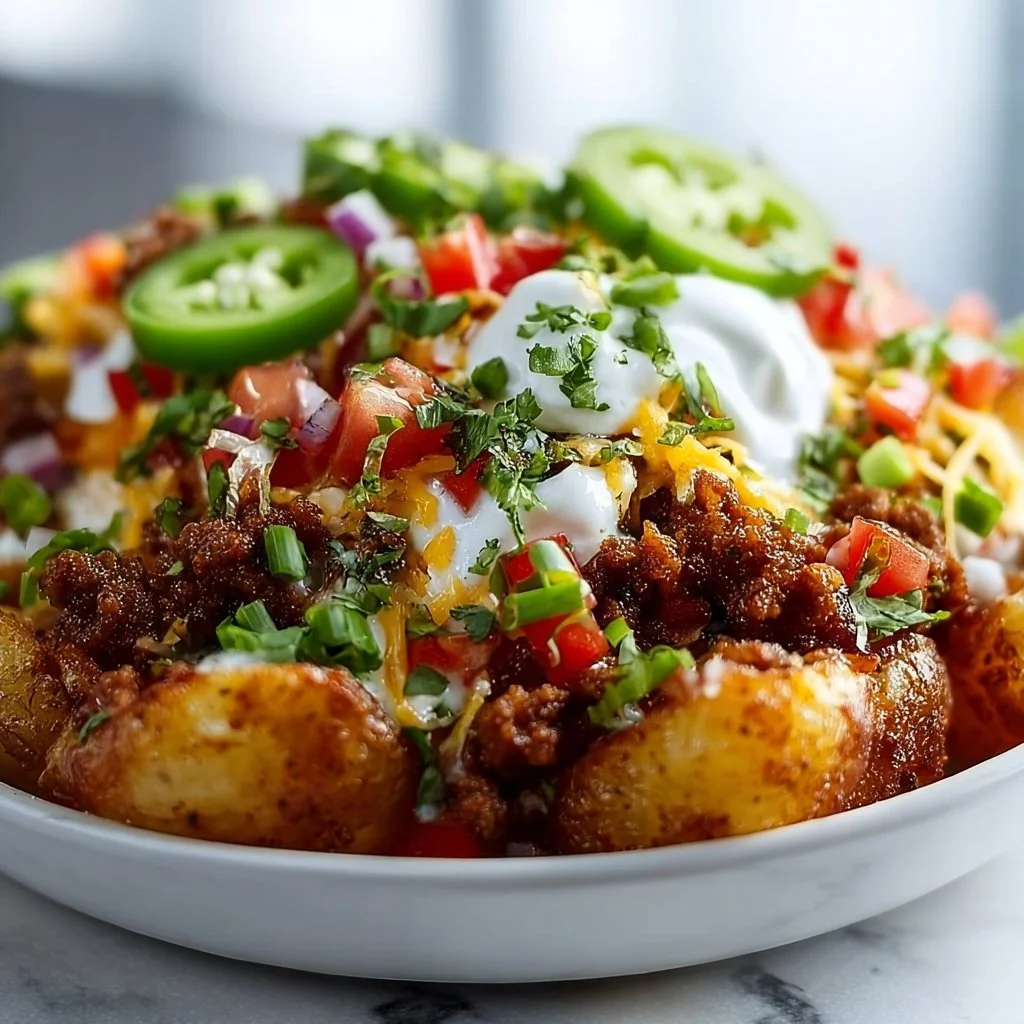
Loaded Potato Taco Bowl
Loaded Potato Taco Bowl: A Feast for Your Taste Buds
Hey there, food lovers! Welcome back to Feastical, where we whip up a delectable storm with ease and panache. Today, I’m super excited to share one of my absolute favorite comfort-food creations: the Loaded Potato Taco Bowl! 🎉 This dish is a vibrant mash-up that combines hearty baked potatoes with the colorful zest of taco flavors, making it a fantastic option for a casual family dinner or a fun meal prep. So, grab your spatula, roll up those sleeves, and let’s get cooking!
A Memory to Savor
Let’s take a little trip down memory lane, shall we? Ever since I was young, I’ve had a special place in my heart for taco night at home. It was that magical time of the week when my family would gather around the dinner table with bowls of fresh ingredients, everyone ready to build their dream taco creations. The air was filled with laughter and the delicious aroma of spices.
One particular taco night stands out in my memory: it was my birthday, and my family had set up a “create your own taco” fiesta, complete with all the toppings you could imagine. My younger sister and I decided to go a little crazy that night and tried to outdo each other with the most outrageous taco concoctions. Picture this: a towering mountain of crispy potato strips, gooey cheese, and enough salsa to cause a flavor explosion!
Fast forward to today, and I’ve channeled that love for tacos and nostalgia into this Loaded Potato Taco Bowl. It’s a dish designed to bring people together, just like those cherished taco nights from my childhood.
Ingredients
Here’s what you’ll need to whip up your Loaded Potato Taco Bowls. Let’s break down each ingredient so you can make informed choices!
-
2 large potatoes, diced
The heart of your bowl! I recommend russet potatoes for their fluffy texture when baked. If you’re looking for a healthier twist, sweet potatoes also work well here. -
1 lb ground beef or turkey
The protein powerhouse! Ground turkey is a leaner option, but it’s all about your preference. For a vegetarian alternative, use crumbled tempeh or lentils. -
1 cup black beans, drained and rinsed
Beans are a fantastic source of fiber and add a lovely creaminess to the bowl. If you’re not a bean fan, you can swap them for kidney beans or chickpeas. -
1 cup corn kernels (fresh or frozen)
Corn brings a pop of sweetness. If corn is out of season, feel free to use canned corn—just be sure to drain it well! -
1 cup diced bell peppers
Any color works! Red, yellow, or green, it’s about what you enjoy. These add flavor and a crisp texture. -
1 avocado, diced
This creamy fruit enriches the dish. If avocados aren’t ripe, try substituting with Greek yogurt for a tangy twist. -
1 cup shredded cheese (cheddar or Mexican blend)
Cheese makes everything better! Grate your own for the best melt. If you want to keep it dairy-free, use a nut-based cheese alternative. -
1 tablespoon olive oil
A dash of good fat for flavor and cooking. You can use avocado oil for a slightly different taste. -
1 teaspoon chili powder
This adds warmth! Adjust to taste based on your spice tolerance; go for smoked paprika if you want a different flavor profile. -
1 teaspoon cumin
Cumin brings an earthy depth. Feel free to experiment with coriander for a fresh twist! -
Salt and pepper to taste
Seasoning is crucial! Always taste as you go to elevate those flavors. -
Fresh cilantro for garnish
A sprinkle of freshness! If cilantro’s not your thing, fresh parsley works too.
Step-by-Step Instructions
Let’s get those potatoes loaded, folks! Here’s how to create your Loaded Potato Taco Bowl, step-by-step:
-
Bake those Potatoes!
Preheat your oven to 400°F (200°C). Dice your potatoes into bite-sized cubes and toss them in a mixing bowl with olive oil, salt, pepper, and half of your chili powder and cumin. Spread them out in a single layer on a baking sheet. Bake for about 25-30 minutes until golden brown and crispy on the edges. Pro Tip: Turn them halfway through for even crispiness! -
Cook the Ground Meat.
While your potatoes are cooking, grab a skillet and heat over medium-high heat. Add your ground beef or turkey, breaking it up with a spoon. Sprinkle in the remaining chili powder and cumin, adding salt and pepper to taste. Cook until the meat is browned and fully cooked—about 5-7 minutes. Drain any excess fat if needed. Chef Hack: Add a splash of broth for moisture and flavor if your meat seems dry. -
Prep the Veggies!
In the same skillet (because who wants to do extra dishes?), toss in your diced bell peppers and the rinsed black beans. Sauté them together for 3-4 minutes until the peppers are tender and vibrant. Feel free to season with a tad more chili powder if you want that extra oomph! -
Add the Corn.
Mix in the corn and stir everything together, letting the heat warm it through. This step should only take about 2 minutes. If you want to swap corn for something different, now’s the time to get creative! -
Assembly Line!
Now it’s your time to shine! Grab your favorite bowls, ladle some crispy baked potatoes to form a base, then add layers of the flavored beef mixture, and top it off with diced avocado and shredded cheese. I love to use a generous handful of cheese, as it melts beautifully with the heat from the potatoes and meat. -
Garnish like a Pro!
Don’t forget those finishing touches! Sprinkle freshly chopped cilantro over the top for vibrancy and flavor. If you’re feeling fancy, drizzle with lime juice or your favorite taco sauce to bring it all home.
Serving Suggestions
When it comes to serving, think about creating a taco bar vibe! Treat your family or friends to their own Loaded Potato Taco Bowls, complete with various toppings. Set out extra garnishes like sour cream, jalapeños, and salsa for people to customize their creations. Serve with a side of tortilla chips for that perfect crunch, and don’t forget some refreshing beverages—maybe a zesty limeade or a chilled beer! Cheers to a meal that not only tastes amazing but looks vibrant and inviting.
Recipe Variations
Now that you have the basics down, let’s get creative! Here are some fun variations to try:
-
Fiesta Loaded Potato Bowl:
Add taco seasoning to your baked potatoes and layer them with spicy chorizo for an extra kick. -
Vegetarian Delight:
Swap the meat for a mix of black beans and sweet potatoes. It’s hearty, delicious, and full of flavor! -
Mexican Street Corn Style:
Stir in some crumbled feta and add lime juice to your corn for that traditional elote flavor. -
Breakfast Taco Bowl:
Instead of ground meat, use scrambled eggs and top it all off with a dollop of salsa and some crispy bacon bits for a hearty breakfast treat. -
Cheesy Spinach Version:
Add fresh spinach to the mix when you sauté the vegetables for a nutritious boost, and don’t skimp on the cheese!
Chef’s Notes
This Loaded Potato Taco Bowl has evolved over time, and every family has a slightly different take on it! I remember the first time I tried adding avocado to the mix—it was a total revelation! Sometimes, the most basic ingredients can be transformed into something extraordinary. Quick funny kitchen mishap: One time, I accidentally muddled the chili powder with cinnamon; no one ever let me forget it! Lesson learned: label your spices, folks!
FAQs and Troubleshooting
Let’s tackle some common questions you might run into:
-
Can I make this ahead of time?
Absolutely! You can prepare the baked potatoes and meat mixture ahead of time. Just keep them stored separately in the fridge and assemble when you’re ready to eat. -
Why are my potatoes not crispy?
If they come out soft, you might have overcrowded the baking sheet. Give them enough space to roast properly. -
How can I make it spicier?
Add diced jalapeños to the meat mixture or sprinkle some cayenne pepper into your seasoning blend. -
What if my avocado isn’t ripe?
If you can’t find a ripe avocado, try using pico de gallo or chunky salsa for that fresh element.
Nutritional Info
A single serving of this Loaded Potato Taco Bowl contains roughly:
- Calories: 600-700 kcal (depending on toppings)
- Protein: 30-35g
- Fat: 25-30g
- Carbohydrates: 70-80g
- Fiber: 10-15g
These values can shift based on the protein choice or if you decide to go heavy on the toppings.
Final Thoughts
There you have it, food enthusiasts—a scrumptious voyage to the Loaded Potato Taco Bowl! I hope this recipe has inspired you to bring your loved ones together, just like my family did on those beloved taco nights. So, dive into your kitchen, throw on your apron, and let the joy of cooking fill your home. Remember, food is not just about sustenance; it’s about creating moments, memories, and happiness. Happy cooking, and don’t forget to share your delicious creations! 🍽️
Until next time, keep it simple, soulful, and satisfying. Bon appétit!
Print
Loaded Potato Taco Bowl
- Total Time: 45 minutes
- Yield: 4 servings 1x
- Diet: Carnivore / Optional Vegetarian
Description
A vibrant mash-up that combines hearty baked potatoes with colorful taco flavors, perfect for a casual family dinner or meal prep.
Ingredients
- 2 large potatoes, diced
- 1 lb ground beef or turkey
- 1 cup black beans, drained and rinsed
- 1 cup corn kernels (fresh or frozen)
- 1 cup diced bell peppers
- 1 avocado, diced
- 1 cup shredded cheese (cheddar or Mexican blend)
- 1 tablespoon olive oil
- 1 teaspoon chili powder
- 1 teaspoon cumin
- Salt and pepper to taste
- Fresh cilantro for garnish
Instructions
- Preheat your oven to 400°F (200°C). Dice your potatoes into bite-sized cubes and toss them in a mixing bowl with olive oil, salt, pepper, and half of your chili powder and cumin. Spread them out in a single layer on a baking sheet. Bake for about 25-30 minutes until golden brown and crispy on the edges. Pro Tip: Turn them halfway through for even crispiness!
- While your potatoes are cooking, grab a skillet and heat over medium-high heat. Add your ground beef or turkey, breaking it up with a spoon. Sprinkle in the remaining chili powder and cumin, adding salt and pepper to taste. Cook until the meat is browned and fully cooked—about 5-7 minutes. Drain any excess fat if needed. Chef Hack: Add a splash of broth for moisture and flavor if your meat seems dry.
- In the same skillet, toss in your diced bell peppers and the rinsed black beans. Sauté them together for 3-4 minutes until the peppers are tender and vibrant. Feel free to season with a tad more chili powder if you want that extra oomph!
- Mix in the corn and stir everything together, letting the heat warm it through. This step should only take about 2 minutes.
- Grab your favorite bowls, ladle some crispy baked potatoes to form a base, then add layers of the flavored beef mixture, and top it off with diced avocado and shredded cheese.
- Sprinkle freshly chopped cilantro over the top for vibrancy and flavor. Drizzle with lime juice or your favorite taco sauce to bring it all home.
Notes
For best results, serve with extra toppings like sour cream, jalapeños, and salsa for a personalized feel. Customize with different proteins or veggies as desired.
- Prep Time: 15 minutes
- Cook Time: 30 minutes
- Category: Main Course
- Method: Baking
- Cuisine: Mexican
Nutrition
- Serving Size: 1 serving
- Calories: 650
- Sugar: 4g
- Sodium: 600mg
- Fat: 28g
- Saturated Fat: 10g
- Unsaturated Fat: 12g
- Trans Fat: 0g
- Carbohydrates: 75g
- Fiber: 12g
- Protein: 32g
- Cholesterol: 70mg
Keywords: taco bowl, loaded potato, family dinner, comfort food, Mexican recipe
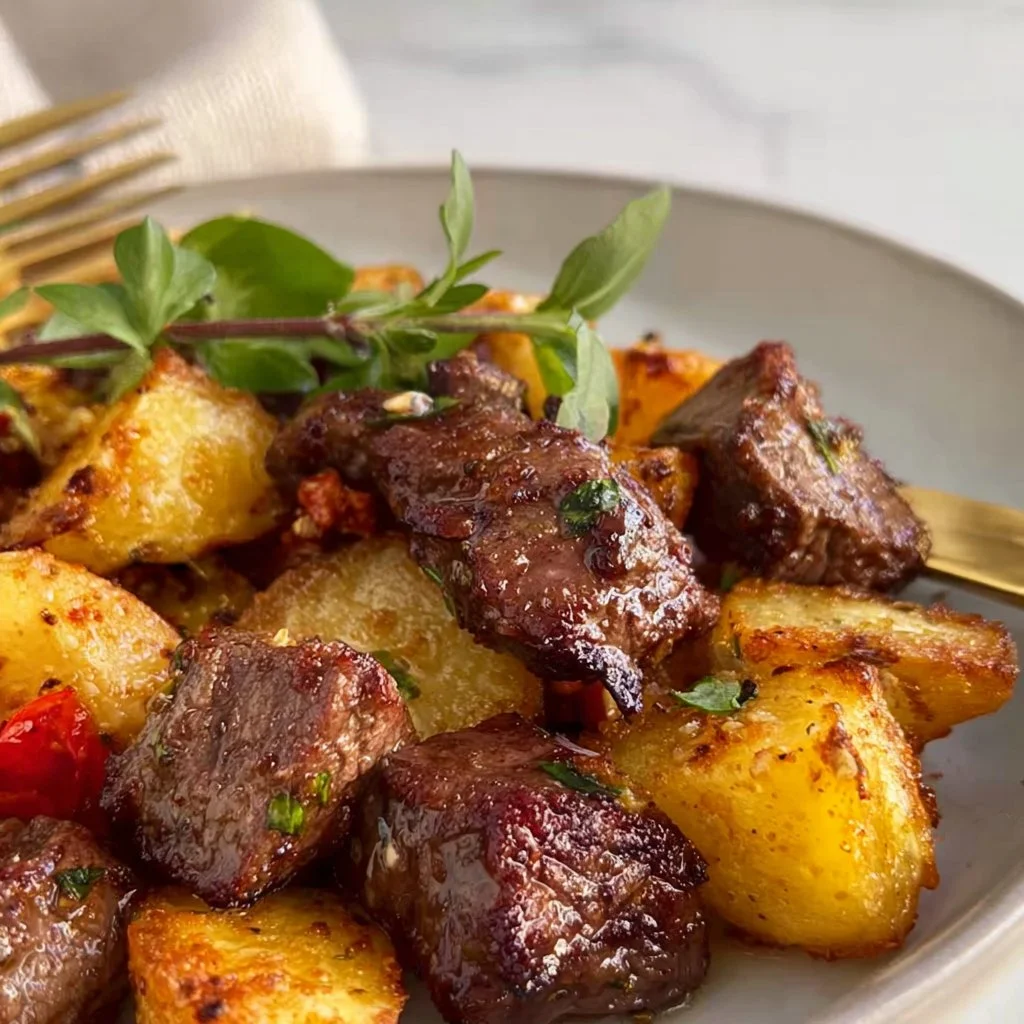
Air Fryer Cubed Steak & Crispy Potatoes
Air Fryer Cubed Steak & Crispy Potatoes: A Feast to Remember
Hey there, food lovers! Are you ready to take a trip down memory lane while savoring a delicious meal? Today, we’re diving into an irresistible comfort food that’s bound to warm your heart and fill your belly—Air Fryer Cubed Steak & Crispy Potatoes! This dish combines tender, flavorful cubed steak with perfectly crispy potatoes, all cooked to perfection in your trusty air fryer.
Now, you might be wondering, “Can cooking be both easy and satisfying?” Absolutely! When I started my culinary journey, I wanted to create meals that everyone—regardless of cooking skill—could whip up in their own kitchen. The air fryer makes this dream a reality, combining the ease of cooking with the unbeatable flavors of homemade fare. So grab your spatula and let’s create something magical!
Cooking isn’t just about following recipes; it’s about building memories and sharing love. Whenever I make this dish, I think of family dinners around the table, where stories were shared and laughter filled the air. Imagine the smell of juicy steak sizzling, complemented by the fragrant aroma of garlic and paprika wafting through your kitchen. Let me take you along on this tasty journey, where every bite is a delicious hug for your palate.
Now, whether you’re looking to impress a date, treat the family, or just indulge your own cravings, Air Fryer Cubed Steak & Crispy Potatoes is here to save the day. It’s hearty, wholesome, and downright fabulous. Ready? Let’s jump into my favorite memories involving this fantastic dish that holds a special spot in my heart.
Personal Story
Growing up, Sunday evenings were sacred in our household. After a long week, my parents would gather us all for a hearty family dinner—and without fail, cubed steak would be on the menu. My mom had a knack for making the most scrumptious versions of this dish, seasoning it with love and pairing it with crispy, golden potatoes. As a kid, there was nothing better than sitting around the table with my siblings, each forkful of tender steak bringing joy and togetherness.
I vividly remember one particular Sunday when a surprise storm knocked out the power. Instead of feeling defeated, my mom lit candles and pulled out our trusty camping stove. With laughter in the air and excitement building, we huddled in the kitchen as she masterfully cooked up her signature cubed steak and potatoes—power or no power. That night was magic. It wasn’t just about the food; it was about our family bond and resilience.
Now, I’ve taken those cherished memories and reimagined the dish in a quick and healthier way with the air fryer. This isn’t just a meal for me; it’s a bridge connecting past and present and a tribute to the joy food brings. Ready to replicate the magic? Let’s gather our ingredients!
Ingredients
Here’s everything you’ll need to whip up some Air Fryer Cubed Steak & Crispy Potatoes:
-
Cubed Steak
- Perfectly tender and easy to cook, cubed steak is an inexpensive cut of beef that’s great for quick meals. If you can’t find it, flank steak or sirloin can work as excellent substitutes. Just slice them into cubes.
-
Potatoes
- Choose your favorite: Russets, red, or Yukon Golds all work wonderfully. These spuds become crispy little nuggets of joy in the air fryer! Substitute with sweet potatoes for a healthier twist.
-
Olive Oil
- This is our magic ingredient! Olive oil enhances flavor while helping achieve that crispy texture. Feel free to use canola or avocado oil if you prefer.
-
Salt
- A good pinch of salt makes all the difference in elevating flavors. Sea salt or kosher salt works best—just remember to season well!
-
Black Pepper
- Freshly cracked black pepper adds that much-needed zing. If you’re feeling adventurous, try smoked paprika or chili flakes for added heat.
-
Garlic Powder
- A dash of garlic powder brings depth of flavor without the fuss of chopping garlic. Fresh garlic can also be used; just sauté it briefly before applying to the steak.
-
Paprika
- This beautiful spice brings a warm, smoky flavor to the party. Use sweet, smoked, or even hot paprika—experimenting is encouraged!
Are you excited? I know I am! Let’s get cooking.
Step-by-Step Instructions
-
Prepping the Ingredients
- Start by peeling your potatoes and cutting them into small cubes, about one inch in size. This ensures even cooking and maximum crispiness. Remember, the smaller the pieces, the more crunch you’ll get!
- Next, season your cubed steak with salt, pepper, garlic powder, and paprika. Ensure every piece is generously coated for that flavorful kick. Set both aside while you prepare the air fryer.
-
Preheating the Air Fryer
- Preheat your air fryer to 400°F (about 200°C). Preheating helps achieve that crispy exterior we all adore.
-
Tossing the Potatoes
- In a mixing bowl, toss your cubed potatoes with a tablespoon of olive oil, making sure they’re well-coated. Then, season with salt and pepper to taste. You might want to add a bit of paprika for a pop of color and flavor!
-
Air Frying the Potatoes
- Place the cubed potatoes in a single layer in the air fryer basket. Cook at 400°F for about 15 minutes. Don’t forget to shake the basket halfway through to ensure even crisping.
-
Preparing the Steak
- While your potatoes are cooking, drizzle the workout cubed steak with a little olive oil and give it another seating of salt, pepper, and paprika if desired. Let it sit for about 5 minutes so the seasoning infuses the meat.
-
Air Frying the Steak
- Once the potatoes are done, remove them and set aside. Now it’s time to cook the cubed steak! Place the seasoned steak in the air fryer basket in a single layer (you might need to do this in batches). Cook at 400°F for about 10-12 minutes. Make sure to flip them halfway through to ensure they cook evenly.
-
Checking for Doneness
- The internal temperature of the cubed steak should reach at least 145°F (63°C) for medium-rare. Just a quick check with a meat thermometer is all you need!
-
Final Touches
- Once cooked, let both the potatoes and steak rest for a few minutes. This will help lock in those juices and crispiness! Don’t rush this step!
Your Air Fryer Cubed Steak & Crispy Potatoes are now waiting to be plated—let’s get ready to serve!
Serving Suggestions
Now comes the fun part: plating! I love to serve this dish family-style, where everyone can dive in. Start with a generous portion of crispy potatoes at the bottom, and arrange the sliced cubed steak on top. Drizzle a little extra olive oil or sprinkle some fresh herbs, like parsley or chives, for a pop of color.
Consider serving this meal with a side of your favorite dipping sauce or a simple green salad. The cool, crisp salad complements the hearty, warm flavors perfectly. And guess what? Leftovers (if there are any) can also be salvaged well! Just store them in an airtight container, and you’re good to go.
Recipe Variations
Let your creativity flourish with these fun twists:
-
Spicy Steak & Potatoes: Add a teaspoon of cayenne pepper or chili powder to spice things up for those craving heat.
-
Cajun Flavor: Swap in Cajun seasoning for a zesty Southern twist that will make your taste buds dance!
-
Herb-Infused: Incorporate fresh herbs like thyme or rosemary for an aromatic flair. Toss it with the potatoes before air frying.
-
Cheesy Indulgence: Top with shredded cheese (like cheddar or mozzarella) in the last few minutes of cooking for a gooey, cheesy delight.
-
Vegetarian Option: Substitute the cubed steak with seasoned mushrooms or tofu for a delightful plant-based meal.
With these variations, you’ll always have a new way to enjoy this dish!
Chef’s Notes
I can tell you countless stories from my kitchen escapades, but let’s focus on this fantastic dish. Over time, I’ve experimented with various techniques for cooking cubed steak and potatoes, and I must say, the air fryer is a game-changer. It captures the essence of my mom’s recipe while saving time and minimizing oil.
Cooking memories are often delicious but sometimes amusing. I recall the first time I tried the steak-and-potato combo in my air fryer—let’s just say the smoke alarm had an unexpected but brief moment of fame! Now I have it down to a science.
FAQs and Troubleshooting
Q: What if my steak is tough?
- Overcooking can lead to tough steak. Make sure to monitor the cooking time closely and check for doneness with a meat thermometer. Resting the meat after cooking is crucial, too!
Q: Can I prepare this dish in advance?
- Yes! You can season the steak and potatoes beforehand and refrigerate them. When you’re ready to cook, just pop them into the air fryer directly from the fridge.
Q: What should I do if my potatoes aren’t crispy enough?
- If your potatoes are in a crowded air fryer basket, they may steam rather than crisp. Cook in smaller batches to get that wonderful crunchity-crunch you crave.
Q: Do you recommend marinating the steak?
- Absolutely! Marinating cubed steak for a few hours before cooking can really elevate the flavor profile. Just make sure to pat them dry before air frying for optimal crispiness!
Nutritional Info
Now, you might be wondering about the nutritional breakdown of our dish. Here’s a ballpark figure (per serving):
- Calories: ~350
- Protein: ~30g
- Carbohydrates: ~25g
- Fats: ~15g
These values will vary depending on ingredients and portion size, but know you’re enjoying a balanced plate that delights the senses. It’s comfort food that still respects your health goals—how awesome is that?
Final Thoughts
And there you have it, folks! Air Fryer Cubed Steak & Crispy Potatoes that bring together flavors of nostalgia and the modern twist of air frying. Every bite of this dish is a reminder of family dinners, laughter, and love. Such meals feed both body and soul, and I hope this recipe becomes a cherished part of your culinary repertoire.
So, the next time you’re in need of comfort food that’s quick and satisfying, don’t forget about this gem. Share it with your loved ones, or simply treat yourself. Remember, cooking is about making connections, one delicious meal at a time.
Thanks for spending this time with me in the kitchen! Here’s to creating more beautiful memories around the table—let’s feast! 🍽️💕
Print
Air Fryer Cubed Steak & Crispy Potatoes
- Total Time: 45 minutes
- Yield: 4 servings
- Diet: Carnivore
Description
A delightful comfort food that combines tender cubed steak with crispy potatoes, all prepared in an air fryer for a quick and satisfying meal.
Ingredients
- Cubed steak
- Potatoes
- Olive oil
- Salt
- Black pepper
- Garlic powder
- Paprika
Instructions
- Start by peeling your potatoes and cutting them into small cubes, about one inch in size.
- Next, season your cubed steak with salt, pepper, garlic powder, and paprika.
- Preheat your air fryer to 400°F (about 200°C).
- In a mixing bowl, toss your cubed potatoes with a tablespoon of olive oil.
- Place the cubed potatoes in a single layer in the air fryer basket. Cook at 400°F for about 15 minutes.
- While your potatoes are cooking, drizzle the cubed steak with a little olive oil and season again.
- Once the potatoes are done, remove them and place the seasoned steak in the air fryer basket.
- Cook the cubed steak at 400°F for about 10-12 minutes, flipping halfway through.
- Check the internal temperature of the steak to ensure it reaches at least 145°F (63°C).
- Let both the potatoes and steak rest for a few minutes before serving.
Notes
For a spicy twist, consider adding cayenne pepper or trying different seasonings like Cajun spice.
- Prep Time: 15 minutes
- Cook Time: 30 minutes
- Category: Main Course
- Method: Air Frying
- Cuisine: American
Nutrition
- Serving Size: 1 serving
- Calories: 350
- Sugar: 2g
- Sodium: 400mg
- Fat: 15g
- Saturated Fat: 4g
- Unsaturated Fat: 8g
- Trans Fat: 0g
- Carbohydrates: 25g
- Fiber: 3g
- Protein: 30g
- Cholesterol: 70mg
Keywords: air fryer, cubed steak, crispy potatoes, comfort food, easy recipe
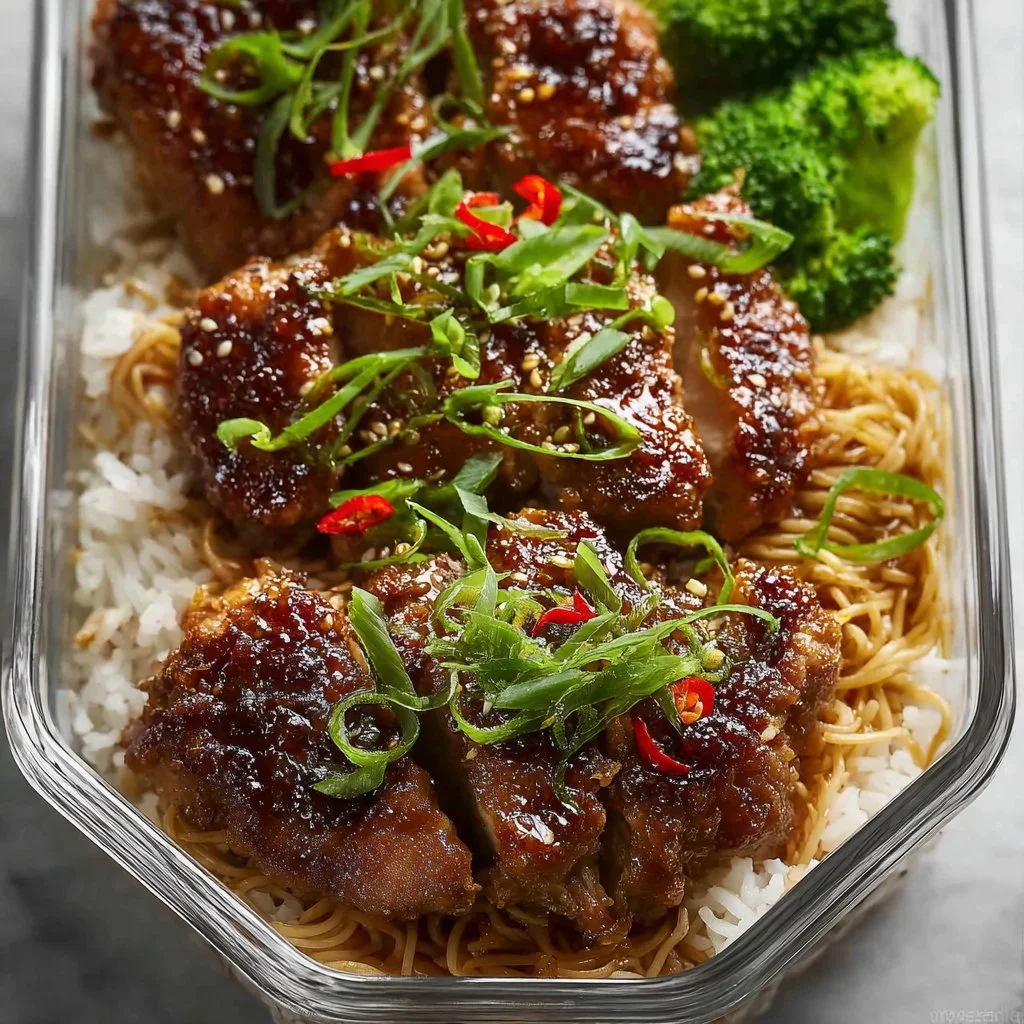
Sticky Ginger Soy Glazed Chicken Meal Prep Box
# Sticky Ginger Soy Glazed Chicken Meal Prep Box: A Feastical Favorite!

Hey there, fellow foodies! I’m Beau Collier, and I can't wait to dive into something special with you today. If you're anything like me, you love a good meal prep recipe that shines in flavor and makes your week so much easier. That’s right—I’m talking about my Sticky Ginger Soy Glazed Chicken Meal Prep Box!

This dish is not just simple to make but also bursts with Asian-inspired flavors that will have you feeling energized and satisfied all week long. Imagine juicy chicken thighs or breasts soaked in a sticky ginger and soy glaze, complemented by crisp broccoli that gives it a vibrant pop. Perfect for keeping your lunch or dinner both delicious and healthy, right?

Meal prep can feel overwhelming at times, but it doesn't have to be! You'll find that once you get into the groove of assembling these boxes, you'll appreciate the preparation just as much as the delectable bites you'll be enjoying all week. So, let’s roll up our sleeves, grab our favorite spatulas, and get started on a cooking adventure you'll keep coming back to!

## Personal Story: A Flavorful Tradition

When I think back to my childhood, the comfort of my mom's kitchen comes to mind. She had this magical ability to conjure up dishes that filled our home with warmth and love. One of my favorite memories is when she would make a similar ginger-soy chicken stir-fry on those busy weeknights after school. The sweet and savory aroma would fill the air, and I knew dinner was going to be good.

We'd huddle around the dinner table, sharing stories of our day—all while eagerly grabbing pieces of sticky chicken, diving into the vibrant greens, and savoring every last bite. It was more than just food; it was our cozy family time, punctuated with laughter and lots of "Can I have seconds?" I’ve taken that delicious nostalgic feeling and turned it into this meal prep box so that you can share similar moments with your loved ones. Let’s carry on the tradition, shall we?

## Ingredients

Here’s what you’ll need for your Sticky Ginger Soy Glazed Chicken Meal Prep Box:

- **Chicken Thighs or Breasts**
  Tender, juicy chicken thighs are perfect for this dish, but if you prefer leaner cuts, go for chicken breasts. Just keep in mind that breasts may dry out more easily, so you’ll want to monitor cooking time carefully.

- **Soy Sauce**
  This is the heart of the glaze! It adds depth and richness. For a gluten-free option, feel free to swap it with tamari. If you're watching your sodium intake, consider low-sodium soy sauce too!

- **Fresh Ginger, grated**
  Ginger is essential for that zingy flavor! Freshly grated ginger works best in this recipe, but if you’re in a pinch, ground ginger can suffice—though it won’t be quite the same.

- **Honey or Brown Sugar**
  This adds the delightful sweetness that balances the soy sauce's saltiness. If you’re looking for a vegan option, use maple syrup or agave nectar for that sticky sweetness!

- **Garlic, minced**
  Garlic is the unassuming superstar that rounds out this dish. You can use powdered garlic if you're in a hurry, but fresh is always best for that vibrant, aromatic punch.

- **Broccoli Florets**
  Broccoli gives color and crunch, making your meal-prep boxes look appealing and fresh! You can substitute it with snap peas, bell peppers, or your favorite green veggies.

- **Olive Oil**
  Just a splash for sautéing! If you prefer another oil, avocado oil or sesame oil would enhance the flavors even more.

- **Salt and Pepper**
  Essential seasoning to enhance all those delicious flavors. Don’t skip this step!

## Step-by-Step Instructions

Alright, let’s get cooking! Here’s our step-by-step guide to creating this flavorful masterpiece.

### 1. Prepare Your Chicken
Start by trimming any excess fat off your chicken thighs or breasts. Pat them dry with a paper towel; this helps the marinade adhere better! Place them in a bowl or a resealable plastic bag.

### 2. Make the Marinade
In a small bowl, mix together 1/3 cup of soy sauce, 2 tablespoons of honey (or brown sugar), 1 tablespoon of freshly grated ginger, and 2 minced garlic cloves. Stir until the honey is well mixed. Pour this luscious marinade over the chicken, ensuring each piece is covered. Let it marinate for at least 30 minutes, or overnight if you have the time—trust me, it'll be worth the wait!

### 3. Sauté the Chicken
Heat a tablespoon of olive oil in a large skillet over medium-high heat. Once the oil is shimmering, remove the chicken from the marinade (let the marinade drip off a bit) and place it in the skillet. Sauté for 5–7 minutes on each side or until the chicken reaches an internal temperature of 165°F (74°C). If you have too much marinade left, don't toss it yet! You’ll need it in a moment.

### 4. Make the Glaze
Remove the chicken once cooked and cover it loosely with foil to keep warm. In the same skillet, pour in the leftover marinade and bring it to a simmer. Let it cook for about 3–4 minutes until it thickens into a sticky glaze. This will create a final layer of flavor on your chicken!

### 5. Cook Your Broccoli
While your glaze is working its magic, steam your broccoli florets in a separate pot for about 5–7 minutes, or until tender but still bright green. The steaming method retains nutrients and gives the broccoli that lovely crunch you want!

### 6. Combine and Serve
Cut the chicken into bite-sized pieces, then add it back into the skillet with the glaze to coat. Toss the cooked broccoli in as well! Mix until everything is nicely coated, and voilà! Your meal prep base is ready to rock!

## Serving Suggestions

Now that you’ve got your Sticky Ginger Soy Glazed Chicken all prepped, it’s time to think about how to serve it! For meal prep, you can portion it out into your favorite meal prep containers. Start with a scoop of fluffy jasmine rice or quinoa for a wholesome base. Then layer on that juicy chicken and broccoli onto each container!

Garnish with sesame seeds and thinly sliced green onions for a pop of color and extra flavor. If you're feeling fancy, a drizzle of sriracha or a sprinkle of chili flakes can take it to the next level. Just make sure to keep your ingredients separated until meal time if you prefer your rice and chicken to remain distinct!

## Recipe Variations

Let’s shake things up a bit! Here are a few creative twists and variations you can try:

1. **Pineapple Ginger Glaze**: Add some crushed pineapple while making the glaze. It adds a tropical, sweet twist!

2. **Spicy Sriracha Urge**: Mix in a tablespoon of sriracha in the marinade for a spicy kick.

3. **Citrus Burst**: Add the zest and juice of one lime or orange to the marinade for a refreshing tang.

4. **Substitute Other Proteins**: Swap chicken for tofu or tempeh for a plant-based meal prep option.

5. **Mixed Veggie Delight**: Throw in a medley of bell peppers, carrots, and snap peas in addition to the broccoli for an even more colorful meal!

## Chef’s Notes

This recipe has swirled through my kitchen many times over the years, evolving and adapting with new friends, flavors, and even seasons. I've made it using every kind of protein I could think of, but the classic chicken version will always hold a soft spot in my heart.

And let me tell you—a funny mishap happened once when I accidentally added a cup of soy sauce instead of 1/3 cup. Instead of tossing it, I rolled with it, and after some adjustments, it turned out to be a deliciously tangy, sweet, sticky mess we lovingly dubbed "Ginger Explosion Chicken”! Sometimes, a kitchen flop can turn into a new family favorite!

## FAQs and Troubleshooting

**Q: What if my chicken is tough or dry?**
A: Overcooked chicken can get dry fast, so be sure to monitor the cooking closely. Use a meat thermometer to ensure it’s cooked perfectly.

**Q: How long can I keep this meal prep in the fridge?**
A: These meal prep boxes are safe to eat for up to 4 days in the fridge. Don't freeze the glazed chicken, as it may not retain its texture.

**Q: Can I make this ahead of time?**
A: Absolutely! This recipe is perfect for meal prep. Just prepare and store the components separately to maintain texture.

**Q: How do I know my broccoli is perfectly cooked?**
A: You want firm, bright green broccoli with a slight crunch. If it’s too soft or mushy, you may have cooked it too long!

## Nutritional Info

Each serving of this Sticky Ginger Soy Glazed Chicken (with broccoli and rice) provides a balanced meal packed with protein, fiber, and all those yummy flavors. Here's a quick nutritional breakdown for one meal prep box:

- **Calories**: Approx. 400–500, depending on portion sizes
- **Protein**: 30g from chicken
- **Carbohydrates**: 50g (mainly from rice)
- **Fiber**: 5–7g from broccoli and rice
- **Fats**: 8–10g from olive oil and chicken

Feel free to adjust ingredients for your dietary needs, swapping rice for cauliflower rice, or adding more veggies!

## Final Thoughts

So there you have it, folks! A delicious, easy-peasy recipe for Sticky Ginger Soy Glazed Chicken Meal Prep Box that brings back memories of cozy family dinners but makes your busy week a whole lot easier. Life gets hectic, but that doesn't mean you can't enjoy flavorful, wholesome food!

Whether you make this for yourself, your family, or your friends, I guarantee that it’ll bring smiles to the table. Remember, cooking is about joy, creativity, and sharing moments with loved ones. I can't wait to hear how your cooking adventures unfold!

So grab your spatula, and let's keep the delicious momentum going on this Feastical journey. Until next time, happy cooking, and remember – food is about love, laughter, and feeling good.

Sticky Ginger Soy Glazed Chicken Meal Prep Box
- Total Time: 50 minutes
- Yield: 4 servings
- Diet: Gluten-Free
Description
A flavorful meal prep recipe featuring sticky ginger soy glazed chicken and crisp broccoli, perfect for a healthy and satisfying week.
Ingredients
- Chicken thighs or breasts
- Soy sauce
- Fresh ginger, grated
- Honey or brown sugar
- Garlic, minced
- Broccoli florets
- Olive oil
- Salt and pepper
Instructions
- Prepare your chicken by trimming excess fat and patting dry.
- Make the marinade by mixing soy sauce, honey, ginger, and garlic.
- Sauté the chicken in a skillet for 5–7 minutes on each side.
- Make the glaze in the same skillet with leftover marinade.
- Cook the broccoli until bright green and tender.
- Combine the chicken and broccoli with the glaze and serve.
Notes
For a gluten-free option, use tamari instead of soy sauce. You can store meal prep boxes in the fridge for up to 4 days.
- Prep Time: 30 minutes
- Cook Time: 20 minutes
- Category: Main Course
- Method: Sautéing
- Cuisine: Asian
Nutrition
- Serving Size: 1 serving
- Calories: 450
- Sugar: 10g
- Sodium: 800mg
- Fat: 10g
- Saturated Fat: 2g
- Unsaturated Fat: 7g
- Trans Fat: 0g
- Carbohydrates: 50g
- Fiber: 5g
- Protein: 30g
- Cholesterol: 70mg
Keywords: meal prep, chicken recipe, ginger soy glaze, healthy lunch