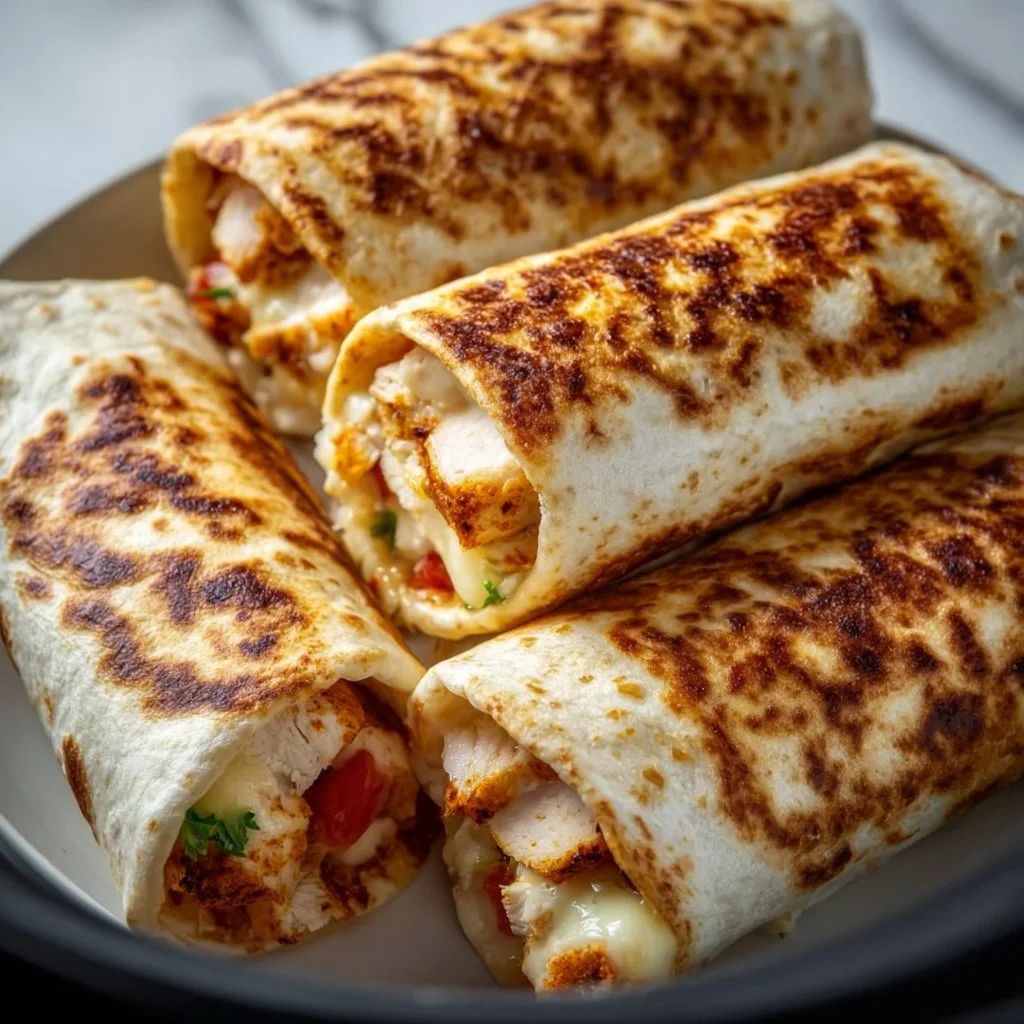
Air Fryer Chicken & Mozzarella Wraps
Air Fryer Chicken & Mozzarella Wraps: A Feast of Flavors
Hey there, fellow food lovers! I’m Beau Collier, and if you’re looking for a scrumptious meal that brings a little comfort and a whole lot of flavor to your kitchen, then boy, do I have a treat for you! Today, we’re diving into the delightful world of Air Fryer Chicken & Mozzarella Wraps. This dish is a definite crowd-pleaser—perfect for family dinners, casual get-togethers, or just a cozy night in.
You know those meals that just make you feel good? The ones that wrap you in a warm hug and remind you of good times? Well, this recipe is exactly that! These wraps are not only mouthwateringly delicious but also incredibly easy to whip up, especially with the magic of the air fryer. I love using the air fryer because it makes cooking quicker and gives your food that perfectly crispy texture—without drowning everything in oil. If you’re like me and prefer your meals to be satisfying but not overly complicated, you’re in for a real treat!
Now, let’s talk about these wraps! With juicy chicken breasts seasoned to perfection, melty mozzarella cheese, and a fresh crunch from spinach, all snugly tucked in a whole wheat tortilla, it’s a breeze to prepare. I’ll guide you through every step of the way, sharing tips, tricks, and my personal thoughts to make your cooking experience as enjoyable as the meal itself.
So grab your apron and let’s get cooking; we’re about to make some magic happen in the kitchen!
Personal Story
Okay, picture this: It was a chilly evening a few years back, and I was back home visiting my family. My niece had just finished her first week at school and was buzzing with excitement as she shared stories about her day. Inspired by my sister’s hectic schedule of working and managing family life, I decided to whip us up some quick and easy chicken wraps for dinner.
I took out some chicken breasts from the fridge, sprinkled them with a mix of spices—my trusty garlic powder and paprika (my flavor pals)—and popped them in the air fryer. The aroma wafted through the house, and my niece’s eyes lit up! As I assembled the wraps with gooey mozzarella and fresh spinach, laughter filled the kitchen. That night wasn’t just about the food; it was about bonding over good eats and making memories. Since then, Air Fryer Chicken & Mozzarella Wraps have become a staple in my house—a reminder of those lovely moments around the table.
Ingredients
Let’s break it down! Here’s everything you’ll need to make these scrumptious wraps. Each ingredient plays a key role in creating the flavor profile and texture of the dish!
-
2 large chicken breasts (about 1 pound total)
- The star of the show! Choose fresh, boneless chicken for juiciness. For a quicker option, you can use pre-cooked grilled chicken.
-
1 teaspoon garlic powder
- Adds a punch of flavor! Feel free to substitute with minced fresh garlic (1 clove = about 1/8 teaspoon powder) if you want a fresh kick.
-
1 teaspoon paprika
- This adds a warm color and smoky flavor. Smoked paprika can amp up the taste even more!
-
1/2 teaspoon salt
- Don’t skimp here! It enhances all the flavors, but if you’re on a low-sodium diet, you can cut this down or use a salt substitute.
-
1/2 teaspoon black pepper
- For a touch of heat and complexity. White pepper can be used if you want a milder flavor.
-
4 whole wheat tortillas
- Opt for whole wheat for added fiber and nutrients. You can also swap these for gluten-free tortillas if necessary.
-
1 cup shredded mozzarella cheese
- Melts beautifully! If you’re feeling adventurous, use a mix of mozzarella and cheddar for an extra zing.
-
1 cup fresh spinach leaves
- For a burst of color and nutrition. Kale or arugula could be a fun twist!
-
1/4 cup ranch dressing (optional, for serving)
- This creamy dressing is a great finishing touch, but feel free to swap it out for your favorite dressing, or even a dollop of Greek yogurt for a healthier spin!
Step-by-Step Instructions
Ready to get cooking? Here’s how to turn those simple ingredients into a mouthwatering feast!
-
Prep the Chicken:
Begin by trimming any excess fat from the chicken breasts. Rinse them under cold water, then pat them dry with paper towels. This step is crucial because it helps the seasoning to adhere better! -
Season the Chicken:
Rub the chicken with garlic powder, paprika, salt, and black pepper, making sure to cover every nook and cranny. This seasoning not only enhances flavor but also showcases that beautiful, golden color once cooked! -
Preheat the Air Fryer:
While you’re seasoning, preheat your air fryer to 375°F (190°C) for about 3-5 minutes. This step ensures that the chicken cooks evenly and gets that crispy exterior. -
Air Fry the Chicken:
Place the seasoned chicken breasts in the air fryer basket. Cook for 15-20 minutes, flipping halfway through. The internal temperature should reach 165°F (74°C). Pro tip: Use a meat thermometer to avoid overcooking! -
Shred the Chicken:
Once cooked, remove the chicken from the air fryer and let it rest for about 5 minutes—it helps retain moisture. Then, using two forks, shred the chicken. This is a great time to sneak a bite to check if it’s as tasty as it smells! -
Assemble the Wraps:
Lay a tortilla flat and sprinkle some shredded mozzarella in the center. Add a generous amount of shredded chicken on top, followed by a handful of fresh spinach. You can sprinkle a bit more cheese on top for extra stretchiness. -
Wrap It Up:
Roll the tortilla tightly from the bottom up, folding in the sides as you go to keep all that goodness inside. You want these wraps snug so you don’t lose any filling during cooking! -
Air Fry Again:
Place the wraps seam-side down in the air fryer basket. Air fry at 375°F (190°C) for another 5-7 minutes until the tortillas are golden and crispy. Keep an eye on them, as different air fryers can vary in cooking time! -
Serve:
Carefully remove the wraps from the air fryer and let them rest for a minute. Cut in half for that Instagram-ready pic, and serve with ranch dressing on the side for dipping. Voilà!
Serving Suggestions
There’s nothing like the way these wraps look on a plate! For an attractive presentation, serve them on a wooden board or a colorful platter. You could slice them in half to reveal the melting cheese and vibrant colors inside, or serve them whole for a rustic feel.
For an extra touch, drizzle some ranch dressing over the top or garnish with fresh herbs like cilantro or parsley. A side of crunchy carrot sticks or a light salad can really round out the meal, adding a refreshing element to each bite.
Recipe Variations
Feeling creative? Here are some fun variations you can try with these wraps!
-
Buffalo Chicken Wraps:
Swap in some spicy buffalo sauce for a kick! Just mix some sauce with the shredded chicken before assembling. Serve with blue cheese dressing on the side. -
Southwestern Style:
Add some black beans, corn, and a sprinkle of cumin to the chicken before wrapping. Top with jalapeños for an extra heat wave! -
Mediterranean Twist:
Mix in some chopped olives and sun-dried tomatoes with the spinach. Serve with tzatziki on the side for a refreshing dip. -
Veggie-Loaded:
For a vegetarian option, skip the chicken altogether and use roasted veggies like bell peppers, zucchini, and red onion, with added feta cheese. -
Breakfast Wraps:
Use scrambled eggs or egg whites instead of chicken, adding in some diced tomatoes and avocado slices for a breakfast twist.
Chef’s Notes
I’ve made these wraps countless times, and each time they seem to get better! A funny memory that comes to mind is when I forgot to flip the chicken halfway through cooking once. While they were still delicious, I had a bit of a crisis when one side was perfectly golden, and the other side looked like it needed a little TLC.
Over the years, I’ve played with spices and ingredients based on what I had in the fridge, and I realized that this recipe is so adaptable! If you ever find yourself with leftover roasted vegetables or that last bit of cheese at the bottom of the fridge, toss it in! It’s the perfect canvas for culinary creativity.
FAQs and Troubleshooting
Here are some common questions you might have—and my friendly solutions!
Q: What if I don’t have an air fryer?
A: No worries! You can bake these wraps in the oven at 400°F (200°C) for about 20-25 minutes or until the tortillas are golden brown. Just be sure to flip them halfway through!
Q: My wraps fell apart! What went wrong?
A: They may have been too stuffed or not rolled tightly enough. Just practice makes perfect! Use less filling if needed, and really tuck those sides in while rolling.
Q: Can I make these ahead of time?
A: You can! Just prepare the chicken and assemble the wraps, but store them in the refrigerator and air fry just before serving. They’re best eaten fresh!
Q: How do I know when the chicken is fully cooked?
A: Using a meat thermometer is the best way to check! Chicken should register 165°F (74°C) internally. If you don’t have one, ensuring the juices run clear when poked is a good indicator, too.
Nutritional Info
While I’m not one to obsess over numbers, I’ll share a rough idea of the nutrition in these wraps to keep your mind at ease:
- Calories: Approximately 400-500 per wrap (depending on additions and portion sizes)
- Protein: 35g (thanks to the chicken and cheese!)
- Carbohydrates: 40g (mostly from the whole wheat tortilla)
- Fat: 15g (mainly from cheese; consider using low-fat for a lighter option)
- Fiber: Around 5g (great job choosing whole wheat!)
Feel free to adjust ingredients to meet your dietary needs. Adding more veggies can boost fiber and nutrients while keeping those calories down!
Final Thoughts
And there you have it, my friends! Air Fryer Chicken & Mozzarella Wraps are a simple yet soul-satisfying meal that can easily become a favorite in your home. They’re great for any occasion, and I hope they become just as special to you as they have to me. Cooking should be fun, a little messy, and, most importantly, full of love.
Next time you find yourself feeling blue or just want to enjoy something delicious, reach for these wraps! Remember, life is short—make it delicious. Until next time, keep experimenting, keep smiling, and keep sharing those kitchen stories. Happy cooking!
Print
Air Fryer Chicken & Mozzarella Wraps
- Total Time: 30 minutes
- Yield: 4 servings 1x
- Diet: Gluten-Free, Dairy-Free options available
Description
Enjoy a scrumptious meal with Air Fryer Chicken & Mozzarella Wraps, featuring juicy chicken, melty cheese, and fresh spinach, all enveloped in whole wheat tortillas.
Ingredients
- 2 large chicken breasts (about 1 pound total)
- 1 teaspoon garlic powder
- 1 teaspoon paprika
- 1/2 teaspoon salt
- 1/2 teaspoon black pepper
- 4 whole wheat tortillas
- 1 cup shredded mozzarella cheese
- 1 cup fresh spinach leaves
- 1/4 cup ranch dressing (optional, for serving)
Instructions
- Prep the chicken: Trim any excess fat and rinse under cold water, then pat dry.
- Season the chicken: Rub with garlic powder, paprika, salt, and black pepper.
- Preheat the air fryer: Set to 375°F (190°C) for about 3-5 minutes.
- Air fry the chicken: Place in basket and cook for 15-20 minutes, flipping halfway through.
- Shred the chicken: Remove from air fryer, let rest, and then shred with two forks.
- Assemble the wraps: Lay a tortilla flat, add mozzarella, chicken, and spinach.
- Wrap it up: Roll tightly from the bottom and tuck in the sides.
- Air fry again: Place wraps seam-side down and cook at 375°F (190°C) for 5-7 minutes.
- Serve: Remove, let rest, and cut in half for serving with ranch dressing on the side.
Notes
Feel free to customize with different proteins or add more veggies for a unique twist.
- Prep Time: 10 minutes
- Cook Time: 20 minutes
- Category: Main Course
- Method: Air Frying
- Cuisine: American
Nutrition
- Serving Size: 1 wrap
- Calories: 450
- Sugar: 2g
- Sodium: 600mg
- Fat: 15g
- Saturated Fat: 8g
- Unsaturated Fat: 6g
- Trans Fat: 0g
- Carbohydrates: 40g
- Fiber: 5g
- Protein: 35g
- Cholesterol: 80mg
Keywords: air fryer, chicken wraps, mozzarella wraps, easy dinner, comfort food

Korean Fried Chicken Air Fryer
Crispy and Crunchy: Air Fryer Korean Fried Chicken Recipe
Hey foodies! Today, we’re diving into the delightful world of Korean Fried Chicken—but with a healthy twist! If you’ve ever found yourself yearning for that crispy, sticky goodness of traditional fried chicken without the guilt, you’re in luck. We’re going to whip up an Air Fryer version that’s just as delicious but way lighter on the waistline. So buckle up and let’s get cooking!
Introduction: Welcome to Flavor Town!
Korean Fried Chicken is legendary for its crunchy texture and rich flavors. Imagine biting into crispy chicken adorned with a glaze so good it makes your taste buds do a happy dance. Growing up, I remember Saturday nights spent on the couch watching movies, and the kitchen filled with the tantalizing aroma of fried chicken. A perfectly crispy exterior locked in succulent flavors? Yes, please!
But let’s be real: deep-frying can turn into an oil slick in your kitchen, and the cleanup? Ugh! That’s where the air fryer comes in, my friends. It transforms our crispy chicken dreams into a healthier reality without compromising that crunch we crave. Ah, the magic of modern cooking! Plus, the air fryer makes it super easy to maintain that addictively crispy coating…and did I mention it’s a breeze to clean?
So, whether you’re having a cozy night in, throwing a party, or just craving some comfort food, this Air Fryer Korean Fried Chicken will bring joy to your table. Grab your apron, and let’s get to it!
Personal Story: A Love for Korean Cuisine
I still remember the first time I tasted authentic Korean fried chicken. It was at a local little joint that had just opened up, and even from the outside, you could smell the intoxicating aroma of frying chicken. As soon as I sank my teeth into that crispy delight, I was hooked! The combo of crunch from the skin and the sweet-spicy sticky glaze was unlike anything I’d experienced before.
In college, a group of friends and I made it a tradition to indulge in this deliciousness every Friday night. We’d pile into someone’s tiny apartment, food scattered all over the table, laughter filling the room. Those gatherings were filled with stories, laughter, and a sense of togetherness as we dove into shared plates of crispy chicken, giggly over spicy dipping sauces. Today, those memories fuel my passion for recreating dishes like this one, translating shared moments with friends and family onto our plates. What better way to connect with people than over some good food?
Ingredients
Now let’s dive into the deliciousness! Here are the ingredients you’ll need to create the most scrumptious Air Fryer Korean Fried Chicken:
For the Chicken Coating:
-
8 pieces of chicken tenders: Tender chicken is key for juicy bites. Feel free to use boneless chicken thighs or even chicken wings if you prefer!
-
1 cup of crushed corn flakes: These give an insane crunch— plus, they’re a healthier alternative to breadcrumbs!
-
1 tbsp of garlic powder: A flavor powerhouse! You could also use fresh garlic if you prefer a stronger taste.
-
1 tsp of paprika: This adds a little warmth without overwhelming heat. Feel free to swap it with smoked paprika for a delicious twist!
-
2 eggs: The glue that holds our crispy coating together. If you’re looking for an egg-free alternative, try a mix of flour and water as a binder.
-
1 tsp of salt: Essential for enhancing flavors. You can also use sea salt or even garlic salt for an extra punch.
-
1 tsp of pepper: A dash of pepper goes a long way in elevating the taste.
For the Korean Style Sauce:
-
1 tbsp avocado oil: For sautéing garlic and keeping the sauce from burning. Use another neutral oil if needed, like canola or vegetable oil.
-
2 cloves of garlic (minced): Fresh garlic adds that extra flavor. If you love garlic, don’t be shy—throw in a bit more!
-
2 stalks of green onion (whites and greens separated): The whites add a nice flavor to the sauce, while the greens are lovely for garnish.
-
2 tbsp of gochujang: This savory and spicy Korean chili paste is a must-have. It brings true authentic flavor! Can’t find it? Try using Sriracha or a red pepper paste as a substitute.
-
3 tbsp honey: Sweetness balances the heat of the gochujang! Alternatively, maple syrup or agave works if you want a vegan option.
-
3 tbsp ketchup: Adds a tangy flavor and a hint of sweetness. You can swap it with tomato paste—just adjust honey for the sweetness.
-
2 tbsp mirin: This sweet rice wine enhances the sauce depth. If you’re avoiding alcohol, rice vinegar can be used with a touch of sugar.
-
1 tbsp sesame oil: This adds a nutty aroma and flavor. Just remember—less is more with sesame oil!
-
Toasted sesame seeds: Perfect as a crunchy garnish. If you don’t have them, feel free to skip or use chopped nuts for extra crunch!
Step-by-Step Instructions
Alright, let’s get down to the nitty-gritty! Here’s how you whip up this dish for yourself. Trust me; it’s easy, and you’ll be proud to serve it!
Step 1: Prepare the Chicken
-
Preheat your Air Fryer to 380°F (193°C) for around 5 minutes.
-
Get your chicken tenders ready. Pat them dry with a paper towel (this makes them crispier!). If they’re a bit thick, you might want to pound them down lightly so they cook evenly.
-
Set up your coating station. In one bowl, whisk the eggs. In another, combine crushed corn flakes, garlic powder, paprika, salt, and pepper.
Step 2: Coat the Chicken
-
Dunk each chicken tender in the egg first, allowing the excess to drip off.
-
Now, roll it in the corn flake mixture, pressing gently to get that crispy coating on all sides. Pro tip: Use one hand for wet and the other for dry ingredients to keep things less messy.
Step 3: Air Fry the Chicken
-
Spray your air fryer basket lightly with cooking spray. This will help the chicken crisp up even more!
-
Lay the chicken tenders in a single layer in the Air Fryer. Work in batches if necessary.
-
Air fry for about 15-18 minutes, turning halfway through. Keep an eye on them! They should be golden-brown and crispy.
Step 4: Prepare the Sauce
-
While the chicken is cooking, let’s make that luscious sauce! Heat avocado oil in a small saucepan over medium heat.
-
Add the minced garlic and the white parts of the green onion, sauté them for about a minute until fragrant. Careful not to burn them!
-
Stir in gochujang, honey, ketchup, mirin, and sesame oil. Cook on low for about 5 minutes until it thickens slightly.
Step 5: Toss and Serve
-
Once your chicken is done, place it in a large bowl. Pour that mouthwatering sauce all over, and gently toss until all pieces are well coated.
-
Serve it up!
Serving Suggestions
Presentation is everything, right? Here’s how to plate this Air Fryer Korean Fried Chicken beautifully:
-
On a platter: Arrange the chicken tenders neatly, ensuring they have some space between them to show off their crispy layers.
-
Garnish: Sprinkle with toasted sesame seeds and the green tops of your green onions for a pop of color and freshness.
-
Serve with sides: You can add some fresh cucumber slices or a simple cabbage salad to balance the richness of the chicken. And hey, don’t forget kimchi if you love that tangy kick!
Recipe Variations
Here are some twists to customize your Korean Fried Chicken to suit your vibe:
-
Spicy Version: Add more gochujang or a splash of sriracha to the sauce for that extra kick.
-
Sweet Garlic Soy: Omit the ketchup and mix soy sauce into the glaze in place of soda for a savory-sweet twist.
-
Crispy Panko Coating: Swap corn flakes with panko breadcrumbs for an ultra-crispy crust.
-
Pineapple Gochujang: Add some crushed pineapple to your sauce for a sweet-tangy flavor explosion!
-
BBQ Chick: Use BBQ sauce instead of the gochujang glaze for a sweet and smoky flavor you’ll love.
Chef’s Notes
This recipe has come a long way from my college days when I used whatever was in the pantry at the moment. I’ve experimented and made this dish many times, and air frying has genuinely transformed how I enjoy fried chicken. It’s a little bit healthier, but it’s still packed with that mouthwatering goodness we all love. Plus, it makes it perfect for gatherings—I can whip up a bunch in no time!
FAQs and Troubleshooting
Q1: Why isn’t my chicken crispy?
A: Make sure your air fryer is preheated and allow enough space between the chicken tenders for air to circulate. If they’re overcrowded, they’ll steam instead of crisp up!
Q2: Can I make this gluten-free?
A: Absolutely! Just use gluten-free corn flakes for the coating. And check the label on your gochujang and sauces to ensure they’re gluten-free.
Q3: What’s the best way to store leftovers?
A: Store leftovers in an airtight container in the fridge for up to 3 days. Reheat in the air fryer to regain that crispy texture.
Q4: Can I freeze these?
A: Yes! You can freeze uncooked, coated chicken tenders. Just make sure they’re in a single layer on a baking sheet before transferring to a freezer bag.
Nutritional Info
Let’s break it down! Since nutritional content can vary depending on brands and exact measurements, here’s a general estimation for one serving (2 tenders with sauce):
- Calories: ~300
- Protein: 25g
- Carbohydrates: 30g
- Fat: 12g
- Fiber: 1g
This is a guilt-free indulgence you can feel good about enjoying.
Final Thoughts
Well, there you have it—your guide to making Air Fryer Korean Fried Chicken! It’s crispy, it’s saucy, and it’s perfect for any occasion. Whether it’s a movie night, dinner with friends, or just a little treat for yourself, this dish is bound to impress.
Cooking should be about having fun, sharing moments, and enjoying delicious food with those you love. The best part? You’ve put your twist on a classic you’ll cherish for years to come. So gather your friends or family, put on your favorite tunes, and have a feast! Until next time, happy cooking, and bon appétit! Enjoy every bite!
Print
Air Fryer Korean Fried Chicken
- Total Time: 35 minutes
- Yield: 4 servings 1x
- Diet: Gluten-Free, Nut-Free
Description
A healthier twist on the classic Korean Fried Chicken, made in an air fryer for a crispy, guilt-free indulgence.
Ingredients
- 8 pieces of chicken tenders
- 1 cup of crushed corn flakes
- 1 tbsp of garlic powder
- 1 tsp of paprika
- 2 eggs
- 1 tsp of salt
- 1 tsp of pepper
- 1 tbsp avocado oil
- 2 cloves of garlic (minced)
- 2 stalks of green onion (whites and greens separated)
- 2 tbsp of gochujang
- 3 tbsp honey
- 3 tbsp ketchup
- 2 tbsp mirin
- 1 tbsp sesame oil
- Toasted sesame seeds (for garnish)
Instructions
- Preheat your Air Fryer to 380°F (193°C) for around 5 minutes.
- Prepare your chicken tenders by patting them dry with a paper towel.
- Set up your coating station with one bowl for eggs and another for the corn flakes mixture.
- Dunk each chicken tender in the egg and then roll in the corn flake mixture.
- Spray the air fryer basket with cooking spray, then lay the chicken in a single layer.
- Air fry for about 15-18 minutes, turning halfway through.
- Heat avocado oil in a small saucepan and sauté garlic and white parts of green onion.
- Stir in gochujang, honey, ketchup, mirin, and sesame oil, cooking until slightly thickened.
- Toss the cooked chicken in the sauce until well coated.
- Serve immediately, garnished with sesame seeds and green parts of the onion.
Notes
You can make this recipe gluten-free by using gluten-free corn flakes and checking the labels of the sauces.
- Prep Time: 15 minutes
- Cook Time: 20 minutes
- Category: Main Course
- Method: Air Frying
- Cuisine: Korean
Nutrition
- Serving Size: 2 tenders
- Calories: 300
- Sugar: 8g
- Sodium: 600mg
- Fat: 12g
- Saturated Fat: 2g
- Unsaturated Fat: 10g
- Trans Fat: 0g
- Carbohydrates: 30g
- Fiber: 1g
- Protein: 25g
- Cholesterol: 150mg
Keywords: Korean Fried Chicken, Air Fryer, Healthy Chicken Recipe
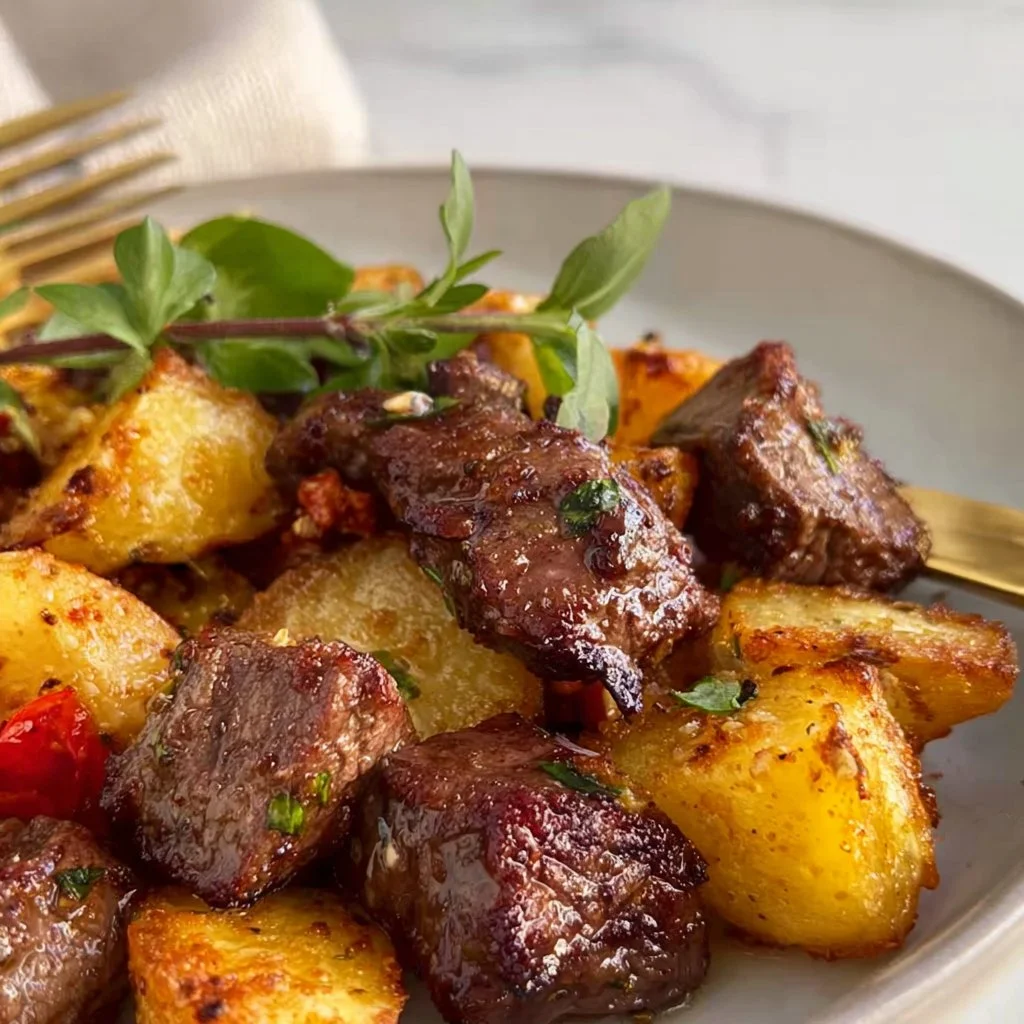
Air Fryer Cubed Steak & Crispy Potatoes
Air Fryer Cubed Steak & Crispy Potatoes: A Feast to Remember
Hey there, food lovers! Are you ready to take a trip down memory lane while savoring a delicious meal? Today, we’re diving into an irresistible comfort food that’s bound to warm your heart and fill your belly—Air Fryer Cubed Steak & Crispy Potatoes! This dish combines tender, flavorful cubed steak with perfectly crispy potatoes, all cooked to perfection in your trusty air fryer.
Now, you might be wondering, “Can cooking be both easy and satisfying?” Absolutely! When I started my culinary journey, I wanted to create meals that everyone—regardless of cooking skill—could whip up in their own kitchen. The air fryer makes this dream a reality, combining the ease of cooking with the unbeatable flavors of homemade fare. So grab your spatula and let’s create something magical!
Cooking isn’t just about following recipes; it’s about building memories and sharing love. Whenever I make this dish, I think of family dinners around the table, where stories were shared and laughter filled the air. Imagine the smell of juicy steak sizzling, complemented by the fragrant aroma of garlic and paprika wafting through your kitchen. Let me take you along on this tasty journey, where every bite is a delicious hug for your palate.
Now, whether you’re looking to impress a date, treat the family, or just indulge your own cravings, Air Fryer Cubed Steak & Crispy Potatoes is here to save the day. It’s hearty, wholesome, and downright fabulous. Ready? Let’s jump into my favorite memories involving this fantastic dish that holds a special spot in my heart.
Personal Story
Growing up, Sunday evenings were sacred in our household. After a long week, my parents would gather us all for a hearty family dinner—and without fail, cubed steak would be on the menu. My mom had a knack for making the most scrumptious versions of this dish, seasoning it with love and pairing it with crispy, golden potatoes. As a kid, there was nothing better than sitting around the table with my siblings, each forkful of tender steak bringing joy and togetherness.
I vividly remember one particular Sunday when a surprise storm knocked out the power. Instead of feeling defeated, my mom lit candles and pulled out our trusty camping stove. With laughter in the air and excitement building, we huddled in the kitchen as she masterfully cooked up her signature cubed steak and potatoes—power or no power. That night was magic. It wasn’t just about the food; it was about our family bond and resilience.
Now, I’ve taken those cherished memories and reimagined the dish in a quick and healthier way with the air fryer. This isn’t just a meal for me; it’s a bridge connecting past and present and a tribute to the joy food brings. Ready to replicate the magic? Let’s gather our ingredients!
Ingredients
Here’s everything you’ll need to whip up some Air Fryer Cubed Steak & Crispy Potatoes:
-
Cubed Steak
- Perfectly tender and easy to cook, cubed steak is an inexpensive cut of beef that’s great for quick meals. If you can’t find it, flank steak or sirloin can work as excellent substitutes. Just slice them into cubes.
-
Potatoes
- Choose your favorite: Russets, red, or Yukon Golds all work wonderfully. These spuds become crispy little nuggets of joy in the air fryer! Substitute with sweet potatoes for a healthier twist.
-
Olive Oil
- This is our magic ingredient! Olive oil enhances flavor while helping achieve that crispy texture. Feel free to use canola or avocado oil if you prefer.
-
Salt
- A good pinch of salt makes all the difference in elevating flavors. Sea salt or kosher salt works best—just remember to season well!
-
Black Pepper
- Freshly cracked black pepper adds that much-needed zing. If you’re feeling adventurous, try smoked paprika or chili flakes for added heat.
-
Garlic Powder
- A dash of garlic powder brings depth of flavor without the fuss of chopping garlic. Fresh garlic can also be used; just sauté it briefly before applying to the steak.
-
Paprika
- This beautiful spice brings a warm, smoky flavor to the party. Use sweet, smoked, or even hot paprika—experimenting is encouraged!
Are you excited? I know I am! Let’s get cooking.
Step-by-Step Instructions
-
Prepping the Ingredients
- Start by peeling your potatoes and cutting them into small cubes, about one inch in size. This ensures even cooking and maximum crispiness. Remember, the smaller the pieces, the more crunch you’ll get!
- Next, season your cubed steak with salt, pepper, garlic powder, and paprika. Ensure every piece is generously coated for that flavorful kick. Set both aside while you prepare the air fryer.
-
Preheating the Air Fryer
- Preheat your air fryer to 400°F (about 200°C). Preheating helps achieve that crispy exterior we all adore.
-
Tossing the Potatoes
- In a mixing bowl, toss your cubed potatoes with a tablespoon of olive oil, making sure they’re well-coated. Then, season with salt and pepper to taste. You might want to add a bit of paprika for a pop of color and flavor!
-
Air Frying the Potatoes
- Place the cubed potatoes in a single layer in the air fryer basket. Cook at 400°F for about 15 minutes. Don’t forget to shake the basket halfway through to ensure even crisping.
-
Preparing the Steak
- While your potatoes are cooking, drizzle the workout cubed steak with a little olive oil and give it another seating of salt, pepper, and paprika if desired. Let it sit for about 5 minutes so the seasoning infuses the meat.
-
Air Frying the Steak
- Once the potatoes are done, remove them and set aside. Now it’s time to cook the cubed steak! Place the seasoned steak in the air fryer basket in a single layer (you might need to do this in batches). Cook at 400°F for about 10-12 minutes. Make sure to flip them halfway through to ensure they cook evenly.
-
Checking for Doneness
- The internal temperature of the cubed steak should reach at least 145°F (63°C) for medium-rare. Just a quick check with a meat thermometer is all you need!
-
Final Touches
- Once cooked, let both the potatoes and steak rest for a few minutes. This will help lock in those juices and crispiness! Don’t rush this step!
Your Air Fryer Cubed Steak & Crispy Potatoes are now waiting to be plated—let’s get ready to serve!
Serving Suggestions
Now comes the fun part: plating! I love to serve this dish family-style, where everyone can dive in. Start with a generous portion of crispy potatoes at the bottom, and arrange the sliced cubed steak on top. Drizzle a little extra olive oil or sprinkle some fresh herbs, like parsley or chives, for a pop of color.
Consider serving this meal with a side of your favorite dipping sauce or a simple green salad. The cool, crisp salad complements the hearty, warm flavors perfectly. And guess what? Leftovers (if there are any) can also be salvaged well! Just store them in an airtight container, and you’re good to go.
Recipe Variations
Let your creativity flourish with these fun twists:
-
Spicy Steak & Potatoes: Add a teaspoon of cayenne pepper or chili powder to spice things up for those craving heat.
-
Cajun Flavor: Swap in Cajun seasoning for a zesty Southern twist that will make your taste buds dance!
-
Herb-Infused: Incorporate fresh herbs like thyme or rosemary for an aromatic flair. Toss it with the potatoes before air frying.
-
Cheesy Indulgence: Top with shredded cheese (like cheddar or mozzarella) in the last few minutes of cooking for a gooey, cheesy delight.
-
Vegetarian Option: Substitute the cubed steak with seasoned mushrooms or tofu for a delightful plant-based meal.
With these variations, you’ll always have a new way to enjoy this dish!
Chef’s Notes
I can tell you countless stories from my kitchen escapades, but let’s focus on this fantastic dish. Over time, I’ve experimented with various techniques for cooking cubed steak and potatoes, and I must say, the air fryer is a game-changer. It captures the essence of my mom’s recipe while saving time and minimizing oil.
Cooking memories are often delicious but sometimes amusing. I recall the first time I tried the steak-and-potato combo in my air fryer—let’s just say the smoke alarm had an unexpected but brief moment of fame! Now I have it down to a science.
FAQs and Troubleshooting
Q: What if my steak is tough?
- Overcooking can lead to tough steak. Make sure to monitor the cooking time closely and check for doneness with a meat thermometer. Resting the meat after cooking is crucial, too!
Q: Can I prepare this dish in advance?
- Yes! You can season the steak and potatoes beforehand and refrigerate them. When you’re ready to cook, just pop them into the air fryer directly from the fridge.
Q: What should I do if my potatoes aren’t crispy enough?
- If your potatoes are in a crowded air fryer basket, they may steam rather than crisp. Cook in smaller batches to get that wonderful crunchity-crunch you crave.
Q: Do you recommend marinating the steak?
- Absolutely! Marinating cubed steak for a few hours before cooking can really elevate the flavor profile. Just make sure to pat them dry before air frying for optimal crispiness!
Nutritional Info
Now, you might be wondering about the nutritional breakdown of our dish. Here’s a ballpark figure (per serving):
- Calories: ~350
- Protein: ~30g
- Carbohydrates: ~25g
- Fats: ~15g
These values will vary depending on ingredients and portion size, but know you’re enjoying a balanced plate that delights the senses. It’s comfort food that still respects your health goals—how awesome is that?
Final Thoughts
And there you have it, folks! Air Fryer Cubed Steak & Crispy Potatoes that bring together flavors of nostalgia and the modern twist of air frying. Every bite of this dish is a reminder of family dinners, laughter, and love. Such meals feed both body and soul, and I hope this recipe becomes a cherished part of your culinary repertoire.
So, the next time you’re in need of comfort food that’s quick and satisfying, don’t forget about this gem. Share it with your loved ones, or simply treat yourself. Remember, cooking is about making connections, one delicious meal at a time.
Thanks for spending this time with me in the kitchen! Here’s to creating more beautiful memories around the table—let’s feast! 🍽️💕
Print
Air Fryer Cubed Steak & Crispy Potatoes
- Total Time: 45 minutes
- Yield: 4 servings
- Diet: Carnivore
Description
A delightful comfort food that combines tender cubed steak with crispy potatoes, all prepared in an air fryer for a quick and satisfying meal.
Ingredients
- Cubed steak
- Potatoes
- Olive oil
- Salt
- Black pepper
- Garlic powder
- Paprika
Instructions
- Start by peeling your potatoes and cutting them into small cubes, about one inch in size.
- Next, season your cubed steak with salt, pepper, garlic powder, and paprika.
- Preheat your air fryer to 400°F (about 200°C).
- In a mixing bowl, toss your cubed potatoes with a tablespoon of olive oil.
- Place the cubed potatoes in a single layer in the air fryer basket. Cook at 400°F for about 15 minutes.
- While your potatoes are cooking, drizzle the cubed steak with a little olive oil and season again.
- Once the potatoes are done, remove them and place the seasoned steak in the air fryer basket.
- Cook the cubed steak at 400°F for about 10-12 minutes, flipping halfway through.
- Check the internal temperature of the steak to ensure it reaches at least 145°F (63°C).
- Let both the potatoes and steak rest for a few minutes before serving.
Notes
For a spicy twist, consider adding cayenne pepper or trying different seasonings like Cajun spice.
- Prep Time: 15 minutes
- Cook Time: 30 minutes
- Category: Main Course
- Method: Air Frying
- Cuisine: American
Nutrition
- Serving Size: 1 serving
- Calories: 350
- Sugar: 2g
- Sodium: 400mg
- Fat: 15g
- Saturated Fat: 4g
- Unsaturated Fat: 8g
- Trans Fat: 0g
- Carbohydrates: 25g
- Fiber: 3g
- Protein: 30g
- Cholesterol: 70mg
Keywords: air fryer, cubed steak, crispy potatoes, comfort food, easy recipe