Beginner-Friendly 5-Ingredient No-Bake Coconut Sago Dessert Cups
Indulge in Sweet Bliss with Coconut Sago Dessert Cups
Hey there, fellow food lovers! Today, I’m beyond excited to share a delightful culinary treat that’s sure to tickle your taste buds – Coconut Sago Dessert Cups! Now, if you’ve never tasted this creamy, tropical dessert, you’re in for a treat. But fear not, because whether you’ve mastered the art of sago cooking or are navigating the kitchen like a curious cat, I’ll guide you through every step.
Picture this: a warm summer day, the sun shining bright, and the smell of fresh coconut wafting through the air. That was the setting of my first encounter with sago – a memory tucked away, wrapped in nostalgia and drizzled with sweet memories. I stumbled upon this luscious dessert at a local food market while I was traveling, and honestly? It was love at first bite!
Coconut sago is light, refreshing, and the perfect palate cleanser after any meal. Plus, it’s super easy to whip up at home! Today, I’ll share how to create these little cups of joy, complete with tips and tricks to make them your own.
So grab your apron, channel your inner chef, and let’s dive into the wonderful world of Coconut Sago Dessert Cups!
A Sweet Memory with Sago
Let me take you on a little journey back to a sunny afternoon in my childhood. I was at my grandmother’s house, bursting with the glee only a five-year-old can muster. She was a wizard in the kitchen, and while she had her classic recipes down to a science, there was one magical dish that stood out: her Coconut Sago.
As she stirred the pot, the sweet aroma of coconut filled the kitchen, and every time she ladled the warm mixture into bowls, I couldn’t help but feel a sense of anticipation. I remember the thrill of adding fresh mango slices on top, creating a beautiful contrast of colors. To this day, those dessert cups represent comfort, warmth, and the joy of sharing delicious food with loved ones. It’s no wonder I’ve been inspired to recreate this experience for all of you foodies!
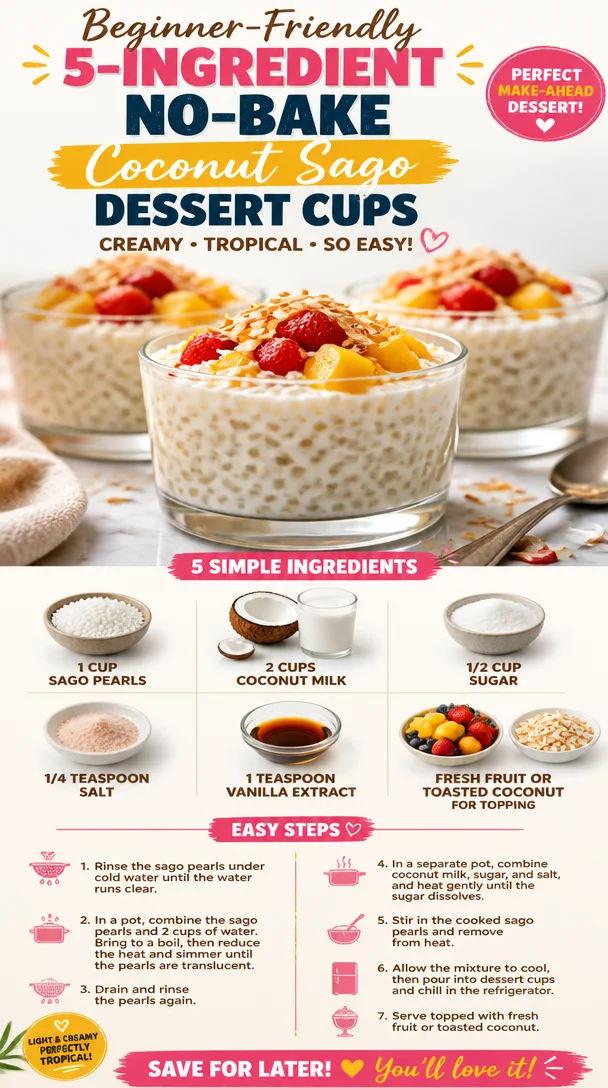
Ingredients
Now that we’re all lined up for a delightful culinary adventure, let’s talk about the star ingredients. Here’s what you’ll need:
-
1 cup sago pearls
These tiny, translucent pearls are made from tapioca, and they bring a wonderful texture to the dessert. You can substitute them with tapioca pearls if needed, but keep in mind that cooking times may vary! -
2 cups coconut milk
Creamy and dreamy, coconut milk adds richness and a tropical twist. If you’re looking for a dairy-free option, this is your go-to! (Note: you can also use light coconut milk for a lighter version). -
1/2 cup sugar
Sweetness is key! You can adjust the sugar quantity based on your preference. Feel free to substitute with coconut sugar for deeper flavor or a sugar alternative like agave nectar for a low-calorie option. -
1/4 teaspoon salt
A pinch of salt enhances all those sweet flavors and keeps the dessert balanced. Trust me, it’s a game-changer! -
1 teaspoon vanilla extract
This will elevate the flavors and add warmth. You can also use almond extract for a different twist. -
Fresh fruit or toasted coconut for topping
This is where you can really get creative! Top your sago cups with seasonal fruit, granola, or even a sprinkle of toasted coconut flakes for extra crunch and flavor.
Step-by-Step Instructions
Now that we have our ingredients ready, let’s get cooking! Follow these steps to create your own Coconut Sago Dessert Cups:
-
Rinse the Sago Pearls
Start by rinsing the sago pearls under cold water. This helps to remove excess starch, which can make your dessert gummy. Give them a good swish and let them drain. -
Cook the Sago
In a medium-sized pot, bring 3 cups of water to a gentle boil. Add the rinsed sago pearls and reduce the heat to a simmer. Cook them for about 15-20 minutes, stirring occasionally, until they turn translucent and have a slightly chewy texture. If they’re not fully cooked, simply give them a few more minutes. They should be tender but not mushy – just like your favorite al dente pasta! -
Prepare the Coconut Mixture
Once the sago pearls are ready, drain them in a fine sieve and transfer them back to the pot. Pour in the 2 cups of coconut milk and stir. Now add the sugar, salt, and vanilla extract. This is where the magic happens! Cook this mixture on low heat, stirring continuously until the sugar dissolves. It should be thick and creamy – think of it as a warm hug for your taste buds. -
Chill the Dessert Cups
After about 5 minutes on low heat, remove the pot from the stove and let the sago cool down for a few minutes. Once it’s slightly cooler, spoon the mixture into individual dessert cups or bowls. Cover them with plastic wrap or lids and place them in the refrigerator for at least 2 hours, or until set. -
Top and Serve
When you’re ready to serve, take the cups out of the fridge and top them with your choice of fresh fruit or toasted coconut. Get creative! You can add sliced mango, strawberries, kiwi, or even some edible flowers for that Instagram-worthy look.
Serving Suggestions
These Coconut Sago Dessert Cups are all about simplicity and elegance. Serve them chilled in clear glass cups to showcase their beautiful layers. You could also garnish each cup with a sprig of mint for a pop of color.
For an added touch, consider drizzling some extra coconut milk or a quick homemade caramel sauce around the rim of the cup before adding the sago mixture. This enhances both the visual appeal and flavor.
If you’re throwing a gathering, why not make a sago dessert bar? Set out an array of toppings, including fresh fruits, nuts, and various syrups, allowing your guests to customize their own dessert cups!
Recipe Variations
Want to put your own twist on these delightful cups? Here are a few fun variations you might try:
- Tropical Bliss: Incorporate crushed pineapple into the coconut mixture for a fruity surprise.
- Chocolate Delight: Add cocoa powder to the coconut mixture, stir well, and enjoy a chocolatey spin on the classic dessert.
- Matcha Magic: Mix in some matcha powder for a vibrant green hue and earthy flavor.
- Nutty Coconut: Fold in some almond butter or peanut butter before chilling for that extra creamy, nutty goodness.
- Vegan Vibes: Use agave nectar instead of sugar and ensure your coconut milk is 100% vegan.
Chef’s Notes
Oh, the stories I could tell you from the kitchen! The first time I made these Coconut Sago Dessert Cups, let’s just say it was an adventure all on its own. I was so eager to impress my friends that I accidentally added too much salt (oops!).
Needless to say, my friends were very polite about trying it, and I learned my lesson on recipe testing! Over the years, I’ve tweaked and perfected this recipe, ensuring it’s not just delicious but also a breeze to whip up. Whether you’re celebrating a milestone or simply indulging on a quiet evening, I guarantee these little dessert cups will bring you joy.
FAQs and Troubleshooting
-
Why are my sago pearls not cooking properly?
Sometimes, they need a little more time. Just keep simmering them on low heat. If you’re using older sago, it might have lost its ability to cook through, so ensure you’re using fresh pearls. -
How can I prevent my sago from becoming too sticky?
A good rinse before cooking removes excess starch, which helps. Also, keep stirring them while cooking to prevent clumping. -
Can I make this dessert ahead of time?
Absolutely! These cups can be made a day in advance, making them perfect for parties or gatherings. Just be sure to keep them in the fridge! -
What should I do if my mixture is too thick?
If you find the mix is too thick once cooled, simply add a splash more coconut milk and stir well to loosen it up.
Nutritional Info
Now, let’s chat about the nutritional side of these delightful cups. Each serving (approximately 1/2 cup) offers a treat that’s not only delicious but also packed with some nutritional benefits.
- Calories: About 200-250 (depending on the toppings and sugar used)
- Healthy Fats: Thanks to the coconut milk, these cups provide healthy fats that are great for energy.
- Fiber: Adding fresh fruits on top brings natural fiber, which aids digestion and leaves you feeling satisfied.
Keep in mind that portion control is key here (though it’s hard to resist going for seconds).
Final Thoughts
And there you have it, friends! A delectable journey to savor Coconut Sago Dessert Cups, infused with warmth, memories, and a sprinkle of creativity. Cooking shouldn’t be a chore; it’s all about bringing joy to yourself and those around you.
So next time you’re looking for something special to delight in, consider whipping up these heavenly sago cups. They carry a piece of my heart, and I hope they will become a cherished part of your kitchen adventures as well!
Now, go on, gather your ingredients, and let’s make some sweet memories together! Happy cooking! 🍽️✨
Print
Coconut Sago Dessert Cups
- Total Time: 135 minutes
- Yield: 4 servings 1x
- Diet: Vegan
Description
A light and refreshing coconut sago dessert, perfect for warm days and gatherings.
Ingredients
- 1 cup sago pearls
- 2 cups coconut milk
- 1/2 cup sugar
- 1/4 teaspoon salt
- 1 teaspoon vanilla extract
- Fresh fruit or toasted coconut for topping
Instructions
- Rinse the sago pearls under cold water to remove excess starch.
- Cook the sago in boiling water for about 15-20 minutes until translucent and slightly chewy.
- Prepare the coconut mixture by combining cooked sago, coconut milk, sugar, salt, and vanilla in a pot over low heat.
- Chill the mixture in individual cups for at least 2 hours until set.
- Top with fresh fruit or toasted coconut before serving.
Notes
For added creativity, consider mixing in pineapple, cocoa powder, or matcha for unique flavors.
- Prep Time: 15 minutes
- Cook Time: 20 minutes
- Category: Dessert
- Method: Chilling
- Cuisine: Asian
Nutrition
- Serving Size: 1/2 cup
- Calories: 200
- Sugar: 10g
- Sodium: 100mg
- Fat: 8g
- Saturated Fat: 7g
- Unsaturated Fat: 1g
- Trans Fat: 0g
- Carbohydrates: 30g
- Fiber: 2g
- Protein: 2g
- Cholesterol: 0mg
Keywords: coconut, sago, dessert, vegan, tropical, summer treats
Coconut Tapioca Pudding
Coconut Tapioca Pudding: A Sweet Journey to Simplicity
Hey there, fellow food enthusiasts! Welcome back to Feastical! Today, we’re diving into a delightful dessert that’s as comforting as a favorite blanket on a chilly day—Coconut Tapioca Pudding. This dish is not just a treat for your taste buds; it’s a nostalgia-infused journey that brings back memories of simpler times when dessert was all about sweet simplicity and indulgent satisfaction. Get ready to whip up a batch, and allow my storytelling to whet your appetite!
A Sweet Memory
Let me take you back to my childhood kitchen, back when my grandmother would pull out her treasured recipe book every Sunday. She had a magical way of transforming ordinary ingredients into something extraordinarily delicious. One recipe that stood out was her coconut tapioca pudding, a dish that would fill the house with a sweet, nutty aroma that hinted at the joy to come.
I vividly remember the day she enlisted me as her sous-chef. With my tiny hands, I’d measure and pour while she stirred the creamy concoction on the stove, sharing stories of her own childhood and the flavors that shaped her life. The best part? The texture of the small tapioca pearls! They felt playful between my fingers, reminding me that cooking is not just about the final product but also about the joy in the process.
Fast forward to today, every time I make this comforting pudding, it evokes those precious memories of time spent with my grandma—stories shared and laughter exchanged around the kitchen table. And now, I’m thrilled to share this simple yet satisfying recipe with you.
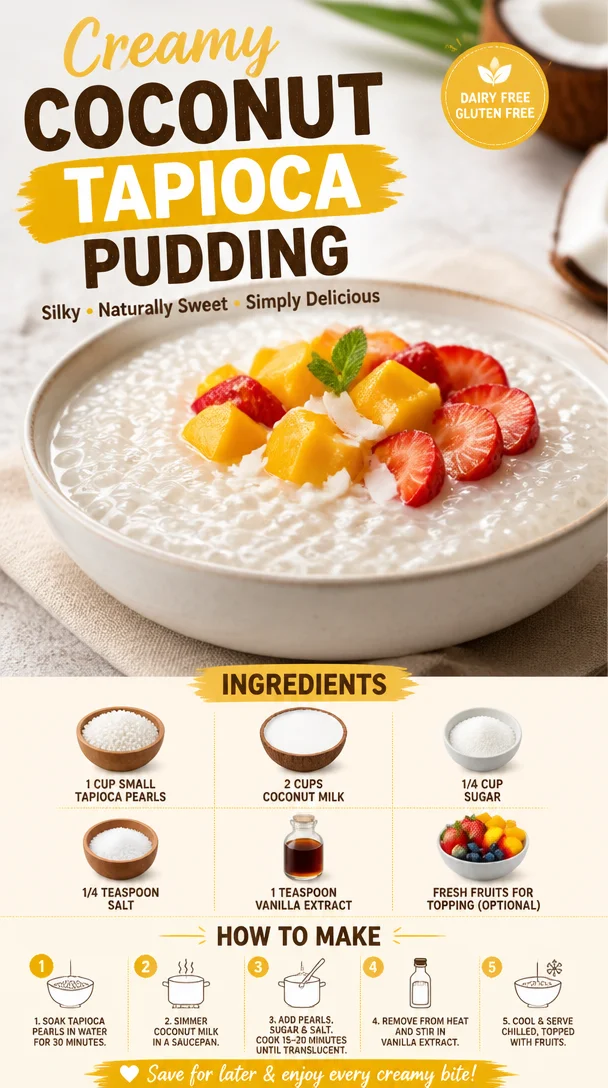
Ingredients
Here’s what you’ll need to create this dreamy coconut tapioca pudding:
-
1 cup small tapioca pearls
These little gems serve as the star of the show! Small tapioca pearls are naturally gluten-free and add a delightful chewy texture. If you can’t find them, you can use instant tapioca, but the texture will be different. For a more adventurous option, try using sago pearls! -
2 cups coconut milk
This is where the magic happens! Coconut milk brings a rich creaminess and a tropical twist to your dessert. If you’re looking for a lighter version, feel free to use light coconut milk or even unsweetened almond milk for a different flavor profile. -
1/4 cup sugar
Sweetness, of course, is key! You can adjust the sugar to your liking. If you prefer a natural sweetener, honey or maple syrup will work, but you’ll want to adjust the quantities to taste. -
1/4 teaspoon salt
A pinch of salt enhances all the flavors, balancing the sweetness beautifully. If you like a deeper flavor, consider using sea salt. -
1 teaspoon vanilla extract
For an aromatic touch! If you’re feeling adventurous, you can infuse this pudding with other flavors—like almond extract or even a splash of rum. -
Fresh fruits for topping (optional)
Topping it with fresh fruits like mango, kiwi, or berries not only enhances the flavor but also adds a beautiful pop of color and nutrition. Use whatever fruits you love or that are in season!
Step-by-Step Instructions
Now that we have our ingredients, let’s get cooking! Follow these steps to make your own coconut tapioca pudding:
-
Prep the Tapioca Pearls
Start by rinsing the tapioca pearls with cold water in a fine-mesh sieve. This helps them release some of the excess starch and ensures they cook evenly. No one likes sticky tapioca! -
Combine Ingredients
In a medium saucepan, whisk together the coconut milk, sugar, and salt. Place over medium heat and stir occasionally until the sugar is dissolved and the mixture is warm—but not boiling. This step is where the sweet aromas start to fill your kitchen! -
Add the Tapioca
Once the coconut mixture is warm, gently stir in the rinsed tapioca pearls. Keep stirring occasionally over medium heat. You’ll notice the pearls start to absorb the liquid and become transparent—this is a sign they’re cooking! It usually takes about 15-20 minutes of cooking (depending on the brand), so keep an eye on them! -
Thickening the Pudding
Once the tapioca pearls are cooked and the pudding has thickened (it should coat the back of a spoon), remove the saucepan from the heat. Stir in the vanilla extract. Take a moment and breathe in that wonderful smell—it’s heavenly, right? -
Chill the Pudding
Transfer the pudding to serving cups or bowls and let it cool at room temperature for about 30 minutes. Then, cover them with plastic wrap and refrigerate for at least 2 hours. Chilling allows the pudding to firm up, making it easier to serve. -
Serve and Enjoy
Once chilled, it’s time to plate! Garnish each serving with fresh fruits, a sprinkle of toasted coconut flakes, or even a drizzle of honey for an extra touch of sweetness. Don’t forget to grab a spoon and dig in!
Serving Suggestions
Presentation is everything, my friends! When serving your coconut tapioca pudding, consider using clear glass cups or dessert bowls to showcase that beautiful pudding and toppings. Layering your pudding with fruits can create an eye-catching effect that’ll impress your family or guests. For an extra touch of flair, sprinkle a few mint leaves on top for that fresh finish. Not only does it look good, but it also adds a delightful aroma!
Recipe Variations
Ready to get creative? Here are some fun twists and variations on this classic dessert:
-
Matcha Coconut Tapioca: Add a teaspoon of matcha powder to the coconut milk mixture while it’s warming for a vibrant green hue and an earthy flavor.
-
Chocolate Coconut Tapioca: Stir in some cocoa powder or melted dark chocolate after cooking to elevate your pudding into a chocolate lover’s dream!
-
Tropical Rainbow: Mix in diced tropical fruits (like pineapple and papaya) into the pudding right before chilling for a burst of color and flavor throughout.
-
Nutty Delight: Fold in chopped nuts (like pistachios or almonds) once it’s cooled for added crunch and flavor.
-
Dairy-Free Chocolate Version: Substitute coconut milk with almond or cashew milk and then mix in cocoa for a dairy-free delight.
Chef’s Notes
I’ll let you in on a little secret—this pudding gets better with time! The flavors meld beautifully if you let it sit for a day in the fridge. Just be sure to give it a good stir before serving, and don’t be alarmed if the consistency thickens a bit more. Remember, cooking is all about experimentation and making the dish your own.
Speaking of kitchen stories, I once tried adding cardamom to a batch, thinking it’d provide a unique twist. Let’s just say my taste buds couldn’t handle that unexpected warmth! Experimentation can lead to incredible breakthroughs or a few giggles in the kitchen.
FAQs and Troubleshooting
Q: Why are my tapioca pearls not cooking properly?
A: If your pearls aren’t cooking through, double-check that you’re using small tapioca and not the instant kind. Remember to keep stirring and simmering gently; patience is key!
Q: Can I use regular milk instead of coconut milk?
A: Sure! You can substitute with whole milk or a non-dairy option, but remember, this changes the flavor profile. Coconut milk gives that tropical flair you crave.
Q: How can I make the pudding thicker?
A: If you want a thicker pudding, cook it a bit longer, or add an extra tablespoon of tapioca pearls. It’s all about finding that sweet spot for your personal preference.
Q: Can I freeze this pudding?
A: While it’s not ideal to freeze pudding because it can change the texture, you could store it in the fridge for 3-4 days if covered properly.
Nutritional Info
This delectable coconut tapioca pudding not only satisfies your sweet tooth but also brings some nutritional benefits to the table. It’s naturally gluten-free and can easily be made dairy-free, accommodating a range of dietary needs. Made with coconut milk, it’s rich in healthy fats and provides quick energy. Plus, if you load it up with fruits, you’re boosting the fiber, vitamins, and antioxidants right in your dessert!
Here’s a rough nutritional information breakdown per serving (with fruits):
- Calories: 210-250
- Protein: 3g
- Fat: 12g
- Carbohydrates: 28g
- Fiber: 2g
- Sugar: 14g
Final Thoughts
As we wrap up this delightful culinary adventure, I hope you’re inspired to give this coconut tapioca pudding a try! It’s a dish that encompasses the joy of cooking, the warmth of cherished memories, and the sweetness of indulging in something that feels like home.
Whether you make it for yourself, share it with friends, or whip it up for a family gathering, remember that the heart of cooking lies not just in the ingredients but in the love you put into it. So grab your ingredients, channel your inner chef, and let’s create some edible joy together!
Thank you for stopping by Feastical! Until next time, happy cooking and happy eating!
Print
Coconut Tapioca Pudding
- Total Time: 2 hours 30 minutes
- Yield: 4 servings 1x
- Diet: Gluten-Free
Description
A comforting and nostalgic coconut tapioca pudding that brings back memories of simpler times and indulgent satisfaction.
Ingredients
- 1 cup small tapioca pearls
- 2 cups coconut milk
- 1/4 cup sugar
- 1/4 teaspoon salt
- 1 teaspoon vanilla extract
- Fresh fruits for topping (optional)
Instructions
- Prep the tapioca pearls by rinsing them with cold water in a fine-mesh sieve.
- Combine the coconut milk, sugar, and salt in a medium saucepan over medium heat, stirring until the sugar dissolves.
- Add the rinsed tapioca pearls to the warm coconut mixture and stir occasionally as they cook, about 15-20 minutes, until transparent.
- Thicken the pudding by removing it from heat once it coats the back of a spoon, then stir in the vanilla extract.
- Chill the pudding in serving cups for at least 2 hours after cooling at room temperature for 30 minutes.
- Serve and enjoy with toppings like fresh fruits, toasted coconut flakes, or honey.
Notes
This pudding tastes best after a day in the fridge, allowing the flavors to meld. Stir before serving.
- Prep Time: 10 minutes
- Cook Time: 20 minutes
- Category: Dessert
- Method: Stovetop
- Cuisine: Asian
Nutrition
- Serving Size: 1 serving
- Calories: 230
- Sugar: 14g
- Sodium: 100mg
- Fat: 12g
- Saturated Fat: 10g
- Unsaturated Fat: 2g
- Trans Fat: 0g
- Carbohydrates: 28g
- Fiber: 2g
- Protein: 3g
- Cholesterol: 0mg
Keywords: Coconut Tapioca, Dessert, Gluten-Free, Pudding, Easy Dessert
Crustless Coconut Pie
Crustless Coconut Pie: The Ultimate Comfort Dessert
Hey food lovers! Today, I’m whipping up something absolutely delightful that guarantees to make your taste buds dance: a warm and cozy Crustless Coconut Pie. If you’re anything like me, the smell of coconut baking in the oven evokes memories of sunny days, family gatherings, and lazy afternoons. It’s one of those desserts that feel like a sweet embrace when you’re having a rough day.
Now, coconut pie might sound daunting to make, especially without a crust, but trust me—this recipe is as straightforward as it gets! In fact, I created it to celebrate simplicity, making it perfect not just for seasoned bakers but also for those just discovering their love for the kitchen. Think about it: all the deliciousness of a traditional coconut pie minus the time-consuming crust-making process. What’s not to love?
Whether you’re preparing for a family feast or just want a slice of sunshine on a Tuesday, this pie has got you covered. You know that feeling when you bite into something and it takes you back? Every slice of this Crustless Coconut Pie does just that. So grab your whisk, preheat that oven, and let’s dive into this sweet adventure that’s sure to bring warmth to your kitchen and happiness to your heart!
Personal Story
Let me take you back in time for a moment—a sunny Saturday afternoon in my grandmother’s kitchen. The scent of freshly baked coconut pie mixed with laughter and chatter was the golden backdrop of my childhood. Grandma would have me by her side, my small hands struggling to keep up as she danced around the kitchen, mixing ingredients with phenomenal ease.
One of my fondest memories involved making her famous coconut pie. It was her go-to dish for family gatherings, and with every slice, she served a sprinkle of love, making each pie even more special. As we prepped the ingredients, I remember her saying, “Honey, cooking is an art, but dessert is magic!” How true that was! The coconut pie was like a spell cast over everyone present—a unique blend of sweet, creamy, and deliciously rich that seemed to make the world a brighter place.
Watching her work her magic inspired me to take on cooking as a passion—something I’m thrilled to share with all of you through this recipe. Inspired by Grandma, this Crustless Coconut Pie will leave your loved ones asking for seconds and recounting fond memories for years to come.
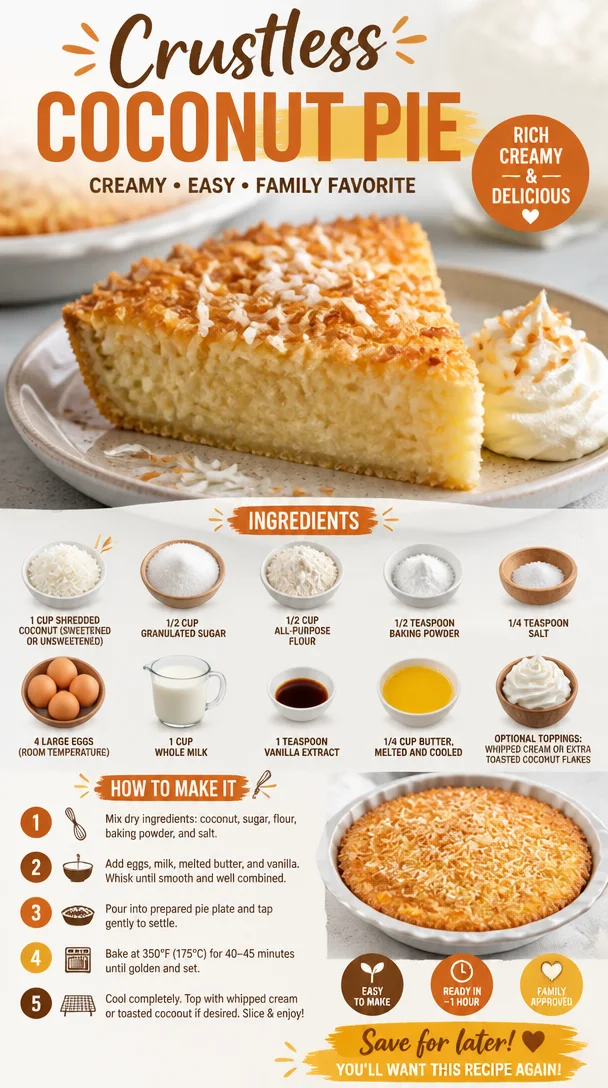
Ingredients
Here’s a rundown of what you’ll need to create this delightful dessert masterpiece.
-
1 cup shredded coconut (sweetened or unsweetened)
The star of the show! I usually go for unsweetened coconut, allowing the natural flavor to shine. Don’t worry; you can easily swap this with chocolate chips for a twist! -
1/2 cup granulated sugar
Sweetness is key, but you can substitute with coconut sugar for a more caramel-like flavor or use a sugar substitute for a low-calorie option. -
1/2 cup all-purpose flour
This helps to bind everything together. If you’re looking for gluten-free options, almond flour or coconut flour can work great, but you may need to adjust the quantities. -
1/2 teaspoon baking powder
This little guy adds some volume, so your pie has that fluffy texture we all adore. -
1/4 teaspoon salt
A pinch of salt intensifies the flavors, balancing the sweetness out beautifully. -
4 large eggs (room temperature)
Eggs provide structure and moisture. Room temperature helps them blend in more smoothly, giving the pie that lovely custard-like filling. -
1 cup whole milk
Creamy is the name of the game! You can swap this with coconut milk to enhance the coconut flavor further or almond milk if you prefer a lighter pie. -
1 teaspoon vanilla extract
This adds a warm, comforting note to your pie, enhancing the overall flavor profile. -
1/4 cup butter, melted and cooled
Richness alert! If you’re looking for a dairy-free alternative, melted coconut oil works wonders here too. -
Optional toppings: whipped cream or extra toasted coconut flakes
Because who doesn’t love a little something extra? Feel free to get creative!
Step-by-Step Instructions
Let’s get those baking gloves on and dive into the deliciousness!
-
Preheat the Oven: Start by preheating your oven to 350°F (175°C). This is crucial for the perfect bake!
-
Prep Your Baking Dish: Grease a 9-inch pie dish with a little butter or non-stick cooking spray. This simple step will go a long way in ensuring your beautiful pie doesn’t stick.
-
Mix Dry Ingredients: In a medium bowl, whisk together the shredded coconut, granulated sugar, flour, baking powder, and salt. This guarantees even distribution of the dry ingredients, ensuring that every bite of your pie is bursting with flavor.
-
Prepare Wet Ingredients: In another bowl, beat the eggs until they’re a lovely golden color. Add the milk, vanilla extract, and melted butter while whisking. This combination is where the magic happens—it will come together beautifully!
-
Combine Ingredients: Slowly incorporate the dry mixture into the wet mixture. Don’t overmix; just stir until it’s well combined. You’ll see those scrummy coconut flakes throughout—yum!
-
Pour Into Dish: Gently pour the mixture into your prepared pie dish, making sure the coconut is evenly spread throughout.
-
Bake: Pop it in the oven and let it bake for about 45-50 minutes. You know it’s done when the top is golden brown, and a toothpick inserted in the center comes out clean. Pro tip: If the top is browning too quickly, you can cover it loosely with aluminum foil.
-
Let it Cool: Once done, remove from the oven and let it cool for at least 15 minutes—you can let it cool longer if you want it to set perfectly. It can be enjoyed warm or chilled, depending on your preference!
Serving Suggestions
Now that your Crustless Coconut Pie is gorgeous and golden, you might be wondering how to serve it up. I recommend cutting it into generous slices and placing them on a chic dessert plate. A dollop of whipped cream on top adds an extra flair—who can resist that creaminess?
For garnish, sprinkle some toasted coconut flakes on top for a bit of texture and a beautiful presentation. Serve it alongside a steaming cup of coffee or a refreshing iced tea on a warm day for an utterly blissful experience.
Recipe Variations
Feeling adventurous? Here are a few creative twists to make this coconut pie your very own:
-
Pineapple Coconut Pie: Add 1 cup of crushed pineapple (drained) for a tropical touch!
-
Chocolate Coconut Pie: Mix in 1/2 cup of chocolate chips for that luscious chocolate-coconut combo that’ll leave you craving more.
-
Coconut Lime Pie: Add the zest of 1 lime and a little lime juice for a refreshing zing—like summer in a slice!
-
Gluten-Free Version: Substitute the all-purpose flour with a gluten-free blend to ensure everyone can enjoy this treat!
-
Vegan Coconut Pie: Replace the eggs with flax eggs and use almond or oat milk instead of whole milk. Don’t forget to choose a plant-based butter!
Chef’s Notes
While perfecting this Crustless Coconut Pie, I’ve had my fair share of triumphs and disasters! There was that one time I got a little too excited and added a whole bag of coconut. Let’s just say, “coconut soup” isn’t quite what I was aiming for.
Seriously, though, I’ve learned that keeping it simple is the best way to go. Each batch has brought back happy memories of my grandma, reminding me that the best recipes are the ones made with love. This pie has evolved into a staple at family gatherings, each time reminding us of the joy and sweetness of sharing a meal together.
FAQs and Troubleshooting
Q: What if my pie doesn’t set?
A: If your pie is still jiggly in the center, give it more time in the oven. Sometimes it can take longer, depending on your oven, so just keep an eye on it!
Q: Can I make this ahead of time?
A: Absolutely! Make it a day in advance and chill it in the fridge. It often tastes even better after a night of resting.
Q: How long will leftovers last?
A: Store any leftovers in an airtight container in the fridge for up to 3-5 days—if it lasts that long!
Q: Can I freeze this pie?
A: Yes! Wrap it tightly in plastic wrap, then foil, and store it in the freezer for up to 2 months. Let it thaw in the fridge before serving.
Nutritional Info
For those keeping an eye on health while savoring their treats, here’s a quick breakdown of the nutritional info (per slice, based on 8 servings):
- Calories: 220
- Protein: 4g
- Total Fat: 10g
- Saturated Fat: 5g
- Carbohydrates: 30g
- Fiber: 2g
- Sugar: 14g
Remember, indulging in dessert is all about balance—enjoy every moment!
Final Thoughts
And there you have it—a Crustless Coconut Pie that’s a breeze to make and utterly delicious to eat! Whether you’re baking for a special occasion or just because it’s Tuesday, this pie is bound to uplift your spirits and spread joy.
As you dig into your creation, take a moment to appreciate the simple beauty of cooking; it’s a journey full of flavors, aromas, and memories. I hope you find as much joy in making this pie as I do, and may it become a cherished recipe worth revisiting time and time again.
Now go ahead, gather your friends and family, slice up that pie, and make some memories! And don’t forget to share your own kitchen stories with me—I would love to hear how you made this recipe your own! Happy baking!
Print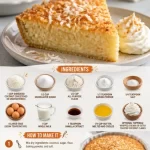
Crustless Coconut Pie
- Total Time: 65 minutes
- Yield: 8 servings 1x
- Diet: Vegetarian
Description
A warm and cozy Crustless Coconut Pie that’s easy to make and evokes sweet memories.
Ingredients
- 1 cup shredded coconut (sweetened or unsweetened)
- 1/2 cup granulated sugar
- 1/2 cup all-purpose flour
- 1/2 teaspoon baking powder
- 1/4 teaspoon salt
- 4 large eggs (room temperature)
- 1 cup whole milk
- 1 teaspoon vanilla extract
- 1/4 cup butter, melted and cooled
- Optional toppings: whipped cream or extra toasted coconut flakes
Instructions
- Preheat the oven to 350°F (175°C).
- Prep a 9-inch pie dish by greasing it.
- Mix dry ingredients in a bowl: shredded coconut, sugar, flour, baking powder, and salt.
- Prepare wet ingredients in another bowl by beating the eggs and mixing in milk, vanilla, and melted butter.
- Combine the dry mixture with the wet mixture until just mixed.
- Pour the mixture into the prepared pie dish.
- Bake for 45-50 minutes until golden brown.
- Let cool for at least 15 minutes before serving.
Notes
For a twist, try adding crushed pineapple or chocolate chips.
- Prep Time: 15 minutes
- Cook Time: 50 minutes
- Category: Dessert
- Method: Baking
- Cuisine: American
Nutrition
- Serving Size: 1 slice
- Calories: 220
- Sugar: 14g
- Sodium: 150mg
- Fat: 10g
- Saturated Fat: 5g
- Unsaturated Fat: 4g
- Trans Fat: 0g
- Carbohydrates: 30g
- Fiber: 2g
- Protein: 4g
- Cholesterol: 100mg
Keywords: coconut pie, easy dessert, comfort food