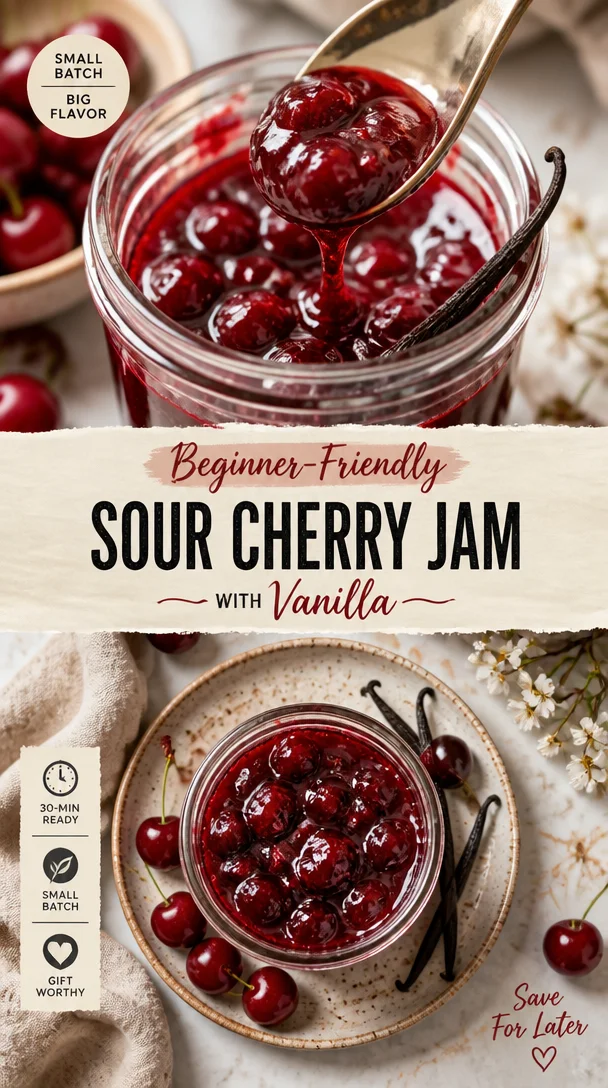
Beginner-Friendly Small-Batch Sour Cherry Jam with Vanilla
Easy Small Batch Sour Cherry Jam with Vanilla
Hey there, fellow foodies! Are you ready to embark on a delightful kitchen adventure that will bring a little sunshine into your life? Let’s be real; there’s something truly magical about homemade jam. It’s like capturing the essence of summer in a jar and spreading it on your morning toast! Today, I’m thrilled to share my Easy Small Batch Sour Cherry Jam with Vanilla recipe. This is not just any jam—it’s a flavor explosion that combines the tangy goodness of sour cherries with the warm embrace of vanilla.
Jam-making might sound like a daunting task, but trust me, it’s way simpler than it seems! Plus, this small batch recipe means you won’t need to commandeer a whole day—or your grandma’s vintage preserving pots. Just a little time and love, and you’ll be rewarded with a delicious, homemade treat that’s perfect for breakfast, snacks, desserts, or even just a spoonful right out of the jar!
Imagine waking up in the morning to the enticing aroma of freshly made jam wafting through your kitchen. Picture drizzling this luscious delight over pancakes, slathering it on a warm biscuit, or mixing it into yogurt for a quick snack. With the addition of fragrant vanilla, your sour cherry jam will take on a flavor profile that is both comforting and luxurious. So, roll up your sleeves, gather your ingredients, and let’s dive into this jam-making journey together!
Personal Story
Ah, sour cherry season! It evokes some of my fondest childhood memories. Growing up, my grandparents had a sprawling garden filled with fruit trees that were nothing short of a seasonal paradise. Whenever the sour cherries came into their prime, my family would gather for a cherry-picking extravaganza. Armed with nothing but our enthusiasm and the occasional basket, we’d traverse the branches, excitedly plucking the ruby-red gems that hung tantalizingly in the sun.
One particular summer, my grandma decided to turn our cherry bounty into homemade jam. The process felt almost magical as we watched the vibrant fruit transform into a thick, glossy concoction bubbling away on the stove. I still remember the warmth of her kitchen, bustling with the sound of laughter, the aroma of bursting cherries, and the melodic pop of the jars sealing. It was one of those beautiful family moments that made me realize how food connects us—the joy of sharing and the satisfaction of creating something delicious together.
Now, every time I whip up a batch of sour cherry jam, it brings back those cherished memories of family, fun, and flavors. That’s why I’m so excited to share this easy, small-batch recipe with you. It might just inspire a few tasty memories of your own!
Ingredients
To whip up your very own Easy Small Batch Sour Cherry Jam with Vanilla, you’ll need the following ingredients:
-
2 cups (about 300g) sour cherries, pitted and fresh or frozen
Sour cherries have a unique tartness that makes them ideal for jams. If you can’t find fresh ones, frozen sour cherries work wonderfully too! Just make sure to thaw and drain them before using. -
3/4 cup (150g) granulated sugar
Sugar is essential for sweetness and also acts as a preservative. You can substitute with other sweeteners like honey or maple syrup, but keep in mind that this might change the consistency and flavor. -
1 tablespoon (15ml) fresh lemon juice
Lemon juice helps enhance the flavors and provides pH balance for proper gel formation. If you don’t have fresh lemons, bottled lemon juice will work just as well. -
1 whole vanilla bean, split lengthwise and seeds scraped out (or 1 teaspoon pure vanilla extract)
Vanilla adds a luxurious flavor profile that complements the tart cherries beautifully. If you’re using extract, opt for pure rather than imitation for the best flavor. -
1/4 cup (60ml) water
Water helps in the cooking process, allowing the cherries to soften and release their juices. If you prefer a thicker jam, you can reduce the water slightly.
Step-by-Step Instructions
Step 1: Prep Your Ingredients
First things first, let’s get organized—grab your pitted sour cherries, sugar, lemon juice, vanilla, and water. This is where the magic begins! If you’re using frozen cherries, ensure they are thawed and drained—nobody wants excess water messing with our jam’s fabulous consistency.
Step 2: Combine the Ingredients in a Pot
In a medium-sized, heavy-bottomed pot, combine your sour cherries, granulated sugar, lemon juice, and water. Stir everything together gently to ensure the cherries are coated with sugar—this step is crucial as it helps draw out the juices from the cherries, giving your jam that lovely vibrancy!
Step 3: Cook on Medium Heat
Place your pot over medium heat and let it simmer. Occasionally stir the mixture as it heats up, keeping an eye on it to avoid any sticking. You’ll start to notice the sugar melting and the cherries softening, releasing their sweet-tart juices. Cook this mixture for about 10–15 minutes, or until the cherries are completely soft and the liquid has thickened a bit.
Step 4: Add the Vanilla
Once your cherry mixture reaches that lovely consistency, it’s time to introduce the star of the show: the vanilla! If you’re using a whole vanilla bean, add both the scraped seeds and the pod into the pot. If you’ve opted for vanilla extract, stir it in at this stage. Give everything a good stir, allowing the fragrant notes of vanilla to infuse into the jam.
Step 5: Test for Doneness
Now comes the fun part! To test if your jam is ready, grab a small plate and put it in the freezer for a few minutes. Once it’s chilled, drop a spoonful of the cherry mixture onto the plate and let it sit for about 30 seconds. Run your finger through it—if it holds its shape and doesn’t run back together, you’re all set! If it’s still too runny, continue cooking for another 5–10 minutes and test again.
Step 6: Jar It Up
When you’ve got that perfect jam consistency, remove the pot from the heat. Take out the vanilla pod if you used one. Now, carefully ladle the hot jam into clean, sterilized jars. Make sure to leave a little space at the top. Place the lids on the jars while still warm, and let them cool to room temperature. If you’re planning to eat the jam right away, it can be stored in the refrigerator.
Serving Suggestions
Now that you’ve made your delicious jam, let’s talk about how to enjoy it! Here are a few tasty ideas to get you started:
-
Spread it on Toast: The classic choice! Layer a generous spoonful on your morning toast or bagel with a bit of butter for an indulgent breakfast treat.
-
Top Your Pancakes or Waffles: Drizzle it over stacks of fluffy pancakes or crispy waffles. Add a dollop of whipped cream or yogurt on top for a scrumptious brunch dish.
-
Incorporate Into Desserts: Use this jam as a filling in pastries or as a swirl in cheesecake for a fruity twist. It also makes a lovely addition to ice cream or yogurt parfaits.
-
Pair with Cheese: A nice cheese platter isn’t complete without a fruit jam like this! Scoop it on top of creamy goat cheese or sharp cheddar for a delightful contrast of flavors.
Recipe Variations
Feeling adventurous? Here are a few creative twists and swaps that you can try with this sour cherry jam recipe:
-
Spiced Jam: Add a pinch of cinnamon or a touch of ground ginger for a warm, spiced flavor profile that complements the cherries beautifully.
-
Infused Flavors: Try mixing in some fresh herbs like thyme or mint for an earthy note. Simply stir in chopped herbs during the last few minutes of cooking for a fresh, aromatic finish.
-
Lemon Zest: For an extra citrus kick, add some fresh lemon zest along with the juice. It brightens the flavor and adds a nice texture.
-
Raspberry-Cherry Combo: Mix in some fresh raspberries for a twangy fusion. Replace half of the sour cherries with raspberries in the recipe for a mixed berry jam!
-
Reduce Sugar: If you’re looking for a healthier option, feel free to reduce the sugar. Use a sugar substitute that measures similarly, and remember, your jam might be a tad less sweet!
Chef’s Notes
As I reflect on how this recipe has evolved over time, I can’t help but chuckle at my early attempts at jam-making. I once ended up with cherry syrup instead of jam because I got a little too enthusiastic with the heat. It turns out patience really is a virtue in the kitchen!
Another tip I’ve learned along the way is to always taste as you go. Who wouldn’t want a jam that’s perfectly tailored to their palate? The beauty of cooking is that there are no hard-and-fast rules—go with your instincts, and don’t be afraid to innovate!
FAQs and Troubleshooting
Q1: My jam didn’t set! What did I do wrong?
A: This usually happens if there isn’t enough sugar or if the cooking time was too short. Make sure you followed the recipe closely. If it happens again, you can always re-cook it with a little pectin to help it set!
Q2: Can I can this jam for longer storage?
A: Absolutely! Just make sure you follow proper canning procedures by sterilizing your jars and processing them in a boiling water bath for about 10 minutes after filling.
Q3: Can I use other fruits for this recipe?
A: Yes! This method can work with a variety of fruits—think blueberries, strawberries, or even peaches. Just adjust the sugar and acid levels a bit depending on the fruit’s sweetness.
Q4: My jam is too tart. How can I fix this?
A: If your jam turned out too tart, you can balance it by adding a bit more sugar or even a hint of honey after it cools down. Remember to warm it gently if you do this!
Nutritional Info
This Easy Small Batch Sour Cherry Jam is not only delightful but also packs some nutritional benefits:
- Calories: Approximately 60 calories per tablespoon
- Sugar: 14g (from natural sources and added sugar)
- Vitamin C: Thanks to the cherries and lemon juice, which boosts your immune system!
- No preservatives: Unlike store-bought jams, this homemade version is free from preservatives and artificial flavors.
Enjoy it in moderation, and savor every scrumptious spoonful!
Final Thoughts
There you have it, friends! Your very own Easy Small Batch Sour Cherry Jam with Vanilla is just a few steps away. I hope this recipe inspires you to get creative in your kitchen, bring back cherished memories, and share your delicious creations with your loved ones.
Making jam might just be one of the simplest joys in life—what’s more satisfying than spreading homemade goodness on your favorite breakfast treats? So, gather your cherries, channel your inner chef, and enjoy a jar of happiness—one spoonful at a time!
Remember, whether you enjoy it on toast, in desserts, or right out of the jar, every bite is imbued with love and deliciousness. Happy cooking, and see you around Feastical!🌟
Print
Easy Small Batch Sour Cherry Jam with Vanilla
- Total Time: 25 minutes
- Yield: 2 servings 1x
- Diet: Vegetarian
Description
A delightful small batch sour cherry jam infused with the warm essence of vanilla, perfect for breakfasts and desserts.
Ingredients
- 2 cups (about 300g) sour cherries, pitted and fresh or frozen
- 3/4 cup (150g) granulated sugar
- 1 tablespoon (15ml) fresh lemon juice
- 1 whole vanilla bean, split lengthwise and seeds scraped out (or 1 teaspoon pure vanilla extract)
- 1/4 cup (60ml) water
Instructions
- Prep your ingredients by gathering the sour cherries, sugar, lemon juice, vanilla, and water.
- Combine the ingredients in a medium-sized pot, stirring gently to ensure the cherries are coated with sugar.
- Cook the mixture over medium heat, stirring occasionally, for about 10–15 minutes, until the cherries soften.
- Add the vanilla once the mixture has thickened, stirring to infuse the flavor.
- Test for doneness by dropping a spoonful on a chilled plate and checking if it holds its shape.
- Jar the jam into sterilized jars, leaving space at the top, and let it cool to room temperature.
Notes
For variations, consider adding spices like cinnamon or experimenting with other fruits.
- Prep Time: 10 minutes
- Cook Time: 15 minutes
- Category: Condiment
- Method: Stovetop
- Cuisine: American
Nutrition
- Serving Size: 1 tablespoon
- Calories: 60
- Sugar: 14g
- Sodium: 1mg
- Fat: 0g
- Saturated Fat: 0g
- Unsaturated Fat: 0g
- Trans Fat: 0g
- Carbohydrates: 15g
- Fiber: 1g
- Protein: 0.5g
- Cholesterol: 0mg
Keywords: sour cherry jam, homemade jam, small batch jam, vanilla jam, fruit preserves

Fig Rosemary and Red Wine Jam
Fig Rosemary and Red Wine Jam: A Culinary Adventure Awaits!
Hey there, fellow food lovers! Welcome to the mouthwatering adventure of crafting Fig Rosemary and Red Wine Jam. If you’ve ever had a jar of homemade jam that whisked you down memory lane, you know just how special it can be. This jam is not only visually stunning but also packs a flavorful punch that elevates everything from breakfast to dessert. So, let’s embark on a culinary journey with a recipe that’s packed with nostalgia, flavor, and a sprinkle of love!
A Sweet Memory
Ah, figs! For me, they evoke memories of warm summer days spent at my grandmother’s house. Her garden was a haven of life and flavors, where fig trees towered over lovely blooms and herbs. Each summer, we would gather the delicious black mission figs, their warm exterior promising a sweet, sticky treasure inside. I remember the excitement of making jam with her, transforming those beautiful figs into something that could be enjoyed long after the seasons changed.
The addition of rosemary and red wine came about by pure serendipity during one of those bustling afternoons. I had accidentally dropped a sprig of rosemary into our bubbling pot of figs, and as we tasted the jam, something magical happened! The herbaceous note intertwined beautifully with the sweetness of the figs and the rich depth of red wine. What started as a kitchen mishap turned out to be a cherished family recipe. Now, I want you to experience that same joy and nostalgia when you whip up your own Fig Rosemary and Red Wine Jam!
Ingredients
Let’s gather our ingredients to get started. Just like a well-curated playlist, each item plays a pivotal role in creating the harmonious symphony of flavors. Here’s what you’ll need:
-
1½ cups fruity red wine (such as Pinot Noir, Merlot, or Burgundy)
A tasty red wine will cement the rich flavor of your jam while offering a touch of acidity to balance the sweetness. -
3 sprigs fresh rosemary
Rosemary adds an aromatic and earthy depth. If fresh rosemary is out of reach, feel free to use dried rosemary (but cut the amount to 1 tablespoon). -
3 cups chopped black mission figs (stems removed)
These figs are a jam-making superstar, boasting a delightful sweetness. If black mission figs are hard to find, you can substitute with other varieties like Calimyrna or Kadota. -
1 (1.75-ounce) package powdered pectin
Pectin is the magical ingredient that helps your jam thicken and set. If you’re using low-sugar fruit, you might opt for a low-sugar pectin. -
¼ cup bottled lemon juice
Lemon juice brightens the flavors and helps to balance the sweetness. Always go for bottled for consistency—freshly squeezed can vary in acidity. -
4 cups granulated sugar
No jam is complete without the sweet stuff! The sugar not only sweetens but also acts as a preservative.
Step-by-Step Instructions
Now, let’s dive into the delightful process of making Fig Rosemary and Red Wine Jam. Ready your spatula, and let’s get cooking!
-
Prepare Your Figs: Start by washing your figs gently under cold water. Pat them dry with a clean towel. Remove the stems and chop them into small, bite-sized pieces. Trust me, those little morsels of goodness will melt in your mouth!
-
Infuse the Red Wine: In a medium-sized pot, pour in your fruity red wine and toss in the rosemary sprigs. Bring it to a gentle simmer over medium heat. This step will allow that fragrant rosemary to infuse its magic into the wine, creating a beautifully aromatic base.
-
Add Figs and Juice: Once the wine mixture is simmering, add your chopped figs and lemon juice to the pot. Give it a good stir to combine those friendly ingredients. Let it simmer for about 10 minutes, allowing the figs to soften and release their natural juices. It should smell incredible by now!
-
Incorporate the Pectin: Stir in the powdered pectin, mixing until it’s fully dissolved. Keep the heat over medium-high and bring the mixture to a rolling boil. This is where the magic happens! The pectin will start to thicken the mixture.
-
Sugaring Time: Once boiling, add the sugar all at once and stir thoroughly until it’s completely dissolved. It may look like a sweet concoction, but I promise you, this is how true jam is born!
-
Final Boil: Bring the mixture back to a rolling boil. Keep it boiling rapidly for 1-2 minutes. You want to reach that perfect setting point—just make sure to stir continuously to avoid sticking!
-
Test for Doneness: Now’s the fun part! Place a spoonful of jam onto a cold plate and let it sit for a minute. Run your finger through it; if it holds its shape, you’re good to go! If not, stir and boil for another minute or so.
-
Jar it Up: Remove the pot from the heat and skim off any foam that’s formed. Ladle your jam into sterilized jars, leaving about ¼ inch of space at the top. Seal your jars with lids tightly and process them in a boiling water bath for 5-10 minutes if you want to preserve them.
Serving Suggestions
Now that your Fig Rosemary and Red Wine Jam is ready, it’s time to serve and share! There are endless ways to enjoy this delicious concoction. Here are a few suggestions to get your culinary wheels spinning:
-
Toast or Scones: Slather the jam generously on warm, buttery toast or flaky scones for an exquisite breakfast treat.
-
Cheese Board Delight: Pair it with a selection of cheeses—think creamy Brie or tangy goat cheese. The contrast of flavors will leave your guests raving!
-
Glaze for Meats: Use the jam as a glaze for roasted meats, like pork or chicken. It adds a surprising and delicious depth that will wow your dinner guests.
-
Dessert Topping: Drizzle it over ice cream or yogurt for a sweet finish to your meal. Why not add a sprinkle of chopped nuts for a crunchy twist?
Recipe Variations
If you’re feeling adventurous or want to tailor this jam to suit your palate or dietary restrictions, here are a few creative twists worth trying:
-
Spicy Kick: Add a pinch of red pepper flakes or chopped fresh chili to your jam when cooking to introduce a delightful heat.
-
Citrus Zing: Infuse the jam with some grated orange or lemon zest for an extra fruity burst.
-
Nutty Addition: Throw in some finely chopped walnuts or pecans during the final simmer for a nutty texture that complements the figs beautifully.
-
Herb Variation: Swap rosemary for thyme or even basil to create a different herbal experience; each herb brings a unique flavor profile to the jam.
-
Low-Sugar Option: Substitute some of the granulated sugar with honey or agave syrup for a more natural sweetening option. Just remember that it may alter the set a bit!
Chef’s Notes
As I reflect on this jam, I can’t help but chuckle at some of my earlier kitchen adventures. I once used way too much rosemary and thought I might have created something inedible. Spoiler alert: it was delicious after all! I have come to understand that cooking is about experimenting, making mistakes, and embracing imperfections. Each jar of jam tells a story of laughter, learning, and love, and I hope this recipe provides you with the same joyful journey.
FAQs and Troubleshooting
Now, before you get cooking, let’s tackle a few common questions so you can dodge any kitchen mishaps.
-
Why didn’t my jam set?
If your jam didn’t set, it may be due to not using enough pectin or not boiling it long enough. Don’t fret—you can always reprocess it! -
Can I use frozen figs?
Absolutely! Just make sure to thaw them out and drain excess moisture before chopping them. -
How long will the jam last?
When properly sealed and stored in a cool, dark place, your jam can last up to a year! Once opened, store in the fridge and use within a month. -
Can I experiment with other fruits?
You bet! Just adjust the pectin and sugar levels according to sweetness and juiciness of the other fruits you choose.
Nutritional Info
For those who like to count those calories and sugar levels, here’s roughly what to expect per 1 tablespoon of Fig Rosemary and Red Wine Jam:
- Calories: 50
- Total Fat: 0g
- Sodium: 0mg
- Total Carbohydrates: 13g
- Dietary Fiber: 0g
- Sugars: 12g
- Protein: 0g
Remember, this jam is meant to be enjoyed in moderation as part of a balanced diet!
Final Thoughts
As you roll up your sleeves and embark on this Fig Rosemary and Red Wine Jam adventure, remember that cooking is a blend of science and art. It’s about making something special to share with those we love. I encourage you to unleash your creativity, savor the process, and more than anything, enjoy the rhythms of the kitchen. Here’s to memorable flavors, shared experiences, and the delicious success that awaits you with every jar of homemade jam. Happy cooking, my friends!
Print
Fig Rosemary and Red Wine Jam
- Total Time: 45 minutes
- Yield: 4 cups 1x
- Diet: Vegetarian
Description
A flavorful homemade jam combining black mission figs, aromatic rosemary, and fruity red wine, perfect for spreading on toast or as a glaze.
Ingredients
- 1½ cups fruity red wine (such as Pinot Noir, Merlot, or Burgundy)
- 3 sprigs fresh rosemary
- 3 cups chopped black mission figs (stems removed)
- 1 (1.75-ounce) package powdered pectin
- ¼ cup bottled lemon juice
- 4 cups granulated sugar
Instructions
- Prepare your figs: Start by washing your figs gently under cold water. Pat them dry and chop them into small pieces.
- Infuse the red wine: In a pot, pour in your red wine and add the rosemary sprigs. Bring to a gentle simmer.
- Add figs and juice: Once simmering, add your chopped figs and lemon juice. Stir to combine and let simmer for about 10 minutes.
- Incorporate the pectin: Stir in the powdered pectin and bring to a rolling boil, mixing until dissolved.
- Add the sugar: Once boiling, add the sugar all at once and stir until completely dissolved.
- Finalize the boil: Bring back to a rolling boil and keep boiling for 1-2 minutes while stirring continuously.
- Test for doneness: Place a spoonful on a cold plate; if it holds shape, it’s ready. If not, boil for another minute.
- Jar it up: Remove from heat, skim off foam, and ladle into sterilized jars, sealing tightly.
Notes
Ensure to use bottled lemon juice for consistent acidity. You can experiment with other fruits by adjusting pectin and sugar levels accordingly.
- Prep Time: 15 minutes
- Cook Time: 30 minutes
- Category: Preserves
- Method: Canning
- Cuisine: American
Nutrition
- Serving Size: 1 tablespoon
- Calories: 50
- Sugar: 12g
- Sodium: 0mg
- Fat: 0g
- Saturated Fat: 0g
- Unsaturated Fat: 0g
- Trans Fat: 0g
- Carbohydrates: 13g
- Fiber: 0g
- Protein: 0g
- Cholesterol: 0mg
Keywords: fig jam, rosemary jam, red wine preserves, homemade jam, fruit spread

Beginner Peach Jelly: Quick Canning or Freezer Prep
Golden Peach Jelly: A Sweet Summer Treat
Hey there, fellow foodies! Today, we’re diving into a golden world of flavor with one of my absolute favorite recipes—Golden Peach Jelly. There’s something undeniably magical about making jelly, isn’t there? It takes me back to sun-drenched summers filled with the intoxicating aroma of ripe peaches, laughter echoing from the kitchen, and every jar being a little treasure waiting to be opened.
A Sweet Taste of Nostalgia
Growing up, my grandma always seemed to have something bubbling away on the stovetop. She was the queen of canning, and her specialty was peach jelly. Every summer, we’d head to the local peach orchard and pick baskets full of the juiciest fruit. The sun would shine down while we hunted for the plumpest peaches, our fingers sticky from the juices.
When we got back to her kitchen, it felt like a scene from a movie—rows of sparkling jars lined up on the counter, the vibrant orange jelly simmering in a pot. We’d sing songs, tell stories, and sneak spoonfuls of jelly straight from the pan (a must-have kitchen tradition!). To this day, that golden peach jelly is a symbol of love and togetherness, and I’m excited to share this simple recipe with you. Trust me; making your own jelly isn’t just delicious—it’s a wonderful way to preserve summertime and bring a bit of sunshine to your winter mornings.
Now, let’s get into the nitty-gritty of making this delightful Golden Peach Jelly!
Ingredients
Here’s what you’ll need to create your own batch of luscious Golden Peach Jelly:
-
3 lbs Peaches (organic is best)
- Ripe, juicy peaches are key! Organic peaches bring vibrant flavor—and if you can’t find fresh peaches, frozen ones work too. Just make sure they’re thawed and drained.
-
1/2 Cup Lemon Juice
- Fresh lemon juice adds the perfect zing to balance the sweetness. Don’t have fresh lemons? Bottled lemon juice will do in a pinch, but nothing beats fresh!
-
1.75 oz Regular Powdered Pectin
- This is your gelling agent! The regular powdered pectin helps the jelly set beautifully. Make sure to read the package instructions in case of any specific uses or recommendations.
-
5 Cups Sugar
- Yes, it’s a lot of sugar, but this is jelly, after all! It’s essential for flavor and helps the jelly set. For a healthier twist, you could experiment with less sugar or sugar substitutes, but for the best traditional flavor, stick to the basics!
-
3 tablespoons Bourbon (optional)
- Adding bourbon gives a lovely depth to the peach flavor. If bourbon isn’t your thing, feel free to leave it out or substitute it with a splash of vanilla extract for another layer of sweetness.
Step-by-Step Instructions
Now, let’s roll up our sleeves and get cooking! Here’s the easy-to-follow process for making your Golden Peach Jelly:
-
Prepare the Peaches:
- Start by washing your peaches thoroughly to remove any dirt or pesticides. Then, peel and pit them. Cut the peaches into small chunks and place them in a large bowl (the nostalgia is kicking in!). You should have about 4 cups of chopped peaches.
-
Extract the Juice:
- In a large pot, combine the chopped peaches with 1/4 cup of water. Cook them over medium heat for about 10 minutes, stirring occasionally. What you’re aiming for here is to get the peaches nice and soft, allowing their juices to flow.
-
Mash and Strain:
- After the peaches are soft, remove them from heat and mash them lightly with a potato masher or fork. Next, strain the juice using a fine mesh sieve or cheesecloth into another pot. You should have around 4 cups of peach juice—this is pure peach magic!
-
Mix in the Ingredients:
- To your peach juice, add the 1/2 cup of lemon juice, the powdered pectin, and the bourbon (if using). Stir well to combine. The mixture is surely looking bright and inviting!
-
Bring to a Boil:
- Now, place the pot on the stove over high heat. Bring the mixture to a rolling boil while stirring constantly. View this as a mini cardio workout—keep stirring!
-
Adding Sugar:
- Once boiling, add the 5 cups of sugar all at once. Again, stir continuously for about 1-2 minutes until the sugar dissolves. The magic moment is when your jelly starts bubbling away!
-
Test the Set:
- After the sugar has dissolved and the mixture returns to a rolling boil, let it cook for an additional minute. To check if it’s ready, do the spoon test: dip a spoon into the jelly; if it coats the back and doesn’t run, you’re good to go!
-
Canning or Freezing:
- If canning, pour the hot jelly into sterilized mason jars, leaving about 1/4-inch headspace. Wipe the rims clean, place on the lid, and process in a boiling water bath for about 5-10 minutes. For freezing, pour the hot mixture into freezer-safe containers, leaving space for expansion.
-
Cool and Store:
- Let the cans or containers sit at room temperature until completely cooled. Then, store your jelly in the fridge if you’ve opted for the freezer, or in a cool, dark place if you’ve canned it. Voila!
Serving Suggestions
Golden Peach Jelly is just the icing on the cake when it comes to elevating your breakfast or dessert game. Here are some delicious ways to serve it:
-
Spread on Toast: Slather your homemade jelly on warm, crusty toast or buttery biscuits. It’s a match made in heaven that’ll start your day on a sweet note!
-
With Yogurt: Drop a spoonful of jelly into a bowl of creamy yogurt—talk about a perfect pairing! Add some granola and fresh fruit on top, and you have yourself a delightful breakfast or snack.
-
Gifting: Jar up some of that golden goodness and gift it to friends or family. Tie a ribbon around it with a little tag, and you’ve created a heartwarming gift that’s sure to make anyone smile.
Recipe Variations
Let’s get creative! Here are a few fun spins on this classic Golden Peach Jelly recipe:
-
Peach-Raspberry Fusion: Swap half of the peaches for fresh or frozen raspberries for a tangy twist. The tartness of raspberries adds a delightful contrast.
-
Spiced Peach Jelly: Infuse the jelly with some cinnamon or nutmeg while it cooks for a warm, cozy flavor that’s perfect for the fall season.
-
Habanero Peach Jelly: For those who love a little kick, add finely chopped habanero peppers (adjust based on your spice tolerance) for a spicy-sweet sensation that can jazz up meats or cheese platters.
-
Citrus Peach Jelly: Mix in the zest of oranges or limes for an extra burst of citrus that enhances the peachy taste. It’s fresh, zesty, and so vibrant!
-
Berry Peach Mashup: Combine peaches with other berries like strawberries or blackberries for a mixed-flavor jelly. It’ll add complexity and profundity to the flavor profile!
Chef’s Notes
As I craft these flavorful jars, I can’t help but remember the many times my grandma and I experimented with flavors and ingredients. Sometimes we’d sneak in some ginger just to see what would happen. It didn’t always work, but when it did—oh boy!
Now that I’ve mastered the peach jelly, I love to incorporate different fruits and spices to make memorable batches for my friends. I cherish the memories created in the kitchen, and it’s so rewarding to see my loved ones enjoying a taste of summer all year long.
FAQs and Troubleshooting
-
Why isn’t my jelly setting?
- Ensure you’ve used the correct amount of pectin and sugar. If it doesn’t set, you can reprocess it by adding more pectin.
-
Can I make this jelly without pectin?
- You can, but it’ll require a longer cooking time and more sugar to achieve the right consistency.
-
How long can I store my jelly?
- Canned jelly can last up to a year if stored properly, while frozen jelly should be consumed within a year for the best quality.
-
What if I end up with foam on top?
- Foam can separate; skimming it off before canning is fine! You can also use a little butter in the mixture while cooking to reduce foaming.
Nutritional Info
Jelly is typically enjoyed in moderation, but for those curious, here’s a rough breakdown of the nutritional information per tablespoon of peach jelly:
- Calories: 50
- Total Fat: 0g
- Sodium: 0mg
- Carbohydrates: 13g
- Sugars: 12g
- Protein: 0g
Enjoying jelly should remain about savoring the delicious flavors rather than stressing over the numbers.
Final Thoughts
And there you have it—your very own Golden Peach Jelly! This recipe is not just about capturing a taste of summer; it’s also about sharing memories and moments through food. Whether you’re enjoying it on a quiet morning or dressing up a dessert for a gathering, this jelly brings a bit of sunshine to any table.
As you embark on your peach jelly making journey, remember to have fun! Food is all about experimenting, sharing, and enjoying the process. Don’t be afraid to make it your own. Whip out those jars, call your friends over for a canning party, and let’s capture the flavors of summer together.
Stay sweet, my friends, and happy jamming! 🍑✨
Print
Golden Peach Jelly
- Total Time: 45 minutes
- Yield: 4 cups 1x
- Diet: Vegetarian
Description
A delightful and sweet summer treat that captures the essence of ripe peaches in a jar.
Ingredients
- 3 lbs Peaches (organic is best)
- 1/2 Cup Lemon Juice
- 1.75 oz Regular Powdered Pectin
- 5 Cups Sugar
- 3 tablespoons Bourbon (optional)
Instructions
- Prepare the peaches by washing, peeling, and cutting into small chunks.
- Combine the chopped peaches with 1/4 cup of water in a large pot and cook over medium heat for 10 minutes.
- Mash the peaches lightly and strain the juice using a fine mesh sieve into another pot.
- Add lemon juice, powdered pectin, and bourbon (if using) to the peach juice and stir well.
- Bring the mixture to a rolling boil while stirring constantly.
- Add sugar all at once and stir continuously until dissolved.
- Test the set by performing the spoon test.
- Pour the hot jelly into sterilized mason jars or freezer-safe containers.
- Cool and store in the fridge or a cool, dark place.
Notes
For variations, try swapping peaches for other fruits or adding spices for different flavors.
- Prep Time: 30 minutes
- Cook Time: 15 minutes
- Category: Preserves
- Method: Canning
- Cuisine: American
Nutrition
- Serving Size: 1 tablespoon
- Calories: 50
- Sugar: 12g
- Sodium: 0mg
- Fat: 0g
- Saturated Fat: 0g
- Unsaturated Fat: 0g
- Trans Fat: 0g
- Carbohydrates: 13g
- Fiber: 0g
- Protein: 0g
- Cholesterol: 0mg
Keywords: peach jelly, summer recipe, preserves, canning, homemade jelly

Pioneer Woman Peach Preserves Recipe: Quick Batch Today
The Sweetest Tale: Crafting Pioneer Woman Peach Preserves
Hey there, food lovers! Welcome back to Feastical, where we dive into delicious recipes that remind us why we love food in the first place. Today, we’re tackling something that feels like a hug wrapped in sweetness: Pioneer Woman Peach Preserves.
Now, whether you’ve got a basket of juicy peaches from the farmers’ market or you just happened to snag some from the grocery store without a plan (hey, it happens!), making peach preserves is a delightful experience that doesn’t require a degree in culinary arts. It’s simple, fun, and oh-so-satisfying when you seal up those jars and pop them into your pantry.
A Bite of Nostalgia
Let me whisk you away to my childhood for a second. Picture this: summer days filled with laughter, the scent of sun-warmed peaches wafting through the air, and my grandma in her kitchen, bustling around with jars, boiling water, and a big pot full of sweet fruity goodness. She was the queen of preserves, and her homemade peaches were legendary. I remember the first time I “helped” her. I was probably more of a hindrance at age eight, trying to sneak bites of sticky peach slices while she expertly mixed sugar and lemon juice.
As the kitchen filled with bubbling joy, her special secret was the generous squeeze of lemon juice—she’d say it didn’t just help with preservation; it was the magic touch that brightened the flavor of everything! Fast forward to today, and I find such joy in preserving the flavors of summer. It’s a tradition that keeps family memories alive, and I can’t wait to share it with you.
So, let’s grab those peaches and get started on a journey that’s sure to make your taste buds sing!
Fresh Ingredients to Scoop Up
To make the most luscious peach preserves, here’s what you’ll need:
-
11 lbs peaches, rinsed (about 5 kg)
Look for peaches that are ripe but still firm. They should yield slightly to gentle pressure. If they’re too soft, they might turn mushy during cooking. -
3 ½ to 4 cups white sugar (840-960 ml)
Sugar is essential for sweetness and preservation. If you want to reduce sugar, you can use honey, but keep in mind that it may alter the flavor profile. -
Juice of 1 medium lemon (about 2 tablespoons or 30 ml)
Lemon juice is the secret weapon here! Not only does it enhance flavor, but it also helps to prevent browning. If you don’t have fresh lemon, bottled juice works, but fresh is always best. -
5-6 pint-sized jars with lids
Make sure these are clean and sterile. You can run them through the dishwasher or boil them to keep your preserves fresh and safe.
Step-by-Step Instructions
Ready to make some magic happen? Here’s how you whip up those delicious peach preserves.
-
Prep the Peaches
Start by washing your peaches thoroughly. This removes any dirt or residues. Next, peel them—if you want to channel your inner chef, use a paring knife for precision or opt for a peeler if that suits you better. Cut each peach in half, remove the pit, and dice the fruit into bite-sized pieces. Pro tip: To make peeling easier, blanch them in hot water for about 30 seconds, then transfer them to cold water. -
Mix with Sugar
In a large bowl, combine your diced peaches and sugar. Stir gently to ensure the sugar coats every peach piece. Let this mixture sit for about an hour. This process is called maceration, and it helps the fruit release its natural juices. You’ll see those beautiful syrupy juices forming—trust me, your kitchen will smell divine! -
Juice It Up
After an hour, transfer the peach and sugar mixture to a large pot. Now, add that tangy lemon juice. Stir everything together. The combination of the sweet peaches and zesty lemon is going to create a symphony in your mouth. -
Cook
Place the pot over medium heat until it starts to boil. This is where the magic happens! Simmer it gently, stirring occasionally. You want to break down those peach pieces but also let it bubble away until it thickens. This could take anywhere from 20 to 40 minutes. You’ll know it’s ready when the preserves coat the back of a spoon. Keep an eye on it—nobody likes burnt preserves! -
Fill the Jars
Once thickened, remove from heat. Using a ladle (and some care—it’s hot!), funnel the peach preserves into your clean, sterilized jars, leaving about a quarter inch of space at the top. Chef’s hack: Wipe the rims of the jars with a clean cloth to remove any drips—it’s crucial for sealing! -
Seal ‘Em Up
Place the lids on the jars while the preserves are still hot. If you’re ready to dig in and don’t need long-term storage, you can let them cool and pop them in the fridge. Otherwise, process them in a boiling water bath for about 10 minutes to seal for longer storage.
Serving Suggestions
Now you’ve got those luscious peach preserves ready to go! Whether you’re slathering them on toast, spooning them over pancakes, or dolloping them on vanilla ice cream, these preserves are versatile and delightful. For a special brunch, serve them alongside a cheese board with brie and crusty bread. A little bit of sweetness balances the richness beautifully!
Recipe Variations
Feeling adventurous? Here are a few twists you can try with your peach preserves:
-
Spicy Peach Preserves: Add a little kick by including chopped jalapeños or a pinch of cayenne pepper to the mix. It’s a delightful contrast that will surprise your taste buds!
-
Vanilla Infusion: Stir in a teaspoon of vanilla extract just before you start cooking. The warm vanilla notes add a creamy depth to the sweetness.
-
Herb-Infused Preserves: Try infusing your preserves with fresh herbs like basil or rosemary. Just toss a few sprigs in while cooking, then strain them out before jar filling!
-
Berry Peach Combo: Mix in some fresh blueberries or raspberries during the cooking process for a berry-peach twist—delicious with a scone!
-
Alcohol-Enhanced: A splash of bourbon or rum can add an adult twist that adds another layer of flavor. Just remember to add it gradually and adjust to your taste.
Chef’s Notes
As I mentioned earlier, my love affair with peach preserves is nostalgic. It’s evolved with time as I’ve tried different variations. One time, I added a few sprigs of thyme on a whim, and it turned out to be an exquisite enhancement! Every jar you seal can capture a moment in your life or a flavor journey.
Remember, don’t stress too much about the process. Mistakes can turn into beautiful discoveries. Every batch you make is a chance to experiment—just like my grandma taught me.
FAQs and Troubleshooting
-
What if my preserves didn’t thicken?
If your peach preserves didn’t set up, don’t fret! You can always cook them a bit longer until they thicken. Just keep stirring to avoid burning. -
How long will my preserves last?
If properly sealed and stored in a cool, dark place, your peach preserves can last up to a year. Once opened, try to consume within a few weeks. -
Can I use frozen peaches for this recipe?
Absolutely! Just thaw them completely and drain any excess liquid before using. The taste may differ slightly, but they still make delicious preserves. -
What if I didn’t have enough peach juice?
You can always add a bit of water or additional lemon juice to make up for it. Just remember, it may slightly alter the flavor.
Nutritional Info
While I’ve not gone into all the nitty-gritty details of nutritional data, here’s a quick overview: When made with the ingredients above, peach preserves are primarily made of sugars and naturally occurring fruit carbs. A tablespoon could have around 40-50 calories, largely from sugars. Keep this in mind especially if you’re watching your sugar intake!
However, they’re also a source of vitamins A and C, thanks to those beautiful peaches, making them a tasty addition to your diet when consumed in moderation.
Final Thoughts
Making Pioneer Woman’s peach preserves is not just a delightful culinary experience; it’s a heartwarming time that connects us to tradition and family. Whether you’re keeping the flavors close to your heart or sharing them with loved ones, there’s something truly special about homemade preserves.
So, what are you waiting for? Grab those juicy peaches, and let’s get preserving! As usual, I can’t wait to hear about your kitchen adventures. Share your stories with me in the comments below or tag me on social media with your beautiful peach preserves! Until next time, stay hungry and keep those ovens warm! Bon appétit!
Print
Pioneer Woman Peach Preserves
- Total Time: 70 minutes
- Yield: 6 pint-sized jars 1x
- Diet: Vegetarian
Description
A delightful recipe for homemade peach preserves that captures the sweetness of summer and family traditions.
Ingredients
- 11 lbs peaches, rinsed (about 5 kg)
- 3 ½ to 4 cups white sugar (840–960 ml)
- Juice of 1 medium lemon (about 2 tablespoons or 30 ml)
- 5–6 pint-sized jars with lids
Instructions
- Prep the peaches by washing, peeling, and dicing them into bite-sized pieces.
- Mix the diced peaches with sugar in a large bowl and let sit for about an hour.
- Juice the mixture by transferring to a pot and adding lemon juice, stirring well.
- Cook over medium heat, stirring occasionally until it thickens (20 to 40 minutes).
- Fill the sterilized jars with hot preserves, leaving space at the top.
- Seal the jars while hot or process in a boiling water bath for 10 minutes for long-term storage.
Notes
For additional flavors, consider infusing with herbs, spices, or berries. Adjust sugar levels according to taste.
- Prep Time: 30 minutes
- Cook Time: 40 minutes
- Category: Preserves
- Method: Canning
- Cuisine: American
Nutrition
- Serving Size: 1 tablespoon
- Calories: 45
- Sugar: 12g
- Sodium: 1mg
- Fat: 0g
- Saturated Fat: 0g
- Unsaturated Fat: 0g
- Trans Fat: 0g
- Carbohydrates: 12g
- Fiber: 1g
- Protein: 0g
- Cholesterol: 0mg
Keywords: peach preserves, homemade jam, canning recipe, summer treats, fruit preserves