Minute Vegan Quesadillas with Black Beans and Avocado
Vegan Quesadillas with Black Beans and Avocado
Introduction
Hey there, fellow food lovers! Welcome back to Feastical, where we whip up feel-good dishes that not only satisfy your cravings but also warm your heart. Today, we’re diving into a delightful, vibrant dish that is perfect for any mealtime: Vegan Quesadillas with Black Beans and Avocado!
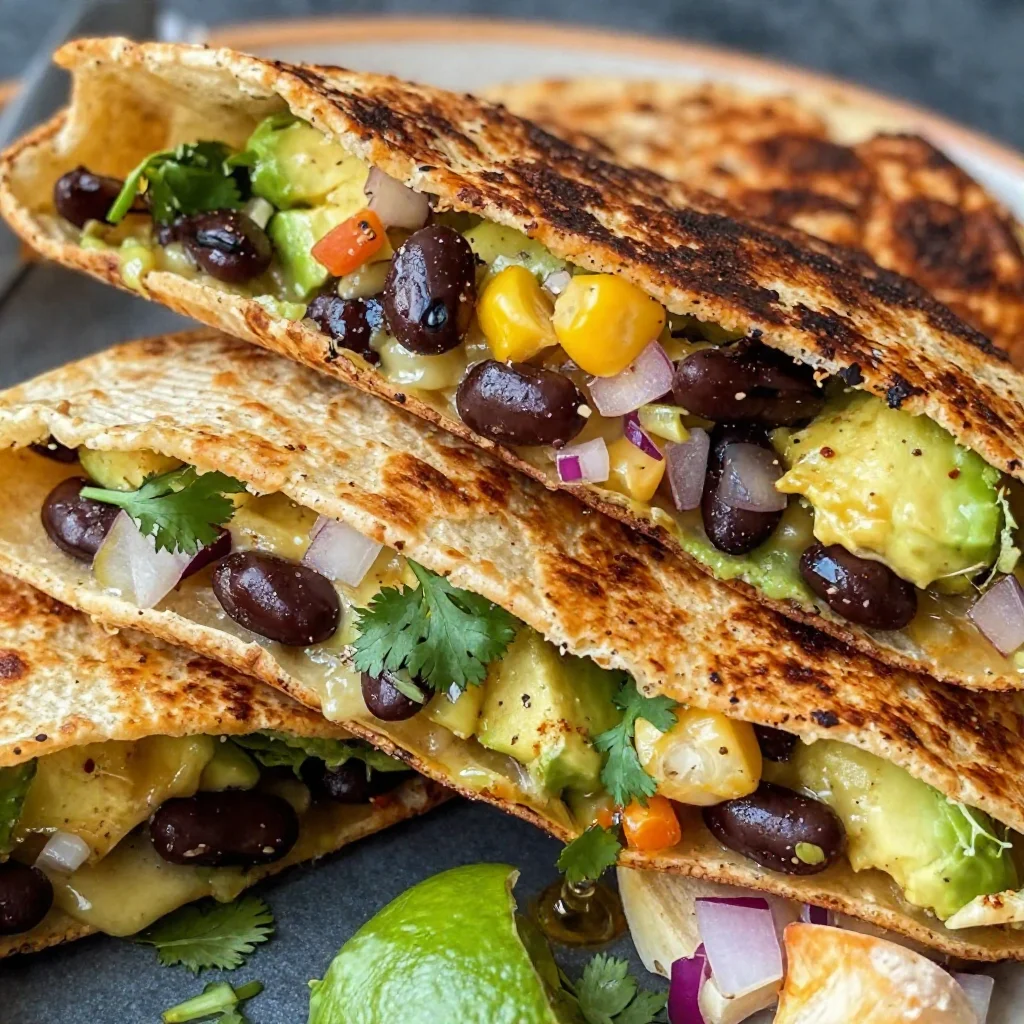
Now, I know some of you might be thinking, "Quesadillas? Aren’t they just cheese and tortillas?" Well, let me tell you—this recipe takes that classic concept and gives it a fresh, plant-based twist that will leave you wondering why you ever needed cheese in the first place! Imagine biting into a crispy tortilla filled with seasoned black beans, creamy avocado, and a sprinkle of zingy lime juice. Yes, please!
Not only are these quesadillas bursting with flavor, but they’re also super customizable, making them perfect for everything from casual weeknight dinners to fancy gatherings with friends. Plus, they’re quick and easy to whip up, even if you’re just getting the hang of your kitchen skills. By the end of this post, you’ll be ready to make these delicious vegan quesadillas and impress everyone at your table. So, roll up your sleeves, and let’s get cooking!
Personal Story
Before we dive into the delicious details, let me share a little story about why these vegan quesadillas hold a special place in my heart. A few summers ago, I decided to host a casual backyard gathering with my friends. It was a warm Saturday afternoon, and we were all about the sunshine and good vibes. As I planned the menu, I wanted something easy but still packed with flavor and nutrition, and that’s when the idea of vegan quesadillas popped into my mind.
I quickly whipped up a batch of these quesadillas, filled with black beans and creamy avocado, and served them with fresh salsa and guacamole. The moment I took that first bite, I was transported back to my college days. I used to make bean and cheese quesadillas in our tiny dorm kitchen, but now, I was sharing this vibrant, healthier version with friends I adored. Watching everyone dig in and savor them was a moment I’ll never forget. Laughter filled the air, plates emptied faster than I could refill them, and the sense of community and love was palpable.
That day, I realized food is much more than just sustenance; it brings us together and creates memories we cherish forever. So, let’s create some of those moments together with these delectable vegan quesadillas!
Ingredients
Here’s what you’ll need to get started:
-
2-3 large tortillas (whole wheat or gluten-free)
Feel free to choose what fits your dietary needs! Whole wheat adds extra fiber, while gluten-free tortillas cater to those avoiding gluten. -
2 ripe avocados
The creaminess of ripe avocados is what makes these quesadillas so enticing. If you’re short on avocados, consider using guacamole for a zesty twist! -
1/2 cup cooked black beans (rinsed)
Black beans are packed with protein and fiber. You can substitute them with pinto beans or even chickpeas if you want a different flavor. -
1/4 cup corn
Sweet corn adds a pop of flavor and texture. Try using frozen corn for convenience! -
2 tablespoons diced red onion
Red onion provides a nice crunch and bite. If you prefer something milder, opt for green onions or shallots. -
Juice of 1/2 lime
Lime juice will brighten up the flavors. A splash of lemon juice works too if you’re out of limes! -
1 garlic clove (minced)
Garlic adds a delightful aroma and flavor. For those who adore garlic, feel free to add more! -
1 teaspoon cumin
Cumin adds an earthy depth to the dish. If you’re short on cumin, smoked paprika is a delightful alternative. -
Pinch of crushed red pepper
This is optional but recommended for a little kick! Adjust it based on your spice tolerance. -
Handful of chopped cilantro
Fresh cilantro elevates the dish with its bright flavor. If you’re not a fan, parsley works well too! -
Olive oil for cooking
This will keep your quesadillas from sticking and help them develop that lovely golden crust. Avocado oil can be a wonderful substitute!
Step-by-Step Instructions
Ready to make your vegan quesadillas? Let’s get down to the nitty-gritty!
-
Prepare the Filling
In a bowl, mash the ripe avocados and mix in the black beans, corn, red onion, lime juice, minced garlic, cumin, and crushed red pepper. Make sure to mix everything until it’s well combined but still chunky, as that texture will make your quesadillas oh-so-satisfying. Use a fork for easy mashing, and don’t be afraid to taste along the way! -
Heat the Pan
Grab a non-stick skillet and heat it over medium heat. Drizzle in a bit of olive oil to coat the pan. Once it’s hot and shimmering, you’re ready to go! This is the secret to achieving that perfect golden-brown crust. -
Assemble the Quesadillas
On one half of your tortilla, pile some of the flavorful avocado-bean mixture. Give it a generous amount but don’t over-stuff, or you’ll have a messy situation on your hands! Fold the tortilla in half to create a pocket of goodness. -
Cook the Quesadilla
Carefully place the folded tortilla into the hot skillet. Let it cook for about 3-4 minutes on one side, or until it’s golden brown and crispy. Peek underneath to check the color—don’t be shy! Press it down gently with a spatula for even cooking. -
Flip and Finish
Once one side is beautifully browned, it’s time to flip! Carefully slide the spatula under the quesadilla and flip it over. Cook for another 3-4 minutes on this side. Just keep an eye on it to avoid burning—this is the moment when you realize you’re a kitchen wizard! -
Repeat
Repeat this process for the remaining tortillas and filling. If you have more than one quesadilla to cook, it’s perfectly fine to keep them warm in a very low oven covered with foil until you’re done. -
Slice and Serve
Once they’re all cooked, allow them to cool for a minute—then slice each quesadilla into triangles. Arrange them on a plate, and get ready to impress your friends or family!
Serving Suggestions
Now that you’re armed with these delicious vegan quesadillas, let’s talk about the best ways to serve them:
- Dips Galore: Serve with fresh guacamole, salsa, or a dollop of vegan sour cream for that extra zing!
- Garnish: A sprinkle of extra cilantro or sliced green onions on top adds freshness and color.
- Side Salads: Pair them with a refreshing side salad. A crunchy corn and tomato salad works wonders!
- Plating: Stack the quesadillas on a colorful platter and serve them with lime wedges on the side for an eye-catching presentation.
Recipe Variations
Feeling adventurous? Here are some creative twists and variations you can try with these vegan quesadillas:
- Spicy Jalapeño: For heat lovers, add sliced jalapeños to the filling or opt for jalapeño-infused olive oil for cooking.
- Pumpkin & Sage: Substitute the black beans with mashed pumpkin or butternut squash and sprinkle in some sage—perfect for fall!
- Mediterranean Delight: Swap in chopped sun-dried tomatoes and kalamata olives, and use hummus instead of avocado for a Mediterranean flair.
- Cheesy Style: If dietary restrictions allow, throw in some vegan mozzarella cheese for a melty, gooey experience.
- Sweet Twist: For a sweet version, use caramelized bananas and a touch of cinnamon in place of the savory filling—an adventurous dessert option!
Chef’s Notes
These vegan quesadillas have been my go-to comfort food for years, evolving with new ingredients and flavor profiles that I discover. I can’t tell you how many times they’ve come to my rescue on busy weeknights or when friends drop by with little notice. Every time I make them, I add a little something different, and they always turn out great, showcasing just how versatile this recipe is!
And let’s not forget the time I accidentally added way too much crushed red pepper thinking it was paprika. Spoiler alert: I’ve never seen so many red faces as my friends attempted to enjoy the spicy quesadillas I’d made! Always taste as you go, folks!
FAQs and Troubleshooting
-
What if my tortillas keep tearing?
If your tortillas are too stiff, try warming them slightly in the microwave for about 10 seconds before assembling. This makes them more pliable! -
How do I prevent sticking?
Utilizing a non-stick skillet and plenty of olive oil should help prevent sticking. Just ensure your pan is preheated enough! -
Can I prepare these in advance?
While these are best served fresh, you can prep the filling a day before and assemble them when you’re ready to cook. -
What do I do if they’re too dry?
A quick drizzle of olive oil before cooking or a bit of extra avocado can help keep things creamy and rich!
Nutritional Info
These quesadillas pack quite the nutritional punch. Here’s a rough idea of what you can expect:
- Calories: Approximately 250-300 calories per serving, depending on how many ingredients you pack in.
- Protein: With the black beans and avocado, you’re looking at roughly 10-12g of plant-based protein for each quesadilla.
- Fiber: Each serving is high in fiber—around 8-10g—thanks to the black beans, corn, and whole wheat tortillas.
- Healthy Fats: Avocados are full of heart-healthy fats, which keeps you full and satisfied.
As always, feel free to tweak the ingredients based on your dietary preferences and needs!
Final Thoughts
And there you have it, folks—Vegan Quesadillas with Black Beans and Avocado that are not only simple to make but also bursting with flavor! Whether you’re enjoying them for a light lunch, dinner, or even a fun appetizer, you’ve got a dish that will surely delight your palate.
Cooking should be all about creativity and sharing joy, as we discussed. So don’t hesitate to experiment with the flavors and ingredients! By inviting your friends and family into your kitchen, you’re creating memories just as delicious as the food.
Thanks for joining me today. Now go grab those ingredients, channel your inner chef, and let’s get those quesadillas sizzling! Remember: the kitchen is your playground—savor every moment of the experience! Until next time, happy cooking, my friends!
Print
Vegan Quesadillas with Black Beans and Avocado
- Total Time: 25 minutes
- Yield: 4 servings 1x
- Diet: Vegan
Description
Delicious vegan quesadillas filled with seasoned black beans, creamy avocado, and lime, perfect for any meal.
Ingredients
- 2–3 large tortillas (whole wheat or gluten-free)
- 2 ripe avocados
- 1/2 cup cooked black beans (rinsed)
- 1/4 cup corn
- 2 tablespoons diced red onion
- Juice of 1/2 lime
- 1 garlic clove (minced)
- 1 teaspoon cumin
- Pinch of crushed red pepper
- Handful of chopped cilantro
- Olive oil for cooking
Instructions
- Prepare the filling by mashing avocados and mixing in black beans, corn, red onion, lime juice, garlic, cumin, and crushed red pepper.
- Heat a non-stick skillet over medium heat and drizzle in olive oil.
- Assemble the quesadillas by piling the filling on one half of each tortilla and folding it over.
- Cook the folded tortillas in the skillet for 3-4 minutes on one side until golden brown.
- Flip the quesadilla and cook for another 3-4 minutes until the other side is browned.
- Repeat the process with remaining tortillas and filling.
- Slice the quesadillas into triangles and serve warm.
Notes
Serve with guacamole, salsa, or a side salad for a complete meal. These quesadillas are easy to customize based on preferences!
- Prep Time: 10 minutes
- Cook Time: 15 minutes
- Category: Main Course
- Method: Pan-frying
- Cuisine: Mexican
Nutrition
- Serving Size: 1 quesadilla
- Calories: 300
- Sugar: 2g
- Sodium: 250mg
- Fat: 16g
- Saturated Fat: 2g
- Unsaturated Fat: 10g
- Trans Fat: 0g
- Carbohydrates: 36g
- Fiber: 10g
- Protein: 10g
- Cholesterol: 0mg
Keywords: vegan, quesadillas, black beans, avocado, easy recipe, plant-based

Amazing Sticky Honey Garlic Cauliflower in 5 Steps
# Amazing Sticky Honey Garlic Cauliflower in 5 Steps

## Introduction

Hey there, food lovers! It's Beau Collier, your friendly kitchen companion, and today we’re diving into one of my all-time favorite dishes: **Sticky Honey Garlic Cauliflower**! If you’re looking for a recipe that brings people together and leans into those warm, cozy vibes we crave, you’ve found it! This dish is everything you want and more—it’s savory, sweet, and ridiculously easy to whip up, making it perfect for a weeknight dinner or a vibrant addition to any gathering.

Let’s talk about comfort food for a moment. It’s that food that not only fills your belly but also warms your soul. Think of it as a hug from the inside out! What’s fantastic about this Sticky Honey Garlic Cauliflower is that it playfully straddles the line between comfort and a little flair. It's vegetarian, absolutely delicious, and makes a stunning centerpiece on your dining table. Plus, it’s a great way to sneak some extra veggies into your life or the lives of your loved ones—without them even knowing they’re eating their greens!

This dish is all about balance: the sweetness of honey mingling perfectly with the umami depth of soy sauce, topped off with a garlicky aroma that makes your kitchen smell like a five-star restaurant. And don’t worry—this isn't just a recipe for the pros! Whether you’re a seasoned chef or still trying to figure out the difference between baking soda and baking powder, I’ve got your back. So grab your apron, put on your most fabulous cooking playlist, and let’s get this culinary adventure started!

## Personal Story

I’ll never forget the first time I made a similar dish for my family. It was a chilly Friday evening, and I wanted to treat my parents to something comforting and vibrant. While flipping through an old family cookbook, I stumbled upon a recipe for honey garlic chicken. But as I flipped the page, I realized I had a large head of cauliflower staring back at me from the fridge. It was the solution to my conundrum: why not swap out the chicken for this beautiful veggie? I got to work, tossing it together with some fragrant garlic and sweet honey, and the rest is history!

My family took their first bite and erupted with delighted laughter. “This isn’t chicken, is it?!” my dad exclaimed. But you know what? They loved it even more! It turned into a tradition for us to make sticky cauliflower on those cozy Friday nights, and it became a staple dish at family gatherings ever since. Food has this magical ability to create memories and connections, don’t you agree? Now, every time I make this dish, it carries a little piece of that joyous moment along with it, reminding me of the love we share around the table.

## Ingredients

Before we get into the nitty-gritty of cooking, let’s gather our superstar ingredients:

- **1 large head cauliflower**: Cut into bite-sized florets. When shopping, look for fresh, firm cauliflower with no brown spots. If you're not a cauliflower fan, use broccoli or Brussels sprouts instead!

- **2 tablespoons olive oil**: This not only helps to roast the cauliflower but adds flavor too. If you're looking for a different taste, avocado oil works wonders here!

- **1/4 cup honey**: The sweet star of our dish! If you’re vegan, you can substitute maple syrup for a similarly sweet flavor.

- **1/4 cup soy sauce/tamari**: For that salty umami kick. Tamari is a great gluten-free option, while coconut aminos offer a soy-free alternative.

- **2 tablespoons rice vinegar**: It adds a tangy brightness to the sauce. If it’s not available, apple cider vinegar is a decent substitute.

- **1 tablespoon sesame oil**: This adds a nutty, rich depth. If you can’t find it, you can use more olive oil or even peanut oil for a different flavor profile!

- **3 cloves garlic, minced**: Fresh is always best! Garlic powder can work in a pinch, but the fresh stuff packs an unparalleled punch.

- **1 teaspoon fresh ginger, grated**: Ginger adds warmth and zest. Ground ginger can work too but use it sparingly!

- **Pinch of red pepper flakes (optional)**: For a touch of heat! If you're not into spicy, feel free to skip this step.

- **Sesame seeds, for garnish**: These little beauties add a crunch and beautiful visual appeal.

- **Green onions, chopped, for garnish**: They bring freshness and an extra layer of flavor. If you’re not a fan, fresh cilantro or parsley will do the trick!

## Step-by-Step Instructions

Now, let’s get cooking! Follow along with these easy steps, and don’t forget to sprinkle in a dash of fun!

### Step 1: Preheat and Prep
First things first—preheat your oven to **425°F (220°C)**. This is key for getting that wonderful caramelization on the cauliflower. While the oven is warming up, let’s get those cauliflower florets nice and clean! Rinse them under cold water and make sure to pat them dry. The dryer they are, the better they’ll roast!

### Step 2: Toss in Those Flavors
In a large mixing bowl, combine the **olive oil**, **honey**, **soy sauce**, **rice vinegar**, **sesame oil**, **minced garlic**, **grated ginger**, and a pinch of **red pepper flakes** (if using). Give this mixture a good stir until everything is well combined. And oh, the aroma that wafts up from that bowl is intoxicating—like a warm embrace from your favorite food memory!

### Step 3: Coat the Cauliflower
Now, toss the cauliflower florets into the bowl and gently coat them in your sticky honey garlic sauce. I recommend using your hands for this—it’s the best way to ensure every floret is thoroughly covered. Plus, it’s oddly satisfying! After they’re all coated, spread the cauliflower out on a baking sheet lined with parchment paper. Ensure they’re in a single layer for optimal roasting; nobody likes a soggy floret!

### Step 4: Roast, Don't Toast!
Slide that baking sheet into your preheated oven and roast for **25-30 minutes**, flipping the florets halfway through. This is the magic moment where the sugars in the honey start to caramelize, giving you that beautiful, sticky glaze. Keep an eye on them towards the end; you’re aiming for a lovely golden-brown color with crispy edges!

### Step 5: Garnish and Serve
Once the cauliflower is out of the oven, it’s time for the grand reveal! Sprinkle sesame seeds and green onions over the top for an added burst of flavor and visual appeal. And there you have it—your beautiful Sticky Honey Garlic Cauliflower is ready to be devoured! Serve it warm as a delightful side dish, over rice, or as a stunning appetizer for your next gathering.

## Serving Suggestions

This sticky goodness makes a fabulous centerpiece to any meal! Serve it alongside some fluffy jasmine rice or quinoa to soak up all that luscious sauce. If you’re feeling extra fancy, try it on top of a vibrant salad with fresh greens, avocado, and a zesty orange dressing. Want to level up your dinner game? Pair it with grilled chicken or fish for the carnivores at the table, or even some crispy tofu for a veggie twist. The possibilities are endless!

## Recipe Variations

You know I love getting creative in the kitchen! Here are a few fun variations to mix things up:

1. **Add More Veggies**: Try tossing in some chopped bell peppers or snap peas for a delightful crunch. Just adjust the cooking time accordingly!

2. **Spice It Up**: Add sliced jalapeños instead of red pepper flakes for a spicier kick.

3. **Curry Twist**: Mix in a teaspoon of curry powder for an exotic flavor profile. It’s a whole new world of deliciousness!

4. **Sweet and Savory**: Add some pineapple chunks to the mix before roasting. The tropical sweetness complements the dish beautifully!

5. **Nutty Goodness**: Throw in some chopped peanuts or cashews when plating for added crunch and richness.

## Chef’s Notes

Cooking is an adventure, my friends! This recipe has evolved over time. It started as a humble spin on a chicken dish and transformed into one of my go-to crowd-pleasers. The first time my niece tried it, she declared it “the best cauliflower ever!” I still chuckle at the memory of her tiny face covered in sticky sauce, giggling. Cooking should be fun—it’s all about experimentation and finding joy in every bite. So don’t hesitate to add your twist, and make this dish uniquely yours!

## FAQs and Troubleshooting

**1. Can I make this dish in advance?**
Absolutely! You can roast the cauliflower ahead of time, but I recommend enjoying it fresh for the best texture. If you must, just reheat gently in the oven.

**2. It burned! What went wrong?**
If your cauliflower is burning, it may be too close to the heating element or the oven temperature is too high. Just lower the heat slightly and keep an eye on it!

**3. Can I use frozen cauliflower?**
Yes, you can! Just remember to thaw and drain well before marinating, or else your sauce may turn out too watery.

**4. What's the best way to store leftovers?**
Transfer any leftovers to an airtight container and store them in the fridge for up to 3 days. Reheat in the oven to regain that crispy texture!

## Nutritional Info

Let’s talk a little about nutrition! A serving of this delightful Sticky Honey Garlic Cauliflower (about 1 cup) contains:

- **Calories**: Approximately 180
- **Protein**: 5g
- **Fat**: 8g
- **Carbohydrates**: 25g
- **Fiber**: 3g
- **Sugar**: 10g

It's a wholesome option packed with vitamins and minerals, and of course, lots of flavor! Just remember to adjust your portion sizes based on your dietary needs.

## Final Thoughts

There you have it! A delicious, satisfying, and easy-to-make recipe that will bring joy to your table. Sticky Honey Garlic Cauliflower is not just a dish; it’s an experience, a memory in the making, and a perfect way to elevate your home cooking. Whether you devour it solo or share it with friends and family, you’re bound to be hit with a wave of satisfaction.

So, what are you waiting for? Turn up that oven, get your ingredients prepped, and let’s make some magic happen in the kitchen! And don't forget to share your creations with me—I'd love to see how you put your unique spin on this marvelously sticky delight. Happy cooking, my friends!

Sticky Honey Garlic Cauliflower
- Total Time: 45 minutes
- Yield: 4 servings 1x
- Diet: Vegetarian
Description
A delicious and easy vegetarian dish featuring savory, sweet honey garlic cauliflower that’s perfect for any gathering.
Ingredients
- 1 large head cauliflower, cut into bite-sized florets
- 2 tablespoons olive oil
- 1/4 cup honey
- 1/4 cup soy sauce or tamari
- 2 tablespoons rice vinegar
- 1 tablespoon sesame oil
- 3 cloves garlic, minced
- 1 teaspoon fresh ginger, grated
- Pinch of red pepper flakes (optional)
- Sesame seeds, for garnish
- Green onions, chopped, for garnish
Instructions
- Preheat your oven to 425°F (220°C) and rinse the cauliflower florets under cold water, then pat them dry.
- Combine olive oil, honey, soy sauce, rice vinegar, sesame oil, minced garlic, grated ginger, and red pepper flakes in a large mixing bowl.
- Toss the cauliflower florets in the sauce until well coated, then spread them on a baking sheet lined with parchment paper.
- Roast in the oven for 25-30 minutes, flipping the florets halfway through, until golden brown and crispy.
- Garnish with sesame seeds and green onions before serving warm.
Notes
For a vegan option, substitute honey with maple syrup. Adjust cooking time if you add additional vegetables.
- Prep Time: 15 minutes
- Cook Time: 30 minutes
- Category: Side Dish
- Method: Roasting
- Cuisine: Asian
Nutrition
- Serving Size: 1 cup
- Calories: 180
- Sugar: 10g
- Sodium: 600mg
- Fat: 8g
- Saturated Fat: 1g
- Unsaturated Fat: 6g
- Trans Fat: 0g
- Carbohydrates: 25g
- Fiber: 3g
- Protein: 5g
- Cholesterol: 0mg
Keywords: cauliflower, honey garlic, vegetarian, side dish, easy recipe, roasting