
McDonald’s Mango Smoothie Copycat Recipe
McDonald’s Mango Smoothie Copycat Recipe: Sip into Sunshine!
Hey foodies! I’m so excited to share a little slice of sunshine with you today, right from the comfort of your kitchen. If you’ve ever strolled into a McDonald’s on a sunny day, you might have encountered their mouthwatering mango smoothie. It’s creamy, tropical, and just downright delicious! But why settle for a drive-thru visit when you can whip up your very own McDonald’s mango smoothie copycat recipe at home? That’s right! We’re gonna make a refreshing treat that’s as easy as pie—only way more delicious!
Imagine this: It’s a hot summer afternoon, and you’ve just finished mowing the lawn or perhaps playing with the kids in the backyard. The sun is high, and all you can think about is cooling down with something luscious and sweet. This mango smoothie is your answer! Not only is it a fantastic way to beat the heat, but it’s also a super easy recipe that’ll impress anyone lucky enough to share it with you.
So, let’s grab our blenders and get blending! We’ll take those simple ingredients and turn them into a dreamy, creamy mango paradise. Trust me; your taste buds will thank you!
A Sweet Memory
When I think of mango smoothies, I can’t help but be transported back to a family vacation in Florida, where the vibe was all about sunshine and chilled drinks. We hit up a local beach shack that served tropical smoothies, and the moment I took a sip of that mango blend—it was magic! The sensation of the creamy mango paired with the tartness of the orange juice was pure bliss. I remember laughing with my family, feeling the salty ocean breeze, and just soaking in all that joy.
Fast-forward to today, and I’m lucky to not only recreate those delicious memories but also share that same flavor with you! This recipe is like a warm hug from those carefree days—a sip of bliss that brings back that joyful nostalgia. So, let’s dive into the ingredients, shall we?
Ingredients
-
1 cup frozen pineapple
Perfect for adding a refreshing sweetness and a tropical twist! If you don’t have frozen pineapple, fresh works too; just toss it in the freezer for a few hours beforehand for that frosty goodness. -
1 cup frozen mango
Mango is the star of the show here! It adds that luscious, creamy texture. You can use fresh mango if you prefer; just peel and chop it, then freeze for a few hours. -
1 cup orange juice
The orange juice brightens up the smoothie with a zesty kick that balances all that sweetness. Feel free to use fresh-squeezed for an extra burst of flavor, or substitute with another juice like pineapple if you’re feeling fruity! -
1/3 cup vanilla yogurt
Creamy and dreamy, vanilla yogurt is what gives this smoothie its rich texture. Greek yogurt is a fantastic substitute if you’re looking for more protein. Go ahead and experiment with other flavors, too—coconut yogurt would be divine!
Step-by-Step Instructions
-
Gather Your Ingredients
First things first, gather your ingredients. You’ll want to make sure everything is ready to go; trust me, it makes the blending process smoother than ever—pun totally intended! -
Add Frozen Fruits to Blender
Toss in the frozen pineapple and mango first. You want to start with the frozen fruits for that cold, creamy texture. -
Pour in the Orange Juice
Next, pour in the orange juice. This liquid gold will help everything blend beautifully. If you’re using fresh juice, I recommend squeezing a few oranges for that vibrant taste. -
Scoop in the Vanilla Yogurt
Gently add in the vanilla yogurt. This is where our smoothie gets its creamy heaven—so don’t skimp on this step! -
Blend It Up!
Now it’s time for the fun part! Replace the lid on your blender and hit the button. Blend until smooth and creamy, stopping halfway to scrape down the sides if needed. If you find it too thick, add a splash more juice! -
Taste Test
Don’t forget to taste your creation! Adjust sweetness or tanginess here if you like. If you want it sweeter, blend in a small spoonful of honey or a splash of agave syrup! -
Serve and Enjoy
Pour that glorious mango smoothie into a tall glass. You can garnish with a slice of fresh mango or a sprig of mint for that extra touch. Cheers to summer vibes in a cup!
Serving Suggestions
This mango smoothie is versatile, perfect for breakfast, a midday snack, or even as a post-workout treat. To plate or rather serve it up nicely, consider using a mason jar or a fun glass with a colorful straw. Fancy it up with some tropical garnishes—think fresh mint leaves, slices of kiwi, or even a sprinkle of chia seeds on top.
Also, why not double the recipe and impress your friends during your next brunch gathering? It’s a vibrant centerpiece on any table, and you can make a toast to good times and great food!
Recipe Variations
Just because the original mango smoothie is a hit doesn’t mean we can’t play around with it! Here are some creative twists you can try:
-
Berry Blast
Swap out half of the mango for frozen strawberries or blueberries for a berry mango smoothie! -
Coconut Vibes
Grab some coconut milk instead of orange juice and throw in some shredded coconut for that tropical flair. -
Green Goodness
Add a handful of spinach or kale before blending for a healthy green smoothie that still tastes delicious! -
Protein Power
Mix in a scoop of your favorite protein powder if you need an extra boost after a workout. -
Choco-Mango Magic
Feel adventurous? Add a tablespoon of cocoa powder for a rich chocolatey twist on the classic!
Chef’s Notes
Over the years, I’ve had my own fun experimenting with this mango smoothie. I’ve tried various fruits, different yogurts, and even added a splash of rum for a tropical adult treat on lazy summer evenings! What started as a simple copycat has evolved into a kitchen staple that adapts to every season and craving.
Also, a funny kitchen story I have is how I once mistakenly added pickle juice instead of orange juice (don’t ask). It was not a proud moment—I’m still trying to block out that taste! But every misstep has taught me to keep experimenting until I find that right combination.
FAQs and Troubleshooting
-
Can I use fresh fruit instead of frozen?
Absolutely! Just freeze fresh fruit for a few hours before blending. This ensures your smoothie has the right texture. -
What if my smoothie is too thick?
No worries! Just add a bit more orange juice to loosen it up. Blend again, and you’ll have the perfect consistency! -
How long can I store leftovers?
Ideally, enjoy your smoothie fresh! But if you have leftovers, store them in the fridge for up to 24 hours in a sealed container. Give it a good stir before drinking, as it might separate. -
Is it possible to make this smoothie vegan?
Sure thing! Just swap the yogurt for a plant-based version, and you’re golden!
Nutritional Info
If you’re curious about the nutritional content of this delightful mango smoothie, here’s a general breakdown per serving:
- Calories: Approximately 200-250 kcal
- Carbohydrates: 45g
- Fiber: 3g
- Protein: 5g
- Fat: 3-5g (depending on yogurt choice)
- Sugars: 35g (mostly from the fruits, naturally!)
This smoothie is a great quick energy booster and a smart choice for breakfast or post-workout, providing a good balance of vitamins, nutrients, and hydration!
Final Thoughts
As we wrap up this tropical journey, I hope you feel inspired to bring a bit of sunshine into your home with this McDonald’s mango smoothie copycat recipe. Whether you’re sipping it solo or sharing with friends, it’s bound to bring smiles all around. Remember, cooking is about joy, love, and a sprinkle of creativity—so don’t be afraid to put your own spin on things!
Cheers to simple pleasures and delightful moments in the kitchen. Now go on, grab those ingredients, and let’s make some magic happen! Until next time, happy blending!
Print
McDonald’s Mango Smoothie Copycat Recipe
- Total Time: 10 minutes
- Yield: 2 servings 1x
- Diet: Vegetarian
Description
A delightful copycat recipe for McDonald’s creamy mango smoothie, perfect for cooling off on a hot day.
Ingredients
- 1 cup frozen pineapple
- 1 cup frozen mango
- 1 cup orange juice
- 1/3 cup vanilla yogurt
Instructions
- Gather your ingredients.
- Add frozen fruits to the blender.
- Pour in the orange juice.
- Scoop in the vanilla yogurt.
- Blend it up!
- Taste test.
- Serve and enjoy.
Notes
Try adding different fruits or yogurt for variations. This smoothie works great with fresh fruit too; just freeze it beforehand.
- Prep Time: 10 minutes
- Cook Time: 0 minutes
- Category: Beverage
- Method: Blending
- Cuisine: American
Nutrition
- Serving Size: 1 serving
- Calories: 225
- Sugar: 35g
- Sodium: 40mg
- Fat: 5g
- Saturated Fat: 2g
- Unsaturated Fat: 3g
- Trans Fat: 0g
- Carbohydrates: 45g
- Fiber: 3g
- Protein: 5g
- Cholesterol: 10mg
Keywords: mango smoothie, copycat recipe, refreshing drink, summer beverage
Irresistible Ruth’s Chris Stuffed Chicken Copycat Recipe Revealed!
Irresistible Ruth’s Chris Stuffed Chicken Copycat Recipe Revealed!
Hey there, fellow foodies! I’m Beau Collier, and I’m thrilled to welcome you to Feastical, where comfort-food dreams come to life. If you’ve ever dined at the iconic Ruth’s Chris Steak House, then you know their stuffed chicken is nothing short of a culinary marvel. But let me tell you—it’s not just a star on their menu; it can shine brightly right in your kitchen too!
Today, I’m here to unveil my very own take on this irresistible stuffed chicken, and trust me, it’s just as delightful, without the hefty price tag. What’s more, you’ll find that cooking this dish isn’t just about the final meal; it’s a journey filled with savory aromas, delightful flavors, and the joy of creating something special. So, whether you’re planning a cozy dinner for two, or you just want to impress your friends at a gathering, this recipe has got you covered!
We’re diving deep into every aspect of this scrumptious dish, from seasoning and stuffing to cooking hacks that’ll leave your guests begging for seconds! You might think that this classic dish is reserved for special occasions, but I’m here to tell you that you can whip it up anytime you want. Let’s have some fun in the kitchen as we roll up our sleeves and fetch those spatulas! Ready? Let’s get cooking!
Personal Story
Ah, stuffed chicken! It takes me back to a warm summer evening when I was just sixteen, helping my mom prepare dinner for a family gathering. We loved hosting our loved ones, and nothing said “celebrate” quite like a delicious homemade meal. I remember the scent of garlic sautéing in olive oil wafting through the kitchen as I stirred in the spinach, cream cheese, and mozzarella—my mom’s secret weapon. That night, we stuffed chicken breasts to bursting, and they were a hit!
We spent hours laughing and reminiscing around the dinner table, the once-quiet house transformed into a lively gathering place filled with love and laughter. Each slice of the stuffed chicken revealed a warm, cheesy center, and I watched everyone’s faces light up with joy—a memory etched in my heart forever. That experience not only sparked my love for cooking but taught me the importance of sharing good food with great company. So, every time I whip up this dish, it’s not just about the flavors; it’s about creating those same warm, joyful moments that bring people together!
Ingredients
Let’s gather our ingredients for this delicious stuffed chicken!
-
2 boneless, skinless chicken breasts
The star of the show! Choose chicken breasts that are plump and fresh. If you’re looking for a healthier option, try using chicken thighs for a juicier bite. -
1 cup spinach, chopped
Fresh spinach adds a lovely color and nutritional boost! If you can’t find fresh spinach, frozen will do just fine—just be sure to thaw and drain any excess water. -
1/2 cup cream cheese, softened
This creamy delight brings richness to the filling. Feel free to substitute with goat cheese or ricotta for a different flavor profile! -
1/2 cup mozzarella cheese, shredded
Mozzarella ties everything together with its irresistible melt! Want a smokier flavor? Try smoked mozzarella or gouda! -
1/4 cup grated Parmesan cheese
This adds a nice salty kick that elevates the dish. Pecorino Romano is a fantastic alternative if you’re seeking a sharper taste. -
2 cloves garlic, minced
Garlic is a must in my kitchen. It adds depth and flavor to the filling. If you’re in a pinch, garlic powder will work as a substitute! -
1 teaspoon Italian seasoning
A blend of herbs that takes this dish to the next level. If you have fresh herbs on hand, feel free to chop some up instead! -
Salt and pepper to taste
Don’t skip these; they’re essential for flavor. Kosher salt is preferable due to its grain size for even seasoning! -
Olive oil for cooking
I love using extra virgin olive oil for its flavor and heart-healthy benefits. You can also use avocado oil if you prefer a higher smoke point!
Step-by-Step Instructions
Step 1: Preheat the Oven
Let’s kick things off! Preheat your oven to 375°F (190°C). Preheating your oven ensures that your chicken will cook evenly and retain its juiciness. No one wants dry chicken, right?
Step 2: Prepare the Filling
In a medium mixing bowl, combine your chopped spinach, cream cheese, mozzarella, Parmesan, minced garlic, and Italian seasoning. Use a fork or spatula to blend everything together until it’s nicely mixed. You want the cheese to be evenly distributed among the spinach. If it looks a bit lumpy, don’t worry; that’s all part of its charm!
Step 3: Season the Chicken
Next up, let’s season our chicken breasts! Give them a gentle rinse and pat them dry with some paper towels. This step is crucial because you want to avoid any excess moisture on the surface. Season both sides generously with salt and pepper. Got any favorite spice blends? Feel free to sprinkle those on too!
Step 4: Stuff the Chicken
Now comes the fun part! To stuff the chicken, create a pocket by slicing into the side of each breast (don’t cut all the way through!). Grab a generous spoonful of your creamy spinach filling and stuff it right in there. Don’t be shy; you want that filling to be nice and full!
Step 5: Secure the Chicken
Use toothpicks to secure the openings of the stuffed chicken breasts. This will prevent that luscious filling from spilling out while it cooks. A little kitchen hack? Soak the toothpicks in water for about 10 minutes before using them. This prevents them from burning!
Step 6: Cook the Chicken
In an oven-safe skillet, heat about a tablespoon of olive oil over medium-high heat. Once the oil is shimmering, carefully add the stuffed chicken breasts. Sear them for about 4–5 minutes on each side until they turn beautiful golden brown. This step not only locks in all that moisture but also gives it an appetizing color.
Step 7: Bake to Perfection
Once browned, transfer the skillet to your preheated oven. Bake for 25-30 minutes, or until the chicken reaches an internal temperature of 165°F (74°C). Use your meat thermometer to check. Juicy, perfectly cooked chicken is the goal!
Step 8: Rest Before Serving
Remove the skillet from the oven and let the chicken rest for about 5 minutes. This allows the juices to redistribute for that tender bite. You know you’ve got a great dish when the chicken is juicy and oozes that heavenly filling as you slice into it!
Serving Suggestions
Time to plate this beauty! For a stunning presentation, I suggest serving your stuffed chicken over a bed of fluffy risotto or creamy mashed potatoes. Drizzle some extra virgin olive oil over the top for shine, and sprinkle with fresh herbs like parsley or basil for that pop of color. You can even try pairing it with a refreshing side salad or seasonal roasted vegetables to balance the richness!
Recipe Variations
-
Mediterranean Twist: Swap out the cream cheese for feta and add sun-dried tomatoes and Kalamata olives into the spinach filling for a Mediterranean feast!
-
Spicy Kick: Add some crushed red pepper flakes or sliced jalapeños into the filling to give your chicken a kick that will spice up your dinner!
-
Herbaceous Delight: Use fresh herbs like basil and thyme instead of Italian seasoning for a vibrant, fresh taste. Combine with some lemon zest for zesty brightness!
-
Cheesy Broccoli Stuffing: Instead of spinach, use finely chopped steamed broccoli with cheddar cheese for a different veggie-packed version.
-
Wild Mushroom Medley: Sauté some wild mushrooms with garlic and mix them into the filling for an earthy flavor profile that elevates this dish even further!
Chef’s Notes
As this dish has evolved over time, it remains a staple in my kitchen repertoire! I’ve played around with various ingredients and fillings, and each twist brings back delightful memories of that summer evening with my mom. One funny kitchen story? The first time I attempted this recipe, I got too excited and stuffed the chicken until it burst in the skillet! So, remember the golden rule—stuff generously, but not excessively! Everyone makes mistakes in the kitchen. It’s part of the cooking journey!
FAQs and Troubleshooting
-
What can I do if my chicken breasts are uneven in thickness?
- If you have uneven chicken breasts, you can gently pound them to an even thickness using a meat mallet. This will ensure even cooking and tenderness throughout.
-
Why is my cheese oozing out?
- If your filling is too much for the pocket, it may ooze out as it cooks. Just make sure not to overstuff your chicken and secure those openings well!
-
How do I know when the chicken is done?
- The safest way to check is by using a meat thermometer. Chicken should reach an internal temperature of 165°F (74°C) for it to be safe to eat!
-
Can I make this ahead of time?
- Absolutely! You can prepare and stuff the chicken earlier in the day. Just keep it in the fridge, and when you’re ready, pop it in the oven. Cooking time might need a slight adjustment!
Nutritional Info
This copycat Ruth’s Chris stuffed chicken packs a punch with flavor and nutrition! Each serving is approximately 400 calories, rich in protein from the chicken and cheese, and boasts vitamins and minerals from the spinach. Packed with healthy fats from olive oil and cheese, it also delivers comfort without compromise. But remember, portion control is key if you’re watching your calorie intake. Serve it with a side of veggies or a salad for a balanced meal!
Final Thoughts
And there you have it, foodie friends! The deliciousness of a classic Ruth’s Chris stuffed chicken right in your very own home. Cooking is all about bringing people together and enjoying those flavorful moments of joy—all while having fun. I hope you’ll make this dish a part of your kitchen adventures!
Don’t forget, cooking is just as much about experimentation and creativity as it is about following the recipe. So, feel free to customize it to suit your tastes! I’d love to hear about your unique takes on this dish, so drop a comment below or tag me when you share your creations. Remember, as long as you cook with love and laughter, you can never go wrong in the kitchen. Happy cooking, and may your plates always be filled with joy! ✨
Print
Irresistible Ruth’s Chris Stuffed Chicken Copycat
- Total Time: 45 minutes
- Yield: 2 servings 1x
- Diet: Paleo
Description
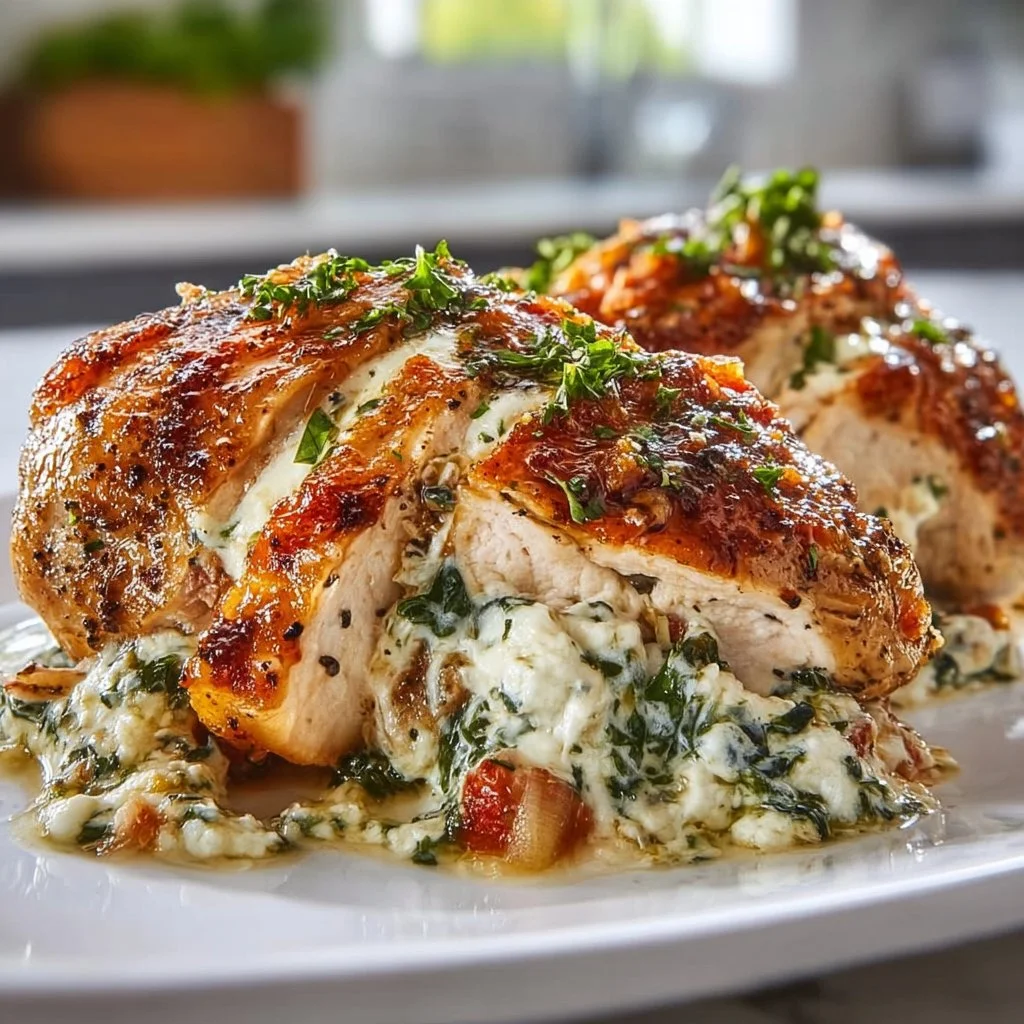
Enjoy the flavors of Ruth’s Chris Steak House with this delightful stuffed chicken recipe, featuring a creamy spinach filling.
Ingredients
- 2 boneless, skinless chicken breasts
- 1 cup spinach, chopped
- 1/2 cup cream cheese, softened
- 1/2 cup mozzarella cheese, shredded
- 1/4 cup grated Parmesan cheese
- 2 cloves garlic, minced
- 1 teaspoon Italian seasoning
- Salt and pepper to taste
- Olive oil for cooking
Instructions
- Preheat your oven to 375°F (190°C).
- Combine chopped spinach, cream cheese, mozzarella, Parmesan, minced garlic, and Italian seasoning in a bowl.
- Season both sides of the chicken breasts with salt and pepper.
- Stuff each chicken breast by creating a pocket and filling it with the spinach mixture.
- Secure the openings with toothpicks to keep the filling inside.
- Heat olive oil in an oven-safe skillet and sear the chicken for 4–5 minutes on each side.
- Transfer the skillet to the preheated oven and bake for 25-30 minutes until the chicken is cooked through.
- Rest for 5 minutes before serving.
Notes
This dish can be prepared ahead of time; just refrigerate and bake when ready.
- Prep Time: 15 minutes
- Cook Time: 30 minutes
- Category: Main Course
- Method: Baking
- Cuisine: American
Nutrition
- Serving Size: 1 serving
- Calories: 400
- Sugar: 2g
- Sodium: 500mg
- Fat: 24g
- Saturated Fat: 10g
- Unsaturated Fat: 10g
- Trans Fat: 0g
- Carbohydrates: 8g
- Fiber: 1g
- Protein: 35g
- Cholesterol: 90mg
Keywords: stuffed chicken, creamy spinach, copycat recipe, Ruth's Chris, comfort food