
Your New Favorite Dessert is a Happy Little Accident
Hey there, friend! Beau here, welcoming you back to my kitchen at Feastical. You know me—I’m all about those recipes that feel like a warm hug, the ones that bring people together without stressing you out. Today, we’re whipping up a dessert that’s so simple, so soul-satisfyingly good, it feels like a secret we all should have been let in on years ago. I’m talking about my Yellow Cheesy Cake.
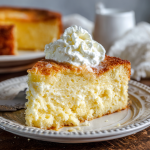
Now, if you’re picturing a classic, fussy New York-style cheesecake with a water bath and a potential for cracks, take a deep breath and let that go. This is the opposite of that. This is a vintage, grandma-style hack that uses a box of yellow cake mix as its starting point. But wait—before you scroll on, hear me out! This isn’t just a cake mix cake. By folding in creamy, tangy cream cheese and a dollop of rich sour cream, we transform that humble box into something magical: a dense, moist, and incredibly tender cake that tastes just like the soul of a cheesecake, but with the easy-breezy attitude of a weeknight snack.
It’s soft, it’s creamy, and it has this melt-in-your-mouth texture that will have you sneaking back to the pan for just one more “forkful.” It’s the perfect bridge between a casual potluck and a cozy family dinner. So, grab your favorite mixing bowl and that trusty spatula (you know, the one that’s always hiding in the back of the drawer). We’re about to make a little magic happen.
The Day Grandma’s Recipe Box Spilled Its Secrets
This recipe takes me right back to my Aunt Carol’s sun-drenched kitchen. She was the queen of “semi-homemade” before it was even a thing. One sweltering summer afternoon, she was supposed to bring a dessert to a family reunion. The problem? Her air conditioner was on the fritz, and the last thing she wanted to do was fuss with a complicated, hours-long recipe.
I watched her, a whirlwind of flour and determination, glance at a box of yellow cake mix and then at a block of cream cheese softening on the counter. With a mischievous grin, she declared, “We’re experimenting, Beau!” What came out of the oven that day was a revelation. It was golden, slightly crisp on the edges, but impossibly soft and rich in the middle. It had the familiar comfort of a birthday cake but with a sophisticated, tangy depth we all recognized from cheesecake. It was an instant hit, and it’s been a staple in my recipe arsenal ever since. It’s a beautiful reminder that the best recipes aren’t always the most complicated—they’re the ones born out of necessity, a little creativity, and a whole lot of love.
Gathering Your Kitchen Crew: The Ingredients
Here’s the beautiful part: you only need a handful of simple ingredients to create this masterpiece. Let’s break them down, because knowing your “why” makes the cooking so much more fun.
- 1 box Yellow Cake Mix: This is our foundation. It brings the perfect vanilla-buttery flavor and the structure we need. Don’t use a “pudding in the mix” variety if you can avoid it; the standard one works perfectly. Chef’s Insight: The pre-mixed flour, leavening, and sugar in the box are our best friends for a no-fail start.
- 2 large Eggs: Our binding agents! They add richness, structure, and that beautiful golden color to the crumb. Make sure they’re at room temperature for a smoother, more cohesive batter.
- 3–4 tbsp Sour Cream: This is the secret weapon for incredible moisture and a subtle tang. The fat content is key here. Substitution Tip: No sour cream? Full-fat Greek yogurt is a fantastic stand-in.
- ½ block (4 oz) Cream Cheese, softened: The star of the show! This is what gives our cake that iconic “cheesy” flavor and dense, luxurious texture. Softening it is non-negotiable—if it’s cold, you’ll end up with lumpy batter. Leave it on the counter for a good hour before you start.
- Water or Buttermilk, as needed: We use this to bring the batter to the perfect, thick-but-pourable consistency. Chef’s Hack: I highly recommend buttermilk! Its acidity tenderizes the gluten in the cake mix, making for an even more tender crumb and adding another layer of tangy flavor. If you only have water, that’s totally fine—it’ll still be delicious!
Let’s Get Baking: The Step-by-Step Magic
Ready to see how this all comes together? It’s a one-bowl wonder, my friends. Follow these steps, and you’ll be a hero in under an hour.
- Preheat and Prep. Fire up that oven to a cozy 350°F (175°C). While it’s warming up, generously grease your 9×13 inch baking pan or a standard round cake pan. I’m a big fan of using a little butter and a dusting of flour, but a good non-stick spray works wonders, too. Chef’s Tip: For super easy removal, line your greased pan with a sheet of parchment paper, letting the edges hang over the sides. You’ll thank me later!
- The Big Mix. In a large mixing bowl, combine the yellow cake mix, eggs, sour cream, and that all-important softened cream cheese. Now, here’s where your arm gets a little workout! Using a hand mixer (or a sturdy whisk and some determination), beat everything on medium speed until it’s just combined. You want a thick, almost cookie-dough-like consistency at this stage. A few small lumps of cream cheese are okay—they’ll melt into lovely little pockets of creaminess.
- Find the Flow. This is where you become the artist. Start adding your water or buttermilk, a tablespoon or two at a time, mixing after each addition. We’re looking for a thick but pourable batter—think a slow-moving lava kind of vibe. You may not need the full amount listed, or you might need a splash more. Trust your instincts! The batter should plop off a spoon rather than run off.
- Pan and Smooth. Pour your beautiful batter into your prepared pan. Use a spatula or the back of a spoon to spread it into an even layer, making sure you get right into the corners. Little Chef Hack: Give the pan a few gentle taps on the countertop to release any large air bubbles, which helps us get an even bake.
- Bake to Golden Perfection. Slide that pan into the center of your preheated oven and let the magic happen for 35-40 minutes. You’ll know it’s done when the top is a gorgeous golden brown, the edges are just starting to pull away from the pan, and a toothpick inserted into the center comes out clean or with a few moist crumbs attached. Watchful Eye: All ovens are different, so start checking at the 30-minute mark!
- The Hardest Part: The Cool Down. I know, the aroma is intoxicating and you want to dive right in. But patience, young grasshopper! Let the cake cool in the pan on a wire rack for at least 20-30 minutes. This allows the structure to set, making it much easier to slice and serve.
How to Serve This Slice of Sunshine
Now for the fun part: eating! This Yellow Cheesy Cake is incredibly versatile. Here are a few of my favorite ways to dress it up (or down!).
Keep it Simple: Honestly, a square of this cake, still slightly warm from the pan, is absolute perfection all on its own. The flavors are so rich and comforting, it doesn’t need a thing.
Classic & Creamy: A generous dollop of freshly whipped cream and a handful of fresh berries (raspberries or strawberries are my go-to) cuts through the richness beautifully and adds a bright, fresh note.
Frosting Fanatic? You can’t go wrong with a simple vanilla glaze (just mix powdered sugar with a little milk and vanilla extract) or even a smear of store-bought cream cheese frosting for the ultimate cheesy experience. Drizzle it over the top while the cake is still warm so it soaks in a little.
Pro Plating: For a dinner party, slice a square, place it slightly off-center on a white plate, dust it with powdered sugar, add a mint sprig, and a zigzag of raspberry coulis. Looks fancy, took seconds. Your secret is safe with me.
Make It Your Own: Delicious Twists & Swaps
Once you’ve mastered the base recipe, the playground is open! Here are a few ways to mix it up and keep things exciting.
- Lemon Zest Sunshine: Add the zest of one large lemon to the batter. The bright, citrusy pop works wonders with the creamy tang of the cheese.
- Chocolate Chip Cheesy Dream: Fold in a heaping ½ cup of semi-sweet chocolate chips right before pouring the batter into the pan. It’s like a cookie and a cake had the most delicious baby.
- Fruity Swirl Sensation: Before baking, drop spoonfuls of your favorite fruit preserves (raspberry, cherry, or apricot are fantastic) over the top of the batter. Use a knife or toothpick to gently swirl it in for a beautiful marbled effect.
- Gluten-Free & Dairy-Smart: You can absolutely make this work for your dietary needs! Use a certified gluten-free yellow cake mix. For the dairy, swap the sour cream for a plant-based alternative and use a vegan cream cheese and butter substitute. The texture might vary slightly, but the delicious spirit will remain.
- Spice It Up: For a fall-inspired version, add a teaspoon of cinnamon and a pinch of nutmeg to the dry cake mix. It’s like a cozy snickerdoodle in cake form.
Beau’s Kitchen Chronicles: A Few Parting Thoughts
This recipe has been with me through so many life moments—it’s been the star of backyard barbecues, the comfort food after a long day, and the “oh, you shouldn’t have!” dish at countless potlucks. Over the years, I’ve learned it’s virtually foolproof. I once accidentally used a whole block of cream cheese instead of a half (I was chatting and not paying attention!), and you know what? It was even richer and more decadent! A happy little accident, as Bob Ross would say.
The beauty of this Yellow Cheesy Cake is its flexibility and its heart. It never fails to bring a smile. So don’t be afraid to make it your own. Baking is about joy, not just rules.
Your Questions, Answered!
I’ve gotten a lot of questions about this recipe over the years. Here are the most common ones to ensure your baking success.
Q: My batter was really lumpy. What did I do wrong?
A: This almost always happens when the cream cheese wasn’t fully softened. Make sure to take it out of the fridge at least an hour beforehand. If you’re in a pinch, you can microwave it for 10-15 seconds on a plate, but be careful not to melt it! For existing lumps, just keep mixing—they’ll mostly incorporate.
Q: Can I make this into cupcakes?
A: Absolutely! This recipe makes fantastic, dense cupcakes. Line a muffin tin with liners, fill them ⅔ full, and bake for 18-22 minutes, or until a toothpick comes out clean. They’re a huge hit with kids and are perfect for portioning.
Q: The middle of my cake sunk a little after baking. Is it ruined?
A: Not at all! A slight dip in the center is pretty common with this denser cake and is often due to the high moisture content from the cream cheese and sour cream. It’s certainly not a flaw in flavor! This is actually the perfect little well for holding extra whipped cream or glaze. No one will ever know it wasn’t planned.
Q: How should I store leftovers?
A> Cover the pan tightly with plastic wrap or transfer slices to an airtight container. It will keep beautifully at room temperature for 2 days, or in the fridge for up to 5 days. I actually love it cold straight from the fridge—the texture becomes even more fudgy!
Yellow Cheesy Cake : Vintage Cream Cheese Cake Hack
Description
This isn’t your fussy, crack-prone cheesecake. This is a dense, moist, and tender cake with all the rich, tangy flavor of cheesecake, made simple with a humble box of yellow cake mix. With cream cheese, sour cream, and a few clever tricks, this dessert is a happy little accident that will have everyone coming back for more.
Ingredients
-
1 box yellow cake mix (regular, no pudding-in-the-mix)
-
2 large eggs, room temperature
-
3–4 tbsp sour cream (or full-fat Greek yogurt)
-
½ block (4 oz) cream cheese, softened
-
2–4 tbsp water or buttermilk (to adjust batter consistency)
Optional Add-ins & Toppings:
-
Fresh berries or fruit preserves
-
Whipped cream
-
Powdered sugar or vanilla glaze
-
Chocolate chips
-
Spices: cinnamon, nutmeg, or lemon zest
Instructions
Preheat oven to 350°F (175°C). Grease a 9×13-inch pan or standard cake pan (line with parchment for easy removal).
In a large bowl, beat together eggs, sour cream, and softened cream cheese until smooth.
Add the yellow cake mix to the bowl. Beat on medium speed until combined. Batter will be thick—small lumps of cream cheese are okay.
Add water or buttermilk 1 tbsp at a time, mixing gently, until the batter is thick but pourable.
Transfer batter to the prepared pan. Spread evenly, and tap gently to release air bubbles.
Bake for 35–40 minutes, or until the top is golden and a toothpick inserted in the center comes out clean or with a few moist crumbs. Start checking at 30 minutes.
Cool for at least 20–30 minutes before slicing. Serve warm or at room temperature. Add whipped cream, fresh berries, or a simple glaze if desired.
Notes
-
Lumpy batter? Cream cheese may not have been fully softened. Mix a bit longer; small lumps will bake in beautifully.
-
Can this be cupcakes? Yes! Line a muffin tin, fill ⅔ full, bake 18–22 minutes.
-
Sinking middle? Common for dense cakes with high moisture—perfect for holding toppings like whipped cream.
-
Storage: Cover tightly; keeps 2 days at room temperature, 5 days refrigerated. Delicious cold!
Nutrition
- Calories: 240 Cal Per Serving
- Sugar: 15g
- Fat: 12g
- Carbohydrates: 28g
- Protein: 3g
Let’s Talk Nutrition (The Real Talk!)
Look, I’m a firm believer that food is about nourishment for the soul as much as it is for the body. This Yellow Cheesy Cake is a dessert, through and through—a treat to be savored and shared with joy. It’s not a salad, and we’re not going to pretend it is!
That said, here’s a general nutritional breakdown per slice (based on 12 servings, without any added frosting or glaze, and using the ingredients listed). Remember, these are estimates and can vary based on the specific brands you use.
- Calories: ~240
- Carbohydrates: 28g
- Fat: 12g
- Sugar: 15g
- Protein: 3g
My philosophy? Enjoy a slice, share the rest, and savor every single, blissful bite without an ounce of guilt. Life’s too short not to enjoy the simple, cheesy pleasures.
One Last Forkful of Wisdom
And there you have it, my friend. The wonderfully simple, endlessly adaptable Yellow Cheesy Cake. It’s proof that you don’t need a culinary degree or a pantry full of obscure ingredients to create something truly special and memorable in the kitchen. It’s about the joy of mixing, the anticipation as it bakes, and the shared happiness as you pass a plate to someone you love.
I’d love to hear how your cake turns out! Did you add a twist? Did it become an instant family favorite? Tag me on social @Feastical or drop a comment on the blog. Sharing our kitchen stories is my favorite part of this whole delicious journey.
Until next time, keep your whisks busy and your hearts full.
– Beau