
Your New Favorite Dessert is Here: White Chocolate Raspberry Cheesecake
Hey friends, Beau from Feastical here! Let’s talk about a dessert that feels like a celebration in every single bite. We’re diving fork-first into the world of my legendary White Chocolate Raspberry Cheesecake. Now, I know what you might be thinking: “Beau, cheesecake can be intimidating!” But trust me, we’re going to walk through this together, step-by-step, and I promise you’ll end up with a show-stopping masterpiece that’s as fun to make as it is to devour.
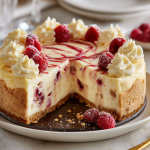
This isn’t just any cheesecake. This is a symphony of textures and flavors. Imagine a buttery, crumbly crust that gives way to an impossibly silky, rich filling infused with sweet, creamy white chocolate. Woven through it all are vibrant, tangy ribbons of raspberry swirl that cut through the richness perfectly. It’s elegant enough for a holiday table, special enough for a birthday, and honestly, just perfect for a Tuesday when you need a little extra joy.
So, tie on your favorite apron, clear some counter space, and let’s create some magic. This recipe is my love letter to desserts that look fancy but are built on simple, feel-good techniques. Get ready to fall in love with baking all over again!
The Cheesecake That Started It All
This recipe takes me right back to my grandma’s kitchen, a place that always smelled like sugar and sunshine. She was the queen of “a little of this, a little of that” cooking, but her cheesecake was a sacred, written-in-pen recipe. One summer, I was determined to learn it. I was about fourteen, feeling mighty confident with a whisk, and I decided to “improve” her classic New York-style by adding the white chocolate and raspberry she loved in her thumbprint cookies.
The first attempt was… a learning experience. Let’s just say I learned the hard way that “softened” cream cheese doesn’t mean “melted in the microwave.” We ended up with a lumpy, grainy filling that made us both laugh until we cried. But Grandma, in her infinite wisdom, just patted my shoulder and said, “Beau, the best recipes are born from happy mistakes. Let’s try again, together.” That second try, watching the beautiful pink swirls marble into the creamy white batter, was pure magic. It’s that spirit of joy, experimentation, and togetherness that I’ve baked into this very recipe for you.
Gathering Your Cheesecake Dream Team
Here’s everything you’ll need to create this masterpiece. I’ve included some of my favorite chef insights and substitution tips to make this recipe your own. Remember, quality ingredients make a happy cheesecake!
For the Buttery Crust:
- 1½ cups graham cracker or vanilla wafer crumbs: Graham crackers give you that classic, slightly honeyed flavor, while vanilla wafers create a sweeter, more cookie-like base. You can’t go wrong! I often use a food processor to crush them, but a zip-top bag and a rolling pin work great for a little stress relief.
- ¼ cup granulated sugar: This sweetens the crust and helps it crisp up beautifully.
- 6 tbsp melted butter: The glue that holds our crust together! Use unsalted butter so you control the salt level. For a deeper flavor, try browning the butter first—it adds a incredible nutty note.
For the Silky White Chocolate Filling:
- 3 (8 oz) blocks full-fat cream cheese, softened: This is non-negotiable, friends. Full-fat gives you that luxuriously creamy texture. And softened is the secret word! Leave it on the counter for a few hours until it’s room temperature and pliable. This prevents a lumpy batter.
- ¾ cup granulated sugar: The perfect amount to sweeten without overpowering the white chocolate.
- 3 large eggs, at room temperature: Room temp eggs incorporate more smoothly, giving you a seamless, velvety filling. Add them one at a time, just like we’ll talk about in the steps.
- 8 oz quality white chocolate, melted and slightly cooled: Don’t use white chocolate chips here—they often contain stabilizers that don’t melt as smoothly. Look for a baking bar. We’ll melt it gently to avoid seizing.
- ½ cup full-fat sour cream: This is my secret weapon! It adds a subtle tang and incredible moisture, making the cheesecake even creamier.
- 1 tsp pure vanilla extract: The flavor backbone. It enhances both the chocolate and the berry notes beautifully.
For the Vibrant Raspberry Swirl:
- ½ cup raspberry preserves or seedless raspberry sauce: Using seedless preserves gives you a super smooth, beautiful swirl. If you love the texture of seeds, go for it! You can also blend fresh raspberries with a little sugar and strain them for a from-scratch sauce.
Let’s Build This Beautiful Beast: Step-by-Step
Okay, team. This is where the fun begins. Read through all the steps once before you start, and remember: patience is your best friend in the cheesecake game. We’re not rushing; we’re creating.
- Preheat and Prep: Fire up your oven to 325°F (165°C). Grab your trusty 9-inch springform pan. Pro Chef Hack: For extra insurance against sticking, take a small piece of butter and lightly grease the bottom and sides of the pan before you add the crust. It’s a little trick that makes release day a breeze.
- Create the Crust: In a medium bowl, stir together your graham cracker crumbs and sugar. Pour in the melted butter and mix until the mixture resembles wet sand and holds together when you pinch it. Dump it into your prepared pan and press it firmly and evenly into the bottom and about halfway up the sides. I like to use the bottom of a measuring cup to really tamp it down flat. Bake this for 10 minutes, then let it cool on a rack while you make the filling. This quick pre-bake sets the crust and prevents sogginess!
- Conquer the Filling: In the bowl of a stand mixer fitted with the paddle attachment (or a large bowl with a hand mixer), beat the softened cream cheese and sugar on medium-low speed until it is completely smooth, creamy, and free of lumps. This is crucial: Scrape down the bowl and beater several times to ensure no hidden lumps are lurking. Now, with the mixer on low, add the eggs one at a time, mixing until just incorporated after each addition. Overmixing at this stage incorporates too much air and can cause cracking! Finally, mix in the slightly cooled melted white chocolate, followed by the sour cream and vanilla extract. Mix until the batter is a beautiful, uniform, creamy dream. Remember, low and slow wins the race.
- The Grand Swirl: Pour your gorgeous filling into the cooled crust and smooth the top with a spatula. Now, for the art project! Drop small spoonfuls of the raspberry preserves randomly over the top of the filling. Take a thin knife or a wooden skewer and gently drag it through the raspberry dollops and the cheesecake batter beneath, creating beautiful marbled patterns. Don’t over-swirl, or the colors will muddle! A few elegant passes are all you need.
- The Perfect Bake: Place the cheesecake in the preheated oven and bake for 55-65 minutes. You’re looking for the edges to be puffed and set, while the center—about a 3-inch circle—still has a distinct jiggle when you gently shake the pan. It will look underdone, but I promise, it’s perfect. This residual heat will continue to cook the center as it cools. Another Pro Hack: For the ultimate creamy texture and to prevent cracks, place a pan of hot water on the rack below the cheesecake. The steam creates a gentle, even heat.
- The All-Important Cool Down: Once baked, turn off the oven, crack the door open slightly, and let the cheesecake cool inside for about an hour. This gradual temperature change is the #1 defense against the dreaded cheesecake crack! After that, transfer it to a wire rack to cool completely to room temperature. Then, and only then, cover it and move it to the refrigerator to chill for at least 4 hours, but preferably overnight. This patience-testing step is what gives you that perfect, sliceable, firm-yet-creamy texture.
How to Serve This Stunning Dessert
The moment of truth! When you’re ready to serve, run a thin, sharp knife under hot water, wipe it dry, and gently slide it around the edge of the springform pan before releasing the clamp. This ensures a clean, beautiful release.
For the final flourish, I love to top the whole cheesecake with a pile of fresh, vibrant raspberries right in the center. You can also dust the edges with a little powdered sugar for a snowy effect or drizzle with a bit of extra melted white chocolate.
When slicing, remember the hot knife trick! Dip your sharp knife in hot water and wipe it clean between each cut. This gives you those pristine, restaurant-quality slices that show off your beautiful swirls. Serve it on its own for pure decadence, or with a little dollop of freshly whipped cream on the side. It’s a showstopper no matter what!
Make It Your Own: Delicious Twists & Swaps
One of the best things about this recipe is its versatility. Feel like playing? Here are some of my favorite ways to mix it up:
- Chocolate Lover’s Dream: Swap the graham cracker crust for a chocolate wafer crust. You can even fold in a handful of mini dark chocolate chips into the batter for a double-chocolate experience.
- Triple Berry Blast: Use a mix of raspberry, blackberry, and strawberry preserves for your swirl. The mix of berry flavors is absolutely incredible.
- Lemon Raspberry Brightness: Add the zest of one lemon to the cheesecake filling. The bright, citrusy notes make the raspberry and white chocolate absolutely sing.
- Boozy & Bold: For a grown-up version, stir one tablespoon of Chambord (raspberry liqueur) or a good quality vanilla vodka into the raspberry preserves before swirling.
- Gluten-Free Friendly: Use certified gluten-free graham crackers for the crust, and you’re all set! The filling is naturally gluten-free.
Beau’s Chef’s Notes & Kitchen Confessions
This recipe has been my go-to for years, and it’s evolved with every bake. I used to be so terrified of cracks that I’d barely breathe near the oven! But I’ve learned that even if a small crack appears (and they sometimes do!), it’s nothing a pile of fresh berries or a whipped cream topping can’t hide. The flavor is always 100% phenomenal.
My biggest lesson? The overnight chill is not a suggestion—it’s a commandment. The flavors meld and deepen, and the texture becomes absolute perfection. It’s a dessert that rewards planning. And hey, if you’re like me and sometimes forget to soften the cream cheese, you can *gently* warm it in the microwave in 15-second bursts on low power. Just watch it like a hawk!
Your Cheesecake Questions, Answered!
Over the years, I’ve gotten a lot of questions about this recipe. Here are the ones I see most often!
Q: My cheesecake cracked! What did I do wrong?
A: First, don’t panic! It still tastes amazing. Cracks usually happen from a sudden temperature change or overbaking. Next time, make sure you’re using the water bath method (even just a pan of water on a lower rack helps) and that you’re cooling it gradually in the turned-off oven with the door cracked. Remember, the center should still be jiggly!
Q: Can I use frozen raspberries instead of preserves?
A: You can! Thaw about 1 cup of frozen raspberries, then blend and strain them to remove the seeds. Simmer the puree in a small saucepan with a tablespoon of sugar until it thickens slightly (like a thin sauce). Let it cool completely before using it for the swirl.
Q: Why is my filling lumpy?
A: This almost always traces back to the cream cheese not being soft enough. Room temperature is key! Also, make sure you’re beating the cream cheese and sugar until it’s perfectly smooth before adding the other ingredients.
Q: How long will this keep in the fridge?
A: Tightly covered, this cheesecake is happy in the fridge for up to 5 days. It also freezes beautifully for up to 3 months. Thaw it overnight in the refrigerator before serving.
White Chocolate Raspberry Cheesecake
Description
Hey friends, Beau from Feastical here! This cheesecake is a showstopper: buttery crust, silky white chocolate filling, and vibrant raspberry swirls that cut through the richness perfectly. Elegant enough for holidays, birthdays, or just a Tuesday treat, it’s built on simple, feel-good techniques that anyone can master.
Ingredients
For the Crust:
-
1½ cups graham cracker or vanilla wafer crumbs
-
¼ cup granulated sugar
-
6 tbsp unsalted butter, melted
For the White Chocolate Filling:
-
3 (8 oz) blocks full-fat cream cheese, softened
-
¾ cup granulated sugar
-
3 large eggs, room temperature
-
8 oz white chocolate, melted and slightly cooled
-
½ cup full-fat sour cream
-
1 tsp vanilla extract
For the Raspberry Swirl:
-
½ cup raspberry preserves or seedless raspberry sauce
Optional Garnish:
-
Fresh raspberries
-
Powdered sugar
-
Drizzle of melted white chocolate
Instructions
1. Prep & Crust
-
Preheat oven to 325°F (165°C).
-
Grease a 9-inch springform pan lightly with butter.
-
Mix crumbs and sugar; stir in melted butter until wet sand-like. Press into the bottom and halfway up the sides.
-
Bake 10 minutes; let cool while preparing filling.
2. Make Filling
-
Beat cream cheese and sugar until smooth.
-
Add eggs one at a time, mixing slowly.
-
Mix in melted white chocolate, sour cream, and vanilla until smooth.
3. Add Raspberry Swirl
-
Pour filling over cooled crust.
-
Drop spoonfuls of raspberry preserves on top and gently swirl with a knife or skewer.
4. Bake Cheesecake
-
Bake 55–65 minutes: edges set, center slightly jiggly.
-
Optional: place a pan of hot water on a lower rack for gentle baking.
5. Cool & Chill
-
Let cool in oven with door cracked for 1 hour.
-
Transfer to wire rack to reach room temperature.
-
Refrigerate at least 4 hours or overnight.
6. Serve
-
Run a hot, clean knife around the edges before removing the springform.
-
Garnish with fresh raspberries, powdered sugar, or extra melted white chocolate.
-
Slice with a hot knife for perfect, clean pieces.
Notes
-
Chocolate Lovers: Use chocolate wafer crust or fold in mini dark chocolate chips.
-
Triple Berry: Swap or mix preserves: raspberry, strawberry, and blackberry.
-
Lemon Twist: Add zest of 1 lemon to filling for bright citrus notes.
-
Boozy: Stir 1 tbsp Chambord or vanilla vodka into raspberry preserves.
-
Gluten-Free: Use certified gluten-free graham crackers.
-
Prevent Cracks: Use a water bath and allow gradual cooling.
Nutrition
- Calories: 420Cal Per slice
- Fat: 28g
- Carbohydrates: 35g
- Protein: 6g
Nutritional Info (Because Balance is Key!)
Now, let’s be real—this is a decadent, special-occasion dessert. But I believe in knowing what you’re eating, so you can enjoy every single bite mindfully. The following is an estimate per slice (based on 12 servings):
- Calories: ~420
- Fat: 28g
- Protein: 6g
- Carbohydrates: 35g
This cheesecake is rich in calcium from the dairy and provides a good amount of energy, making it a truly satisfying treat. It’s all about savoring a slice, not devouring the whole thing (as tempting as that may be!). Pair it with a cup of black coffee or a glass of cold milk for the ultimate experience.
Final Thoughts from My Kitchen to Yours
Well, there you have it, my friends—my heart and soul in cheesecake form. This White Chocolate Raspberry Cheesecake is more than just a recipe; it’s a project filled with love, a little bit of science, and a whole lot of delicious reward. It’s the dessert you make when you want to say “I love you,” “Congratulations,” or simply “You are worth the effort.”
I hope you feel inspired, empowered, and excited to give it a try. Remember, cooking is an adventure, and the kitchen is your playground. If you make it, I’d be absolutely thrilled to see your creation! Tag me @Feastical on social media so I can cheer you on.
Until next time, keep your kitchen messy and your heart full.