White Chocolate Berry Clusters – Sweet, Crunchy, and No-Bake in Minutes
The Easiest, Most Impressive Little Treat You’ll Ever Make
Hey friends, Beau here! Let’s be real for a second. Some days, you need a little spark of sweetness in your life, but the thought of preheating the oven, hauling out the mixer, and scrubbing a mountain of bowls feels… well, it feels like a chore. And around here, we believe food should never feel like a chore. It should feel like a high-five for your soul.
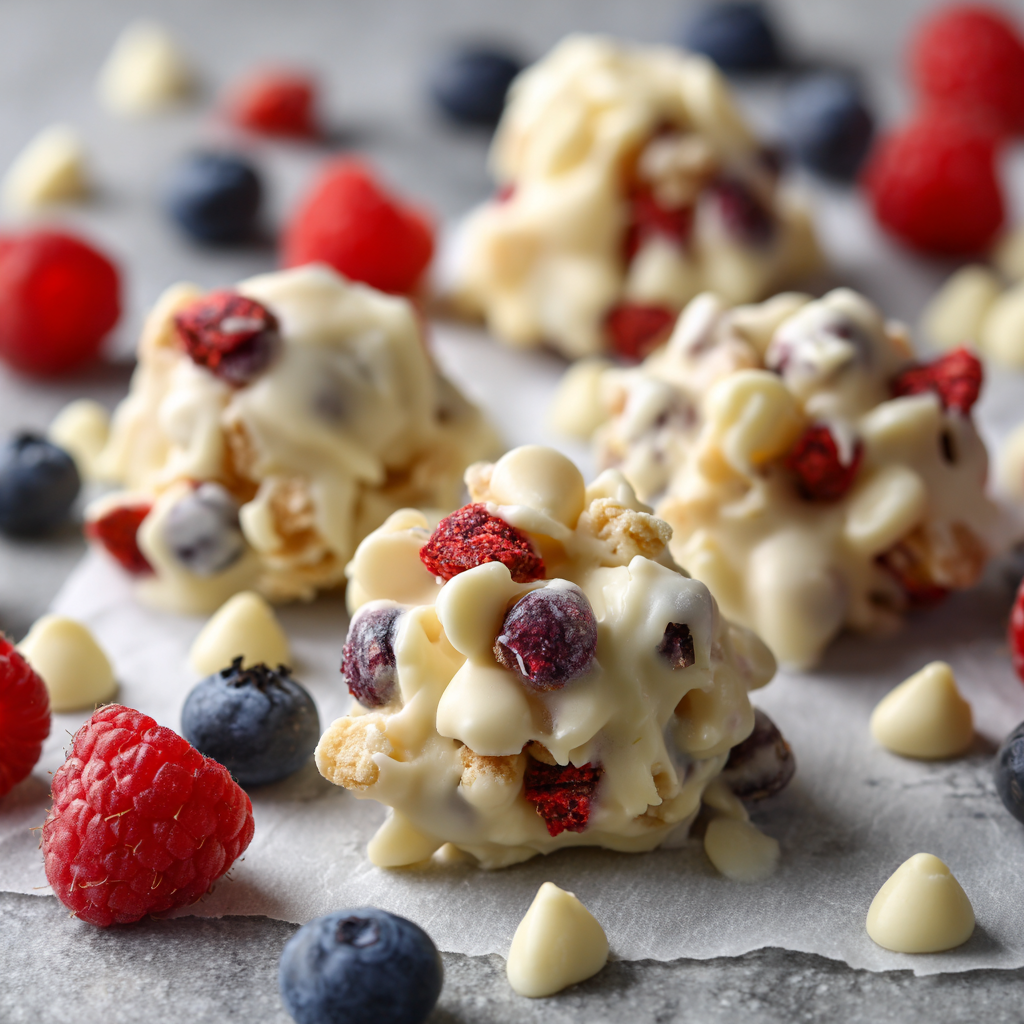
That’s exactly why I’m so head-over-heels for these White Chocolate Berry Clusters. Holy moly, are these little guys life-changers. Imagine this: creamy, dreamy white chocolate hugging tart, crispy freeze-dried berries and a handful of crunchy cereal, all clumped together into a perfect, bite-sized cluster of joy. They’re like if a cereal bar and a truffle had a beautiful, no-fuss baby.
The best part? You literally need three ingredients and about five active minutes. I’m not kidding. You can whip these up during a commercial break, right before guests arrive, or when that 3 p.m. sugar craving hits like a freight train. They’re the ultimate “I-made-this-from-scratch” flex with none of the actual stress. So, let’s ditch the complicated recipes for a minute and make something that’s pure, unadulterated, feel-good fun. Your spatula (wherever it may be) and your taste buds will thank you.
A Happy Little Kitchen Accident
I have to confess, this recipe wasn’t born from some grand, planned-out culinary experiment. It came from a classic “Beau” moment of desperation. Picture this: It was a sweltering summer afternoon, and I’d promised to bring a dessert to a friend’s backyard BBQ. I had grand plans for an elaborate layered cake, but the mercury was pushing 95 degrees, and my tiny apartment kitchen felt like a sauna. Turning on the oven was simply not an option.
I stood in front of the pantry, staring blankly at the shelves. A bag of white chocolate chips from a previous baking spree caught my eye. Next to it, a container of freeze-dried strawberries I used for my morning oatmeal. And of course, the ever-faithful box of crispy rice cereal. In a moment of “what do I have to lose?” inspiration, I melted the chocolate, stirred everything together, and dropped little spoonfuls onto a tray. Twenty minutes later, I had these stunning, jewel-toned clusters that were the absolute hit of the party. Everyone thought I’d slaved for hours. I just smiled and kept my delicious little secret.
Gathering Your Trio of Magic Makers
See? I told you it was simple. Here’s your shopping list—or more likely, your pantry-raiding list. Let’s break down why each of these ingredients is a superstar.
- 1½ cups white chocolate chips or chopped white chocolate bars – This is our glue and our star of the show. A quick chef’s insight: chopped bar chocolate often melts a bit smoother than chips (which have stabilizers), but chips are totally fantastic and what I use 90% of the time. Just make sure you’re using real white chocolate that contains cocoa butter for the best flavor and texture. If you’re dairy-free, check the label, but there are some great vegan white chocolate options out there now!
- ¾ cup freeze-dried berries (strawberries, raspberries, or a mix!) – This is where the magic happens. Freeze-dried berries give you an intense, pure fruit flavor and a delightful, airy crunch without adding any moisture (which would make our chocolate seize up). You can find these in the snack aisle or the dried fruit section of most grocery stores. Feel free to mix and match your favorites!
- 1 cup of your favorite crispy cereal or granola – This is our texture foundation. Rice Krispies give a classic, light crunch. Cornflakes offer a sturdier, flaky texture. And a clumpy, nutty granola can take these into a whole new, hearty territory. This is your chance to get creative and make these clusters uniquely yours.
Let’s Get Clustering! Your Foolproof Guide
Okay, team. Time to get our hands dirty (figuratively, of course—we’re keeping things clean!). Follow these steps, and you’ll be a cluster-making pro in no time.
- Prep Your Stage. Line a standard baking sheet with parchment paper or a silicone baking mat. This little trick is your best friend here—it guarantees no sticking and makes cleanup an absolute breeze. Do not skip this step! Have your tray ready to go before you even melt the chocolate. A prepared chef is a happy chef.
- Melt the Chocolate Like a Pro. Pour your white chocolate chips into a microwave-safe bowl that’s large enough to hold all your ingredients later. Now, here’s my number one chef hack for perfect melted chocolate: MICROWAVE IN SHORT BURSTS! Pop the bowl in the microwave for 20 seconds on high power. Take it out, stir it well. Another 20 seconds, stir again. It might not look melted at first, but keep stirring. Repeat until the chocolate is almost completely smooth and liquid. The residual heat will finish the job. Rushing this with longer blasts is the number one way to scorch your chocolate and turn it into a grainy, clumpy mess. Patience is key!
- The Gentle Fold. Now, add all your freeze-dried berries and cereal to the bowl of beautiful, melted white chocolate. Here’s where we use a light touch. Using a spatula, gently fold the ingredients together until everything is evenly coated. Don’t stir aggressively, or you might crush your berries and cereal into a powder. We want distinct, delightful bits of crunch and fruit in every single bite.
- Create Your Clusters. Grab a tablespoon or a small cookie scoop. Spoon small mounds of the mixture onto your prepared baking sheet. You can make them as big or as small as you like, but I find that a heaping tablespoon gives you the perfect two-bite treat. Don’t worry about making them perfectly round—a rustic, craggy look is part of their charm!
- The Big Chill. Carefully slide the entire baking sheet into the refrigerator. Let the clusters chill for 20-30 minutes, or until the white chocolate is completely firm to the touch. This is the hardest part—waiting! But trust me, it’s worth it.
How to Serve These Little Gems of Joy
Once they’re set, the fun really begins. How you serve these can take them from a simple snack to a show-stopping dessert.
For a casual treat, just pile them high in a cute bowl and leave them on the counter for everyone to grab as they walk by. They’re the perfect movie-night snack or lunchbox surprise.
Want to get a little fancy? Arrange them on a beautiful platter as part of a dessert board. They look incredible next to some fresh berries, a few pieces of dark chocolate, and a small bowl of nuts. The vibrant red from the berries against the white chocolate is just stunning.
And let’s talk gifting! These make the most wonderful homemade present. Tuck a few into a small cellophane bag, tie it with a ribbon, and you’ve got a sweet, heartfelt gift for a teacher, neighbor, or hostess that’s infinitely better than anything from a store.
Make It Your Own: Delicious Twists & Swaps
The beauty of this recipe is its incredible flexibility. Once you’ve mastered the basic trio, the flavor world is your oyster! Here are a few of my favorite variations to get your creative juices flowing.
- The Tropical Escape: Use freeze-dried mango and pineapple, and mix in some toasted coconut flakes with your cereal. It’s like a vacation in a cluster.
- The Nutty Professor: Swap out half of the cereal for chopped, toasted almonds, pecans, or peanuts. This adds a rich, buttery depth that’s just incredible.
- Peanut Butter Paradise: Stir two tablespoons of creamy peanut butter into the melted white chocolate before adding your berries and cereal. It’s a sweet-and-salty dream come true.
- Dark Chocolate Decadence: Not a white chocolate fan? No problem! Simply swap it out for an equal amount of dark or semi-sweet chocolate chips. The contrast with the tart berries is phenomenal.
- Festive Fun: For the holidays, use freeze-dried raspberries and stir in a handful of festive sprinkles for a pop of color and cheer.
Beau’s Brainstorm: A Few Parting Thoughts
Over the years, this recipe has become my go-to “oh crumb, I need something quick” lifesaver. I’ve made them for last-minute school bake sales, potlucks, and even as a fancy petit four for a dinner party. They’ve never, ever let me down.
One time, I was feeling extra ambitious and decided to drizzle a little melted dark chocolate over the top after they had set. Let me tell you, it took them from a 10 to an 11. It’s not necessary, but if you’re looking to impress, it’s a power move.
The most important thing I’ve learned? Have fun with it. Cooking shouldn’t be about rigid rules. It’s about throwing things together that make you and the people you love happy. This recipe is the perfect canvas for that.
Your Questions, Answered!
I’ve gotten a lot of questions about these clusters over the years, so I’ve compiled the most common ones right here for you.
- Q: My chocolate got thick and clumpy when I melted it. What did I do wrong?
A: This sounds like seized chocolate, usually caused by a tiny drop of water or steam getting into the mix, or from overheating. To prevent it, always make sure your bowl and utensils are completely dry. If it happens, you can sometimes save it by stirring in a teaspoon of solid vegetable shortening (like Crisco) until it smooths out again.
- Q: Can I use fresh or frozen berries instead?
A: I strongly advise against it. Fresh and frozen berries are full of water, which will cause the white chocolate to seize and become a grainy, unworkable mess. The magic of freeze-dried fruit is that all the moisture is removed, leaving behind pure flavor and crunch.
- Q: How should I store these, and how long do they last?
A: Store them in an airtight container at room temperature for up to 5 days, or in the fridge for up to two weeks. If your kitchen is very warm, I’d recommend keeping them chilled so they don’t get soft.
- Q: Can I double this recipe?
A: Absolutely! Just use a larger bowl for mixing so you have plenty of room to fold everything together evenly. It’s the perfect recipe for making a big batch for a crowd.
White Chocolate Berry Clusters : Sweet, Crunchy, and No-Bake in Minutes
Description
Need a quick, show-stopping treat that requires zero baking? These White Chocolate Berry Clusters are creamy, crunchy, and bursting with flavor. Freeze-dried berries meet melted white chocolate and crispy cereal in bite-sized clusters that are perfect for a snack, dessert platter, or homemade gift. They take just a few minutes to prep, yet they look and taste like you spent hours in the kitchen.
Ingredients
-
1½ cups white chocolate chips or chopped white chocolate bars
-
¾ cup freeze-dried berries (strawberries, raspberries, or a mix)
-
1 cup crispy cereal or granola (Rice Krispies, cornflakes, or nutty granola)
Optional toppings & variations:
-
Toasted coconut flakes, chopped nuts, or festive sprinkles
-
Dark or semi-sweet chocolate instead of white chocolate
-
2 tablespoons peanut butter stirred into melted chocolate for a sweet-salty twist
Instructions
-
Prep your tray: Line a baking sheet with parchment paper or a silicone mat.
-
Melt the chocolate: Microwave chocolate in 20-second bursts, stirring in between until smooth. Avoid overheating.
-
Combine ingredients: Gently fold in freeze-dried berries and cereal until evenly coated.
-
Form clusters: Spoon heaping tablespoons onto the prepared sheet. Rustic shapes are perfect!
-
Chill: Refrigerate 20–30 minutes until chocolate is firm.
Serving Suggestions
-
Casual snack: Pile clusters in a bowl for movie nights or lunchbox treats.
-
Elegant dessert: Arrange on a platter with fresh berries and nuts.
-
Gift idea: Bag clusters in cellophane with a ribbon for homemade gifts.
Creative Twists
-
Tropical Escape: Use freeze-dried mango and pineapple, plus coconut flakes.
-
Nutty Professor: Fold in chopped, toasted nuts with the cereal.
-
Peanut Butter Paradise: Stir peanut butter into melted chocolate before folding in the other ingredients.
-
Chocolate Swap: Use dark or semi-sweet chocolate instead of white.
-
Festive Fun: Add sprinkles for holiday cheer.
Notes
-
Chop chocolate bars for smoother melting; microwave in 20-second bursts, stirring each time.
-
Use freeze-dried fruit—fresh or frozen berries have too much moisture.
-
Be gentle when folding to keep berries and cereal intact.
Nutrition
- Calories: 130 Cal Per cluster
- Sugar: 12g
- Fat: 7 g
- Carbohydrates: 16 g
A Quick Bite on Nutrition
Now, I’m a comfort food chef, not a nutritionist, but I believe in being transparent about what we’re eating! These clusters are a treat, through and through. The estimated nutritional info per cluster (based on a batch of 12) is a great guide. You’re looking at around 130 calories, with 7g of fat, 16g of carbs, and 12g of sugar.
The sugar comes primarily from the white chocolate, while the berries provide a little fiber and a burst of natural fruit flavor. Using a whole-grain cereal or a granola low in added sugar can make these a slightly more balanced snack. But remember, the goal here is a little bit of joyful indulgence! It’s all about balance, friends.
Final Thoughts
My not-so-secret, secret weapon for effortless, delicious, and downright gorgeous treats. These White Chocolate Berry Clusters are proof that you don’t need fancy equipment or a whole day in the kitchen to create something special.
They’re a celebration of simplicity, a testament to the power of a few good ingredients, and a reminder that the best food often comes from happy little accidents. I hope this recipe finds its way into your regular rotation and brings as much joy to your kitchen as it has to mine.
Now, I’d love to hear from you! Did you try the classic version or one of the fun twists? Tag me on social @Feastical with your creations so I can see your beautiful clusters! Happy cooking, everyone!