
Crispy Cheesy Roll Ups
Crispy Cheesy Roll Ups: A Culinary Adventure You’ll Love
Hey there, fellow foodies! I’m Beau Collier, your guide to a deliciously fun journey in the kitchen, where I share my love for all things cozy and comforting. Today, we’re diving into a recipe that will instantly transport you back to simpler times: Crispy Cheesy Roll Ups! Imagine sinking your teeth into golden brown morsels packed with gooey, melty cheese, paired beautifully with a warm bowl of tomato soup or marinara sauce for dipping. It’s pure joy on a plate!
There’s something so nostalgic about crunchy, cheesy snacks. They evoke memories of childhood lunches and rainy days spent inside, huddling around the table with friends. And let me tell you, these crispy delights are not just for kids—they’re pure happiness for adults, too! Simple to make, yet endlessly satisfying, this recipe is bound to become a go-to in your kitchen repertoire.
In today’s post, I’ll guide you through the entire process of crafting these delicious roll-ups, sharing personal stories and tips along the way. Whether you’re hosting a casual get-together or just treating yourself to a cozy night in, this dish is sure to impress. So grab your apron and let’s get cooking together!
Personal Story
Growing up, my kitchen was bustling with laughter and the tempting aroma of my mom’s cooking. One of my favorite memories was when she would whip up these crispy cheesy roll-ups for us after school. With my siblings and I coming home famished and ready for a treat, the sight of those little golden rolls sizzling in the skillet was pure magic.
I remember sitting at the kitchen counter, devouring them while they were still steaming hot, dipping them into rich tomato soup. It felt like a hug in every bite, the kind of comfort you can only find in food made from the heart. As I grew older and started experimenting in my own kitchen, these roll-ups became my go-to treat for friends and family gatherings. With every crunch and cheesy pull, I was reminded of those warm, fuzzy moments shared around the table with my loved ones.
Now, as I share this recipe with all of you, I hope to inspire similar moments of joy and togetherness in your own kitchens.
Ingredients
Here’s what you’ll need to make these delicious Crispy Cheesy Roll Ups. Don’t worry, each ingredient is simple, and I’ve included some tips for making the most of them:
-
Bread (sliced, preferably white or whole wheat)
The base of our roll-ups! White bread gives a classic texture, while whole wheat adds a nutty flavor. You can also try sourdough for an extra tart twist. If gluten-free is your thing, any gluten-free bread will do. -
Cheese (your choice, such as cheddar or mozzarella)
The star of the show! Cheddar gives a sharp, tangy flavor, while mozzarella melts to perfection for that gooey goodness. Feel free to mix and match! Pepper Jack offers a nice kick if you’re feeling adventurous! -
Butter (for grilling)
Butter adds richness and ensures that your roll-ups get that golden-brown crust. If you’re looking for a healthier alternative, olive oil works wonderfully, too! -
Tomato soup or marinara sauce (for dipping)
A flavorful sidekick! You can use store-bought or homemade sauces. For something different, try a spicy salsa or even a creamy ranch for dipping, if you’re feeling cheeky!
Step-by-Step Instructions
Ready to bring these cheesy dreams to life? Let’s get cooking! Follow these steps:
-
Prepare Your Ingredients:
Start by gathering all your ingredients and laying them out on your kitchen counter. This makes the process feel seamless and fun. You’ll thank yourself later for having everything in one place! -
Flatten the Bread:
Using a rolling pin, gently flatten each slice of bread. This step helps ensure that you can roll them up easily and that they cook evenly. If you’re feeling fancy, you could even use a wine bottle if no rolling pin is around! -
Add the Cheese:
Place a slice or a handful of your chosen cheese onto each flattened piece of bread. Don’t be shy! The more cheese, the better! You want it to be generous enough that it melts and oozes out when you bite into it. -
Roll It Up:
Carefully roll the bread from one end to the other, making sure the cheese is encased snugly inside. You can secure the roll with a toothpick; it helps keep everything together while you cook. -
Butter Up:
In a small bowl, mix melted butter (or olive oil) with a pinch of salt. Brush this mixture over your roll-ups for that golden crunch. -
Pan-Fry:
Heat a skillet over medium heat. Once hot, place your roll-ups (with the seam side down) in the pan. Cook for about 3-4 minutes per side, or until they reach that beautiful golden brown and are crispy. Keep an eye on them; you want them to be crispy but not burnt. Flip them with care! -
Serve and Enjoy:
Once it’s done, place them on a paper towel to absorb any excess butter. Serve them hot with your dipping sauce on the side. Enjoy the oohs and aahs as you present these crispy delights to your friends and family!
Serving Suggestions
Presentation is key! To elevate your serving game, arrange the crispy cheesy roll-ups on a large platter, artfully drizzling the tomato soup or marinara sauce in a small bowl in the center. You can also sprinkle some fresh herbs—like basil or parsley—over the top for a pop of color and added flavor. For extra flair, consider garnishing your dish with a bowl of mixed olives or a side salad for freshness. Trust me, a little garnish goes a long way!
Recipe Variations
Here are some fun twists you can try to shake up the classic recipe:
-
Vegetable Lovers:
Add finely chopped veggies like spinach, bell peppers, or mushrooms inside the roll-ups for added texture and flavor. -
Meat it Up:
Toss in some ham or pepperoni slices for a heartier option. These savory goodies pair beautifully with melted cheese! -
Herb Infusion:
Experiment with different herbs! Try mixing some Italian seasoning or garlic powder into your butter for a fragrant surprise with every bite. -
Spicy Crunch:
For a little heat, add some sliced jalapeños or crushed red pepper flakes into the cheese mix before rolling it up. -
Sweet Surprise:
For a sweet twist, use cream cheese as your base with a sprinkle of cinnamon sugar and serve with a side of warm chocolate sauce for dipping!
Chef’s Notes
These roll-ups are endlessly adaptable, which is one of the things I love most about them! They’ve come a long way from my mom’s classic version—with every tweak, I’ve learned something new. From using different breads to experimenting with cheese types, the possibilities are as exciting as a new recipe book. Remember to have fun in the kitchen, and don’t stress if they don’t turn out picture-perfect. It’s all about good times and good eats!
FAQs and Troubleshooting
-
What if my roll-ups are falling apart?
If your roll-ups are unraveling, make sure to secure them with toothpicks before frying, or you can use a bit of cheese to seal the edges. -
Can I make these in advance?
Yes! You can assemble them ahead of time, store them in the fridge, and fry them just before serving. Just be mindful that they’ll need slightly longer in the skillet. -
How do I know when they are done cooking?
Keep an eye on that golden-brown color. Generally, about 3-4 minutes on each side should do the trick, but don’t hesitate to cut one open to check for gooeyness! -
What cheese is the best for this recipe?
That really depends on your preference, but mozzarella is fantastic for its meltability! Cheddar adds a lovely flavor, so I’d say mix and match according to what you have on hand!
Nutritional Info
Here’s a quick breakdown of what you can expect in one serving of the classic Crispy Cheesy Roll Up (with cheese and bread):
- Calories: Around 200-250, depending on the cheese you choose.
- Fat: 10-15g (mostly from butter & cheese)
- Protein: 8-10g
- Carbohydrates: 25-30g
- Fiber: 1-2g
Remember, these numbers can fluctuate based on your ingredient choices and portion sizes. Feel free to modify the recipe to fit your dietary needs!
Final Thoughts
I hope you’re feeling as excited as I am to whip up these Crispy Cheesy Roll Ups. They’re perfect for a cozy night in or as a crowd-pleasing appetizer at your next get-together. Remember, it’s about more than just food; it’s about sharing wonderful moments with friends and family.
So gather your loved ones, thank the good old days for inspiring us, and enjoy the joy of cooking and eating together. I can’t wait to hear how yours turn out! Share your stories and variations, and always remember—around here, food is love, laughter, and warm hugs. Happy cooking, and let’s dig in!
Print
Crispy Cheesy Roll Ups
- Total Time: 30 minutes
- Yield: 2 servings 1x
- Diet: Vegetarian
Description
Delicious, crispy roll-ups filled with gooey, melty cheese, perfect for dipping in tomato soup or marinara.
Ingredients
- 4 slices of bread (white or whole wheat)
- 1 cup cheese (cheddar or mozzarella)
- 2 tablespoons butter (for grilling)
- 1 cup tomato soup or marinara sauce (for dipping)
Instructions
- Prepare your ingredients by gathering everything on your kitchen counter.
- Flatten each slice of bread using a rolling pin.
- Add a slice or handful of cheese to each piece of flattened bread.
- Roll the bread tightly, enclosing the cheese securely inside.
- Butter the roll-ups with melted butter or olive oil mixed with salt.
- Pan-Fry in a skillet over medium heat for 3-4 minutes on each side until golden brown and crispy.
- Serve hot with your dipping sauce and enjoy!
Notes
These roll-ups are adaptable; try adding vegetables or different cheeses for variety.
- Prep Time: 15 minutes
- Cook Time: 15 minutes
- Category: Appetizer
- Method: Pan-Frying
- Cuisine: American
Nutrition
- Serving Size: 1 serving
- Calories: 250
- Sugar: 2g
- Sodium: 300mg
- Fat: 15g
- Saturated Fat: 7g
- Unsaturated Fat: 8g
- Trans Fat: 0g
- Carbohydrates: 30g
- Fiber: 2g
- Protein: 10g
- Cholesterol: 30mg
Keywords: cheese roll-ups, crispy snacks, comfort food, easy appetizer, childhood recipe
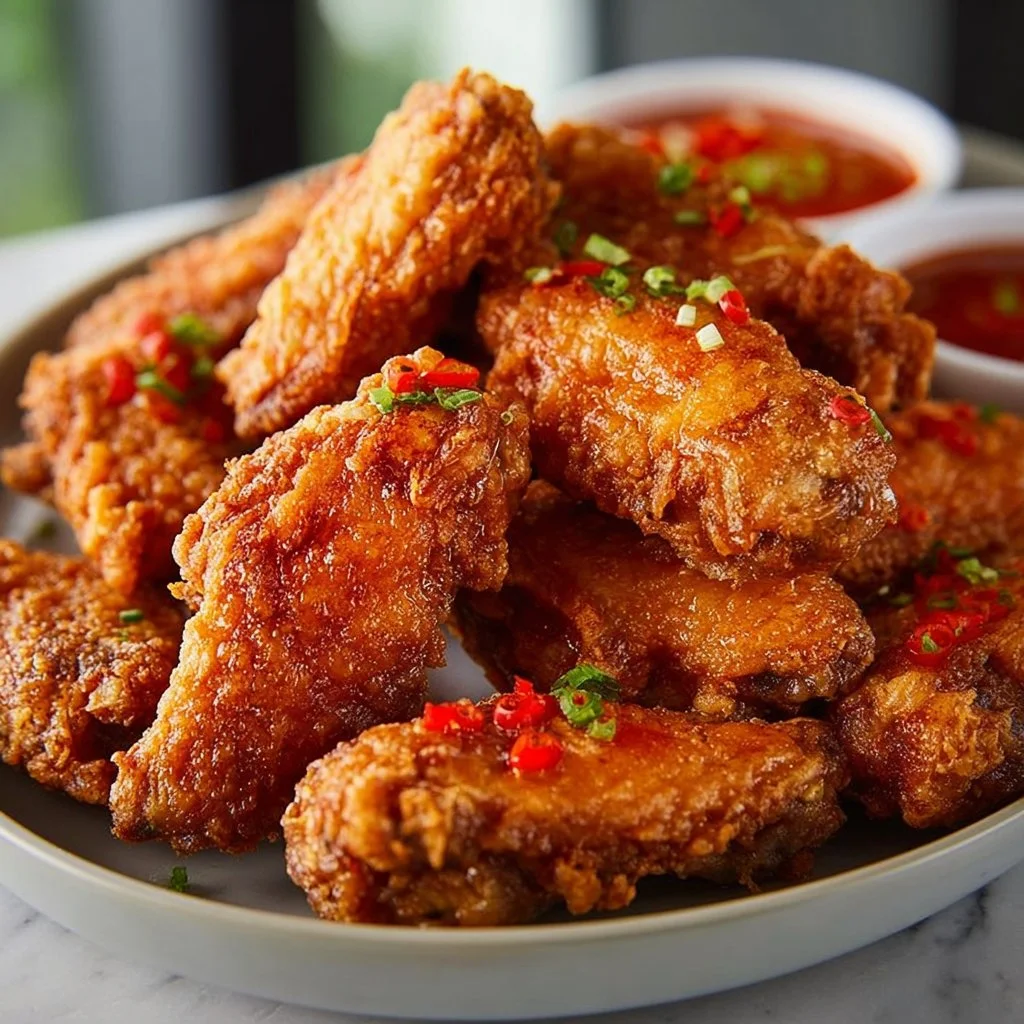
Crispy Fried Chicken Wings Recipe: A Simple, Flavorful Treat for Any Occasion
# Crispy Fried Chicken Wings Recipe: A Simple, Flavorful Treat for Any Occasion

## Introduction

Hey there, fellow food lover! Welcome back to Feastical, your happy place for feel-good food. Today, we’re diving into a classic comfort dish that’s sure to bring smiles around the table: Crispy Fried Chicken Wings! These golden, crunchy bites are a staple for game nights, family gatherings, or when you just want to treat yourself to something utterly delicious.

Now, who doesn’t love a good wing? They’re perfect for digging into while catching your favorite sports game or simply enjoying a cozy evening at home. But here’s the kicker — they don't have to be complicated to make! Trust me, with just a few simple ingredients and some love, we’ll have your kitchen smelling like a restaurant in no time. And between you and me, the best part about making wings at home is that you can customize the flavors however you like!

In this recipe, we’ll cover everything you need, from gathering our ingredients to serving your delicious wings. Whether you’re seasoned in the kitchen or just figuring out where your spatula is stashed, I’m here to show you how to make these wings crispy, flavorful, and utterly irresistible. So, let’s roll up our sleeves and get those wings frying!

## Personal Story

Ah, chicken wings! They always remind me of a special summer BBQ I had with my family years back. I was just a kid, barely tall enough to see over the grill, but the smell of frying chicken filled the air — a scent that seemed to go hand-in-hand with laughter and fun. My uncle was the self-proclaimed "Wing King," and he had perfected his recipe over the years. Everyone was clamoring around the grill, hoping to get the first taste of those crispy treats.

I remember the anticipation, the golden wings flying off the platter as soon as they hit the table. I swear, I couldn’t eat just one! The joy of gathering with loved ones, sharing stories, and, of course, devouring those wings brought me so much happiness. That day inspired me to create my own version of crispy fried chicken wings, one that brings the same feeling of warmth and connection. With this recipe, I hope to evoke the same joy for you! Ready to make your own batch of crispy memories? Let's get started!

## Ingredients

To whip up a batch of these scrumptious wings, here’s what you’ll need:

- **2 lbs chicken wings**
  - Look for fresh or frozen wings, depending on what’s available. If using frozen, make sure to fully thaw them before cooking. For a healthier option, you can also use boneless chicken thighs.

- **17 fl oz vegetable or canola oil**
  - We use these oils because they have a high smoke point, perfect for frying. They also won’t overwhelm the flavor of your wings. If desired, you can try peanut oil for a nuttier taste, but ensure no one has allergies.

- **1/2 cup all-purpose flour**
  - This helps create that glorious crispiness we're after! If you're looking for gluten-free options, you can swap it out for almond flour or a gluten-free flour blend.

- **1 tsp salt**
  - Essential for seasoning the wings to perfection. Remember, you can always adjust this to suit your taste.

- **1/2 tsp black pepper**
  - A little heat will elevate your wings. Feel free to use freshly ground pepper for a stronger flavor.

- **1/4 tsp garlic powder**
  - This adds a kick of flavor without being overpowering. If you love garlic, try adding fresh minced garlic instead!

- **1/4 tsp paprika**
  - To give those wings a lovely color and a subtle sweetness. Smoked paprika can add a deeper flavor profile if you're feeling adventurous.

- **1/4 tsp cayenne pepper**
  - For those who like it spicy! You can adjust this based on your tolerance; it’s totally optional.

- **1 whole egg**
  - This allows our flour coating to stick beautifully to the wings. For a vegan alternative, you could use aquafaba or a flax egg.

## Step-by-Step Instructions

### 1. Prepping the Wings
Start by rinsing your chicken wings under cold water. Pat them dry with paper towels – this is key! The drier the wings, the crispier they will get.

### 2. Marinating
In a large mixing bowl, toss the wings with salt, black pepper, garlic powder, paprika, and cayenne pepper for about 10-15 minutes. You want all those flavors to seep into the meat. Let them sit while you prepare your batter.

### 3. Preparing the Batter
In a separate bowl, whisk the egg until it’s frothy. Then, taking the seasoned wings, dip them in the egg mixture, allowing any excess to drip off. The egg acts as glue to the flour, which we’ll get to next!

### 4. Coating the Wings
Now, toss the egg-coated wings into the flour. Use your hands to ensure they’re completely covered. Give them a gentle shake to remove any excess flour — we want them lightly coated, not caked!

### 5. Heating the Oil
In a heavy-bottomed pot or deep fryer, heat your oil over medium-high heat. Use a thermometer to get the oil to around 350°F (175°C). If you don’t have a thermometer, drop a small piece of bread in; if it sizzles and browns in about 60 seconds, you're good to go!

### 6. Frying the Wings
Carefully lower the coated wings into the hot oil, being careful not to overcrowd the pan. Fry them in batches for about 8-10 minutes or until they’re golden brown and crispy. Make sure to flip them halfway through for even cooking.

### 7. Draining the Wings
Once fried, carefully use a slotted spoon to remove the wings and let them drain on a paper towel-lined plate. This helps eliminate excess oil and keeps them crispy.

### 8. Serving
Serve your crispy fried chicken wings hot! They’re perfect as-is, but feel free to toss them in your favorite sauce or serve with dipping sauces on the side.

## Serving Suggestions

When it comes to plating, presentation is key! Arrange your wings on a large platter, perhaps sprinkle a bit of fresh parsley or chives for color – it's all about that wow factor! You can serve them with a side of celery and carrot sticks for a classic touch.

Outfit your table with an array of dipping sauces like ranch, buffalo sauce, or BBQ sauce, encouraging everyone to dive right in. The best part? Get ready for that satisfying crunch when they take their first bite!

## Recipe Variations

1. **Buffalo Style**: Toss the fried wings in melted butter and your favorite hot sauce for that classic Buffalo flavor.

2. **Honey Garlic**: After frying, drizzle with a mixture of honey, soy sauce, and minced garlic for a sweet Asian-inspired twist.

3. **Spicy Cajun**: Incorporate Cajun seasoning into your flour mix for a zesty kick!

4. **Lemon Pepper**: After frying, toss wings with fresh lemon juice and lemon pepper seasoning for a refreshing flavor.

5. **Sweet Chili**: Coat with sweet chili sauce afterward for a delicious sweet and spicy combo!

## Chef’s Notes

This crispy fried chicken wing recipe has been a staple in my kitchen for years, evolving from a basic breading technique to the perfected recipe it is today. I once tried to make a batch while multitasking and nearly set the smoke alarm off! But hey, that's part of the kitchen adventure, right?

The beauty of cooking is that you can tweak and refine recipes over time. Don’t hesitate to play around with flavors! Whether it’s adding your favorite spices or experimenting with sauces, the kitchen is yours to explore.

## FAQs and Troubleshooting

1. **Why aren’t my wings crispy?**
   - The key to crispy wings is drying them completely before frying and ensuring your oil is hot enough.

2. **Can I bake these instead?**
   - Absolutely! For a healthier version, bake at 425°F (220°C) for about 40-45 minutes, flipping halfway through until they’re crispy.

3. **What dipping sauces pair well?**
   - Classic ranch, buffalo sauce, blue cheese dip, or a tangy BBQ sauce are all excellent choices.

4. **How do I store leftovers?**
   - Store any leftovers in an airtight container in the fridge for up to 2 days. Reheat in an oven to retain crispiness.

## Nutritional Info

(Yield: 4 servings)

- **Calories per serving**: ~350
- **Protein**: ~28g
- **Fat**: ~23g
- **Carbohydrates**: ~10g
- **Fiber**: 0g
- **Sodium**: ~600mg

Please note, calorie counts can vary depending on portion sizes and cooking methods.

## Final Thoughts

There you have it, my friend! A delicious, crispy fried chicken wings recipe that’s sure to impress your friends and family — or keep all to yourself for a cozy night in. Due to the versatility of chicken wings, you can dress them up or down according to occasion or mood.

So, what are you waiting for? Grab your ingredients and let’s get cooking! I can’t wait for you to enjoy these tasty bites just as much as I do. Don’t forget to share your thoughts or any unique twists you try with me! Until next time, keep your spatula handy and your heart full of love for food. Happy cooking, and see you soon at Feastical!

Crispy Fried Chicken Wings
- Total Time: 45 minutes
- Yield: 4 servings 1x
- Diet: Paleo
Description
Delicious and crispy fried chicken wings, perfect for game nights or family gatherings.
Ingredients
- 2 lbs chicken wings
- 17 fl oz vegetable or canola oil
- 1/2 cup all-purpose flour
- 1 tsp salt
- 1/2 tsp black pepper
- 1/4 tsp garlic powder
- 1/4 tsp paprika
- 1/4 tsp cayenne pepper
- 1 whole egg
Instructions
- Start by rinsing your chicken wings under cold water. Pat them dry with paper towels.
- In a large mixing bowl, toss the wings with salt, black pepper, garlic powder, paprika, and cayenne pepper for 10-15 minutes.
- In a separate bowl, whisk the egg until frothy. Dip the seasoned wings in the egg mixture.
- Now, toss the egg-coated wings into the flour, ensuring they’re completely covered.
- In a heavy-bottomed pot or deep fryer, heat your oil over medium-high heat to around 350°F (175°C).
- Carefully lower the coated wings into the hot oil, frying them in batches for about 8-10 minutes until golden brown.
- Once fried, use a slotted spoon to remove the wings and let them drain on a paper towel-lined plate.
- Serve your crispy fried chicken wings hot, with your favorite dipping sauces on the side.
Notes
For a healthier version, you can bake the wings at 425°F (220°C) for about 40-45 minutes.
- Prep Time: 15 minutes
- Cook Time: 30 minutes
- Category: Main Course
- Method: Frying
- Cuisine: American
Nutrition
- Serving Size: 1 serving
- Calories: 350
- Sugar: 0g
- Sodium: 600mg
- Fat: 23g
- Saturated Fat: 6g
- Unsaturated Fat: 15g
- Trans Fat: 0g
- Carbohydrates: 10g
- Fiber: 0g
- Protein: 28g
- Cholesterol: 85mg
Keywords: crispy chicken wings, fried wings, party food, game night recipes, comfort food