
Taco Sliders: Your New Go-To Party Hero is Here!
Hey friends, Beau here! Let me paint you a picture. It’s game day, a birthday bash, or just a classic Friday night when you’ve got a hungry crew to feed. You want something everyone will love, something you can make without a fuss, and something that feels like a genuine celebration on a plate. You’re thinking tacos… but you’re also thinking sliders. Well, what if I told you the best of both worlds exists, and it’s even more fun and flavorful than you imagined?
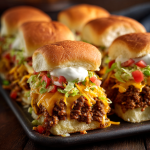
Welcome to the glorious universe of Taco Sliders! This is the recipe that never fails to steal the show. We’re talking juicy, perfectly seasoned beef, a glorious river of melted cheddar cheese, all snuggled inside soft, pillowy slider buns. They’re built for sharing, designed for maximum deliciousness, and guaranteed to have your people hovering around the oven, asking “are they ready yet?”
I created this recipe for Feastical to solve that “what do I feed a crowd?” puzzle. It’s the culinary equivalent of a high-five. It’s simple enough for a weeknight but special enough for your biggest gatherings. So, grab your favorite skillet, and let’s make some magic happen. These bold, cheesy, and utterly shareable Taco Sliders are about to become a regular star in your kitchen lineup.
The Messy, Beautiful Origin of These Sliders
This recipe was born out of pure, beautiful kitchen chaos. Picture this: It was my nephew’s 10th birthday, and I was on snack duty for a dozen rambunctious kids. The plan was a classic taco bar. I had all the toppings laid out—lettuce, tomatoes, sour cream, the works. It was a great plan… until I realized I’d completely forgotten the taco shells. A moment of pure panic!
But then, my eyes landed on a package of soft, fluffy slider rolls I’d bought for burgers later in the week. A lightbulb went off. I quickly browned the beef, seasoned it up, and instead of filling hard shells, I spread that glorious mixture over the bottom layer of rolls, blanketed it in cheese, and popped the whole thing in the oven. What emerged was a golden, cheesy, cohesive masterpiece. The kids could grab their own slider, and the parents didn’t have to worry about messy, crumbling tacos. It was a unanimous win. That happy accident taught me a valuable lesson: sometimes, the best recipes come from a little improvisation and a lot of love.
Gathering Your Flavor Arsenal
One of the best things about this recipe is its simplicity. You probably have most of this in your pantry right now! Here’s your shopping list for flavor town.
- 1 lb ground beef (80/20 blend): I like a little fat for flavor and juiciness, but lean 90/10 works great, too! Chef’s Insight: For a lighter twist, ground turkey or chicken is a fantastic swap.
- 1 packet taco seasoning: The ultimate shortcut to big flavor. Use your favorite brand! Substitution Tip: Have 5 minutes? Make your own blend with chili powder, cumin, garlic powder, onion powder, and a pinch of paprika and oregano.
- 12 slider rolls: Those soft, connected Hawaiian sweet rolls are my absolute favorite here, but any dinner roll style will work. Chef’s Insight: The slightly sweet flavor of Hawaiian rolls is a perfect counterpoint to the savory, spiced beef.
- 1 cup shredded cheddar cheese: We want meltability! Pre-shredded is convenient, but a block you shred yourself will melt even creamier. Substitution Tip: Pepper jack for a kick, a Mexican blend for complexity, or Monterey Jack for a milder melt.
- Shredded lettuce, diced tomato, sour cream (for topping): The fresh, cool crunch that brings it all home. Chef’s Insight: Don’t add these before baking! They go on fresh at the end to keep their texture and brightness.
Let’s Build These Flavor Bombs!
Okay, team, aprons on! This is where the fun begins. Follow these steps, and you’ll have a tray of perfection in no time.
- Preheat & Prep: First things first, get that oven preheated to a cozy 350°F (175°C). This gives it time to come to the perfect temperature while we work. Then, grab your trusty 9×13 inch baking dish. No need to grease it—the rolls usually have enough butter to prevent sticking. Chef’s Hack: You can line the dish with parchment paper for the absolute easiest cleanup later.
- Cook the Beef: Grab a large skillet and place it over medium heat. Crumble in your ground beef. I like to use a wooden spatula to really break it up into small, perfect pieces for our sliders. Cook it until it’s beautifully browned and no pink remains. Now, here’s a key step: carefully drain off the excess fat. This keeps our sliders from getting greasy. Return the skillet to the heat, add your taco seasoning and the amount of water the packet calls for (usually about ¾ cup). Let it simmer for 3-5 minutes, stirring occasionally, until the sauce has thickened and clings to every bit of beef. That’s flavor central, right there.
- Assemble the Sliders: Take your whole sheet of slider rolls and, without separating them, slice the entire thing in half horizontally, so you have a top “lid” and a bottom “base.” Place the bottom half of the rolls snugly into your baking dish. Now, evenly spread that glorious, seasoned beef all over the roll bottoms. Get it right to the edges! Next, shower the beef with your shredded cheddar cheese. Don’t be shy—this is the glue that holds our happy little community together.
- The Optional (But Highly Recommended) Bake: Place the top half of the rolls back on, creating a delicious beef and cheese sandwich. Now, for the pro-move: cover the whole dish loosely with aluminum foil. This traps the steam and gently warms the rolls and melts the cheese without over-toasting the tops. Bake for 10-12 minutes, or until everything is warm, gooey, and irresistible.
- Add the Fresh Toppings: Carefully remove the tray from the oven (it’s hot!). Using a fork or your fingers, gently lift the top “lid” of rolls. This is your canvas! Pile on the shredded lettuce, the juicy diced tomatoes, and generous dollops of cool sour cream. Chef’s Hack: If you’re adding guacamole, now is the time! Spreading it under the top bun lets it get slightly warm and creamy.
- Serve Immediately & Watch Them Disappear: The final act! Use a sharp knife to slice along the perforated lines, creating 12 individual sliders. Transfer them to a platter, stand back, and watch the magic happen. They are best enjoyed warm, straight from the oven, when the cheese is at its peak stretchiness.
How to Serve These Crowd-Pleasers
Presentation is part of the fun! I love serving these Taco Sliders right on a big wooden cutting board or a vibrant platter. It feels rustic, inviting, and totally shareable. Let people dig in with their hands—that’s the whole point!
While these sliders are a meal all on their own, turning them into a full fiesta spread is a breeze. I love pairing them with a big, colorful corn and black bean salad, a bowl of tortilla chips and chunky salsa, or some simple cilantro-lime rice. For drinks, a crisp Mexican lager, a zesty margarita, or a refreshing agua fresca are the perfect partners in crime. Don’t forget the napkins—the good, sturdy kind. You’re going to need them!
Make It Your Own: Taco Slider Twists
The beauty of this recipe is its versatility. Once you’ve mastered the classic, get creative! Here are a few of my favorite ways to mix it up.
- Spicy Fiesta: Kick up the heat! Mix a few tablespoons of chopped pickled jalapeños into the beef mixture and swap the cheddar for pepper jack cheese. You can even brush the bun tops with a mix of melted butter and a dash of hot sauce before baking.
- Crunchy Taco Supreme: Right after you add the fresh toppings, sprinkle a handful of crushed tortilla chips over the top of each slider. It adds an incredible, satisfying crunch that mimics your favorite hard-shell taco.
- Green Goddess: For a fresher, creamier twist, skip the lettuce and tomato and spread a layer of simple, mashed avocado or store-bought guacamole on the bottom bun before adding the beef. It’s rich, delicious, and a total crowd-pleaser.
- Buttery, Garlicky Top: This is a game-changer for the bun itself. Before baking, whisk together 2 tablespoons of melted butter with ½ teaspoon of garlic powder and ½ teaspoon of the taco seasoning. Brush this mixture generously over the top of the buns. It gives them a gorgeous, golden, and flavor-packed crust.
- Double Batch for a Crowd: Simply double all the ingredients and use a larger baking sheet. This makes 24 sliders, perfect for a big party. You can even create a “slider bar” with two different fillings—one beef and one shredded chicken with green chiles!
Beau’s Kitchen Notes & Stories
This recipe has truly evolved in my kitchen. The first time I made it, I just piled the cold toppings on and served it. It was good, but the cold-on-hot contrast was a bit jarring. Then I tried baking the lettuce and tomato (disaster—wilted and sad). Finally, I landed on the “lift the lid” method, and it was a revelation. The toppings stay crisp, and you get that perfect temperature and texture in every single bite.
A funny story: I once accidentally used cinnamon rolls instead of slider buns (the packages looked identical in my haste!). It was… an interesting experiment. Let’s just say sweet and savory took on a whole new meaning. Stick to the dinner rolls, folks. Trust me on this one.
Your Taco Slider Questions, Answered!
I’ve gotten a lot of questions about this recipe over the years. Here are the most common ones to help you nail it every single time.
- Can I make these Taco Sliders ahead of time? Absolutely! You can assemble the entire slider (beef and cheese only, no toppings) up to a day in advance. Cover it tightly with plastic wrap and foil and keep it in the fridge. When you’re ready, just pop it in the oven, adding a few extra minutes to the bake time since it’s starting from cold.
- My sliders got a bit soggy. What happened? The most common culprit is not draining the fat from the beef adequately. Make sure you give it a good drain after browning. Also, letting the beef mixture cool for a few minutes before assembling can help prevent the steam from immediately softening the buns.
- Can I use something other than ground beef? Of course! Ground turkey, chicken, or even a plant-based ground “meat” work wonderfully. Just be sure to season it well. For a shredded meat option, try using leftover shredded chicken or pork tinga—it’s incredible!
- Do I have to bake them? Nope! If you’re in a super hurry, you can skip the baking step. The heat from the beef will melt the cheese enough if you assemble and let it sit for a minute. But I highly recommend the quick bake—it toasts the buns slightly and makes everything wonderfully warm and cohesive.
Taco Sliders : Bold, Cheesy, and Built for Sharing
Description
These cheesy, flavorful sliders are the perfect mash-up of tacos and sandwiches—easy to make, shareable, and guaranteed to disappear fast. Perfect for game day, birthday parties, or a casual Friday night with friends!
Ingredients
-
1 lb ground beef (80/20 blend; lean 90/10 or turkey/chicken works too)
-
1 packet taco seasoning (or homemade: chili powder, cumin, garlic powder, onion powder, paprika, oregano)
-
12 slider rolls (Hawaiian rolls recommended)
-
1 cup shredded cheddar cheese (or pepper jack, Monterey Jack, or Mexican blend)
-
Shredded lettuce, diced tomato, sour cream (for topping)
-
Optional: guacamole, pickled jalapeños, crushed tortilla chips
Instructions
-
Preheat oven: 350°F (175°C). Prepare a 9×13 inch baking dish. Optional: line with parchment paper for easy cleanup.
-
Cook the beef: In a large skillet over medium heat, crumble and brown the beef. Drain excess fat. Stir in taco seasoning and water (usually ¾ cup). Simmer 3–5 minutes until thickened.
-
Assemble sliders: Slice the slider rolls horizontally as a whole sheet. Place the bottom half in the baking dish. Spread the seasoned beef evenly over the rolls and top with shredded cheese. Place the top half of the rolls back on.
-
Bake: Cover loosely with foil and bake 10–12 minutes until cheese is melted and sliders are warm.
-
Add toppings: Lift the top buns and add lettuce, tomato, sour cream, and optional toppings like guacamole or jalapeños.
-
Serve: Slice along the roll seams to create individual sliders and enjoy immediately.
Notes
-
Spicy Fiesta: Add chopped pickled jalapeños to beef and swap cheddar for pepper jack.
-
Crunchy Taco Supreme: Sprinkle crushed tortilla chips over sliders after topping with veggies.
-
Green Goddess: Spread mashed avocado or guacamole on the bottom bun instead of lettuce.
-
Garlic-Butter Buns: Brush tops with melted butter, garlic powder, and taco seasoning before baking.
-
Double Batch: Double all ingredients and bake in a larger dish for 24 sliders.
Nutrition
- Calories: 180–220 Cal Per Serving
- Fat: 9g
- Carbohydrates: 18g
- Protein: 10g
Quick Nutrition Breakdown
Now, I’m all about feel-good food, and that includes being mindful of what we’re eating. Here’s a general estimate of what you’re getting in one classic Taco Slider. Remember, these numbers can vary based on the specific brands of meat, cheese, and rolls you use.
Estimated per slider (based on 12 sliders): 180-220 calories | 9g fat | 18g carbs | 10g protein
To lighten things up, you can use lean ground beef (90/10 or 93/7), opt for low-fat cheese, and use whole-wheat slider rolls. Loading them up with fresh veggies like lettuce and tomato adds volume and nutrients for very few calories. It’s all about balance! Enjoy them as part of a fun gathering without any guilt.
Your New Signature Party Dish Awaits
And there you have it, my friends—the complete guide to the most fun, flavorful, and foolproof party food you’ll ever make. These Taco Sliders are more than just a recipe; they’re a ticket to a stress-free, delicious time with the people you love most.
I hope this recipe brings as much joy and laughter to your table as it has to mine. It’s a reminder that the best meals aren’t always the fanciest—they’re the ones that bring us together. So, go on, give it a try. And when you do, I’d love to see your creation! Tag me @Feastical on social media so I can share in the fun.
Final Thoughts: Your New Party Staple is Served!
Taco Sliders are the ultimate win: minimal effort for maximum flavor and fun. They’re the guaranteed crowd-pleaser that solves the “what to feed everyone” dilemma. So ditch the stress, embrace the delicious, and make your next gathering an unforgettable fiesta. Your guests will thank you!
Happy cooking, and remember—keep it simple, soulful, and always satisfying.
– Beau