
Sunshine in a Square: Meet Your New Favorite Summer Treat!
Hey friends, Beau here! Can you smell that? It’s the sweet perfume of ripe strawberries mingling with zippy lemon zest – summer’s officially knocking, and I’ve got just the thing to swing the door wide open. These Strawberry-Lemonade Bars are like bottling up a perfect sunny day and turning it into dessert. Imagine classic lemon bars got a juicy berry upgrade: buttery shortbread crust hugging a tangy-sweet filling that’s creamy, dreamy, and blushing pink. They’re the rockstars of picnics, potlucks, and those “I deserve something fabulous” Tuesday afternoons. No fancy skills needed – just a love for bright flavors and sticky fingers. So tie on that apron (or don’t, I won’t tell!), and let’s make some magic happen!
Why’s this recipe a Feastical favorite? It’s that glorious balance – lip-puckering lemon meets mellow strawberry sweetness, all anchored by that melt-in-your-mouth crust. They’re make-ahead champs (hello, stress-free entertaining!), and watching faces light up after that first bite? Pure joy, folks. Whether you’re a baking pro or just conquered microwave popcorn, these bars are your golden ticket to delicious. Ready to bake some sunshine? Let’s roll!
Grandma’s Porch & The Lemonade Stand That Started It All
This recipe? It’s basically summer vacation at my Grandma Ellie’s house, distilled into a 9×13 pan. Picture it: sticky Georgia afternoons, cicadas singing, and me – a determined 8-year-old running a wildly overpriced lemonade stand (50 cents a cup! Highway robbery!). Grandma, the ultimate accomplice, would sneak me sugar and lemons. One sweltering day, she emerged not with lemonade, but with a plate of her famous lemon bars dusted with snowy sugar. “Too hot for liquid sunshine, Beau-Beau,” she’d wink. “Try sunshine you can chew.”
Years later, when I first experimented adding strawberries to her recipe, it wasn’t just about flavor. It was capturing that memory – the tart punch of childhood ambition (and slightly sour homemade lemonade!) mellowed by the sweetness of her love, just like the berries soften the lemon’s edge. Baking these now, I still catch a whiff of her lilac perfume and hear that screen door slam. That’s the magic of food, isn’t it? It’s never just ingredients. It’s a time machine on a dessert plate. Now, let’s make some new memories!
Gathering Your Sunshine Squad: Ingredients & Smart Swaps
Don’t sweat the details, but here’s the lowdown on our flavor all-stars. Fresh is fantastic, but I’ve got your back with easy swaps!
Crust:
- Cooking spray: For easy release! Butter works too.
- ½ cup + 1 tbsp (115g) granulated sugar: Sweetens the base. Swap in coconut sugar for a hint of caramel.
- 1 tsp finely grated lemon zest: Brightens the crust. Chef’s Tip: Zest before juicing!
- ¼ tsp kosher salt: Balances sweetness. If using table salt, halve it.
- 2½ cups (300g) all-purpose flour: The structure. Gluten-free 1:1 blend? Works like a charm.
- 1 cup + 2 tbsp (2¼ sticks / 255g) unsalted butter, melted: Creates that tender, crumbly magic. Salted butter? Just skip the added salt above.
Filling:
- 1½ cups (8 oz) fresh strawberries, hulled: The berry heart! Frozen work great – thaw and drain well.
- 1½ cups (300g) granulated sugar: Sweetens the tang. Reduce slightly if berries are super ripe.
- 3 tbsp cornstarch: Key thickener! Arrowroot powder is a solid 1:1 sub.
- 1 tbsp finely grated lemon zest: Intense citrus punch! Don’t skip – it’s the soul.
- 1½ cups fresh lemon juice (8-12 lemons): Chef’s Must: Fresh squeezed only! Bottled lacks vibrancy. Roll lemons hard before juicing for max yield!
- ½ tsp kosher salt: Makes the flavors pop.
- 4 large eggs + 3 large egg yolks: Creates the luscious, custardy texture. Extra yolks = extra richness!
Finishing:
- Confectioners’ sugar, for dusting: The pretty “snowfall” finish. Optional but oh-so-pretty!
Baking the Sunshine: Let’s Get Layering!
Grab your favorite mixing bowl and that trusty spatula – here’s where the fun begins! We’re building in layers: crust first, then that glorious pink filling.
- Prep & Preheat: Fire up your oven to 350°F (175°C). Line a 9×13 inch baking pan with parchment paper, letting it hang over the sides (this is your magic handle for lifting out bars later!). Give it a light spray with cooking spray – no sticking allowed!
- Mix the Crust: In a medium bowl, stir together the sugar, lemon zest, salt, and flour until they’re best friends. Pour in the melted butter and mix with a fork (or your fingers!) until it looks like damp sand and holds together when pinched. Chef’s Hack: Mix while the butter’s still warm for easier blending!
- Press & Bake (Crust): Dump the crumbly mixture into your prepped pan. Press it down firmly and evenly with your fingers, the bottom of a glass, or a measuring cup – get it compact! This prevents a soggy bottom later. Bake for 18-20 minutes, just until the edges are lightly golden. It’ll smell like buttery heaven! Let it cool slightly while you make the filling – warm is okay, hot is not!
- Blitz the Berries & Whisk the Wet: Puree those hulled strawberries in a blender or food processor until completely smooth. No chunks! In a large bowl, whisk together the sugar, cornstarch, lemon zest, lemon juice, and salt until dissolved. Whisk in the eggs and egg yolks until smooth and pale yellow. Finally, whisk in the strawberry puree until you have a gorgeous, vibrant pink liquid. Chef’s Tip: Strain the puree if you want seedless perfection!
- Pour & Bake (Filling): Slowly pour the strawberry-lemon filling over the slightly cooled crust. Gently place the pan back in the oven. Bake for 30-35 minutes. The key? It’s done when the edges are set, but the center still has a slight jiggle – like set Jell-O, not liquid. It will firm up as it cools! Overbaking leads to cracks. Trust the jiggle!
- Cool Completely & Chill: This is the patience part! Let the pan cool completely on a wire rack at room temperature. No shortcuts! Once cool, cover loosely and refrigerate for at least 2 hours (overnight is golden!). This sets the filling perfectly for clean slices.
- Slice & Shine: Use the parchment paper “handles” to lift the entire bar slab out onto a cutting board. Slice into squares (wipe the knife clean between cuts for neat edges!). Dust generously with confectioners’ sugar right before serving. Boom! Sunshine served.
Sunshine Presentation: Serving Up the Good Vibes
These bars are stunners all on their own! For maximum “wow”:
- Dust that snowy confectioners’ sugar just before serving – it dissolves fast on the cold filling.
- Plate them on a bright white dish or vibrant ceramic platter – let that pink pop!
- Add tiny fresh mint leaves or a delicate edible flower (like a viola or borage blossom) on top for a fancy touch.
- Serve slightly chilled for the best texture – that cool, creamy filling against the buttery crust is *chef’s kiss*.
- Pair with a glass of sparkling water with a lemon twist or a scoop of vanilla bean ice cream for over-the-top indulgence!
Make It Your Own: Berry Delicious Twists!
Love the base? Let’s play! Here are some fun spins on the classic:
- Mixed Berry Bonanza: Swap strawberries for raspberries, blueberries, or blackberries (or a combo!). Adjust sugar slightly depending on berry tartness.
- Lime-Aid Bars: Replace lemon zest and juice with fresh lime for a vibrant tropical twist. Pair with coconut in the crust!
- Boozy Berry: Add 1 tbsp limoncello or strawberry liqueur to the filling for a grown-up kick.
- Dairy-Free Delight: Use a plant-based butter stick (like Miyoko’s or Earth Balance) in the crust and ensure your sugar is vegan. The filling is naturally dairy-free!
- Gluten-Free Sunshine: Use a trusted 1:1 gluten-free flour blend in the crust (like Bob’s Red Mill).
- Mini Marvels: Bake in a parchment-lined muffin tin for adorable individual portions (reduce baking time by 5-10 mins!).
Beau’s Backstory: From Flop to Fabulous!
Confession time: My first batch of these was… a pink puddle. Seriously. I underestimated the cornstarch and overestimated my patience (didn’t chill it!). Lesson learned: cornstarch is your thickening BFF, and chilling is non-negotiable! Over the years, I’ve tweaked it – adding the extra egg yolks for silkiness, straining the berry puree for elegance (though rustic is charming too!), and learning that slightly underbaking the filling is the secret to dreamy texture.
The funniest fail? Using frozen berries without draining… my filling was so watery it practically waved hello! Now I always drain thawed berries like my dessert depends on it (because it does!). This recipe is resilient, though. It’s survived oven mishaps, toddler “helpers,” and my own occasional forgetfulness. It’s become my go-to for last-minute invites because it always impresses. That sweet-tart punch? It never gets old. Pass me a square!
Your Berry Burning Questions, Answered!
Let’s tackle those common kitchen conundrums:
- Q: My filling cracked! What went wrong?
A: Overbaking is the usual culprit. Remember, we want a *slight* jiggle in the center at 35 minutes. It sets fully as it cools. Also, avoid drastic temperature changes – let it cool gradually at room temp before chilling. If cracks happen, just dust extra sugar on top – it hides a multitude of sins! - Q: Can I use frozen strawberries?
A: Absolutely! They work great year-round. Thaw them completely first, then drain off ALL the excess liquid (press them gently in a sieve). Using the liquid will make your filling too thin. Measure the berries *after* draining. - Q: Why is my crust soggy?
A: Two main reasons: 1) Not pressing the crust firmly enough before baking – get it compact! 2) Pouring the filling onto a piping hot crust. Let the crust cool slightly (10-15 mins) before adding the filling. That quick cool-down creates a barrier. - Q: How long do these bars keep?
A: Stored airtight in the fridge, they’re fabulous for 4-5 days. The sugar dusting will absorb, so re-dust before serving. You can also freeze the undusted bars (well-wrapped) for up to 2 months! Thaw overnight in the fridge. - Q: Is bottled lemon juice okay?
A: I strongly recommend fresh lemons! Bottled juice lacks the bright, vibrant flavor and can taste flat or even slightly bitter. Rolling the lemons firmly on the counter before juicing gets you every last drop!
Strawberry-Lemonade Bars
- Total Time: 55 minutes
Description
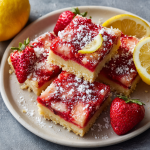
Craving that summer-in-a-bite vibe? These Strawberry-Lemonade Bars are buttery, blushing-pink bites of joy that balance zesty lemon tang with juicy strawberry sweetness. With a crisp shortbread base and silky, fruit-forward filling, they’re picnic heroes, potluck rockstars, and Tuesday afternoon pick-me-ups. No fancy gear, no stress—just good vibes and big flavor. Chill, slice, and serve joy.
Ingredients
For the crust:
-
Cooking spray or butter
-
½ cup + 1 tbsp granulated sugar
-
1 tsp lemon zest
-
¼ tsp kosher salt
-
2½ cups all-purpose flour (GF 1:1 works too)
-
1 cup + 2 tbsp unsalted butter, melted
For the filling:
-
1½ cups fresh (or thawed & drained) strawberries
-
1½ cups granulated sugar
-
3 tbsp cornstarch
-
1 tbsp lemon zest
-
1½ cups fresh lemon juice (~8–12 lemons)
-
½ tsp kosher salt
-
4 large eggs + 3 large egg yolks
Finish:
-
Confectioners’ sugar, for dusting
Instructions
-
Preheat oven to 350°F (175°C). Line a 9×13 pan with parchment, leaving overhang. Lightly spray.
-
Make crust: Mix sugar, zest, salt, and flour. Stir in warm melted butter until crumbly. Press into pan. Bake 18–20 mins, until lightly golden. Cool slightly.
-
Make filling: Purée strawberries. In a bowl, whisk sugar, cornstarch, zest, juice, salt, eggs, and yolks. Add purée and whisk smooth.
-
Bake bars: Pour filling over crust. Bake 30–35 mins until edges are set and center jiggles. Cool completely, then chill 2+ hours.
-
Serve: Lift from pan, slice, and dust with sugar before serving.
Notes
-
Frozen berries? Thaw, drain, then measure.
-
Add limoncello or use limes for a twist.
-
Crust soggy? Let it cool slightly before pouring filling.
- Prep Time: 20 mins
- Cook Time: 35 mins
Nutrition
- Calories: 190 cal Per bar
- Fat: 8g
- Carbohydrates: 28g
- Protein: 2g
Nutritional Nibbles (Per Bar, Approx):
- 🔥 Calories: ~190
- 💪 Carbs: 28g
- 🧈 Fat: 8g (Saturated Fat: 5g)
- 🍬 Sugar: 19g
- 🌾 Fiber: 1g
- 🥚 Protein: 2g
Remember, this is a treat! Enjoy every sunny bite mindfully.
Final Thoughts: A Slice of Sunshine
These strawberry-lemonade bars aren’t just dessert—they’re edible nostalgia. They capture the carefree joy of summer, the thrill of a childhood lemonade stand, and the comfort of a grandma’s kitchen. Every bite is a reminder that the best recipes aren’t about perfection; they’re about sticky fingers, shared laughs, and the courage to tweak traditions (hello, strawberries!).
So whether you’re baking them for a special occasion or just because the sun is shining, know this: You’re not just making bars. You’re bottling sunshine, one square at a time. Now go forth, bake boldly, and don’t forget to lick the spoon.